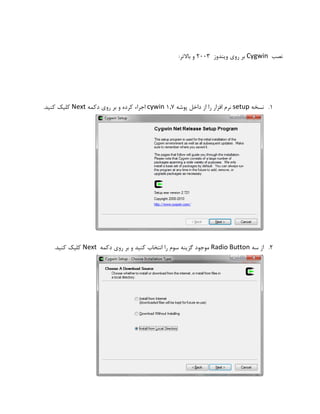
‫ﻧﺼﺐ ‪ Cygwin‬ﺑﺮ روي وﻳﻨﺪوز 3002 و ﺑﺎﻻﺗﺮ:‬

‫1. ﻧﺴﺨﻪ ‪ setup‬ﻧﺮم اﻓﺰار را از داﺧﻞ ﭘﻮﺷﻪ 7,1 ‪ cywin‬اﺟﺮاء ﻛﺮده و ﺑﺮ روي دﻛﻤﻪ ‪ Next‬ﻛﻠﻴﻚ ﻛﻨﻴﺪ.‬

‫2. از ﺳﻪ ‪ Radio Button‬ﻣﻮﺟﻮد ﮔﺰﻳﻨﻪ ﺳﻮم را اﻧﺘﺨﺎب ﻛﻨﻴﺪ و ﺑﺮ روي دﻛﻤﻪ ‪ Next‬ﻛﻠﻴﻚ ﻛﻨﻴﺪ.‬
‫3. ﻫﻤﺎﻧﻄﻮر ﻛﻪ در ﺷﻜﻞ ﻧﺸﺎن داده ﺷﺪه اﺳﺖ در ﻗﺴﻤﺖ ‪ Root Directory‬ﻣﻘﺪار ‪ C:cygwin‬و در‬
‫ﻗﺴﻤﺖ ‪ Install For‬ﮔﺰﻳﻨﻪ ‪ All Users‬را اﻧﺘﺨﺎب ﻛﻨﻴﺪ و ﺑﺮ روي دﻛﻤﻪ ‪ Next‬ﻛﻠﻴﻚ ﻛﻨﻴﺪ:‬

‫4. در اﻳﻦ ﻣﺮﺣﻠﻪ ﺑﺎﻳﺪ ﻣﻨﺒﻊ ﻧﺼﺐ ﻧﺮم اﻓﺰار را ﻣﺸﺨﺺ ﻛﻨﻴﺪ. ﻣﻘﺪار اﻳﻦ ﮔﺰﻳﻨﻪ ﺑﺴﺘﮕﻲ ﺑﻪ ﻣﺤﻠﻲ دارد ﻛﻪ ﻧﺮم‬
‫اﻓﺰار در آن ﻗﺮار دارد. ﺑﺎ ﻣﺸﺨﺺ ﻛﺮدن اﻳﻦ ﻣﻘﺪار ﺑﺮ روي دﻛﻤﻪ ‪ Next‬ﻛﻠﻴﻚ ﻛﻨﻴﺪ.‬
‫5. ﺑﺎ ﻛﻠﻴﻚ ﺑﺮ روي دﻛﻤﻪ ‪ Next‬ﻧﺮم اﻓﺰار ﭘﺲ از ﭼﻚ ﻛﺮدن ﭼﮕﻮﻧﮕﻲ ﻧﺼﺐ ) ﺑﻪ ﺻﻮرت ‪ Local‬و ﻳﺎ‬
‫‪ (Online‬وارد ﻣﺮﺣﻠﻪ اﻧﺘﺨﺎب ‪ Package‬ﻫﺎ ﻣﻲ ﺷﻮد.‬
‫6. در اﻳﻦ ﻣﺮﺣﻠﻪ ‪ Package‬ﻫﺎي ﻣﻮرد ﻧﻴﺎز ﺑﺮاي ﭘﻴﺎده ﺳﺎزي ‪ SSH‬در وﻳﻨﺪوز اﻧﺘﺨﺎب ﻣﻲ ﺷﻮﻧﺪ.‬
‫‪ Package‬ﻫﺎي ﻣﻮرد ﻧﻴﺎز )ﻫﻤﺎﻧﻄﻮر ﻛﻪ در ﺷﻜﻠﻬﺎي زﻳﺮ ﻗﺎﺑﻞ ﻣﺸﺎﻫﺪه اﺳﺖ( ﻋﺒﺎرﺗﻨﺪ از‬
‫‪ .a‬در ﻗﺴﻤﺖ ‪ Archive‬ﭘﻜﻴﺞ ﻫﺎي ‪ )unzip & zip‬ﺗﻮﺟﻪ داﺷﺘﻪ ﺑﺎﺷﻴﺪ ﻛﻪ ﻫﻢ ﺑﺎﻳﺪ ‪ Bin‬و ﻫﻢ‬
‫‪ Source‬ﭘﻜﻴﺞ ﻫﺎي اﻧﺘﺨﺎب ﺷﻮﻧﺪ.(‬
‫‪ .b‬در ﻗﺴﻤﺖ ‪ Net‬ﭘﻜﻴﺞ ﻫﺎي ‪openssh & openssl‬‬
‫ﭘﺲ از اﻧﺘﺨﺎب اﻳﻦ ﭘﻜﻴﺞ ﻫﺎي ﺑﺮ روي دﻛﻤﻪ ‪ Next‬ﻛﻠﻴﻚ ﻛﻨﻴﺪ.‬

‫7. در اﻳﻦ ﻣﺮﺣﻠﻪ از اﻧﺘﺨﺎب ﮔﺰﻳﻨﻪ )‪ Select required packages (RECOMMENDED‬اﻃﻤﻴﻨﺎن‬
‫ﺣﺎﺻﻞ ﻛﺮده و ﺑﺮ روي دﻛﻤﻪ ‪ Next‬ﻛﻠﻴﻚ ﻛﻨﻴﺪ.‬
‫8. ﻫﻤﺎﻧﻈﻮر ﻛﻪ در ﺷﻜﻞ زﻳﺮ ﻣﺸﺎﻫﺪه ﻣﻲ ﺷﻮد در اﻳﻦ ﻣﺮﺣﻠﻪ اﺑﺘﺪا ﻧﺼﺐ ﻧﺮم اﻓﺰار ﺷﺮوع ﻣﻲ ﺷﻮد و ﭘﺲ از‬
‫اﺗﻤﺎم ﻧﺼﺐ وﻳﺰارد اﺗﻤﺎم ﻧﺼﺐ ﻇﺎﻫﺮ ﻣﻲ ﺷﻮد. ﺑﺮ روي دﻛﻤﻪ ‪ Finish‬ﻛﻠﻴﻚ ﻛﻨﻴﺪ.‬

‫9. ﭘﺲ از اﺗﻤﺎم ﻧﺼﺐ ﻓﺎﻳﻞ ‪ cygwin.bat‬ﻣﻮﺟﻮد در ﻣﺴﻴﺮ ﻧﺼﺐ )‪ (C:cygwin‬را ﺑﺎ اﺳﺘﻔﺎده از وﻳﺮاﻳﺸﮕﺮ‬
‫‪ notepad‬ﺑﺎز ﻛﺮده و ﺧﻂ زﻳﺮ را ﺑﻪ آن اﺿﺎﻓﻪ ﻛﻨﻴﺪ‬
‫‪set CYGWIN=binmode tty ntsec‬‬
‫ اﺳﺘﻔﺎده ﻧﻤﻮد. ﺷﻜﻞ زﻳﺮ‬Desktop ‫ ﻣﻲ ﺗﻮان از اﻳﻜﻮن ﻣﻮﺟﻮد ﺑﺮ روي‬cygwin ‫01. ﺑﺮاي ورود ﺑﻪ ﻧﺮم اﻓﺰار‬
.‫ را ﻧﺸﺎن ﻣﻲ دﻫﺪ‬cygwin ‫ﺧﻂ ﻓﺮﻣﺎن ﻧﺮم اﻓﺰار‬

‫“ ﻓﺮﻣﺎن زﻳﺮ را در ﺧﻂ‬can not create /home/userid” ‫در ﺻﻮرت ﻣﺸﺎﻫﺪه ﭘﻴﻐﺎﻣﻲ ﻣﺒﺘﻨﻲ ﺑﺮ‬
mkpasswd –l > /etc/passwd

:‫ اﺟﺮاء ﻛﻨﻴﺪ‬cygwin ‫ﻓﺮﻣﺎن‬

:‫ در ﺳﻄﺢ وﻳﻨﺪوز ﻣﺮاﺣﻞ زﻳﺮ ﺑﺎﻳﺪ اﺟﺮاء ﺷﻮد‬ssh ‫11. ﺑﺮاي ﻧﺼﺐ ﺳﺮوﻳﺲ‬

‫ اﺟﺮاء ﻛﻨﻴﺪ و ورودي ﻫﺎي ﻣﻮرد ﻧﻴﺎز را‬cygwin ‫ را در ﺧﻂ ﻓﺮﻣﺎن‬ssh-host-config ‫. ﻓﺮﻣﺎن‬a
: (‫ ﻣﺸﺨﺺ ﺷﺪه اﻧﺪ‬Bold ‫ﻣﻄﺎﺑﻖ ﺷﻜﻞ زﻳﺮ وارد ﻛﻨﻴﺪ ) ورودي ﻫﺎي ﺑﻪ ﺻﻮرت‬

$ssh-host-config
***Info: Generating /etc/ssh_host_key
***Info: Generating /etc/ssh_host_rsa_key
***Info: Generating /etc/ssh_host_dsa_key
***Info: Creating default /etc/ssh_config file
***Info: Creating default /etc/sshd_config file
***Info: Privilege separation is set to yes by default since OpenSSH 3,3.
***Info: However, this requires a non-privileged account called 'sshd.'
***Info: For more info on privilege separation read /usr/share/doc/openssh/README.privsep.
***Query: Should privilege separation be used? (yes/no) yes
***Info: Note that creating a new user requires that the current account have
***Info: Administrator privileges. Should this script attempt to create a
***Query: new local account 'sshd'? (yes/no) yes
***Info: Updating /etc/sshd_config file

***Warning: The following functions require administrator privileges!
***Query: Do you want to install sshd as a service?
***Query: (Say "no" if it is already installed as a service) (yes/no) yes
***Query: Enter the value of CYGWIN for the daemon: [] binmode tty ntsec
***Info: On Windows Server 2003, Windows Vista, and above, the
***Info: SYSTEM account cannot setuid to other users -- a capability
***Info: sshd requires. You need to have or to create a privileged
***Info: account. This script will help you do so.
***Info: You appear to be running Windows 2003 Server or later. On 2003
***Info: and later systems, it's not possible to use the LocalSystem
***Info: account for services that can change the user id without an
***Info: explicit password (such as passwordless logins [e.g. public key
***Info: authentication] via sshd.(
***Info: If you want to enable that functionality, it's required to create
***Info: a new account with special privileges (unless a similar account
***Info: already exists). This account is then used to run these special
***Info: servers.
***Info: Note that creating a new user requires that the current account
***Info: have Administrator privileges itself.
***Info: No privileged account could be found.
***Info: This script plans to use 'cyg_server.'
***Info: 'cyg_server' will only be used by registered services.
***Query: Do you want to use a different name? (yes/no) no
***Query: Create new privileged user account 'cyg_server'? (yes/no) yes
***Info: Please enter a password for new user cyg_server. Please be sure
***Info: that this password matches the password rules given on your system.
***Info: Entering no password will exit the configuration.
***Query: Please enter the password : ******
***Query: Reenter:******
***Info: User 'cyg_server' has been created with password ‘*******.’
***Info: If you change the password, please remember also to change the
***Info: password for the installed services which use (or will soon use(
***Info: the 'cyg_server' account.
***Info: Also keep in mind that the user 'cyg_server' needs read permissions
***Info: on all users' relevant files for the services running as 'cyg_server.'
***Info: In particular, for the sshd server all users' .ssh/authorized_keys
***Info: files must have appropriate permissions to allow public key
***Info: authentication. (Re-)running ssh-user-config for each user will set
***Info: these permissions corrently. [Similary restrictions apply, for
***Info: instance, for .rhosts files if the rshd server is running, etc.[
***Info: The sshd service has been installed under the 'cyg_server'
***Info: account. To start the service now, call `net start sshd' or
***Info: `cygrunsrv -S sshd'. Otherwise, it will start automatically
***Info: after the next reboot.
***Info: Host configuration finished. Have fun!

Public & Private ‫ در ﺟﻬﺖ اﻳﺠﺎد ﻛﻠﻴﺪﻫﺎي‬ssh-user-config ‫. اﺟﺮاي ﻓﺮﻣﺎن‬b
$ssh-user-config
***Query: Shall I create an SSH1 RSA identity file for you? (yes/no) yes
***Info: Generating /home/Administrator/.ssh/identity
Enter passphrase (empty for no passphrase:(
Enter same passphrase again:
***Query: Do you want to use this identity to login to this machine? (yes/no) yes
***Info: Adding to /home/Administrator/.ssh/authorized_keys
***Query: Shall I create an SSH2 RSA identity file for you? (yes/no) yes
***Info: Generating /home/Administrator/.ssh/id_rsa
Enter passphrase (empty for no passphrase:(
Enter same passphrase again:
***Query: Do you want to use this identity to login to this machine? (yes/no) yes
***Info: Adding to /home/Administrator/.ssh/authorized_keys
***Query: Shall I create an SSH2 DSA identity file for you? (yes/no(
***Query: Shall I create an SSH2 DSA identity file for you? (yes/no) yes
***Info: Generating /home/Administrator/.ssh/id_dsa
Enter passphrase (empty for no passphrase:(
Enter same passphrase again:
***Query: Do you want to use this identity to login to this machine? (yes/no) yes
***Info: Adding to /home/Administrator/.ssh/authorized_keys
***Info: Configuration finished. Have fun!

Control Panel/ Administrative Tools/ ) ‫ در وﻳﻨﺪوز‬services ‫. ﺑﺎ ورود ﺑﻪ ﻗﺴﻤﺖ‬c
.‫ را استارت کنيد‬Cygwin ‫( سرويس ايجاد شده برای‬Services
Grid ‫ و ﺳﺮور‬agent ‫ ﻣﻴﺎن‬User Equivalency ‫21. ﺑﺮ ﻗﺮاري‬
:‫ﺑﺎ اﺟﺮاي ﻓﺮﻣﺎن ﻫﺎي زﻳﺮ اﻳﻦ اﻣﺮ اﻧﺠﺎم ﻣﻲ ﭘﺬﻳﺮد‬

1.
2.
3.
4.
5.
6.
7.

cat ~/.ssh/id_rsa.pub >> ~/.ssh/authorized_keys
cat ~/.ssh/id_dsa.pub >> ~/.ssh/authorized_keys
ssh Administrator@grid-server cat ~/.ssh/id_rsa.pub >> ~/.ssh/authorized_keys
ssh Administrator@grid-server cat ~/.ssh/id_dsa.pub >> ~/.ssh/authorized_keys
ssh Administrator@agent-server cat ~/.ssh/id_rsa.pub >> ~/.ssh/authorized_keys
ssh Administrator@agent-server cat ~/.ssh/id_dsa.pub >> ~/.ssh/authorized_keys
chmod 644 ~/.ssh/authorized_keys

.‫ ﻧﻴﺎز ﺑﻪ اﺟﺮاء ﺷﺪن دارﻧﺪ‬Agent ‫*ﺧﻄﻬﺎي 4،3،2،1 ﻓﻘﻂ در زﻣﺎن اﺿﺎﻓﻪ ﻛﺮدن اوﻟﻴﻦ‬
:‫ از ﻓﺮﻣﺎن زﻳﺮ اﺳﺘﻔﺎده ﻛﻨﻴﺪ‬User Equivalency ‫31. ﺑﺮاي ﺗﺴﺖ ﺑﺮﻗﺮار ﺑﻮدن‬
On grid server# Ssh grid-server date
On agent server# Ssh agent-server date

‫ اﺳﺖ. از داﻳﺮﻛﺘﻮري ﻣﻨﺒﻊ ﻧﺮم‬Agent ‫ از ﺳﺮور‬Silent ‫ ﺑﻪ ﺻﻮرت‬Agent ‫41. ﻣﺮﺣﻠﻪ آﺧﺮ ﻧﺼﺐ ﻧﺮم اﻓﺰار‬
additional- ‫ وارد ﻣﺴﻴﺮ ...... ﺷﻮﻳﺪ و ﭘﺎراﻣﺘﺮﻫﺎي ﻣﻮرد اﺷﺎره در زﻳﺮ را در ﻓﺎﻳﻞ‬Agent ‫اﻓﺰار‬
:‫ ﻣﻘﺪار دﻫﻲ ﻛﻨﻴﺪ‬agent.rsp
SECURITY_UPDATES_VIA_MYORACLESUPPORT=false
DECLINE_SECURITY_UPDATES=True
INSTALL_UPDATES_SELECTION="skip"
ORACLE_AGENT_HOME_LOCATION=”windows path of installation: D:”
OMS_HOST=”Ip address of grid control server: 10,200,23,19”
OMS_PORT=”Port number for uploading xml files to grid control server: 7201”
AGENT_REGISTRATION_PASSWORD=”Registration password to register agent on grid control: qwert123”

‫ ﺑﺎ‬setup.exe ‫ ﺑﺎ ورود ﺑﻪ ﻣﺴﻴﺮ .... و اﺟﺮاي ﻓﺎﻳﻞ‬Response ‫51. ﭘﺲ اﻧﺠﺎم ﺗﻐﻴﻴﺮات در ﻓﺎﻳﻞ‬
:‫ﭘﺎراﻣﺘﺮﻫﺎي زﻳﺮ ﻧﺼﺐ ﺷﺮوع ﻣﻲ ﺷﻮد‬
setup.exe –silent –responsefile ….

Cygwin installation

  • 1.
    ‫ﻧﺼﺐ ‪ Cygwin‬ﺑﺮروي وﻳﻨﺪوز 3002 و ﺑﺎﻻﺗﺮ:‬ ‫1. ﻧﺴﺨﻪ ‪ setup‬ﻧﺮم اﻓﺰار را از داﺧﻞ ﭘﻮﺷﻪ 7,1 ‪ cywin‬اﺟﺮاء ﻛﺮده و ﺑﺮ روي دﻛﻤﻪ ‪ Next‬ﻛﻠﻴﻚ ﻛﻨﻴﺪ.‬ ‫2. از ﺳﻪ ‪ Radio Button‬ﻣﻮﺟﻮد ﮔﺰﻳﻨﻪ ﺳﻮم را اﻧﺘﺨﺎب ﻛﻨﻴﺪ و ﺑﺮ روي دﻛﻤﻪ ‪ Next‬ﻛﻠﻴﻚ ﻛﻨﻴﺪ.‬
  • 2.
    ‫3. ﻫﻤﺎﻧﻄﻮر ﻛﻪدر ﺷﻜﻞ ﻧﺸﺎن داده ﺷﺪه اﺳﺖ در ﻗﺴﻤﺖ ‪ Root Directory‬ﻣﻘﺪار ‪ C:cygwin‬و در‬ ‫ﻗﺴﻤﺖ ‪ Install For‬ﮔﺰﻳﻨﻪ ‪ All Users‬را اﻧﺘﺨﺎب ﻛﻨﻴﺪ و ﺑﺮ روي دﻛﻤﻪ ‪ Next‬ﻛﻠﻴﻚ ﻛﻨﻴﺪ:‬ ‫4. در اﻳﻦ ﻣﺮﺣﻠﻪ ﺑﺎﻳﺪ ﻣﻨﺒﻊ ﻧﺼﺐ ﻧﺮم اﻓﺰار را ﻣﺸﺨﺺ ﻛﻨﻴﺪ. ﻣﻘﺪار اﻳﻦ ﮔﺰﻳﻨﻪ ﺑﺴﺘﮕﻲ ﺑﻪ ﻣﺤﻠﻲ دارد ﻛﻪ ﻧﺮم‬ ‫اﻓﺰار در آن ﻗﺮار دارد. ﺑﺎ ﻣﺸﺨﺺ ﻛﺮدن اﻳﻦ ﻣﻘﺪار ﺑﺮ روي دﻛﻤﻪ ‪ Next‬ﻛﻠﻴﻚ ﻛﻨﻴﺪ.‬
  • 3.
    ‫5. ﺑﺎ ﻛﻠﻴﻚﺑﺮ روي دﻛﻤﻪ ‪ Next‬ﻧﺮم اﻓﺰار ﭘﺲ از ﭼﻚ ﻛﺮدن ﭼﮕﻮﻧﮕﻲ ﻧﺼﺐ ) ﺑﻪ ﺻﻮرت ‪ Local‬و ﻳﺎ‬ ‫‪ (Online‬وارد ﻣﺮﺣﻠﻪ اﻧﺘﺨﺎب ‪ Package‬ﻫﺎ ﻣﻲ ﺷﻮد.‬
  • 4.
    ‫6. در اﻳﻦﻣﺮﺣﻠﻪ ‪ Package‬ﻫﺎي ﻣﻮرد ﻧﻴﺎز ﺑﺮاي ﭘﻴﺎده ﺳﺎزي ‪ SSH‬در وﻳﻨﺪوز اﻧﺘﺨﺎب ﻣﻲ ﺷﻮﻧﺪ.‬ ‫‪ Package‬ﻫﺎي ﻣﻮرد ﻧﻴﺎز )ﻫﻤﺎﻧﻄﻮر ﻛﻪ در ﺷﻜﻠﻬﺎي زﻳﺮ ﻗﺎﺑﻞ ﻣﺸﺎﻫﺪه اﺳﺖ( ﻋﺒﺎرﺗﻨﺪ از‬ ‫‪ .a‬در ﻗﺴﻤﺖ ‪ Archive‬ﭘﻜﻴﺞ ﻫﺎي ‪ )unzip & zip‬ﺗﻮﺟﻪ داﺷﺘﻪ ﺑﺎﺷﻴﺪ ﻛﻪ ﻫﻢ ﺑﺎﻳﺪ ‪ Bin‬و ﻫﻢ‬ ‫‪ Source‬ﭘﻜﻴﺞ ﻫﺎي اﻧﺘﺨﺎب ﺷﻮﻧﺪ.(‬ ‫‪ .b‬در ﻗﺴﻤﺖ ‪ Net‬ﭘﻜﻴﺞ ﻫﺎي ‪openssh & openssl‬‬ ‫ﭘﺲ از اﻧﺘﺨﺎب اﻳﻦ ﭘﻜﻴﺞ ﻫﺎي ﺑﺮ روي دﻛﻤﻪ ‪ Next‬ﻛﻠﻴﻚ ﻛﻨﻴﺪ.‬ ‫7. در اﻳﻦ ﻣﺮﺣﻠﻪ از اﻧﺘﺨﺎب ﮔﺰﻳﻨﻪ )‪ Select required packages (RECOMMENDED‬اﻃﻤﻴﻨﺎن‬ ‫ﺣﺎﺻﻞ ﻛﺮده و ﺑﺮ روي دﻛﻤﻪ ‪ Next‬ﻛﻠﻴﻚ ﻛﻨﻴﺪ.‬
  • 5.
    ‫8. ﻫﻤﺎﻧﻈﻮر ﻛﻪدر ﺷﻜﻞ زﻳﺮ ﻣﺸﺎﻫﺪه ﻣﻲ ﺷﻮد در اﻳﻦ ﻣﺮﺣﻠﻪ اﺑﺘﺪا ﻧﺼﺐ ﻧﺮم اﻓﺰار ﺷﺮوع ﻣﻲ ﺷﻮد و ﭘﺲ از‬ ‫اﺗﻤﺎم ﻧﺼﺐ وﻳﺰارد اﺗﻤﺎم ﻧﺼﺐ ﻇﺎﻫﺮ ﻣﻲ ﺷﻮد. ﺑﺮ روي دﻛﻤﻪ ‪ Finish‬ﻛﻠﻴﻚ ﻛﻨﻴﺪ.‬ ‫9. ﭘﺲ از اﺗﻤﺎم ﻧﺼﺐ ﻓﺎﻳﻞ ‪ cygwin.bat‬ﻣﻮﺟﻮد در ﻣﺴﻴﺮ ﻧﺼﺐ )‪ (C:cygwin‬را ﺑﺎ اﺳﺘﻔﺎده از وﻳﺮاﻳﺸﮕﺮ‬ ‫‪ notepad‬ﺑﺎز ﻛﺮده و ﺧﻂ زﻳﺮ را ﺑﻪ آن اﺿﺎﻓﻪ ﻛﻨﻴﺪ‬ ‫‪set CYGWIN=binmode tty ntsec‬‬
  • 6.
    ‫ اﺳﺘﻔﺎده ﻧﻤﻮد.ﺷﻜﻞ زﻳﺮ‬Desktop ‫ ﻣﻲ ﺗﻮان از اﻳﻜﻮن ﻣﻮﺟﻮد ﺑﺮ روي‬cygwin ‫01. ﺑﺮاي ورود ﺑﻪ ﻧﺮم اﻓﺰار‬ .‫ را ﻧﺸﺎن ﻣﻲ دﻫﺪ‬cygwin ‫ﺧﻂ ﻓﺮﻣﺎن ﻧﺮم اﻓﺰار‬ ‫“ ﻓﺮﻣﺎن زﻳﺮ را در ﺧﻂ‬can not create /home/userid” ‫در ﺻﻮرت ﻣﺸﺎﻫﺪه ﭘﻴﻐﺎﻣﻲ ﻣﺒﺘﻨﻲ ﺑﺮ‬ mkpasswd –l > /etc/passwd :‫ اﺟﺮاء ﻛﻨﻴﺪ‬cygwin ‫ﻓﺮﻣﺎن‬ :‫ در ﺳﻄﺢ وﻳﻨﺪوز ﻣﺮاﺣﻞ زﻳﺮ ﺑﺎﻳﺪ اﺟﺮاء ﺷﻮد‬ssh ‫11. ﺑﺮاي ﻧﺼﺐ ﺳﺮوﻳﺲ‬ ‫ اﺟﺮاء ﻛﻨﻴﺪ و ورودي ﻫﺎي ﻣﻮرد ﻧﻴﺎز را‬cygwin ‫ را در ﺧﻂ ﻓﺮﻣﺎن‬ssh-host-config ‫. ﻓﺮﻣﺎن‬a : (‫ ﻣﺸﺨﺺ ﺷﺪه اﻧﺪ‬Bold ‫ﻣﻄﺎﺑﻖ ﺷﻜﻞ زﻳﺮ وارد ﻛﻨﻴﺪ ) ورودي ﻫﺎي ﺑﻪ ﺻﻮرت‬ $ssh-host-config ***Info: Generating /etc/ssh_host_key ***Info: Generating /etc/ssh_host_rsa_key ***Info: Generating /etc/ssh_host_dsa_key ***Info: Creating default /etc/ssh_config file ***Info: Creating default /etc/sshd_config file ***Info: Privilege separation is set to yes by default since OpenSSH 3,3. ***Info: However, this requires a non-privileged account called 'sshd.' ***Info: For more info on privilege separation read /usr/share/doc/openssh/README.privsep. ***Query: Should privilege separation be used? (yes/no) yes ***Info: Note that creating a new user requires that the current account have ***Info: Administrator privileges. Should this script attempt to create a ***Query: new local account 'sshd'? (yes/no) yes ***Info: Updating /etc/sshd_config file ***Warning: The following functions require administrator privileges! ***Query: Do you want to install sshd as a service? ***Query: (Say "no" if it is already installed as a service) (yes/no) yes
  • 7.
    ***Query: Enter thevalue of CYGWIN for the daemon: [] binmode tty ntsec ***Info: On Windows Server 2003, Windows Vista, and above, the ***Info: SYSTEM account cannot setuid to other users -- a capability ***Info: sshd requires. You need to have or to create a privileged ***Info: account. This script will help you do so. ***Info: You appear to be running Windows 2003 Server or later. On 2003 ***Info: and later systems, it's not possible to use the LocalSystem ***Info: account for services that can change the user id without an ***Info: explicit password (such as passwordless logins [e.g. public key ***Info: authentication] via sshd.( ***Info: If you want to enable that functionality, it's required to create ***Info: a new account with special privileges (unless a similar account ***Info: already exists). This account is then used to run these special ***Info: servers. ***Info: Note that creating a new user requires that the current account ***Info: have Administrator privileges itself. ***Info: No privileged account could be found. ***Info: This script plans to use 'cyg_server.' ***Info: 'cyg_server' will only be used by registered services. ***Query: Do you want to use a different name? (yes/no) no ***Query: Create new privileged user account 'cyg_server'? (yes/no) yes ***Info: Please enter a password for new user cyg_server. Please be sure ***Info: that this password matches the password rules given on your system. ***Info: Entering no password will exit the configuration. ***Query: Please enter the password : ****** ***Query: Reenter:****** ***Info: User 'cyg_server' has been created with password ‘*******.’ ***Info: If you change the password, please remember also to change the ***Info: password for the installed services which use (or will soon use( ***Info: the 'cyg_server' account. ***Info: Also keep in mind that the user 'cyg_server' needs read permissions ***Info: on all users' relevant files for the services running as 'cyg_server.' ***Info: In particular, for the sshd server all users' .ssh/authorized_keys ***Info: files must have appropriate permissions to allow public key ***Info: authentication. (Re-)running ssh-user-config for each user will set ***Info: these permissions corrently. [Similary restrictions apply, for ***Info: instance, for .rhosts files if the rshd server is running, etc.[
  • 8.
    ***Info: The sshdservice has been installed under the 'cyg_server' ***Info: account. To start the service now, call `net start sshd' or ***Info: `cygrunsrv -S sshd'. Otherwise, it will start automatically ***Info: after the next reboot. ***Info: Host configuration finished. Have fun! Public & Private ‫ در ﺟﻬﺖ اﻳﺠﺎد ﻛﻠﻴﺪﻫﺎي‬ssh-user-config ‫. اﺟﺮاي ﻓﺮﻣﺎن‬b $ssh-user-config ***Query: Shall I create an SSH1 RSA identity file for you? (yes/no) yes ***Info: Generating /home/Administrator/.ssh/identity Enter passphrase (empty for no passphrase:( Enter same passphrase again: ***Query: Do you want to use this identity to login to this machine? (yes/no) yes ***Info: Adding to /home/Administrator/.ssh/authorized_keys ***Query: Shall I create an SSH2 RSA identity file for you? (yes/no) yes ***Info: Generating /home/Administrator/.ssh/id_rsa Enter passphrase (empty for no passphrase:( Enter same passphrase again: ***Query: Do you want to use this identity to login to this machine? (yes/no) yes ***Info: Adding to /home/Administrator/.ssh/authorized_keys ***Query: Shall I create an SSH2 DSA identity file for you? (yes/no( ***Query: Shall I create an SSH2 DSA identity file for you? (yes/no) yes ***Info: Generating /home/Administrator/.ssh/id_dsa Enter passphrase (empty for no passphrase:( Enter same passphrase again: ***Query: Do you want to use this identity to login to this machine? (yes/no) yes ***Info: Adding to /home/Administrator/.ssh/authorized_keys ***Info: Configuration finished. Have fun! Control Panel/ Administrative Tools/ ) ‫ در وﻳﻨﺪوز‬services ‫. ﺑﺎ ورود ﺑﻪ ﻗﺴﻤﺖ‬c .‫ را استارت کنيد‬Cygwin ‫( سرويس ايجاد شده برای‬Services
  • 9.
    Grid ‫ وﺳﺮور‬agent ‫ ﻣﻴﺎن‬User Equivalency ‫21. ﺑﺮ ﻗﺮاري‬ :‫ﺑﺎ اﺟﺮاي ﻓﺮﻣﺎن ﻫﺎي زﻳﺮ اﻳﻦ اﻣﺮ اﻧﺠﺎم ﻣﻲ ﭘﺬﻳﺮد‬ 1. 2. 3. 4. 5. 6. 7. cat ~/.ssh/id_rsa.pub >> ~/.ssh/authorized_keys cat ~/.ssh/id_dsa.pub >> ~/.ssh/authorized_keys ssh Administrator@grid-server cat ~/.ssh/id_rsa.pub >> ~/.ssh/authorized_keys ssh Administrator@grid-server cat ~/.ssh/id_dsa.pub >> ~/.ssh/authorized_keys ssh Administrator@agent-server cat ~/.ssh/id_rsa.pub >> ~/.ssh/authorized_keys ssh Administrator@agent-server cat ~/.ssh/id_dsa.pub >> ~/.ssh/authorized_keys chmod 644 ~/.ssh/authorized_keys .‫ ﻧﻴﺎز ﺑﻪ اﺟﺮاء ﺷﺪن دارﻧﺪ‬Agent ‫*ﺧﻄﻬﺎي 4،3،2،1 ﻓﻘﻂ در زﻣﺎن اﺿﺎﻓﻪ ﻛﺮدن اوﻟﻴﻦ‬ :‫ از ﻓﺮﻣﺎن زﻳﺮ اﺳﺘﻔﺎده ﻛﻨﻴﺪ‬User Equivalency ‫31. ﺑﺮاي ﺗﺴﺖ ﺑﺮﻗﺮار ﺑﻮدن‬ On grid server# Ssh grid-server date On agent server# Ssh agent-server date ‫ اﺳﺖ. از داﻳﺮﻛﺘﻮري ﻣﻨﺒﻊ ﻧﺮم‬Agent ‫ از ﺳﺮور‬Silent ‫ ﺑﻪ ﺻﻮرت‬Agent ‫41. ﻣﺮﺣﻠﻪ آﺧﺮ ﻧﺼﺐ ﻧﺮم اﻓﺰار‬ additional- ‫ وارد ﻣﺴﻴﺮ ...... ﺷﻮﻳﺪ و ﭘﺎراﻣﺘﺮﻫﺎي ﻣﻮرد اﺷﺎره در زﻳﺮ را در ﻓﺎﻳﻞ‬Agent ‫اﻓﺰار‬ :‫ ﻣﻘﺪار دﻫﻲ ﻛﻨﻴﺪ‬agent.rsp SECURITY_UPDATES_VIA_MYORACLESUPPORT=false DECLINE_SECURITY_UPDATES=True INSTALL_UPDATES_SELECTION="skip" ORACLE_AGENT_HOME_LOCATION=”windows path of installation: D:” OMS_HOST=”Ip address of grid control server: 10,200,23,19” OMS_PORT=”Port number for uploading xml files to grid control server: 7201” AGENT_REGISTRATION_PASSWORD=”Registration password to register agent on grid control: qwert123” ‫ ﺑﺎ‬setup.exe ‫ ﺑﺎ ورود ﺑﻪ ﻣﺴﻴﺮ .... و اﺟﺮاي ﻓﺎﻳﻞ‬Response ‫51. ﭘﺲ اﻧﺠﺎم ﺗﻐﻴﻴﺮات در ﻓﺎﻳﻞ‬ :‫ﭘﺎراﻣﺘﺮﻫﺎي زﻳﺮ ﻧﺼﺐ ﺷﺮوع ﻣﻲ ﺷﻮد‬ setup.exe –silent –responsefile ….