Here is a draft action plan:
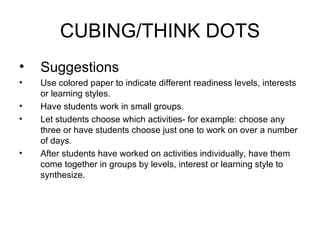
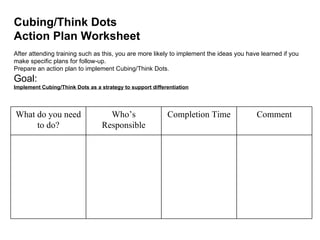
Goal: Implement Cubing/Think Dots as a strategy to support differentiation in my classroom
What do you need to do? Who's Responsible Completion Time Comment
Research content areas Me Within 2 weeks To identify appropriate
topics
Design Cubing/Think Me Within 3 weeks Will create cubes/cards
Dots activities at 3 levels
Pilot activities with Me Week 4 Get feedback and make
small group adjustments
Implement fully in Me Week 5 Roll out differentiated
classroom strategy
Assess effectiveness Me Ongoing Use rub
5. LET’S TRY IT
• With your table group, brainstorm the
different uses for a cube.
• A recorder will write the top three
responses on the poster paper at the front
of the room.
• You’ll have 5 minutes to complete this
task.
6. DEBRIEF
• How did your group identify the uses for
the cube?
• Did experiences from your past and
present help you identify the many uses of
the cube?
7. CUBING STATEMENTS
• Describe it: Look at the subject closely (perhaps with your
physical senses as well as your mind).
• Compare it: What is it similar to? What is it different from?
• Associate it; What does it make you think of? What comes to
your mind when you think of it? Perhaps people? Places?
Things? Feelings? Let your mind go and see what feelings you
have for the subject.
• Analyze it: Tell how it is made. What are it is traits and
attributes?
• Apply it: Tell what you can do with it. How can it be used?
• Argue for or against: Take a stand. Use any kind of reasoning
you want-logical, silly, anywhere in between.
8. WHY WOULD YOU USE
CUBING/THINK DOTS?
• To engage your students in idea and information
processing activities.
• To match your students learning profiles and current
needs.
• To engage your students forward on many learning
continuums.
• To identify the students readiness levels, interests,
learning styles.
• To use an on-going assessment process.
9. WHEN WOULD YOU USE
CUBING/THINK DOTS?
• After a unit has been presented and students are
familiar with the elements of the unit and
conceptual skills, Cubing/ThinkDots is an activity
to help students to Think about and make sense
of the unit and concepts they are studying. The
teacher first defines readiness levels, interests
and learning styles in the class, using on-going
assessment. Decide what you want your
students to know, do, and understand.
10. DIRECTIONS FOR CUBING
• First Step: (use on of the cubes)
– Write 6 questions that ask for information on the selected unit.
– Use your 6 levels of Bloom intelligence levels or any of the cubing statements to design questions.
– Make questions that use these levels that probe the specifics of your unit.
– Keep one question opinion based---no right or wrong.
• Second Step: (use other cubes)
– Use the first cube as you average cube, create 2 more using one as a lower level and one as a higher level.
– Remember all cubes need to cover the same type of questions, just geared to the level and one as a higher
level.
– Label your cubes so you know which level of readiness you are addressing.
• Third Step:
– Always remember to have an easy problem on each cube and a hard one regardless the levels.
– Color code the cubes for easy identification, also if students change cubes for questions, for learning style
groups.
– Decide on the rules. Will the students be asked to do all 6 sides? Roll and do any 4 sides? Do any two
questions on each of the cubes?
• Places to get questions
– Old quizzes, worksheets, textbook-study problems, student generated, etc.
17. DIRECTIONS FOR THINK DOTS
• First Steps:
-For each readiness level, write six activities on the pre-printed ThinkDots
template should be created.
- Use your 6 levels of Bloom intelligence levels or any of the ThinkDots
statements to write a activity for each card.
- Make the questions that use these levels that probe the specifics of your
unit.
- Keep one question opinion based—no right or wrong.
• Second Steps:
- Then cut each page into the six sections.
- On the back of each card, dots corresponding to the dots on the faces
of a die should be drawn on each of the six sections of the page.
- Use the hole punch to make holes in one corner or in the top of each
activity card.
- Use a 1” metal ring to hold each set of six cards together.
- Teacher may create an Activity Sheet to correspond to the lesson for
easy recording and management.
18. a, b, c and d each represent a Explain the mathematical reasoning Explain in words what the equation
different value. involved in solving 2x + 4 = 10 means.
If a = 2, find b, c, and d. card 1. Solve the problem.
a+b=c
a-c=d
a+b=5
Create an interesting word problem Diagram how to solve Explain what changing the “ 3 “ in
that is modeled by 8x – 2 = 7x. 2x = 8. 3x = 9 to a “2” does to the value of
x. Why is this true?
Think Dots
Title: Algebra level 1
19. a, b, c and d each represent a Explain the mathematical Explain how a variable is used to
different value. reasoning involved in solving solve word problem.
If a = 1, find b, c, and d. card 1.
a+b=c
b-b=d
c + a = -a
Create an interesting word problem Diagram how to solve Explain why
that is modeled by 3x + 1 = 10. x=4 in 2x = 8,
2x + 4 = 4x - 10. but x=16 in ½ x = 8.
Solve the problem. Why does this make sense?
Think Dots
Title: Algebra level 2
20. a, b, c and d each represent a Explain the mathematical reasoning Explain how a variable in
different value. involved in solving mathematics. Give examples.
If a = 4, find b, c, and d. card 1.
a+c=b
b-a=c
cd = -d
d+d=a
Create an interesting word problem Diagram how to solve Given ax = 15, explain how x is
that is modeled by . 3x + 4 = x + 12. changes if a is large or a is small in
value.
Solve the problem.
Think Dots
Title: Algebra level 3
21. STUDENTS USE
CUBES/THINK DOTs
• Cubing
• Students begin cubing by sitting with other students using cubes of the same color.
• Students take turns rolling their cube.
• If the first roll is an activity that the student does not want to do a second roll is
allowed.
• Teachers can create an Activity Sheet to correspond to the lesson for easy recording
and management.
• Think Dots
• Students begin Think Dots by sitting with other student using activity cards of the
same color.
• Students roll the die and complete the activity on the card that corresponds to the
dots thrown on the die.
• If the first roll is an activity that the student does not want to do a second roll is
allowed.
• Teachers can create an Activity Sheet to correspond to the lesson for easy recording
and management.
22. CUBING/THINK DOTS
• Suggestions
• Use colored paper to indicate different readiness levels, interests
or learning styles.
• Have students work in small groups.
• Let students choose which activities- for example: choose any
three or have students choose just one to work on over a number
of days.
• After students have worked on activities individually, have them
come together in groups by levels, interest or learning style to
synthesize.
23. LET’S TRY IT
• Choose your unit from your conceptual
skill that you would like to apply to your
choice.
• Choose Cubing or Think Dots…which one
grabs you? Follow the instructions on the
handout.
24. Let’s Assess
• Assessing provides direction for the
teacher to adjust to needs in order to
ensure growth and success.
• Assessing using a rubric is a key to
understanding and attending to student
interest and learning profile needs.
25. Cubing/Think Dots Rubric
2 1
3
-Evidence of alignment with Bloom’s -Some evidence of alignment -No evidence of alignment
Taxonomy
-Evidence that activities are designed -Some evidence of design for -No evidence of readiness, interest, or
for readiness, interest, or learning readiness, interest, or learning styles learning styles
styles
-Evidence of what students are to -Some evidence of what students are -No evidence of what students are to
Know, Understand, and Do to Know, Understand, and Do Know, Understand, and Do
26. Reflection
• Explain your understanding of the skills
involved in creating cubing/ThinkDots
activities.
• How did the activities lead you into a
deeper need for exploration of the
cubing/think dots?
28. Cubing/Think Dots
Action Plan Worksheet
After attending training such as this, you are more likely to implement the ideas you have learned if you
make specific plans for follow-up.
Prepare an action plan to implement Cubing/Think Dots.
Goal:
Implement Cubing/Think Dots as a strategy to support differentiation
What do you need Who’s Completion Time Comment
to do? Responsible
Editor's Notes
This slide should be shown as participants enter the room.
Introduce the concept of KUD.
Continue with the concept of KUD.
Continue with concept of KUD.
Introduce the HOOK activity. Poster paper should be in place at the front of the room. Allow 5 minutes for brainstorming session.
Have a whole group discussion regarding the group responses. Make connections between prior knowledge that students will need to know to complete a cubing/think dots activity.
Trainer should place table vocabulary cards on each subject area table group. Trainer will introduce the vocabulary and how it relates to Bloom’s and Cubing/Think Dots activities. After the whole group discussion of cubing statements slide #7, participants will be given Bloom’s Taxonomy (Handout B) to use with the Active Learning activity.
Trainer will lead a discussion on the various reasons of why Cubing/Think Dots is an effective strategy for differentiated instruction.
Trainer will lead a discussion on when Cubing/Think Dots could be used in the classroom.
Trainer will discuss the directions for cubing using slide 10 as a guide. Participants will have a paper copy to refer to throughout the discussion.
Trainer will discuss the example and make reference to the use of levels of questioning.
Continue with example.
Trainer will now discuss the reading example.
Continue with example.
Presenter will explain the directions for Think Dots. Participants will have a paper copy at their tables to refer to throughout the discussion. A created example of the product would be helpful to show as the presenter discusses the directions.
Presenter will discuss the example of a Think Dots template completed for a Math level 1.
Continue with example.
Presenter will discuss some different uses for Cubing/Think Dots and how these activities can be changed to fit a teacher’s needs.
Presenter will continue with some other ideas and suggestions.
Participants will use the direction handouts (Handouts C & D) for Cubing/Think Dots, the template handouts ( Handout F & G). Participants will begin using the supplies in their resource baskets to create their own Cube or Think Dot activities. Presenter will move throughout the room to assist and answer questions.
Trainer will discuss the reasoning behind the use of assessment.
Participants will use the Cubing/Think Dots Rubric to assess the Cube or Think Dots example that they created. Trainer might use the option of a peer evaluation if time permits.
Trainer will discuss the importance of reflection and instruct the participants to answer the reflective questions on slide 26 on index cards. Presenter will collect index cards to use for feedback.
Presenter will discuss the importance of a action plan in implementation of the Cubing/Think Dots strategy.
Participants will complete their individual action plan to use as a continuation of their implementation of the Cubing/Think Dots strategy.