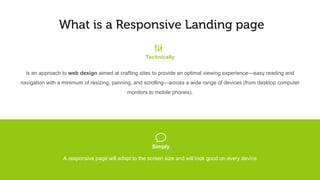
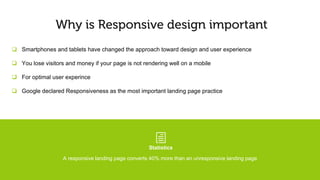
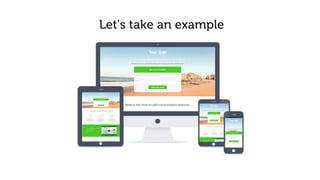
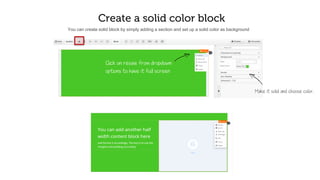
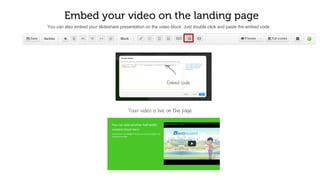
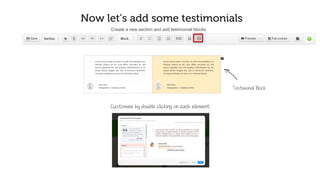
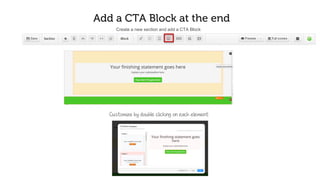
LeadSquared landing pages are now responsive
What is a responsive landing page
It is an approach to web design aimed at crafting sites for an optimal viewing experience—easy reading and navigation
with minimal resizing, panning, and scrolling—across a wide range of devices (from desktop computer monitors to mobile
phones).
g
Technically
vTechnicallyIn simple terms
A responsive page will adapt to the screen size and will look good on every device
Why is responsive design important
 Smartphones and tablets have changed the approach towards design and user experience
 You lose visitors and money if your page doesn’t render well on mobile
 To provide optimal user experience
 Google has declared Responsiveness as one of the most important landing page practices
hTechnically
Statistics
A responsive landing page converts 40% more than an unresponsive landing page
Let’s take an example
Ready to create this in LeadSquared ?
Hold on! Before you get started, you should know a few terms.
A section is an area, where you can add blocks .
A block is an area where you can add the content
Meet the Editor
Section Options
Blank Default Section
Block Types
Properties Panel
Blocks
The editor has 8 default blocks which cater to most of the needs
content
feature
form
image
button
video
testimonial
You can edit or move the blocks by clicking on them
Good to go. Let’s begin
This is what we will make in next 15 minutes
Let’s start by adding the background image
From the properties panel select Canvas > Background > Select image
You can choose solid color, gradient,
or an image from the dropdown
Upload and select the image you want to set as the background
Make sure you select a high resolution
image, typically around 1500px width
Now it’s time for the logo
Select Image Block > Double click to edit > Choose your logo image> Insert
This is not how we want it. We want it centered
and a little away from the top edge
Logo is an image; we can use image block for the logo.
To make it centered , stretch the block and apply some padding on top
Padding
TIPS TO NOTE
 Upload the hero image in the canvas background.
 Learn how to stretch and shrink the blocks.
 Give spacing and white spaces using padding and margins.
Now let’s add another section for headlines
For headline select Content Block > Double click to enter html editor > Write your content
This is a content block. You can change the
font, size, alignment etc. in the html editor
We can use content block to write headline and sub-headlines
Clicking on the content blocks opens up the html editor
TIPS TO NOTE
 The default font is Open sans, which is highly readable. Use readable fonts
 Switch the editor background to black, if your content color is white
 Try CTA Block if you have a click through landing page. It would have a headline, a sub-
headline and a Button
Let’s add heart to your landing page, The form
To add form, select Form Block. To keep it in the center add an empty block first
See how the content block gets added to the
left . Keep minimum height as 0
Leadsquared offers a very powerful form editor, Create a new section and select a form block
This is how the form editor looks like
You can make custom adjustments like col
or labels borders here
You can add/delete the fields here
Customize the form header
Click on the header tab to customize
The header
You can customize the color , text and other settings of the header here
Change the color and padding from
The properties panel
Change the form header text
Double click on the header to
Edit the text
Double clicking on the header will allow you to change the text
Toggle the editor color so the
White text is visible on black
Let’s refine it a bit more
Try to adjust the padding a little more, change form fields, colors and form headline to get better results.
TIPS TO NOTE
 Form is fully customizable. Check out the header and the footer tab
 The header and the footer properties are on the right properties pane. Double click o
n them to edit the text and custom html
 You can customize the button by clicking on it. To change the text you can simply
type the content there in the popup.
Let’s add a features block
The features blocks has many templates. Choose whichever suits your needs.
Double click the block to customize the content and icon
TIPS TO NOTE
 Set your style on one features block and clone others.
 Choose good quality icons. There are plenty of free resources on the web
 To change the canvas width or height. Go to Canvas > Dimensions and Spacing
Create a solid color block
You can create a solid block by simply adding a section, and choosing a solid color as background
Make it solid and choose color,
Click on resize from dropdown
options to have it full screen
Embed your video on the landing page
You can also embed your SlideShare presentation on the video block. Just double click and paste the embed code
Your video is live on the page
Embed code
Now let’s add some testimonials
Create a new section and add testimonial blocks
To customize an element, double click
Testimonial Block
Add a CTA Block at the end
Create a new section and add a CTA Block
Double click on any element to customize it
Let’s preview and check
You can preview the page anytime and check how it renders on each device
TIPS TO NOTE
 Use resize button in a section drop-bar for full page width block or sections.
 Use top padding to achieve vertical spacing on lower resolution
CHECK-OUT THE LIVE PAGE
http://responsive.landingpages.io/
h
NEW ADDITIONS
 Visibility- Allows you to hide the blocks in mobiles
 Advanced CSS- Change the CSS of a particular block
 Style Editor- Add your custom CSS to override the default leadsquared blocks and
create your own themes
Visibility- hide blocks on Mobile
Select the block and click on visibility tab on the right property panel
Activate Hidden.
By doing that the block will not
appear on the mobile
Advanced CSS- Add your custom CSS
Select the block and click on Advanced>CSS tab on the right property panel
Add your custom CSS here
Style Editor- Change the overall theme of your page
Select the Style editor on the right properties panel
Create your own theme
Style Editor panel
Write down your own custom styles
Edit the code by clicking the edit tab and click
on apply style.
FOR ANY HELP OR TIPS
Write to support@leadsquared.com
j
GO RESPONSIVE TODAY

Creating responsive landing pages using LeadSquared

  • 1.
    LeadSquared landing pagesare now responsive
  • 2.
    What is aresponsive landing page It is an approach to web design aimed at crafting sites for an optimal viewing experience—easy reading and navigation with minimal resizing, panning, and scrolling—across a wide range of devices (from desktop computer monitors to mobile phones). g Technically vTechnicallyIn simple terms A responsive page will adapt to the screen size and will look good on every device
  • 3.
    Why is responsivedesign important  Smartphones and tablets have changed the approach towards design and user experience  You lose visitors and money if your page doesn’t render well on mobile  To provide optimal user experience  Google has declared Responsiveness as one of the most important landing page practices hTechnically Statistics A responsive landing page converts 40% more than an unresponsive landing page
  • 4.
  • 5.
    Ready to createthis in LeadSquared ? Hold on! Before you get started, you should know a few terms. A section is an area, where you can add blocks . A block is an area where you can add the content
  • 6.
    Meet the Editor SectionOptions Blank Default Section Block Types Properties Panel
  • 7.
    Blocks The editor has8 default blocks which cater to most of the needs content feature form image button video testimonial You can edit or move the blocks by clicking on them
  • 8.
    Good to go.Let’s begin This is what we will make in next 15 minutes
  • 9.
    Let’s start byadding the background image From the properties panel select Canvas > Background > Select image You can choose solid color, gradient, or an image from the dropdown Upload and select the image you want to set as the background Make sure you select a high resolution image, typically around 1500px width
  • 10.
    Now it’s timefor the logo Select Image Block > Double click to edit > Choose your logo image> Insert This is not how we want it. We want it centered and a little away from the top edge Logo is an image; we can use image block for the logo. To make it centered , stretch the block and apply some padding on top Padding
  • 11.
    TIPS TO NOTE Upload the hero image in the canvas background.  Learn how to stretch and shrink the blocks.  Give spacing and white spaces using padding and margins.
  • 12.
    Now let’s addanother section for headlines For headline select Content Block > Double click to enter html editor > Write your content This is a content block. You can change the font, size, alignment etc. in the html editor We can use content block to write headline and sub-headlines Clicking on the content blocks opens up the html editor
  • 13.
    TIPS TO NOTE The default font is Open sans, which is highly readable. Use readable fonts  Switch the editor background to black, if your content color is white  Try CTA Block if you have a click through landing page. It would have a headline, a sub- headline and a Button
  • 14.
    Let’s add heartto your landing page, The form To add form, select Form Block. To keep it in the center add an empty block first See how the content block gets added to the left . Keep minimum height as 0 Leadsquared offers a very powerful form editor, Create a new section and select a form block This is how the form editor looks like You can make custom adjustments like col or labels borders here You can add/delete the fields here
  • 15.
    Customize the formheader Click on the header tab to customize The header You can customize the color , text and other settings of the header here Change the color and padding from The properties panel
  • 16.
    Change the formheader text Double click on the header to Edit the text Double clicking on the header will allow you to change the text Toggle the editor color so the White text is visible on black
  • 17.
    Let’s refine ita bit more Try to adjust the padding a little more, change form fields, colors and form headline to get better results.
  • 18.
    TIPS TO NOTE Form is fully customizable. Check out the header and the footer tab  The header and the footer properties are on the right properties pane. Double click o n them to edit the text and custom html  You can customize the button by clicking on it. To change the text you can simply type the content there in the popup.
  • 19.
    Let’s add afeatures block The features blocks has many templates. Choose whichever suits your needs. Double click the block to customize the content and icon
  • 20.
    TIPS TO NOTE Set your style on one features block and clone others.  Choose good quality icons. There are plenty of free resources on the web  To change the canvas width or height. Go to Canvas > Dimensions and Spacing
  • 21.
    Create a solidcolor block You can create a solid block by simply adding a section, and choosing a solid color as background Make it solid and choose color, Click on resize from dropdown options to have it full screen
  • 22.
    Embed your videoon the landing page You can also embed your SlideShare presentation on the video block. Just double click and paste the embed code Your video is live on the page Embed code
  • 23.
    Now let’s addsome testimonials Create a new section and add testimonial blocks To customize an element, double click Testimonial Block
  • 24.
    Add a CTABlock at the end Create a new section and add a CTA Block Double click on any element to customize it
  • 25.
    Let’s preview andcheck You can preview the page anytime and check how it renders on each device
  • 26.
    TIPS TO NOTE Use resize button in a section drop-bar for full page width block or sections.  Use top padding to achieve vertical spacing on lower resolution
  • 27.
    CHECK-OUT THE LIVEPAGE http://responsive.landingpages.io/ h
  • 28.
    NEW ADDITIONS  Visibility-Allows you to hide the blocks in mobiles  Advanced CSS- Change the CSS of a particular block  Style Editor- Add your custom CSS to override the default leadsquared blocks and create your own themes
  • 29.
    Visibility- hide blockson Mobile Select the block and click on visibility tab on the right property panel Activate Hidden. By doing that the block will not appear on the mobile
  • 30.
    Advanced CSS- Addyour custom CSS Select the block and click on Advanced>CSS tab on the right property panel Add your custom CSS here
  • 31.
    Style Editor- Changethe overall theme of your page Select the Style editor on the right properties panel Create your own theme
  • 32.
    Style Editor panel Writedown your own custom styles Edit the code by clicking the edit tab and click on apply style.
  • 33.
    FOR ANY HELPOR TIPS Write to support@leadsquared.com j
  • 34.