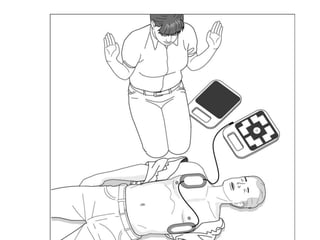
FIRST AID
• HEART ATTACK
• CHOCKING
• MINOR WOUND
• DRESSING AND BANDAGES
• FRACTURE AND DISLOCATION
• NEUROLOGICAL CONDITION (HEAD INJURY, STROKE)
• DRUG TOXICITY AND POISONING
• ANAPHYLAXIS(BITE, STINGS)
• FOOD POISON
• ELECTRIC SHOCK
• BURNS
• HEMORRHAGE
Measuring Vital Signs
• Pulse Rate>>>60/min.
• Respiratory Rate>>> 12-16/min.
• Body Temperature>>> 96.8°F (36°C) and
98.6°F (37°C)
• Blood Pressure>>> 120/80
Assessing a Collapsed Victim
DR ABC Action Plan :
◾ Danger
◾ Response
◾ Airway
◾ Breathing
◾ CPR
ABC>>>CAB
• In adult
CIRCULATION>>AIRWAY>>BREATHING
To deliver high-quality chest compressions:
1. Kneel at the victim’s side, parallel to his chest.
2. Place the heel of one hand in the middle of the victim’s chest over
the breastbone.
3. Place your other hand on top so your hands are parallel.
4. Push down to a depth of at least two inches (five centimeters).
5. Fully release and let the chest wall recoil.
6. Repeat and aim for 100 to 120 chest compressions per minute
(maximum of two chest compressions per second). Keep your elbows
locked and use your upper body weight to deliver effective chest
compressions. Ensure that you let the chest wall recoil fully after
each compression and do not lean on the victim’s chest.
• Don’t Worry About Rib Fractures
How to Give Effective Rescue Breaths
• 30:2 (If you are a trained rescuer and willing to deliver
rescue breaths)
1. Open the victim’s airway by tilting the head backward.
2. Pinch the nose to prevent air leaking out.
3. Take a regular breath and make a seal over the victim’s
mouth,
using a disposable resuscitation face shield if available.
4. Breathe into the victim’s mouth for approximately one
second; do not overinflate the victim’s lungs as this could
cause air to go into the stomach and the victim to vomit.
5. Deliver two rescue breath attempts in total, then
immediately resume chest compressions
• two trained rescuers are present, one can
perform chest
• compressions, and the other deliver rescue
breaths, still at a ratio of
• thirty chest compressions to two rescue
breaths
• Continue providing CPR (either chest
compressions only, or chest Compressions
with rescue breaths) until the arrival of a
defibrillator or emergency medical help.
When to Stop CPR
CPR needs to be performed continuously for it
to be effective
Stop CPR only if:
◾ The victim shows signs of life and is breathing
normally.
◾ EMS arrives and asks you to stop.
◾ The environment becomes too unsafe for you to
remain on scene, and you cannot safely move the
victim.
◾ You become physically exhausted and unable to
continue. Remember you are the most important
person in any emergency situation. If you become
exhausted and bystanders are present, show them how
to perform chest compressions so they can take over.
Using an Automated External
Defibrillator (AED)
• Defibrillator is a medical device used to
deliver a controlled electrical shock to a victim
of cardiac arrest
• automated external defibrillator (AED) is a
defibrillator designed to be used by
bystanders with only basic medical training
• An AED will analyze the victim’s heart rhythm
itself and only deliver an electrical shock if
appropriate to do so.
AED should be used as soon as possible once
cardiac arrest occurs.
How to Use an AED
• 1. Switch on the AED.
• 2. Expose the victim’s bare chest.
• 3. Apply the electrical pads to the victim’s chest as indicated by the
• instructions. If a victim has excessive chest hair you may need to
• remove this using a razor to ensure good contact of the pad with the
• skin. Warning! The pads are very sticky; if using gloves, take care
• that the pads don’t become stuck together or to your gloves.
• 4. Follow the visual and audible prompts for the device. The AED will
• analyze the victim’s heart rhythm and decide whether to deliver an
• electrical shock.
• 5. If the AED wishes to deliver a shock, ensure there is no one in
• contact with the victim before the shock is delivered. Give a loud
• verbal warning such as “Stand clear!” and press the shock button
• indicated on the machine.
• 6. Resume CPR if instructed to by the AED until the device gives you
• further instructions.
• The AED may deliver more than one electrical
shock or instruct you to alternate between
performing CPR and delivering shocks. Always
follow the instructions from the AED until the
arrival of emergency medical help
AED Safety
• Ensure no one is touching the victim before a
shock is administered by the AED.
• The victim’s chest should be dry to reduce the
risk of burns. Most AEDs come with a small
towel to dry the victim’s chest if required.
Helping a Choking Victim
First aid treatment:
Back blows and Abdominal Thrusts
- Attempt to dislodge the object and clear the
airway.
• Abdominal thrusts are also known as the
Heimlich maneuver.
Deliver abdominal thrusts (Heimlich
maneuver):
• 1. Immediately call EMS.
• 2. Deliver abdominal thrusts (Heimlich maneuver):
a. Stand behind the victim and explain what you are going to do.
b. Put your arms around his body, make a fist with one hand, and
place this just above the victim’s belly button.
c. Grasp this fist with your other hand and firmly pull inward and
upward. If unable to deliver abdominal thrusts, then deliver chest
thrusts (see sidebar, Chest Thrusts) or back blows
3. Continue giving abdominal thrusts, chest thrusts, or back blows until
emergency medical help arrives.
4. If the victim loses consciousness, assess whether he is breathing
normally. If he is not breathing normally, immediately update EMS
and commence cardiopulmonary resuscitation (CPR) until the
arrival of medical help
CHOKING CHILD ONE YEAR TO
PUBERTY
WHAT TO DO?
1. If the child is breathing, encourage her to cough; this may clear
the obstruction. Remove any obvious obstruction from her mouth
2. If the child cannot speak, or stops coughing or breathing, carry out
back blows. Bend her well forward and give up to five blows
between her shoulder blades using the heel of your hand. Check
her mouth, but not sweep the mouth with your finger.
3. If the back blows fail, try abdominal thrusts.
4. Check the mouth. If the obstruction has not cleared, call 999/112
for emergency help.
5. Repeat steps 2 and 3 – rechecking the mouth after each step –
until help arrives or the child becomes unresponsive.
CHOKING INFANT UNDER ONE YEAR
• An infant is more likely to choke on food or
small objects than an adult. The infant will
rapidly become distressed, and you need to
act quickly to clear any obstruction. If the
infant becomes unresponsive, the throat
muscles may relax and the airway may open
enough to do rescue breathing. Be prepared
to begin rescue breaths and chest
compressions.
WHAT TO DO ?
HANGING AND STRANGULATION
• If pressure is exerted on the outside of the
neck, the airway is squeezed and the flow of
air to the lungs is cut off.
• The main causes of such pressure are:
Hanging – suspension of the body by a noose
around the neck.
Strangulation – constriction or squeezing
around the neck or throat.
CAUTION
• Do not move the casualty unnecessarily, in
case of spinal injury.
• Do not destroy or interfere with any material
that has been constricting the neck, such as
knotted rope as the police may need it for
evidence.
• If the casualty is unresponsive, open the
airway and check breathing
WHAT TO DO?
1. Quickly remove any constriction from around the
casualty’s neck.
2. If the casualty is hanging, support the body while you
relieve the constriction. Be aware that the body will
be very heavy if he is unresponsive.
3. If the casualty is responsive, help him to lie down
while supporting his head and neck.
4. Call 999/112 for emergency help, even if he appears
to recover fully. Monitor and record his vital signs –
breathing, pulse and level of response.
YOUR AIMS
■ To restore adequate breathing.
■ To arrange urgent removal to hospital.
INHALATION OF FUMES
• The inhalation of smoke, gases (such as
carbon monoxide) or toxic vapours can be
lethal.
• low levels of oxygen in his body tissues:
HYPOXIA
1. SMOKE INHALATION
2. INHALATION OF CARBON MONOXIDE
WHAT TO DO
1. Call 999/112 for emergency help. Tell ambulance
control that you suspect fume inhalation.
2. If it is necessary to escape from the source of the
fumes, help the casualty away from the fumes into
fresh air. Do not enter the fume-filled area yourself.
3. Support the casualty and encourage him to breathe
normally. If the casualty’s clothing is still burning, try
to extinguish the flames.
4. Stay with the casualty until help arrives. Monitor and
record the casualty’s vital signs – breathing, pulse and
level of response.
DROWNING
• Drowning causes breathing impairment as a
result of submersion or immersion in a liquid.
• YOUR AIMS: To restore breathing AND To
arrange urgent removal to hospital.
DROWNING CHAIN
OF SURVIVAL
WHAT TO DO?
1. When the casualty is rescued from liquid Check his level of
response, open his airway and check breathing.
2. If he is unresponsive and not breathing normally, shout for help
and call 999/112 for emergency help or ask someone to make the
call and request an AED.
3. Check that the airway is open and give FIVE 6 initial rescue breaths.
Follow this with 30 chest compressions, then TWO rescue breaths.
4. Continue CPR at a rate of 30:2 until help arrives; the casualty shows
signs of becoming responsive – coughing, opening his eyes,
speaking, or moving purposefully – and starts breathing normally;
or you are too exhausted to continue.
5. If an AED is available attach while continuing CPR.
6. If the casualty starts to breathe normally, treat him for
hypothermia by covering him with warm clothes and blankets. If
possible replace wet clothes with dry ones. Monitor and record the
casualty’s vital signs – breathing, pulse and level of response until
help arrives.
PENETRATING CHEST WOUND
• The heart and lungs, and the major blood
vessels around them, lie in the chest,
protected by the breastbone and the 12 pairs
of ribs that make up the ribcage. The ribcage
extends far enough downwards to protect
organs such as the liver and spleen in the
upper part of the abdomen.
• Air can then enter between the membranes and
exert pressure on the lung, and the lung may
collapse – a condition called pneumothorax.
• Pressure around the affected lung may build up
to such an extent that it affects the uninjured
lung. As a result, the casualty becomes
increasingly breathless. This build-up of pressure
may prevent the heart from refilling with blood
properly, impairing the circulation and causing
shock – a condition known as a tension
pneumothorax.
WHAT TO DO?
• Help the casualty to sit down. Encourage him to lean
towards the injured side. Leave the wound exposed,
without a dressing.
• If the wound is obviously bleeding, control with direct
pressure and, if necessary, apply a dressing.
• Call 999/112 for emergency help. While waiting for
help, continue to support the casualty in the same
position as long as he continues to be responsive.
• Monitor and record the casualty’s vital signs –
breathing, pulse and level of response (pp.52–53) –
until help arrives.
SPECIAL CASE IF THE CASUALTY IS
UNRESPONSIVE
• If the casualty is unresponsive, open the
airway and check breathing. If you need to
place a breathing casualty in the recovery
position, roll him on to his injured side to help
the healthy lung to work effectively.

CPR.pptx

  • 1.
  • 2.
    • HEART ATTACK •CHOCKING • MINOR WOUND • DRESSING AND BANDAGES • FRACTURE AND DISLOCATION • NEUROLOGICAL CONDITION (HEAD INJURY, STROKE) • DRUG TOXICITY AND POISONING • ANAPHYLAXIS(BITE, STINGS) • FOOD POISON • ELECTRIC SHOCK • BURNS • HEMORRHAGE
  • 3.
    Measuring Vital Signs •Pulse Rate>>>60/min. • Respiratory Rate>>> 12-16/min. • Body Temperature>>> 96.8°F (36°C) and 98.6°F (37°C) • Blood Pressure>>> 120/80
  • 4.
    Assessing a CollapsedVictim DR ABC Action Plan : ◾ Danger ◾ Response ◾ Airway ◾ Breathing ◾ CPR
  • 5.
  • 10.
    To deliver high-qualitychest compressions: 1. Kneel at the victim’s side, parallel to his chest. 2. Place the heel of one hand in the middle of the victim’s chest over the breastbone. 3. Place your other hand on top so your hands are parallel. 4. Push down to a depth of at least two inches (five centimeters). 5. Fully release and let the chest wall recoil. 6. Repeat and aim for 100 to 120 chest compressions per minute (maximum of two chest compressions per second). Keep your elbows locked and use your upper body weight to deliver effective chest compressions. Ensure that you let the chest wall recoil fully after each compression and do not lean on the victim’s chest.
  • 12.
    • Don’t WorryAbout Rib Fractures
  • 13.
    How to GiveEffective Rescue Breaths • 30:2 (If you are a trained rescuer and willing to deliver rescue breaths) 1. Open the victim’s airway by tilting the head backward. 2. Pinch the nose to prevent air leaking out. 3. Take a regular breath and make a seal over the victim’s mouth, using a disposable resuscitation face shield if available. 4. Breathe into the victim’s mouth for approximately one second; do not overinflate the victim’s lungs as this could cause air to go into the stomach and the victim to vomit. 5. Deliver two rescue breath attempts in total, then immediately resume chest compressions
  • 14.
    • two trainedrescuers are present, one can perform chest • compressions, and the other deliver rescue breaths, still at a ratio of • thirty chest compressions to two rescue breaths
  • 15.
    • Continue providingCPR (either chest compressions only, or chest Compressions with rescue breaths) until the arrival of a defibrillator or emergency medical help.
  • 16.
    When to StopCPR CPR needs to be performed continuously for it to be effective
  • 17.
    Stop CPR onlyif: ◾ The victim shows signs of life and is breathing normally. ◾ EMS arrives and asks you to stop. ◾ The environment becomes too unsafe for you to remain on scene, and you cannot safely move the victim. ◾ You become physically exhausted and unable to continue. Remember you are the most important person in any emergency situation. If you become exhausted and bystanders are present, show them how to perform chest compressions so they can take over.
  • 18.
    Using an AutomatedExternal Defibrillator (AED) • Defibrillator is a medical device used to deliver a controlled electrical shock to a victim of cardiac arrest • automated external defibrillator (AED) is a defibrillator designed to be used by bystanders with only basic medical training • An AED will analyze the victim’s heart rhythm itself and only deliver an electrical shock if appropriate to do so.
  • 19.
    AED should beused as soon as possible once cardiac arrest occurs.
  • 20.
    How to Usean AED • 1. Switch on the AED. • 2. Expose the victim’s bare chest. • 3. Apply the electrical pads to the victim’s chest as indicated by the • instructions. If a victim has excessive chest hair you may need to • remove this using a razor to ensure good contact of the pad with the • skin. Warning! The pads are very sticky; if using gloves, take care • that the pads don’t become stuck together or to your gloves. • 4. Follow the visual and audible prompts for the device. The AED will • analyze the victim’s heart rhythm and decide whether to deliver an • electrical shock. • 5. If the AED wishes to deliver a shock, ensure there is no one in • contact with the victim before the shock is delivered. Give a loud • verbal warning such as “Stand clear!” and press the shock button • indicated on the machine. • 6. Resume CPR if instructed to by the AED until the device gives you • further instructions.
  • 22.
    • The AEDmay deliver more than one electrical shock or instruct you to alternate between performing CPR and delivering shocks. Always follow the instructions from the AED until the arrival of emergency medical help
  • 23.
    AED Safety • Ensureno one is touching the victim before a shock is administered by the AED. • The victim’s chest should be dry to reduce the risk of burns. Most AEDs come with a small towel to dry the victim’s chest if required.
  • 24.
    Helping a ChokingVictim First aid treatment: Back blows and Abdominal Thrusts - Attempt to dislodge the object and clear the airway.
  • 25.
    • Abdominal thrustsare also known as the Heimlich maneuver.
  • 29.
    Deliver abdominal thrusts(Heimlich maneuver): • 1. Immediately call EMS. • 2. Deliver abdominal thrusts (Heimlich maneuver): a. Stand behind the victim and explain what you are going to do. b. Put your arms around his body, make a fist with one hand, and place this just above the victim’s belly button. c. Grasp this fist with your other hand and firmly pull inward and upward. If unable to deliver abdominal thrusts, then deliver chest thrusts (see sidebar, Chest Thrusts) or back blows 3. Continue giving abdominal thrusts, chest thrusts, or back blows until emergency medical help arrives. 4. If the victim loses consciousness, assess whether he is breathing normally. If he is not breathing normally, immediately update EMS and commence cardiopulmonary resuscitation (CPR) until the arrival of medical help
  • 30.
    CHOKING CHILD ONEYEAR TO PUBERTY WHAT TO DO? 1. If the child is breathing, encourage her to cough; this may clear the obstruction. Remove any obvious obstruction from her mouth 2. If the child cannot speak, or stops coughing or breathing, carry out back blows. Bend her well forward and give up to five blows between her shoulder blades using the heel of your hand. Check her mouth, but not sweep the mouth with your finger. 3. If the back blows fail, try abdominal thrusts. 4. Check the mouth. If the obstruction has not cleared, call 999/112 for emergency help. 5. Repeat steps 2 and 3 – rechecking the mouth after each step – until help arrives or the child becomes unresponsive.
  • 31.
    CHOKING INFANT UNDERONE YEAR • An infant is more likely to choke on food or small objects than an adult. The infant will rapidly become distressed, and you need to act quickly to clear any obstruction. If the infant becomes unresponsive, the throat muscles may relax and the airway may open enough to do rescue breathing. Be prepared to begin rescue breaths and chest compressions.
  • 33.
  • 34.
    HANGING AND STRANGULATION •If pressure is exerted on the outside of the neck, the airway is squeezed and the flow of air to the lungs is cut off. • The main causes of such pressure are: Hanging – suspension of the body by a noose around the neck. Strangulation – constriction or squeezing around the neck or throat.
  • 36.
    CAUTION • Do notmove the casualty unnecessarily, in case of spinal injury. • Do not destroy or interfere with any material that has been constricting the neck, such as knotted rope as the police may need it for evidence. • If the casualty is unresponsive, open the airway and check breathing
  • 37.
    WHAT TO DO? 1.Quickly remove any constriction from around the casualty’s neck. 2. If the casualty is hanging, support the body while you relieve the constriction. Be aware that the body will be very heavy if he is unresponsive. 3. If the casualty is responsive, help him to lie down while supporting his head and neck. 4. Call 999/112 for emergency help, even if he appears to recover fully. Monitor and record his vital signs – breathing, pulse and level of response.
  • 38.
    YOUR AIMS ■ Torestore adequate breathing. ■ To arrange urgent removal to hospital.
  • 39.
    INHALATION OF FUMES •The inhalation of smoke, gases (such as carbon monoxide) or toxic vapours can be lethal. • low levels of oxygen in his body tissues: HYPOXIA 1. SMOKE INHALATION 2. INHALATION OF CARBON MONOXIDE
  • 41.
    WHAT TO DO 1.Call 999/112 for emergency help. Tell ambulance control that you suspect fume inhalation. 2. If it is necessary to escape from the source of the fumes, help the casualty away from the fumes into fresh air. Do not enter the fume-filled area yourself. 3. Support the casualty and encourage him to breathe normally. If the casualty’s clothing is still burning, try to extinguish the flames. 4. Stay with the casualty until help arrives. Monitor and record the casualty’s vital signs – breathing, pulse and level of response.
  • 43.
    DROWNING • Drowning causesbreathing impairment as a result of submersion or immersion in a liquid. • YOUR AIMS: To restore breathing AND To arrange urgent removal to hospital.
  • 44.
  • 45.
    WHAT TO DO? 1.When the casualty is rescued from liquid Check his level of response, open his airway and check breathing. 2. If he is unresponsive and not breathing normally, shout for help and call 999/112 for emergency help or ask someone to make the call and request an AED. 3. Check that the airway is open and give FIVE 6 initial rescue breaths. Follow this with 30 chest compressions, then TWO rescue breaths. 4. Continue CPR at a rate of 30:2 until help arrives; the casualty shows signs of becoming responsive – coughing, opening his eyes, speaking, or moving purposefully – and starts breathing normally; or you are too exhausted to continue. 5. If an AED is available attach while continuing CPR. 6. If the casualty starts to breathe normally, treat him for hypothermia by covering him with warm clothes and blankets. If possible replace wet clothes with dry ones. Monitor and record the casualty’s vital signs – breathing, pulse and level of response until help arrives.
  • 46.
    PENETRATING CHEST WOUND •The heart and lungs, and the major blood vessels around them, lie in the chest, protected by the breastbone and the 12 pairs of ribs that make up the ribcage. The ribcage extends far enough downwards to protect organs such as the liver and spleen in the upper part of the abdomen.
  • 47.
    • Air canthen enter between the membranes and exert pressure on the lung, and the lung may collapse – a condition called pneumothorax. • Pressure around the affected lung may build up to such an extent that it affects the uninjured lung. As a result, the casualty becomes increasingly breathless. This build-up of pressure may prevent the heart from refilling with blood properly, impairing the circulation and causing shock – a condition known as a tension pneumothorax.
  • 49.
    WHAT TO DO? •Help the casualty to sit down. Encourage him to lean towards the injured side. Leave the wound exposed, without a dressing. • If the wound is obviously bleeding, control with direct pressure and, if necessary, apply a dressing. • Call 999/112 for emergency help. While waiting for help, continue to support the casualty in the same position as long as he continues to be responsive. • Monitor and record the casualty’s vital signs – breathing, pulse and level of response (pp.52–53) – until help arrives.
  • 50.
    SPECIAL CASE IFTHE CASUALTY IS UNRESPONSIVE • If the casualty is unresponsive, open the airway and check breathing. If you need to place a breathing casualty in the recovery position, roll him on to his injured side to help the healthy lung to work effectively.