
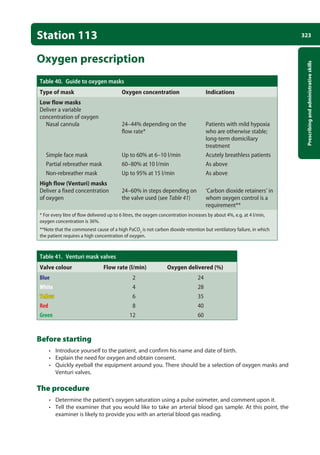
Downloaded 97 times


![1
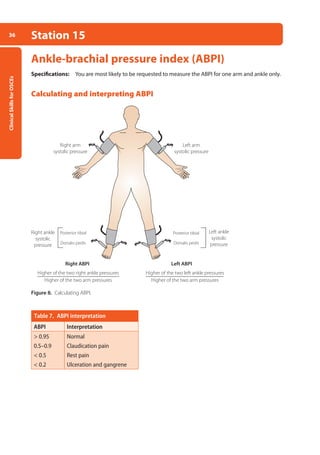
General
skills
Station 1
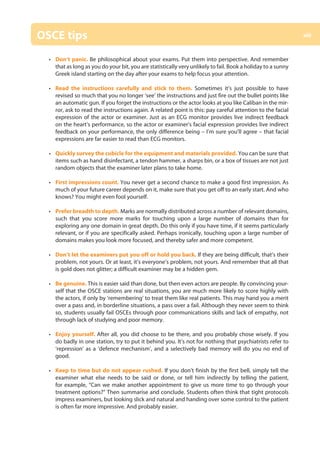
Hand washing
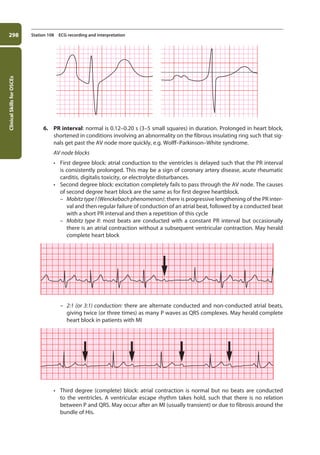
Hands must be washed before every episode of care that involves direct contact with a patient’s skin,
their food or medication, invasive devices, or dressings, and after any activity or contact that potentially
contaminates the hands.
The procedure
• Your arms should be bare below the elbows: roll up your sleeves, remove your watch, any jewel-
lery, and fake nails or nail varnish (fingernails should be kept short, ideally not exceeding 1mm
from the edge of the nail bed).
• Turn on the hot and cold taps with your elbows and thoroughly wet your hands once the water
is warm.
• Apply liquid soap (used in most hospital situations) or disinfectant from the dispenser (used
in the operating theatre). Disinfectants include pink aqueous chlorhexidine (‘Hibiscrub’) and
brown povidone iodine (‘Betadine’). Alcohol hand rubs offer a quicker alternative to liquid
soaps and disinfectants, though they should be applied for at least 20–30 seconds. Mere soap
bars are to be avoided.
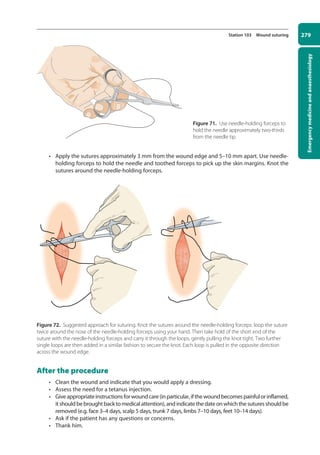
• Wash your hands using the Ayliffe hand washing technique (see Figure 1 overleaf):
➀ palm to palm
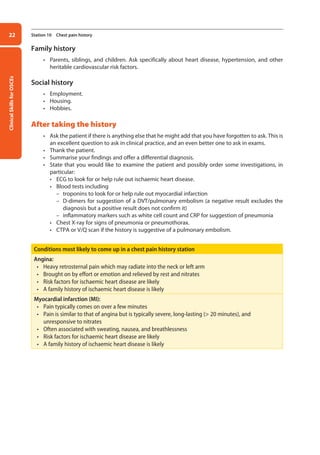
➁ right palm over left dorsum and left palm over right dorsum
➂ palm to palm with fingers interlaced
➃ back of fingers to opposing palms with fingers interlocked
➄ rotational rubbing of right thumb clasped in left palm and left thumb clasped in right palm
➅ rotational rubbing, backwards and forwards, with clasped fingers of right hand in left palm
and clasped fingers of left hand in right palm
• Rinse your hands thoroughly.
• Turn the taps off with your elbows.
• Dry your hands with a paper towel and discard it in the foot-operated bin, remembering to use
the pedal rather than your clean hands!
• Consider applying an emollient if you have dry skin.
[Note] Alcohol hand rubs are ineffective against spores and should be avoided if there is contamination with biological
remnantssuchasfaeces,blood,orurine;ifthereisvisibledirt;orifthepatientisinfectedwithClostridiumdifficile.
01-OCSEs-General_Skills_5e ccp.indd 1 18/03/2015 13:18](https://image.slidesharecdn.com/clinical-skills-for-osces-230108185648-1adad12b/85/Clinical-Skills-for-OSCEs-pdf-16-320.jpg)


![Clinical
Skills
for
OSCEs
34 Station 14 Peripheral vascular system examination
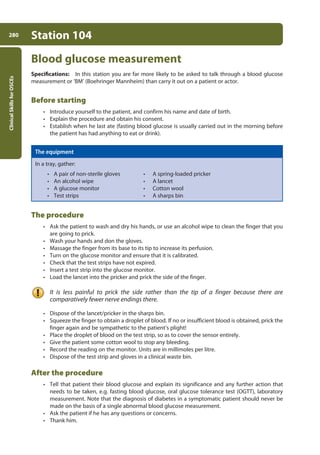
–
– ask the patient to dangle his legs over the edge of the couch; in chronic limb ischaemia,
rather than returning to its normal colour, the skin will slowly turn red like a cooked lobster
(reactive hyperaemia)
• Oedema. Firm ‘non-pitting’ oedema is a sign of chronic venous insufficiency (compare to the
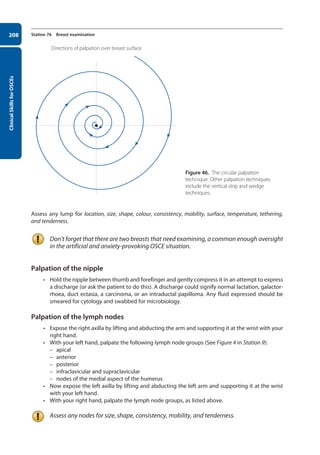
‘pitting’ oedema of cardiac failure).
• Varicose veins. Tenderness on palpation suggests thrombophlebitis.
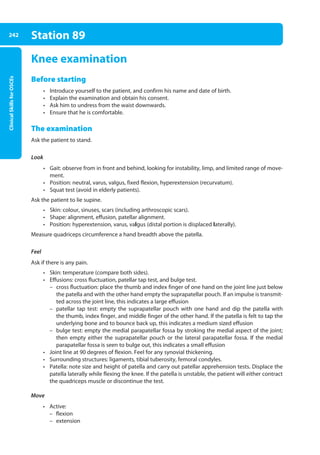
• Trendelenburg’s test:
–
– elevate the leg to 90 degrees to drain the veins of blood
–
– occlude the sapheno-femoral junction (SFJ) with two fingers
–
– keep your fingers in place and ask the patient to stand up
–
– remove your fingers: if the superficial veins refill, this indicates incompetence at the SFJ
• Tourniquet test:
–
– elevate the leg to 90 degrees to drain the veins of blood
–
– apply a tourniquet to the upper thigh
–
– ask the patient to stand up: if the superficial veins below the tourniquet refill, this indicates
incompetent perforators below the tourniquet
–
– release the tourniquet: sudden additional filling of the veins is a sign of sapheno-femoral
incompetence
[Note] The tourniquet test can be repeated further and further down the leg, until the superficial veins below the
tourniquet no longer refill.
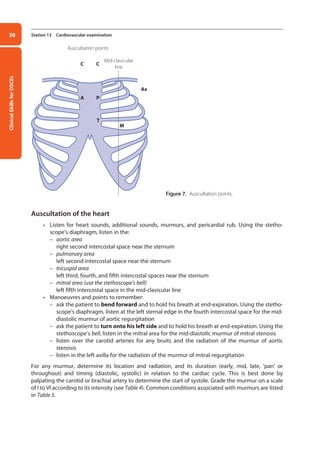
Auscultation
• Femoral arteries.
• Abdominal aorta.
• Renal arteries.
After the examination
• Thank the patient.
• Ensure that he is comfortable.
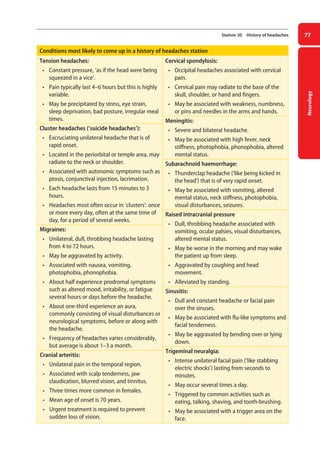
• Summarise your findings and offer a differential diagnosis.
• If appropriate, indicate that you might also measure the ABPI (see Station 15) and examine the
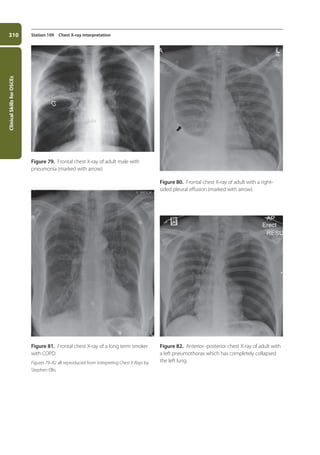
cardiovascular system and abdomen (aortic aneurysm).
02-OCSEs-Cardio__Resp_Med_5e ccp.indd 34 18/03/2015 13:21](https://image.slidesharecdn.com/clinical-skills-for-osces-230108185648-1adad12b/85/Clinical-Skills-for-OSCEs-pdf-49-320.jpg)
![Cardiovascular
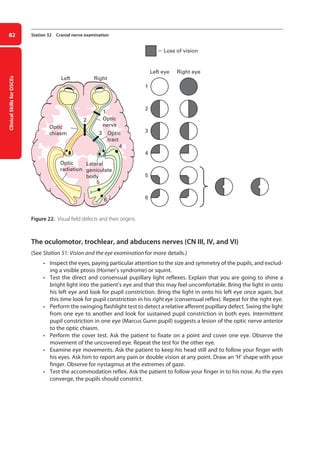
and
respiratory
medicine
35
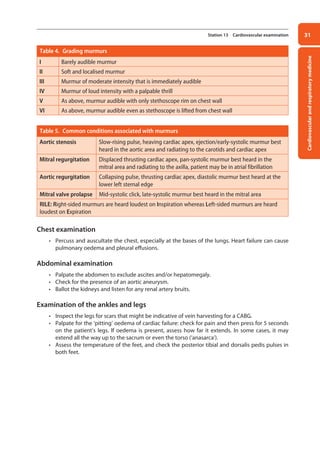
Station 14 Peripheral vascular system examination
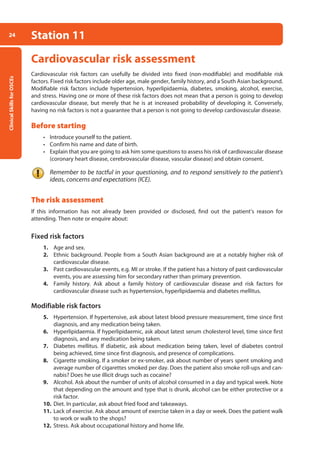
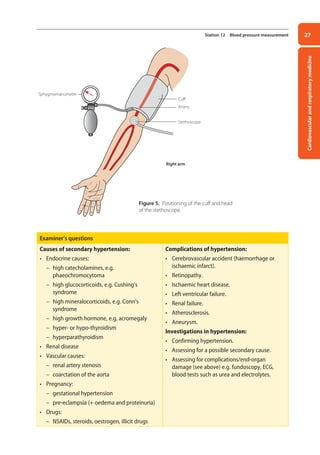
Table 6. Examination of the arterial or venous system only
Arterial system Venous system
Pallor
Shininess
Dystrophic nails
Loss of body hair
Arterial ulcers
Signs of gangrene
Skin temperature
Capillary refill
Peripheral pulses
Buerger’s test
Auscultation of femoral arteries and aorta
ABPI (if time permits, see Station 15)
Atrophie blanche
Pigmentation
Inflammation
Eczema
Lipodermatosclerosis
Oedema (non-pitting)
Venous ulcers
Varicose veins
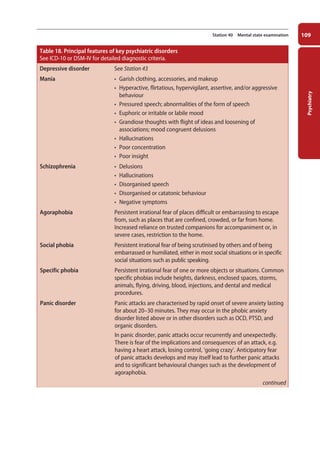
Scars due to varicose vein surgery
Trendelenburg test
Perthes’ test (if after the gold medal)
[Note] The 6 Ps of limb ischaemia: pain, pallor, pulselessness, paraesthesia, paralysis, and perishingly cold.
02-OCSEs-Cardio__Resp_Med_5e ccp.indd 35 18/03/2015 13:21](https://image.slidesharecdn.com/clinical-skills-for-osces-230108185648-1adad12b/85/Clinical-Skills-for-OSCEs-pdf-50-320.jpg)

![Cardiovascular
and
respiratory
medicine
43
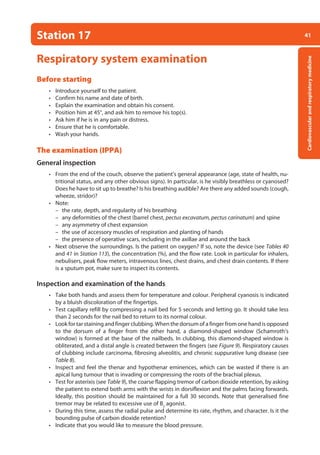
Station 17 Respiratory system examination
• Examine the lymph nodes from behind with the patient sitting up. Have a systematic routine
for examining all of the submental, submandibular, parotid, pre- and post-auricular, occipital,
anterior cervical, posterior cervical, supra- and infra-clavicular, and axillary lymph nodes (see
Station 9).
• Palpate for tracheal deviation by placing the index and middle fingers of one hand on either
side of the trachea in the suprasternal notch. Alternatively, place the index and annular fingers
of one hand on either clavicular head and use your middle finger (called the Vulgaris in Latin)
to palpate the trachea.
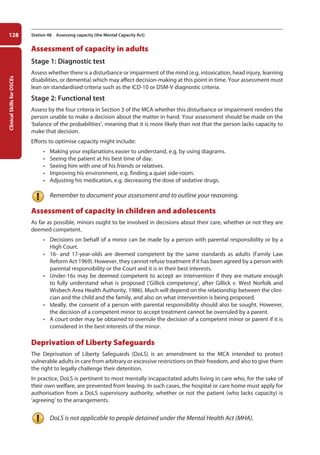
Palpation of the chest
Ask the patient if he has any chest pain.
• Inspect the chest more carefully, looking for asymmetries, deformities, and scars.
• Inspect the precordium and palpate for the position of the cardiac apex. Difficulty palpating for
the position of the cardiac apex may indicate hyperexpansion, although this is not a specific
sign.
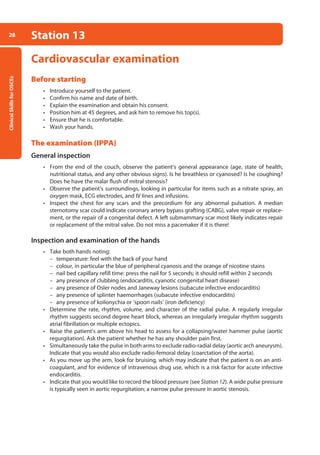
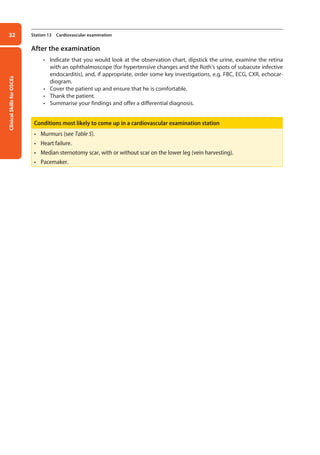
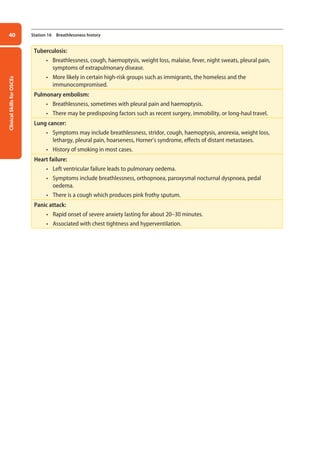
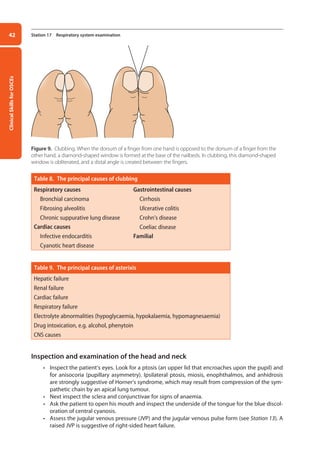
[Note] Carry out all subsequent steps on the front of the chest and, once finished, repeat them on the back of the chest.
This is far more elegant than to keep asking the patient to bend forwards and backwards like a Jack-in-the-box.
Pulmonary anatomy is such that examination of the back of the chest yields information about the lower lobes,
whereas examination of the front of the chest yields information about the upper lobes and, on the right-side,
also the middle lobe (Figure 10).
• Palpate for equal chest expansion, comparing one side to the other. Reduced unilateral chest
expansion might be caused by pneumonia, pleural effusion, pneumothorax, and lung collapse.
If there is a measuring tape, measure the chest expansion.
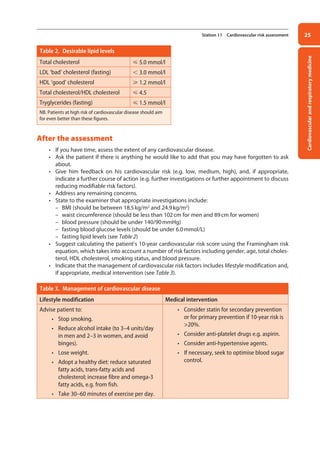
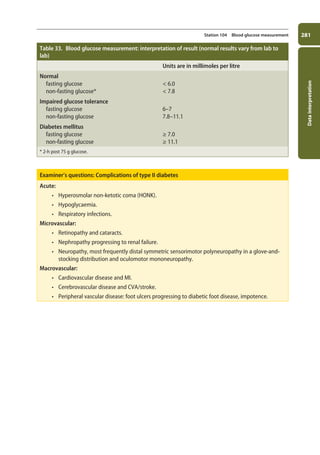
Figure 10. A right lateral view demonstrating lobar
anatomy. Posterior assessment gives information
about the lower lobes, whereas examination from
the front looks at the upper and middle lobes (the
latter only on the right).
Upper lobe
Lower lobe
Middle lobe
02-OCSEs-Cardio__Resp_Med_5e ccp.indd 43 18/03/2015 13:21](https://image.slidesharecdn.com/clinical-skills-for-osces-230108185648-1adad12b/85/Clinical-Skills-for-OSCEs-pdf-58-320.jpg)

![Clinical
Skills
for
OSCEs
66 Station 25 Nasogastric intubation
After the procedure
• Ask the patient if he has any questions or concerns.
• Ensure that he is comfortable.
• Thank him.
• Make an entry in the patient’s notes confirming that the NG tube has been successfully placed.
[Note] The principal complications of NG tube insertion are aspiration and tissue trauma.
03-OCSEs-GI_Medicine_and_Urology_5e ccp.indd 66 19/03/2015 12:31](https://image.slidesharecdn.com/clinical-skills-for-osces-230108185648-1adad12b/85/Clinical-Skills-for-OSCEs-pdf-81-320.jpg)
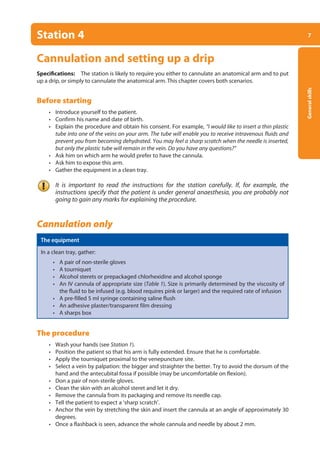
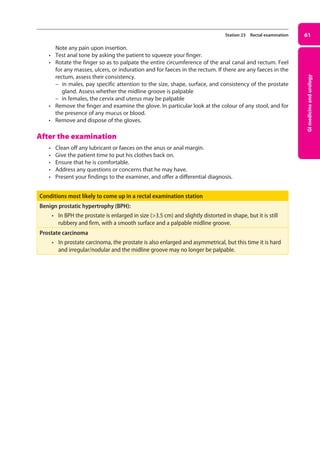
![Clinical
Skills
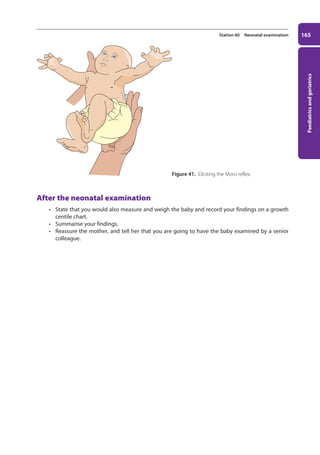
for
OSCEs
70 Station 27 Male genitalia examination
Figure 20. Normal testis and appendages (A), hydrocoele (B), epididymal cyst (C), and varicocoele (D).
Examination of the lymphatics
• Palpate the inguinal nodes in the inguinal crease. Remember that only the penis and scrotum
drain to the inguinal nodes, as the testicles drain to the para-aortic lymph nodes.
After the examination
• Cover up the patient.
• Thank the patient.
• Ensure that he is comfortable.
• Summarise your findings and offer a differential diagnosis.
• Consider a rectal examination to examine the prostate.
• Consider an ultrasound scan if you detect a bulky or painful mass in the scrotum or cannot
palpate the testes.
[Note] Incasesofanacutelytendertesticle,testiculartorsion,whichisasurgicalemergency,mustberuledout.Epididymo-
orchitis also presents as an acutely tender testicle, with the patient requiring admission for IV antibiotics.
Conditions most likely to come up in a male genitalia examination station
Hydrocoele:
• collection of fluid in the tunica vaginalis
surrounding the testis.
• presents as unilateral (or less commonly bilateral)
scrotal swelling.
• not tender.
• fluctuant.
• transilluminant.
Epididymal cyst:
• arises in the epididymis.
• epididymal cysts may be multiple and bilateral.
• unlike in a hydrocoele, the testis is palpable quite
separately from the cyst.
• smooth and fluctuant.
• transilluminant.
Varicocoele:
• dilated veins along the spermatic
cord.
• almost invariably left-sided.
• ‘bag of worms’ upon palpation.
• there may be a cough impulse.
• likely to disappear upon lying down.
Direct inguinal hernia (see Station 24)
(B)
Spermatic
artery
vein
(A)
Epididymis
Tunica
vaginalis
(C) (D)
03-OCSEs-GI_Medicine_and_Urology_5e ccp.indd 70 19/03/2015 12:31](https://image.slidesharecdn.com/clinical-skills-for-osces-230108185648-1adad12b/85/Clinical-Skills-for-OSCEs-pdf-85-320.jpg)
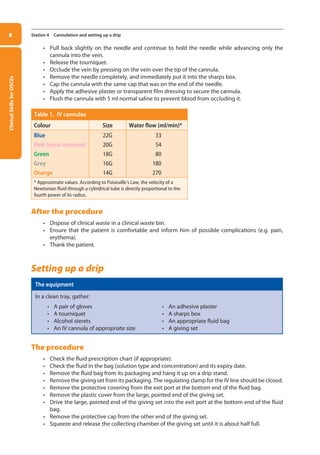
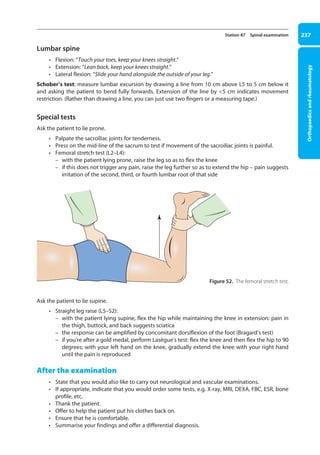
![Neurology
93
Station 35 Motor system of the lower limbs examination
Cerebellar signs
• Carry out the heel-to-shin test.
–
– lie the patient on a couch. Ask him to run the heel of one leg down the shin of the other,
and then to bring the heel back up to the knee and to start again. Ask him to repeat the test
with his other leg
Gait
• If he can, ask the patient to walk to the end of the room and to turn around and walk back. (See
Station 37: Gait, co-ordination, and cerebellar function examination.)
After the examination
• Thank the patient.
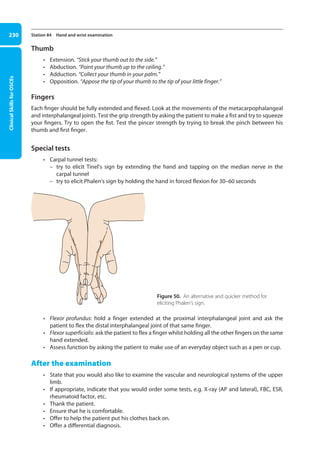
• Ensure that he is comfortable.
• Ask to carry out a full neurological examination.
• If appropriate, indicate that you would order some key investigations, e.g. CT, MRI, nerve con-
duction studies, electromyography, etc.
• Summarise your findings and offer a differential diagnosis.
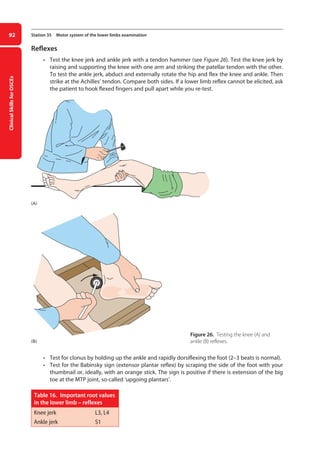
[Note] An upper motor neuron lesion is suggested by spastic tone, reduced power, brisk reflexes, up-going plantars,
reduced co-ordination, and clonus. A lower motor neuron lesion is suggested by normal or reduced tone, reduced
power, reduced reflexes, down-going plantars, normal co-ordination, wasting, and fasciculations.
Figure 27. Testing for the Babinsky or extensor plantar sign.
04-OCSEs-Neurology_5e ccp.indd 93 19/03/2015 12:34](https://image.slidesharecdn.com/clinical-skills-for-osces-230108185648-1adad12b/85/Clinical-Skills-for-OSCEs-pdf-108-320.jpg)

![Clinical
Skills
for
OSCEs
104 Station 39 General psychiatric history
Drug history
• Current psychological treatments.
• Prescribed medication.
• Recent changes in prescribed medication.
• Over-the-counter drugs and herbal remedies.
• Allergies.
Substance use
• Alcohol.
• Tobacco.
• Illicit drugs.
[Note] Further questioning to establish dependence may be required if alcohol use and/or illicit drug use is high (see
Station 45: Alcohol history).
Family history
• Determine if anyone in the family has suffered from psychiatric illness or attempted suicide, e.g.
“Has anyone in the family ever had a nervous breakdown?”
• Enquire about family structure and relationships:
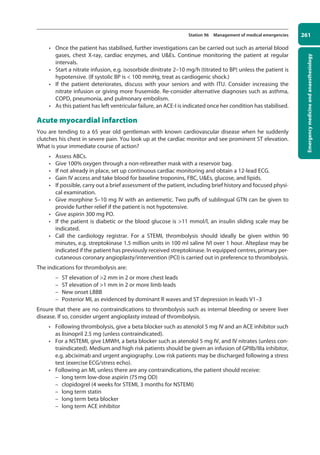
–
– “Do you have a partner or spouse?” If ‘yes’, ask about their age, occupation, and health
–
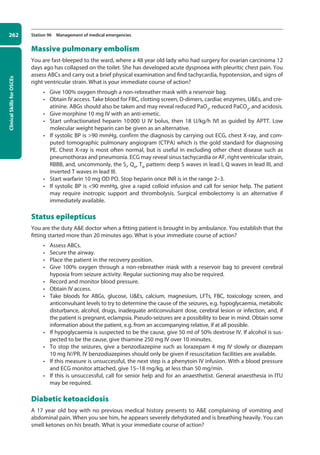
– “Do you have any children?” If ‘yes’, ask about their age, health, where they live, and who is
caring for them
–
– “Have there been any recent events or changes in the family?”
Social history
• Ask about social support and care:
–
– “Who lives with you at home?”
–
– “Who else are you close to?”
–
– “Do you feel like you have enough support?”
• Determine adequacy of housing and finances:
–
– “Do you live in your own house?”
–
– “Are you getting any help with your housing?”
–
– “Do you have any money worries?”
• Map out activities and interests:
–
– “How do you spend a typical day?”
–
– “What sorts of things do you enjoy doing?”
Personal history
• Early life:
–
– “Are you aware of any problems when you were a baby?”
–
– “How would you describe your childhood?”
–
– “Were both your parents around when you were growing up?”
• Educational achievement:
–
– “How did you get on at school?”
–
– “What qualifications did you leave with?”
• Occupational history:
–
– “Tell me about your work.”
–
– “What jobs have you had in the past?”
–
– “Why did you leave each job?”
05-OCSEs-Psychiatry_5e ccp.indd 104 19/03/2015 12:37](https://image.slidesharecdn.com/clinical-skills-for-osces-230108185648-1adad12b/85/Clinical-Skills-for-OSCEs-pdf-119-320.jpg)
![Clinical
Skills
for
OSCEs
108 Station 40 Mental state examination
Differentiating between true hallucinations and pseudo-hallucinations
A pseudo-hallucination may differ from a true hallucination in that:
• it is perceived to arise from the mind (inner space) rather than the sense organs (outer space).
• it is less vivid.
• it is less distressing.
• the patient may have some degree of control over it.
True hallucinations tend to be a feature of functional disorders, whereas pseudo-hallucinations tend
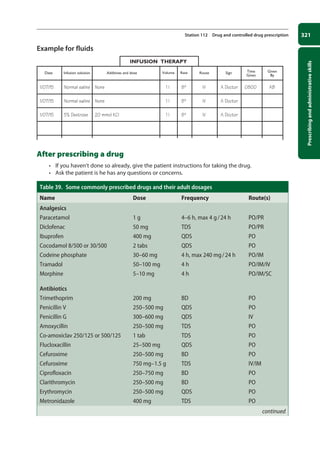
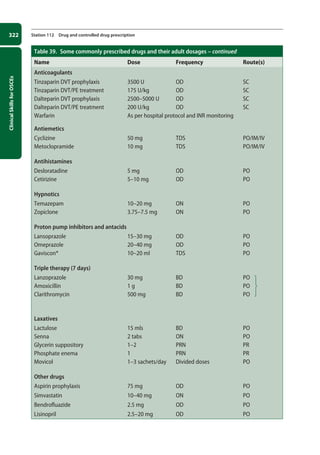
to be a feature of personality disorder. This is, however, not a hard and fast rule.
• Depersonalisation and derealisation, e.g. for depersonalisation “Have you ever felt unreal?” And
for derealisation, “Have you ever felt that things around you are unreal?”
Cognition
Generally speaking, a quick and informal cognitive assessment can be carried out by recording the
following:
• Orientation in time, place, and person.
• Attention and concentration, e.g. serial sevens test, spelling ‘world’ backwards. Record the time
taken and the number of errors.
• Memory:
–
– short-term memory: ask the patient to name and remember three objects, then carry out the
serial sevens test, then ask him to recall the three objects
–
– recent memory: ask him how he came to the clinic this morning/afternoon
–
– remote memory: ask him where he was born, where he grew up, etc.
• Grasp: ask the patient to name the prime minister and reigning monarch.
If cognitive impairment is suspected, you can carry out the Mini-Mental State Examination (MMSE) or, freely
available, the Montreal Cognitive Assessment (MoCA). Both the MMSE and MoCA are scored out of 30.
[Note] The result is invalid if the patient is delirious or has an affective disorder, or is simply not co-operating!
Insight
To determine degree of insight, ask the patient:
• “Do you think there is anything wrong with you?”
If no,
• “Why did you come to hospital?”
If yes,
• “What do you think is wrong with you?”
• “What do you think the cause of it is?”
• “Do you think you need treatment?”
• “What are you hoping treatment will do for you?”
After the mental state examination
• Thank the patient.
• Ensure that he is comfortable.
• Summarise your findings. Note that mood should be reported as subjective mood and objec-
tive mood. Do not omit to comment upon risk.
• Offer a differential diagnosis.
05-OCSEs-Psychiatry_5e ccp.indd 108 19/03/2015 12:37](https://image.slidesharecdn.com/clinical-skills-for-osces-230108185648-1adad12b/85/Clinical-Skills-for-OSCEs-pdf-123-320.jpg)
![111
Psychiatry
Station 41
Cognitive testing
Testing of higher cerebral function begins by the bedside, opening the door to more formal
neuropsychological assessments.
• Introduce yourself to the patient.
• Make sure that the conditions are optimised, e.g. you are in a quiet room, the patient is neither
sedated nor suffering from side-effects, he is wearing his glasses or hearing aid.
• Explain the procedure: “I would like to ask you a few questions to test your memory and concentra-
tion. It should take about five or ten minutes in all. Is that OK?”
• Check orientation in time and place. “What day of the week is it today?” “What’s the date?” “What
town are we in?” “What building are we in?” If the patient is disoriented, give him the correct
information.
• If the patient is disoriented in time and place, check orientation in person.
• Test insight. “People seem quite concerned about you. Why is that?” “Why are you here?”
Dominant hemisphere
[Note] The dominant cerebral hemisphere is usually, although not always, the one on the left.
• Note the patient’s use of language. In the presence of an impaired ability to communicate
(dysphasia), fluency suggests receptive or Wernicke’s dysphasia, whereas hesitancy suggests
expressive or Broca’s dysphasia (see Station 38: Speech assessment).
• If receptive dysphasia is a possibility, test ability to understand commands, e.g. “Raise both
arms.” “Touch your left ear with your right thumb.”
• You can also test for nominal aphasia, a common form of expressive dysphasia, by asking the
patient to name some common objects such as a watch, pen, or penny coin; then to name the
components of some of these objects, e.g. hour hand, winder, strap.
• Having ascertained that the patient is literate, test for dyslexia by asking him to read a couple
of sentences, and for dysgraphia by asking him to write a sentence.
• Test for dyscalculia with ‘serial sevens’, e.g. “What’s 100 minus 7? What’s 93 minus 7? Can you
keep on going?”
• Test ability to recognise objects (agnosia) by, for example, placing a pen, paper, and name
badge on a table and asking the patient to pick up the pen.
In summary, assess the dominant hemisphere by testing for receptive dysphasia, expressive and
nominal dysphasia, dyslexia, dysgraphia, dyscalculia, and agnosia.
Non-dominant hemisphere
Test for:
• Geographical agnosia, e.g. “Show me how you would go to the bathroom and return to your bed.”
• Dressing apraxia, e.g. “Can you please button up your cardigan?”
• Constructional apraxia, e.g. “Can you draw a clock for me?”
05-OCSEs-Psychiatry_5e ccp.indd 111 19/03/2015 12:37](https://image.slidesharecdn.com/clinical-skills-for-osces-230108185648-1adad12b/85/Clinical-Skills-for-OSCEs-pdf-126-320.jpg)
![Clinical
Skills
for
OSCEs
112 Station 41 Cognitive testing
Memory
The following memory tests may be of use in an alert patient who is neither confused nor dysphasic.
• Immediate memory (digit span): “Can you repeat after me, 5438879?”
• Recent memory: “Can you tell me how long you’ve been in hospital?”
• Remote memory: “Where did you live 10 years ago?” “Who was the last Prime Minister?”
• Verbal memory: “I would like you to repeat the following sentence, ‘The quick brown fox jumps
over the lazy dog.’ Now, I would like you to remember that sentence, because I’m going to ask you
to repeat it again in 15 minutes’ time.”
• Visual memory: “I have placed a few objects on the table. I’m going to ask you to name these ob-
jects in 15 minutes’ time, so please could you remember them?”
[Note] You also ought to be aware of retrograde amnesia, which is memory loss for events up to an insult; and post-
traumatic amnesia, which is memory loss for events after an insult.
05-OCSEs-Psychiatry_5e ccp.indd 112 19/03/2015 12:37](https://image.slidesharecdn.com/clinical-skills-for-osces-230108185648-1adad12b/85/Clinical-Skills-for-OSCEs-pdf-127-320.jpg)
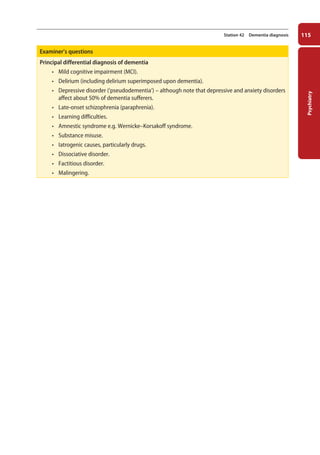
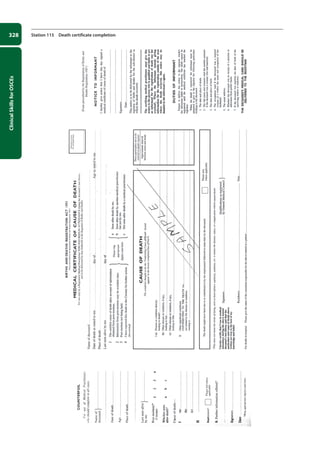
![113
Psychiatry
Station 42
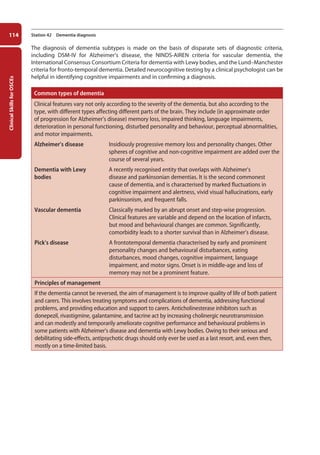
Dementia diagnosis
According to ICD-10, dementia is: “a syndrome due to disease of the brain, usually of a chronic or
progressive nature, in which there is disturbance of multiple higher cortical functions, including
memory, thinking, orientation, comprehension, calculation, learning capacity, language, and
judgement. Consciousness is not clouded… Dementia produces an appreciable decline in intellectual
functioning, and usually some interference with personal activities of daily living…”.
The more important risk factors for dementia are listed in Table 19.
Table 19: Risk factors for dementia
• Advanced age
• Mild cognitive impairment (MCI)
• Family history
• Genetic mutations
• Cerebrovascular disease
• Hyperlipidaemia
• Head injury
The primary requirement for diagnosis, again according to ICD-10, is “evidence of a decline in both
memory and thinking sufficient to impair personal activities of daily living… The impairment of memory
typically affects the registration, storage, and retrieval of new information, but previously learned and
familiar material may also be lost, particularly in later stages. Dementia is more than dysmnesia: there
is also impairment of thinking and reasoning capacity, and a reduction in the flow of ideas”.
The diagnosis of the type of dementia (e.g. Alzheimer’s disease versus vascular dementia or mixed
dementia) is made on clinical grounds, and, strictly speaking, can only be verified by brain biopsy at
post-mortem. In some cases, owing to the progressive nature of disease, an observation time of 6–12
months may be required to make a diagnosis. The order in which symptoms develop can be suggestive
as to the type of dementia involved.
In the first instance, the patient is usually seen by their GP, who attempts to rule out other causes for
cognitive impairment and conducts a basic dementia screen. This includes a bedside standardised test
such as the Mini-Mental State Examination (MMSE), the General Practitioner Assessment of Cognition
(GPCOG), or the Montreal Cognitive Assessment (MoCA), the latter being particularly useful if the
patient is in the early stages of disease. At this (normally) early stage, the physical examination is
usually unremarkable. However, it may reveal an underlying reversible cause, or complications such as
malnutrition, burns, or falls.
Routine blood tests and investigations include:
• FBC and serum vit-B12 and folate to rule out anaemia.
• Metabolic panel to exclude dyshomeostasis of electrolytes and glucose.
• Serum TSH to exclude hyper- or hypothyroidism.
• Serum lipids.
• Urine dipstick to exclude UTI (if delirium is a possibility).
• CT or MRI scan to exclude reversible causes such as tumour, subdural haematoma, and hydro-
cephalus, and to ascertain structural changes such as hippocampal atrophy in Alzheimer’s disease.
[Note] Further investigations should be ordered on a case-by-case basis and might include HIV
testing; syphilis serology; vasculitic, autoimmune, neoplastic, and toxicological screens;
copper studies; cerebrospinal fluid examination; and genetic testing. Brain biopsy itself
is rarely indicated.
05-OCSEs-Psychiatry_5e ccp.indd 113 19/03/2015 12:37](https://image.slidesharecdn.com/clinical-skills-for-osces-230108185648-1adad12b/85/Clinical-Skills-for-OSCEs-pdf-128-320.jpg)

![Clinical
Skills
for
OSCEs
120 Station 45
Alcohol history
Before starting
• Introduce yourself to the patient.
• Confirm his name and date of birth.
• Establish rapport.
• Explain to the patient that you would like to ask him some questions to evaluate his drinking
habits, and ask if that is OK; as he may be reluctant, it is particularly important that you be gentle
and tactful.
Screening for an alcohol problem
Use the CAGE questionnaire to screen for an alcohol problem. A positive response to one or more of
the four questions ought to trigger further questioning.
• “Have you ever felt that you should Cut down on your drinking?”
• “Have people Annoyed you by criticising your drinking?”
• “Have you ever felt Guilty about your drinking?”
• ”Have you ever had a drink first thing in the morning (Eye opener) to steady your nerves or get rid
of a hangover?”
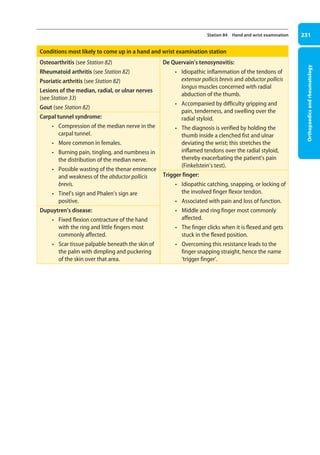
The alcohol history
Ask about:
• Alcohol intake:
–
– what type or types
–
– how much (try to quantify in units of alcohol; see Figure 29)
–
– where
–
– when
–
– with whom
• Onset and duration of alcohol problem, e.g. “How old were you when you first started drinking?“
“When do you think it got out of hand?” “Have you ever tried going dry?” “How did that go?”
• Features of alcohol dependence:
1. compulsion to drink/craving
2. primacy of drinking over other activities
3. stereotyped pattern of drinking, e.g. narrowing of drinking repertoire
4. increased tolerance to alcohol, i.e. needing more and more to produce same effect
5. withdrawal symptoms, e.g. anxiety, sweating, tremor (‘the shakes’), nausea, fits, delirium
tremens
6. relief drinking to avoid withdrawal symptoms, e.g. ‘eye opener’ first thing in the morning
7. reinstatement after abstinence
[Note] For a diagnosis of alcohol dependence to be made, ICD-10 requires at least three from a similar list of features
occurring at any time during a 12-month period.
05-OCSEs-Psychiatry_5e ccp.indd 120 19/03/2015 12:38](https://image.slidesharecdn.com/clinical-skills-for-osces-230108185648-1adad12b/85/Clinical-Skills-for-OSCEs-pdf-135-320.jpg)
![Clinical
Skills
for
OSCEs
124 Station 46 Eating disorders history
–
– relationships
–
– psychiatric complications, especially substance misuse, depression, and self harm
–
– physical complications, e.g. dizziness/syncope, peptic ulceration, constipation
–
– menstrual periods
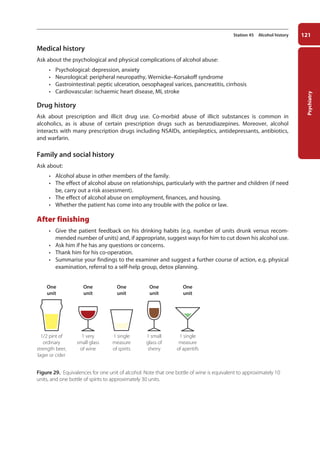
• Past medical, drug, and family history (briefly and only if you have time left).
[Note] Signs of eating disorder include emaciation, lanugo (fine face and body hair), Russell’s sign (knuckle scars from
induced vomiting), parotid gland swelling, and proximal muscle weakness. Other clinical features include
anaemia, leukopaenia, electrolyte disturbances (especially hypokalaemia), abnormal ECG, and osteopaenia.
After finishing
• Ask the patient if there is anything she might add that you have forgotten to ask about.
• Determine the patient’s level of insight into her problem.
• Thank her.
• Summarise your findings.
• Suggest a further course of action:
–
– collateral history
–
– physical examination and investigations
–
– management, e.g. dietary advice, psychotherapy, antidepressants, day- or in-patient admis-
sion
Table 20. Anorexia nervosa vs. bulimia nervosa
DSM-V diagnostic criteria
Anorexia
• Restriction of energy intake leading to significantly low body weight for age, sex, developmental
trajectory, and physical health.
• Intense fear of gaining weight or becoming fat, or persistent behaviour that interferes with weight
gain (even though significantly underweight).
• Disturbed perception of body weight or shape, undue influence of body weight and shape on self-
evaluation, or persistent lack of recognition of the seriousness of low body weight.
Bulimia
• Recurrent episodes of binge eating together with a sense of lack of control.
• Recurrent inappropriate compensatory behaviour to prevent weight gain.
• Episodes of binge eating and compensatory behaviour both occur, on average, at least once a
week for three months.
• Self-evaluation is unduly influenced by body shape and weight.
• The disturbance does not occur exclusively during periods of anorexia nervosa.
NB. Patients with an eating disorder may ‘migrate’ between anorexia, bulimia, and atypical eating
disorders.
05-OCSEs-Psychiatry_5e ccp.indd 124 19/03/2015 12:38](https://image.slidesharecdn.com/clinical-skills-for-osces-230108185648-1adad12b/85/Clinical-Skills-for-OSCEs-pdf-139-320.jpg)


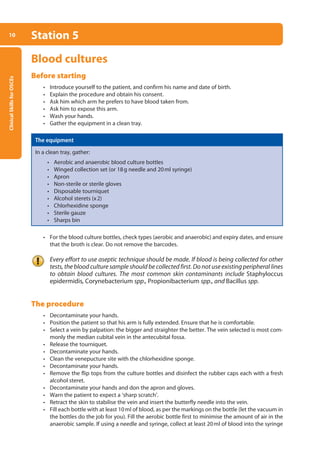
![Ophthalmology,
ENT,
and
dermatology
149
Station 54 Lump in the neck and thyroid examination
After the examination
• Offer to help the patient to put his clothes back on.
• Ensure that he is comfortable.
• Ask him if he has any questions or concerns.
• Thank him.
• Offer a diagnosis or differential diagnosis.
• Offer suggestions for further management, e.g. thyroid function tests, thyroid antibodies, ultra-
sound examination of the thyroid, iodine thyroid scan, fine needle aspiration cytology.
Goitres and thyroid disease
Signs of hyperthyroidism: enlarged thyroid gland or thyroid nodules, thyroid bruit, hyperthermia,
diaphoresis, dehydration, tremor, tachycardia, arrhythmia, congestive cardiac failure, onycholysis.
• Graves’ disease (commonest cause of hyperthyroidism): uniformly enlarged smooth thyroid
gland usually in a younger patient; lid retraction, lid lag, chemosis, periorbital oedema,
proptosis, diplopia, pre-tibial myxoedema (non-pitting oedema and skin thickening, seen in
5% of cases), thyroid acropachy (finger clubbing, seen in 1% of cases).
• Toxic multinodular goitre: enlarged multinodular goitre in a middle-aged patient.
• Toxic nodule and de Quervain’s thyroiditis are less common.
Signs of hypothyroidism: hypothermia and cold intolerance, weight gain, slowed speech and
movements, hoarse voice, dry skin, hair loss, coarse facial features and facial puffiness, hypotension,
bradycardia, and hyporeflexia.
• Hashimoto’s thyroiditis (commonest cause of hypothyroidism): moderately enlarged rubbery
thyroid gland, usually in a female patient aged 30–50 years; initial hyperthyroidism that
progresses to hypothyroidism and, if untreated, to myxoedema.
[Note] Iodine deficiency can also cause a goitre but this is rarely seen in developed countries.
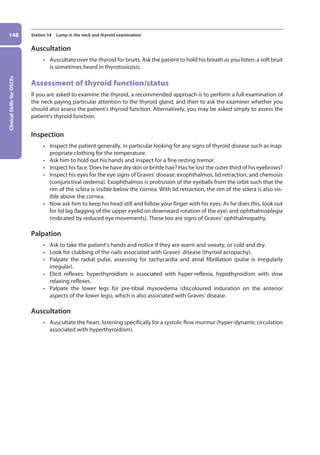
Thyroid cartilage
Thyroid gland
Trachea
Figure 37. Anatomy of the normal thyroid gland.
06-OCSEs-Ophthalmology_5e ccp.indd 149 19/03/2015 07:23](https://image.slidesharecdn.com/clinical-skills-for-osces-230108185648-1adad12b/85/Clinical-Skills-for-OSCEs-pdf-164-320.jpg)


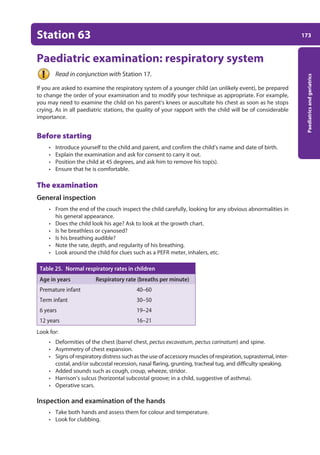
![Clinical
Skills
for
OSCEs
174 Station 63 Paediatric examination: respiratory system
• Determine the rate, rhythm, and character of the radial pulse (in younger infants, the brachial
pulse).
• State that you would record the blood pressure.
Inspection and examination of the head and neck
• Inspect the conjunctivae for signs of anaemia.
• Inspect the mouth for signs of central cyanosis.
• Assess the jugular venous pressure and jugular venous pulse form.
• Palpate the cervical, supraclavicular, infraclavicular, and axillary lymph nodes.
Palpation of the chest
Ask the child if he has any pain in the chest.
• Palpate for tracheal deviation by placing the index and middle fingers of one hand on either
side of the trachea in the suprasternal notch. (As this may be uncomfortable, it is probably best
omitted in younger children.)
• Palpate for the position of the cardiac apex.
[Note] Carry out all subsequent steps on the front of the chest and, once this is done, repeat them on the back of the
chest.
• Palpate for equal chest expansion, comparing one side to the other.
• Palpate for tactile fremitus.
Percussion of the chest
• Percuss the chest. Start at the apex of one lung and compare one side to the other. Do not
forget to percuss over the clavicles and on the sides of the chest. Note that percussion of the
chest is not useful in young infants.
Auscultation of the chest
Warm up the diaphragm of your stethoscope.
• If old enough, ask the child to take deep breaths through the mouth and, using the diaphragm
of the stethoscope, auscultate the chest. Start at the apex of one lung, and compare one side to
the other. Are the breath sounds vesicular or bronchial? Are there any added sounds?
Oedema
• Assess for sacral and pedal oedema.
After the examination
• Cover the child.
• Ask the child and parent if they have any questions or concerns.
• Thank the child and parent.
• Indicate that you would like to look at the sputum pot, measure the PEFR and, if appropriate,
order some key investigations, e.g. a CXR, FBC, etc.
• Summarise your findings and offer a differential diagnosis.
07-OCSEs-Paediatrics__Geriatrics_5e ccp.indd 174 19/03/2015 13:05](https://image.slidesharecdn.com/clinical-skills-for-osces-230108185648-1adad12b/85/Clinical-Skills-for-OSCEs-pdf-189-320.jpg)

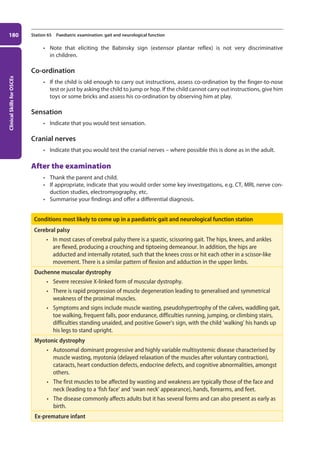
![181
Paediatrics
and
geriatrics
Station 66
Infant and child Basic Life Support
Specifications: A mannequin in lieu of an infant or child.
[Note] For the purposes of Basic Life Support, an infant is defined as being under 1 year, and a child as being between 1
year and puberty.
Figure 42. Paediatric Basic Life Support algorithm. Resuscitation Guidelines 2010.
• Ensure the safety of the rescuer and child
• Check the child’s responsiveness by gently stimulating the child and asking loudly, ‘Are you all
right?’
Do not shake infants or children with suspected cervical spine injuries.
UNRESPONSIVE ?
Shout for help
Shout for help
Open airway
NOT BREATHING NORMALLY ?
NO SIGNS OF LIFE?
5 rescue breaths
15 chest compressions
2 rescue breaths
15 compressions
Call resuscitation team
07-OCSEs-Paediatrics__Geriatrics_5e ccp.indd 181 19/03/2015 13:05](https://image.slidesharecdn.com/clinical-skills-for-osces-230108185648-1adad12b/85/Clinical-Skills-for-OSCEs-pdf-196-320.jpg)

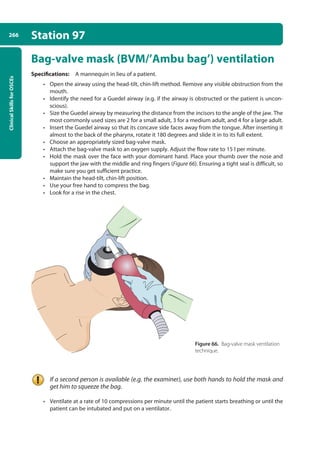
![Clinical
Skills
for
OSCEs
186 Station 68
Geriatric history
Before starting
• Introduce yourself to the patient and confirm his name and date of birth.
• Explain that you are going to ask him some questions to determine the nature of his problems,
and obtain consent.
• Ensure that he is comfortable.
• If he has glasses or a hearing aid, ensure that these are being worn.
• If appropriate, ask if you can take a collateral history from a carer.
The history
Presenting complaint
• Enquire about the patient’s presenting complaint, if any. Use open questions and active listen-
ing.
• Explore any symptoms, e.g. onset, duration, previous episodes, pain, associated symptoms.
• Enquire about the effects that his symptoms are having on his everyday life.
• Elicit his ideas, concerns, and expectations.
[Note] Elderly patients may attribute symptoms to normal ageing and may not offer them unless specifically asked.
Then aim to cover:
• Physical independence, e.g. describe a typical day.
• Functional assessment: can he stand up and walk, climb the stairs, get on and off the toilet, get
in and out of the bathtub, dress, cook/clean/shop, and manage his finances and administration?
• Daily diet, including nausea, vomiting, and change in appetite or weight.
• Urinary and faecal incontinence.
• Mood (e.g. “How are you keeping in your spirits?”). Also ask about sleep and appetite.
• Memory and cognitive impairment.
• Dizziness/falls (see Station 31: History of ‘funny turns’).
• Vision (corrective aids, accidents, difficulty reading, feeding, dressing, grooming, driving, and
recognising pills or items).
Past medical history
• Current, past, and childhood illnesses. Ask about rheumatic fever and polio.
• Surgery.
Drug history
• Prescribed medication and compliance (note that polypharmacy can lead to adverse interactions).
• Over-the-counter drugs.
• Smoking and alcohol use.
• Allergies.
Family history
• Parents, siblings, and children. Ask specifically about diabetes, Alzheimer’s disease, and cancer.
07-OCSEs-Paediatrics__Geriatrics_5e ccp.indd 186 19/03/2015 13:05](https://image.slidesharecdn.com/clinical-skills-for-osces-230108185648-1adad12b/85/Clinical-Skills-for-OSCEs-pdf-201-320.jpg)
![Clinical
Skills
for
OSCEs
206 Station 75 Breast history
Conditions most likely to come up in a breast history station – continued
Intraductal papilloma
• Benign proliferation of duct epithelial cells that may present as a small painful lump in the
area of the nipple.
• Most common cause of a bloody nipple discharge in young women.
Examiner’s questions: Risk factors for breast cancer
• Female sex.
• Increasing age.
• History of breast cancer.
• Family history of breast or ovarian cancer.
• Smoking.
• Obesity.
• HRT.
• Uninterrupted oestrogen exposure:
–
– early menarche
–
– late menopause
–
– nulliparity
–
– first child after age 30
[Note] Breast-feeding is protective
08-OCSEs-Obstet_Gynae_5e ccp.indd 206 19/03/2015 13:13](https://image.slidesharecdn.com/clinical-skills-for-osces-230108185648-1adad12b/85/Clinical-Skills-for-OSCEs-pdf-221-320.jpg)


![Emergency
medicine
and
anaesthesiology
251
Station 92 Choking
• If the obstruction has not cleared, place the child in a head-down, supine position and deliver
chest compressions using the two-finger technique (see Station 66).
• If the obstruction still has not been cleared, repeat the ‘five-and-five’ protocol.
• If the child is unconscious, open the airway, deliver 5 rescue breaths, and start CPR (see
Station 66).
[Note] Followingsuccessfultreatmentforchoking,victimswithapersistentcough,difficultyswallowing,orwithasense
of something still stuck in the throat should seek immediate medical attention.
10-OCSEs-Emergency_Medicine_5e ccp.indd 251 19/03/2015 13:32](https://image.slidesharecdn.com/clinical-skills-for-osces-230108185648-1adad12b/85/Clinical-Skills-for-OSCEs-pdf-266-320.jpg)
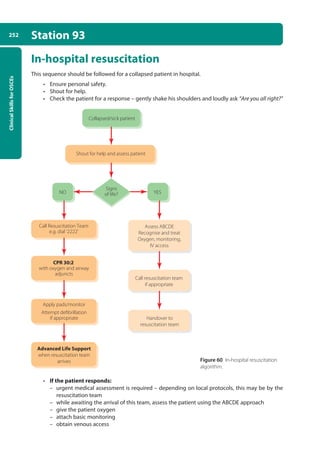
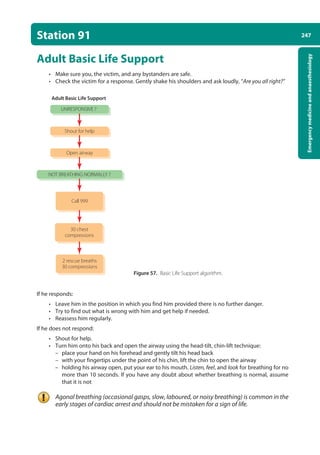
![Emergency
medicine
and
anaesthesiology
253
Station 93 In-hospital resuscitation
• If the patient does not respond:
–
– turn the patient onto his back
–
– open the airway using the head-tilt, chin-lift technique
[Note] if there is a risk of C-spine injury, use the jaw-thrust or chin-lift technique with manual in-line stabilisation (MILS)
of the head and neck by an assistant (if sufficient staff are available). If airway obstruction persists despite jaw
thrustorchinlift,addheadtiltasmallamountatatime.Establishinganairwayshouldtakepriorityoverconcerns
about a potential C-spine injury.
• Holding the patient’s airway open, put your ear to his mouth. Listen, feel, and look for breathing
for no more than 10 seconds. Inspect the oropharynx for a foreign body or vomitus.
• Assess the carotid pulse at the same time or after the breathing check.
Agonal breathing (occasional gasps, slow, laboured, or noisy breathing) is common in the
early stages of cardiac arrest and should not be mistaken for a sign of life.
• If the patient has a pulse or other signs of life:
–
– urgent medical assessment is required. Depending on local protocols, this may be by the
resuscitation team
–
– while awaiting the arrival of this team, assess the patient using the ABCDE approach
–
– give the patient oxygen
–
– attach monitoring
–
– obtain venous access
• If there is no pulse or other signs of life:
–
– one person should start CPR as others call the resuscitation team and collect the resuscita-
tion equipment. If only one member of staff is present, this will mean leaving the patient
–
– give 30 chest compressions followed by 2 ventilations. Place your interlocked hands in the
middle of the lower half of the sternum and depress the chest by 5–6 cm, aiming for a rate
of 100–120 compressions per minute. The person providing the chest compressions should
change every 2 minutes or earlier, with only minimal interruption to the chest compressions
–
– maintain the airway and ventilate the lungs with the most appropriate equipment imme-
diately at hand. A pocket mask, which may be supplemented by an oral airway, is usually
readily available. If no equipment is immediately at hand, give mouth-to-mouth ventilation
unless there are clinical reasons to avoid mouth-to-mouth contact (e.g. TB or SARS)
–
– use an inspiratory time of 1 second and give enough volume to produce a chest rise as in
normal breathing. Add supplemental oxygen as soon as possible
–
– once the airway has been secured, continue chest compressions uninterrupted at a rate of
100–120 compressions per minute and ventilate the lungs at approximately 10 breaths per
minute. Only stop compressions for defibrillation or pulse checks
Figure 61. The head-tilt jaw-thrust technique.
10-OCSEs-Emergency_Medicine_5e ccp.indd 253 19/03/2015 13:32](https://image.slidesharecdn.com/clinical-skills-for-osces-230108185648-1adad12b/85/Clinical-Skills-for-OSCEs-pdf-268-320.jpg)

![269
Emergency
medicine
and
anaesthesiology
Station 99
Pre-operative assessment
The surgical pre-assessment is about half the job of a surgical house officer, so is not unlikely to be
examined in a final year OSCE. The aims of the pre-operative assessment are primarily to:
• Ascertain that the patient is fit for surgery and anaesthesia.
• Take appropriate action if he is not.
• Ensure that he fully understands the proposed procedure.
• Ensure that he fully understands the peri-operative process and any special requirements of the
proposed procedure.
• Minimise any remaining fears or anxieties.
[Note] The responsibility for gaining informed consent from the patient is no longer that of the junior house officer, but
that of the operating surgeon.
Specifications: In this station you may be asked to talk through or carry out a part or parts of the
pre-operative assessment.
Before starting
• Introduce yourself to the patient, and confirm his name and date of birth.
• Explain that you are going to ask him some questions and carry out a physical examination to
assess his fitness for surgery.
• Ensure that he is comfortable.
The assessment
History
• Medical history, in particular:
–
– previous surgery and anaesthesia – ask specifically about history of anaesthetic complica-
tions, e.g. suxamethonium apnoea, malignant hyperpyrexia
–
– previous hospital admissions
–
– cardiovascular: hypertension, palpitations, angina, myocardial infarction, cardiac failure,
orthopnoea, other ‘heart problems’, stroke or TIA
–
– respiratory: dyspnoea, asthma, cough, tuberculosis
–
– GI and renal: dysphagia, heartburn, liver disease, renal failure
–
– other: diabetes, sickle cell anaemia, epilepsy, neuromuscular problems
• Drug history:
–
– prescribed medication – ask specifically about recent changes in medication, insulin, and
anticoagulants
–
– over-the-counter and alternative medication
–
– recreational drugs (especially cocaine, ecstasy, and narcotics)
• Allergies including to antiseptic, plaster, and latex.
• Smoking.
• Alcohol.
[Note] Most drugs should be taken as normal on the day of the surgery, although special advice is needed for insulin and
anticoagulants.
• Family history of allergic reactions, anaesthetic complications, and medical and surgical conditions.
• Social history, e.g. level of support in post-operative period.
10-OCSEs-Emergency_Medicine_5e ccp.indd 269 19/03/2015 13:32](https://image.slidesharecdn.com/clinical-skills-for-osces-230108185648-1adad12b/85/Clinical-Skills-for-OSCEs-pdf-284-320.jpg)


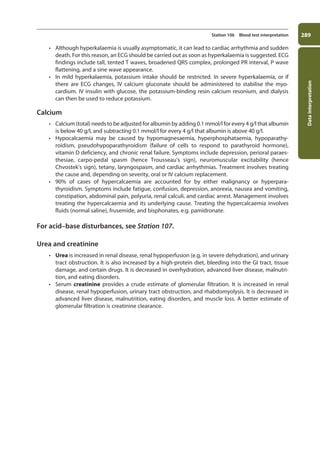
![Data
interpretation
293
Station 107 Arterial blood gas (ABG) sampling
Metabolic
alkalosis
• Results from decreased hydrogen ion concentration or increased bicarbonate
concentration.
• Principal causes include vomiting, diuretic treatment, hypokalaemia (due to
intracellular shift of hydrogen ions), hyperaldosteronism, base ingestion, and over-
compensation of respiratory acidosis.
• Symptoms include symptoms of hypocalcaemia (due to increased binding of
calcium), symptoms of hypokalaemia (due to intracellular shift of potassium),
hypoventilation, arrhythmias, and seizures.
• Metabolic alkalosis involving the loss of chloride ions is termed chloride responsive,
because it typically corrects with IV administration of normal saline, whereas
chloride-unresponsive metabolic alkalosis does not and typically involves severe
hypokalaemia or mineralocorticoid excess.
• Treat the cause. Correct hypovolaemia and hypokalaemia. In severe cases, consider
dialysis.
Examiner’s questions: The anion gap
• Blood ought to have a neutral charge, with the concentration of cations (+) equal to that of
anions (-).
• Blood tests do not measure the concentrations of all ions in the blood: usually, only [Na+
], [K+
],
[Cl-
], and [HCO3
-
] are provided.
• These measurements include the majority of the cations in the blood, but leave out a larger
proportion of the anions, including negatively charged proteins and organic acids.
• This gap, the anion gap, is given by:
([Na+
] + [K+
]) – ([Cl–
] + [HCO3
–
])
• In clinical practice, [K+
] is typically omitted from the equation.
• The normal range is 10–18mmol/l.
• The anion gap, which may be normal or increased, can help to identify the cause of metabolic
acidosis.
• Metabolic acidosis involves a decrease in [HCO3
-
], which, to maintain electroneutrality, ought
to be compensated for by an increase in the concentration of other anions.
• If the anion gap is normal, decreased [HCO3
-
] is the primary pathology and [Cl-
], the only other
major buffering anion, has increased in compensation (hyperchloraemic acidosis).
• If the anion gap is increased, electroneutrality has been maintained by an increase in the con-
centration of unmeasured anions. This occurs when the acidosis is caused by the introduc-
tion of excess acid (but not HCl) into the blood. A good example is lactic acidosis: increased
lactic acid decreases pH and thereby decreases the concentration of HCO3
-
ions, which are
replaced by lactate ions. As lactate ions are unmeasured, the anion gap is increased.
11-OCSEs-Data_interpretation_5e ccp.indd 293 19/03/2015 13:39](https://image.slidesharecdn.com/clinical-skills-for-osces-230108185648-1adad12b/85/Clinical-Skills-for-OSCEs-pdf-308-320.jpg)
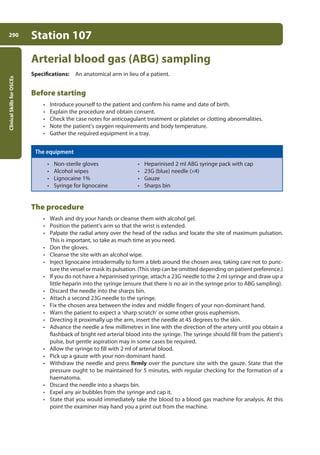
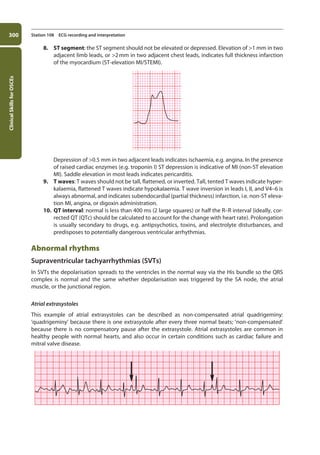
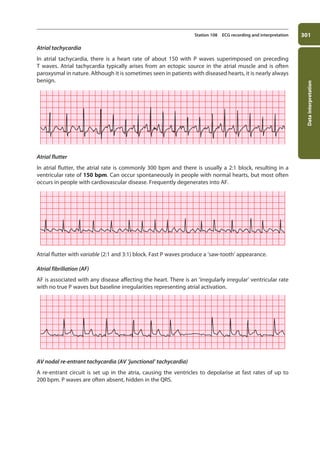
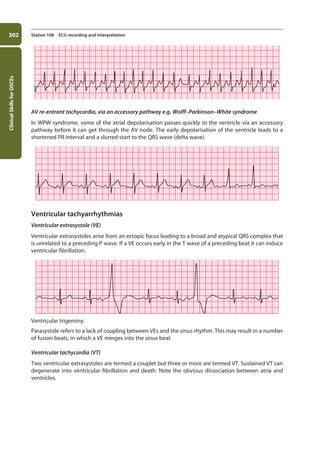
![Data
interpretation
299
Station 108 ECG recording and interpretation
[Note] HeartblockthatisMobitztypeIIoraboveismuchmorelikelytoinvolvehaemodynamiccompromise,andrequires
pacing. The choice between a temporary or permanent pacemaker depends on whether the underlying cause is
transient or permanent.
SA node blocks can also occur but they are uncommon and usually asymptomatic (due to the
establishment of a ventricular escape rhythm). SA node block is not to be confused with SA node
suppression, which occurs when an arrhythmia prevents the SA node from generating an impulse.
7. QRS complex:
a. Normal is 0.12 s or 3 small squares in duration. A broad QRS results either from
depolarisation by a focus in the ventricular muscle or from a bundle branch block (BBB).
i. Right BBB: can be normal, or may be caused by IHD, PE, or ASD.
ii. Left BBB: LBBB invariably reflects underlying heart disease, but its presence precludes
further interpretation of the ECG.
RBBB
characteristics
LBBB
characteristics
V1
rSR’ qRs
V6 V1
rS
R
V6
b. The sum of the S wave in V2 and an R wave in V5 or V6 should not be greater than 35 mm.
If it is, this indicates ventricular hypertrophy.
c. Q waves should not be deeper than two small squares or 25% of the following R wave. If
they are, this indicates an old MI.
11-OCSEs-Data_interpretation_5e ccp.indd 299 19/03/2015 13:39](https://image.slidesharecdn.com/clinical-skills-for-osces-230108185648-1adad12b/85/Clinical-Skills-for-OSCEs-pdf-314-320.jpg)


![337
Communication
skills
Station 118
Endoscopies explanation
Read in conjunction with Station 116: Explaining skills.
• Introduce yourself to the patient, and confirm his name and date of birth.
• State the test required and its indication, e.g. “To help ascertain the cause of your bleeding, we
would like to look at the inside of your stomach with a small telescopic camera.”
• Check the patient’s current understanding, e.g. “Have you ever had this done before?”
• Explain what the test involves (see below).
• Highlight any special preparation involved, e.g. fasting for a certain period prior to the test.
• Check the patient’s understanding.
• Ask whether he has any questions or concerns.
• If possible, tell him where and when the test will take place.
• If possible, give him a leaflet.
• Thank him.
• Document your conversation.
[Note] The most common endoscopies to come up in OSCEs are oesophagogastroduodenoscopy and colonoscopy.
Oesophagogastroduodenoscopy (OGD, gastroscopy, upper
endoscopy)
What the patient should know
• The procedure involves passing a thin, flexible tube or scope down into the stomach.
• This is often carried out under sedation, meaning that you may be very drowsy. In addition or
alternatively, your throat may be numbed with a local anaesthetic spray.
• You will be asked to lie down on your left-hand side.
• The endoscopist will place the scope in the back of your mouth and require your co-operation
as he or she gently guides it down your gullet and into your stomach.
• The scope carries a light and camera and relays images back to a monitor. If need be, it can also
be used to take tissue samples and even to stretch the gullet or stop bleeding.
• The procedure itself usually takes about 15 minutes and is very safe. (For a diagnostic OGD, seri-
ous complications such as bleeding occur in fewer than 1 in 1000 cases; for a therapeutic OGD,
in fewer than 1 in 100 cases.)
• After the procedure, you will be taken to a recovery room where you can remain until the effects
of the sedation have worn off.
• If you are discharged, as is likely, you should arrange for someone to take you home and stay
with you for a day or so. If any complications arise, he or she should take you to AE. Owing
to the sedative, do not drive, operate heavy machinery, or drink alcohol for 24 hours after the
procedure.
• The results of the procedure will be discussed with you by your referring doctor or your GP, who
will be sent a copy of the results.
• Prior to the procedure, you should not eat or drink anything for at least four hours. If you are on
any prescribed medicines for indigestion, you should stop taking them for at least two weeks
(this does not also apply to antacids). Also, do let the endoscopy unit know if you are on any
diabetes or blood-thinning medication.
13-OCSEs-Communication_skills_5e ccp.indd 337 19/03/2015 08:34](https://image.slidesharecdn.com/clinical-skills-for-osces-230108185648-1adad12b/85/Clinical-Skills-for-OSCEs-pdf-352-320.jpg)

This document provides an overview of the contents of a book on Objective Structured Clinical Examinations (OSCEs). It includes a preface and list of contributors. The contents section outlines 12 chapters covering general clinical skills, various medical specialties, data interpretation, prescribing skills, and communication skills. Each chapter contains multiple clinical skills stations that may be assessed in an OSCE.


