The document outlines steps to create a class diagram using Visual Paradigm modeling software:
1. Create a new project and package for the class diagram.
2. Select "Class" as the diagram type and create a "Class Model" package.
3. Create a "Employee" class within the package and add attributes and operations.
4. Create additional elements like interfaces, data types, tables and connect them with relationships.
A Workflow is an automated series of actions that produces a specified outcome. At certain points, it requires actions from users in the form of tasks.
Workflows help people collaborate on assets, automate processes, ...
A workflow is useful in case of:
- Asset approval
- Asset intake
- Issue management
- Escalation by default
- User on-boarding
The design of a workflow starts with defining a process definition. Collibra Data Governance Center uses the Activiti Workflow engine to manage its process definitions.
In this first lesson, I’ll show you how you have to set up the Activiti Workbench.
Assignment6/~$signment6.docx
Assignment6/Assignment6.docx
Assignment #6
Important: This is an individual assignment. Please do not collaborate.
No late assignment will be accepted.
Make sure that you write every line of your code. Using code written by someone else will be considered a violation of the academic integrity and will result in a report to the Dean's office.
Requirements to get full credits in Documentation
1. The assignment number, your name, student ID, lecture number, and a class/file description need to be included at the top of each file/class.
2. A description of each method is also needed.
3. Some additional comments inside of methods to explain code that are hard to follow should be written.
You can look at the Java programs in the text book to see how comments are added to programs.
Minimal Submitted Files
You are required, but not limited, to turn in the following source files:
Assignment6.java (The Assignment6 class extends JApplet)
Project.java
Budget.javaCreatePanel.java - to be completed (it extends JPanel and contains ButtonListener nested class)
ProjectSpendingPanel.java - to be completed (it extends JPanel and contains ButtonListener nested class)
You can download the above files and use them to complete this assignment. You might need to add more methods than the specified ones.
Skills to be Applied:
Swing/AWT, Vector (very similar to ArrayList class)
Classes may be needed:
JApplet, JButton, JTextField, JTextArea, JLabel, Container, JPanel, JTabbedPane, JList, and ActionListener. You may use other classes.
How to run an applet program:
-Create an html file, say "hw6.html" with the following content:
--------------------------------------------------------
<html>
<head>
<title>Assignment 6 Applet</title>
</head>
<body>
<applet code="Assignment6.class" width=900 height=350>
</applet>
</body>
</html>
------------------------------------------------------
-Compile your java program as usual.
-In a console, type:
appletviewer hw6.html
(instead of typing "java Assignment6").
-In the TextPad, choose Tool->Run Java Applet or
press Ctrl-3 (press control key and 3 at the same time).
-In the jGrasp,
choose Run->Run as Applet.
To test to see if your machine is set to view an applet, please go to the following site:
Click this page
Program Description
Suggested Class Diagram:
Write a Java program that constructs an Applet. Your program should provide labels and textfields to a user to enter information regarding projects.
The Applet (JApplet) of your program should contain two tabs. The first tab is labeled "Project creation" and the second tab is labeled "Project spending".
(The size of the applet here is approximately 900 X 350).
The section under the first tab should be divided into two parts:
The left part contains labels, textfields, and a button for a user to enter some project information. The right part shows "No project" at the beginning (it is done usingJTextArea).
A user can enter some project ...
Taskitpro Dashboard overview also see TaskitPro Michael Carew
This presentation provides an overview of the TaskitPro task management dashboard see more at www.taskitpro.com these apps are available from the Apple and Google play stores
(Module: Navigating the Requirements Management application: Web client)
At the end of this lab you will be able to:
► Comment on artifacts
► Optional: Customize your personal dashboard
This slide show was created to assist our partners in uploading items to their digital collections. This is a step-by-step guide to using the ContentDM Project Client.
Module Six Assignment Guidelines and Rubric.htmlOverviewMa.docxroushhsiu
Module Six Assignment Guidelines and Rubric.html
Overview
Many Java programs that you create will receive and process user input. In order to ensure that user input is accurate, you will need to use input validation and exception handling. For example, if you ask for a zip code, you want to ensure the user inputs a five-digit number. In this activity, you are given “buggy” code for a paint program that calculates the number of cans of paint required to paint a wall, given the wall’s height and width. You will need to debug the code and improve it by adding code to validate user input and handle exceptions.
Prompt
For this assignment, you will complete the paint program by debugging the original code and adding code that validates user input and handles exceptions. Use the Uploading Files to Eclipse and the Downloading Files From Eclipse tutorials to help you with this project.DebuggingOpen the Virtual Lab by clicking on the link in the Virtual Lab Access module. Then open your IDE. Upload the Paint1.zip folder and review the code for the Paint1.java file.Find and fix the three errors in the given code.Use the input values below to test your program. If you found and fixed all errors, your output should exactly match what is below.
TIP: When you run your program in Eclipse, it will prompt you to enter input in the Console window. If you cannot find this window, go to Window, then Show View, then Console.
Input Validation and Exception HandlingReview the code, looking for the two code blocks where user input is required.Implement a do-while loop in both blocks of code to ensure that input is valid and any exceptions are handled.
TIP: Consider using a try-catch block for exception handling, but it is not required.Use the two sample invalid inputs below to test your program. Your program should respond to each by prompting the user to enter valid input. This should continue to loop until valid input is received.
THINK: Why is 0 invalid input for this problem? What is the user being asked to input?
Guidelines for Submission
Attach your completed Paint1.java file to the assignment submission page.
Module Six Assignment RubricCriteriaProficient (100%)Needs Improvement (75%)Not Evident (0%)ValueDebuggingDebugs a class so that no errors remain and calculations work correctlyMeets some “Proficient” criteria, but with errors or exclusions such as one or two remaining bugsDoes not attempt criterion30Input Validation and Exception HandlingAdds loops to validate all user input and handle exceptions so that code passes all test casesMeets most “Proficient” criteria, but with errors; areas for improvement may include ability to handle all test casesDoes not attempt criterion70Total:100%
course_documents/Uploading Files to Eclipse Tutorial.pdf
Uploading Files to Eclipse
This tutorial will guide you through the process of uploading a project into Eclipse via the STEM Lab.
1. Open the STEM Lab and select the Launch button for the Java Program ...
GEIT 3341 DATABASE I LAB 2
GEIT 3341 Database I
Lab 2
Web Development with Apex
Due Date:
Submission Method: Project Link, Username & Password
Objective(s) Target CLO(s) Reference
How to develop a web database
application using Oracle Application
Express. In today’s lab, you will learn
how to develop a web application from
a spreadsheet.
5 Instructor Demo Any
book and/or tutorial
on Oracle
Application Express
Name ID Section
Instructions:
This is a hands-on step-by-step lab that will teach you how to
• Build your first app through uploading a Spreadsheet
• Improve the Search and Report pages
GEIT 3341 DATABASE I LAB 2
PART 1: Create an app from Spreadsheet
You will build in this part a simple application based on a spreadsheet.
1. From your APEX workspace home page, click App Builder.
2. Click on Create a New App
GEIT 3341 DATABASE I LAB 2
4. Click the Copy and Paste option at the top and Select Project and Tasks from the sample
data set list and then click Next.
5. Set Table Name to PROJECT_TASKS and click Load Data.
7. Click Create App
3. Click From a File
6. Click on View Table
GEIT 3341 DATABASE I LAB 2
8. On the Create Application page, click Create App.
9. On the Create Application page, you can see all the listed pages. Click on Edit for more
details for a page.
10. Next to Feature, click Check all then click on Create Application
11. Now, you are redirected to the application's home page in the App Builder.
12. Click on Run Application to see how end users will see the app (a new web browser will
open). You have to enter your username and password you used to sign in into the APEX
workspace.
13. Explore the application by clicking on all the available buttons. (Click on Home button to
go back to the main page)
14. Click on Administration to review the options if needed
GEIT 3341 DATABASE I LAB 2
PART 2: Improve the Faceted Search
This part gives you a first-hand experience with enhancing the application by improving the
faceted search page for better clarity and improved usability.
1. For the runtime application, click on Project Tasks Search
2. In the toolbar (bottom of the page), click Edit page 3 (Note - End users who log directly
into the app will not see this toolbar.)
3. Alternatively, you can also navigate back to the APEX App Builder tab in your browser
manually by selecting the appropriate browser tab or window. Once in the App Builder
click 3 - Project Tasks Search.
4. You will have this window (The page should consist of three panes).
GEIT 3341 DATABASE I LAB 2
5. Under Search (from the left pane), within Facets then P3_STATUS
6. Currently the Status facet is a series of checkboxes. However, it is unlikely that users will
want to select more than one a ...
The tutorial describes the following topics in detail
CREATING AN ADF APPLICATION
DEPLOYING & RUNNING ADF APPLICATION ON WEBLOGIC SERVER
ADF DATA VISUALIZATION COMPONENTS
CREATING MORE COMPLEX BUSINESS COMPONENTS
CREATING MULTIPLE PAGE WEBSITES – PAGE FLOWS
CREATING JEE5 STATELESS SESSION EJBS
CREATING JAX-WS WEB SERVICES
ADDING THE NEW SERVICES INTO THE ADF APPLICATION
DATA VALIDATION (OPTIONAL)
Building your first power apps from scratch a step by step walkthroughSanjiv Venkatram
Greetings folks,
Here's a step by step walk through of creating a simple application to capture exam Q&A for students. This is built on Microsoft Power Apps.
Enjoy creating you first application on Power Apps!
Kind regards,
Sanjiv Venkatram
Founder and CEO Prudentia Consulting Pte. Ltd.
Ex - Microsoft, 7 published US patents, MVP, MCE, MCT & ACLP.
MS (URI 97), MBA (Michigan 03)
COLLEGE BUS MANAGEMENT SYSTEM PROJECT REPORT.pdfKamal Acharya
The College Bus Management system is completely developed by Visual Basic .NET Version. The application is connect with most secured database language MS SQL Server. The application is develop by using best combination of front-end and back-end languages. The application is totally design like flat user interface. This flat user interface is more attractive user interface in 2017. The application is gives more important to the system functionality. The application is to manage the student’s details, driver’s details, bus details, bus route details, bus fees details and more. The application has only one unit for admin. The admin can manage the entire application. The admin can login into the application by using username and password of the admin. The application is develop for big and small colleges. It is more user friendly for non-computer person. Even they can easily learn how to manage the application within hours. The application is more secure by the admin. The system will give an effective output for the VB.Net and SQL Server given as input to the system. The compiled java program given as input to the system, after scanning the program will generate different reports. The application generates the report for users. The admin can view and download the report of the data. The application deliver the excel format reports. Because, excel formatted reports is very easy to understand the income and expense of the college bus. This application is mainly develop for windows operating system users. In 2017, 73% of people enterprises are using windows operating system. So the application will easily install for all the windows operating system users. The application-developed size is very low. The application consumes very low space in disk. Therefore, the user can allocate very minimum local disk space for this application.
Courier management system project report.pdfKamal Acharya
It is now-a-days very important for the people to send or receive articles like imported furniture, electronic items, gifts, business goods and the like. People depend vastly on different transport systems which mostly use the manual way of receiving and delivering the articles. There is no way to track the articles till they are received and there is no way to let the customer know what happened in transit, once he booked some articles. In such a situation, we need a system which completely computerizes the cargo activities including time to time tracking of the articles sent. This need is fulfilled by Courier Management System software which is online software for the cargo management people that enables them to receive the goods from a source and send them to a required destination and track their status from time to time.
Cosmetic shop management system project report.pdfKamal Acharya
Buying new cosmetic products is difficult. It can even be scary for those who have sensitive skin and are prone to skin trouble. The information needed to alleviate this problem is on the back of each product, but it's thought to interpret those ingredient lists unless you have a background in chemistry.
Instead of buying and hoping for the best, we can use data science to help us predict which products may be good fits for us. It includes various function programs to do the above mentioned tasks.
Data file handling has been effectively used in the program.
The automated cosmetic shop management system should deal with the automation of general workflow and administration process of the shop. The main processes of the system focus on customer's request where the system is able to search the most appropriate products and deliver it to the customers. It should help the employees to quickly identify the list of cosmetic product that have reached the minimum quantity and also keep a track of expired date for each cosmetic product. It should help the employees to find the rack number in which the product is placed.It is also Faster and more efficient way.
Event Management System Vb Net Project Report.pdfKamal Acharya
In present era, the scopes of information technology growing with a very fast .We do not see any are untouched from this industry. The scope of information technology has become wider includes: Business and industry. Household Business, Communication, Education, Entertainment, Science, Medicine, Engineering, Distance Learning, Weather Forecasting. Carrier Searching and so on.
My project named “Event Management System” is software that store and maintained all events coordinated in college. It also helpful to print related reports. My project will help to record the events coordinated by faculties with their Name, Event subject, date & details in an efficient & effective ways.
In my system we have to make a system by which a user can record all events coordinated by a particular faculty. In our proposed system some more featured are added which differs it from the existing system such as security.
Water scarcity is the lack of fresh water resources to meet the standard water demand. There are two type of water scarcity. One is physical. The other is economic water scarcity.
Explore the innovative world of trenchless pipe repair with our comprehensive guide, "The Benefits and Techniques of Trenchless Pipe Repair." This document delves into the modern methods of repairing underground pipes without the need for extensive excavation, highlighting the numerous advantages and the latest techniques used in the industry.
Learn about the cost savings, reduced environmental impact, and minimal disruption associated with trenchless technology. Discover detailed explanations of popular techniques such as pipe bursting, cured-in-place pipe (CIPP) lining, and directional drilling. Understand how these methods can be applied to various types of infrastructure, from residential plumbing to large-scale municipal systems.
Ideal for homeowners, contractors, engineers, and anyone interested in modern plumbing solutions, this guide provides valuable insights into why trenchless pipe repair is becoming the preferred choice for pipe rehabilitation. Stay informed about the latest advancements and best practices in the field.
Overview of the fundamental roles in Hydropower generation and the components involved in wider Electrical Engineering.
This paper presents the design and construction of hydroelectric dams from the hydrologist’s survey of the valley before construction, all aspects and involved disciplines, fluid dynamics, structural engineering, generation and mains frequency regulation to the very transmission of power through the network in the United Kingdom.
Author: Robbie Edward Sayers
Collaborators and co editors: Charlie Sims and Connor Healey.
(C) 2024 Robbie E. Sayers
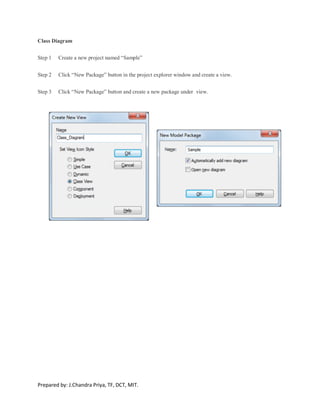
1. Prepared by: J.Chandra Priya, TF, DCT, MIT.
Class Diagram
Step 1 Create a new project named “Sample”
Step 2 Click “New Package” button in the project explorer window and create a view.
Step 3 Click “New Package” button and create a new package under view.
2. Prepared by: J.Chandra Priya, TF, DCT, MIT.
Step 4 To Create a Class Diagram. Select Diagram Type as “Class” press “OK” button
Step 5 Create a package by dragging and dropping the “package” element from the toolbox.
3. Prepared by: J.Chandra Priya, TF, DCT, MIT.
Step 6 Select the diagram type as “Class” from “New Diagram” window and click “OK” button.
4. Prepared by: J.Chandra Priya, TF, DCT, MIT.
Step 7 Double click on the “Class Model” package element and create a class element “Employee” by
dragging and dropping the “Class” element from the toolbox.
5. Prepared by: J.Chandra Priya, TF, DCT, MIT.
Step 8 Right click on the class element “Employee”and select “Features & Properties > Attributes (or)
Operations” menu to create attributes and operations for the “Employee” class.
“Employee Attributes” window is used to add attributes.
6. Prepared by: J.Chandra Priya, TF, DCT, MIT.
“Employee Operation” window is used to add operations.
8. Prepared by: J.Chandra Priya, TF, DCT, MIT.
Step 9 Create an interface (“User”) by dragging and dropping the “Interface” element from the toolbox. Use
the “Realization” connector from the quick linker or toolbox to create a realization relationship between
“Employee” class and “User” interface.
Step 10 Create a “Data Type” element, “Table” element and create a relationship using “Association”
connector either by using quick linker or by using toolbox.
9. Prepared by: J.Chandra Priya, TF, DCT, MIT.
Step 11 Create an “Enumeration” element, “Primitive Type” element and create a relationship using
“Dependency” connector either by using quick linker or by using toolbox.
Step 12 Create a “Signal” element, “Association” element and create a relationship using “Association”
connector either by using quick linker or by using toolbox.
10. Prepared by: J.Chandra Priya, TF, DCT, MIT.
Step 13 Create two more class elements and create a relationship using “Aggregation” connector either by
using quick linker or by using toolbox.
Step 14 Similarly “Aggregate” connector is used either by using quick linker or by using toolbox.
11. Prepared by: J.Chandra Priya, TF, DCT, MIT.
Step 15 Final model will be displayed as shown below.