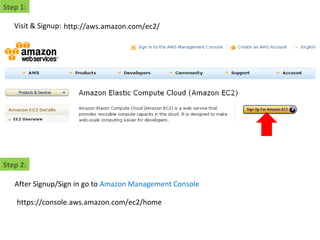
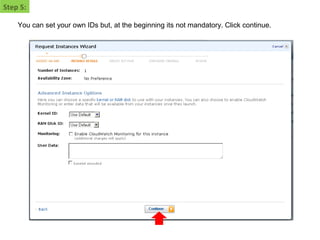
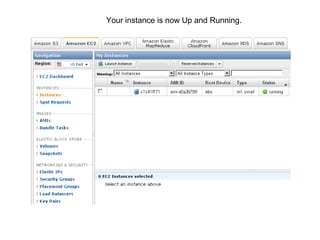
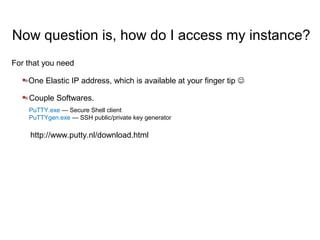
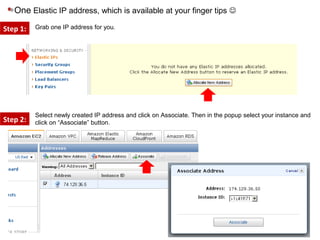
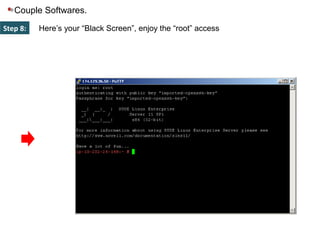
How to begin with Amazon EC2
by Vikrant Labde
http://www.cuelogic.co.in
vikrant@cuelogic.co.in
Step 1:
http://aws.amazon.com/ec2/Visit & Signup:
Step 2:
After Signup/Sign in go to Amazon Management Console
https://console.aws.amazon.com/ec2/home
Step 2: This is very handy consol where you can manage all of the Amazon Cloud Server products
Instance = Cloud server on which you port your website.
Elastic IPs = This is the IP address to which you need to point your
domain/website
For now you just get to know What is Instance & Elastic IPs?
Step 3: Launch new Instance
Its better to start with predefined EBS device. I am opting for small instance which
has LAMP and ROR
Step 4:
We do not need to do much, just click on Continue
Step 5:
You can set your own IDs but, at the beginning its not mandatory. Click continue.
Step 6:
You can assign tags to your instance. It will just simplify the administration if you have robust
EC2 infrastructure.
Step 7:
This is the most important step. It creates Public/Private keypaire for your new instance. You cant access
your instance through SSH without keypair. This will download cuelogic_new.pem file which is Private Key
on your computer. Save that file on appropriate location.
Step 8:
This is firewall, you can start with Quick-start-1. Amazon will setup new group if you do not have one.
You can change the rule afterwards.
Step 9:
There you go. Click on Launch.
Step 10:
Your instance is now Up and Running.
Now question is, how do I access my instance?
Couple Softwares.
PuTTY.exe — Secure Shell client
PuTTYgen.exe — SSH public/private key generator
One Elastic IP address, which is available at your finger tip 
For that you need
http://www.putty.nl/download.html
One Elastic IP address, which is available at your finger tips 
Step 1:
Step 2:
Select newly created IP address and click on Associate. Then in the popup select your instance and
click on “Associate” button.
Grab one IP address for you.
Couple Softwares.
I hope you have downloaded both putty softwares from http://www.putty.nl/download.html
Step 1: Open puTTYgen.exe and go to “Conversion > Import key” and select “.pem” file you download
at the time of creating the instance.
Couple Softwares.
Step 2: Enter passphrase and Save Public Key on to your computer.
Couple Softwares.
Step 3:
Enter any “Passpharase” and Save Private Key on to your computer. Paaspharase is like
Password. You need this at the time of login to your server. So keep it handy.
Couple Softwares.
Step 4: Open putty.exe and enter Elastic IP in the text box labeled as “Host Name (or IP address)
Wait!!! I have not asked you to click on Open yet.
Couple Softwares.
Step 5: Go to SSH > Auth and Select your private key file which you stored via puTTYgen.exe
Wait!!! I STILL have not asked you to click on Open .
Couple Softwares.
Step 6: Go back Session, Name your session under “Saved Session” text box and click on “Save”
Wait!!! I STILL have not asked you to click on Open .
Couple Softwares.
Step 7: You will find your session info in the List Box.
Select that and Now you can Click on OPEN 
Couple Softwares.
Step 8: Since you are a first time going into your server. Click on “YES”
Couple Softwares.
Step 8: Here’s your “Black Screen”, enjoy the “root” access
Now you have one Linux server and One
dedicated IP address to access the server
What you are waiting for?
Go to Domain control panel and point “A”
record (DNS) to you’re your “Elastic IP”

How to begin with Amazon EC2?

  • 1.
    How to beginwith Amazon EC2 by Vikrant Labde http://www.cuelogic.co.in vikrant@cuelogic.co.in
  • 2.
    Step 1: http://aws.amazon.com/ec2/Visit &Signup: Step 2: After Signup/Sign in go to Amazon Management Console https://console.aws.amazon.com/ec2/home
  • 3.
    Step 2: Thisis very handy consol where you can manage all of the Amazon Cloud Server products Instance = Cloud server on which you port your website. Elastic IPs = This is the IP address to which you need to point your domain/website For now you just get to know What is Instance & Elastic IPs?
  • 4.
    Step 3: Launchnew Instance Its better to start with predefined EBS device. I am opting for small instance which has LAMP and ROR
  • 5.
    Step 4: We donot need to do much, just click on Continue
  • 6.
    Step 5: You canset your own IDs but, at the beginning its not mandatory. Click continue.
  • 7.
    Step 6: You canassign tags to your instance. It will just simplify the administration if you have robust EC2 infrastructure.
  • 8.
    Step 7: This isthe most important step. It creates Public/Private keypaire for your new instance. You cant access your instance through SSH without keypair. This will download cuelogic_new.pem file which is Private Key on your computer. Save that file on appropriate location.
  • 9.
    Step 8: This isfirewall, you can start with Quick-start-1. Amazon will setup new group if you do not have one. You can change the rule afterwards.
  • 10.
    Step 9: There yougo. Click on Launch.
  • 11.
  • 12.
    Your instance isnow Up and Running.
  • 13.
    Now question is,how do I access my instance? Couple Softwares. PuTTY.exe — Secure Shell client PuTTYgen.exe — SSH public/private key generator One Elastic IP address, which is available at your finger tip  For that you need http://www.putty.nl/download.html
  • 14.
    One Elastic IPaddress, which is available at your finger tips  Step 1: Step 2: Select newly created IP address and click on Associate. Then in the popup select your instance and click on “Associate” button. Grab one IP address for you.
  • 15.
    Couple Softwares. I hopeyou have downloaded both putty softwares from http://www.putty.nl/download.html Step 1: Open puTTYgen.exe and go to “Conversion > Import key” and select “.pem” file you download at the time of creating the instance.
  • 16.
    Couple Softwares. Step 2:Enter passphrase and Save Public Key on to your computer.
  • 17.
    Couple Softwares. Step 3: Enterany “Passpharase” and Save Private Key on to your computer. Paaspharase is like Password. You need this at the time of login to your server. So keep it handy.
  • 18.
    Couple Softwares. Step 4:Open putty.exe and enter Elastic IP in the text box labeled as “Host Name (or IP address) Wait!!! I have not asked you to click on Open yet.
  • 19.
    Couple Softwares. Step 5:Go to SSH > Auth and Select your private key file which you stored via puTTYgen.exe Wait!!! I STILL have not asked you to click on Open .
  • 20.
    Couple Softwares. Step 6:Go back Session, Name your session under “Saved Session” text box and click on “Save” Wait!!! I STILL have not asked you to click on Open .
  • 21.
    Couple Softwares. Step 7:You will find your session info in the List Box. Select that and Now you can Click on OPEN 
  • 22.
    Couple Softwares. Step 8:Since you are a first time going into your server. Click on “YES”
  • 23.
    Couple Softwares. Step 8:Here’s your “Black Screen”, enjoy the “root” access
  • 24.
    Now you haveone Linux server and One dedicated IP address to access the server What you are waiting for? Go to Domain control panel and point “A” record (DNS) to you’re your “Elastic IP”