
Recommended
More Related Content
What's hot
What's hot (20)
Similar to Chest Tube Insertion Guide
Similar to Chest Tube Insertion Guide (20)
Recently uploaded
Recently uploaded (20)
Chest Tube Insertion Guide
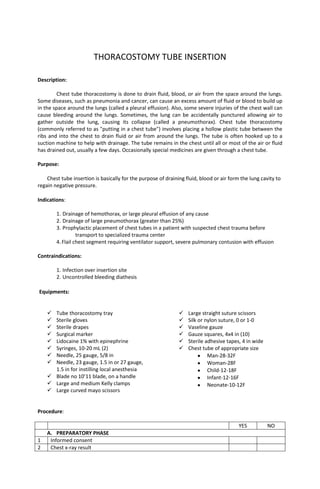
- 1. THORACOSTOMY TUBE INSERTION Description: Chest tube thoracostomy is done to drain fluid, blood, or air from the space around the lungs. Some diseases, such as pneumonia and cancer, can cause an excess amount of fluid or blood to build up in the space around the lungs (called a pleural effusion). Also, some severe injuries of the chest wall can cause bleeding around the lungs. Sometimes, the lung can be accidentally punctured allowing air to gather outside the lung, causing its collapse (called a pneumothorax). Chest tube thoracostomy (commonly referred to as "putting in a chest tube") involves placing a hollow plastic tube between the ribs and into the chest to drain fluid or air from around the lungs. The tube is often hooked up to a suction machine to help with drainage. The tube remains in the chest until all or most of the air or fluid has drained out, usually a few days. Occasionally special medicines are given through a chest tube. Purpose: Chest tube insertion is basically for the purpose of draining fluid, blood or air form the lung cavity to regain negative pressure. Indications: 1. Drainage of hemothorax, or large pleural effusion of any cause 2. Drainage of large pneumothorax (greater than 25%) 3. Prophylactic placement of chest tubes in a patient with suspected chest trauma before transport to specialized trauma center 4. Flail chest segment requiring ventilator support, severe pulmonary contusion with effusion Contraindications: 1. Infection over insertion site 2. Uncontrolled bleeding diathesis Equipments: Tube thoracostomy tray Large straight suture scissors Sterile gloves Silk or nylon suture, 0 or 1-0 Sterile drapes Vaseline gauze Surgical marker Gauze squares, 4x4 in (10) Lidocaine 1% with epinephrine Sterile adhesive tapes, 4 in wide Syringes, 10-20 mL (2) Chest tube of appropriate size Needle, 25 gauge, 5/8 in Man-28-32F Needle, 23 gauge, 1.5 in or 27 gauge, Woman-28F 1.5 in for instilling local anesthesia Child-12-18F Blade no 10’11 blade, on a handle Infant-12-16F Large and medium Kelly clamps Neonate-10-12F Large curved mayo scissors Procedure: YES NO A. PREPARATORY PHASE 1 Informed consent 2 Chest x-ray result
- 2. 3 Wash hands 4. Assemble the drainage system/other equipment needed 5. Reassure the patient and reinforce the steps of the procedure. Inform the patient to expect a needle prick and a sensation of a slight pressure during infiltration of anesthesia 6. Position the patient 7. Clearly mark the site of the chest tube insertion 8. Shave excessive hair and apply a preparatory solution to a wide area of the chest wall B. SKIN PREPARATION AND MARKING 9. Wear sterile gloves, gown, hair cover, and goggles or face shield, and apply sterile drapes to the area 10. Identify the fifth intercostals and the midaxillary line 11. The skin incision is made between the midaxillary and anterior axillary lines over a rib that is below the intercostal level selected for chest tube insertion 12. A surgical marker can be used to better delineate the anatomy 13. Administer a systemic analgesic (unless contraindicated) 14. Use the 25 ga. Needle to inject 5 mL of the local anesthetic solution into the skin overlying the initial skin incision 15. Use the longer needle 923 or, preferably, 27 ga) to infiltrate about 5 mL of the anesthetic solution to a wide area of subcutaneous tissue superior to the expected natal incision 16. Use the number 11 or 10 blade to make a skin incision approximately 4cms long overlying the rib that is below the desired intercostals level of entry. 17. A curve haemostat is inserted into the pleural cavity and the tissue is spread with a clamp 18. A tract is explored with an examining finger 19. The tube is held by the haemostat and directed through the opening up over the ribs and into the pleural cavity 20. The clamp is withdrawn and the chest tube is connected to a chest drainage system 21. A 0 or 1-0 silk or nylon suture is used to secure the chest tube to the skin 22. Apply petroleum (eg Vaseline) gauze over the skin incision 23. Create an occlusive dressing to place over the chest tube by turning regular gauze squares (4x4 in) into Y-shaped fenestrated gauze square and using 4 in. Adhesive tape to secure them to the chest wall 24. Strap the emerging chest tube on to the lower trunk with a adhesive tape, as this avoids kinking of the tube as it passes through the chest wall C. Follow-up phase 25. Observe the drainage system for blood or air. Observe for fluctuation in the tube on respiration 26. Secure a follow-up x-ray 27. Assess for bleeding, infection, leakage of air and fluid around the table Diagram/ Images: