2. NCBON Learning Objectives
1. Define tracheostomy care
2. State 2 reasons tracheostomy tubes are inserted
3. Discuss types of tracheostomy tubes
2
4. Discuss the procedure
for cleaning a
tracheostomy tube:
(a)single cannula,
(b)double cannula
5. Discuss the procedure
for suctioning an
established tracheostomy
3. 3
NCBON Special Directions: NAII may only care for an
established or well-healed tracheostomy.
New trach care may be performed only by a RN. The client is
considered to have an established tracheostomy when ALL of the
following are present: (1) stoma well healed; (2) airway is patent; AND
4. 4
(3) a licensed nurse has performed tracheostomy
care for the patient a sufficient number of times to
assure that the delegation of this task is consistent
with the criteria previously outlined
NCBON Special Directions
5. 5
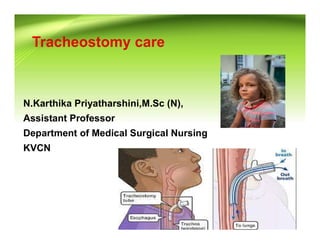
Why Perform a Tracheostomy?
Tracheostomy is done to:
(a)relieve an airway obstruction
(b)facilitate breathing
(c)Removal of secretions
Illustration: http://www.nlm.nih.gov/medlineplus/ency/presentations/100043_4.htm
6. 6
Tracheotomy: A surgical procedure to create an opening
into the neck through which to breathe
The external opening on the skin surface is called a stoma.
Eventually it will heal and remain open. This is a direct
passageway to the lungs
Stoma
8. 8
Tracheostomy Tubes
• Single cannula trach tubes have no inner cannula—they allow
more air flow, but the inner cannula cannot be removed in an
emergency such as a mucous plug in the tube.
• A double cannula (inner and outer) trach tube is used in most
adult patients.
9. 9
The outside of the trach has a flat plate with a flange on
each side that is fastened to twill tape or a Velcro trach
tie which encircles the patient’s neck. These devices help
hold the device in place.
Flat plate
with flange
Trach ties
10. 10
Types of Trach Tubes
An inflated balloon
seals the space
between the trach
tube and the
trachea
It is used for residents who need a ventilator to breathe for
them or who are at high risk of aspiration
Cuffed
11. 11
Types of Trach Tubes Con’t
Uncuffed
Air can move through
the trach tube and also
through the trachea
This trach is used for patients who are breathing without
mechanical assistance and who are not at risk of aspiration.
The patient can begin to speak and cough normally.
12. 12
This type is used for patients who are weaning off their trachs.
When the patient breaths, air can go from the upper respiratory
airway through and around the trach tube and down to the
lungs.
Types of Trach Tubes (continued)
When a plug is put over the
trach opening, the patient can
speak and cough. There are
special plugs available or some
patients just use their finger to
cover the trach opening
Fenestrated outer cannula
13. 13
Obturator
If the trach comes out, call the nurse immediately!
There should always be a spare trach (usually one size
smaller) at the bedside to be used in an emergency.
14. 14
Normally the nose and throat moisten and warm air before it
enters the lungs. Inhaling cold, dry air is very uncomfortable and
irritating to the lungs under the best of circumstances.
Respiratory Changes with a Trach
15. 15
Breathing through a Trach
Because the tracheostomy bypasses the normal breathing
structures, the patient’s body cannot use its normal protective
mechanisms to warm, moisten, or filter the air
16. 16
Therefore, warm, humidified oxygen is often administered to
patients via a trach collar (pictured below).
Trach Collars
17. 17
More Respiratory Changes with a Trach
Normally the structures in the nose and mouth capture
microbes and other foreign particles, preventing them
from entering the airway
The stoma
provides a direct
passageway into
the lungs
The risk of
aspirating a foreign
particle is greatly
increased
Avoid getting
water, powder, lint,
dust, or other
objects near the
stoma
18. 18
Breathing through a
Trach
The trach stoma provides an
open pathway for bacteria to
enter and cause serious
infections
Use faultless sterile technique,
precise medical asepsis, and
practice frequent handwashing
19. 19
Tracheostomy suctioning by the NA II may not involve any need
for nursing assessment, and may only be performed during
tracheostomy care or under an established plan of care for
patients with established tracheotomies as noted below
Patients needing
frequent suctioning or
assessment must
have this provided by
the RN/LPN or family
member, if at home
NCBON Scope of Practice for NAII: Trach Suctioning
20. 20
Suctioning a Tracheostomy
Special Notes:
Suctioning a
tracheostomy
stimulates coughing, so
wearing face and eye
protection may be
necessary. A gown
may be indicated as
well.
22. 22
Pressures on the suction machine should not be below 80
or above 120. If not in this range, notify the RN or
Respiratory Professional
Suctioning a Trach (continued)
23. 23
Suctioning (continued)
Ventilate the patient with a bag-valve device if instructed by the
nurse. The bag-valve-mask is connected to tubing and attached
to the oxygen flow meter (should be set for 15 liters per minute
or as instructed)
24. 24
Observe and Report
• Patient’s reaction
to and tolerance of
procedure
• Change in vital
signs
• Changes in
patient’s color
• Changes in the pulse oximeter or other vital signs
• Color and character of secretions; should be thin,
white, translucent; secretions are slightly sticky
Suctioning a Trach (continued)
25. 25
Cleaning a Tracheostomy
Goals:
• To keep the stoma and cannulas clean and free from
obstruction
• To prevent H2O and solid foreign matter from entering the lungs
• To prevent skin
irritation and
breakdown
• To prevent
infection
26. 26
Trach Care (continued)
• Clean the inner cannula as directed by the nurse (usually NSS
or ½ H2O2 and ½ NSS).
• After re-inserting the inner cannula, turn the adapter on the
distal end clockwise to lock it in place
27. 27
Trach Care (continued)
• Clean gently but thoroughly around the stoma opening and
outer cannula
• The trach dressing is a lint-free 4x4 gauze sponge. It is used to
absorb perspiration and secretions, preventing skin irritation
28. 28
Tracheostomy Dressing Change
• If the split dressing is not available, a sterile gauze
sponge may be folded and inserted so that it surrounds
the cannula
• When the dressing is
inserted, the split faces
up, toward the patient’s
face
• Regular gauze
sponges should not be
cut because lint and
threads in the gauze
may accidentally enter
the stoma
• The dressing is split in the center so it can be positioned
around the outer cannula
29. 29
Safety Precautions When Changing Trach Ties
• Be very careful and follow the
facility procedure. If the patient
begins to cough after the old tie
is removed, the plate and outer
cannula may be coughed right
out of the stoma
• The stoma could close quickly,
and this may become a serious
emergency
• Trach ties should be replaced any time they become moist with
secretions or perspiration
• Wear face protection and a surgical mask when performing this
procedure because manipulating the cannulas may cause the
patient to cough
30. 30
Trach Ties—used to keep the trach in place
• In most facilities a Velcro band is used to secure the outer
cannula
• However, twill ties may still be used
• The trach ties are inserted into a hole in the flange on either
side of the neck
• Gauze roller bandage should not be used due to unraveling
31. 31
• The tape is inserted through the
flange, then drawn securely around
the neck
• It is tied in two double knots at the
side
• The old ties are not removed until
the new ties are in place
• Avoid tying in the back of the neck
• The flat plate to the outer cannula should be flat against the
patient’s neck
• You should be able to place one or two fingers between the
tape and neck
• The ties should hold the tracheostomy firmly in place so it
cannot be coughed out, but should not be too tight
Twill Trach Ties