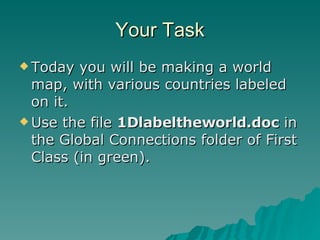
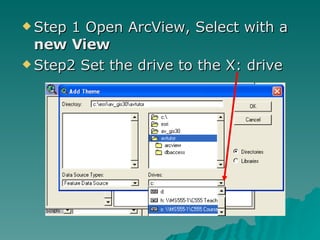
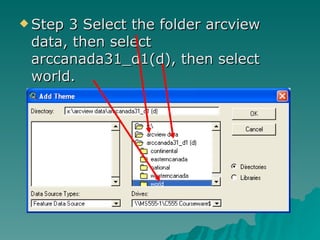
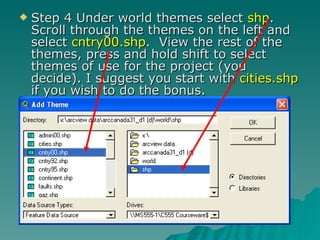
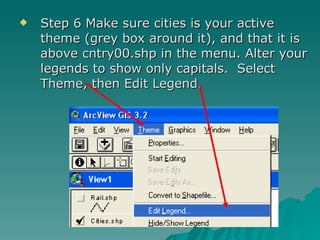
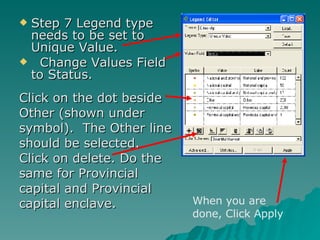
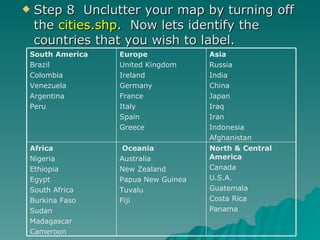
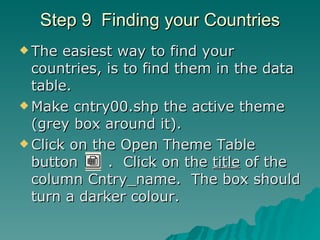
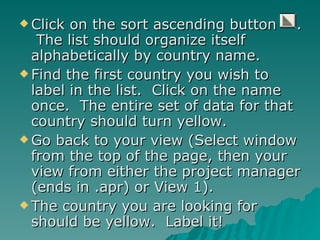
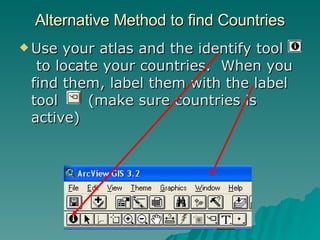
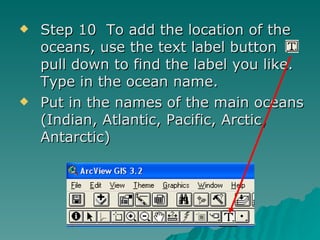
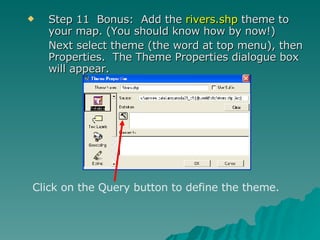
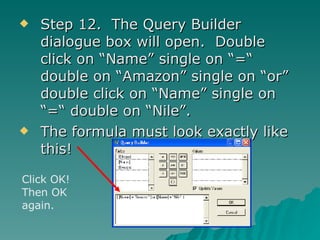
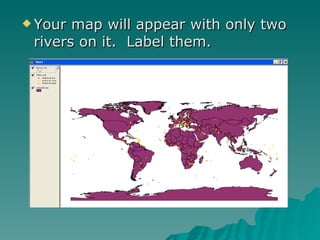
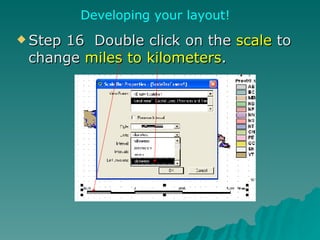
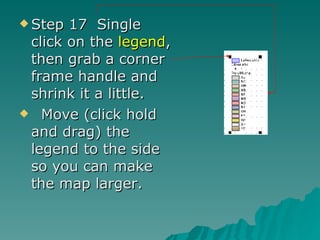
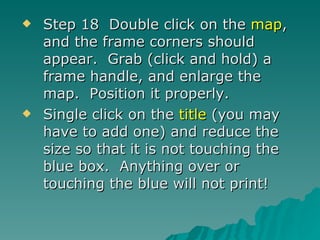
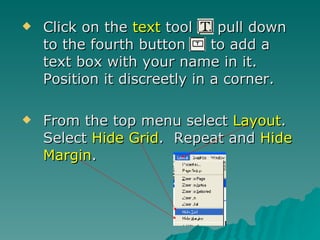
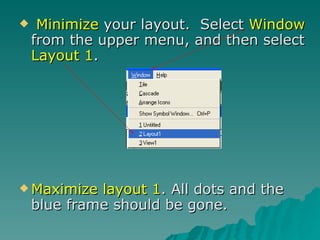
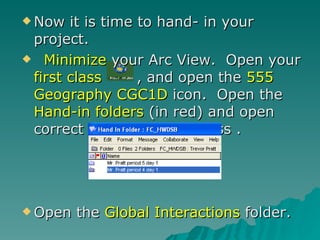
Label the World GIS
Your Task Today you will be making a world map, with various countries labeled on it.  Use the file  1Dlabeltheworld.doc  in the Global Connections folder of First Class (in green).
Step 1 Open ArcView, Select with a  new View Step2 Set the drive to the X: drive
Step 3 Select the folder arcview data, then select arccanada31_d1(d), then select world.
Step 4 Under world themes select  shp .  Scroll through the themes on the left and select  cntry00.shp .  View the rest of the themes, press and hold shift to select themes of use for the project (you decide). I suggest you start with  cities.shp  if you wish to do the bonus.
Step 5 Click ok to select your themes, then make sure to check them to see them in your view. What a mess!
Step 6 Make sure cities is your active theme (grey box around it), and that it is above cntry00.shp in the menu. Alter your legends to show only capitals.  Select Theme, then Edit Legend.
Step 7 Legend type needs to be set to Unique Value. Change Values Field to Status.  Click on the dot beside Other (shown under symbol).  The Other line should be selected.  Click on delete. Do the same for Provincial capital and Provincial capital enclave. When you are done, Click Apply
Step 8  Unclutter your map by turning off the  cities.shp .  Now lets identify the countries that you wish to label.  North & Central America Canada U.S.A. Guatemala Costa Rica Panama Oceania Australia New Zealand Papua New Guinea Tuvalu Fiji Africa Nigeria Ethiopia Egypt South Africa Burkina Faso Sudan Madagascar Cameroon Asia Russia India China Japan Iraq Iran Indonesia Afghanistan Europe United Kingdom Ireland Germany France Italy Spain Greece South America Brazil Colombia Venezuela Argentina Peru
Step 9  Finding your Countries The easiest way to find your countries, is to find them in the data table. Make cntry00.shp the active theme (grey box around it). Click on the Open Theme Table button  .  Click on the  title  of the column Cntry_name.  The box should turn a darker colour.
Click on the sort ascending button  .  The list should organize itself alphabetically by country name. Find the first country you wish to label in the list.  Click on the name once.  The entire set of data for that country should turn yellow. Go back to your view (Select window from the top of the page, then your view from either the project manager (ends in .apr) or View 1). The country you are looking for should be yellow.  Label it!
Use your atlas and the identify tool  to locate your countries.  When you find them, label them with the label tool  (make sure countries is active) Alternative Method to find Countries
Step 10  To add the location of the oceans, use the text label button  pull down to find the label you like.  Type in the ocean name. Put in the names of the main oceans (Indian, Atlantic, Pacific, Arctic, Antarctic)
Step 11  Bonus:  Add the  rivers.shp  theme to your map. (You should know how by now!)  Next select theme (the word at top menu), then Properties.  The Theme Properties dialogue box will appear. Click on the Query button to define the theme.
Step 12.  The Query Builder dialogue box will open.  Double click on “Name” single on “=“ double on “Amazon” single on “or” double click on “Name” single on “=“ double on “Nile”. The formula must look exactly like this! Click OK! Then OK again.
Your map will appear with only two rivers on it.  Label them.
Step 13 Select View from the index at the top, then select properties.  Change the view properties to km.
Step 14  Extra bonus!! Use the measure tool  to determine the length of the Nile, and the Amazon rivers.  Show the answer in a text box on your layout.
Step 15  Save your work by selecting  File  from the upper menu, then  save project as , switch the drive to the  h:  drive and then in the file name field call it  yourfirstnamelastinitialglobal   For example timmykglobal  Then click  OK . File
When you are satisfied with your View, it is time to put this all into a Layout!  At the top menu select  View , then  layout .  Click  OK  to accept the Landscape layout.  Arc View will automatically produce a new map layout for you.
Step 16  Double click on the  scale  to change  miles to kilometers .  Developing your layout!
Step 17  Single click on the  legend , then grab a corner frame handle and shrink it a little. Move (click hold and drag) the legend to the side so you can make the map larger.
Step 18  Double click on the  map , and the frame corners should appear.  Grab (click and hold) a frame handle, and enlarge the map.  Position it properly. Single click on the  title  (you may have to add one) and reduce the size so that it is not touching the blue box.  Anything over or touching the blue will not print!
Click on the  text  tool  pull down to the fourth button  to add a text box with your name in it.  Position it discreetly in a corner. From the top menu select  Layout .  Select  Hide Grid .  Repeat and  Hide Margin .
Minimize  your layout.  Select  Window  from the upper menu, and then select  Layout 1 .  Maximize layout 1 . All dots and the blue frame should be gone.
Make sure that your screen shows exactly what you want the teacher to mark.  It must be on the  Layout  screen. Save your project  .
Now it is time to hand- in your project. Minimize  your Arc View.  Open your  first class  , and open the  555 Geography CGC1D  icon.  Open the  Hand-in folders  (in red) and open correct folder for your class .  Open the  Global Interactions  folder.
Minimize  all screens except for the Canada GIS folder. Open  my computer , and find your file on the  h:  drive.  Click  on it once, hold and  drag it  into the Canada GIS hand-in folder.  It should pull up a file transfer popup screen.  When it is completed click close.  Make sure that your file appears in the folder for YOUR Period !
Congratulations, you are done!

Cgc Label The World Gis

  • 1.
  • 2.
    Your Task Todayyou will be making a world map, with various countries labeled on it. Use the file 1Dlabeltheworld.doc in the Global Connections folder of First Class (in green).
  • 3.
    Step 1 OpenArcView, Select with a new View Step2 Set the drive to the X: drive
  • 4.
    Step 3 Selectthe folder arcview data, then select arccanada31_d1(d), then select world.
  • 5.
    Step 4 Underworld themes select shp . Scroll through the themes on the left and select cntry00.shp . View the rest of the themes, press and hold shift to select themes of use for the project (you decide). I suggest you start with cities.shp if you wish to do the bonus.
  • 6.
    Step 5 Clickok to select your themes, then make sure to check them to see them in your view. What a mess!
  • 7.
    Step 6 Makesure cities is your active theme (grey box around it), and that it is above cntry00.shp in the menu. Alter your legends to show only capitals. Select Theme, then Edit Legend.
  • 8.
    Step 7 Legendtype needs to be set to Unique Value. Change Values Field to Status. Click on the dot beside Other (shown under symbol). The Other line should be selected. Click on delete. Do the same for Provincial capital and Provincial capital enclave. When you are done, Click Apply
  • 9.
    Step 8 Unclutter your map by turning off the cities.shp . Now lets identify the countries that you wish to label. North & Central America Canada U.S.A. Guatemala Costa Rica Panama Oceania Australia New Zealand Papua New Guinea Tuvalu Fiji Africa Nigeria Ethiopia Egypt South Africa Burkina Faso Sudan Madagascar Cameroon Asia Russia India China Japan Iraq Iran Indonesia Afghanistan Europe United Kingdom Ireland Germany France Italy Spain Greece South America Brazil Colombia Venezuela Argentina Peru
  • 10.
    Step 9 Finding your Countries The easiest way to find your countries, is to find them in the data table. Make cntry00.shp the active theme (grey box around it). Click on the Open Theme Table button . Click on the title of the column Cntry_name. The box should turn a darker colour.
  • 11.
    Click on thesort ascending button . The list should organize itself alphabetically by country name. Find the first country you wish to label in the list. Click on the name once. The entire set of data for that country should turn yellow. Go back to your view (Select window from the top of the page, then your view from either the project manager (ends in .apr) or View 1). The country you are looking for should be yellow. Label it!
  • 12.
    Use your atlasand the identify tool to locate your countries. When you find them, label them with the label tool (make sure countries is active) Alternative Method to find Countries
  • 13.
    Step 10 To add the location of the oceans, use the text label button pull down to find the label you like. Type in the ocean name. Put in the names of the main oceans (Indian, Atlantic, Pacific, Arctic, Antarctic)
  • 14.
    Step 11 Bonus: Add the rivers.shp theme to your map. (You should know how by now!) Next select theme (the word at top menu), then Properties. The Theme Properties dialogue box will appear. Click on the Query button to define the theme.
  • 15.
    Step 12. The Query Builder dialogue box will open. Double click on “Name” single on “=“ double on “Amazon” single on “or” double click on “Name” single on “=“ double on “Nile”. The formula must look exactly like this! Click OK! Then OK again.
  • 16.
    Your map willappear with only two rivers on it. Label them.
  • 17.
    Step 13 SelectView from the index at the top, then select properties. Change the view properties to km.
  • 18.
    Step 14 Extra bonus!! Use the measure tool to determine the length of the Nile, and the Amazon rivers. Show the answer in a text box on your layout.
  • 19.
    Step 15 Save your work by selecting File from the upper menu, then save project as , switch the drive to the h: drive and then in the file name field call it yourfirstnamelastinitialglobal For example timmykglobal Then click OK . File
  • 20.
    When you aresatisfied with your View, it is time to put this all into a Layout! At the top menu select View , then layout . Click OK to accept the Landscape layout. Arc View will automatically produce a new map layout for you.
  • 21.
    Step 16 Double click on the scale to change miles to kilometers . Developing your layout!
  • 22.
    Step 17 Single click on the legend , then grab a corner frame handle and shrink it a little. Move (click hold and drag) the legend to the side so you can make the map larger.
  • 23.
    Step 18 Double click on the map , and the frame corners should appear. Grab (click and hold) a frame handle, and enlarge the map. Position it properly. Single click on the title (you may have to add one) and reduce the size so that it is not touching the blue box. Anything over or touching the blue will not print!
  • 24.
    Click on the text tool pull down to the fourth button to add a text box with your name in it. Position it discreetly in a corner. From the top menu select Layout . Select Hide Grid . Repeat and Hide Margin .
  • 25.
    Minimize yourlayout. Select Window from the upper menu, and then select Layout 1 . Maximize layout 1 . All dots and the blue frame should be gone.
  • 26.
    Make sure thatyour screen shows exactly what you want the teacher to mark. It must be on the Layout screen. Save your project .
  • 27.
    Now it istime to hand- in your project. Minimize your Arc View. Open your first class , and open the 555 Geography CGC1D icon. Open the Hand-in folders (in red) and open correct folder for your class . Open the Global Interactions folder.
  • 28.
    Minimize allscreens except for the Canada GIS folder. Open my computer , and find your file on the h: drive. Click on it once, hold and drag it into the Canada GIS hand-in folder. It should pull up a file transfer popup screen. When it is completed click close. Make sure that your file appears in the folder for YOUR Period !
  • 29.