

KENDRIYA VIYALAYA BALLYGUNGE
INDEX
Sl.
No
TOPIC DATE REMARKS PAGE NUMBER
1 Prepare a temporary mount to
observe pollen germination.
2 Collect and study soil from at least
two different sites and study them for
texture, moisture content, pH and
water holding capacity. Correlate
with the kinds of plants found in
them.
3 Collect water from two different
water bodies around you and study
them for pH, clarity and presence of
any living organism.
4 Prepare a temporary mount of onion
root tip to study mitosis.
5 Study the effect of different
temperatures or three different pH on
the activity of salivary amylase on
starch.
6 Isolate DNA from available plant
material such as spinach, green pea
seeds, papaya,
7 Flowers adapted to pollination by
different agencies (wind, insects, and
birds).
8 Identification of stages of gamete
development, i.e., T.S. of testis and
T.S. of ovary through permanent
slides (from grasshopper/mice).
9 Meiosis in onion bud cell or
grasshopper testis through permanent
slides.
10 T.S. of blastula through permanent
slides (Mammalian).
11 Prepared pedigree charts of any one
of the genetic traits such as rolling of
tongue, blood groups, ear lobes,
Widows peak and colour blindness.
12 Common disease causing organisms
like Ascaris, Entamoeba,
Plasmodium, any fungus causing
ringworm through permanent slides,
models or virtual images. Comment
on symptoms of diseases that they
cause.
13 Two plants and two animals
(models/virtual images) found in
xeric conditions. Comment upon
their morphological adaptations.
14 Two plants and two animals
(models/virtual images) found in
aquatic conditions. Comment upon
their morphological adaptations.
15 Appendix
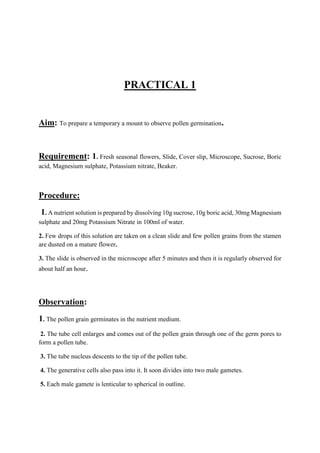
PRACTICAL 1
Aim: To prepare a temporary a mount to observe pollen germination.
Requirement: 1. Fresh seasonal flowers, Slide, Cover slip, Microscope, Sucrose, Boric
acid, Magnesium sulphate, Potassium nitrate, Beaker.
Procedure:
1. A nutrient solution is prepared by dissolving 10g sucrose, 10g boric acid, 30mg Magnesium
sulphate and 20mg Potassium Nitrate in 100ml of water.
2. Few drops of this solution are taken on a clean slide and few pollen grains from the stamen
are dusted on a mature flower.
3. The slide is observed in the microscope after 5 minutes and then it is regularly observed for
about half an hour.
Observation:
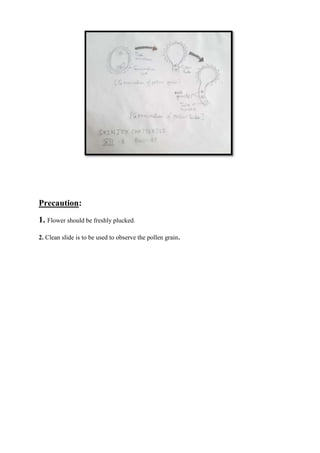
1. The pollen grain germinates in the nutrient medium.
2. The tube cell enlarges and comes out of the pollen grain through one of the germ pores to
form a pollen tube.
3. The tube nucleus descents to the tip of the pollen tube.
4. The generative cells also pass into it. It soon divides into two male gametes.
5. Each male gamete is lenticular to spherical in outline.
Precaution:
1. Flower should be freshly plucked.
2. Clean slide is to be used to observe the pollen grain.
PRACTICAL 2
Aim:-To collect and study soil from at least two different sites and study them for texture
and moisture content, pH and water holding capacity of soil. To correlate with the kinds of
plants found in them.
Theory: - Soil is the upper humus, containing a layer of the earth, consisting of rock and
mineral particles mixed with decayed organic matter. Soil sustains plant life and contains
numerous living organisms. Soil, along with air and water, is one of the three most important
natural resources, which we cannot live without. A productive soil contains approximately
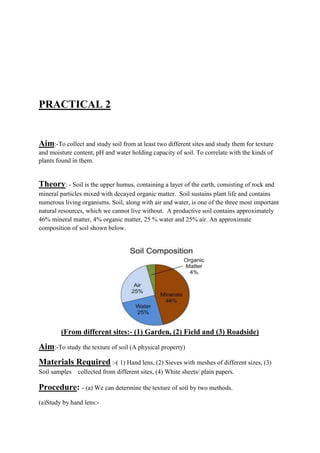
46% mineral matter, 4% organic matter, 25 % water and 25% air. An approximate
composition of soil shown below.
A. Texture of soil
(From different sites:- (1) Garden, (2) Field and (3) Roadside)
Aim:-To study the texture of soil (A physical property)
Materials Required :-( 1) Hand lens, (2) Sieves with meshes of different sizes, (3)
Soil samples collected from different sites, (4) White sheets/ plain papers.
Procedure: - (a) We can determine the texture of soil by two methods.
(a)Study by hand lens:-
 Dry and moist soil is taken in hand and its texture is felt by rubbing it in between the
thumb and the fingers.
 Observations are noted and compared.
 Both the dry and moist soil is taken on a white paper and is viewed under the hand
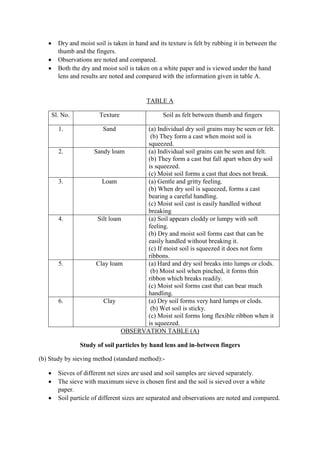
lens and results are noted and compared with the information given in table A.
TABLE A
Sl. No. Texture Soil as felt between thumb and fingers
1. Sand (a) Individual dry soil grains may be seen or felt.
(b) They form a cast when moist soil is
squeezed.
2. Sandy loam (a) Individual soil grains can be seen and felt.
(b) They form a cast but fall apart when dry soil
is squeezed.
(c) Moist soil forms a cast that does not break.
3. Loam (a) Gentle and gritty feeling.
(b) When dry soil is squeezed, forms a cast
bearing a careful handling.
(c) Moist soil cast is easily handled without
breaking
4. Silt loam (a) Soil appears cloddy or lumpy with soft
feeling.
(b) Dry and moist soil forms cast that can be
easily handled without breaking it.
(c) If moist soil is squeezed it does not form
ribbons.
5. Clay loam (a) Hard and dry soil breaks into lumps or clods.
(b) Moist soil when pinched, it forms thin
ribbon which breaks readily.
(c) Moist soil forms cast that can bear much
handling.
6. Clay (a) Dry soil forms very hard lumps or clods.
(b) Wet soil is sticky.
(c) Moist soil forms long flexible ribbon when it
is squeezed.
OBSERVATION TABLE (A)
Study of soil particles by hand lens and in-between fingers
(b) Study by sieving method (standard method):-
 Sieves of different net sizes are used and soil samples are sieved separately.
 The sieve with maximum sieve is chosen first and the soil is sieved over a white
paper.
 Soil particle of different sizes are separated and observations are noted and compared.
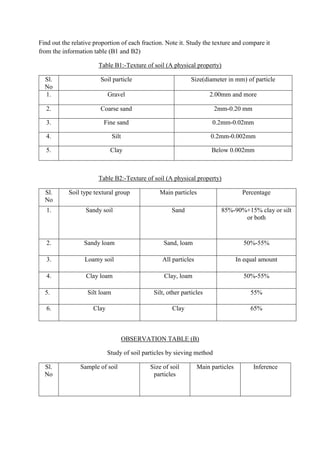
Find out the relative proportion of each fraction. Note it. Study the texture and compare it
from the information table (B1 and B2)
Table B1:-Texture of soil (A physical property)
Sl.
No
Soil particle Size(diameter in mm) of particle
1. Gravel 2.00mm and more
2. Coarse sand 2mm-0.20 mm
3. Fine sand 0.2mm-0.02mm
4. Silt 0.2mm-0.002mm
5. Clay Below 0.002mm
Table B2:-Texture of soil (A physical property)
Sl.
No
Soil type textural group Main particles Percentage
1. Sandy soil Sand 85%-90%+15% clay or silt
or both
2. Sandy loam Sand, loam 50%-55%
3. Loamy soil All particles In equal amount
4. Clay loam Clay, loam 50%-55%
5. Silt loam Silt, other particles 55%
6. Clay Clay 65%
OBSERVATION TABLE (B)
Study of soil particles by sieving method
Sl.
No
Sample of soil Size of soil
particles
Main particles Inference
1. A 2mm-0.20 mm Sand Sandy soil
2. B Below 0.002mm clay Clay
3. C 0.2mm-
0.002mm
Silt, other
particles
Silt loam
4. D 0.2mm-0.02mm All particles Loamy soil
Conclusion: - Texture of the soil is found and recorded.
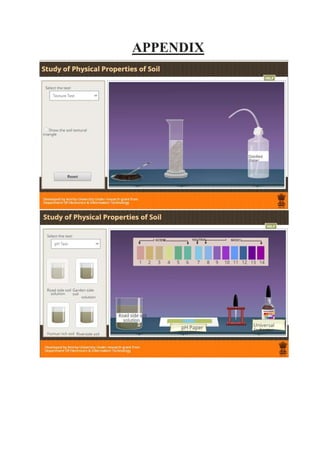
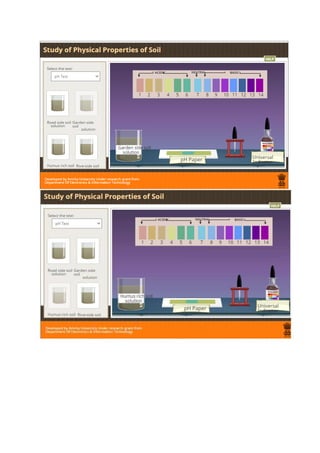
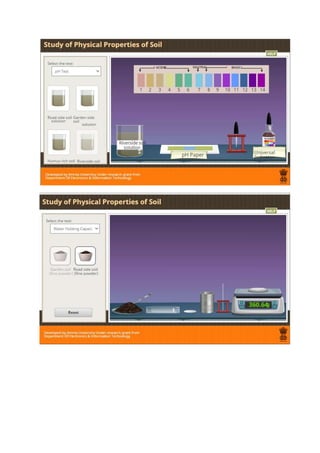
B. ph of soil(A physical property)
 Aim:-To Study pH of Different Types of Soil
 Materials Required: - Garden soil, humus rich soil, roadside soil, droppers,
filter paper, riverside soil, Test tubers, distilled water, funnel
 Procedure:-
o First we will take a pH paper booklet.
o Then we will tear pH paper strips from the booklet and will place 4 strips on the tile.
o Now by using a dropper, we will take some roadside soil solution from the test tube.
o We will put 1 to 2 drops of solution on the first pH strip on the tile.
o Using fresh droppers, we will do the same procedure for garden soil, humus rich and
riverside soil.
o Now we will wait for some time for the pH paper strip to dry.
o We will note the colour and compare with the colour chart given on the broad range
indicator paper and get a rough estimate of pH of the sample solutions.
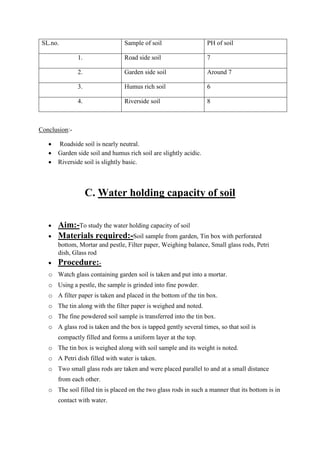
OBSERVATION TABLE
Study the ph of soil using ph paper
SL.no. Sample of soil PH of soil
1. Road side soil 7
2. Garden side soil Around 7
3. Humus rich soil 6
4. Riverside soil 8
Conclusion:-
 Roadside soil is nearly neutral.
 Garden side soil and humus rich soil are slightly acidic.
 Riverside soil is slightly basic.
C. Water holding capacity of soil
 Aim:-To study the water holding capacity of soil
 Materials required:-Soil sample from garden, Tin box with perforated
bottom, Mortar and pestle, Filter paper, Weighing balance, Small glass rods, Petri
dish, Glass rod
 Procedure:-
o Watch glass containing garden soil is taken and put into a mortar.
o Using a pestle, the sample is grinded into fine powder.
o A filter paper is taken and placed in the bottom of the tin box.
o The tin along with the filter paper is weighed and noted.
o The fine powdered soil sample is transferred into the tin box.
o A glass rod is taken and the box is tapped gently several times, so that soil is
compactly filled and forms a uniform layer at the top.
o The tin box is weighed along with soil sample and its weight is noted.
o A Petri dish filled with water is taken.
o Two small glass rods are taken and were placed parallel to and at a small distance
from each other.
o The soil filled tin is placed on the two glass rods in such a manner that its bottom is in
contact with water.
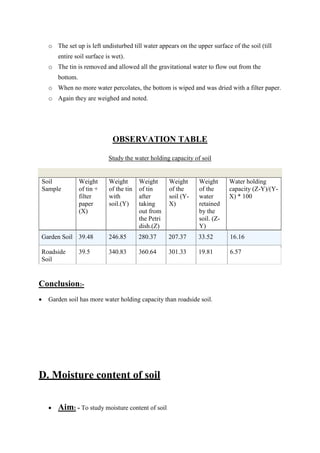
o The set up is left undisturbed till water appears on the upper surface of the soil (till
entire soil surface is wet).
o The tin is removed and allowed all the gravitational water to flow out from the
bottom.
o When no more water percolates, the bottom is wiped and was dried with a filter paper.
o Again they are weighed and noted.
OBSERVATION TABLE
Study the water holding capacity of soil
Soil
Sample
Weight
of tin +
filter
paper
(X)
Weight
of the tin
with
soil.(Y)
Weight
of tin
after
taking
out from
the Petri
dish.(Z)
Weight
of the
soil (Y-
X)
Weight
of the
water
retained
by the
soil. (Z-
Y)
Water holding
capacity (Z-Y)/(Y-
X) * 100
Garden Soil 39.48 246.85 280.37 207.37 33.52 16.16
Roadside
Soil
39.5 340.83 360.64 301.33 19.81 6.57
Conclusion:-
 Garden soil has more water holding capacity than roadside soil.
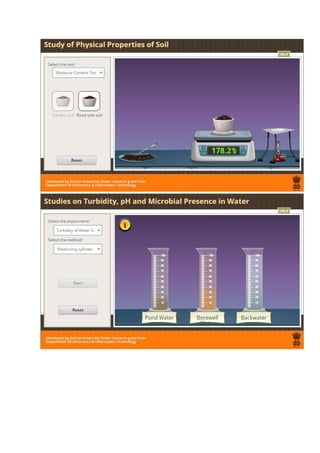
D. Moisture content of soil
 Aim: - To study moisture content of soil
 Materials required: - Garden soil, Roadside soil, Wire gauge, Weighing
balance, Burner, Crucibles.
 Procedure: -
o A watch glass containing garden soil is taken and put into a crucible.
o The crucible with soil sample is weighed on a weighing balance. The crucible is
placed over the burner.
o The soil is heated for some time till the soil becomes dry.
o The crucible is again weighed to record the weight of dry soil.
o Watch glass containing roadside soil is taken and put into a crucible.
o Weigh the crucible with the soil sample on a weighing balance.
o The crucible is taken and is placed it over the Bunsen burner.
o The soil is heated again for some time till the soil becomes dry.
OBSERVATION TABLE:-
Study the moisture content of soil
Soil sample Initial weight (x) gm Final weight (y)
gm
Moisture content (y-x)
gm
roadside soil 208.21 206.35 1.86
garden soil 183.2 178.21 4.99
Conclusion:-
 Garden soil has more moisture content than roadside soil.
Precautions:-
 Collect soil from different locations.
 Collect soil in a poly bag (small) or a paper or aluminum foil or pouches.
 Separate soil samples must be collected separately.
PRACTICAL3 (A)
Aim: To test the clarity of water samples.
Theory: Turbidity is the measure of the relative clarity of a liquid. Turbidity of the water
body determines the depth to which light can penetrate and thus affects the distribution and
photosynthesis of phytoplankton and macrophytes. The more turbid the water body, the less is
the thickness of its photic zone (the layer of a body of water that is penetrated by sufficient
sunlight for photosynthesis).
Materials Required: Water from different sources, beaker, torch, one sided open
wooden box
Procedure:
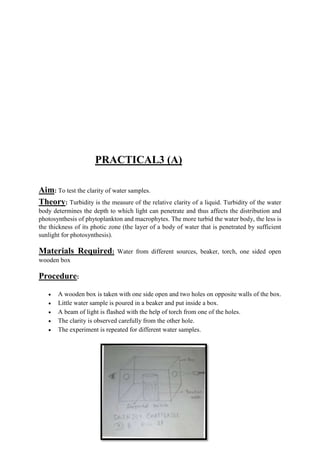
 A wooden box is taken with one side open and two holes on opposite walls of the box.
 Little water sample is poured in a beaker and put inside a box.
 A beam of light is flashed with the help of torch from one of the holes.
 The clarity is observed carefully from the other hole.
 The experiment is repeated for different water samples.
Observation: A large number of particles can be seen moving in Water. The water is
called turbid water and the phenomenon is called Tyndall effect.
Conclusions: Turbidity is the measure of clarity and amount of suspended particles in the
water column. Pond water has fewer suspended particles, so it has a low turbidity level. Bore
well water and backwater have more suspended particles, so they have a high turbidity level.
Precaution:
 The two holes in the box should lie on a straight line
 The turbidity is to be measured carefully without disturbing the sample
PRACTICAL 3(B)
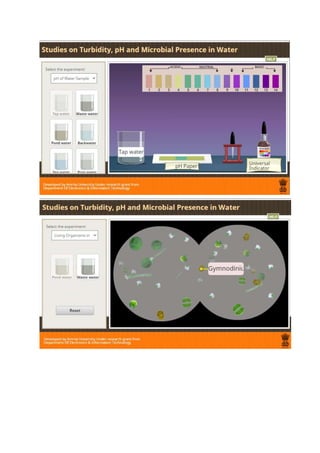
Aim: To study the pH of water.
Materials Required: Pond water, beakers, bore well water, pH indicator papers, dropper,
tap water, backwater, and tile.
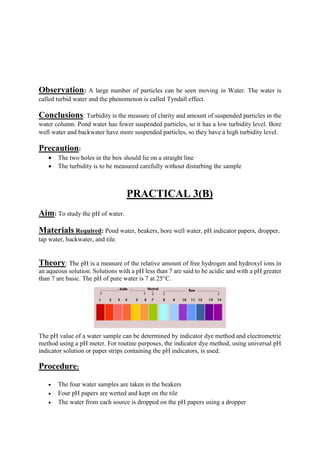
Theory: The pH is a measure of the relative amount of free hydrogen and hydroxyl ions in
an aqueous solution. Solutions with a pH less than 7 are said to be acidic and with a pH greater
than 7 are basic. The pH of pure water is 7 at 25°C.
The pH value of a water sample can be determined by indicator dye method and electrometric
method using a pH meter. For routine purposes, the indicator dye method, using universal pH
indicator solution or paper strips containing the pH indicators, is used.
Procedure:
 The four water samples are taken in the beakers
 Four pH papers are wetted and kept on the tile
 The water from each source is dropped on the pH papers using a dropper
 The pH paper is left for a while to let it dry
 The colour is noted and compared with the colour chart given on the broad range
indicator paper to get a rough estimate of pH of the sample solutions
Observations:
Sl. No. Water samples Colour pH(Approx)
1. Pond Water Light blue 8
2. Tap water greenish 6
3. Backwater Light blue 8
4. Waste water yellowish 3
Results: Hence different sources of water have different pH.
Precautions:
 Beakers should be cleaned well to remove any dirt from it.
 pH paper should be allowed to dry and it should not be contaminated.
PRACTICAL 3 (C)
Aim: To study different organisms found in different water bodies.
Materials required: Water samples, glass slides, cover slips, dropper, filter paper,
compound microscope, needle, test tube.
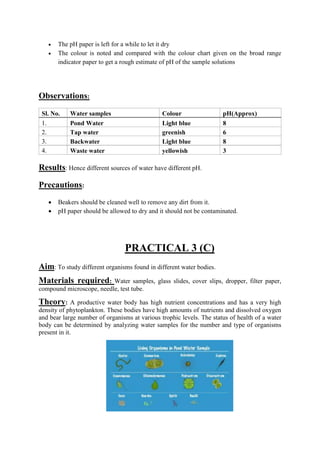
Theory: A productive water body has high nutrient concentrations and has a very high
density of phytoplankton. These bodies have high amounts of nutrients and dissolved oxygen
and bear large number of organisms at various trophic levels. The status of health of a water
body can be determined by analyzing water samples for the number and type of organisms
present in it.
Procedure:
 A beaker containing pond water is taken and poured into a test tube.
 The water sample is left undisturbed for some time till the sediment settles to the bottom
of the test tube.
 The clear water is decanted off leaving the concentrated sediment at the bottom of the
test tube.
 With the help of a dropper, a drop of water is transferred from the test tube to the center
of a glass slide.
 A cover slip is taken and gently placed on the slide with the aid of a needle.
 The extra water is removed using a filter paper.
 This glass slide is placed on the stage of the compound microscope and observed.
 Repeat the procedure with different sources of water.
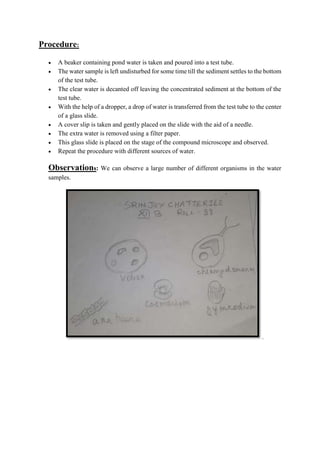
Observations: We can observe a large number of different organisms in the water
samples.
.
Conclusion: Ponds are small and shallow water bodies. The biota consists of
phytoplankton and zooplanktons. Well water contains only few organisms like viruses and
bacteria. Permanent ponds and lakes possess microscopic phytoplankton such as diatoms,
Chlorella, Chlamydomonas, etc. The consumers in small ponds include Daphnia, Cyclops,
amphibians, fish etc. Common water birds are ducks, herons, kingfishers etc. Rivers are
systems where algae, diatoms, water grasses are found. Consumer animals include fish, minks
etc. Variety of organisms is pH sensitive.
Result: Number and type of organisms differ according to type of aquatic habitat.
Precautions:
 Carefully use the compound microscope
 Always use a clean slide. Slide should be cleaned well to remove dirt from it.
 Each sample should be well labeled according to the collection site.
PRACTICAL 4
 Aim-To make a temporary mount of the onion root tip for study of various stages of
mitosis.

 Materials required- Onion root tips , needles, brush, burner, microscope,
acetocarmine strain, hydrochloric acid blade, F.A.A fixative, ethyl alcohol, carnoy’s
fluid, blotting paper etc.

 Procedure:
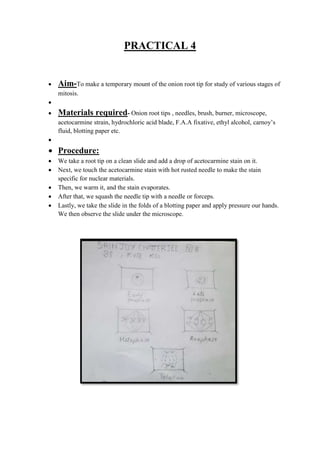
 We take a root tip on a clean slide and add a drop of acetocarmine stain on it.
 Next, we touch the acetocarmine stain with hot rusted needle to make the stain
specific for nuclear materials.
 Then, we warm it, and the stain evaporates.
 After that, we squash the needle tip with a needle or forceps.
 Lastly, we take the slide in the folds of a blotting paper and apply pressure our hands.
We then observe the slide under the microscope.
PRACTICAL 5
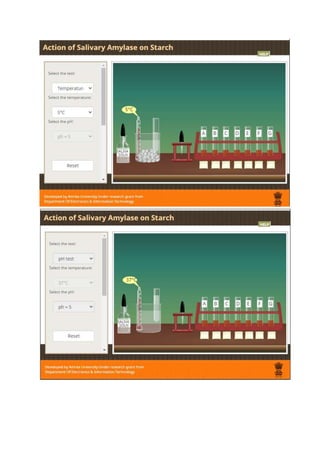
Aim: Study the effect of different temperatures and three different pH on the activity of the
salivary amylase.
Principle:
Chewing of food stimulates the secretion of saliva by salivary gland in our mouth. Saliva
mixes to the food and helps in digestion. The enzyme ptyalin or salivary amylase present in
human saliva hydrolyse the big molecules of food into small molecules called maltose .the
activity of enzymes gets affected by certain factors like ,temperature and Ph .
Effect of temperature :
All enzymes are protein in nature. At a lower temperature, the enzyme salivary amylase is
deactivated and at high temperature the enzyme gets denatured .Therefore, more time would
be taken by the enzyme to digest starch at lower and higher temperatures .Optimum
temperature for enzymatic activity ranges from 32 C TO 37 C. The optimum temperature
means that the temperature at which a enzyme shows it maximum activity .At this optimum
temperature , the enzyme is the most active and shows the maximum activity and takes less
time to digest the starch .
Effect of pH :
The optimum pH for the enzymatic activity ranges from 6 to 7. Above and below this range,
the reaction rate reduces as enzyme gets denatured. The enzyme salivary amylase is most
active at pH 6.8. Our stomach has high level of acidity which causes the enzyme to denature
and change its shape.
Achromatic point:
The effect of temperature and ph on the activity of salivary amylase on starch can be studied
by using the iodine test. If we add saliva on starch, the salivary amylase present in saliva
gradually acts on starch and converts it into maltose. Starch keeps giving blue color with
iodine until it is completely converted into maltose .at this point no blue color is formed. This
point is called achromatic point .Hydrolysis of starch can be verified by the iodine test .Starch
forms blue color complex with iodine. If starch is not present in the food then it will not give
blue color to the food.
Preparation:
Collection of saliva:
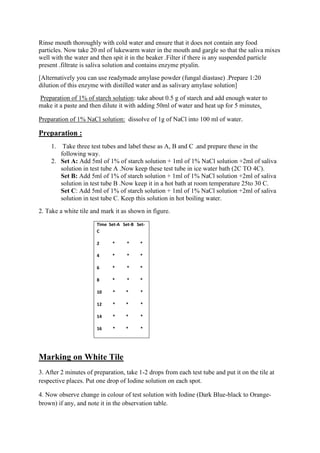
Rinse mouth thoroughly with cold water and ensure that it does not contain any food
particles. Now take 20 ml of lukewarm water in the mouth and gargle so that the saliva mixes
well with the water and then spit it in the beaker .Filter if there is any suspended particle
present .filtrate is saliva solution and contains enzyme ptyalin.
[Alternatively you can use readymade amylase powder (fungal diastase) .Prepare 1:20
dilution of this enzyme with distilled water and as salivary amylase solution]
Preparation of 1% of starch solution: take about 0.5 g of starch and add enough water to
make it a paste and then dilute it with adding 50ml of water and heat up for 5 minutes.
Preparation of 1% NaCl solution: dissolve of 1g of NaCl into 100 ml of water.
Preparation :
1. Take three test tubes and label these as A, B and C .and prepare these in the
following way.
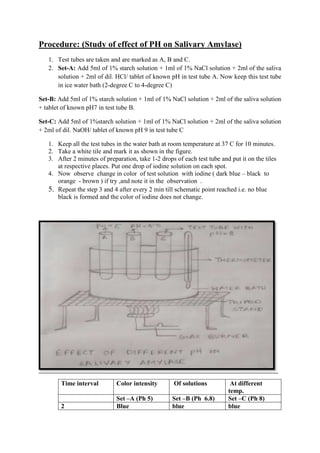
2. Set A: Add 5ml of 1% of starch solution + 1ml of 1% NaCl solution +2ml of saliva
solution in test tube A .Now keep these test tube in ice water bath (2C TO 4C).
Set B: Add 5ml of 1% of starch solution + 1ml of 1% NaCl solution +2ml of saliva
solution in test tube B .Now keep it in a hot bath at room temperature 25to 30 C.
Set C: Add 5ml of 1% of starch solution + 1ml of 1% NaCl solution +2ml of saliva
solution in test tube C. Keep this solution in hot boiling water.
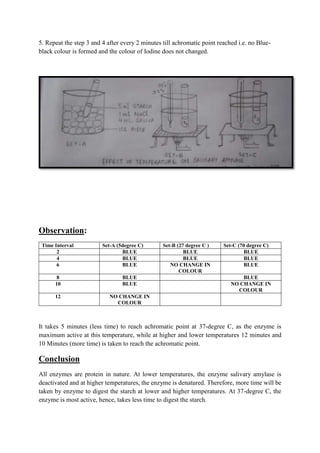
2. Take a white tile and mark it as shown in figure.
Time Set-A Set-B Set-
C
2 * * *
4 * * *
6 * * *
8 * * *
10 * * *
12 * * *
14 * * *
16 * * *
Marking on White Tile
3. After 2 minutes of preparation, take 1-2 drops from each test tube and put it on the tile at
respective places. Put one drop of Iodine solution on each spot.
4. Now observe change in colour of test solution with Iodine (Dark Blue-black to Orange-
brown) if any, and note it in the observation table.
5. Repeat the step 3 and 4 after every 2 minutes till achromatic point reached i.e. no Blue-
black colour is formed and the colour of Iodine does not changed.
Observation:
Time Interval Set-A (5degree C) Set-B (27 degree C ) Set-C (70 degree C)
2 BLUE BLUE BLUE
4 BLUE BLUE BLUE
6 BLUE NO CHANGE IN
COLOUR
BLUE
8 BLUE BLUE
10 BLUE NO CHANGE IN
COLOUR
12 NO CHANGE IN
COLOUR
It takes 5 minutes (less time) to reach achromatic point at 37-degree C, as the enzyme is
maximum active at this temperature, while at higher and lower temperatures 12 minutes and
10 Minutes (more time) is taken to reach the achromatic point.
Conclusion
All enzymes are protein in nature. At lower temperatures, the enzyme salivary amylase is
deactivated and at higher temperatures, the enzyme is denatured. Therefore, more time will be
taken by enzyme to digest the starch at lower and higher temperatures. At 37-degree C, the
enzyme is most active, hence, takes less time to digest the starch.
Procedure: (Study of effect of PH on Salivary Amylase)
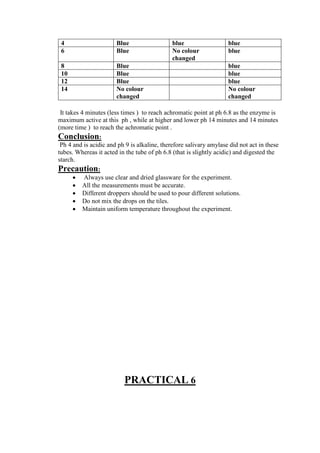
1. Test tubes are taken and are marked as A, B and C.
2. Set-A: Add 5ml of 1% starch solution + 1ml of 1% NaCl solution + 2ml of the saliva
solution + 2ml of dil. HCl/ tablet of known pH in test tube A. Now keep this test tube
in ice water bath (2-degree C to 4-degree C)
Set-B: Add 5ml of 1% starch solution + 1ml of 1% NaCl solution + 2ml of the saliva solution
+ tablet of known pH7 in test tube B.
Set-C: Add 5ml of 1%starch solution + 1ml of 1% NaCl solution + 2ml of the saliva solution
+ 2ml of dil. NaOH/ tablet of known pH 9 in test tube C
1. Keep all the test tubes in the water bath at room temperature at 37 C for 10 minutes.
2. Take a white tile and mark it as shown in the figure.
3. After 2 minutes of preparation, take 1-2 drops of each test tube and put it on the tiles
at respective places. Put one drop of iodine solution on each spot.
4. Now observe change in color of test solution with iodine ( dark blue – black to
orange - brown ) if try ,and note it in the observation .
5. Repeat the step 3 and 4 after every 2 min till schematic point reached i.e. no blue
black is formed and the color of iodine does not change.
Time interval Color intensity Of solutions At different
temp.
Set –A (Ph 5) Set –B (Ph 6.8) Set –C (Ph 8)
2 Blue blue blue
4 Blue blue blue
6 Blue No colour
changed
blue
8 Blue blue
10 Blue blue
12 Blue blue
14 No colour
changed
No colour
changed
It takes 4 minutes (less times ) to reach achromatic point at ph 6.8 as the enzyme is
maximum active at this ph , while at higher and lower ph 14 minutes and 14 minutes
(more time ) to reach the achromatic point .
Conclusion:
Ph 4 and is acidic and ph 9 is alkaline, therefore salivary amylase did not act in these
tubes. Whereas it acted in the tube of ph 6.8 (that is slightly acidic) and digested the
starch.
Precaution:
 Always use clear and dried glassware for the experiment.
 All the measurements must be accurate.
 Different droppers should be used to pour different solutions.
 Do not mix the drops on the tiles.
 Maintain uniform temperature throughout the experiment.
PRACTICAL 6
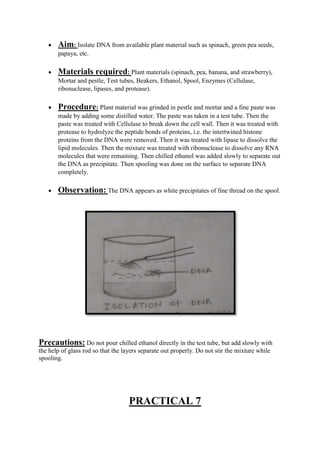
 Aim: Isolate DNA from available plant material such as spinach, green pea seeds,
papaya, etc.
 Materials required: Plant materials (spinach, pea, banana, and strawberry),
Mortar and pestle, Test tubes, Beakers, Ethanol, Spool, Enzymes (Cellulase,
ribonuclease, lipases, and protease).
 Procedure: Plant material was grinded in pestle and mortar and a fine paste was
made by adding some distilled water. The paste was taken in a test tube. Then the
paste was treated with Cellulase to break down the cell wall. Then it was treated with
protease to hydrolyze the peptide bonds of proteins, i.e. the intertwined histone
proteins from the DNA were removed. Then it was treated with lipase to dissolve the
lipid molecules. Then the mixture was treated with ribonuclease to dissolve any RNA
molecules that were remaining. Then chilled ethanol was added slowly to separate out
the DNA as precipitate. Then spooling was done on the surface to separate DNA
completely.
 Observation: The DNA appears as white precipitates of fine thread on the spool.
Precautions: Do not pour chilled ethanol directly in the test tube, but add slowly with
the help of glass rod so that the layers separate out properly. Do not stir the mixture while
spooling.
PRACTICAL 7
Aim: To study the flower adapted to pollination by different agencies (wind, insect and
birds).
Requirements:
Fresh flowers of maize or any other serial/grass, Salvia/Osmium and Brassica
(Mustard) forceps, hand lens, slide, needle etc.
Procedure:
The given flower was placed on a slide and observed with the help of hand lens. The
adaptation of the flower meant for pollination by the external agencies was noted down.
Maize flowers (anemophilous or wind pollinated flowers)
 The flower of maize shows following adaptations for pollination by wind.
 The maize plant is monoecious and bears unisexual flowers. The male flowers
 are born in terminal inflorescence while the female flowers are born in
 Axillary inflorescences.
o Flowers are small and inconspicuous.
o The flowers are colorless, odourless, nectar less.
o Flowers are produced above the foliage or placed in hanging position.
o Both the stigmas and anther are exerted.
o Anthers are versatile, and pollen grains are small and dusty. The pollen grains
are produced in very large numbers.
o Stigma is hairy, feathery or branched to catch wind born pollen grains.
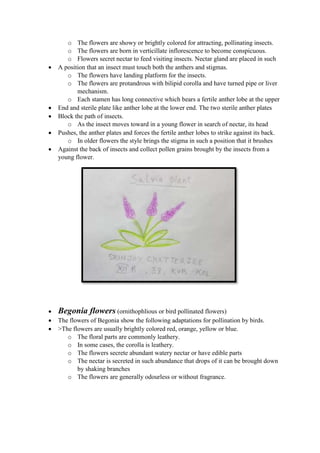
Salvia flowers (entomophilous or insect pollinated flowers)
 The flowers of salvia show following adaptations for pollination by insects.
o The flowers are showy or brightly colored for attracting, pollinating insects.
o The flowers are born in verticillate inflorescence to become conspicuous.
o Flowers secret nectar to feed visiting insects. Nectar gland are placed in such
 A position that an insect must touch both the anthers and stigmas.
o The flowers have landing platform for the insects.
o The flowers are protandrous with bilipid corolla and have turned pipe or liver
mechanism.
o Each stamen has long connective which bears a fertile anther lobe at the upper
 End and sterile plate like anther lobe at the lower end. The two sterile anther plates
 Block the path of insects.
o As the insect moves toward in a young flower in search of nectar, its head
 Pushes, the anther plates and forces the fertile anther lobes to strike against its back.
o In older flowers the style brings the stigma in such a position that it brushes
 Against the back of insects and collect pollen grains brought by the insects from a
young flower.
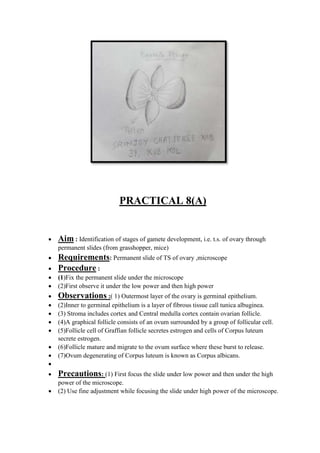
 Begonia flowers (ornithophlious or bird pollinated flowers)
 The flowers of Begonia show the following adaptations for pollination by birds.
 >The flowers are usually brightly colored red, orange, yellow or blue.
o The floral parts are commonly leathery.
o In some cases, the corolla is leathery.
o The flowers secrete abundant watery nectar or have edible parts
o The nectar is secreted in such abundance that drops of it can be brought down
by shaking branches
o The flowers are generally odourless or without fragrance.
PRACTICAL 8(A)
 Aim : Identification of stages of gamete development, i.e. t.s. of ovary through
permanent slides (from grasshopper, mice)
 Requirements: Permanent slide of TS of ovary ,microscope
 Procedure :
 (1)Fix the permanent slide under the microscope
 (2)First observe it under the low power and then high power
 Observations :( 1) Outermost layer of the ovary is germinal epithelium.
 (2)Inner to germinal epithelium is a layer of fibrous tissue call tunica albuginea.
 (3) Stroma includes cortex and Central medulla cortex contain ovarian follicle.
 (4)A graphical follicle consists of an ovum surrounded by a group of follicular cell.
 (5)Follicle cell of Graffian follicle secretes estrogen and cells of Corpus luteum
secrete estrogen.
 (6)Follicle mature and migrate to the ovum surface where these burst to release.
 (7)Ovum degenerating of Corpus luteum is known as Corpus albicans.

 Precautions: (1) First focus the slide under low power and then under the high
power of the microscope.
 (2) Use fine adjustment while focusing the slide under high power of the microscope.
PRACTICAL 8(B)
 Aim:– to study and identify the stages of gamete development on T.S of testis
 Requirements: – slide of T.S of testis, microscope.
 Procedure: - (1) Fix the permanent slide under the microscope.
 (2) First observe it under the low power and then is high power.
 Observations: - (1) The mammalian testis is covered by a thick fibrous tissue
called tunica albuginea.
 (2) Outermost layer of testis is tunica verginalis.
 (3)Testis have 250 compartments of testicular lobules, each contains 1to 3 highly
coiled seminiferous tubules.
 (4)Spermatogonia are formed from germinal epithelium of seminiferous tubules.
 (5)Long cells known as Sertoli cells are present in testis which nourishes the
Spermatogonia.
 (6)Sperms can be observed collected in the centre of seminiferous tubules.
 (7) Interstitial tissue also contains leydig cells which provide sex hormone –
testosterone, dermal cells are in the sequence.
 SPERMATOGONIA > SPERMATOCYTES >
 SPERMATIDS>SPERMATOZOA > SPERMS
 PRECAUTION: - (1) Try not is touch the slide with our naked figure.
 (2)Slide should be first focused in low power then in high power.
 (3)Use fine adjustment while focusing the slide under high power of microscope.
PRACTICAL-9
 Aim- To study meiosis in onion bud cells through permanent slide.
 Requirements-
1. Permanent slide of different stages of meiosis in bud cells.
2. Microscope.
Observations -
Under the high power of microscope following stages of meiosis were distinctly
observed:
 MEIOSIS- I
1. Prophase - It was of long duration and had five sub-stages:
(a)Leptotene
 Chromatin fibres were condensed and formed thick thread like structures called
chromosomes.
 Nuclear envelope nucleolus was distinct.
(b)Zygotene
 Homologous chromosomes were formed in pairs called bivalent. This pairing
was called synapsis.
 The individual of a pair were similar in length and in position of their
centromere.
(c)Pachytene
 The two chromatids of each chromosome became visible, so that a bivalent
would become a tetrad.
Crossing over (exchange of chromatids segments between homologous
chromosomes had taken place between non-sister chromatids of homologous
chromosomes.)
(d)Diplotene
 The two chromosomes of each bivalent moved away and homologous were held
together at one or more points called chiasmata.
(e)Diakinesis
 Homologous chromosomes appeared were thick and ring shaped.
 Nucleolus and nuclear envelope were disappeared and spindle began to be
formed.
2. Metaphase I–
 The bivalent (homologous chromosomes) arranged themselves at the equator of
the spindle
 The spindle got attached to the centromere of the chromosome.
3. Anaphase I
i) The two chromosome of each bivalent moved to the opposite pole.
ii) Each pole has half the number of chromosomes with two chromatids each.
4. Telophase I
i) The chromosome at each pole uncoils, and nucleolus and nuclear envelope reappeared.
ii) Cytokinesis taken place to form two haploid daughter cells.
Interkinesis
A very short interphase might have been intervened between meiosis I and meiosis II.
B. Meiosis II
It include following four stages ---
1. Prophase II
(i) The chromosomes of daughter cell began to condense and become thick.
(ii) Nuclear envelope and nucleolus started disappearing..
2. Metaphase II
(i) The chromosomes were arranged on the equator of the spindle.
(ii) Each chromosome was held by the spindle at the centromere to both the poles.
3. Anaphase II
(i) The sister chromatids (daughter chromosomes) of each chromosome got separated and
started migrating towards the opposite poles.
(i) Each pole, thus received haploid number of chromosomes.
4.Telophase II
(i) They began to uncoil and became thin.
(ii) The nuclear envelope and nucleolus were reconstituted.
Cytokinesis occurred and four daughter cells are formed, each with haploid number of
chromosomes.
Precautions
1. Floral buds have been fixed between 8 to 10 AM.
2. Slide was warmed gently to avoid overheating.
PRACTICAL 10
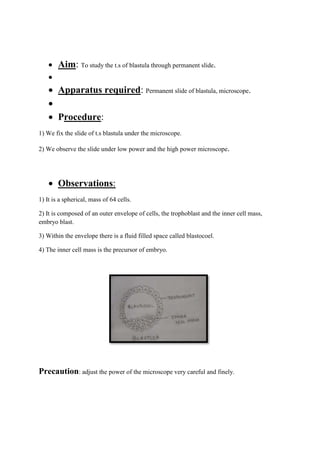
 Aim: To study the t.s of blastula through permanent slide.

 Apparatus required: Permanent slide of blastula, microscope.

 Procedure:
1) We fix the slide of t.s blastula under the microscope.
2) We observe the slide under low power and the high power microscope.
 Observations:
1) It is a spherical, mass of 64 cells.
2) It is composed of an outer envelope of cells, the trophoblast and the inner cell mass,
embryo blast.
3) Within the envelope there is a fluid filled space called blastocoel.
4) The inner cell mass is the precursor of embryo.
Precaution: adjust the power of the microscope very careful and finely.
PRACTICAL 11
 Aim: -To study the prepared pedigree charts of genetic traits such as rolling of
tongue, widow’s peak, colour blindness.
 Requirements: -Prepared pedigree chart of the genetic traits.
 Procedure: -The given pedigree charts were observed and comments were written
on it.

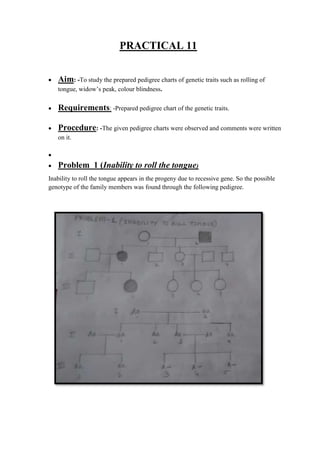
 Problem 1 (Inability to roll the tongue)
Inability to roll the tongue appears in the progeny due to recessive gene. So the possible
genotype of the family members was found through the following pedigree.
Analysis:-
The trait is present in the father parent due to presence of two recessive genes [I- 2 (aa)].The
trait can appear in the progeny only when it becomes homozygous recessive. Since only one
of their progeny carries the trait, the mother parent must be heterozygous (test cross- Aa × aa
= 50% heterozygous, 50% recessive). So I – 1 is (Aa ), II -1is (aa ) and II-2,II-3, II-4 are
heterozygous and therefore( Aa). The cross between II-1 and her husband also produces one
homozygous recessive [III-2 = (aa)]. This is possible only if the outsider is heterozygous
(Aa). Naturally III-1 is also a heterozygous (Aa). II-3 is heterozygous (Aa). Her husband can
either be heterozygous (Aa × AaAA,2 Aa, aa) or homozygous dominant (Aa × AA 2AA,
2Aa). Since none of the progeny is with recessive rolling tongue the possibility is that the
new entrant in the pedigree is homozygous dominant (AA). Therefore III-3, III-4, III-5, are
either AA or Aa.
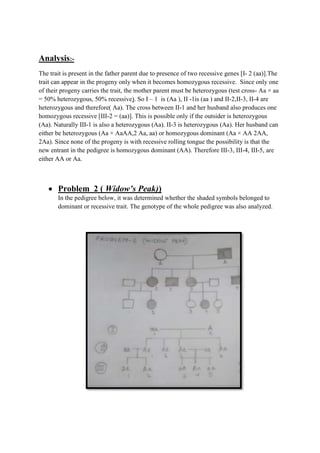
 Problem 2 ( Widow’s Peak))
In the pedigree below, it was determined whether the shaded symbols belonged to
dominant or recessive trait. The genotype of the whole pedigree was also analyzed.
Analysis: -
Since the shaded symbol appears in all the offspring, father must be homozygous
dominant while the mother homozygous recessive (AA × aa= all Aa) because in all other
cases this possibility is absent (Aa × aa = 2Aa+2aa; aa × AA = all Aa; aa × Aa = 2aA +
2aa). All of theII generation will, therefore, be heterozygous (Aa). This is further
confirmed by marriage of II- 1 with homozygous recessive (Aa × aa = aa + Aa) bears
children of both the parental types. Marriage of II- 3 with the homozygous recessive can
produce both recessive and heterozygous.
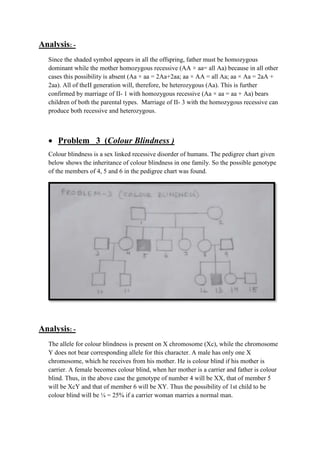
 Problem 3 (Colour Blindness )
Colour blindness is a sex linked recessive disorder of humans. The pedigree chart given
below shows the inheritance of colour blindness in one family. So the possible genotype
of the members of 4, 5 and 6 in the pedigree chart was found.
Analysis: -
The allele for colour blindness is present on X chromosome (Xc), while the chromosome
Y does not bear corresponding allele for this character. A male has only one X
chromosome, which he receives from his mother. He is colour blind if his mother is
carrier. A female becomes colour blind, when her mother is a carrier and father is colour
blind. Thus, in the above case the genotype of number 4 will be XX, that of member 5
will be XcY and that of member 6 will be XY. Thus the possibility of 1st child to be
colour blind will be ¼ = 25% if a carrier woman marries a normal man.
PRACTICAL 12
 Aim: To identify common disease causing organisms like Ascaris, Entamoeba,
Plasmodium, any fungus causing ringworm through permanent slides, models or
virtual images. Comment on symptoms of diseases that they cause.
 Principle: There are a large number of organisms which are pathogenic
/parasitic to humans. These organisms substantially damages human body and cause
diseases, which may be fatal sometimes.
Characteristic morphological features are identified in these organisms and the
symptoms are carefully observed to study the proper behavior of the organisms.
 Materials required: preserved specimen / permanent slide / photographs of
Ascaris, Entamoeba, Plasmodium, ring worm fungus (Trichophyton), compound
microscope
 Procedure :
1. The preserved specimens/permanent slides /photographs of the organisms are
observed.
2. Their characteristic features are noted in the record book
3. Carefully the diagram of the pathogen is drawn and labeled.
 Observation
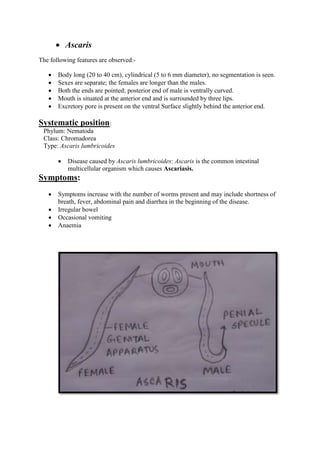
 Ascaris
The following features are observed:-
 Body long (20 to 40 cm), cylindrical (5 to 6 mm diameter), no segmentation is seen.
 Sexes are separate; the females are longer than the males.
 Both the ends are pointed; posterior end of male is ventrally curved.
 Mouth is situated at the anterior end and is surrounded by three lips.
 Excretory pore is present on the ventral Surface slightly behind the anterior end.
Systematic position:
Phylum: Nematoda
Class: Chromadorea
Type: Ascaris lumbricoides
 Disease caused by Ascaris lumbricoides: Ascaris is the common intestinal
multicellular organism which causes Ascariasis.
Symptoms:
 Symptoms increase with the number of worms present and may include shortness of
breath, fever, abdominal pain and diarrhea in the beginning of the disease.
 Irregular bowel
 Occasional vomiting
 Anaemia
 Entamoeba
The following features are observed:-
 It is unicellular
 Shape is irregular and presence of pseudopodia is seen.
 Eccentrically located single nucleus is seen.
 In the nucleus a peripheral ring of granule of nucleoprotein and central karyosome are
observed. Rest of the space in the nucleus looks empty.
 Contractile vacuoles are absent but many food vacuoles can ob observed.
(Mature quadric nucleated cysts may be present.
Systematic position:
Phylum: protozoa
Class: Tubulinea (Superclass: Rhizopoda)
Type: Entamoeba histolytica
 Disease caused by Entamoeba: Entamoeba is an intestinal parasite in
humans and causes amoebic dysentery.
Symptoms:
 frequent loose
 mucus filled watery stools
 abdominal pain and spasms
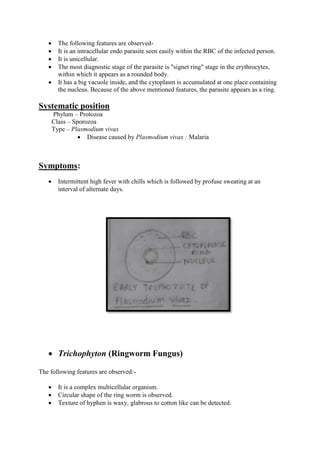
 Plasmodium vivax
 The following features are observed-
 It is an intracellular endo parasite seen easily within the RBC of the infected person.
 It is unicellular.
 The most diagnostic stage of the parasite is "signet ring" stage in the erythrocytes,
within which it appears as a rounded body.
 It has a big vacuole inside, and the cytoplasm is accumulated at one place containing
the nucleus. Because of the above mentioned features, the parasite appears as a ring.
Systematic position
Phylum – Protozoa
Class – Sporozoa
Type – Plasmodium vivax
 Disease caused by Plasmodium vivax : Malaria
Symptoms:
 Intermittent high fever with chills which is followed by profuse sweating at an
interval of alternate days.
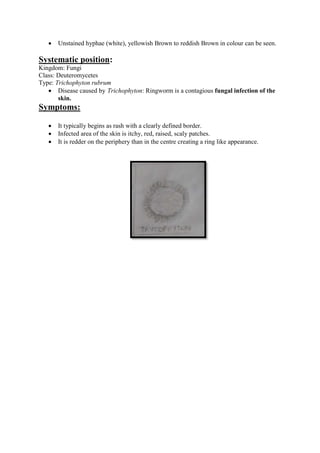
 Trichophyton (Ringworm Fungus)
The following features are observed:-
 It is a complex multicellular organism.
 Circular shape of the ring worm is observed.
 Texture of hyphen is waxy, glabrous to cotton like can be detected.
 Unstained hyphae (white), yellowish Brown to reddish Brown in colour can be seen.
Systematic position:
Kingdom: Fungi
Class: Deuteromycetes
Type: Trichophyton rubrum
 Disease caused by Trichophyton: Ringworm is a contagious fungal infection of the
skin.
Symptoms:
 It typically begins as rash with a clearly defined border.
 Infected area of the skin is itchy, red, raised, scaly patches.
 It is redder on the periphery than in the centre creating a ring like appearance.
PRACTICAL 13
Aim:-To study the morphological adaptations of two plants and two animals
(models/virtual images) found in xeric conditions.
Requirements:-Virtual images or models of two plants and two animals found in xeric
conditions.
Observation:-
1. Capparis decidua
Comments
 It is a drought enduring non-succulent xerophyte.
 The leaves do not open completely and remain on the plant for very short period to
reduce transpiration.
 The stipules are modified into slightly curved spines to reduce transpiration and check
grazing.
 The function of photosynthesis is mainly carried out by green stem.

2. Acacia arabica
Comments
 It is a xerocoles rodent, which avoid heat by adapting nocturnal habits ( i.e active in
the nights ).
 It conserves water by excreting solid urine and can live from birth to death without
drinking water.
 It seal its burrow by day to keep its chamber moist.
 It obtains water from its own metabolic processes and from hygroscopic water in its
food.
3. Kangaroo Rat
Comments
 It is a xerocoles rodent, which avoid heat by adapting nocturnal habits (i.e active
during night).
 It conserves water by excreting solid urine and can live from birth to death without
drinking water.
 It seal its burrow by day to keep its chamber moist.
 It obtains water from its own metabolic processes and from hygroscopic water in its
food.
4. Camel
Comments
 It is a xerocoles animal adapted to the desert conditions.
 It is able to tolerate wide range of temperature fluctuations and is able to maintain
blood moisture even during hot period.
 It excretes concentrated urine and can withstand dehydration upto 25% of its body
weight.
 It accumulate its fat in the hump rather than all over the body. This speeds heat flow
away from the body and its thick coat prevents the flow of the heat inwards to the
body.
 Its feet has two toes each with fleshy pad below which spread the load on sand
enable it to move on hot and slippery sand.
 Its slender snout bears a cleft upper lip, long eye lashes and muscular nostrils which
can be closed for protection from wind blow sand.
PRACTICAL 14
 Aim: study of two plants and two animals found in aquatic conditions and comment
upon their adaptations/ morphological features.
1. Eichhornia(Water hyacinth)
Comments
 It is a free-floating hydrophyte that grows in water bodies containing
fresh water.
 When the level of water is low, the plant gets rooted in the soil.
 The stem is offset that grows prostrate below the surface of water. It is
spongy and stores air.
 The leaves arise at the nodes in clusters. The petioles of the leaves are
inflated that keep the leaves out of water.
 The emerged leaves have waxy and cuticular coating to keep it
waterproof.
2. Nelumbo nucifera (Sacred lotus)
Comments
 The leaves are very wide and disc shaped which allows the lotus to
float on water and absorb large amount of sunlight.
 The stem and leaf surfaces are coated with a wax which is hydrophobic
in nature.
 Heat is produced from the flower, stem, roots and leaves which
regulate the surrounding water temperature.
 Birds and insects are attracted towards them due to their brilliant
colors.
 The seeds are distributed through water. A hard nut-like fruit is formed
after blooming and fell in water after it is dried out.
1. A Freshwater Fish (Rohu or Carp)
Comments
 Its body is compressed laterally to reduce friction and to allow it swift passage in the
water while swimming.
 It has fins that help in swimming.
 It has an air bladder which maintains buoyancy.
 It has gills as organs of respiration for the exchange of gases underwater.
 The body is covered with impermeable scales to prevent the osmotic entry of water
inside the body.
2. Scyphozoa(True Jellyfish)
Comments
 Its tentacles bear nematocysts which helps them in their defense and to
capture their prey.
 It has umbrella-shaped bells which pulsate to provide propulsion and
highly efficient locomotion.
 It exhibits two morphological body plans, the polyp which is sessile and
the medusa which is mobile.
 Gases are diffused through the epidermis of the jelly fish.
APPENDIX
CBSE Class 12 Biology Practical .docx