CamStudio User Guide - VIDEO EDITING AND MAKING SOFTWARE
•
0 likes•553 views

CamStudio is a free and open-source screen recording software for Windows. It allows users to record videos of their desktop and add annotations. The summary documents key steps for configuring and using CamStudio: 1) Configure video options such as compression type, quality, and frame rates. Set audio options like device and format. 2) Use screen annotations to add captions during recording by creating shapes and layouts. Video annotations allow adding webcam video. 3) Define the recording region as a custom region, fixed region, or full screen. Start recording to capture desktop activity within the region.

Recommended
More Related Content
What's hot
What's hot (20)
Similar to CamStudio User Guide - VIDEO EDITING AND MAKING SOFTWARE
Similar to CamStudio User Guide - VIDEO EDITING AND MAKING SOFTWARE (20)
More from MUHAMMAD HUZAIFA CHAUDHARY
More from MUHAMMAD HUZAIFA CHAUDHARY (20)
Recently uploaded
Recently uploaded (16)
CamStudio User Guide - VIDEO EDITING AND MAKING SOFTWARE
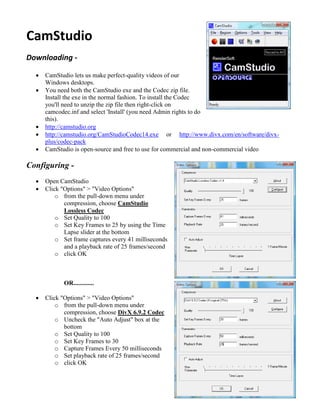
- 1. CamStudio Downloading - CamStudio lets us make perfect-quality videos of our Windows desktops. You need both the CamStudio exe and the Codec zip file. Install the exe in the normal fashion. To install the Codec you'll need to unzip the zip file then right-click on camcodec.inf and select 'Install' (you need Admin rights to do this). http://camstudio.org http://camstudio.org/CamStudioCodec14.exe or http://www.divx.com/en/software/divx- plus/codec-pack CamStudio is open-source and free to use for commercial and non-commercial video Configuring - Open CamStudio Click "Options" > "Video Options" o from the pull-down menu under compression, choose CamStudio Lossless Codec o Set Quality to 100 o Set Key Frames to 25 by using the Time Lapse slider at the bottom o Set frame captures every 41 milliseconds and a playback rate of 25 frames/second o click OK OR............. Click "Options" > "Video Options" o from the pull-down menu under compression, choose DivX 6.9.2 Codec o Uncheck the "Auto Adjust" box at the bottom o Set Quality to 100 o Set Key Frames to 30 o Capture Frames Every 50 milliseconds o Set playback rate of 25 frames/second o click OK
- 2. Setting the video options allows you to optimize your video recordings by choosing between the file size, quality and frame rates of your video files. Auto Adjust Use the Auto Adjust settings to set the Key Frame Rate, Capture Rate and Playback Rate automatically through the slider. Shift the slider to the left to increase the frame rate and to the right to reduce file size. If the slider is situated at the right of the Time Lapse indicator, it means you are creating a time-lapse movie. In Time Lapse mode, CamStudio will usually capture a frame only after a long period of time. (Example: after every 30 seconds). However, during playback, the frames will be displayed more quickly. (Example: at 20 frames per second). Compressor The Compressor select-box allows you to select the encoder for your AVI file. An encoder compresses your AVI files to make them smaller in size and cause them to play faster. The default setting is the MS Video 1 compressor. Configure Click this button to configure the parameters of your selected compressor. The parameters for each compressor is different and some settings will cause CamStudio’s performance to degrade or behave unpredictably. For some compressors, clicking this button will not have any effect. Quality The quality setting determines how nicely your picture is saved. A lower value means a lower picture quality but also a smaller file size. Only some compressors use this value. Set Key Frames Every This setting specifies the keyframe rate. When a frame is saved in an AVI file, they can either be saved as a full frame, or only partially as a difference to the previous frame. The keyframe rate specifies how often full frames are written to the AVI file. A high value means you can fast forward/rewind to a particular frame in your movie much faster. But it also means a higher file size. Capture Frames Every This field determines the input frame rate. It dictates how long the CamStudio will ‘sleep’ after capturing each frame. One millisecond is 1/1000 of a second. If you set this to a large value (for example 1 hour, or 3,600,000 milliseconds), you practically create a time-lapse movie. CamStudio will actually ‘sit and watch’ for activities on the screen that takes a long time to occur and take a snapshot (say, only once every hour).
- 3. Playback Rate This field determines the output frame rate. It specifies how many frames are played back per second. A higher value means a smoother playback. Typical values of 20 – 30 frames per seconds are adequate for most purposes. Click "Options" > "Cursor Options" o This is where you can decide how your cursor looks and works in CamStudio o In my case, I am choosing to show the actual cursor with a yellow highlighted circle to accentuate the place I want the viewer to locate. Click "Options" > check "Record audio from Microphone Click "Options" > "Audio Options" o under Audio Capture Device, select the audio device you are using (i.e. microphone/headset) o the Recording Format should be set to 44.1 kHz and mono 16-bit o the Compressed Format should be MPEG Layer-3 (if not present, press the "Choose Compressed Format" button and choose it from the list) o check both boxes in Interleave every "41" milliseconds and Use MCI Recording o click OK
- 4. Click "Options" > "Program Options" o check Minimize program at start recording o check Save Settings on Exit and Capture Translucent/Layered Windows o In Play AVI file..........check Use CamStudio Player 2.0 o In Temporary Directory...........check Use Windows Directory o In Recording Thread............check Normal o In Name of AVI file...............check Ask for name Setting Regions (From the main menu, choose Regions->Region or Fixed Region or Full Screen) You should set the Input Region before recording. This allows you to define the area and type of video capture. From the main menu, choose Region There are 3 types of regions you can choose: 1) Region Before recording starts, you can define an arbitrary rectangular region with the mouse. The cursor turns into a pen on cross-hairs, which you use to define a rectangular region on your screen by click-dragging the left mouse button. 2) Fixed Region… You can capture a fixed-size rectangular region. A dialog allows you to define the size of the region in pixels. If the Fixed Top-Left Corner checkbox is not selected. Before the recording starts, you can move the fixed-size region around the screen to determine where you want the input area to be. To cancel recording, you can click the right mouse button. If the Fixed Top-Left Corner checkbox is selected. Recording will start immediately when the Record Button is clicked. The region of capture is specified by the Left, Top, Width and Height values of the dialog above.
- 5. If the Drag Corners to Pan checkbox is selected, you can drag either one of the four corners of the recording region (indicated by the flashing rectangle) with your mouse during recording. The mouse cursor will change to a four-pointed arrow when it is over one of the corners. When this happens, click and drag the region to the new location. 3) Screen The entire computer screen is captured. Screen Annotations (From the main menu, choose Tools->Screen Annotations) The Screen Annotations feature allows you to add captions to your screen during recording. An example of a screen annotation is shown below: You can display the Screen Annotations dialog box by clicking on the icon or choose Tools->Screen Annotations from the main menu. Screen annotations consist of two main components: Shapes and Layouts. To instantiate the shape Orange Gradient, simply double click on it or drag it out of the Screen Annotations dialog box.
- 6. Shapes A shape is just a floating window that will appear on top of all other windows on your desktop. An example is shown below. Instantiating a shape To create the shape above, simply double click on the item Orange Gradient or drag it out of the Screen Annotations dialog box. Editing the shape To edit the shape, right-click on it to display a context menu When you have finished editing the shape, you can save it with the Save command. · The Close command will close / hide the shape on your desktop. · The Close All command will close all shapes on your desktop. · The Refresh command will redraw the shape. · The Save Layout command will save all the shapes and their arrangement on your desktop into a layout. Please refer to the Layout section below for more information. Right-click on a shape to display the context menu shown below. The Clone command allows you to create a copy of the shape. You can edit the shape’s text (message, font color and font style) by choosing Edit Text The Resize command lets you change the width and height of your window. The Anti-Alias command lets you adjust the rendering quality of the shape. A higher quality shape will take more time to draw. You can edit the shape’s image (background, border and cutout region) by choosing Edit Image You can make the shape semi-transparent by choosing Edit Transparency
- 7. Editing Text Select Edit Text from the context menu to change the text of the shape. Clicking on the Font Button allows you to choose the Font Name, Font Style (Bold, Italic, Underline) and Font Color of the shape’s text. The three buttons is used for setting the alignment of text. The Choose Language / Encoding button allows you to choose an appropriate font for your language if it is non-Western (English, French, German etc). This feature is available only on Win 2000 / XP. Editing Image Select Edit Image from the context menu to change the text of the shape. Notice the text is surrounded by a dotted rectangle after you have chosen the Edit Text command. You can move / resize the dotted rectangle by dragging it with your mouse.
- 8. The cutout / transparent region allow you to create non-rectangular windows. It refers to the region that allows the background to show through. There are two methods to create a cutout region. 1) By Transparency Color All areas of the image with the specified transparency color will be made transparent. For example, if the transparency color is Black, the image will be transformed into 2) By using a predefined shape. Currently, the predefined shapes are round-rectangle, ellipse and rectangle.
- 9. For example, a round-rectangle cutout region for the image will be something like For a predefined cutout region, you can add a border, and set the color and size of the border. You can set the Background color for a shape if the shape does not have an image. Otherwise, you can click the Load New Image button to change the background image to a new file. The file formats that are accepted are bmp, gif and jpeg. Editing Transparency Select Edit Transparency from the context menu to change the shape’s transparency. This feature is available only in Win 2000 / XP. Note that recording a transparent window will cause the frame rate to drop significantly. You will also have to enable the Program Options ::Capture Translucent / Layered Window setting for the shape to be properly captured into the AVI movie. Resizing Shapes Select Resize from the context menu to resize the shape.
- 10. Note that a shape with a large size will be drawn and displayed very slowly. Managing and creating shapes In the Screen Annotations dialog box, right click on an item to display a context menu for managing and creating shapes. You can also rename a shape by choosing the Edit Shape Name command or selecting a shape and press F2. You can rearrange the order of the shapes in the list by dragging a shape onto another. For example, to switch the order of the “Flat Text” and “Dialog”, simply drag “Dialog” onto the “Flat Text” item. The Shape Library command lets you 1) Save all your existing shapes into a file 2) Load a shape library file into the Screen Annotations dialog box and 3) Create a new (empty) shape library You can create a new shape by choosing the New Shape command. Right click to display the context menu. You can Copy, Paste or Remove shapes in the Screen Annotations dialog box using these commands.
- 11. Note: In the event your default shape library file CamShapes.ini gets corrupted and is unable to load on startup, you can restore the default shapes by opening the file default.shapes in the installed directory of CamStudio. The New Shape command will launch a dialog box where you can specify the 1) Name of the new shape 2) Image of the new shape 3) Size of the new shape and its 4) Initial text
- 12. Layouts A layout is just the arrangement of one or more shapes on your desktop. An example is shown below You usually prepare all your layouts before recording starts. When you start recording, you will click a hotkey / shortcut key to cycle through the layouts to display the appropriate captions at the proper time. You can manage your layout by clicking on the layout tab of the Screen Annotations dialog. Layout Tab Right Click to display the context menu. You use the Copy Layout, Paste Layout and Remove Layout commands to copy, paste and remove layouts in the Screen Annotations dialog box. The Layout Library command lets you 1) Save all your existing shapes into a file 2) Load a shape library file into the Screen Annotations dialog box 3) Create a new (empty) shape library
- 13. Select a layout and right-click on it to display a context menu for managing the layouts. You can rename a layout by choosing the Edit Layout Name command or selecting a layout and press F2. You can rearrange the order of the layouts in the list by dragging a layout onto another. For example, to switch the order of the “Layout 1” and “Layout 2”, simply drag “Layout 1” onto the “Layout 2” item. Instantiating a layout You instantiate a layout by simply double click on the layout item or drag it out of the Screen Annotations dialog box. By doing so, all the shapes that are saved into the layout will be displayed on the desktop in their correct order and position. Saving a layout To save a layout, first, arrange your shapes in their correct position and order. Right click on any of the shapes to bring up a context menu, and select the Save Layout command. Cycling through layouts You can cycle through the layouts by clicking the Next Layout key in the Screen Annotations dialog box. Every click will close all existing shapes on the desktop and instantiate a new layout. Alternatively, you can use a hotkey / keyboard shortcuts to perform the cycling. To customize the keys for navigating the layouts, you can choose Options->Keyboard Shortcuts from the main menu or Objects->Layout Shortcuts from the Screen Annotations menu. Layout shortcuts The keys for cycling through the layouts are Next Layout Key – key for displaying the next layout Previous Layout Key - key for displaying the previous layout Show / Hide Layout Key - key for showing / hiding the current layout
- 14. Video Annotations (From the main menu, choose Tools->Video Annotations) This feature requires a webcam to be installed on your system. The Video Annotations window is essentially a webcam window. By placing a webcam window on your desktop, you can record its content along with other screen content when the webcam window is inside your recording region. The Video Annotation window does not only stream video content to your desktop. You can also add a text caption, make a cutout region, or set transparency values (Win 2000 / XP only) to the video annotation just like you did for screen annotations. To do so, right-click on the webcam window to display a menu like this The Edit Text, Edit Image and Edit Transparency commands have already been covered in the section on Screen Annotations and will not be explained here. Refresh Rate
- 15. The refresh rate indicates the number of times (frames) CamStudio will attempt to capture an image from your webcam and display it on your screen. The actual rate will usually be much lesser, especially for large sized images. Important : Setting a high refresh rate will degrade the recordings of CamStudio considerably. This is especially true if transparency is turned on. It has been observed that some dialog boxes will not appear when they are selected when the Video Annotation window is shown. To stop the blocking of these dialog boxes, you will need to close the Video Annotation window first. The slowdown in the recording rate will be observed even if the Video Annotations window is not inside the recording region. In fact, the presence of the Video Annotations window will even affect the performance of other programs in your system. Therefore, it is highly advised that you close the Video Annotations window when it is not needed. Sometimes, especially on slower systems, the video of the webcam images will appear to be slightly behind the audio track on playback. This is because the acquisition of an image and its display on the screen is quite demanding on your system resources. The computer will take some time to process the acquired image before showing it on the screen. This latency problem can usually be resolved by 1) Choosing a smaller dimension for your video format or 2) Shifting the video track slightly to align it with the audio track. More information can be found in the section Audio and Video Synchronization below. Video Source You can use the video source dialog to select your webcam or video source for the video annotation. You can also set the brightness, contrast, gain, exposure and other settings related to your webcam video. Video Format The video format dialog is used for selecting the dimensions of your webcam or video source image. You can also set the pixel depth and compression (e.g RGB24, RGB32) of your video. Note: You are advised to choose a small dimension (e.g 160 x 120) for the video format, as a large sized format will slow down your system significantly. The video source and video format dialog boxes will vary on different systems. Its implementation will very much depend on the vendor of your webcam.
- 16. Audio and Video Synchronization (From the main menu, choose Options>Audio Options->Audio and Video Synchronization) If the video and audio track of your recording is not in phase during playback, you can try to shift a stream slightly to make them back in sync. This may happen if you are recording the output of a webcam. The amount of shift is measured in milliseconds, and the appropriate value for the shift can usually be determined after a few trail recordings with different time shift values. Note : The dialog above only handles the case when the audio streams appear to go before the video. Some Notes on the Quality and Performance of the Recording CamStudio creates a movie by sampling the screen on fixed-time intervals. If this sampling frequency is too slow, it may not be able to pick up some cursor movements if the mouse moves too fast. The result of this will be that the cursor will appear to jump, become jerky or even cannot be seen in the recorded movie. It is thus advisable to slow down your mouse movements during recording. This sampling problem can also happen when you are recording a fast animation. If CamStudio cannot record much faster than the changes in the animation, CamStudio will miss out on some important data and the playback will not be smooth. Frame Rates The speed of your computer will directly affect the performance of CamStudio. A slow CPU will unquestionably mean slower frame rates. For the best performance, use the fastest computer available for recording. Apart from CPU speed, the following factors will also affect the performance of the recording: Recording a movie that covers a large area.
- 17. Recording pictures that contain many colors in. Running other applications during recording sessions. File Size An AVI file usually has a very large file size, especially for those lengthy and detailed videos. This is due to the fact that a video file has to pack hundreds and thousands of images into a single file. It is thus very common to have size exceeding one megabyte. To reduce the size of the AVI file, you can do the following: Limiting the area of the region being captured. Limiting the (input) rate of which video frames are captured. This can be set in the Capture Frames Every field of Video Options Changing the compressor and compression quality. By changing the compression quality, you are essentially making a tradeoff between picture quality and the file size. Producing Flash (SWF) Files: CamStudio allows you to produce Flash files in two ways 1) Record directly to Flash To record directly to Flash, simply click the button to toggle the recording mode to . After that you may proceed in the same way as you record an AVI file. There are a few options that you can adjust prior to recording to Flash. These are accessed with the Options :: Record to Flash commands in the menu. The Preview SWF File upon completion instructs CamStudio to display your Flash movie in a HTML file when the production is completed. The process of recording to SWF actually involves multiple steps. CamStudio in fact record your screen activity to an intermediate AVI file first, before converting it to a Flash (SWF) file. The Delete the intermediate AVI file upon completion setting thus instructs CamStudio to delete the intermediate AVI file when the conversion is completed. You may want to preserve the AVI file just in case you’ll like to edit it in an AVI editor, but
- 18. that will take up plenty of space on your hard disk, as the format of the AVI is saved with minimal compression settings. The production an SWF file is affected by many parameters in the SWF Producer. These parameters are, by default, hidden from users, but may be revealed if you turn on the Display conversion options before generating SWF setting. For a full description of these parameters, please refer to the section on “Conversion Parameters” in the SWF Producer help file. 2) Convert an existing AVI file to Flash with the SWF Producer The CamStudio distribution package includes a module known as the SWF Producer that is able to convert an AVI file to SWF. This is actually a separate program that can function independently of the CamStudio Screen Recorder. The SWF Producer is launched by selecting Tools :: SWF Producer from the menu. You can also double click the Producer.exe file in CamStudio’s installed directory to launch it. While the SWF Producer works best with the AVI files recorded with CamStudio, it is in fact capable of converting most AVI files created by third party products. Normally, Flash files generated by the SWF Producer results in a much smaller file than the original AVI. For a full description of the usage of the SWF Producer, please refer to the topic on Standalone mode in the SWF Producer help file.