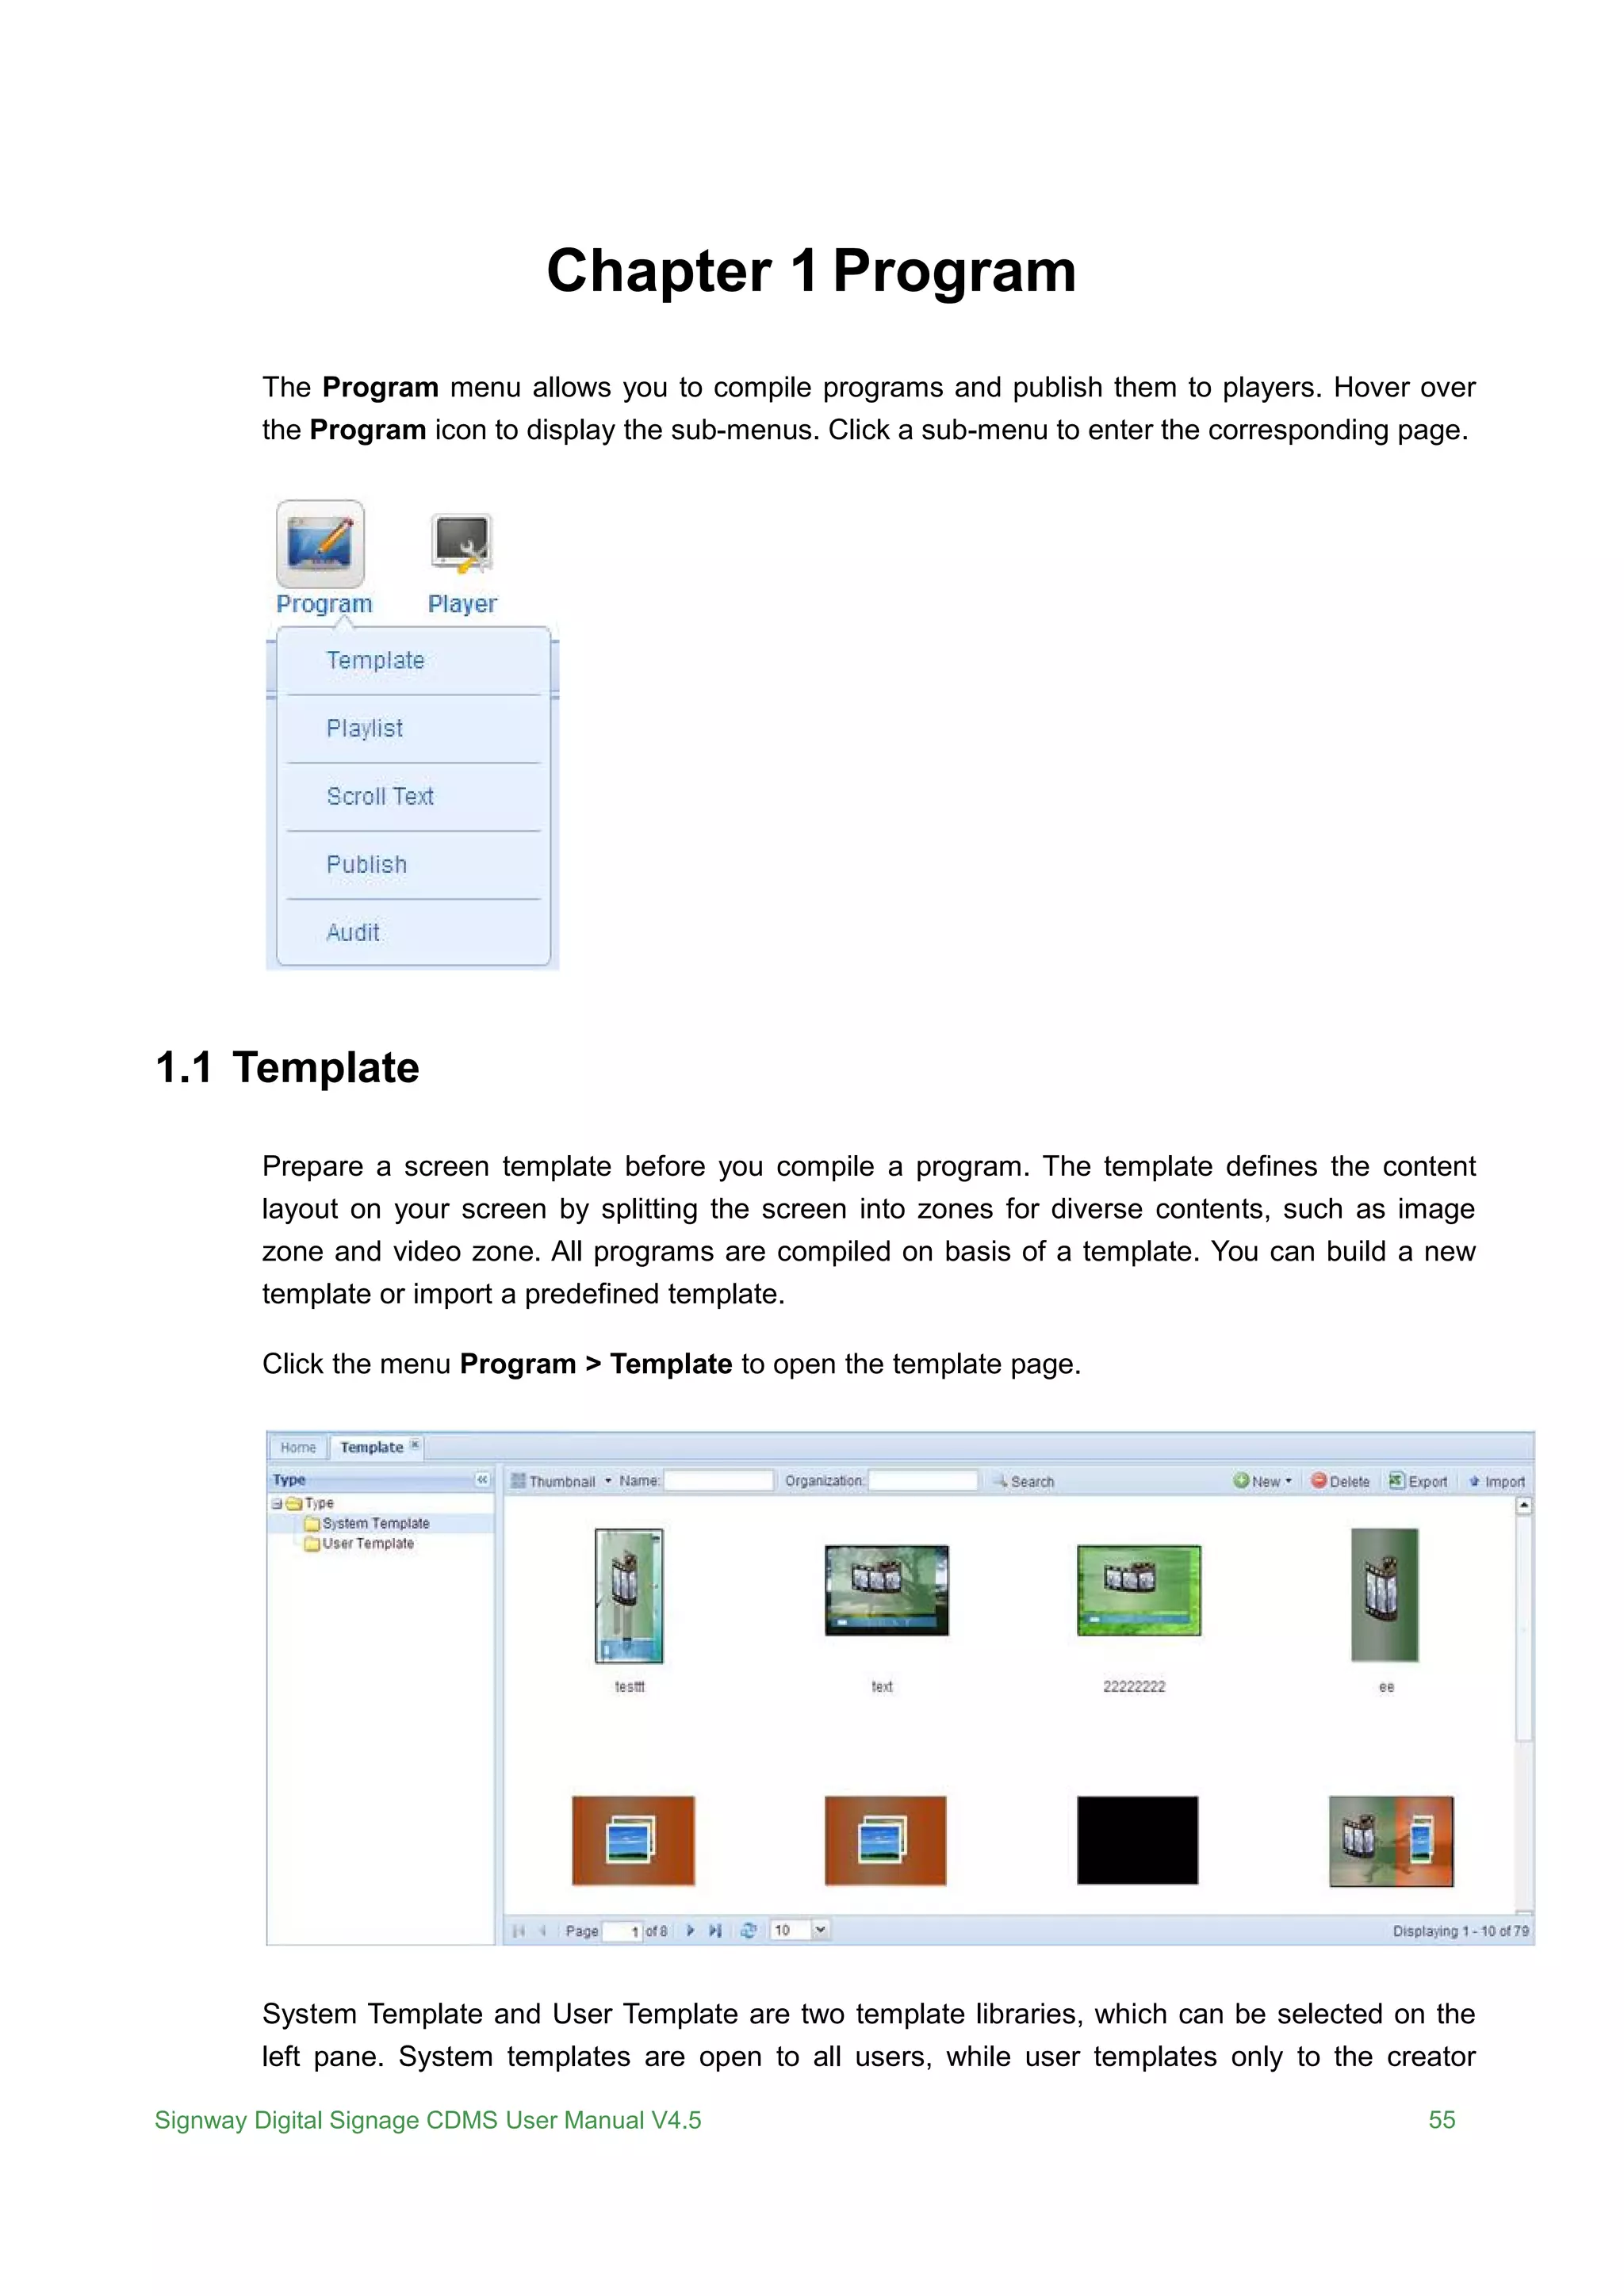
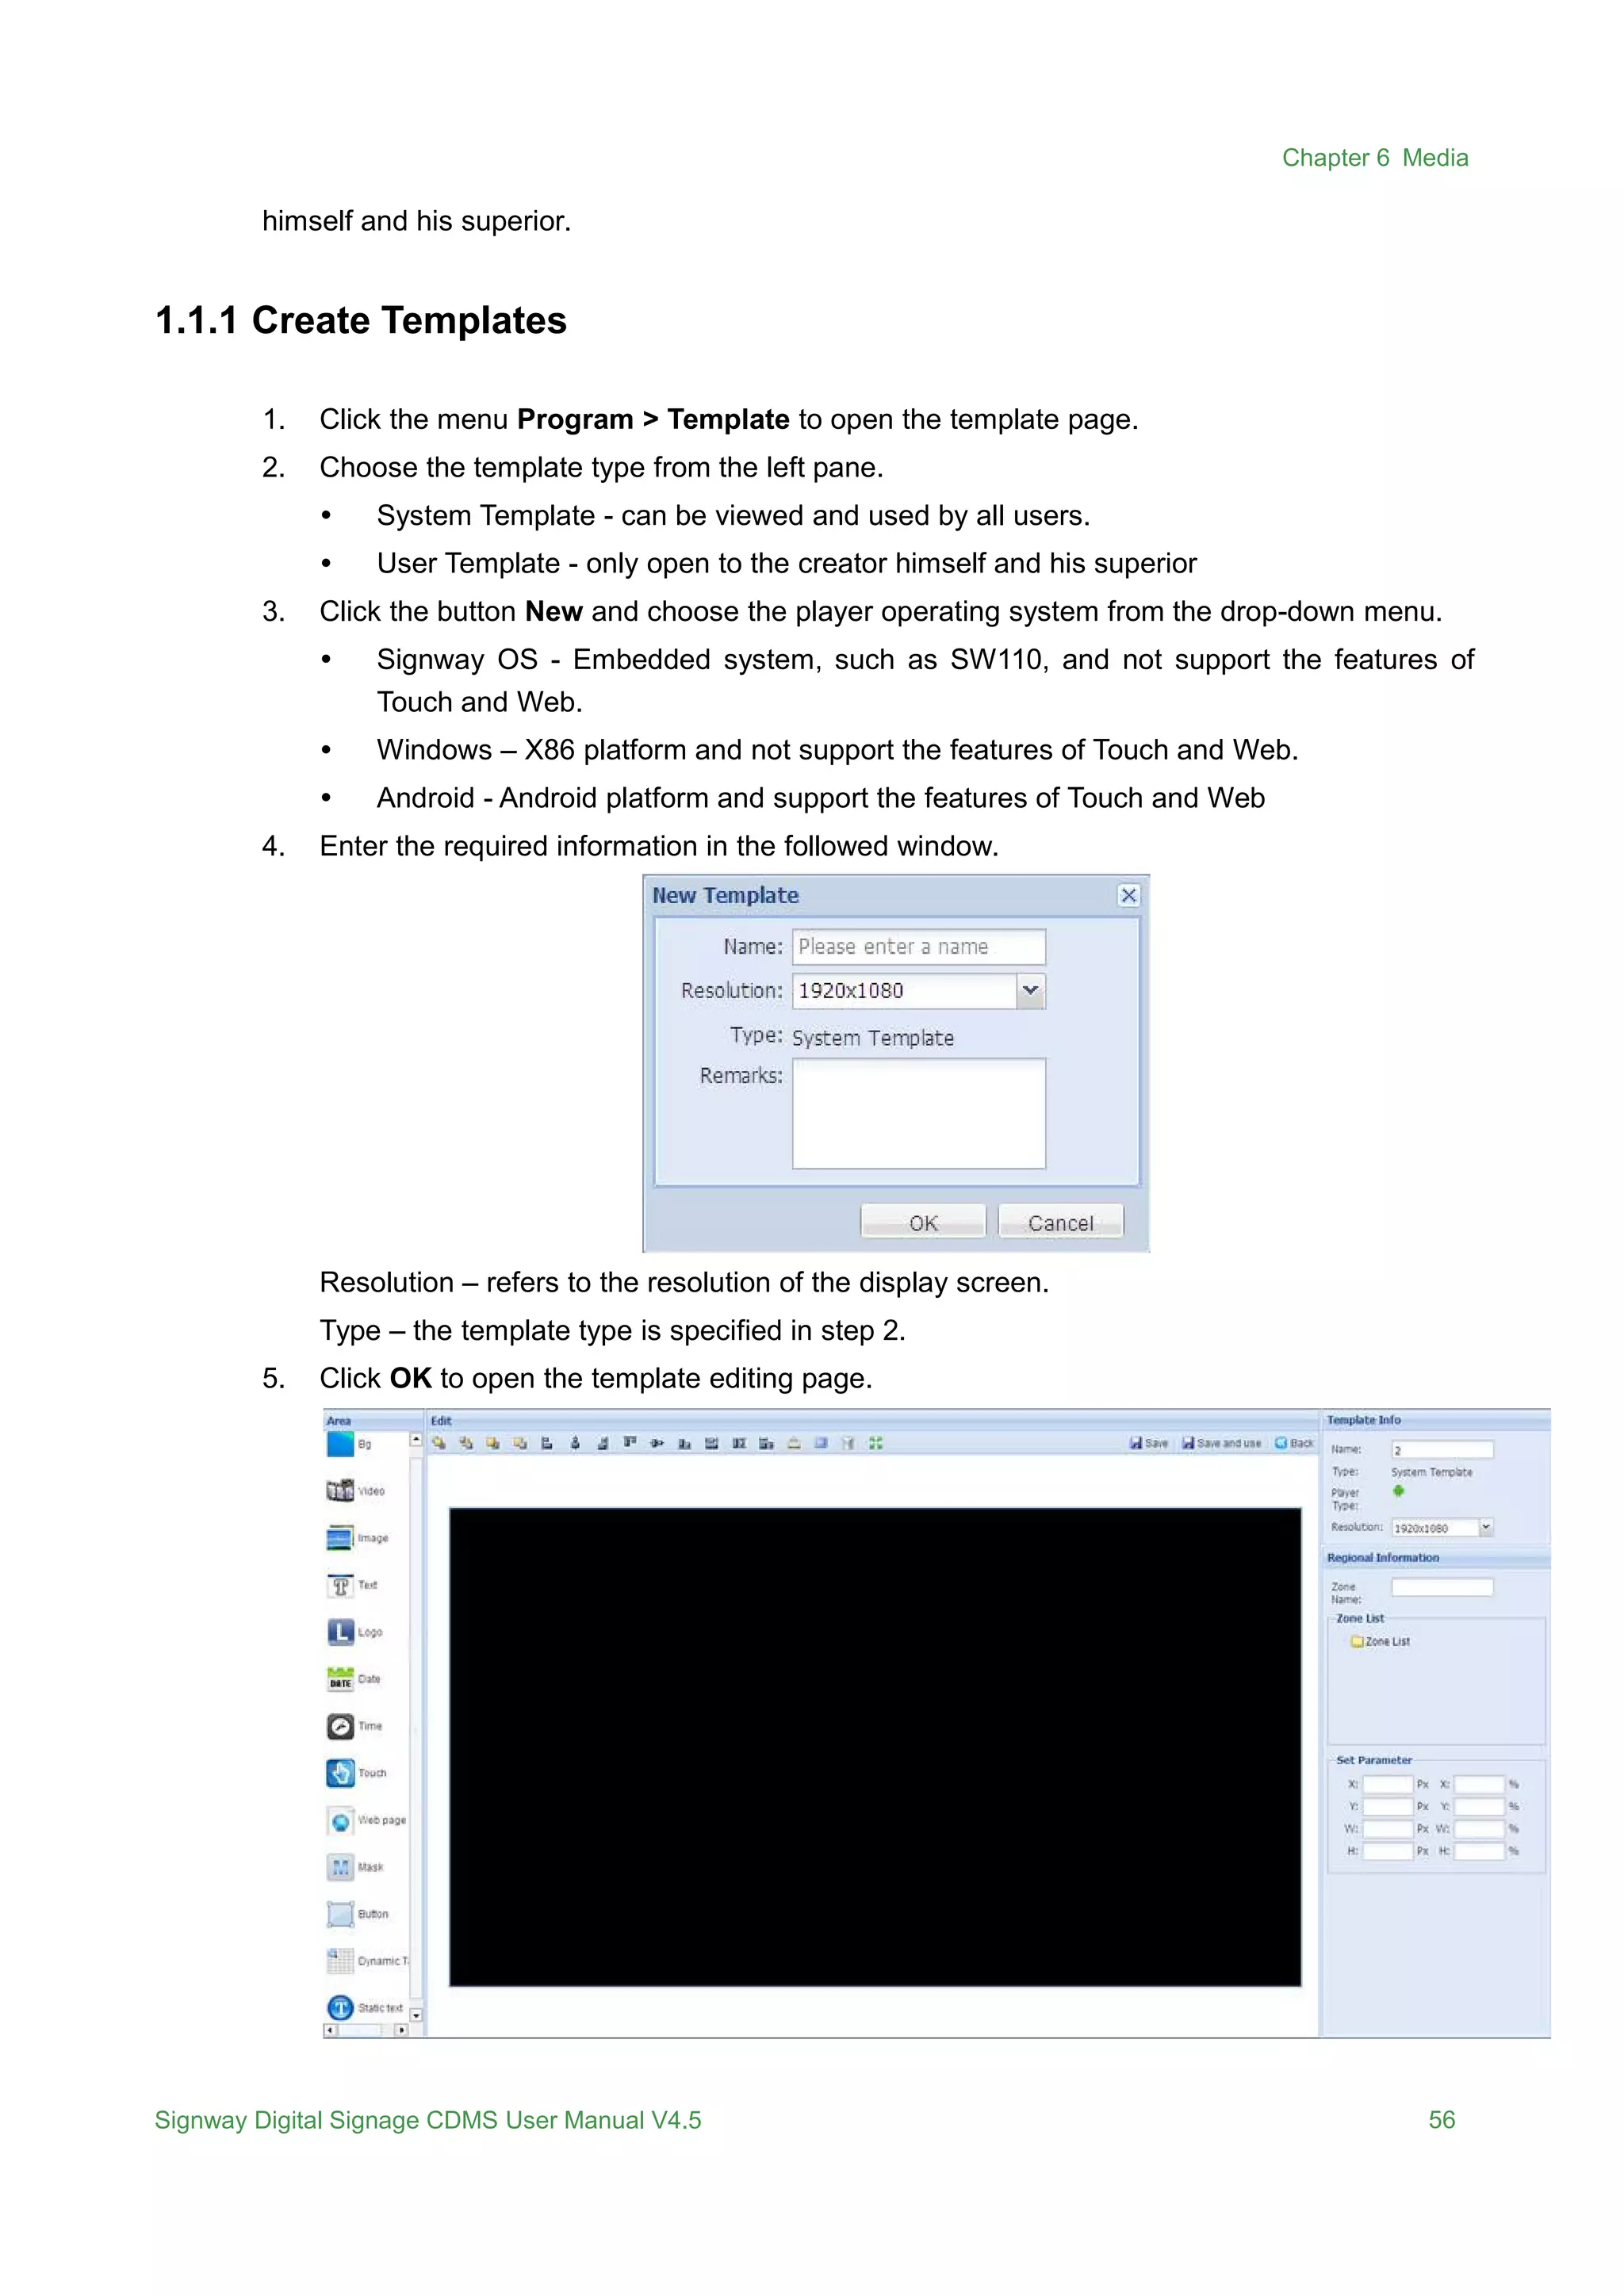
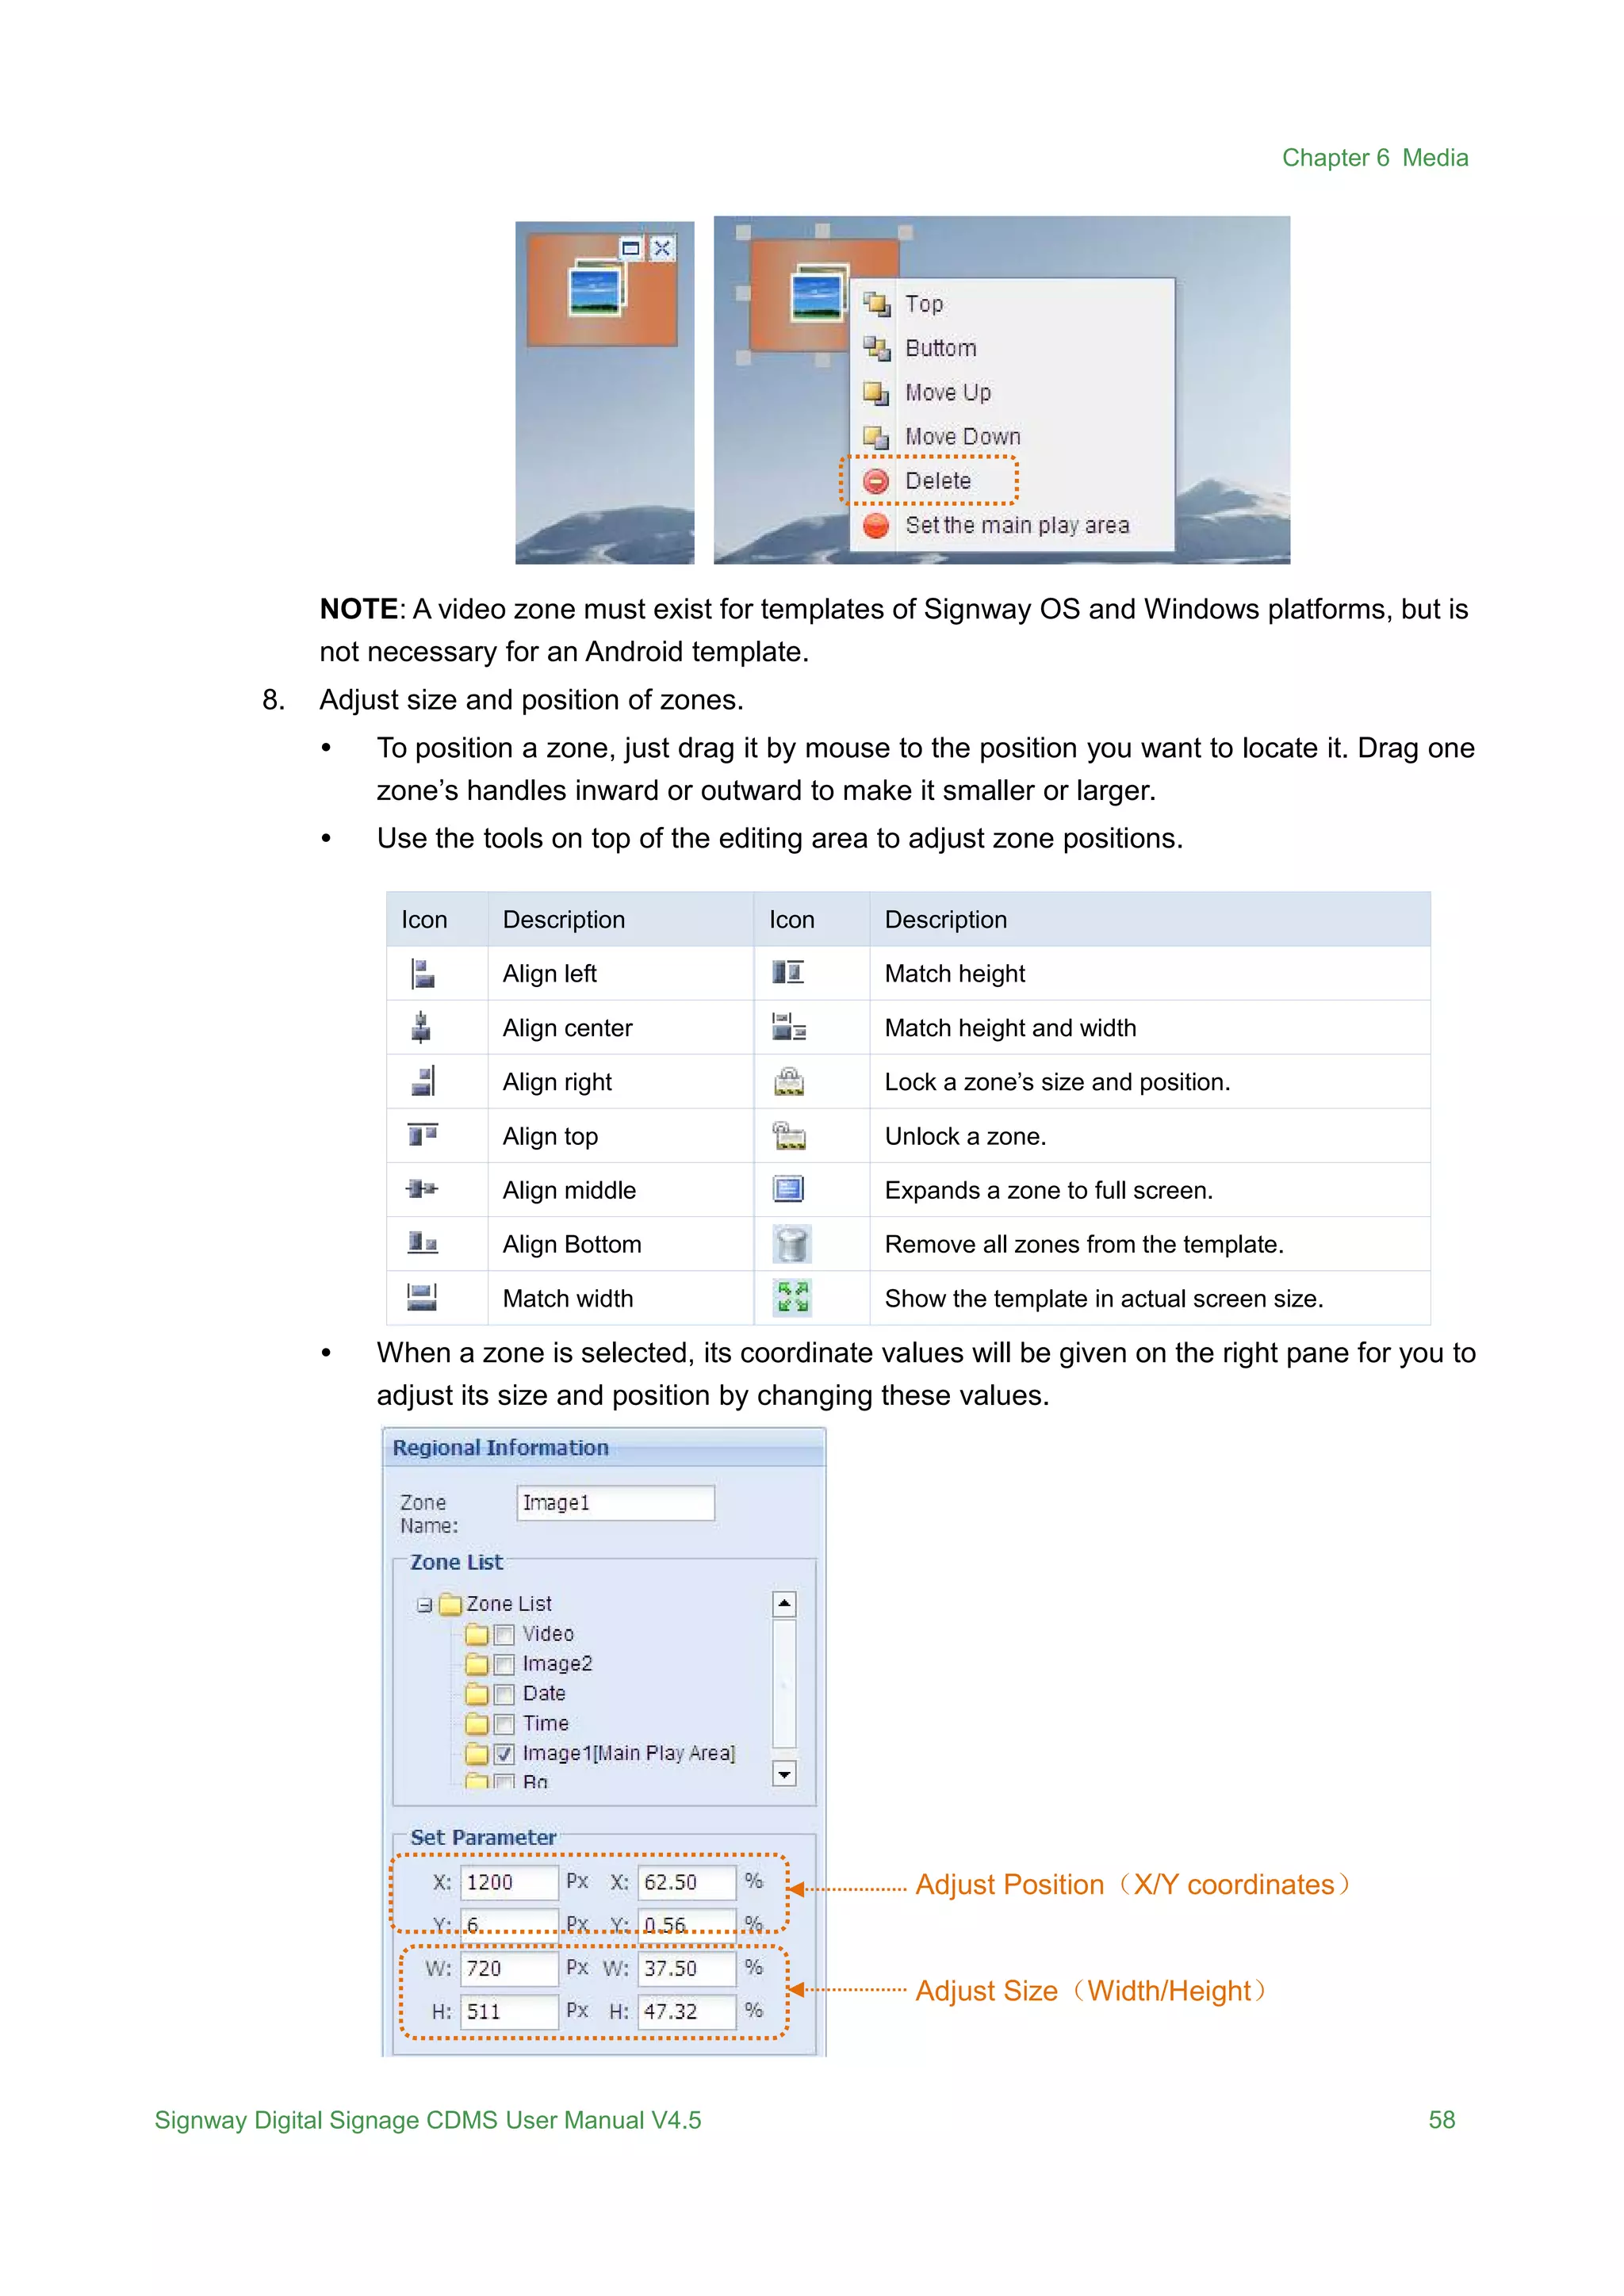
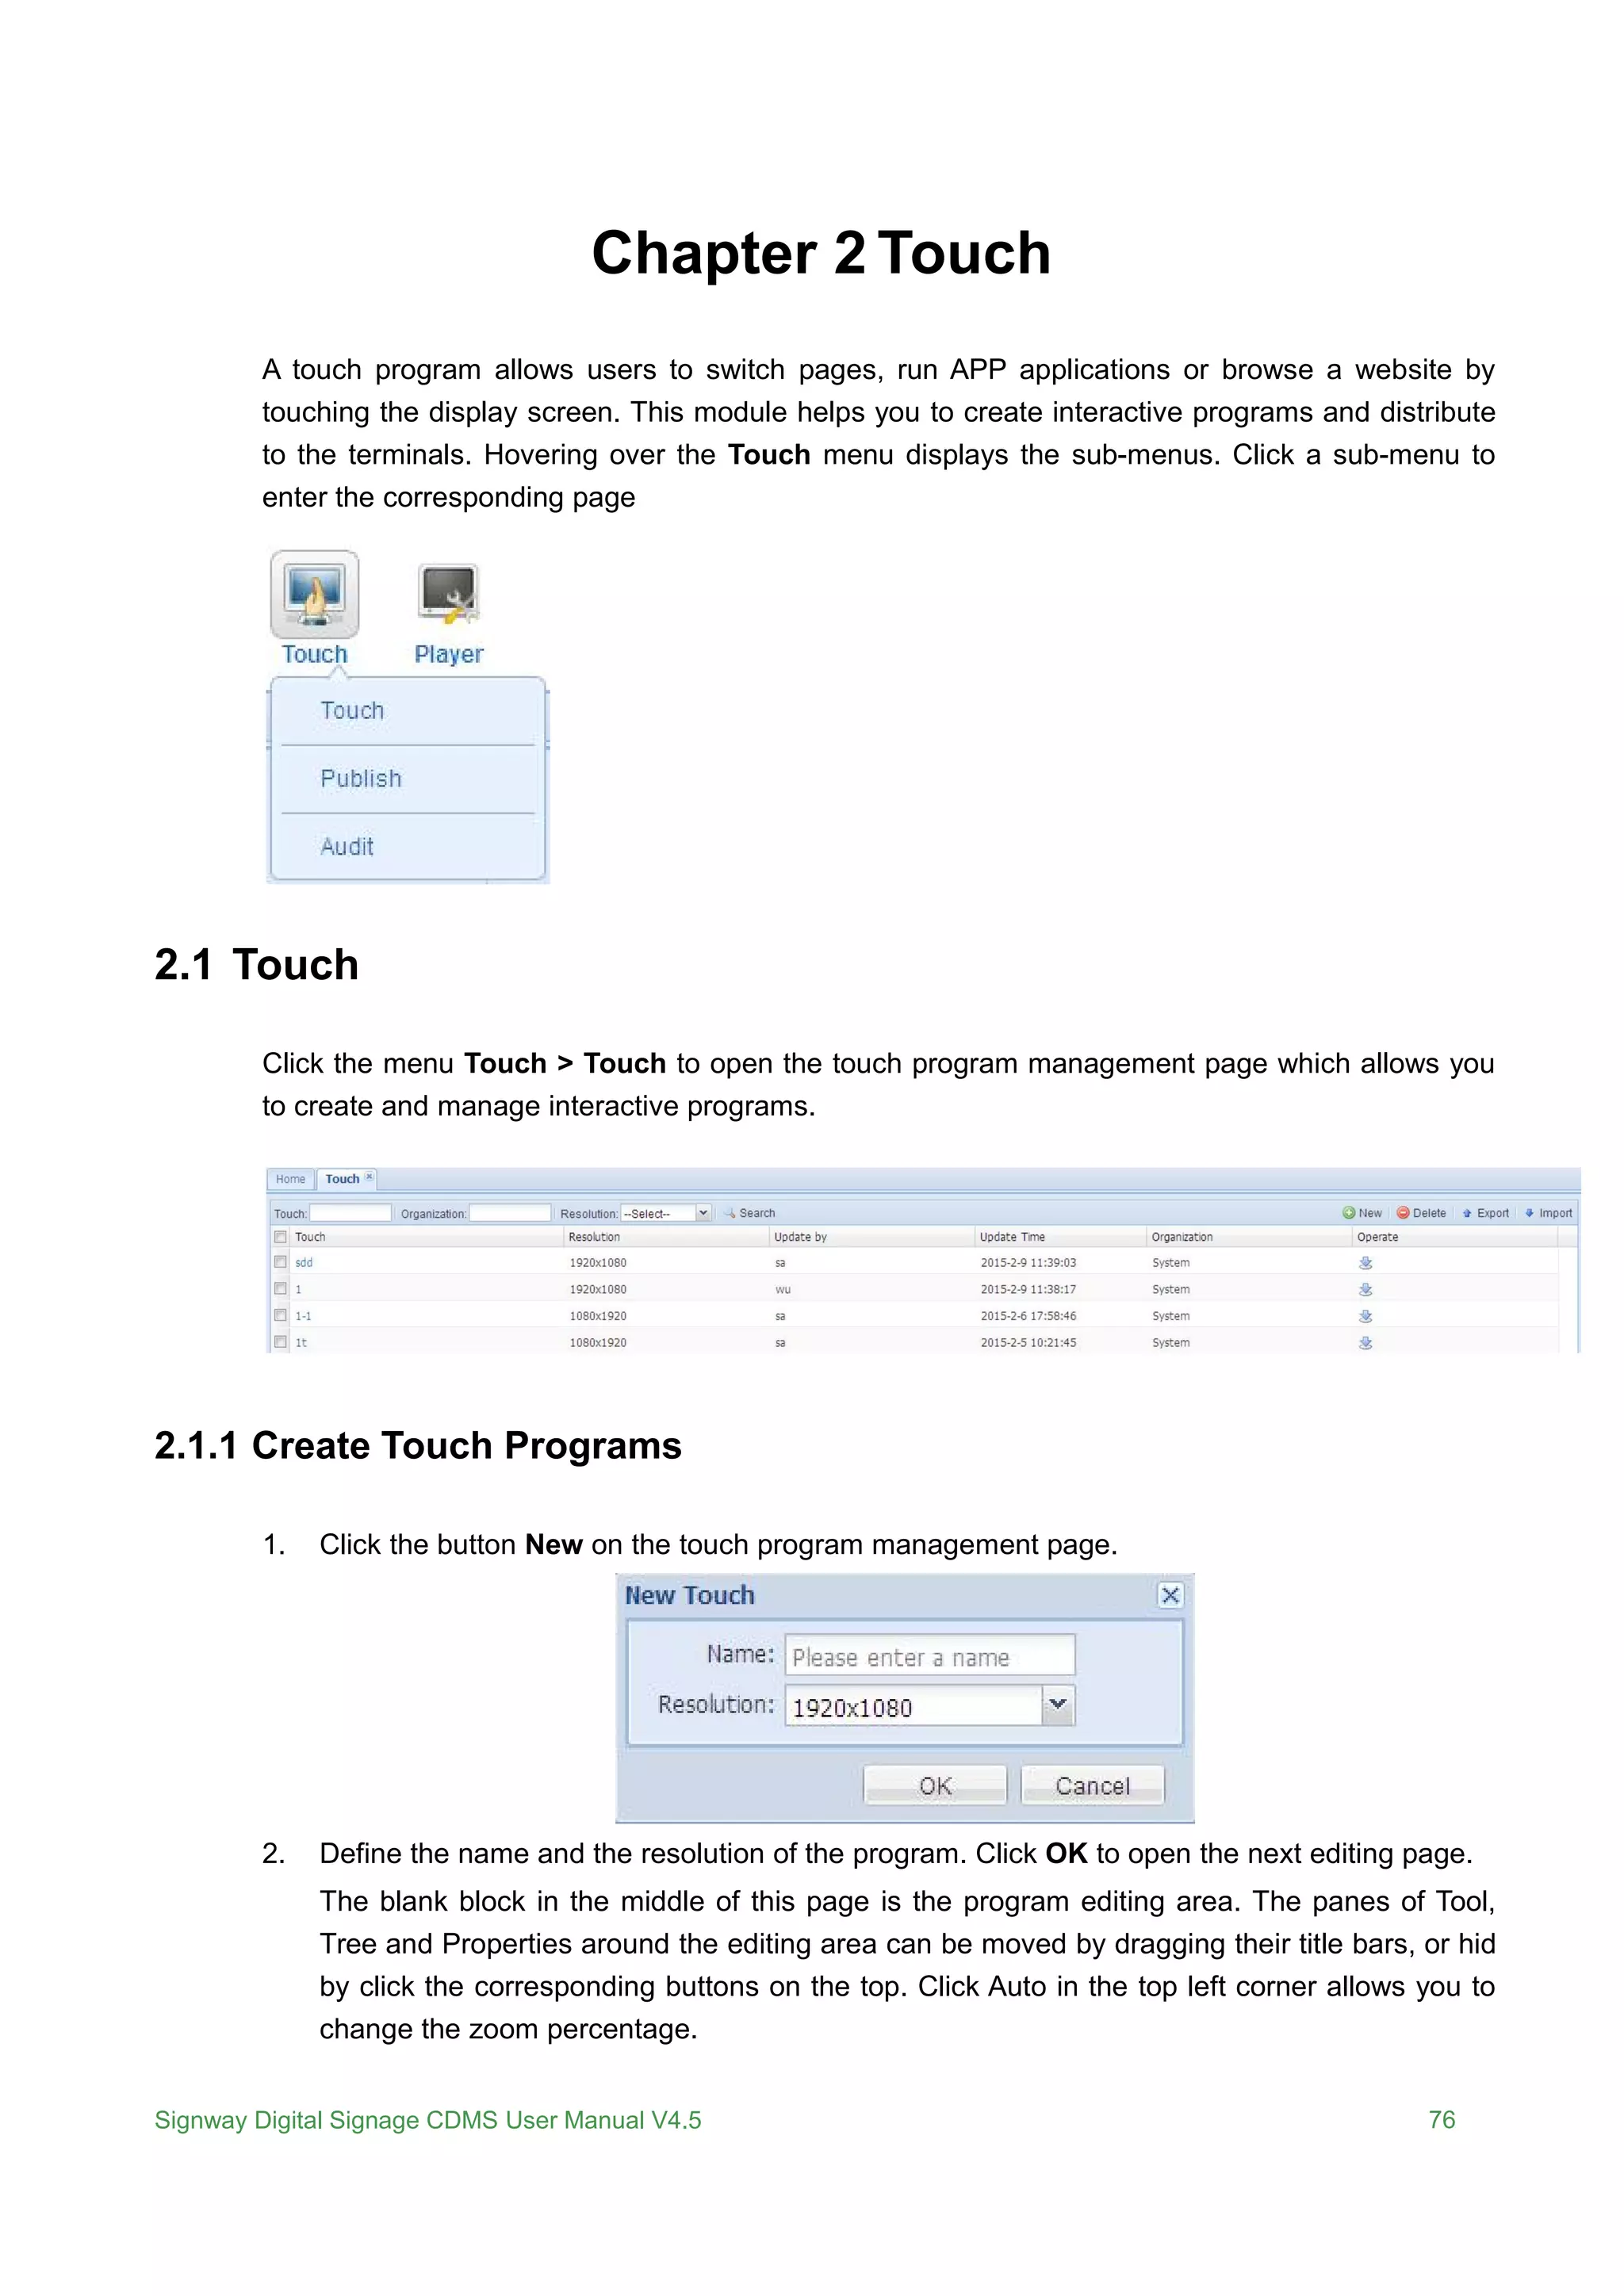
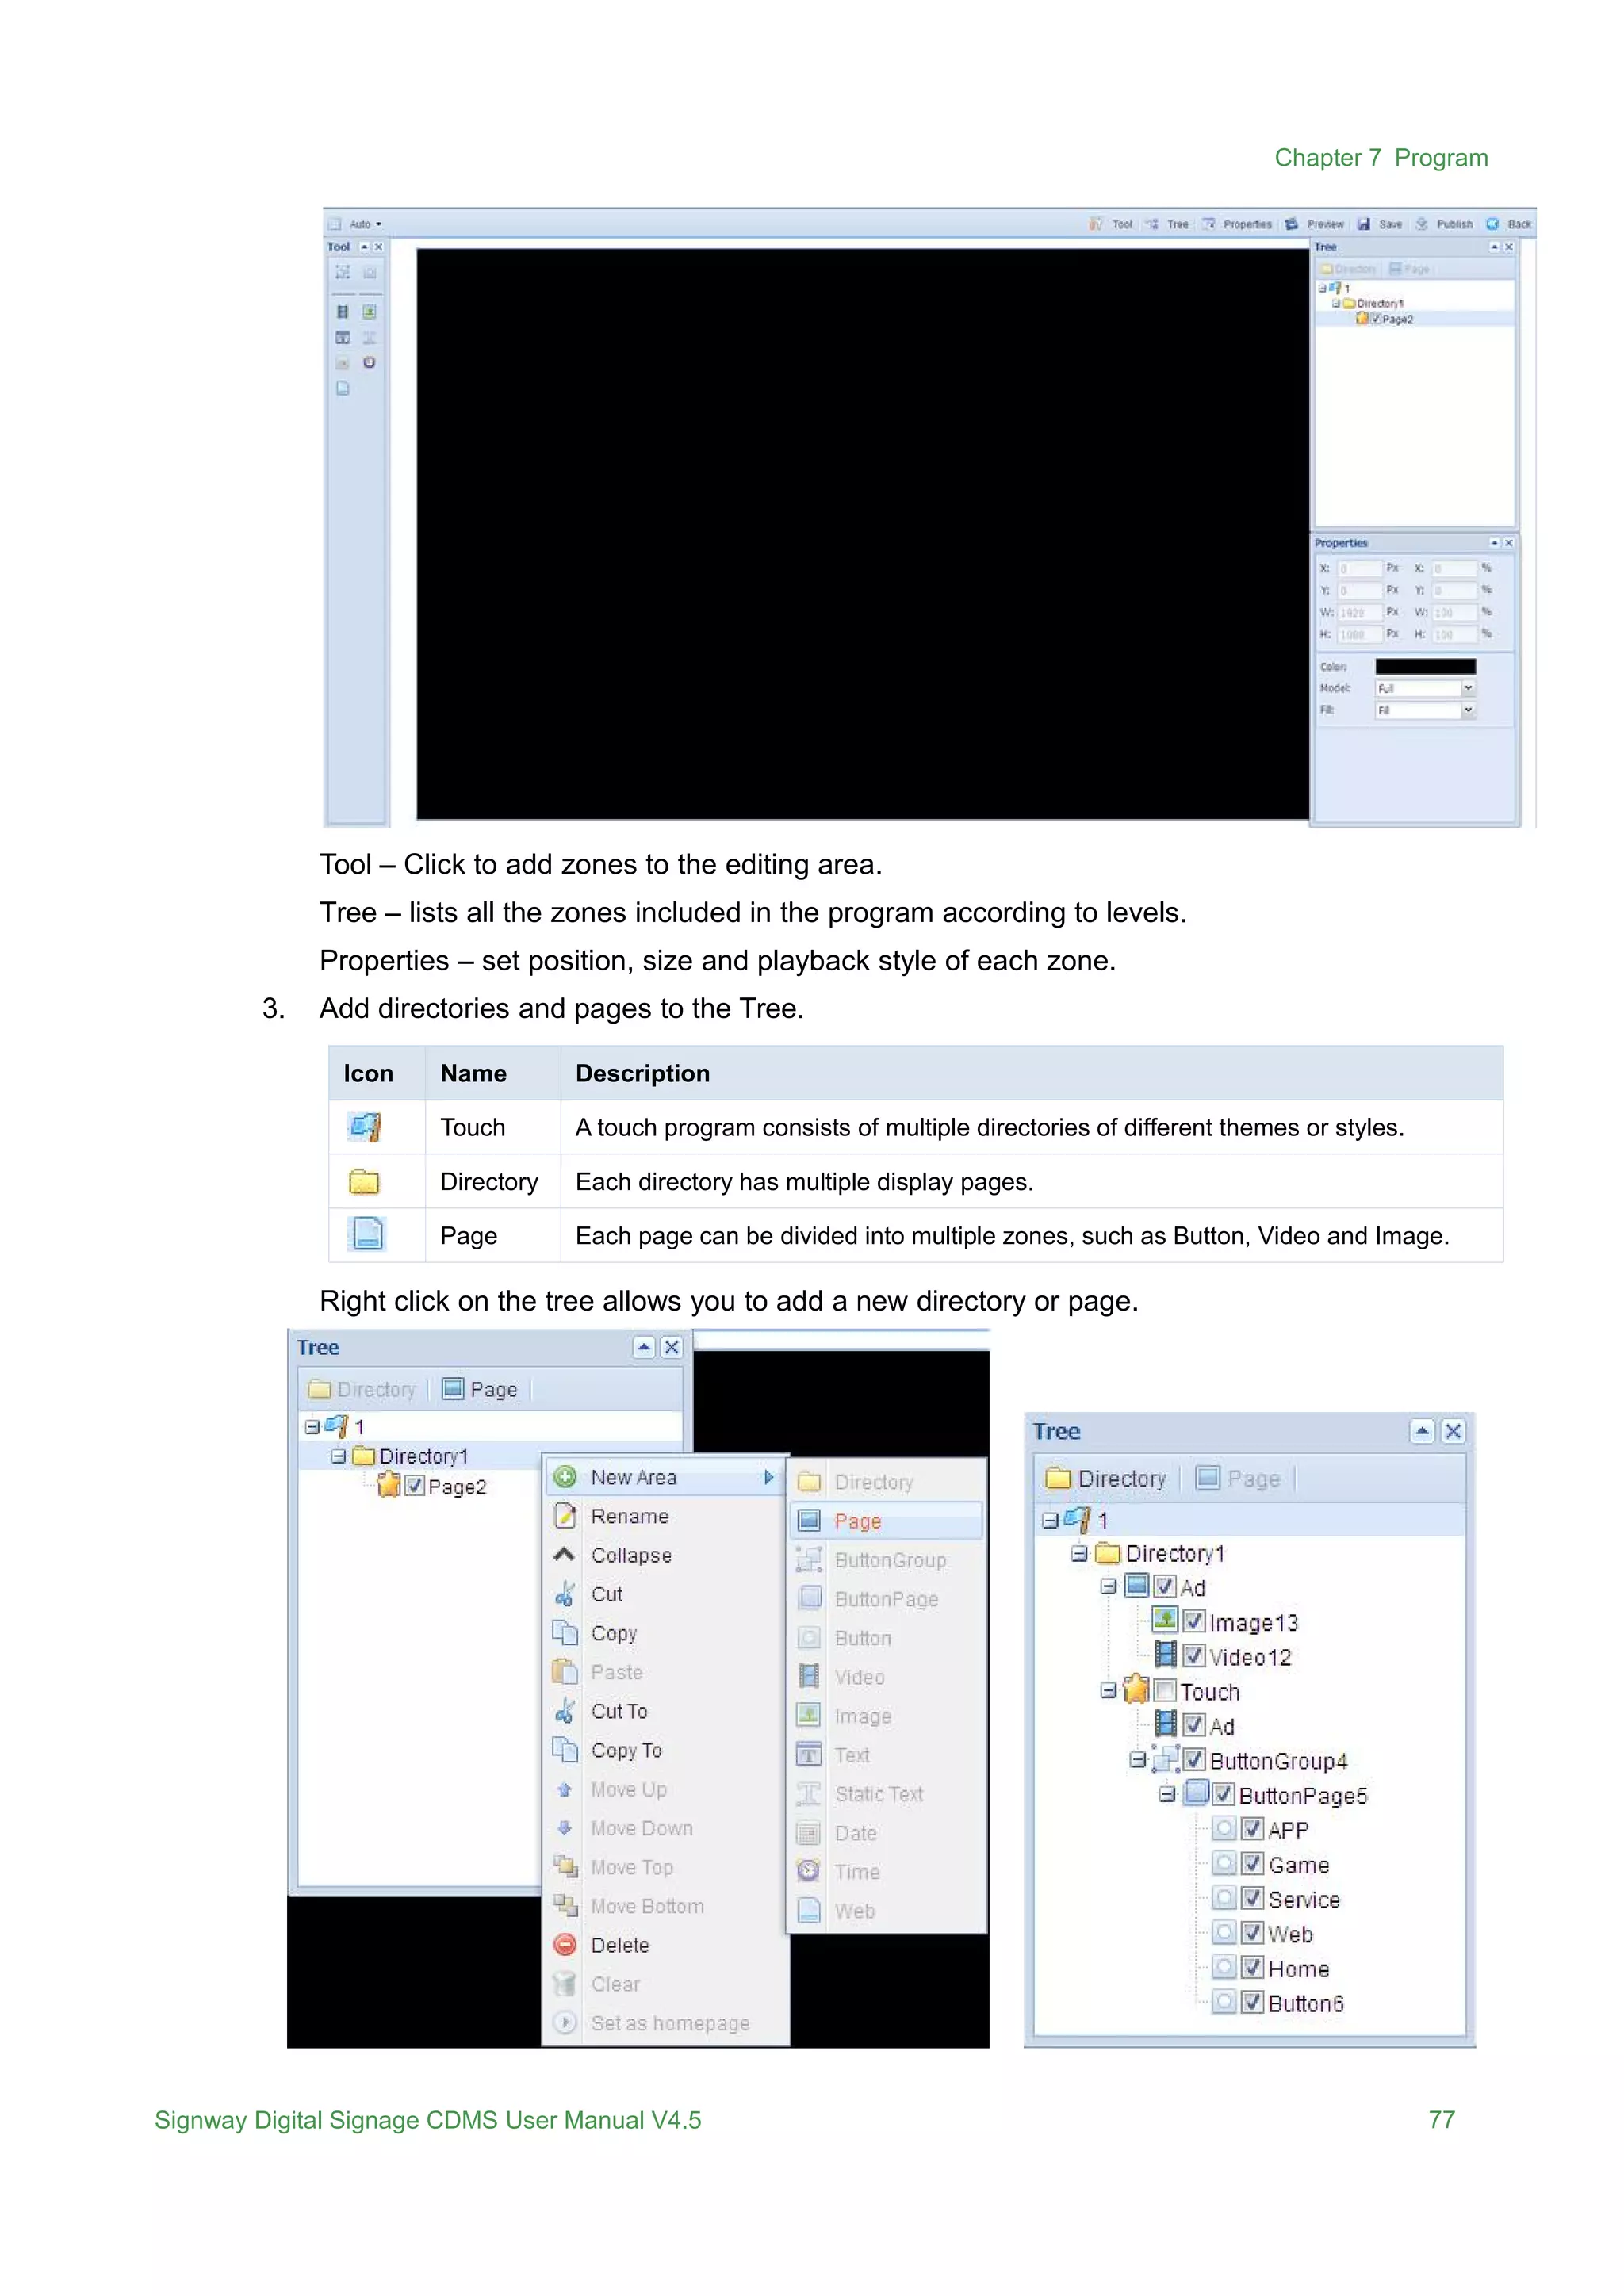
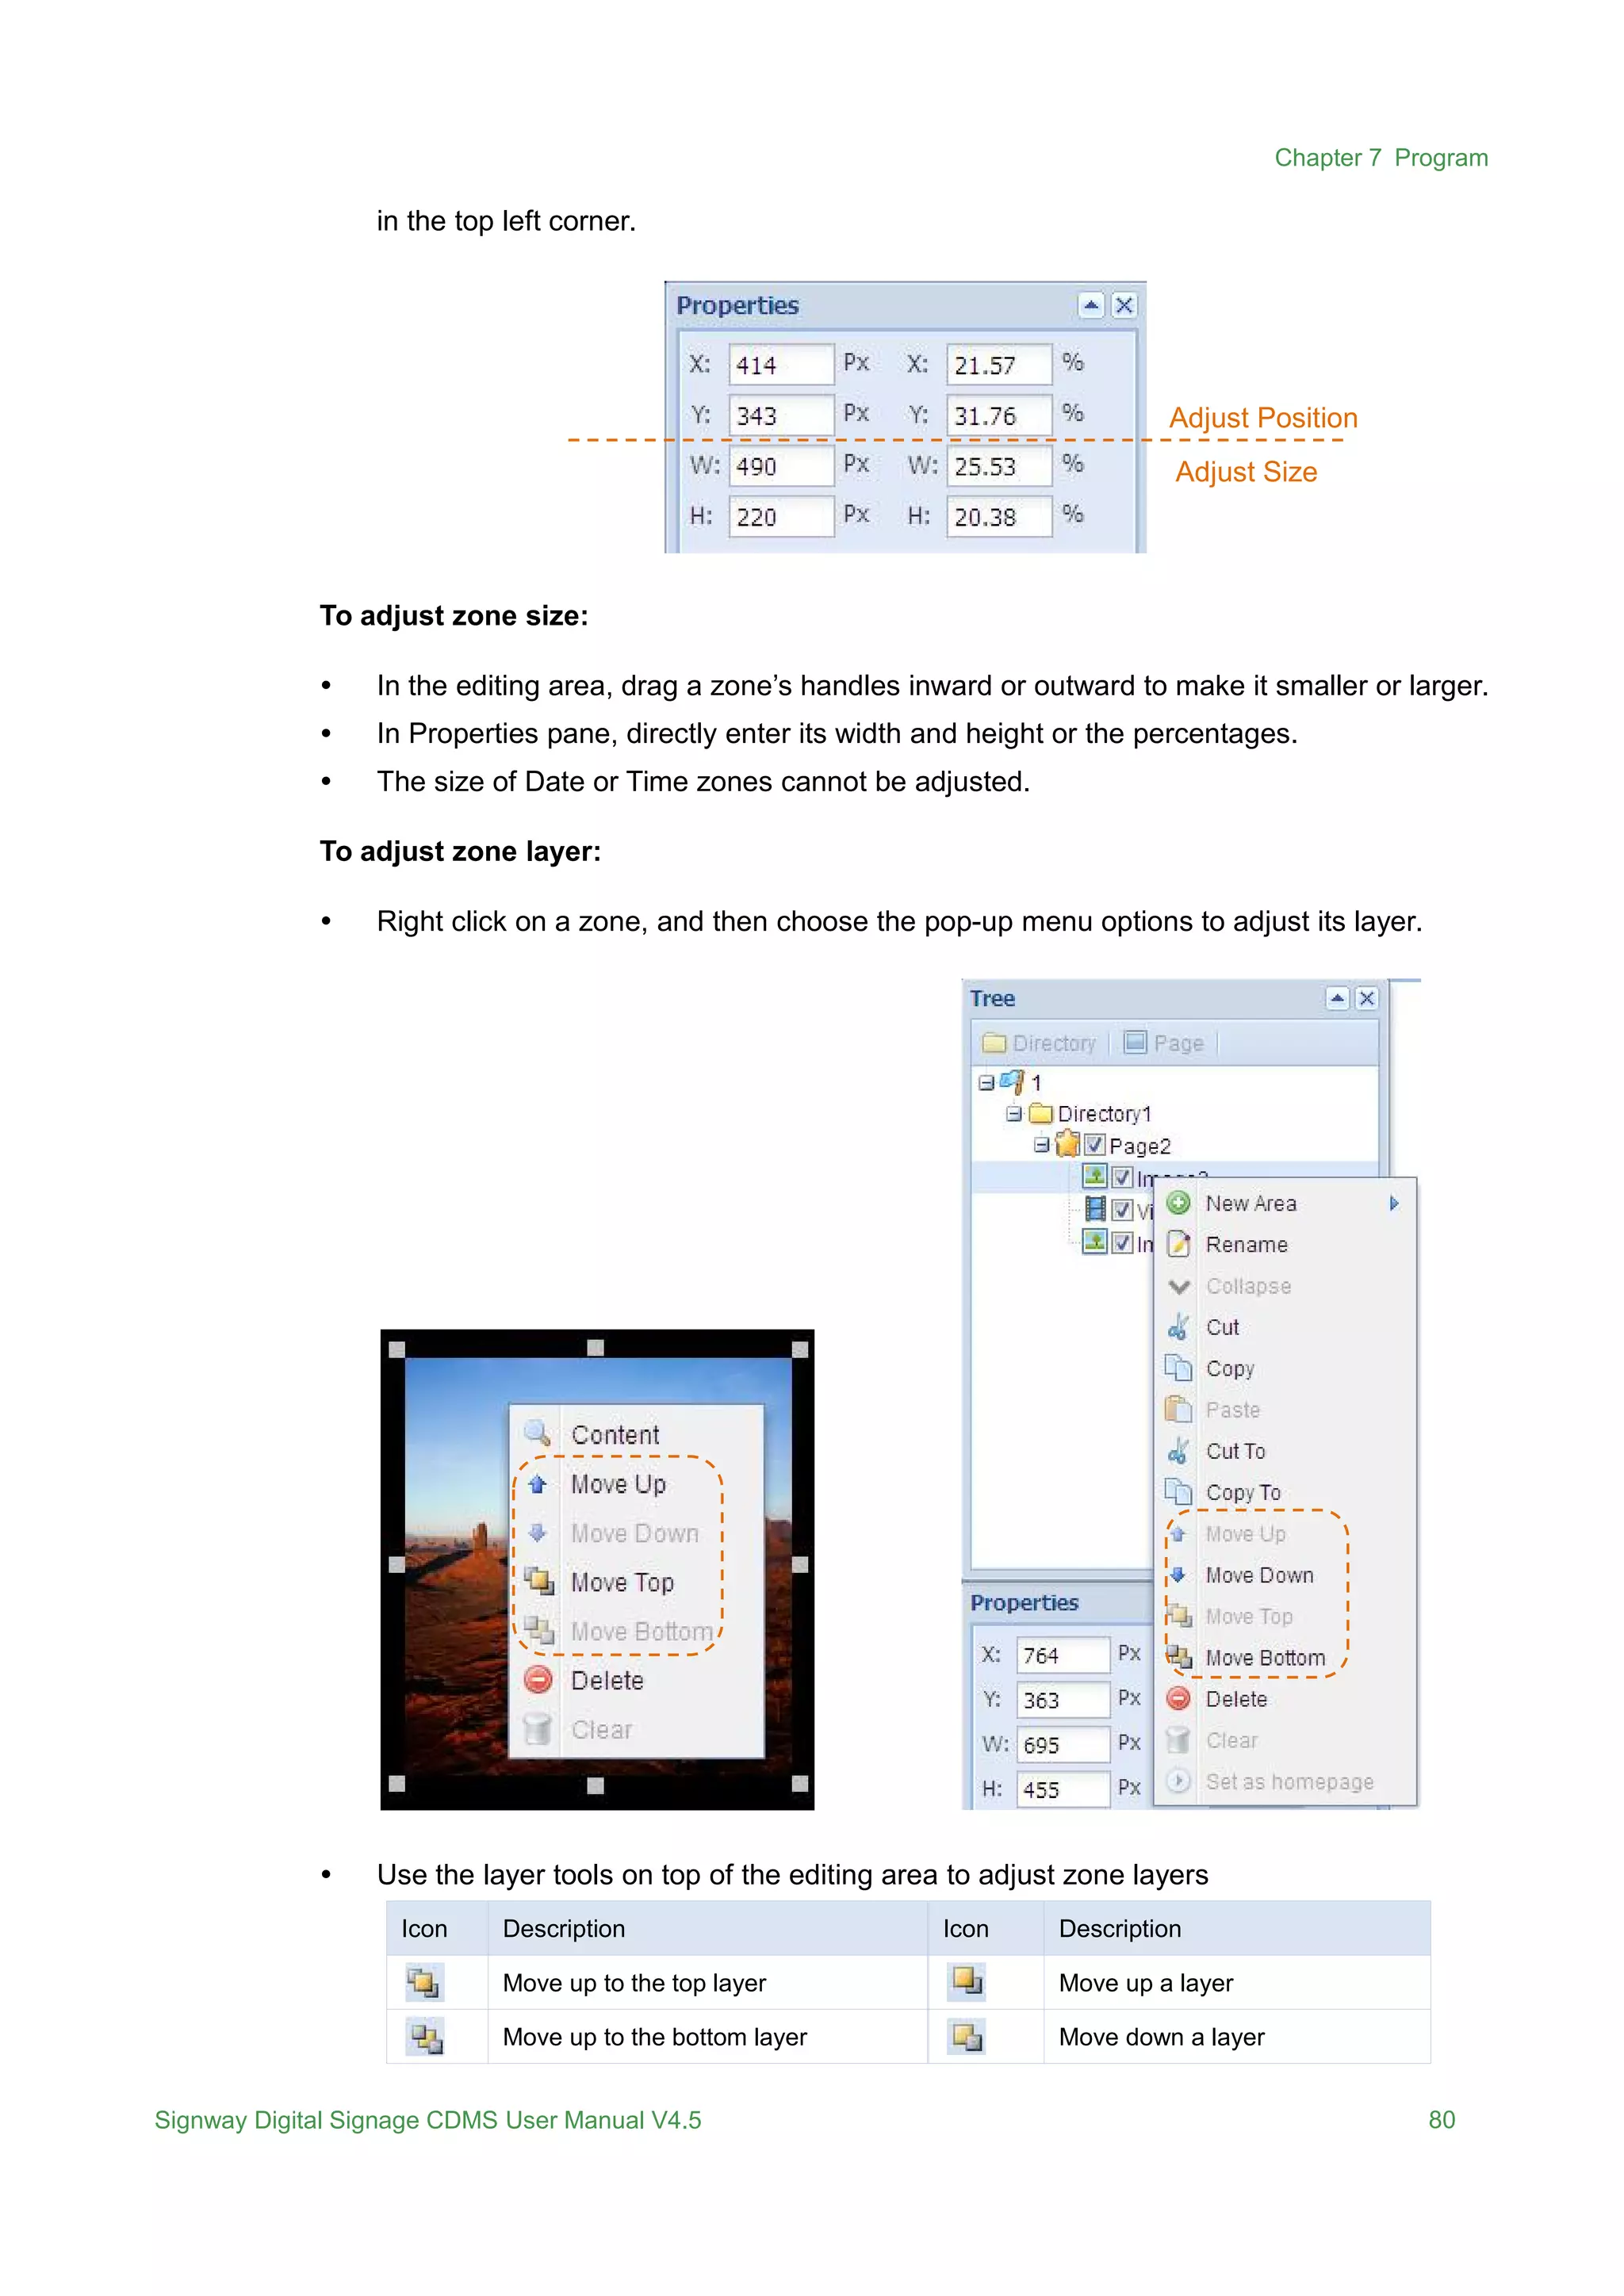
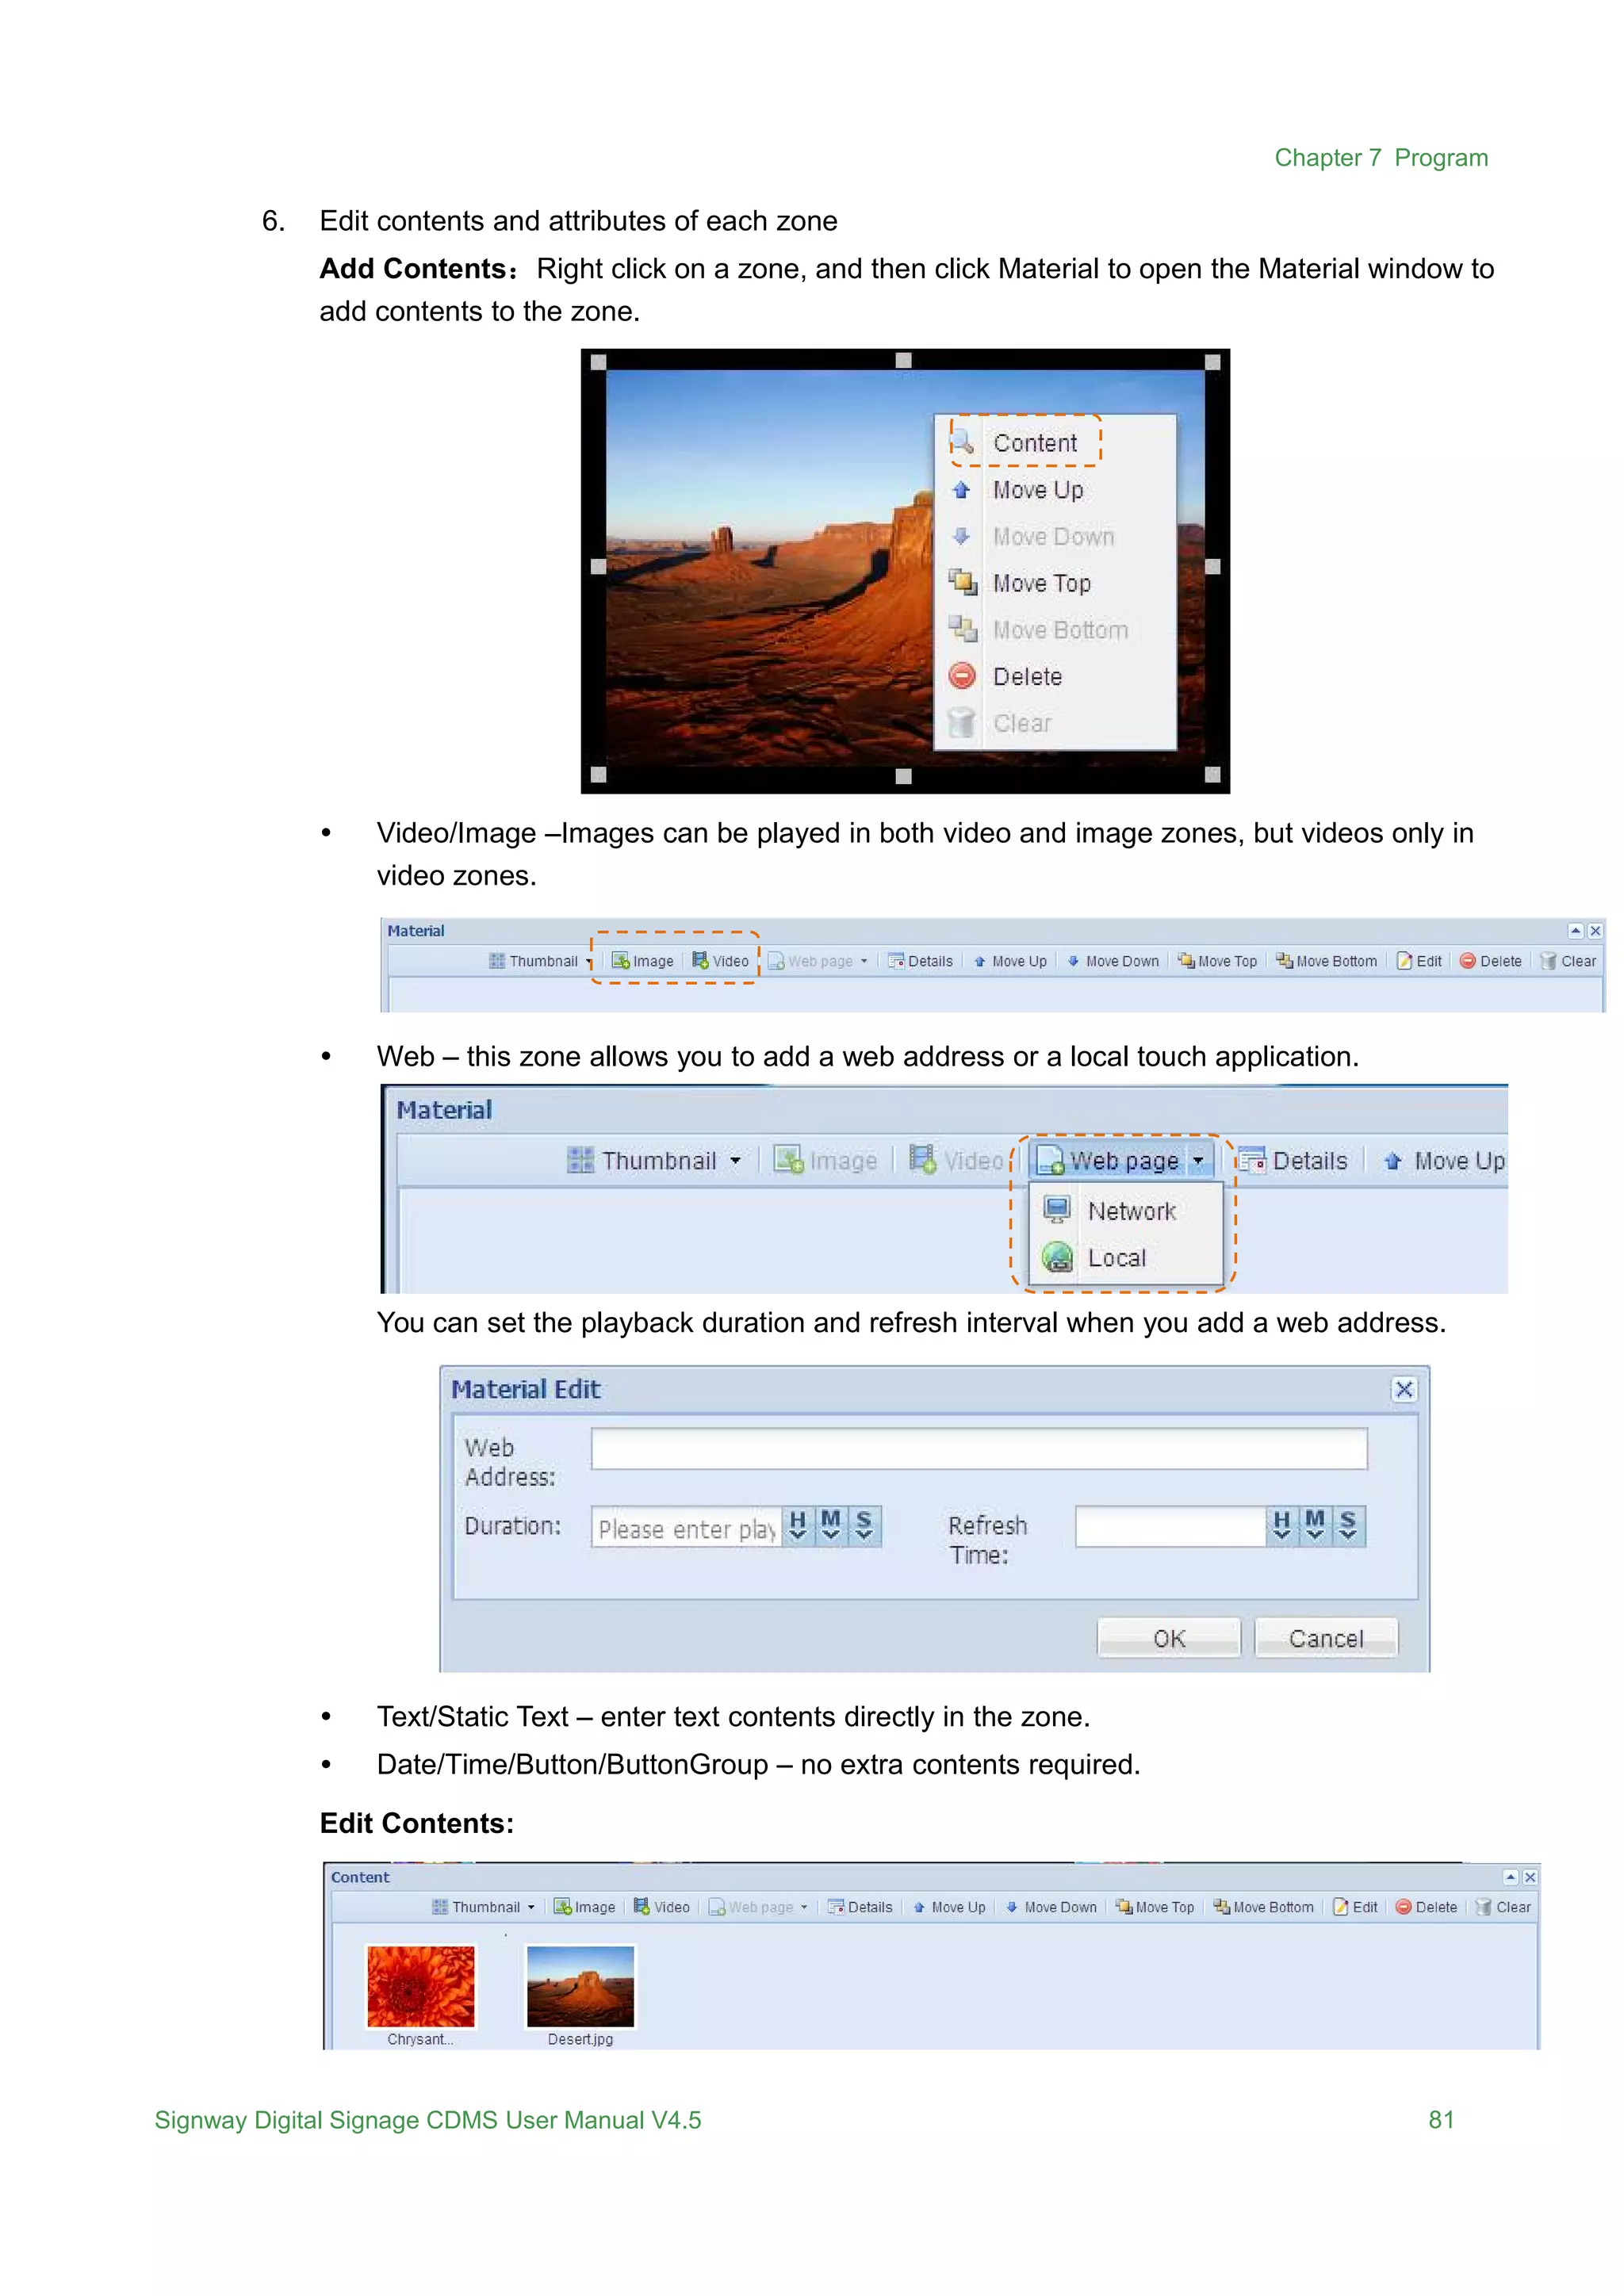
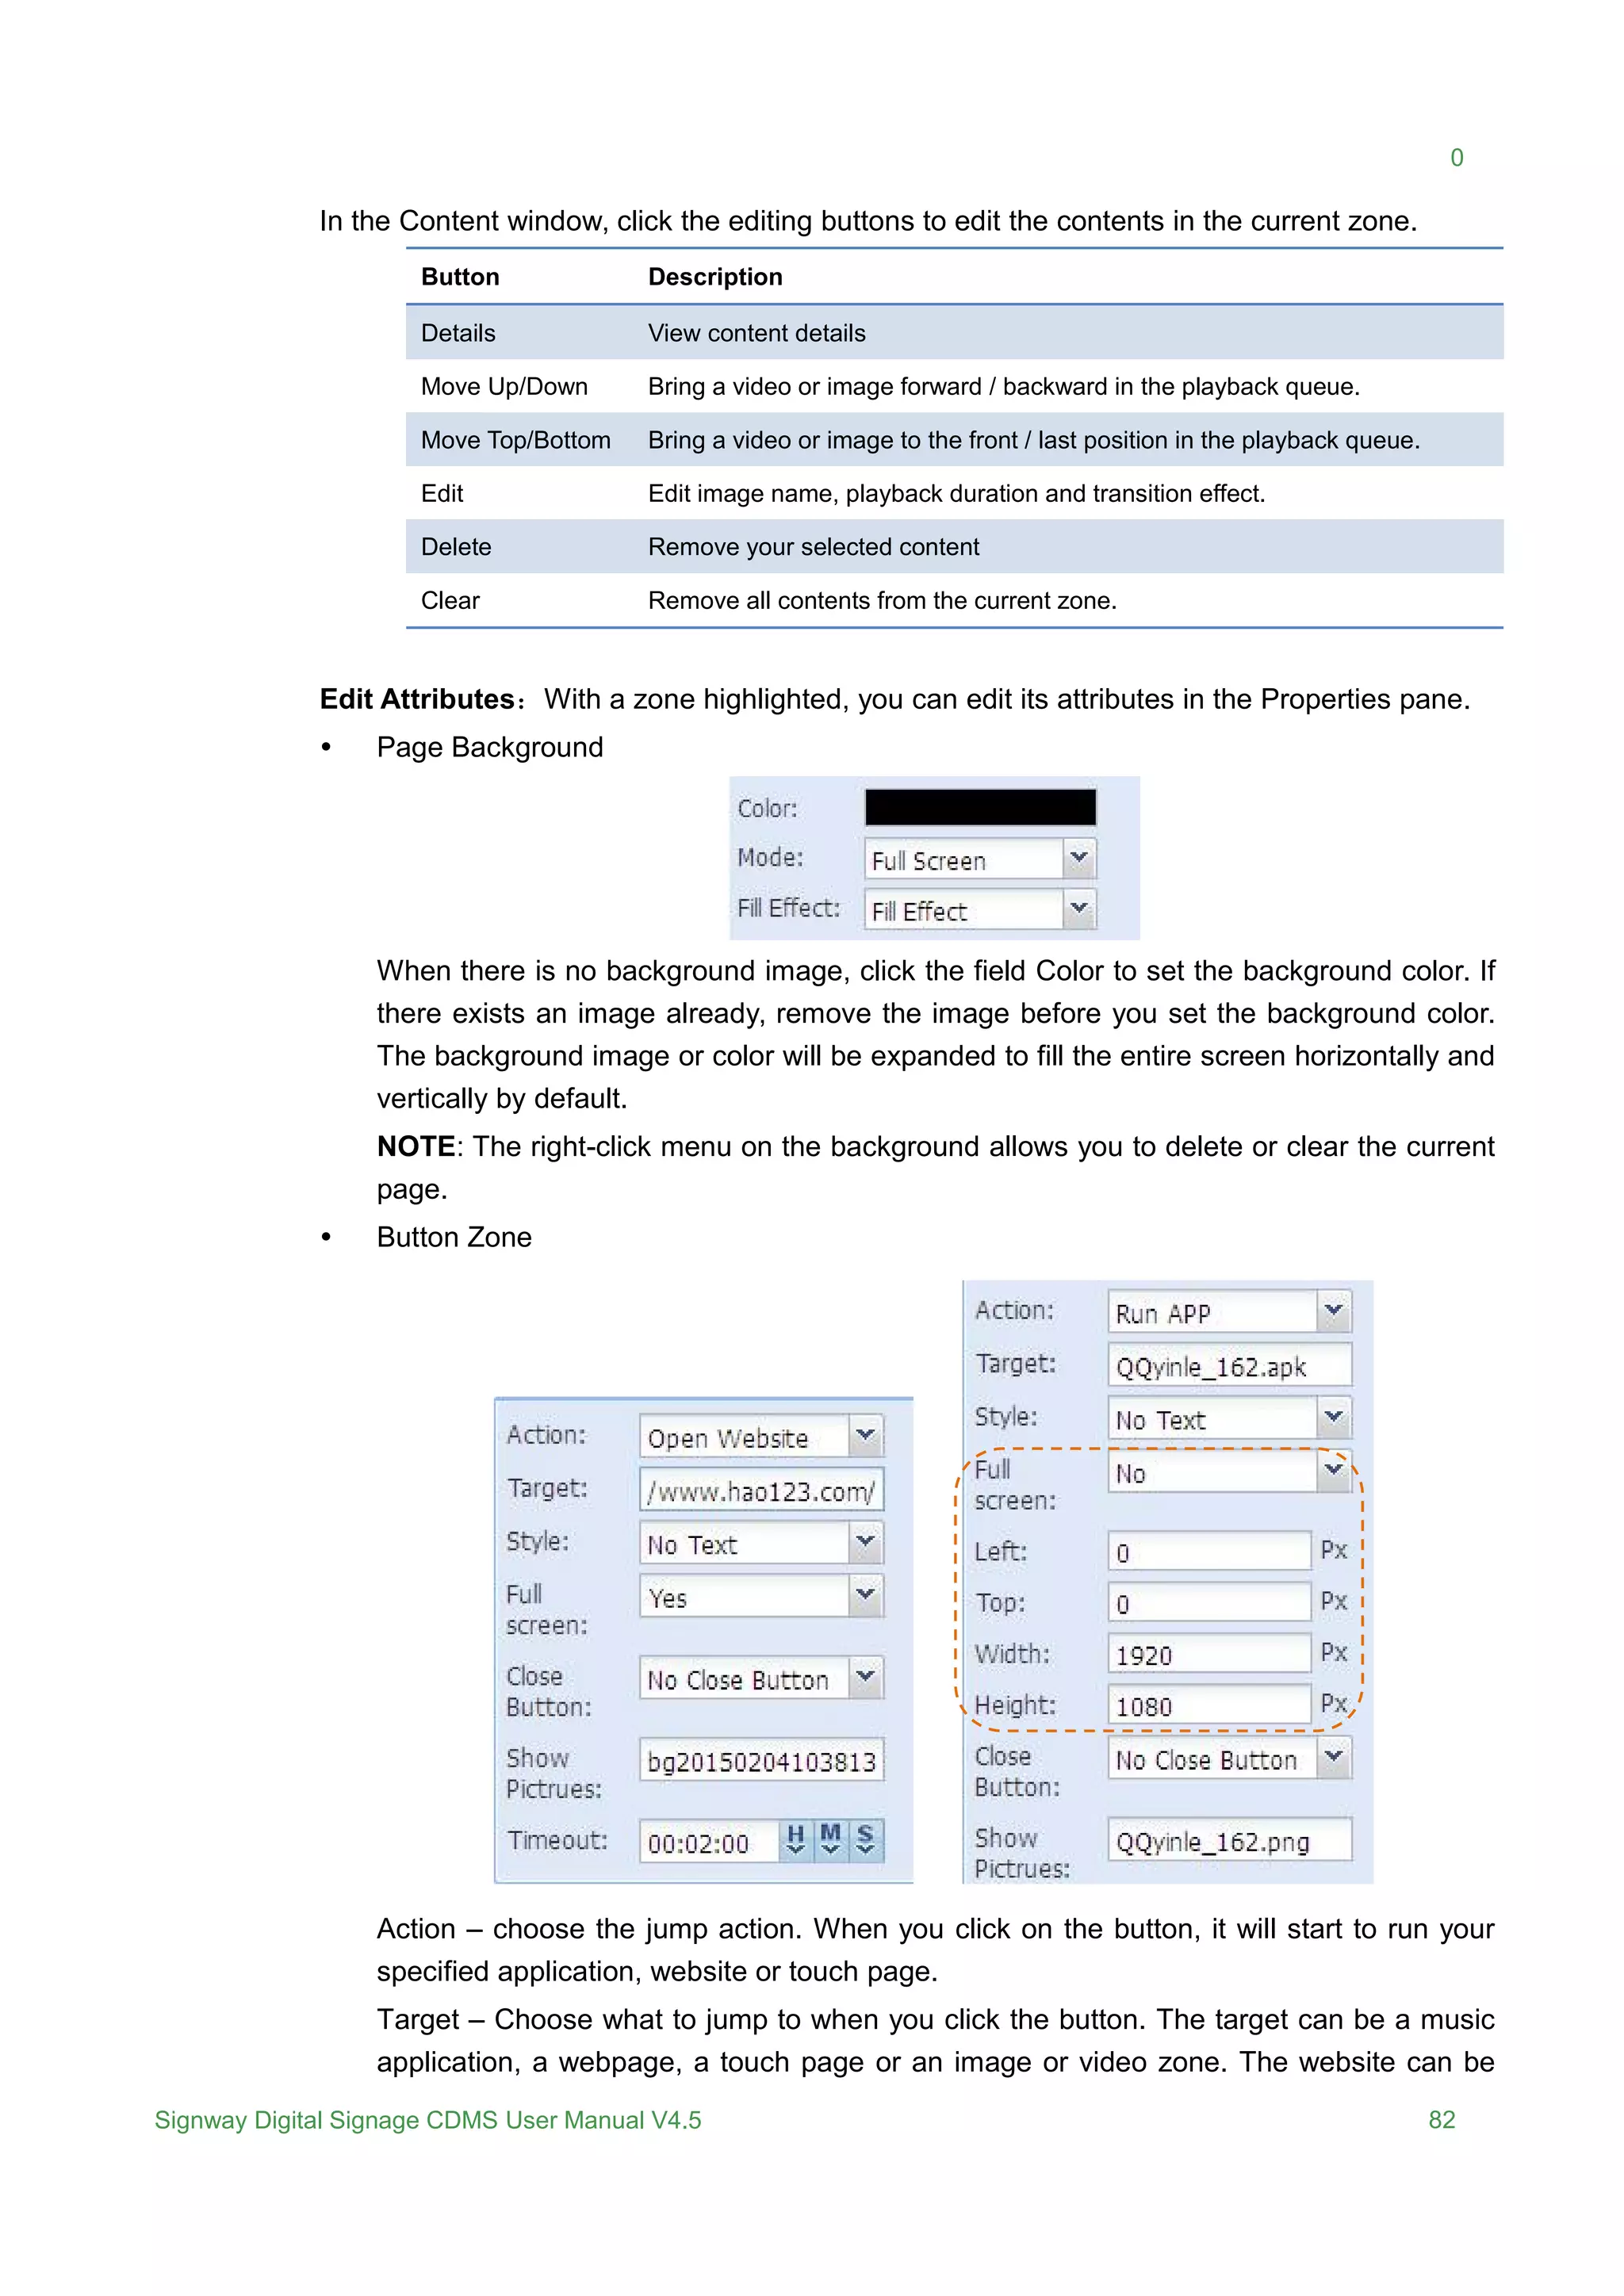
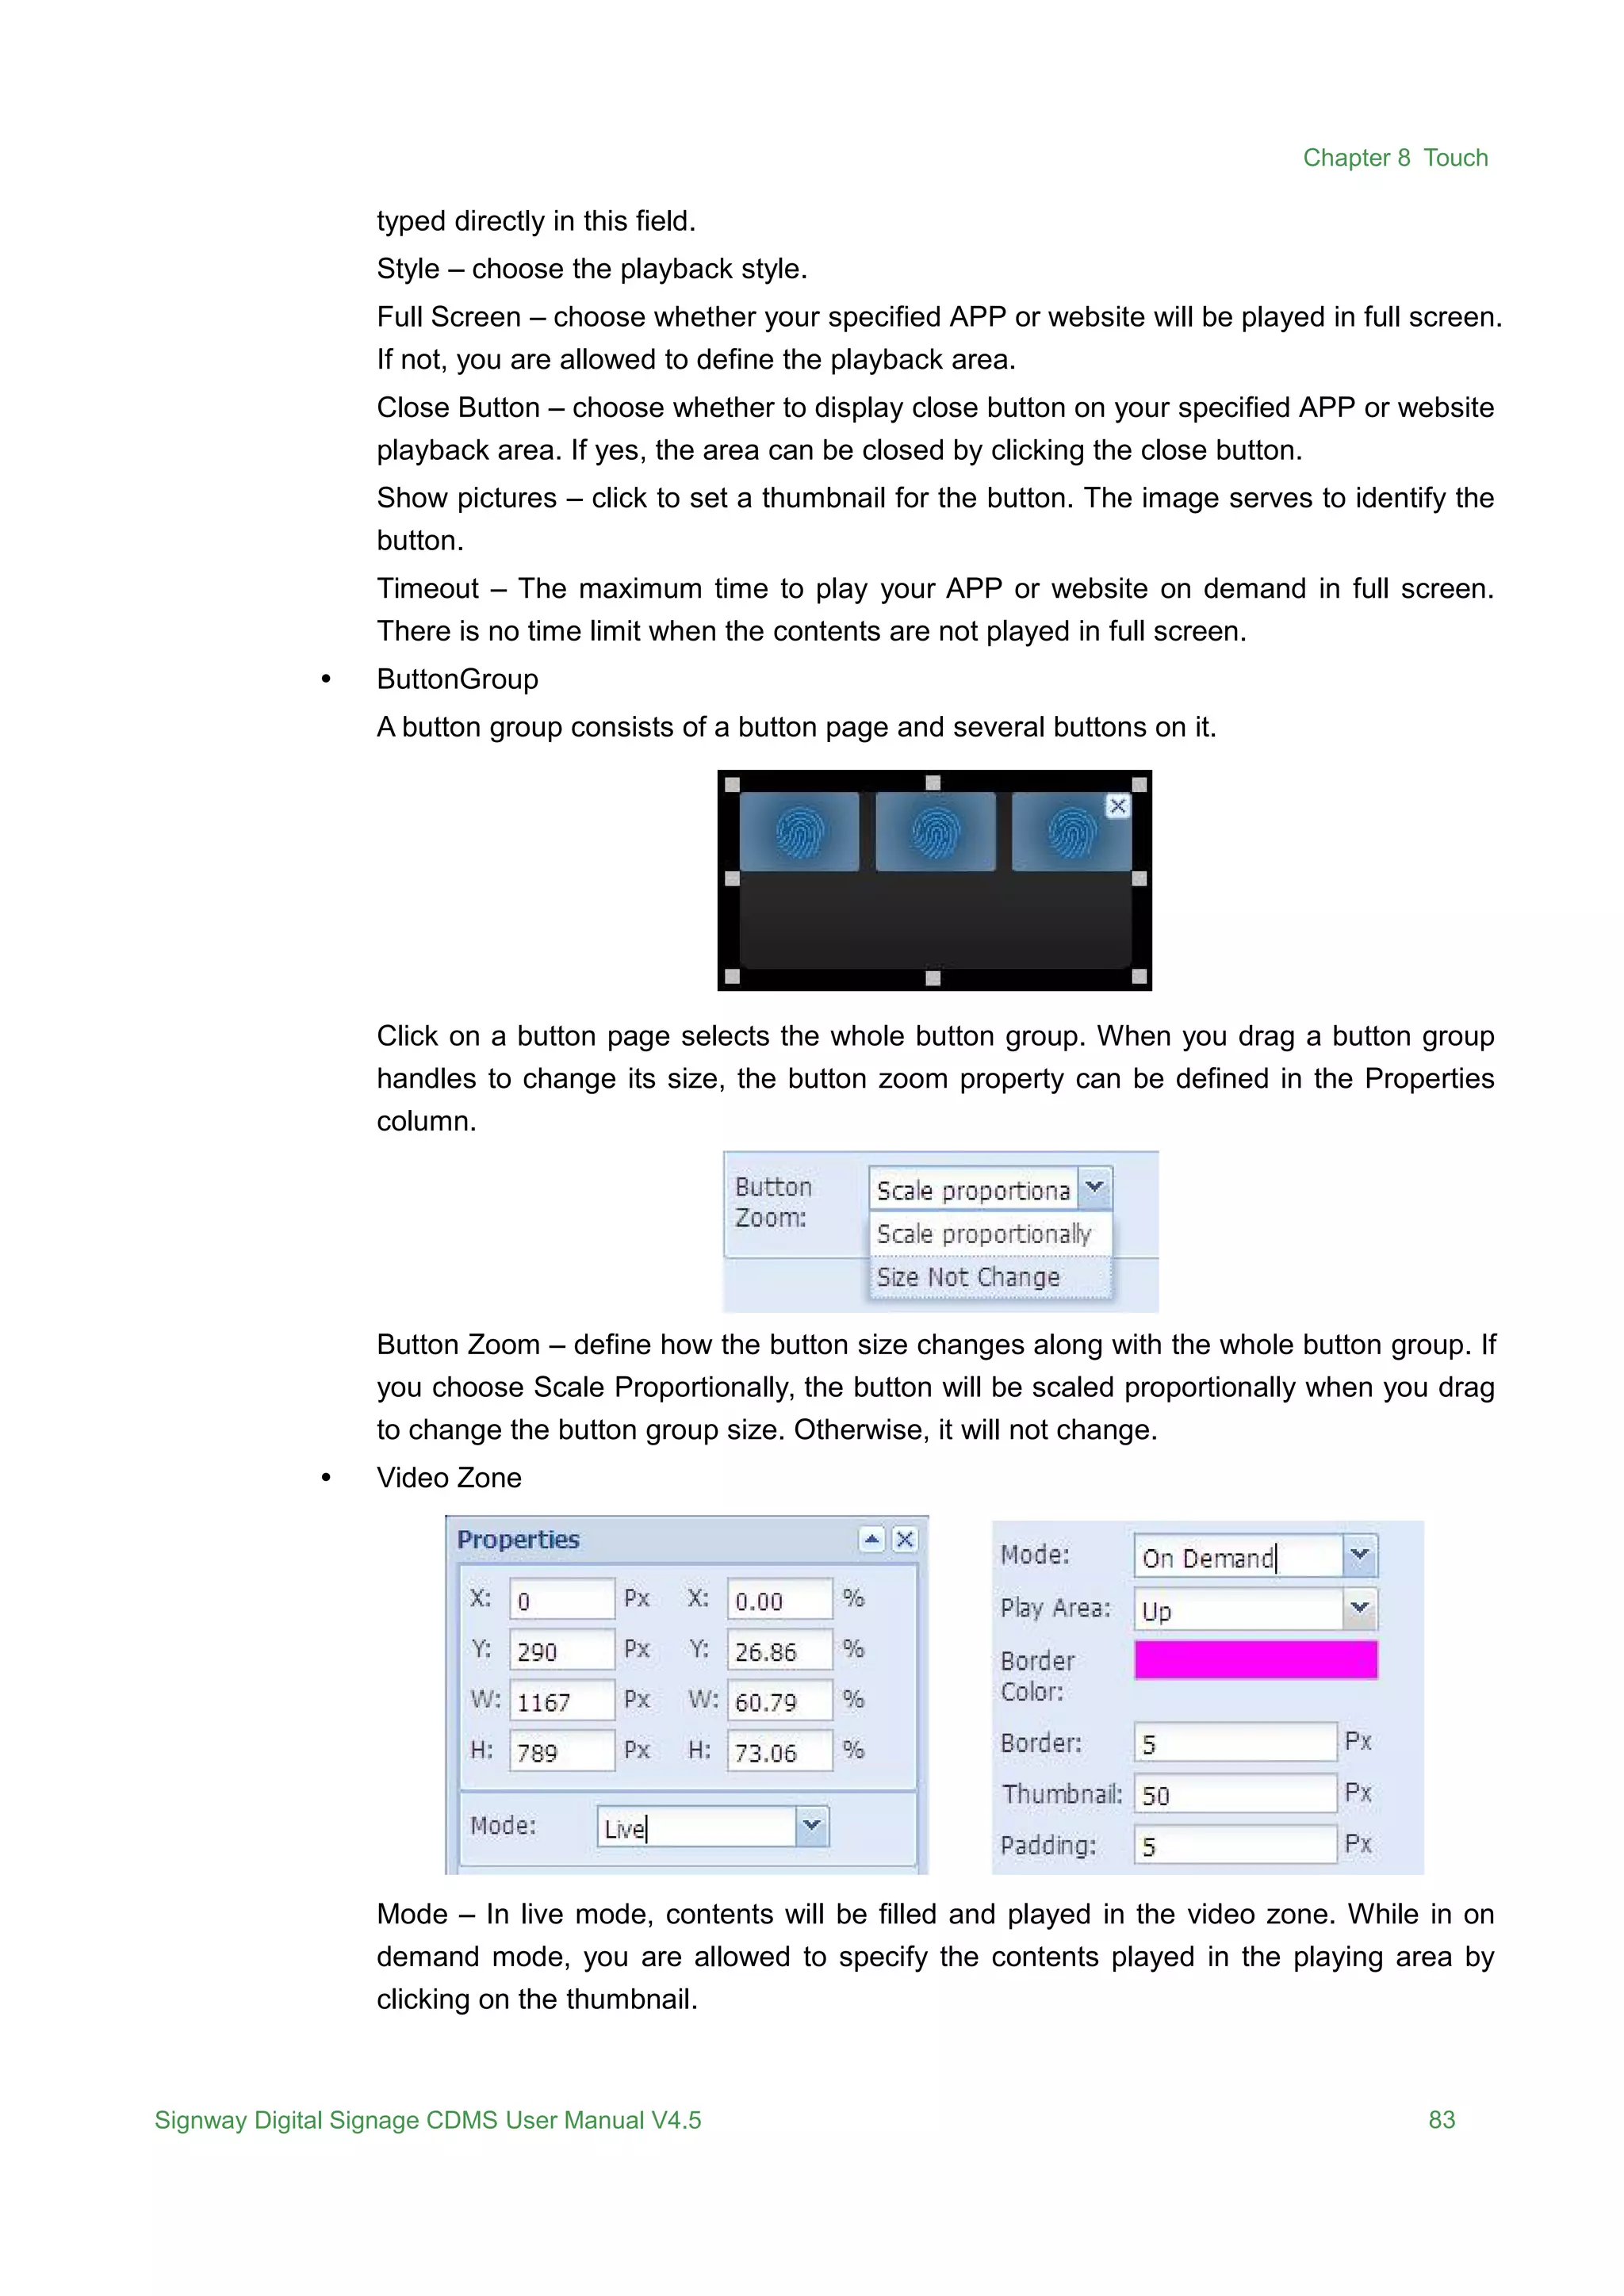
Digital Signage CDMS
User Manual V2
Signway Digital Signage CDMS User Manual V4.5 55
Chapter 1 Program
The Program menu allows you to compile programs and publish them to players. Hover over
the Program icon to display the sub-menus. Click a sub-menu to enter the corresponding page.
1.1 Template
Prepare a screen template before you compile a program. The template defines the content
layout on your screen by splitting the screen into zones for diverse contents, such as image
zone and video zone. All programs are compiled on basis of a template. You can build a new
template or import a predefined template.
Click the menu Program > Template to open the template page.
System Template and User Template are two template libraries, which can be selected on the
left pane. System templates are open to all users, while user templates only to the creator
Chapter 6 Media
Signway Digital Signage CDMS User Manual V4.5 56
himself and his superior.
1.1.1 Create Templates
1. Click the menu Program > Template to open the template page.
2. Choose the template type from the left pane.
 System Template - can be viewed and used by all users.
 User Template - only open to the creator himself and his superior
3. Click the button New and choose the player operating system from the drop-down menu.
 Signway OS - Embedded system, such as SW110, and not support the features of
Touch and Web.
 Windows – X86 platform and not support the features of Touch and Web.
 Android - Android platform and support the features of Touch and Web
4. Enter the required information in the followed window.
Resolution – refers to the resolution of the display screen.
Type – the template type is specified in step 2.
5. Click OK to open the template editing page.
Chapter 6 Media
Signway Digital Signage CDMS User Manual V4.5 57
6. Add background. Skip this if no background is needed.
Click the icon Bg in the left Area column. A dialog appears like below. Click OK to add a
background image. Only one background image is allowed.
If you click No, the background will be black by default. The color can be changed in the
Style section on the right pane.
7. Add Zones.
In the left Area column, click zone icons to add zones to the editing area.
Zone Description
Bg Add a background image or color. One at most. Size and position cannot be changed.
Video
Add a video zone. One at most. Cannot overlap with image, web, touch, button, dynamic
table or static text zones.
Image
Add an image zone. Four at most. Cannot overlap with video, web, touch, button, dynamic
table or static text zones.
Text Add a text zone. One at most.
Logo Add a logo image. One at most.
Date Add a date zone. One at most. Multiple styles for choice.
Time Add a date zone. One at most. Multiple styles for choice.
Touch
Add a touch zone. One at most. Cannot overlap with image, video, web, button, dynamic
table or static text zones.
Web
Add a web zone. One at most. Cannot overlap with image, video, Touch, button, dynamic
table or static text zones.
Mask Add a pre-prepared image masking, which functions like a photo frame. One at most.
Button
Add a jump button which allows you to jump to other contents with just one click. Cannot
overlap with image, video, LOGO, web, touch, dynamic table or static text zones.
Dynamic
Table
Add a dynamic table which allows you to update displaying content of this area without
re-publishing the whole program. Cannot overlap with image, video, LOGO, web, touch,
button or static text zones.
Static Text
Add a stationary text zone when background zone exist. No amount limit. Cannot overlap
with other zones except background.
Hover a zone or right click on a zone allows you to remove the zone.
Chapter 6 Media
Signway Digital Signage CDMS User Manual V4.5 58
NOTE: A video zone must exist for templates of Signway OS and Windows platforms, but is
not necessary for an Android template.
8. Adjust size and position of zones.
 To position a zone, just drag it by mouse to the position you want to locate it. Drag one
zone’s handles inward or outward to make it smaller or larger.
 Use the tools on top of the editing area to adjust zone positions.
Icon Description Icon Description
Align left Match height
Align center Match height and width
Align right Lock a zone’s size and position.
Align top Unlock a zone.
Align middle Expands a zone to full screen.
Align Bottom Remove all zones from the template.
Match width Show the template in actual screen size.
 When a zone is selected, its coordinate values will be given on the right pane for you to
adjust its size and position by changing these values.
Adjust Position(X/Y coordinates)
Adjust Size(Width/Height)
Chapter 6 Media
Signway Digital Signage CDMS User Manual V4.5 59
9. Adjust zone layers.
 Use the layer tools on top of the editing area to adjust zone layers.
Icon Description Icon Description
Move up to the top layer Move up a layer
Move up to the bottom layer Move down a layer
 Right click on a zone, and then choose the pop-up menu to adjust its layer.
10. Set main play area. Skip this if the player operating system is not Android.
For Android templates, the whole playback duration depends on the only main play area. All
zones play on a continuous loop until the playback of the main play area ends. The
background, image, video, touch and web zones can be set to main play area.
NOTE: The main play area for templates of Signway OS and Windows is the video zone by
default.
11. Click the button Save to save the template.
Click Back to return to the previous template page without save. Click Save and Use to
save the template and enter the next playlist editing page. See Chapter 8.2Playlist.
1.1.2 Import Template
1. Click the menu Program > Template to open the template page.
Chapter 6 Media
Signway Digital Signage CDMS User Manual V4.5 60
2. Click the button Import to open the importing page.
3. Click Add File to select templates from your PC
The selected files will appear in the pending list. Click Remove all will remove all the files in
the pending list.
4. Click Upload to start the upload process. Click Stop will cancel the upload.
5. When the upload ends, the files will disappear from the list.
1.1.3 Template Library
All your CDMS templates are showed in the form of list or thumbnail.
Search Template – you are allowed to locate specific template by entering one or more filter
conditions in the multiple criteria tabs.
Edit Template – Click on a template name or double click on its thumbnail opens the template
editing page. Once satisfied, click Save to accept the changes.
Export Template – Click the button Export to export a template.
Remove Template – Click the button Delete to remove a template.
Chapter 6 Media
Signway Digital Signage CDMS User Manual V4.5 61
1.2 Playlist
Playlist is a defined sequence of content to be displayed on the player screen and can be
generated by adding media files to a template.
Click the menu Program > Playlist to open the playlist page.
1.2.1 Create Playlists
1. Click the menu Program > Playlist to open the playlist page.
2. Click the button New to open a window like below.
3. Choose a template.
First select the template type on the left pane, and then select the template you want to use
from the right list. Make your choice based on the player operating system, content types,
and screen size and orientation.
If there is no suitable template in the list, please create one first. See 8.1.1Create Template.
Chapter 7 Program
Signway Digital Signage CDMS User Manual V4.5 62
4. Click OK to open the playlist editing page.
Items – all media files. To preview a file, click on its name or double click on its thumbnail.
Template Info – displays the current template. If the template is not satisfactory, click Edit
Template to modify it. Once satisfied, click Save to return to the current page.
Contents – provide content details on each zone.
5. Add contents to each zone.
Select media files from the left media library and drag them to a suitable playback zone.
Zone Contents can be played
Bg Image, Color
Video Image, Video, Music, Slide, Live
Image Image
Text Dynamic text or scroll text you enter directly
Logo Image
Date requires no extra content
Time requires no extra content
Touch Touch Application
Web Web page
Mask pre-prepared image masking
Button Jump action
Dynamic Table Dynamic Table
Static text Stationary text you type in
Contents
Chapter 7 Program
Signway Digital Signage CDMS User Manual V4.5 63
 Drag media files directly to a zone on the right template.
 Or drag media files directly to the bottom contents section of a zone.
6. Edit contents of each zone.
Switch to a zone by clicking it on the template or the tab in the bottom section.
 Bg
Click buttons on top of this section to view details, edit static text or remove contents.
Right click on the background image also allows you to access these features. Click
the background image allows you to change the background image.
To change a background image, you need to remove the current image before adding
a new one.
Chapter 7 Program
Signway Digital Signage CDMS User Manual V4.5 64
 Static Text
Under the Bg tab, click Edit to open the static text editing page.
 Video/Image
Click buttons on top of this section to edit the content properties, playback sequence or
remove it. Right click on the thumbnail also allows you to access these features.
Button Description
Preview Preview the selected video or image.
Details View content details
Move Up/Down Bring a video or image forward / backward in the playback queue.
Move Top/Bottom Bring a video or image to the front / last position in the playback queue.
Edit
To edit content name, playback schedule, duration and expiration as well as
image transition effect.
Delete Remove a video or image from the current zone.
Clear Remove all contents from the current zone.
 Web
Click the button “+” to add web contents. Click the editing button to make changes.
Chapter 7 Program
Signway Digital Signage CDMS User Manual V4.5 65
 Touch
Click buttons on top of this section to view the content properties or remove it. Right
click on the thumbnail also allows you to access these features.
Only one touch application is supported in this zone. To change it, you need to remove
the current one at first.
 Button
Jump button allows you to jump to other contents with just one click.
Click the field Action to define the jump action, jump to playlist or Jump to touch. The
field Target defines the specific playlist or touch application that this button will lead you
to.
 Dynamic Table
Dynamic table can be created under the menu Media. Dynamic table makes it possible
to update the playback content on terminal displays in real time without re-publishing a
new program.
Right click on the dynamic table allows you to preview, edit or remove it.
 Mask
A mask functions like a photo frame and is used to control a layer’s transparency.
Chapter 7 Program
Signway Digital Signage CDMS User Manual V4.5 66
Several images can be added to this zone. Right click on an image allows you to
preview, edit or remove it.
 Logo
Click buttons on top of this section to view the content properties or remove it. Right
click on the thumbnail also allows you to access these features, as well as preview the
image.
Only one image is allowed to add to the Logo zone. To change it, you need to remove
the current one at first.
 Text
Enter text in the text box and make settings on its properties, such as font, scroll style,
background and duration.
Dynamic text can also be added to this zone. The content of the dynamic text cannot
be edited here. You can make settings on its properties or remove it.
 Date/Time – cannot be edited.
7. On top right corner of the page, click the button Quick Preview or Actual Preview to
preview the current the playlist.
Quick Preview – gives a quick preview of the playlist in a small window on your PC with less
bandwidth consumption.
Scale Preview – gives a precise preview of the playlist in the same size as the real screen.
8. Once satisfied, click Save to save your playlist.
The button Back returns to the previous playlist page without saving. After saving, click the
button Publish to compile programs and then distribute to players. See details about
publish: Chapter 8.4Publish.
NOTE: There must be contents in the main play area. Otherwise, the playlist cannot be
saved.
1.2.2 Playlist Library
All your CDMS playlists are showed in the form of list.
Chapter 7 Program
Signway Digital Signage CDMS User Manual V4.5 67
Search Playlist – you are allowed to locate specific playlist by entering one or more filter
conditions in the multiple criteria tabs.
Remove Playlist – Click the button Delete to remove one or more playlists.
Edit Playlist – Click on a playlist name or click the edit icon in the Operate cell opens the playlist
editing page. Once satisfied, click Save to accept the changes.
Publish Playlist – A playlist can be published to players when its status is Normal. Click the
button Publish in the Operate cell opens the publish page, allowing you to compile programs
and then distribute to players. See details about publish: 8.4Publish.
Chapter 7 Program
Signway Digital Signage CDMS User Manual V4.5 68
1.3 Scroll Text
Scroll text contents are independent to the playlists. They will not be affected when the playlists
switch.
Click the menu Program > Scroll Text to open the scroll text page.
1.3.1 Create Scroll Text
1. Click the menu Program > Scroll Text to open the scroll text page
2. Click the button New and follow the instructions.
3. Specify the screen resolution.
4. Click OK to open the scroll text editing page.
5. Give it a unique name and choose whether to check Auto Match.
Chapter 7 Program
Signway Digital Signage CDMS User Manual V4.5 69
If Auto Match is checked, the scroll text will display at the position of the previous text zone.
If unchecked, it will display as specified.
6. Enter text and make settings in the lower editing section.
7. On top right corner of the page, click the button Quick Preview or Actual Preview to
preview the current the scroll text.
Quick Preview – gives a quick preview of the playlist in a small window on your PC with less
bandwidth consumption.
Scale Preview – gives a precise preview of the playlist in the same size as the real screen
8. Once satisfied, click Save to save your scroll text.
The button Back returns to the previous scroll text page without saving. After saving, click
the button Publish to compile programs and then distribute to players. See details about
publish: 8.4Publish.
1.3.2 Scroll Text Library
All the CDMS scroll text contents are showed in the form of list as below.
Search Scroll Text – you are allowed to locate specific scroll texts by entering one or more filter
conditions in the multiple criteria tabs.
Remove Scroll Tex – Click the button Delete to remove one or more scroll texts.
Edit Scroll Tex – Click on a scroll text name or click the edit icon in the Operate cell opens the
scroll text editing page. Once satisfied, click Save to accept the changes.
Publish Scroll Tex – A scroll text can be published to players when its status is Normal. Click the
button Publish in the Operate cell opens the publish page, allowing you to compile programs
and then distribute to players. See details about publish: 8.4Publish.
Chapter 7 Program
Signway Digital Signage CDMS User Manual V4.5 70
1.4 Publish
Your playlists and scroll texts can be distributed to players over network via the publish feature.
Click the menu Program > Publish to open the publish management page.
All published programs are listed here, including rejected and approved programs. You are
allowed to locate specific programs by entering one or more filter conditions in the multiple
criteria tabs.
Click on a publish ID gives you the publish details, including content, schedule, players and
approvals.
1.4.1 New Publish
1. In the publish management page, click the button New to open the below publish page.
Click Publish in the playlist or scroll text editing page also opens the publish page.
Chapter 7 Program
Signway Digital Signage CDMS User Manual V4.5 71
2. Specify the program type, playlist or scroll text, and then add the corresponding contents.
To create playlists and scroll texts, see 8.2Playlist and 8.3Scroll Text.
3. Click Add to add playlists or scroll texts.
Click OK to replace the current playlists with the selected ones.
Click Add to add the selected playlists after the current ones.
NOTE: The Player Type should be the same for all the playlists included in a program. And
the screen Resolution should be the same for non-android players.
4. Set publish attribute.
Right click to preview,
remove a playlist or
adjust its playback
sequence.
Chapter 7 Program
Signway Digital Signage CDMS User Manual V4.5 72
Play Mode:
Looping Repeat the program continuously in all blank periods that have no scheduled program
Scheduled Play on a continuous loop during the specified period which can be defined by week or by
day. Check the box before Break allows you to break the current broadcast and bring in the
program.
Expiration: the program will be removed from the CDMS system and related players when
the expiration date comes.
Publish Strategy:
Additional Add to the original schedule without replacement or any change.
Overwrite The original schedule will be removed and replaced with the new schedule.
Overwrite & Update Overwrite the playlists of the same name and play in chronological order following
the new schedule.
Overwrite & Keep Replace the playlists of the same name and keep the original playback sequence.
Publish Time:
Immediate Publish immediately when the program is submitted.
Scheduled Publish the program at your specified date and time.
Add: with the start and end date/time set, click Add to add a schedule.
Delete: click to remove a schedule.
5. Specify the target players.
On the left panel, check the target organization, group or players. The selected ones will
appear in the right column Targeted Player / Organization /Group.
When publishing programs, the resolution of a non-Android program must be the same as
that of the terminal. It is not required for Android programs. Android programs for horizontal
screens can be distruibuted to all players with horizontal screens, no matter of what
resolution, vice versa. For example, an Android player with horizontal screen can download
and display both programs with resolution of 1920x1080 and 1366x768.
6. Click OK to submit.
The program will be distributed to the players directly if there is no approval strategy
configured.
Signway Digital Signage CDMS User Manual V4.5 76
Chapter 2 Touch
A touch program allows users to switch pages, run APP applications or browse a website by
touching the display screen. This module helps you to create interactive programs and distribute
to the terminals. Hovering over the Touch menu displays the sub-menus. Click a sub-menu to
enter the corresponding page
2.1 Touch
Click the menu Touch > Touch to open the touch program management page which allows you
to create and manage interactive programs.
2.1.1 Create Touch Programs
1. Click the button New on the touch program management page.
2. Define the name and the resolution of the program. Click OK to open the next editing page.
The blank block in the middle of this page is the program editing area. The panes of Tool,
Tree and Properties around the editing area can be moved by dragging their title bars, or hid
by click the corresponding buttons on the top. Click Auto in the top left corner allows you to
change the zoom percentage.
Chapter 7 Program
Signway Digital Signage CDMS User Manual V4.5 77
Tool – Click to add zones to the editing area.
Tree – lists all the zones included in the program according to levels.
Properties – set position, size and playback style of each zone.
3. Add directories and pages to the Tree.
Icon Name Description
Touch A touch program consists of multiple directories of different themes or styles.
Directory Each directory has multiple display pages.
Page Each page can be divided into multiple zones, such as Button, Video and Image.
Right click on the tree allows you to add a new directory or page.
Chapter 7 Program
Signway Digital Signage CDMS User Manual V4.5 78
The right-click menu on the tree also allows you to edit directories and pages.
Options Description
New Area Add directories, pages or zones to the current program.
Rename Rename directories, pages or zones for ease of search.
Collapse/Expand Collapse or expand any node or the entire tree.
Cut Cutting an item will remove it and you can paste it into another place.
Copy Copping an item will create a duplicate for you to paste into other places.
Paste Paste the item you’ve copied or cut.
Cut To Cut the item and paste it into some other places you specified.
Copy To Copy the item and paste it into some other places you specified.
Move Up/Down Bring the item to an upper or lower layer.
Move Top/Bottom Bring the item to the top or bottom layer.
Delete Remove a directory, page or zone.
Clear Remove all contents from the current page.
Set as homepage
Set the current page as homepage. The player will start playing from the
homepage after program downloading.
4. Add zones to each page.
In the left Tool pane, click zone icons to add zones to the editing area of the current page.
Right click on a page from the tree and choose New Area also allows you to add zones to the
page.
Tool Description
Button Add a button. Click the button on screen will bring you to a specified content.
ButtonGroup Add a group of buttons. A button group consists of a button page and some
buttons on it. A button will bring the user to a specified content.
Video Add a video zone. One at most.
Image Add an image zone.
Text Add a scroll text zone. One at most
Static Text Add a stationary text zone.
Date Add a date zone to show the current date. One at most.
Time Add a date zone to show the current time. One at most.
Web Add a web zone to display web pages or touch applications. One at most.
To remove a zone, right click on it from the tree or the editing area, and then choose Delete
from the drop-down menu.
The Button zone can exist independently on the page or in group on a button page.
Chapter 7 Program
Signway Digital Signage CDMS User Manual V4.5 79
The below window appears when you click the icon ButtonGroup to add a button group.
 Area Width/Height – the horizontal width and vertical height of the zone.
 Column/Row – the number of columns and rows.
 Left/Top – the left and top margin of the first button.
 Width/Height – the horizontal width and vertical height of the button.
 Column Space – the span between two columns
 Row Space - the span between two rows
5. Adjust zone position, size and layer.
Highlight a zone before you adjust its position, size and layer. These adjustments do not
apply to the background zone.
To highlight a zone:
 In the editing area or the tree, click to highlight a zone. Click on a button page selects the
whole button group.
 To select a background zone, click on a page from the tree.
 Hide the upper layer zone before you select a zone in a lower layer. Uncheck the
checkbox before a zone will hide the zone. The hid zone is not removed but not seen
temperately. To show it again, check the checkbox before it.
To adjust the zone position:
 In the editing area, drag a zone by mouse to the position you want to locate it. Click in
the button page and hold down the mouse to drag a button group to a position.
 In Properties pane, directly enter the position coordinates or percentages. The origin lies
A button on the
button page
Chapter 7 Program
Signway Digital Signage CDMS User Manual V4.5 80
in the top left corner.
To adjust zone size:
 In the editing area, drag a zone’s handles inward or outward to make it smaller or larger.
 In Properties pane, directly enter its width and height or the percentages.
 The size of Date or Time zones cannot be adjusted.
To adjust zone layer:
 Right click on a zone, and then choose the pop-up menu options to adjust its layer.
 Use the layer tools on top of the editing area to adjust zone layers
Icon Description Icon Description
Move up to the top layer Move up a layer
Move up to the bottom layer Move down a layer
Adjust Position
Adjust Size
Chapter 7 Program
Signway Digital Signage CDMS User Manual V4.5 81
6. Edit contents and attributes of each zone
Add Contents:Right click on a zone, and then click Material to open the Material window to
add contents to the zone.
 Video/Image –Images can be played in both video and image zones, but videos only in
video zones.
 Web – this zone allows you to add a web address or a local touch application.
You can set the playback duration and refresh interval when you add a web address.
 Text/Static Text – enter text contents directly in the zone.
 Date/Time/Button/ButtonGroup – no extra contents required.
Edit Contents:
0
Signway Digital Signage CDMS User Manual V4.5 82
In the Content window, click the editing buttons to edit the contents in the current zone.
Button Description
Details View content details
Move Up/Down Bring a video or image forward / backward in the playback queue.
Move Top/Bottom Bring a video or image to the front / last position in the playback queue.
Edit Edit image name, playback duration and transition effect.
Delete Remove your selected content
Clear Remove all contents from the current zone.
Edit Attributes:With a zone highlighted, you can edit its attributes in the Properties pane.
 Page Background
When there is no background image, click the field Color to set the background color. If
there exists an image already, remove the image before you set the background color.
The background image or color will be expanded to fill the entire screen horizontally and
vertically by default.
NOTE: The right-click menu on the background allows you to delete or clear the current
page.
 Button Zone
Action – choose the jump action. When you click on the button, it will start to run your
specified application, website or touch page.
Target – Choose what to jump to when you click the button. The target can be a music
application, a webpage, a touch page or an image or video zone. The website can be
Chapter 8 Touch
Signway Digital Signage CDMS User Manual V4.5 83
typed directly in this field.
Style – choose the playback style.
Full Screen – choose whether your specified APP or website will be played in full screen.
If not, you are allowed to define the playback area.
Close Button – choose whether to display close button on your specified APP or website
playback area. If yes, the area can be closed by clicking the close button.
Show pictures – click to set a thumbnail for the button. The image serves to identify the
button.
Timeout – The maximum time to play your APP or website on demand in full screen.
There is no time limit when the contents are not played in full screen.
 ButtonGroup
A button group consists of a button page and several buttons on it.
Click on a button page selects the whole button group. When you drag a button group
handles to change its size, the button zoom property can be defined in the Properties
column.
Button Zoom – define how the button size changes along with the whole button group. If
you choose Scale Proportionally, the button will be scaled proportionally when you drag
to change the button group size. Otherwise, it will not change.
 Video Zone
Mode – In live mode, contents will be filled and played in the video zone. While in on
demand mode, you are allowed to specify the contents played in the playing area by
clicking on the thumbnail.
Chapter 8 Touch
Signway Digital Signage CDMS User Manual V4.5 84
Live On Demand
Play Area – set the playing area position according to the thumbnail in on demand mode.
When you choose Up, contents will be played in the area above the thumbnail.
Border Color – set the border color of the thumbnail.
Border – set the border width of the thumbnail.
Thumbnail – set the size of the thumbnail.
Padding – set the distance between the thumbnail and the video playing area.
 Image
Mode – Live mode is supported only for now. Images will be filled and played in the
image zone.
 Text
Enter text in the text box and make settings in the Properties column.
Font/Background Color – set the text color the background color.
Scroll/ Speed – set the text scrolling orientation and speed.
Font Size/Type – set the text size and font type.
Transparency – set the background transparency. When it is 100%, there is not any
color in the background.
Duration – set the playback duration of the text.
Chapter 8 Touch
Signway Digital Signage CDMS User Manual V4.5 85
 Static Text
With Static Text zone highlighted, you are allowed to enter the content directly in the box
and edit its properties in the Properties column.
Color/Size/Font – set the text color, size and font type.
Style – set the text style.
Position – set the text alignment.
 Date/Time
With Date or Time zone highlighted, you are allowed to change its style and property in
the Properties column.
Color – set the font color.
Style – set the present style.
Size/Font – set the font type and size.
7. On top right corner of the page, click the button Preview to preview the current
8. Once satisfied, click Save in the top right corner to save the touch program.
The button Back returns to the previous publish management page. After saving, click the
button Publish to compile programs and then distribute to players.
2.1.2 Touch Program Management
All your touch programs are showed in the form of list.
Search Touch – you are allowed to locate specific touch programs by entering one or more filter
Chapter 8 Touch
Signway Digital Signage CDMS User Manual V4.5 86
conditions in the multiple criteria tabs.
Remove Touch – Click the button Delete to remove one or more touch programs.
Edit Touch – Click on a touch name or click the edit icon in the Operate cell opens the playlist
editing page. Once satisfied, click Save to accept the changes.
Export/Import Touch – click the button Export or Import to export or import touch programs.
Chapter 8 Touch
Signway Digital Signage CDMS User Manual V4.5 87
2.2 Publish
Your touch programs can be distributed to players over network via the publish feature.
Click the menu Touch > Publish to open the publish management page
All published touch programs are listed here, including rejected and approved programs. You are
allowed to locate specific programs by entering one or more filter conditions in the multiple criteria
tabs.
Click on a publish ID gives you the publish details, including content, schedule and players.
To Publish a Touch Program:
1. In the publish management page, click the button New to open the below publish page.
Click Publish in the touch editing page also opens the publish page
2. In Touch column, click Add to add the touch program that you want to publish.
Chapter 8 Touch
Signway Digital Signage CDMS User Manual V4.5 88
NOTE: only one touch program is allowed in each publish.
3. Set publish attribute.
Expiration: the program will be removed from the CDMS system and related players when
the expiration date comes.
4. Specify the target players.
On the left panel, check the target organization, group or players. The selected ones will
appear in the right column Targeted Player / Organization /Group.
When publishing programs, the resolution of a non-Android program must be the same as
that of the terminal. It is not required for Android programs. Android programs for horizontal
screens can be distruibuted to all players with horizontal screens, no matter of what
resolution, vice versa. For example, an Android player with horizontal screen can download
and display both programs with resolution of 1920x1080 and 1366x768.
5. Click OK to submit.
The program will be distributed to the players directly if there is no approval strategy
configured.
Chapter 9 Player
Signway Digital Signage CDMS User Manual V4.5 105
2.2 Status
This menu allows you to view real-time status of your players and control them over network.
Click the menu Player > Status to open the player status page.
For ease of management, CDMS players are managed by organization and group.
 Organization – realizes grading management on users, players, contents and playlists and
rights controls. Each player belongs to an organization. See 12.1Organization.
 Group – allows you to group players according to the site, contents or any others.
See 10.1.1Player Group.
Check an organization or group on the left panel, all its players will appear on the right.
2.2.1 Player Status
Click the menu Player > Status to open the player status page. The status of CDMS players is
given in the form of list or thumbnail.
You are allowed to locate specific players by entering one or more filter conditions in the multiple
criteria tabs. Click More > Show/Hide Advanced Search to show more criteria tabs.
Chapter 9 Player
Signway Digital Signage CDMS User Manual V4.5 106
 Progress – reports the program download progress.
 Remaining Hard Disk Space – refers to the size of the free disk space.
 Last Heartbeat – refers to the last time when the player communicates with the server.
 Player Status – reports the status of the player.
Icon Description Icon Description
Unknown Abnormal
Connection Lost Update
Play Login
Download Offline
Stop Offline for days
Background Download Sleep
Click on a player name to look at its detailed information. Double click on a listed player allows
you to view the playback schedule and publish details.
Above the player list, click the button More > Export allows you to export the current table of
player status.
2.2.2 Remote Controls
You are allowed to control networked players remotely.
 Bandwidth Controls
By setting bandwidth, you can control the download speed and save bandwidth for other
business. This is especially important for such industries as banks.
1. Click the menu Player > Status to open the player status page.
2. Above the player list, click the button More > Bandwidth.
Chapter 9 Player
Signway Digital Signage CDMS User Manual V4.5 107
3. Specify the maximum bandwidth for a player to download programs from the server. The
unit is KB.
4. Click OK to complete.
If you want to remove the configuration, just leave it blank and click OK. If not configured, the
bandwidth will be the default maximum value.
 Commend Controls
1. Click the menu Player > Status to open the player status page.
2. Above the player list, click the button More > Player Control.
3. Click one of the option to send commend to your selected players.
4. If the commend is received successfully by the player, you’ll the new status of the player in
the player status list.

Digital Signage CDMS_Editor_manual.pdf

  • 1.
  • 2.
    Signway Digital SignageCDMS User Manual V4.5 55 Chapter 1 Program The Program menu allows you to compile programs and publish them to players. Hover over the Program icon to display the sub-menus. Click a sub-menu to enter the corresponding page. 1.1 Template Prepare a screen template before you compile a program. The template defines the content layout on your screen by splitting the screen into zones for diverse contents, such as image zone and video zone. All programs are compiled on basis of a template. You can build a new template or import a predefined template. Click the menu Program > Template to open the template page. System Template and User Template are two template libraries, which can be selected on the left pane. System templates are open to all users, while user templates only to the creator
  • 3.
    Chapter 6 Media SignwayDigital Signage CDMS User Manual V4.5 56 himself and his superior. 1.1.1 Create Templates 1. Click the menu Program > Template to open the template page. 2. Choose the template type from the left pane.  System Template - can be viewed and used by all users.  User Template - only open to the creator himself and his superior 3. Click the button New and choose the player operating system from the drop-down menu.  Signway OS - Embedded system, such as SW110, and not support the features of Touch and Web.  Windows – X86 platform and not support the features of Touch and Web.  Android - Android platform and support the features of Touch and Web 4. Enter the required information in the followed window. Resolution – refers to the resolution of the display screen. Type – the template type is specified in step 2. 5. Click OK to open the template editing page.
  • 4.
    Chapter 6 Media SignwayDigital Signage CDMS User Manual V4.5 57 6. Add background. Skip this if no background is needed. Click the icon Bg in the left Area column. A dialog appears like below. Click OK to add a background image. Only one background image is allowed. If you click No, the background will be black by default. The color can be changed in the Style section on the right pane. 7. Add Zones. In the left Area column, click zone icons to add zones to the editing area. Zone Description Bg Add a background image or color. One at most. Size and position cannot be changed. Video Add a video zone. One at most. Cannot overlap with image, web, touch, button, dynamic table or static text zones. Image Add an image zone. Four at most. Cannot overlap with video, web, touch, button, dynamic table or static text zones. Text Add a text zone. One at most. Logo Add a logo image. One at most. Date Add a date zone. One at most. Multiple styles for choice. Time Add a date zone. One at most. Multiple styles for choice. Touch Add a touch zone. One at most. Cannot overlap with image, video, web, button, dynamic table or static text zones. Web Add a web zone. One at most. Cannot overlap with image, video, Touch, button, dynamic table or static text zones. Mask Add a pre-prepared image masking, which functions like a photo frame. One at most. Button Add a jump button which allows you to jump to other contents with just one click. Cannot overlap with image, video, LOGO, web, touch, dynamic table or static text zones. Dynamic Table Add a dynamic table which allows you to update displaying content of this area without re-publishing the whole program. Cannot overlap with image, video, LOGO, web, touch, button or static text zones. Static Text Add a stationary text zone when background zone exist. No amount limit. Cannot overlap with other zones except background. Hover a zone or right click on a zone allows you to remove the zone.
  • 5.
    Chapter 6 Media SignwayDigital Signage CDMS User Manual V4.5 58 NOTE: A video zone must exist for templates of Signway OS and Windows platforms, but is not necessary for an Android template. 8. Adjust size and position of zones.  To position a zone, just drag it by mouse to the position you want to locate it. Drag one zone’s handles inward or outward to make it smaller or larger.  Use the tools on top of the editing area to adjust zone positions. Icon Description Icon Description Align left Match height Align center Match height and width Align right Lock a zone’s size and position. Align top Unlock a zone. Align middle Expands a zone to full screen. Align Bottom Remove all zones from the template. Match width Show the template in actual screen size.  When a zone is selected, its coordinate values will be given on the right pane for you to adjust its size and position by changing these values. Adjust Position(X/Y coordinates) Adjust Size(Width/Height)
  • 6.
    Chapter 6 Media SignwayDigital Signage CDMS User Manual V4.5 59 9. Adjust zone layers.  Use the layer tools on top of the editing area to adjust zone layers. Icon Description Icon Description Move up to the top layer Move up a layer Move up to the bottom layer Move down a layer  Right click on a zone, and then choose the pop-up menu to adjust its layer. 10. Set main play area. Skip this if the player operating system is not Android. For Android templates, the whole playback duration depends on the only main play area. All zones play on a continuous loop until the playback of the main play area ends. The background, image, video, touch and web zones can be set to main play area. NOTE: The main play area for templates of Signway OS and Windows is the video zone by default. 11. Click the button Save to save the template. Click Back to return to the previous template page without save. Click Save and Use to save the template and enter the next playlist editing page. See Chapter 8.2Playlist. 1.1.2 Import Template 1. Click the menu Program > Template to open the template page.
  • 7.
    Chapter 6 Media SignwayDigital Signage CDMS User Manual V4.5 60 2. Click the button Import to open the importing page. 3. Click Add File to select templates from your PC The selected files will appear in the pending list. Click Remove all will remove all the files in the pending list. 4. Click Upload to start the upload process. Click Stop will cancel the upload. 5. When the upload ends, the files will disappear from the list. 1.1.3 Template Library All your CDMS templates are showed in the form of list or thumbnail. Search Template – you are allowed to locate specific template by entering one or more filter conditions in the multiple criteria tabs. Edit Template – Click on a template name or double click on its thumbnail opens the template editing page. Once satisfied, click Save to accept the changes. Export Template – Click the button Export to export a template. Remove Template – Click the button Delete to remove a template.
  • 8.
    Chapter 6 Media SignwayDigital Signage CDMS User Manual V4.5 61 1.2 Playlist Playlist is a defined sequence of content to be displayed on the player screen and can be generated by adding media files to a template. Click the menu Program > Playlist to open the playlist page. 1.2.1 Create Playlists 1. Click the menu Program > Playlist to open the playlist page. 2. Click the button New to open a window like below. 3. Choose a template. First select the template type on the left pane, and then select the template you want to use from the right list. Make your choice based on the player operating system, content types, and screen size and orientation. If there is no suitable template in the list, please create one first. See 8.1.1Create Template.
  • 9.
    Chapter 7 Program SignwayDigital Signage CDMS User Manual V4.5 62 4. Click OK to open the playlist editing page. Items – all media files. To preview a file, click on its name or double click on its thumbnail. Template Info – displays the current template. If the template is not satisfactory, click Edit Template to modify it. Once satisfied, click Save to return to the current page. Contents – provide content details on each zone. 5. Add contents to each zone. Select media files from the left media library and drag them to a suitable playback zone. Zone Contents can be played Bg Image, Color Video Image, Video, Music, Slide, Live Image Image Text Dynamic text or scroll text you enter directly Logo Image Date requires no extra content Time requires no extra content Touch Touch Application Web Web page Mask pre-prepared image masking Button Jump action Dynamic Table Dynamic Table Static text Stationary text you type in Contents
  • 10.
    Chapter 7 Program SignwayDigital Signage CDMS User Manual V4.5 63  Drag media files directly to a zone on the right template.  Or drag media files directly to the bottom contents section of a zone. 6. Edit contents of each zone. Switch to a zone by clicking it on the template or the tab in the bottom section.  Bg Click buttons on top of this section to view details, edit static text or remove contents. Right click on the background image also allows you to access these features. Click the background image allows you to change the background image. To change a background image, you need to remove the current image before adding a new one.
  • 11.
    Chapter 7 Program SignwayDigital Signage CDMS User Manual V4.5 64  Static Text Under the Bg tab, click Edit to open the static text editing page.  Video/Image Click buttons on top of this section to edit the content properties, playback sequence or remove it. Right click on the thumbnail also allows you to access these features. Button Description Preview Preview the selected video or image. Details View content details Move Up/Down Bring a video or image forward / backward in the playback queue. Move Top/Bottom Bring a video or image to the front / last position in the playback queue. Edit To edit content name, playback schedule, duration and expiration as well as image transition effect. Delete Remove a video or image from the current zone. Clear Remove all contents from the current zone.  Web Click the button “+” to add web contents. Click the editing button to make changes.
  • 12.
    Chapter 7 Program SignwayDigital Signage CDMS User Manual V4.5 65  Touch Click buttons on top of this section to view the content properties or remove it. Right click on the thumbnail also allows you to access these features. Only one touch application is supported in this zone. To change it, you need to remove the current one at first.  Button Jump button allows you to jump to other contents with just one click. Click the field Action to define the jump action, jump to playlist or Jump to touch. The field Target defines the specific playlist or touch application that this button will lead you to.  Dynamic Table Dynamic table can be created under the menu Media. Dynamic table makes it possible to update the playback content on terminal displays in real time without re-publishing a new program. Right click on the dynamic table allows you to preview, edit or remove it.  Mask A mask functions like a photo frame and is used to control a layer’s transparency.
  • 13.
    Chapter 7 Program SignwayDigital Signage CDMS User Manual V4.5 66 Several images can be added to this zone. Right click on an image allows you to preview, edit or remove it.  Logo Click buttons on top of this section to view the content properties or remove it. Right click on the thumbnail also allows you to access these features, as well as preview the image. Only one image is allowed to add to the Logo zone. To change it, you need to remove the current one at first.  Text Enter text in the text box and make settings on its properties, such as font, scroll style, background and duration. Dynamic text can also be added to this zone. The content of the dynamic text cannot be edited here. You can make settings on its properties or remove it.  Date/Time – cannot be edited. 7. On top right corner of the page, click the button Quick Preview or Actual Preview to preview the current the playlist. Quick Preview – gives a quick preview of the playlist in a small window on your PC with less bandwidth consumption. Scale Preview – gives a precise preview of the playlist in the same size as the real screen. 8. Once satisfied, click Save to save your playlist. The button Back returns to the previous playlist page without saving. After saving, click the button Publish to compile programs and then distribute to players. See details about publish: Chapter 8.4Publish. NOTE: There must be contents in the main play area. Otherwise, the playlist cannot be saved. 1.2.2 Playlist Library All your CDMS playlists are showed in the form of list.
  • 14.
    Chapter 7 Program SignwayDigital Signage CDMS User Manual V4.5 67 Search Playlist – you are allowed to locate specific playlist by entering one or more filter conditions in the multiple criteria tabs. Remove Playlist – Click the button Delete to remove one or more playlists. Edit Playlist – Click on a playlist name or click the edit icon in the Operate cell opens the playlist editing page. Once satisfied, click Save to accept the changes. Publish Playlist – A playlist can be published to players when its status is Normal. Click the button Publish in the Operate cell opens the publish page, allowing you to compile programs and then distribute to players. See details about publish: 8.4Publish.
  • 15.
    Chapter 7 Program SignwayDigital Signage CDMS User Manual V4.5 68 1.3 Scroll Text Scroll text contents are independent to the playlists. They will not be affected when the playlists switch. Click the menu Program > Scroll Text to open the scroll text page. 1.3.1 Create Scroll Text 1. Click the menu Program > Scroll Text to open the scroll text page 2. Click the button New and follow the instructions. 3. Specify the screen resolution. 4. Click OK to open the scroll text editing page. 5. Give it a unique name and choose whether to check Auto Match.
  • 16.
    Chapter 7 Program SignwayDigital Signage CDMS User Manual V4.5 69 If Auto Match is checked, the scroll text will display at the position of the previous text zone. If unchecked, it will display as specified. 6. Enter text and make settings in the lower editing section. 7. On top right corner of the page, click the button Quick Preview or Actual Preview to preview the current the scroll text. Quick Preview – gives a quick preview of the playlist in a small window on your PC with less bandwidth consumption. Scale Preview – gives a precise preview of the playlist in the same size as the real screen 8. Once satisfied, click Save to save your scroll text. The button Back returns to the previous scroll text page without saving. After saving, click the button Publish to compile programs and then distribute to players. See details about publish: 8.4Publish. 1.3.2 Scroll Text Library All the CDMS scroll text contents are showed in the form of list as below. Search Scroll Text – you are allowed to locate specific scroll texts by entering one or more filter conditions in the multiple criteria tabs. Remove Scroll Tex – Click the button Delete to remove one or more scroll texts. Edit Scroll Tex – Click on a scroll text name or click the edit icon in the Operate cell opens the scroll text editing page. Once satisfied, click Save to accept the changes. Publish Scroll Tex – A scroll text can be published to players when its status is Normal. Click the button Publish in the Operate cell opens the publish page, allowing you to compile programs and then distribute to players. See details about publish: 8.4Publish.
  • 17.
    Chapter 7 Program SignwayDigital Signage CDMS User Manual V4.5 70 1.4 Publish Your playlists and scroll texts can be distributed to players over network via the publish feature. Click the menu Program > Publish to open the publish management page. All published programs are listed here, including rejected and approved programs. You are allowed to locate specific programs by entering one or more filter conditions in the multiple criteria tabs. Click on a publish ID gives you the publish details, including content, schedule, players and approvals. 1.4.1 New Publish 1. In the publish management page, click the button New to open the below publish page. Click Publish in the playlist or scroll text editing page also opens the publish page.
  • 18.
    Chapter 7 Program SignwayDigital Signage CDMS User Manual V4.5 71 2. Specify the program type, playlist or scroll text, and then add the corresponding contents. To create playlists and scroll texts, see 8.2Playlist and 8.3Scroll Text. 3. Click Add to add playlists or scroll texts. Click OK to replace the current playlists with the selected ones. Click Add to add the selected playlists after the current ones. NOTE: The Player Type should be the same for all the playlists included in a program. And the screen Resolution should be the same for non-android players. 4. Set publish attribute. Right click to preview, remove a playlist or adjust its playback sequence.
  • 19.
    Chapter 7 Program SignwayDigital Signage CDMS User Manual V4.5 72 Play Mode: Looping Repeat the program continuously in all blank periods that have no scheduled program Scheduled Play on a continuous loop during the specified period which can be defined by week or by day. Check the box before Break allows you to break the current broadcast and bring in the program. Expiration: the program will be removed from the CDMS system and related players when the expiration date comes. Publish Strategy: Additional Add to the original schedule without replacement or any change. Overwrite The original schedule will be removed and replaced with the new schedule. Overwrite & Update Overwrite the playlists of the same name and play in chronological order following the new schedule. Overwrite & Keep Replace the playlists of the same name and keep the original playback sequence. Publish Time: Immediate Publish immediately when the program is submitted. Scheduled Publish the program at your specified date and time. Add: with the start and end date/time set, click Add to add a schedule. Delete: click to remove a schedule. 5. Specify the target players. On the left panel, check the target organization, group or players. The selected ones will appear in the right column Targeted Player / Organization /Group. When publishing programs, the resolution of a non-Android program must be the same as that of the terminal. It is not required for Android programs. Android programs for horizontal screens can be distruibuted to all players with horizontal screens, no matter of what resolution, vice versa. For example, an Android player with horizontal screen can download and display both programs with resolution of 1920x1080 and 1366x768. 6. Click OK to submit. The program will be distributed to the players directly if there is no approval strategy configured.
  • 20.
    Signway Digital SignageCDMS User Manual V4.5 76 Chapter 2 Touch A touch program allows users to switch pages, run APP applications or browse a website by touching the display screen. This module helps you to create interactive programs and distribute to the terminals. Hovering over the Touch menu displays the sub-menus. Click a sub-menu to enter the corresponding page 2.1 Touch Click the menu Touch > Touch to open the touch program management page which allows you to create and manage interactive programs. 2.1.1 Create Touch Programs 1. Click the button New on the touch program management page. 2. Define the name and the resolution of the program. Click OK to open the next editing page. The blank block in the middle of this page is the program editing area. The panes of Tool, Tree and Properties around the editing area can be moved by dragging their title bars, or hid by click the corresponding buttons on the top. Click Auto in the top left corner allows you to change the zoom percentage.
  • 21.
    Chapter 7 Program SignwayDigital Signage CDMS User Manual V4.5 77 Tool – Click to add zones to the editing area. Tree – lists all the zones included in the program according to levels. Properties – set position, size and playback style of each zone. 3. Add directories and pages to the Tree. Icon Name Description Touch A touch program consists of multiple directories of different themes or styles. Directory Each directory has multiple display pages. Page Each page can be divided into multiple zones, such as Button, Video and Image. Right click on the tree allows you to add a new directory or page.
  • 22.
    Chapter 7 Program SignwayDigital Signage CDMS User Manual V4.5 78 The right-click menu on the tree also allows you to edit directories and pages. Options Description New Area Add directories, pages or zones to the current program. Rename Rename directories, pages or zones for ease of search. Collapse/Expand Collapse or expand any node or the entire tree. Cut Cutting an item will remove it and you can paste it into another place. Copy Copping an item will create a duplicate for you to paste into other places. Paste Paste the item you’ve copied or cut. Cut To Cut the item and paste it into some other places you specified. Copy To Copy the item and paste it into some other places you specified. Move Up/Down Bring the item to an upper or lower layer. Move Top/Bottom Bring the item to the top or bottom layer. Delete Remove a directory, page or zone. Clear Remove all contents from the current page. Set as homepage Set the current page as homepage. The player will start playing from the homepage after program downloading. 4. Add zones to each page. In the left Tool pane, click zone icons to add zones to the editing area of the current page. Right click on a page from the tree and choose New Area also allows you to add zones to the page. Tool Description Button Add a button. Click the button on screen will bring you to a specified content. ButtonGroup Add a group of buttons. A button group consists of a button page and some buttons on it. A button will bring the user to a specified content. Video Add a video zone. One at most. Image Add an image zone. Text Add a scroll text zone. One at most Static Text Add a stationary text zone. Date Add a date zone to show the current date. One at most. Time Add a date zone to show the current time. One at most. Web Add a web zone to display web pages or touch applications. One at most. To remove a zone, right click on it from the tree or the editing area, and then choose Delete from the drop-down menu. The Button zone can exist independently on the page or in group on a button page.
  • 23.
    Chapter 7 Program SignwayDigital Signage CDMS User Manual V4.5 79 The below window appears when you click the icon ButtonGroup to add a button group.  Area Width/Height – the horizontal width and vertical height of the zone.  Column/Row – the number of columns and rows.  Left/Top – the left and top margin of the first button.  Width/Height – the horizontal width and vertical height of the button.  Column Space – the span between two columns  Row Space - the span between two rows 5. Adjust zone position, size and layer. Highlight a zone before you adjust its position, size and layer. These adjustments do not apply to the background zone. To highlight a zone:  In the editing area or the tree, click to highlight a zone. Click on a button page selects the whole button group.  To select a background zone, click on a page from the tree.  Hide the upper layer zone before you select a zone in a lower layer. Uncheck the checkbox before a zone will hide the zone. The hid zone is not removed but not seen temperately. To show it again, check the checkbox before it. To adjust the zone position:  In the editing area, drag a zone by mouse to the position you want to locate it. Click in the button page and hold down the mouse to drag a button group to a position.  In Properties pane, directly enter the position coordinates or percentages. The origin lies A button on the button page
  • 24.
    Chapter 7 Program SignwayDigital Signage CDMS User Manual V4.5 80 in the top left corner. To adjust zone size:  In the editing area, drag a zone’s handles inward or outward to make it smaller or larger.  In Properties pane, directly enter its width and height or the percentages.  The size of Date or Time zones cannot be adjusted. To adjust zone layer:  Right click on a zone, and then choose the pop-up menu options to adjust its layer.  Use the layer tools on top of the editing area to adjust zone layers Icon Description Icon Description Move up to the top layer Move up a layer Move up to the bottom layer Move down a layer Adjust Position Adjust Size
  • 25.
    Chapter 7 Program SignwayDigital Signage CDMS User Manual V4.5 81 6. Edit contents and attributes of each zone Add Contents:Right click on a zone, and then click Material to open the Material window to add contents to the zone.  Video/Image –Images can be played in both video and image zones, but videos only in video zones.  Web – this zone allows you to add a web address or a local touch application. You can set the playback duration and refresh interval when you add a web address.  Text/Static Text – enter text contents directly in the zone.  Date/Time/Button/ButtonGroup – no extra contents required. Edit Contents:
  • 26.
    0 Signway Digital SignageCDMS User Manual V4.5 82 In the Content window, click the editing buttons to edit the contents in the current zone. Button Description Details View content details Move Up/Down Bring a video or image forward / backward in the playback queue. Move Top/Bottom Bring a video or image to the front / last position in the playback queue. Edit Edit image name, playback duration and transition effect. Delete Remove your selected content Clear Remove all contents from the current zone. Edit Attributes:With a zone highlighted, you can edit its attributes in the Properties pane.  Page Background When there is no background image, click the field Color to set the background color. If there exists an image already, remove the image before you set the background color. The background image or color will be expanded to fill the entire screen horizontally and vertically by default. NOTE: The right-click menu on the background allows you to delete or clear the current page.  Button Zone Action – choose the jump action. When you click on the button, it will start to run your specified application, website or touch page. Target – Choose what to jump to when you click the button. The target can be a music application, a webpage, a touch page or an image or video zone. The website can be
  • 27.
    Chapter 8 Touch SignwayDigital Signage CDMS User Manual V4.5 83 typed directly in this field. Style – choose the playback style. Full Screen – choose whether your specified APP or website will be played in full screen. If not, you are allowed to define the playback area. Close Button – choose whether to display close button on your specified APP or website playback area. If yes, the area can be closed by clicking the close button. Show pictures – click to set a thumbnail for the button. The image serves to identify the button. Timeout – The maximum time to play your APP or website on demand in full screen. There is no time limit when the contents are not played in full screen.  ButtonGroup A button group consists of a button page and several buttons on it. Click on a button page selects the whole button group. When you drag a button group handles to change its size, the button zoom property can be defined in the Properties column. Button Zoom – define how the button size changes along with the whole button group. If you choose Scale Proportionally, the button will be scaled proportionally when you drag to change the button group size. Otherwise, it will not change.  Video Zone Mode – In live mode, contents will be filled and played in the video zone. While in on demand mode, you are allowed to specify the contents played in the playing area by clicking on the thumbnail.
  • 28.
    Chapter 8 Touch SignwayDigital Signage CDMS User Manual V4.5 84 Live On Demand Play Area – set the playing area position according to the thumbnail in on demand mode. When you choose Up, contents will be played in the area above the thumbnail. Border Color – set the border color of the thumbnail. Border – set the border width of the thumbnail. Thumbnail – set the size of the thumbnail. Padding – set the distance between the thumbnail and the video playing area.  Image Mode – Live mode is supported only for now. Images will be filled and played in the image zone.  Text Enter text in the text box and make settings in the Properties column. Font/Background Color – set the text color the background color. Scroll/ Speed – set the text scrolling orientation and speed. Font Size/Type – set the text size and font type. Transparency – set the background transparency. When it is 100%, there is not any color in the background. Duration – set the playback duration of the text.
  • 29.
    Chapter 8 Touch SignwayDigital Signage CDMS User Manual V4.5 85  Static Text With Static Text zone highlighted, you are allowed to enter the content directly in the box and edit its properties in the Properties column. Color/Size/Font – set the text color, size and font type. Style – set the text style. Position – set the text alignment.  Date/Time With Date or Time zone highlighted, you are allowed to change its style and property in the Properties column. Color – set the font color. Style – set the present style. Size/Font – set the font type and size. 7. On top right corner of the page, click the button Preview to preview the current 8. Once satisfied, click Save in the top right corner to save the touch program. The button Back returns to the previous publish management page. After saving, click the button Publish to compile programs and then distribute to players. 2.1.2 Touch Program Management All your touch programs are showed in the form of list. Search Touch – you are allowed to locate specific touch programs by entering one or more filter
  • 30.
    Chapter 8 Touch SignwayDigital Signage CDMS User Manual V4.5 86 conditions in the multiple criteria tabs. Remove Touch – Click the button Delete to remove one or more touch programs. Edit Touch – Click on a touch name or click the edit icon in the Operate cell opens the playlist editing page. Once satisfied, click Save to accept the changes. Export/Import Touch – click the button Export or Import to export or import touch programs.
  • 31.
    Chapter 8 Touch SignwayDigital Signage CDMS User Manual V4.5 87 2.2 Publish Your touch programs can be distributed to players over network via the publish feature. Click the menu Touch > Publish to open the publish management page All published touch programs are listed here, including rejected and approved programs. You are allowed to locate specific programs by entering one or more filter conditions in the multiple criteria tabs. Click on a publish ID gives you the publish details, including content, schedule and players. To Publish a Touch Program: 1. In the publish management page, click the button New to open the below publish page. Click Publish in the touch editing page also opens the publish page 2. In Touch column, click Add to add the touch program that you want to publish.
  • 32.
    Chapter 8 Touch SignwayDigital Signage CDMS User Manual V4.5 88 NOTE: only one touch program is allowed in each publish. 3. Set publish attribute. Expiration: the program will be removed from the CDMS system and related players when the expiration date comes. 4. Specify the target players. On the left panel, check the target organization, group or players. The selected ones will appear in the right column Targeted Player / Organization /Group. When publishing programs, the resolution of a non-Android program must be the same as that of the terminal. It is not required for Android programs. Android programs for horizontal screens can be distruibuted to all players with horizontal screens, no matter of what resolution, vice versa. For example, an Android player with horizontal screen can download and display both programs with resolution of 1920x1080 and 1366x768. 5. Click OK to submit. The program will be distributed to the players directly if there is no approval strategy configured.
  • 33.
    Chapter 9 Player SignwayDigital Signage CDMS User Manual V4.5 105 2.2 Status This menu allows you to view real-time status of your players and control them over network. Click the menu Player > Status to open the player status page. For ease of management, CDMS players are managed by organization and group.  Organization – realizes grading management on users, players, contents and playlists and rights controls. Each player belongs to an organization. See 12.1Organization.  Group – allows you to group players according to the site, contents or any others. See 10.1.1Player Group. Check an organization or group on the left panel, all its players will appear on the right. 2.2.1 Player Status Click the menu Player > Status to open the player status page. The status of CDMS players is given in the form of list or thumbnail. You are allowed to locate specific players by entering one or more filter conditions in the multiple criteria tabs. Click More > Show/Hide Advanced Search to show more criteria tabs.
  • 34.
    Chapter 9 Player SignwayDigital Signage CDMS User Manual V4.5 106  Progress – reports the program download progress.  Remaining Hard Disk Space – refers to the size of the free disk space.  Last Heartbeat – refers to the last time when the player communicates with the server.  Player Status – reports the status of the player. Icon Description Icon Description Unknown Abnormal Connection Lost Update Play Login Download Offline Stop Offline for days Background Download Sleep Click on a player name to look at its detailed information. Double click on a listed player allows you to view the playback schedule and publish details. Above the player list, click the button More > Export allows you to export the current table of player status. 2.2.2 Remote Controls You are allowed to control networked players remotely.  Bandwidth Controls By setting bandwidth, you can control the download speed and save bandwidth for other business. This is especially important for such industries as banks. 1. Click the menu Player > Status to open the player status page. 2. Above the player list, click the button More > Bandwidth.
  • 35.
    Chapter 9 Player SignwayDigital Signage CDMS User Manual V4.5 107 3. Specify the maximum bandwidth for a player to download programs from the server. The unit is KB. 4. Click OK to complete. If you want to remove the configuration, just leave it blank and click OK. If not configured, the bandwidth will be the default maximum value.  Commend Controls 1. Click the menu Player > Status to open the player status page. 2. Above the player list, click the button More > Player Control. 3. Click one of the option to send commend to your selected players. 4. If the commend is received successfully by the player, you’ll the new status of the player in the player status list.