This document provides an introduction to using 3D z-depth renders in After Effects. It explains how to render z-depth data from Maya as an EXR file containing depth information. It then describes how to import this file into After Effects and extract the z-depth channel to use as a mask for blurring and desaturating distant objects, creating a sense of depth. The z-depth layer can be pre-composed and used as an inverted luma matte to apply effects only in the masked areas representing closer objects.

![Compile Your Film: After Effects
BASIC STEPS A: COMPILE YOUR FILM
1. File > import (or [Cmd]/[Ctrl] + [i]). Select just the first frame of your
sequence, and because “JPG sequence” is turned on (by default) your entire
sequence will be imported into the Project window. RightClick on this
imported sequence to “Interpret Main” and set framerate to 24fps before
creating a Comp in the next step (so the Comp is also automatically 24fps).
2. Drag this sequence to the film icon at the bottom of the Project column, to
create a “Comp” from it (Composition).
3. If you have one or more audio clip (music or SFX), import those as well
([Cmd]/[Ctrl] + [i]) and drag them into the Timeline of your existing Comp.
Hit the Play button in the Preview panel (right side) to load a preview.](https://image.slidesharecdn.com/3dlessonopostprocessingeffects-240317204212-968e3a37/85/3Dimenssion_lessonO_PostProcessingEffects-pptx-4-320.jpg)
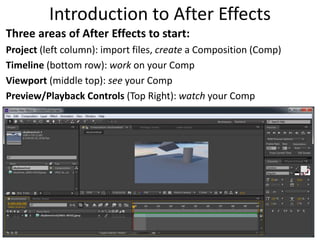
![Compile Your Film: After Effects
BASIC STEPS B: TITLE SCREEN
1. To create a Title Screen:
Add a Text layer: chooser the Text tool in the top toolbar and click in the Comp
View window. OR, RightClick in the Comp Timeline list to make a Text object, or
Layer > new > Text. Start typing, and then select the layer. In the Character tab
(which can be found under the Window menu if it is not visible) adjust the size,
style, color, kerning, etc. to make it easy to read. Include the film title and your
credits.
Choose Start and End points: Move the Timeslider to the desired time, and then
[Alt]+[ [ ] to make that the START of the clip, or [Alt]+[ ] ] to make that the END of
the clip. Also, selecting the track and simply hitting [ or ] moves the start or end of
the track to the current time.
Consider adding a Solid (not required): RightClick in the Comp Timeline list to
create a solid, or Layer > New > Solid. Choose a color. To be part of the titlecard,
Start the Solid clip at 0 and end 5-10 frames into the start of the film (increase film
time by selecting the Comp in the Project window and in the Composition menu
choose Composition Settings. Title card can be 1-2 seconds long)](https://image.slidesharecdn.com/3dlessonopostprocessingeffects-240317204212-968e3a37/85/3Dimenssion_lessonO_PostProcessingEffects-pptx-5-320.jpg)
![Compile Your Film: After Effects
STEPS: RENDERING
1. With your Comp selected in the Project window, go to the Composition menu
> Add to Render Queue.
2. Click Output Module: Lossless to set Format to Quicktime and under Format
Options set Video Codec to H264, MPEG-4, or DV/NTSC 24p, 90%. Turn on
audio, and hit [OK].
3. Click Output To: Not Yet Specified and choose destination and name. Hit [OK].
4. Hit [Render].
To duplicate “used” (grayed-out) render settings, click the render track and hit
[Ctrl] or [Cmd] +[d]](https://image.slidesharecdn.com/3dlessonopostprocessingeffects-240317204212-968e3a37/85/3Dimenssion_lessonO_PostProcessingEffects-pptx-7-320.jpg)


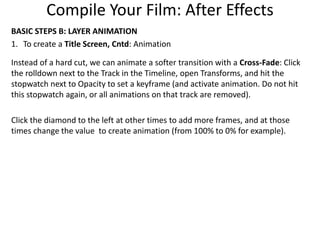
![After Effects: Blending Modes
Make Blending Modes visible: RightClick the right end of the Timeline toolbar to open
Columns > Modes.
Duplicate a layer of your footage. In this new layer, under modes, try changing the
blending mode from Normal to other options to see the effect: Try Multiply, Screen,
Overlay and others to enhance the final image. Try changing the transparency [t] of
these upper, Blended layers to manage the amount of the effect on the final result.
You can also create a color solid and apply blending modes to affect the image below,
as another way to integrate the entire image with a common color.
In the below example, left shows the original lighting and right shows that sequence
duplicated with the upper layer Blending Mode set to Multiply, Opacity 50%.
Image 2018 by Francheska Lopez Rivera](https://image.slidesharecdn.com/3dlessonopostprocessingeffects-240317204212-968e3a37/85/3Dimenssion_lessonO_PostProcessingEffects-pptx-11-320.jpg)
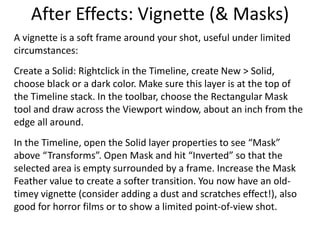
![Z-Depth part 1/5
Z-depth is a specialized render sequence where
objects that are closer to the camera are assigned
a different grayscale value than objects that are
further, allowing us to distinguish between these
distances with blur and saturation effects in After
Effects or Nuke to create a greater sense of
distance akin to real camera footage.
[A] To render Z-depth from MAYA:
1. Open Render Settings. Set the render to Arnold
and the file type to EXR (a super-format that can
contain multiple files in a single file!).
2. In the AOV panel, under “Available AOV” select
“Z” and hit [>>] to move it to “Active AOV”. In the
bottom right, next to “Closest” choose the down-
arrow and hit “Select Driver.” In the Attribute
Editor, choose “Merge AOVs” (this will combine
the Z render with the Beauty as two distinct
sequences inside EXR files).](https://image.slidesharecdn.com/3dlessonopostprocessingeffects-240317204212-968e3a37/85/3Dimenssion_lessonO_PostProcessingEffects-pptx-13-320.jpg)
![Z-Depth part 2/5
[A] To render Z-depth from MAYA:
3. To view the Z-Depth effect, turn on the Arnold Render and switch the view
(upper left) from “Beauty” to “Z”. The screen turns white, because the depth is set
to 0 by default (far right of the tools bar). Set it to -9 to see the depth effect in
action!
4. RENDER: As usual,
Set your Project, be
sure your renders
have a destination
(the image folder
under Edit in the
render settings) and
in the Rendering
module Render >
Render Sequence.](https://image.slidesharecdn.com/3dlessonopostprocessingeffects-240317204212-968e3a37/85/3Dimenssion_lessonO_PostProcessingEffects-pptx-14-320.jpg)
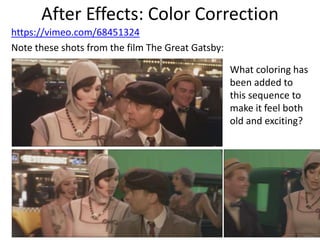
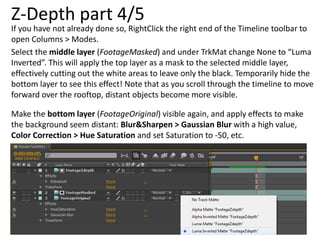
![Z-Depth part 3/5
In AFTER EFFECTS: import the EXR sequence.
Drag to film icon to make a Comp. In the
Timeline, duplicate the EXR layer x2, for a
total of 3 layers. Rename them (select a layer,
and hit [Enter] to rename):
Select the top layer (FootageZdepth) and
RightClick to apply Effect > 3D Channel >
EXtractoR. In the Effects panel, click on RGB
options and set each to Z.
Note the screen turns white (look familiar?).
Adjust the White Point value to see the Z-
Depth effect: Try 300 for the provided
Rooftop sequence.
To make the layer effective as a mask for the
layer below it, RightClick it to select Pre-
compose, and choose “Move all attributes
into the new composition.”
FootageZdepth
FootageMasked
FootageOriginal](https://image.slidesharecdn.com/3dlessonopostprocessingeffects-240317204212-968e3a37/85/3Dimenssion_lessonO_PostProcessingEffects-pptx-15-320.jpg)


![[Pro forma] - production log](https://cdn.slidesharecdn.com/ss_thumbnails/pro-forma-productionlog-171123132521-thumbnail.jpg?width=640&height=640&fit=bounds)


