SlideShare a Scribd company logo
1 of 44
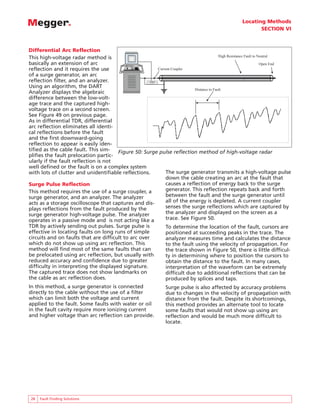
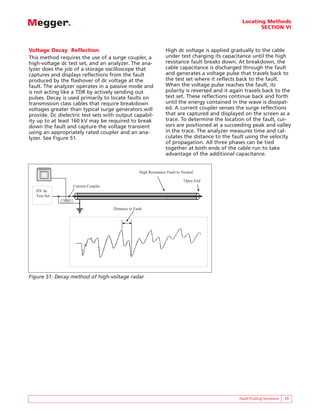
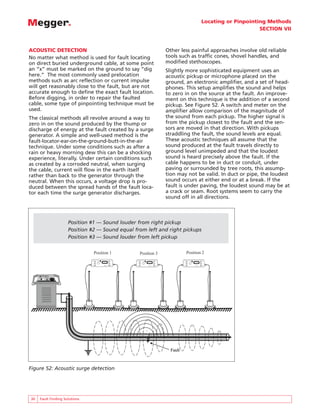
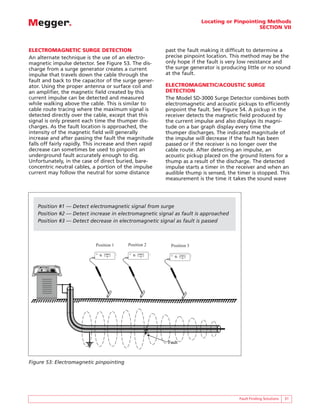
Download to read offline
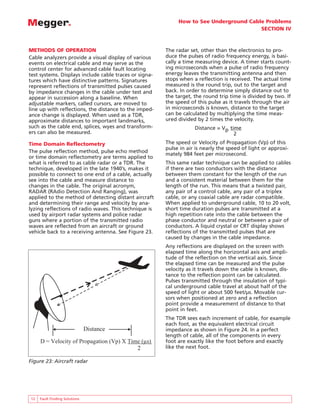
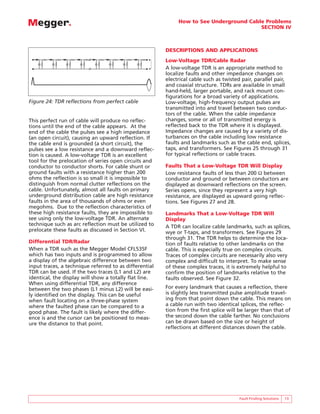
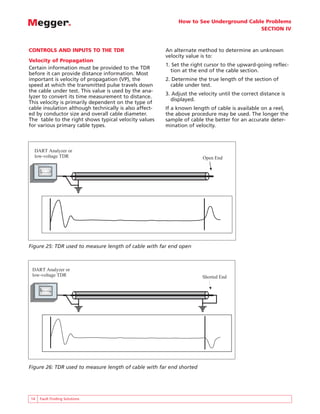
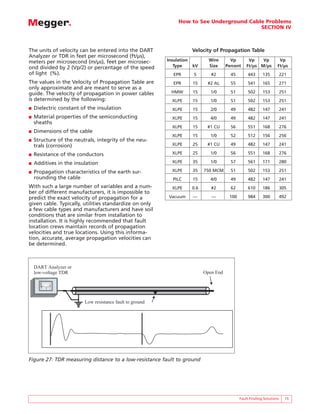
WWW.MEGGER.COM
FAULT FINDING
SOLUTIONS
MEG-231/MIL/3M/11.2003
Megger
PO Box 118 Cherrybrook
NSW 2126
AUSTRALIA
T +61 (0)2 9875 4765
F +61 (0)2 9875 1094
E ausales@megger.com
Megger
PO Box 15777
Kingdom of BAHRAIN
T +973 254752
F +973 274232
E mesales@megger.com
Megger Limited
110 Milner Avenue Unit 1
Scarborough Ontario M1S 3R2
CANADA
T 1 800 297 9688 (Canada only)
T +1 416 298 6770
F +1 416 298 0848
E casales@megger.com
Megger SARL
23 rue Eugène Henaff
ZA du Buisson de la Couldre
78190 TRAPPES
T +01 30 16 08 90
F +01 34 61 23 77
E infos@megger.com
Megger
PO Box 12052
Mumbai 400 053
INDIA
T +91 22 6315114
F +91 22 6328004
E insales@megger.com
Megger
MBE No 393
C/Modesto Lafuente 58
28003 Madrid
ESPAÑA
T + 44 1304 502101
F + 44 1304 207342
E espana@megger.com
Megger Limited
Archcliffe Road Dover
CT17 9EN
UK
T +44 (0) 1304 502100
F +44 (0) 1304 207342
E uksales@megger.com
Megger
4271 Bronze Way
Dallas, TX 75237-1088 USA
T 1 800 723 2861 (USA only)
T +1 214 333 3201
F +1 214 331 7399
E ussales@megger.com
See us on the web at www.megger.com
1-800-723-2861
Tel: 1-214-330-3255
Fax: 1-214-333-3533
cfl@megger.com
WWW.MEGGER.COM
The word “Megger” is a registered trademark
Table of Contents
Fault Finding Solutions
Section Page
I Cable Characteristics
Good Cable Insulation . . . . . . . . . . . . . . . . . . . .2
When Cable Insulation is Bad . . . . . . . . . . . . . .2
Why a cable becomes bad . . . . . . . . . . . . . . .3
Cable Faults Described . . . . . . . . . . . . . . . . . . . .3
II Fault Locating Procedures
Locate Faults in Buried Primary Cable . . . . . . . .4
Test the cable . . . . . . . . . . . . . . . . . . . . . . . . .4
Fault resistance and loop test . . . . . . . . . . . .4
TDR tests . . . . . . . . . . . . . . . . . . . . . . . . . . . . .5
DC hipot test . . . . . . . . . . . . . . . . . . . . . . . . .5
Analyze the Data . . . . . . . . . . . . . . . . . . . . . . . .5
Fault resistance and loop test . . . . . . . . . . . .5
TDR tests . . . . . . . . . . . . . . . . . . . . . . . . . . . . .6
DC Hipot test . . . . . . . . . . . . . . . . . . . . . . . . .6
Cable Route . . . . . . . . . . . . . . . . . . . . . . . . . .6
Localize - prelocate the fault . . . . . . . . . . . . . . .6
Locate - pinpoint the fault . . . . . . . . . . . . . . . .6
Locate Faults in Above Ground
Primary Cable . . . . . . . . . . . . . . . . . . . . . . . . . . .6
III Cable Route Tracers/Locators
Overview . . . . . . . . . . . . . . . . . . . . . . . . . . . . . .7
Selecting a Locator . . . . . . . . . . . . . . . . . . . . . .8
Hookups . . . . . . . . . . . . . . . . . . . . . . . . . . . . . . .9
Using the Receiver . . . . . . . . . . . . . . . . . . . . . .10
IV How to See Underground Cable Problems
Methods of Operation . . . . . . . . . . . . . . . . . . .12
Time domain reflectometry . . . . . . . . . . . . .12
Differential TDR/radar . . . . . . . . . . . . . . . . .13
Descriptions and Applications . . . . . . . . . . . . .13
Low-voltage TDR/cable radar . . . . . . . . . . . .13
Faults that a low-voltage
TDR will display . . . . . . . . . . . . . . . . . . . . . .13
Landmarks that a low-voltage
TDR will display . . . . . . . . . . . . . . . . . . . . . .13
Controls and Inputs to the TDR . . . . . . . . . . . .14
Velocity of propagation . . . . . . . . . . . . . . . .14
Range . . . . . . . . . . . . . . . . . . . . . . . . . . . . . .16
Gain . . . . . . . . . . . . . . . . . . . . . . . . . . . . . . .16
Cursors . . . . . . . . . . . . . . . . . . . . . . . . . . . . .16
Zoom . . . . . . . . . . . . . . . . . . . . . . . . . . . . . .16
Pulse width . . . . . . . . . . . . . . . . . . . . . . . . . .16
Distance Measurements . . . . . . . . . . . . . . . . . .17
Three-stake method . . . . . . . . . . . . . . . . . . .17
Section Page
V Surge Generators, Filters and Couplers
Surge Generators . . . . . . . . . . . . . . . . . . . . . . .19
Energy . . . . . . . . . . . . . . . . . . . . . . . . . . . . .19
Capacitance . . . . . . . . . . . . . . . . . . . . . . . . .20
Voltage . . . . . . . . . . . . . . . . . . . . . . . . . . . . .20
Basic Surge Generator Operation . . . . . . . . . .21
Proof/Burn . . . . . . . . . . . . . . . . . . . . . . . . . .21
Surge . . . . . . . . . . . . . . . . . . . . . . . . . . . . . .21
Ground . . . . . . . . . . . . . . . . . . . . . . . . . . . . .21
Single Point Grounding . . . . . . . . . . . . . . . . . .22
Arc Reflection Filters and Couplers . . . . . . . . .22
VI Localizing Methods
Overview . . . . . . . . . . . . . . . . . . . . . . . . . . . . .24
Sectionalizing . . . . . . . . . . . . . . . . . . . . . . . .24
Resistance ratio . . . . . . . . . . . . . . . . . . . . . .24
Electromagnetic surge detection . . . . . . . . .25
Single phase, coaxial power cable
with neutral bridges over splices . . . . . . .25
Single phase PILC cable with bonded
grounds in conduit . . . . . . . . . . . . . . . . . .26
Three-phase PILC . . . . . . . . . . . . . . . . . . . .26
DART Analyzer/High-Voltage Radar . . . . . . . .27
Arc reflection . . . . . . . . . . . . . . . . . . . . . . . .27
Differential arc reflection . . . . . . . . . . . . . . .28
Surge pulse reflection . . . . . . . . . . . . . . . . .28
Voltage decay reflection . . . . . . . . . . . . . . .29
VII Locating or Pinpointing Methods
Acoustic Detection . . . . . . . . . . . . . . . . . . . . . .30
Electromagnetic Surge Detection . . . . . . . . . .31
Electromagnetic/Acoustic Surge Detection . . .31
Earth Gradient . . . . . . . . . . . . . . . . . . . . . . . . .33
VIII Solutions for Cable Fault Locating
Underground Utility Locating
and Tracing Equipment . . . . . . . . . . . . . . . . . .34
Time Domain Reflectometers . . . . . . . . . . . . . .35
Cable Fault Pinpointing Equipment . . . . . . . . .36
High-Voltage DC Dielectric Test Sets . . . . . . . .37
Suitcase Impulse Generator . . . . . . . . . . . . . . .37
Cable Analyzer . . . . . . . . . . . . . . . . . . . . . . . . .38
Power Fault Locators . . . . . . . . . . . . . . . . . . . .38
Impulse Generators . . . . . . . . . . . . . . . . . . . . .40
Table of Figures
Fault Finding Solutions 1
Figure Page
1 Good insulation . . . . . . . . . . . . . . . . . . . . . . .2
2 Equivalent circuit of good cable . . . . . . . . . .2
3 Bad insulation . . . . . . . . . . . . . . . . . . . . . . . .2
4 Ground or shunt fault on the cable . . . . . . . .3
5 Fault region simplified diagram . . . . . . . . . . .3
6 Open or series fault on the cable . . . . . . . . . .3
7 Test for insulation (fault) resistance
using a Megger® insulation tester . . . . . . . . .4
8 Loop test for continuity using a
Megger insulation tester . . . . . . . . . . . . . . . .4
9 TDR test for cable length . . . . . . . . . . . . . . . .5
10 TDR test for continuity . . . . . . . . . . . . . . . . . .5
11 How cable locators work . . . . . . . . . . . . . . . .7
12 Cable under test . . . . . . . . . . . . . . . . . . . . . . .7
13 Using an ohmmeter to measure
resistance of the circuit . . . . . . . . . . . . . . . . .8
14 Hookup showing ground rod at
far end of cable under test . . . . . . . . . . . . . .9
15 Hookup with far end of cable
under test isolated . . . . . . . . . . . . . . . . . . . . .9
16 Current coupler connection to
neutral on primary jacketed cable . . . . . . . . .9
17 Inductive coupling to neutral on
primary jacketed cable . . . . . . . . . . . . . . . . .10
18 Use of return wire to
improve current loop . . . . . . . . . . . . . . . . . .10
19 Circling path with receiver . . . . . . . . . . . . . .10
20 No interference, no offset between
magnetic field center and center
of cable . . . . . . . . . . . . . . . . . . . . . . . . . . . . .11
21 Depth measurement using null method
with antenna at 45-degree angle . . . . . . . .11
22 Offset caused by interference from
nontarget cable . . . . . . . . . . . . . . . . . . . . . .11
23 Aircraft radar . . . . . . . . . . . . . . . . . . . . . . . .12
24 TDR reflections from perfect cable . . . . . . .13
25 TDR used to measure length of cable
with far end open . . . . . . . . . . . . . . . . . . . .14
26 TDR used to measure length of cable
with far end shorted . . . . . . . . . . . . . . . . . .14
27 TDR measuring distance to a
low-resistance fault to ground . . . . . . . . . . .15
Figure Page
28 TDR used to measure distance to
open in conductor . . . . . . . . . . . . . . . . . . . .16
29 TDR used to localize distance to splice . . . .17
30 TDR used to localize distance to T-tap . . . . .18
31 TDR used to localize distance to
fault relative to a landmark . . . . . . . . . . . . .18
32 Three-stake method . . . . . . . . . . . . . . . . . . .18
33 Block diagram of surge generator . . . . . . . .19
34 Energy vs. voltage for a 4-µF, 25-kV
surge generator . . . . . . . . . . . . . . . . . . . . . .19
35 Energy vs. voltage for a 12-µF, 16-kV
surge generator . . . . . . . . . . . . . . . . . . . . . .20
36 Energy vs. voltage for a constant
energy 12-µF, 16/32-kV surge generator . . .20
37 Acoustic shock wave from arcing fault . . . .21
38 Single point grounding . . . . . . . . . . . . . . . .22
39 Inductive arc reflection diagram . . . . . . . . .23
40 Resistive arc reflection diagram . . . . . . . . . .23
41 Sectionalizing method . . . . . . . . . . . . . . . . .24
42 Basic Wheatstone Bridge . . . . . . . . . . . . . . .24
43 Murray Loop Bridge application . . . . . . . . .24
44 Application of Bridge/TDR . . . . . . . . . . . . . .25
45 Coaxial power cable with neutral
bridges over splices . . . . . . . . . . . . . . . . . . .25
46 Electromagnetic detection in single-phase
PILC cable with bonded grounds . . . . . . . . .26
47 Electromagnetic detection of faults on
three-phase power cable . . . . . . . . . . . . . . .26
48 Arc reflection method of HV radar . . . . . . .27
49 Arc reflection and differential arc
reflection methods of HV radar . . . . . . . . . .27
50 Surge pulse reflection method
of HV radar . . . . . . . . . . . . . . . . . . . . . . . . . .28
51 Decay method of HV radar . . . . . . . . . . . . .29
52 Acoustic surge detection . . . . . . . . . . . . . . .30
53 Electromagnetic pinpointing . . . . . . . . . . . .31
54 Acoustic/electromagnetic pinpointing . . . . .32
55 SD-3000 display at positions 1, 2, & 3 . . . . .33
56 AC voltage gradient . . . . . . . . . . . . . . . . . . .33
57 DC voltage gradient . . . . . . . . . . . . . . . . . . .33
Cable Characteristics
SECTION I
2 Fault Finding Solutions
GOOD CABLE INSULATION
When voltage is impressed across any insulation
system, some current leaks into, through, and
around the insulation. When testing with dc high-
voltage, capacitive charging current, insulation
absorption current, insulation leakage current, and
by-pass current are all present to some degree. For
the purposes of this document on cable fault
locating, only leakage current through the insula-
tion will be considered.
For shielded cable, insulation is used to limit cur-
rent leakage between the phase conductor and
ground or between two conductors of differing
potential. As long as the leakage current does not
exceed a specific design limit, the cable is judged
good and is able to deliver electrical energy to a
load efficiently.
Cable insulation may be considered good when
leakage current is negligible but since there is no
perfect insulator even good insulation allows some
small amount of leakage current measured in
microamperes. See Figure 1.
The electrical equivalent circuit of a good run of
cable is shown in Figure 2. If the insulation were
perfect, the parallel resistance RP would not exist
and the insulation would appear as strictly capaci-
tance. Since no insulation is perfect, the parallel or
insulation resistance exists. This is the resistance
measured during a test using a Megger®
Insulation
Tester. Current flowing through this resistance is
measured when performing a dc hipot test as
shown in Figure 1. The combined inductance (L),
series resistance (RS), capacitance (C) and parallel
resistance (RP) as shown in Figure 2 is defined as
the characteristic impedance (Z0) of the cable.
µAmps
HV
Test
Set
Figure 1: Good insulation
Series Resistance
RS
Parallel
Resistance
RP
Capacitance
C
Inductance
L
Z0 Z0
Figure 2: Equivalent circuit of good cable
mAmps
HV
Test
Set
Figure 3: Bad insulation
WHEN CABLE INSULATION IS BAD
When the magnitude of the leakage current
exceeds the design limit, the cable will no longer
deliver energy efficiently. See Figure 3.
Why A Cable Becomes Bad
All insulation deteriorates naturally with age,
especially when exposed to elevated temperature
due to high loading and even when it is not physi-
cally damaged. In this case, there is a distributed
flow of leakage current during a test or while
energized. Many substances such as water, oil and
chemicals can contaminate and shorten the life of
insulation and cause serious problems. Cross-linked
polyethylene (XLPE) insulation is subject to a con-
dition termed treeing. It has been found that the
presence of moisture containing contaminants,
irregular surfaces or protrusions into the insulation
plus electrical stress provides the proper environ-
ment for inception and growth of these trees
within the polyethylene material. Testing indicates
that the ac breakdown strength of these treed
cables is dramatically reduced. Damage caused by
lightning, fire, or overheating may require replace-
ment of the cable to restore service.
Cable Characteristics
SECTION I
Fault Finding Solutions 3
mAmps
Fault
HV
Test
Set
Figure 4: Ground or shunt fault on the cable
Phase Conductor
Shield or Neutral
Spark Gap
G Fault Resistance
RF
Phase Conductor
Shield or Neutral
Spark Gap
G
Fault Resistance
RF
Figure 5: Fault region simplified diagram
Figure 6: Open or series fault on the cable
CABLE FAULTS DESCRIBED
When at some local point in a cable, insulation has
deteriorated to a degree that a breakdown occurs
allowing a surge of current to ground, the cable is
referred to as a faulted cable and the position of
maximum leakage may be considered a cata-
strophic insulation failure. See Figure 4. At this
location the insulation or parallel resistance has
been drastically reduced and a spark gap has
developed. See Figure 5.
Occasionally a series fault shown in Figure 6 can
develop due to a blown open phase conductor
caused by high fault current, a dig-in or a failed
splice.
Fault Locating Procedures
SECTION II
4 Fault Finding Solutions
LOCATE FAULTS IN BURIED PRIMARY CABLE
After all clearances have been obtained and the
cable has been isolated in preparation for cable
fault locating, it is strongly recommended that a
fixed plan of attack be followed for locating the
fault. As in diagnosing any complex problem, fol-
lowing a set step-by-step procedure will help in
arriving at the solution or, in this case, pinpointing
the fault efficiently.
At the very start, it is a good idea to gather as
much information as possible about the cable
under test. Information that will help in the fault
locating process is:
■ Cable type — is it lead covered, concentric neu-
tral (bare or jacketed), tape shield?
■ Insulation type — is it XLPE, EPR, Paper?
■ Conductor and size — is it CU, AL, stranded,
solid, 2/0, 350 MCM?
■ Length of the run — how long is it?
■ Splices — are there splices, are the locations
known?
■ T-taps or wye splices — are there any taps, are
the locations known, how long are branches?
After obtaining the cable description the acronym
“TALL” can help you remember the procedure for
finding cable faults in buried cable.
TEST ANALYZE LOCALIZE
LOCATE
TEST THE CABLE
Fault Resistance and Loop Test
Although most faults occur between phase
and ground, series opens also occur such as
a blown open splice or a dig-in. Phase-to-
phase faults can also occur on multi- phase
runs. Helpful information can be gathered
with a Megger®
Insulation Tester that has
both megohm and an ohm (continuity)
range.
Make a series of measurements as follows:
■ At end A, connect the instrument
between the faulted conductor and
ground as shown in Figure 7. Using an
insulation resistance range, measure and
record this resistance reading.
Figure 8: Loop test for continuity using a Megger®
insulation
tester
■ At end A, connect the instrument between each
of the other phase conductors, if any, and
ground and record the insulation resistance
readings.
■ After connecting a short between the phase and
neutral at end B (Figure 8), do a loop test for
continuity at end A using the ohms or continuity
range on the instrument. If a reading of greater
than 10 ohms is obtained when the cable has a
concentric neutral, test the conductor and neu-
tral independently by using a nearby good cable
as a return path. This will help to determine
whether it is the conductor or neutral that is
the problem. A reading in the hundreds of ohms
is a good indication of corroded neutral if work-
ing on a bare concentric-type cable. If no nearby
good cable is available, use a long insulated con-
ductor to complete the loop from end B. If a
reading of infinity is measured either the phase
conductor or the neutral is completely open
between end A and end B which could be
caused by a dig-in or a fault that has blown
open the phase conductor.
■ Repeat all tests from end B and record all
readings.
Fault
End A End B
MEGGER
Insulation
Tester
Fault
End A End B
Shorting Strap or Grounding Elbow
MEGGER
Insulation
Tester
Figure 7: Test for insulation (fault) resistance using a
Megger®
insulation tester
Fault Locating Procedures
SECTION II
Fault Finding Solutions 5
Figure 9: TDR test for cable length
Figure 10: TDR test for continuity
TDR Tests
Refer to Section IV for details on the use of the
Time Domain Reflectometer.
■ At end A, connect a TDR or DART®
Cable
Analyzer (use the TDR mode) between the fault-
ed conductor and neutral or shield as shown in
Figure 9. Look for an upward reflection from the
open end of the cable and measure the length
to the open using the cursors.
■ After connecting a short between phase and
neutral at end B (Figure 10), look for the down-
ward indication of a short circuit at the cable
end on the TDR. If the TDR shows an alternating
open and short when alternately removing and
applying the ground at the end of the cable, the
phase and shield are continuous to the cable
end. If the short does not appear on the TDR
and a high resistance was read during the loop
test, either the phase or shield is open at some
point before the cable end.
■ If a downward reflection is observed on the TDR
and the fault resistance measured less than
200 Ω in the test, the fault has been found. If a
downward reflection is observed on the TDR and
the fault resistance measured greater than 200 Ω
in the test, there is likely a T-tap or wye splice at
that location.
DC Hipot Test
After a surge generator is connected to the cable
under test, do a quick dc proof test to be sure the
cable is faulted and will not hold voltage. Make a
note of the kilovolt measurement when the fault
breaks down. This will be an indicator of what
voltage will be required when surging in order
break down the fault when doing prelocation or
pinpointing. If there are transformers connected
to the cable under test, a proof test will always
indicate a failure due to the low resistance path to
ground through the transformer primary winding.
A dc proof test in this case is not a valid test.
ANALYZE THE DATA
Fault Resistance and Loop Test
If the insulation resistance of the faulted conduc-
tor is less than 50 Ω or more than one MΩ, the
fault will be relatively easy to prelocate but may
be difficult to pinpoint. For values between 50 Ω
and 1 MΩ, the fault may be more difficult to
locate. Some reasons for the difficulty with these
faults is the possible presence of oil or water in
the faulted cavity or the presence of multiple
faults.
Fault
End A End B
TDR
Fault
End A End B
Shorting Strap or Grounding Elbow
End A
TDR
If tests indicate insulation (fault) resistance values
less than 10 ohms, it may not be possible to create
a flashover at the fault site when surge generator
methods are used. This type of fault is often
referred to as a bolted fault. A TDR can be used to
locate this type of fault.
If a measurement of very low resistance in ohms is
made from one end and a high resistance in
megohms from the other end, it is likely that the
phase conductor or a splice is blown open.
If the loop test indicates a resistance reading in
the 10 to 1000 ohm range and particularly if the
reading varies during the measurement, there is
very likely neutral corrosion on the cable. This
could affect success when performing localizing
and locating procedures. If the loop test measure-
ment is infinity, indicating an open circuit, either
the phase conductor or a splice has blown open or
a dig-in has occurred.
TDR Tests
If the TDR tests indicate a shorter than expected
cable length with no change of reflections when a
short is applied to the cable end there is likely a
blown open splice or phase conductor or a dig-in
has occurred. If the TDR tests indicate a longer
than expected cable run, a thorough route trace
may be in order to detect additional cable not
indicated on maps.
Fault Locating Procedures
SECTION II
6 Fault Finding Solutions
DC Hipot Test
If the cable holds voltage during the dc hipot test,
the cable may be good. If the cable is faulted,
burning may be required to reduce the breakdown
voltage required when surging or you have con-
nected to the wrong phase.
Cable Route
At this point, it is recommended that the cable
route be determined or confirmed by consulting
accurate maps or actually tracing the cable route.
See Section III. When attempting to localize or
locate the cable fault, prelocation measurements
and pinpointing techniques must be made over
the actual cable path. Being off the route by as lit-
tle as a few feet may make the locate an extreme-
ly difficult and time-consuming process.
LOCALIZE - PRELOCATE THE FAULT
Selection of a localizing technique is based, at
least in part, on the character of the fault. Several
techniques are fully described in Section VI. They
are as follows:
■ Sectionalizing
■ Bridge — single faults
■ TDR/low-voltage radar — faults measuring less
than 200 Ω and all opens
■ High-voltage radar methods — all faults arc
reflection, surge pulse reflection and decay
■ Electromagnetic impulse detection — all shorts
and some opens
LOCATE - PINPOINT THE FAULT
Locating, often referred to as pinpointing, is nec-
essary before digging up direct buried cable. After
the fault has been localized, a surge generator is
connected to one end of the faulted cable and
then listening in the localized area for the telltale
thump from the fault. When the thump is not loud
enough to hear, it may be necessary to use a surge
detector or an acoustic impulse detector to pin-
point the fault.
Voltage gradient test sets are effective in pinpoint-
ing faults on direct-buried secondary cable but the
method depends on the fault existing between
conductor and earth. When the cable is in conduit,
a different method must be used. When a single
conductor is contained within a plastic conduit,
shorts cannot occur unless water gains access
through a crack or other entry point. When a fault
develops, leakage current flows from the conduc-
tor through the break in insulation, and then fol-
lows the water to the break in the conduit to
earth. If voltage gradient is used, the location of
the crack in the conduit could be found, but the
location of the fault in the insulation would
remain unknown.
LOCATE FAULTS IN ABOVE GROUND PRIMARY
CABLE
Some faults can be found by searching for obvious
physical damage to the cable especially if the cable
section is short. If necessary, connect a surge gen-
erator and walk the cable and listen for the dis-
charge. If the cable is very long it might take a
good deal of time to walk the cable while the
surge generator is on. To reduce the total time
spent and to minimize high-voltage exposure to
the cable, use a localizing technique before
attempting to pinpoint the fault.
Once the fault is localized, a listening aid is used
to zero in on the thump that occurs when the
surge generator breaks down the fault. For metal-
to-metal (bolted) faults on non-buried cable, an
electromagnetic impulse detector may help to pin-
point the fault. The use of electromagnetic
impulse detectors is discussed in detail in Section
VI.
Cable Route Tracers/Cable Locators
SECTION III
Fault Finding Solutions 7
7 MEGGER
OVERVIEW
Before attempting to locate underground cable
faults on direct buried primary cable, it is neces-
sary to know where the cable is located and what
route it takes. If the fault is on secondary cable,
knowing the exact route is even more critical.
Since it is extremely difficult to find a cable fault
without knowing where the cable is, it makes
sense to master cable locating and tracing and to
do a cable trace before beginning the fault locat-
ing process.
Success in locating or tracing the route of electrical
cable and metal pipe depends upon knowledge,
skill, and perhaps, most of all,
experience. Although locating can
be a complex job, it will very likely
become even more complex as
more and more underground
plant is installed. It is just as
important to understand how the
equipment works as it is to be
thoroughly familiar with the exact
equipment being used.
All popular locators/tracers consist
of two basic modules:
The transmitter — an ac generator
which supplies the signal current
on the underground cable or pipe
to be traced.
The receiver — detects the electro-
magnetic field produced by the
transmitted ac current flow. See
Figure 11.
Before starting, it will be helpful
to obtain the following informa-
tion:
■ What type of cable is it?
■ Is the cable the same type all the
way along its length?
■ Is the target cable the only cable
in the trench?
■ Are there any taps?
■ Is the cable run single phase or
multiphase?
Figure 12: Cable under test
■ Is the cable shielded or unshielded?
■ Is the cable direct buried or in conduit?
■ Are there metal pipes or other underground
structures under, over or near the target cable?
■ Is the target cable connected to other cables or
pipes through grounded neutrals?
This information will help to select the most
appropriate locator and to prepare to locate the
cable successfully. See Figure 12.
Transmitter
AC Current Flow Electromagnetic Field
Produced by Current Flow
Receiver Antenna
Nearby Cables and/or Pipes
Current Return Paths
Tee or Wye Splice
Interfering Cables and Pipes
Cable to be traced
Figure 11: How cable locators work
Cable Route Tracers/Cable Locators
SECTION III
8 Fault Finding Solutions
Many transmitters are equipped
with some means of indicating the
resistance of the circuit that it is
trying to pump current through
and can indicate a measurement
of the current actually being trans-
mitted. Output current can be
checked in several ways as follows:
■ By measuring the resistance of
the circuit with an ohmmeter.
When the resistance is less than
approximately 80,000 Ω, there
will typically be enough current
flowing in the cable to allow a
good job of tracing. This is no
guarantee that the transmitted
current is passing through the
target cable. The measured
resistance may be affected by
other circuits or pipes electrically connected to
the target cable acting as parallel resistances.
See Figure 13.
■ By observing the actual signal strength being
transmitted by the transmitter. Many transmit-
ters provide a measurement or some indication
of output current. A loading indicator on the
Portable Locator Model L1070 blinks to indicate
the approximate circuit resistance. A rate of four
blinks per second indicates a low resistance,
almost a short circuit providing a very traceable
signal. A rate of one blink every three seconds
shows a high resistance and a weaker signal.
■ By observing the signal power detected by the
receiver. Signal level indicator numbers are dis-
played digitally on most receivers and older
models may display signal power with analog
meters. The L1070 has both an analog style sig-
nal strength bargraph plus a digital numeric
readout. Tracing experience gives the operator
the ability to judge whether or not the numbers
are high enough. This is the most practical way
to check signal current flow.
Remember, the more current flow through the
conductor the stronger the electromagnetic field
being detected by the receiver and the further
from the conductor being traced the less field is
being detected.
SELECTING A LOCATOR
Cable locating test sets, often referred to as cable
tracers, may be grouped as follows:
■ Low frequency — usually less than 20 kHz some-
times referred to as audio frequency (AF).
■ High frequency — usually higher than 20 kHz
and in the radio frequency (RF) range to about
80 kHz.
■ 60 Hz — most tracers provide this mode to allow
tracing of energized cables.
Low frequency (AF) is considered the general-pur-
pose selection because it is more effective in trac-
ing the route of cables located in congested areas
due to less capacitive coupling to everything else
in the ground. Low frequency can be more effec-
tive over greater distances due to less capacitive
leakage and because higher signal power is
allowed by the FCC. The use of high frequency (RF)
is typical in non-congested areas on relatively short
lengths of cable or when a return path cannot be
provided from the far end. If a proper return path
is provided, either low or high frequencies can be
used effectively for very long distances. The L1070
allows selection of AF, RF, both AF and RF, or 60 Hz
as required by the specific application.
Ohmmeter
If the resistance is too high, ground the far end
If the resistance is still too high, connect an insulated jumper wire for the return path
Figure 13: Using an ohmmeter to measure resistance of the circuit
Cable Route Tracers/Cable Locators
SECTION III
Fault Finding Solutions 9
HOOKUPS
When a direct-buried secondary cable is to be
traced, the transmitter is connected to the conduc-
tor. When coaxial types of primary cable are
traced, the signal may be transmitted along either
the phase conductor or the neutral.
Whenever possible use the direct connection
method with the test leads supplied with the loca-
tor. This is often referred to as the conductive
method. Connect one output lead (usually red)
from the transmitter to the conductor under test
making sure that the alligator clip is making good
contact. Connect the other lead (usually black) to a
temporary metal ground probe and check that the
pin is making good contact with the earth. When
the earth is dry it may be necessary to use a longer
metallic ground stake or to pour water on the
ground rod to give it better contact with the
earth. Place the ground rod off to the side as far
away from the target cable as practical, but try to
avoid crossing over neighboring cables and pipes.
It may be necessary to vary the location of the
ground rod to obtain suitable results.
For best results, install a temporary ground con-
nection to the far end of the conductor being
traced. See Figure 14. In this case
either AF or RF can be used. If a
ground cannot be applied to the
far end, use RF and expect that the
effective traceable length may be
as short as 200 feet. See Figure 15.
The only current flow in this situa-
tion is due to capacitive current
flow and after some point the sig-
nal disappears.
If a direct connection is impossible,
a clamp coupler can be used to
induce the signal current onto the
target cable. See Figure 16. If trac-
ing a primary cable, place the loop
around the neutral. When tracing
secondary, connecting jumper wires
from the conductor to earth at
both ends of the cable may be nec-
essary to obtain an adequate signal
current flow through the target
cable. Remember that for sufficient
current to flow to produce a strong
traceable field there must be a loop
or return path provided back to the
source.
If a current coupler is not available,
the transmitter module itself can be
used to couple the signal inductive-
ly from an antenna in the base of
the transmitter into the cable. See
Figure 17. The transmitter is set on
the earth directly over the target
cable with the arrow on the top
panel in line with the cable. Use
the RF frequency selection and
keep the transmitter and receiver
at least 25 feet apart to avoid inter-
fering signals generated directly
through the air.
Transmiter
BIDDLE
BIDDLE
R
R
L1070
Portable Locator
L1070
Portable Locator
TM
TM
Transmitter
BIDDLE
BIDDLE
R
R
L1070
Portable Locator
L1070
Portable Locator
TM
TM
Figure 14: Hookup showing ground rod at far end of cable under
test
Figure 15: Hookup with far end of cable under test isolated
Transmitter
Jacket
Neutral
BIDDLE
BIDDLE
R
R
L1070
Portable Locator
L1070
Portable Locator
TM
TM
Figure 16: Current coupler connection to neutral on primary
jacketed cable
Cable Route Tracers/Cable Locators
SECTION III
10 Fault Finding Solutions
Keep in mind that the best technique is to connect
the isolated far end of the target cable to a tem-
porary ground rod beyond the far end of the
cable. This will reduce the loop resistance, increase
the transmitted current flow, and maximize the
strength of the signal to be detected by the receiv-
er. See previous Figure 14.
When the far end is parked and isolated, loop cur-
rent is entirely dependent upon capacitive cou-
pling through the insulation or jacket of the cable
and through any faults to ground that may be
present. See previous Figure 15.
If all else fails and in a very congested area, com-
plete the current loop by using a long insulated
jumper wire connected between one side of the
transmitter and the far end of the cable under
test. This technique has limitations as to length
but will definitely limit current flow to the target
cable. See Figure 18. Remember to keep the route
of the return wire well off to the side to avoid
interference.
Direct buried concentric neutral cable can be
traced by connecting the transmitter to the con-
ductor or the neutral. Remember that when con-
nected to the neutral, the signal can more easily
bleed over to other cables and pipes that
may be connected to the ground. A
stronger tracing signal can sometimes be
developed when the transmitter is connect-
ed to the neutral. This is particularly true
when using a current clamp or coupler as
shown previously in Figure 16.
USING THE RECEIVER
To begin the tracing process, start by circling
the connection point to the target cable at
a radius of 10 feet or so to find the position
with the strongest signal when using the
peaking mode. See Figure 19. The L1070
receiver allows pushbutton selection of
either the peaking or nulling modes of trac-
ing. See Figure 20. Some older models
require a change in position of the
antenna head from horizontal to
vertical. Most receivers now also
provide an automatic depth meas-
urement, usually with the push of a
button. Older units require posi-
tioning of the antenna head at a
45-degree angle and following the
process shown in Figure 21.
In the peaking mode of operation,
a maximum signal level is obtained
when the receiver is positioned
directly over the target cable. In the
nulling mode, a minimum signal is
detected when directly over the
target cable. Some units provide a
simultaneous display of both
modes. In general, if the object of
tracing is simply to locate the
approximate path of the target
cable, the peaking mode is recom-
mended. If a more accurate trace is
required such as prior to secondary
fault locating or splice locating, the
nulling mode may be the better
Transmitter
Neutral
Figure 17: Inductive coupling to neutral on primary
jacketed cable
Transmitter
BIDDLE
BIDDLE
R
R
L1070
Portable Locator
L1070
Portable Locator
TM
TM
Figure 18: Use of return wire to improve current loop
Transmitter
BIDDLE
BIDDLE
R
R
L1070
Portable Locator
L1070
Portable Locator
TM
TM
Figure 19: Circling path with receiver
Cable Route Tracers/Cable Locators
SECTION III
Fault Finding Solutions 11
Figure 20: No interference — no offset between
magnetic field center and center of cable
choice. An analog bar-graph display, a digital
numeric readout, a variable volume audible tone
or all three may indicate the receiver signal level.
While walking along the route with the strongest
signal level, note the value of signal strength. Also
while tracing, periodically check the depth. If the
signal level numbers drop as you proceed along
the path away from the transmitter, there should
be a corresponding increase in depth. If the signal
level increases as you proceed along the path,
there should be a corresponding decrease in
depth. If signal level decreases, even though the
depth does not increase, it could mean that you
have just passed a fault to ground or a wye splice.
The transmitter current flow beyond a fault may
be significantly reduced to only capacitive leakage
so the resulting drop in signal level may be
enough evidence to conclude that a fault to
ground has been passed.
When no interference is present, the combined
antennas in the receivers of newer locators will
sense both a null and a peak magnetic field at the
identical spot directly over the target cable.
Interfering conductors and pipes can cause the
magnetic field around the target cable to become
oval, or egg-shaped rather than circular and con-
centric. This will cause an offset between the
detected and actual location. See Figure 22. This
problem is often not possible to detect at the time
the locating is being carried out and is only discov-
ered when digging begins. To prevent this, every
effort should be made to prevent signal current
from bleeding or leaking onto other conductors in
the area, which is often impossible.
Antenna
Conductor or Pipe
Peak Mode Null Mode
X Feet X Feet
X Feet
True Location of
Target
Indicated Position of
Target
Conductor or Pipe Interfering Conductor
or Pipe
Figure 21: Depth measurement using null method
with antenna at 45-degree angle
Figure 22: Offset caused by interference from
non-target cable
How to See Underground Cable Problems
SECTION IV
12 Fault Finding Solutions
METHODS OF OPERATION
Cable analyzers provide a visual display of various
events on electrical cable and may serve as the
control center for advanced cable fault locating
test systems. Displays include cable traces or signa-
tures which have distinctive patterns. Signatures
represent reflections of transmitted pulses caused
by impedance changes in the cable under test and
appear in succession along a baseline. When
adjustable markers, called cursors, are moved to
line up with reflections, the distance to the imped-
ance change is displayed. When used as a TDR,
approximate distances to important landmarks,
such as the cable end, splices, wyes and transform-
ers can also be measured.
Time Domain Reflectometry
The pulse reflection method, pulse echo method
or time domain reflectometry are terms applied to
what is referred to as cable radar or a TDR. The
technique, developed in the late 1940’s, makes it
possible to connect to one end of a cable, actually
see into the cable and measure distance to
changes in the cable. The original acronym,
RADAR (RAdio Detection And Ranging), was
applied to the method of detecting distant aircraft
and determining their range and velocity by ana-
lyzing reflections of radio waves. This technique is
used by airport radar systems and police radar
guns where a portion of the transmitted radio
waves are reflected from an aircraft or ground
vehicle back to a receiving antenna. See Figure 23.
The radar set, other than the electronics to pro-
duce the pulses of radio frequency energy, is basi-
cally a time measuring device. A timer starts count-
ing microseconds when a pulse of radio frequency
energy leaves the transmitting antenna and then
stops when a reflection is received. The actual time
measured is the round trip, out to the target and
back. In order to determine simply distance out to
the target, the round trip time is divided by two. If
the speed of this pulse as it travels through the air
in microseconds is known, distance to the target
can be calculated by multiplying the time meas-
ured divided by 2 times the velocity.
Distance = Vp time
2
The speed or Velocity of Propagation (Vp) of this
pulse in air is nearly the speed of light or approxi-
mately 984 feet per microsecond.
This same radar technique can be applied to cables
if there are two conductors with the distance
between them constant for the length of the run
and a consistent material between them for the
length of the run. This means that a twisted pair,
any pair of a control cable, any pair of a triplex
cable, or any coaxial cable are radar compatible.
When applied to underground cable, 10 to 20 volt,
short time duration pulses are transmitted at a
high repetition rate into the cable between the
phase conductor and neutral or between a pair of
conductors. A liquid crystal or CRT display shows
reflections of the transmitted pulses that are
caused by changes in the cable impedance.
Any reflections are displayed on the screen with
elapsed time along the horizontal axis and ampli-
tude of the reflection on the vertical axis. Since
the elapsed time can be measured and the pulse
velocity as it travels down the cable is known, dis-
tance to the reflection point can be calculated.
Pulses transmitted through the insulation of typi-
cal underground cable travel at about half of the
speed of light or about 500 feet/µs. Movable cur-
sors when positioned at zero and a reflection
point provide a measurement of distance to that
point in feet.
The TDR sees each increment of cable, for example
each foot, as the equivalent electrical circuit
impedance as shown in Figure 24. In a perfect
length of cable, all of the components in every
foot are exactly like the foot before and exactly
like the next foot.
Distance
D = Velocity of Propagation (Vp) X Time (µs)
2
Figure 23: Aircraft radar
How to See Underground Cable Problems
SECTION IV
This perfect run of cable will produce no reflec-
tions until the end of the cable appears. At the
end of the cable the pulses see a high impedance
(an open circuit), causing an upward reflection. If
the cable end is grounded (a short circuit), the
pulses see a low resistance and a downward reflec-
tion is caused. A low-voltage TDR is an excellent
tool for the prelocation of series open circuits and
conductor to conductor shorts. For cable shunt or
ground faults with a resistance higher than 200
ohms the reflection is so small it is impossible to
distinguish from normal clutter reflections on the
cable. Unfortunately, almost all faults on primary
underground distribution cable are high resistance
faults in the area of thousands of ohms or even
megohms. Due to the reflection characteristics of
these high resistance faults, they are impossible to
see using only the low-voltage TDR. An alternate
technique such as arc reflection must be utilized to
prelocate these faults as discussed in Section VI.
Differential TDR/Radar
When a TDR such as the Megger Model CFL535F
which has two inputs and is programmed to allow
a display of the algebraic difference between two
input traces, a technique referred to as differential
TDR can be used. If the two traces (L1 and L2) are
identical, the display will show a totally flat line.
When using differential TDR, any difference
between the two phases (L1 minus L2) will be easi-
ly identified on the display. This can be useful
when fault locating on a three-phase system
where the faulted phase can be compared to a
good phase. The fault is likely where the differ-
ence is and the cursor can be positioned to meas-
ure the distance to that point.
DESCRIPTIONS AND APPLICATIONS
Low-Voltage TDR/Cable Radar
A low-voltage TDR is an appropriate method to
localize faults and other impedance changes on
electrical cable such as twisted pair, parallel pair,
and coaxial structure. TDRs are available in small
hand-held, larger portable, and rack mount con-
figurations for a broad variety of applications.
Low-voltage, high-frequency output pulses are
transmitted into and travel between two conduc-
tors of the cable. When the cable impedance
changes, some or all of transmitted energy is
reflected back to the TDR where it is displayed.
Impedance changes are caused by a variety of dis-
turbances on the cable including low resistance
faults and landmarks such as the cable end, splices,
taps, and transformers. See Figures 25 through 31
for typical reflections or cable traces.
Faults That a Low-Voltage TDR Will Display
Low resistance faults of less than 200 Ω between
conductor and ground or between conductors are
displayed as downward reflections on the screen.
Series opens, since they represent a very high
resistance, are displayed as upward going reflec-
tions. See Figures 27 and 28.
Landmarks That a Low-Voltage TDR Will
Display
A TDR can localize cable landmarks, such as splices,
wye or T-taps, and transformers. See Figures 29
through 31. The TDR helps to determine the loca-
tion of faults relative to other landmarks on the
cable. This is especially true on complex circuits.
Traces of complex circuits are necessarily also very
complex and difficult to interpret. To make sense
of these complex traces, it is extremely helpful to
confirm the position of landmarks relative to the
faults observed. See Figure 32.
For every landmark that causes a reflection, there
is slightly less transmitted pulse amplitude travel-
ing from that point down the cable. This means on
a cable run with two identical splices, the reflec-
tion from the first splice will be larger than that of
the second down the cable farther. No conclusions
can be drawn based on the size or height of
reflections at different distances down the cable.
Fault Finding Solutions 13
Figure 24: TDR reflections from perfect cable
How to See Underground Cable Problems
SECTION IV
14 Fault Finding Solutions
CONTROLS AND INPUTS TO THE TDR
Velocity of Propagation
Certain information must be provided to the TDR
before it can provide distance information. Most
important is velocity of propagation (VP), the
speed at which the transmitted pulse travels down
the cable under test. This value is used by the ana-
lyzer to convert its time measurement to distance.
This velocity is primarily dependent on the type of
cable insulation although technically is also affect-
ed by conductor size and overall cable diameter.
The table to the right shows typical velocity values
for various primary cable types.
An alternate method to determine an unknown
velocity value is to:
1. Set the right cursor to the upward-going reflec-
tion at the end of the cable section.
2. Determine the true length of the section of
cable under test.
3. Adjust the velocity until the correct distance is
displayed.
If a known length of cable is available on a reel,
the above procedure may be used. The longer the
sample of cable the better for an accurate deter-
mination of velocity.
Open End
DART Analyzer or
low-voltage TDR
BIDDLE R
R
R DART
ANALYSIS SYSTEM
Shorted End
DART Analyzer or
low-voltage TDR
BIDDLE R
R
R DART
ANALYSIS SYSTEM
Figure 25: TDR used to measure length of cable with far end open
Figure 26: TDR used to measure length of cable with far end shorted
How to See Underground Cable Problems
SECTION IV
The units of velocity can be entered into the DART
Analyzer or TDR in feet per microsecond (ft/µs),
meters per microsecond (m/µs), feet per microsec-
ond divided by 2 (Vp/2) or percentage of the speed
of light (%).
The values in the Velocity of Propagation Table are
only approximate and are meant to serve as a
guide. The velocity of propagation in power cables
is determined by the following:
■ Dielectric constant of the insulation
■ Material properties of the semiconducting
sheaths
■ Dimensions of the cable
■ Structure of the neutrals, integrity of the neu-
trals (corrosion)
■ Resistance of the conductors
■ Additives in the insulation
■ Propagation characteristics of the earth sur-
rounding the cable
With such a large number of variables and a num-
ber of different manufacturers, it is impossible to
predict the exact velocity of propagation for a
given cable. Typically, utilities standardize on only
a few cable types and manufacturers and have soil
conditions that are similar from installation to
installation. It is highly recommended that fault
location crews maintain records of propagation
velocities and true locations. Using this informa-
tion, accurate, average propagation velocities can
be determined.
Fault Finding Solutions 15
Open End
DART Analyzer or
low-voltage TDR
Low resistance fault to ground
BIDDLE R
R
R DART
ANALYSIS SYSTEM
Figure 27: TDR measuring distance to a low-resistance fault to ground
Insulation Wire Vp Vp Vp Vp
Type kV Size Percent Ft/µs M/µs Ft/µs
EPR 5 #2 45 443 135 221
EPR 15 #2 AL 55 541 165 271
HMW 15 1/0 51 502 153 251
XLPE 15 1/0 51 502 153 251
XLPE 15 2/0 49 482 147 241
XLPE 15 4/0 49 482 147 241
XLPE 15 #1 CU 56 551 168 276
XLPE 15 1/0 52 512 156 256
XLPE 25 #1 CU 49 482 147 241
XLPE 25 1/0 56 551 168 276
XLPE 35 1/0 57 561 171 280
XLPE 35 750 MCM 51 502 153 251
PILC 15 4/0 49 482 147 241
XLPE 0.6 #2 62 610 186 305
Vacuum — — 100 984 300 492
Velocity of Propagation Table
How to See Underground Cable Problems
SECTION IV
16 Fault Finding Solutions
Range
Range is the maximum distance the TDR sees
across the face of the display. Initially, select a
range longer than the actual cable length so the
upward-going reflection from the end can be
identified. Move the right cursor to that upward
reflection and measure the total length. Does the
measurement make sense? A range can then be
selected that is less than the overall cable run but
the TDR will only see out the distance of the range
setting.
Gain
Gain changes the vertical height or amplitude of
reflections on the display. It may be necessary to
increase the gain on a very long cable or a cable
with many impedance changes along its path to
identify the end or other landmarks. Gain adjust-
ment has no effect on measurement accuracy.
Cursors
For all TDR measurements, the cursor is positioned
at the left side of the reflection, just where it
leaves the horizontal baseline either upward or
down. Move the right cursor to the reflection of
interest just as it leaves the base line so that the
TDR can calculate its distance. If the left cursor is
set to the left of the first upward-going reflection,
its zero point is at the output terminals of the
instrument. If you do not recalibrate, it will be
necessary to subtract your test lead length from all
distances measured. Remember, the TDR measures
every foot of cable from the connector on the
instrument to the reflection of interest.
When the test leads are especially long (such as
125 feet long on most high-voltage radar systems),
it is often desirable for you to set the left cursor to
the end of the test leads. When this offset is cali-
brated, the distance indicated by the right cursor
will not include the length of the test leads. To do
this calibration in the field simply touch the ends
of the test leads and position the left cursor at the
toggle point as the TDR sees an open and then a
short. Press the Save Offset to set the left cursor
zero to that point.
Zoom
When you have set the cursor at the reflection of
interest, the distance to that point on the cable
run will appear in the distance readout. When a
zoom feature is provided, the area centered
around the cursor is expanded by the zoom factor
selected: X2 (times 2), X4 (times four), etc. It is
often possible to set the cursor to a more precise
position when the zoom mode is activated and the
reflection is broadened.
Pulse Width
The width of the pulses generated by the TDR typ-
ically ranges from 80 nanoseconds up to 10
microseconds. As range is changed from shorter to
longer, the pulse width is automatically increased
in width so that enough energy is being sent
down the cable to be able to see some level of
reflection from the end. The wider the pulse the
more reflection amplitude but the less resolution.
The narrower the pulse the more resolution but
less reflection amplitude. For the best resolution or
in order to see small changes on the cable, a nar-
row pulse width is required and in order to see the
BIDDLE R
R
R DART
ANALYSIS SYSTEM
DART Analyzer or
low-voltage TDR
Open conductor fault
Figure 28: TDR used to measure distance to open in conductor
How to See Underground Cable Problems
SECTION IV
Fault Finding Solutions 17
end a wide pulse width may be required. The
pulse width may be changed manually to override
the automatic selection. An effect termed pulse
dispersion widens the pulse as it travels down a
long run of cable so resolution may be worse
toward the end of a long cable.
DISTANCE MEASUREMENTS
Three-Stake Method
Measurements to a fault using a low-voltage TDR
are strictly a localizing technique. Never dig a hole
based solely on a TDR measurement. There are too
many variables that include:
• The exact velocity
• The exact cable route
• The accuracy of the TDR itself
The three-stake method is a means to get a rea-
sonably accurate fault pinpoint using only the
TDR. The method consists of making a fault dis-
tance reading from one end (terminal 1) of the
faulted line and placing a marker (stake 1) at that
position as shown in Figure 32. With the TDR con-
nected at the other end of the line (terminal 2),
find the fault distance for a second marker (stake
2). In actual practice, stake 2 may fall short of
stake 1, may be located at the same point, or may
pass beyond stake 1. In any case the fault will lie
between the two stakes. It is important that the
same velocity setting is used for both measure-
ments and the distance measurements are made
over the actual cable route. This may mean tracing
the cable.
Location of the third marker (stake 3), the actual
fault, may be found by using the proportionality
that exists between the fault distances, d1 and d2,
and their error distances, e1 and e2. To locate
stake 3, measure the distance d3 between stakes 1
and 2 and multiply it by the ratio of distance d1 to
the sum of distances d1 and d2. Stake 3 then is
placed at this incremental distance, e1, as meas-
ured from stake 1 toward stake 2.
e1 = d3 d1
d1 + d2
Alternatively, stake 3 can be placed at the incre-
mental distance, e2, as measured from stake 2
toward stake 1.
e2 = d3 d2
d1 + d2
This third stake should be very close to the fault.
A practical field approach (with no math involved)
is to make a second set of measurements from
both ends with a different velocity. If the distance
between stakes 1 and 2 was 50 feet, by adjusting
the velocity upward the new distance measure-
ments may reduce the difference to 30 feet. With
enough tests at differing velocities the distance
can be lowered to a reasonable backhoe trenching
distance.
Open End
DART Analyzer or
low-voltage TDR
Splice
BIDDLE R
R
R DART
ANALYSIS SYSTEM
Figure 29: TDR used to localize distance to a splice
How to See Underground Cable Problems
SECTION IV
18 Fault Finding Solutions
Open End
DART Analyzer or
low-voltage TDR
Open End of Tap
BIDDLE R
R
R DART
ANALYSIS SYSTEM
Tee (Y) Splice
Figure 30: TDR used to localize distance to a T-tap
Open End
Low Resistance Fault to Ground
Open End
Tee (Y) Splice
Splice
DART Analyzer or
low-voltage TDR
BIDDLE R
R
R DART
ANALYSIS SYSTEM
Figure 31: TDR used to localize distance to a fault relative to a landmark
Figure 32: Three-stake method
d3
e1 e2
d1 d2
Stake 1
Stake 1 Stake 3
Stake 3 Stake 2
Stake 2
Fault
Fault
Terminal Terminal 2
Surge Generators, Filters and Couplers
SECTION V
Fault Finding Solutions 19
SURGE GENERATORS
The first commercially available surge generators
for underground cable fault locating were intro-
duced in the late 1940’s. The device is basically a
high voltage impulse generator consisting of a dc
power supply, a high voltage capacitor, and some
type of high voltage switch. See Figure 33.
The power supply is used to charge the capacitor
to a high voltage and then a contact closure dis-
charges the capacitor into the cable under test. If
the voltage is high enough to break down the
fault, the energy stored in the capacitor is rapidly
discharged through a flashover at the fault creat-
ing a detectable sound or “thump” at ground
level. The important specifications of a thumper
are the maximum voltage it can develop and how
much energy it delivers to the fault.
The classical fault locating process has been to
hook up the surge generator, crank up the volt-
age, and walk back and forth over the cable route
until the thump is heard or better yet to feel the
earth move. This process pinpoints the fault allow-
ing a repair crew to dig a hole and repair the
cable. In some cases, it may take hours (or days) to
walk the cable and definitely locate the fault.
During that time, the cable is being exposed to
high voltage thumping.
A few years after polyethylene cable began to be
installed underground, evidence began to surface
that due to “treeing” in the insulation, high-volt-
age thumping of this plastic cable for long periods
of time was doing more harm than good. The
same is not true for PILC cables where typically
higher voltage and more energy is required to
locate faults with no damage to the cable. There is
mixed opinion as to the treeing situation in EPR.
Due to this treeing situation, many utilities issued
work rules reducing the maximum allowable volt-
age to be used for fault locating.
Energy
The energy output of any surge generator meas-
ured in Joules (Watt-Seconds) is calculated as fol-
lows:
E = V2 C
2
where E = Energy in Joules, C = capacitance in µf,
V = voltage in kV
To increase the “bang” at the fault the only two
options are to increase the voltage which can be
done by the operator or increase the capacitance
which must be done by the manufacturer. Figure
34 shows the output energy curve of a typical four
microfarad surge generator that generates 1250
Joules at a maximum voltage of 25 kV. If the fault
locating crew is told that the output voltage of
the thumper must be limited to 12.5 kV (one half
of 25 kV), the output energy of their thumper is
reduced by a factor of four down to 312 Joules.
In a practical world, 300 to 400 Joules is the
threshold for hearing a thump at ground level
with no acoustic amplification and with very little
background noise. If the thump at the fault can
not be heard, the only option is to increase volt-
age in order to find the fault, make a repair and
get the lights back on.
HV dc
Power
Supply
Cap
Proof / Burn Mode
Surge Mode
Discharge
Resistor
Discharge
Switch
HV Switch
HV
HV Return
Safety Ground
Chassis
Figure 33: Block diagram of surge generator
1250
0
200
400
600
800
1000
1200
1400
1 3 5 7 9 11 13 15 17 19 21 23 25
kV
Joules
Figure 34: Energy vs. voltage for a 4-µF, 25-kV
surge generator
Surge Generators, Filters and Couplers
SECTION V
20 Fault Finding Solutions
To help in lowering the voltage required to locate
underground faults, the PFL-4000 Surge Generator
uses a 12 microfarad capacitor producing 1536
Joules at 16 kV. See Figure 35. This allows thump-
ing at lower voltages while still delivering reason-
able energy to the fault. Thumping at 12.5 kV, as
above, now produces a very audible 937 Joules.
Different surge generator energy levels are
required to do fault locating on different lengths
and types of cable constructions. XLPE and EPR
insulated cables typically require much less energy
to locate a fault than a lead cable of comparable
size and construction. For long runs or complex
systems of lead cable that cannot be broken down
into small manageable sections, high voltage and
energy may be required to flashover a fault.
There are currently two types of surge generators
available, one referred to as progressive energy as
described above and the second, constant energy.
The constant energy units contain two or more
capacitors with a corresponding voltage range for
each capacitor. The energy is only constant at the
maximum voltage on each range. A typical exam-
ple is a PFL-6000 with two voltage ranges of 0 to
16 kV and 0 to 32 kV. When the 16 kV range is
selected, a 24 µF capacitor is switched in and when
the 32 kV range is selected a 6 µF capacitor is used.
In this case, at 16 kV or 32 kV the energy output
will be a constant 3072 Joules. See Figure 36.
Capacitance
Cables by their very nature are capacitive since
they consist of two conductors separated by an
insulator. The two conductors in power cable are
the phase conductor and the shield, sheath, or
concentric neutral. These two conductors are sepa-
rated by XLPE, EPR, or oil impregnated paper.
Safety is always a priority even when a cable is not
energized because, as any capacitor, the cable will
hold a charge until discharged or grounded. A
cable must always be grounded before making any
connections even if the cable has been parked and
isolated as it may pickup up a charge from the
field of adjacent energized phases.
The longer the cable or the more complex the sys-
tem or network, the higher the capacitance. If the
surge generator capacitor is smaller than the cable
capacitance, the fault will not discharge until cable
capacitance is fully charged which could take mul-
tiple surges. If the cable capacitance is smaller
than the surge generator capacitance, the fault
will typically flashover on the first try.
Voltage
Deciding on surge generator voltage levels is
extremely important. Without a high enough volt-
age, the fault will not break down. Very high volt-
age surging for long periods of time may promote
the growth of treeing and reduce cable life. If the
fault does not flashover, there will be no thump
that identifies and pinpoints the fault. A very
important factor to consider is that the voltage
pulse doubles in peak-to-peak amplitude on a
good cable as it reflects from the isolated open
1536
0
200
400
600
800
1000
1200
1400
1600
1 3 5 7 9 11 13 15
kV
Joules
Figure 35: Energy vs. voltage for a 12-µF, 16 kV
surge generator
1 3 5 7 9 11 13 15 17 19 21 23 25 27 29 31 33
Joules
0
500
1000
1500
3000
3500
2500
2000
3072 3072
Figure 36: Energy vs. voltage for a 12-µF, 16/32-µF
surge generator
Surge Generators, Filters and Couplers
SECTION V
Fault Finding Solutions 21
end. This also applies if the cable is faulted but the
voltage doubling only occurs between the fault
the open isolated end of the cable.
When surging at 15 kV, the cable between the
fault and the end is exposed to a shock wave of 30
kV peak-to-peak. A hint for fault locating on a
cable that has several splices and has been worked
on from the same end is to look for the current
fault past the last splice. That section of cable was
exposed to voltage doubling during the previous
fault locate with a high probability that the pres-
ent fault is at a weak spot in that length of cable.
BASIC SURGE GENERATOR OPERATION
Proof/Burn
A proof test is performed to determine whether or
not a cable and accessories are good or bad. The
result of a proof test is on a go/no-go basis. The
voltage is increased on the cable under test to the
required voltage level and held there for a period
of time. If there is little or no leakage current and
the voltage reading is stable, the cable is consid-
ered to be good. If a voltage is reached where the
reading becomes unstable or drops with a dramat-
ic increase in current, it is considered to be bad.
This test should be done initially as described in
Section I to help establish that the cable is actually
bad and then to gain some information on the
fault condition. A quick check can also be done
after repair to be sure there is not another fault
and to check workmanship on the splice.
The burn mode is used when the fault will not
flashover at the maximum available voltage of the
surge generator. This condition is due to the elec-
trical characteristics of the fault that may be
altered by applying voltage to the cable until the
fault breaks down and then supplying
current flow. This causes conditioning
or additional damage at the fault loca-
tion that in turn decreases the fault
resistance and reduces voltage
required for breakdown.
When applied to paper-insulated
cable, the insulation actually burns
and becomes charred, permanently
altering the fault characteristics. As
applied to XLPE cable, heat produced
by arcing at the fault can soften the
insulation but when arcing is stopped
the insulation returns to a solid condi-
tion without changing its characteris-
tics drastically. Burning can be effec-
tive on a splice failure or a water filled
fault.
Surge
In the surge mode, the internal capacitor is
charged up to the level selected with the voltage
control and then discharged into the cable. This
process can be automatically repeated on a time
basis by adjusting the surge interval control or
manually by push-button on some models. A surge
of current from the discharging capacitor travels
down the cable, arcs over at the fault, and returns
back to the capacitor on the neutral or sheath.
This rapid discharge of energy causes an audible
explosion and the sound created travels out
through the earth and is used to pinpoint the fault
location. See Figure 37. It is assumed that the
sound travels in a straight and direct path up to
the surface of the earth. Sometimes the soil condi-
tions are such that the sound travels away in a
downward direction or is absorbed and cannot be
heard. In this case, some type of listening device or
surge detector may be needed to assist in pin-
pointing. If the surge of current sees a high resist-
ance path back to the capacitor, as is the case
when the neutral is corroded, the sound level cre-
ated at the fault will be minimal. This current flow
back through the earth can also cause a rise in
potential of any metallic structures mounted in the
ground and a difference in potential on the sur-
face.
Ground
If the surge generator safety ground is connected
properly, the ground mode absolutely and posi-
tively grounds and discharges the surge genera-
tor’s capacitor and the cable under test. After
turning the main power switch off, which dis-
charges the capacitor and cable through a resistor,
always move the mode switch to ground before
removing test leads.
Fault
Fault
Surge Generator
Shock Wave
Figure 37: Acoustic shock wave from arcing fault
Surge Generators, Filters and Couplers
SECTION V
22 Fault Finding Solutions
SINGLE POINT GROUNDING
For safety, always use the single point grounding
scheme as shown in Figure 38 when using a surge
generator. When making or removing connections
to a cable always follow your company’s safety
rules and regulations.
Check the isolated cable for voltage and ground it.
Connect the surge generator safety ground to the
ground rod at the transformer, switch cabinet or
pole. Next, connect the high-voltage return lead to
the shield or neutral as close as possible to the
high-voltage connection. Leave the neutral
grounded at both ends of the cable. Finally, con-
nect the high-voltage test lead to the phase con-
ductor. When removing test leads, use the oppo-
site sequence by removing the high voltage, high
voltage return and lastly the safety ground. The
local ground is only required if company safety
procedures demand it. The safest and lowest resist-
ance safety ground connection is system neutral
which will keep the equipment at zero volts in the
case of a backfeed.
ARC REFLECTION FILTERS AND COUPLERS
In order to reduce the cable exposure to high volt-
age surging and thereby avoid the possibility of
setting the cable up for future failures, some
method of fault prelocation should be used. The
surge pulse and arc reflection methods of preloca-
tion have been used for many years. In order to
use either method, additional equipment is
required including a DART®
Analysis System as dis-
cussed in detail in Section VI.
A signal coupler must be added to the surge gen-
erator to provide the additional capability of using
the surge pulse reflection method of prelocation.
See Figure 39. The coupler can be an inductive or
capacitive type that is used to pick up reflections
on the cable and send them to the DART Analyzer.
Both types of couplers work effectively and the
only difference is that the captured wave shapes
vary slightly.
An arc reflection filter is necessary to provide the
capability of using the arc reflection method. This
filter allows a TDR developing 10 to 20 volt pulses
to be connected to the same cable that is also
being surged at 10,000 volts. The filter also does
some pulse routing to make sure both high- and
low-voltage pulses are sent down the cable under
test. The primary purpose of the filter is to allow
the TDR or analyzer to look down the cable while
it is being surged and, of course, to allow this
while not destroying the analyzer in the process.
The filter may also contain the coupler necessary
to provide surge pulse capability.
There are two types of arc reflection filters, induc-
tive and resistive. Both types are placed in the cir-
cuit between the surge generator and the cable
under test. The inductive filter, as shown in Figure
39, uses a choke that slows the surge generator
pulse down, extending it over time. This makes the
arc at the fault last longer and reflects more TDR
pulses, providing a higher probability that a down-
ward going reflection will be captured. The induc-
tance of the choke also blocks the TDR pulses from
High voltage
High-voltage return
Safety ground
Local ground
(supplemental)
Figure 38: Single point grounding
Surge Generators, Filters and Couplers
SECTION V
Fault Finding Solutions 23
going back to the surge generator’s capacitor and
basically being shorted out. One advantage of the
inductive filter is that it helps to clamp or limit the
voltage applied to the cable under test to only the
level required to breakdown the fault. The choke
in the inductive filter also absorbs less energy cre-
ated by the surge generator, letting more down
the cable to arc over at the fault.
The second type of filter, as shown in Figure 40,
uses a resistor to do the job of pulse routing and
has the benefits of lower cost and smaller size. The
resistor still blocks the TDR pulses and changes the
surge generator pulse slightly but does not limit or
clamp the voltage. The resistive filter tends to
absorb somewhat more of the surge generator
energy than the inductive filter.
Analyzer/TDR
Analyzer
Inductive surge
pulse coupler
Proof burn impulse
Arc Reflection
HV
HV return
Figure 39: Inductive arc reflection diagram
Analyzer
Analyzer/TDR
Inductive surge
pulse coupler
Proof burn impulse
Arc Reflection
HV
HV return
Figure 40: Resistive arc reflection diagram
the relatively short “bad” section remaining can
be replaced. If the cable is in duct or conduit, the
bad section can be replaced. This relatively primi-
tive method is usable on most types of phase-to-
ground and phase-to-phase faults.
Resistance Ratio
Often called the
bridge method, a
variation of the
Wheatstone
Bridge is an
example of the
resistance ratio
methods. See
Figure 42.
When using a
Wheatstone
Bridge, B1, B2,
and C2 represent
known resistanc-
es. C1 represents
the unknown
resistance.
At balance, typi-
cally by adjusting the resistance values of B1 and
B2 when the zero center null detector D indicates
zero, C1/C2 = B1/B2
Therefore, C1 = (C2 x B1)/B2
A variation on the Wheatstone Bridge is the
Murray Loop Bridge. Figure 43 shows that the
adjacent resistances, RC1 of a faulted cable in a
loop with RC2 of a good cable can be made to
represent C1 and C2 of the Wheatstone Bridge.
Similarly, corresponding portions of a slidewire
resistor RB1 and RB2 can be made to represent the
resistances B1 and B2. At balance in the Murray
Loop Bridge, RC1/ RC2 is equal to RB1/RB2.
C2
B2
C1
B1
D
Battery
Figure 41: Sectionalizing method
Locating Methods
SECTION VI
24 Fault Finding Solutions
OVERVIEW
Localizing or prelocation methods provide an
approximate distance to a fault. With cable in con-
duit or duct, an approximate distance is all that is
required because the bad cable will be pulled out
and new back in. With direct buried underground
residential distribution loop fed circuits, localizing
can be used to isolate a bad section between two
pad-mount transformers. The bad section can then
be parked and the loop fed from both ends. In the
case of a radial feed localizing must be followed
by an appropriate pinpointing method. Some early
localizing methods are as follows:
Sectionalizing
The earliest sectionalizing method has been called
the “Cut and Try Method” or the “Divide and
Conquer Method.” This was among the first tech-
niques to be used for fault locating on direct-
buried cable. Hopefully, its use today is limited to
that of a last resort. See Figure 41.
After isolating both ends of the cable section
under test, a Megger®
Insulation Tester is connect-
ed between the conductor and neutral or ground.
A faulted cable will have a lower insulation resist-
ance than a cable with no fault. After measuring
the fault resistance, a hole is dug half way down
the length of the cable section. The cable is cut at
that location and a resistance measurement is
made on each half. The “bad” half of the cable
with the fault will a have lower resistance than the
“good” half and the resistance value on the “bad”
half should be the same as the fault resistance
measured on the complete length of cable. A sec-
ond dig is made half the distance down the “bad”
half. Again, the cable is cut and a resistance meas-
urement is made on each section to identify the
faulted part of the remaining section. Eventually,
L
First Cut at 1/2 L
Second Cut at 3/4 L
Third Cut at 5/8 L
Fault
Figure 42: Basic Wheatstone
Bridge
RB2
RB1
D
Battery
Rf
Fault Resistance
Good Conductor
Faulted Conductor
L
RC1
Shorting
Jumper
RC2
Lx
Figure 43: Murray Loop Bridge application
Locating Methods
SECTION VI
When it is assumed that the resistance of a uni-
form conductor is linear and proportional to its
length, and the total length of the cable section
under test is L, the distance to the fault, Lx, is cal-
culated as follows:
Lx = 2L RB1/RB2
When using the Murray Loop method the series
resistance and length of the good phase and fault-
ed phase must be identical. If the resistances are
different, as would exist if one phase contains a
splice and not the other, the resulting accuracy is
drastically affected. This is a localizing method not
a pinpointing method. Figure 44 illustrates the
practical application of an instrument that
combines a TDR and Murray Loop Bridge in one
instrument.
Electromagnetic Surge Detection
Electromagnetic surge detection techniques have
been used to localize faults on power cable for
more than 50 years. Theoretically, the methods can
be used to locate faults on many types of power
cable but they are generally used only to identify
faulted sections of cable in conduit or duct and
Fault Finding Solutions 25
mostly on network lead paper cables. Electromag-
netic detection methods are used with a surge
generator which provides the impulse of current
necessary to produce the strong electromagnetic
field required to make the method practical.
Since the current impulse is polarized, the field is
also polarized which gives the method much of its
usefulness. An iron core sheath coil with a second-
ary winding will induce a polarized output when
subjected to this field. When a zero center
microammeter is connected to the sheath coil sec-
ondary winding, the direction of the net electro-
magnetic field can be determined. This characteris-
tic allows a determination of whether the fault is
ahead of or behind the detector. See Figures 45
and 46. Since the sheath coil is polarized, and to
maintain consistent information, always place the
coil with arrow on top pointing toward the surge
generator.
Single Phase, Coaxial Power Cable with Neutral
Bridges Over the Splices
Electromagnetic detection methods can be used to
locate faults on coaxial cable systems with access
points such as manholes, cabinets, and
pull boxes as shown in Figure 45. When
the cable system is designed with neutral
bridges over the splices, the pickup coil is
placed directly on the cable under the
neutral. The current impulse produced
by a surge generator will produce a
strong polarized indication as it passes
through the phase conductor and the
direction of the current impulse can be
determined. As long as a strong positive-
ly polarized electromagnetic field can be
sensed, the fault is located in the portion
of cable still ahead. Since the phase con-
ductor is isolated at the far end, the cur-
rent impulse flows through the fault and
then back to the surge generator
through the neutral. Either a weak or no
electromagnetic field will be sensed past
the location of the fault. Therefore, it is
possible to determine in which direction
the fault is located.
If the sheath coil is placed over the neu-
tral, the electromagnetic field produced
by the current impulse in the conductor
is balanced exactly by the return current
back through the neutral and the meter
provides no indication and stays at zero.
When bonded grounds are present in a
Figure 44: Application of Bridge/TDR
Shorting
Jumper
Fault
Figure 45: Coaxial power cable with neutral bridges over the
splices
Fault
Access #1
Strong Field
Access #2
Weak Field
+
- 0
+
- 0
Locating Methods
SECTION VI
26 Fault Finding Solutions
system such as usually found in paper-insulated,
lead-covered cable (PILC) construction, it may be
possible to use a fault locating technique involving
electromagnetic detectors, even though the pickup
coil must be placed over the leaded neutral.
Single-Phase PILC Cable with Bonded Grounds in
Conduit
As shown in Figure 46, this method only applies to
circuits with good bonded grounds at every man-
hole location as commonly provided in network
systems. Without bonded grounds, the surge cur-
rent through the phase conductor is exactly the
same magnitude as the return surge current
through the neutral. With bonded grounds, the
current impulse through the phase conductor
is slightly greater than the returning surge
current in the neutral. This differential is
caused by the small amount of surge current
that flows through the neutral beyond the
fault and into earth through the bonded
ground at the next manhole and back to the
surge generator through the bonded grounds
before the fault. See Figure 46. No current
flows through the second bonded ground
after the fault. When relative readings are
taken with the sheath coil placed on the
cable both before and after the fault, they
will all be positive. Readings taken on the
conductor before the fault will almost always
be noticeably higher in magnitude than those
after the fault. However, the difference is
often too small to instill confidence
in the cable fault location. More
importantly, readings taken on the
bonded grounds before the fault
will become progressively higher as
the faulted section is approached.
Also, the reading taken on the
bonded ground in the first manhole
after the fault will also be high.
Readings taken on the bonded
ground in the second and succeed-
ing manholes after the fault will be
zero. This process allows the faulted
section of cable can be identified.
Three-phase PILC
Strange as it may seem at first, it is
usually easier to locate a fault in
three-phase PILC coaxial cable than
in single phase. See Figure 47. The
current pulse from a surge genera-
tor through one phase of a three-
phase cable will generate a stronger magnetic
field at the cable surface closest to the faulted
phase. When the detector is placed at various posi-
tions around the cable ahead of the fault, the
readings will vary in magnitude. When the detec-
tor is placed at various positions around the cable
in the first manhole past the fault, all readings will
be the same. Note that almost all of the current
pulse returns to the surge generator through the
neutral at the fault site. A small amount of surge
current passes through the neutral past the fault
and out of the next bonded ground. This small
current finds its way back to the surge generator
from earth through the bonded grounds ahead of
the fault.
First manhole after fault
Fault
First manhole in system
Surge current to Thumper
Surge Current from Thumper
Figure 46: Electromagnetic detection in single-phase PILC
cable with bonded grounds
Phase 1 being surged
Sensor position 1 (Strong)
Sensor position 4 (Weak)
Sensor position 3 (Weak)
Sensor position 2 (Strong) First bonded ground in system
First bonded ground after fault
Fault to
neutral
Cross section of cable at last
manhole before the fault
Cross section of cable at first
manhole after the fault
All Detector positions
detect the same strength
Figure 47: Electromagnetic detection of faults on three-phase power
cable
Locating Methods
SECTION VI
DART®
ANALYZER/HIGH-VOLTAGE
RADAR
Because the low-voltage TDR is unable to
identify high resistance shunt faults, its
effectiveness as a fault locator on power
cables is limited. When used in a high-
voltage radar system with surge genera-
tors, filters or couplers, the TDR/Analyzer
is able to display both low and high resist-
ance faults. The DART Analyzer provides
both TDR and storage oscilloscope func-
tions and is able to utilize all of the cable
fault locating methods listed below.
Arc Reflection
This method is often referred to as a high-
voltage radar technique that overcomes
the 200 Ω limitation of low-voltage radar.
In addition to the TDR, an arc reflection
filter and surge generator is required. The
surge generator is used to create an arc
across the shunt fault which creates a
momentary short circuit that the TDR can
display as a downward-going reflection.
The filter protects the TDR from the high-
voltage pulse generated by the surge gen-
erator and routes the low-voltage pulses
down the cable.
Arc reflection is the most accurate and
easiest prelocation method and should be
used as a first approach. The fault is dis-
played in relation to other cable land-
marks such as splices, taps and transform-
ers and no interpretation is required.
Arc reflection makes it possible for the
TDR to display “before” and “after”
traces or cable signatures. See Figure 48.
The “before” trace is the low-voltage
radar signature that shows all cable land-
marks but does not show the downward
reflection of a high resistance shunt fault.
The “after” trace is the high-voltage sig-
nature that includes the fault location
even though its resistance may be higher
than 200 Ω. This trace is digitized, stored
and displayed on the screen allowing the
cursors can be easily positioned in order
to read the distance to the high resistance
fault.
Open End
High Resistance Fault to Neutral
Low Voltage Trace
High Voltage Trace
BIDDLE R
R
R DART
ANALYSIS SYSTEM
Figure 48: Arc reflection method of high-voltage radar
Fault Finding Solutions 27
Open End
High Resistance Fault to Neutral
Open End
Splice
Arc Reflection Trace
Differential Arc Reflection Trace
BIDDLE R
R
R DART
ANALYSIS SYSTEM
Long test leads
Tee splice
Low Voltage Trace
Figure 49: Arc reflection and differential arc reflection
methods of high-voltage radar
Locating Methods
SECTION VI
28 Fault Finding Solutions
Differential Arc Reflection
This high-voltage radar method is
basically an extension of arc
reflection and it requires the use
of a surge generator, an arc
reflection filter, and an analyzer.
Using an algorithm, the DART
Analyzer displays the algebraic
difference between the low-volt-
age trace and the captured high-
voltage trace on a second screen.
See Figure 49 on previous page.
As in differential TDR, differential
arc reflection eliminates all identi-
cal reflections before the fault
and the first downward-going
reflection to appear is easily iden-
tified as the cable fault. This sim-
plifies the fault prelocation partic-
ularly if the fault reflection is not
well defined or the fault is on a complex system
with lots of clutter and unidentifiable reflections.
Surge Pulse Reflection
This method requires the use of a surge coupler, a
surge generator, and an analyzer. The analyzer
acts as a storage oscilloscope that captures and dis-
plays reflections from the fault produced by the
surge generator high-voltage pulse. The analyzer
operates in a passive mode and is not acting like a
TDR by actively sending out pulses. Surge pulse is
effective in locating faults on long runs of simple
circuits and on faults that are difficult to arc over
which do not show up using arc reflection. This
method will find most of the same faults that can
be prelocated using arc reflection, but usually with
reduced accuracy and confidence due to greater
difficulty in interpreting the displayed signature.
The captured trace does not show landmarks on
the cable as arc reflection does.
In this method, a surge generator is connected
directly to the cable without the use of a filter
which can limit both the voltage and current
applied to the fault. Some faults with water or oil
in the fault cavity require more ionizing current
and higher voltage than arc reflection can provide.
The surge generator transmits a high-voltage pulse
down the cable creating an arc at the fault that
causes a reflection of energy back to the surge
generator. This reflection repeats back and forth
between the fault and the surge generator until
all of the energy is depleted. A current coupler
senses the surge reflections which are captured by
the analyzer and displayed on the screen as a
trace. See Figure 50.
To determine the location of the fault, cursors are
positioned at succeeding peaks in the trace. The
analyzer measures time and calculates the distance
to the fault using the velocity of propagation. For
the trace shown in Figure 50, there is little difficul-
ty in determining where to position the cursors to
obtain the distance to the fault. In many cases,
interpretation of the waveform can be extremely
difficult due to additional reflections that can be
produced by splices and taps.
Surge pulse is also affected by accuracy problems
due to changes in the velocity of propagation with
distance from the fault. Despite its shortcomings,
this method provides an alternate tool to locate
some faults that would not show up using arc
reflection and would be much more difficult to
locate.
Open End
High Resistance Fault to Neutral
Distance to Fault
Current Coupler
BIDDLE R
R
R DART
ANALYSIS SYSTEM
Figure 50: Surge pulse reflection method of high-voltage radar
Locating Methods
SECTION VI
Fault Finding Solutions 29
Voltage Decay Reflection
This method requires the use of a surge coupler, a
high-voltage dc test set, and an analyzer. The ana-
lyzer does the job of a storage oscilloscope that
captures and displays reflections from the fault
produced by the flashover of dc voltage at the
fault. The analyzer operates in a passive mode and
is not acting like a TDR by actively sending out
pulses. Decay is used primarily to locate faults on
transmission class cables that require breakdown
voltages greater than typical surge generators will
provide. Dc dielectric test sets with output capabil-
ity up to at least 160 kV may be required to break
down the fault and capture the voltage transient
using an appropriately rated coupler and an ana-
lyzer. See Figure 51.
High dc voltage is applied gradually to the cable
under test charging its capacitance until the high
resistance fault breaks down. At breakdown, the
cable capacitance is discharged through the fault
and generates a voltage pulse that travels back to
the test set where it reflects back to the fault.
When the voltage pulse reaches the fault, its
polarity is reversed and it again travels back to the
test set. These reflections continue back and forth
until the energy contained in the wave is dissipat-
ed. A current coupler senses the surge reflections
that are captured and displayed on the screen as a
trace. To determine the location of the fault, cur-
sors are positioned at a succeeding peak and valley
in the trace. The analyzer measures time and cal-
culates the distance to the fault using the velocity
of propagation. All three phases can be tied
together at both ends of the cable run to take
advantage of the additional capacitance.
Open End
High Resistance Fault to Neutral
Distance to Fault
Current Coupler
BIDDLE R
R
R DART
ANALYSIS SYSTEM
HV dc
Test Set
Figure 51: Decay method of high-voltage radar
Locating or Pinpointing Methods
SECTION VII
30 Fault Finding Solutions
ACOUSTIC DETECTION
No matter what method is used for fault locating
on direct buried underground cable, at some point
an “x” must be marked on the ground to say “dig
here.” The most commonly used prelocation
methods such as arc reflection or current impulse
will get reasonably close to the fault, but are not
accurate enough to define the exact fault location.
Before digging, in order to repair the faulted
cable, some type of pinpointing technique must be
used.
The classical methods all revolve around a way to
zero in on the sound produced by the thump or
discharge of energy at the fault created by a surge
generator. A simple and well-used method is the
fault-locator-ear-on-the-ground-butt-in-the-air
technique. Under some conditions such as after a
rain or heavy morning dew this can be a shocking
experience, literally. Under certain conditions such
as created by a corroded neutral, when surging
the cable, current will flow in the earth itself
rather than back to the generator through the
neutral. When this occurs, a voltage drop is pro-
duced between the spread hands of the fault loca-
tor each time the surge generator discharges.
Other less painful approaches involve old reliable
tools such as traffic cones, shovel handles, and
modified stethoscopes.
Slightly more sophisticated equipment uses an
acoustic pickup or microphone placed on the
ground, an electronic amplifier, and a set of head-
phones. This setup amplifies the sound and helps
to zero in on the source at the fault. An improve-
ment on this technique is the addition of a second
pickup. See Figure 52. A switch and meter on the
amplifier allow comparison of the magnitude of
the sound from each pickup. The higher signal is
from the pickup closest to the fault and the sen-
sors are moved in that direction. With pickups
straddling the fault, the sound levels are equal.
These acoustic techniques all assume that the
sound produced at the fault travels directly to
ground level unimpeded and that the loudest
sound is heard precisely above the fault. If the
cable happens to be in duct or conduit, under
paving or surrounded by tree roots, this assump-
tion may not be valid. In duct or pipe, the loudest
sound occurs at either end or at a break. If the
fault is under paving, the loudest sound may be at
a crack or seam. Root systems seem to carry the
sound off in all directions.
Fault
Fault
SD-3000
SURGE DETECTOR
MAG
SET
FREQ
LEFT
MUTE
ON/OFF
SAVE
RIGHT
MUTE
TIME
AMPL
VOLUME
SD-3000
SURGE DETECTOR
TM
MAG
SET
FREQ
LEFT
MUTE
ON/OFF
SAVE
RIGHT
MUTE
TIME
AMPL
VOLUME
SD-3000
SURGE DETECTOR
MAG
SET
FREQ
LEFT
MUTE
ON/OFF
SAVE
RIGHT
MUTE
TIME
AMPL
VOLUME
Position 1 Position 2
Position 3
Figure 52: Acoustic surge detection
Position #1 — Sound louder from right pickup
Position #2 — Sound equal from left and right pickups
Position #3 — Sound louder from left pickup
Locating or Pinpointing Methods
SECTION VII
ELECTROMAGNETIC SURGE DETECTION
An alternate technique is the use of an electro-
magnetic impulse detector. See Figure 53. The dis-
charge from a surge generator creates a current
impulse that travels down the cable through the
fault and back to the capacitor of the surge gener-
ator. Using the proper antenna or surface coil and
an amplifier, the magnetic field created by this
current impulse can be detected and measured
while walking above the cable. This is similar to
cable route tracing where the maximum signal is
detected directly over the cable, except that this
signal is only present each time the thumper dis-
charges. As the fault location is approached, the
intensity of the magnetic field will generally
increase and after passing the fault the magnitude
falls off fairly rapidly. This increase and then rapid
decrease can sometimes be used to pinpoint an
underground fault accurately enough to dig.
Unfortunately, in the case of direct buried, bare-
concentric neutral cables, a portion of the impulse
current may follow the neutral for some distance
Fault Finding Solutions 31
past the fault making it difficult to determine a
precise pinpoint location. This method may be the
only hope if the fault is very low resistance and
the surge generator is producing little or no sound
at the fault.
ELECTROMAGNETIC/ACOUSTIC SURGE
DETECTION
The Model SD-3000 Surge Detector combines both
electromagnetic and acoustic pickups to efficiently
pinpoint the fault. See Figure 54. A pickup in the
receiver detects the magnetic field produced by
the current impulse and also displays its magni-
tude on a bar graph display every time the
thumper discharges. The indicated magnitude of
the impulse will decrease if the fault has been
passed or if the receiver is no longer over the
cable route. After detecting an impulse, an
acoustic pickup placed on the ground listens for a
thump as a result of the discharge. The detected
impulse starts a timer in the receiver and when an
audible thump is sensed, the timer is stopped. This
measurement is the time it takes the sound wave
Fault
Fault
Position 1 Position 2 Position 3
Position #1 — Detect electromagnetic signal from surge
Position #2 — Detect increase in electromagnetic signal as fault is approached
Position #3 — Detect decrease in electromagnetic signal as fault is passed
Figure 53: Electromagnetic pinpointing
Locating or Pinpointing Methods
SECTION VII
32 Fault Finding Solutions
produced at the fault to travel to the acoustic
pickup and is displayed in milliseconds. As the
fault is approached, this time interval decreases to
a minimum directly over the fault and increases
again as the fault is passed. The time never goes
to zero because there is always the depth of the
cable between the pickup and the fault. This tech-
nique relies on the elapsed time between the two
events, not simply the loudness of the sound and
thereby eliminates the problems of accurate pin-
pointing even under difficult conditions.
If two acoustic pickups are used, the receiver
makes dual measurements and indicates with an
arrow on the display which direction to move
toward the fault. As the fault is approached, the
tail on the arrow becomes shorter until the fault is
passed when the direction of the arrow reverses.
At this point, small movements of the pickups are
made. When they actually straddle the fault, two
arrowheads appear pointed toward each other.
Once the instrument “hears” the thump, head-
phones are no longer necessary and the measure-
ments will lead the operator directly to the fault.
The receiver also measures and displays a digital
value of the sound level, which typically increases
as the fault is approached. By using the Save func-
tion in the unit, two sets of time and sound level
values can be saved and displayed while observing
the current values which confirms that the direc-
tion being taken is correct.
The SD-3000 provides information on its liquid
crystal display, which will efficiently and quickly
guide the operator to within inches of the exact
fault location:
■ Intensity of the surge impulse.
■ Elapsed time between the impulse and thump.
■ Magnitude of the sound.
■ Direction and relative distance to the fault.
Figure 55 shows typical displays of the SD-3000.
Figure 54: Acoustic/electromagnetic pinpointing
Fault
Fault
SD-3000
SURGE DETECTOR
TM
MAG
SET
FREQ
LEFT
MUTE
ON/OFF
SAVE
RIGHT
MUTE
TIME
AMPL
VOLUME
SD-3000
SURGE DETECTOR
TM
MAG
SET
FREQ
LEFT
MUTE
ON/OFF
SAVE
RIGHT
MUTE
TIME
AMPL
VOLUME
SD-3000
SURGE DETECTOR
TM
MAG
SET
FREQ
LEFT
MUTE
ON/OFF
SAVE
RIGHT
MUTE
TIME
AMPL
VOLUME
Position 1 Position 2
Position 3
Position # 1 — Sound detected. Arrow points toward fault. Electromagnetic
signal detected. Time decreases as fault is approached.
Position # 2 — Sound detected. Arrow points toward fault. Electromagnetic
signal detected. Time decreases as fault is approached
Position # 3 — Loud sound detected. Arrows point toward each other. Time
measurement at minimum.
Locating or Pinpointing Methods
SECTION VII
Fault Finding Solutions 33
EARTH GRADIENT
Although primarily designed to pinpoint faults on
direct buried secondary cable, an earth gradient
test set can at times be used to pinpoint faults on
jacketed primary cables when all else fails. A gen-
erator is used to produce a flow of current
between the point of the fault through the earth
and back to the generator by way of an earth con-
tact. Because the earth is a resistance, current flow
will develop a difference in potential or earth gra-
dient along the surface.
The A-frame, with two isolated measuring probes
connected to its receiver, measures and displays
the value of this potential difference. The A-frame
must be moved along directly over the cable route
so tracing the cable before hand is essential. If the
current flow is equal in all directions, measuring
the voltage drop along the cable route will lead to
the point of the fault. If the current flow finds its
way onto another conductor such as a buried pipe,
this technique will likely be ineffective because no
voltage gradient is developed.
When using an ac transmitter as shown in Figure
56, the voltage measured increases as the A-frame
is moved closer to the fault. When the A-frame
straddles the fault, the measurement drops to zero
and after the fault is passed, the voltage increases
again. At the indicated point of the fault, turn the
A-frame at a right angle and follow the same pro-
cedure. This will confirm the fault location when
moving left and right at ninety degrees to the
cable path.
A similar technique uses a dc generator that pro-
duces a several second pulse of voltage at a regu-
lar time interval. In this case, a zero-center meter
on the A-frame will jog in one direction for every
pulse as you approach the fault, read zero when
directly over the fault, and jog to the opposite
direction after the fault is passed. This approach
has the advantage that in most cases the voltage is
much higher than that produced by an ac genera-
tor. Higher voltage creates a larger current flow
through the earth producing a higher earth gradi-
ent voltage. See Figure 57.
3. 9
19
2. 5
25
1. 9ms
29
1. 9
29
1. 5
39
1. 0ms
59
3. 9
19
2. 5
25
1. 9ms
29
Impulse
Elapsed Time
Sound
Direction & Distance
Figure 55: SD-3000 display at positions 1, 2, and 3
Transmitter
Current Flow
Current Flow
BIDDLE
BIDDLE
R
R
L1070
Portable
Locator
L1070
Portable
Locator
TM
TM
450 850 000 400
Voltage Drop
DC
Transmitter
Current Flow
Current Flow
Voltage Drop
0
0
0 0
Figure 56: AC voltage gradient Figure 57: DC voltage gradient
Cable fault-finding-guide

More Related Content

What's hot

Motorola solutions ap6532 access point installation guide (part no. 72 e 1493...
Motorola solutions ap6532 access point installation guide (part no. 72 e 1493...Motorola solutions ap6532 access point installation guide (part no. 72 e 1493...
Motorola solutions ap6532 access point installation guide (part no. 72 e 1493...Advantec Distribution
 
ENERGY HARVESTING TREES
ENERGY HARVESTING TREESENERGY HARVESTING TREES
ENERGY HARVESTING TREESSahity Sahi
 
SVC PLUS Frequency Stabilizer Frequency and voltage support for dynamic grid...
SVC PLUS Frequency Stabilizer Frequency and voltage support for  dynamic grid...SVC PLUS Frequency Stabilizer Frequency and voltage support for  dynamic grid...
SVC PLUS Frequency Stabilizer Frequency and voltage support for dynamic grid...Power System Operation
 
Representação de Sistemas Elétricos de Potência.ppt
Representação de Sistemas Elétricos de Potência.pptRepresentação de Sistemas Elétricos de Potência.ppt
Representação de Sistemas Elétricos de Potência.pptRodrigoPBaziuk
 
Eletricidade e mecânica aula 6
Eletricidade e mecânica aula 6Eletricidade e mecânica aula 6
Eletricidade e mecânica aula 6Aline Rodrigues
 
Apostila senai materiais e equipamentos de instalações elétricas(1)
Apostila senai   materiais e equipamentos de instalações elétricas(1)Apostila senai   materiais e equipamentos de instalações elétricas(1)
Apostila senai materiais e equipamentos de instalações elétricas(1)silvanojsilva
 
Instalações elétricas instalações elétricas residenciais - prysmian - 2006
Instalações elétricas   instalações elétricas residenciais - prysmian - 2006Instalações elétricas   instalações elétricas residenciais - prysmian - 2006
Instalações elétricas instalações elétricas residenciais - prysmian - 2006ClaytonSulivan Oliveira
 
Benefits of solar, Solar Module, Solar Cell, Solar Photovoltic Effect, Electr...
Benefits of solar, Solar Module, Solar Cell, Solar Photovoltic Effect, Electr...Benefits of solar, Solar Module, Solar Cell, Solar Photovoltic Effect, Electr...
Benefits of solar, Solar Module, Solar Cell, Solar Photovoltic Effect, Electr...Jay Ranvir
 
ETAP - Estudio corto circuito ppt
ETAP - Estudio corto circuito pptETAP - Estudio corto circuito ppt
ETAP - Estudio corto circuito pptHimmelstern
 
Esquema simples para ligação paralela de lampadas
Esquema simples para ligação paralela de lampadasEsquema simples para ligação paralela de lampadas
Esquema simples para ligação paralela de lampadaswozlllll
 
Resolvendo problemas no seu micro 2007 - laercio vasconcelos -
Resolvendo problemas no seu micro   2007 - laercio vasconcelos -Resolvendo problemas no seu micro   2007 - laercio vasconcelos -
Resolvendo problemas no seu micro 2007 - laercio vasconcelos -Bianca Amarante
 
Especificaciones para construcción de subestaciones central hidroeléctrica ...
Especificaciones para construcción de subestaciones   central hidroeléctrica ...Especificaciones para construcción de subestaciones   central hidroeléctrica ...
Especificaciones para construcción de subestaciones central hidroeléctrica ...Wilder Oyola Rosales
 
Piezoelectric Energy Harvester - Capstone Design
Piezoelectric Energy Harvester - Capstone DesignPiezoelectric Energy Harvester - Capstone Design
Piezoelectric Energy Harvester - Capstone DesignMehnaz Newaz
 

What's hot (20)

Motorola solutions ap6532 access point installation guide (part no. 72 e 1493...
Motorola solutions ap6532 access point installation guide (part no. 72 e 1493...Motorola solutions ap6532 access point installation guide (part no. 72 e 1493...
Motorola solutions ap6532 access point installation guide (part no. 72 e 1493...
 
ENERGY HARVESTING TREES
ENERGY HARVESTING TREESENERGY HARVESTING TREES
ENERGY HARVESTING TREES
 
Itur Manual
Itur ManualItur Manual
Itur Manual
 
SVC PLUS Frequency Stabilizer Frequency and voltage support for dynamic grid...
SVC PLUS Frequency Stabilizer Frequency and voltage support for  dynamic grid...SVC PLUS Frequency Stabilizer Frequency and voltage support for  dynamic grid...
SVC PLUS Frequency Stabilizer Frequency and voltage support for dynamic grid...
 
Elétrica predial
Elétrica predialElétrica predial
Elétrica predial
 
Representação de Sistemas Elétricos de Potência.ppt
Representação de Sistemas Elétricos de Potência.pptRepresentação de Sistemas Elétricos de Potência.ppt
Representação de Sistemas Elétricos de Potência.ppt
 
THE LAW OF CREATION OF ENERGY of 1820 - How Created Sub-Atomic Quantum Electr...
THE LAW OF CREATION OF ENERGY of 1820 - How Created Sub-Atomic Quantum Electr...THE LAW OF CREATION OF ENERGY of 1820 - How Created Sub-Atomic Quantum Electr...
THE LAW OF CREATION OF ENERGY of 1820 - How Created Sub-Atomic Quantum Electr...
 
Eletricidade e mecânica aula 6
Eletricidade e mecânica aula 6Eletricidade e mecânica aula 6
Eletricidade e mecânica aula 6
 
Honeywell udc 2500
Honeywell udc 2500Honeywell udc 2500
Honeywell udc 2500
 
History of Electricity
History of ElectricityHistory of Electricity
History of Electricity
 
Apostila senai materiais e equipamentos de instalações elétricas(1)
Apostila senai   materiais e equipamentos de instalações elétricas(1)Apostila senai   materiais e equipamentos de instalações elétricas(1)
Apostila senai materiais e equipamentos de instalações elétricas(1)
 
Sapf2
Sapf2Sapf2
Sapf2
 
Instalações elétricas instalações elétricas residenciais - prysmian - 2006
Instalações elétricas   instalações elétricas residenciais - prysmian - 2006Instalações elétricas   instalações elétricas residenciais - prysmian - 2006
Instalações elétricas instalações elétricas residenciais - prysmian - 2006
 
Benefits of solar, Solar Module, Solar Cell, Solar Photovoltic Effect, Electr...
Benefits of solar, Solar Module, Solar Cell, Solar Photovoltic Effect, Electr...Benefits of solar, Solar Module, Solar Cell, Solar Photovoltic Effect, Electr...
Benefits of solar, Solar Module, Solar Cell, Solar Photovoltic Effect, Electr...
 
ETAP - Estudio corto circuito ppt
ETAP - Estudio corto circuito pptETAP - Estudio corto circuito ppt
ETAP - Estudio corto circuito ppt
 
Esquema simples para ligação paralela de lampadas
Esquema simples para ligação paralela de lampadasEsquema simples para ligação paralela de lampadas
Esquema simples para ligação paralela de lampadas
 
Resolvendo problemas no seu micro 2007 - laercio vasconcelos -
Resolvendo problemas no seu micro   2007 - laercio vasconcelos -Resolvendo problemas no seu micro   2007 - laercio vasconcelos -
Resolvendo problemas no seu micro 2007 - laercio vasconcelos -
 
Especificaciones para construcción de subestaciones central hidroeléctrica ...
Especificaciones para construcción de subestaciones   central hidroeléctrica ...Especificaciones para construcción de subestaciones   central hidroeléctrica ...
Especificaciones para construcción de subestaciones central hidroeléctrica ...
 
Mallas de tierra
Mallas de tierraMallas de tierra
Mallas de tierra
 
Piezoelectric Energy Harvester - Capstone Design
Piezoelectric Energy Harvester - Capstone DesignPiezoelectric Energy Harvester - Capstone Design
Piezoelectric Energy Harvester - Capstone Design
 

Similar to Cable fault-finding-guide

Liquiline cm442 cm444 cm448-endress+hauser datasheet-multiparameter transmitter
Liquiline cm442 cm444 cm448-endress+hauser datasheet-multiparameter transmitterLiquiline cm442 cm444 cm448-endress+hauser datasheet-multiparameter transmitter
Liquiline cm442 cm444 cm448-endress+hauser datasheet-multiparameter transmitterENVIMART
 
Proline promag 10 w endress+hauser datasheet-electromagnetic flowmeter
Proline promag 10 w endress+hauser datasheet-electromagnetic flowmeterProline promag 10 w endress+hauser datasheet-electromagnetic flowmeter
Proline promag 10 w endress+hauser datasheet-electromagnetic flowmeterENVIMART
 
Proline promag 10 l endress+hauser datasheet-electromagnetic flowmeter
Proline promag 10 l endress+hauser datasheet-electromagnetic flowmeterProline promag 10 l endress+hauser datasheet-electromagnetic flowmeter
Proline promag 10 l endress+hauser datasheet-electromagnetic flowmeterENVIMART
 
Proline promag 10 p endress+hauser datasheet-electromagnetic flowmeter
Proline promag 10 p endress+hauser datasheet-electromagnetic flowmeterProline promag 10 p endress+hauser datasheet-electromagnetic flowmeter
Proline promag 10 p endress+hauser datasheet-electromagnetic flowmeterENVIMART
 
Proline promag d 400 endress+hauser datasheet-electromagnetic flowmeter
Proline promag d 400 endress+hauser datasheet-electromagnetic flowmeterProline promag d 400 endress+hauser datasheet-electromagnetic flowmeter
Proline promag d 400 endress+hauser datasheet-electromagnetic flowmeterENVIMART
 
Proline promag 50 l endress+hauser datasheet-electromagnetic flowmeter
Proline promag 50 l endress+hauser datasheet-electromagnetic flowmeterProline promag 50 l endress+hauser datasheet-electromagnetic flowmeter
Proline promag 50 l endress+hauser datasheet-electromagnetic flowmeterENVIMART
 
Tank Side Monitor NRF590 Inventory Control Field device for tank sensor opera...
Tank Side Monitor NRF590 Inventory Control Field device for tank sensor opera...Tank Side Monitor NRF590 Inventory Control Field device for tank sensor opera...
Tank Side Monitor NRF590 Inventory Control Field device for tank sensor opera...Michael Sun
 
Proline promag 50 h endress+hauser datasheet-electromagnetic flowmeter
Proline promag 50 h endress+hauser datasheet-electromagnetic flowmeterProline promag 50 h endress+hauser datasheet-electromagnetic flowmeter
Proline promag 50 h endress+hauser datasheet-electromagnetic flowmeterENVIMART
 
Proline promag 50 w endress+hauser datasheet-electromagnetic flowmeter
Proline promag 50 w endress+hauser datasheet-electromagnetic flowmeterProline promag 50 w endress+hauser datasheet-electromagnetic flowmeter
Proline promag 50 w endress+hauser datasheet-electromagnetic flowmeterENVIMART
 

Similar to Cable fault-finding-guide (20)

Liquiline cm442 cm444 cm448-endress+hauser datasheet-multiparameter transmitter
Liquiline cm442 cm444 cm448-endress+hauser datasheet-multiparameter transmitterLiquiline cm442 cm444 cm448-endress+hauser datasheet-multiparameter transmitter
Liquiline cm442 cm444 cm448-endress+hauser datasheet-multiparameter transmitter
 
Dissolved Oxygen Transmitter-Liquiline CM442/CM444/CM448
Dissolved Oxygen Transmitter-Liquiline CM442/CM444/CM448Dissolved Oxygen Transmitter-Liquiline CM442/CM444/CM448
Dissolved Oxygen Transmitter-Liquiline CM442/CM444/CM448
 
pH.ORP Transmitter-Multiparameter eight channels
pH.ORP Transmitter-Multiparameter eight channelspH.ORP Transmitter-Multiparameter eight channels
pH.ORP Transmitter-Multiparameter eight channels
 
Turbidity and Suspended Solids Transmitter-CM442-CM444-CM448
Turbidity and Suspended Solids Transmitter-CM442-CM444-CM448Turbidity and Suspended Solids Transmitter-CM442-CM444-CM448
Turbidity and Suspended Solids Transmitter-CM442-CM444-CM448
 
Electromagnetic flowmeter - Proline promag 10D
Electromagnetic flowmeter - Proline promag 10DElectromagnetic flowmeter - Proline promag 10D
Electromagnetic flowmeter - Proline promag 10D
 
Proline promag 10 w endress+hauser datasheet-electromagnetic flowmeter
Proline promag 10 w endress+hauser datasheet-electromagnetic flowmeterProline promag 10 w endress+hauser datasheet-electromagnetic flowmeter
Proline promag 10 w endress+hauser datasheet-electromagnetic flowmeter
 
Proline promag 10 l endress+hauser datasheet-electromagnetic flowmeter
Proline promag 10 l endress+hauser datasheet-electromagnetic flowmeterProline promag 10 l endress+hauser datasheet-electromagnetic flowmeter
Proline promag 10 l endress+hauser datasheet-electromagnetic flowmeter
 
Proline Promag 10L-Electromagnetic Flowmeter
Proline Promag 10L-Electromagnetic FlowmeterProline Promag 10L-Electromagnetic Flowmeter
Proline Promag 10L-Electromagnetic Flowmeter
 
Flowmeter Promag 10W-Electromagnetic-Water and Waste Water
Flowmeter Promag 10W-Electromagnetic-Water and Waste WaterFlowmeter Promag 10W-Electromagnetic-Water and Waste Water
Flowmeter Promag 10W-Electromagnetic-Water and Waste Water
 
Proline promag 10 p endress+hauser datasheet-electromagnetic flowmeter
Proline promag 10 p endress+hauser datasheet-electromagnetic flowmeterProline promag 10 p endress+hauser datasheet-electromagnetic flowmeter
Proline promag 10 p endress+hauser datasheet-electromagnetic flowmeter
 
Proline Promag 10P-Electromagnetic Flowmeter
Proline Promag 10P-Electromagnetic FlowmeterProline Promag 10P-Electromagnetic Flowmeter
Proline Promag 10P-Electromagnetic Flowmeter
 
Proline Promag 50L-Electromagnetic Flowmeter
Proline Promag 50L-Electromagnetic FlowmeterProline Promag 50L-Electromagnetic Flowmeter
Proline Promag 50L-Electromagnetic Flowmeter
 
Proline promag d 400 endress+hauser datasheet-electromagnetic flowmeter
Proline promag d 400 endress+hauser datasheet-electromagnetic flowmeterProline promag d 400 endress+hauser datasheet-electromagnetic flowmeter
Proline promag d 400 endress+hauser datasheet-electromagnetic flowmeter
 
Proline promag 50 l endress+hauser datasheet-electromagnetic flowmeter
Proline promag 50 l endress+hauser datasheet-electromagnetic flowmeterProline promag 50 l endress+hauser datasheet-electromagnetic flowmeter
Proline promag 50 l endress+hauser datasheet-electromagnetic flowmeter
 
Tank Side Monitor NRF590 Inventory Control Field device for tank sensor opera...
Tank Side Monitor NRF590 Inventory Control Field device for tank sensor opera...Tank Side Monitor NRF590 Inventory Control Field device for tank sensor opera...
Tank Side Monitor NRF590 Inventory Control Field device for tank sensor opera...
 
Electromagnetic flowmeter - Proline Promag 50D
Electromagnetic flowmeter - Proline Promag 50DElectromagnetic flowmeter - Proline Promag 50D
Electromagnetic flowmeter - Proline Promag 50D
 
Flowmeter Promag W 800-Electromagnetic-Battery Powered
Flowmeter Promag W 800-Electromagnetic-Battery PoweredFlowmeter Promag W 800-Electromagnetic-Battery Powered
Flowmeter Promag W 800-Electromagnetic-Battery Powered
 
Proline promag 50 h endress+hauser datasheet-electromagnetic flowmeter
Proline promag 50 h endress+hauser datasheet-electromagnetic flowmeterProline promag 50 h endress+hauser datasheet-electromagnetic flowmeter
Proline promag 50 h endress+hauser datasheet-electromagnetic flowmeter
 
Proline promag 50 w endress+hauser datasheet-electromagnetic flowmeter
Proline promag 50 w endress+hauser datasheet-electromagnetic flowmeterProline promag 50 w endress+hauser datasheet-electromagnetic flowmeter
Proline promag 50 w endress+hauser datasheet-electromagnetic flowmeter
 
Level Radar-Tank Side Monitor NRF590
Level Radar-Tank Side Monitor NRF590Level Radar-Tank Side Monitor NRF590
Level Radar-Tank Side Monitor NRF590
 

More from vishal laddha

Case study on EHTC.pdf
Case study on EHTC.pdfCase study on EHTC.pdf
Case study on EHTC.pdfvishal laddha
 
Super critcal_sub critical_higher capacity sets - Copy.pdf
Super critcal_sub critical_higher capacity sets - Copy.pdfSuper critcal_sub critical_higher capacity sets - Copy.pdf
Super critcal_sub critical_higher capacity sets - Copy.pdfvishal laddha
 
Real Python 🐍👨_💻-1.pdf
Real Python 🐍👨_💻-1.pdfReal Python 🐍👨_💻-1.pdf
Real Python 🐍👨_💻-1.pdfvishal laddha
 
Brief Writeup on BCVMS.pdf
Brief Writeup on BCVMS.pdfBrief Writeup on BCVMS.pdf
Brief Writeup on BCVMS.pdfvishal laddha
 
BASICS OF VIBRATION.ppt
BASICS OF VIBRATION.pptBASICS OF VIBRATION.ppt
BASICS OF VIBRATION.pptvishal laddha
 
EXCITATION SYSTEM.ppt
EXCITATION SYSTEM.pptEXCITATION SYSTEM.ppt
EXCITATION SYSTEM.pptvishal laddha
 
December'2022 Maintenance review1.pptx
December'2022 Maintenance review1.pptxDecember'2022 Maintenance review1.pptx
December'2022 Maintenance review1.pptxvishal laddha
 
Case Studies on Vibrations.ppt
Case Studies on Vibrations.pptCase Studies on Vibrations.ppt
Case Studies on Vibrations.pptvishal laddha
 
Assignment business comm
Assignment business commAssignment business comm
Assignment business commvishal laddha
 
Plant operation manual
Plant operation manualPlant operation manual
Plant operation manualvishal laddha
 

More from vishal laddha (20)

Case study on EHTC.pdf
Case study on EHTC.pdfCase study on EHTC.pdf
Case study on EHTC.pdf
 
Super critcal_sub critical_higher capacity sets - Copy.pdf
Super critcal_sub critical_higher capacity sets - Copy.pdfSuper critcal_sub critical_higher capacity sets - Copy.pdf
Super critcal_sub critical_higher capacity sets - Copy.pdf
 
CMC.pptx
CMC.pptxCMC.pptx
CMC.pptx
 
Gun Kaizen.pptx
Gun Kaizen.pptxGun Kaizen.pptx
Gun Kaizen.pptx
 
MAR,23.pptx
MAR,23.pptxMAR,23.pptx
MAR,23.pptx
 
Real Python 🐍👨_💻-1.pdf
Real Python 🐍👨_💻-1.pdfReal Python 🐍👨_💻-1.pdf
Real Python 🐍👨_💻-1.pdf
 
Brief Writeup on BCVMS.pdf
Brief Writeup on BCVMS.pdfBrief Writeup on BCVMS.pdf
Brief Writeup on BCVMS.pdf
 
BASICS OF VIBRATION.ppt
BASICS OF VIBRATION.pptBASICS OF VIBRATION.ppt
BASICS OF VIBRATION.ppt
 
Flame Scanner.ppt
Flame Scanner.pptFlame Scanner.ppt
Flame Scanner.ppt
 
EXCITATION SYSTEM.ppt
EXCITATION SYSTEM.pptEXCITATION SYSTEM.ppt
EXCITATION SYSTEM.ppt
 
HR.pptx
HR.pptxHR.pptx
HR.pptx
 
battery.ppt
battery.pptbattery.ppt
battery.ppt
 
December'2022 Maintenance review1.pptx
December'2022 Maintenance review1.pptxDecember'2022 Maintenance review1.pptx
December'2022 Maintenance review1.pptx
 
Case Studies on Vibrations.ppt
Case Studies on Vibrations.pptCase Studies on Vibrations.ppt
Case Studies on Vibrations.ppt
 
Assignment business comm
Assignment business commAssignment business comm
Assignment business comm
 
Assignment accounts
Assignment  accountsAssignment  accounts
Assignment accounts
 
Assignment hrm
Assignment hrmAssignment hrm
Assignment hrm
 
Plant operation manual
Plant operation manualPlant operation manual
Plant operation manual
 
Hplpbp
HplpbpHplpbp
Hplpbp
 
Cable construction
Cable constructionCable construction
Cable construction
 

Recently uploaded

VIP Call Girls Service Hitech City Hyderabad Call +91-8250192130
VIP Call Girls Service Hitech City Hyderabad Call +91-8250192130VIP Call Girls Service Hitech City Hyderabad Call +91-8250192130
VIP Call Girls Service Hitech City Hyderabad Call +91-8250192130Suhani Kapoor
 
Call Girls in Nagpur Suman Call 7001035870 Meet With Nagpur Escorts
Call Girls in Nagpur Suman Call 7001035870 Meet With Nagpur EscortsCall Girls in Nagpur Suman Call 7001035870 Meet With Nagpur Escorts
Call Girls in Nagpur Suman Call 7001035870 Meet With Nagpur EscortsCall Girls in Nagpur High Profile
 
High Profile Call Girls Nagpur Isha Call 7001035870 Meet With Nagpur Escorts
High Profile Call Girls Nagpur Isha Call 7001035870 Meet With Nagpur EscortsHigh Profile Call Girls Nagpur Isha Call 7001035870 Meet With Nagpur Escorts
High Profile Call Girls Nagpur Isha Call 7001035870 Meet With Nagpur Escortsranjana rawat
 
The Most Attractive Pune Call Girls Budhwar Peth 8250192130 Will You Miss Thi...
The Most Attractive Pune Call Girls Budhwar Peth 8250192130 Will You Miss Thi...The Most Attractive Pune Call Girls Budhwar Peth 8250192130 Will You Miss Thi...
The Most Attractive Pune Call Girls Budhwar Peth 8250192130 Will You Miss Thi...ranjana rawat
 
Extrusion Processes and Their Limitations
Extrusion Processes and Their LimitationsExtrusion Processes and Their Limitations
Extrusion Processes and Their Limitations120cr0395
 
MANUFACTURING PROCESS-II UNIT-5 NC MACHINE TOOLS
MANUFACTURING PROCESS-II UNIT-5 NC MACHINE TOOLSMANUFACTURING PROCESS-II UNIT-5 NC MACHINE TOOLS
MANUFACTURING PROCESS-II UNIT-5 NC MACHINE TOOLSSIVASHANKAR N
 
MANUFACTURING PROCESS-II UNIT-2 LATHE MACHINE
MANUFACTURING PROCESS-II UNIT-2 LATHE MACHINEMANUFACTURING PROCESS-II UNIT-2 LATHE MACHINE
MANUFACTURING PROCESS-II UNIT-2 LATHE MACHINESIVASHANKAR N
 
HARMONY IN THE NATURE AND EXISTENCE - Unit-IV
HARMONY IN THE NATURE AND EXISTENCE - Unit-IVHARMONY IN THE NATURE AND EXISTENCE - Unit-IV
HARMONY IN THE NATURE AND EXISTENCE - Unit-IVRajaP95
 
Processing & Properties of Floor and Wall Tiles.pptx
Processing & Properties of Floor and Wall Tiles.pptxProcessing & Properties of Floor and Wall Tiles.pptx
Processing & Properties of Floor and Wall Tiles.pptxpranjaldaimarysona
 
chaitra-1.pptx fake news detection using machine learning
chaitra-1.pptx  fake news detection using machine learningchaitra-1.pptx  fake news detection using machine learning
chaitra-1.pptx fake news detection using machine learningmisbanausheenparvam
 
(SHREYA) Chakan Call Girls Just Call 7001035870 [ Cash on Delivery ] Pune Esc...
(SHREYA) Chakan Call Girls Just Call 7001035870 [ Cash on Delivery ] Pune Esc...(SHREYA) Chakan Call Girls Just Call 7001035870 [ Cash on Delivery ] Pune Esc...
(SHREYA) Chakan Call Girls Just Call 7001035870 [ Cash on Delivery ] Pune Esc...ranjana rawat
 
main PPT.pptx of girls hostel security using rfid
main PPT.pptx of girls hostel security using rfidmain PPT.pptx of girls hostel security using rfid
main PPT.pptx of girls hostel security using rfidNikhilNagaraju
 
Structural Analysis and Design of Foundations: A Comprehensive Handbook for S...
Structural Analysis and Design of Foundations: A Comprehensive Handbook for S...Structural Analysis and Design of Foundations: A Comprehensive Handbook for S...
Structural Analysis and Design of Foundations: A Comprehensive Handbook for S...Dr.Costas Sachpazis
 
College Call Girls Nashik Nehal 7001305949 Independent Escort Service Nashik
College Call Girls Nashik Nehal 7001305949 Independent Escort Service NashikCollege Call Girls Nashik Nehal 7001305949 Independent Escort Service Nashik
College Call Girls Nashik Nehal 7001305949 Independent Escort Service NashikCall Girls in Nagpur High Profile
 
Introduction to IEEE STANDARDS and its different types.pptx
Introduction to IEEE STANDARDS and its different types.pptxIntroduction to IEEE STANDARDS and its different types.pptx
Introduction to IEEE STANDARDS and its different types.pptxupamatechverse
 
GDSC ASEB Gen AI study jams presentation
GDSC ASEB Gen AI study jams presentationGDSC ASEB Gen AI study jams presentation
GDSC ASEB Gen AI study jams presentationGDSCAESB
 
Introduction and different types of Ethernet.pptx
Introduction and different types of Ethernet.pptxIntroduction and different types of Ethernet.pptx
Introduction and different types of Ethernet.pptxupamatechverse
 
OSVC_Meta-Data based Simulation Automation to overcome Verification Challenge...
OSVC_Meta-Data based Simulation Automation to overcome Verification Challenge...OSVC_Meta-Data based Simulation Automation to overcome Verification Challenge...
OSVC_Meta-Data based Simulation Automation to overcome Verification Challenge...Soham Mondal
 
Model Call Girl in Narela Delhi reach out to us at 🔝8264348440🔝
Model Call Girl in Narela Delhi reach out to us at 🔝8264348440🔝Model Call Girl in Narela Delhi reach out to us at 🔝8264348440🔝
Model Call Girl in Narela Delhi reach out to us at 🔝8264348440🔝soniya singh
 

Recently uploaded (20)

VIP Call Girls Service Hitech City Hyderabad Call +91-8250192130
VIP Call Girls Service Hitech City Hyderabad Call +91-8250192130VIP Call Girls Service Hitech City Hyderabad Call +91-8250192130
VIP Call Girls Service Hitech City Hyderabad Call +91-8250192130
 
Call Girls in Nagpur Suman Call 7001035870 Meet With Nagpur Escorts
Call Girls in Nagpur Suman Call 7001035870 Meet With Nagpur EscortsCall Girls in Nagpur Suman Call 7001035870 Meet With Nagpur Escorts
Call Girls in Nagpur Suman Call 7001035870 Meet With Nagpur Escorts
 
★ CALL US 9953330565 ( HOT Young Call Girls In Badarpur delhi NCR
★ CALL US 9953330565 ( HOT Young Call Girls In Badarpur delhi NCR★ CALL US 9953330565 ( HOT Young Call Girls In Badarpur delhi NCR
★ CALL US 9953330565 ( HOT Young Call Girls In Badarpur delhi NCR
 
High Profile Call Girls Nagpur Isha Call 7001035870 Meet With Nagpur Escorts
High Profile Call Girls Nagpur Isha Call 7001035870 Meet With Nagpur EscortsHigh Profile Call Girls Nagpur Isha Call 7001035870 Meet With Nagpur Escorts
High Profile Call Girls Nagpur Isha Call 7001035870 Meet With Nagpur Escorts
 
The Most Attractive Pune Call Girls Budhwar Peth 8250192130 Will You Miss Thi...
The Most Attractive Pune Call Girls Budhwar Peth 8250192130 Will You Miss Thi...The Most Attractive Pune Call Girls Budhwar Peth 8250192130 Will You Miss Thi...
The Most Attractive Pune Call Girls Budhwar Peth 8250192130 Will You Miss Thi...
 
Extrusion Processes and Their Limitations
Extrusion Processes and Their LimitationsExtrusion Processes and Their Limitations
Extrusion Processes and Their Limitations
 
MANUFACTURING PROCESS-II UNIT-5 NC MACHINE TOOLS
MANUFACTURING PROCESS-II UNIT-5 NC MACHINE TOOLSMANUFACTURING PROCESS-II UNIT-5 NC MACHINE TOOLS
MANUFACTURING PROCESS-II UNIT-5 NC MACHINE TOOLS
 
MANUFACTURING PROCESS-II UNIT-2 LATHE MACHINE
MANUFACTURING PROCESS-II UNIT-2 LATHE MACHINEMANUFACTURING PROCESS-II UNIT-2 LATHE MACHINE
MANUFACTURING PROCESS-II UNIT-2 LATHE MACHINE
 
HARMONY IN THE NATURE AND EXISTENCE - Unit-IV
HARMONY IN THE NATURE AND EXISTENCE - Unit-IVHARMONY IN THE NATURE AND EXISTENCE - Unit-IV
HARMONY IN THE NATURE AND EXISTENCE - Unit-IV
 
Processing & Properties of Floor and Wall Tiles.pptx
Processing & Properties of Floor and Wall Tiles.pptxProcessing & Properties of Floor and Wall Tiles.pptx
Processing & Properties of Floor and Wall Tiles.pptx
 
chaitra-1.pptx fake news detection using machine learning
chaitra-1.pptx  fake news detection using machine learningchaitra-1.pptx  fake news detection using machine learning
chaitra-1.pptx fake news detection using machine learning
 
(SHREYA) Chakan Call Girls Just Call 7001035870 [ Cash on Delivery ] Pune Esc...
(SHREYA) Chakan Call Girls Just Call 7001035870 [ Cash on Delivery ] Pune Esc...(SHREYA) Chakan Call Girls Just Call 7001035870 [ Cash on Delivery ] Pune Esc...
(SHREYA) Chakan Call Girls Just Call 7001035870 [ Cash on Delivery ] Pune Esc...
 
main PPT.pptx of girls hostel security using rfid
main PPT.pptx of girls hostel security using rfidmain PPT.pptx of girls hostel security using rfid
main PPT.pptx of girls hostel security using rfid
 
Structural Analysis and Design of Foundations: A Comprehensive Handbook for S...
Structural Analysis and Design of Foundations: A Comprehensive Handbook for S...Structural Analysis and Design of Foundations: A Comprehensive Handbook for S...
Structural Analysis and Design of Foundations: A Comprehensive Handbook for S...
 
College Call Girls Nashik Nehal 7001305949 Independent Escort Service Nashik
College Call Girls Nashik Nehal 7001305949 Independent Escort Service NashikCollege Call Girls Nashik Nehal 7001305949 Independent Escort Service Nashik
College Call Girls Nashik Nehal 7001305949 Independent Escort Service Nashik
 
Introduction to IEEE STANDARDS and its different types.pptx
Introduction to IEEE STANDARDS and its different types.pptxIntroduction to IEEE STANDARDS and its different types.pptx
Introduction to IEEE STANDARDS and its different types.pptx
 
GDSC ASEB Gen AI study jams presentation
GDSC ASEB Gen AI study jams presentationGDSC ASEB Gen AI study jams presentation
GDSC ASEB Gen AI study jams presentation
 
Introduction and different types of Ethernet.pptx
Introduction and different types of Ethernet.pptxIntroduction and different types of Ethernet.pptx
Introduction and different types of Ethernet.pptx
 
OSVC_Meta-Data based Simulation Automation to overcome Verification Challenge...
OSVC_Meta-Data based Simulation Automation to overcome Verification Challenge...OSVC_Meta-Data based Simulation Automation to overcome Verification Challenge...
OSVC_Meta-Data based Simulation Automation to overcome Verification Challenge...
 
Model Call Girl in Narela Delhi reach out to us at 🔝8264348440🔝
Model Call Girl in Narela Delhi reach out to us at 🔝8264348440🔝Model Call Girl in Narela Delhi reach out to us at 🔝8264348440🔝
Model Call Girl in Narela Delhi reach out to us at 🔝8264348440🔝
 

Cable fault-finding-guide

  • 1. WWW.MEGGER.COM FAULT FINDING SOLUTIONS MEG-231/MIL/3M/11.2003 Megger PO Box 118 Cherrybrook NSW 2126 AUSTRALIA T +61 (0)2 9875 4765 F +61 (0)2 9875 1094 E ausales@megger.com Megger PO Box 15777 Kingdom of BAHRAIN T +973 254752 F +973 274232 E mesales@megger.com Megger Limited 110 Milner Avenue Unit 1 Scarborough Ontario M1S 3R2 CANADA T 1 800 297 9688 (Canada only) T +1 416 298 6770 F +1 416 298 0848 E casales@megger.com Megger SARL 23 rue Eugène Henaff ZA du Buisson de la Couldre 78190 TRAPPES T +01 30 16 08 90 F +01 34 61 23 77 E infos@megger.com Megger PO Box 12052 Mumbai 400 053 INDIA T +91 22 6315114 F +91 22 6328004 E insales@megger.com Megger MBE No 393 C/Modesto Lafuente 58 28003 Madrid ESPAÑA T + 44 1304 502101 F + 44 1304 207342 E espana@megger.com Megger Limited Archcliffe Road Dover CT17 9EN UK T +44 (0) 1304 502100 F +44 (0) 1304 207342 E uksales@megger.com Megger 4271 Bronze Way Dallas, TX 75237-1088 USA T 1 800 723 2861 (USA only) T +1 214 333 3201 F +1 214 331 7399 E ussales@megger.com See us on the web at www.megger.com 1-800-723-2861 Tel: 1-214-330-3255 Fax: 1-214-333-3533 cfl@megger.com WWW.MEGGER.COM The word “Megger” is a registered trademark
  • 2. Table of Contents Fault Finding Solutions Section Page I Cable Characteristics Good Cable Insulation . . . . . . . . . . . . . . . . . . . .2 When Cable Insulation is Bad . . . . . . . . . . . . . .2 Why a cable becomes bad . . . . . . . . . . . . . . .3 Cable Faults Described . . . . . . . . . . . . . . . . . . . .3 II Fault Locating Procedures Locate Faults in Buried Primary Cable . . . . . . . .4 Test the cable . . . . . . . . . . . . . . . . . . . . . . . . .4 Fault resistance and loop test . . . . . . . . . . . .4 TDR tests . . . . . . . . . . . . . . . . . . . . . . . . . . . . .5 DC hipot test . . . . . . . . . . . . . . . . . . . . . . . . .5 Analyze the Data . . . . . . . . . . . . . . . . . . . . . . . .5 Fault resistance and loop test . . . . . . . . . . . .5 TDR tests . . . . . . . . . . . . . . . . . . . . . . . . . . . . .6 DC Hipot test . . . . . . . . . . . . . . . . . . . . . . . . .6 Cable Route . . . . . . . . . . . . . . . . . . . . . . . . . .6 Localize - prelocate the fault . . . . . . . . . . . . . . .6 Locate - pinpoint the fault . . . . . . . . . . . . . . . .6 Locate Faults in Above Ground Primary Cable . . . . . . . . . . . . . . . . . . . . . . . . . . .6 III Cable Route Tracers/Locators Overview . . . . . . . . . . . . . . . . . . . . . . . . . . . . . .7 Selecting a Locator . . . . . . . . . . . . . . . . . . . . . .8 Hookups . . . . . . . . . . . . . . . . . . . . . . . . . . . . . . .9 Using the Receiver . . . . . . . . . . . . . . . . . . . . . .10 IV How to See Underground Cable Problems Methods of Operation . . . . . . . . . . . . . . . . . . .12 Time domain reflectometry . . . . . . . . . . . . .12 Differential TDR/radar . . . . . . . . . . . . . . . . .13 Descriptions and Applications . . . . . . . . . . . . .13 Low-voltage TDR/cable radar . . . . . . . . . . . .13 Faults that a low-voltage TDR will display . . . . . . . . . . . . . . . . . . . . . .13 Landmarks that a low-voltage TDR will display . . . . . . . . . . . . . . . . . . . . . .13 Controls and Inputs to the TDR . . . . . . . . . . . .14 Velocity of propagation . . . . . . . . . . . . . . . .14 Range . . . . . . . . . . . . . . . . . . . . . . . . . . . . . .16 Gain . . . . . . . . . . . . . . . . . . . . . . . . . . . . . . .16 Cursors . . . . . . . . . . . . . . . . . . . . . . . . . . . . .16 Zoom . . . . . . . . . . . . . . . . . . . . . . . . . . . . . .16 Pulse width . . . . . . . . . . . . . . . . . . . . . . . . . .16 Distance Measurements . . . . . . . . . . . . . . . . . .17 Three-stake method . . . . . . . . . . . . . . . . . . .17 Section Page V Surge Generators, Filters and Couplers Surge Generators . . . . . . . . . . . . . . . . . . . . . . .19 Energy . . . . . . . . . . . . . . . . . . . . . . . . . . . . .19 Capacitance . . . . . . . . . . . . . . . . . . . . . . . . .20 Voltage . . . . . . . . . . . . . . . . . . . . . . . . . . . . .20 Basic Surge Generator Operation . . . . . . . . . .21 Proof/Burn . . . . . . . . . . . . . . . . . . . . . . . . . .21 Surge . . . . . . . . . . . . . . . . . . . . . . . . . . . . . .21 Ground . . . . . . . . . . . . . . . . . . . . . . . . . . . . .21 Single Point Grounding . . . . . . . . . . . . . . . . . .22 Arc Reflection Filters and Couplers . . . . . . . . .22 VI Localizing Methods Overview . . . . . . . . . . . . . . . . . . . . . . . . . . . . .24 Sectionalizing . . . . . . . . . . . . . . . . . . . . . . . .24 Resistance ratio . . . . . . . . . . . . . . . . . . . . . .24 Electromagnetic surge detection . . . . . . . . .25 Single phase, coaxial power cable with neutral bridges over splices . . . . . . .25 Single phase PILC cable with bonded grounds in conduit . . . . . . . . . . . . . . . . . .26 Three-phase PILC . . . . . . . . . . . . . . . . . . . .26 DART Analyzer/High-Voltage Radar . . . . . . . .27 Arc reflection . . . . . . . . . . . . . . . . . . . . . . . .27 Differential arc reflection . . . . . . . . . . . . . . .28 Surge pulse reflection . . . . . . . . . . . . . . . . .28 Voltage decay reflection . . . . . . . . . . . . . . .29 VII Locating or Pinpointing Methods Acoustic Detection . . . . . . . . . . . . . . . . . . . . . .30 Electromagnetic Surge Detection . . . . . . . . . .31 Electromagnetic/Acoustic Surge Detection . . .31 Earth Gradient . . . . . . . . . . . . . . . . . . . . . . . . .33 VIII Solutions for Cable Fault Locating Underground Utility Locating and Tracing Equipment . . . . . . . . . . . . . . . . . .34 Time Domain Reflectometers . . . . . . . . . . . . . .35 Cable Fault Pinpointing Equipment . . . . . . . . .36 High-Voltage DC Dielectric Test Sets . . . . . . . .37 Suitcase Impulse Generator . . . . . . . . . . . . . . .37 Cable Analyzer . . . . . . . . . . . . . . . . . . . . . . . . .38 Power Fault Locators . . . . . . . . . . . . . . . . . . . .38 Impulse Generators . . . . . . . . . . . . . . . . . . . . .40
  • 3. Table of Figures Fault Finding Solutions 1 Figure Page 1 Good insulation . . . . . . . . . . . . . . . . . . . . . . .2 2 Equivalent circuit of good cable . . . . . . . . . .2 3 Bad insulation . . . . . . . . . . . . . . . . . . . . . . . .2 4 Ground or shunt fault on the cable . . . . . . . .3 5 Fault region simplified diagram . . . . . . . . . . .3 6 Open or series fault on the cable . . . . . . . . . .3 7 Test for insulation (fault) resistance using a Megger® insulation tester . . . . . . . . .4 8 Loop test for continuity using a Megger insulation tester . . . . . . . . . . . . . . . .4 9 TDR test for cable length . . . . . . . . . . . . . . . .5 10 TDR test for continuity . . . . . . . . . . . . . . . . . .5 11 How cable locators work . . . . . . . . . . . . . . . .7 12 Cable under test . . . . . . . . . . . . . . . . . . . . . . .7 13 Using an ohmmeter to measure resistance of the circuit . . . . . . . . . . . . . . . . .8 14 Hookup showing ground rod at far end of cable under test . . . . . . . . . . . . . .9 15 Hookup with far end of cable under test isolated . . . . . . . . . . . . . . . . . . . . .9 16 Current coupler connection to neutral on primary jacketed cable . . . . . . . . .9 17 Inductive coupling to neutral on primary jacketed cable . . . . . . . . . . . . . . . . .10 18 Use of return wire to improve current loop . . . . . . . . . . . . . . . . . .10 19 Circling path with receiver . . . . . . . . . . . . . .10 20 No interference, no offset between magnetic field center and center of cable . . . . . . . . . . . . . . . . . . . . . . . . . . . . .11 21 Depth measurement using null method with antenna at 45-degree angle . . . . . . . .11 22 Offset caused by interference from nontarget cable . . . . . . . . . . . . . . . . . . . . . .11 23 Aircraft radar . . . . . . . . . . . . . . . . . . . . . . . .12 24 TDR reflections from perfect cable . . . . . . .13 25 TDR used to measure length of cable with far end open . . . . . . . . . . . . . . . . . . . .14 26 TDR used to measure length of cable with far end shorted . . . . . . . . . . . . . . . . . .14 27 TDR measuring distance to a low-resistance fault to ground . . . . . . . . . . .15 Figure Page 28 TDR used to measure distance to open in conductor . . . . . . . . . . . . . . . . . . . .16 29 TDR used to localize distance to splice . . . .17 30 TDR used to localize distance to T-tap . . . . .18 31 TDR used to localize distance to fault relative to a landmark . . . . . . . . . . . . .18 32 Three-stake method . . . . . . . . . . . . . . . . . . .18 33 Block diagram of surge generator . . . . . . . .19 34 Energy vs. voltage for a 4-µF, 25-kV surge generator . . . . . . . . . . . . . . . . . . . . . .19 35 Energy vs. voltage for a 12-µF, 16-kV surge generator . . . . . . . . . . . . . . . . . . . . . .20 36 Energy vs. voltage for a constant energy 12-µF, 16/32-kV surge generator . . .20 37 Acoustic shock wave from arcing fault . . . .21 38 Single point grounding . . . . . . . . . . . . . . . .22 39 Inductive arc reflection diagram . . . . . . . . .23 40 Resistive arc reflection diagram . . . . . . . . . .23 41 Sectionalizing method . . . . . . . . . . . . . . . . .24 42 Basic Wheatstone Bridge . . . . . . . . . . . . . . .24 43 Murray Loop Bridge application . . . . . . . . .24 44 Application of Bridge/TDR . . . . . . . . . . . . . .25 45 Coaxial power cable with neutral bridges over splices . . . . . . . . . . . . . . . . . . .25 46 Electromagnetic detection in single-phase PILC cable with bonded grounds . . . . . . . . .26 47 Electromagnetic detection of faults on three-phase power cable . . . . . . . . . . . . . . .26 48 Arc reflection method of HV radar . . . . . . .27 49 Arc reflection and differential arc reflection methods of HV radar . . . . . . . . . .27 50 Surge pulse reflection method of HV radar . . . . . . . . . . . . . . . . . . . . . . . . . .28 51 Decay method of HV radar . . . . . . . . . . . . .29 52 Acoustic surge detection . . . . . . . . . . . . . . .30 53 Electromagnetic pinpointing . . . . . . . . . . . .31 54 Acoustic/electromagnetic pinpointing . . . . .32 55 SD-3000 display at positions 1, 2, & 3 . . . . .33 56 AC voltage gradient . . . . . . . . . . . . . . . . . . .33 57 DC voltage gradient . . . . . . . . . . . . . . . . . . .33
  • 4. Cable Characteristics SECTION I 2 Fault Finding Solutions GOOD CABLE INSULATION When voltage is impressed across any insulation system, some current leaks into, through, and around the insulation. When testing with dc high- voltage, capacitive charging current, insulation absorption current, insulation leakage current, and by-pass current are all present to some degree. For the purposes of this document on cable fault locating, only leakage current through the insula- tion will be considered. For shielded cable, insulation is used to limit cur- rent leakage between the phase conductor and ground or between two conductors of differing potential. As long as the leakage current does not exceed a specific design limit, the cable is judged good and is able to deliver electrical energy to a load efficiently. Cable insulation may be considered good when leakage current is negligible but since there is no perfect insulator even good insulation allows some small amount of leakage current measured in microamperes. See Figure 1. The electrical equivalent circuit of a good run of cable is shown in Figure 2. If the insulation were perfect, the parallel resistance RP would not exist and the insulation would appear as strictly capaci- tance. Since no insulation is perfect, the parallel or insulation resistance exists. This is the resistance measured during a test using a Megger® Insulation Tester. Current flowing through this resistance is measured when performing a dc hipot test as shown in Figure 1. The combined inductance (L), series resistance (RS), capacitance (C) and parallel resistance (RP) as shown in Figure 2 is defined as the characteristic impedance (Z0) of the cable. µAmps HV Test Set Figure 1: Good insulation Series Resistance RS Parallel Resistance RP Capacitance C Inductance L Z0 Z0 Figure 2: Equivalent circuit of good cable mAmps HV Test Set Figure 3: Bad insulation WHEN CABLE INSULATION IS BAD When the magnitude of the leakage current exceeds the design limit, the cable will no longer deliver energy efficiently. See Figure 3. Why A Cable Becomes Bad All insulation deteriorates naturally with age, especially when exposed to elevated temperature due to high loading and even when it is not physi- cally damaged. In this case, there is a distributed flow of leakage current during a test or while energized. Many substances such as water, oil and chemicals can contaminate and shorten the life of insulation and cause serious problems. Cross-linked polyethylene (XLPE) insulation is subject to a con- dition termed treeing. It has been found that the presence of moisture containing contaminants, irregular surfaces or protrusions into the insulation plus electrical stress provides the proper environ- ment for inception and growth of these trees within the polyethylene material. Testing indicates that the ac breakdown strength of these treed cables is dramatically reduced. Damage caused by lightning, fire, or overheating may require replace- ment of the cable to restore service.
  • 5. Cable Characteristics SECTION I Fault Finding Solutions 3 mAmps Fault HV Test Set Figure 4: Ground or shunt fault on the cable Phase Conductor Shield or Neutral Spark Gap G Fault Resistance RF Phase Conductor Shield or Neutral Spark Gap G Fault Resistance RF Figure 5: Fault region simplified diagram Figure 6: Open or series fault on the cable CABLE FAULTS DESCRIBED When at some local point in a cable, insulation has deteriorated to a degree that a breakdown occurs allowing a surge of current to ground, the cable is referred to as a faulted cable and the position of maximum leakage may be considered a cata- strophic insulation failure. See Figure 4. At this location the insulation or parallel resistance has been drastically reduced and a spark gap has developed. See Figure 5. Occasionally a series fault shown in Figure 6 can develop due to a blown open phase conductor caused by high fault current, a dig-in or a failed splice.
  • 6. Fault Locating Procedures SECTION II 4 Fault Finding Solutions LOCATE FAULTS IN BURIED PRIMARY CABLE After all clearances have been obtained and the cable has been isolated in preparation for cable fault locating, it is strongly recommended that a fixed plan of attack be followed for locating the fault. As in diagnosing any complex problem, fol- lowing a set step-by-step procedure will help in arriving at the solution or, in this case, pinpointing the fault efficiently. At the very start, it is a good idea to gather as much information as possible about the cable under test. Information that will help in the fault locating process is: ■ Cable type — is it lead covered, concentric neu- tral (bare or jacketed), tape shield? ■ Insulation type — is it XLPE, EPR, Paper? ■ Conductor and size — is it CU, AL, stranded, solid, 2/0, 350 MCM? ■ Length of the run — how long is it? ■ Splices — are there splices, are the locations known? ■ T-taps or wye splices — are there any taps, are the locations known, how long are branches? After obtaining the cable description the acronym “TALL” can help you remember the procedure for finding cable faults in buried cable. TEST ANALYZE LOCALIZE LOCATE TEST THE CABLE Fault Resistance and Loop Test Although most faults occur between phase and ground, series opens also occur such as a blown open splice or a dig-in. Phase-to- phase faults can also occur on multi- phase runs. Helpful information can be gathered with a Megger® Insulation Tester that has both megohm and an ohm (continuity) range. Make a series of measurements as follows: ■ At end A, connect the instrument between the faulted conductor and ground as shown in Figure 7. Using an insulation resistance range, measure and record this resistance reading. Figure 8: Loop test for continuity using a Megger® insulation tester ■ At end A, connect the instrument between each of the other phase conductors, if any, and ground and record the insulation resistance readings. ■ After connecting a short between the phase and neutral at end B (Figure 8), do a loop test for continuity at end A using the ohms or continuity range on the instrument. If a reading of greater than 10 ohms is obtained when the cable has a concentric neutral, test the conductor and neu- tral independently by using a nearby good cable as a return path. This will help to determine whether it is the conductor or neutral that is the problem. A reading in the hundreds of ohms is a good indication of corroded neutral if work- ing on a bare concentric-type cable. If no nearby good cable is available, use a long insulated con- ductor to complete the loop from end B. If a reading of infinity is measured either the phase conductor or the neutral is completely open between end A and end B which could be caused by a dig-in or a fault that has blown open the phase conductor. ■ Repeat all tests from end B and record all readings. Fault End A End B MEGGER Insulation Tester Fault End A End B Shorting Strap or Grounding Elbow MEGGER Insulation Tester Figure 7: Test for insulation (fault) resistance using a Megger® insulation tester
  • 7. Fault Locating Procedures SECTION II Fault Finding Solutions 5 Figure 9: TDR test for cable length Figure 10: TDR test for continuity TDR Tests Refer to Section IV for details on the use of the Time Domain Reflectometer. ■ At end A, connect a TDR or DART® Cable Analyzer (use the TDR mode) between the fault- ed conductor and neutral or shield as shown in Figure 9. Look for an upward reflection from the open end of the cable and measure the length to the open using the cursors. ■ After connecting a short between phase and neutral at end B (Figure 10), look for the down- ward indication of a short circuit at the cable end on the TDR. If the TDR shows an alternating open and short when alternately removing and applying the ground at the end of the cable, the phase and shield are continuous to the cable end. If the short does not appear on the TDR and a high resistance was read during the loop test, either the phase or shield is open at some point before the cable end. ■ If a downward reflection is observed on the TDR and the fault resistance measured less than 200 Ω in the test, the fault has been found. If a downward reflection is observed on the TDR and the fault resistance measured greater than 200 Ω in the test, there is likely a T-tap or wye splice at that location. DC Hipot Test After a surge generator is connected to the cable under test, do a quick dc proof test to be sure the cable is faulted and will not hold voltage. Make a note of the kilovolt measurement when the fault breaks down. This will be an indicator of what voltage will be required when surging in order break down the fault when doing prelocation or pinpointing. If there are transformers connected to the cable under test, a proof test will always indicate a failure due to the low resistance path to ground through the transformer primary winding. A dc proof test in this case is not a valid test. ANALYZE THE DATA Fault Resistance and Loop Test If the insulation resistance of the faulted conduc- tor is less than 50 Ω or more than one MΩ, the fault will be relatively easy to prelocate but may be difficult to pinpoint. For values between 50 Ω and 1 MΩ, the fault may be more difficult to locate. Some reasons for the difficulty with these faults is the possible presence of oil or water in the faulted cavity or the presence of multiple faults. Fault End A End B TDR Fault End A End B Shorting Strap or Grounding Elbow End A TDR If tests indicate insulation (fault) resistance values less than 10 ohms, it may not be possible to create a flashover at the fault site when surge generator methods are used. This type of fault is often referred to as a bolted fault. A TDR can be used to locate this type of fault. If a measurement of very low resistance in ohms is made from one end and a high resistance in megohms from the other end, it is likely that the phase conductor or a splice is blown open. If the loop test indicates a resistance reading in the 10 to 1000 ohm range and particularly if the reading varies during the measurement, there is very likely neutral corrosion on the cable. This could affect success when performing localizing and locating procedures. If the loop test measure- ment is infinity, indicating an open circuit, either the phase conductor or a splice has blown open or a dig-in has occurred. TDR Tests If the TDR tests indicate a shorter than expected cable length with no change of reflections when a short is applied to the cable end there is likely a blown open splice or phase conductor or a dig-in has occurred. If the TDR tests indicate a longer than expected cable run, a thorough route trace may be in order to detect additional cable not indicated on maps.
  • 8. Fault Locating Procedures SECTION II 6 Fault Finding Solutions DC Hipot Test If the cable holds voltage during the dc hipot test, the cable may be good. If the cable is faulted, burning may be required to reduce the breakdown voltage required when surging or you have con- nected to the wrong phase. Cable Route At this point, it is recommended that the cable route be determined or confirmed by consulting accurate maps or actually tracing the cable route. See Section III. When attempting to localize or locate the cable fault, prelocation measurements and pinpointing techniques must be made over the actual cable path. Being off the route by as lit- tle as a few feet may make the locate an extreme- ly difficult and time-consuming process. LOCALIZE - PRELOCATE THE FAULT Selection of a localizing technique is based, at least in part, on the character of the fault. Several techniques are fully described in Section VI. They are as follows: ■ Sectionalizing ■ Bridge — single faults ■ TDR/low-voltage radar — faults measuring less than 200 Ω and all opens ■ High-voltage radar methods — all faults arc reflection, surge pulse reflection and decay ■ Electromagnetic impulse detection — all shorts and some opens LOCATE - PINPOINT THE FAULT Locating, often referred to as pinpointing, is nec- essary before digging up direct buried cable. After the fault has been localized, a surge generator is connected to one end of the faulted cable and then listening in the localized area for the telltale thump from the fault. When the thump is not loud enough to hear, it may be necessary to use a surge detector or an acoustic impulse detector to pin- point the fault. Voltage gradient test sets are effective in pinpoint- ing faults on direct-buried secondary cable but the method depends on the fault existing between conductor and earth. When the cable is in conduit, a different method must be used. When a single conductor is contained within a plastic conduit, shorts cannot occur unless water gains access through a crack or other entry point. When a fault develops, leakage current flows from the conduc- tor through the break in insulation, and then fol- lows the water to the break in the conduit to earth. If voltage gradient is used, the location of the crack in the conduit could be found, but the location of the fault in the insulation would remain unknown. LOCATE FAULTS IN ABOVE GROUND PRIMARY CABLE Some faults can be found by searching for obvious physical damage to the cable especially if the cable section is short. If necessary, connect a surge gen- erator and walk the cable and listen for the dis- charge. If the cable is very long it might take a good deal of time to walk the cable while the surge generator is on. To reduce the total time spent and to minimize high-voltage exposure to the cable, use a localizing technique before attempting to pinpoint the fault. Once the fault is localized, a listening aid is used to zero in on the thump that occurs when the surge generator breaks down the fault. For metal- to-metal (bolted) faults on non-buried cable, an electromagnetic impulse detector may help to pin- point the fault. The use of electromagnetic impulse detectors is discussed in detail in Section VI.
  • 9. Cable Route Tracers/Cable Locators SECTION III Fault Finding Solutions 7 7 MEGGER OVERVIEW Before attempting to locate underground cable faults on direct buried primary cable, it is neces- sary to know where the cable is located and what route it takes. If the fault is on secondary cable, knowing the exact route is even more critical. Since it is extremely difficult to find a cable fault without knowing where the cable is, it makes sense to master cable locating and tracing and to do a cable trace before beginning the fault locat- ing process. Success in locating or tracing the route of electrical cable and metal pipe depends upon knowledge, skill, and perhaps, most of all, experience. Although locating can be a complex job, it will very likely become even more complex as more and more underground plant is installed. It is just as important to understand how the equipment works as it is to be thoroughly familiar with the exact equipment being used. All popular locators/tracers consist of two basic modules: The transmitter — an ac generator which supplies the signal current on the underground cable or pipe to be traced. The receiver — detects the electro- magnetic field produced by the transmitted ac current flow. See Figure 11. Before starting, it will be helpful to obtain the following informa- tion: ■ What type of cable is it? ■ Is the cable the same type all the way along its length? ■ Is the target cable the only cable in the trench? ■ Are there any taps? ■ Is the cable run single phase or multiphase? Figure 12: Cable under test ■ Is the cable shielded or unshielded? ■ Is the cable direct buried or in conduit? ■ Are there metal pipes or other underground structures under, over or near the target cable? ■ Is the target cable connected to other cables or pipes through grounded neutrals? This information will help to select the most appropriate locator and to prepare to locate the cable successfully. See Figure 12. Transmitter AC Current Flow Electromagnetic Field Produced by Current Flow Receiver Antenna Nearby Cables and/or Pipes Current Return Paths Tee or Wye Splice Interfering Cables and Pipes Cable to be traced Figure 11: How cable locators work
  • 10. Cable Route Tracers/Cable Locators SECTION III 8 Fault Finding Solutions Many transmitters are equipped with some means of indicating the resistance of the circuit that it is trying to pump current through and can indicate a measurement of the current actually being trans- mitted. Output current can be checked in several ways as follows: ■ By measuring the resistance of the circuit with an ohmmeter. When the resistance is less than approximately 80,000 Ω, there will typically be enough current flowing in the cable to allow a good job of tracing. This is no guarantee that the transmitted current is passing through the target cable. The measured resistance may be affected by other circuits or pipes electrically connected to the target cable acting as parallel resistances. See Figure 13. ■ By observing the actual signal strength being transmitted by the transmitter. Many transmit- ters provide a measurement or some indication of output current. A loading indicator on the Portable Locator Model L1070 blinks to indicate the approximate circuit resistance. A rate of four blinks per second indicates a low resistance, almost a short circuit providing a very traceable signal. A rate of one blink every three seconds shows a high resistance and a weaker signal. ■ By observing the signal power detected by the receiver. Signal level indicator numbers are dis- played digitally on most receivers and older models may display signal power with analog meters. The L1070 has both an analog style sig- nal strength bargraph plus a digital numeric readout. Tracing experience gives the operator the ability to judge whether or not the numbers are high enough. This is the most practical way to check signal current flow. Remember, the more current flow through the conductor the stronger the electromagnetic field being detected by the receiver and the further from the conductor being traced the less field is being detected. SELECTING A LOCATOR Cable locating test sets, often referred to as cable tracers, may be grouped as follows: ■ Low frequency — usually less than 20 kHz some- times referred to as audio frequency (AF). ■ High frequency — usually higher than 20 kHz and in the radio frequency (RF) range to about 80 kHz. ■ 60 Hz — most tracers provide this mode to allow tracing of energized cables. Low frequency (AF) is considered the general-pur- pose selection because it is more effective in trac- ing the route of cables located in congested areas due to less capacitive coupling to everything else in the ground. Low frequency can be more effec- tive over greater distances due to less capacitive leakage and because higher signal power is allowed by the FCC. The use of high frequency (RF) is typical in non-congested areas on relatively short lengths of cable or when a return path cannot be provided from the far end. If a proper return path is provided, either low or high frequencies can be used effectively for very long distances. The L1070 allows selection of AF, RF, both AF and RF, or 60 Hz as required by the specific application. Ohmmeter If the resistance is too high, ground the far end If the resistance is still too high, connect an insulated jumper wire for the return path Figure 13: Using an ohmmeter to measure resistance of the circuit
  • 11. Cable Route Tracers/Cable Locators SECTION III Fault Finding Solutions 9 HOOKUPS When a direct-buried secondary cable is to be traced, the transmitter is connected to the conduc- tor. When coaxial types of primary cable are traced, the signal may be transmitted along either the phase conductor or the neutral. Whenever possible use the direct connection method with the test leads supplied with the loca- tor. This is often referred to as the conductive method. Connect one output lead (usually red) from the transmitter to the conductor under test making sure that the alligator clip is making good contact. Connect the other lead (usually black) to a temporary metal ground probe and check that the pin is making good contact with the earth. When the earth is dry it may be necessary to use a longer metallic ground stake or to pour water on the ground rod to give it better contact with the earth. Place the ground rod off to the side as far away from the target cable as practical, but try to avoid crossing over neighboring cables and pipes. It may be necessary to vary the location of the ground rod to obtain suitable results. For best results, install a temporary ground con- nection to the far end of the conductor being traced. See Figure 14. In this case either AF or RF can be used. If a ground cannot be applied to the far end, use RF and expect that the effective traceable length may be as short as 200 feet. See Figure 15. The only current flow in this situa- tion is due to capacitive current flow and after some point the sig- nal disappears. If a direct connection is impossible, a clamp coupler can be used to induce the signal current onto the target cable. See Figure 16. If trac- ing a primary cable, place the loop around the neutral. When tracing secondary, connecting jumper wires from the conductor to earth at both ends of the cable may be nec- essary to obtain an adequate signal current flow through the target cable. Remember that for sufficient current to flow to produce a strong traceable field there must be a loop or return path provided back to the source. If a current coupler is not available, the transmitter module itself can be used to couple the signal inductive- ly from an antenna in the base of the transmitter into the cable. See Figure 17. The transmitter is set on the earth directly over the target cable with the arrow on the top panel in line with the cable. Use the RF frequency selection and keep the transmitter and receiver at least 25 feet apart to avoid inter- fering signals generated directly through the air. Transmiter BIDDLE BIDDLE R R L1070 Portable Locator L1070 Portable Locator TM TM Transmitter BIDDLE BIDDLE R R L1070 Portable Locator L1070 Portable Locator TM TM Figure 14: Hookup showing ground rod at far end of cable under test Figure 15: Hookup with far end of cable under test isolated Transmitter Jacket Neutral BIDDLE BIDDLE R R L1070 Portable Locator L1070 Portable Locator TM TM Figure 16: Current coupler connection to neutral on primary jacketed cable
  • 12. Cable Route Tracers/Cable Locators SECTION III 10 Fault Finding Solutions Keep in mind that the best technique is to connect the isolated far end of the target cable to a tem- porary ground rod beyond the far end of the cable. This will reduce the loop resistance, increase the transmitted current flow, and maximize the strength of the signal to be detected by the receiv- er. See previous Figure 14. When the far end is parked and isolated, loop cur- rent is entirely dependent upon capacitive cou- pling through the insulation or jacket of the cable and through any faults to ground that may be present. See previous Figure 15. If all else fails and in a very congested area, com- plete the current loop by using a long insulated jumper wire connected between one side of the transmitter and the far end of the cable under test. This technique has limitations as to length but will definitely limit current flow to the target cable. See Figure 18. Remember to keep the route of the return wire well off to the side to avoid interference. Direct buried concentric neutral cable can be traced by connecting the transmitter to the con- ductor or the neutral. Remember that when con- nected to the neutral, the signal can more easily bleed over to other cables and pipes that may be connected to the ground. A stronger tracing signal can sometimes be developed when the transmitter is connect- ed to the neutral. This is particularly true when using a current clamp or coupler as shown previously in Figure 16. USING THE RECEIVER To begin the tracing process, start by circling the connection point to the target cable at a radius of 10 feet or so to find the position with the strongest signal when using the peaking mode. See Figure 19. The L1070 receiver allows pushbutton selection of either the peaking or nulling modes of trac- ing. See Figure 20. Some older models require a change in position of the antenna head from horizontal to vertical. Most receivers now also provide an automatic depth meas- urement, usually with the push of a button. Older units require posi- tioning of the antenna head at a 45-degree angle and following the process shown in Figure 21. In the peaking mode of operation, a maximum signal level is obtained when the receiver is positioned directly over the target cable. In the nulling mode, a minimum signal is detected when directly over the target cable. Some units provide a simultaneous display of both modes. In general, if the object of tracing is simply to locate the approximate path of the target cable, the peaking mode is recom- mended. If a more accurate trace is required such as prior to secondary fault locating or splice locating, the nulling mode may be the better Transmitter Neutral Figure 17: Inductive coupling to neutral on primary jacketed cable Transmitter BIDDLE BIDDLE R R L1070 Portable Locator L1070 Portable Locator TM TM Figure 18: Use of return wire to improve current loop Transmitter BIDDLE BIDDLE R R L1070 Portable Locator L1070 Portable Locator TM TM Figure 19: Circling path with receiver
  • 13. Cable Route Tracers/Cable Locators SECTION III Fault Finding Solutions 11 Figure 20: No interference — no offset between magnetic field center and center of cable choice. An analog bar-graph display, a digital numeric readout, a variable volume audible tone or all three may indicate the receiver signal level. While walking along the route with the strongest signal level, note the value of signal strength. Also while tracing, periodically check the depth. If the signal level numbers drop as you proceed along the path away from the transmitter, there should be a corresponding increase in depth. If the signal level increases as you proceed along the path, there should be a corresponding decrease in depth. If signal level decreases, even though the depth does not increase, it could mean that you have just passed a fault to ground or a wye splice. The transmitter current flow beyond a fault may be significantly reduced to only capacitive leakage so the resulting drop in signal level may be enough evidence to conclude that a fault to ground has been passed. When no interference is present, the combined antennas in the receivers of newer locators will sense both a null and a peak magnetic field at the identical spot directly over the target cable. Interfering conductors and pipes can cause the magnetic field around the target cable to become oval, or egg-shaped rather than circular and con- centric. This will cause an offset between the detected and actual location. See Figure 22. This problem is often not possible to detect at the time the locating is being carried out and is only discov- ered when digging begins. To prevent this, every effort should be made to prevent signal current from bleeding or leaking onto other conductors in the area, which is often impossible. Antenna Conductor or Pipe Peak Mode Null Mode X Feet X Feet X Feet True Location of Target Indicated Position of Target Conductor or Pipe Interfering Conductor or Pipe Figure 21: Depth measurement using null method with antenna at 45-degree angle Figure 22: Offset caused by interference from non-target cable
  • 14. How to See Underground Cable Problems SECTION IV 12 Fault Finding Solutions METHODS OF OPERATION Cable analyzers provide a visual display of various events on electrical cable and may serve as the control center for advanced cable fault locating test systems. Displays include cable traces or signa- tures which have distinctive patterns. Signatures represent reflections of transmitted pulses caused by impedance changes in the cable under test and appear in succession along a baseline. When adjustable markers, called cursors, are moved to line up with reflections, the distance to the imped- ance change is displayed. When used as a TDR, approximate distances to important landmarks, such as the cable end, splices, wyes and transform- ers can also be measured. Time Domain Reflectometry The pulse reflection method, pulse echo method or time domain reflectometry are terms applied to what is referred to as cable radar or a TDR. The technique, developed in the late 1940’s, makes it possible to connect to one end of a cable, actually see into the cable and measure distance to changes in the cable. The original acronym, RADAR (RAdio Detection And Ranging), was applied to the method of detecting distant aircraft and determining their range and velocity by ana- lyzing reflections of radio waves. This technique is used by airport radar systems and police radar guns where a portion of the transmitted radio waves are reflected from an aircraft or ground vehicle back to a receiving antenna. See Figure 23. The radar set, other than the electronics to pro- duce the pulses of radio frequency energy, is basi- cally a time measuring device. A timer starts count- ing microseconds when a pulse of radio frequency energy leaves the transmitting antenna and then stops when a reflection is received. The actual time measured is the round trip, out to the target and back. In order to determine simply distance out to the target, the round trip time is divided by two. If the speed of this pulse as it travels through the air in microseconds is known, distance to the target can be calculated by multiplying the time meas- ured divided by 2 times the velocity. Distance = Vp time 2 The speed or Velocity of Propagation (Vp) of this pulse in air is nearly the speed of light or approxi- mately 984 feet per microsecond. This same radar technique can be applied to cables if there are two conductors with the distance between them constant for the length of the run and a consistent material between them for the length of the run. This means that a twisted pair, any pair of a control cable, any pair of a triplex cable, or any coaxial cable are radar compatible. When applied to underground cable, 10 to 20 volt, short time duration pulses are transmitted at a high repetition rate into the cable between the phase conductor and neutral or between a pair of conductors. A liquid crystal or CRT display shows reflections of the transmitted pulses that are caused by changes in the cable impedance. Any reflections are displayed on the screen with elapsed time along the horizontal axis and ampli- tude of the reflection on the vertical axis. Since the elapsed time can be measured and the pulse velocity as it travels down the cable is known, dis- tance to the reflection point can be calculated. Pulses transmitted through the insulation of typi- cal underground cable travel at about half of the speed of light or about 500 feet/µs. Movable cur- sors when positioned at zero and a reflection point provide a measurement of distance to that point in feet. The TDR sees each increment of cable, for example each foot, as the equivalent electrical circuit impedance as shown in Figure 24. In a perfect length of cable, all of the components in every foot are exactly like the foot before and exactly like the next foot. Distance D = Velocity of Propagation (Vp) X Time (µs) 2 Figure 23: Aircraft radar
  • 15. How to See Underground Cable Problems SECTION IV This perfect run of cable will produce no reflec- tions until the end of the cable appears. At the end of the cable the pulses see a high impedance (an open circuit), causing an upward reflection. If the cable end is grounded (a short circuit), the pulses see a low resistance and a downward reflec- tion is caused. A low-voltage TDR is an excellent tool for the prelocation of series open circuits and conductor to conductor shorts. For cable shunt or ground faults with a resistance higher than 200 ohms the reflection is so small it is impossible to distinguish from normal clutter reflections on the cable. Unfortunately, almost all faults on primary underground distribution cable are high resistance faults in the area of thousands of ohms or even megohms. Due to the reflection characteristics of these high resistance faults, they are impossible to see using only the low-voltage TDR. An alternate technique such as arc reflection must be utilized to prelocate these faults as discussed in Section VI. Differential TDR/Radar When a TDR such as the Megger Model CFL535F which has two inputs and is programmed to allow a display of the algebraic difference between two input traces, a technique referred to as differential TDR can be used. If the two traces (L1 and L2) are identical, the display will show a totally flat line. When using differential TDR, any difference between the two phases (L1 minus L2) will be easi- ly identified on the display. This can be useful when fault locating on a three-phase system where the faulted phase can be compared to a good phase. The fault is likely where the differ- ence is and the cursor can be positioned to meas- ure the distance to that point. DESCRIPTIONS AND APPLICATIONS Low-Voltage TDR/Cable Radar A low-voltage TDR is an appropriate method to localize faults and other impedance changes on electrical cable such as twisted pair, parallel pair, and coaxial structure. TDRs are available in small hand-held, larger portable, and rack mount con- figurations for a broad variety of applications. Low-voltage, high-frequency output pulses are transmitted into and travel between two conduc- tors of the cable. When the cable impedance changes, some or all of transmitted energy is reflected back to the TDR where it is displayed. Impedance changes are caused by a variety of dis- turbances on the cable including low resistance faults and landmarks such as the cable end, splices, taps, and transformers. See Figures 25 through 31 for typical reflections or cable traces. Faults That a Low-Voltage TDR Will Display Low resistance faults of less than 200 Ω between conductor and ground or between conductors are displayed as downward reflections on the screen. Series opens, since they represent a very high resistance, are displayed as upward going reflec- tions. See Figures 27 and 28. Landmarks That a Low-Voltage TDR Will Display A TDR can localize cable landmarks, such as splices, wye or T-taps, and transformers. See Figures 29 through 31. The TDR helps to determine the loca- tion of faults relative to other landmarks on the cable. This is especially true on complex circuits. Traces of complex circuits are necessarily also very complex and difficult to interpret. To make sense of these complex traces, it is extremely helpful to confirm the position of landmarks relative to the faults observed. See Figure 32. For every landmark that causes a reflection, there is slightly less transmitted pulse amplitude travel- ing from that point down the cable. This means on a cable run with two identical splices, the reflec- tion from the first splice will be larger than that of the second down the cable farther. No conclusions can be drawn based on the size or height of reflections at different distances down the cable. Fault Finding Solutions 13 Figure 24: TDR reflections from perfect cable
  • 16. How to See Underground Cable Problems SECTION IV 14 Fault Finding Solutions CONTROLS AND INPUTS TO THE TDR Velocity of Propagation Certain information must be provided to the TDR before it can provide distance information. Most important is velocity of propagation (VP), the speed at which the transmitted pulse travels down the cable under test. This value is used by the ana- lyzer to convert its time measurement to distance. This velocity is primarily dependent on the type of cable insulation although technically is also affect- ed by conductor size and overall cable diameter. The table to the right shows typical velocity values for various primary cable types. An alternate method to determine an unknown velocity value is to: 1. Set the right cursor to the upward-going reflec- tion at the end of the cable section. 2. Determine the true length of the section of cable under test. 3. Adjust the velocity until the correct distance is displayed. If a known length of cable is available on a reel, the above procedure may be used. The longer the sample of cable the better for an accurate deter- mination of velocity. Open End DART Analyzer or low-voltage TDR BIDDLE R R R DART ANALYSIS SYSTEM Shorted End DART Analyzer or low-voltage TDR BIDDLE R R R DART ANALYSIS SYSTEM Figure 25: TDR used to measure length of cable with far end open Figure 26: TDR used to measure length of cable with far end shorted
  • 17. How to See Underground Cable Problems SECTION IV The units of velocity can be entered into the DART Analyzer or TDR in feet per microsecond (ft/µs), meters per microsecond (m/µs), feet per microsec- ond divided by 2 (Vp/2) or percentage of the speed of light (%). The values in the Velocity of Propagation Table are only approximate and are meant to serve as a guide. The velocity of propagation in power cables is determined by the following: ■ Dielectric constant of the insulation ■ Material properties of the semiconducting sheaths ■ Dimensions of the cable ■ Structure of the neutrals, integrity of the neu- trals (corrosion) ■ Resistance of the conductors ■ Additives in the insulation ■ Propagation characteristics of the earth sur- rounding the cable With such a large number of variables and a num- ber of different manufacturers, it is impossible to predict the exact velocity of propagation for a given cable. Typically, utilities standardize on only a few cable types and manufacturers and have soil conditions that are similar from installation to installation. It is highly recommended that fault location crews maintain records of propagation velocities and true locations. Using this informa- tion, accurate, average propagation velocities can be determined. Fault Finding Solutions 15 Open End DART Analyzer or low-voltage TDR Low resistance fault to ground BIDDLE R R R DART ANALYSIS SYSTEM Figure 27: TDR measuring distance to a low-resistance fault to ground Insulation Wire Vp Vp Vp Vp Type kV Size Percent Ft/µs M/µs Ft/µs EPR 5 #2 45 443 135 221 EPR 15 #2 AL 55 541 165 271 HMW 15 1/0 51 502 153 251 XLPE 15 1/0 51 502 153 251 XLPE 15 2/0 49 482 147 241 XLPE 15 4/0 49 482 147 241 XLPE 15 #1 CU 56 551 168 276 XLPE 15 1/0 52 512 156 256 XLPE 25 #1 CU 49 482 147 241 XLPE 25 1/0 56 551 168 276 XLPE 35 1/0 57 561 171 280 XLPE 35 750 MCM 51 502 153 251 PILC 15 4/0 49 482 147 241 XLPE 0.6 #2 62 610 186 305 Vacuum — — 100 984 300 492 Velocity of Propagation Table
  • 18. How to See Underground Cable Problems SECTION IV 16 Fault Finding Solutions Range Range is the maximum distance the TDR sees across the face of the display. Initially, select a range longer than the actual cable length so the upward-going reflection from the end can be identified. Move the right cursor to that upward reflection and measure the total length. Does the measurement make sense? A range can then be selected that is less than the overall cable run but the TDR will only see out the distance of the range setting. Gain Gain changes the vertical height or amplitude of reflections on the display. It may be necessary to increase the gain on a very long cable or a cable with many impedance changes along its path to identify the end or other landmarks. Gain adjust- ment has no effect on measurement accuracy. Cursors For all TDR measurements, the cursor is positioned at the left side of the reflection, just where it leaves the horizontal baseline either upward or down. Move the right cursor to the reflection of interest just as it leaves the base line so that the TDR can calculate its distance. If the left cursor is set to the left of the first upward-going reflection, its zero point is at the output terminals of the instrument. If you do not recalibrate, it will be necessary to subtract your test lead length from all distances measured. Remember, the TDR measures every foot of cable from the connector on the instrument to the reflection of interest. When the test leads are especially long (such as 125 feet long on most high-voltage radar systems), it is often desirable for you to set the left cursor to the end of the test leads. When this offset is cali- brated, the distance indicated by the right cursor will not include the length of the test leads. To do this calibration in the field simply touch the ends of the test leads and position the left cursor at the toggle point as the TDR sees an open and then a short. Press the Save Offset to set the left cursor zero to that point. Zoom When you have set the cursor at the reflection of interest, the distance to that point on the cable run will appear in the distance readout. When a zoom feature is provided, the area centered around the cursor is expanded by the zoom factor selected: X2 (times 2), X4 (times four), etc. It is often possible to set the cursor to a more precise position when the zoom mode is activated and the reflection is broadened. Pulse Width The width of the pulses generated by the TDR typ- ically ranges from 80 nanoseconds up to 10 microseconds. As range is changed from shorter to longer, the pulse width is automatically increased in width so that enough energy is being sent down the cable to be able to see some level of reflection from the end. The wider the pulse the more reflection amplitude but the less resolution. The narrower the pulse the more resolution but less reflection amplitude. For the best resolution or in order to see small changes on the cable, a nar- row pulse width is required and in order to see the BIDDLE R R R DART ANALYSIS SYSTEM DART Analyzer or low-voltage TDR Open conductor fault Figure 28: TDR used to measure distance to open in conductor
  • 19. How to See Underground Cable Problems SECTION IV Fault Finding Solutions 17 end a wide pulse width may be required. The pulse width may be changed manually to override the automatic selection. An effect termed pulse dispersion widens the pulse as it travels down a long run of cable so resolution may be worse toward the end of a long cable. DISTANCE MEASUREMENTS Three-Stake Method Measurements to a fault using a low-voltage TDR are strictly a localizing technique. Never dig a hole based solely on a TDR measurement. There are too many variables that include: • The exact velocity • The exact cable route • The accuracy of the TDR itself The three-stake method is a means to get a rea- sonably accurate fault pinpoint using only the TDR. The method consists of making a fault dis- tance reading from one end (terminal 1) of the faulted line and placing a marker (stake 1) at that position as shown in Figure 32. With the TDR con- nected at the other end of the line (terminal 2), find the fault distance for a second marker (stake 2). In actual practice, stake 2 may fall short of stake 1, may be located at the same point, or may pass beyond stake 1. In any case the fault will lie between the two stakes. It is important that the same velocity setting is used for both measure- ments and the distance measurements are made over the actual cable route. This may mean tracing the cable. Location of the third marker (stake 3), the actual fault, may be found by using the proportionality that exists between the fault distances, d1 and d2, and their error distances, e1 and e2. To locate stake 3, measure the distance d3 between stakes 1 and 2 and multiply it by the ratio of distance d1 to the sum of distances d1 and d2. Stake 3 then is placed at this incremental distance, e1, as meas- ured from stake 1 toward stake 2. e1 = d3 d1 d1 + d2 Alternatively, stake 3 can be placed at the incre- mental distance, e2, as measured from stake 2 toward stake 1. e2 = d3 d2 d1 + d2 This third stake should be very close to the fault. A practical field approach (with no math involved) is to make a second set of measurements from both ends with a different velocity. If the distance between stakes 1 and 2 was 50 feet, by adjusting the velocity upward the new distance measure- ments may reduce the difference to 30 feet. With enough tests at differing velocities the distance can be lowered to a reasonable backhoe trenching distance. Open End DART Analyzer or low-voltage TDR Splice BIDDLE R R R DART ANALYSIS SYSTEM Figure 29: TDR used to localize distance to a splice
  • 20. How to See Underground Cable Problems SECTION IV 18 Fault Finding Solutions Open End DART Analyzer or low-voltage TDR Open End of Tap BIDDLE R R R DART ANALYSIS SYSTEM Tee (Y) Splice Figure 30: TDR used to localize distance to a T-tap Open End Low Resistance Fault to Ground Open End Tee (Y) Splice Splice DART Analyzer or low-voltage TDR BIDDLE R R R DART ANALYSIS SYSTEM Figure 31: TDR used to localize distance to a fault relative to a landmark Figure 32: Three-stake method d3 e1 e2 d1 d2 Stake 1 Stake 1 Stake 3 Stake 3 Stake 2 Stake 2 Fault Fault Terminal Terminal 2
  • 21. Surge Generators, Filters and Couplers SECTION V Fault Finding Solutions 19 SURGE GENERATORS The first commercially available surge generators for underground cable fault locating were intro- duced in the late 1940’s. The device is basically a high voltage impulse generator consisting of a dc power supply, a high voltage capacitor, and some type of high voltage switch. See Figure 33. The power supply is used to charge the capacitor to a high voltage and then a contact closure dis- charges the capacitor into the cable under test. If the voltage is high enough to break down the fault, the energy stored in the capacitor is rapidly discharged through a flashover at the fault creat- ing a detectable sound or “thump” at ground level. The important specifications of a thumper are the maximum voltage it can develop and how much energy it delivers to the fault. The classical fault locating process has been to hook up the surge generator, crank up the volt- age, and walk back and forth over the cable route until the thump is heard or better yet to feel the earth move. This process pinpoints the fault allow- ing a repair crew to dig a hole and repair the cable. In some cases, it may take hours (or days) to walk the cable and definitely locate the fault. During that time, the cable is being exposed to high voltage thumping. A few years after polyethylene cable began to be installed underground, evidence began to surface that due to “treeing” in the insulation, high-volt- age thumping of this plastic cable for long periods of time was doing more harm than good. The same is not true for PILC cables where typically higher voltage and more energy is required to locate faults with no damage to the cable. There is mixed opinion as to the treeing situation in EPR. Due to this treeing situation, many utilities issued work rules reducing the maximum allowable volt- age to be used for fault locating. Energy The energy output of any surge generator meas- ured in Joules (Watt-Seconds) is calculated as fol- lows: E = V2 C 2 where E = Energy in Joules, C = capacitance in µf, V = voltage in kV To increase the “bang” at the fault the only two options are to increase the voltage which can be done by the operator or increase the capacitance which must be done by the manufacturer. Figure 34 shows the output energy curve of a typical four microfarad surge generator that generates 1250 Joules at a maximum voltage of 25 kV. If the fault locating crew is told that the output voltage of the thumper must be limited to 12.5 kV (one half of 25 kV), the output energy of their thumper is reduced by a factor of four down to 312 Joules. In a practical world, 300 to 400 Joules is the threshold for hearing a thump at ground level with no acoustic amplification and with very little background noise. If the thump at the fault can not be heard, the only option is to increase volt- age in order to find the fault, make a repair and get the lights back on. HV dc Power Supply Cap Proof / Burn Mode Surge Mode Discharge Resistor Discharge Switch HV Switch HV HV Return Safety Ground Chassis Figure 33: Block diagram of surge generator 1250 0 200 400 600 800 1000 1200 1400 1 3 5 7 9 11 13 15 17 19 21 23 25 kV Joules Figure 34: Energy vs. voltage for a 4-µF, 25-kV surge generator
  • 22. Surge Generators, Filters and Couplers SECTION V 20 Fault Finding Solutions To help in lowering the voltage required to locate underground faults, the PFL-4000 Surge Generator uses a 12 microfarad capacitor producing 1536 Joules at 16 kV. See Figure 35. This allows thump- ing at lower voltages while still delivering reason- able energy to the fault. Thumping at 12.5 kV, as above, now produces a very audible 937 Joules. Different surge generator energy levels are required to do fault locating on different lengths and types of cable constructions. XLPE and EPR insulated cables typically require much less energy to locate a fault than a lead cable of comparable size and construction. For long runs or complex systems of lead cable that cannot be broken down into small manageable sections, high voltage and energy may be required to flashover a fault. There are currently two types of surge generators available, one referred to as progressive energy as described above and the second, constant energy. The constant energy units contain two or more capacitors with a corresponding voltage range for each capacitor. The energy is only constant at the maximum voltage on each range. A typical exam- ple is a PFL-6000 with two voltage ranges of 0 to 16 kV and 0 to 32 kV. When the 16 kV range is selected, a 24 µF capacitor is switched in and when the 32 kV range is selected a 6 µF capacitor is used. In this case, at 16 kV or 32 kV the energy output will be a constant 3072 Joules. See Figure 36. Capacitance Cables by their very nature are capacitive since they consist of two conductors separated by an insulator. The two conductors in power cable are the phase conductor and the shield, sheath, or concentric neutral. These two conductors are sepa- rated by XLPE, EPR, or oil impregnated paper. Safety is always a priority even when a cable is not energized because, as any capacitor, the cable will hold a charge until discharged or grounded. A cable must always be grounded before making any connections even if the cable has been parked and isolated as it may pickup up a charge from the field of adjacent energized phases. The longer the cable or the more complex the sys- tem or network, the higher the capacitance. If the surge generator capacitor is smaller than the cable capacitance, the fault will not discharge until cable capacitance is fully charged which could take mul- tiple surges. If the cable capacitance is smaller than the surge generator capacitance, the fault will typically flashover on the first try. Voltage Deciding on surge generator voltage levels is extremely important. Without a high enough volt- age, the fault will not break down. Very high volt- age surging for long periods of time may promote the growth of treeing and reduce cable life. If the fault does not flashover, there will be no thump that identifies and pinpoints the fault. A very important factor to consider is that the voltage pulse doubles in peak-to-peak amplitude on a good cable as it reflects from the isolated open 1536 0 200 400 600 800 1000 1200 1400 1600 1 3 5 7 9 11 13 15 kV Joules Figure 35: Energy vs. voltage for a 12-µF, 16 kV surge generator 1 3 5 7 9 11 13 15 17 19 21 23 25 27 29 31 33 Joules 0 500 1000 1500 3000 3500 2500 2000 3072 3072 Figure 36: Energy vs. voltage for a 12-µF, 16/32-µF surge generator
  • 23. Surge Generators, Filters and Couplers SECTION V Fault Finding Solutions 21 end. This also applies if the cable is faulted but the voltage doubling only occurs between the fault the open isolated end of the cable. When surging at 15 kV, the cable between the fault and the end is exposed to a shock wave of 30 kV peak-to-peak. A hint for fault locating on a cable that has several splices and has been worked on from the same end is to look for the current fault past the last splice. That section of cable was exposed to voltage doubling during the previous fault locate with a high probability that the pres- ent fault is at a weak spot in that length of cable. BASIC SURGE GENERATOR OPERATION Proof/Burn A proof test is performed to determine whether or not a cable and accessories are good or bad. The result of a proof test is on a go/no-go basis. The voltage is increased on the cable under test to the required voltage level and held there for a period of time. If there is little or no leakage current and the voltage reading is stable, the cable is consid- ered to be good. If a voltage is reached where the reading becomes unstable or drops with a dramat- ic increase in current, it is considered to be bad. This test should be done initially as described in Section I to help establish that the cable is actually bad and then to gain some information on the fault condition. A quick check can also be done after repair to be sure there is not another fault and to check workmanship on the splice. The burn mode is used when the fault will not flashover at the maximum available voltage of the surge generator. This condition is due to the elec- trical characteristics of the fault that may be altered by applying voltage to the cable until the fault breaks down and then supplying current flow. This causes conditioning or additional damage at the fault loca- tion that in turn decreases the fault resistance and reduces voltage required for breakdown. When applied to paper-insulated cable, the insulation actually burns and becomes charred, permanently altering the fault characteristics. As applied to XLPE cable, heat produced by arcing at the fault can soften the insulation but when arcing is stopped the insulation returns to a solid condi- tion without changing its characteris- tics drastically. Burning can be effec- tive on a splice failure or a water filled fault. Surge In the surge mode, the internal capacitor is charged up to the level selected with the voltage control and then discharged into the cable. This process can be automatically repeated on a time basis by adjusting the surge interval control or manually by push-button on some models. A surge of current from the discharging capacitor travels down the cable, arcs over at the fault, and returns back to the capacitor on the neutral or sheath. This rapid discharge of energy causes an audible explosion and the sound created travels out through the earth and is used to pinpoint the fault location. See Figure 37. It is assumed that the sound travels in a straight and direct path up to the surface of the earth. Sometimes the soil condi- tions are such that the sound travels away in a downward direction or is absorbed and cannot be heard. In this case, some type of listening device or surge detector may be needed to assist in pin- pointing. If the surge of current sees a high resist- ance path back to the capacitor, as is the case when the neutral is corroded, the sound level cre- ated at the fault will be minimal. This current flow back through the earth can also cause a rise in potential of any metallic structures mounted in the ground and a difference in potential on the sur- face. Ground If the surge generator safety ground is connected properly, the ground mode absolutely and posi- tively grounds and discharges the surge genera- tor’s capacitor and the cable under test. After turning the main power switch off, which dis- charges the capacitor and cable through a resistor, always move the mode switch to ground before removing test leads. Fault Fault Surge Generator Shock Wave Figure 37: Acoustic shock wave from arcing fault
  • 24. Surge Generators, Filters and Couplers SECTION V 22 Fault Finding Solutions SINGLE POINT GROUNDING For safety, always use the single point grounding scheme as shown in Figure 38 when using a surge generator. When making or removing connections to a cable always follow your company’s safety rules and regulations. Check the isolated cable for voltage and ground it. Connect the surge generator safety ground to the ground rod at the transformer, switch cabinet or pole. Next, connect the high-voltage return lead to the shield or neutral as close as possible to the high-voltage connection. Leave the neutral grounded at both ends of the cable. Finally, con- nect the high-voltage test lead to the phase con- ductor. When removing test leads, use the oppo- site sequence by removing the high voltage, high voltage return and lastly the safety ground. The local ground is only required if company safety procedures demand it. The safest and lowest resist- ance safety ground connection is system neutral which will keep the equipment at zero volts in the case of a backfeed. ARC REFLECTION FILTERS AND COUPLERS In order to reduce the cable exposure to high volt- age surging and thereby avoid the possibility of setting the cable up for future failures, some method of fault prelocation should be used. The surge pulse and arc reflection methods of preloca- tion have been used for many years. In order to use either method, additional equipment is required including a DART® Analysis System as dis- cussed in detail in Section VI. A signal coupler must be added to the surge gen- erator to provide the additional capability of using the surge pulse reflection method of prelocation. See Figure 39. The coupler can be an inductive or capacitive type that is used to pick up reflections on the cable and send them to the DART Analyzer. Both types of couplers work effectively and the only difference is that the captured wave shapes vary slightly. An arc reflection filter is necessary to provide the capability of using the arc reflection method. This filter allows a TDR developing 10 to 20 volt pulses to be connected to the same cable that is also being surged at 10,000 volts. The filter also does some pulse routing to make sure both high- and low-voltage pulses are sent down the cable under test. The primary purpose of the filter is to allow the TDR or analyzer to look down the cable while it is being surged and, of course, to allow this while not destroying the analyzer in the process. The filter may also contain the coupler necessary to provide surge pulse capability. There are two types of arc reflection filters, induc- tive and resistive. Both types are placed in the cir- cuit between the surge generator and the cable under test. The inductive filter, as shown in Figure 39, uses a choke that slows the surge generator pulse down, extending it over time. This makes the arc at the fault last longer and reflects more TDR pulses, providing a higher probability that a down- ward going reflection will be captured. The induc- tance of the choke also blocks the TDR pulses from High voltage High-voltage return Safety ground Local ground (supplemental) Figure 38: Single point grounding
  • 25. Surge Generators, Filters and Couplers SECTION V Fault Finding Solutions 23 going back to the surge generator’s capacitor and basically being shorted out. One advantage of the inductive filter is that it helps to clamp or limit the voltage applied to the cable under test to only the level required to breakdown the fault. The choke in the inductive filter also absorbs less energy cre- ated by the surge generator, letting more down the cable to arc over at the fault. The second type of filter, as shown in Figure 40, uses a resistor to do the job of pulse routing and has the benefits of lower cost and smaller size. The resistor still blocks the TDR pulses and changes the surge generator pulse slightly but does not limit or clamp the voltage. The resistive filter tends to absorb somewhat more of the surge generator energy than the inductive filter. Analyzer/TDR Analyzer Inductive surge pulse coupler Proof burn impulse Arc Reflection HV HV return Figure 39: Inductive arc reflection diagram Analyzer Analyzer/TDR Inductive surge pulse coupler Proof burn impulse Arc Reflection HV HV return Figure 40: Resistive arc reflection diagram
  • 26. the relatively short “bad” section remaining can be replaced. If the cable is in duct or conduit, the bad section can be replaced. This relatively primi- tive method is usable on most types of phase-to- ground and phase-to-phase faults. Resistance Ratio Often called the bridge method, a variation of the Wheatstone Bridge is an example of the resistance ratio methods. See Figure 42. When using a Wheatstone Bridge, B1, B2, and C2 represent known resistanc- es. C1 represents the unknown resistance. At balance, typi- cally by adjusting the resistance values of B1 and B2 when the zero center null detector D indicates zero, C1/C2 = B1/B2 Therefore, C1 = (C2 x B1)/B2 A variation on the Wheatstone Bridge is the Murray Loop Bridge. Figure 43 shows that the adjacent resistances, RC1 of a faulted cable in a loop with RC2 of a good cable can be made to represent C1 and C2 of the Wheatstone Bridge. Similarly, corresponding portions of a slidewire resistor RB1 and RB2 can be made to represent the resistances B1 and B2. At balance in the Murray Loop Bridge, RC1/ RC2 is equal to RB1/RB2. C2 B2 C1 B1 D Battery Figure 41: Sectionalizing method Locating Methods SECTION VI 24 Fault Finding Solutions OVERVIEW Localizing or prelocation methods provide an approximate distance to a fault. With cable in con- duit or duct, an approximate distance is all that is required because the bad cable will be pulled out and new back in. With direct buried underground residential distribution loop fed circuits, localizing can be used to isolate a bad section between two pad-mount transformers. The bad section can then be parked and the loop fed from both ends. In the case of a radial feed localizing must be followed by an appropriate pinpointing method. Some early localizing methods are as follows: Sectionalizing The earliest sectionalizing method has been called the “Cut and Try Method” or the “Divide and Conquer Method.” This was among the first tech- niques to be used for fault locating on direct- buried cable. Hopefully, its use today is limited to that of a last resort. See Figure 41. After isolating both ends of the cable section under test, a Megger® Insulation Tester is connect- ed between the conductor and neutral or ground. A faulted cable will have a lower insulation resist- ance than a cable with no fault. After measuring the fault resistance, a hole is dug half way down the length of the cable section. The cable is cut at that location and a resistance measurement is made on each half. The “bad” half of the cable with the fault will a have lower resistance than the “good” half and the resistance value on the “bad” half should be the same as the fault resistance measured on the complete length of cable. A sec- ond dig is made half the distance down the “bad” half. Again, the cable is cut and a resistance meas- urement is made on each section to identify the faulted part of the remaining section. Eventually, L First Cut at 1/2 L Second Cut at 3/4 L Third Cut at 5/8 L Fault Figure 42: Basic Wheatstone Bridge RB2 RB1 D Battery Rf Fault Resistance Good Conductor Faulted Conductor L RC1 Shorting Jumper RC2 Lx Figure 43: Murray Loop Bridge application
  • 27. Locating Methods SECTION VI When it is assumed that the resistance of a uni- form conductor is linear and proportional to its length, and the total length of the cable section under test is L, the distance to the fault, Lx, is cal- culated as follows: Lx = 2L RB1/RB2 When using the Murray Loop method the series resistance and length of the good phase and fault- ed phase must be identical. If the resistances are different, as would exist if one phase contains a splice and not the other, the resulting accuracy is drastically affected. This is a localizing method not a pinpointing method. Figure 44 illustrates the practical application of an instrument that combines a TDR and Murray Loop Bridge in one instrument. Electromagnetic Surge Detection Electromagnetic surge detection techniques have been used to localize faults on power cable for more than 50 years. Theoretically, the methods can be used to locate faults on many types of power cable but they are generally used only to identify faulted sections of cable in conduit or duct and Fault Finding Solutions 25 mostly on network lead paper cables. Electromag- netic detection methods are used with a surge generator which provides the impulse of current necessary to produce the strong electromagnetic field required to make the method practical. Since the current impulse is polarized, the field is also polarized which gives the method much of its usefulness. An iron core sheath coil with a second- ary winding will induce a polarized output when subjected to this field. When a zero center microammeter is connected to the sheath coil sec- ondary winding, the direction of the net electro- magnetic field can be determined. This characteris- tic allows a determination of whether the fault is ahead of or behind the detector. See Figures 45 and 46. Since the sheath coil is polarized, and to maintain consistent information, always place the coil with arrow on top pointing toward the surge generator. Single Phase, Coaxial Power Cable with Neutral Bridges Over the Splices Electromagnetic detection methods can be used to locate faults on coaxial cable systems with access points such as manholes, cabinets, and pull boxes as shown in Figure 45. When the cable system is designed with neutral bridges over the splices, the pickup coil is placed directly on the cable under the neutral. The current impulse produced by a surge generator will produce a strong polarized indication as it passes through the phase conductor and the direction of the current impulse can be determined. As long as a strong positive- ly polarized electromagnetic field can be sensed, the fault is located in the portion of cable still ahead. Since the phase con- ductor is isolated at the far end, the cur- rent impulse flows through the fault and then back to the surge generator through the neutral. Either a weak or no electromagnetic field will be sensed past the location of the fault. Therefore, it is possible to determine in which direction the fault is located. If the sheath coil is placed over the neu- tral, the electromagnetic field produced by the current impulse in the conductor is balanced exactly by the return current back through the neutral and the meter provides no indication and stays at zero. When bonded grounds are present in a Figure 44: Application of Bridge/TDR Shorting Jumper Fault Figure 45: Coaxial power cable with neutral bridges over the splices Fault Access #1 Strong Field Access #2 Weak Field + - 0 + - 0
  • 28. Locating Methods SECTION VI 26 Fault Finding Solutions system such as usually found in paper-insulated, lead-covered cable (PILC) construction, it may be possible to use a fault locating technique involving electromagnetic detectors, even though the pickup coil must be placed over the leaded neutral. Single-Phase PILC Cable with Bonded Grounds in Conduit As shown in Figure 46, this method only applies to circuits with good bonded grounds at every man- hole location as commonly provided in network systems. Without bonded grounds, the surge cur- rent through the phase conductor is exactly the same magnitude as the return surge current through the neutral. With bonded grounds, the current impulse through the phase conductor is slightly greater than the returning surge current in the neutral. This differential is caused by the small amount of surge current that flows through the neutral beyond the fault and into earth through the bonded ground at the next manhole and back to the surge generator through the bonded grounds before the fault. See Figure 46. No current flows through the second bonded ground after the fault. When relative readings are taken with the sheath coil placed on the cable both before and after the fault, they will all be positive. Readings taken on the conductor before the fault will almost always be noticeably higher in magnitude than those after the fault. However, the difference is often too small to instill confidence in the cable fault location. More importantly, readings taken on the bonded grounds before the fault will become progressively higher as the faulted section is approached. Also, the reading taken on the bonded ground in the first manhole after the fault will also be high. Readings taken on the bonded ground in the second and succeed- ing manholes after the fault will be zero. This process allows the faulted section of cable can be identified. Three-phase PILC Strange as it may seem at first, it is usually easier to locate a fault in three-phase PILC coaxial cable than in single phase. See Figure 47. The current pulse from a surge genera- tor through one phase of a three- phase cable will generate a stronger magnetic field at the cable surface closest to the faulted phase. When the detector is placed at various posi- tions around the cable ahead of the fault, the readings will vary in magnitude. When the detec- tor is placed at various positions around the cable in the first manhole past the fault, all readings will be the same. Note that almost all of the current pulse returns to the surge generator through the neutral at the fault site. A small amount of surge current passes through the neutral past the fault and out of the next bonded ground. This small current finds its way back to the surge generator from earth through the bonded grounds ahead of the fault. First manhole after fault Fault First manhole in system Surge current to Thumper Surge Current from Thumper Figure 46: Electromagnetic detection in single-phase PILC cable with bonded grounds Phase 1 being surged Sensor position 1 (Strong) Sensor position 4 (Weak) Sensor position 3 (Weak) Sensor position 2 (Strong) First bonded ground in system First bonded ground after fault Fault to neutral Cross section of cable at last manhole before the fault Cross section of cable at first manhole after the fault All Detector positions detect the same strength Figure 47: Electromagnetic detection of faults on three-phase power cable
  • 29. Locating Methods SECTION VI DART® ANALYZER/HIGH-VOLTAGE RADAR Because the low-voltage TDR is unable to identify high resistance shunt faults, its effectiveness as a fault locator on power cables is limited. When used in a high- voltage radar system with surge genera- tors, filters or couplers, the TDR/Analyzer is able to display both low and high resist- ance faults. The DART Analyzer provides both TDR and storage oscilloscope func- tions and is able to utilize all of the cable fault locating methods listed below. Arc Reflection This method is often referred to as a high- voltage radar technique that overcomes the 200 Ω limitation of low-voltage radar. In addition to the TDR, an arc reflection filter and surge generator is required. The surge generator is used to create an arc across the shunt fault which creates a momentary short circuit that the TDR can display as a downward-going reflection. The filter protects the TDR from the high- voltage pulse generated by the surge gen- erator and routes the low-voltage pulses down the cable. Arc reflection is the most accurate and easiest prelocation method and should be used as a first approach. The fault is dis- played in relation to other cable land- marks such as splices, taps and transform- ers and no interpretation is required. Arc reflection makes it possible for the TDR to display “before” and “after” traces or cable signatures. See Figure 48. The “before” trace is the low-voltage radar signature that shows all cable land- marks but does not show the downward reflection of a high resistance shunt fault. The “after” trace is the high-voltage sig- nature that includes the fault location even though its resistance may be higher than 200 Ω. This trace is digitized, stored and displayed on the screen allowing the cursors can be easily positioned in order to read the distance to the high resistance fault. Open End High Resistance Fault to Neutral Low Voltage Trace High Voltage Trace BIDDLE R R R DART ANALYSIS SYSTEM Figure 48: Arc reflection method of high-voltage radar Fault Finding Solutions 27 Open End High Resistance Fault to Neutral Open End Splice Arc Reflection Trace Differential Arc Reflection Trace BIDDLE R R R DART ANALYSIS SYSTEM Long test leads Tee splice Low Voltage Trace Figure 49: Arc reflection and differential arc reflection methods of high-voltage radar
  • 30. Locating Methods SECTION VI 28 Fault Finding Solutions Differential Arc Reflection This high-voltage radar method is basically an extension of arc reflection and it requires the use of a surge generator, an arc reflection filter, and an analyzer. Using an algorithm, the DART Analyzer displays the algebraic difference between the low-volt- age trace and the captured high- voltage trace on a second screen. See Figure 49 on previous page. As in differential TDR, differential arc reflection eliminates all identi- cal reflections before the fault and the first downward-going reflection to appear is easily iden- tified as the cable fault. This sim- plifies the fault prelocation partic- ularly if the fault reflection is not well defined or the fault is on a complex system with lots of clutter and unidentifiable reflections. Surge Pulse Reflection This method requires the use of a surge coupler, a surge generator, and an analyzer. The analyzer acts as a storage oscilloscope that captures and dis- plays reflections from the fault produced by the surge generator high-voltage pulse. The analyzer operates in a passive mode and is not acting like a TDR by actively sending out pulses. Surge pulse is effective in locating faults on long runs of simple circuits and on faults that are difficult to arc over which do not show up using arc reflection. This method will find most of the same faults that can be prelocated using arc reflection, but usually with reduced accuracy and confidence due to greater difficulty in interpreting the displayed signature. The captured trace does not show landmarks on the cable as arc reflection does. In this method, a surge generator is connected directly to the cable without the use of a filter which can limit both the voltage and current applied to the fault. Some faults with water or oil in the fault cavity require more ionizing current and higher voltage than arc reflection can provide. The surge generator transmits a high-voltage pulse down the cable creating an arc at the fault that causes a reflection of energy back to the surge generator. This reflection repeats back and forth between the fault and the surge generator until all of the energy is depleted. A current coupler senses the surge reflections which are captured by the analyzer and displayed on the screen as a trace. See Figure 50. To determine the location of the fault, cursors are positioned at succeeding peaks in the trace. The analyzer measures time and calculates the distance to the fault using the velocity of propagation. For the trace shown in Figure 50, there is little difficul- ty in determining where to position the cursors to obtain the distance to the fault. In many cases, interpretation of the waveform can be extremely difficult due to additional reflections that can be produced by splices and taps. Surge pulse is also affected by accuracy problems due to changes in the velocity of propagation with distance from the fault. Despite its shortcomings, this method provides an alternate tool to locate some faults that would not show up using arc reflection and would be much more difficult to locate. Open End High Resistance Fault to Neutral Distance to Fault Current Coupler BIDDLE R R R DART ANALYSIS SYSTEM Figure 50: Surge pulse reflection method of high-voltage radar
  • 31. Locating Methods SECTION VI Fault Finding Solutions 29 Voltage Decay Reflection This method requires the use of a surge coupler, a high-voltage dc test set, and an analyzer. The ana- lyzer does the job of a storage oscilloscope that captures and displays reflections from the fault produced by the flashover of dc voltage at the fault. The analyzer operates in a passive mode and is not acting like a TDR by actively sending out pulses. Decay is used primarily to locate faults on transmission class cables that require breakdown voltages greater than typical surge generators will provide. Dc dielectric test sets with output capabil- ity up to at least 160 kV may be required to break down the fault and capture the voltage transient using an appropriately rated coupler and an ana- lyzer. See Figure 51. High dc voltage is applied gradually to the cable under test charging its capacitance until the high resistance fault breaks down. At breakdown, the cable capacitance is discharged through the fault and generates a voltage pulse that travels back to the test set where it reflects back to the fault. When the voltage pulse reaches the fault, its polarity is reversed and it again travels back to the test set. These reflections continue back and forth until the energy contained in the wave is dissipat- ed. A current coupler senses the surge reflections that are captured and displayed on the screen as a trace. To determine the location of the fault, cur- sors are positioned at a succeeding peak and valley in the trace. The analyzer measures time and cal- culates the distance to the fault using the velocity of propagation. All three phases can be tied together at both ends of the cable run to take advantage of the additional capacitance. Open End High Resistance Fault to Neutral Distance to Fault Current Coupler BIDDLE R R R DART ANALYSIS SYSTEM HV dc Test Set Figure 51: Decay method of high-voltage radar
  • 32. Locating or Pinpointing Methods SECTION VII 30 Fault Finding Solutions ACOUSTIC DETECTION No matter what method is used for fault locating on direct buried underground cable, at some point an “x” must be marked on the ground to say “dig here.” The most commonly used prelocation methods such as arc reflection or current impulse will get reasonably close to the fault, but are not accurate enough to define the exact fault location. Before digging, in order to repair the faulted cable, some type of pinpointing technique must be used. The classical methods all revolve around a way to zero in on the sound produced by the thump or discharge of energy at the fault created by a surge generator. A simple and well-used method is the fault-locator-ear-on-the-ground-butt-in-the-air technique. Under some conditions such as after a rain or heavy morning dew this can be a shocking experience, literally. Under certain conditions such as created by a corroded neutral, when surging the cable, current will flow in the earth itself rather than back to the generator through the neutral. When this occurs, a voltage drop is pro- duced between the spread hands of the fault loca- tor each time the surge generator discharges. Other less painful approaches involve old reliable tools such as traffic cones, shovel handles, and modified stethoscopes. Slightly more sophisticated equipment uses an acoustic pickup or microphone placed on the ground, an electronic amplifier, and a set of head- phones. This setup amplifies the sound and helps to zero in on the source at the fault. An improve- ment on this technique is the addition of a second pickup. See Figure 52. A switch and meter on the amplifier allow comparison of the magnitude of the sound from each pickup. The higher signal is from the pickup closest to the fault and the sen- sors are moved in that direction. With pickups straddling the fault, the sound levels are equal. These acoustic techniques all assume that the sound produced at the fault travels directly to ground level unimpeded and that the loudest sound is heard precisely above the fault. If the cable happens to be in duct or conduit, under paving or surrounded by tree roots, this assump- tion may not be valid. In duct or pipe, the loudest sound occurs at either end or at a break. If the fault is under paving, the loudest sound may be at a crack or seam. Root systems seem to carry the sound off in all directions. Fault Fault SD-3000 SURGE DETECTOR MAG SET FREQ LEFT MUTE ON/OFF SAVE RIGHT MUTE TIME AMPL VOLUME SD-3000 SURGE DETECTOR TM MAG SET FREQ LEFT MUTE ON/OFF SAVE RIGHT MUTE TIME AMPL VOLUME SD-3000 SURGE DETECTOR MAG SET FREQ LEFT MUTE ON/OFF SAVE RIGHT MUTE TIME AMPL VOLUME Position 1 Position 2 Position 3 Figure 52: Acoustic surge detection Position #1 — Sound louder from right pickup Position #2 — Sound equal from left and right pickups Position #3 — Sound louder from left pickup
  • 33. Locating or Pinpointing Methods SECTION VII ELECTROMAGNETIC SURGE DETECTION An alternate technique is the use of an electro- magnetic impulse detector. See Figure 53. The dis- charge from a surge generator creates a current impulse that travels down the cable through the fault and back to the capacitor of the surge gener- ator. Using the proper antenna or surface coil and an amplifier, the magnetic field created by this current impulse can be detected and measured while walking above the cable. This is similar to cable route tracing where the maximum signal is detected directly over the cable, except that this signal is only present each time the thumper dis- charges. As the fault location is approached, the intensity of the magnetic field will generally increase and after passing the fault the magnitude falls off fairly rapidly. This increase and then rapid decrease can sometimes be used to pinpoint an underground fault accurately enough to dig. Unfortunately, in the case of direct buried, bare- concentric neutral cables, a portion of the impulse current may follow the neutral for some distance Fault Finding Solutions 31 past the fault making it difficult to determine a precise pinpoint location. This method may be the only hope if the fault is very low resistance and the surge generator is producing little or no sound at the fault. ELECTROMAGNETIC/ACOUSTIC SURGE DETECTION The Model SD-3000 Surge Detector combines both electromagnetic and acoustic pickups to efficiently pinpoint the fault. See Figure 54. A pickup in the receiver detects the magnetic field produced by the current impulse and also displays its magni- tude on a bar graph display every time the thumper discharges. The indicated magnitude of the impulse will decrease if the fault has been passed or if the receiver is no longer over the cable route. After detecting an impulse, an acoustic pickup placed on the ground listens for a thump as a result of the discharge. The detected impulse starts a timer in the receiver and when an audible thump is sensed, the timer is stopped. This measurement is the time it takes the sound wave Fault Fault Position 1 Position 2 Position 3 Position #1 — Detect electromagnetic signal from surge Position #2 — Detect increase in electromagnetic signal as fault is approached Position #3 — Detect decrease in electromagnetic signal as fault is passed Figure 53: Electromagnetic pinpointing
  • 34. Locating or Pinpointing Methods SECTION VII 32 Fault Finding Solutions produced at the fault to travel to the acoustic pickup and is displayed in milliseconds. As the fault is approached, this time interval decreases to a minimum directly over the fault and increases again as the fault is passed. The time never goes to zero because there is always the depth of the cable between the pickup and the fault. This tech- nique relies on the elapsed time between the two events, not simply the loudness of the sound and thereby eliminates the problems of accurate pin- pointing even under difficult conditions. If two acoustic pickups are used, the receiver makes dual measurements and indicates with an arrow on the display which direction to move toward the fault. As the fault is approached, the tail on the arrow becomes shorter until the fault is passed when the direction of the arrow reverses. At this point, small movements of the pickups are made. When they actually straddle the fault, two arrowheads appear pointed toward each other. Once the instrument “hears” the thump, head- phones are no longer necessary and the measure- ments will lead the operator directly to the fault. The receiver also measures and displays a digital value of the sound level, which typically increases as the fault is approached. By using the Save func- tion in the unit, two sets of time and sound level values can be saved and displayed while observing the current values which confirms that the direc- tion being taken is correct. The SD-3000 provides information on its liquid crystal display, which will efficiently and quickly guide the operator to within inches of the exact fault location: ■ Intensity of the surge impulse. ■ Elapsed time between the impulse and thump. ■ Magnitude of the sound. ■ Direction and relative distance to the fault. Figure 55 shows typical displays of the SD-3000. Figure 54: Acoustic/electromagnetic pinpointing Fault Fault SD-3000 SURGE DETECTOR TM MAG SET FREQ LEFT MUTE ON/OFF SAVE RIGHT MUTE TIME AMPL VOLUME SD-3000 SURGE DETECTOR TM MAG SET FREQ LEFT MUTE ON/OFF SAVE RIGHT MUTE TIME AMPL VOLUME SD-3000 SURGE DETECTOR TM MAG SET FREQ LEFT MUTE ON/OFF SAVE RIGHT MUTE TIME AMPL VOLUME Position 1 Position 2 Position 3 Position # 1 — Sound detected. Arrow points toward fault. Electromagnetic signal detected. Time decreases as fault is approached. Position # 2 — Sound detected. Arrow points toward fault. Electromagnetic signal detected. Time decreases as fault is approached Position # 3 — Loud sound detected. Arrows point toward each other. Time measurement at minimum.
  • 35. Locating or Pinpointing Methods SECTION VII Fault Finding Solutions 33 EARTH GRADIENT Although primarily designed to pinpoint faults on direct buried secondary cable, an earth gradient test set can at times be used to pinpoint faults on jacketed primary cables when all else fails. A gen- erator is used to produce a flow of current between the point of the fault through the earth and back to the generator by way of an earth con- tact. Because the earth is a resistance, current flow will develop a difference in potential or earth gra- dient along the surface. The A-frame, with two isolated measuring probes connected to its receiver, measures and displays the value of this potential difference. The A-frame must be moved along directly over the cable route so tracing the cable before hand is essential. If the current flow is equal in all directions, measuring the voltage drop along the cable route will lead to the point of the fault. If the current flow finds its way onto another conductor such as a buried pipe, this technique will likely be ineffective because no voltage gradient is developed. When using an ac transmitter as shown in Figure 56, the voltage measured increases as the A-frame is moved closer to the fault. When the A-frame straddles the fault, the measurement drops to zero and after the fault is passed, the voltage increases again. At the indicated point of the fault, turn the A-frame at a right angle and follow the same pro- cedure. This will confirm the fault location when moving left and right at ninety degrees to the cable path. A similar technique uses a dc generator that pro- duces a several second pulse of voltage at a regu- lar time interval. In this case, a zero-center meter on the A-frame will jog in one direction for every pulse as you approach the fault, read zero when directly over the fault, and jog to the opposite direction after the fault is passed. This approach has the advantage that in most cases the voltage is much higher than that produced by an ac genera- tor. Higher voltage creates a larger current flow through the earth producing a higher earth gradi- ent voltage. See Figure 57. 3. 9 19 2. 5 25 1. 9ms 29 1. 9 29 1. 5 39 1. 0ms 59 3. 9 19 2. 5 25 1. 9ms 29 Impulse Elapsed Time Sound Direction & Distance Figure 55: SD-3000 display at positions 1, 2, and 3 Transmitter Current Flow Current Flow BIDDLE BIDDLE R R L1070 Portable Locator L1070 Portable Locator TM TM 450 850 000 400 Voltage Drop DC Transmitter Current Flow Current Flow Voltage Drop 0 0 0 0 Figure 56: AC voltage gradient Figure 57: DC voltage gradient