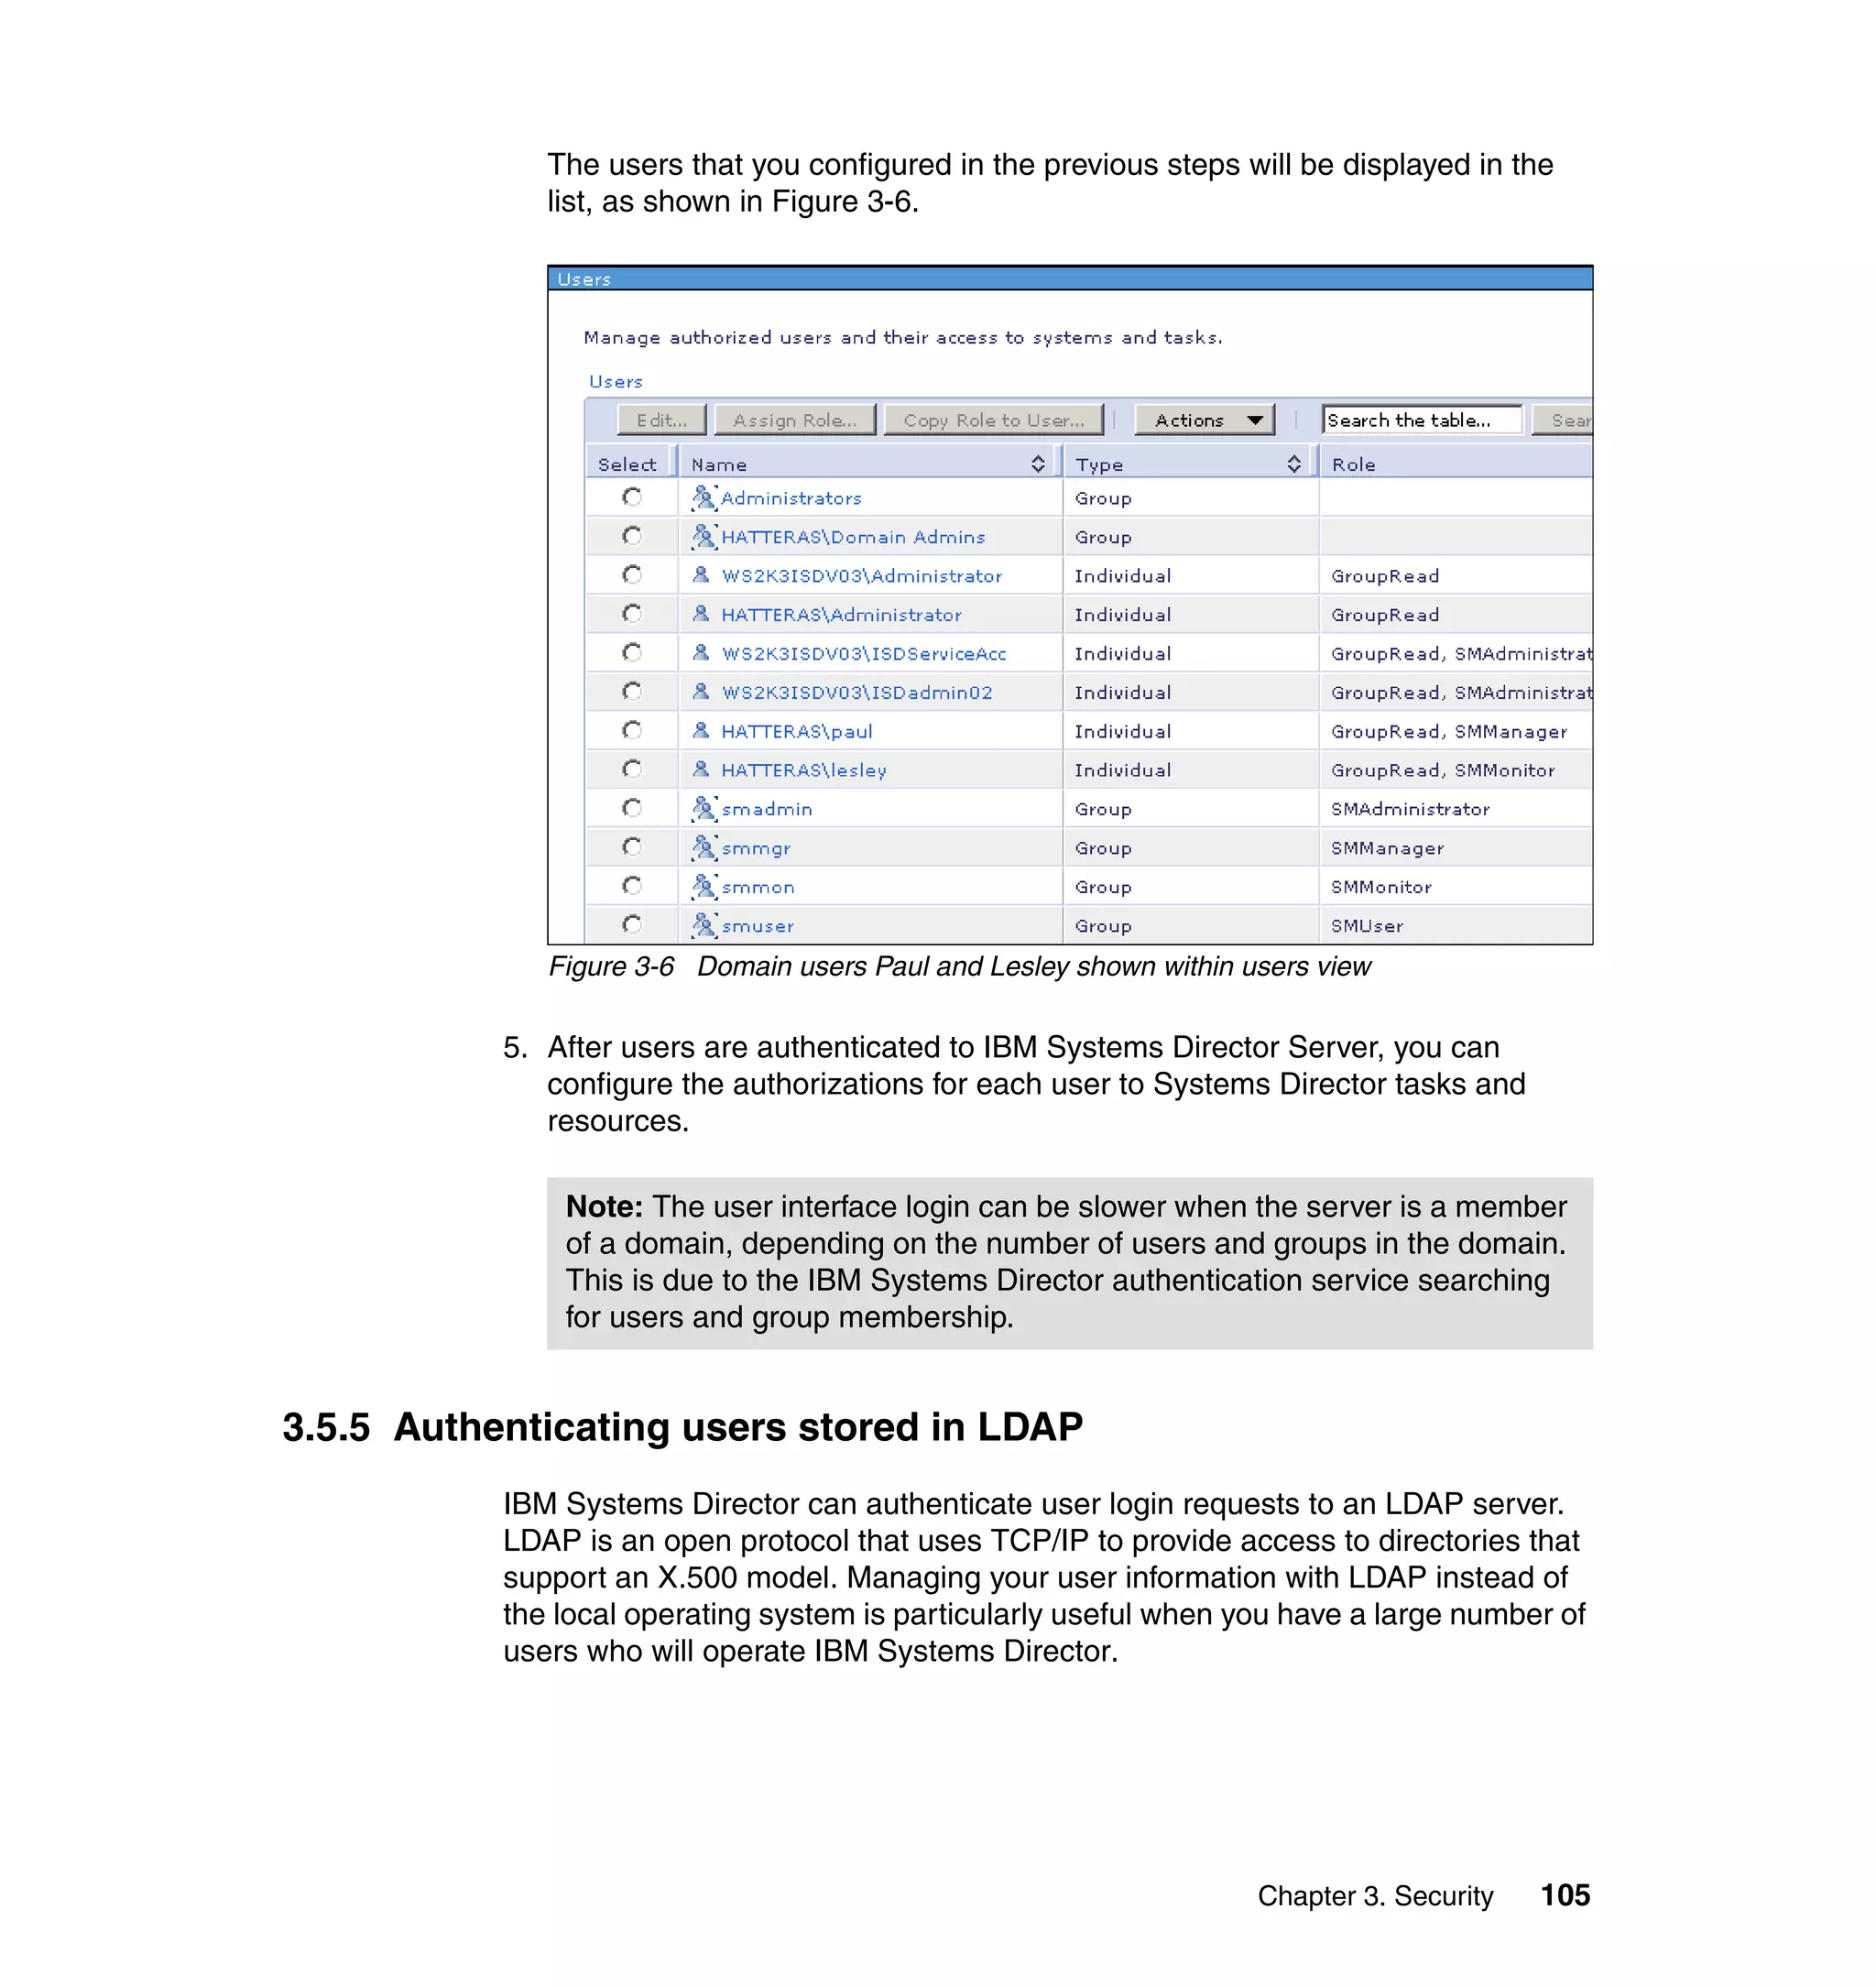
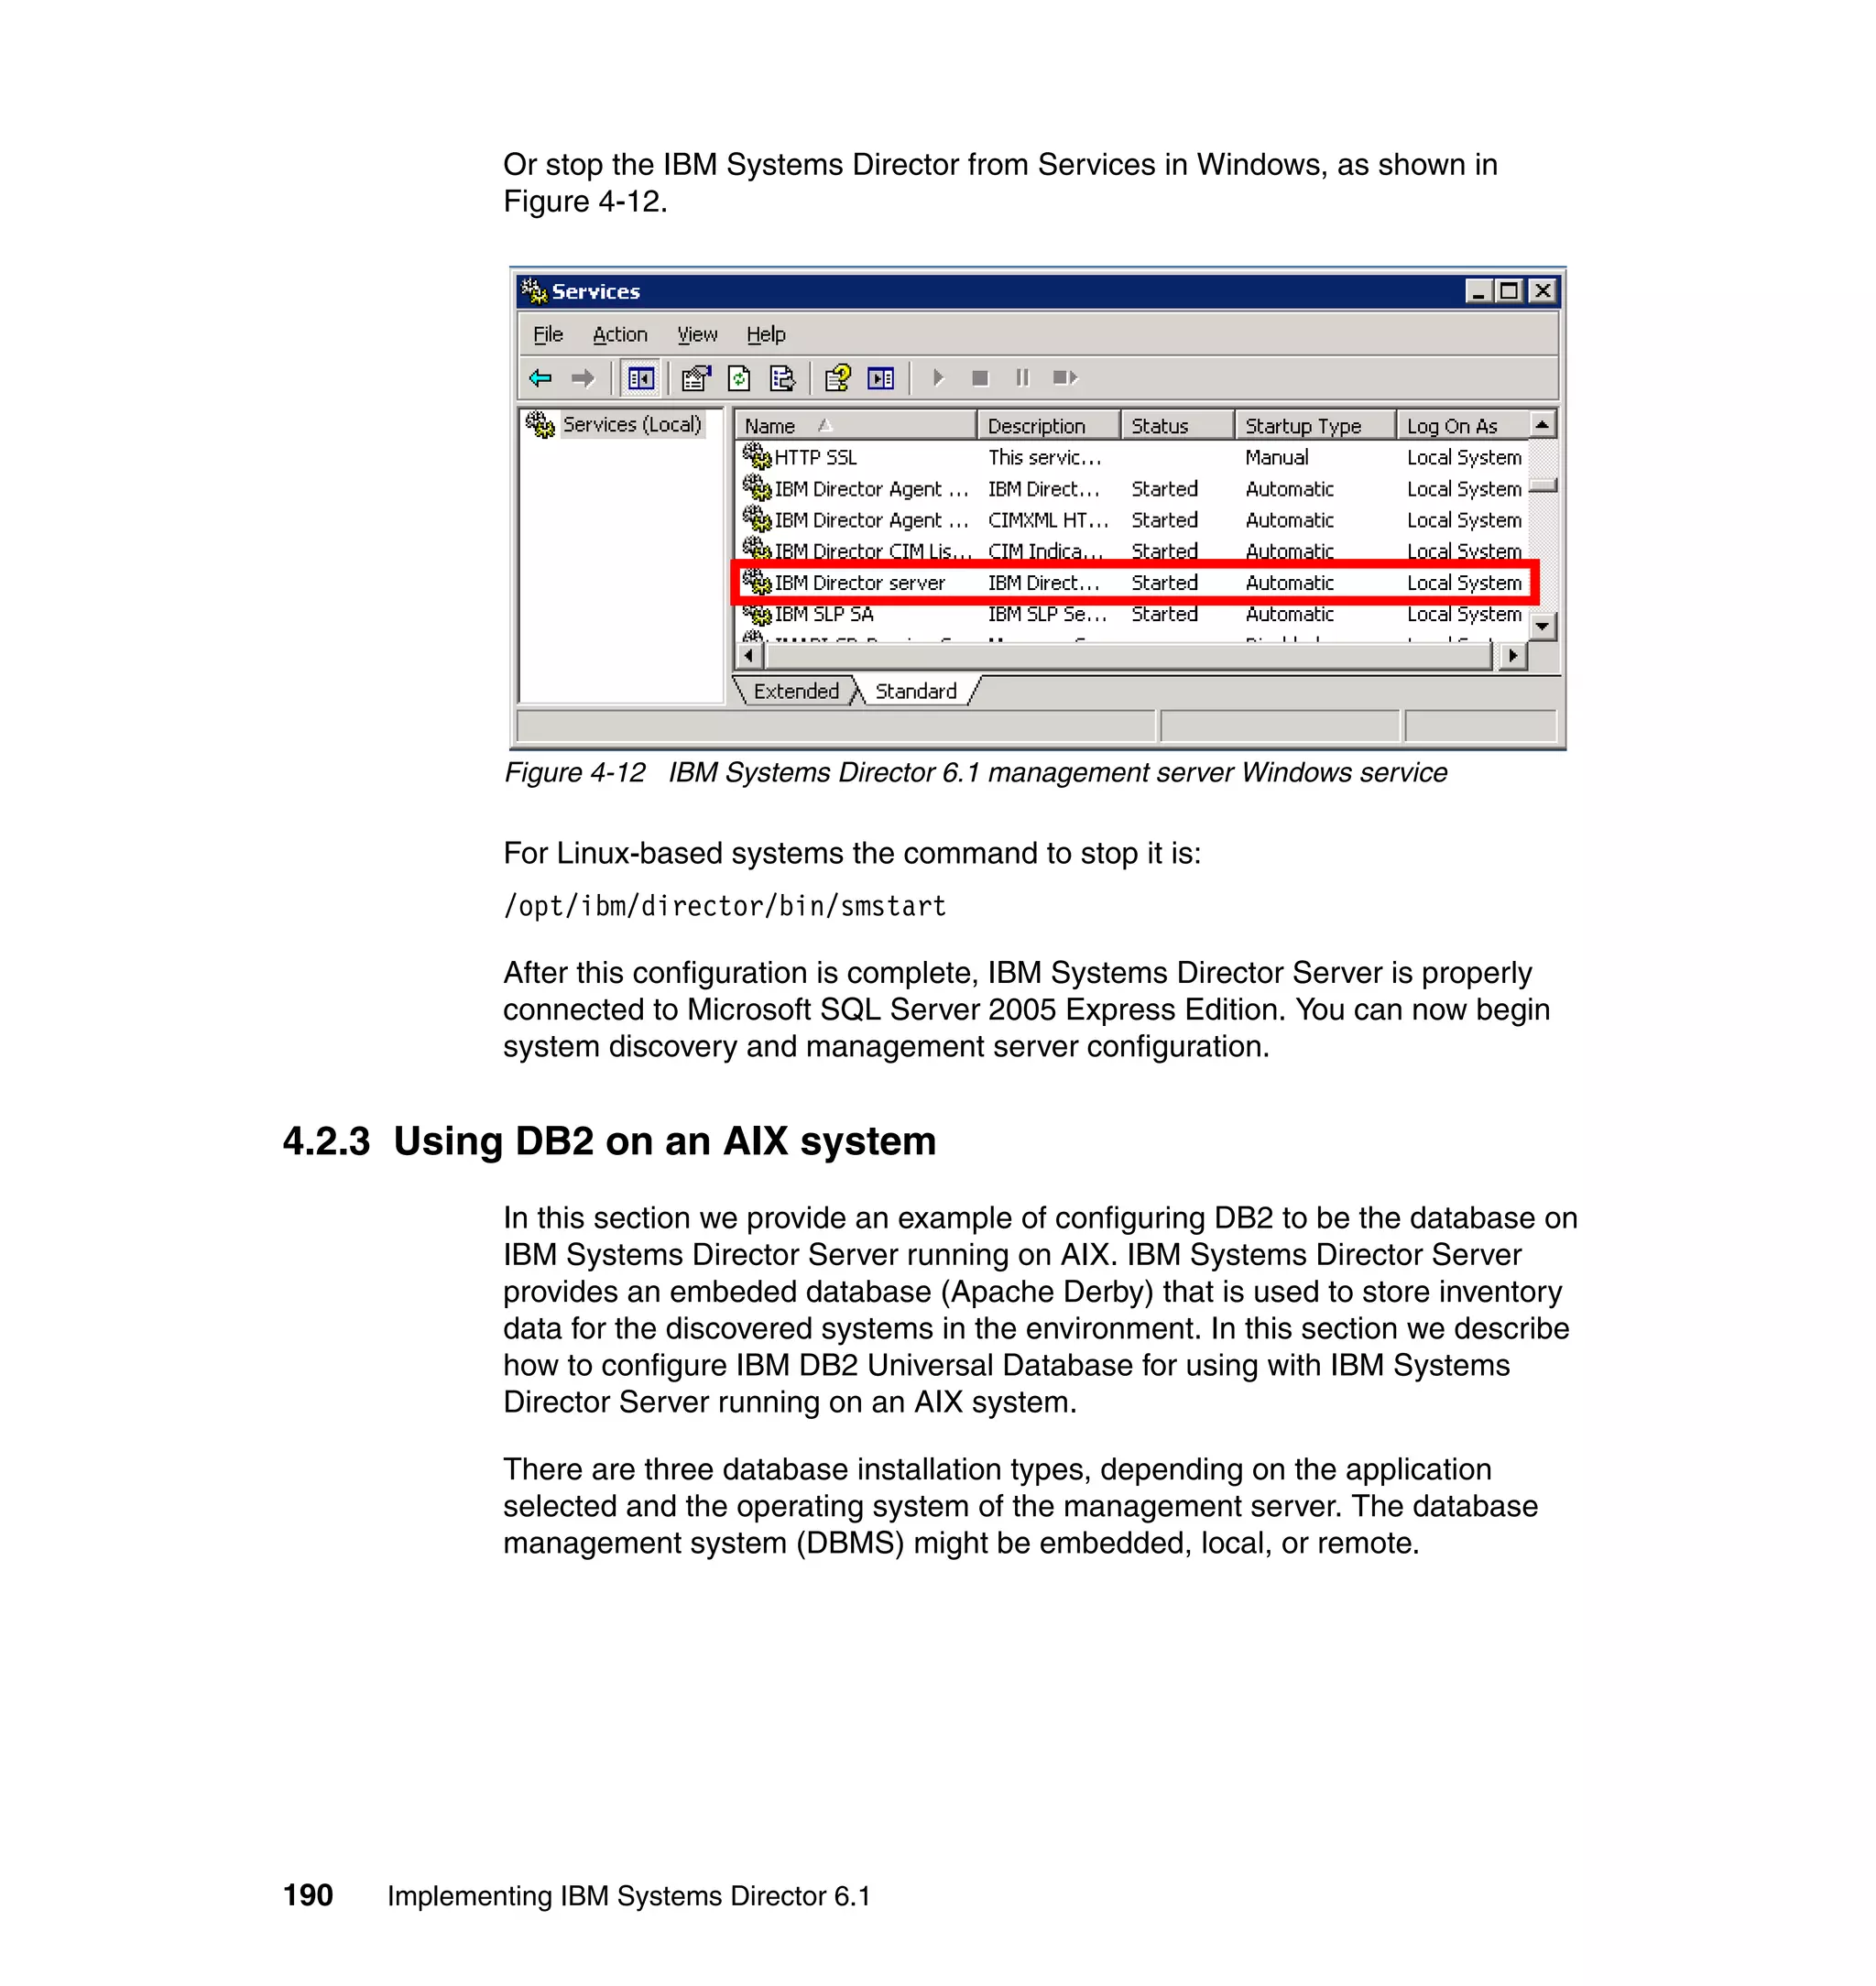
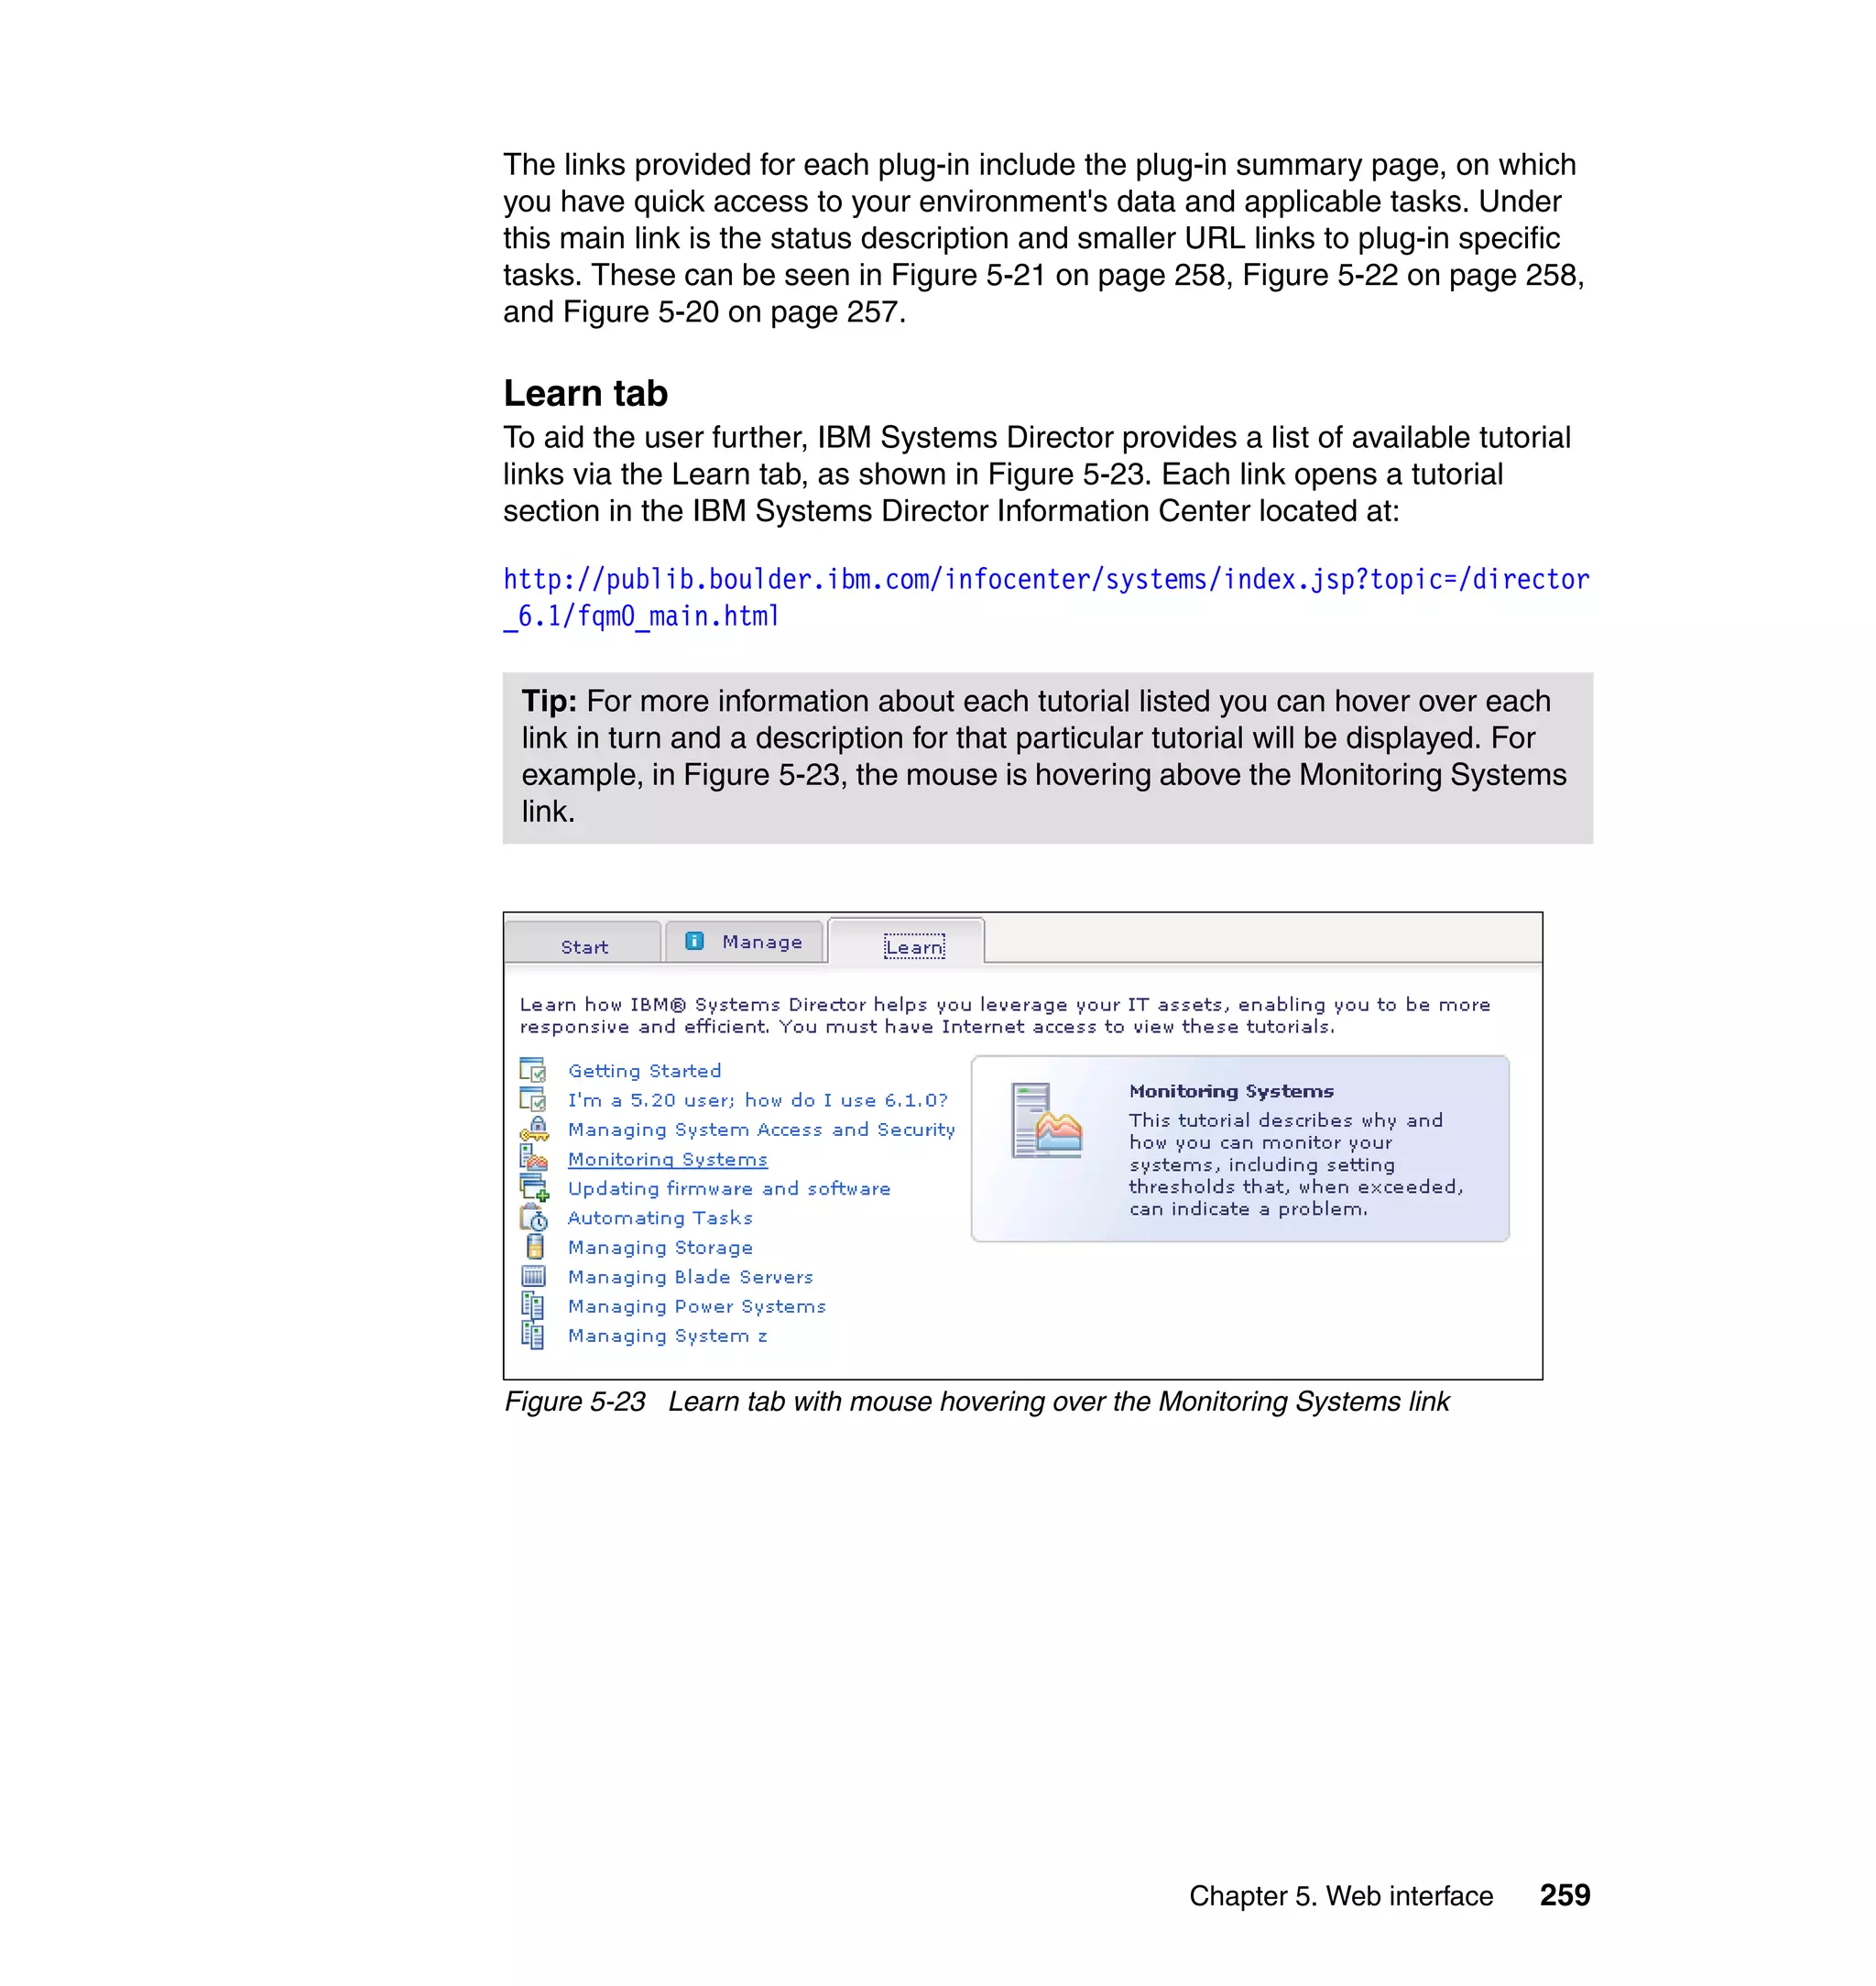
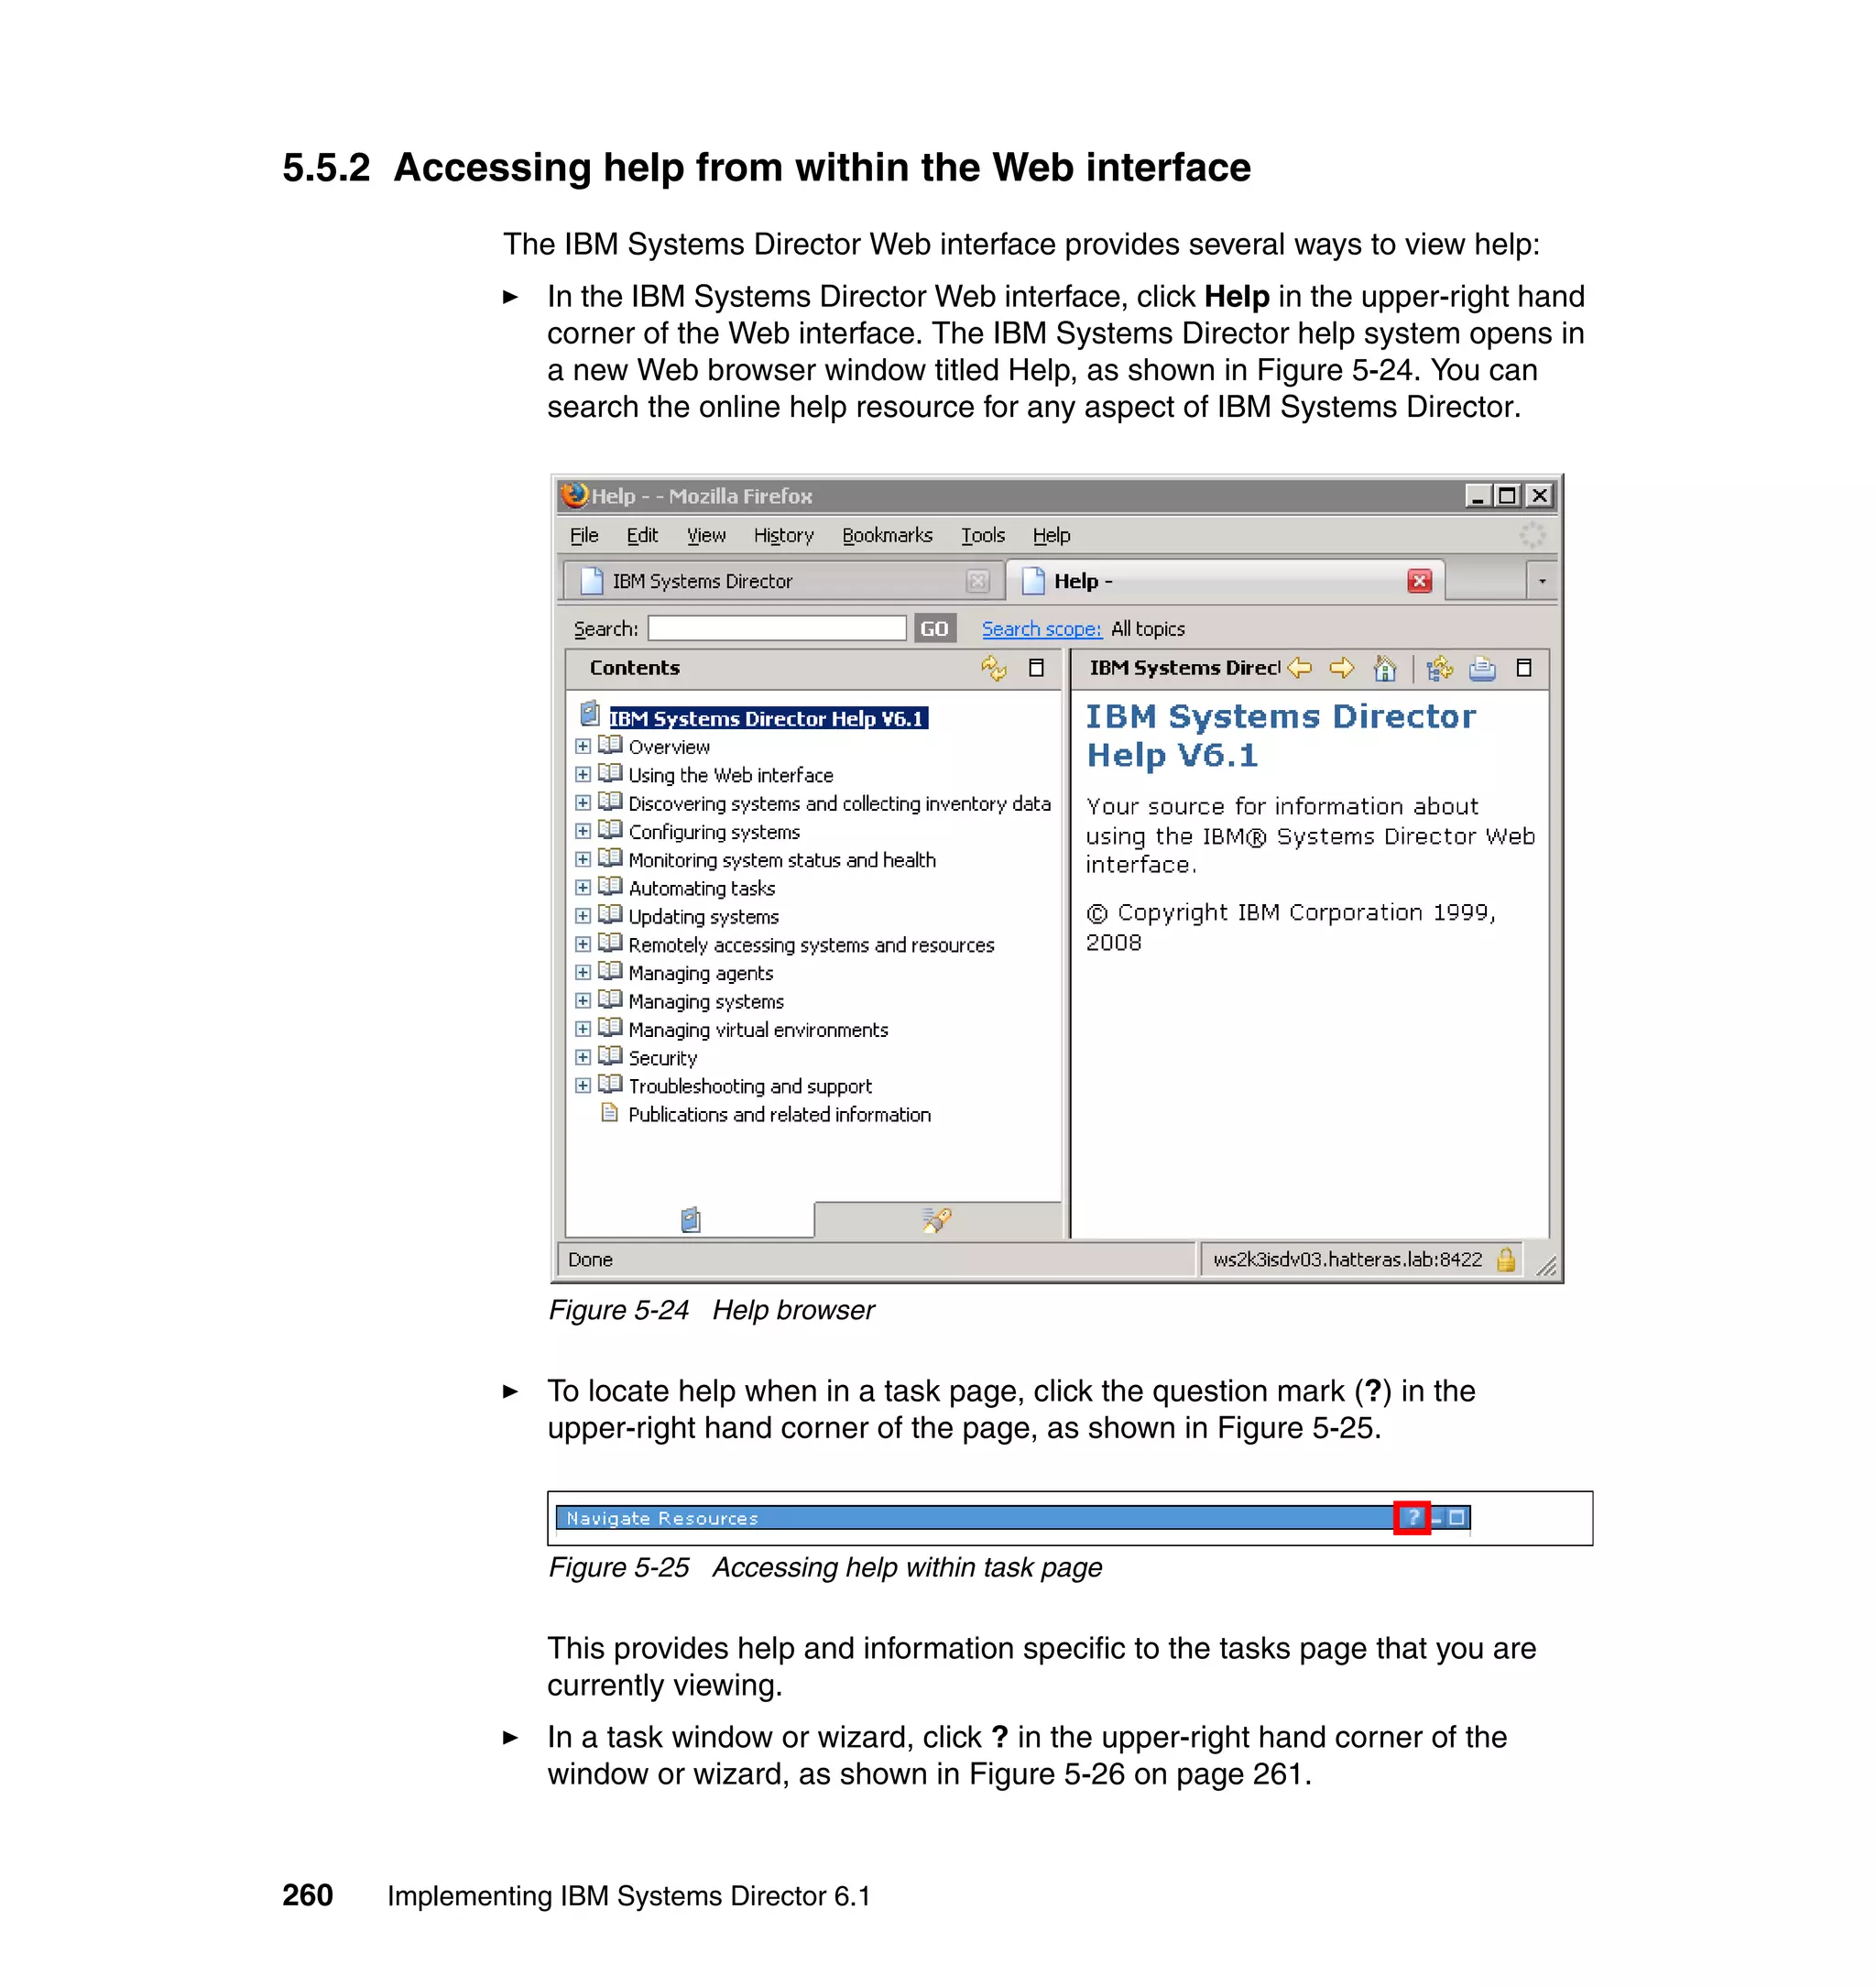
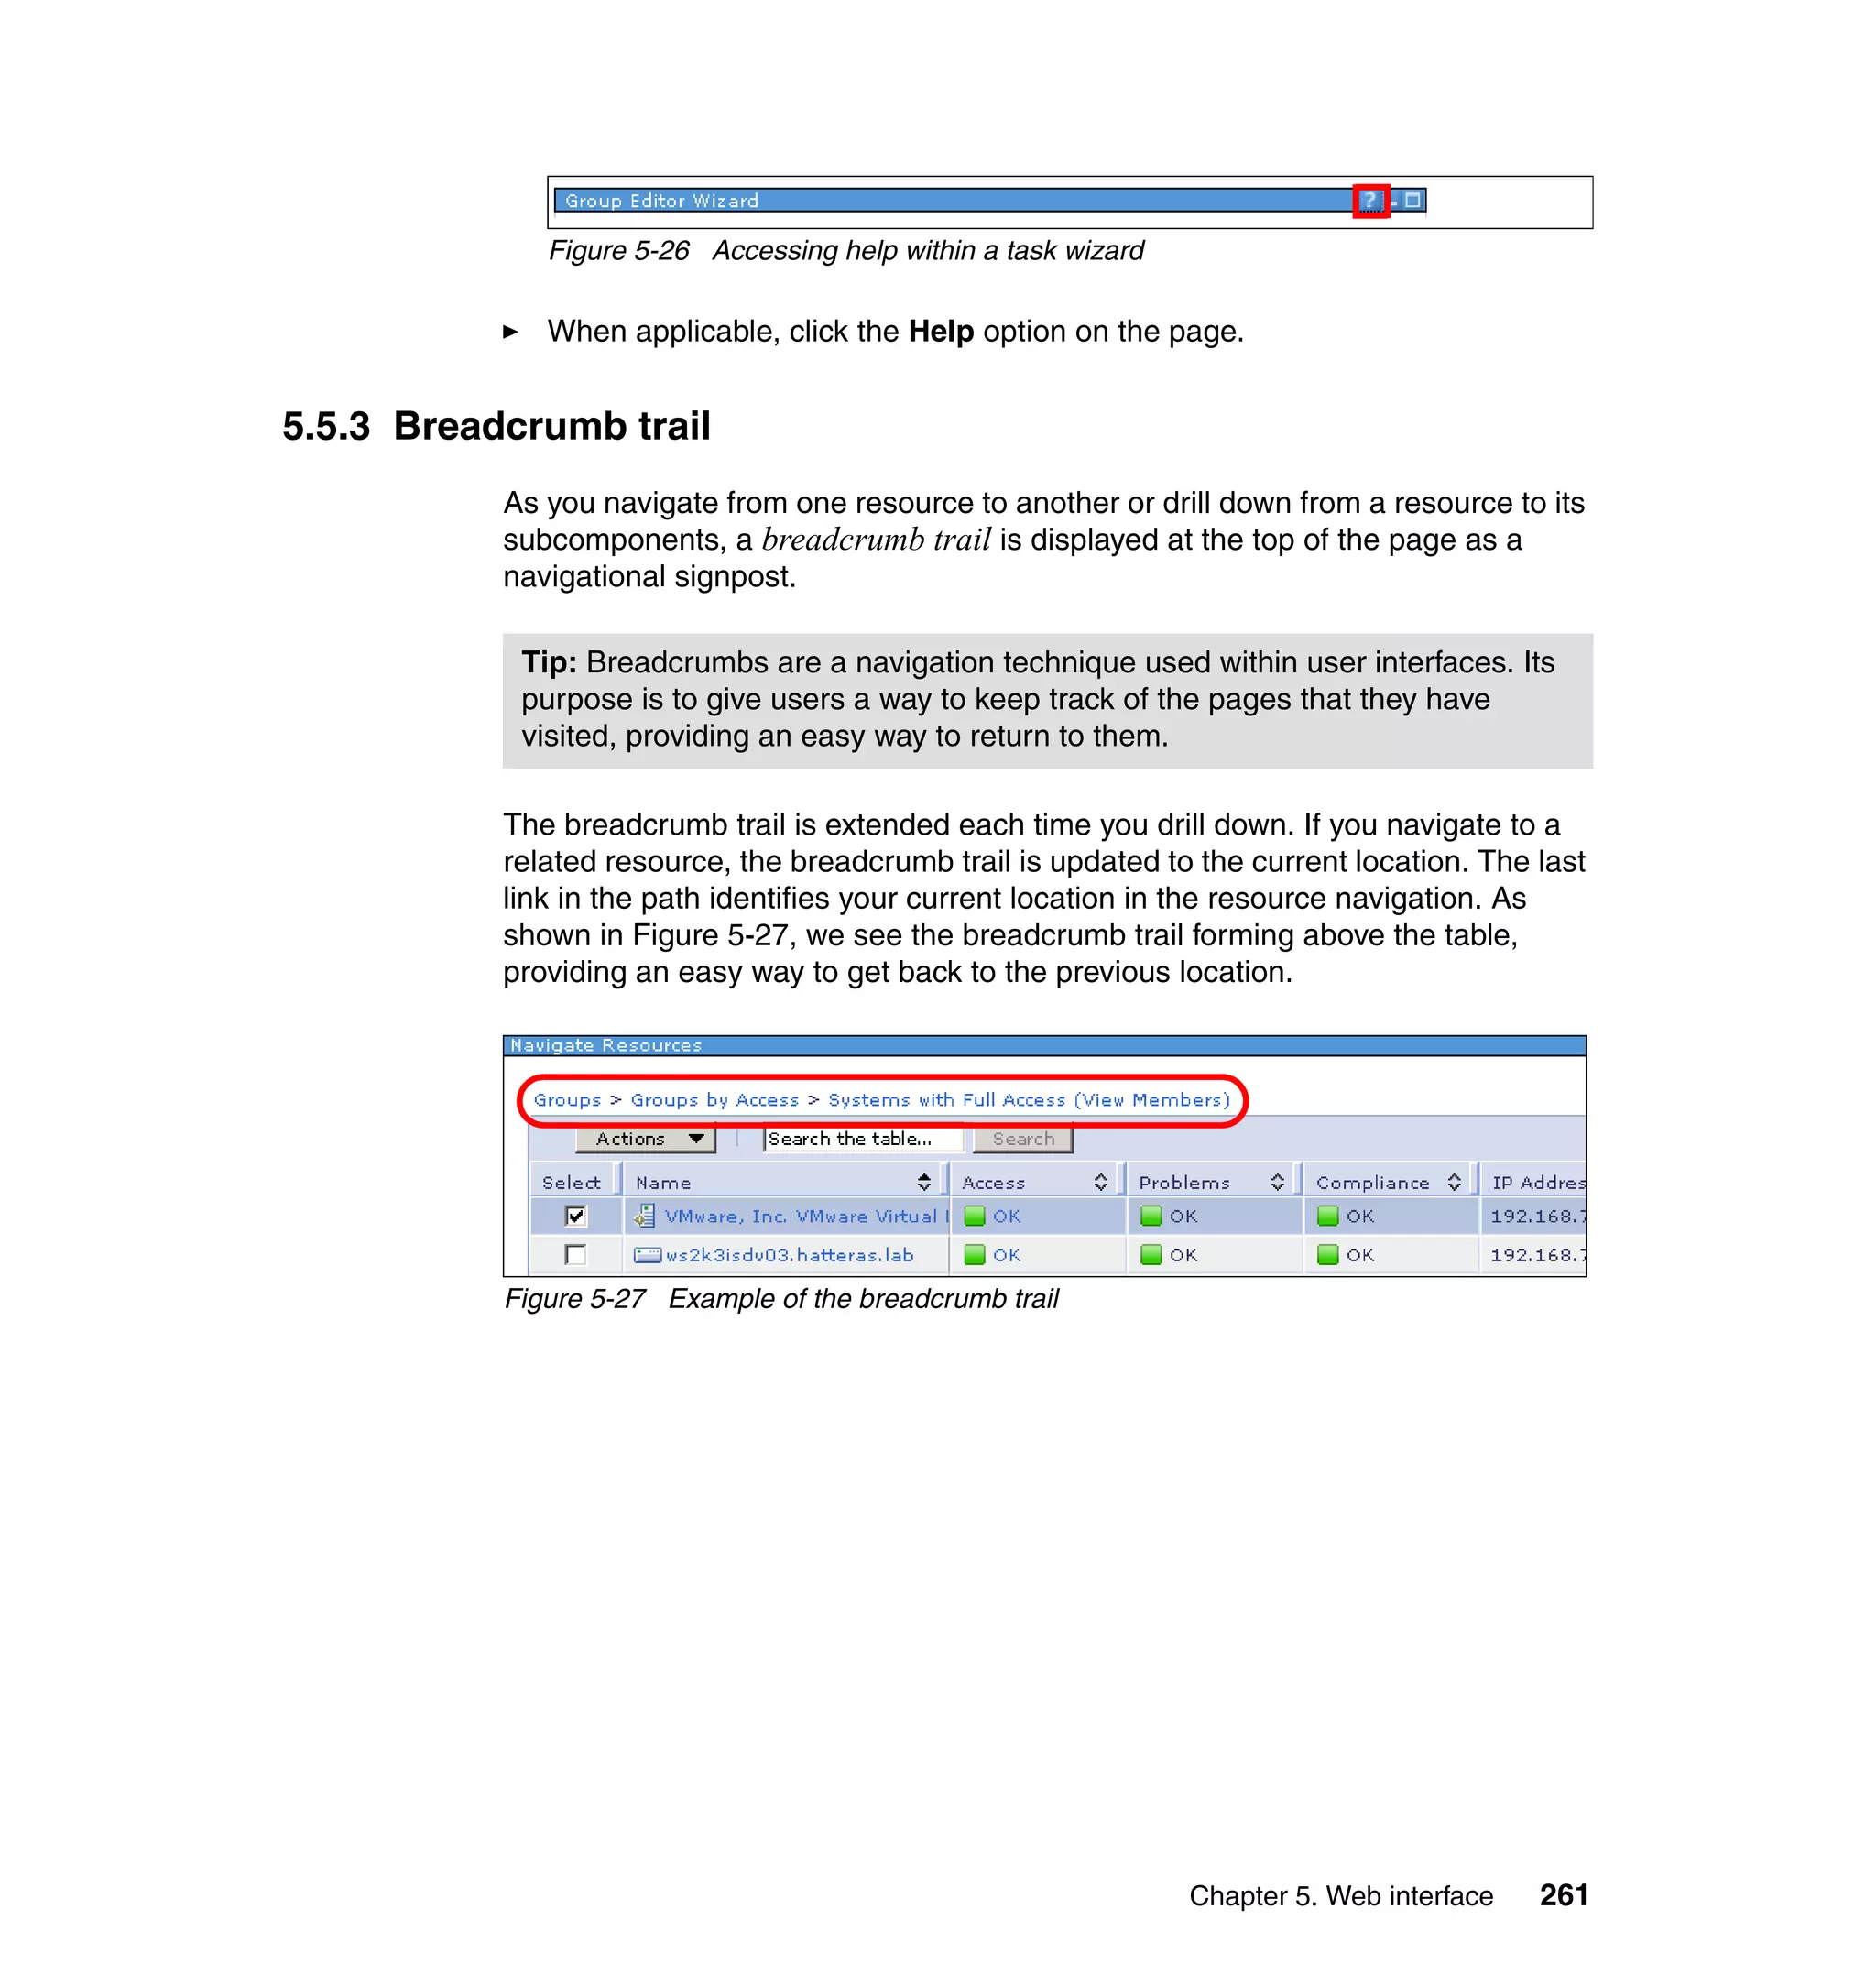
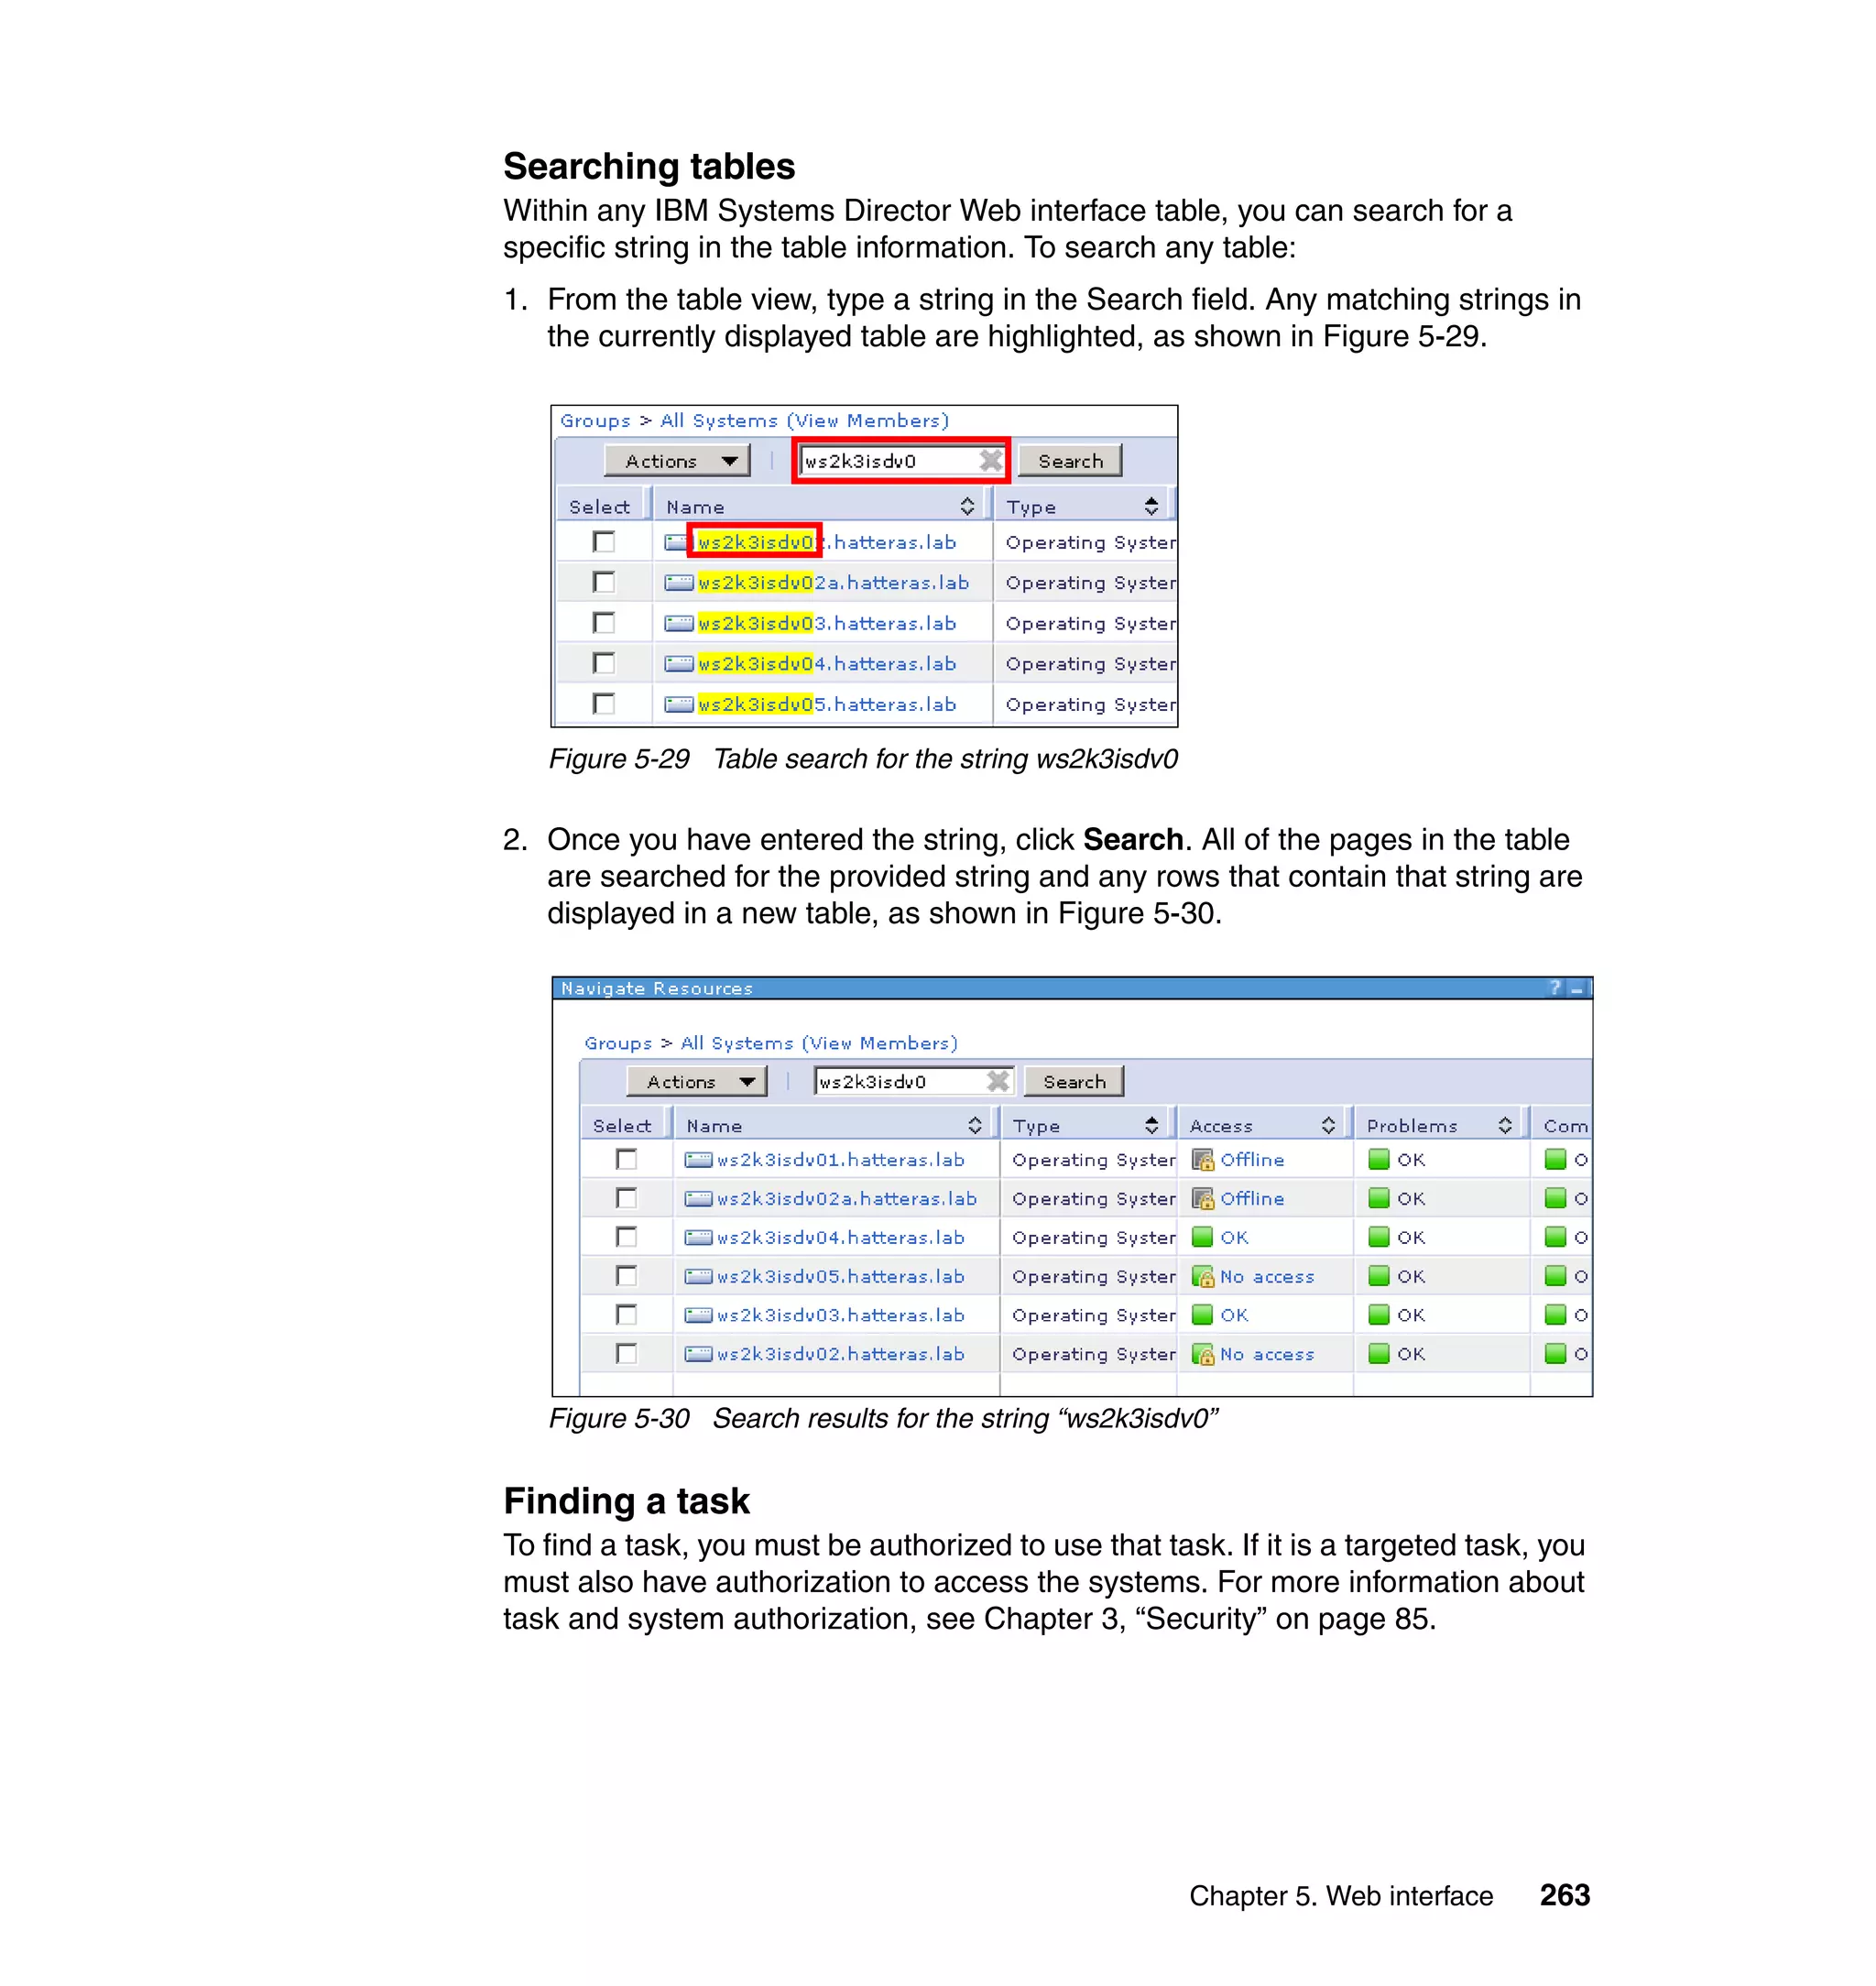
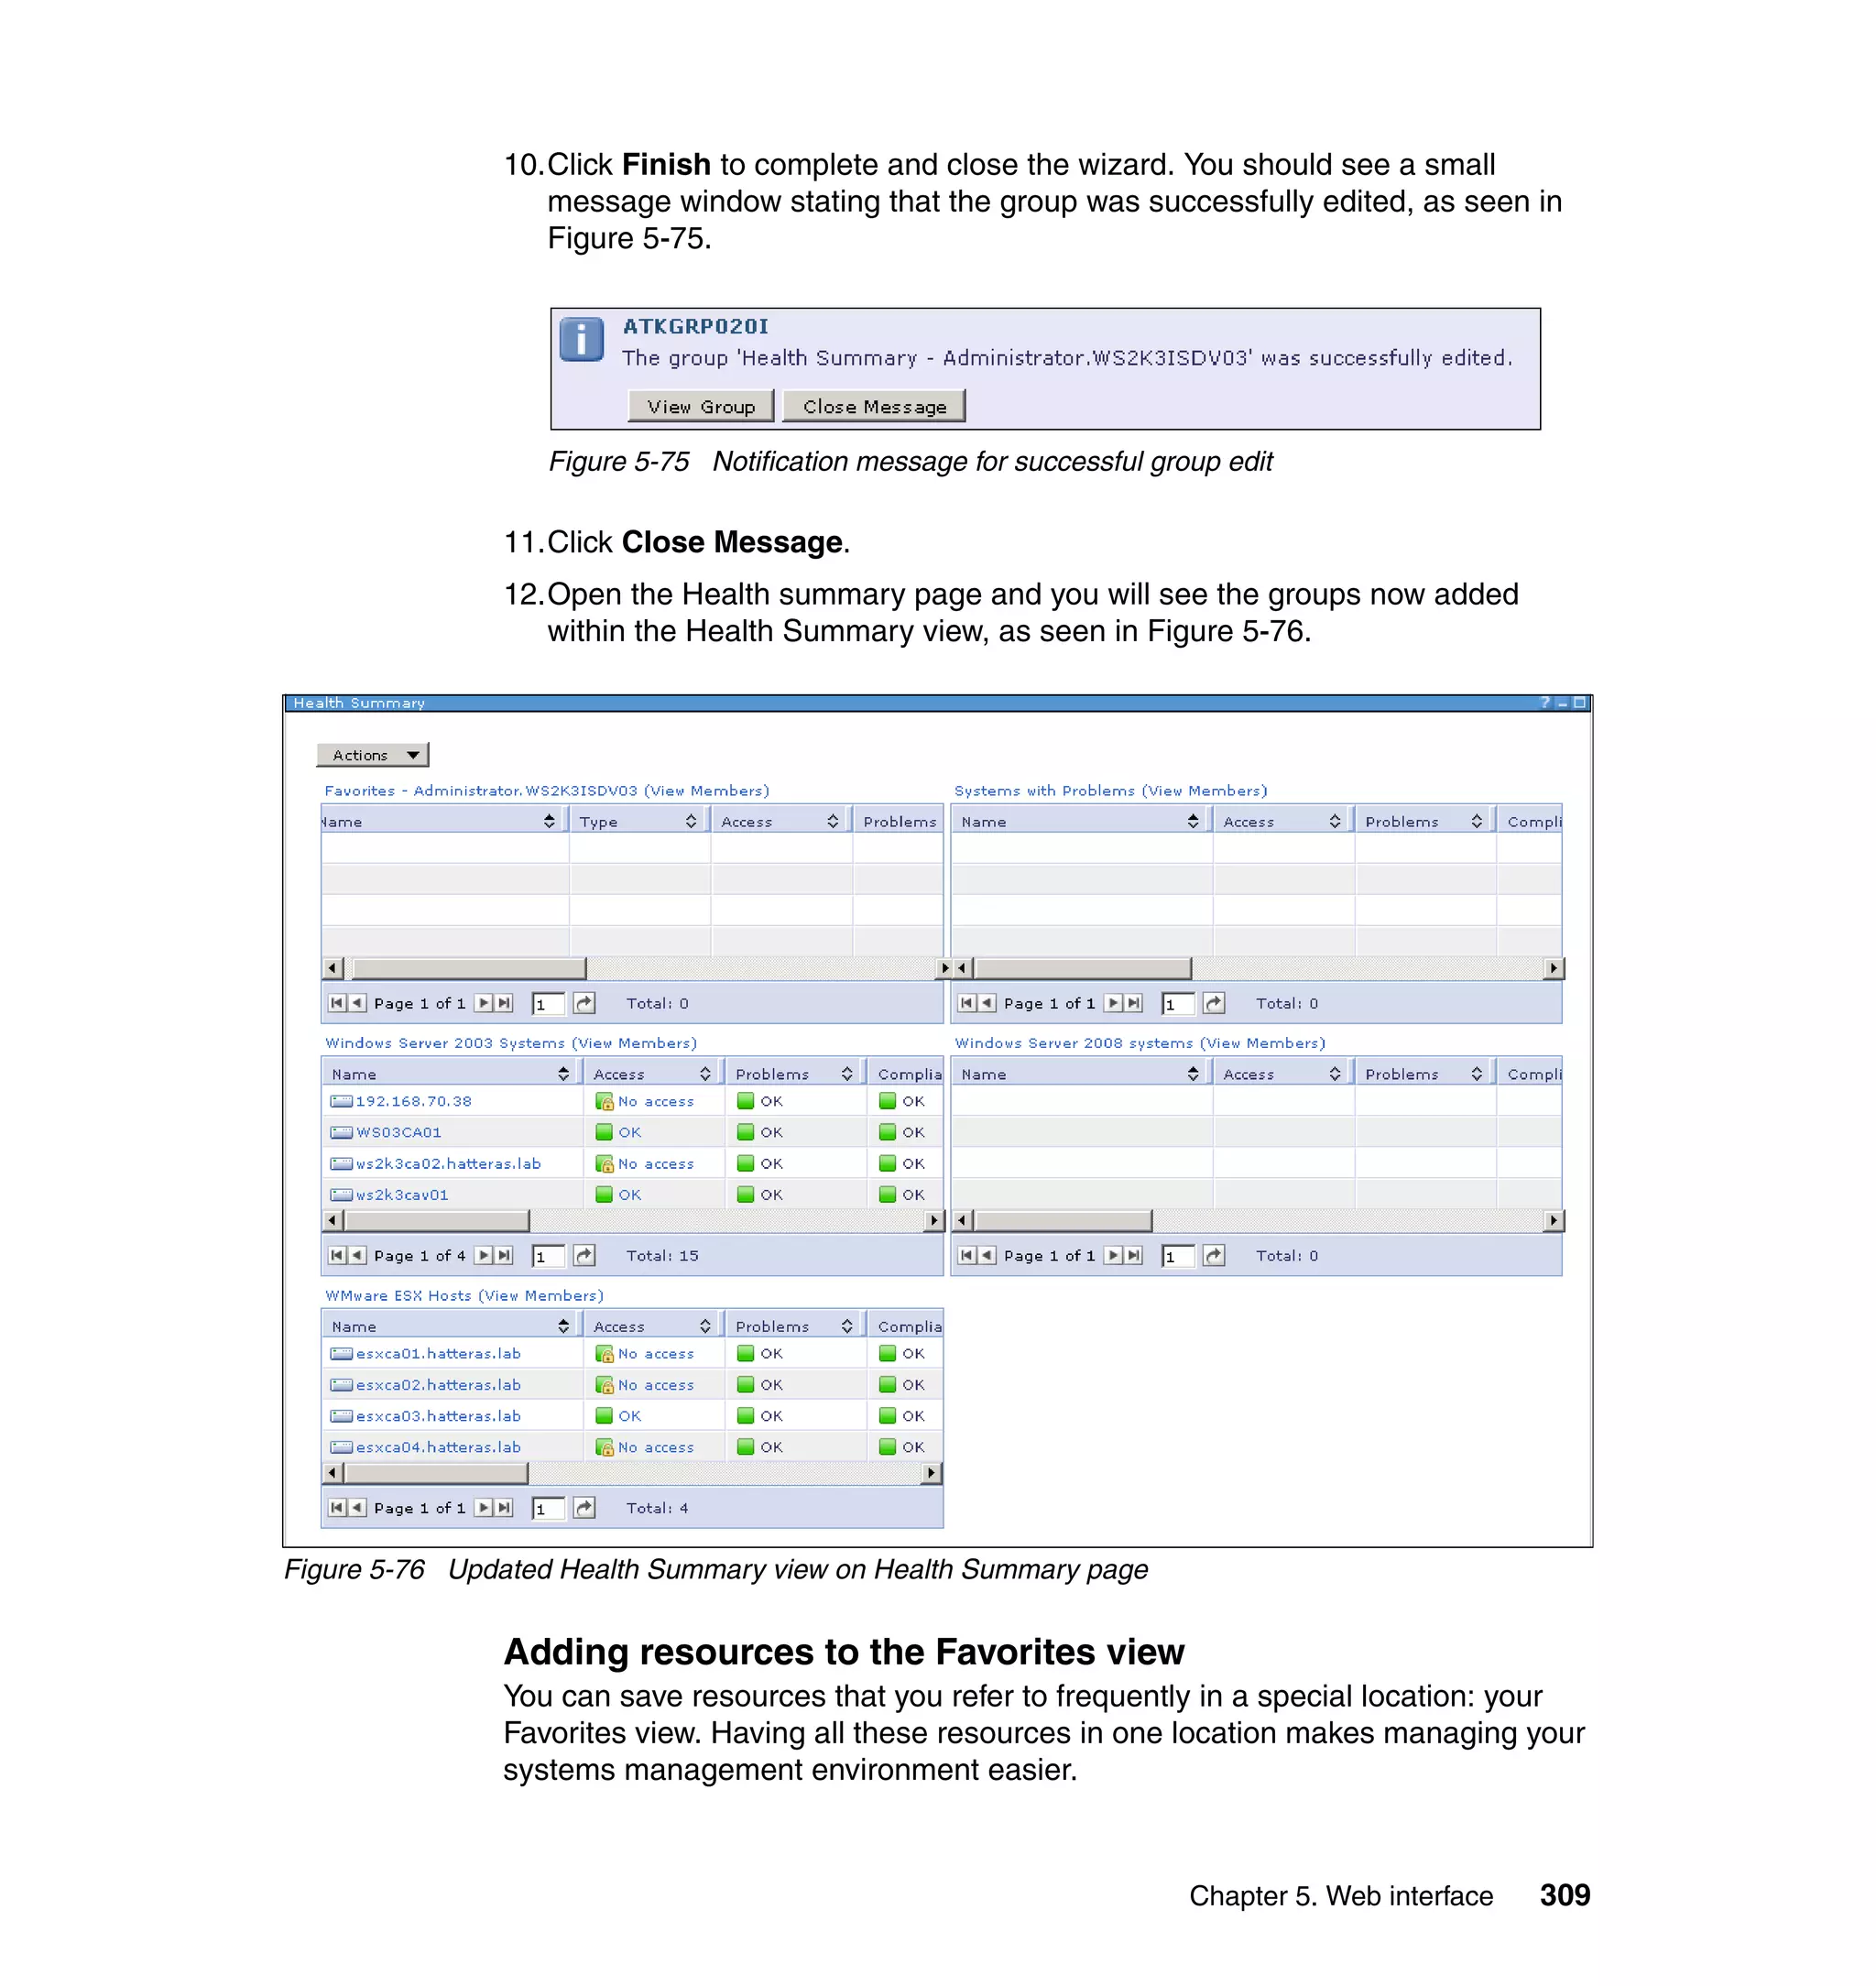
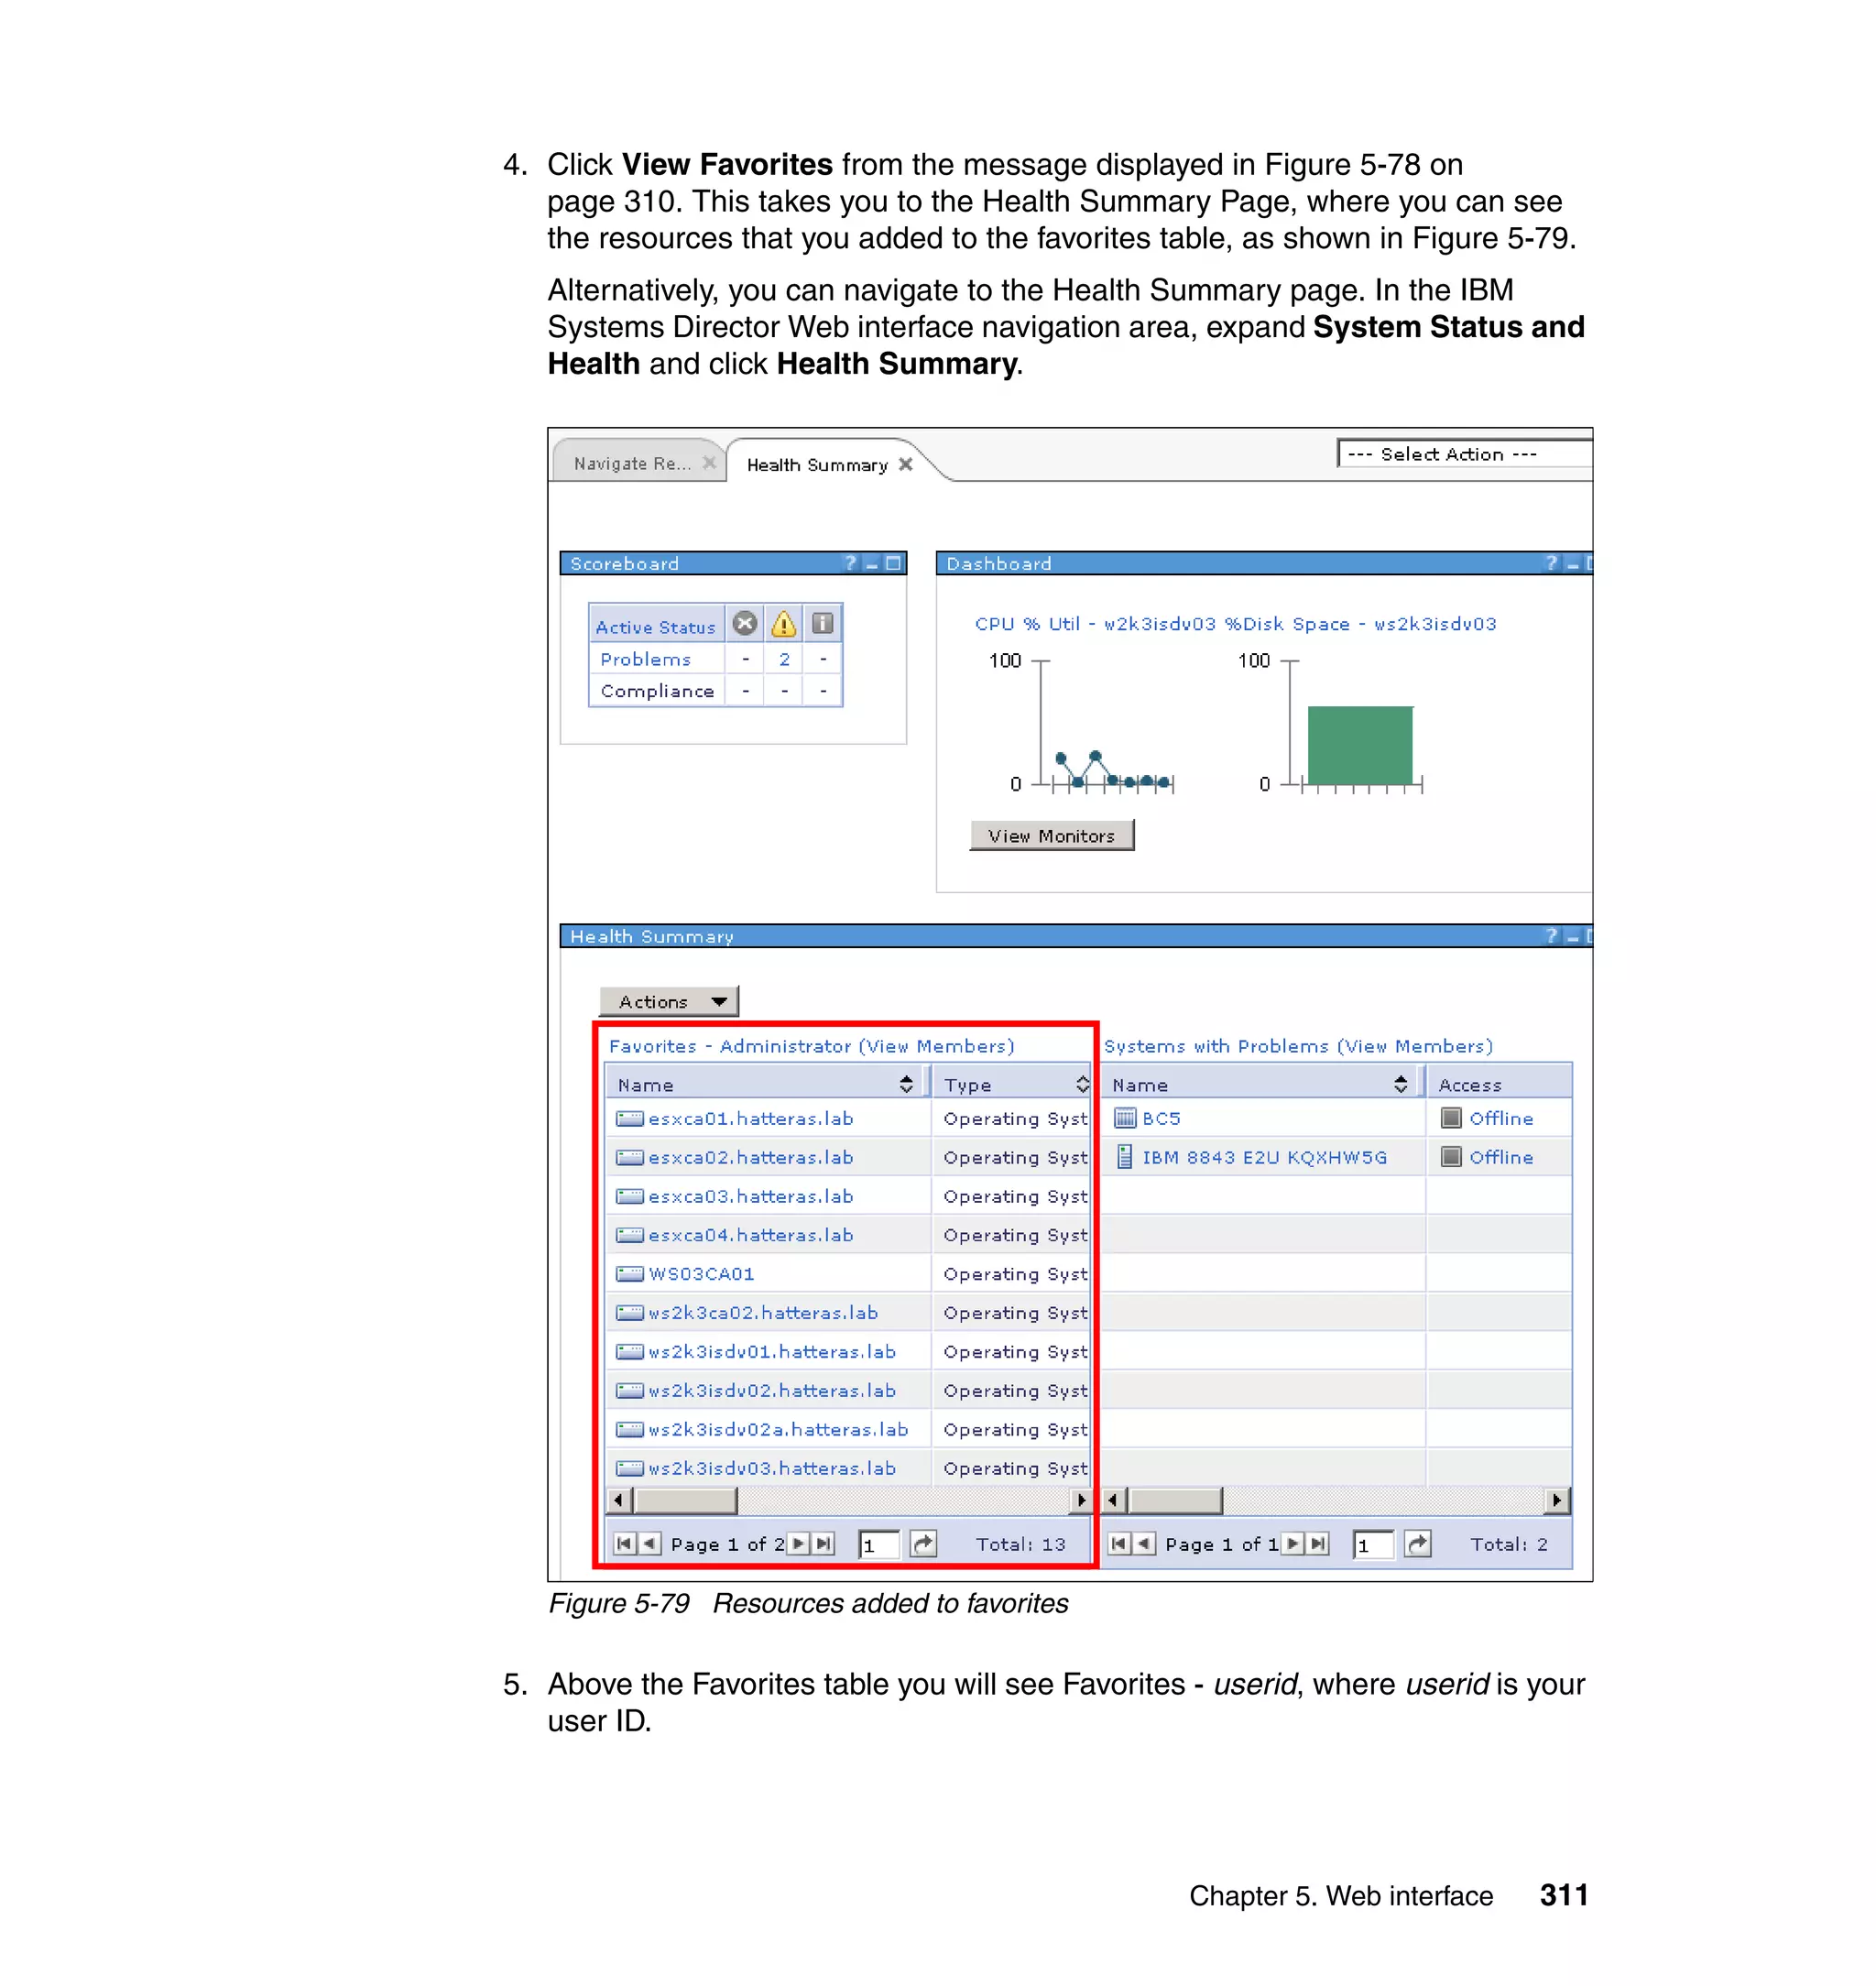
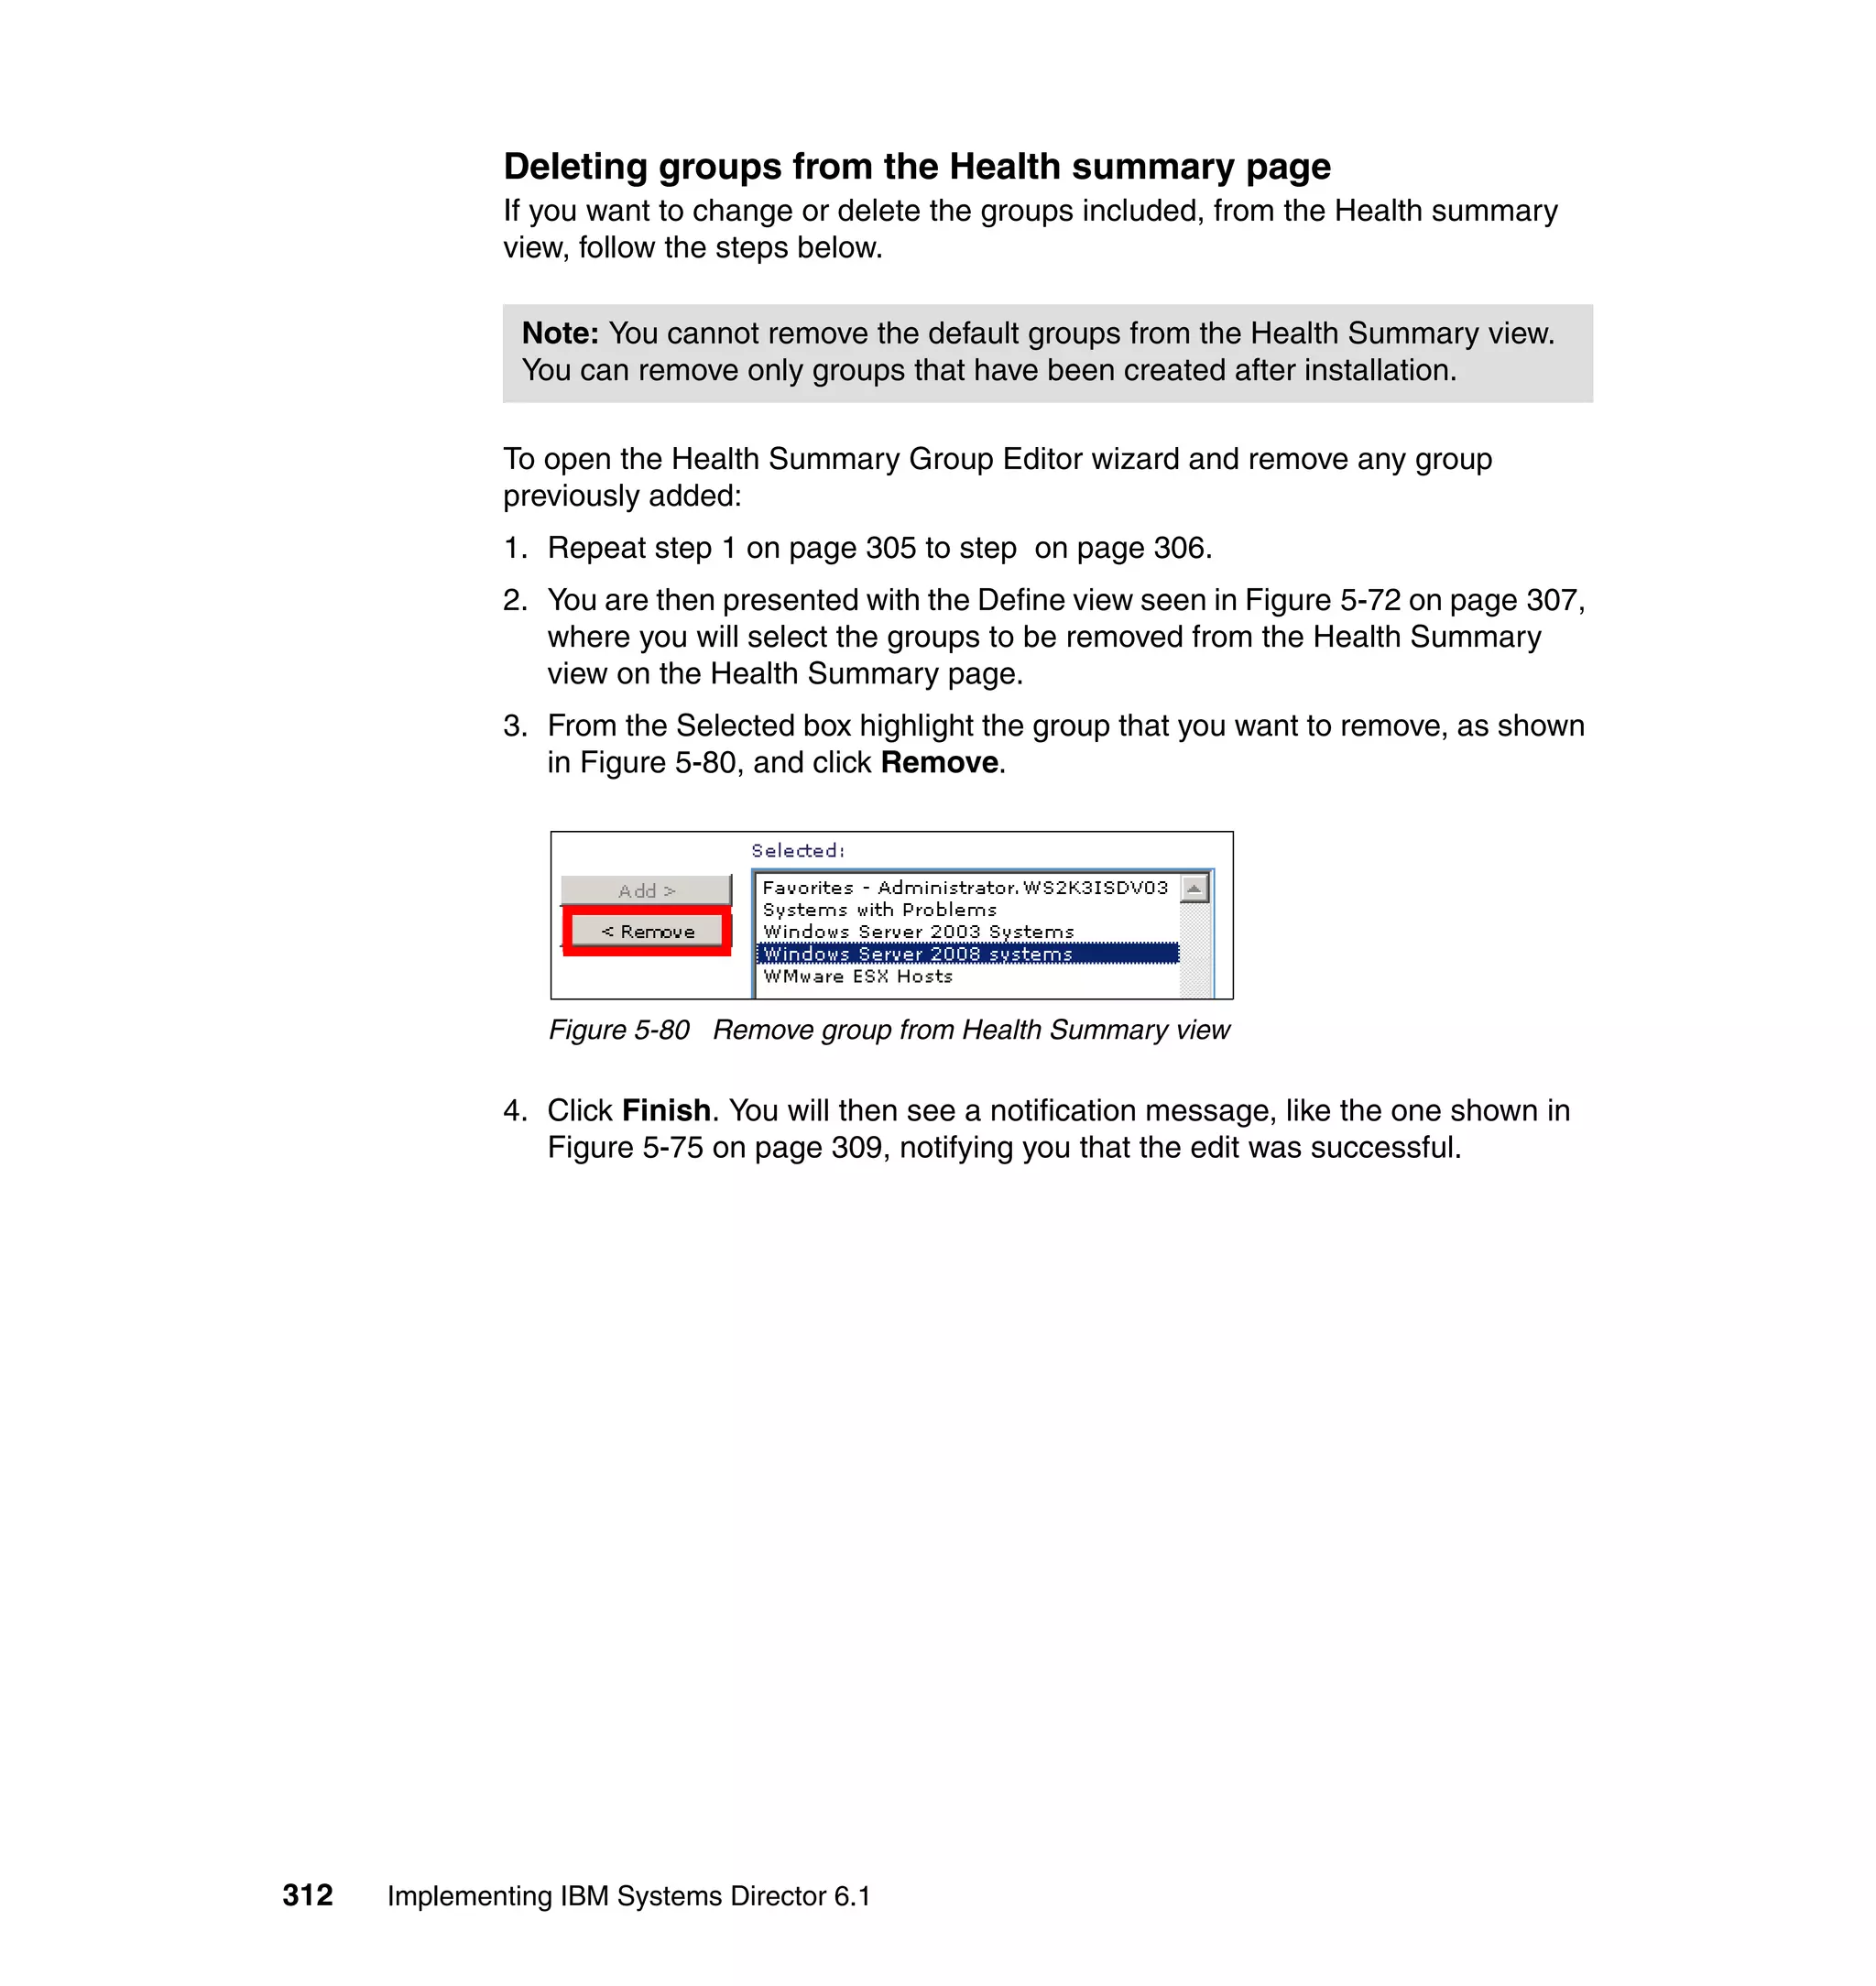
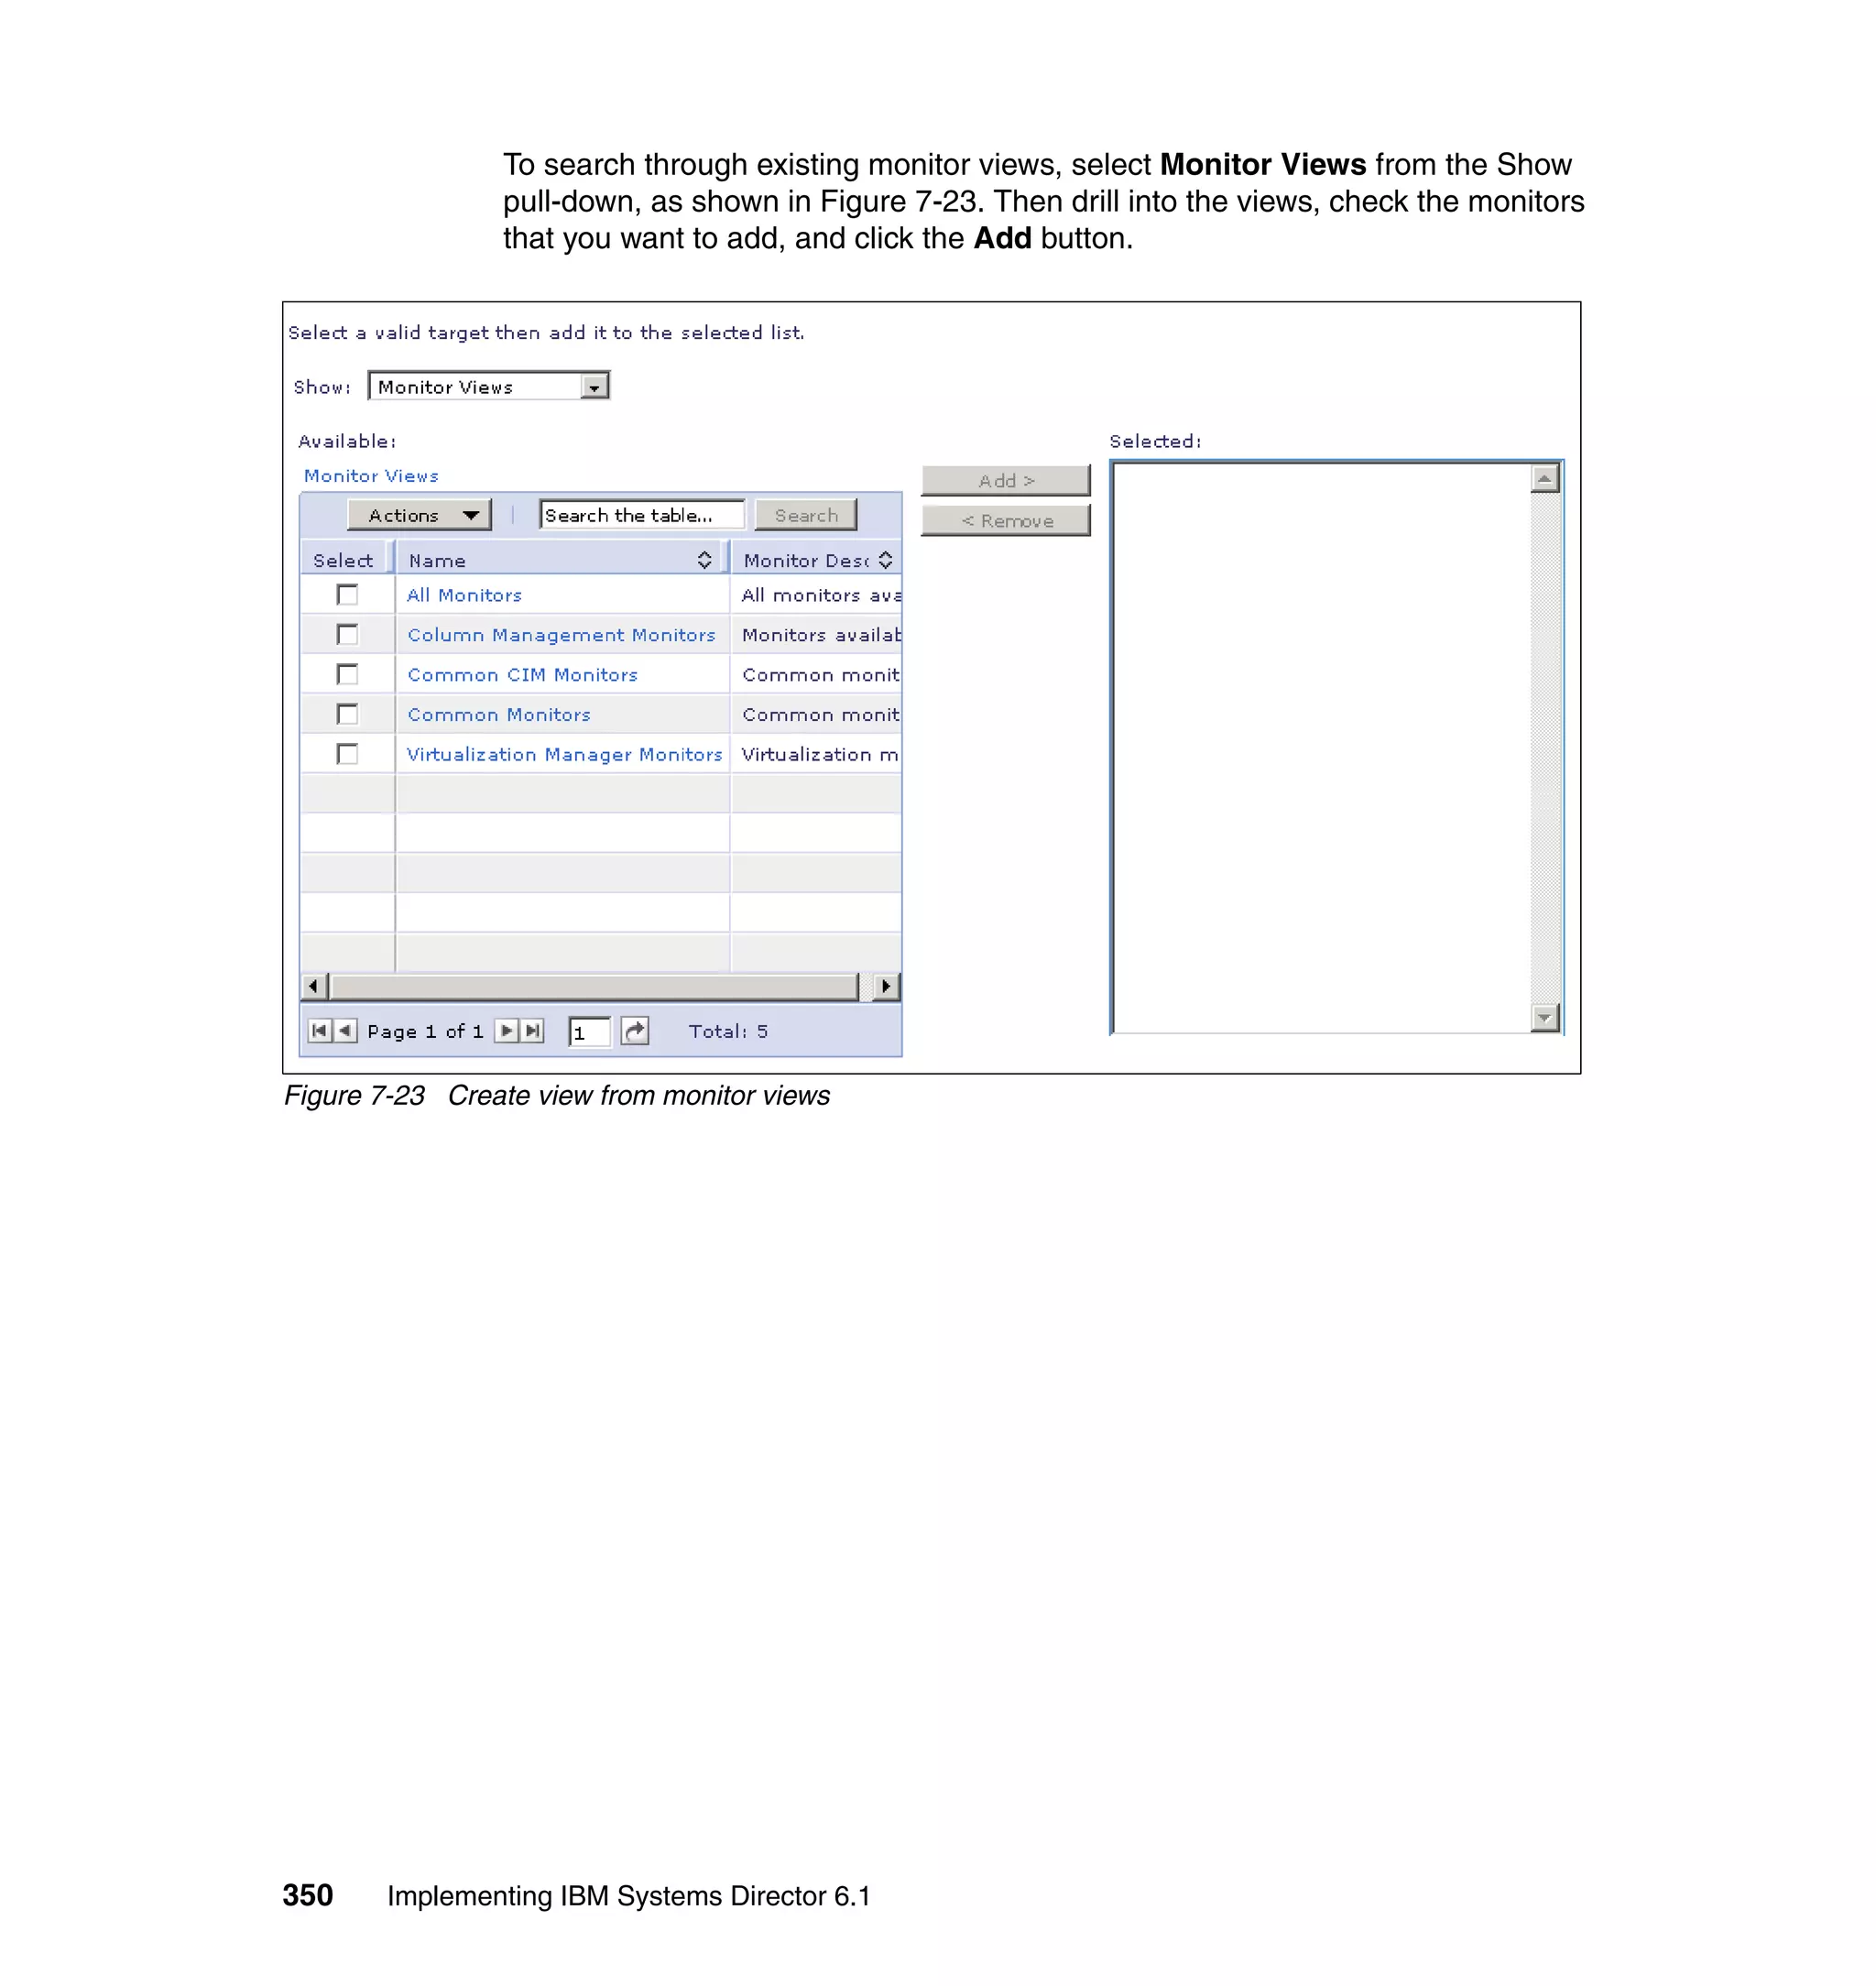
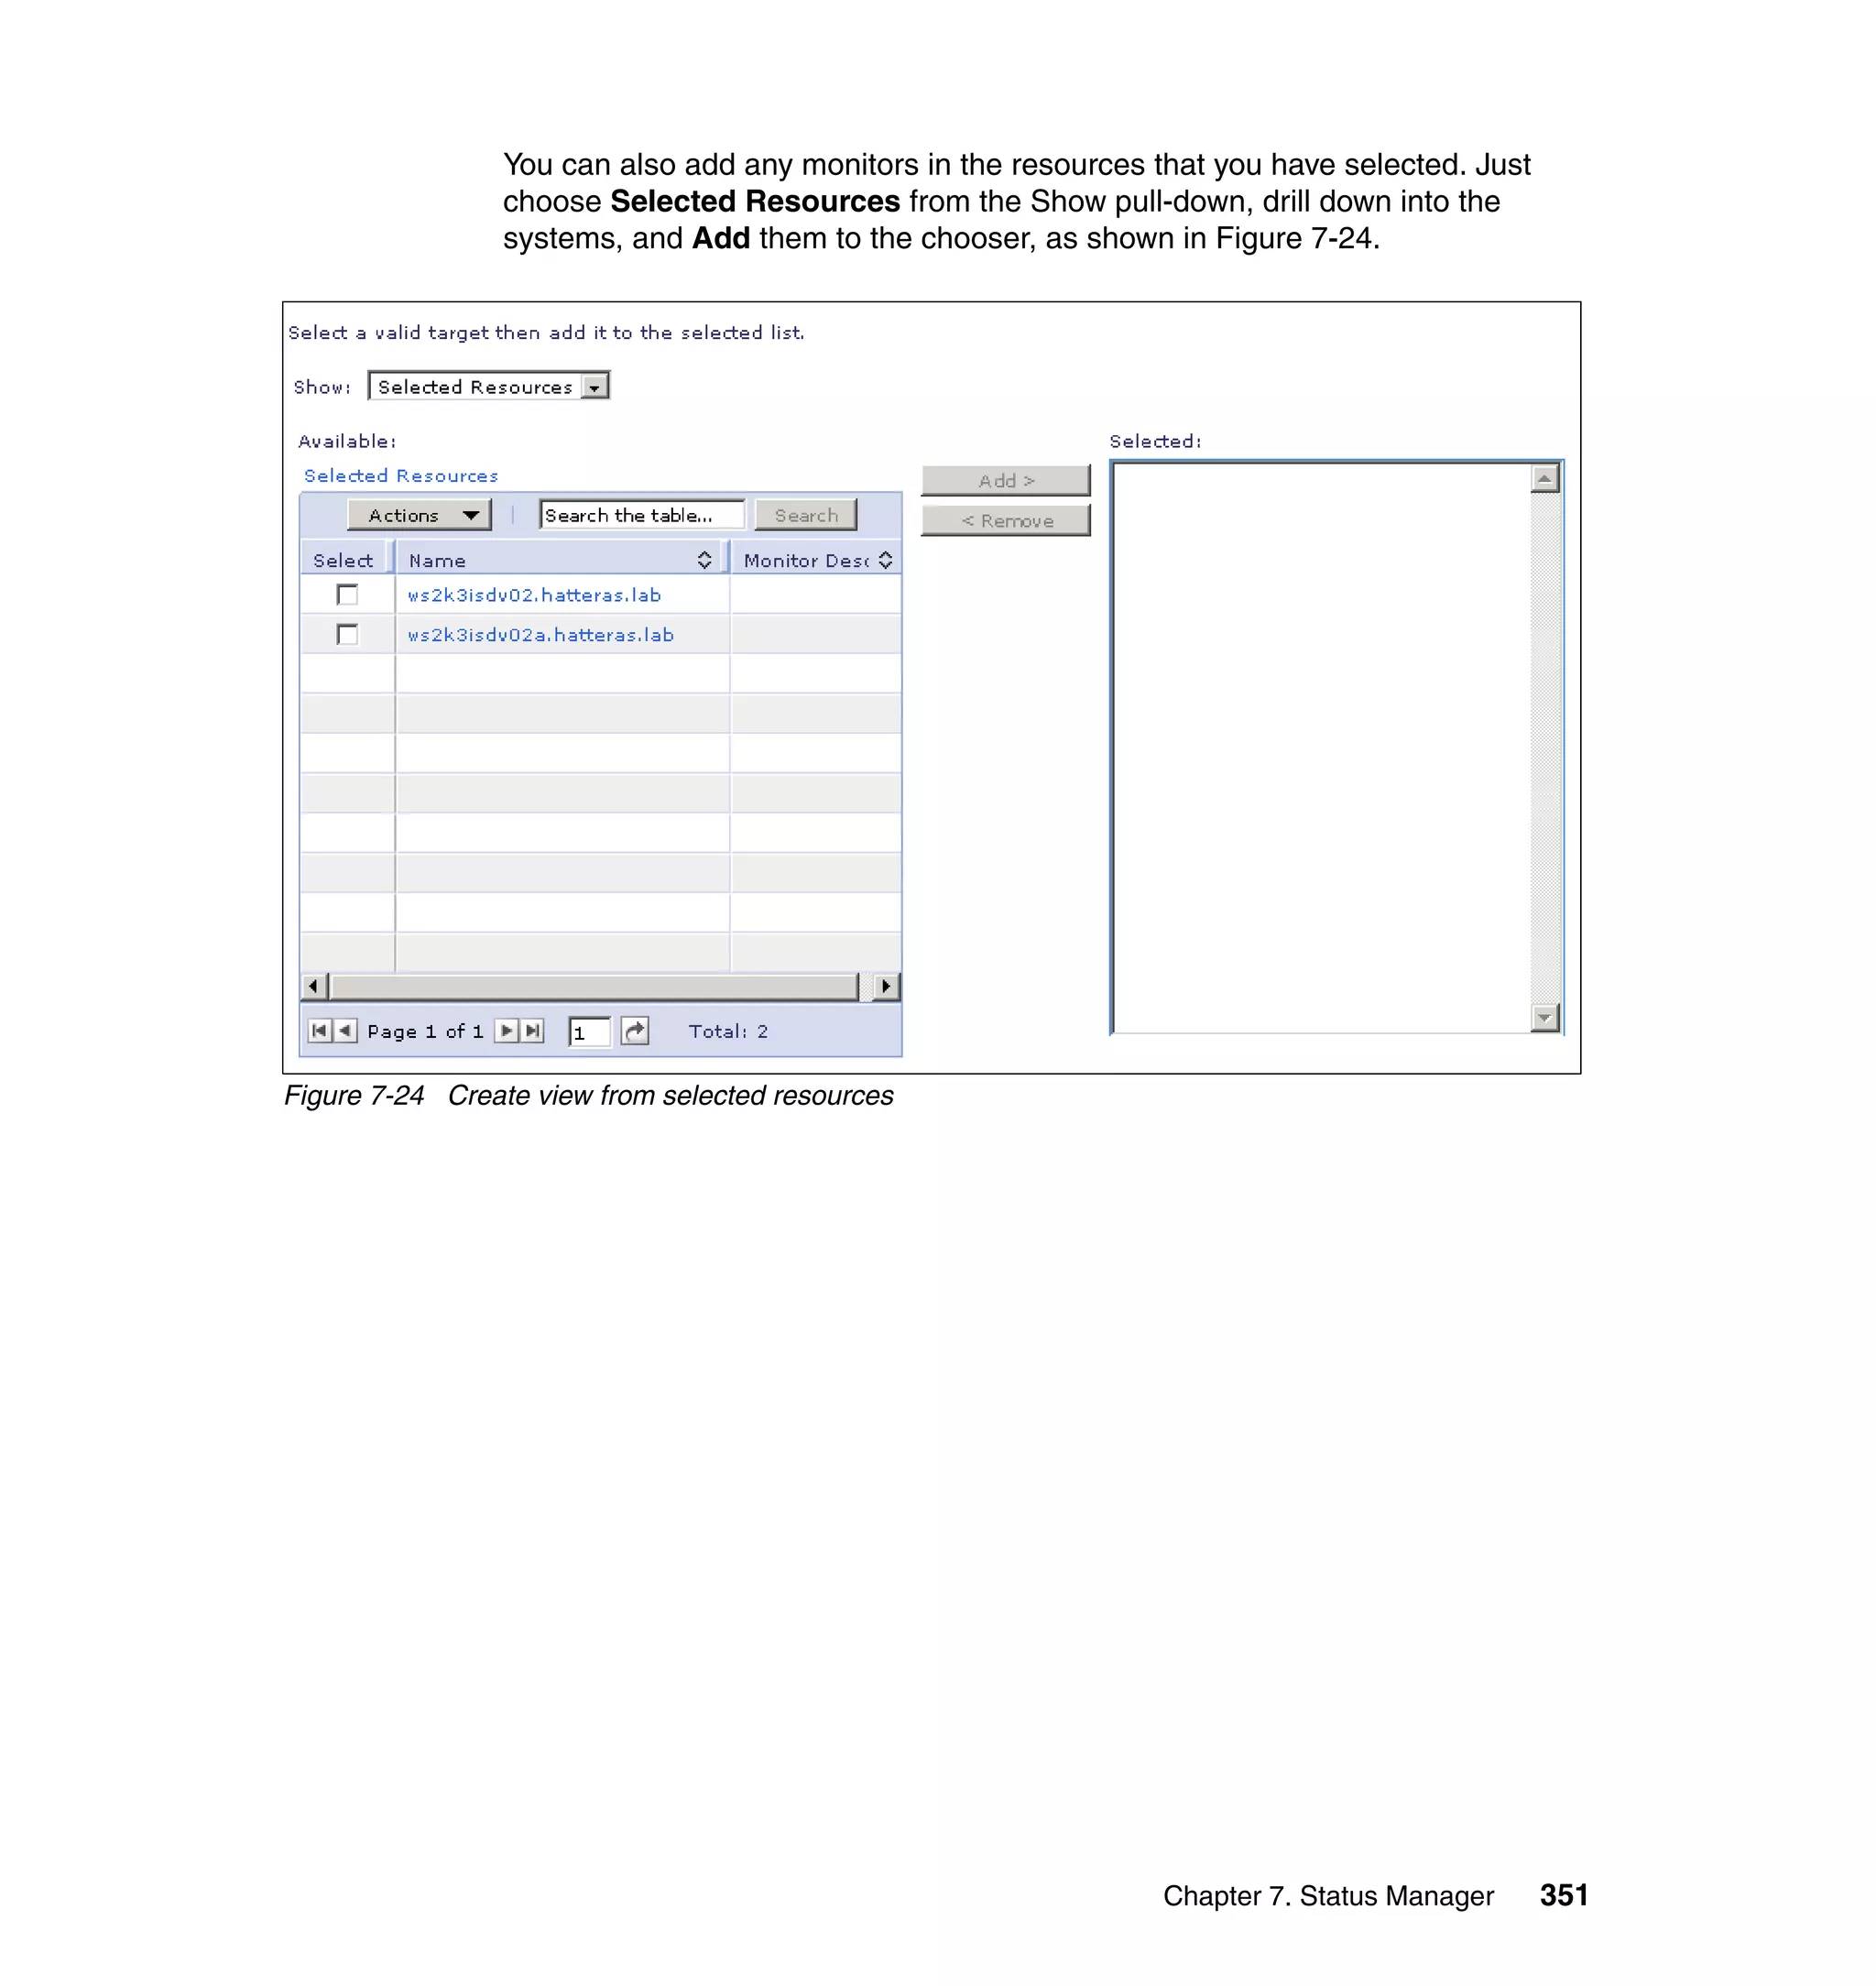
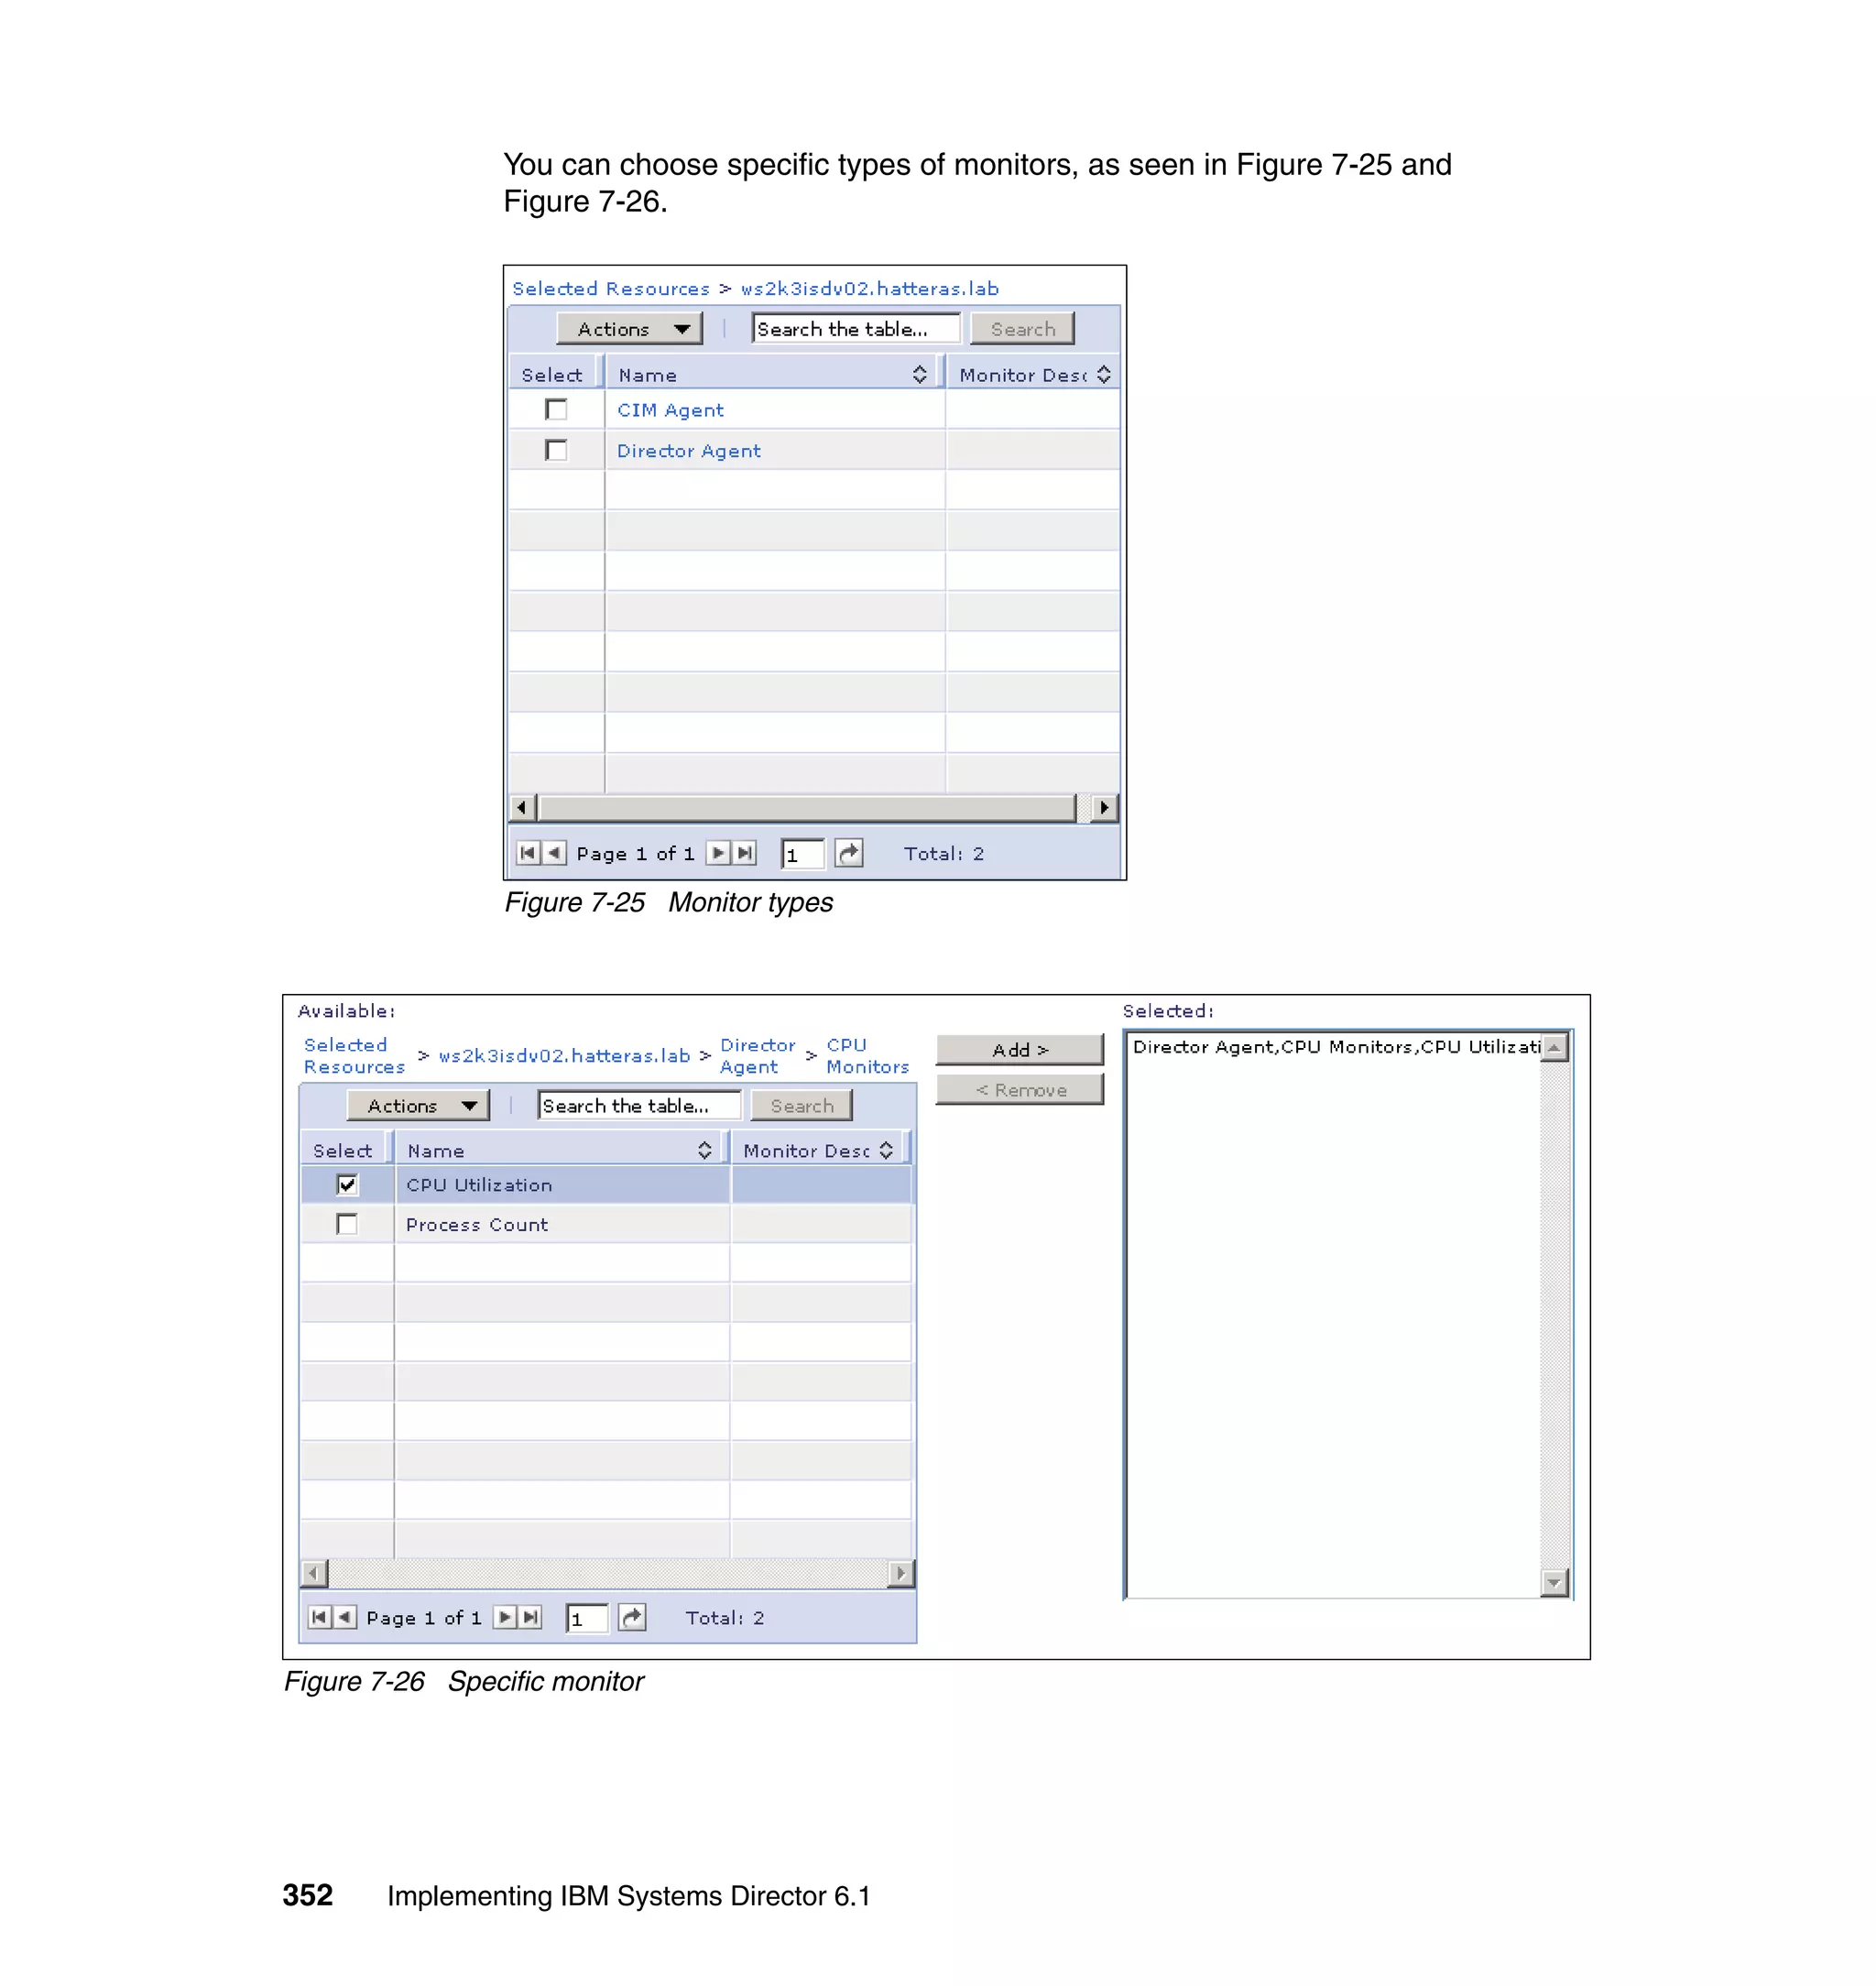
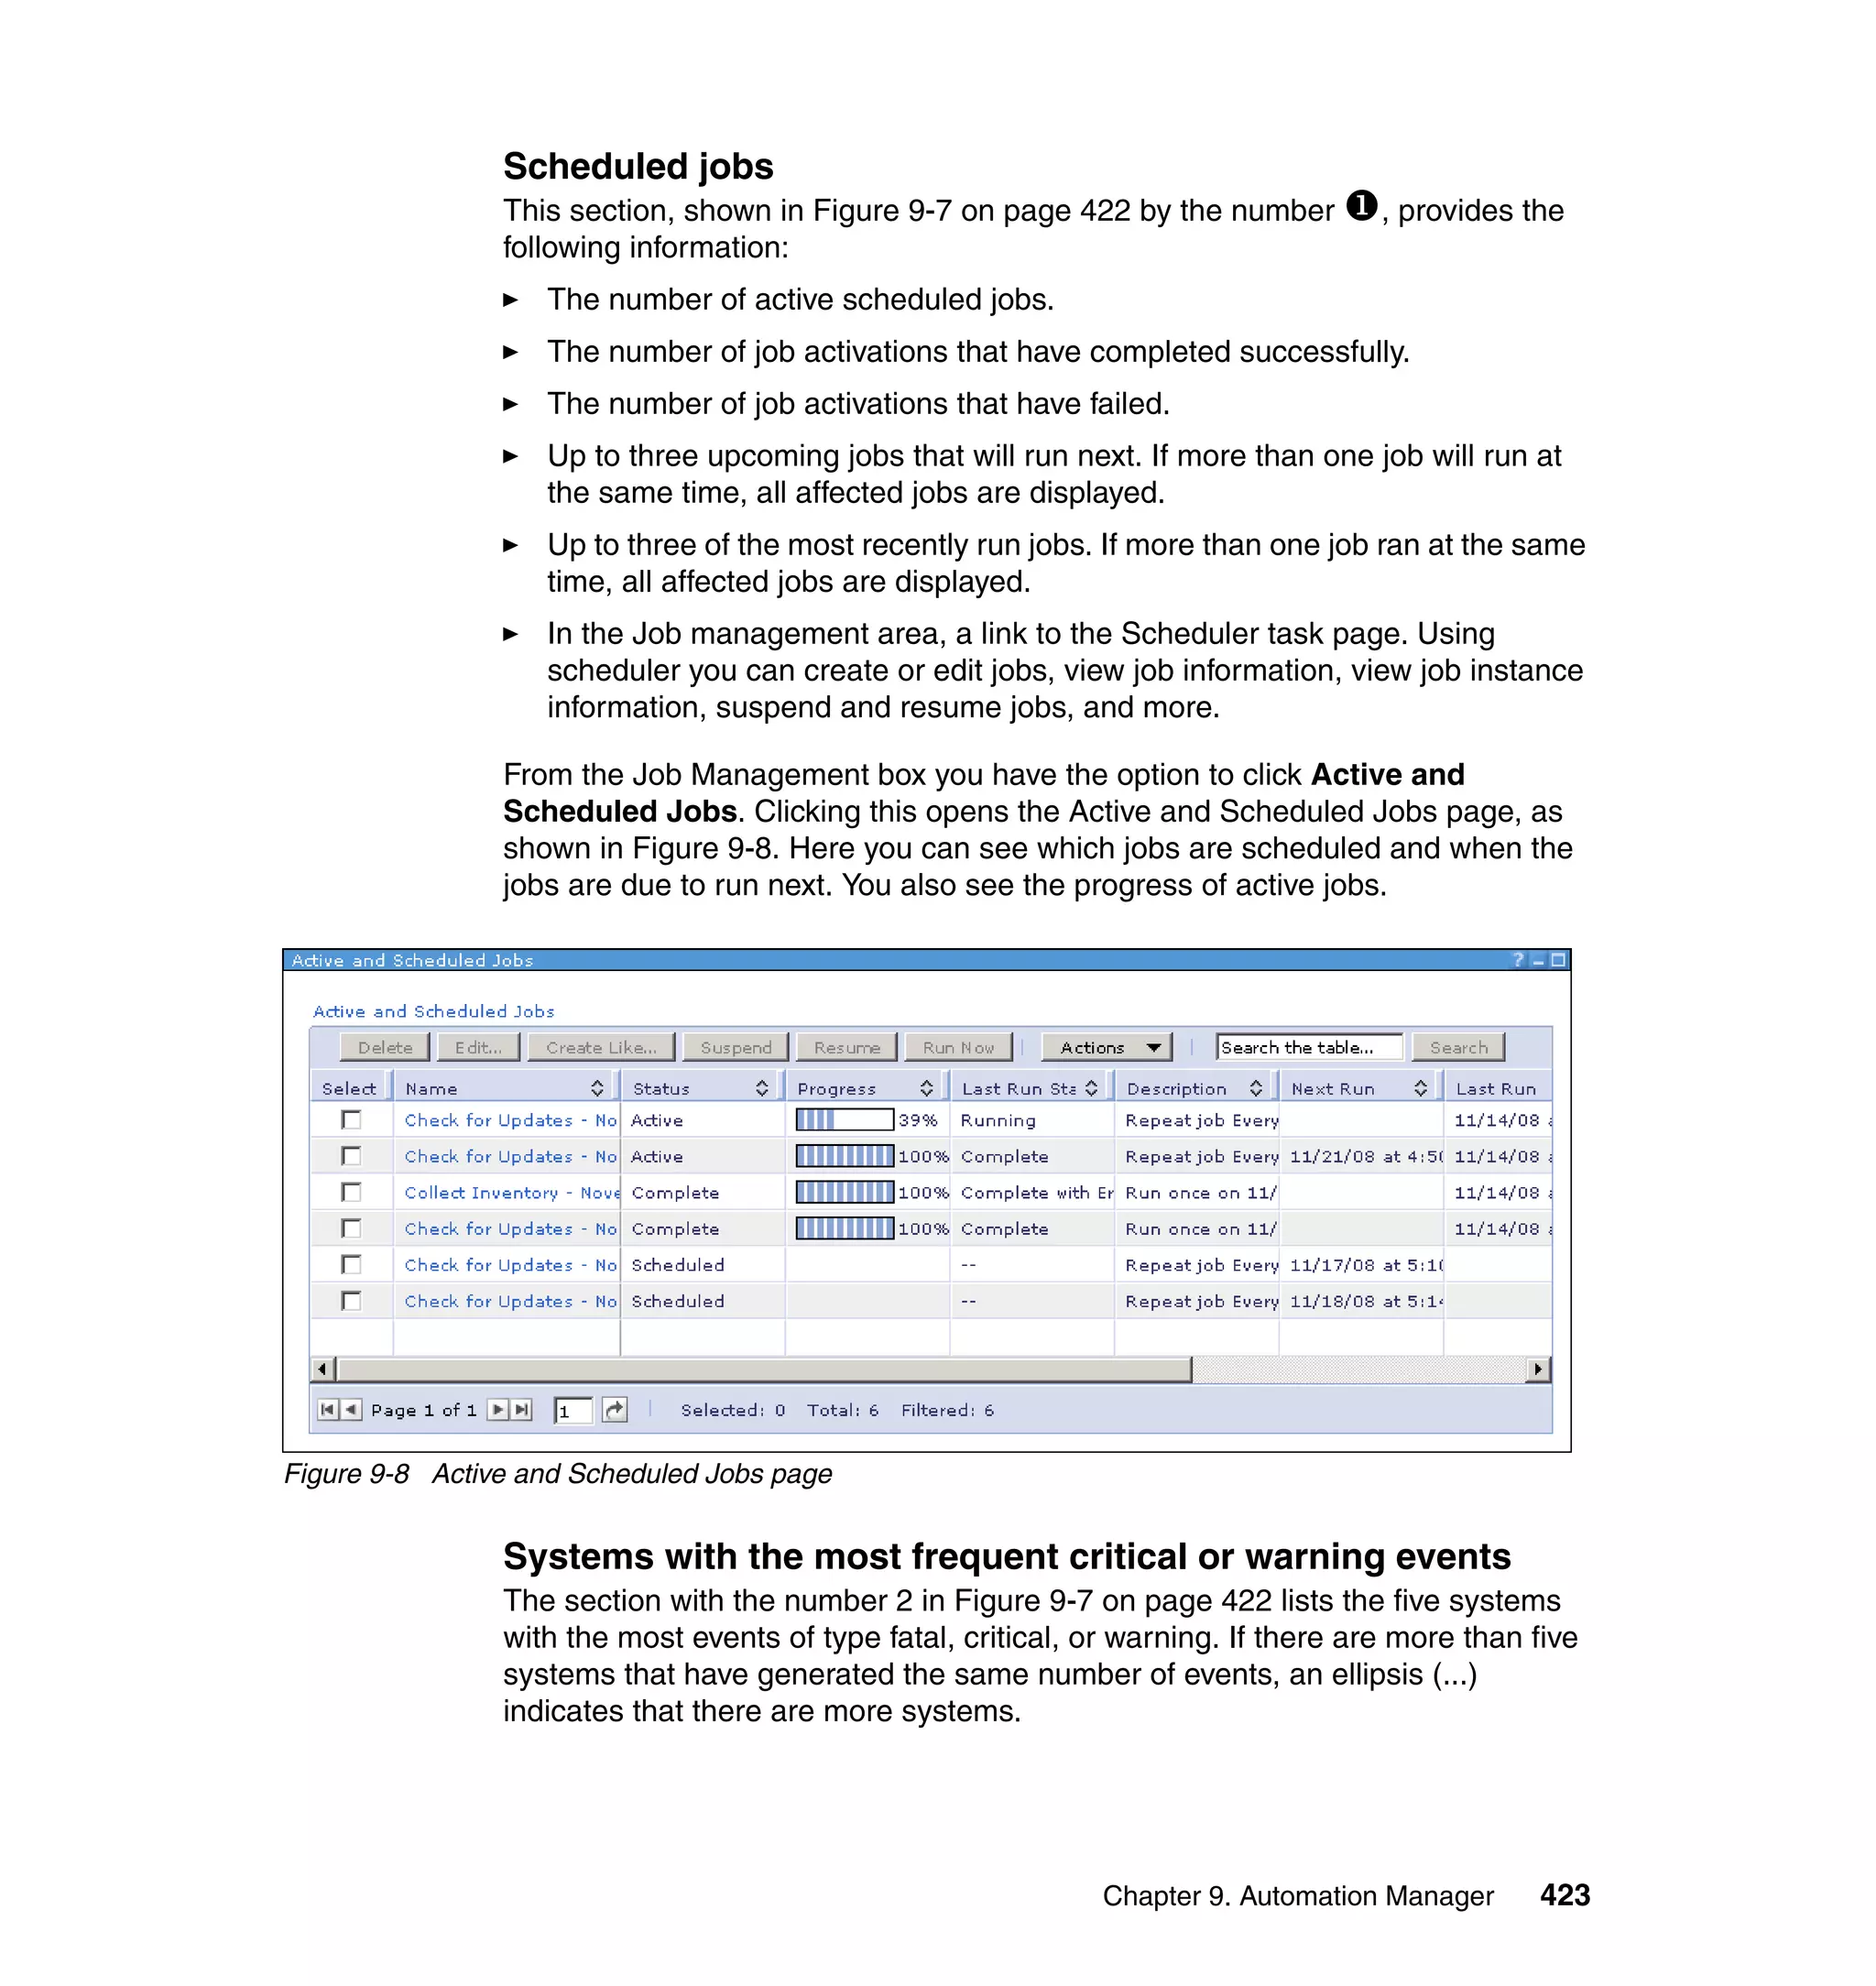
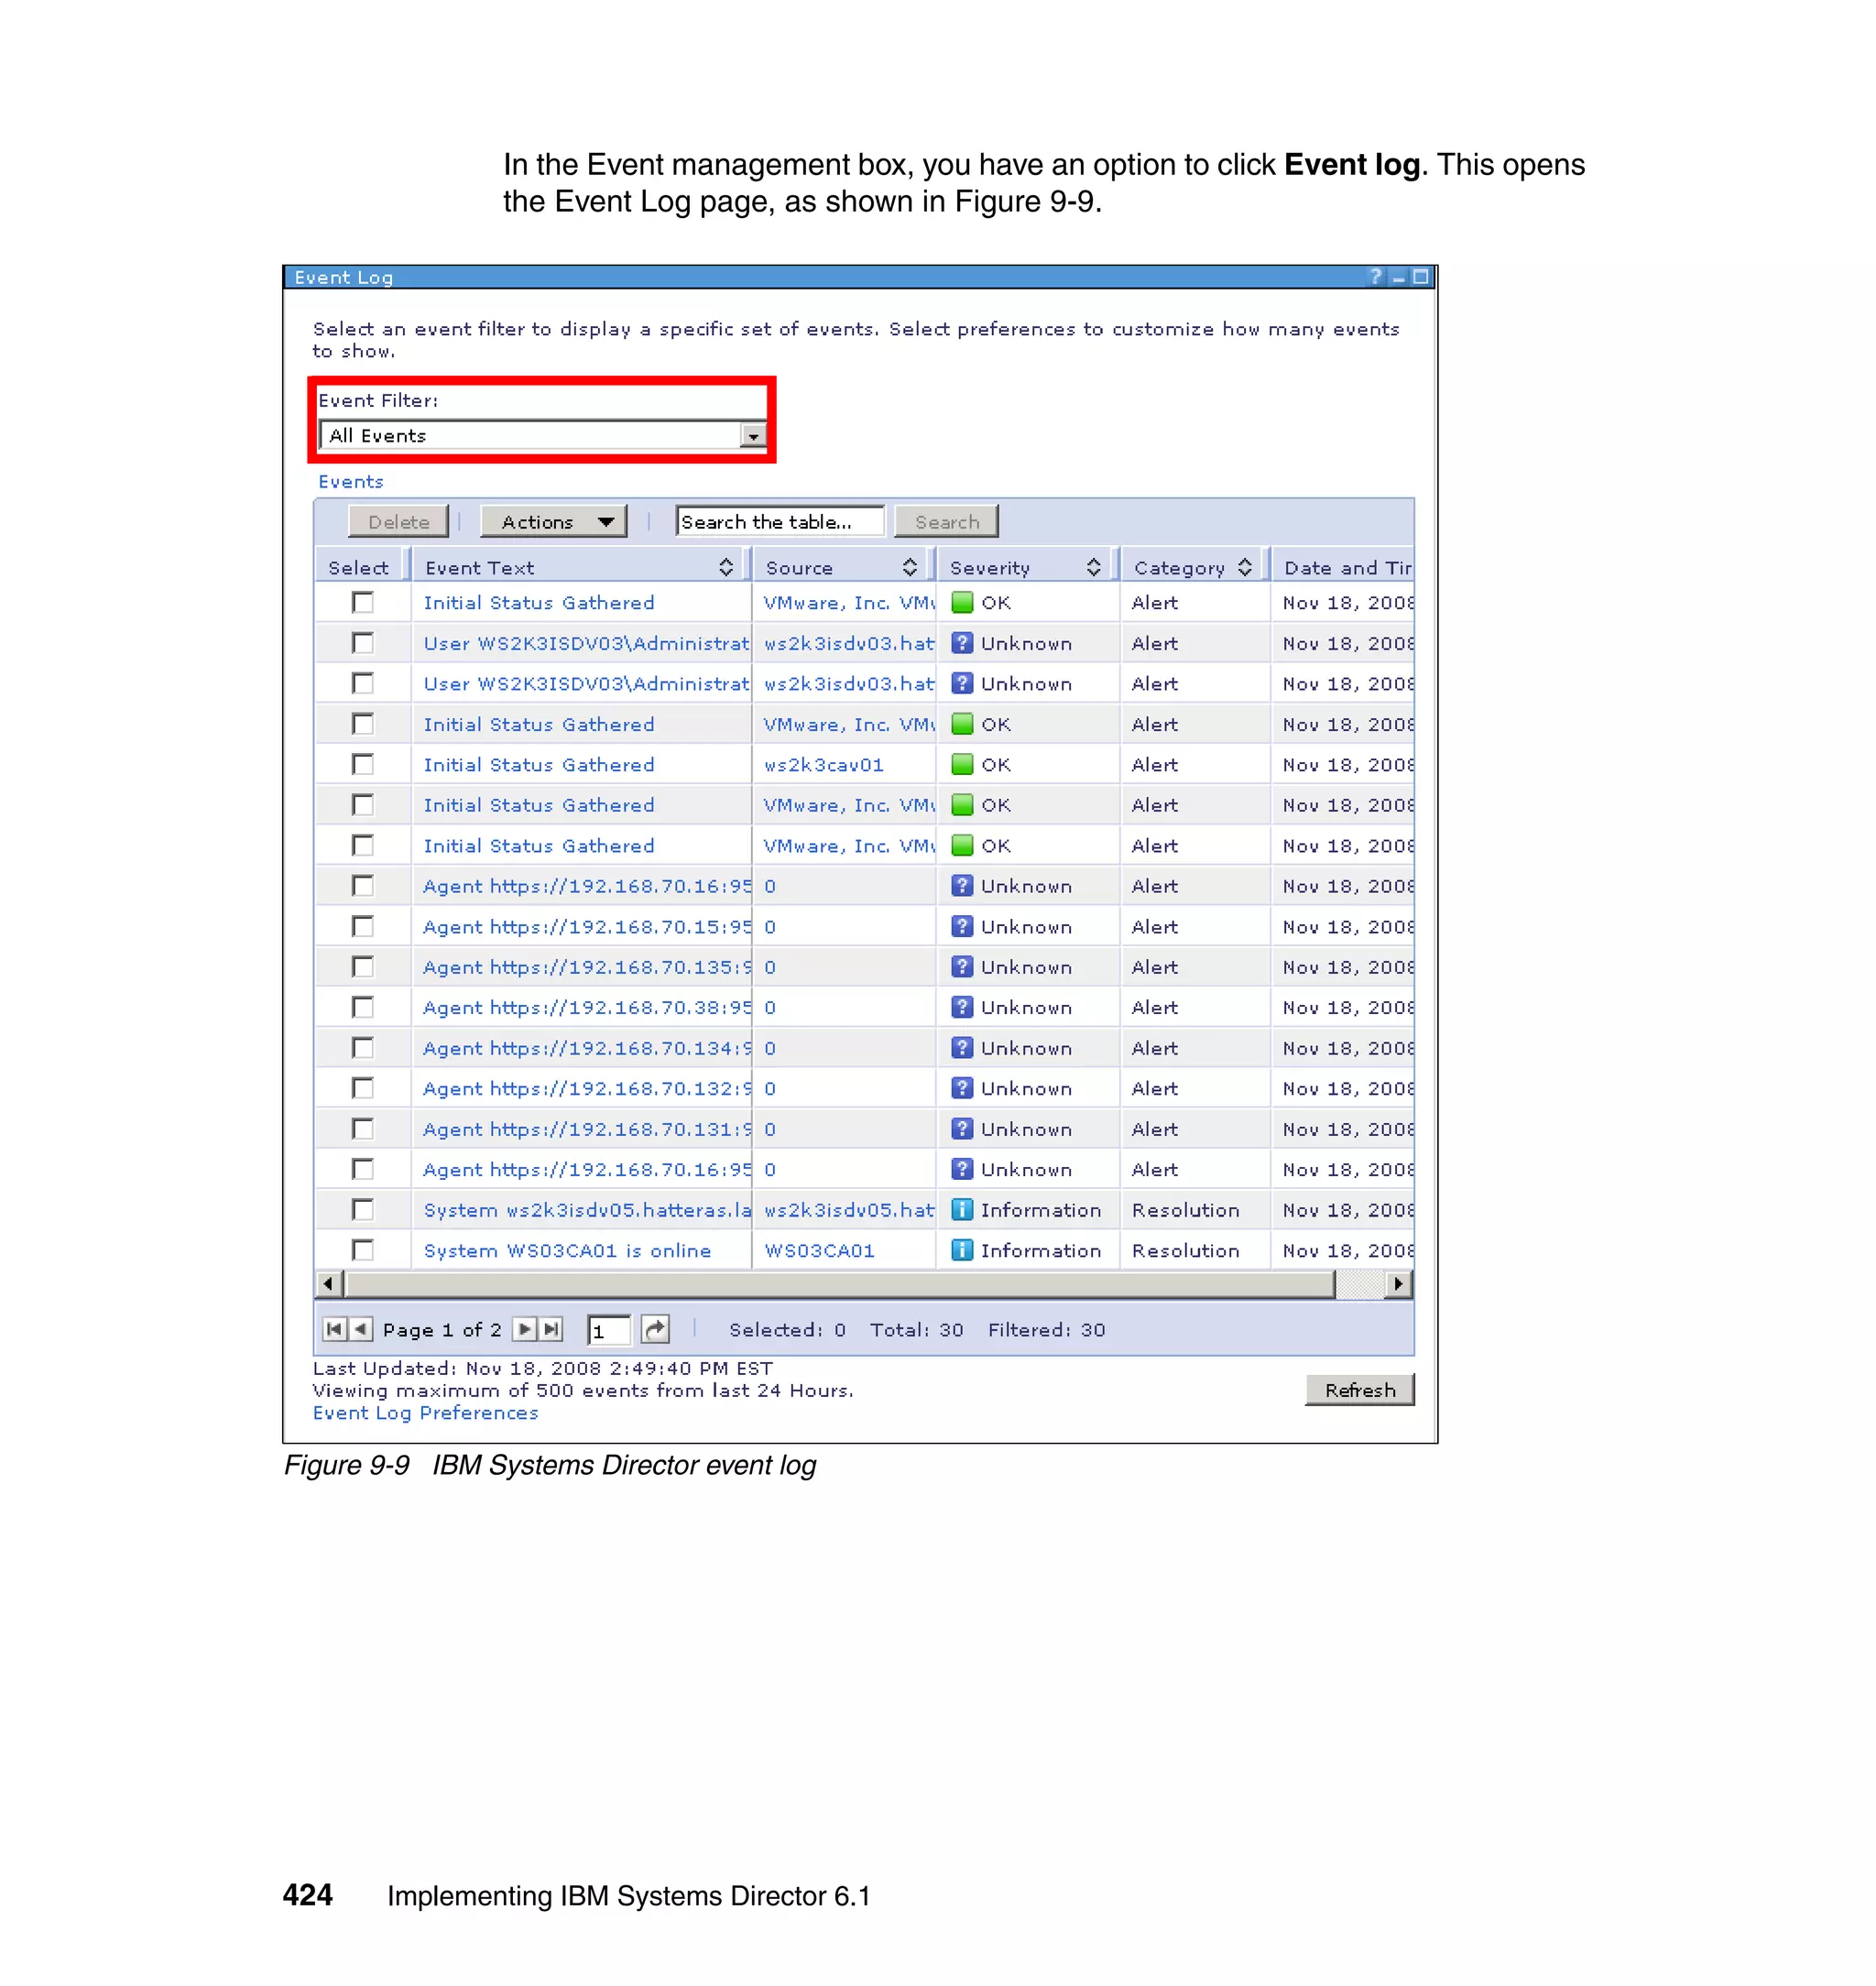
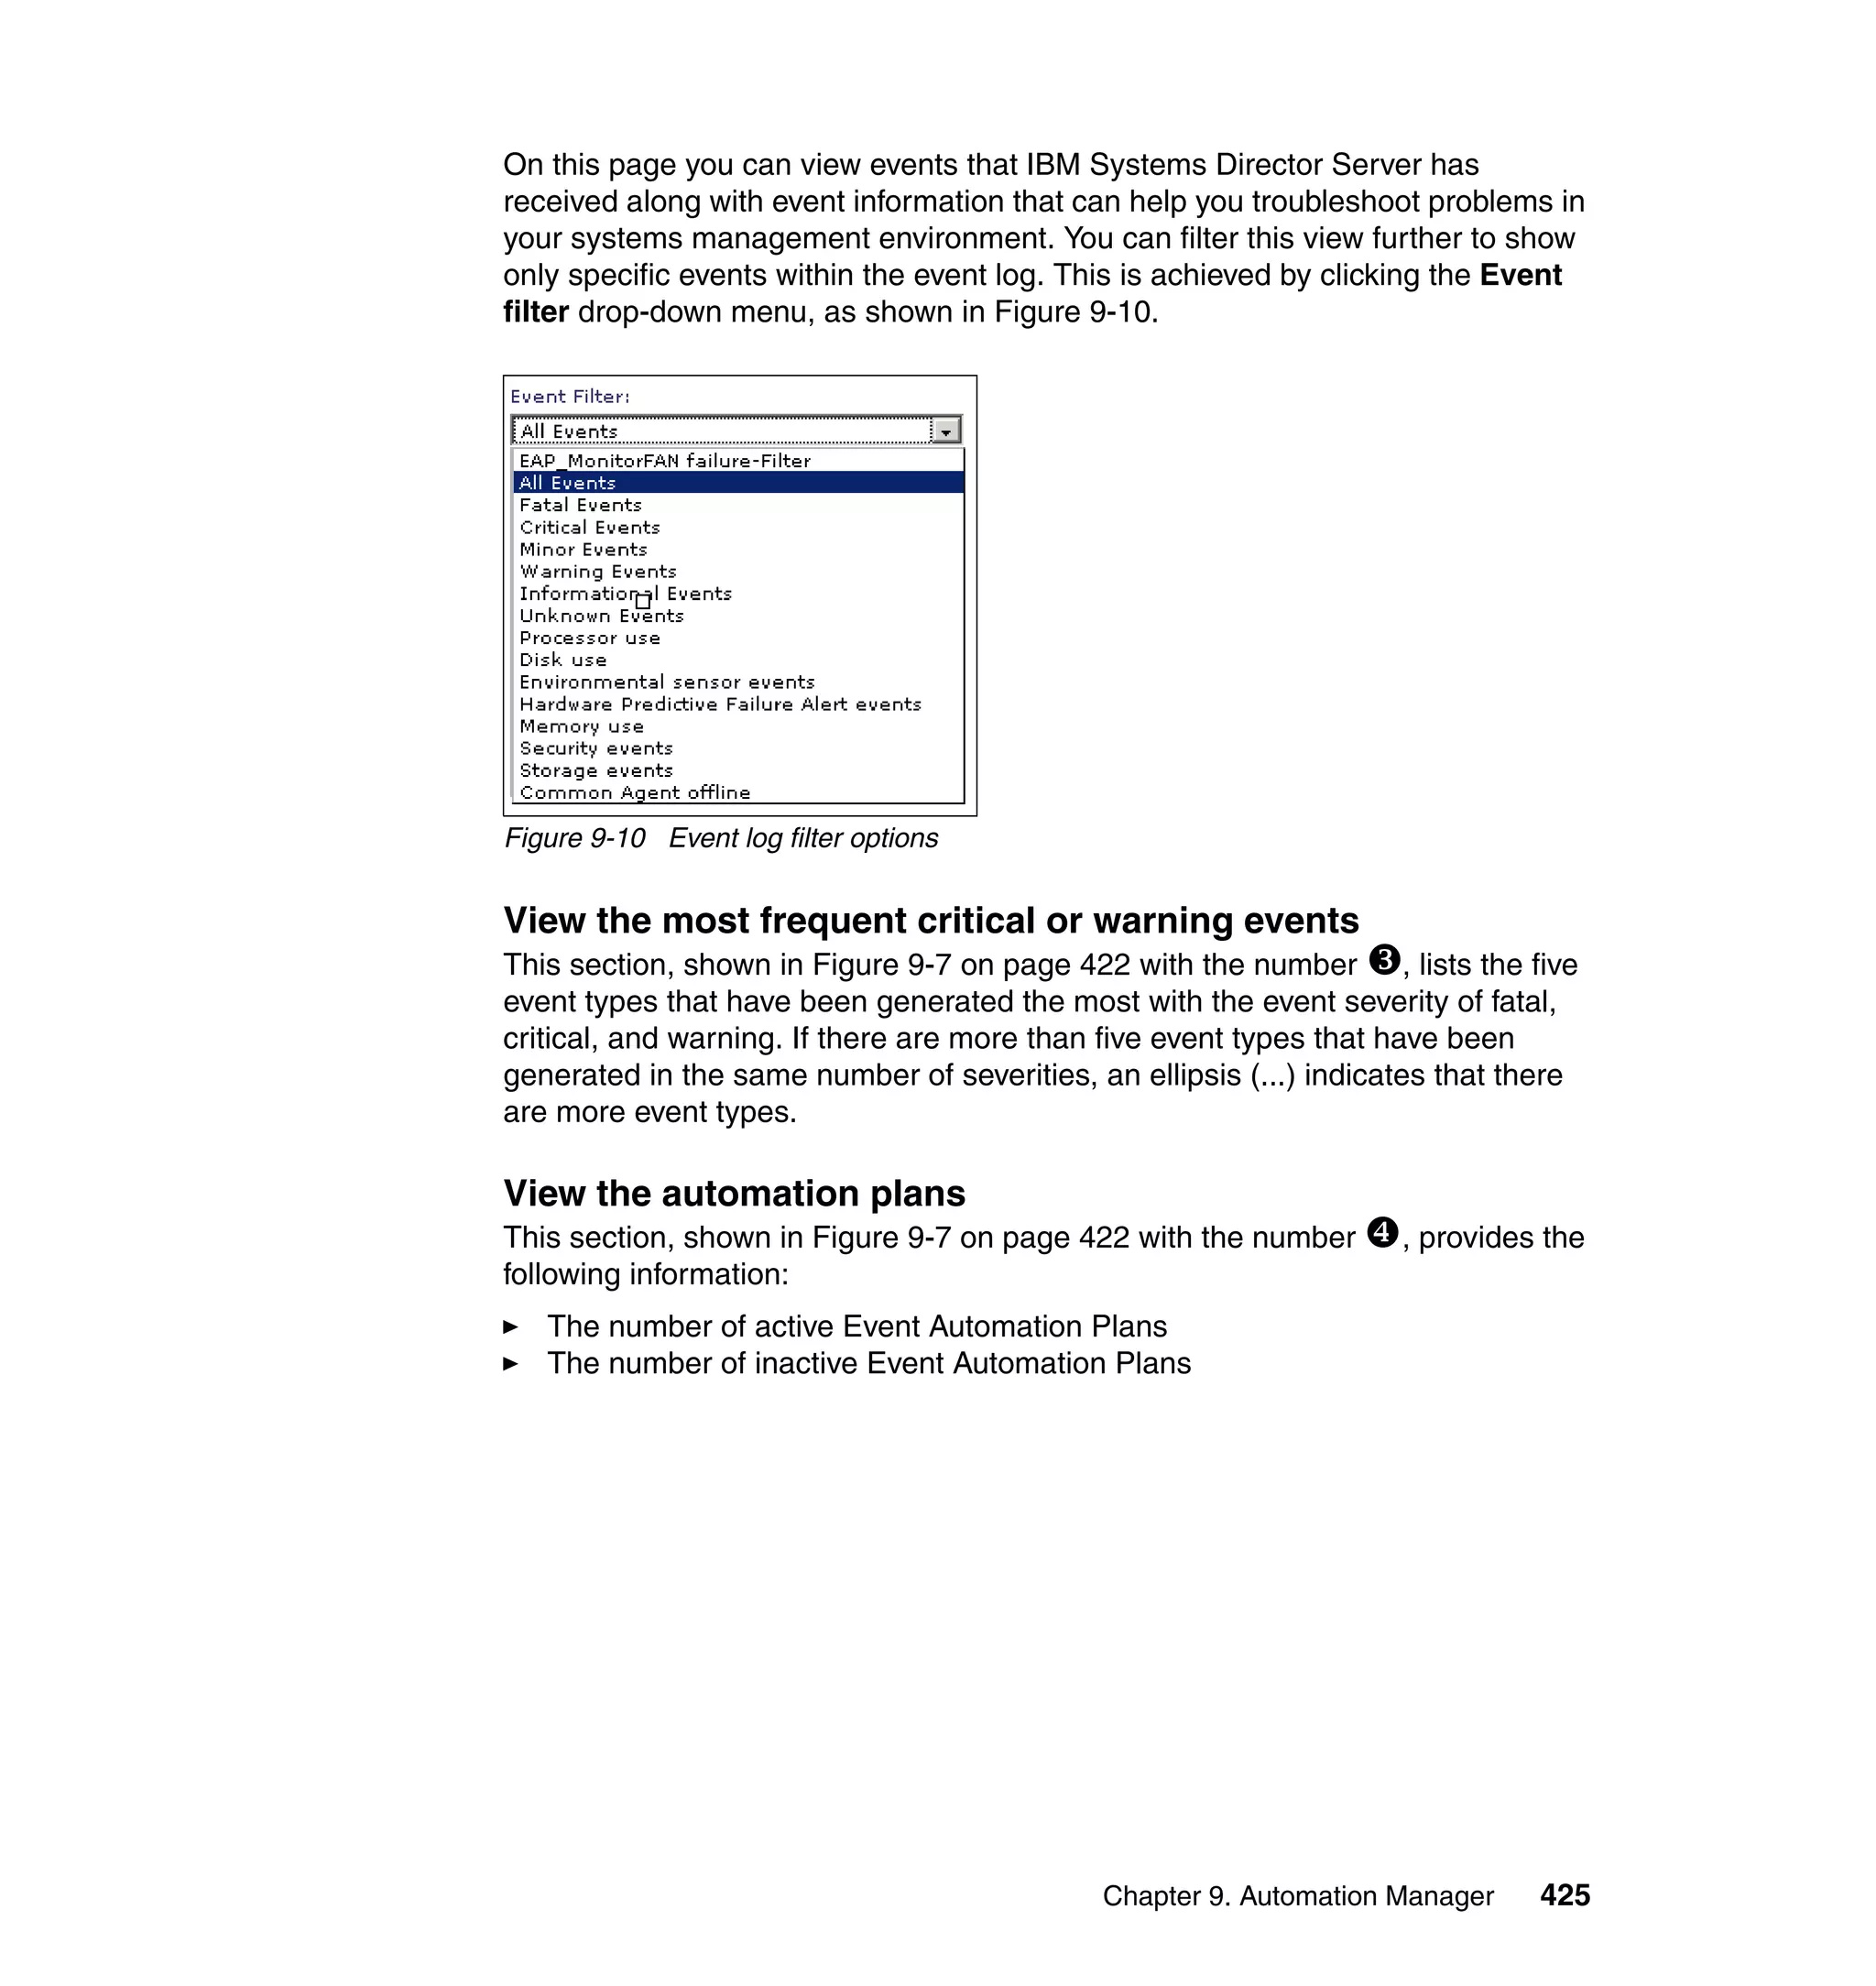
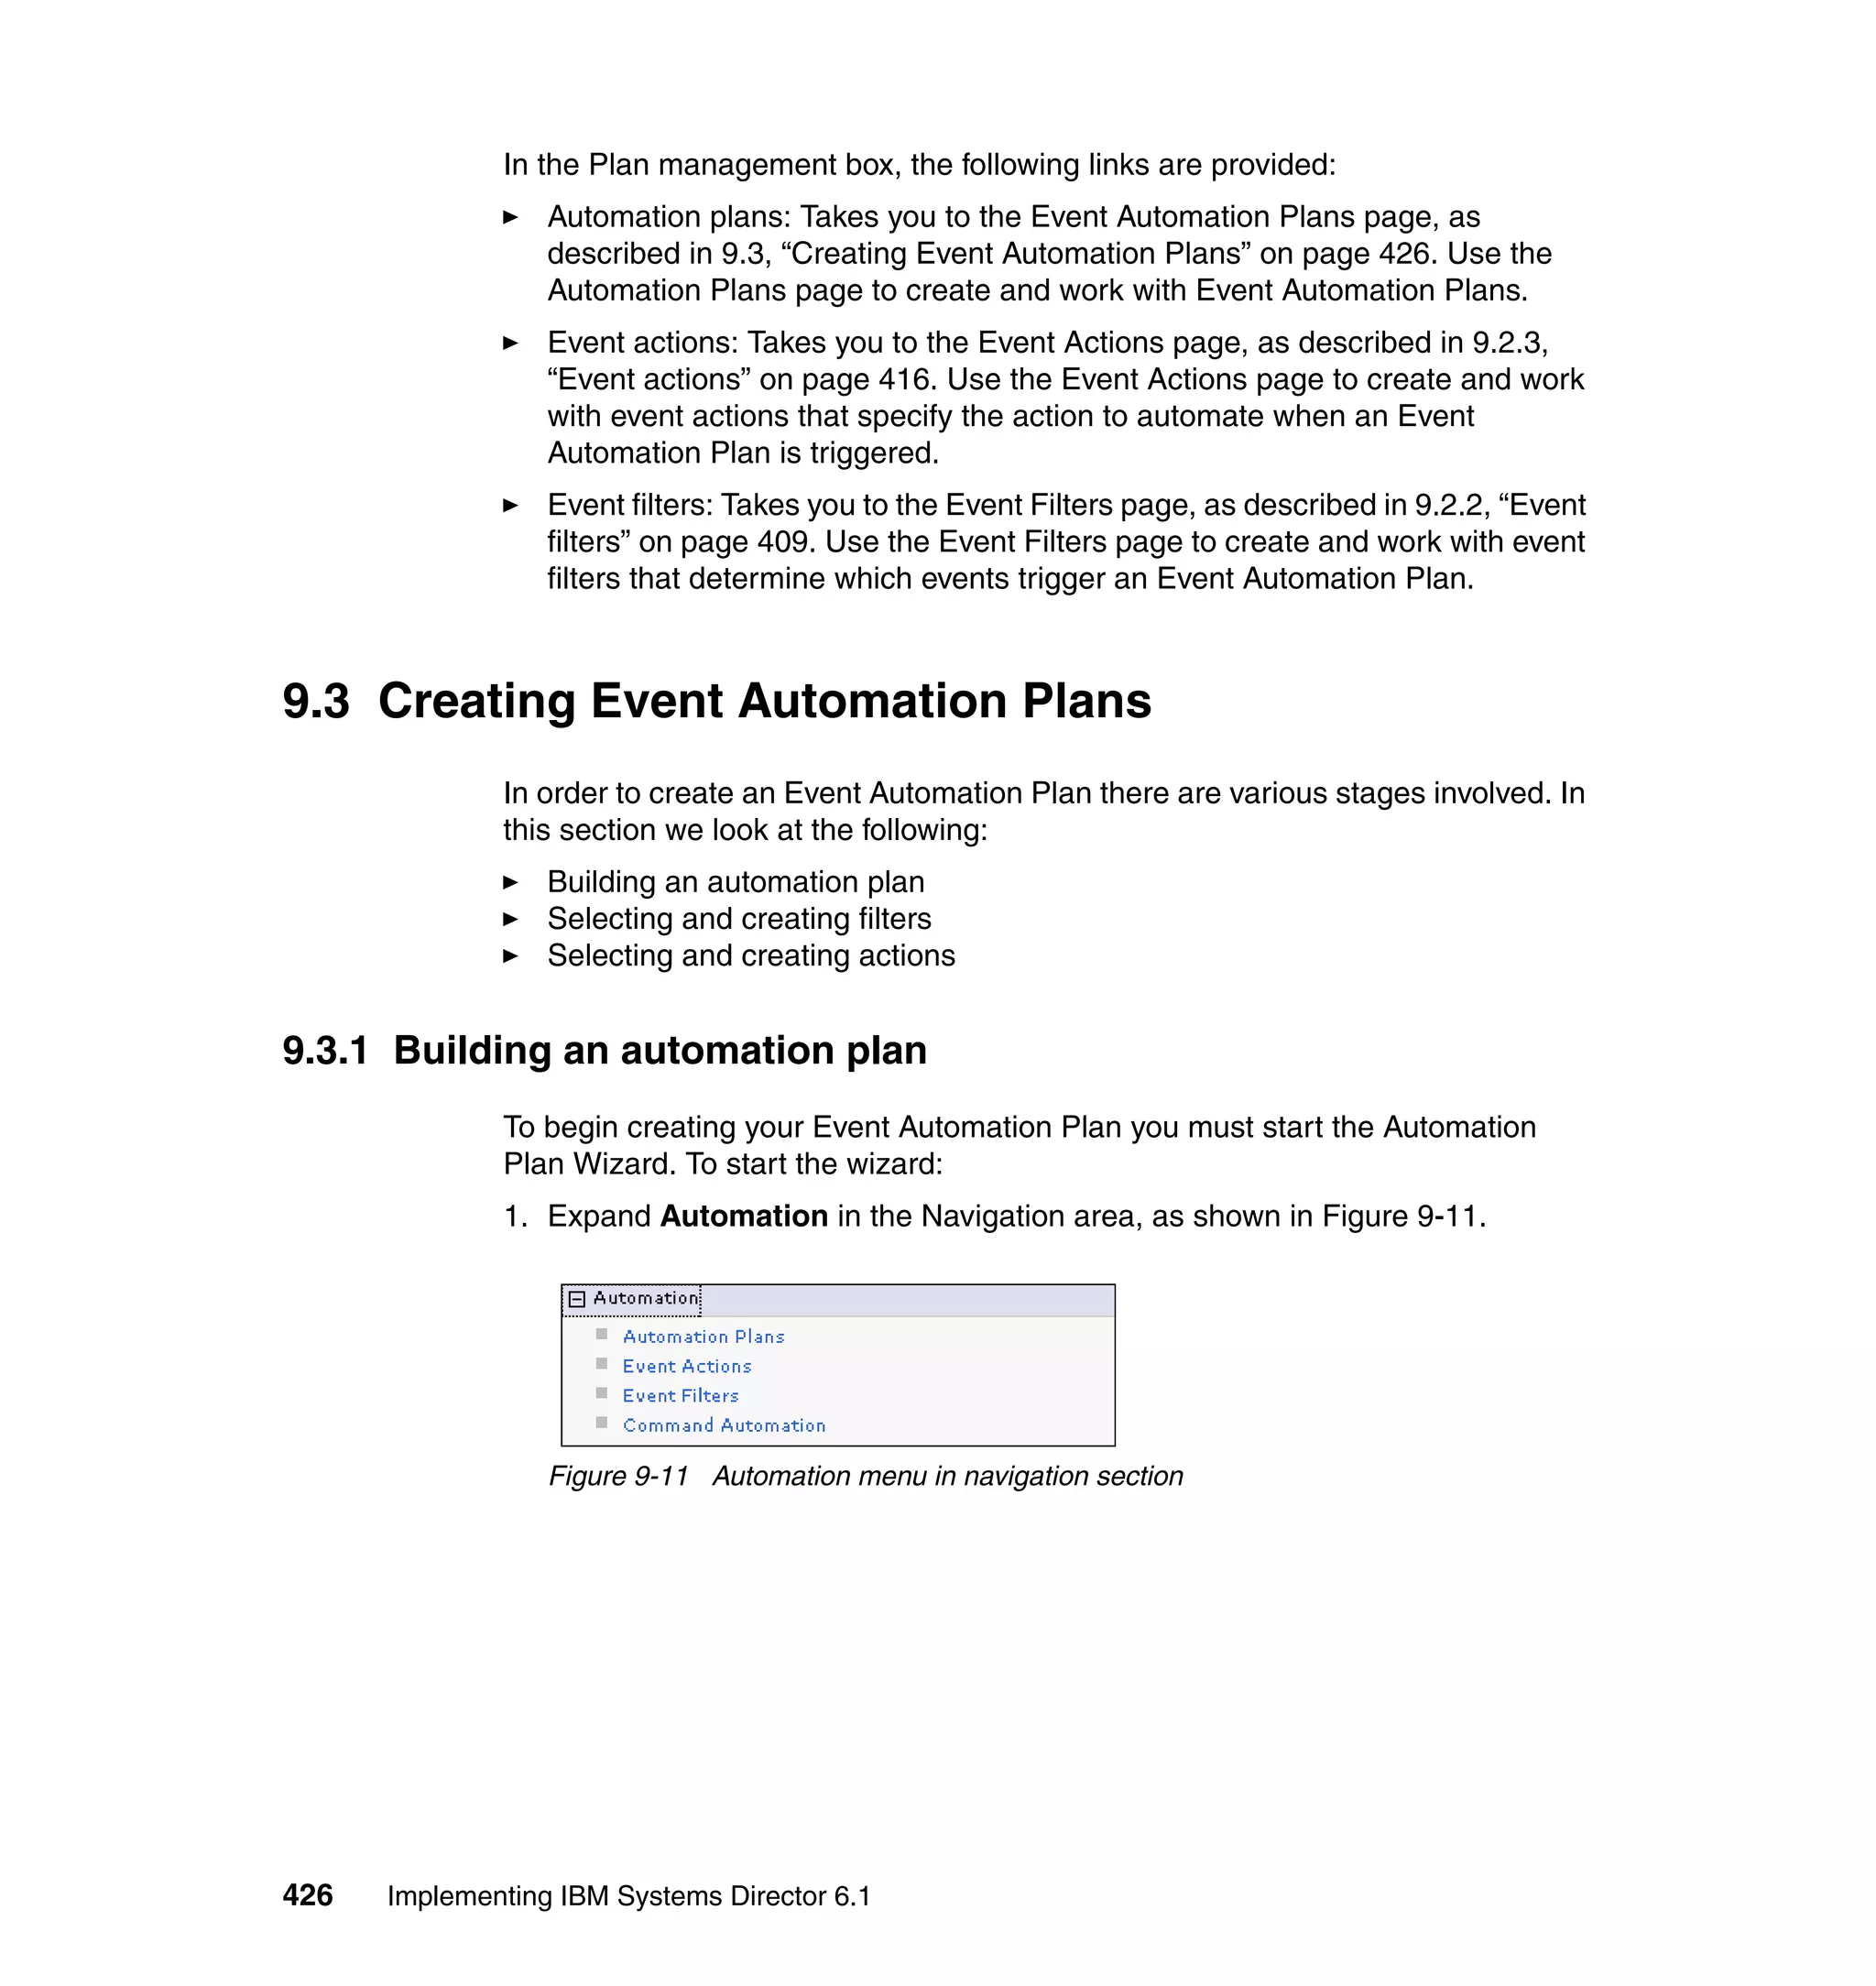
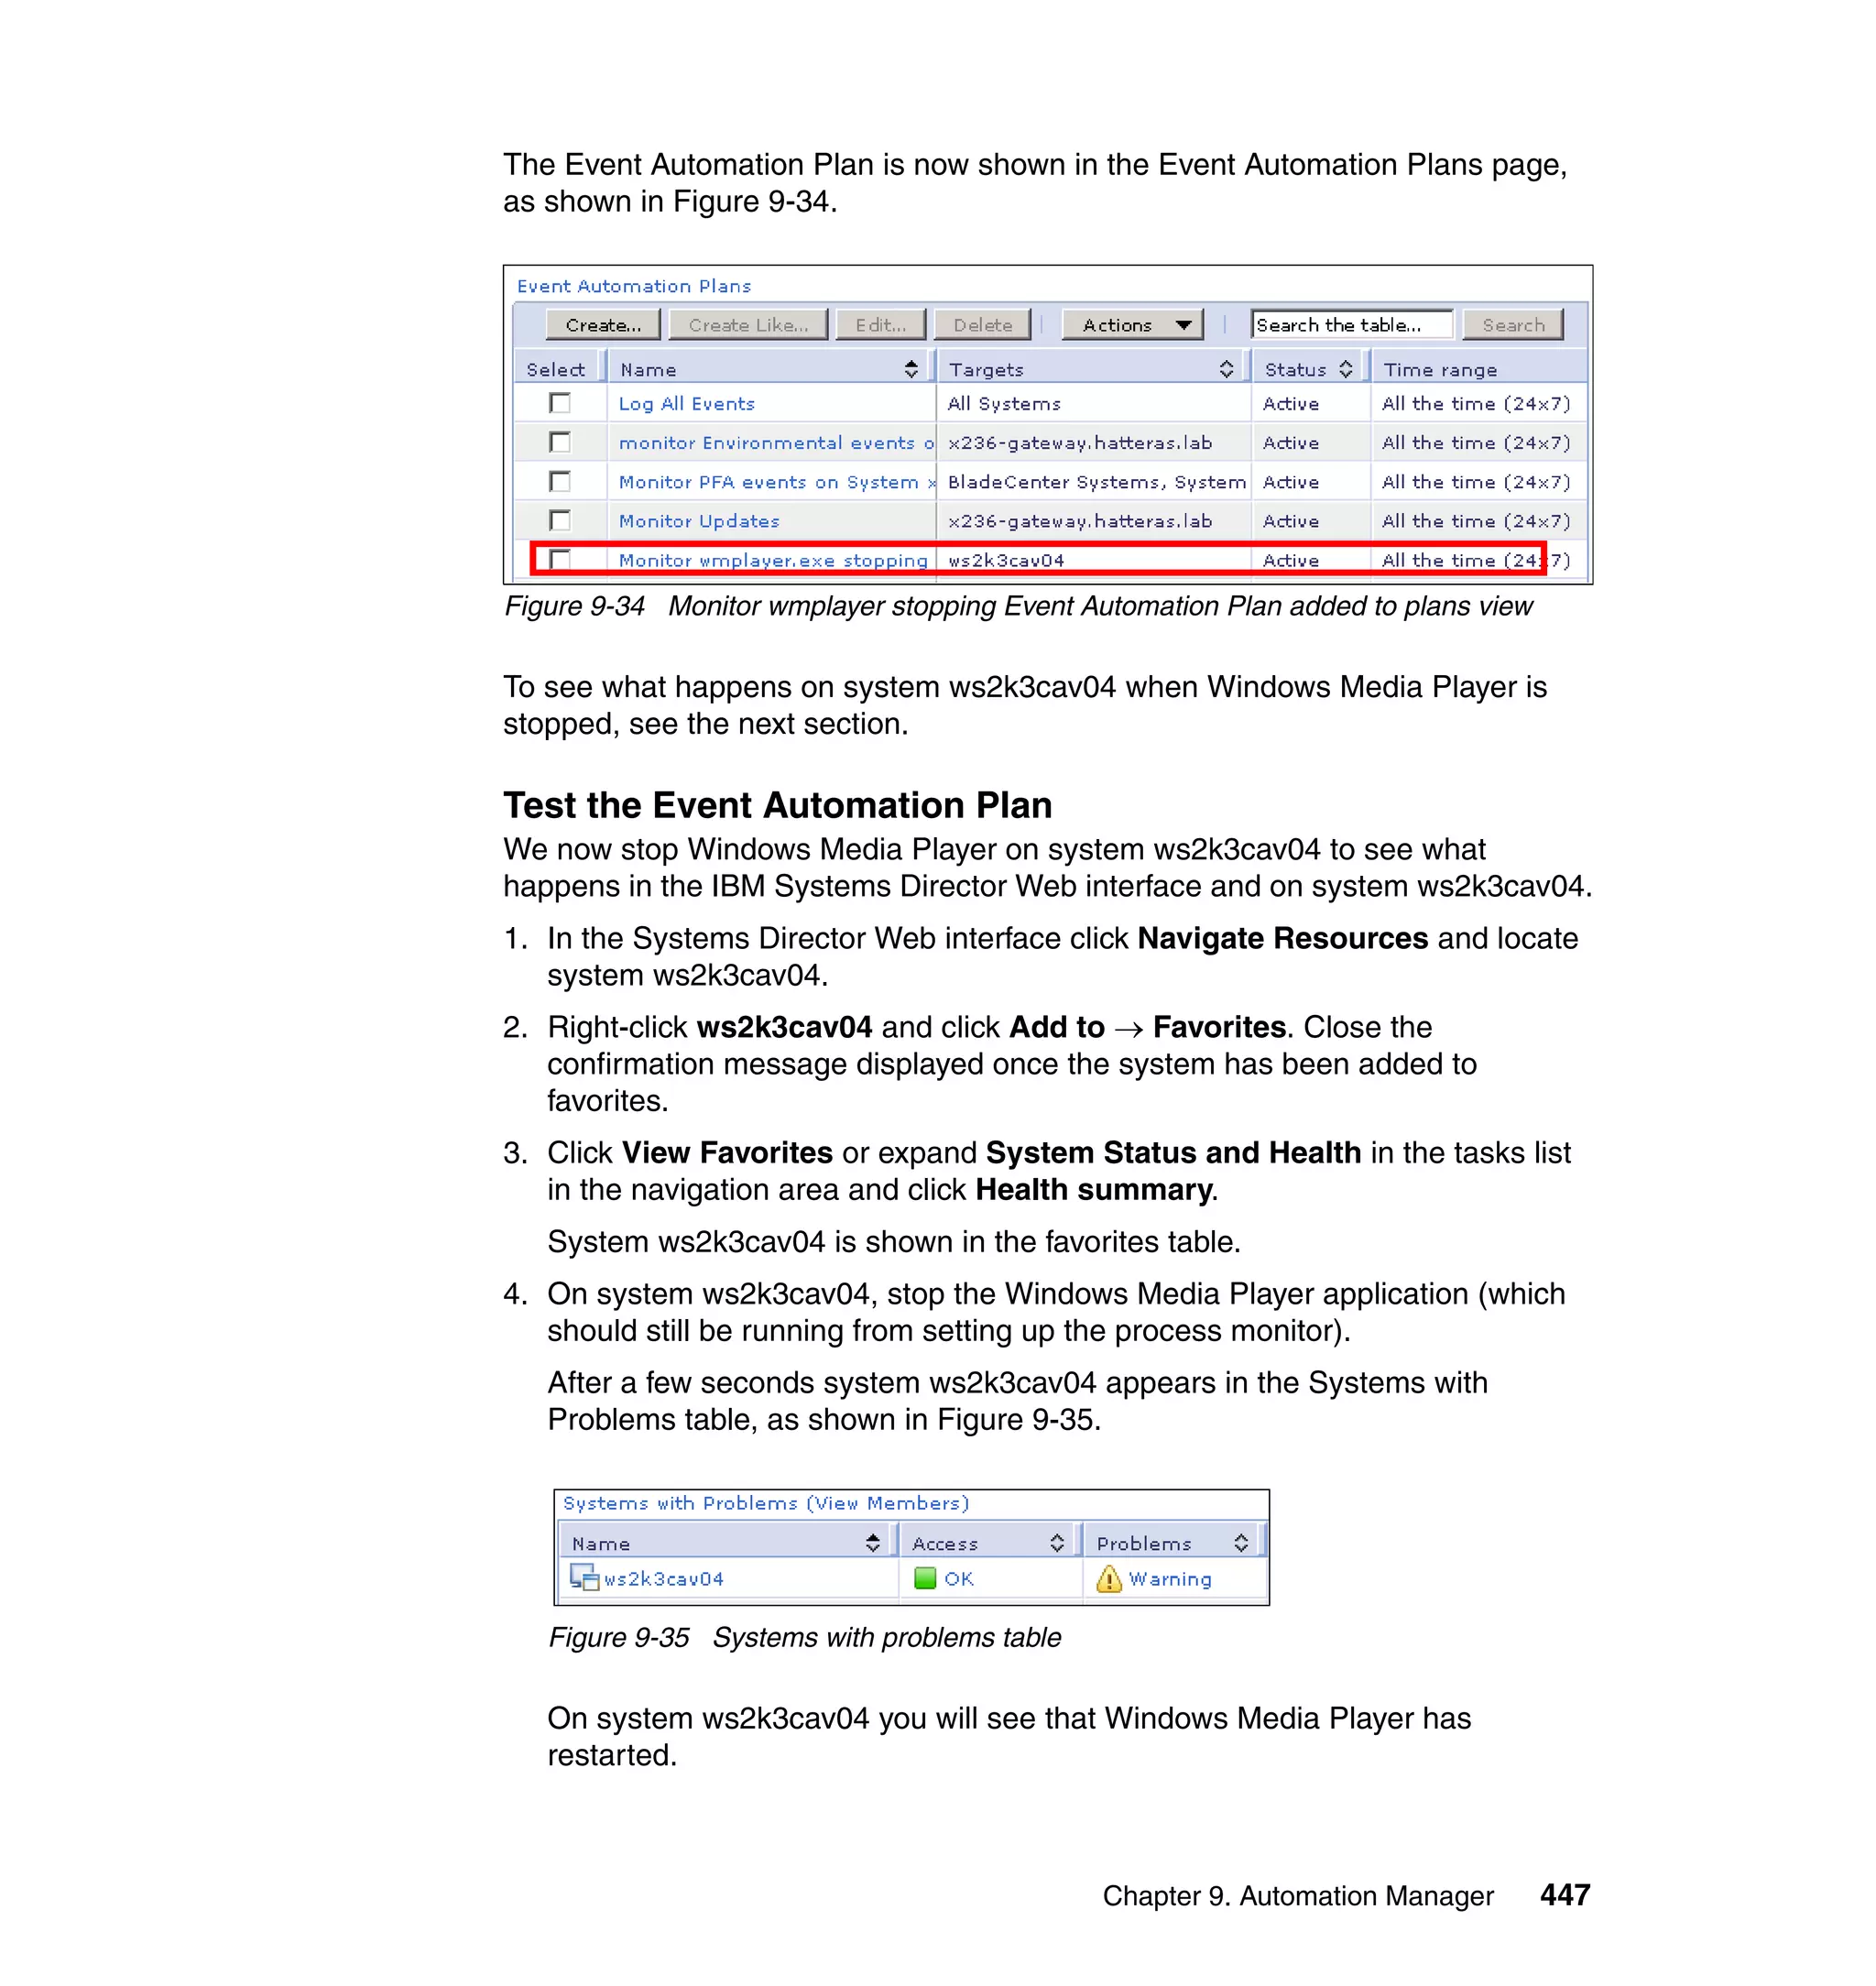
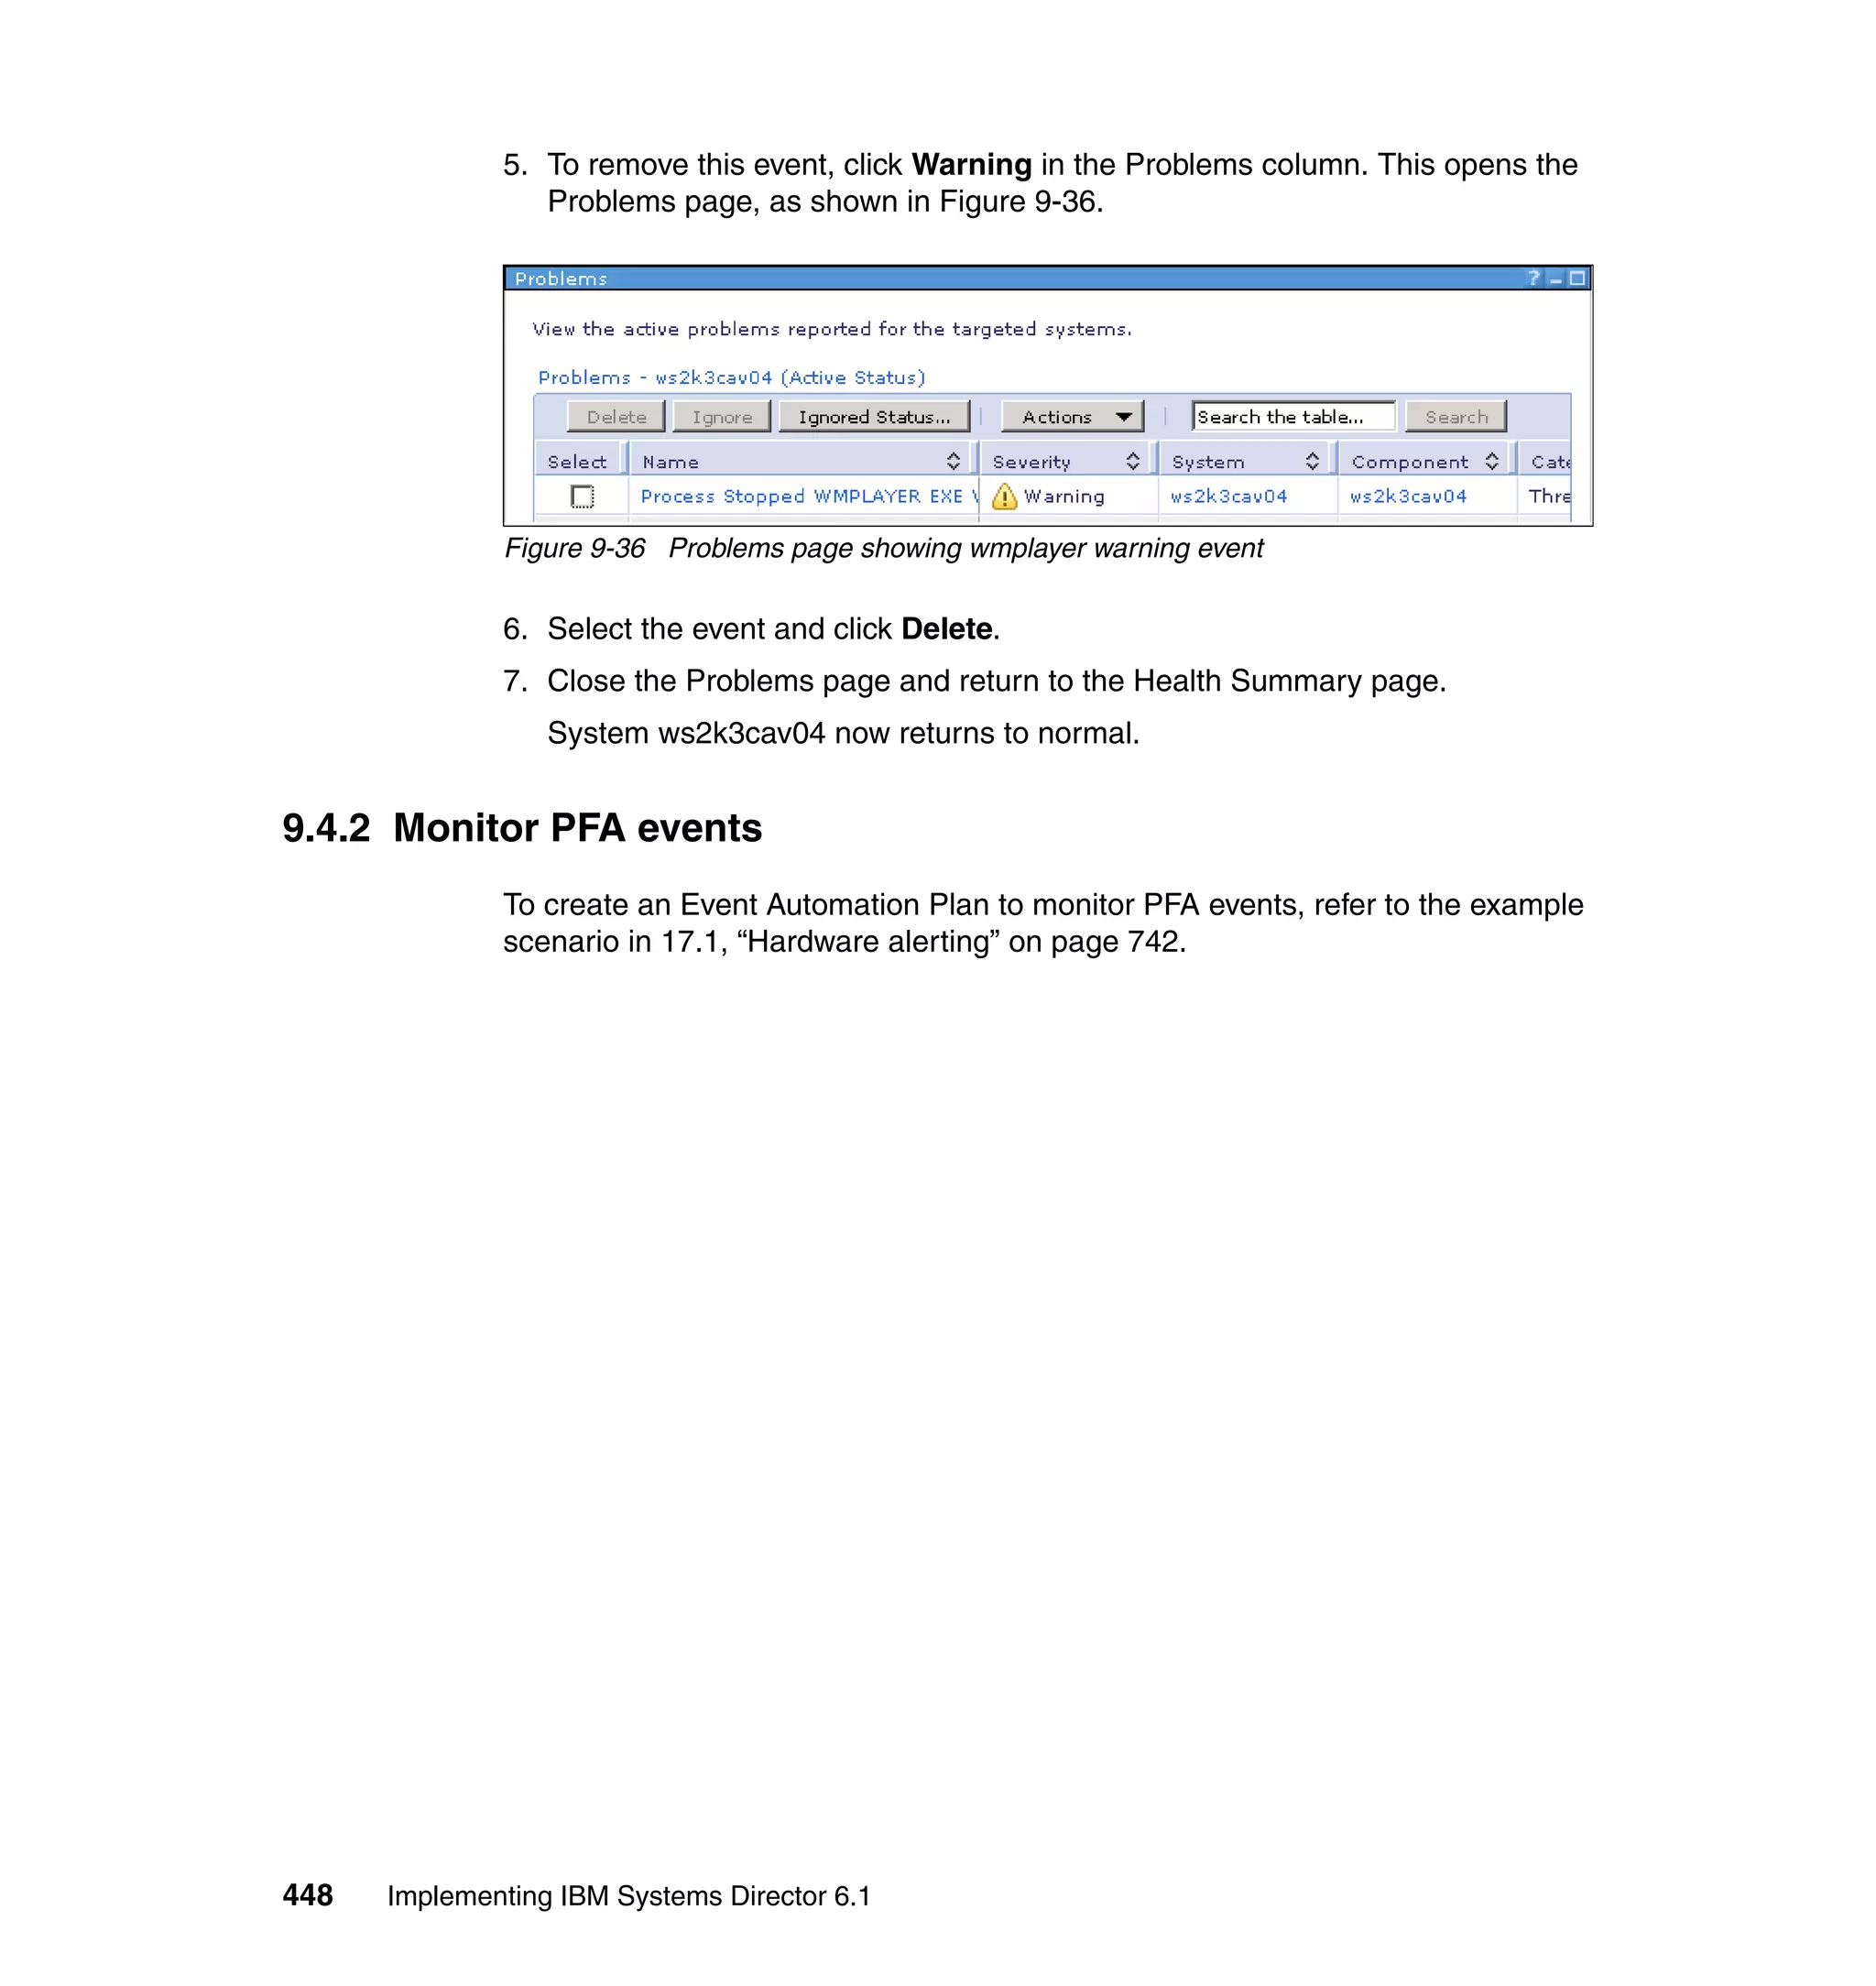
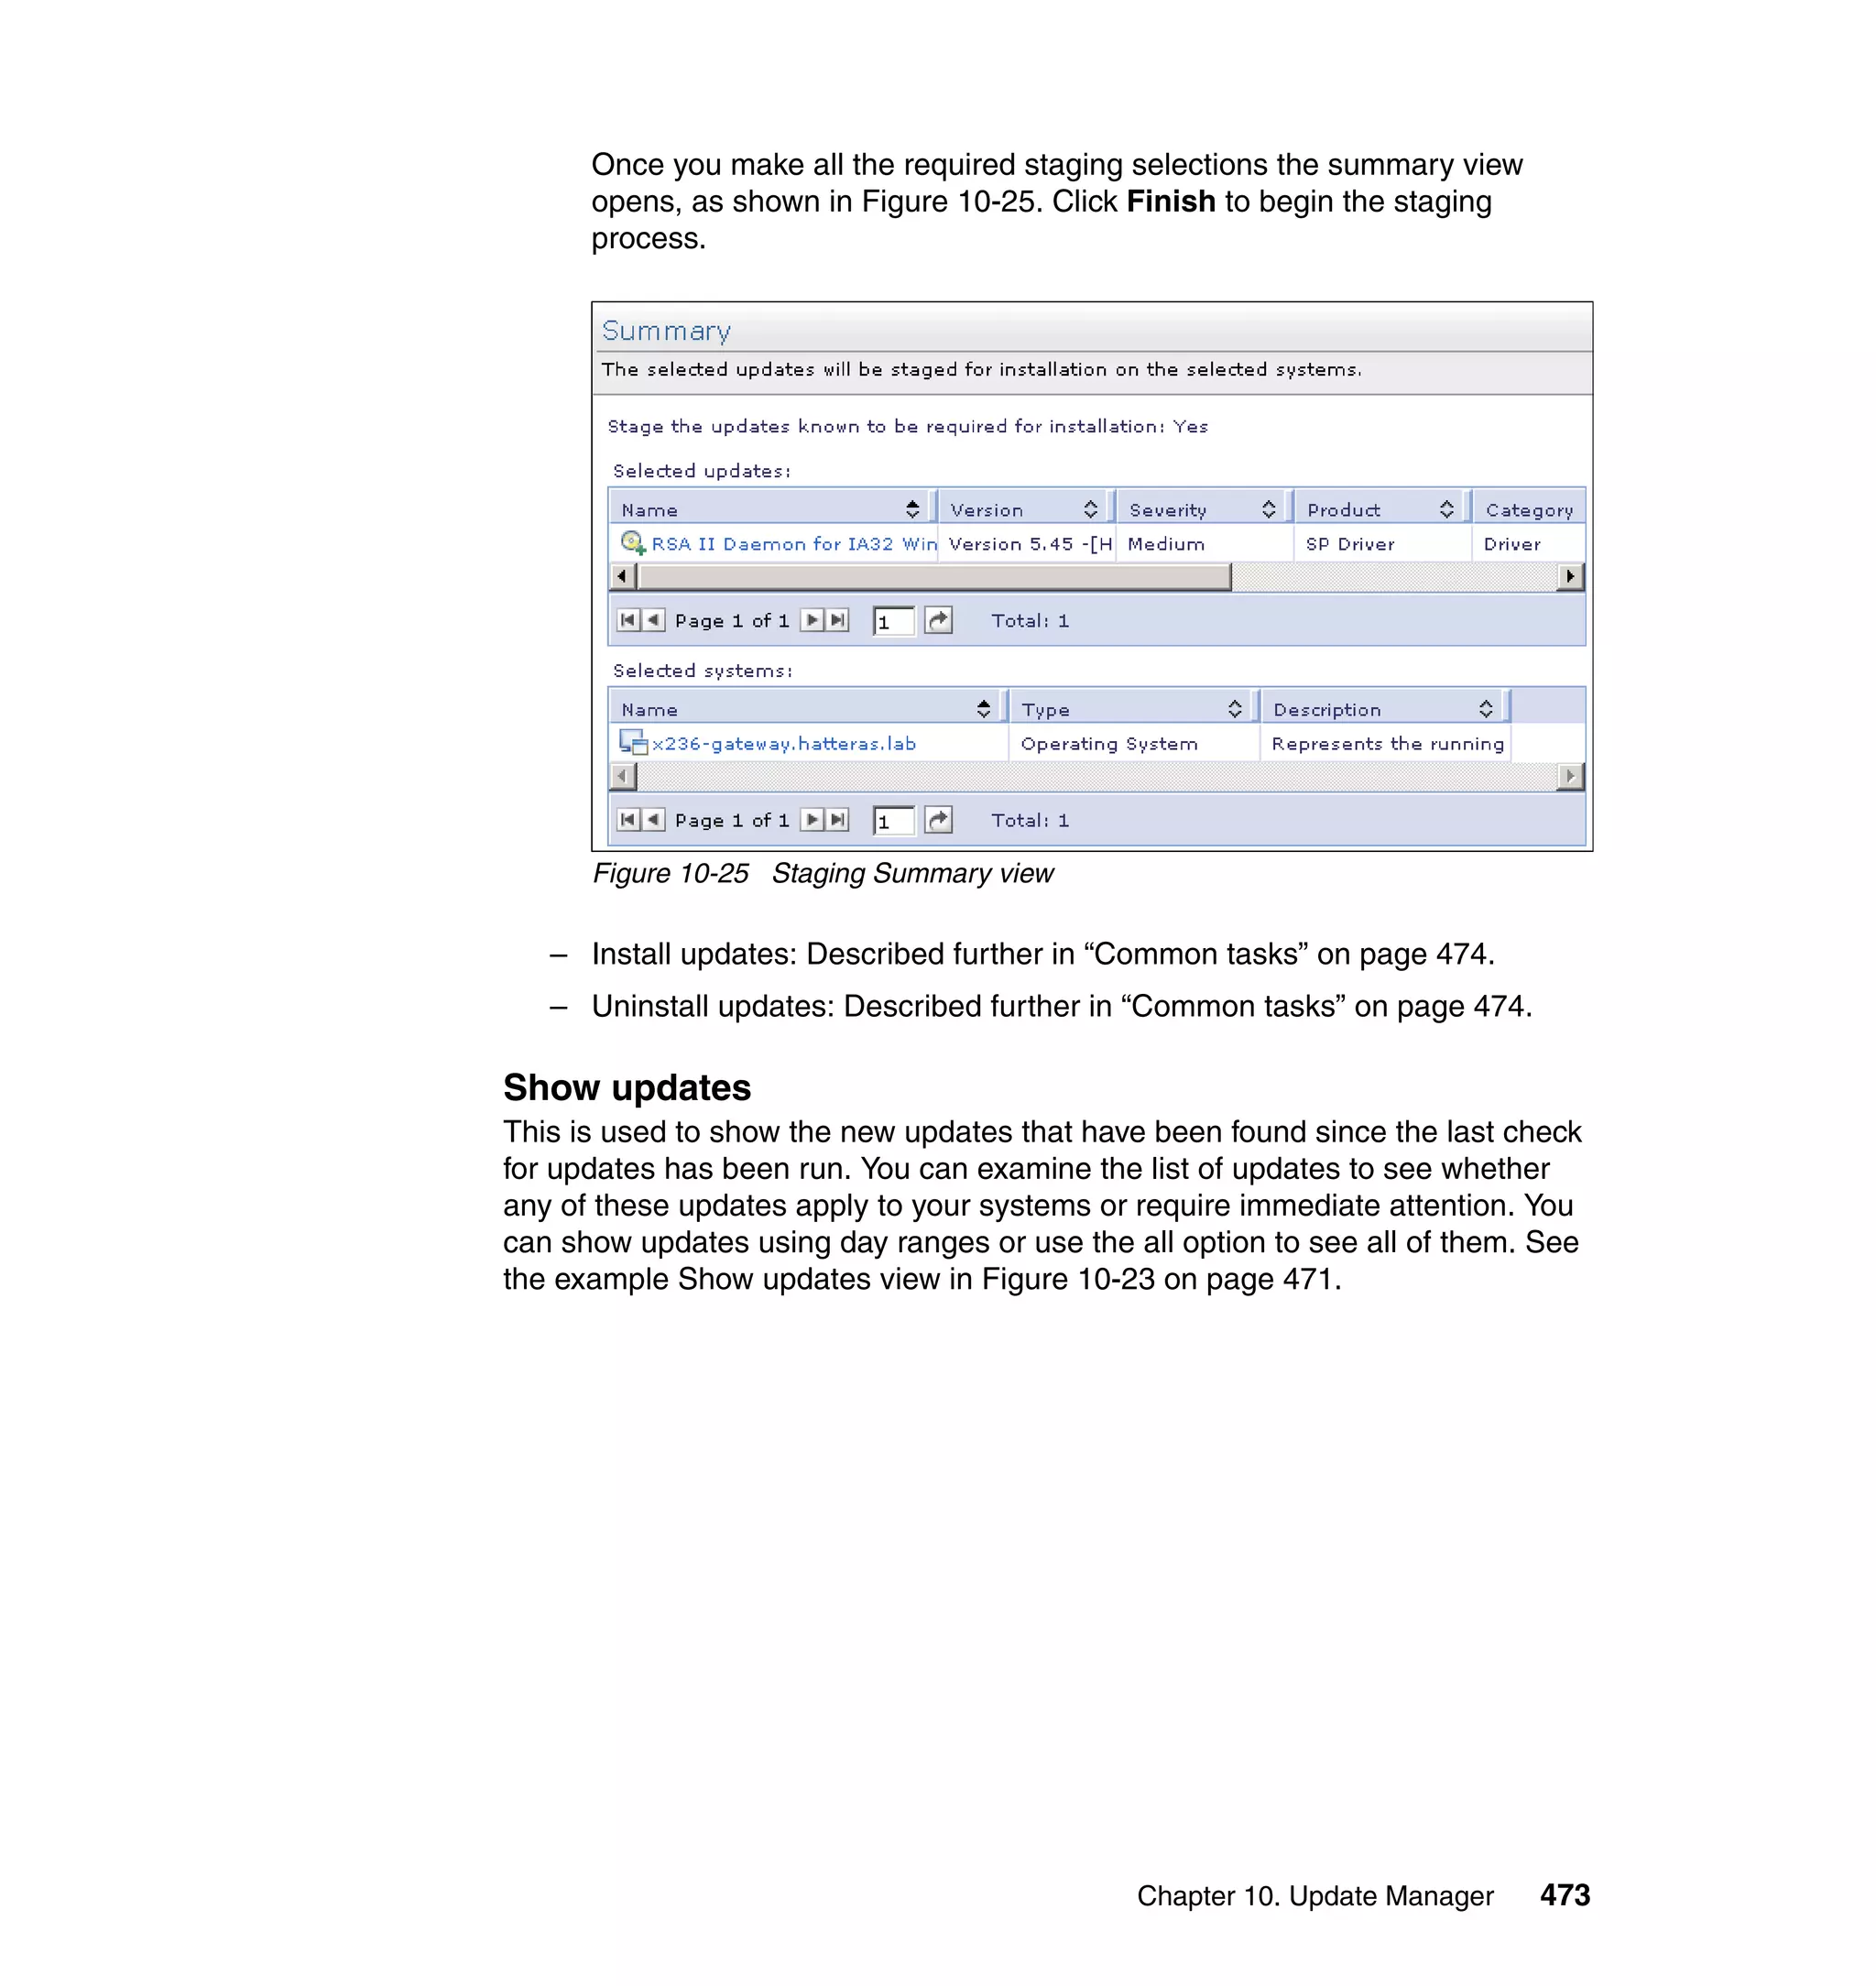
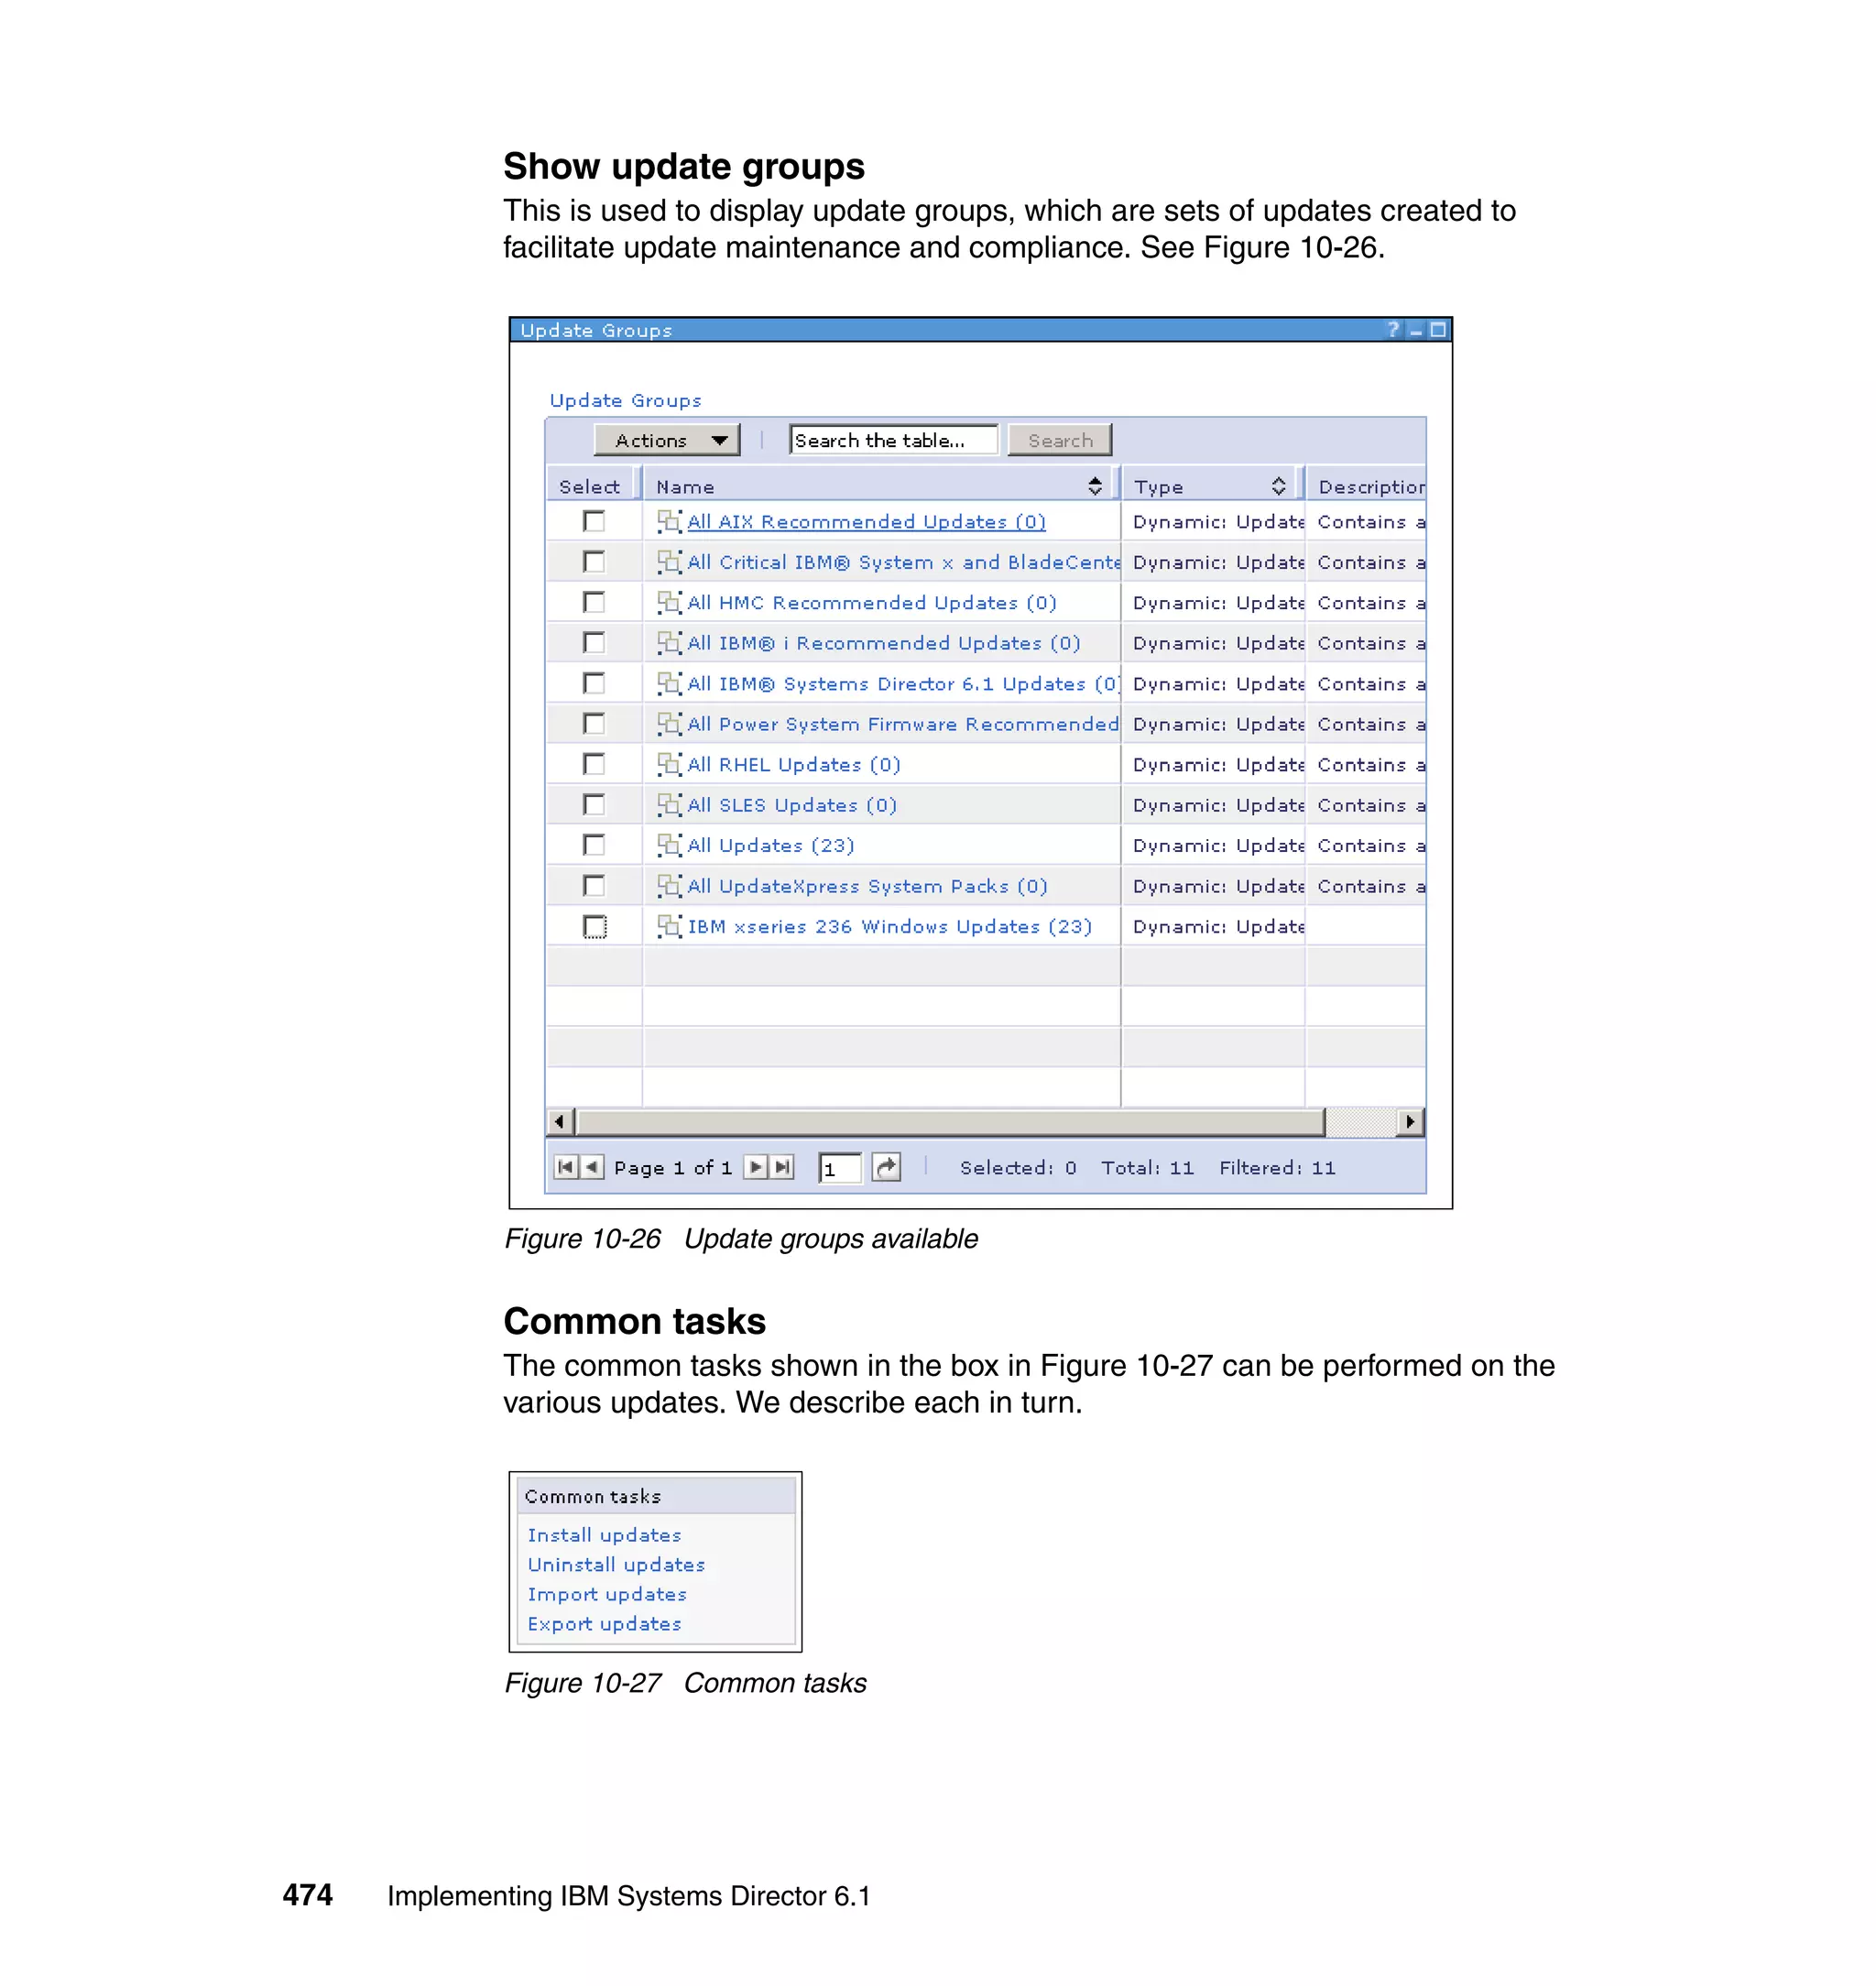
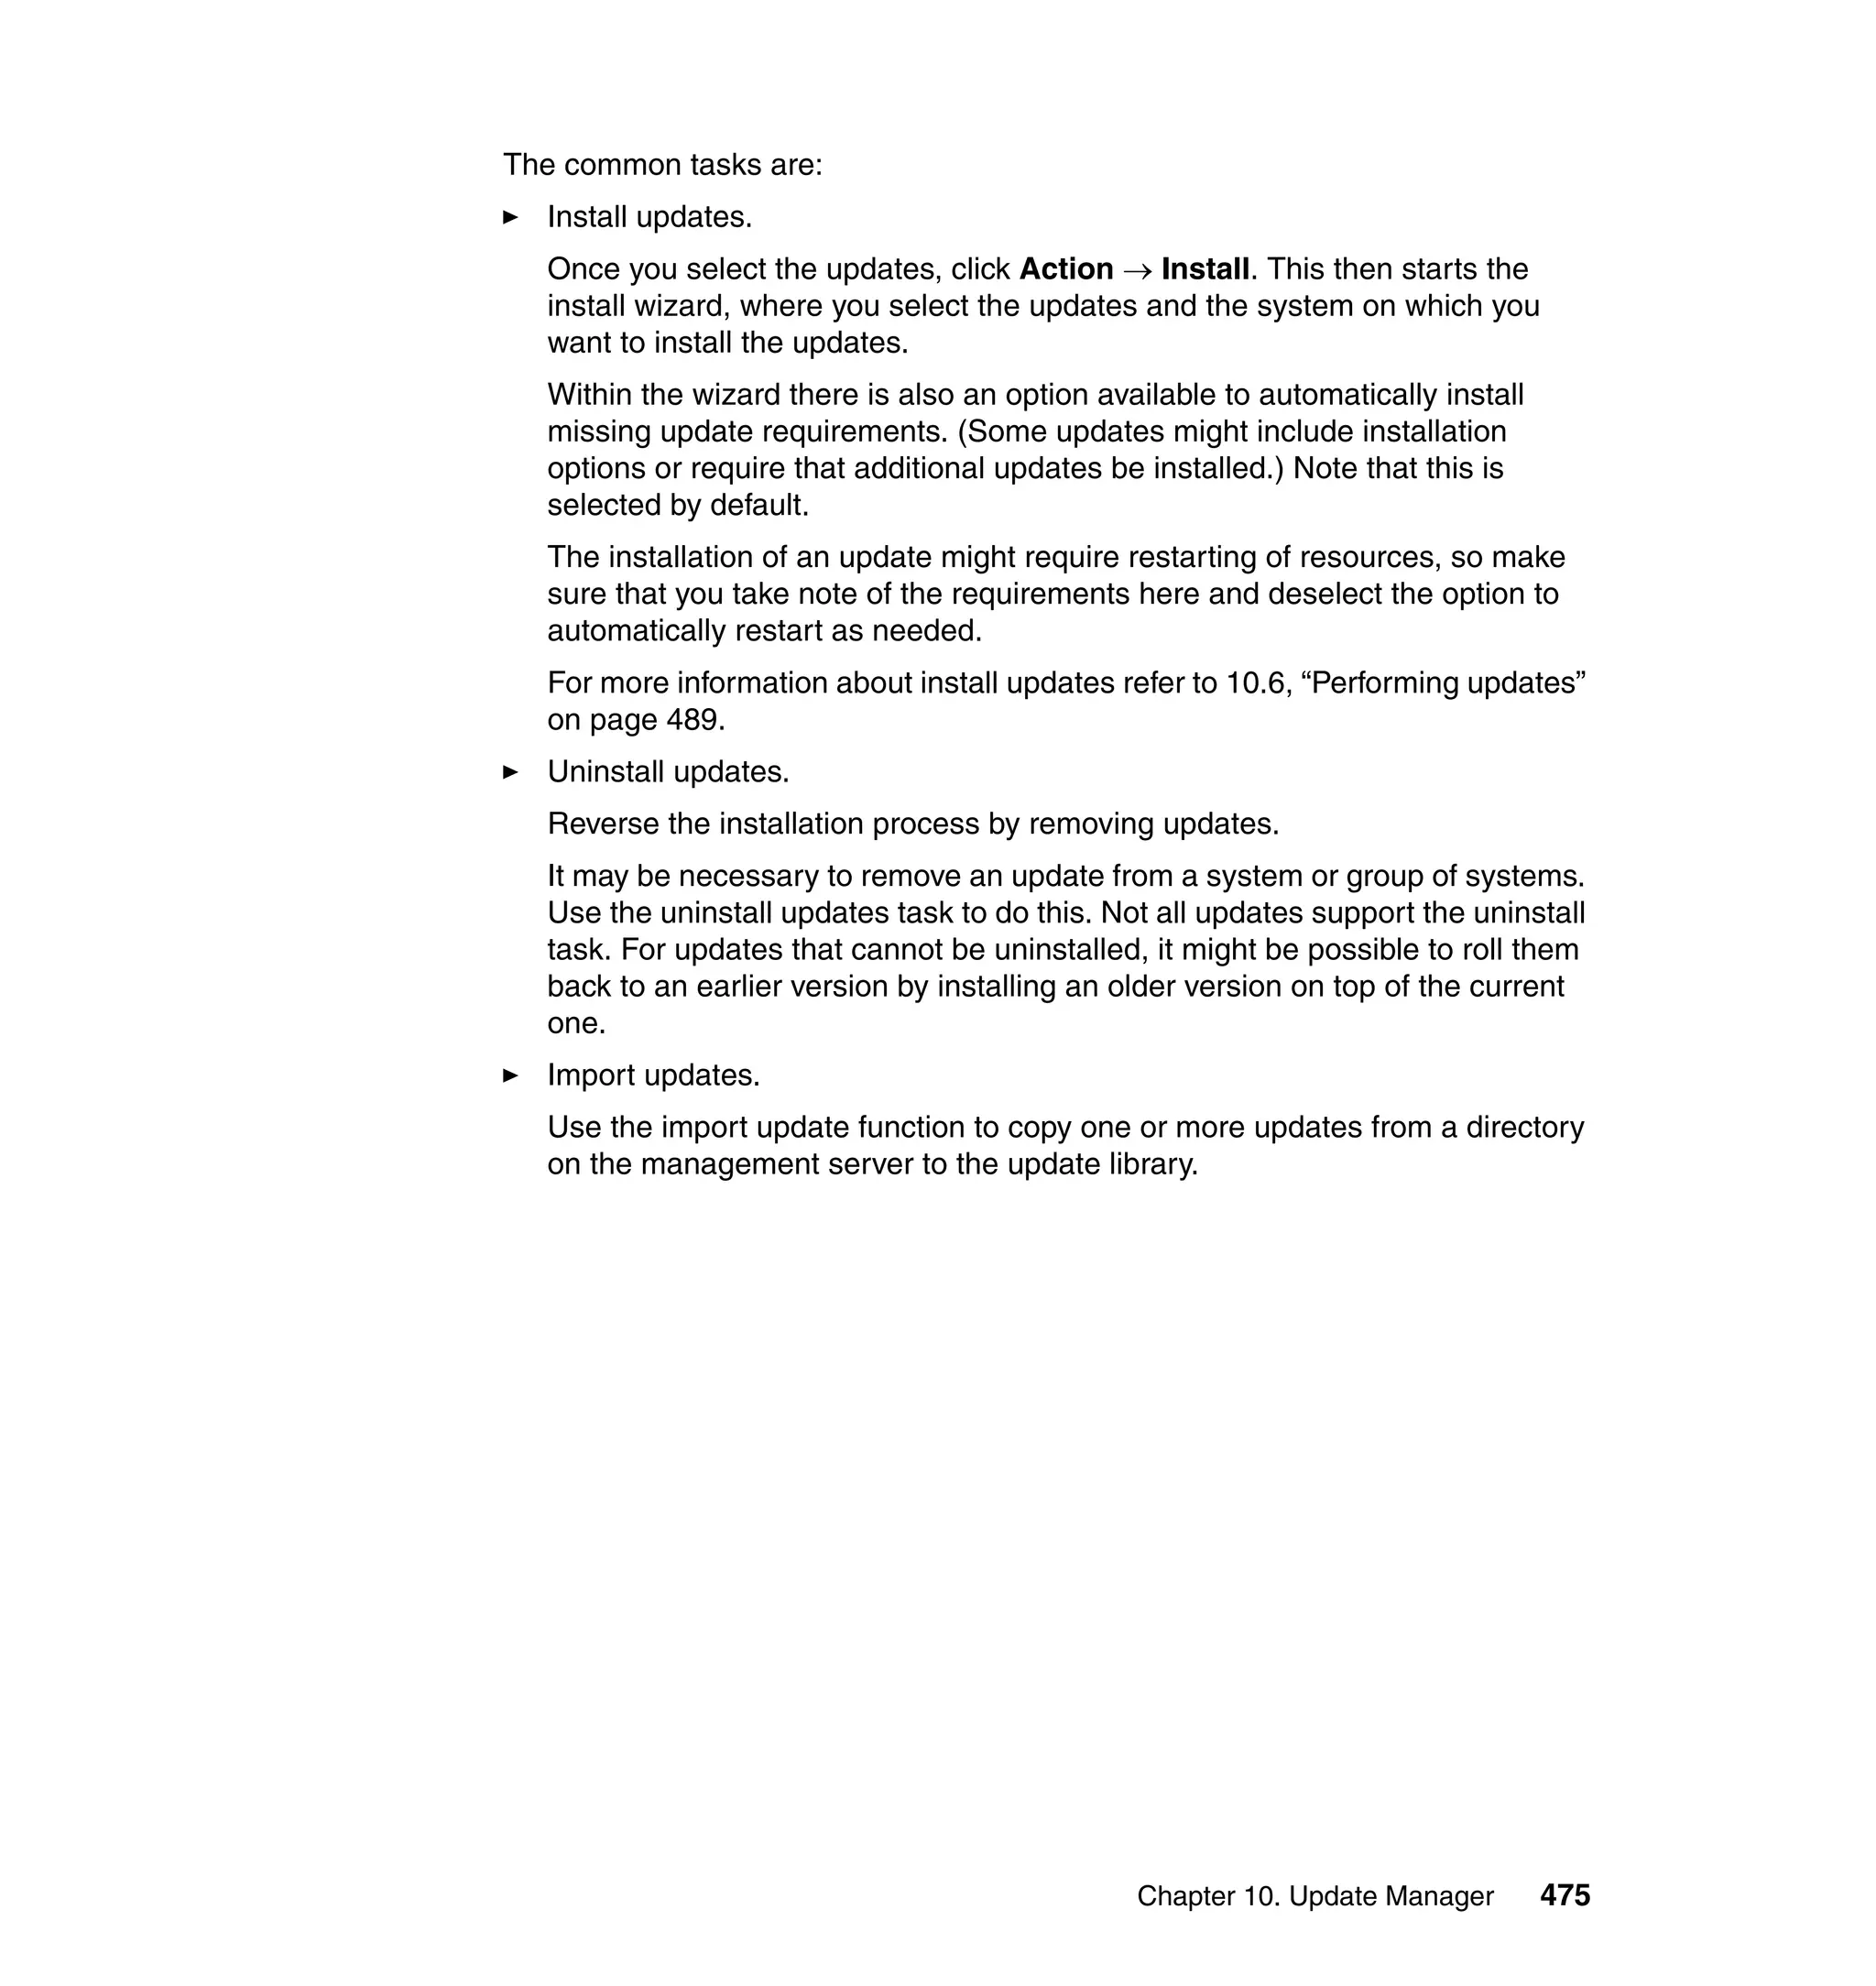
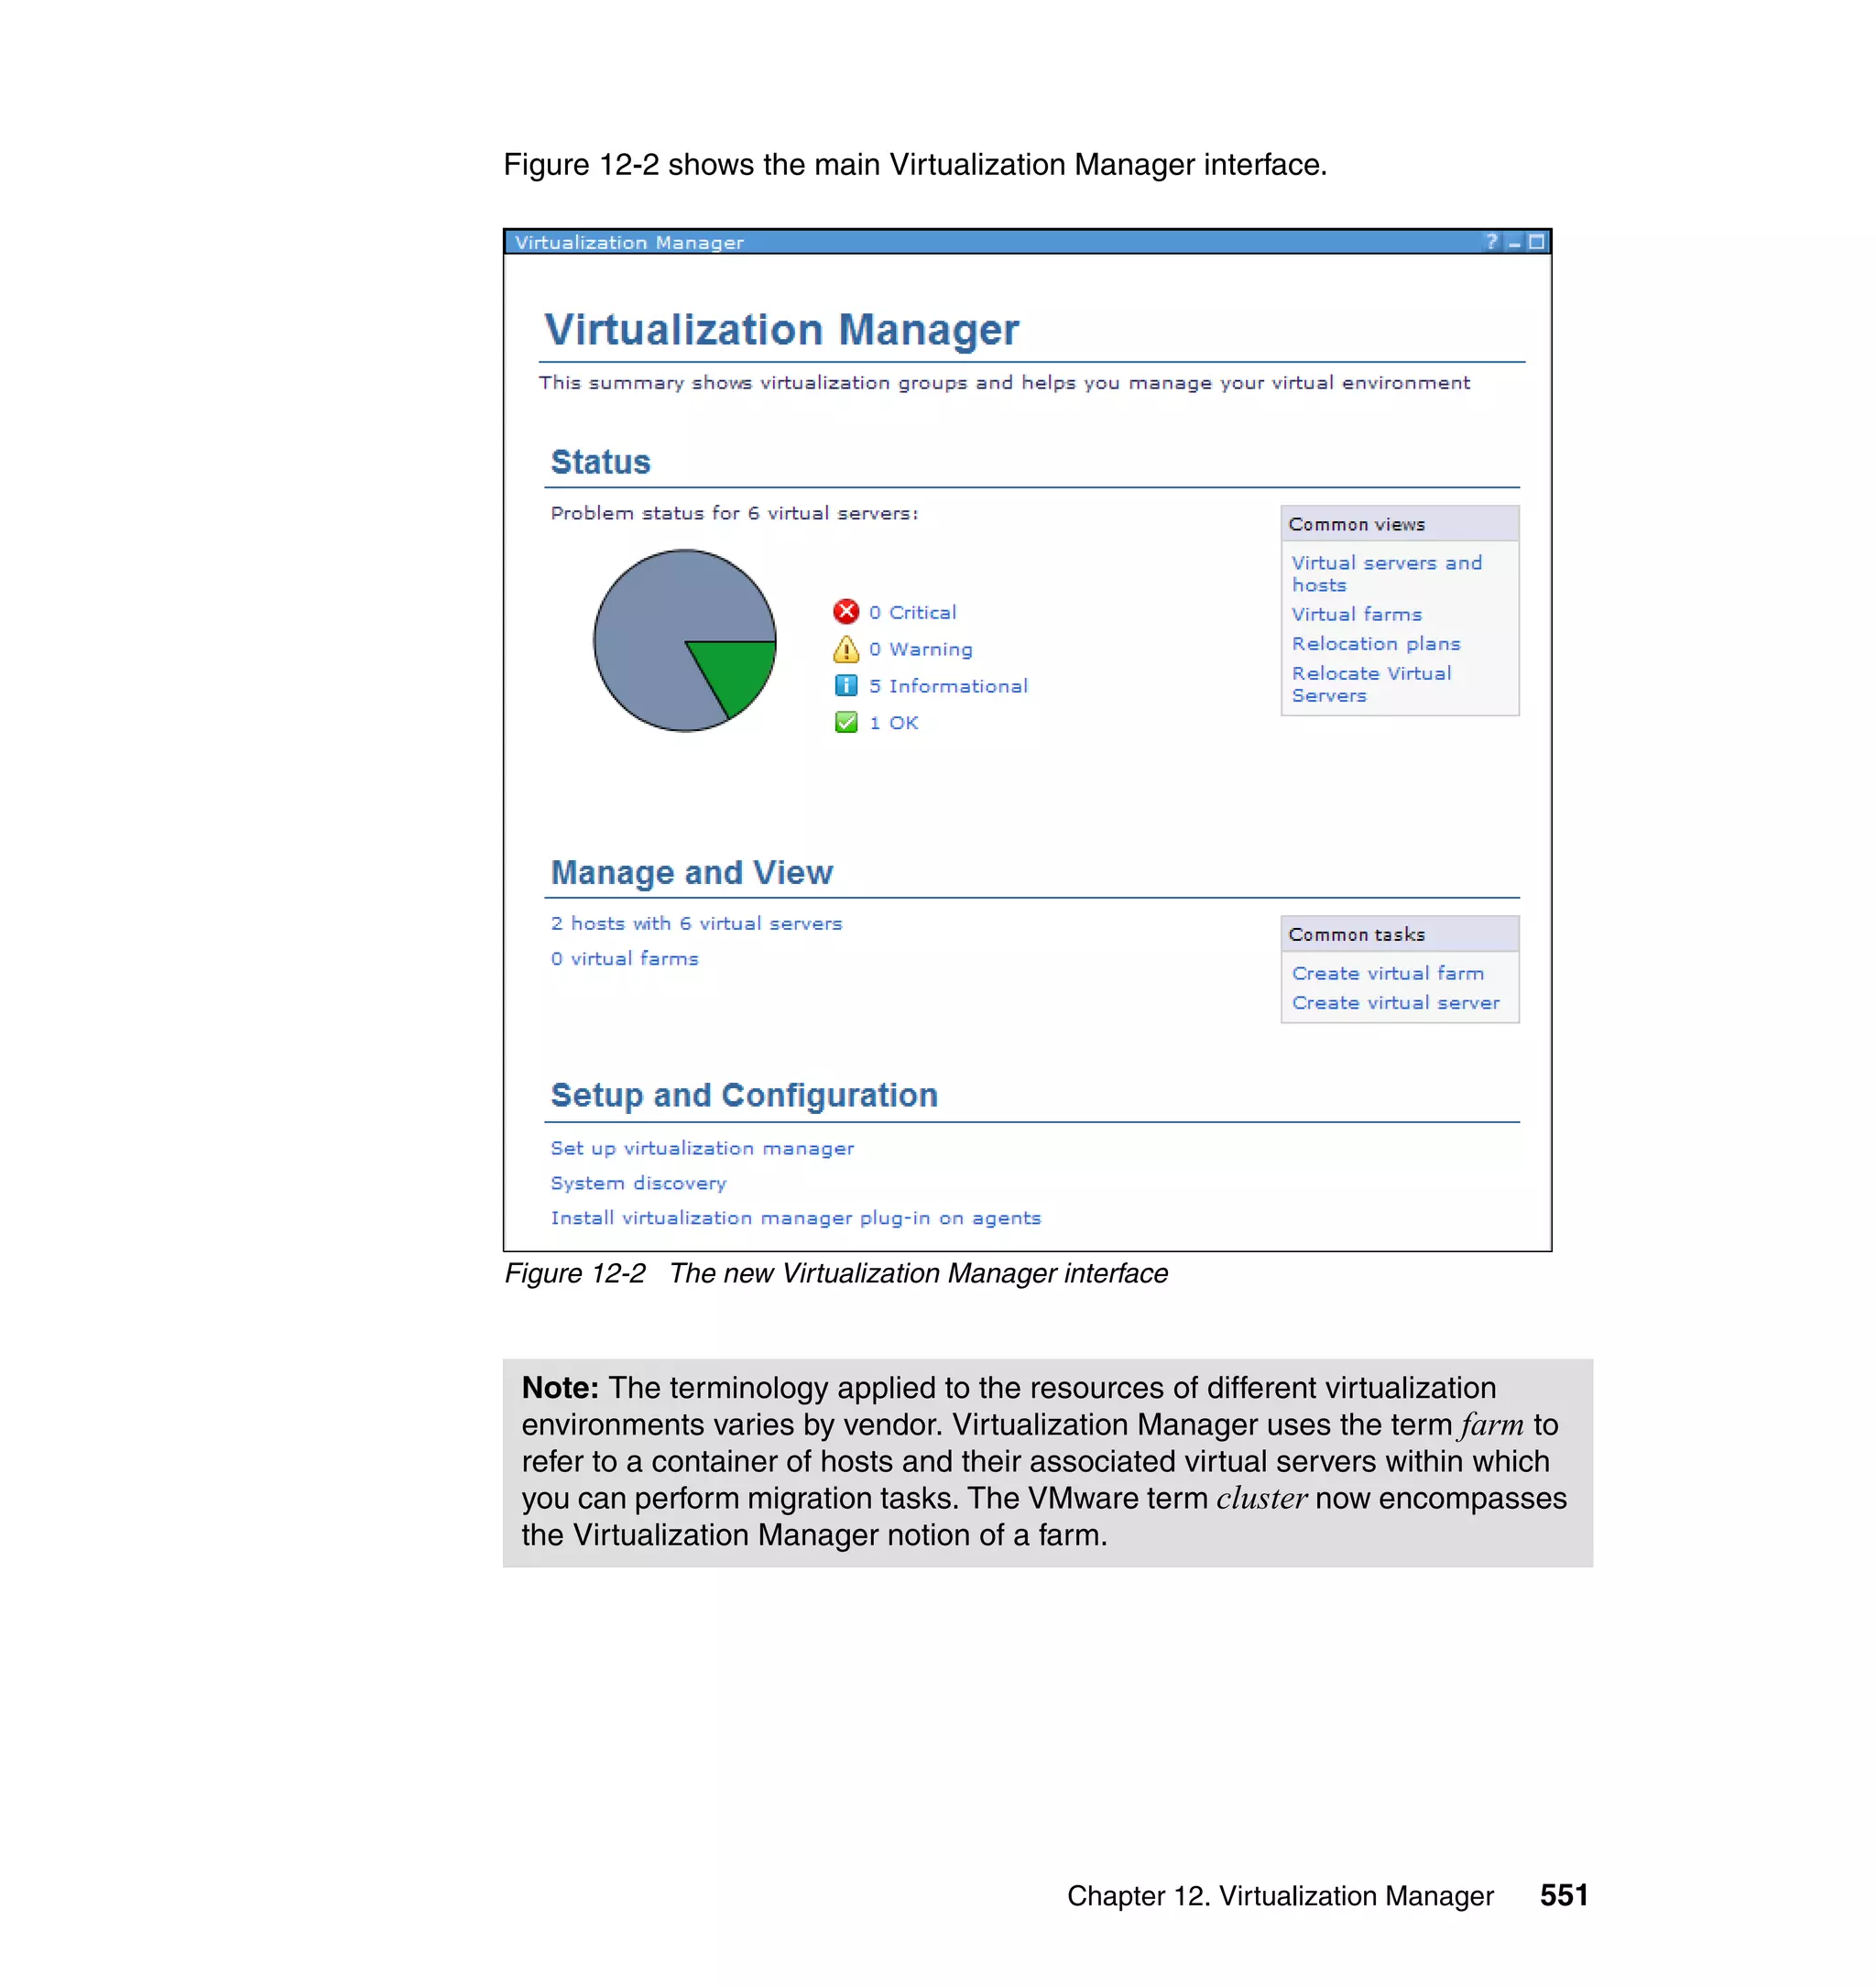
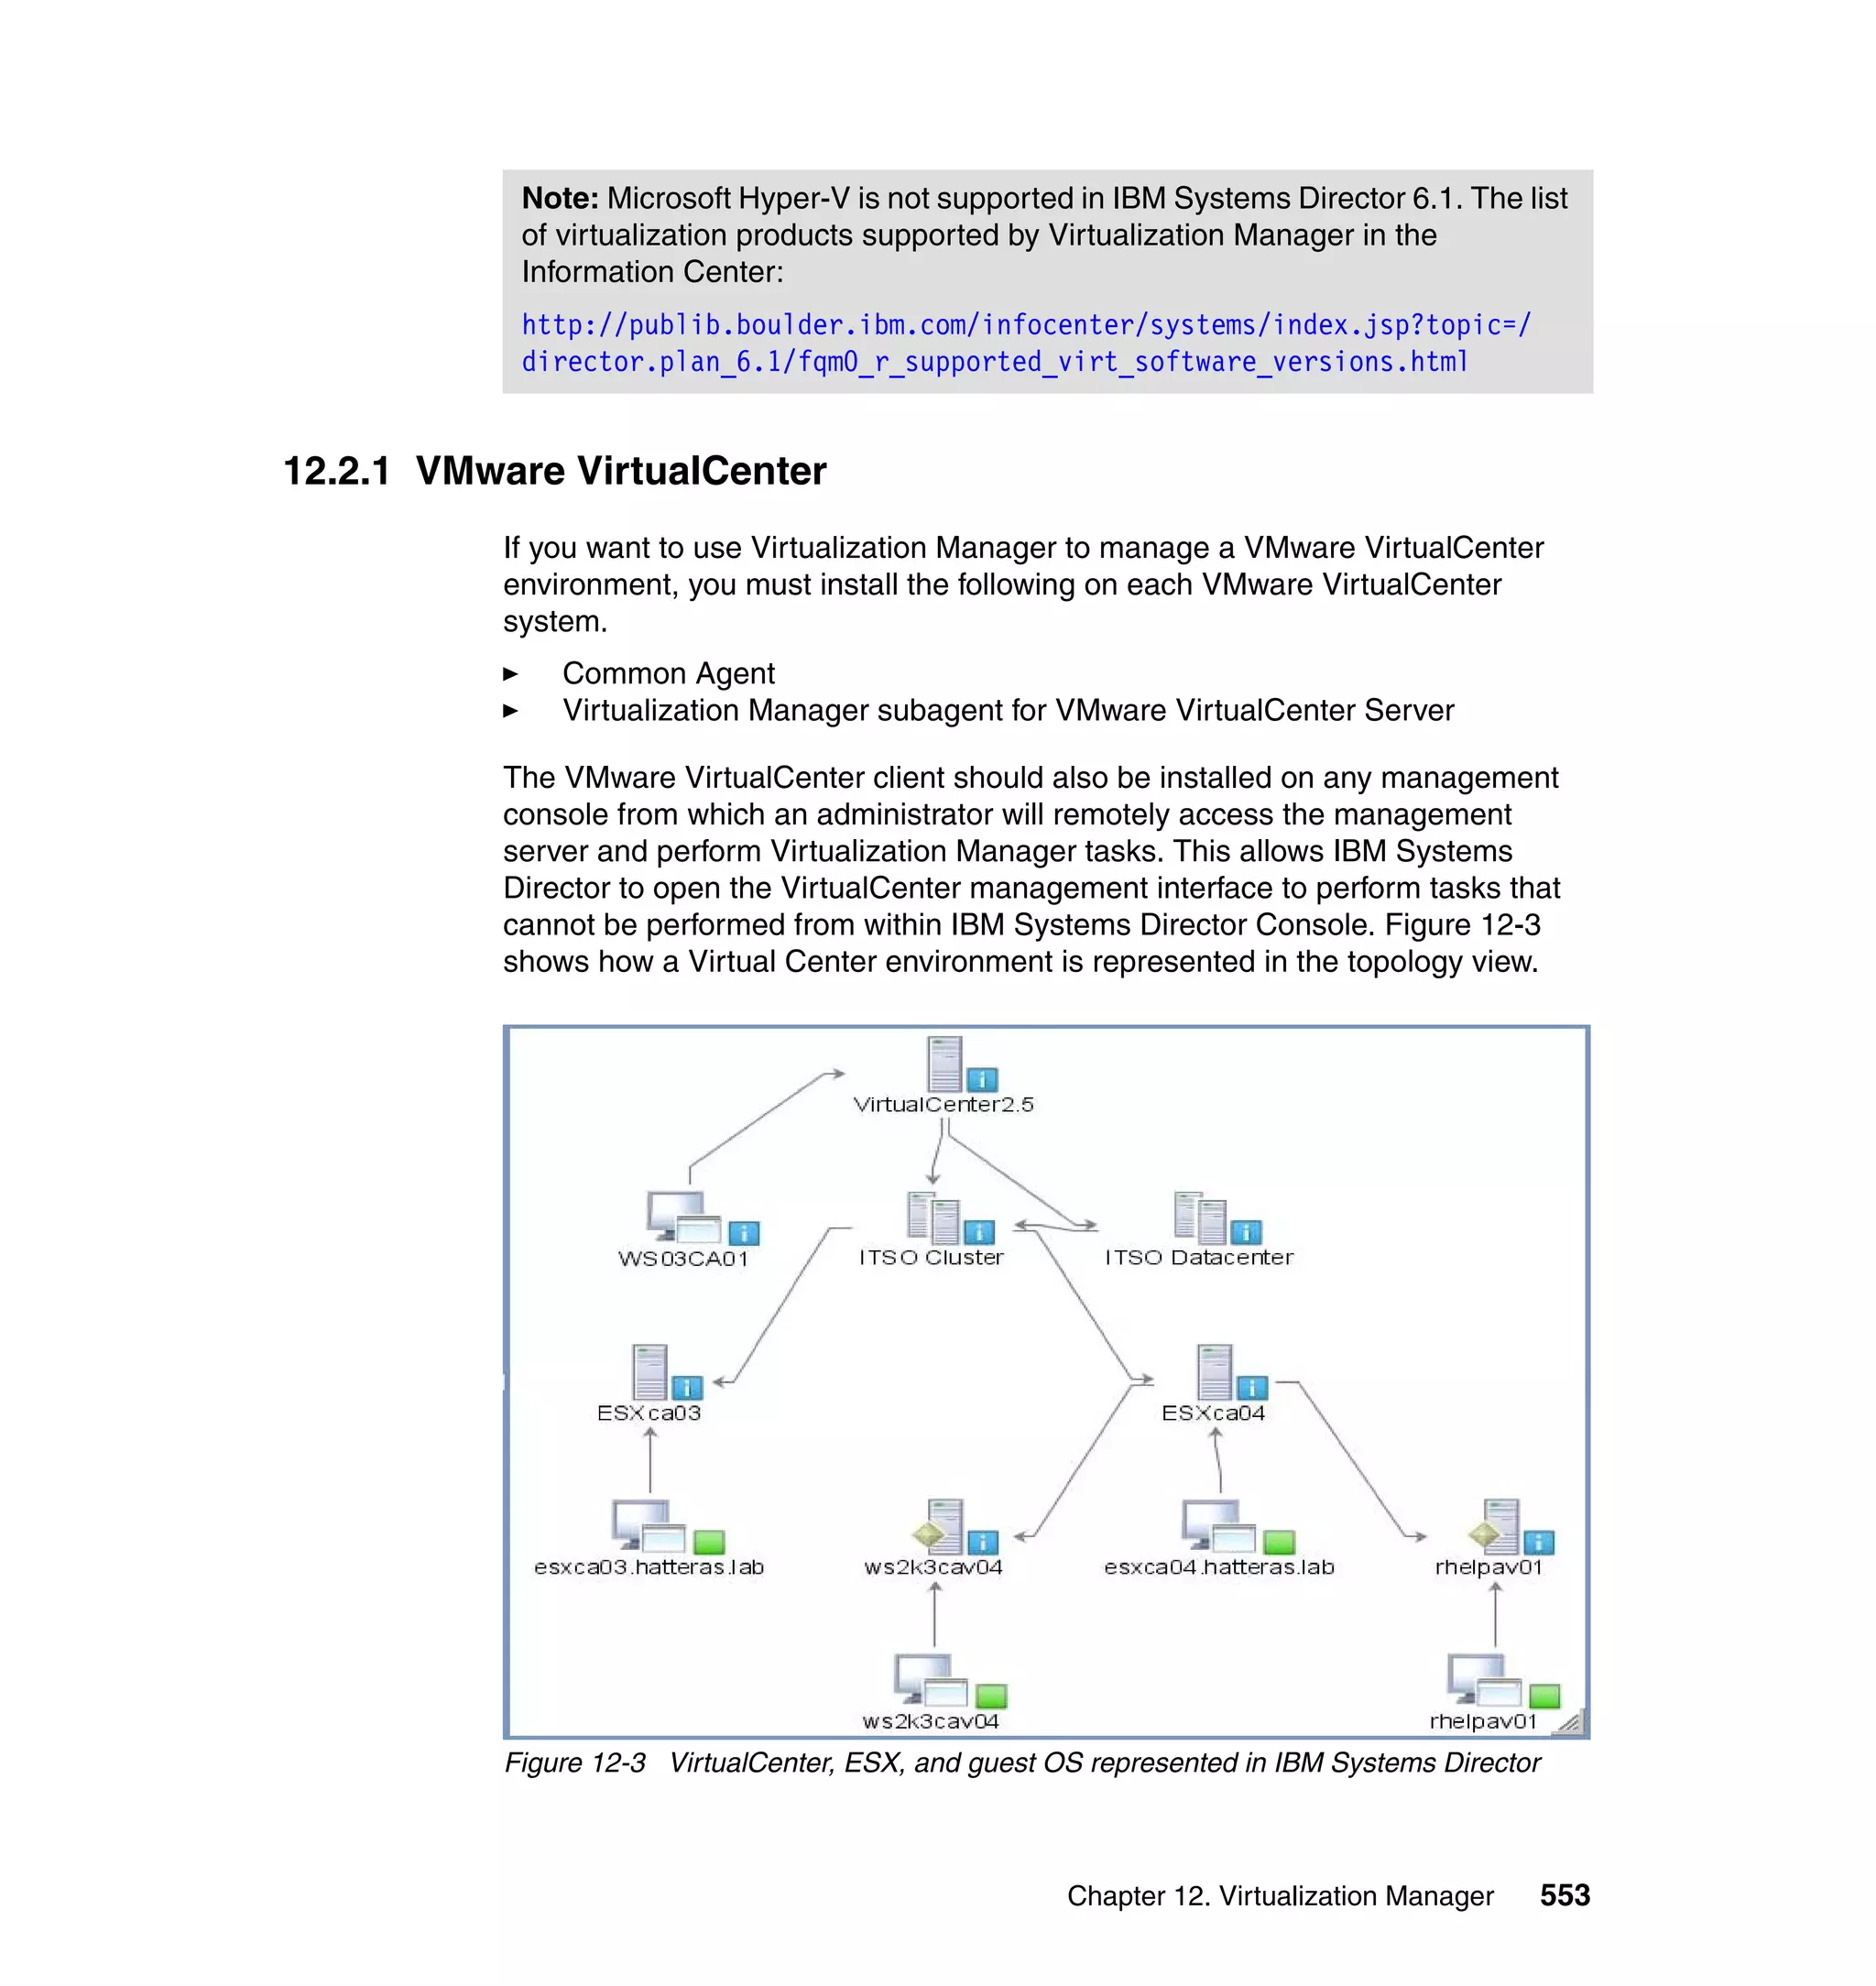
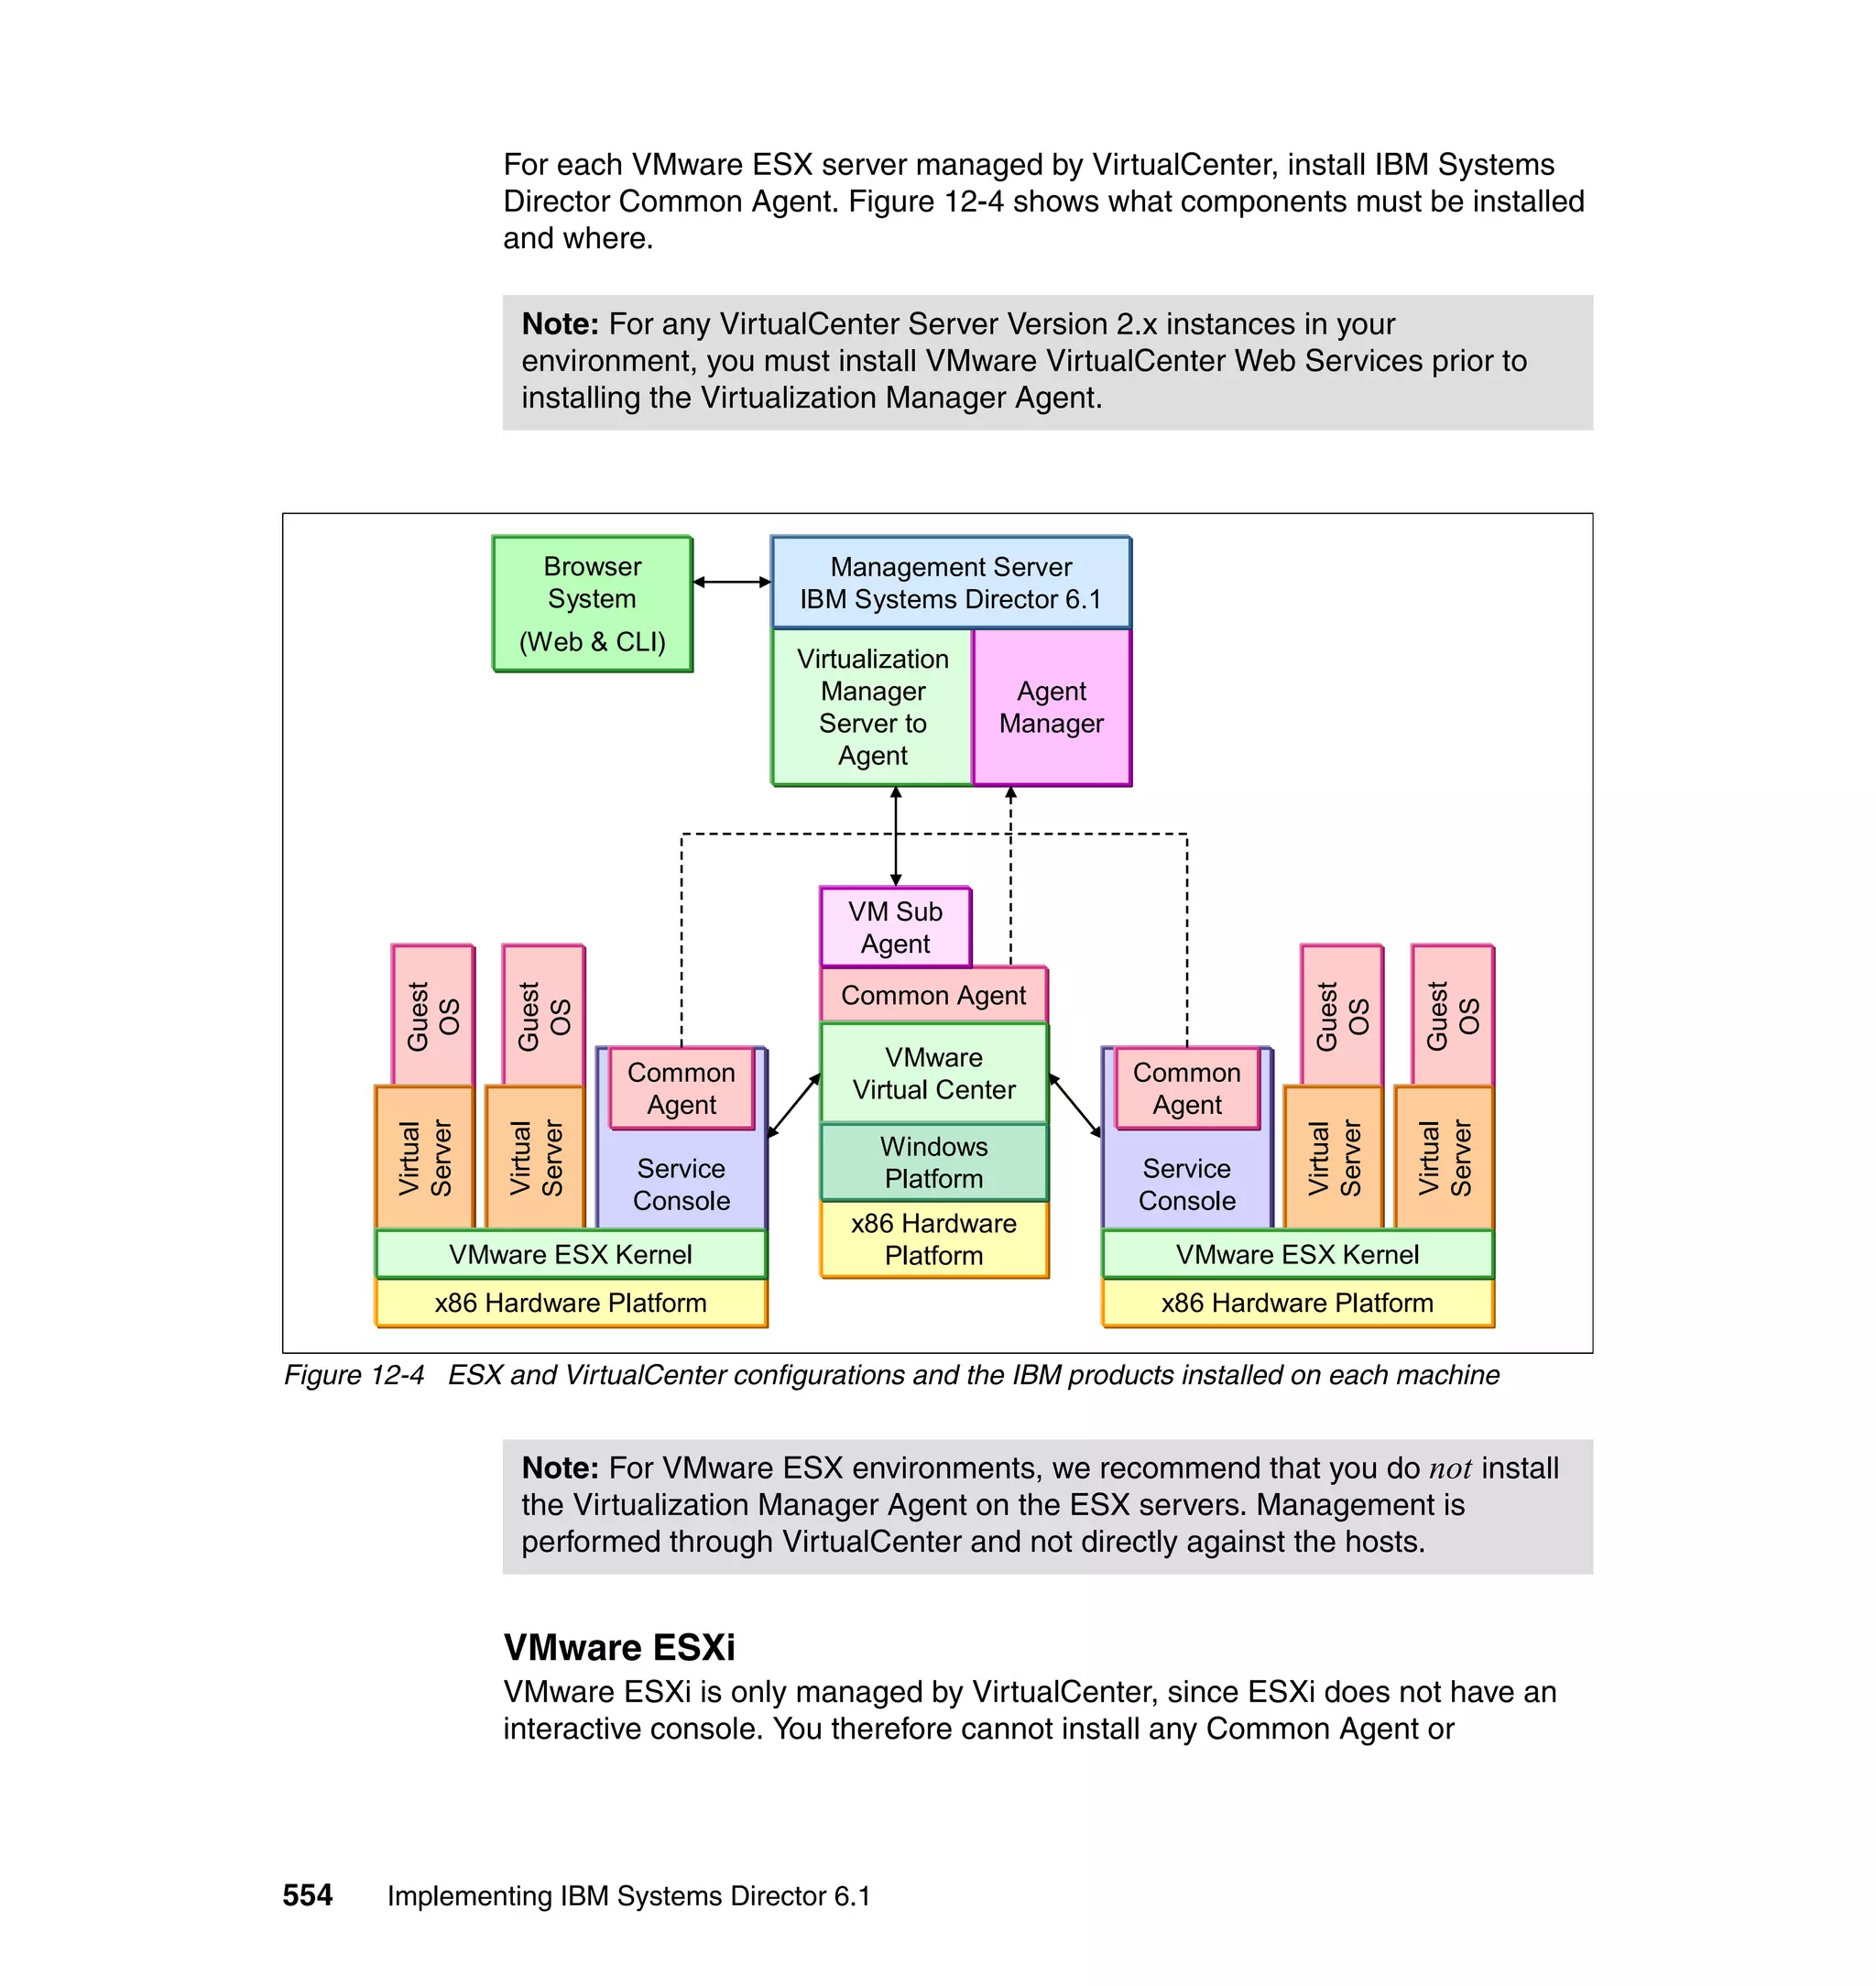
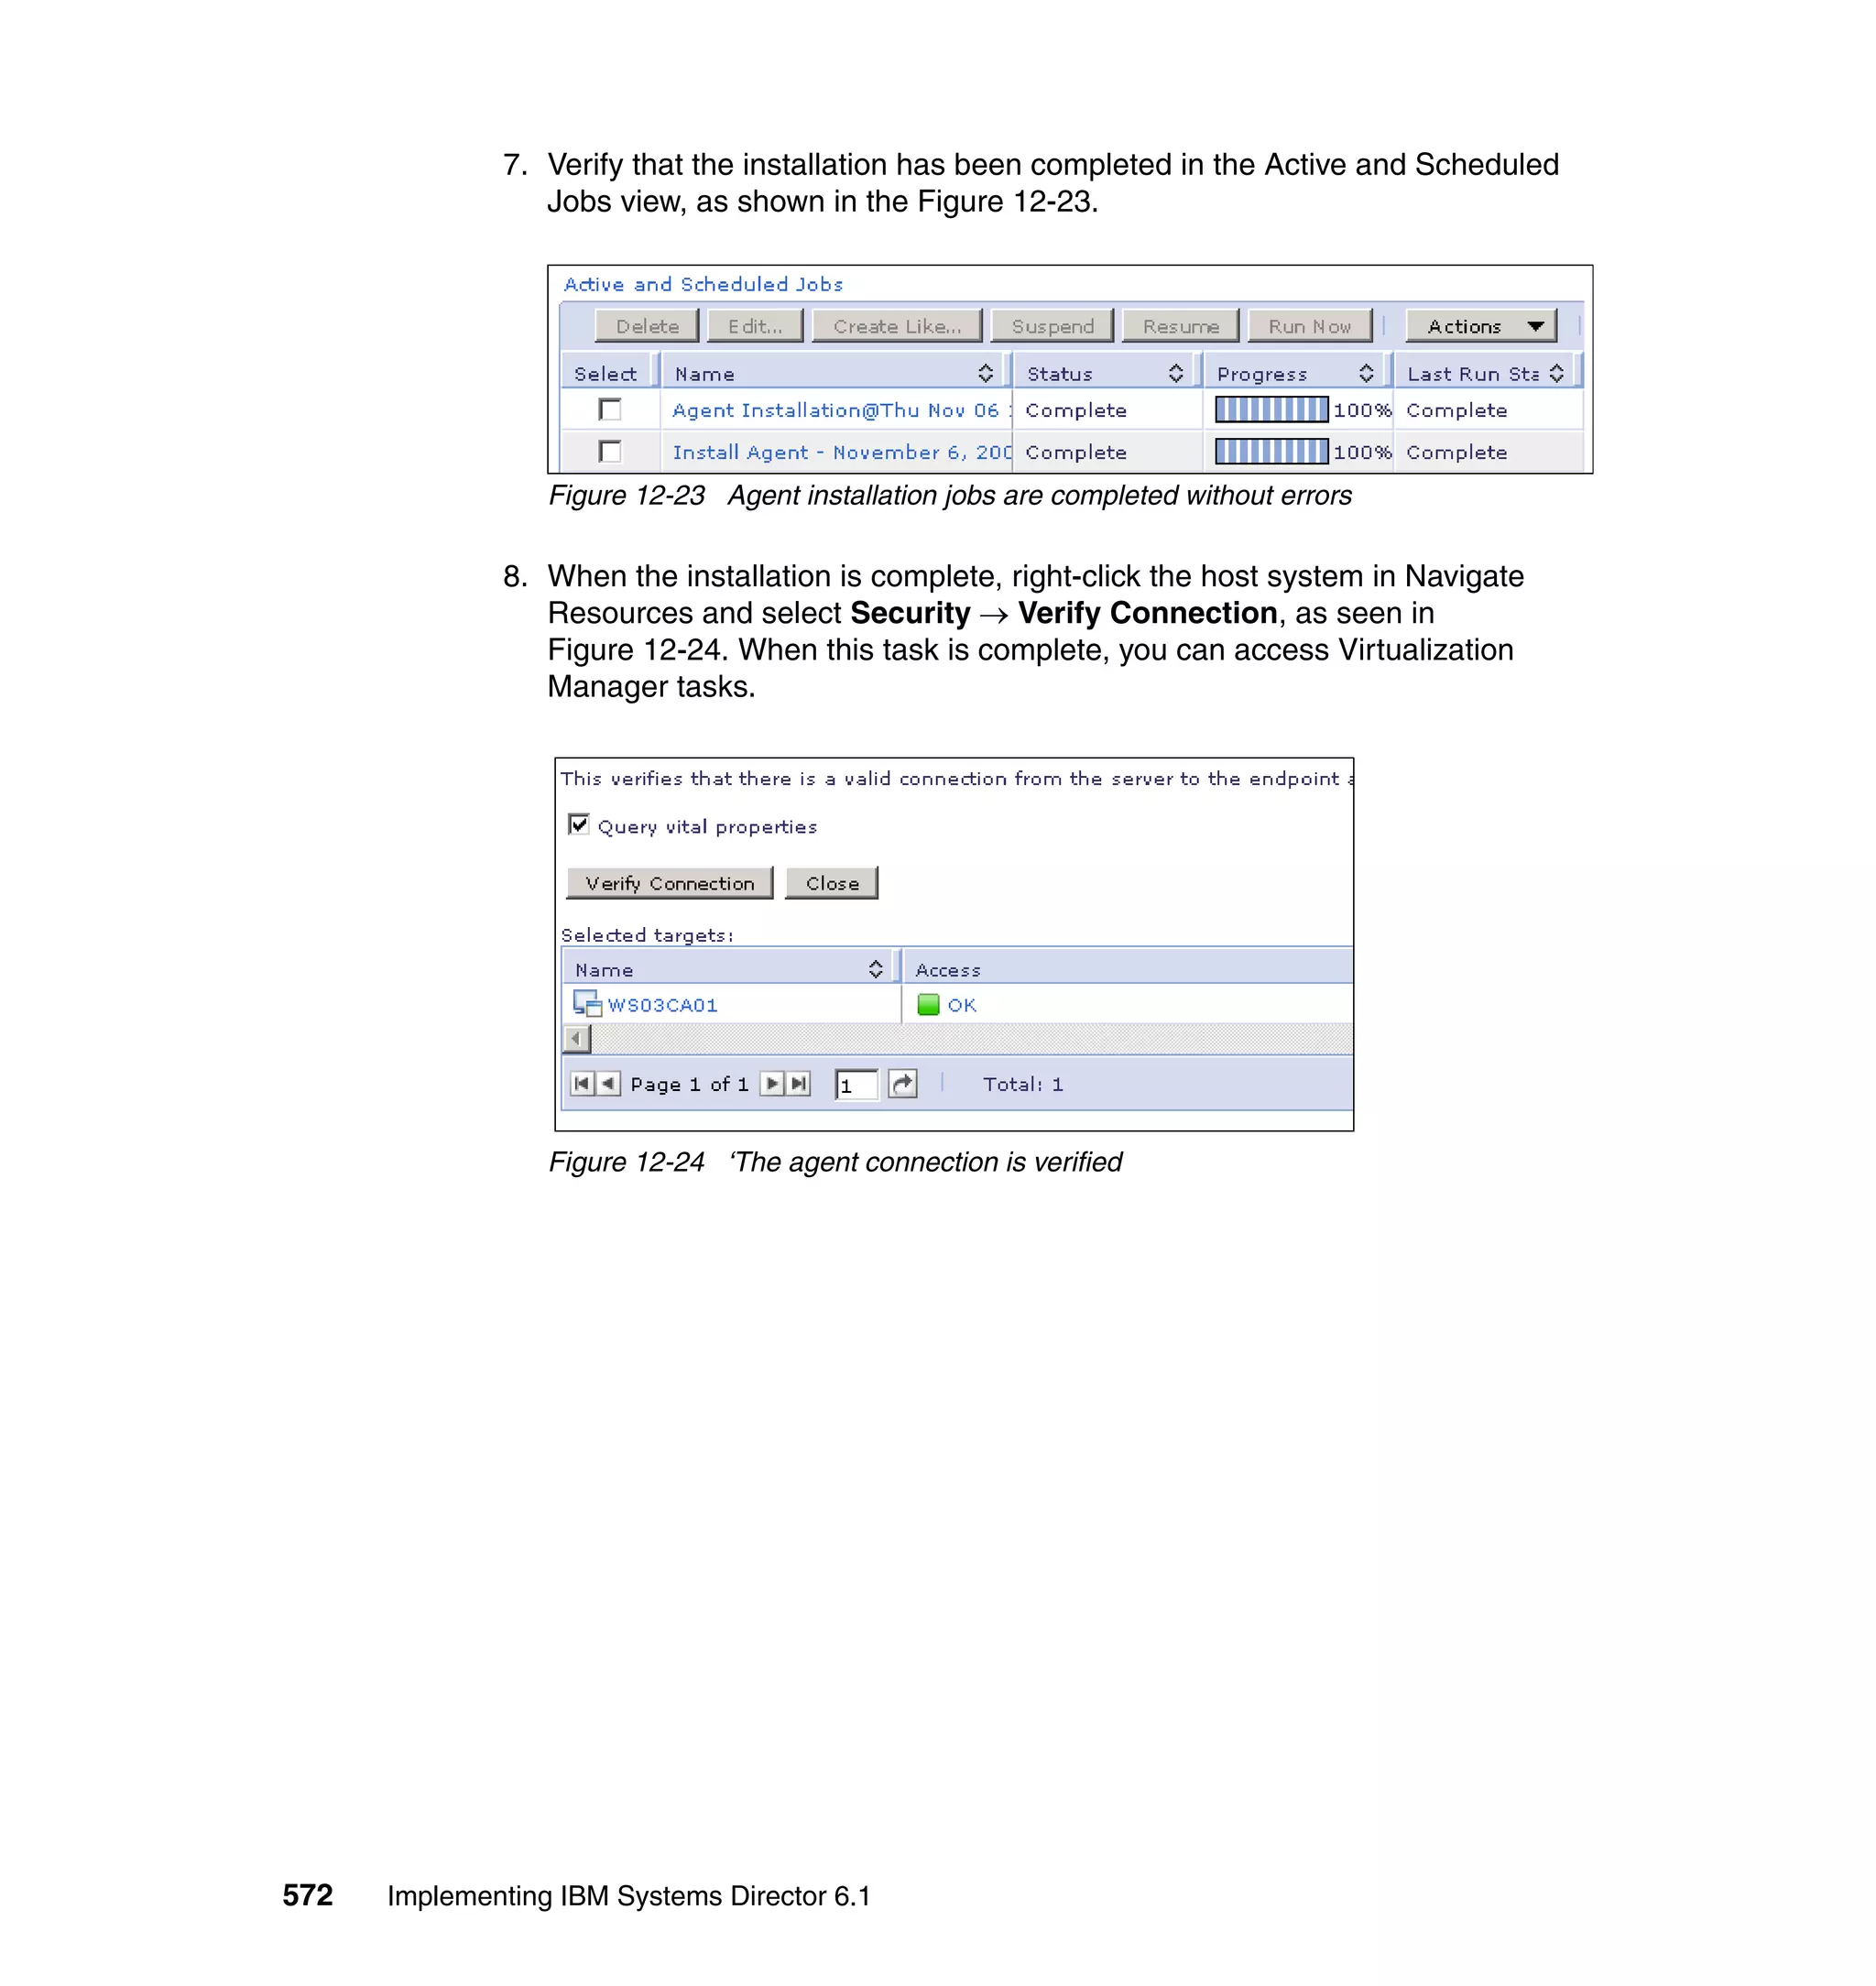
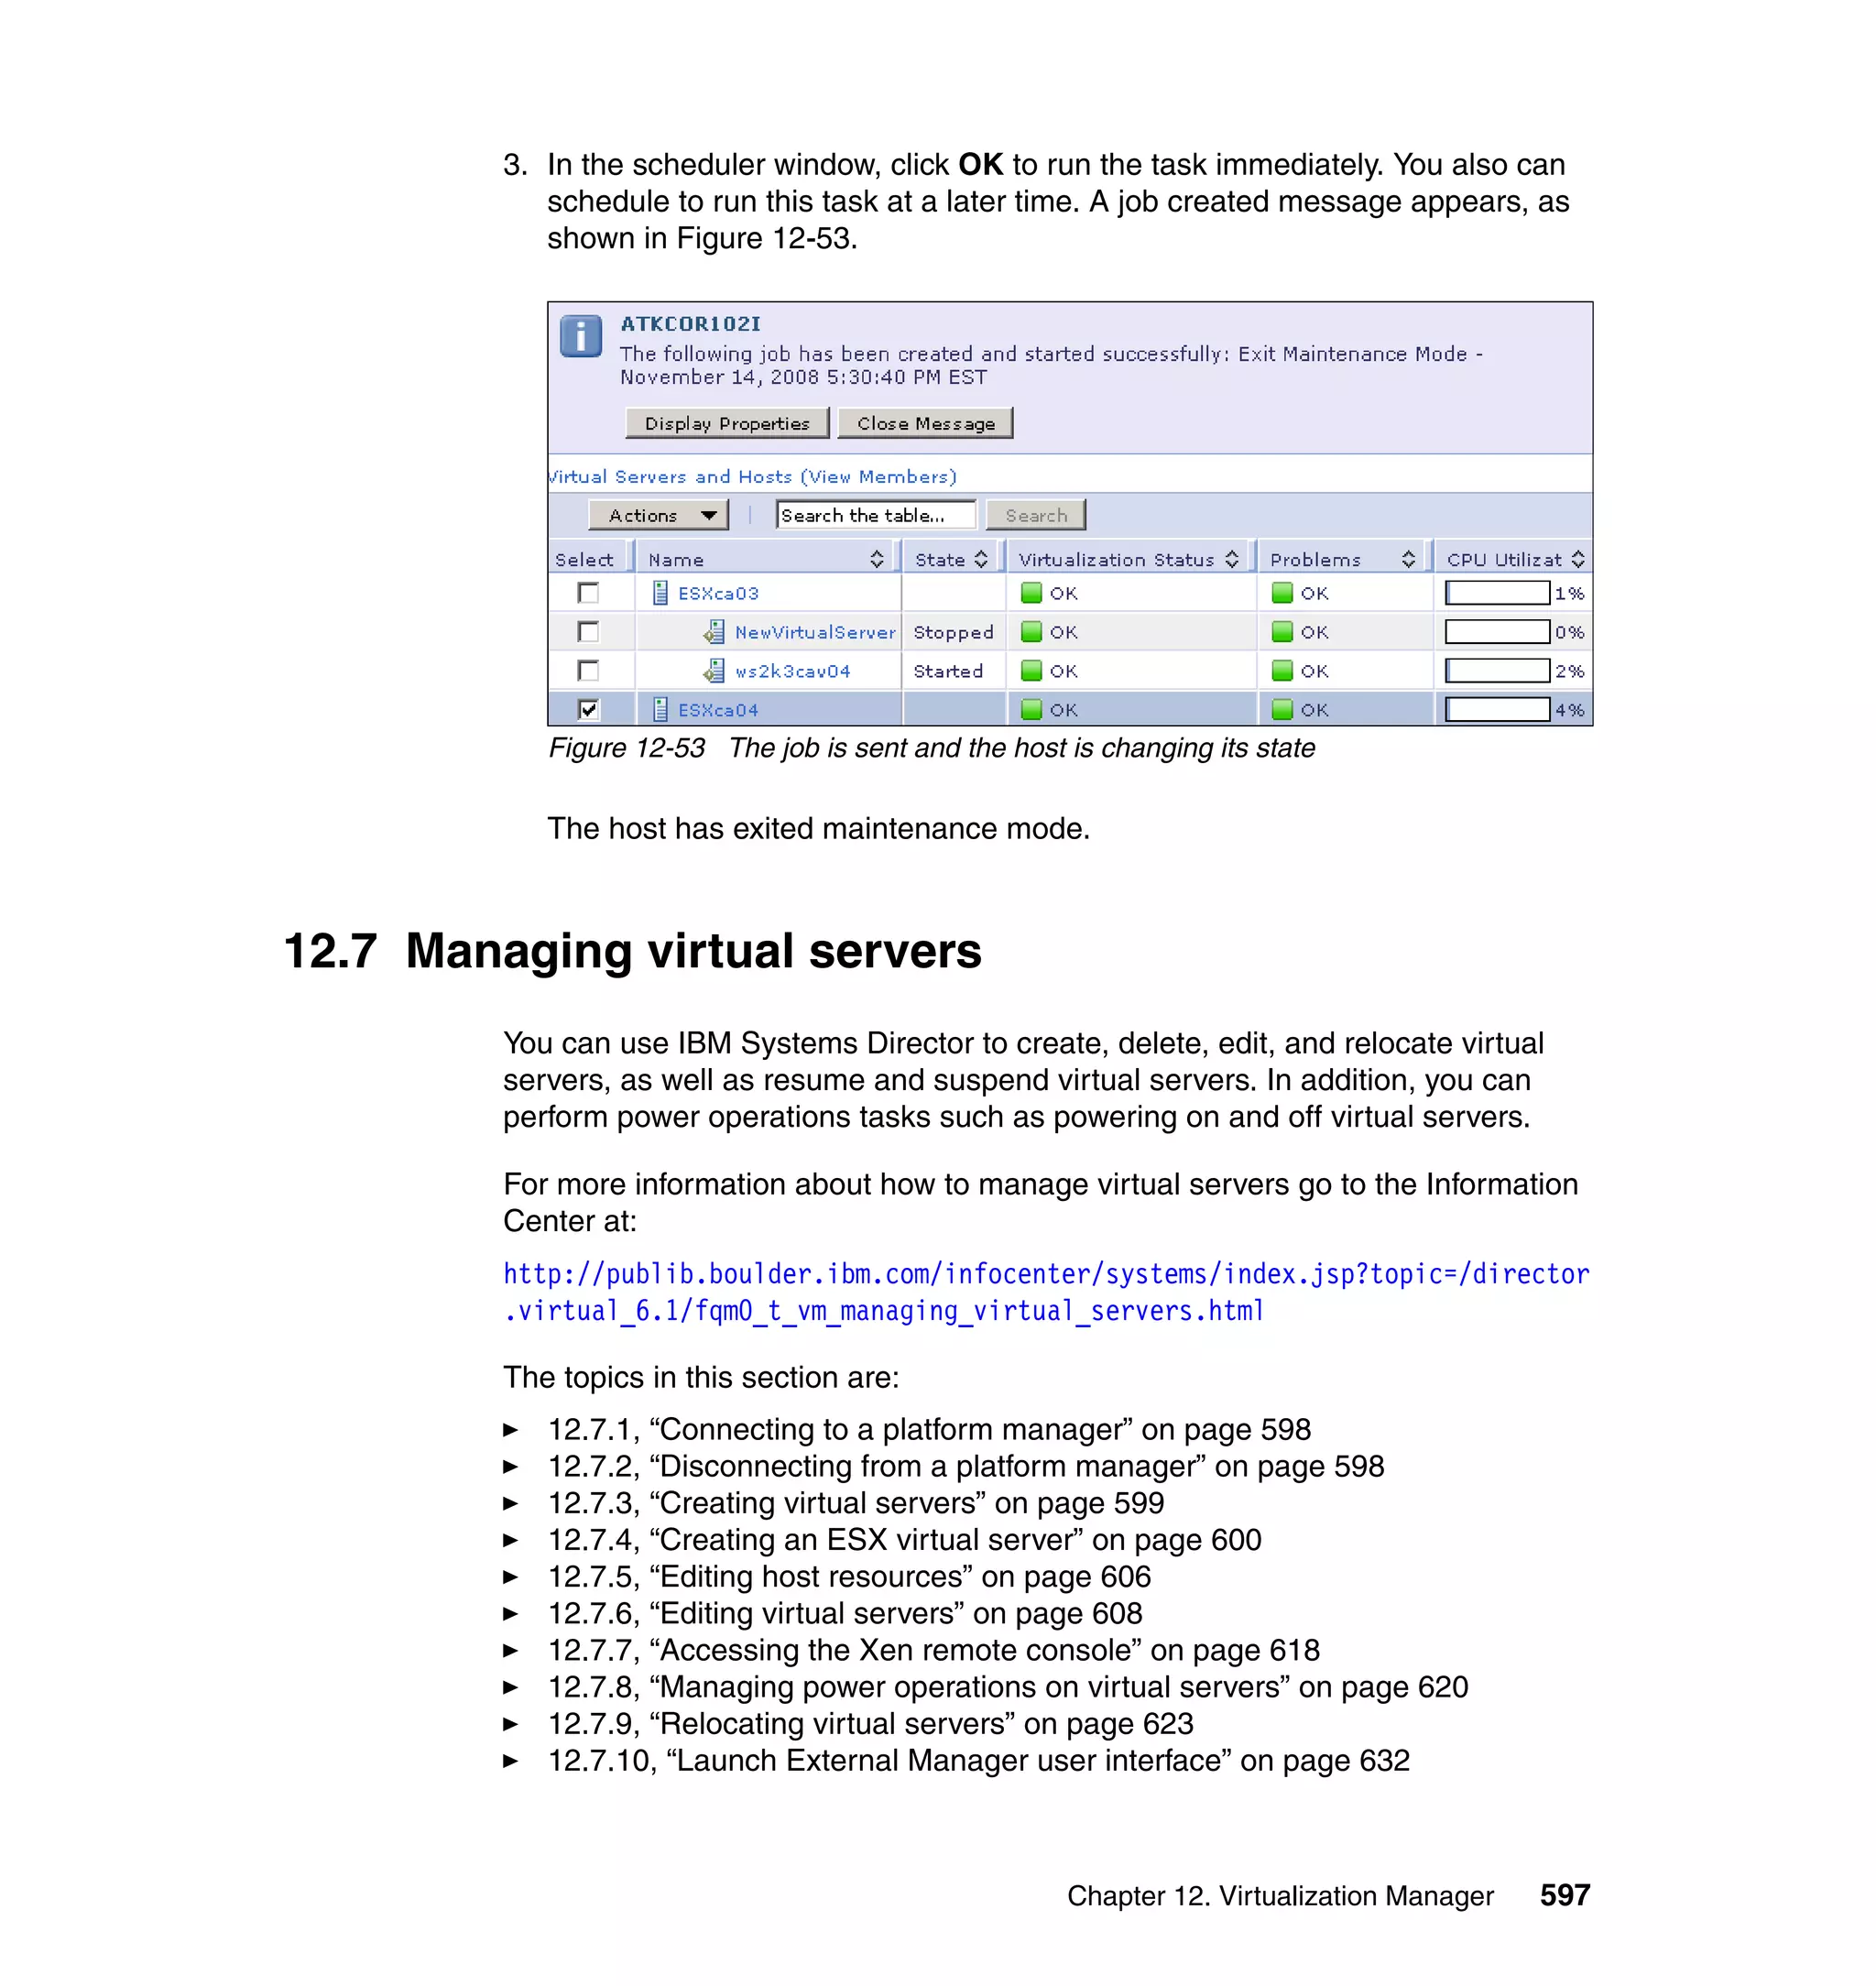
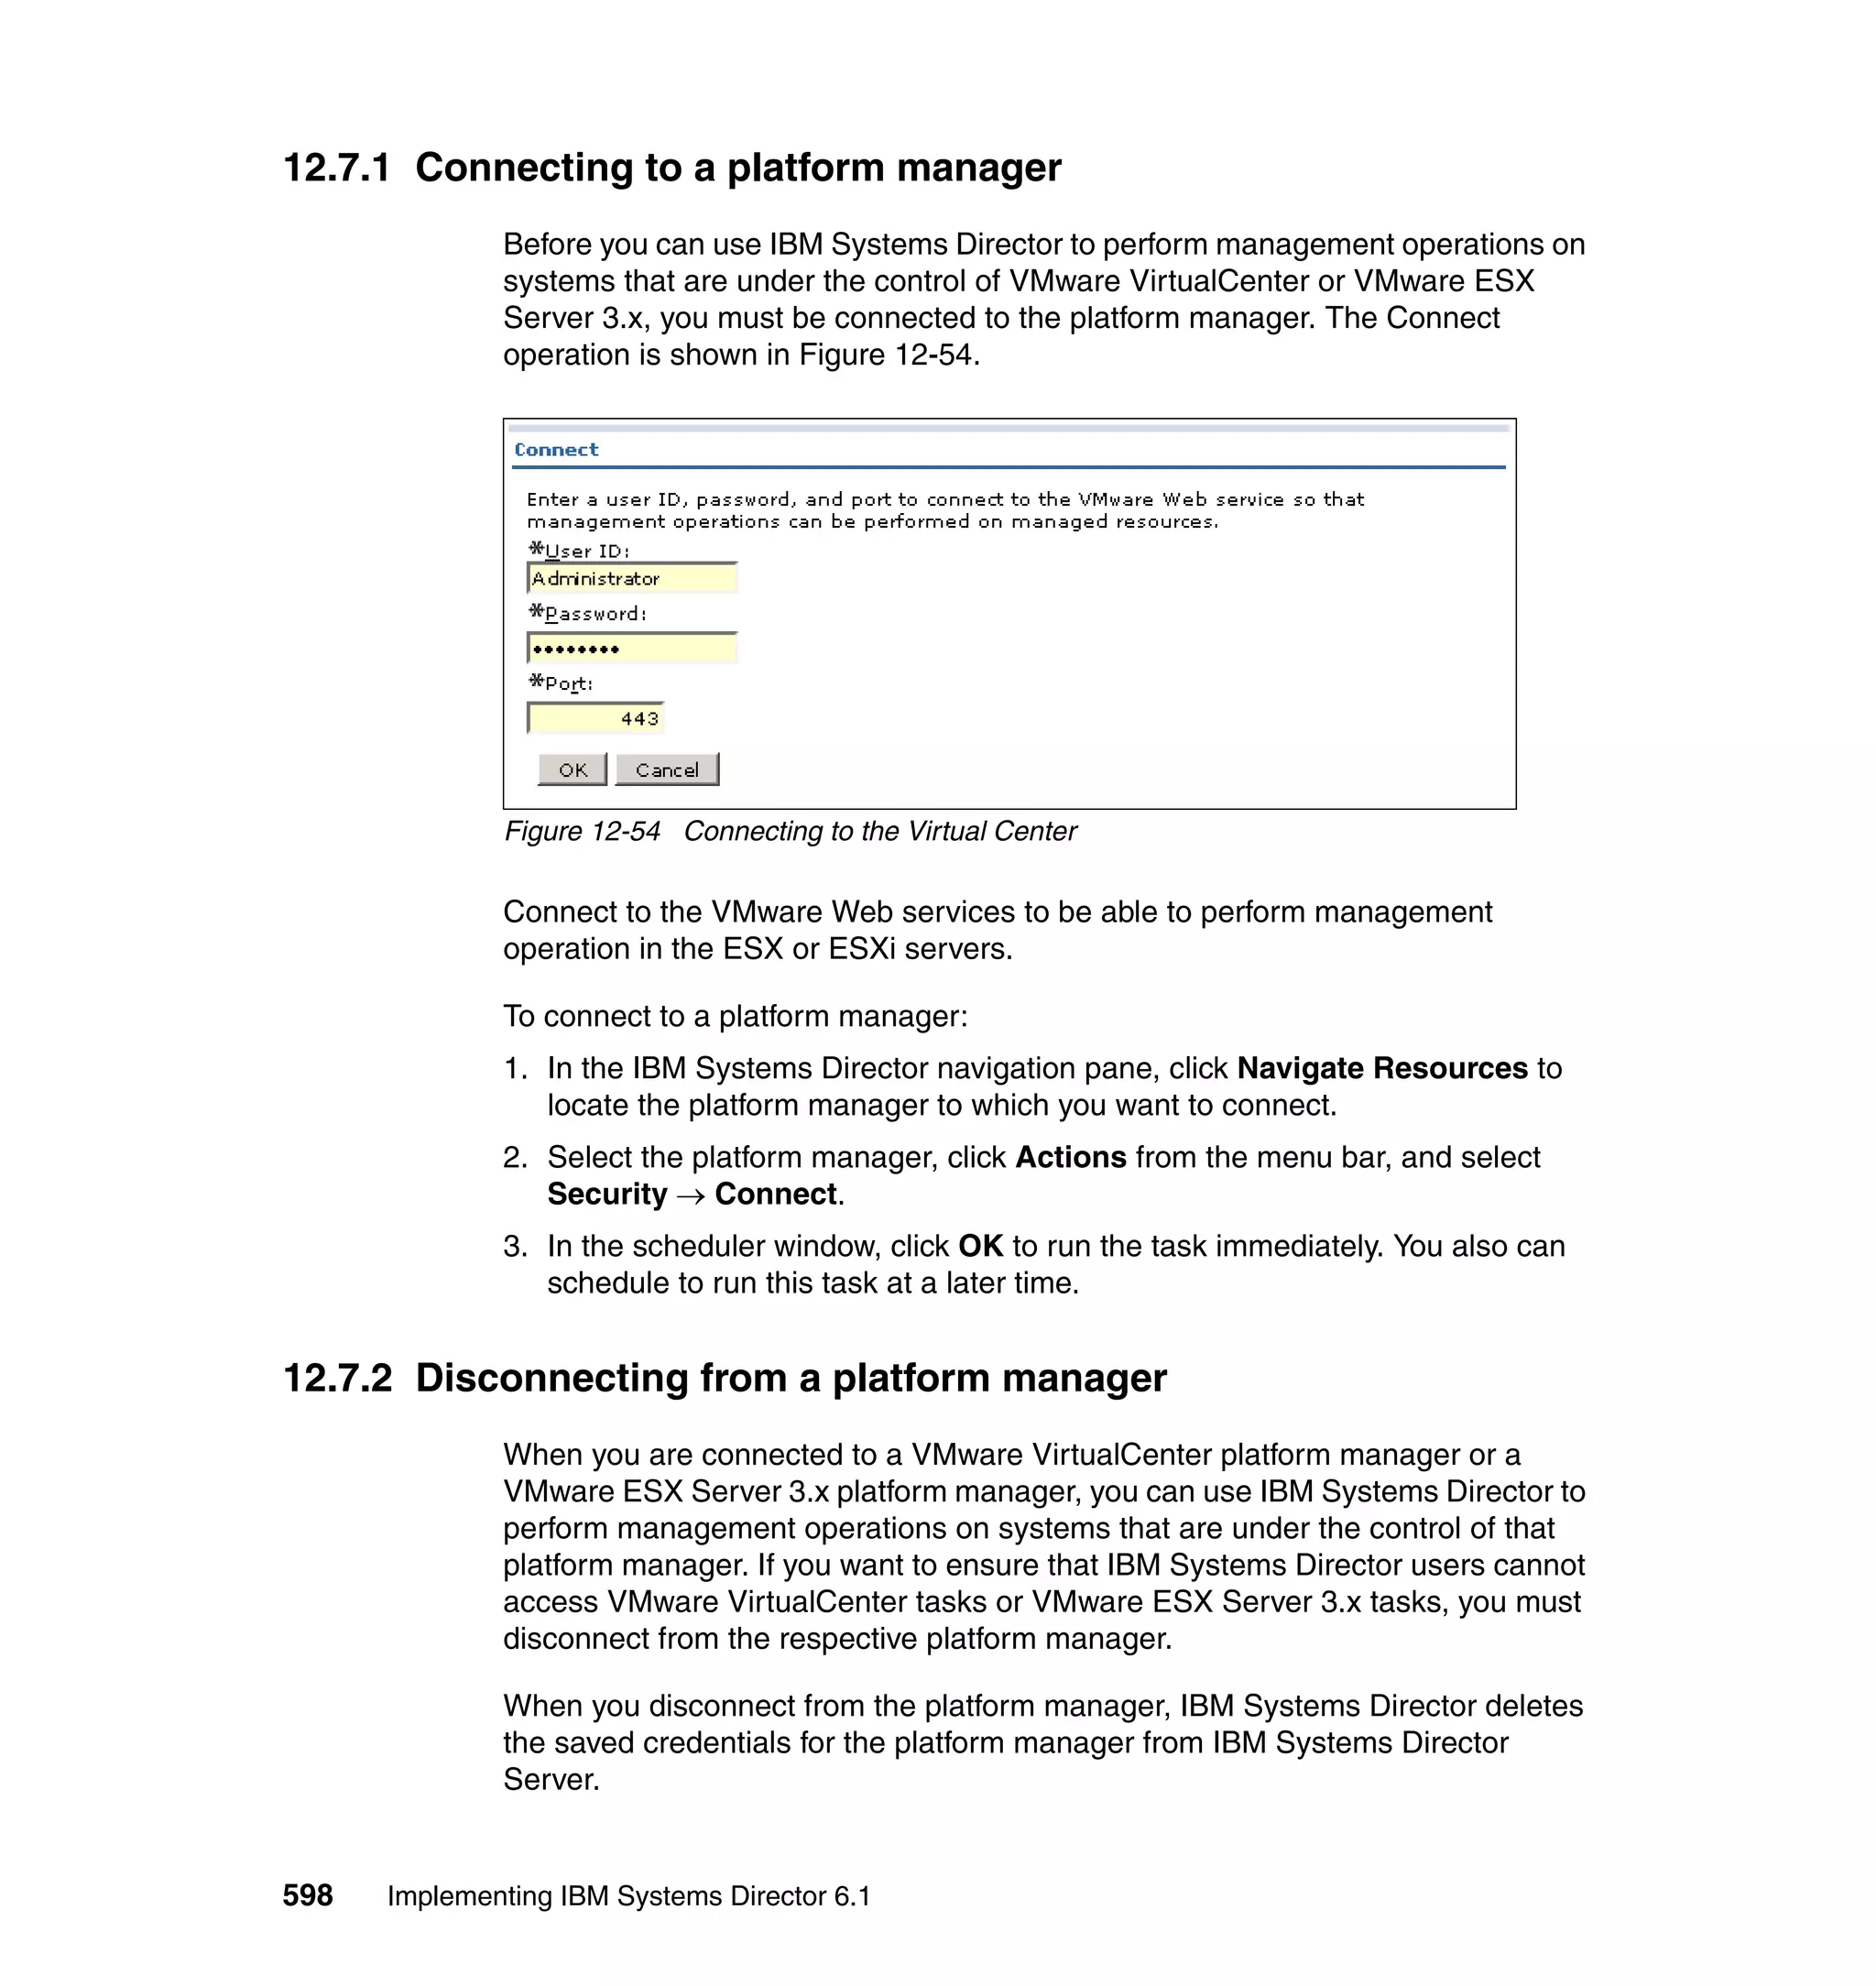
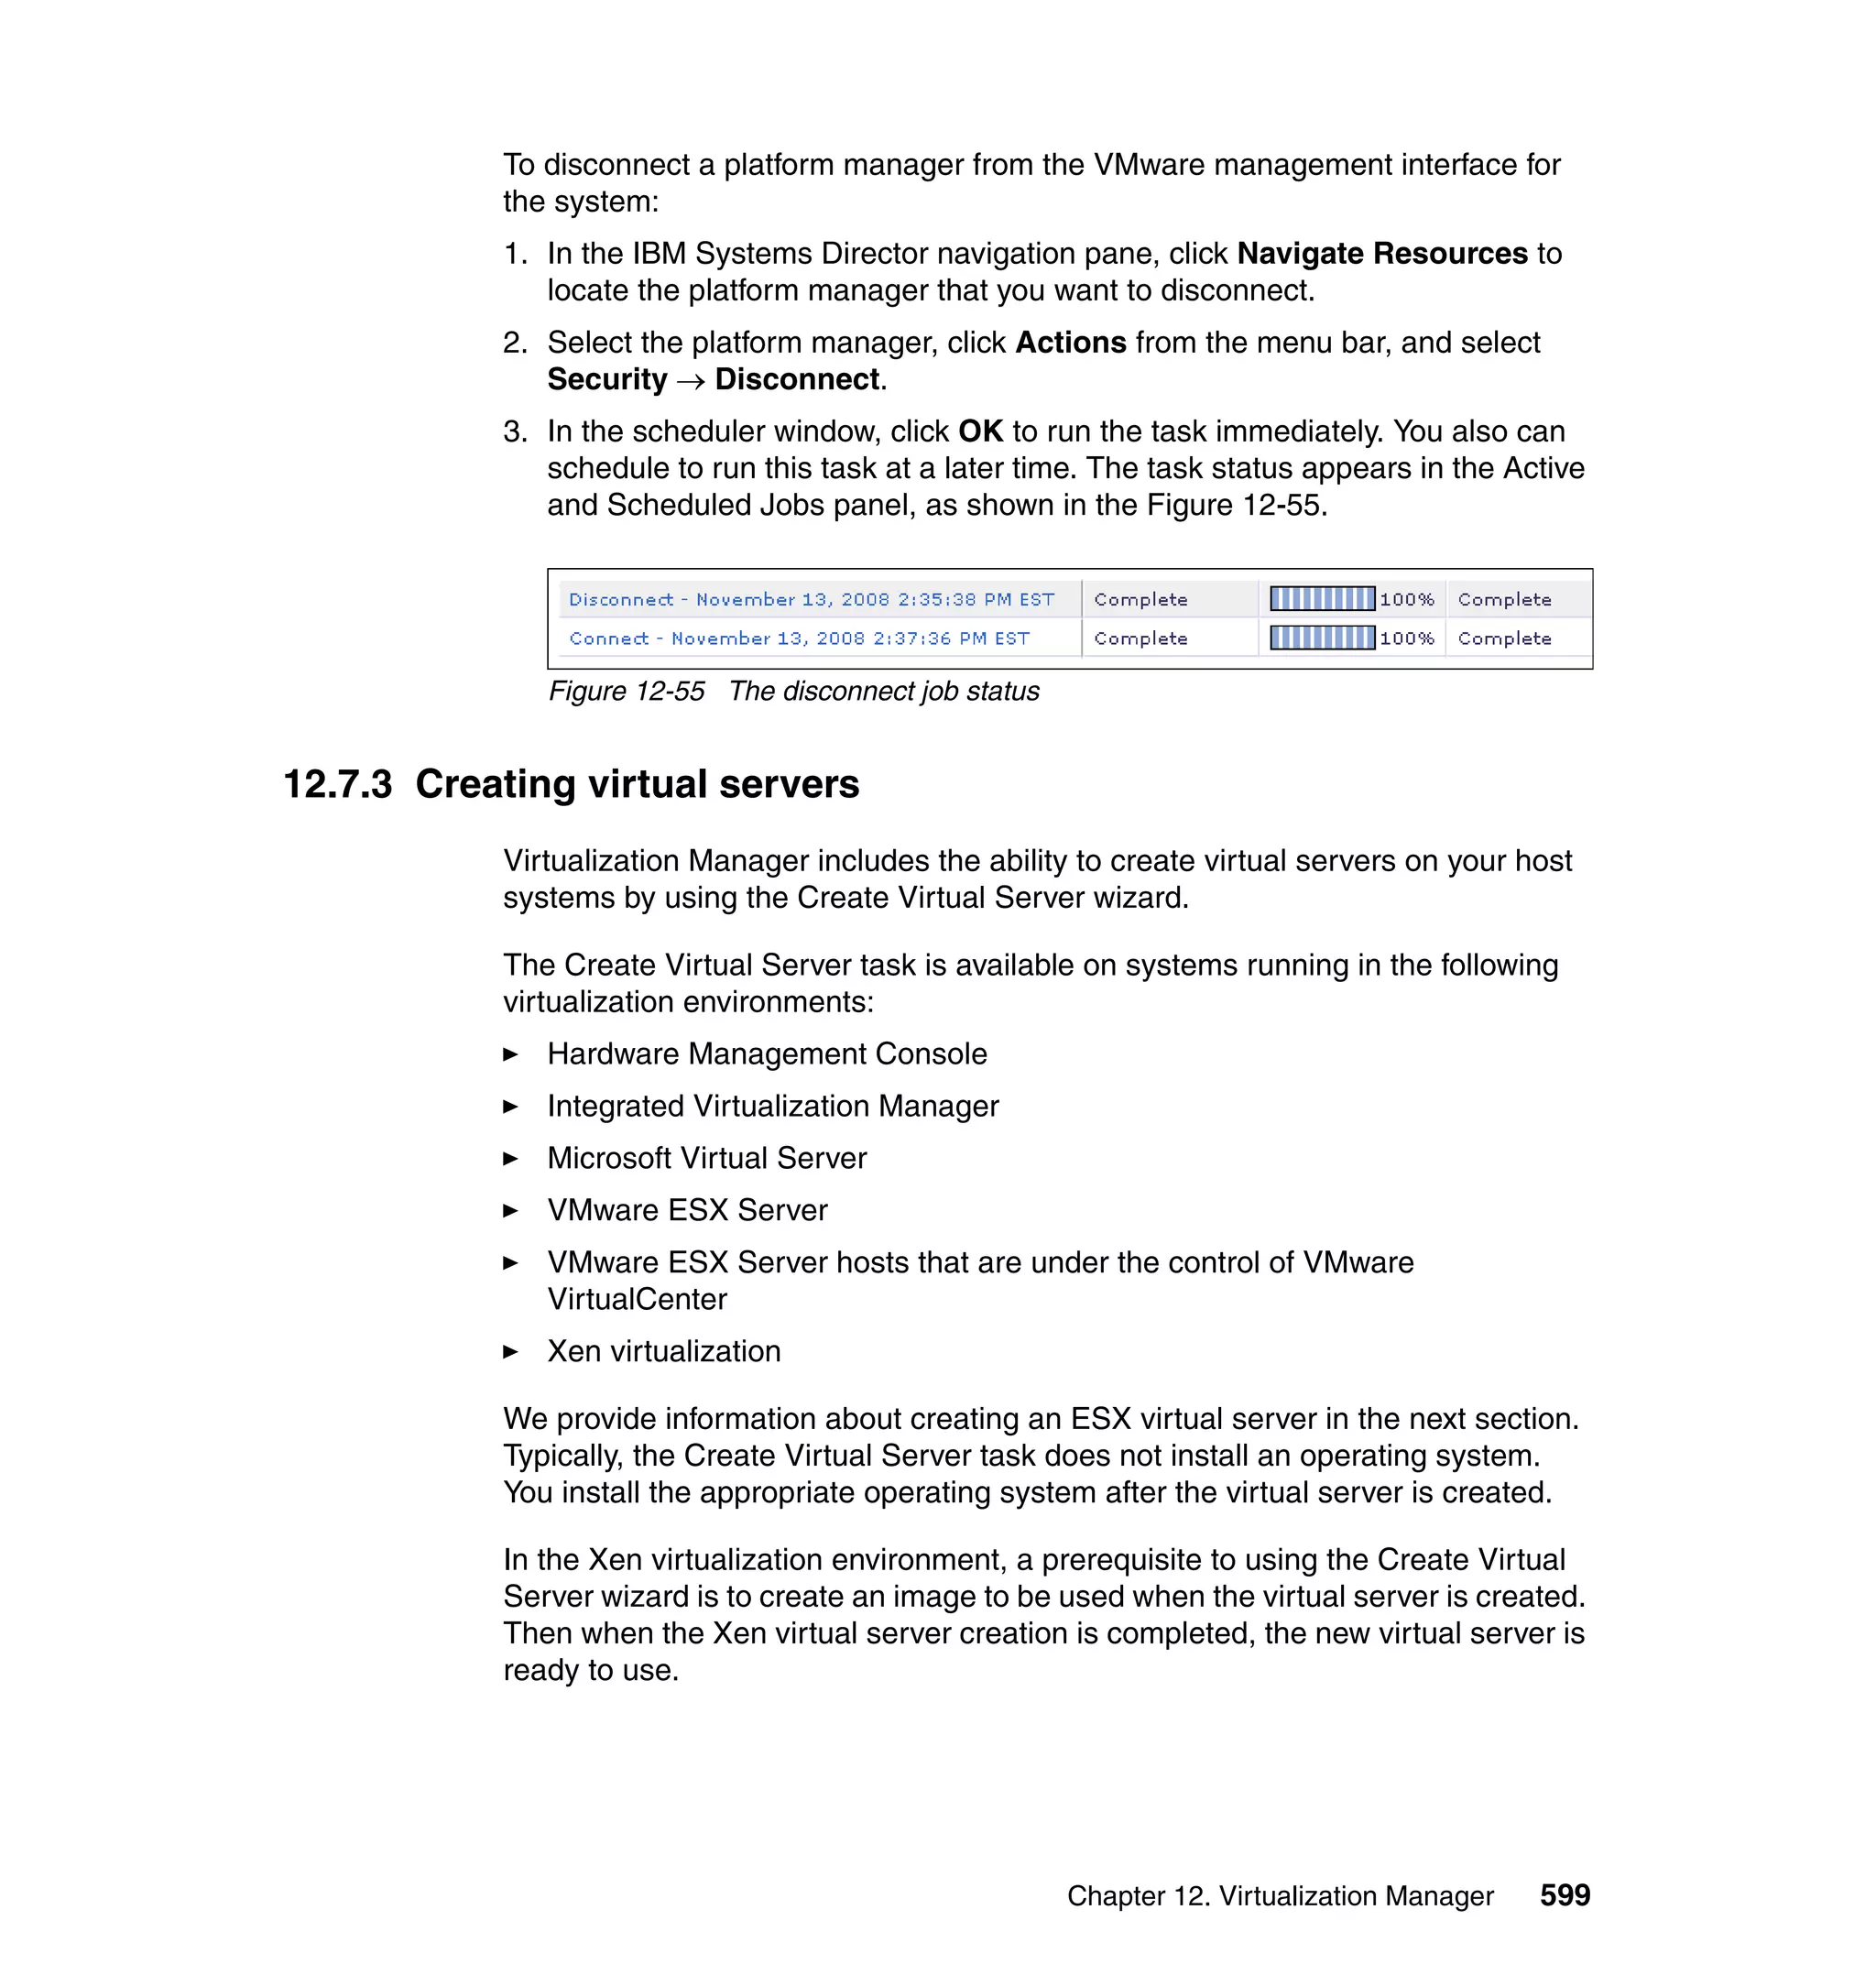
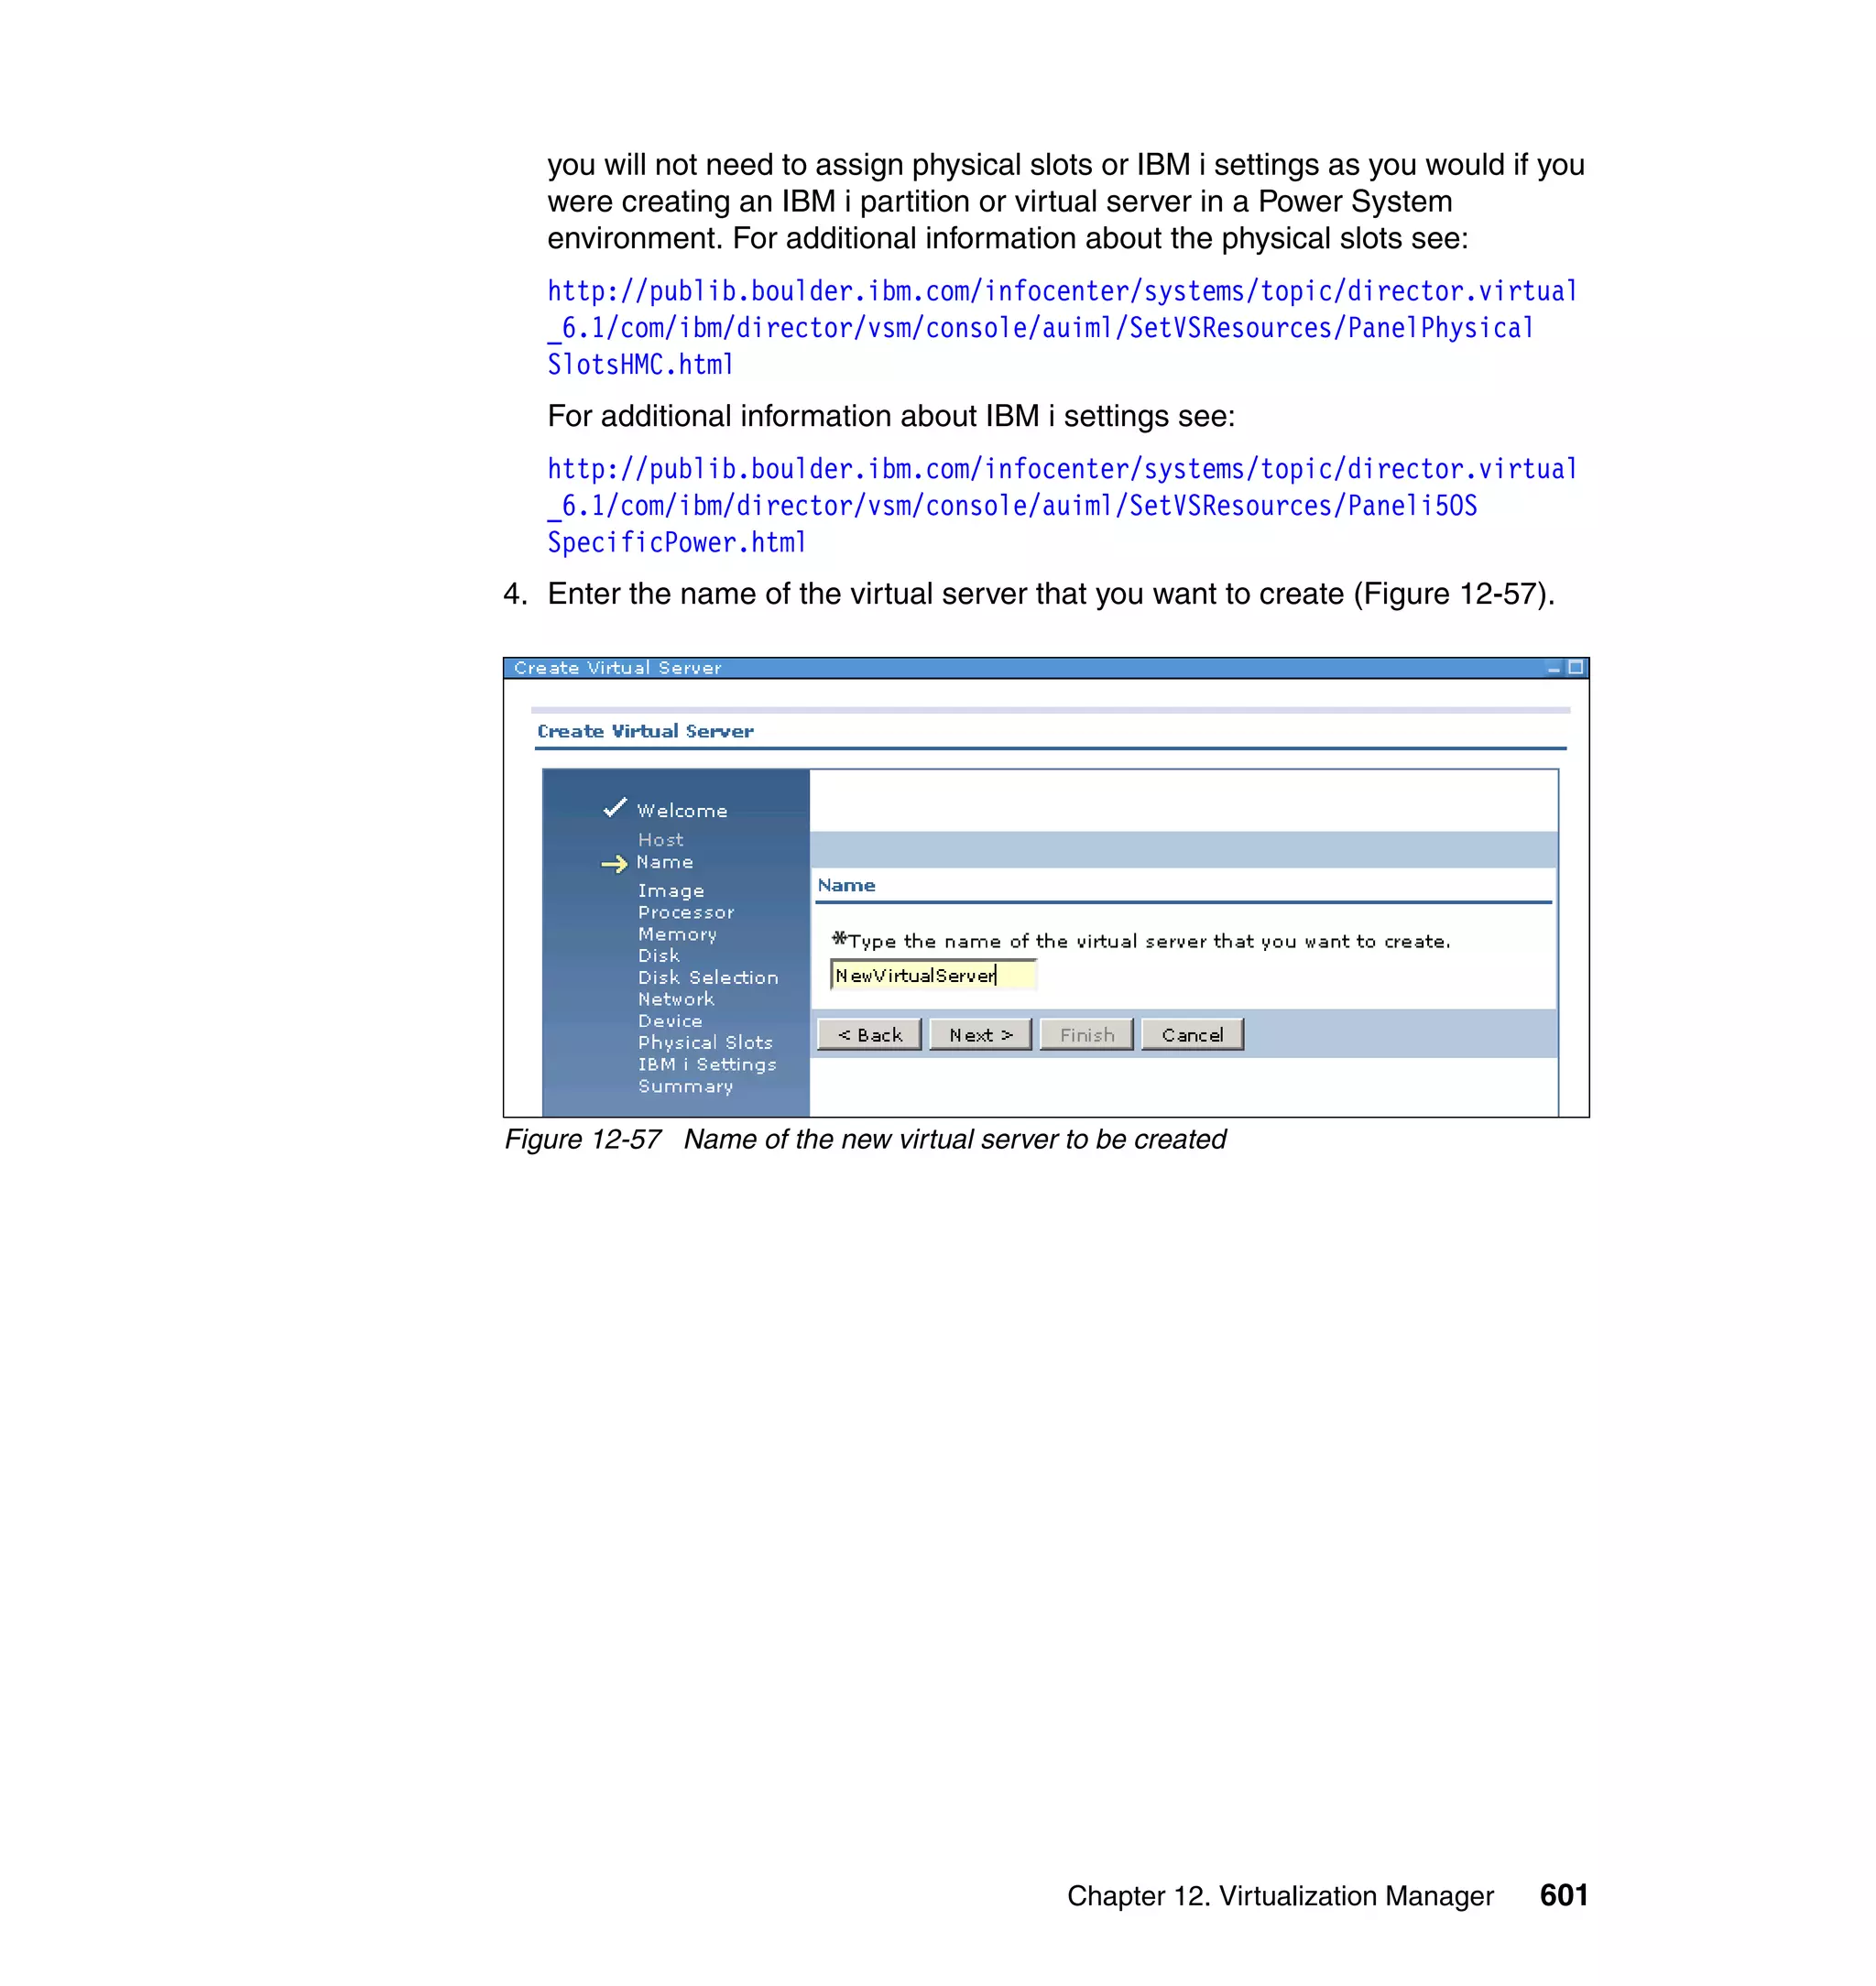
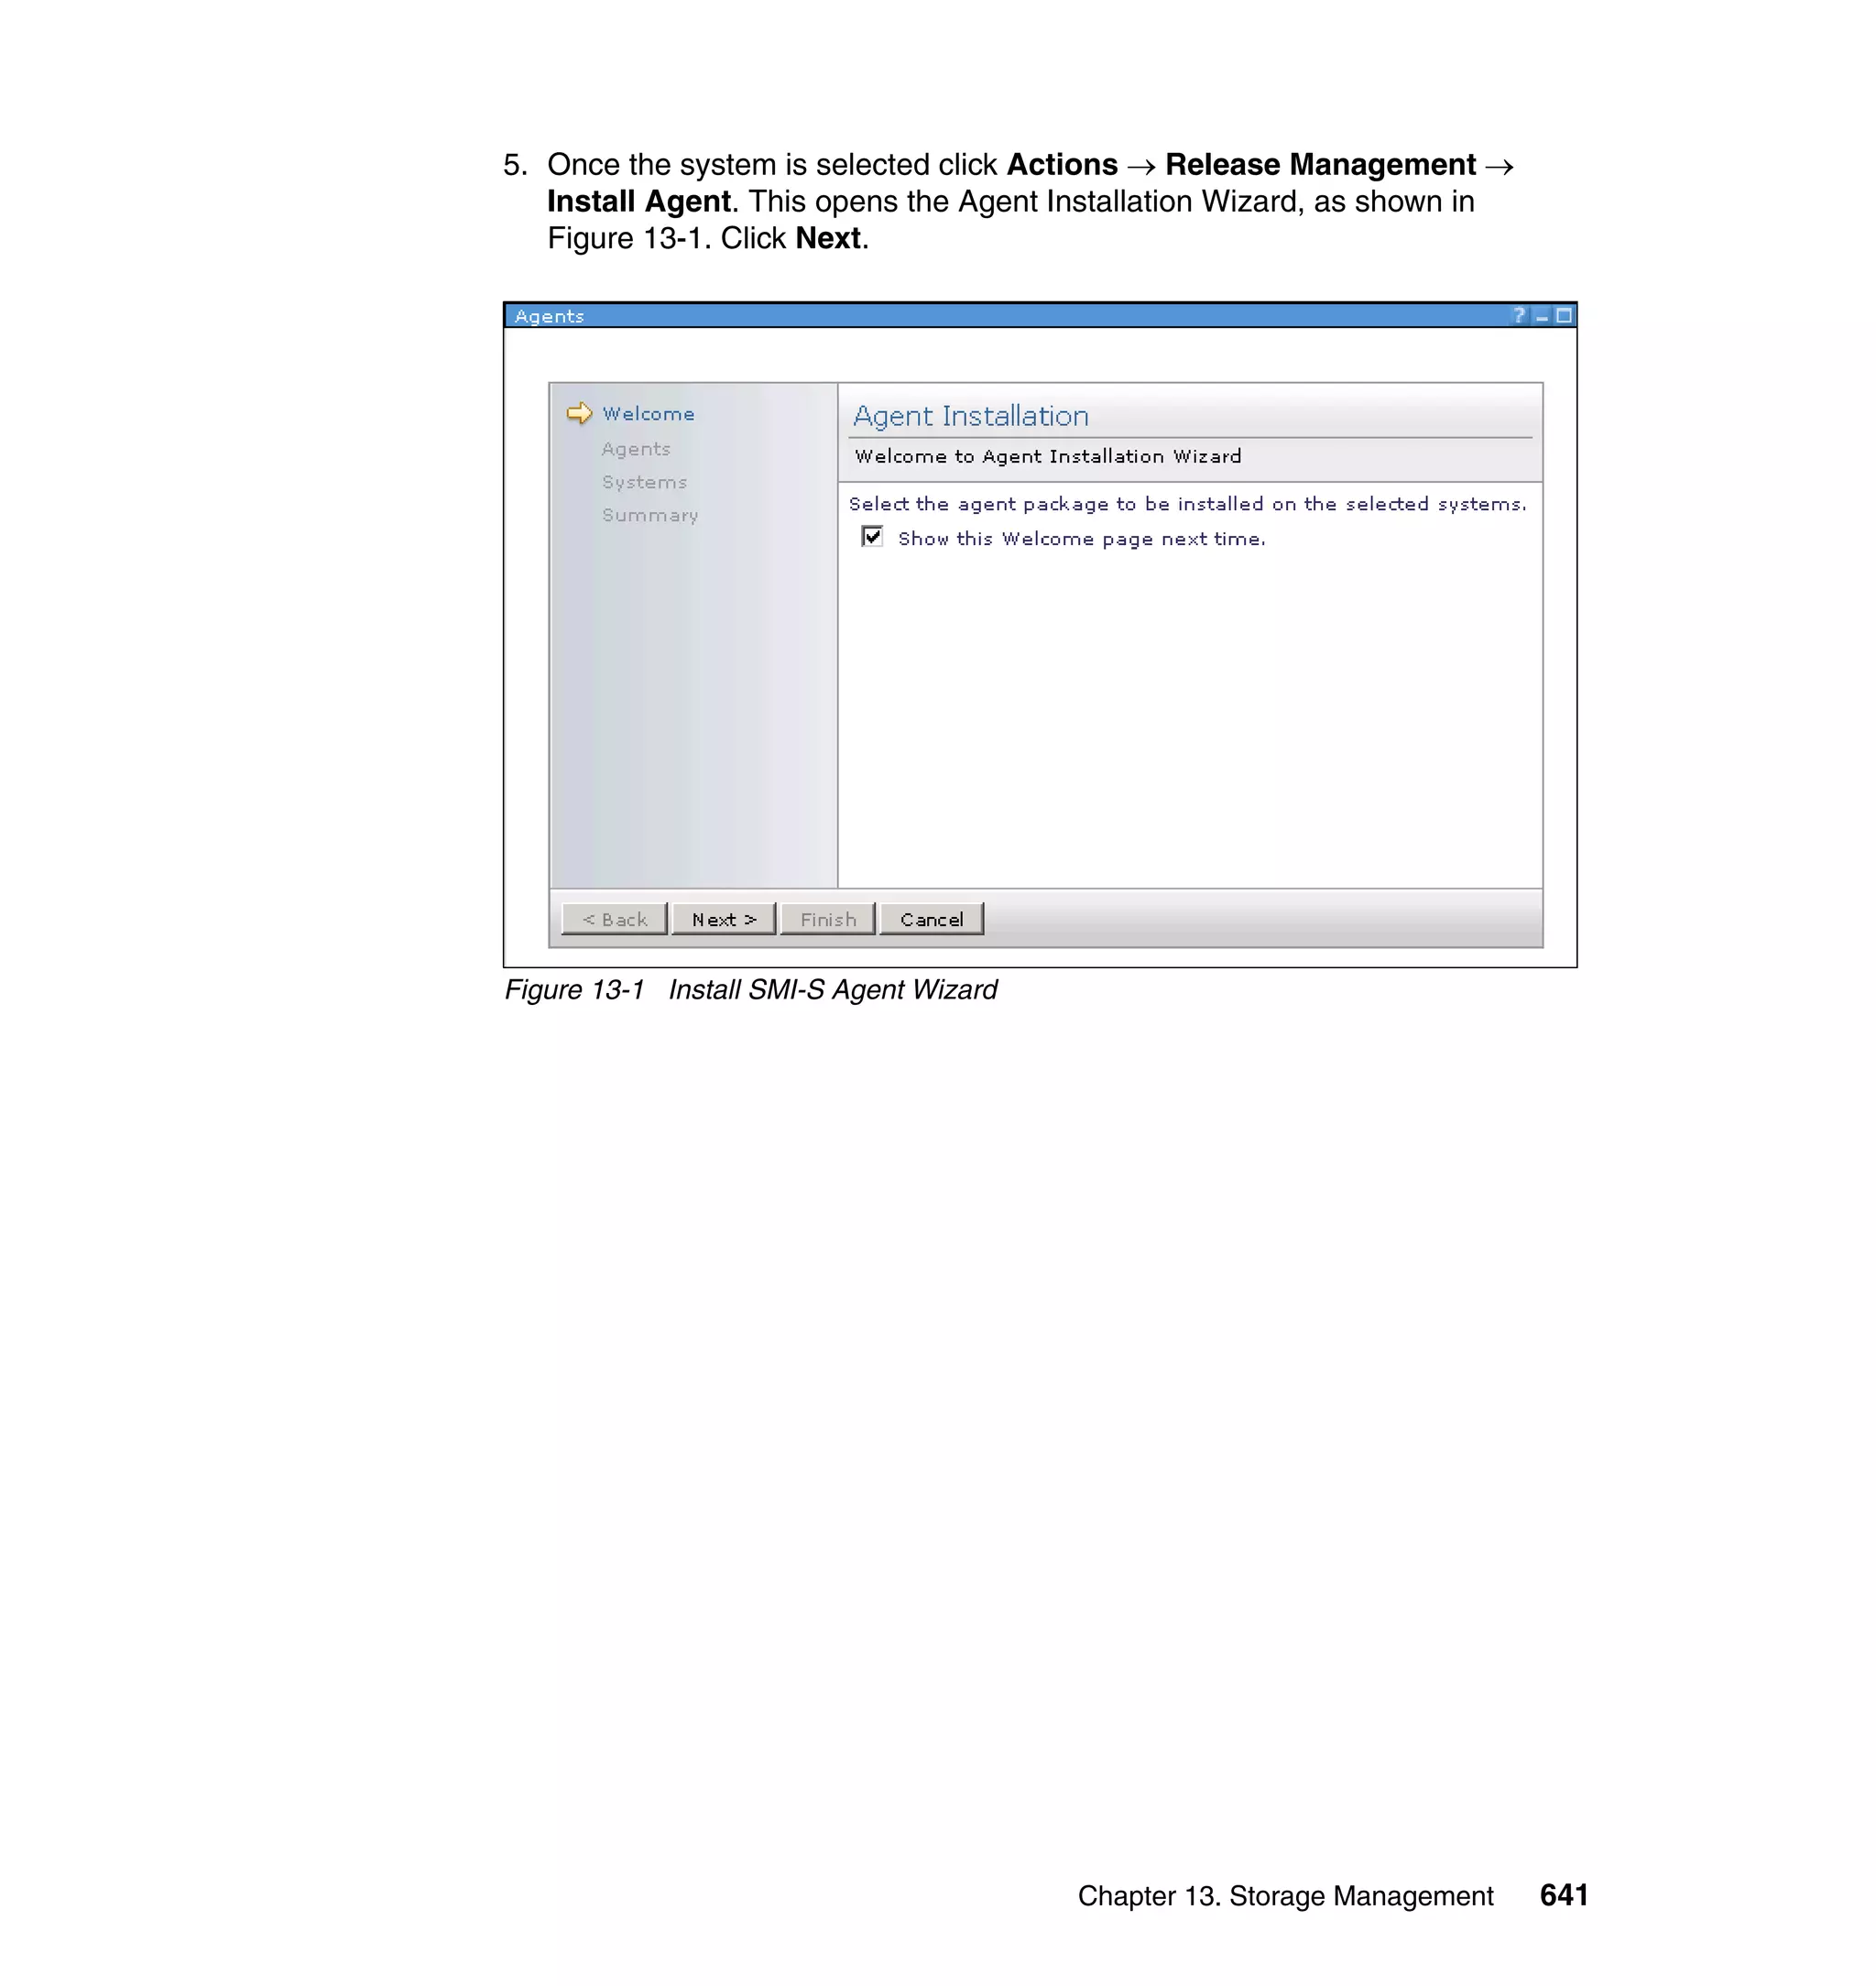
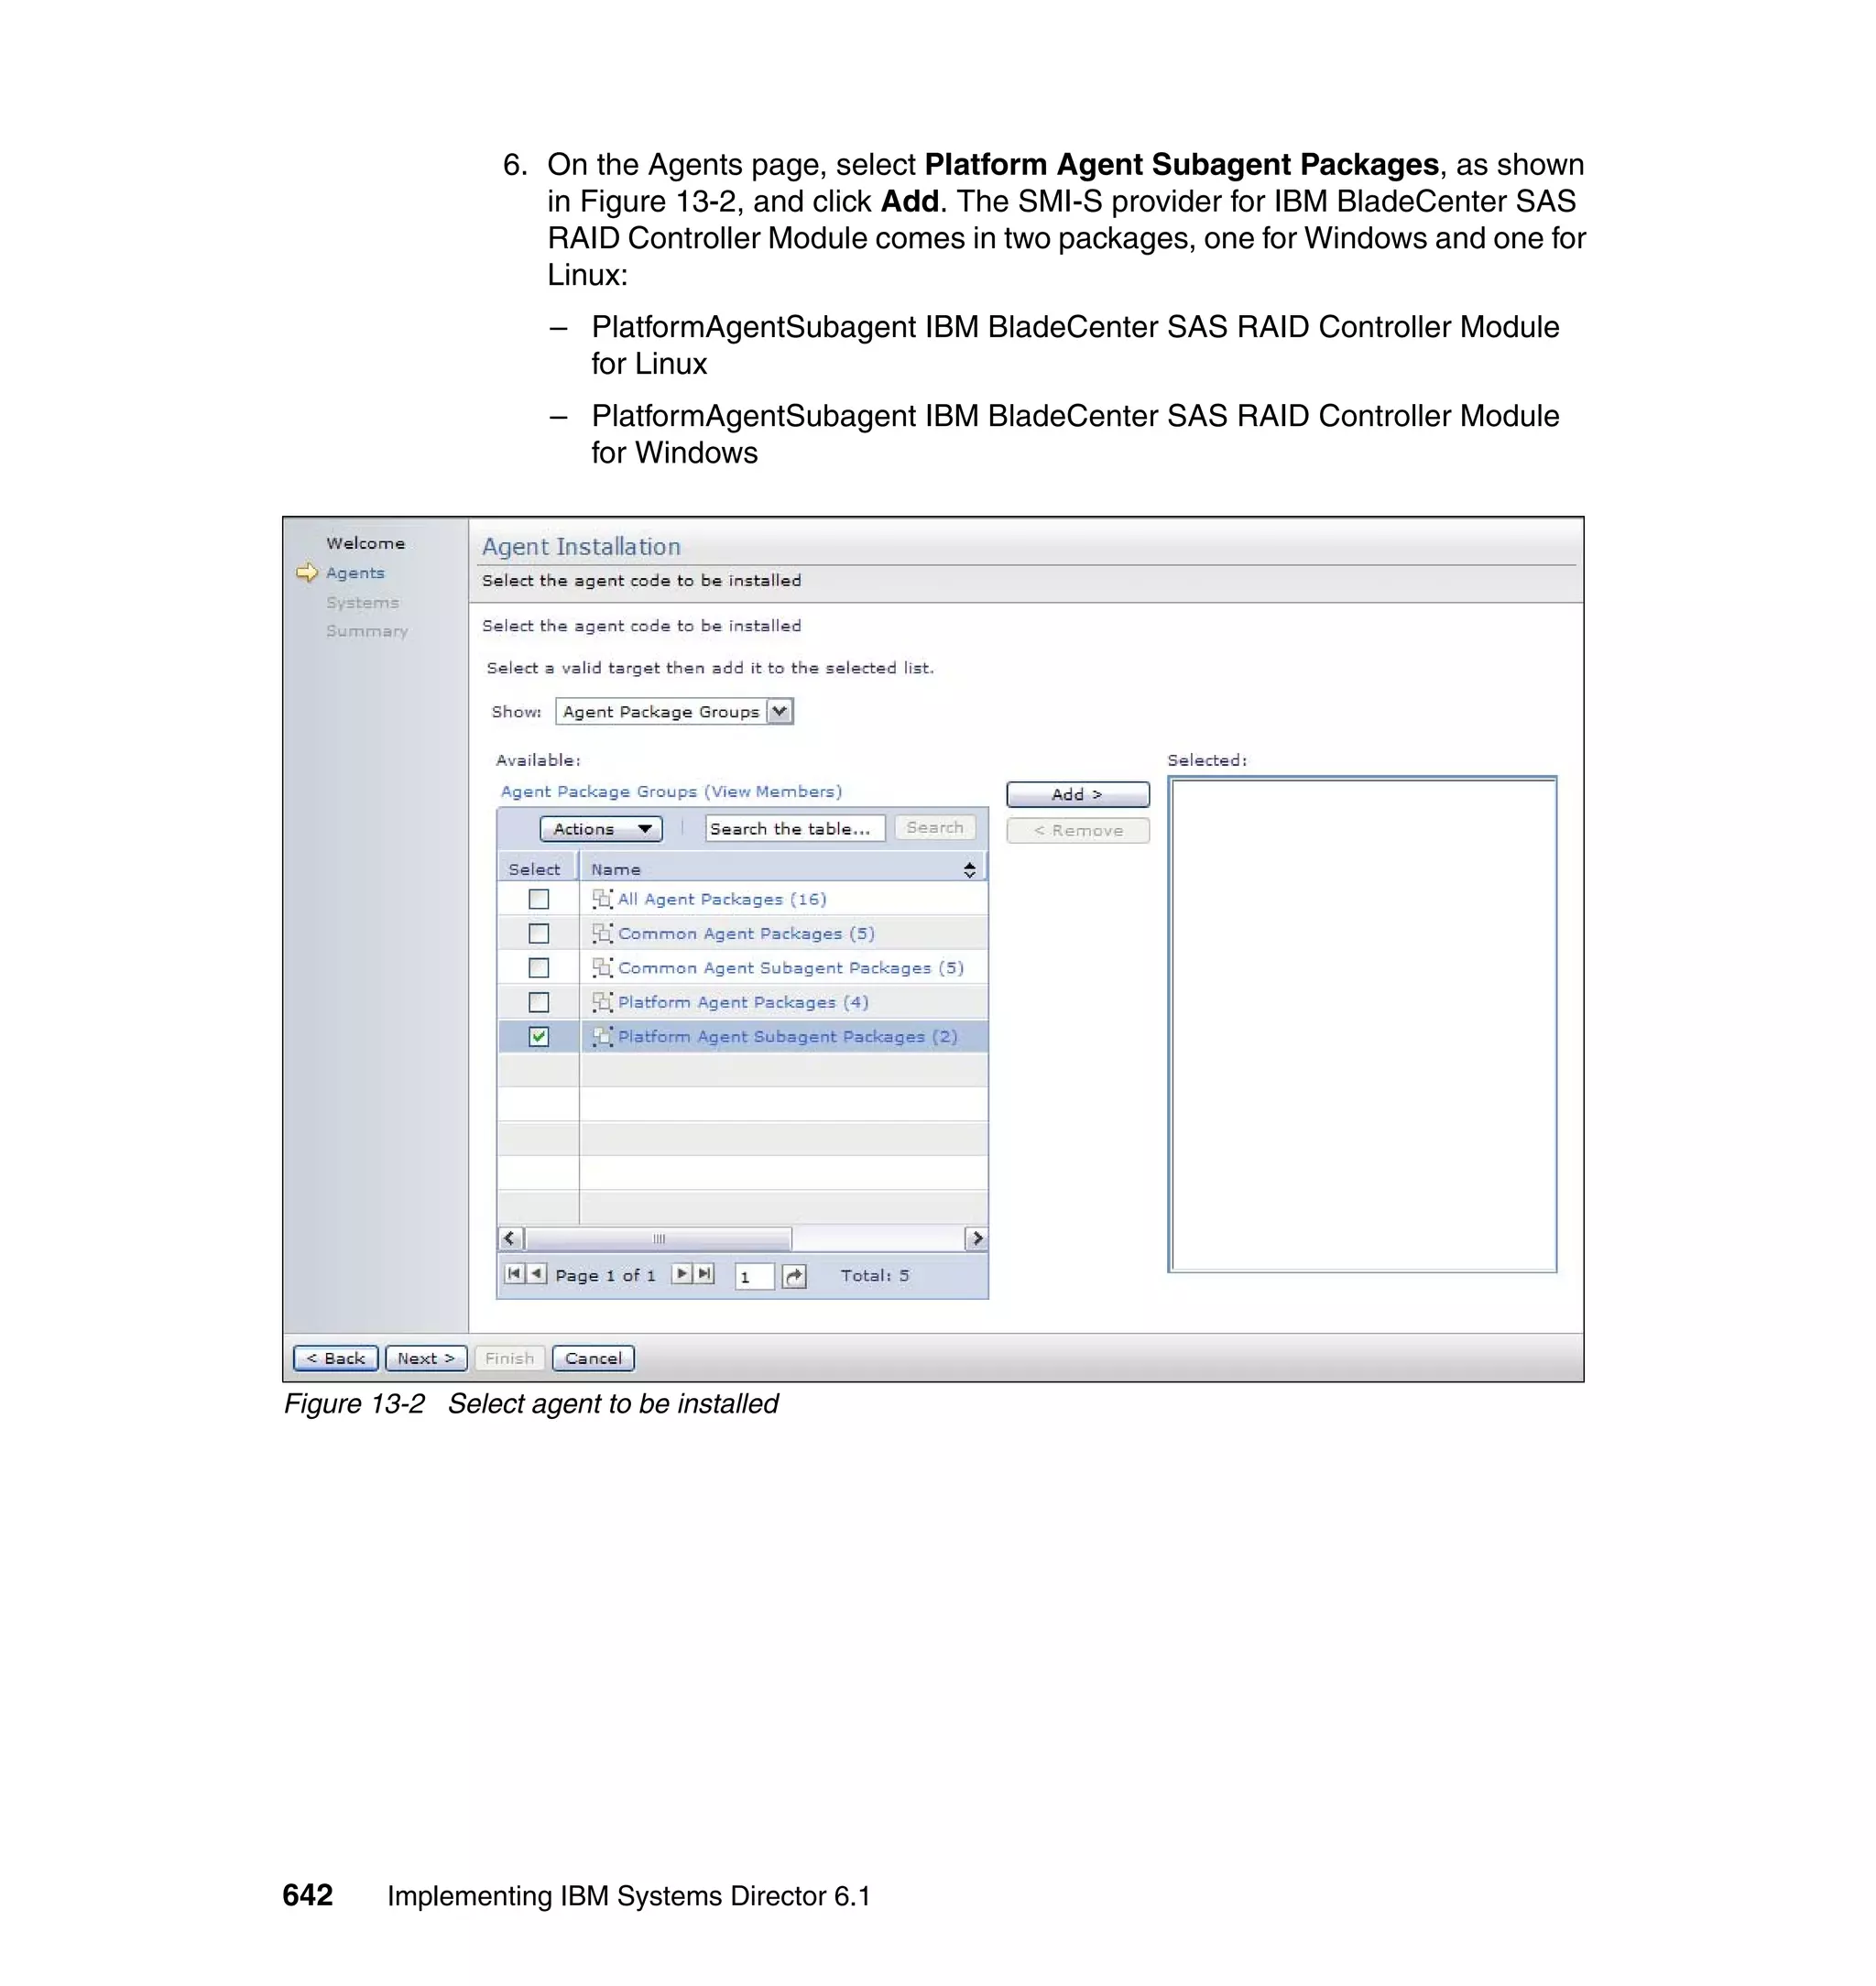
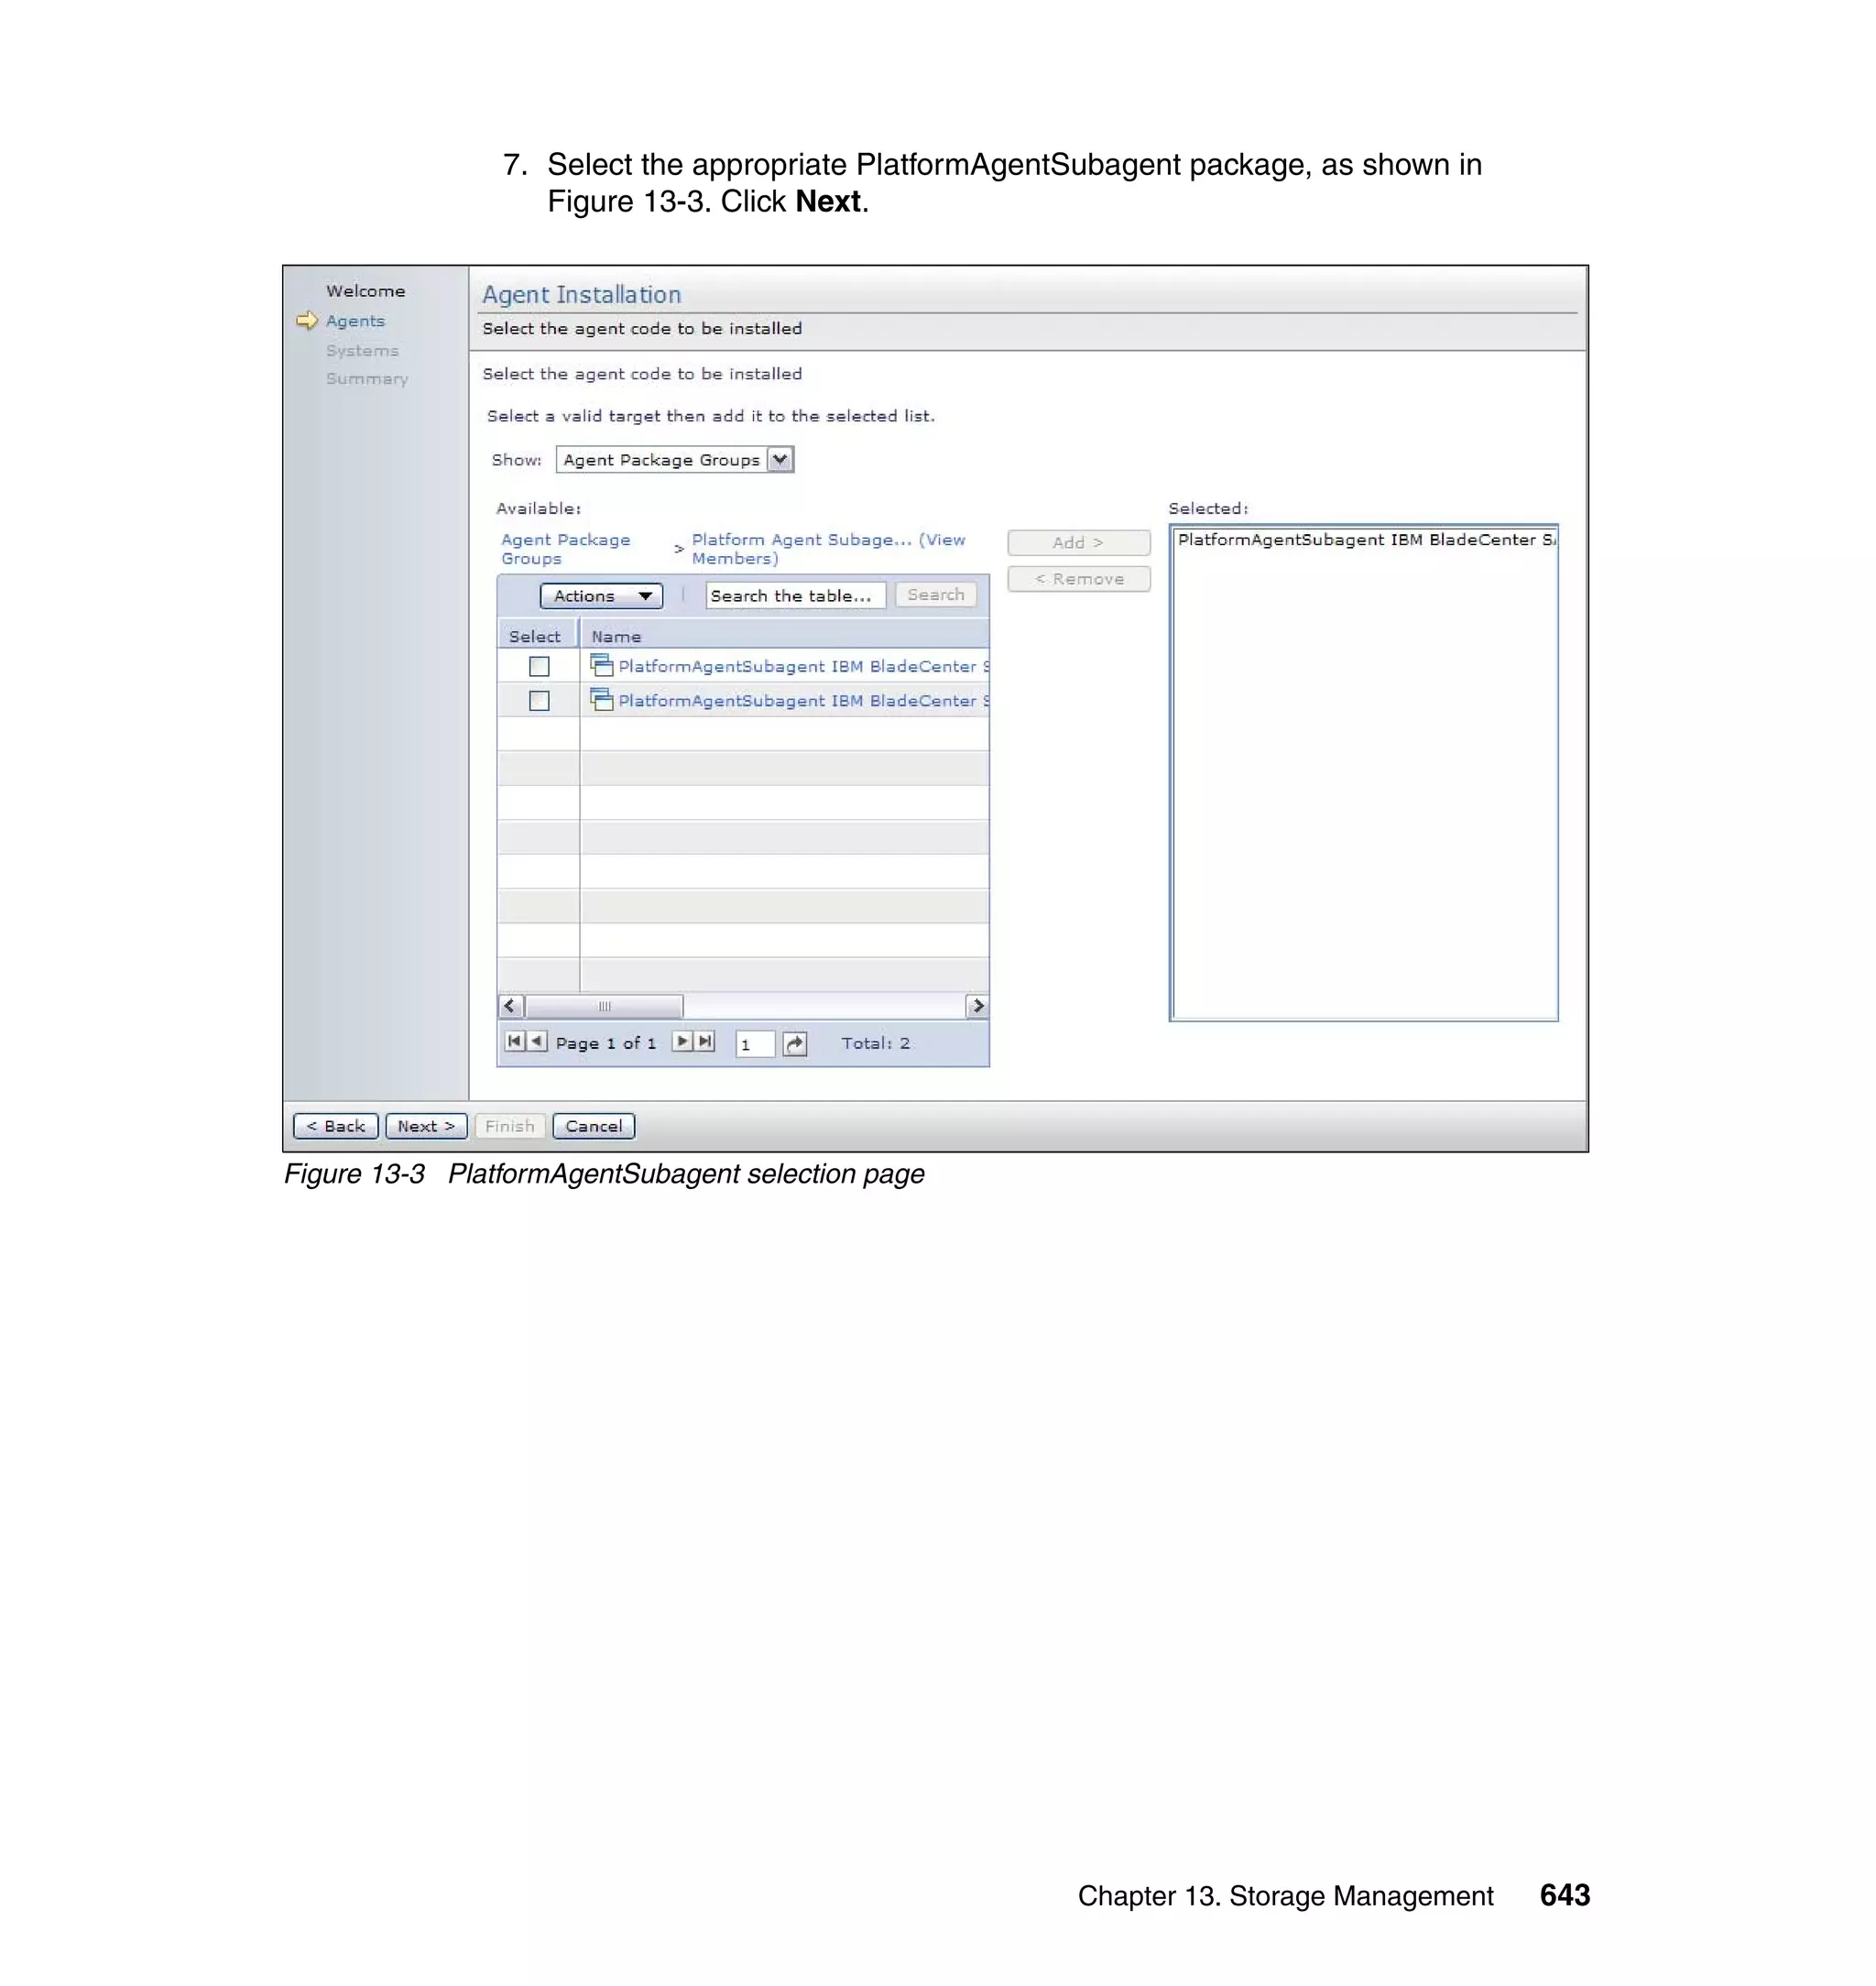
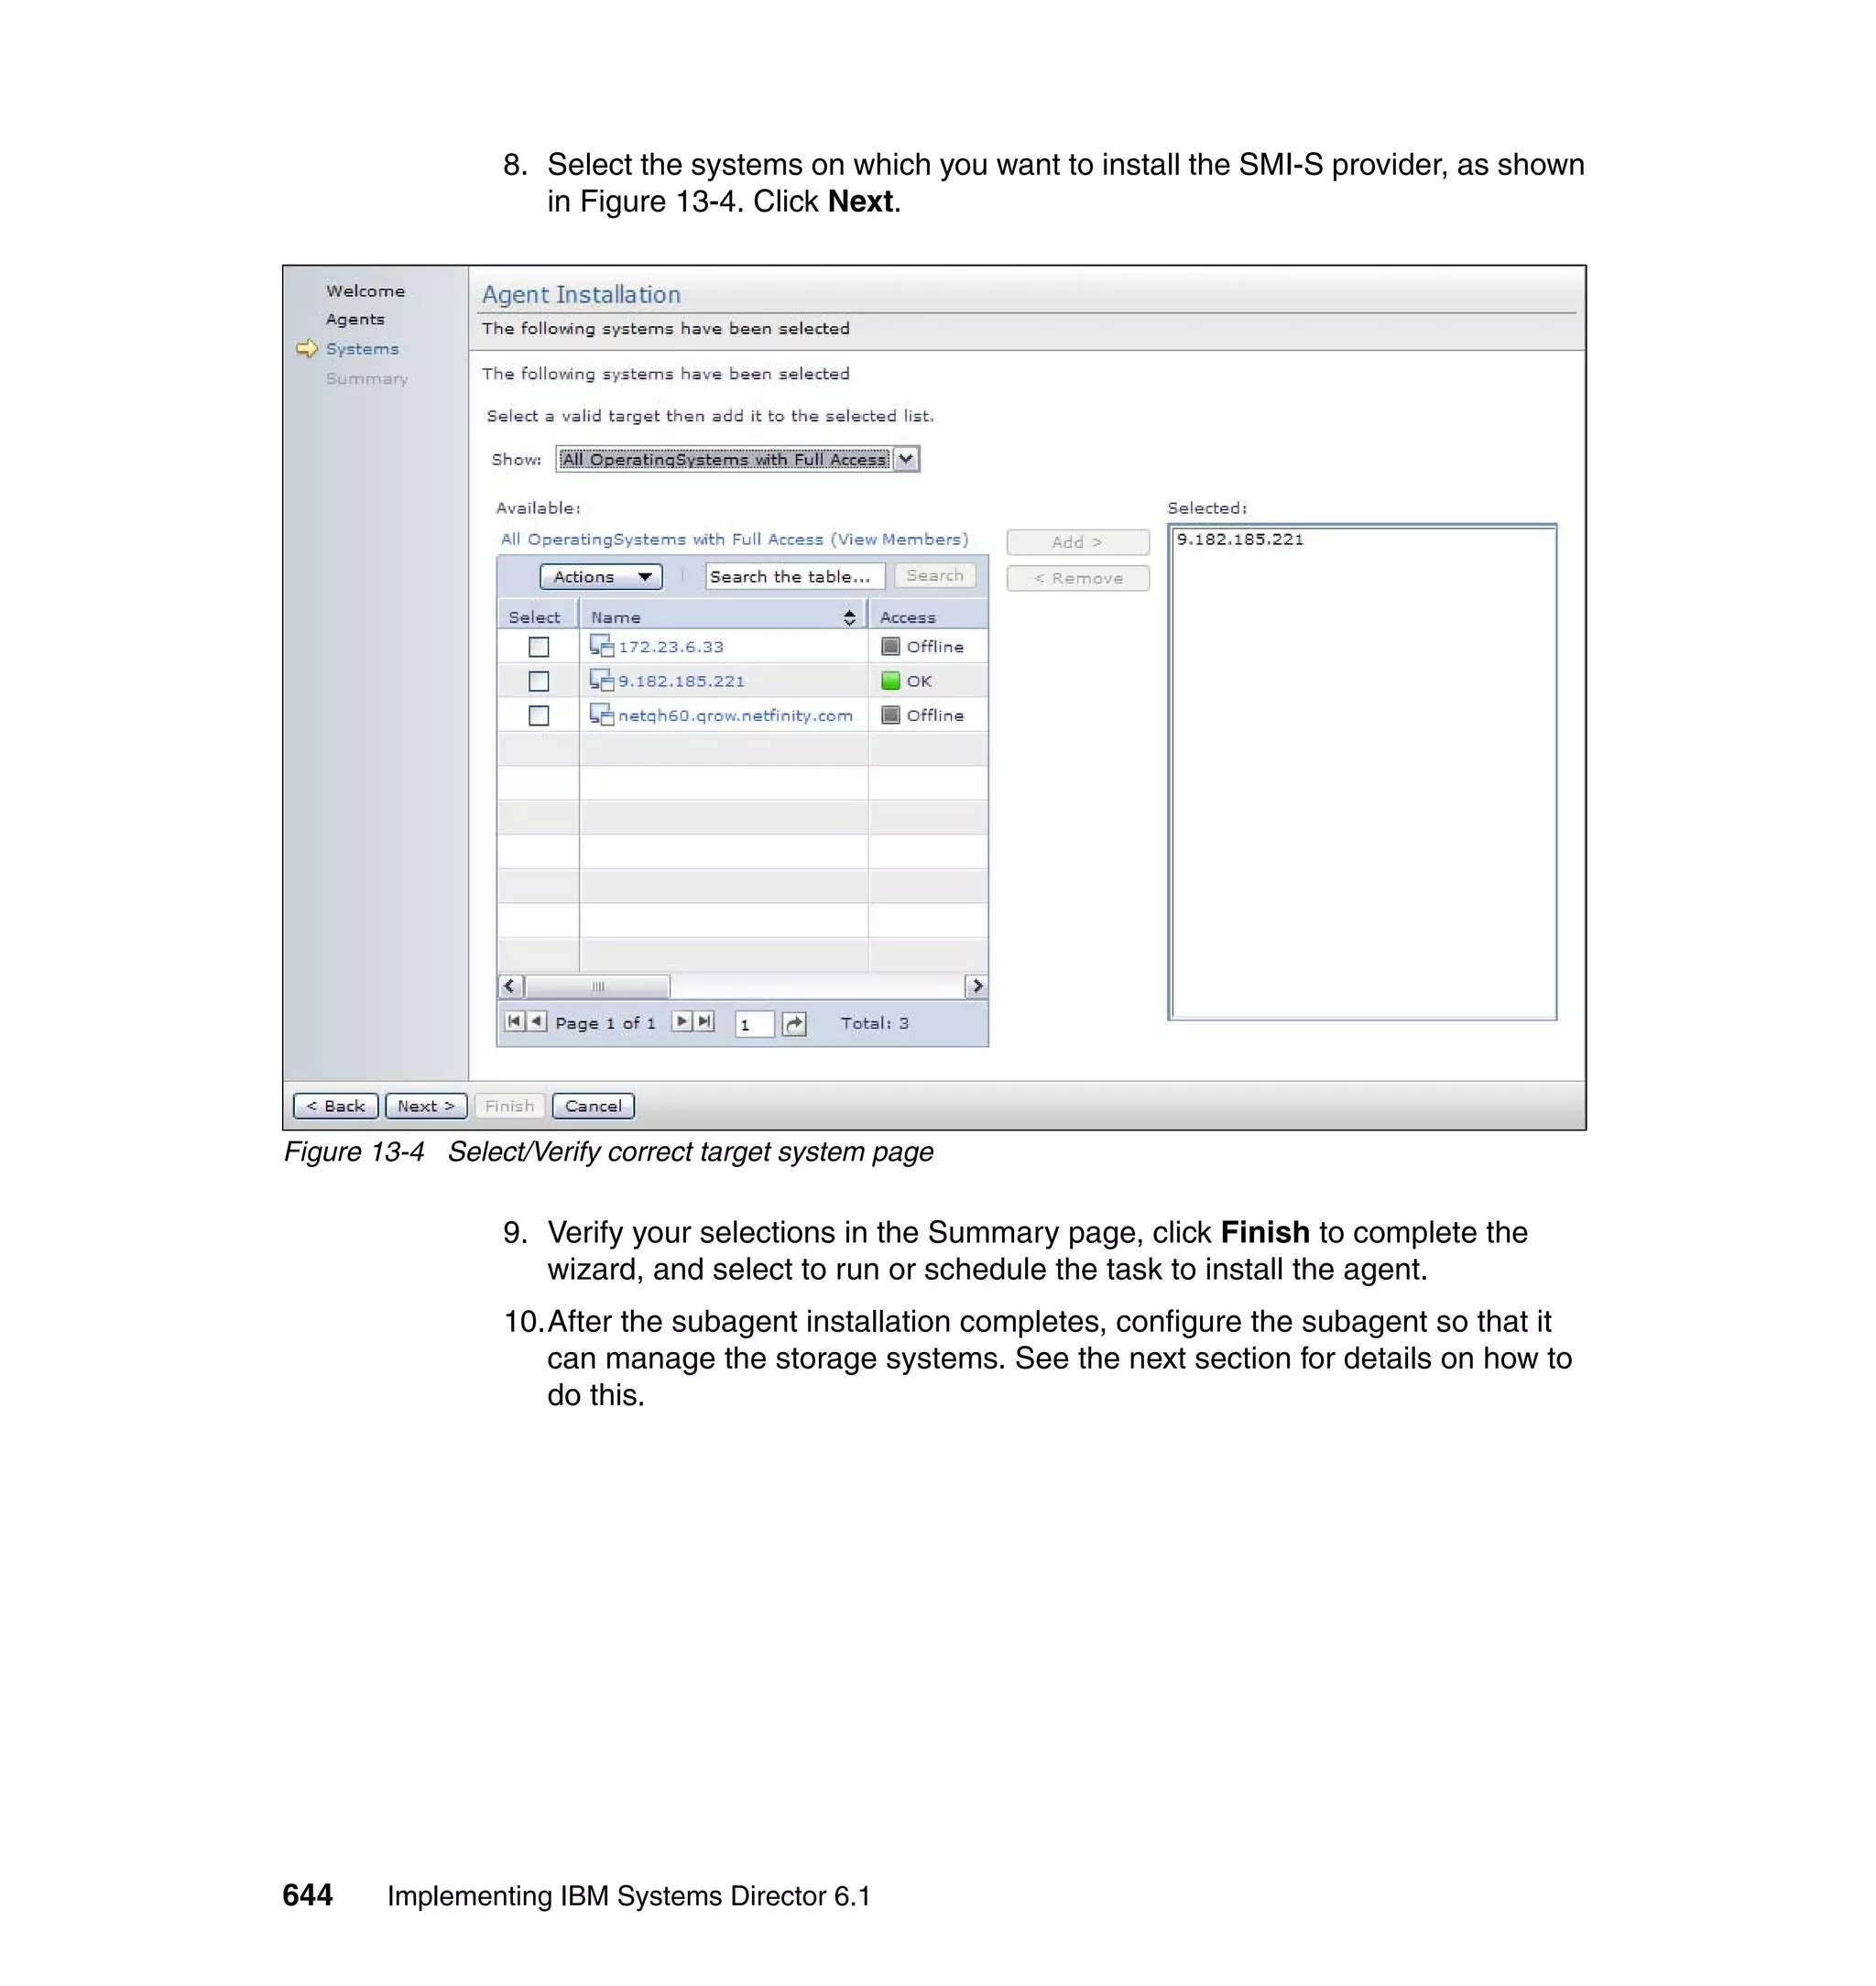
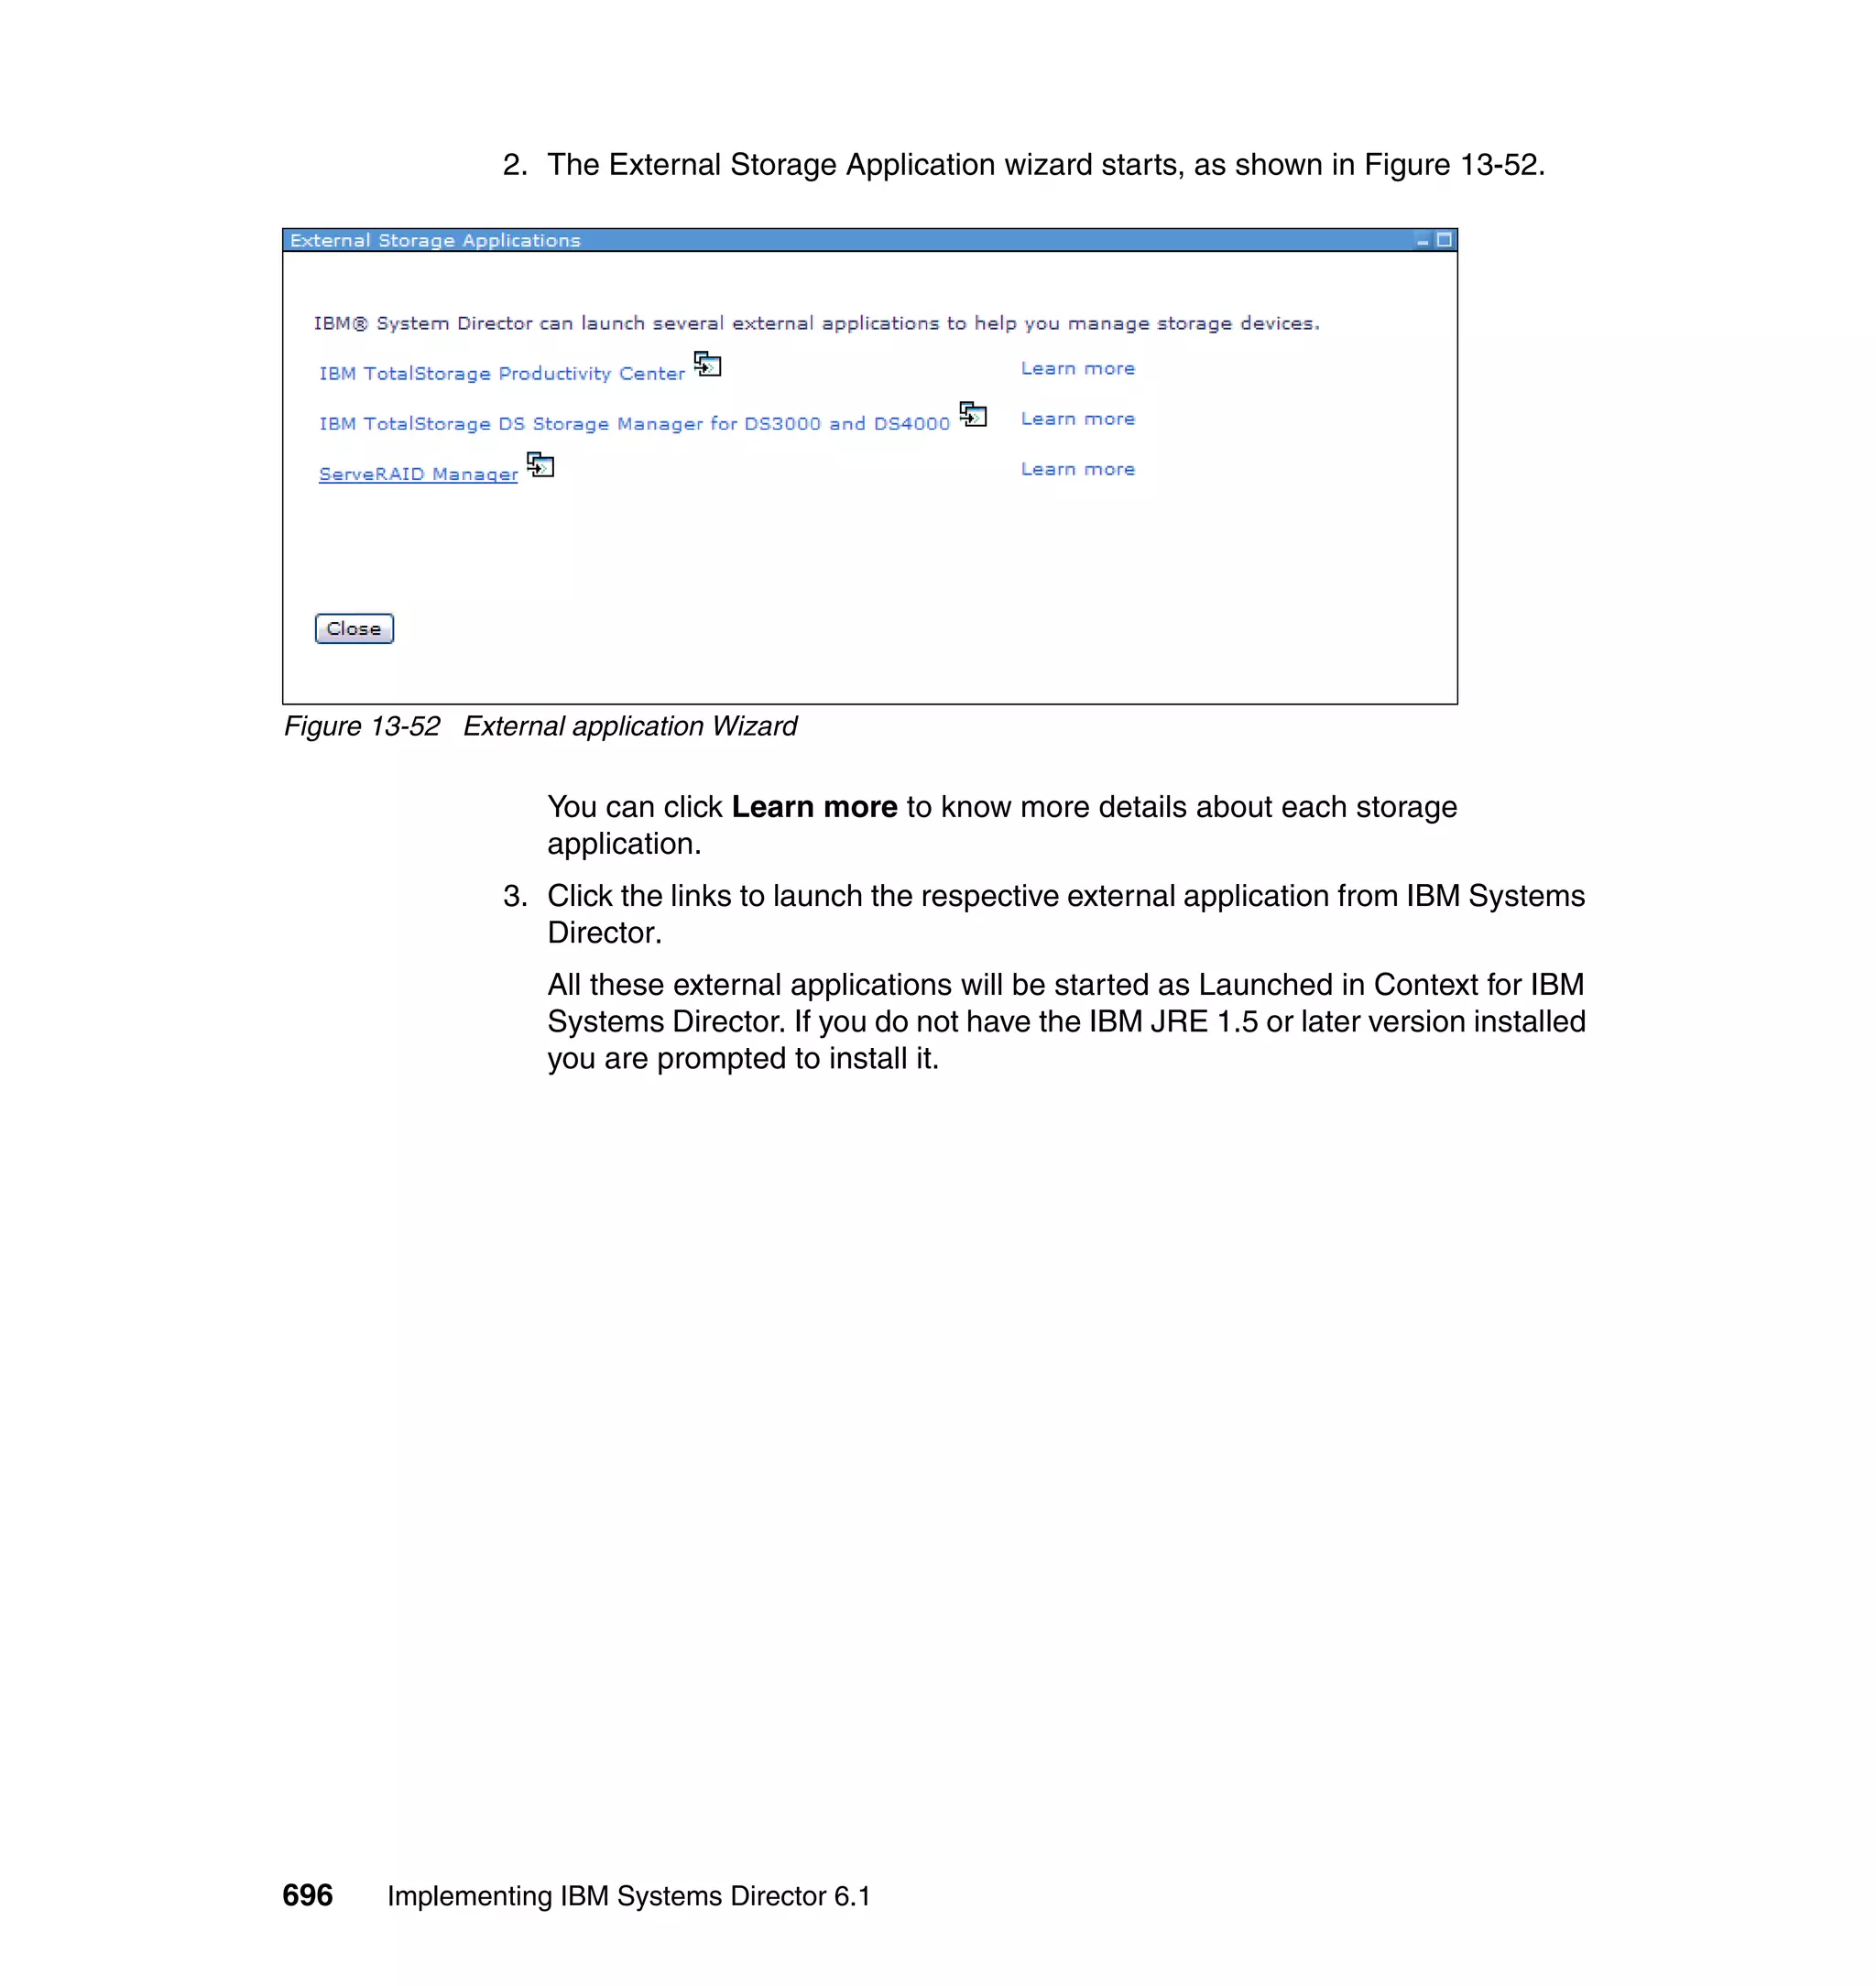
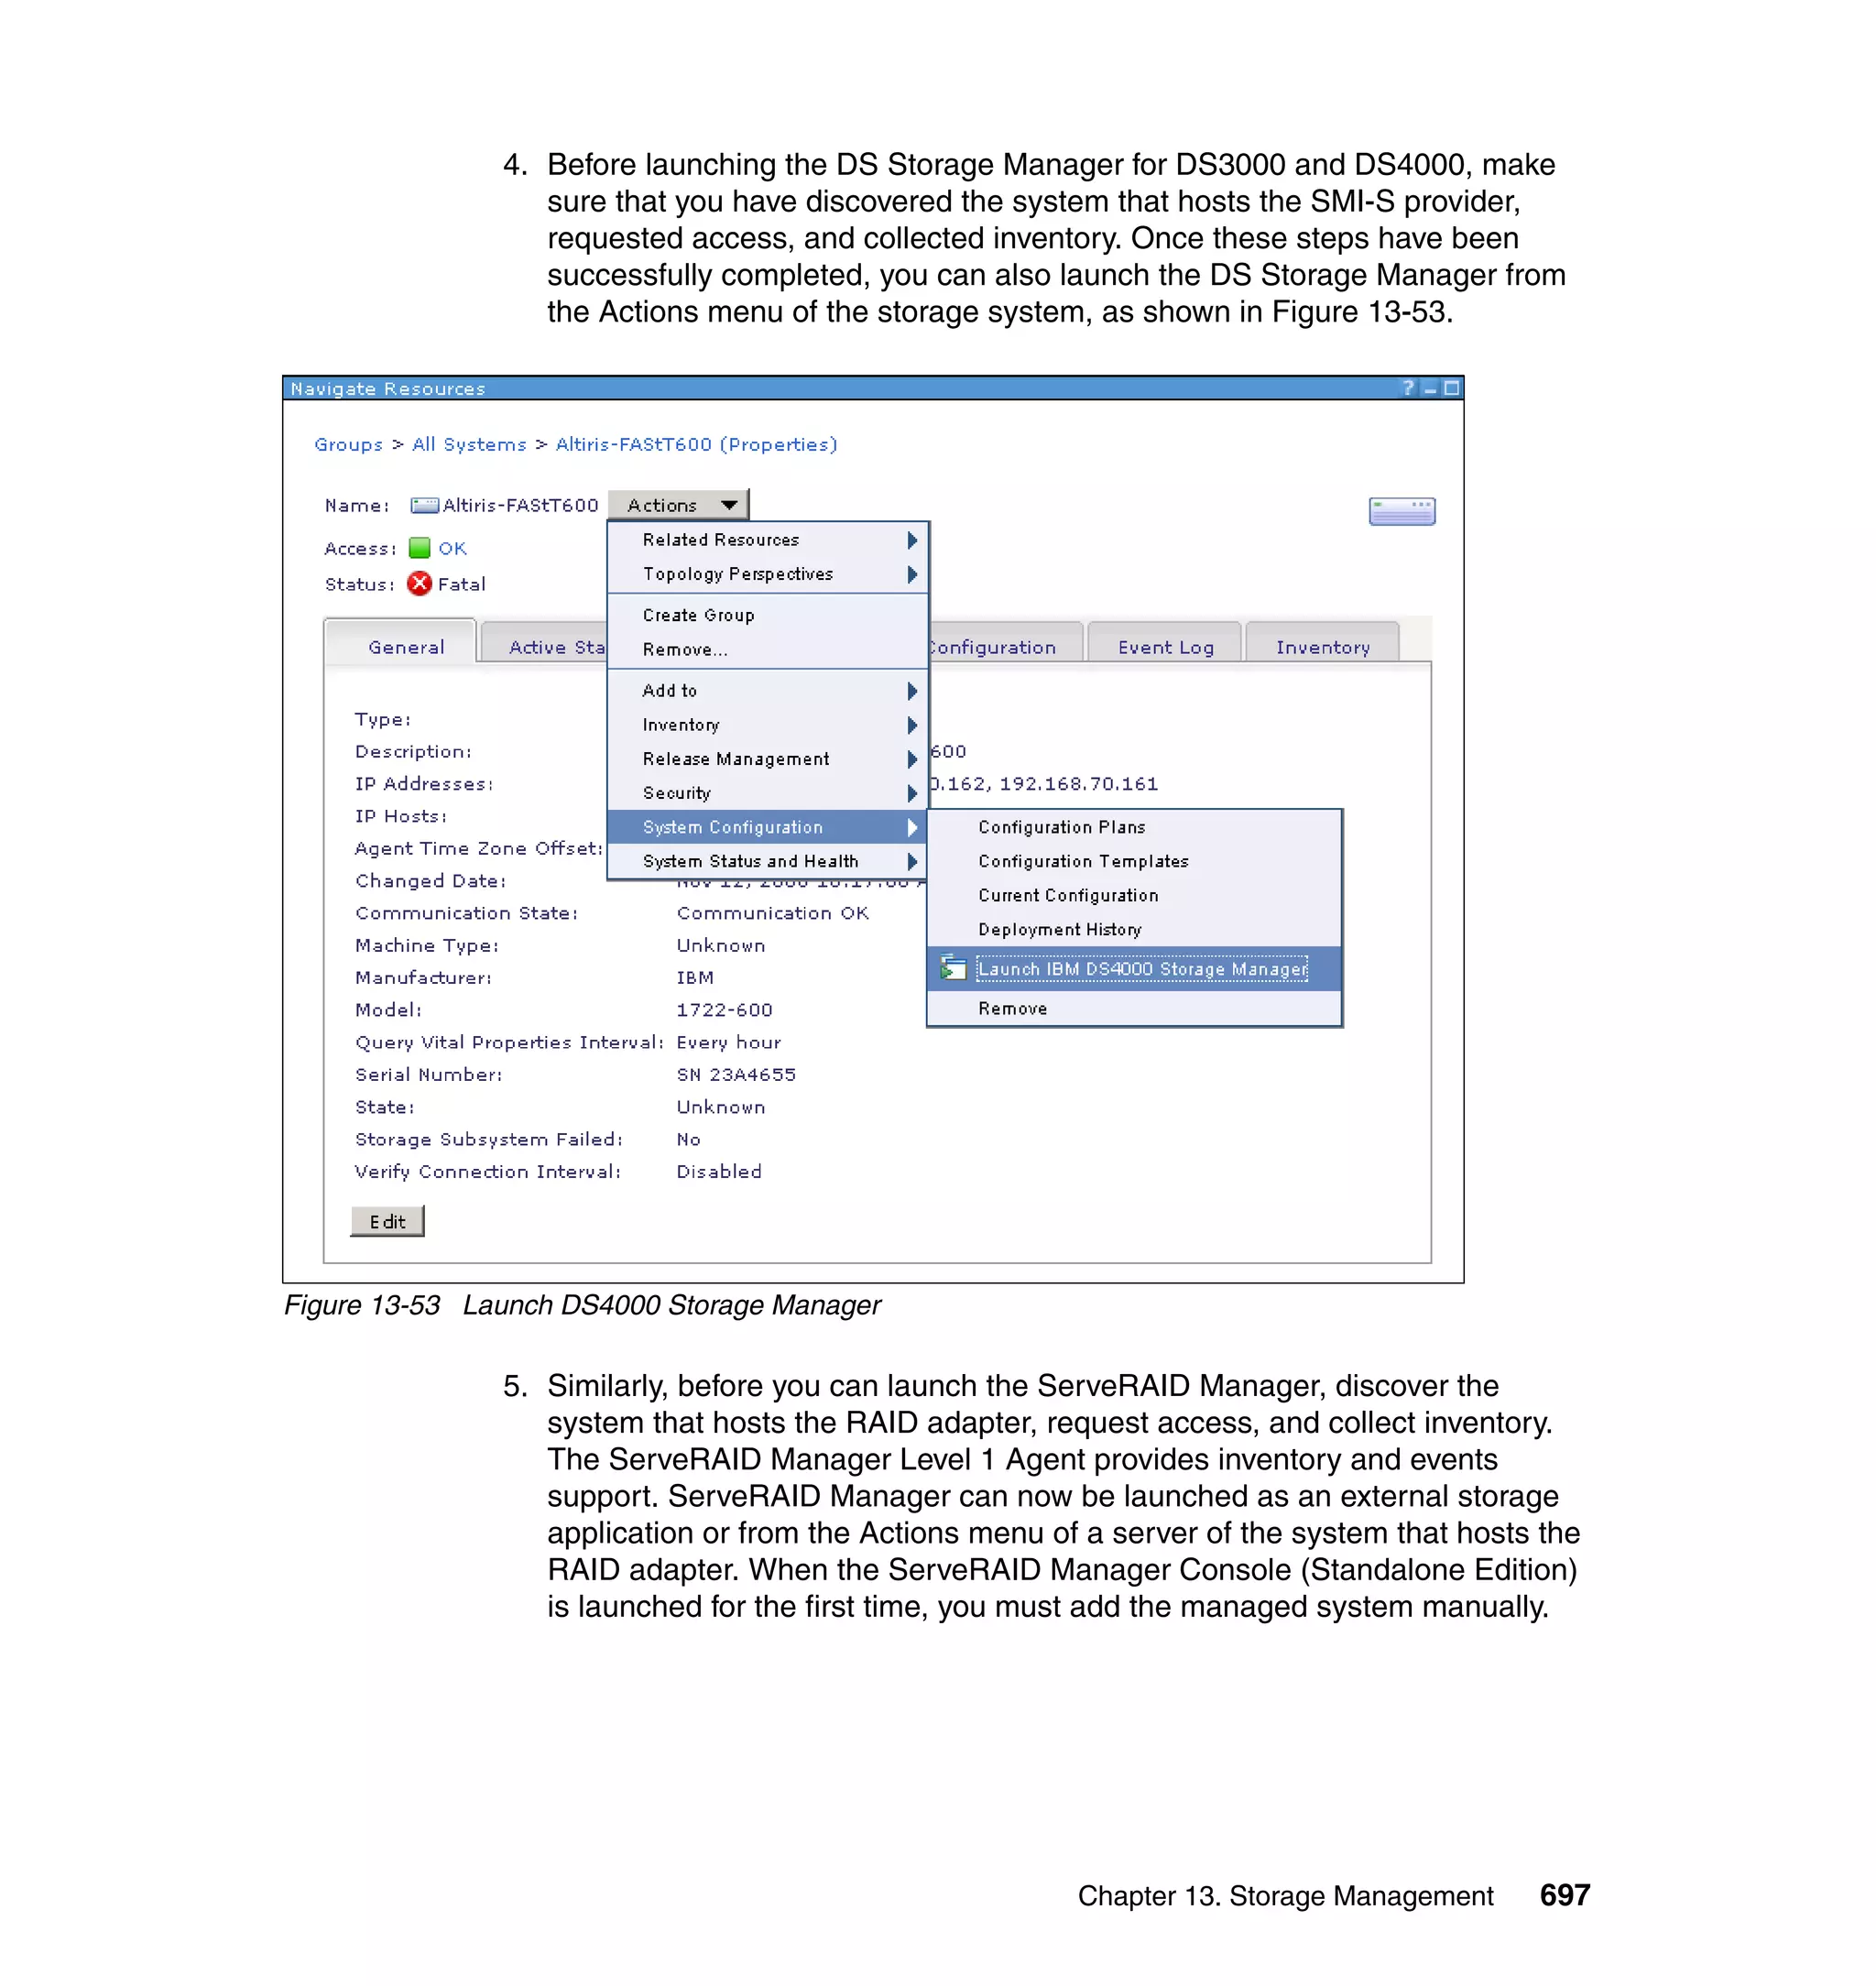
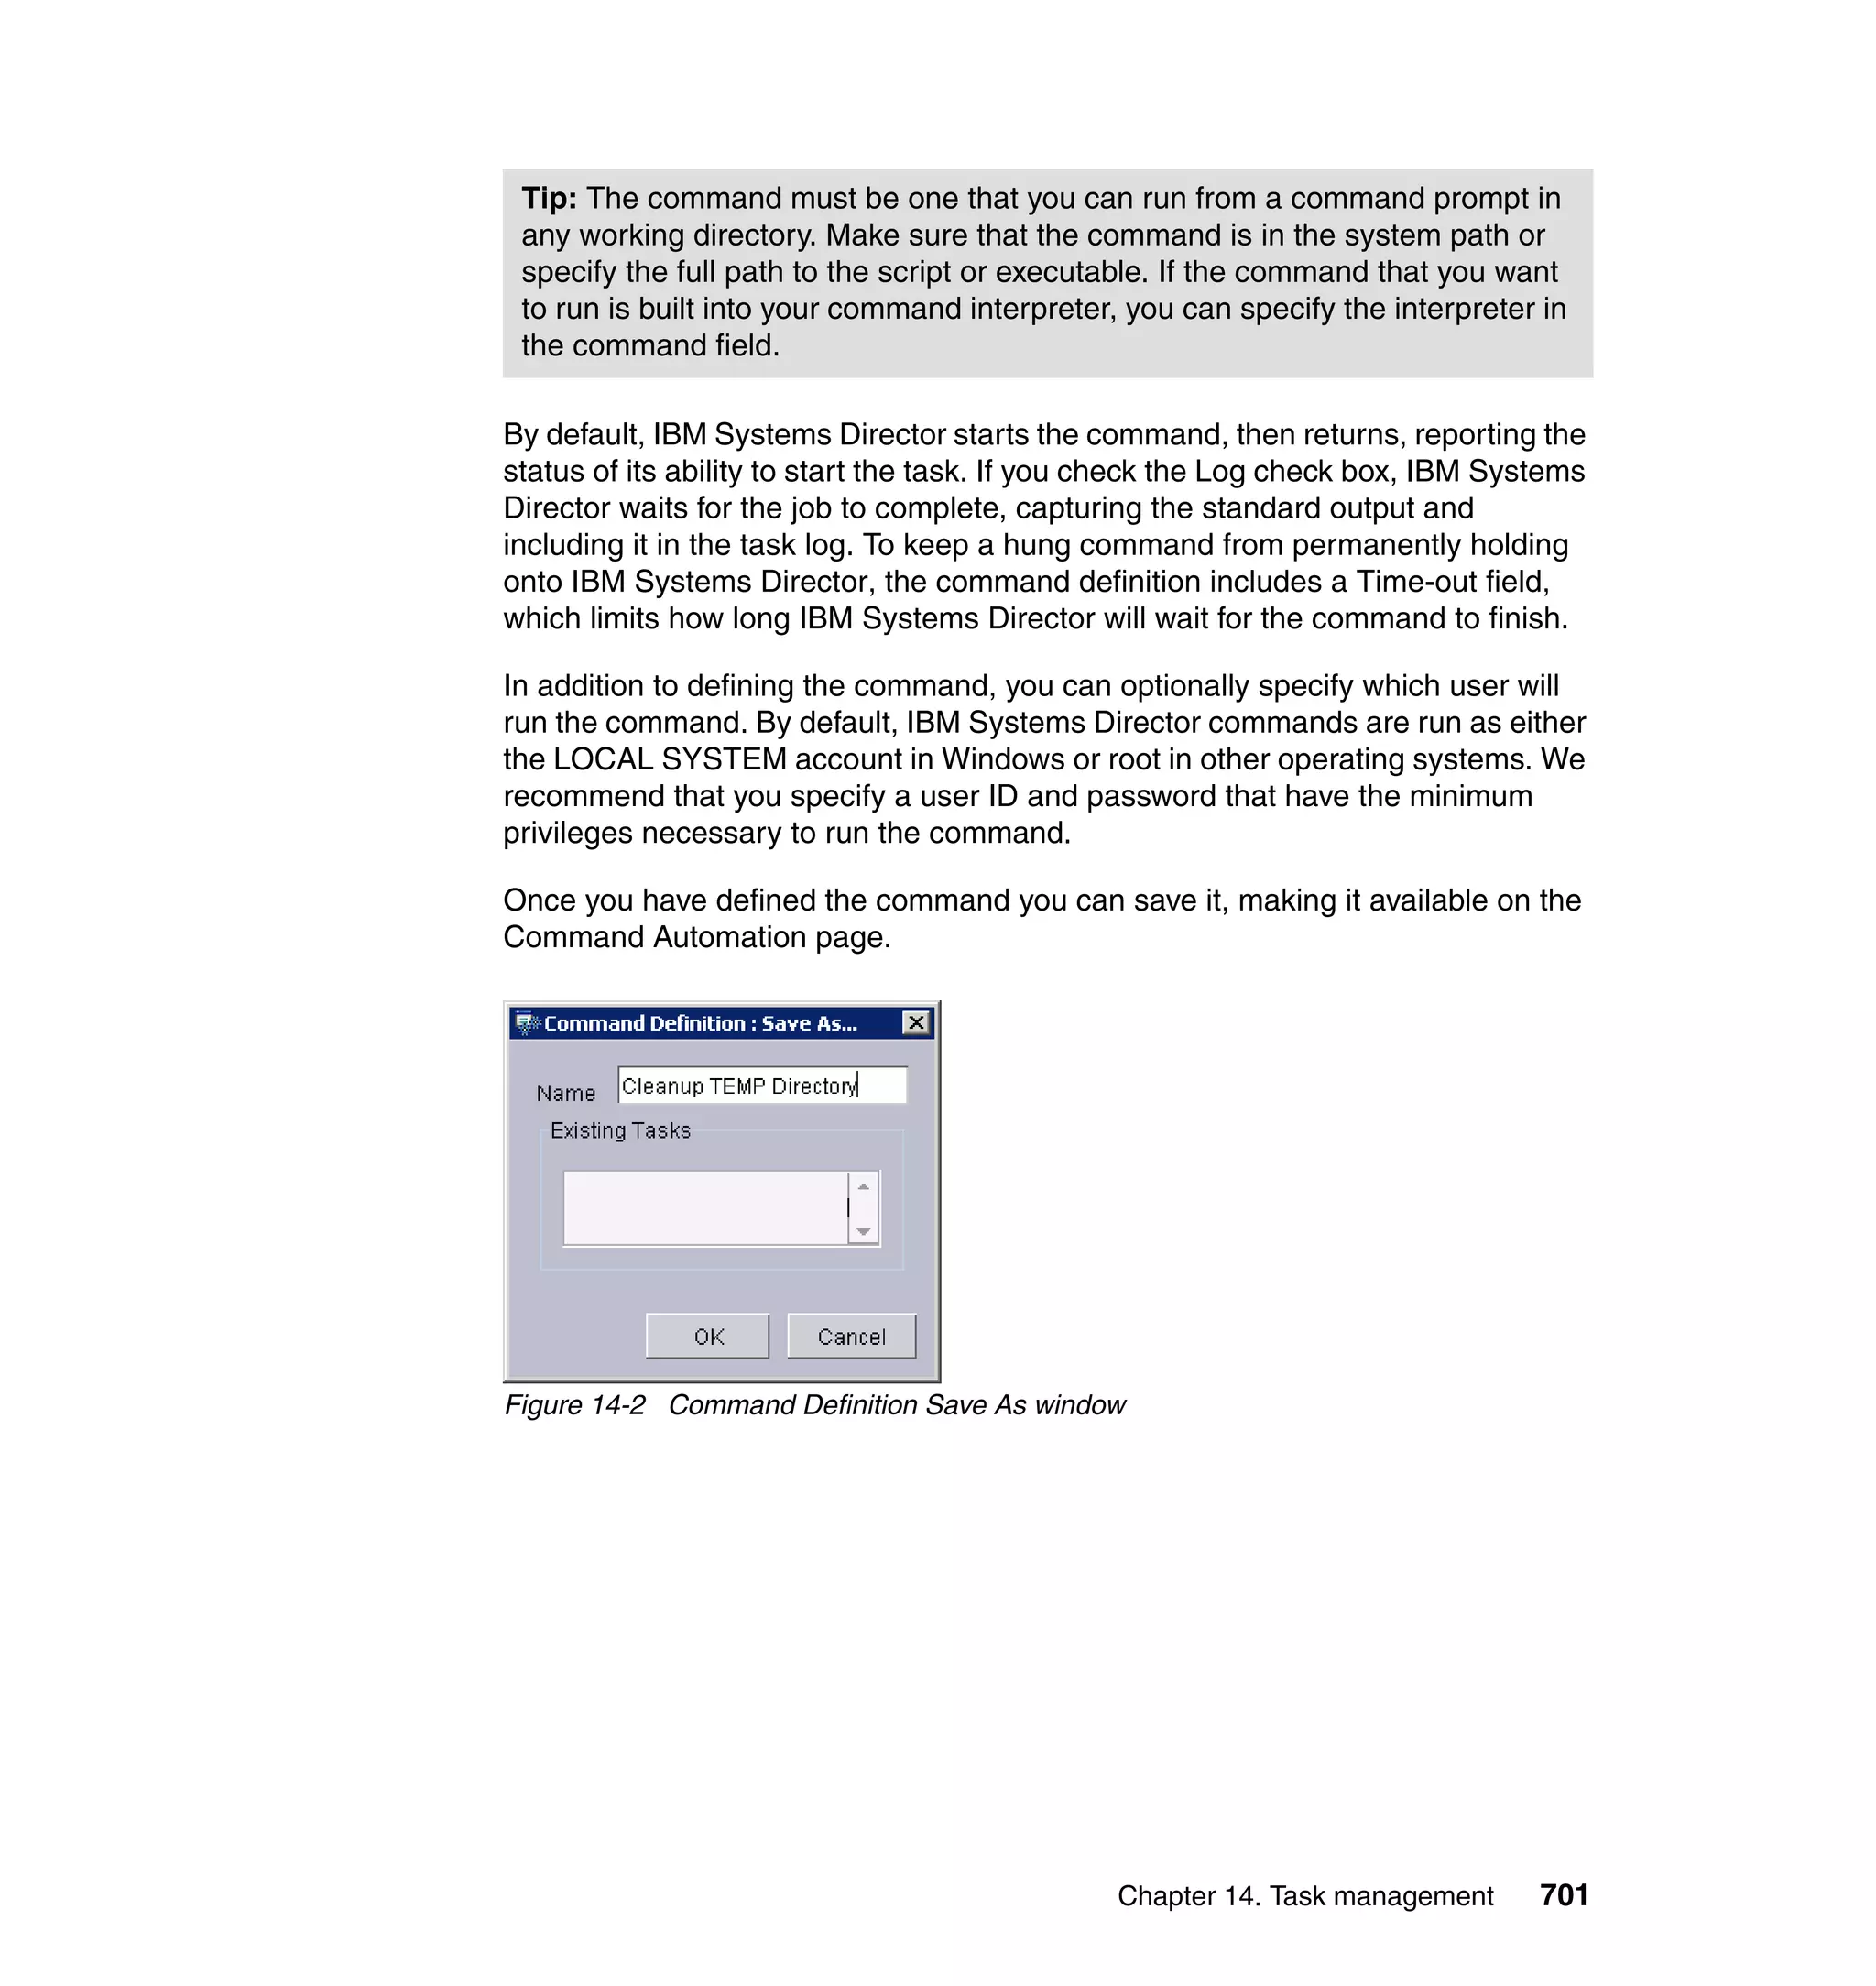
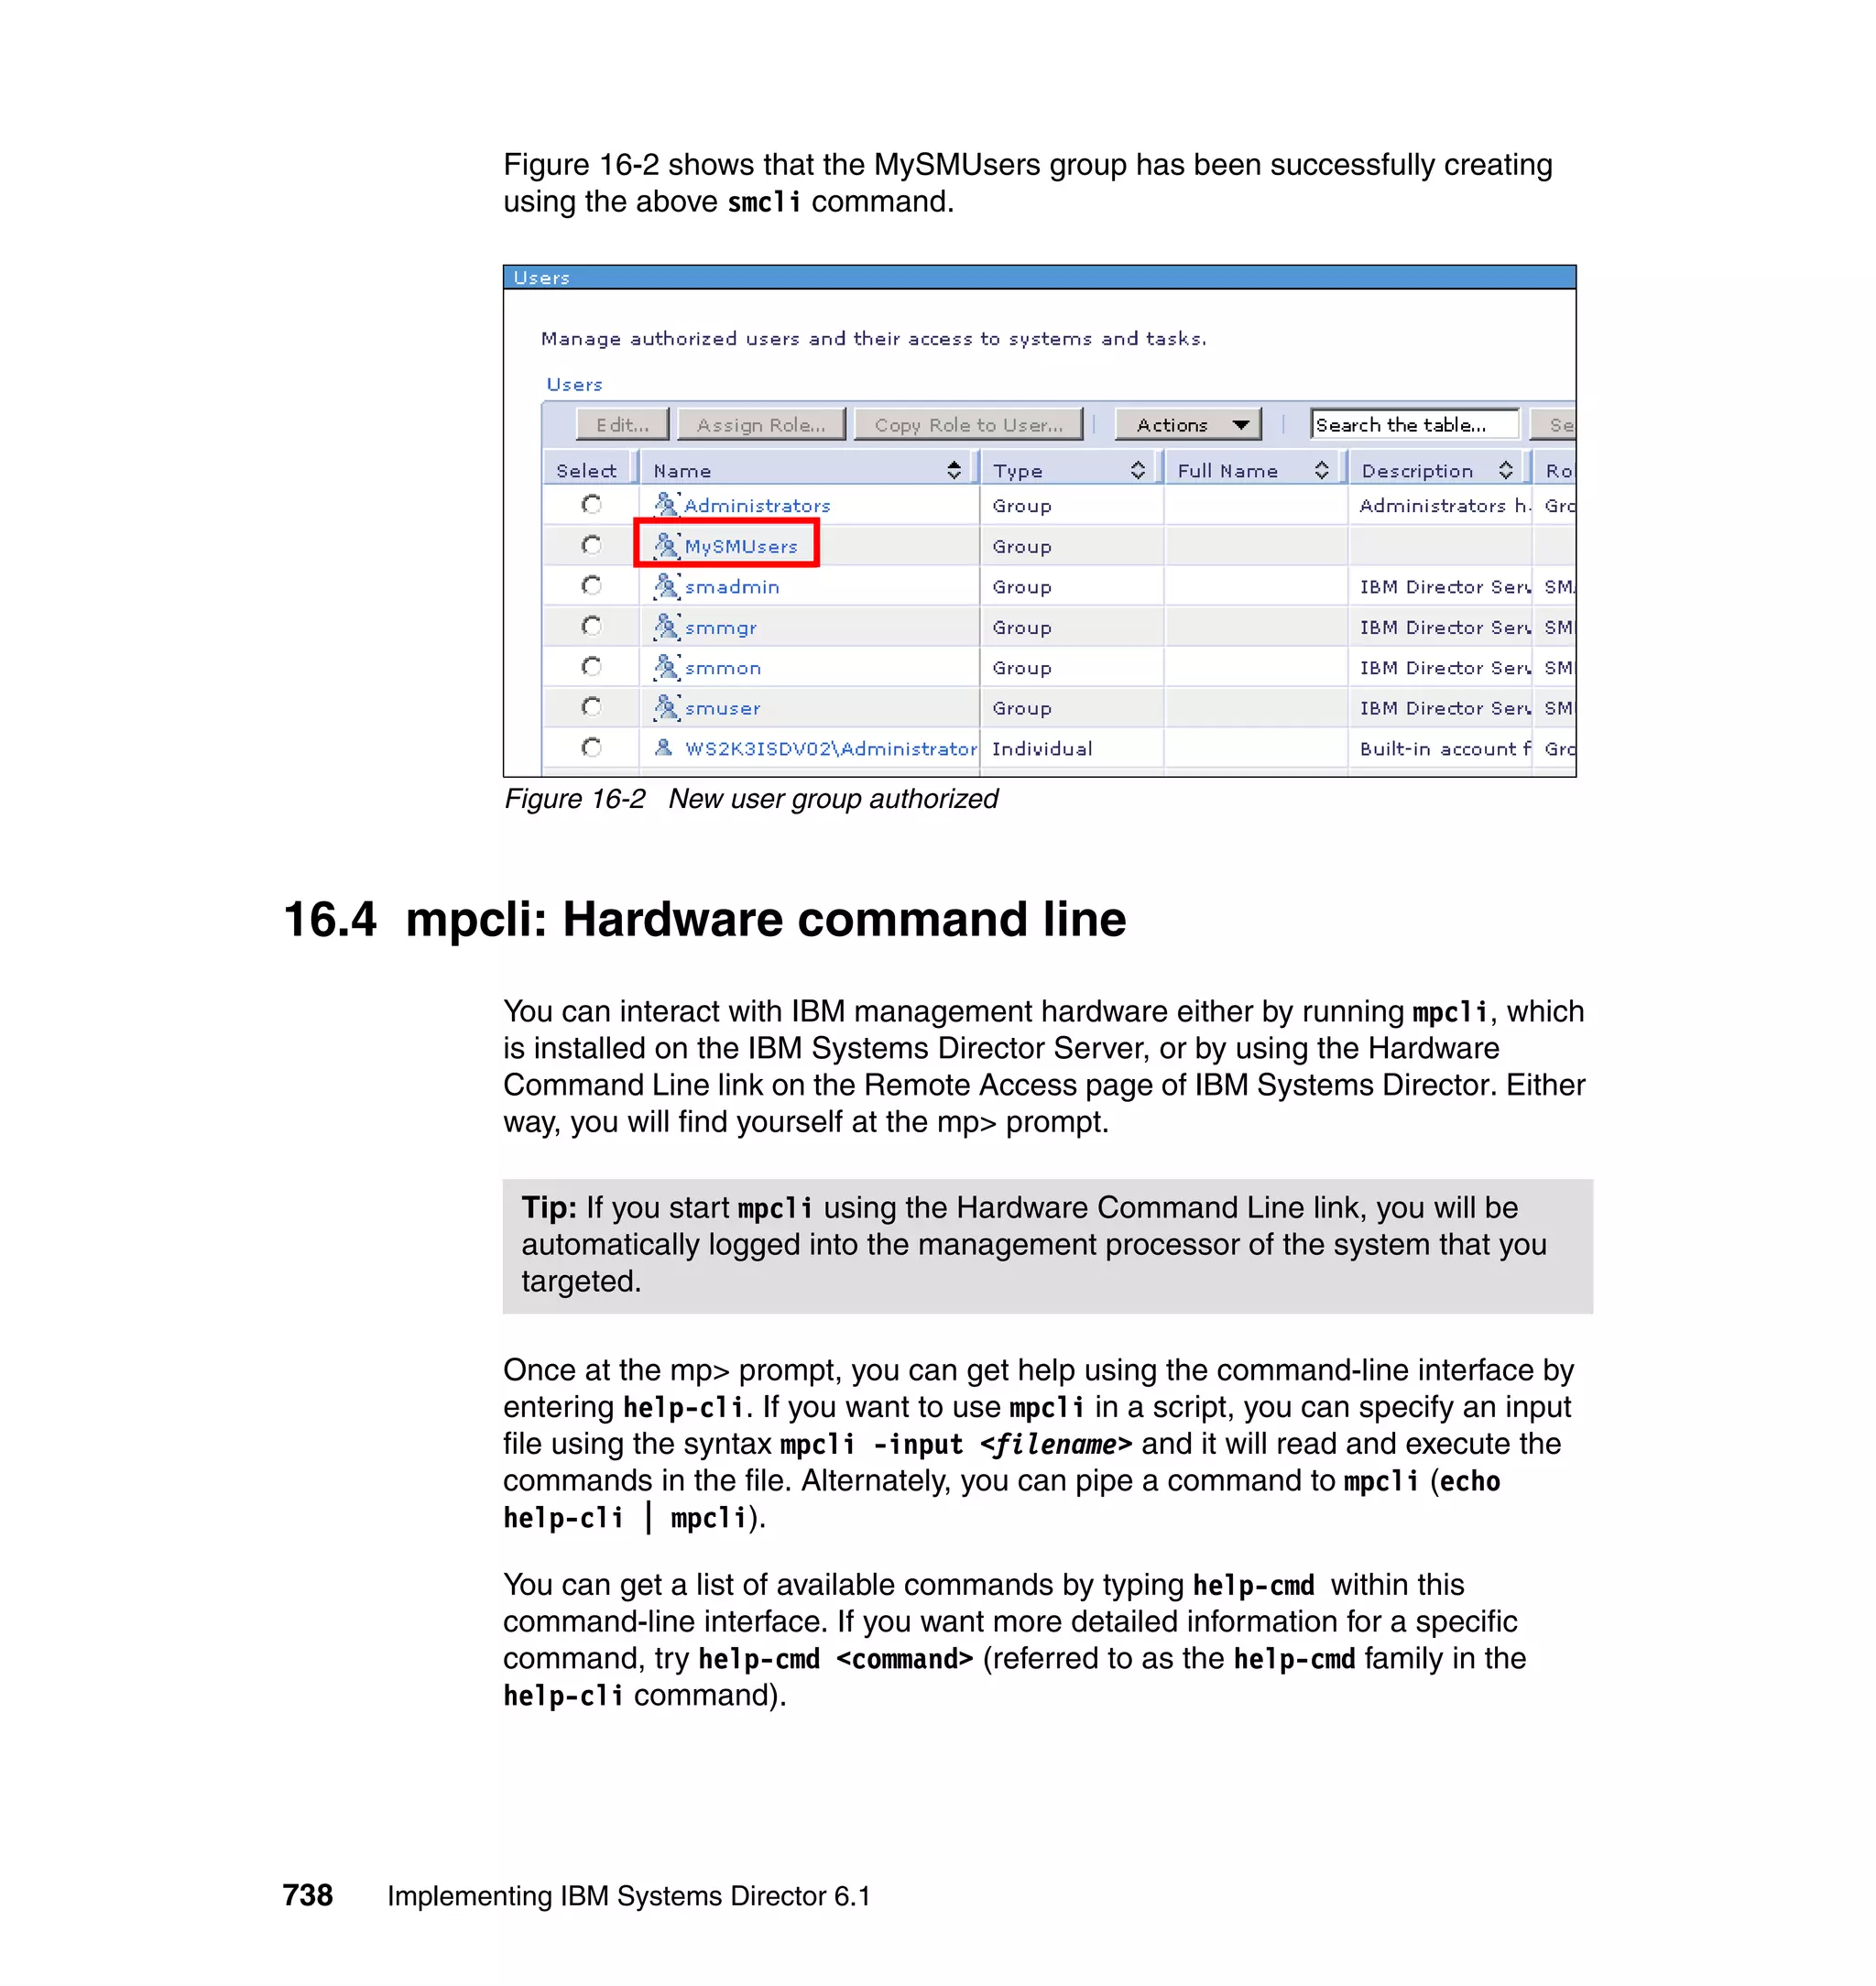
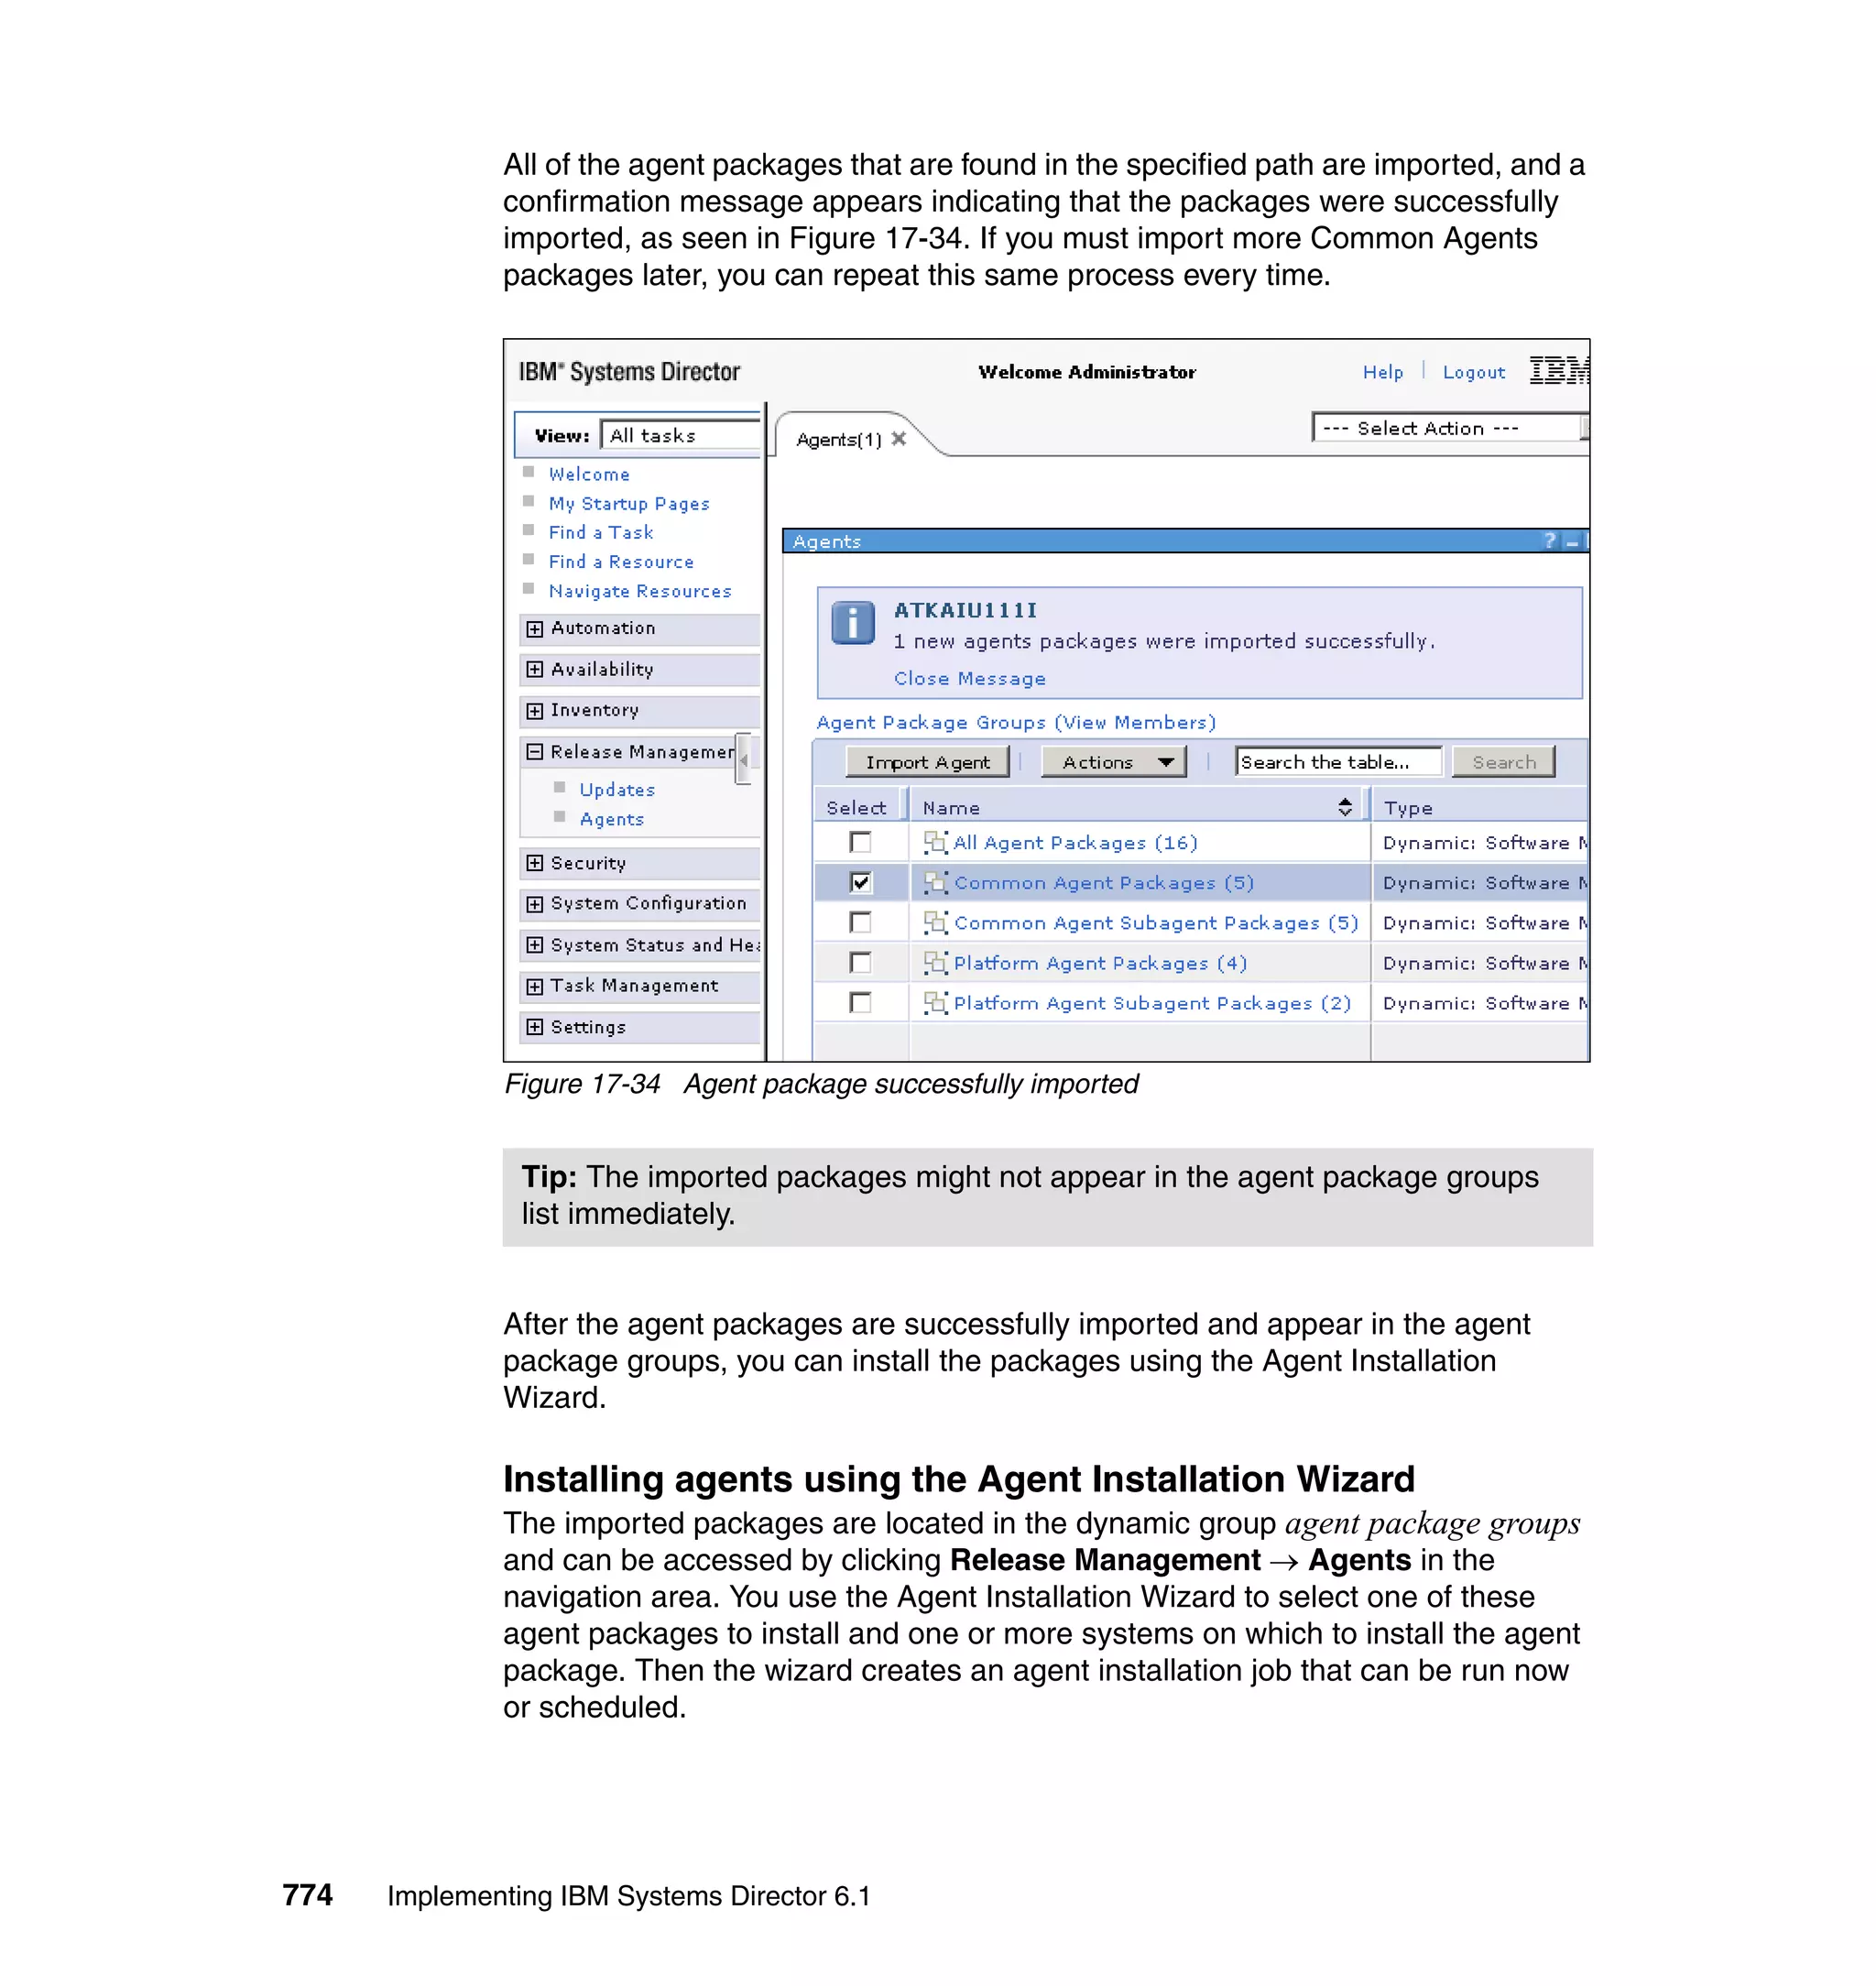
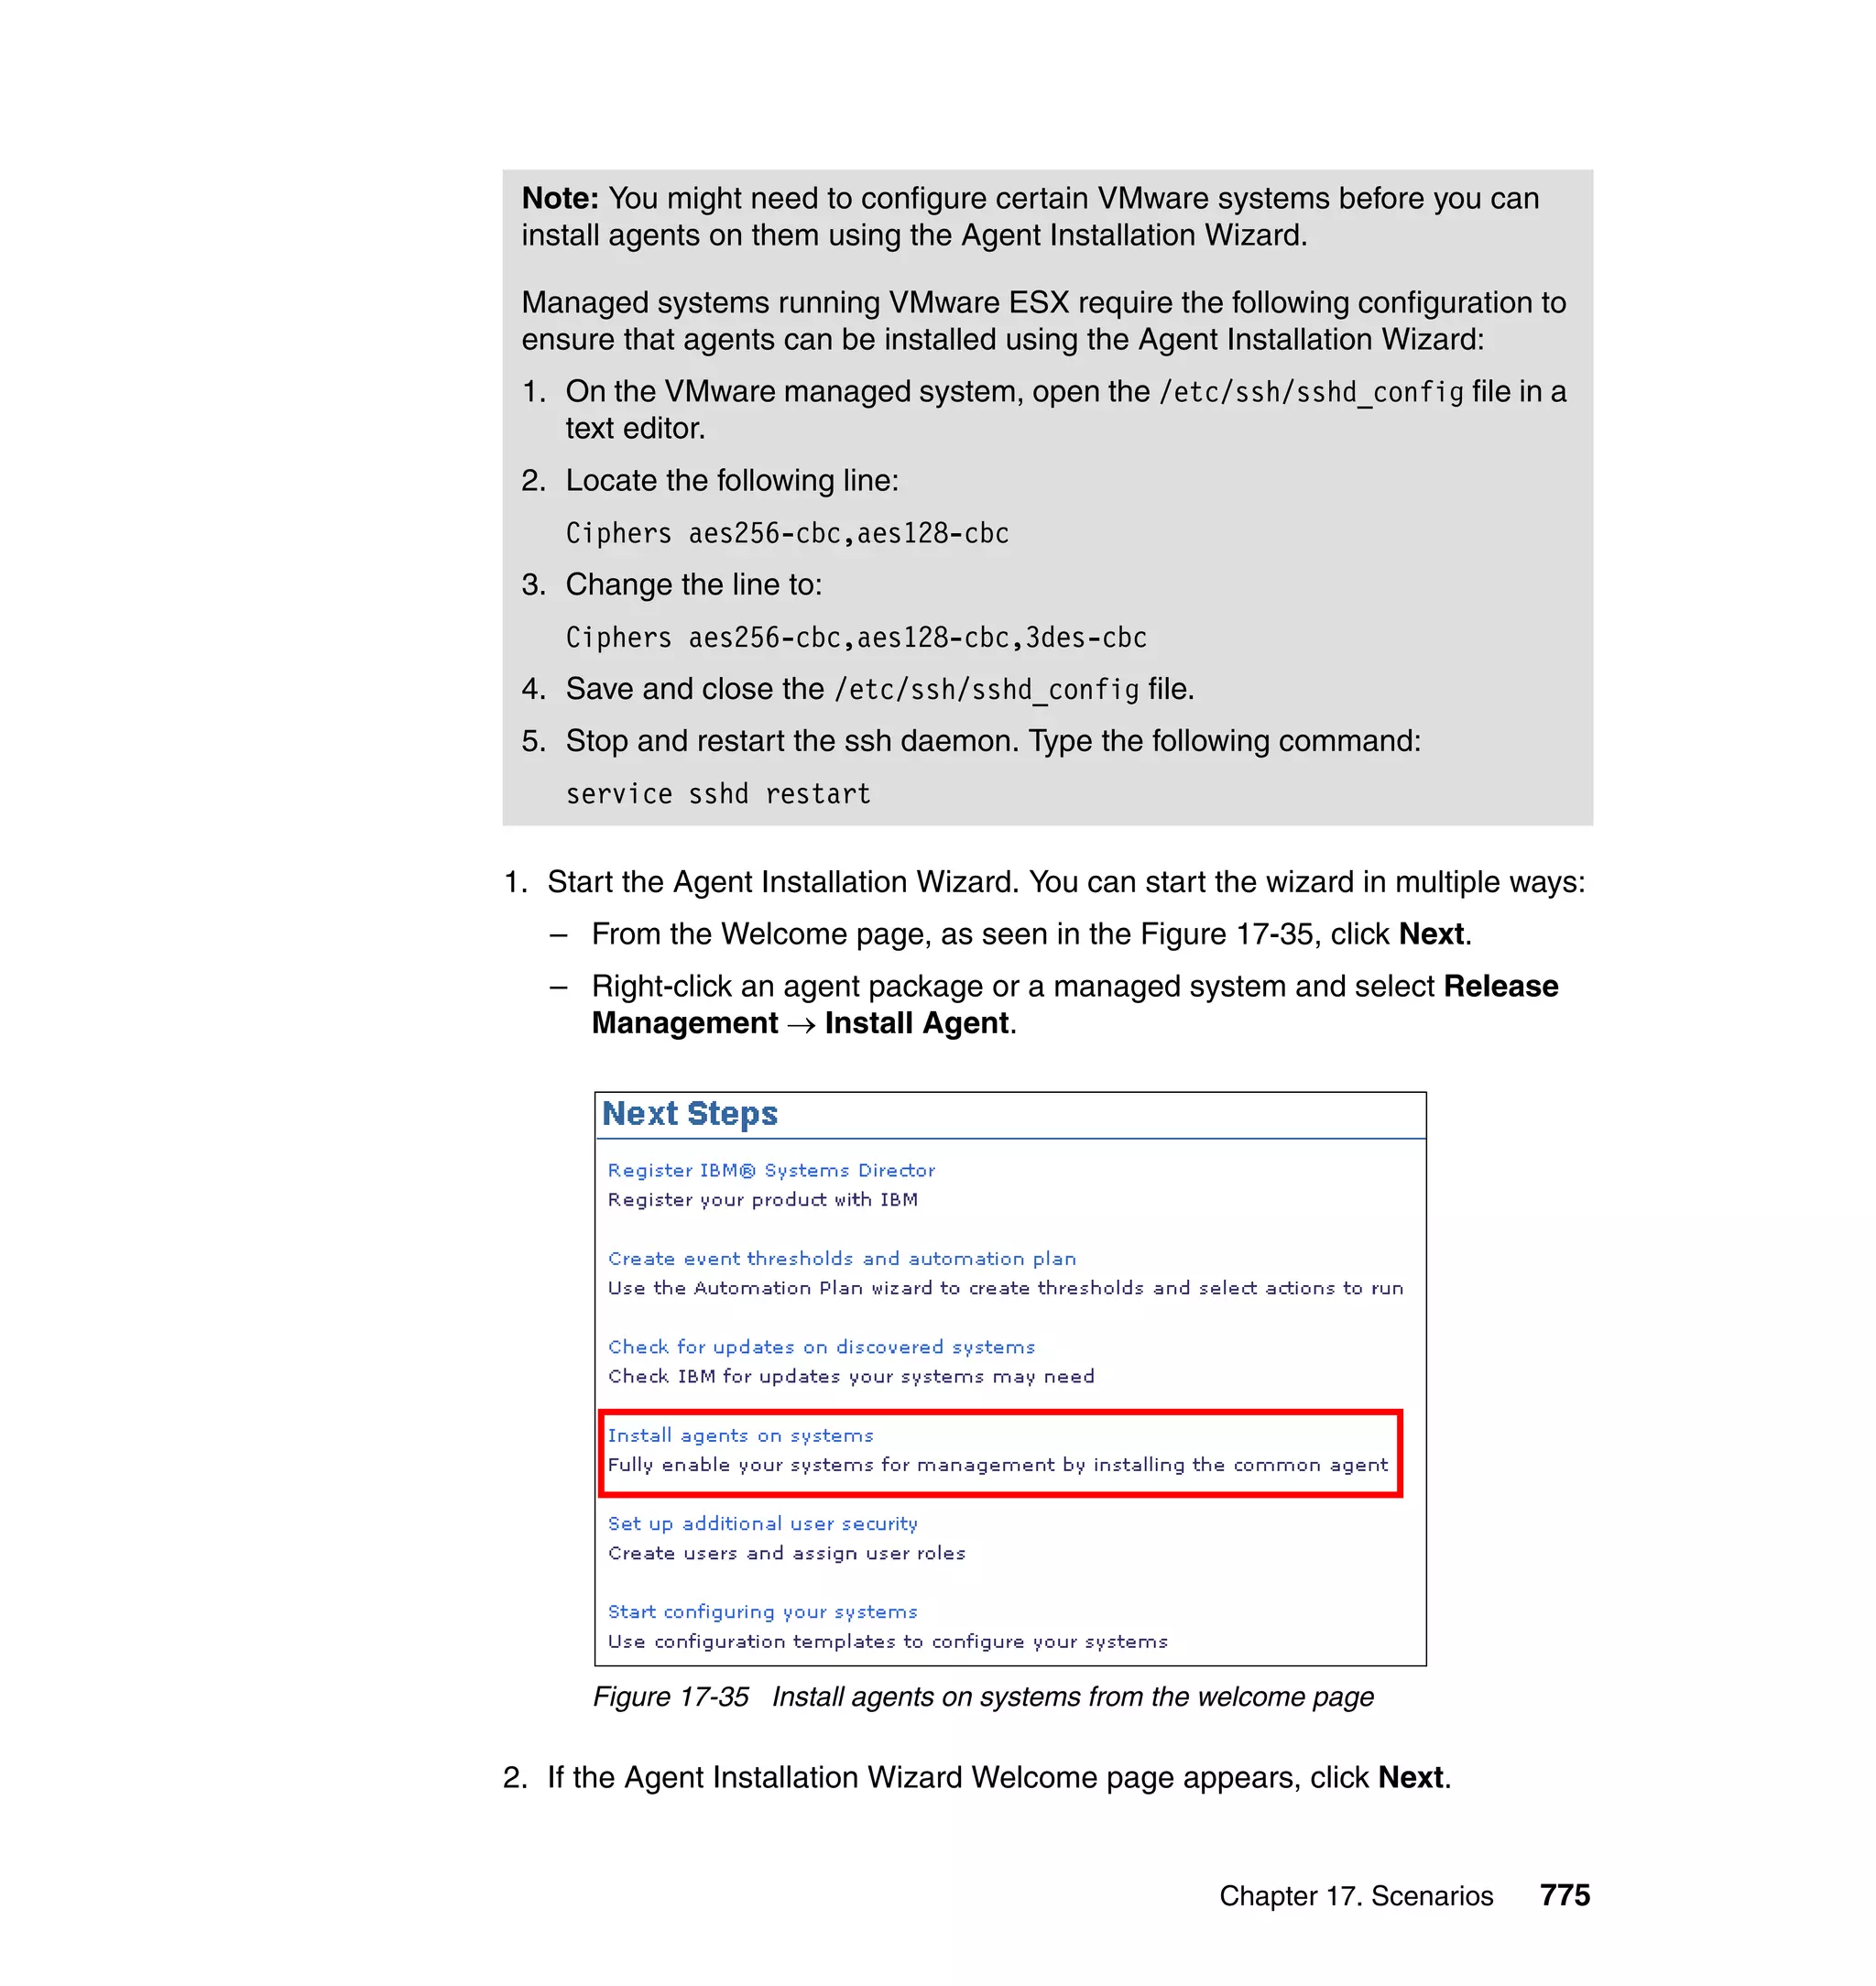
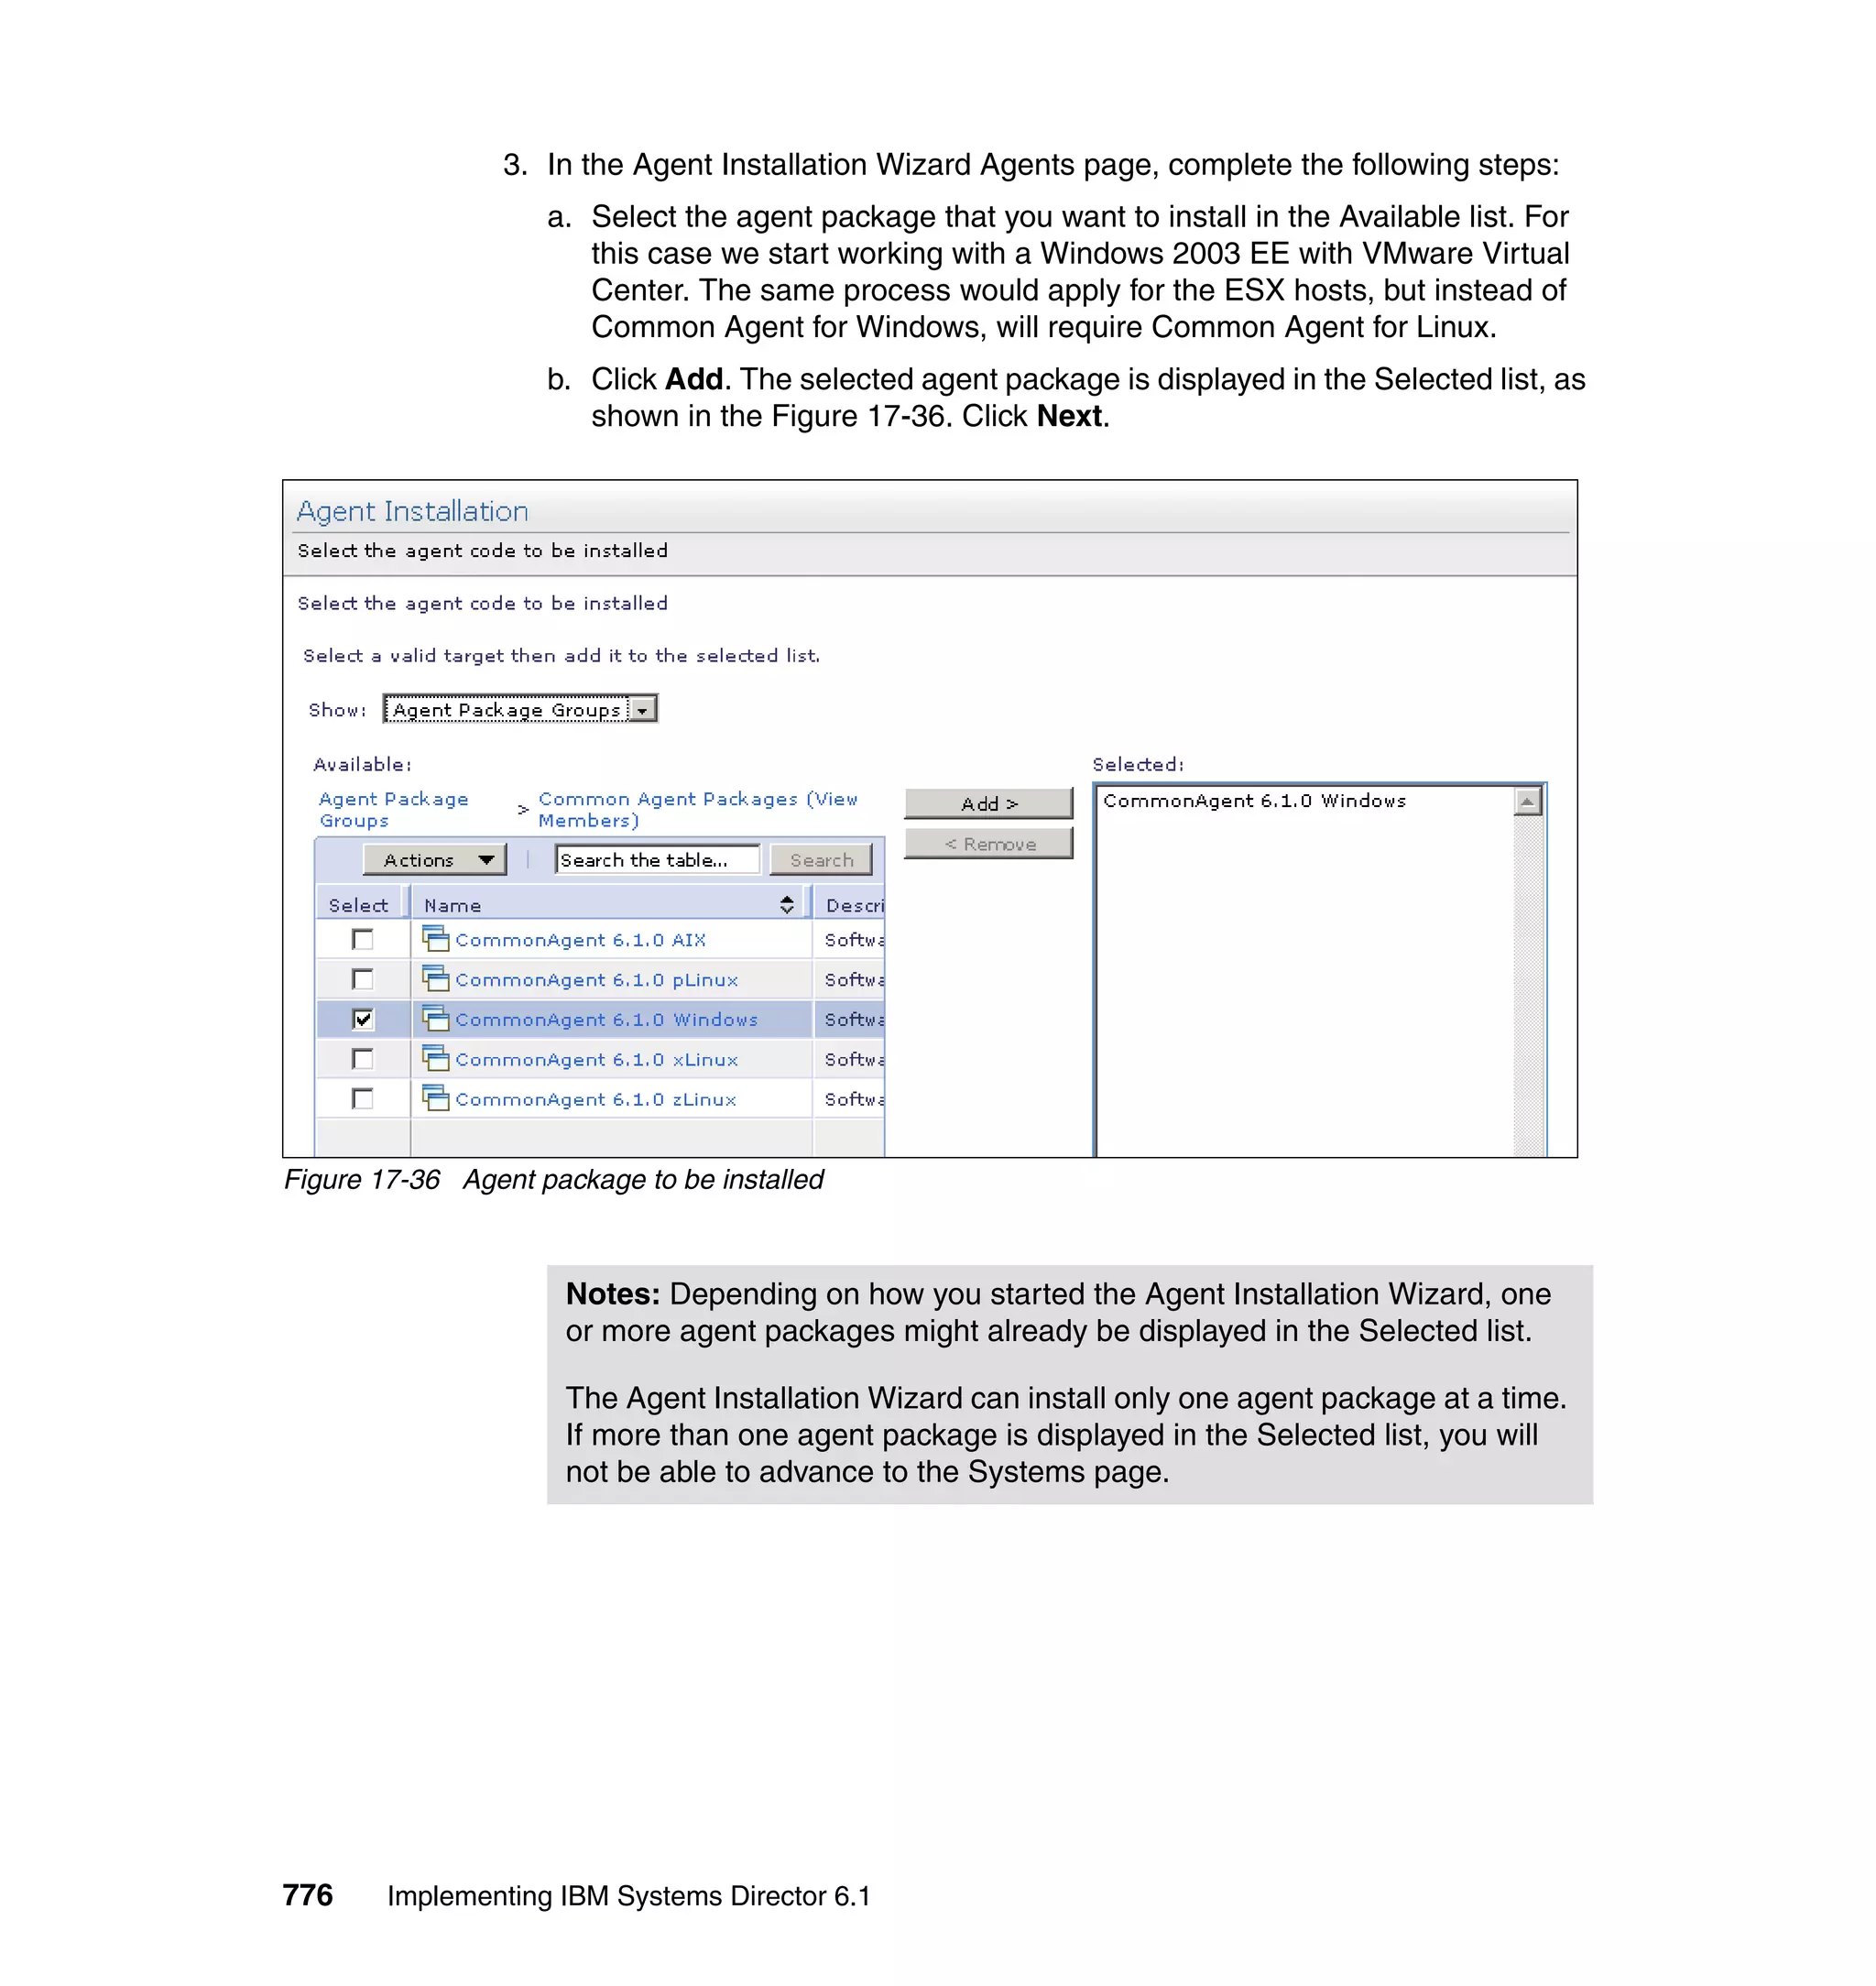
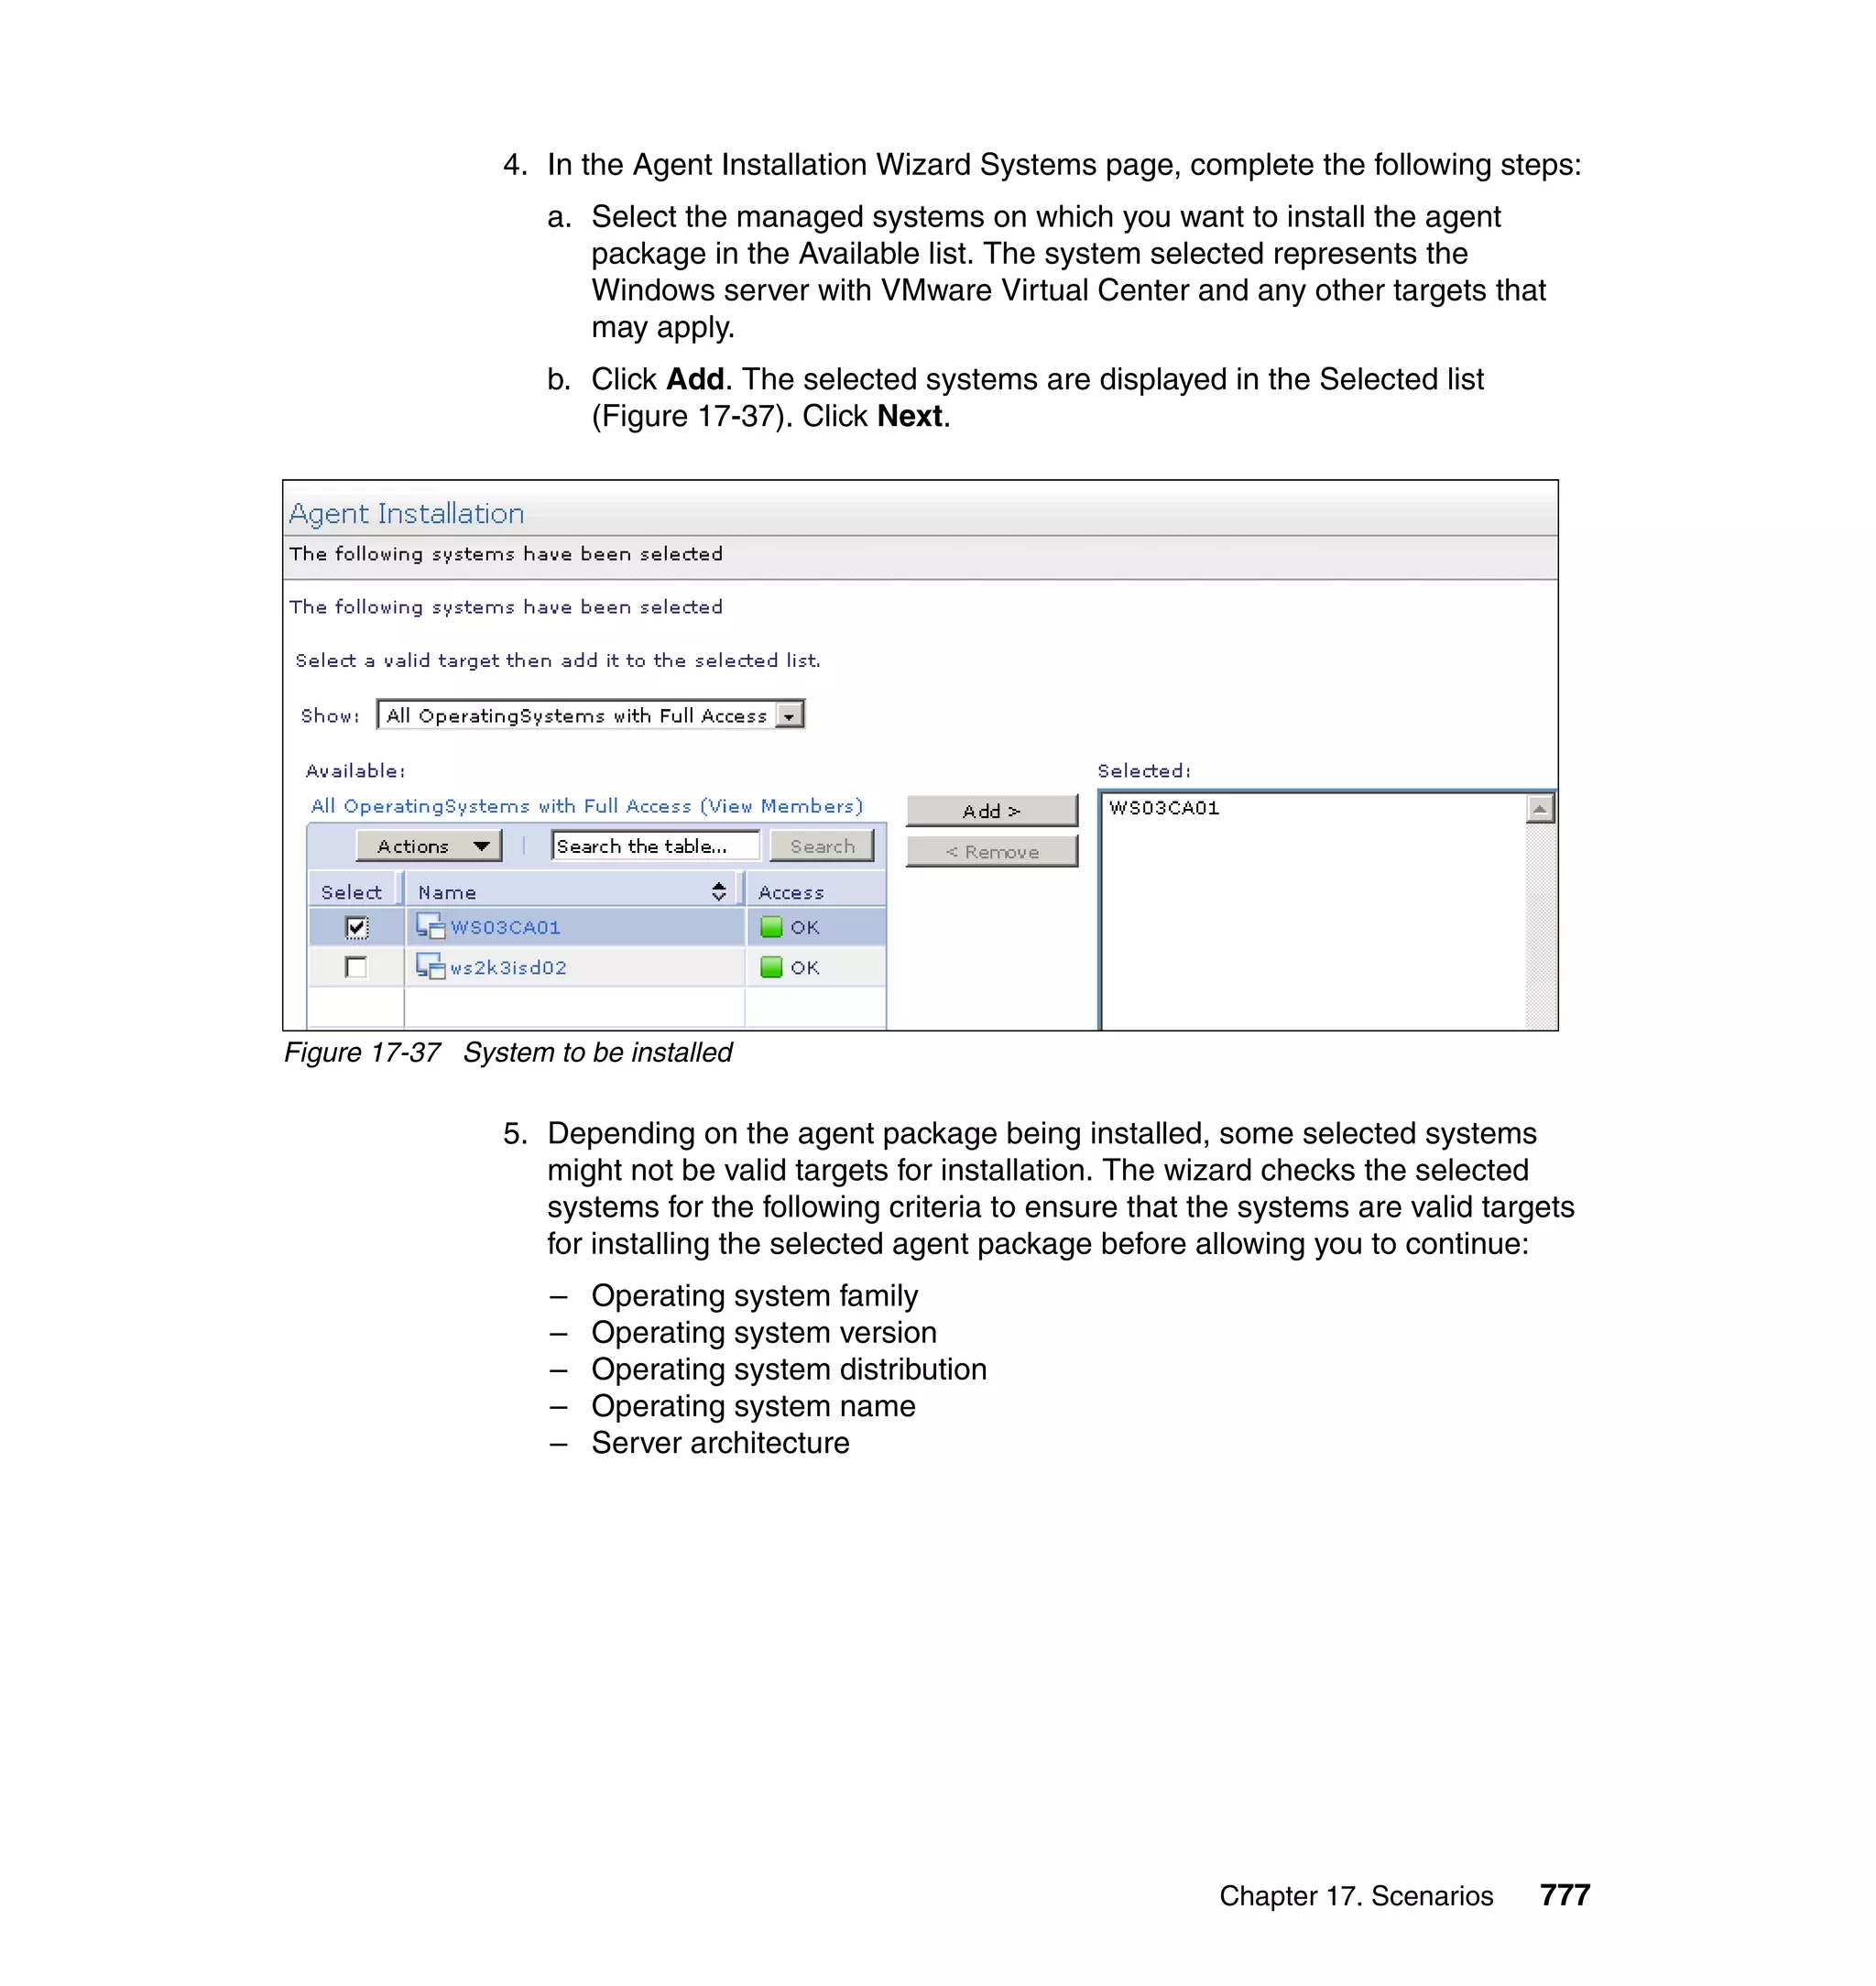
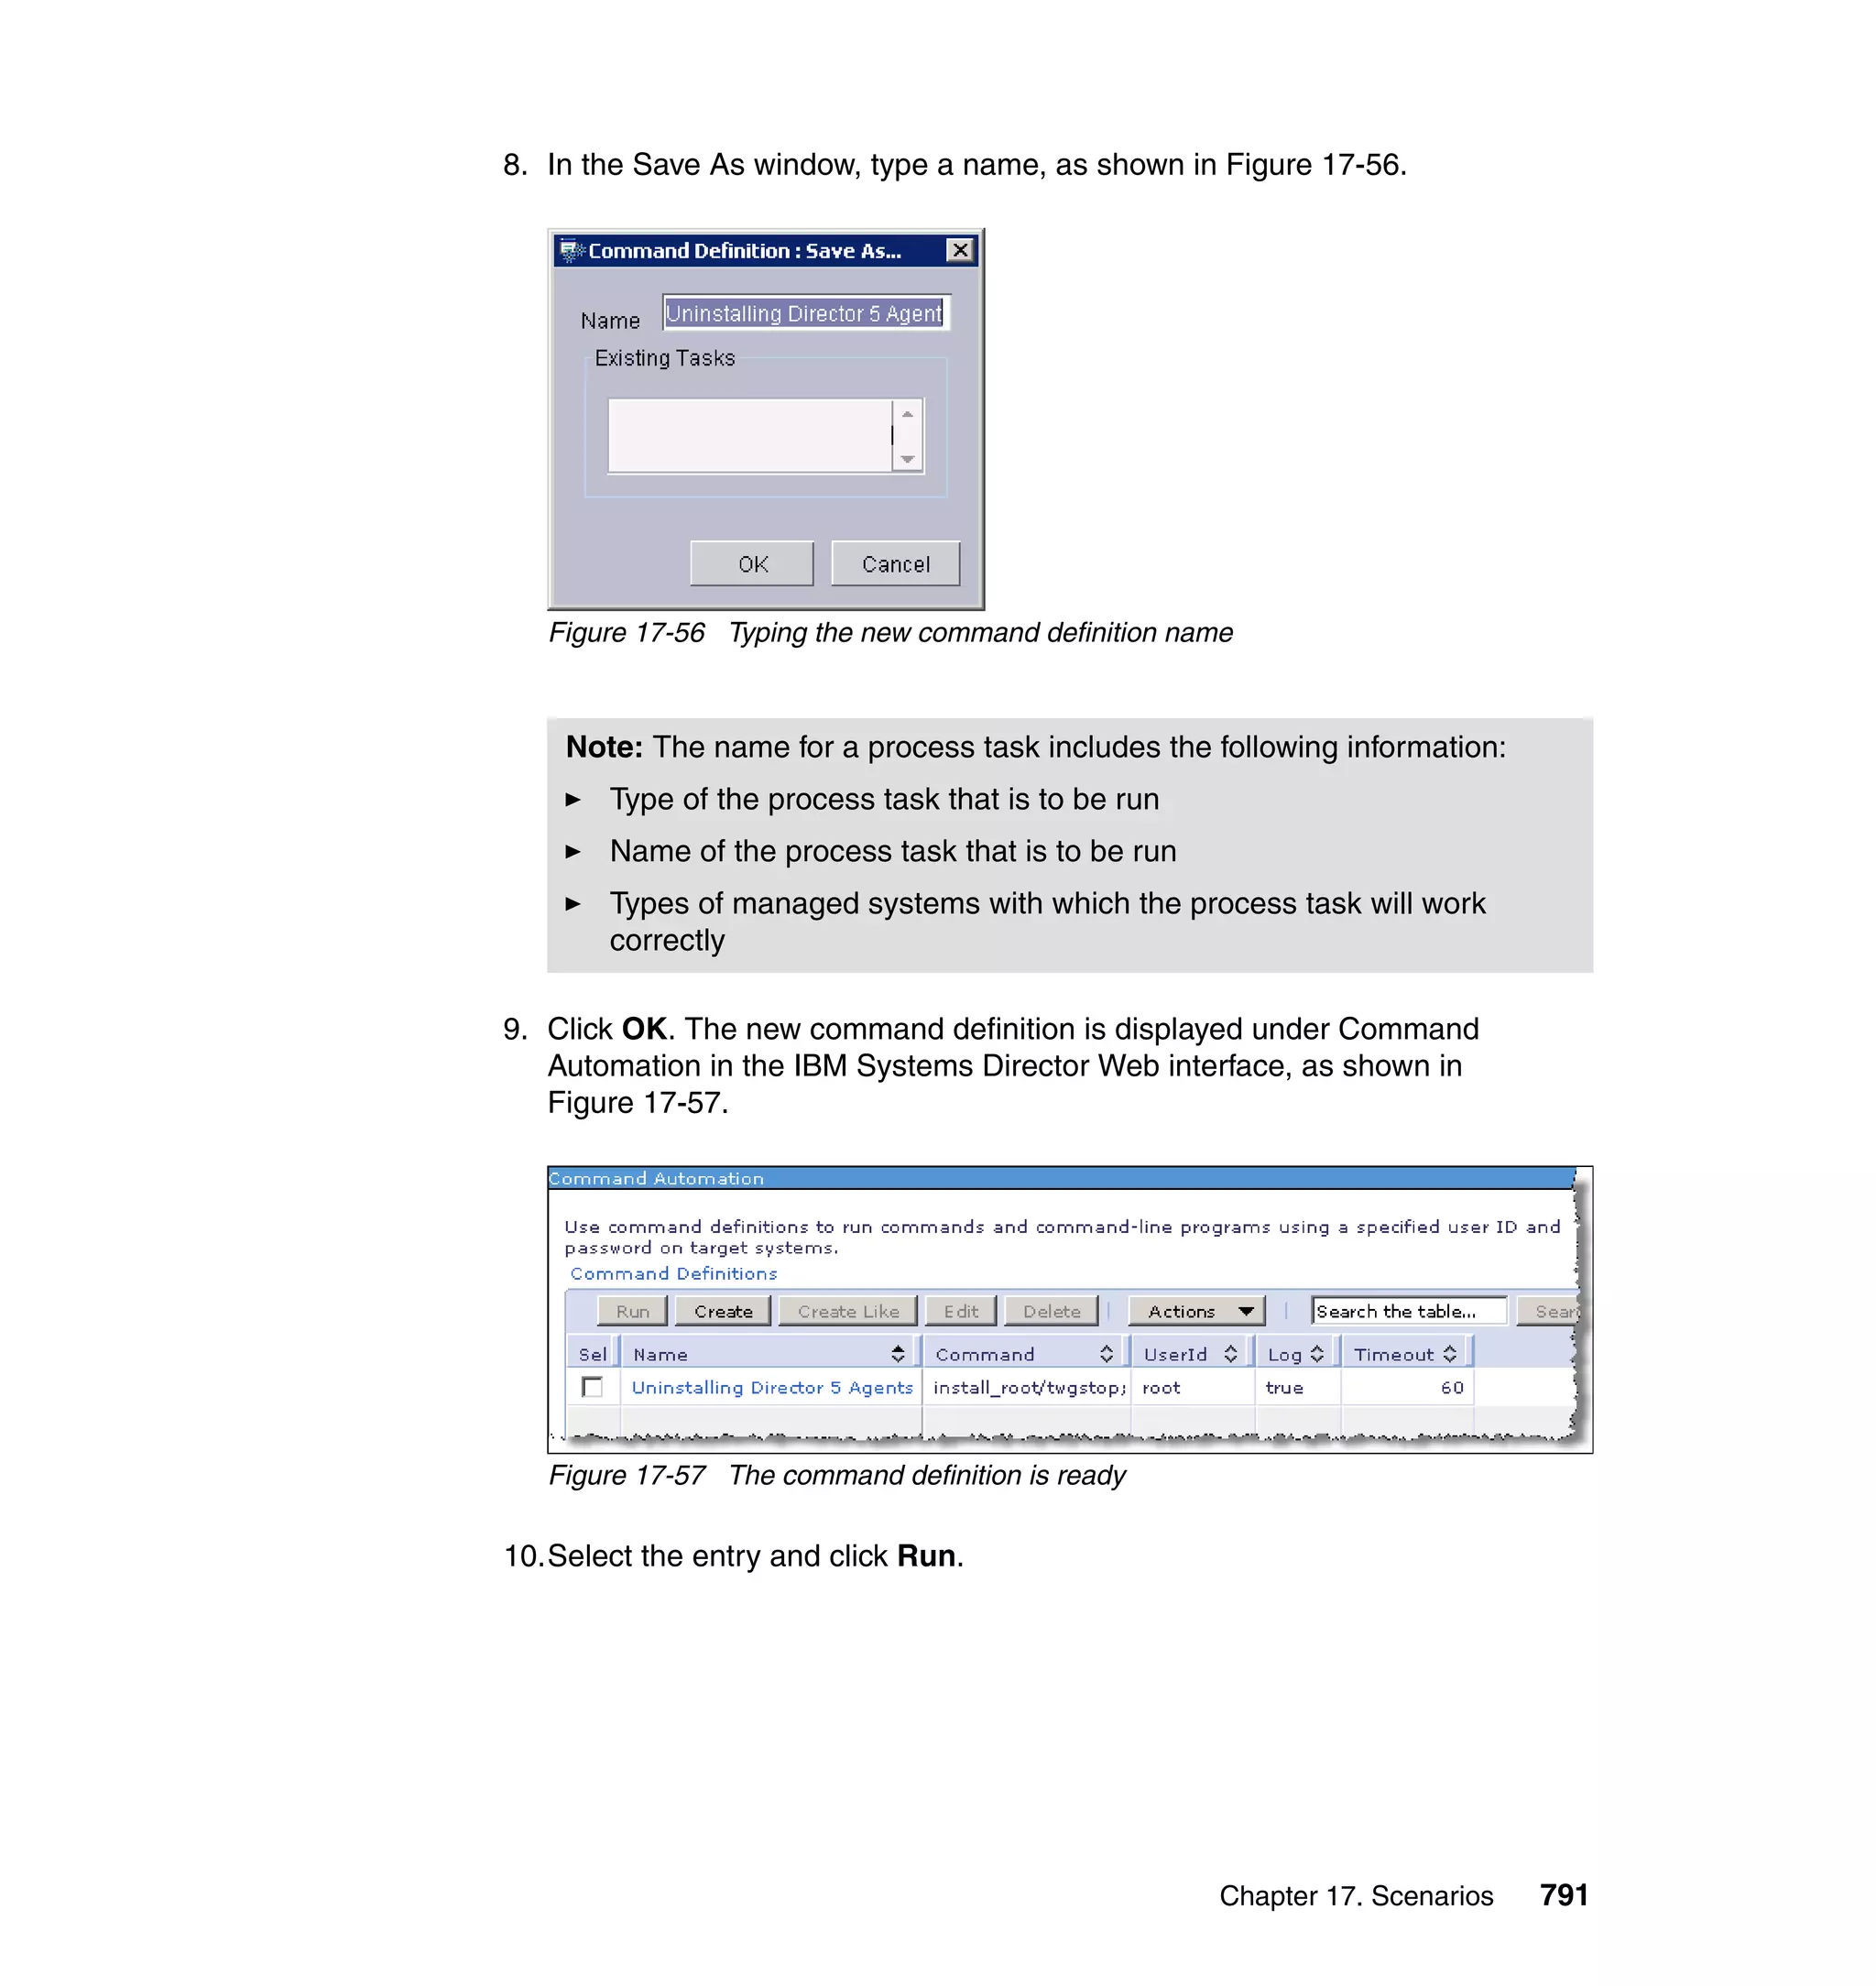
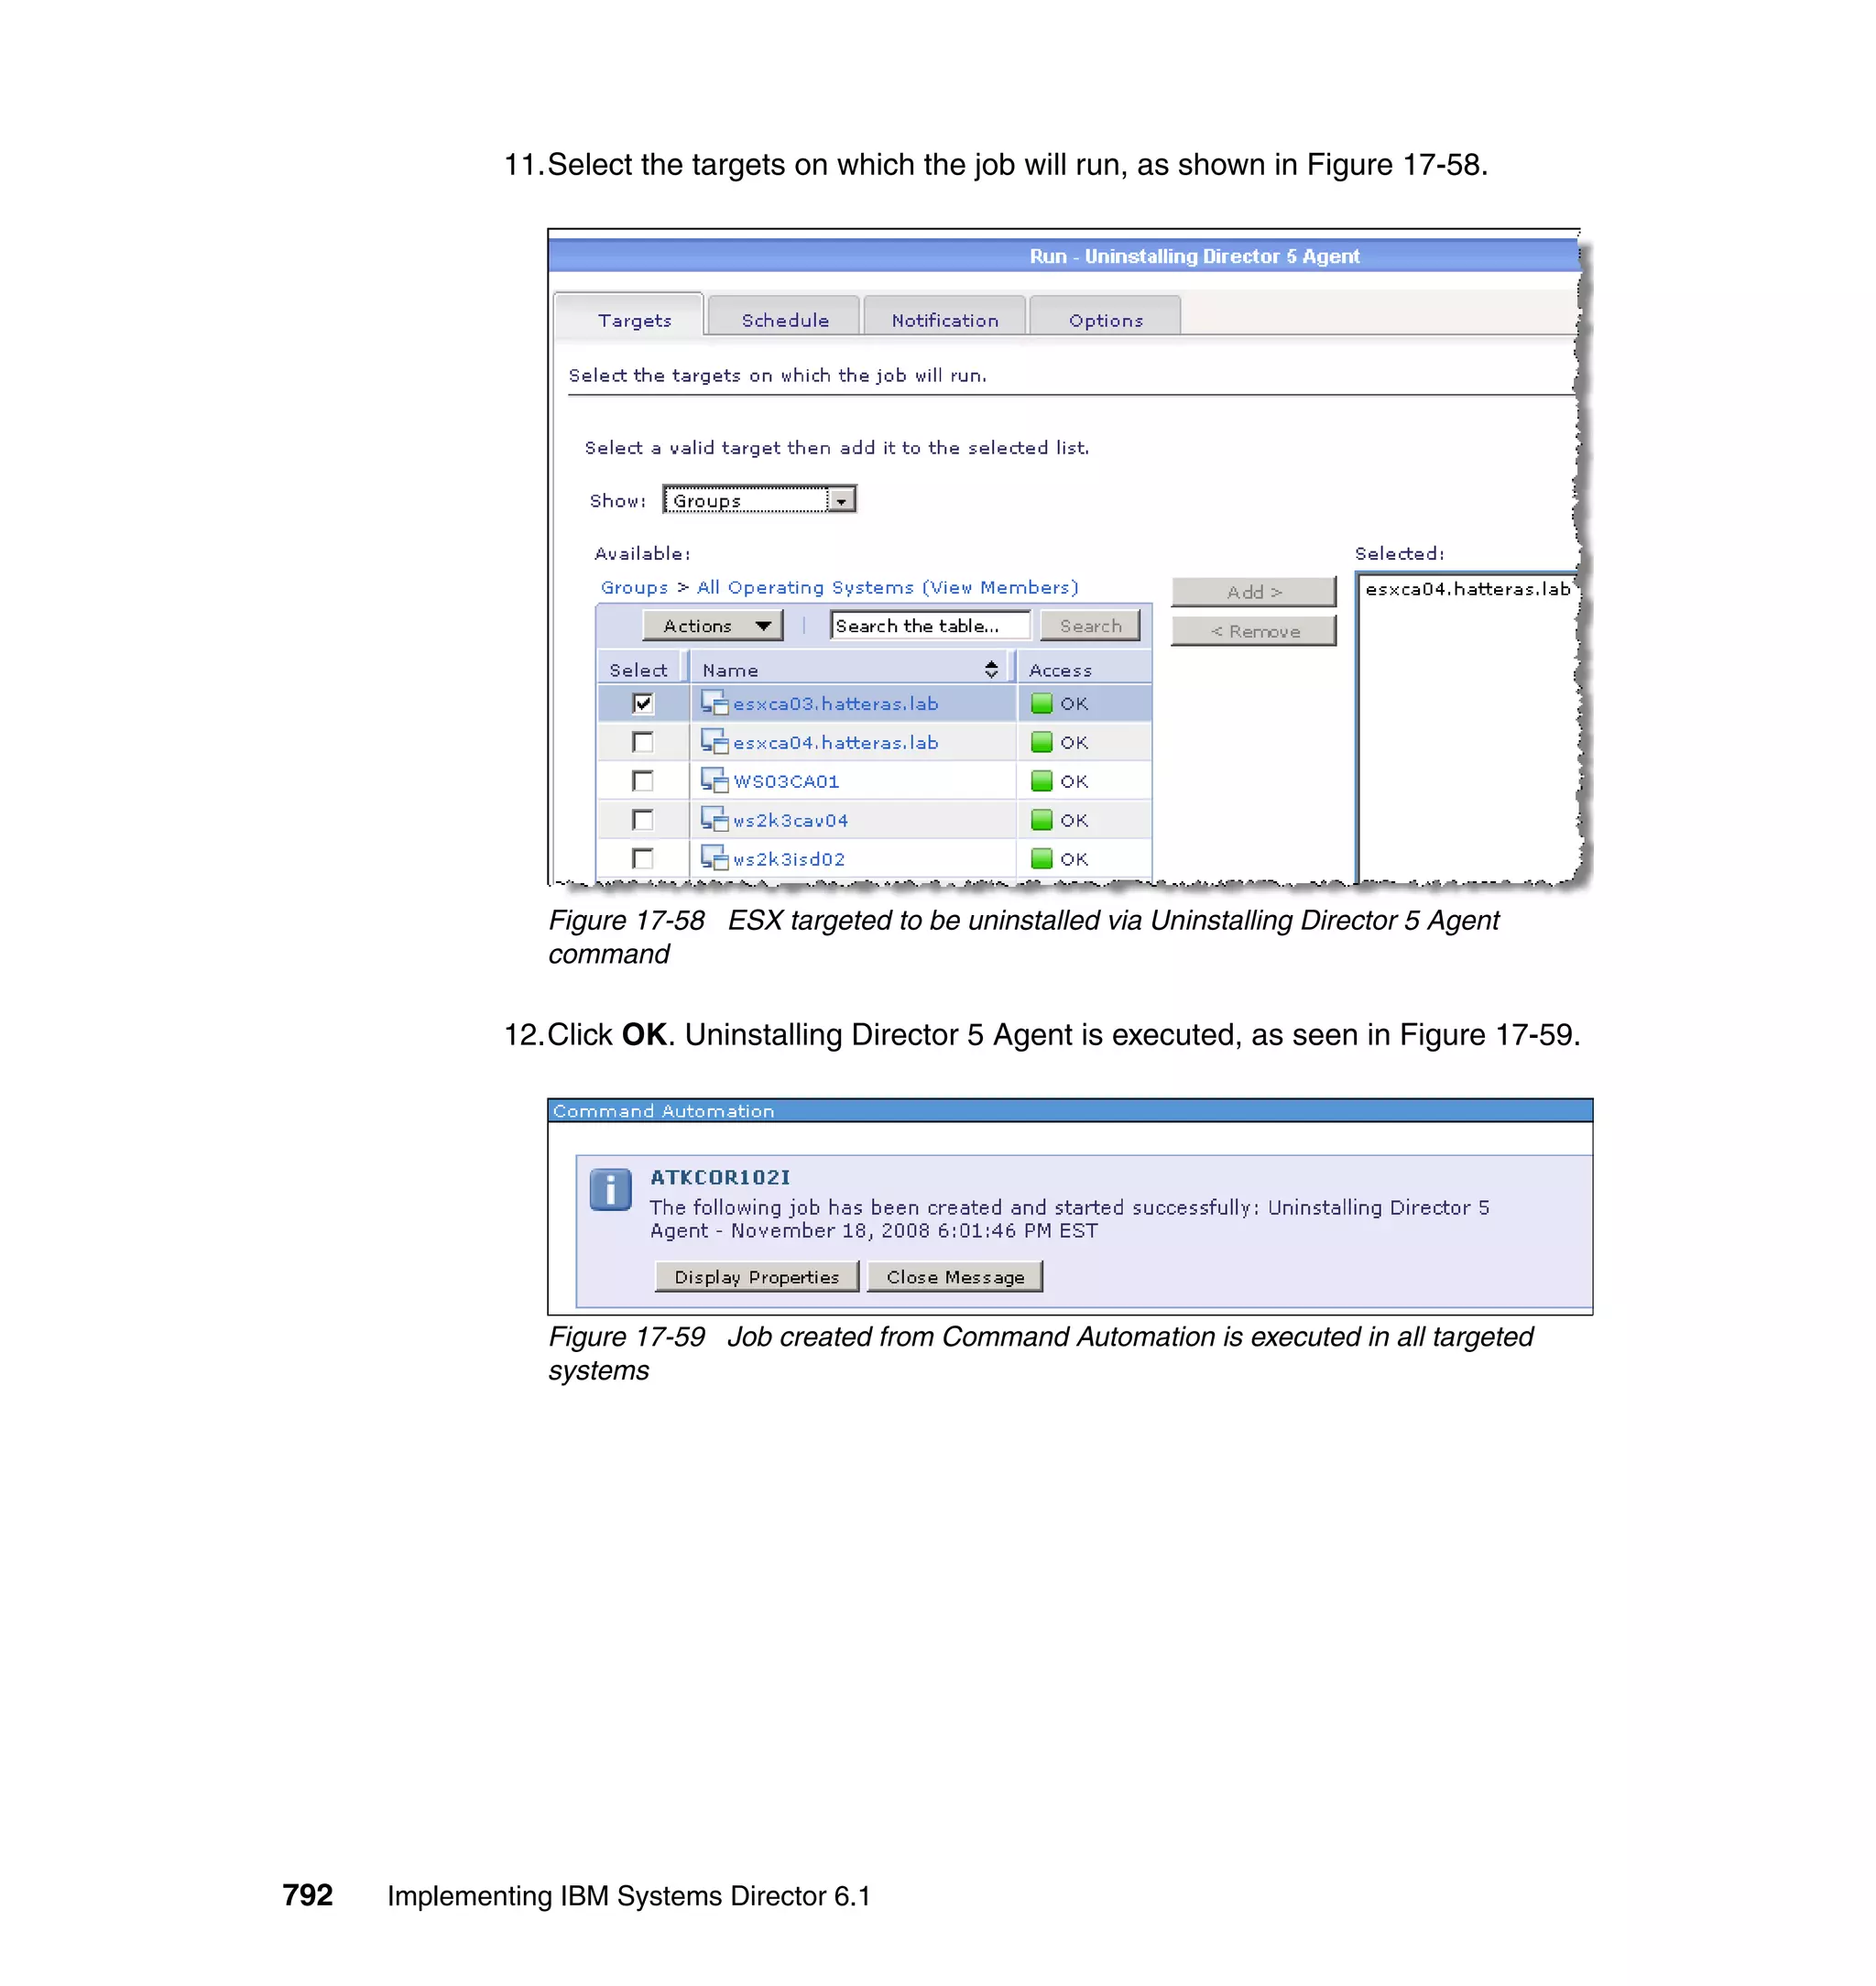
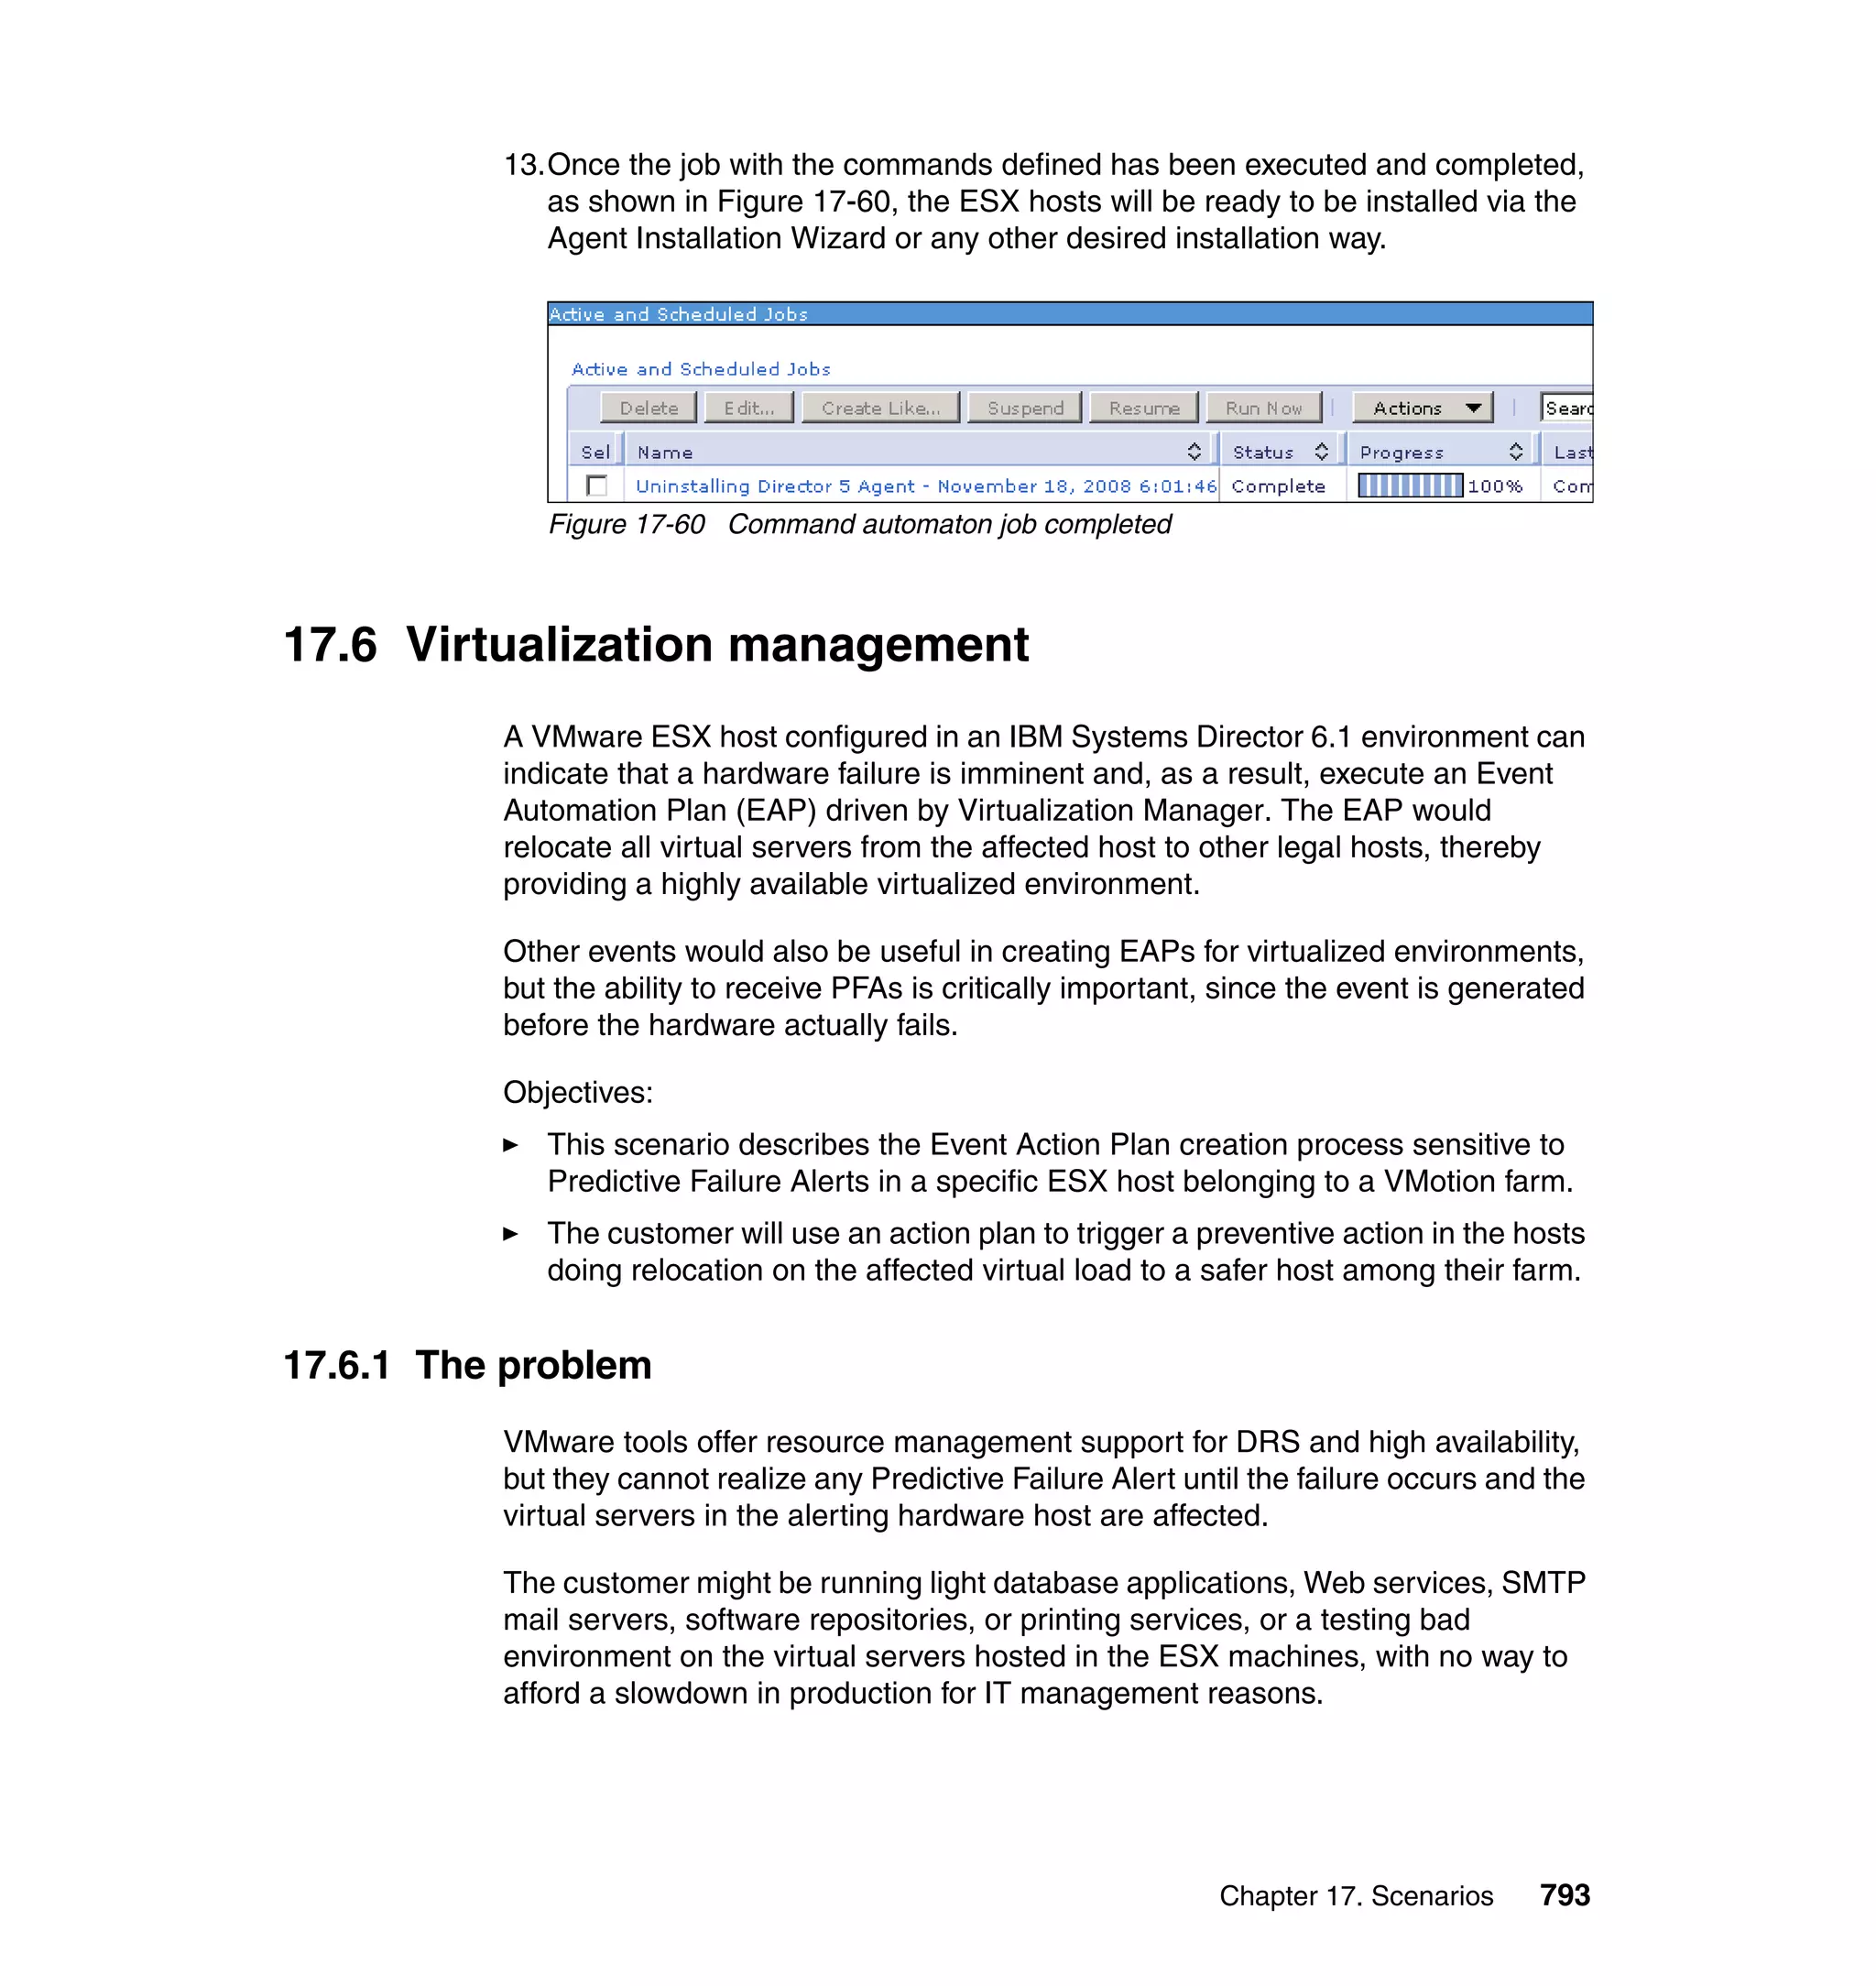
Download to read offline


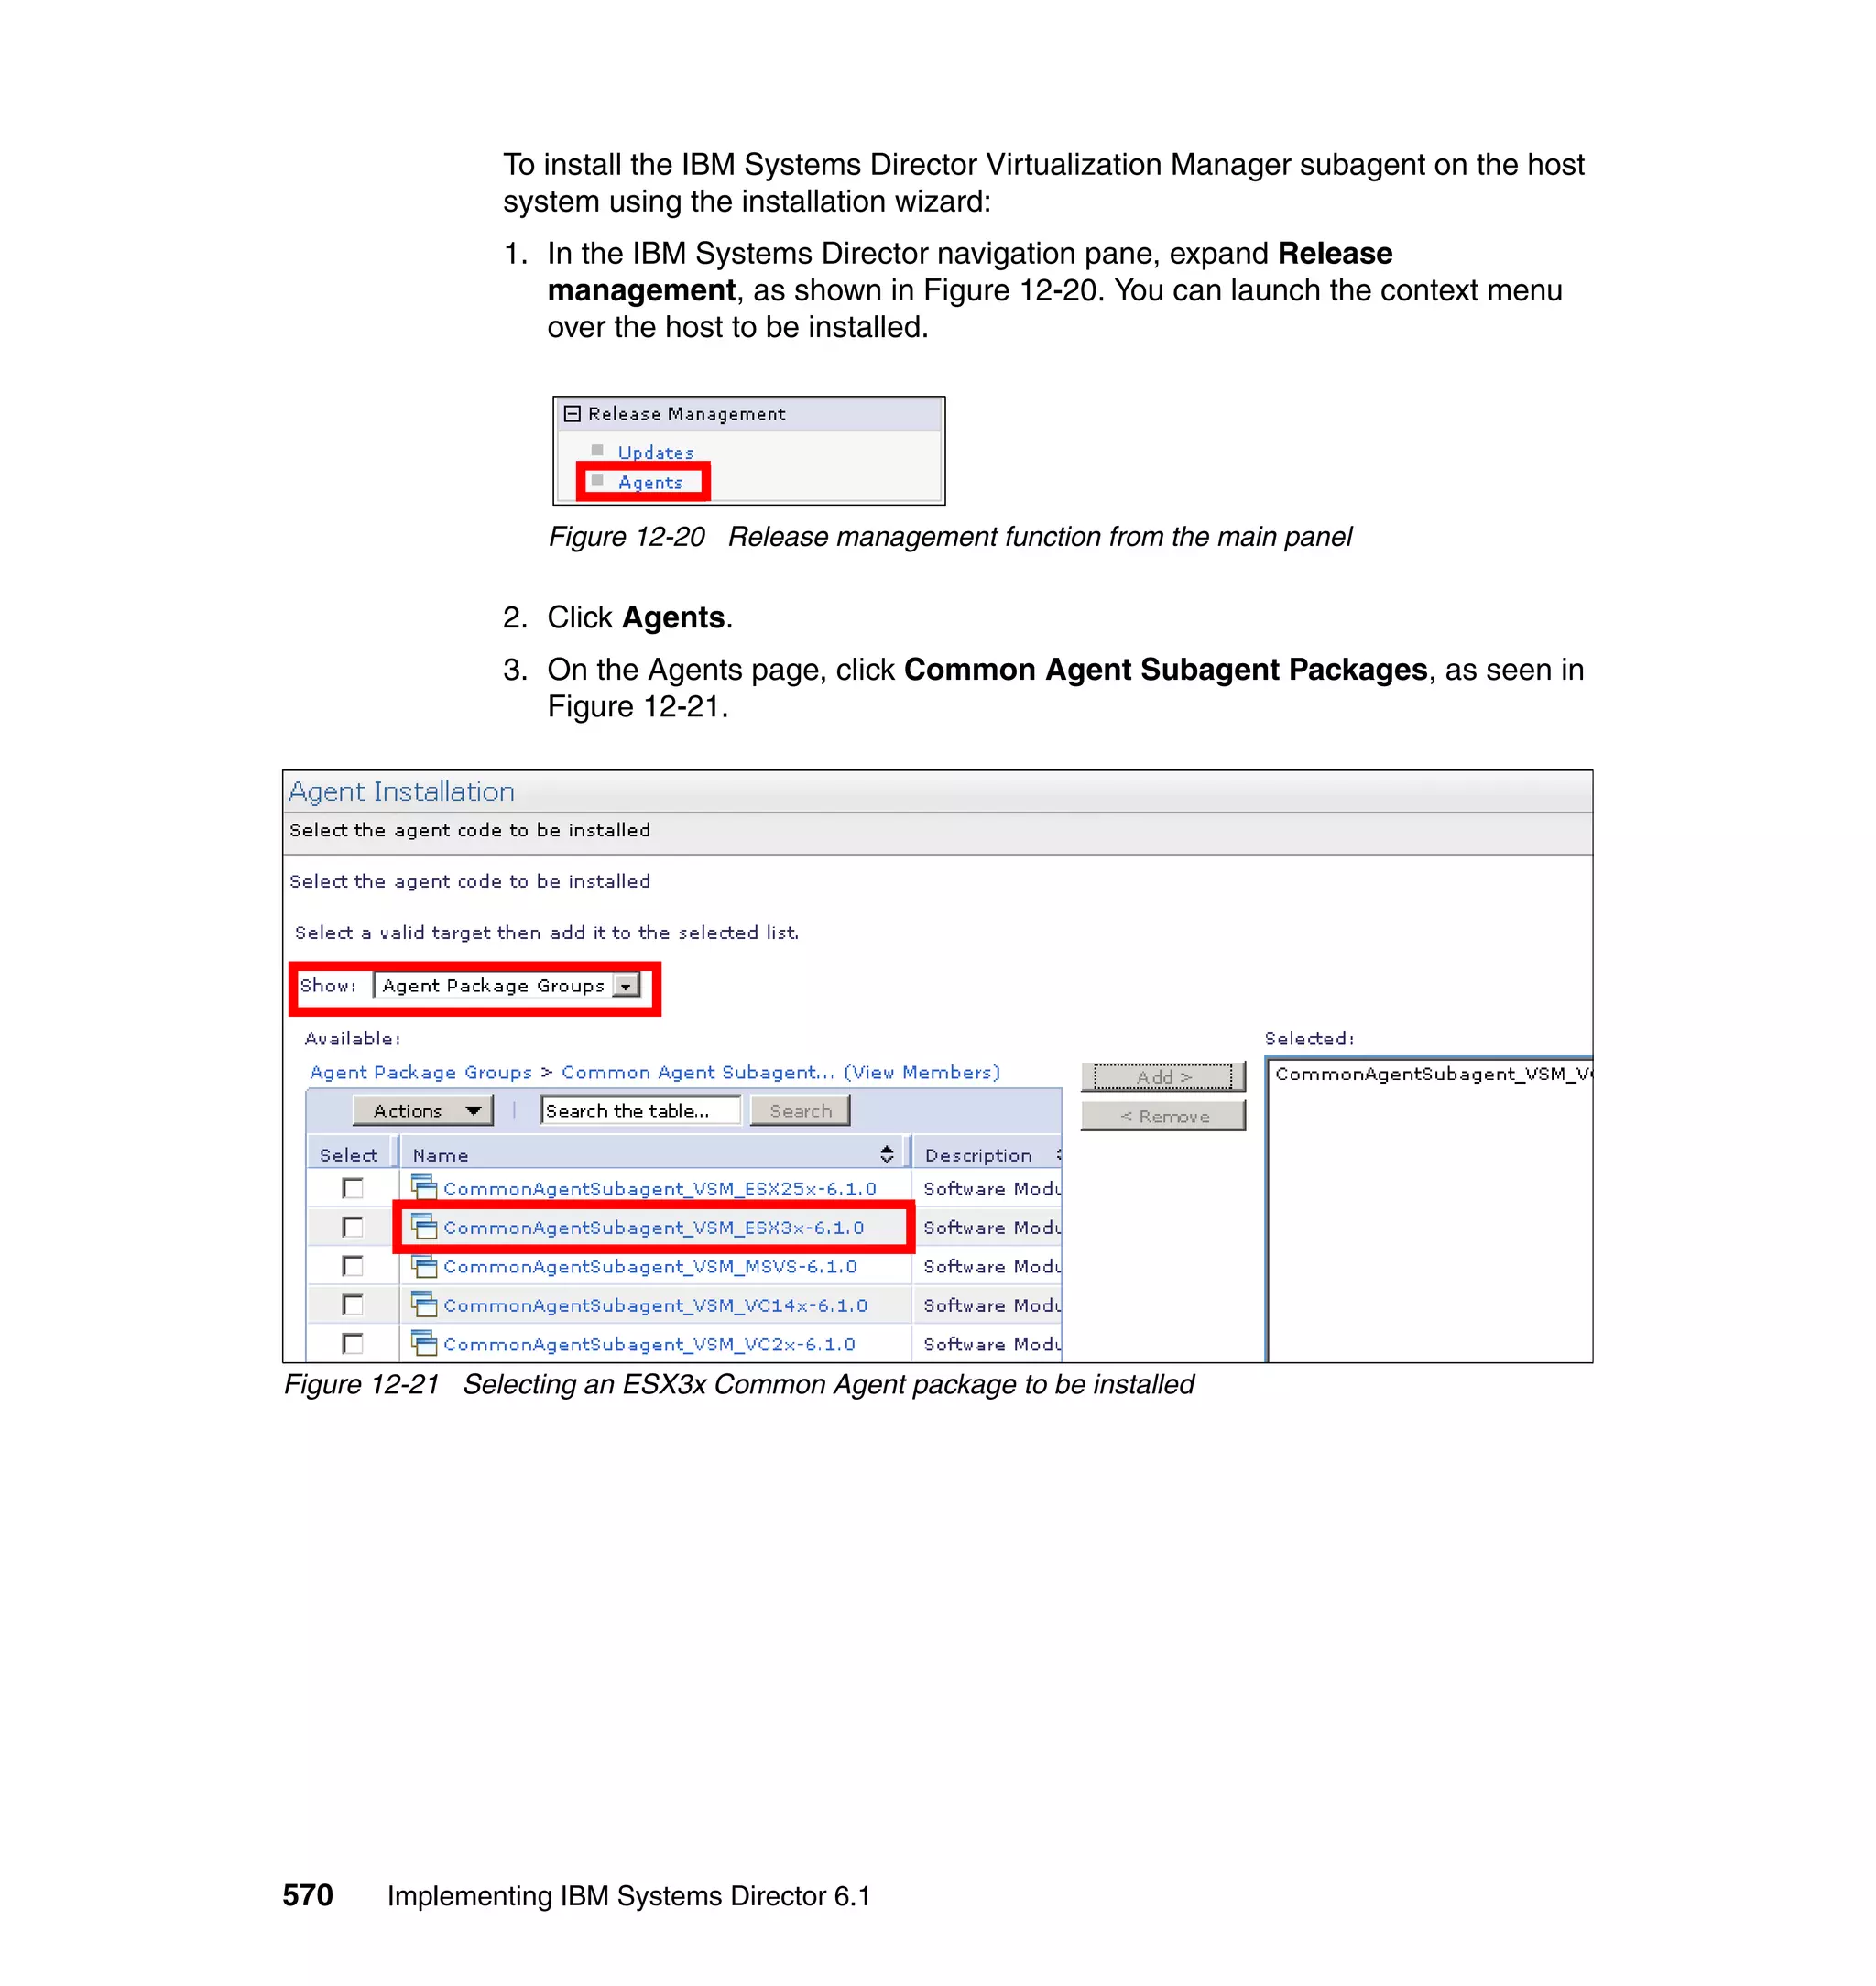
![58 Implementing IBM Systems Director 6.1
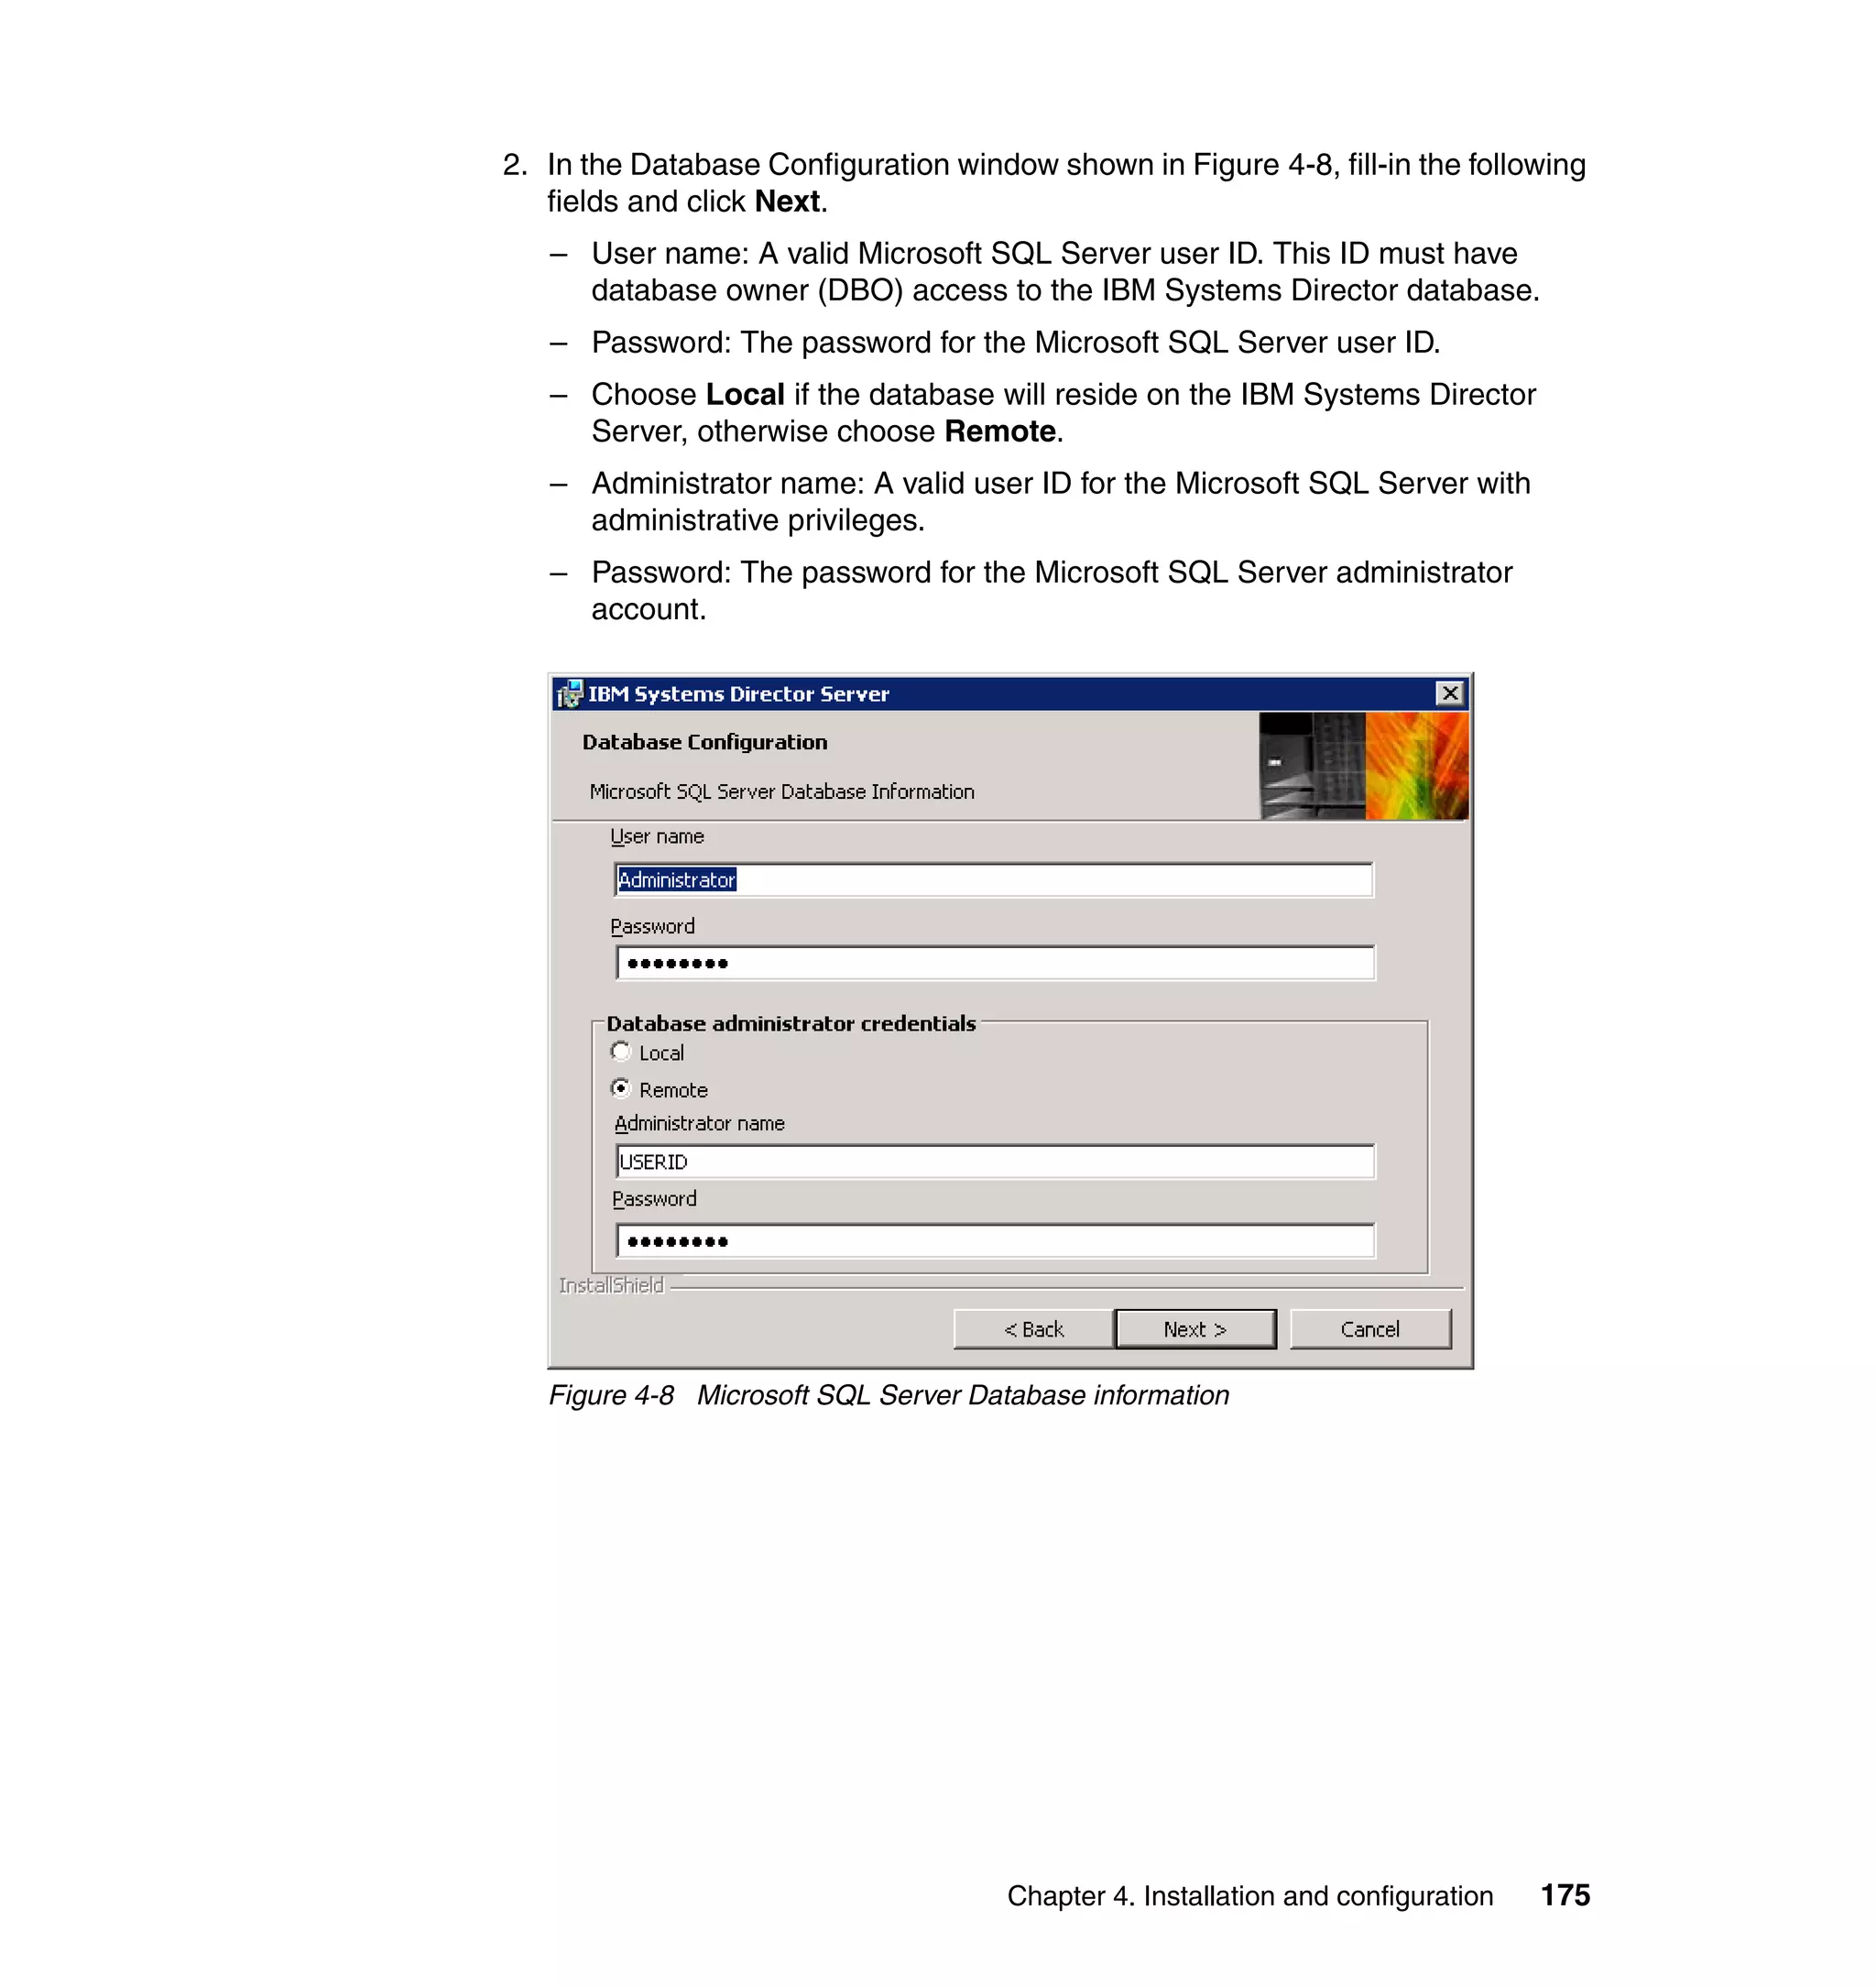
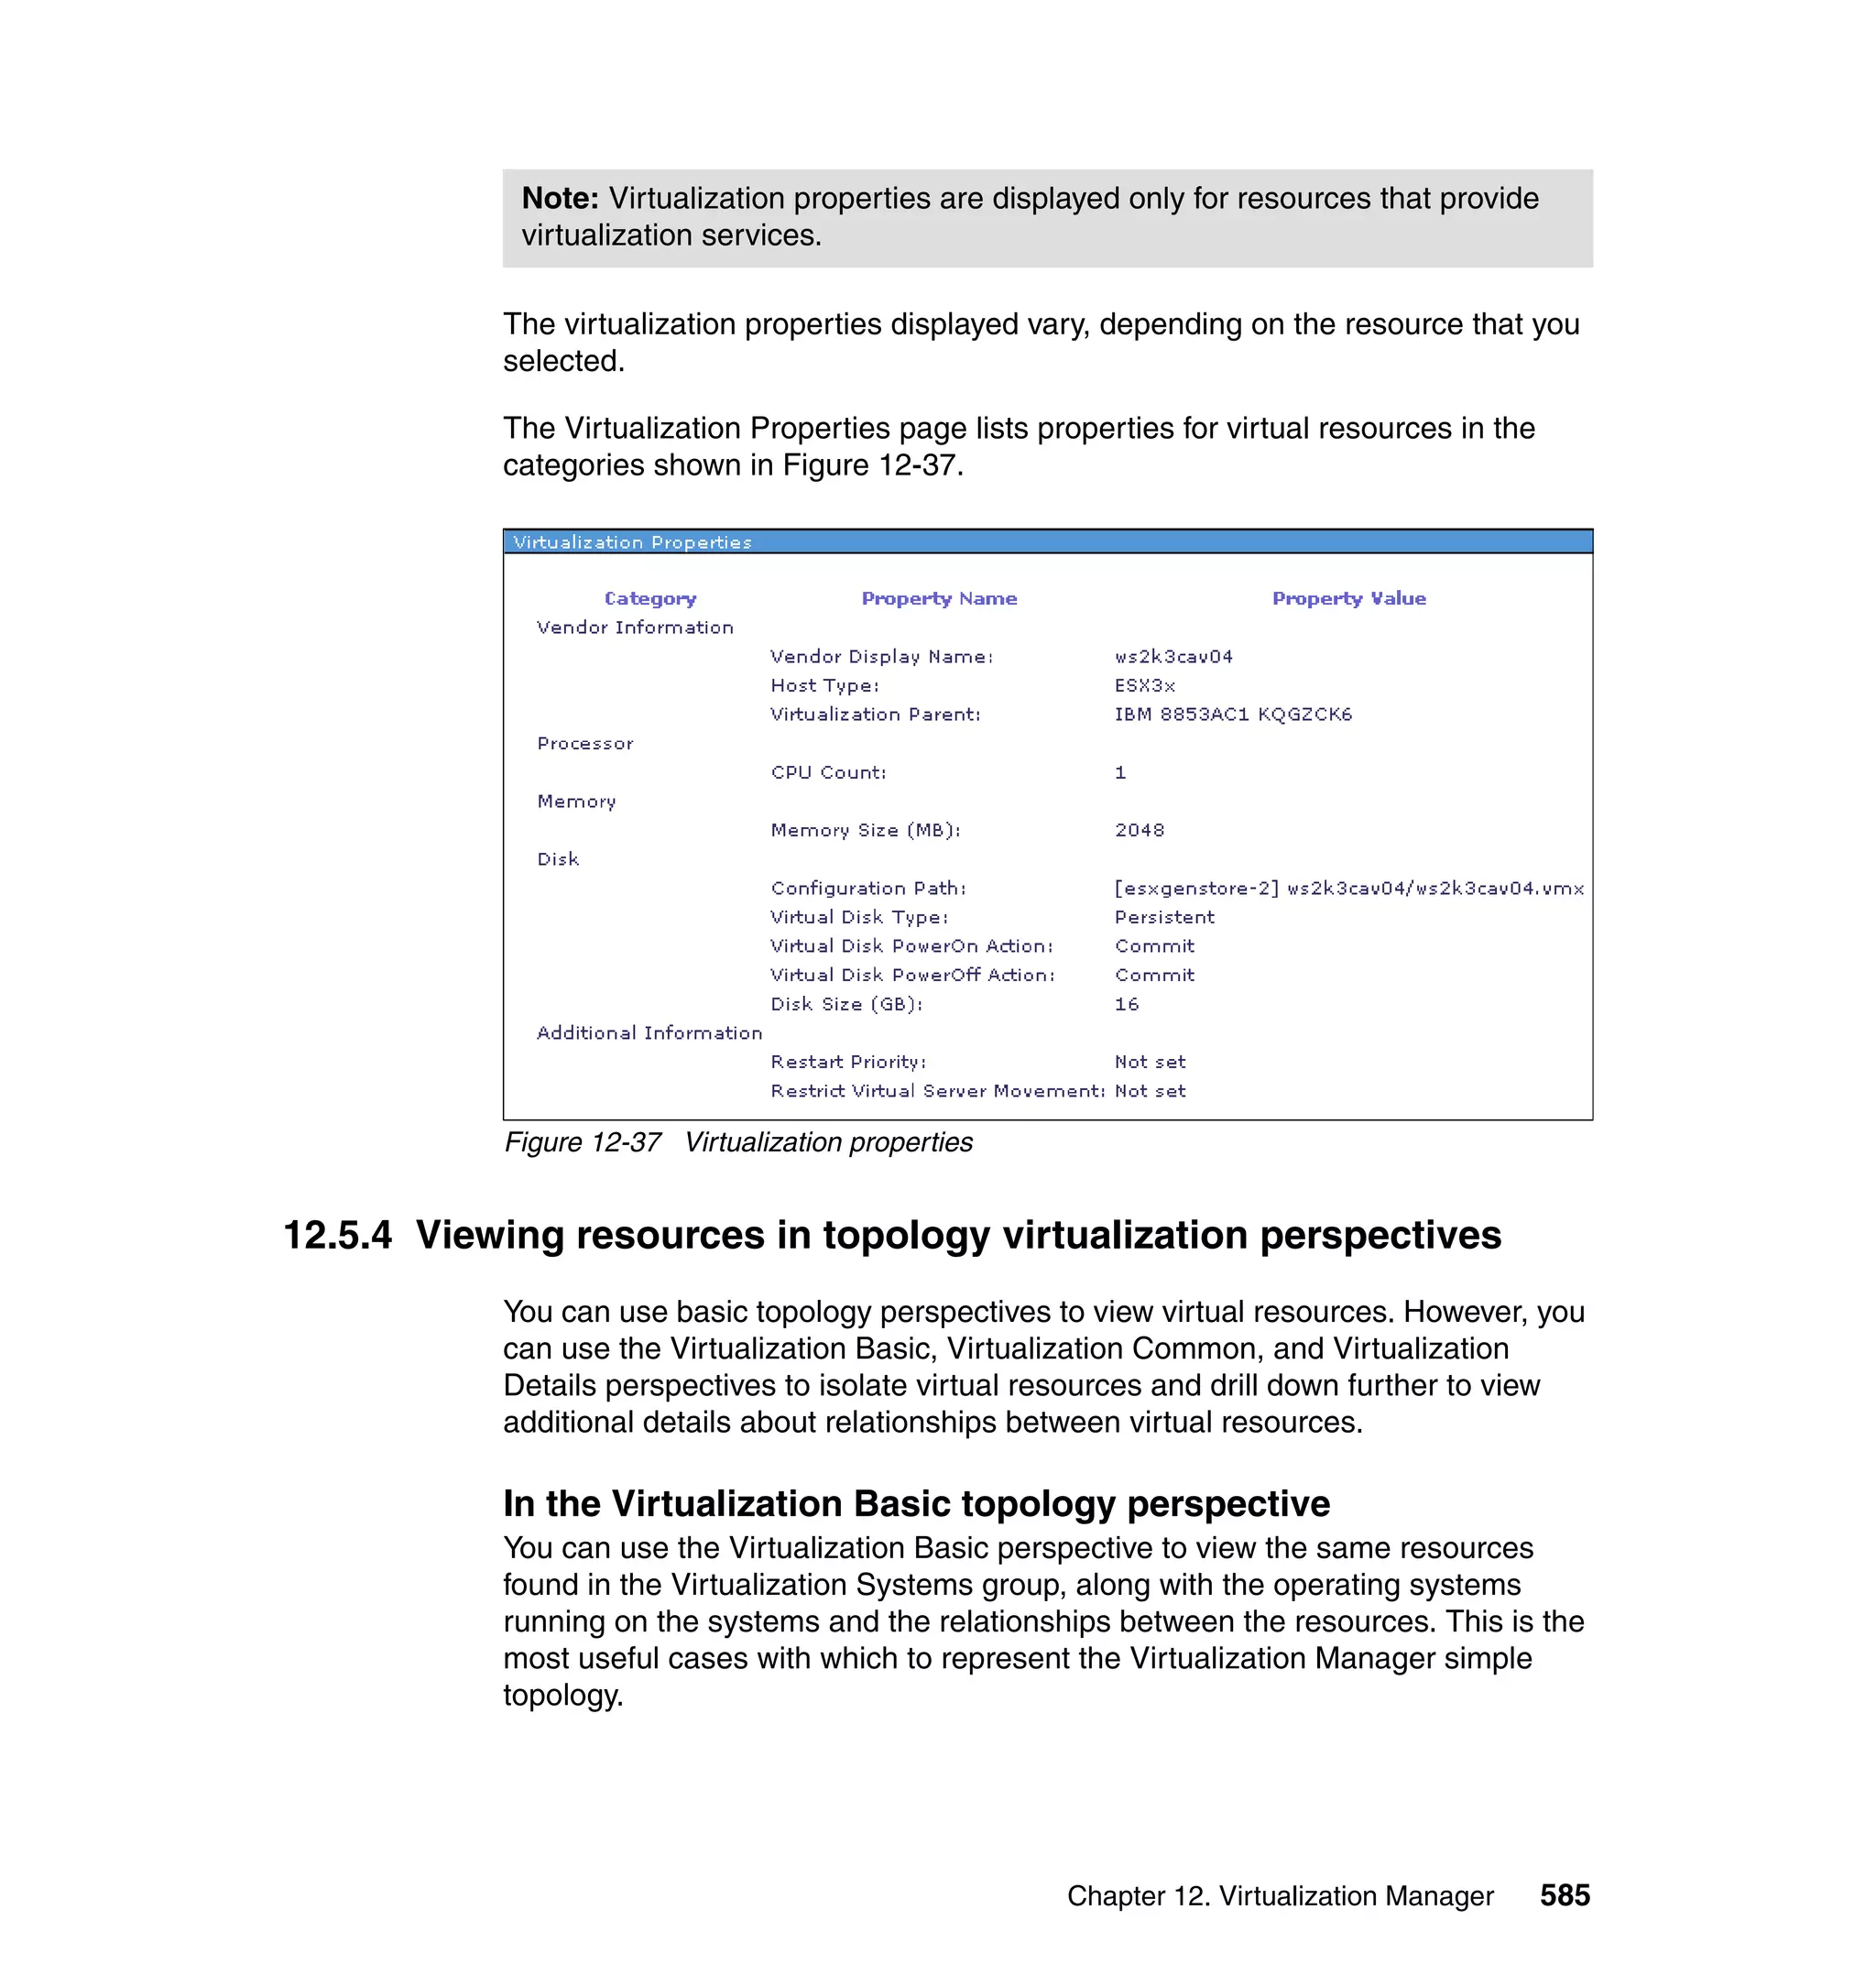
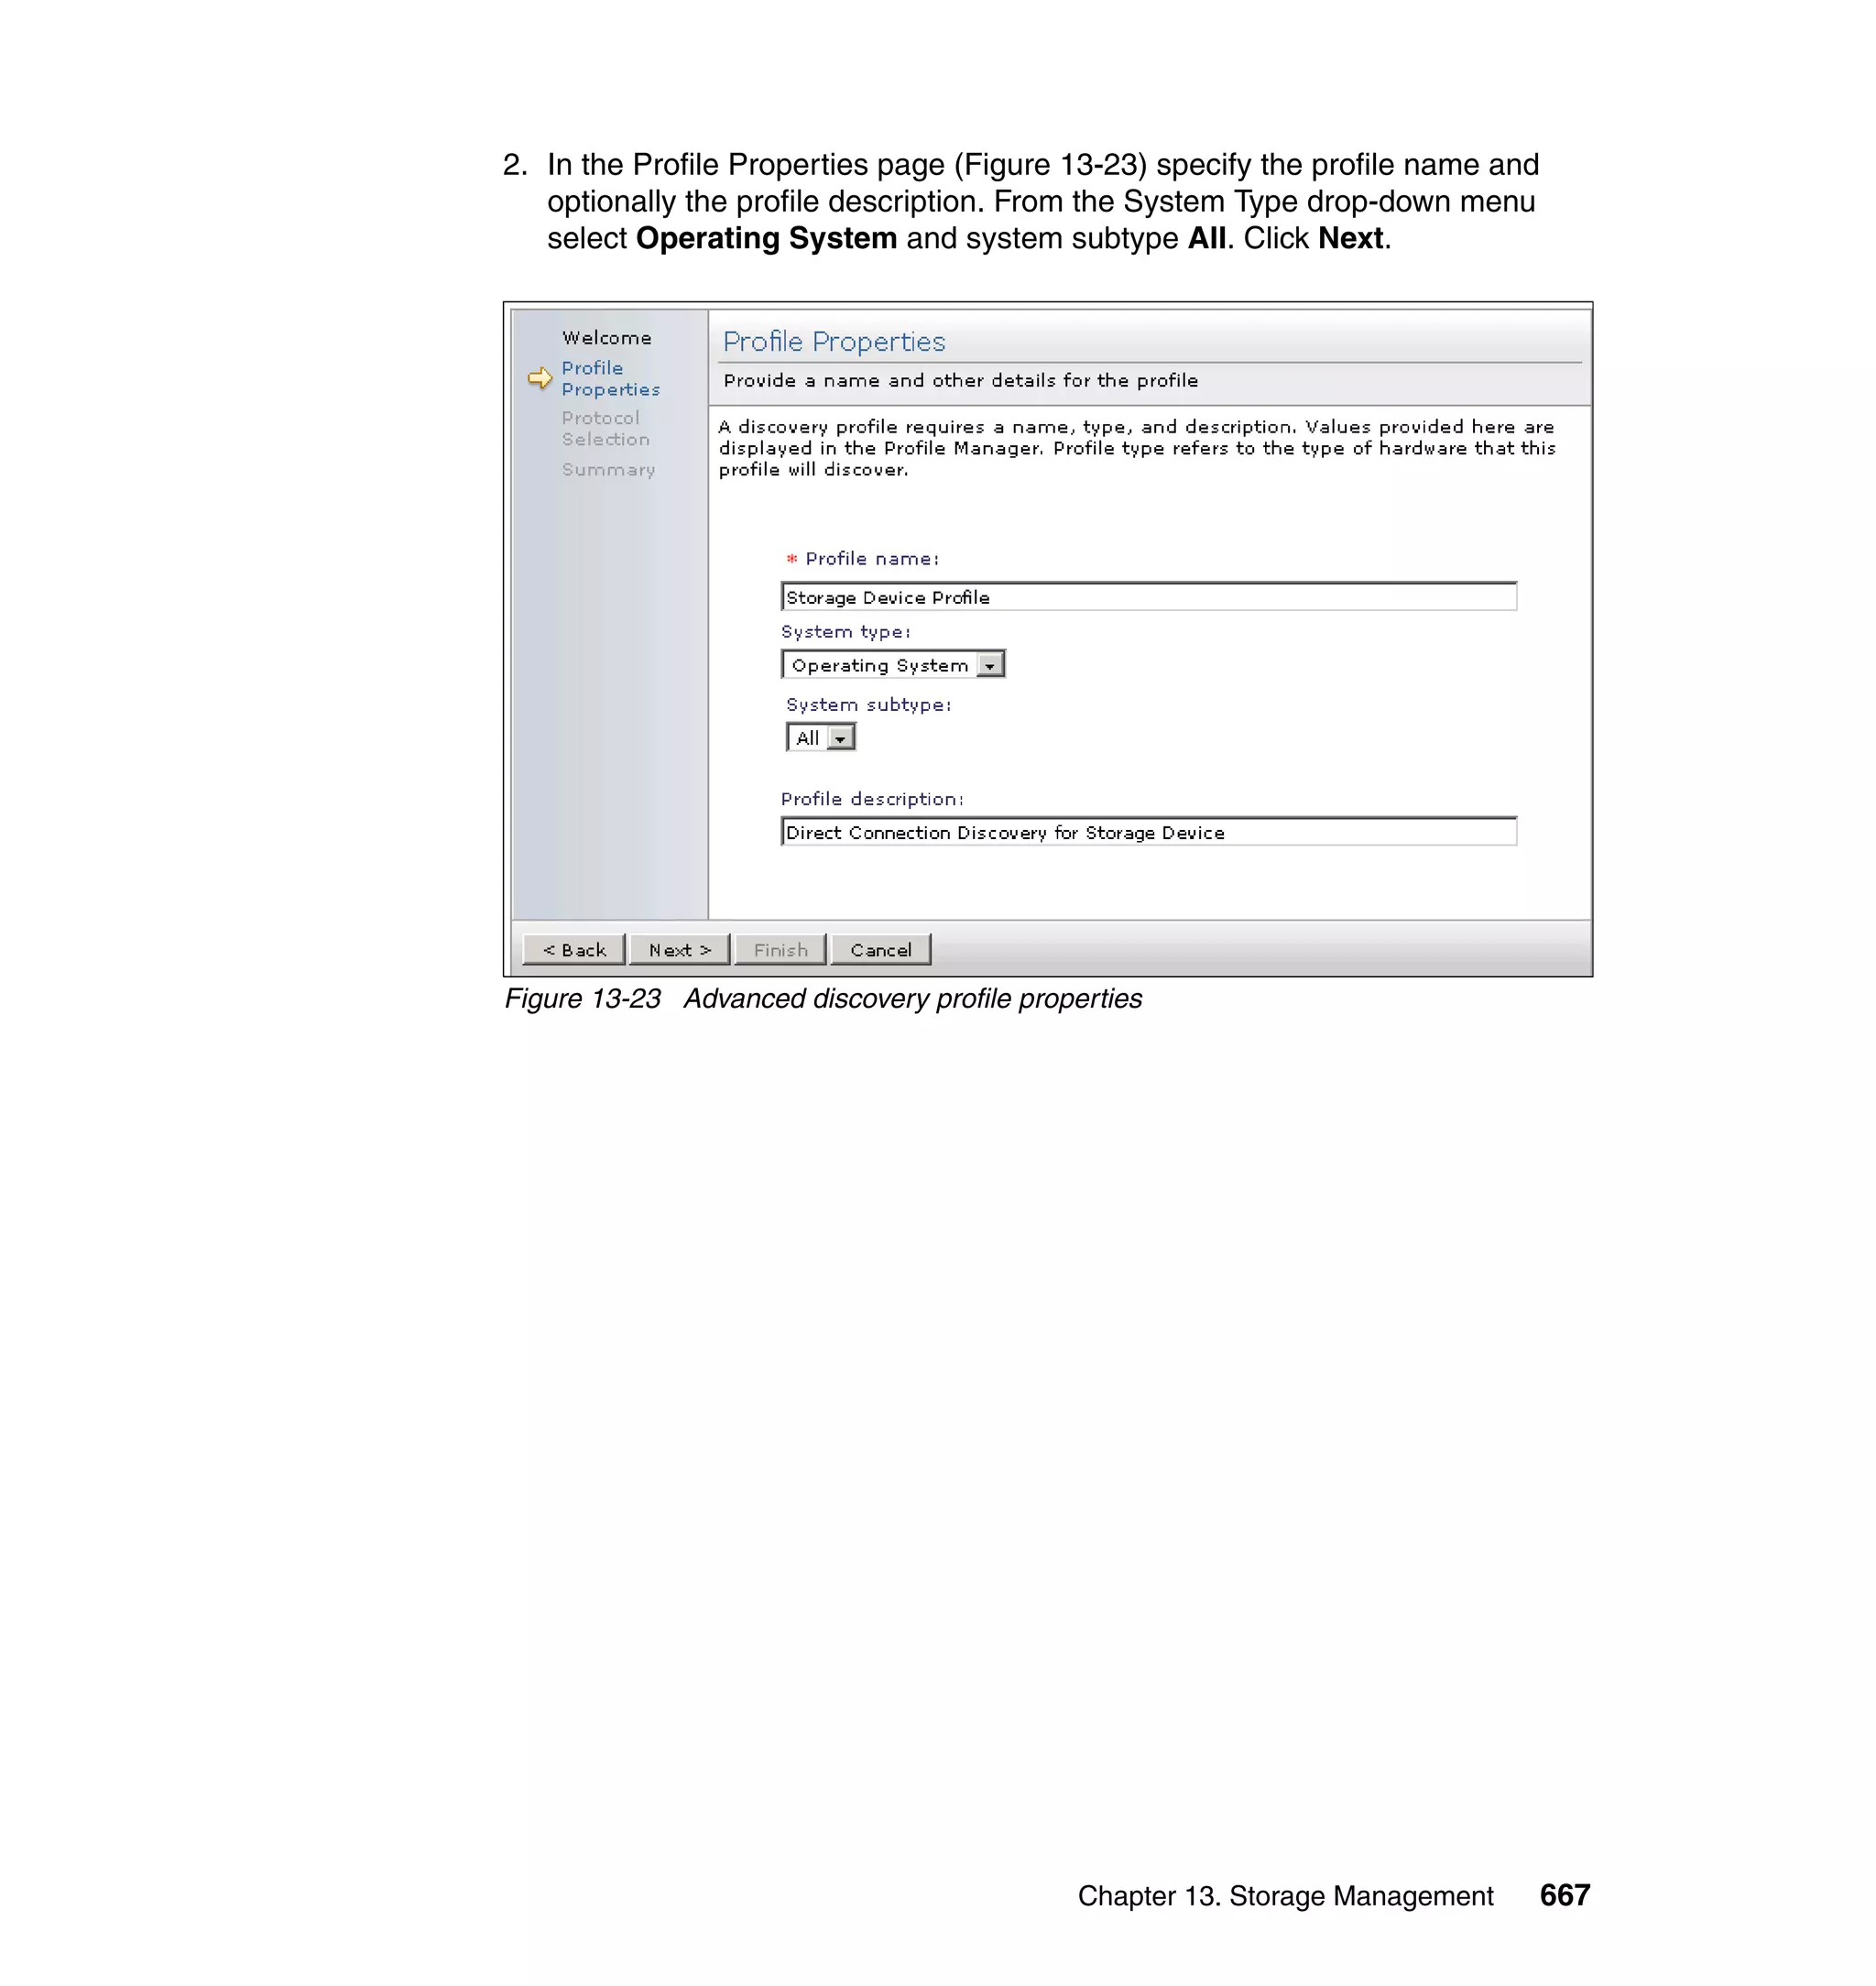
Component (now called template)
This is a stored version of definition parameters for the configuration of a
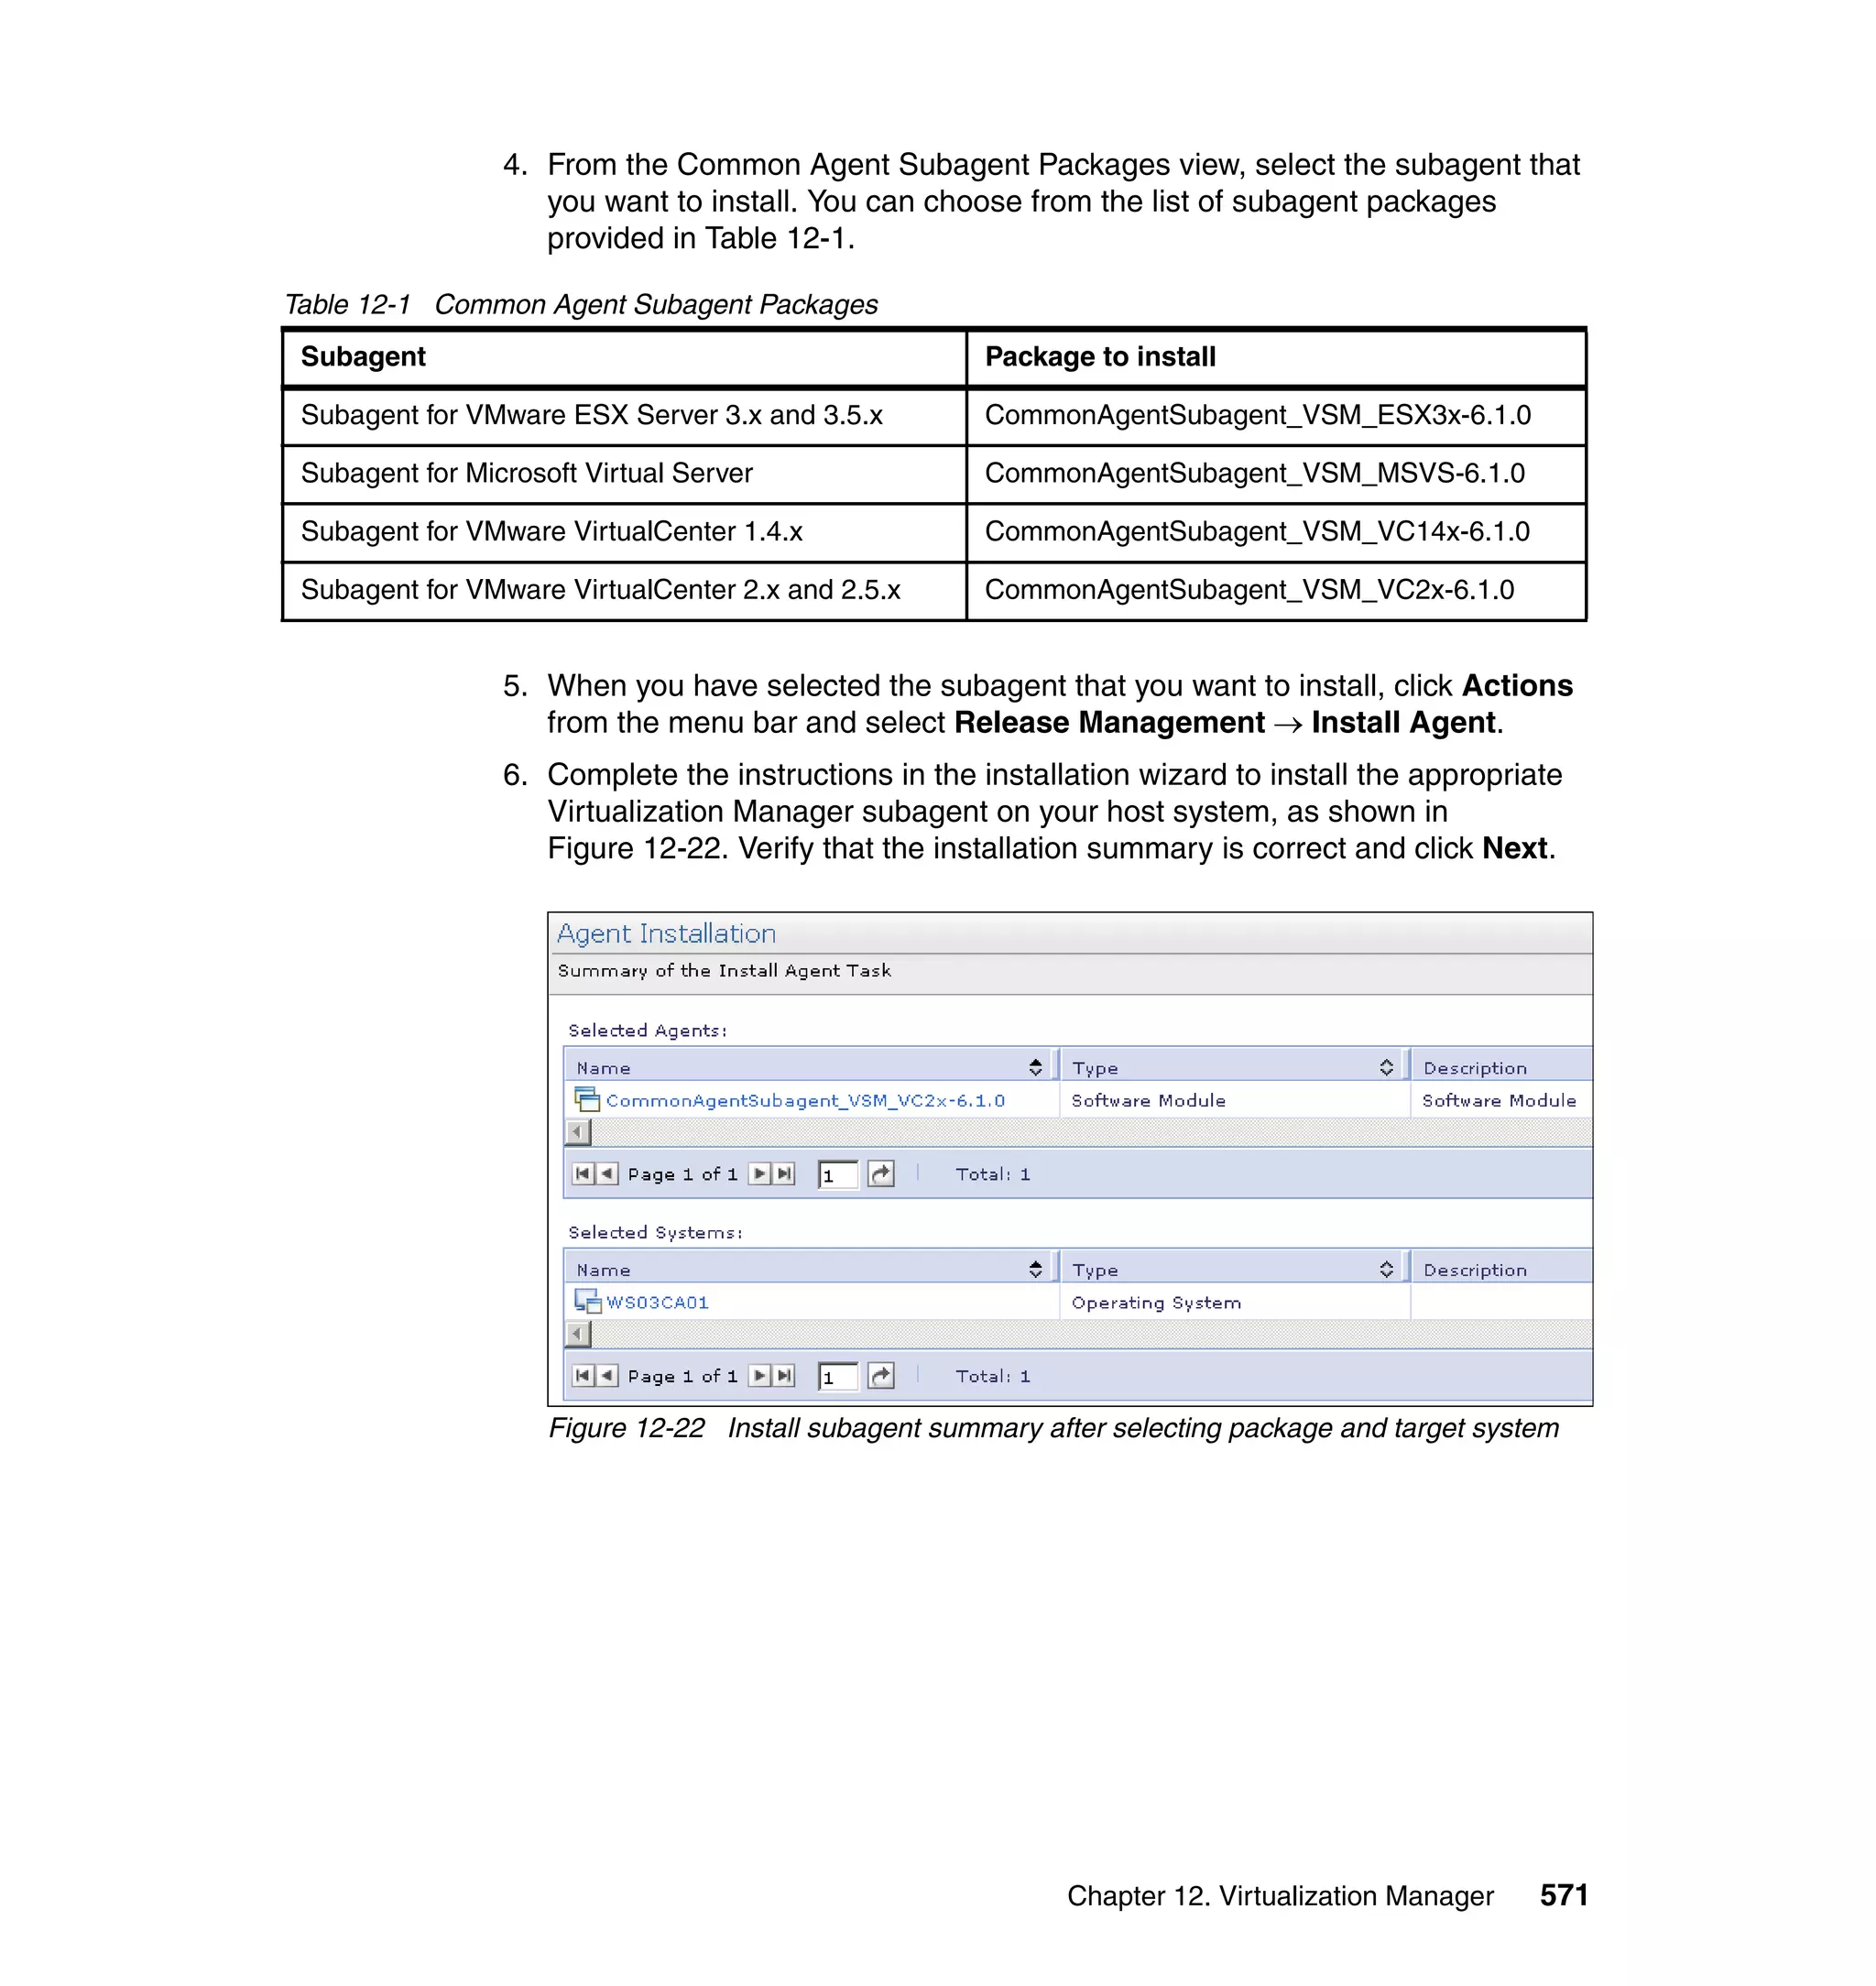
specific system.
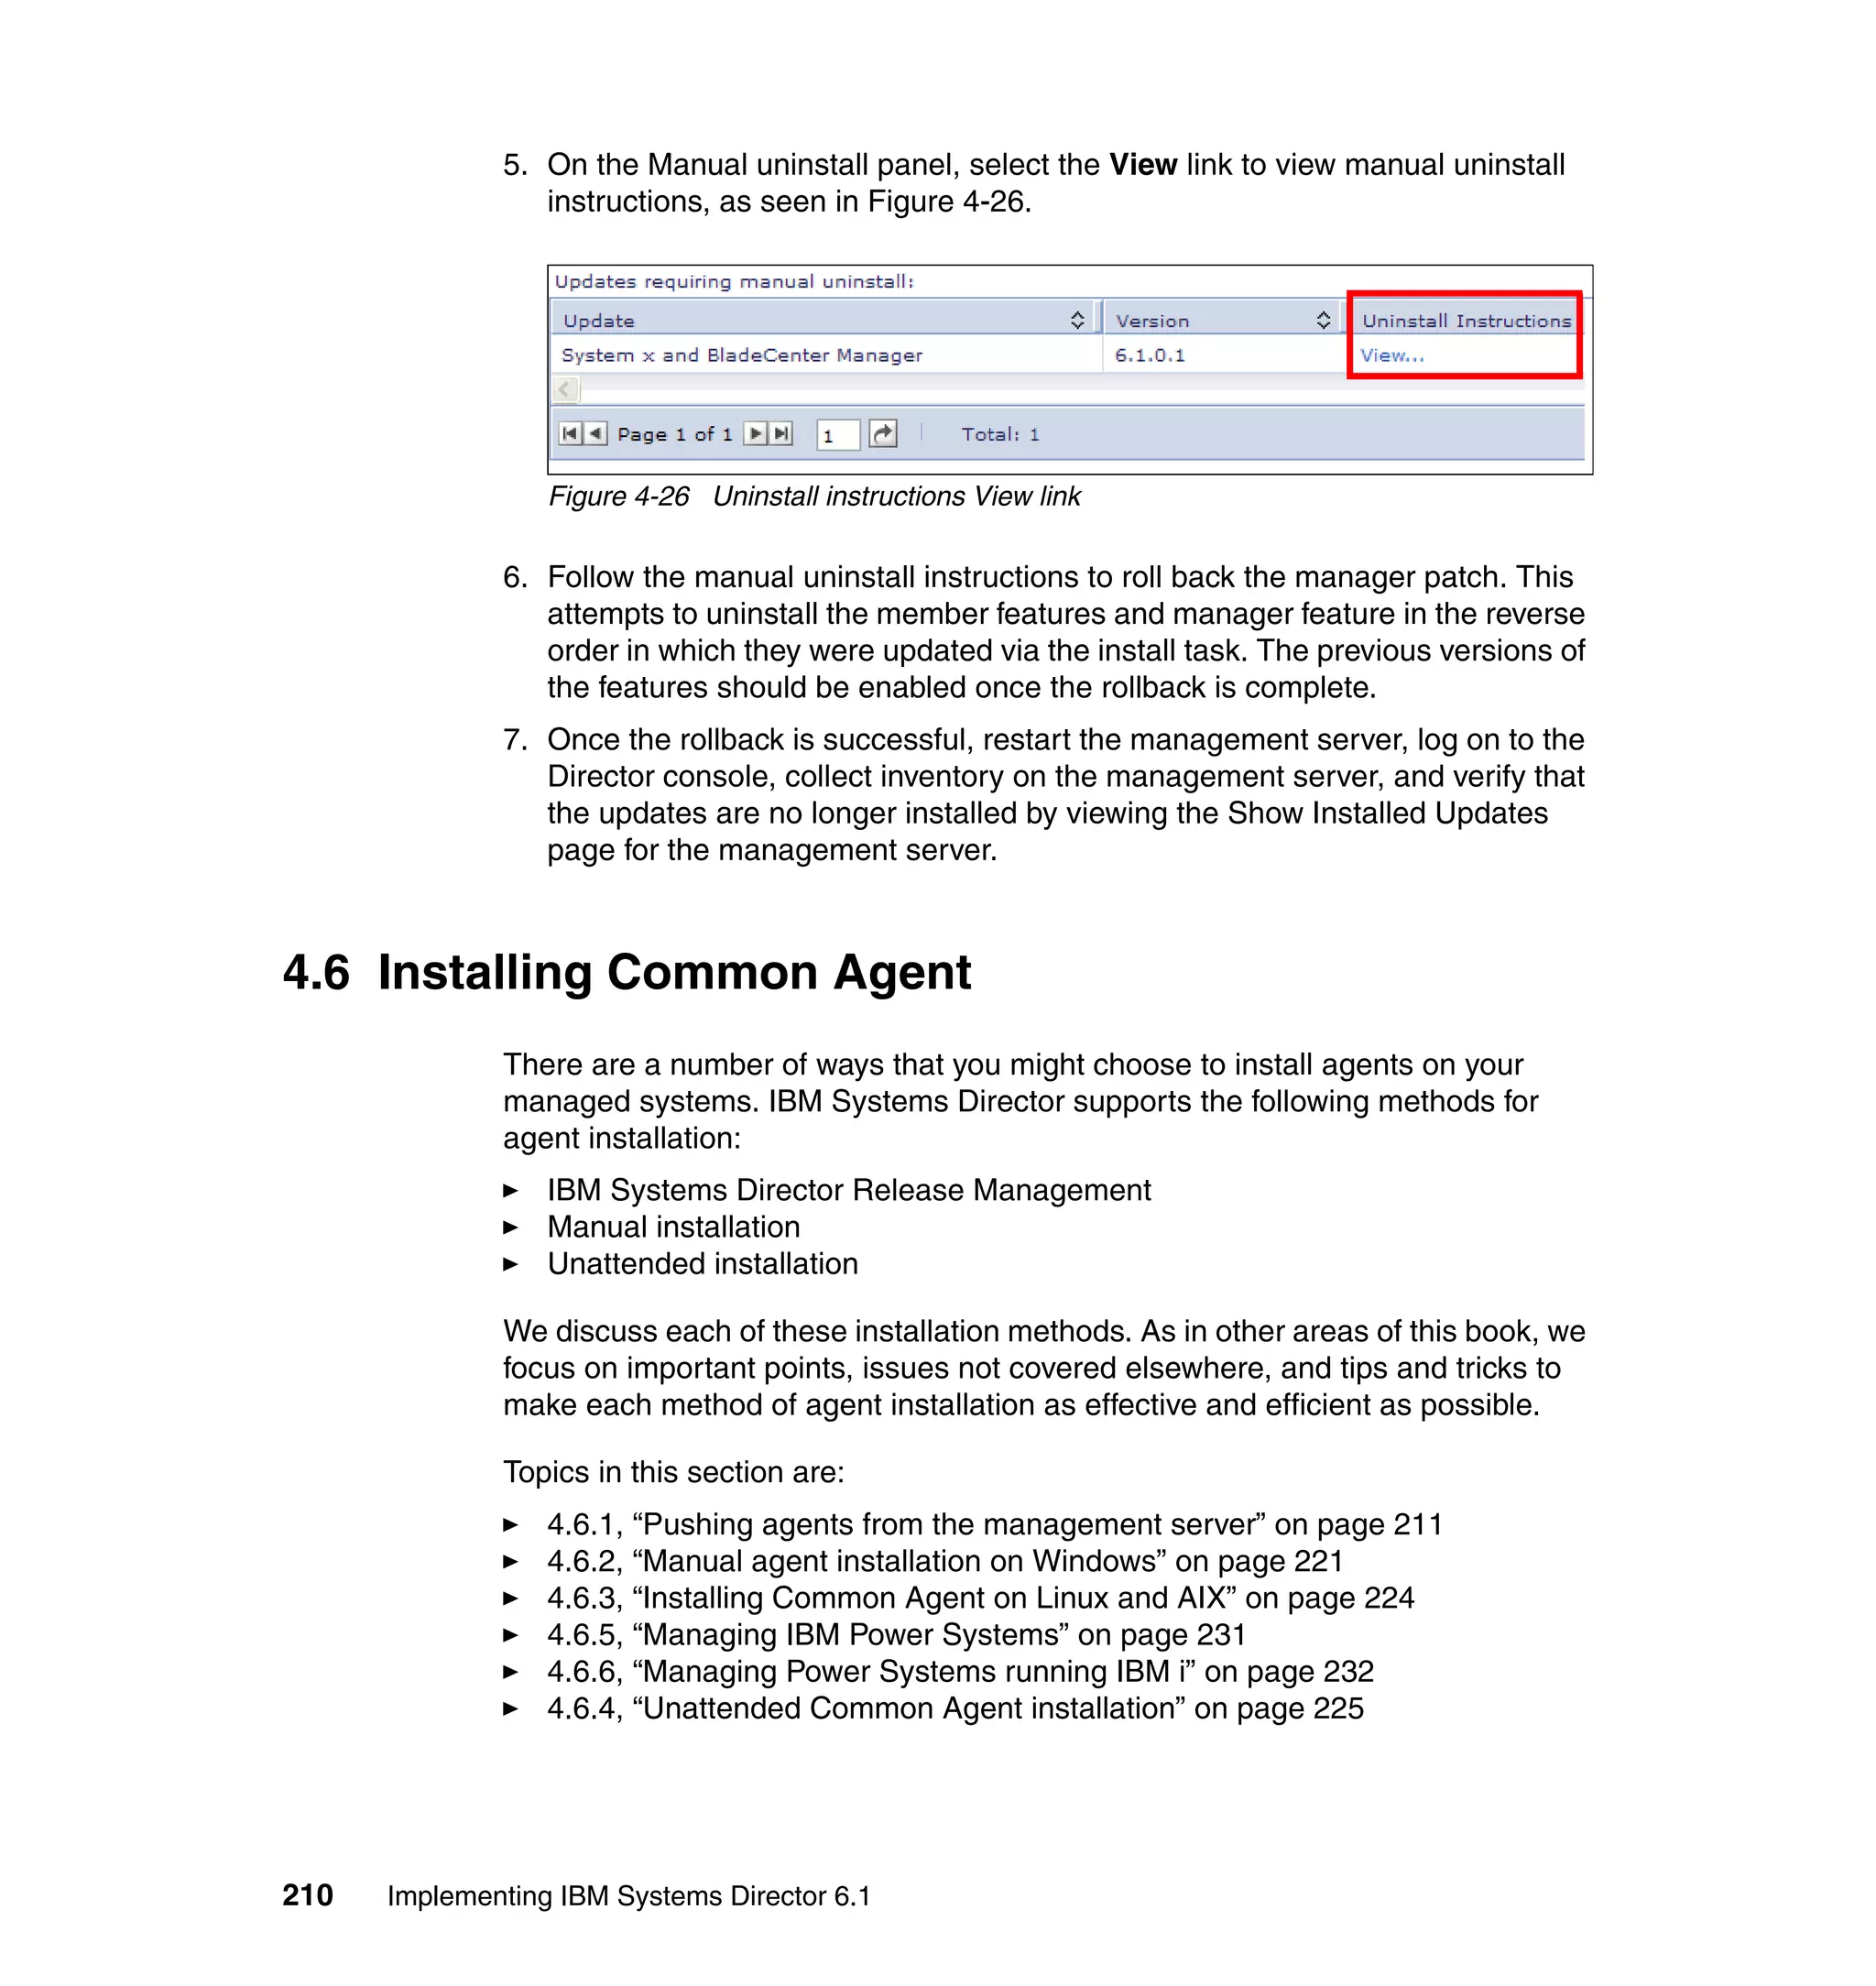
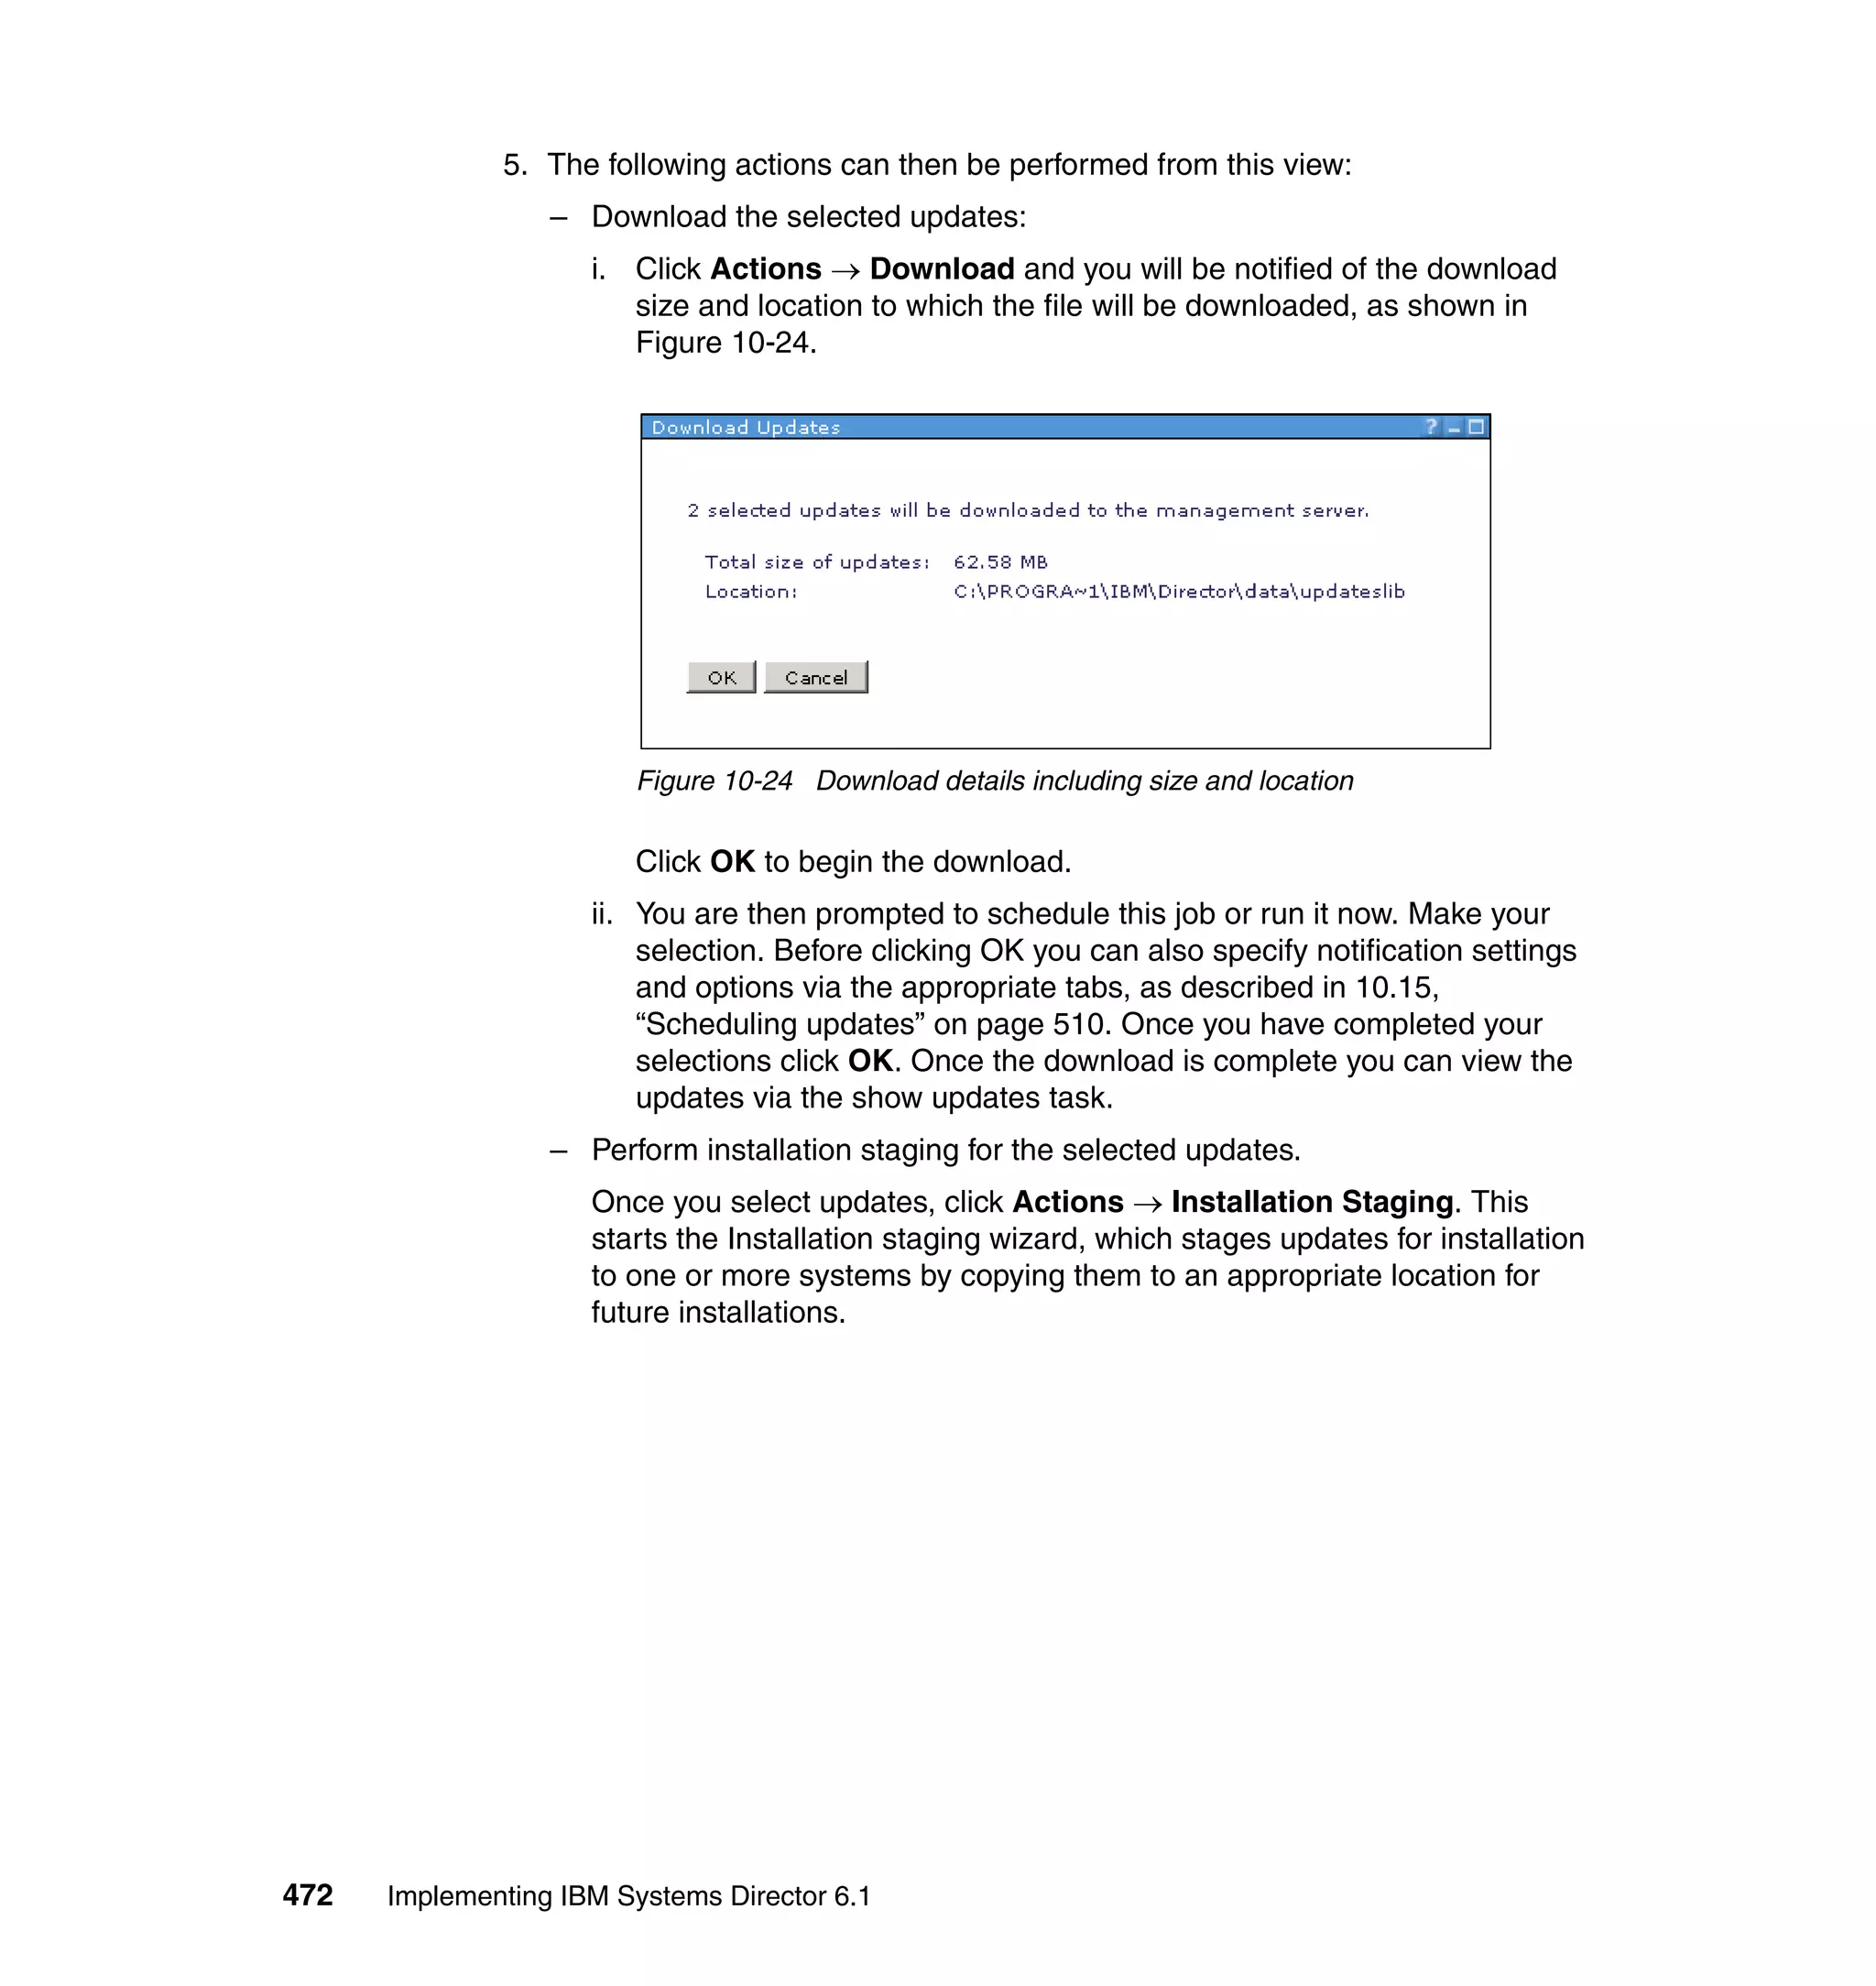
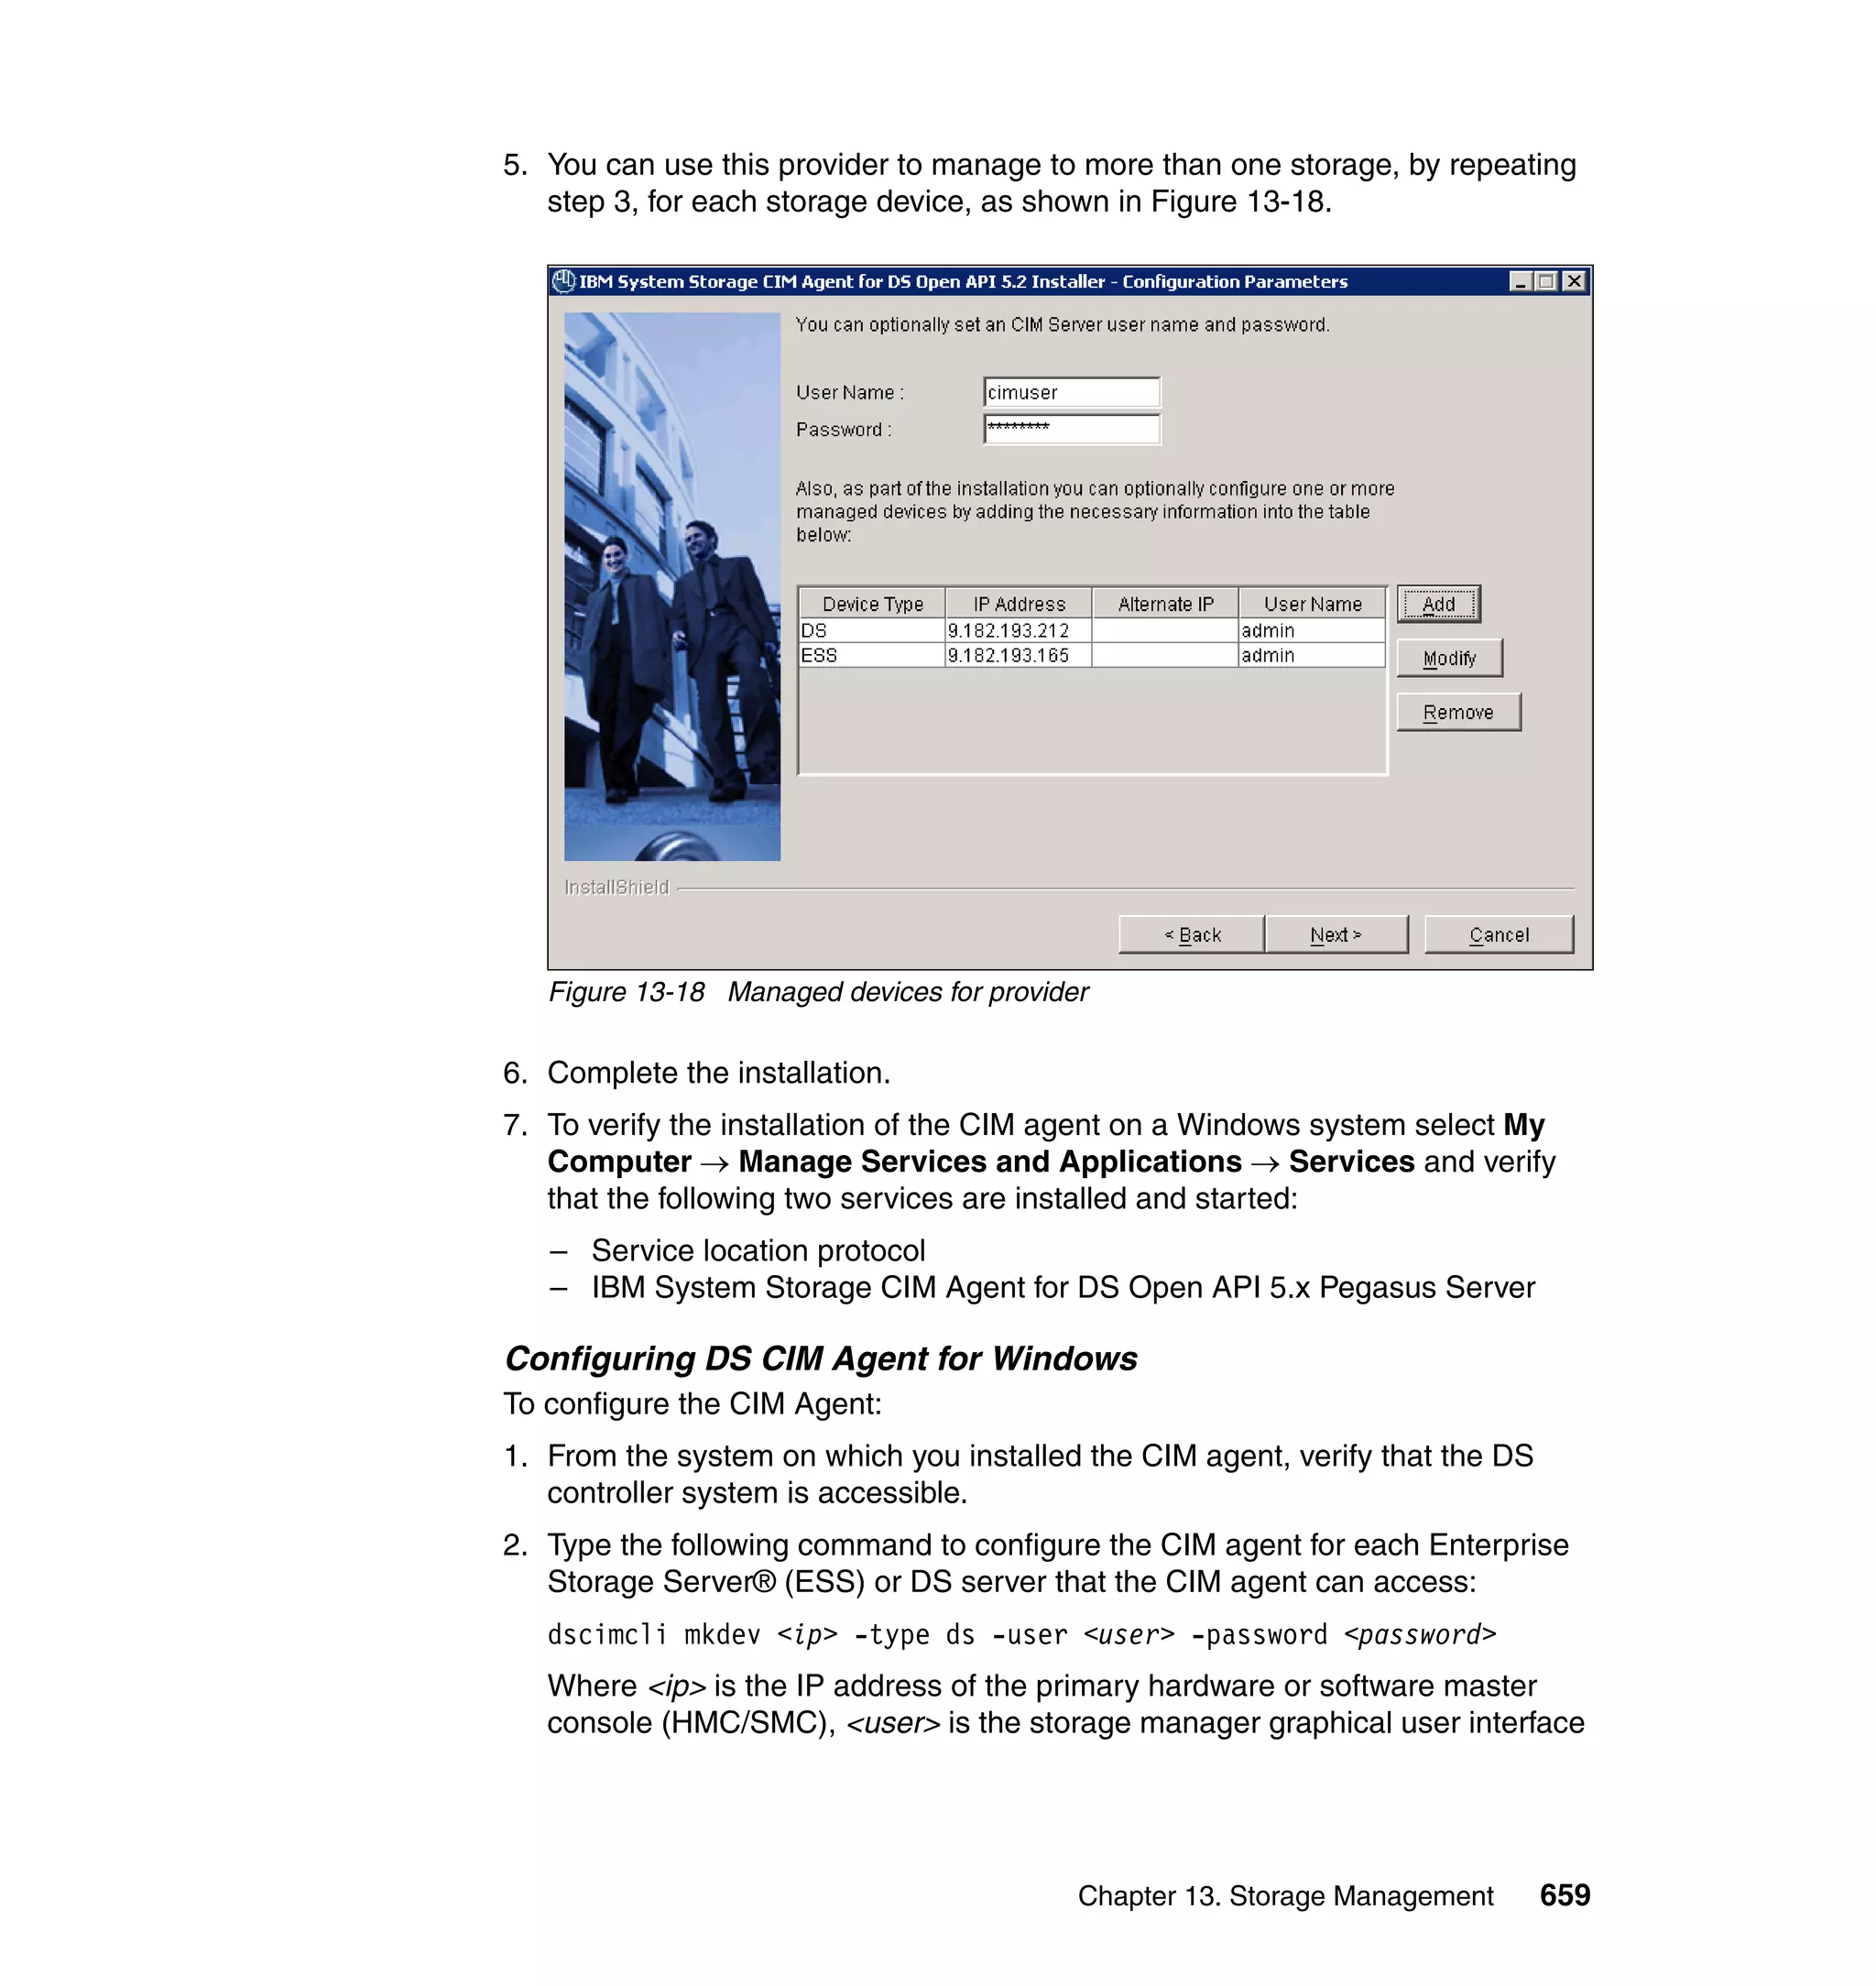
Remote session (now called remote command line)
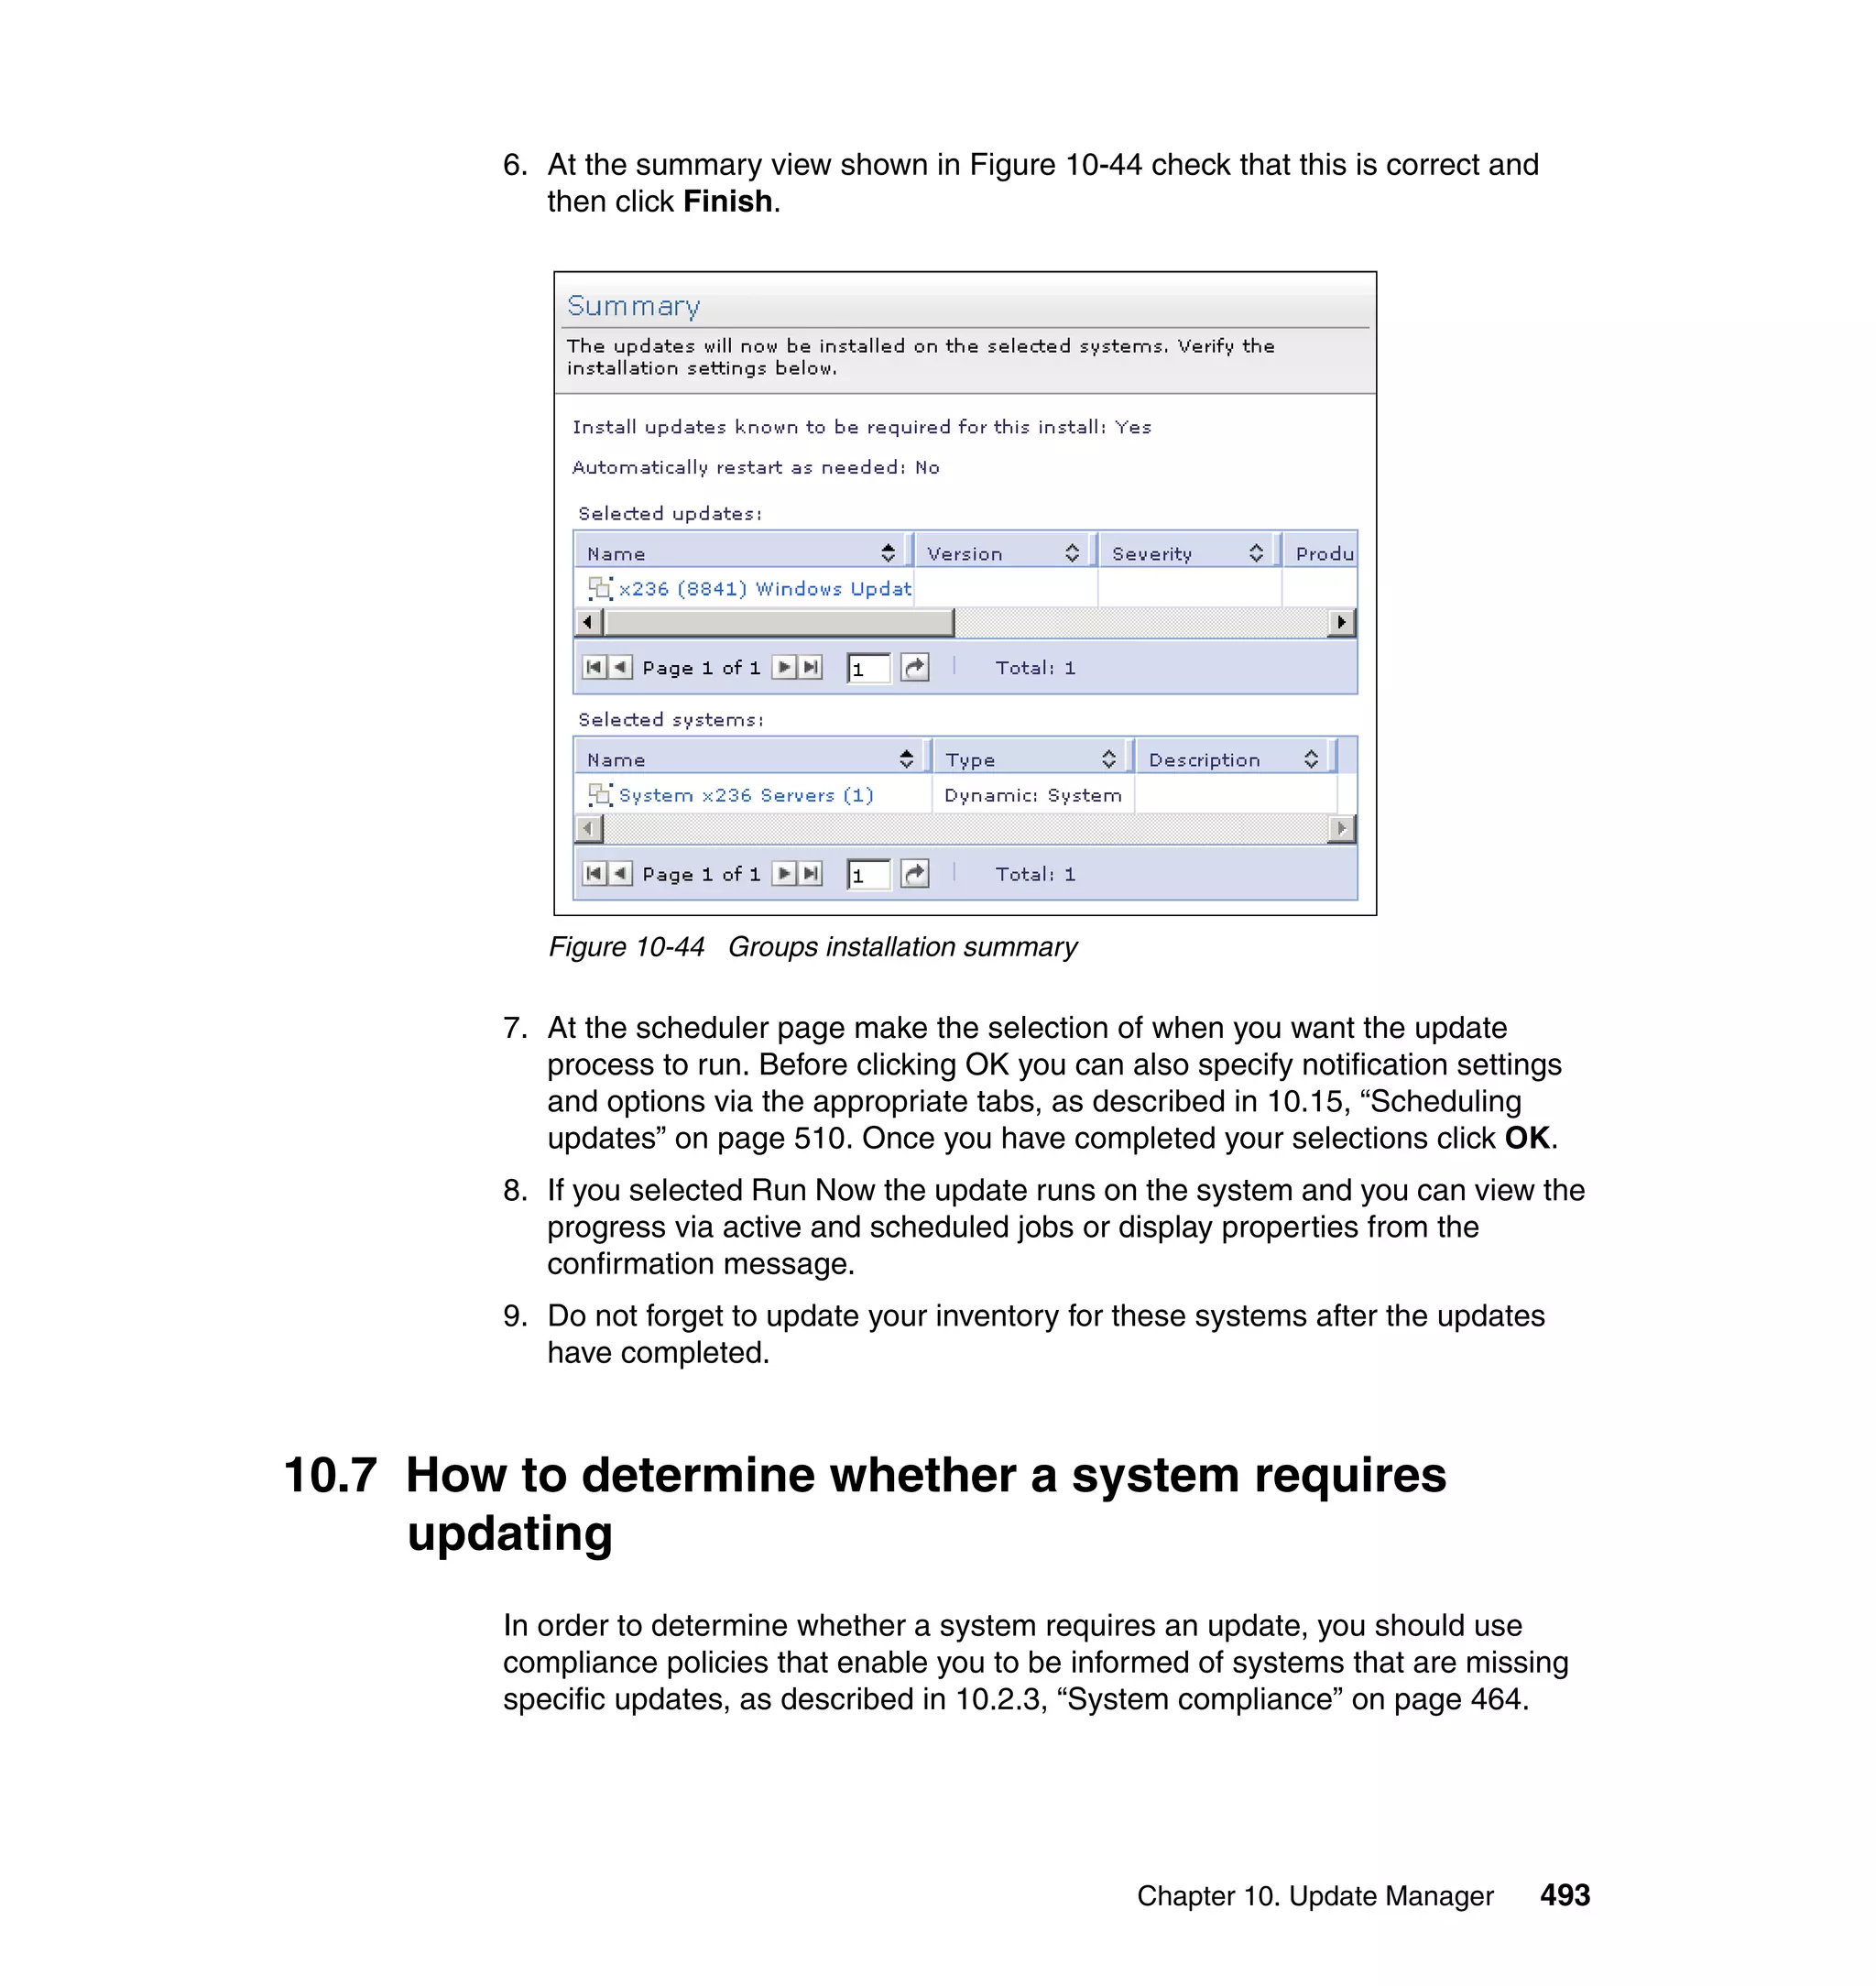
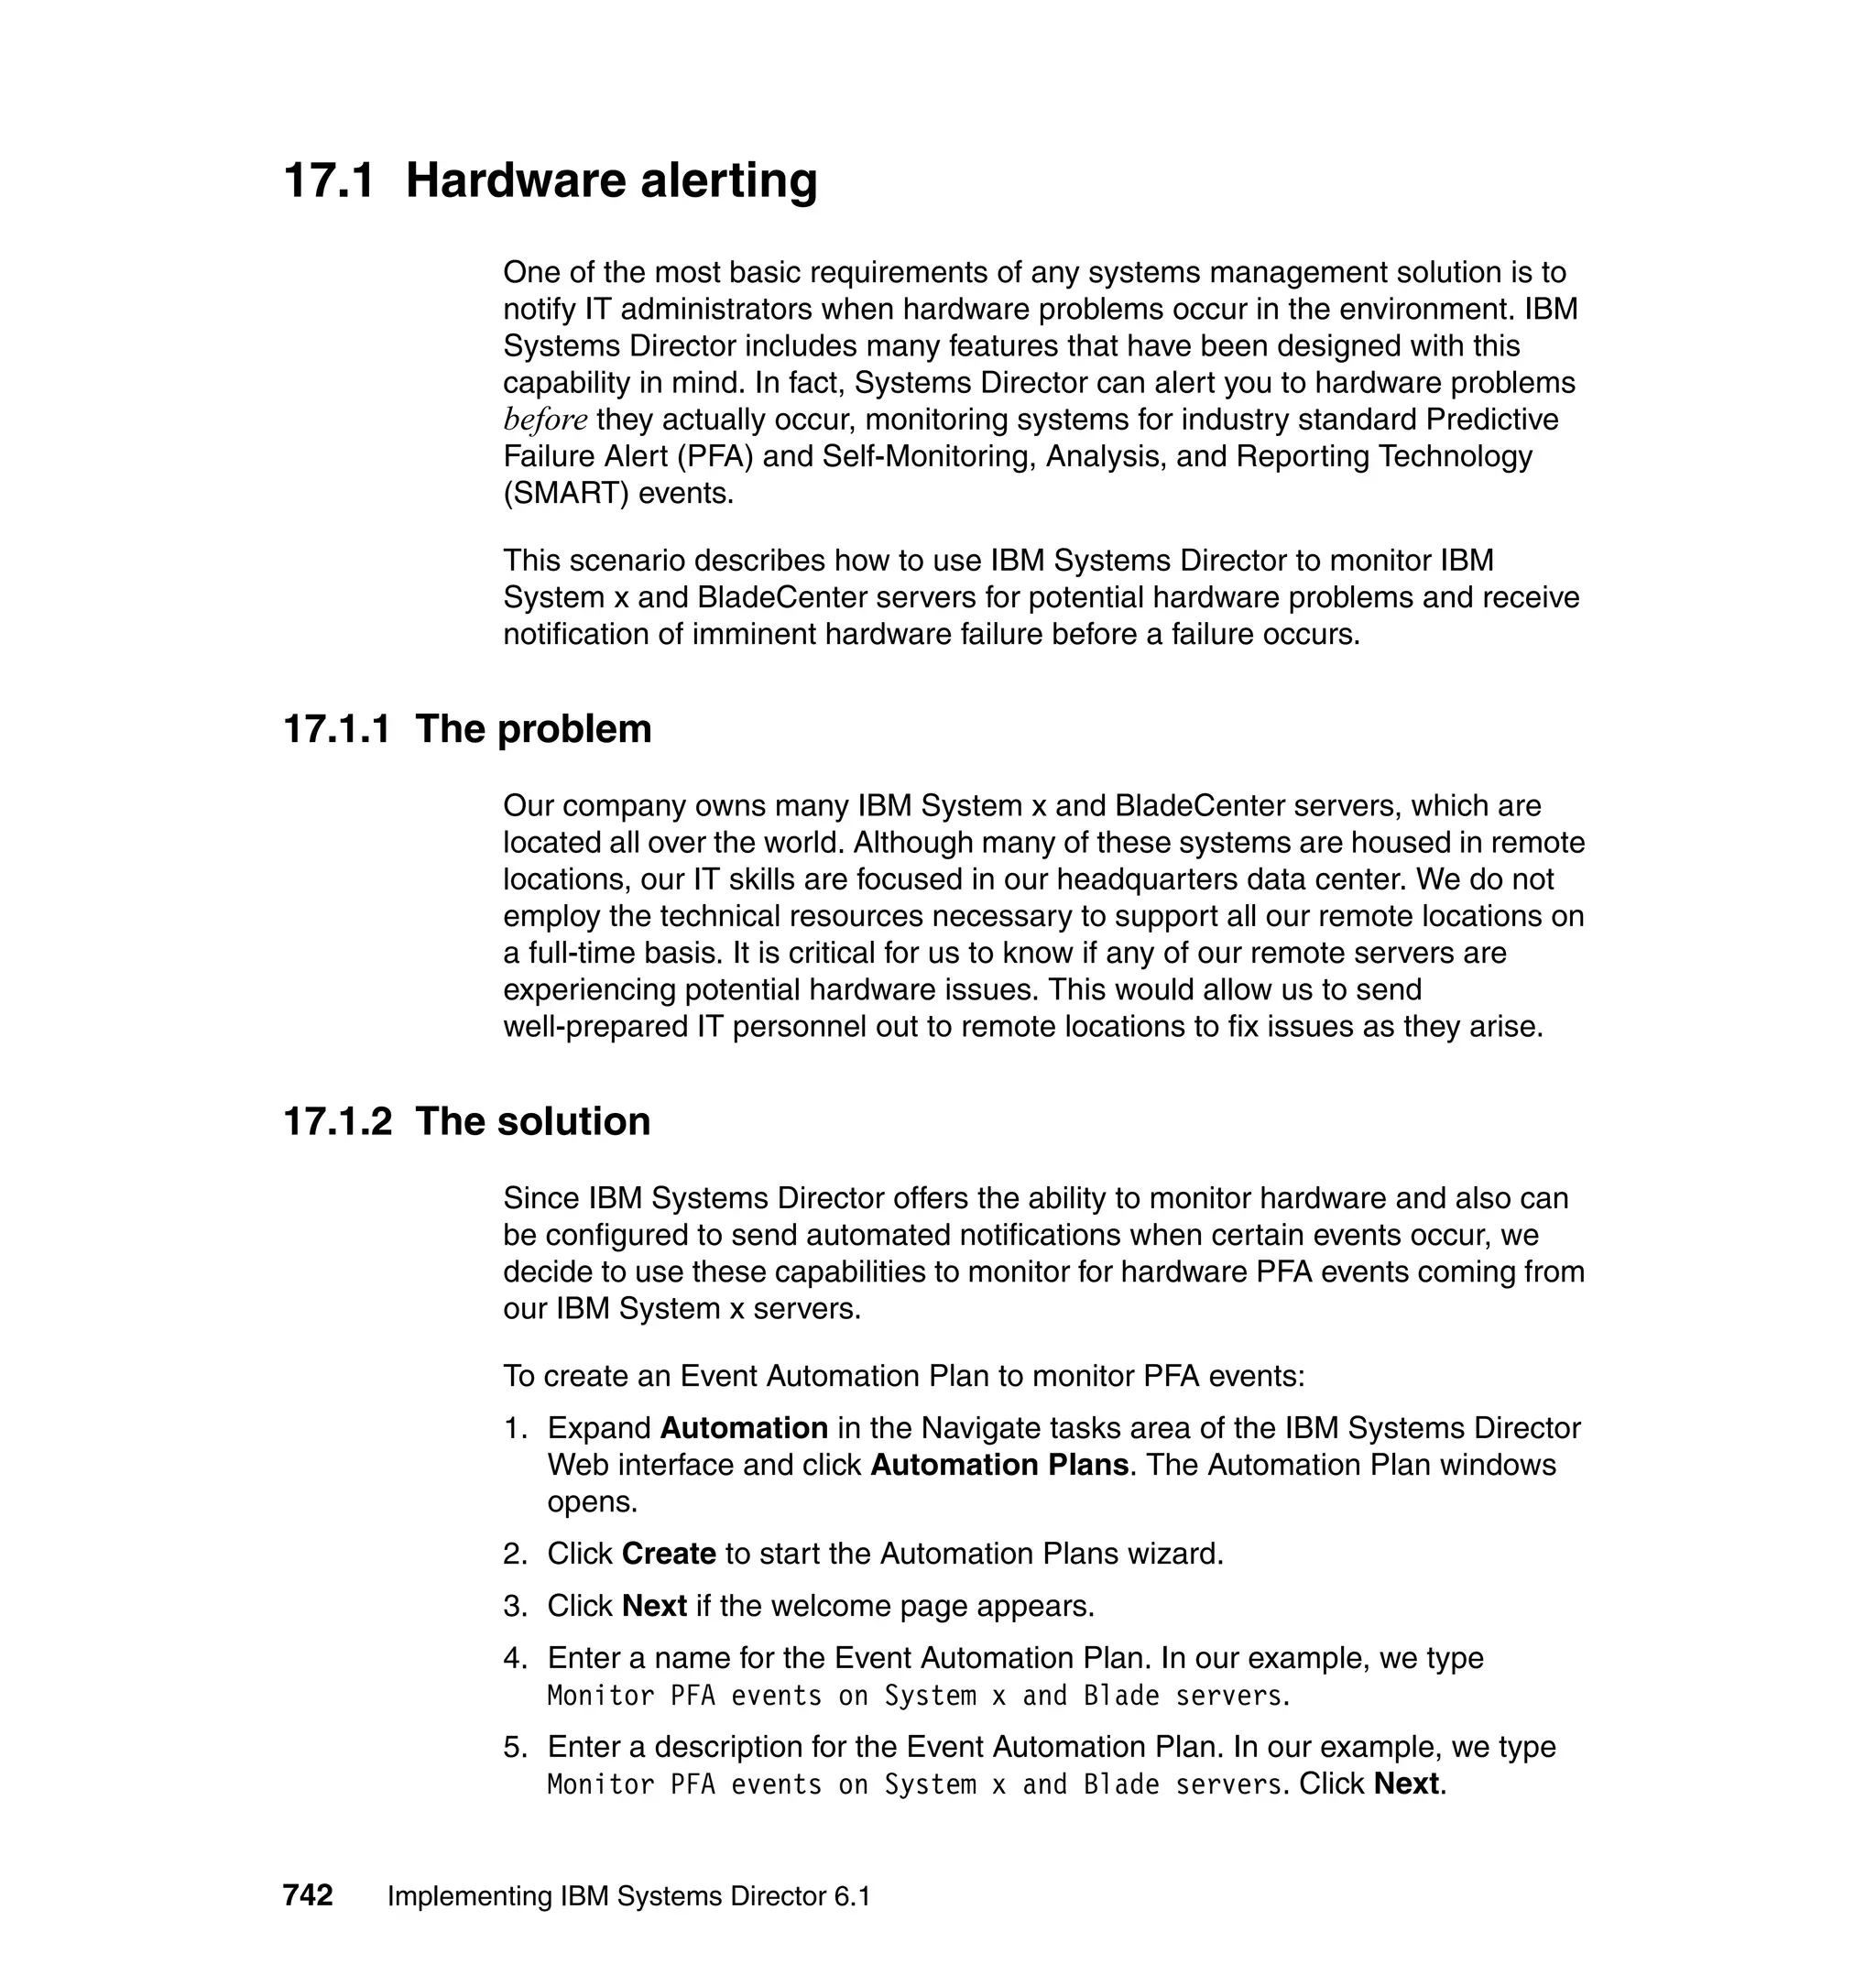
This is a command-line interface to a remote system.
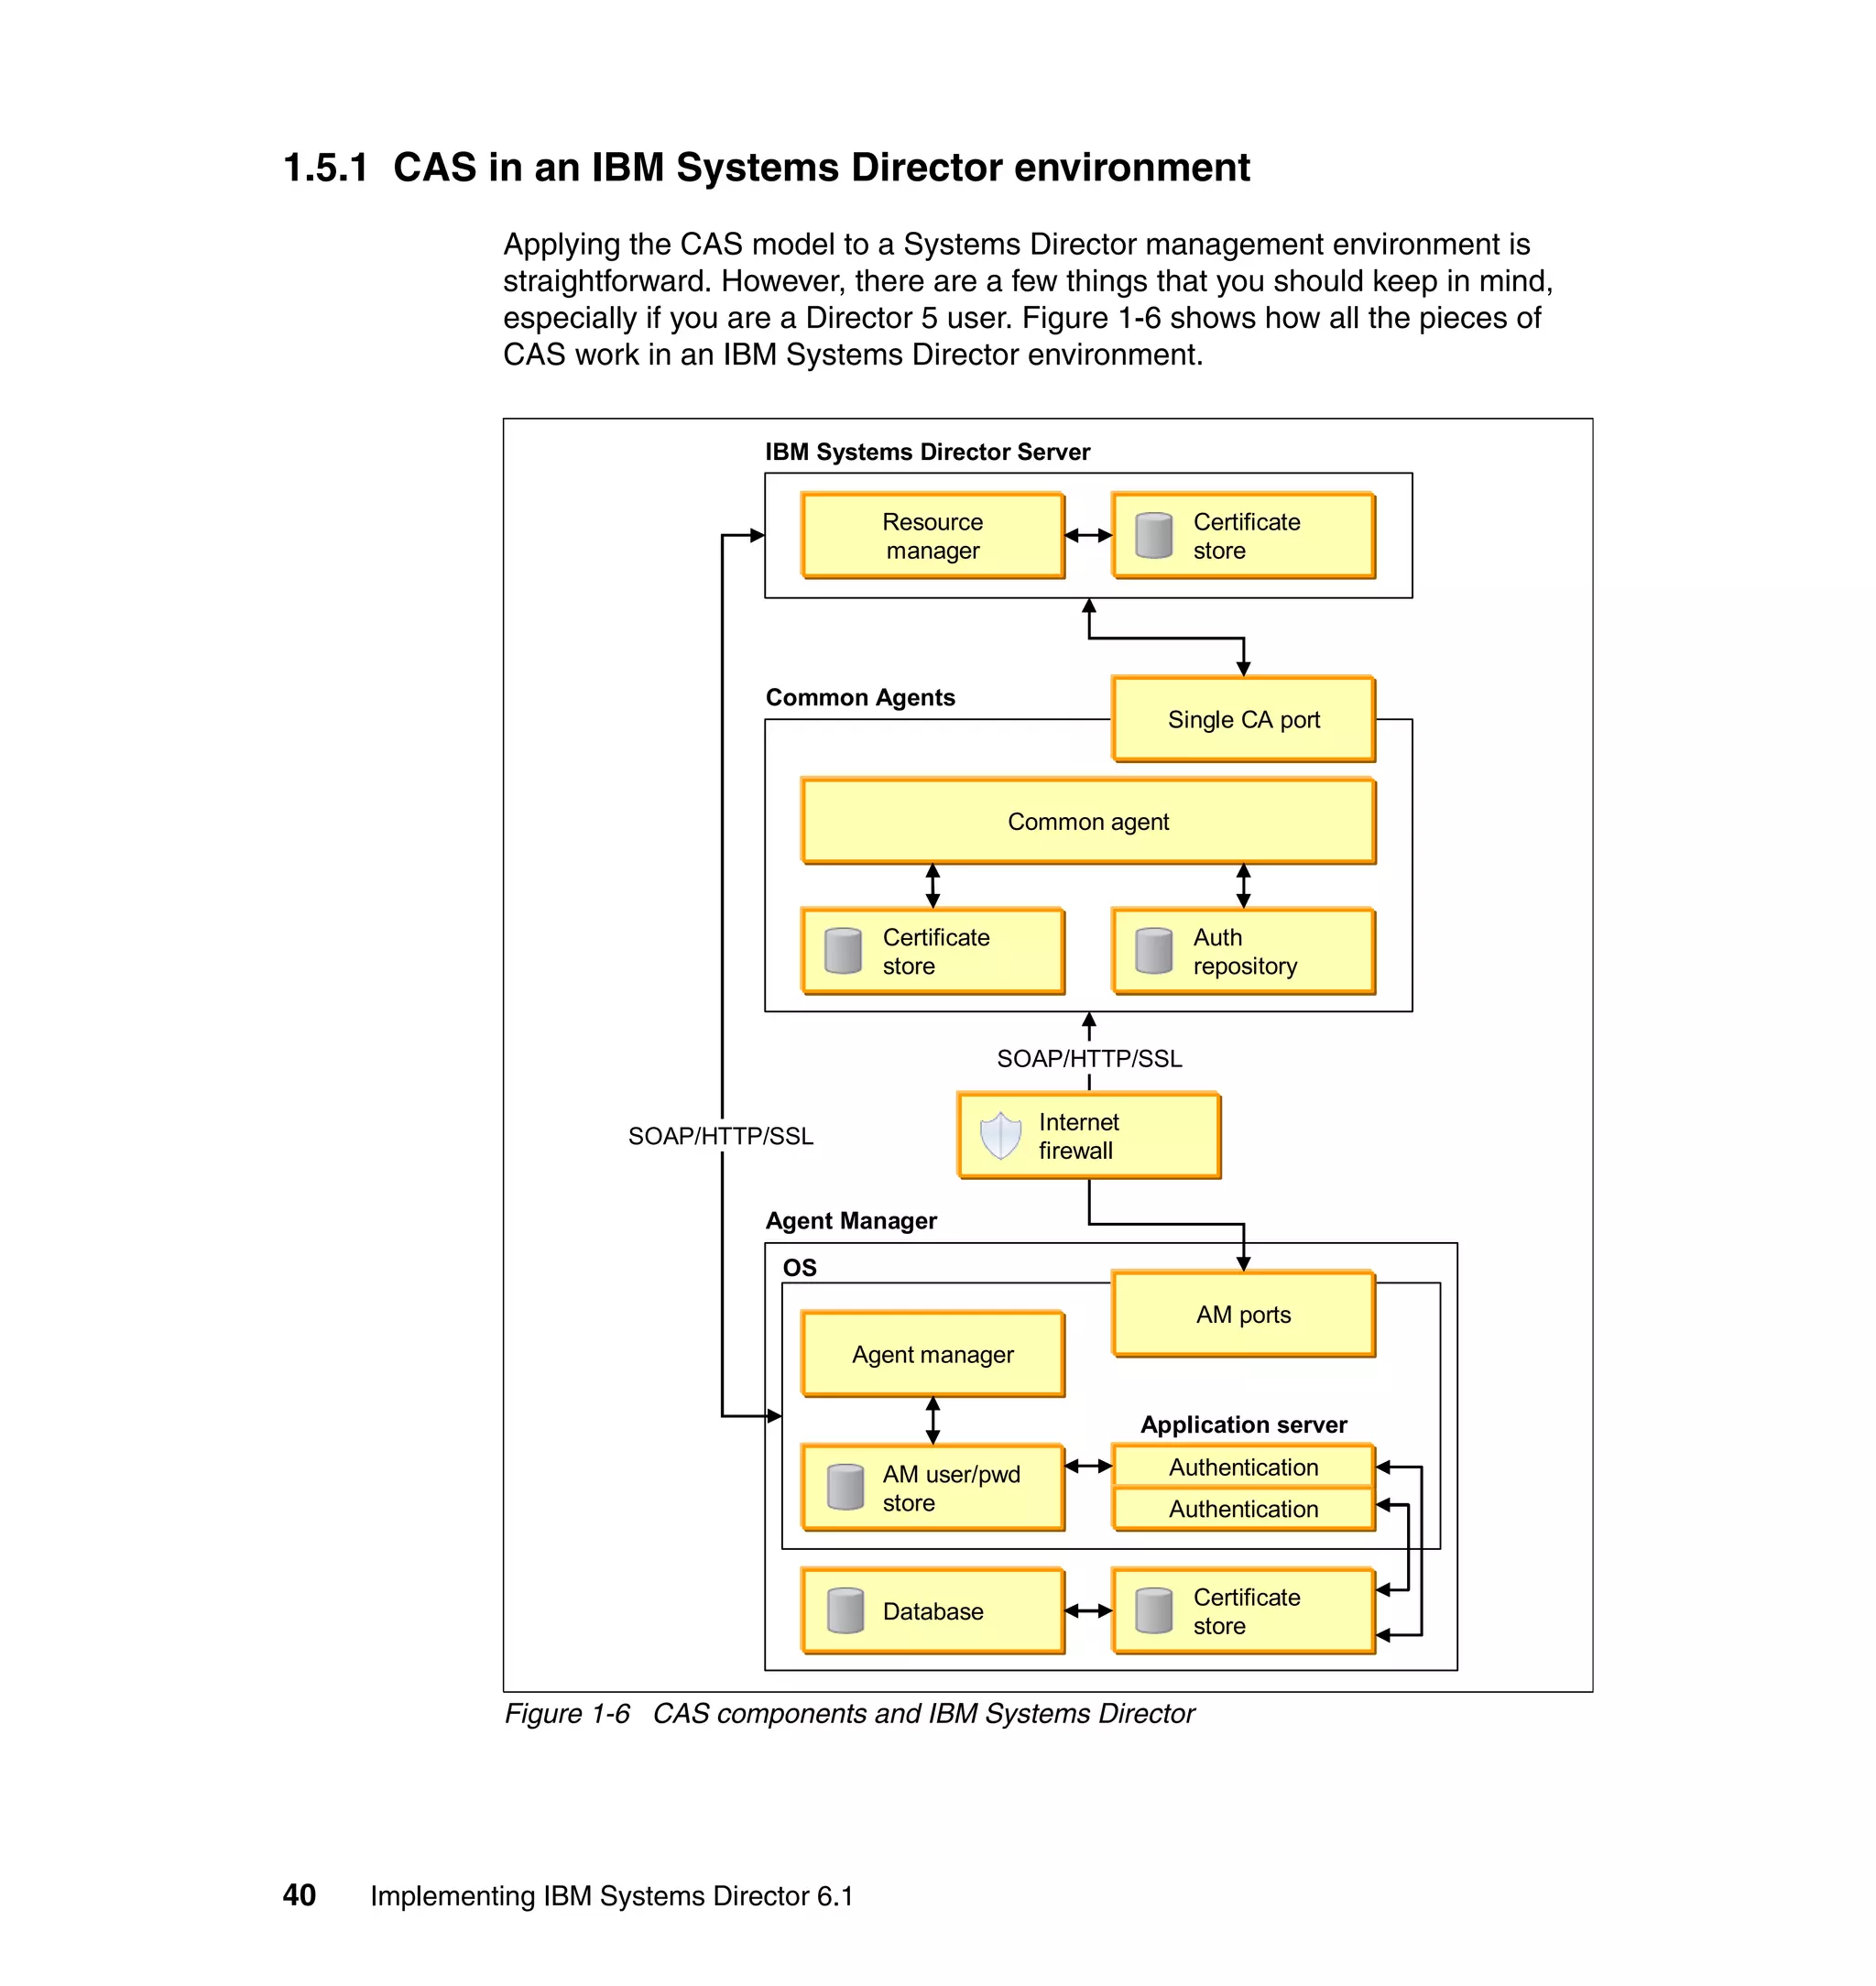
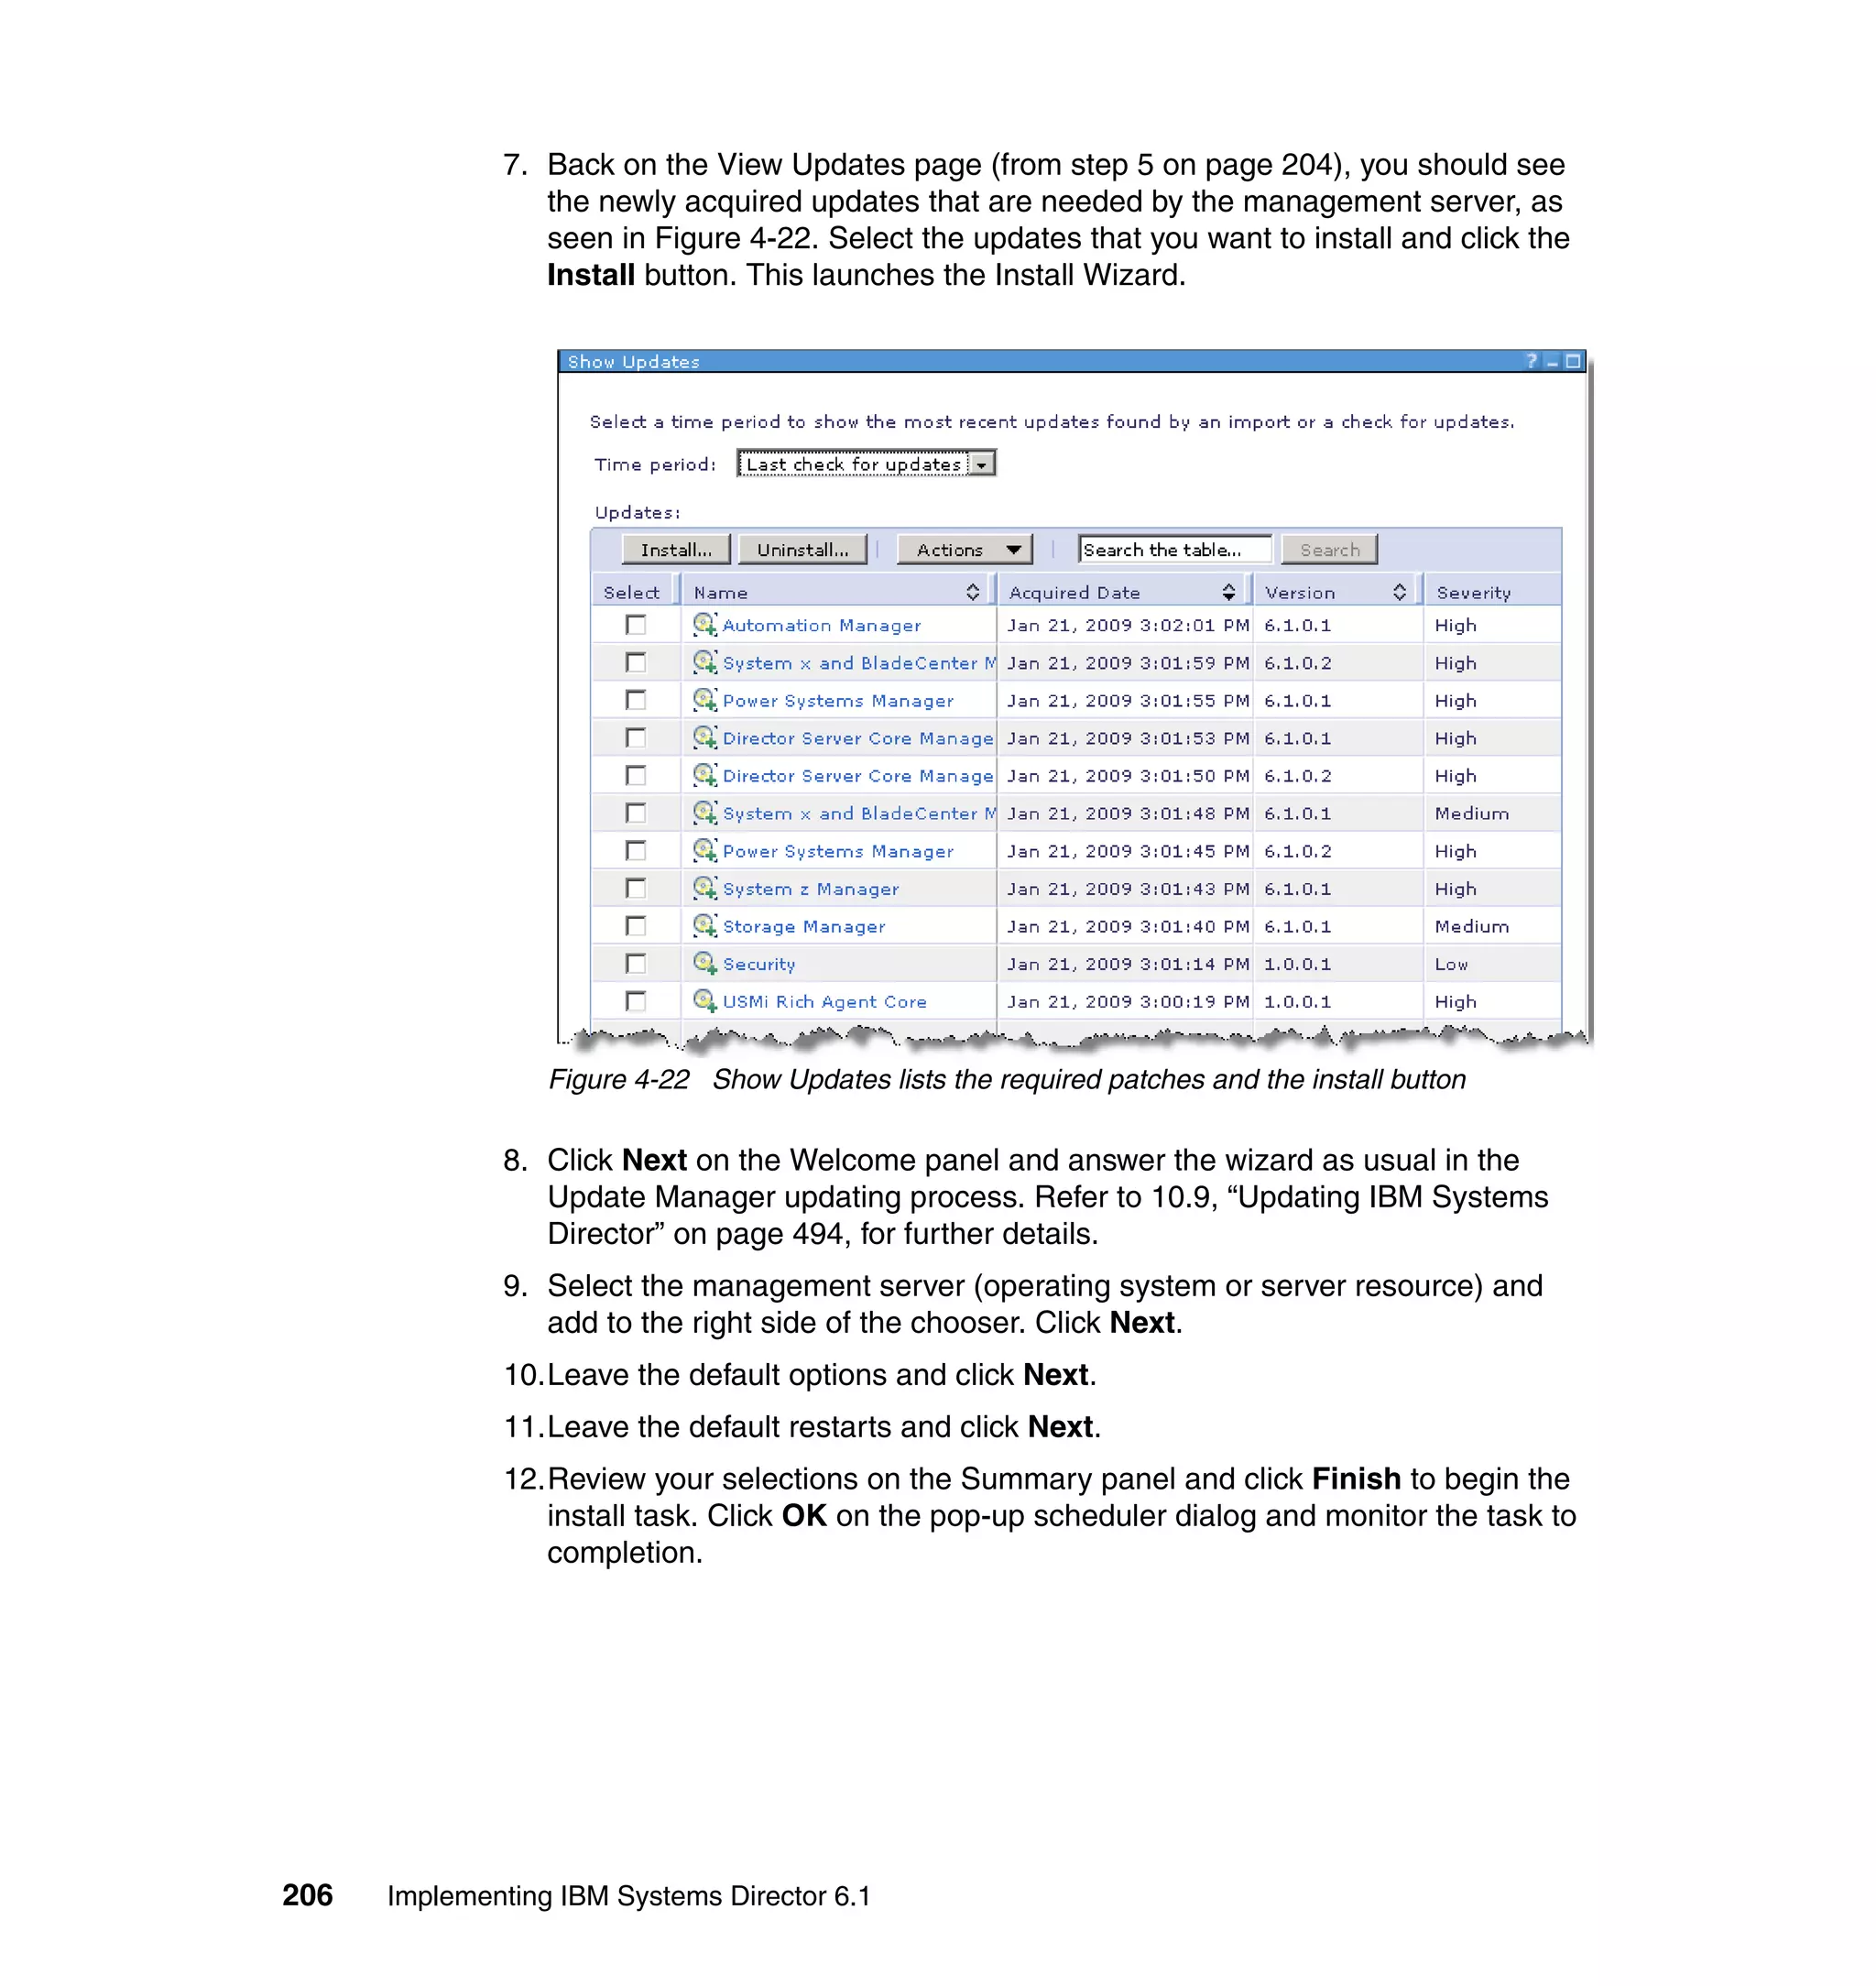
Agent Manager
New to IBM Systems Director 6.1 is the concept of an Agent Manager. In IBM
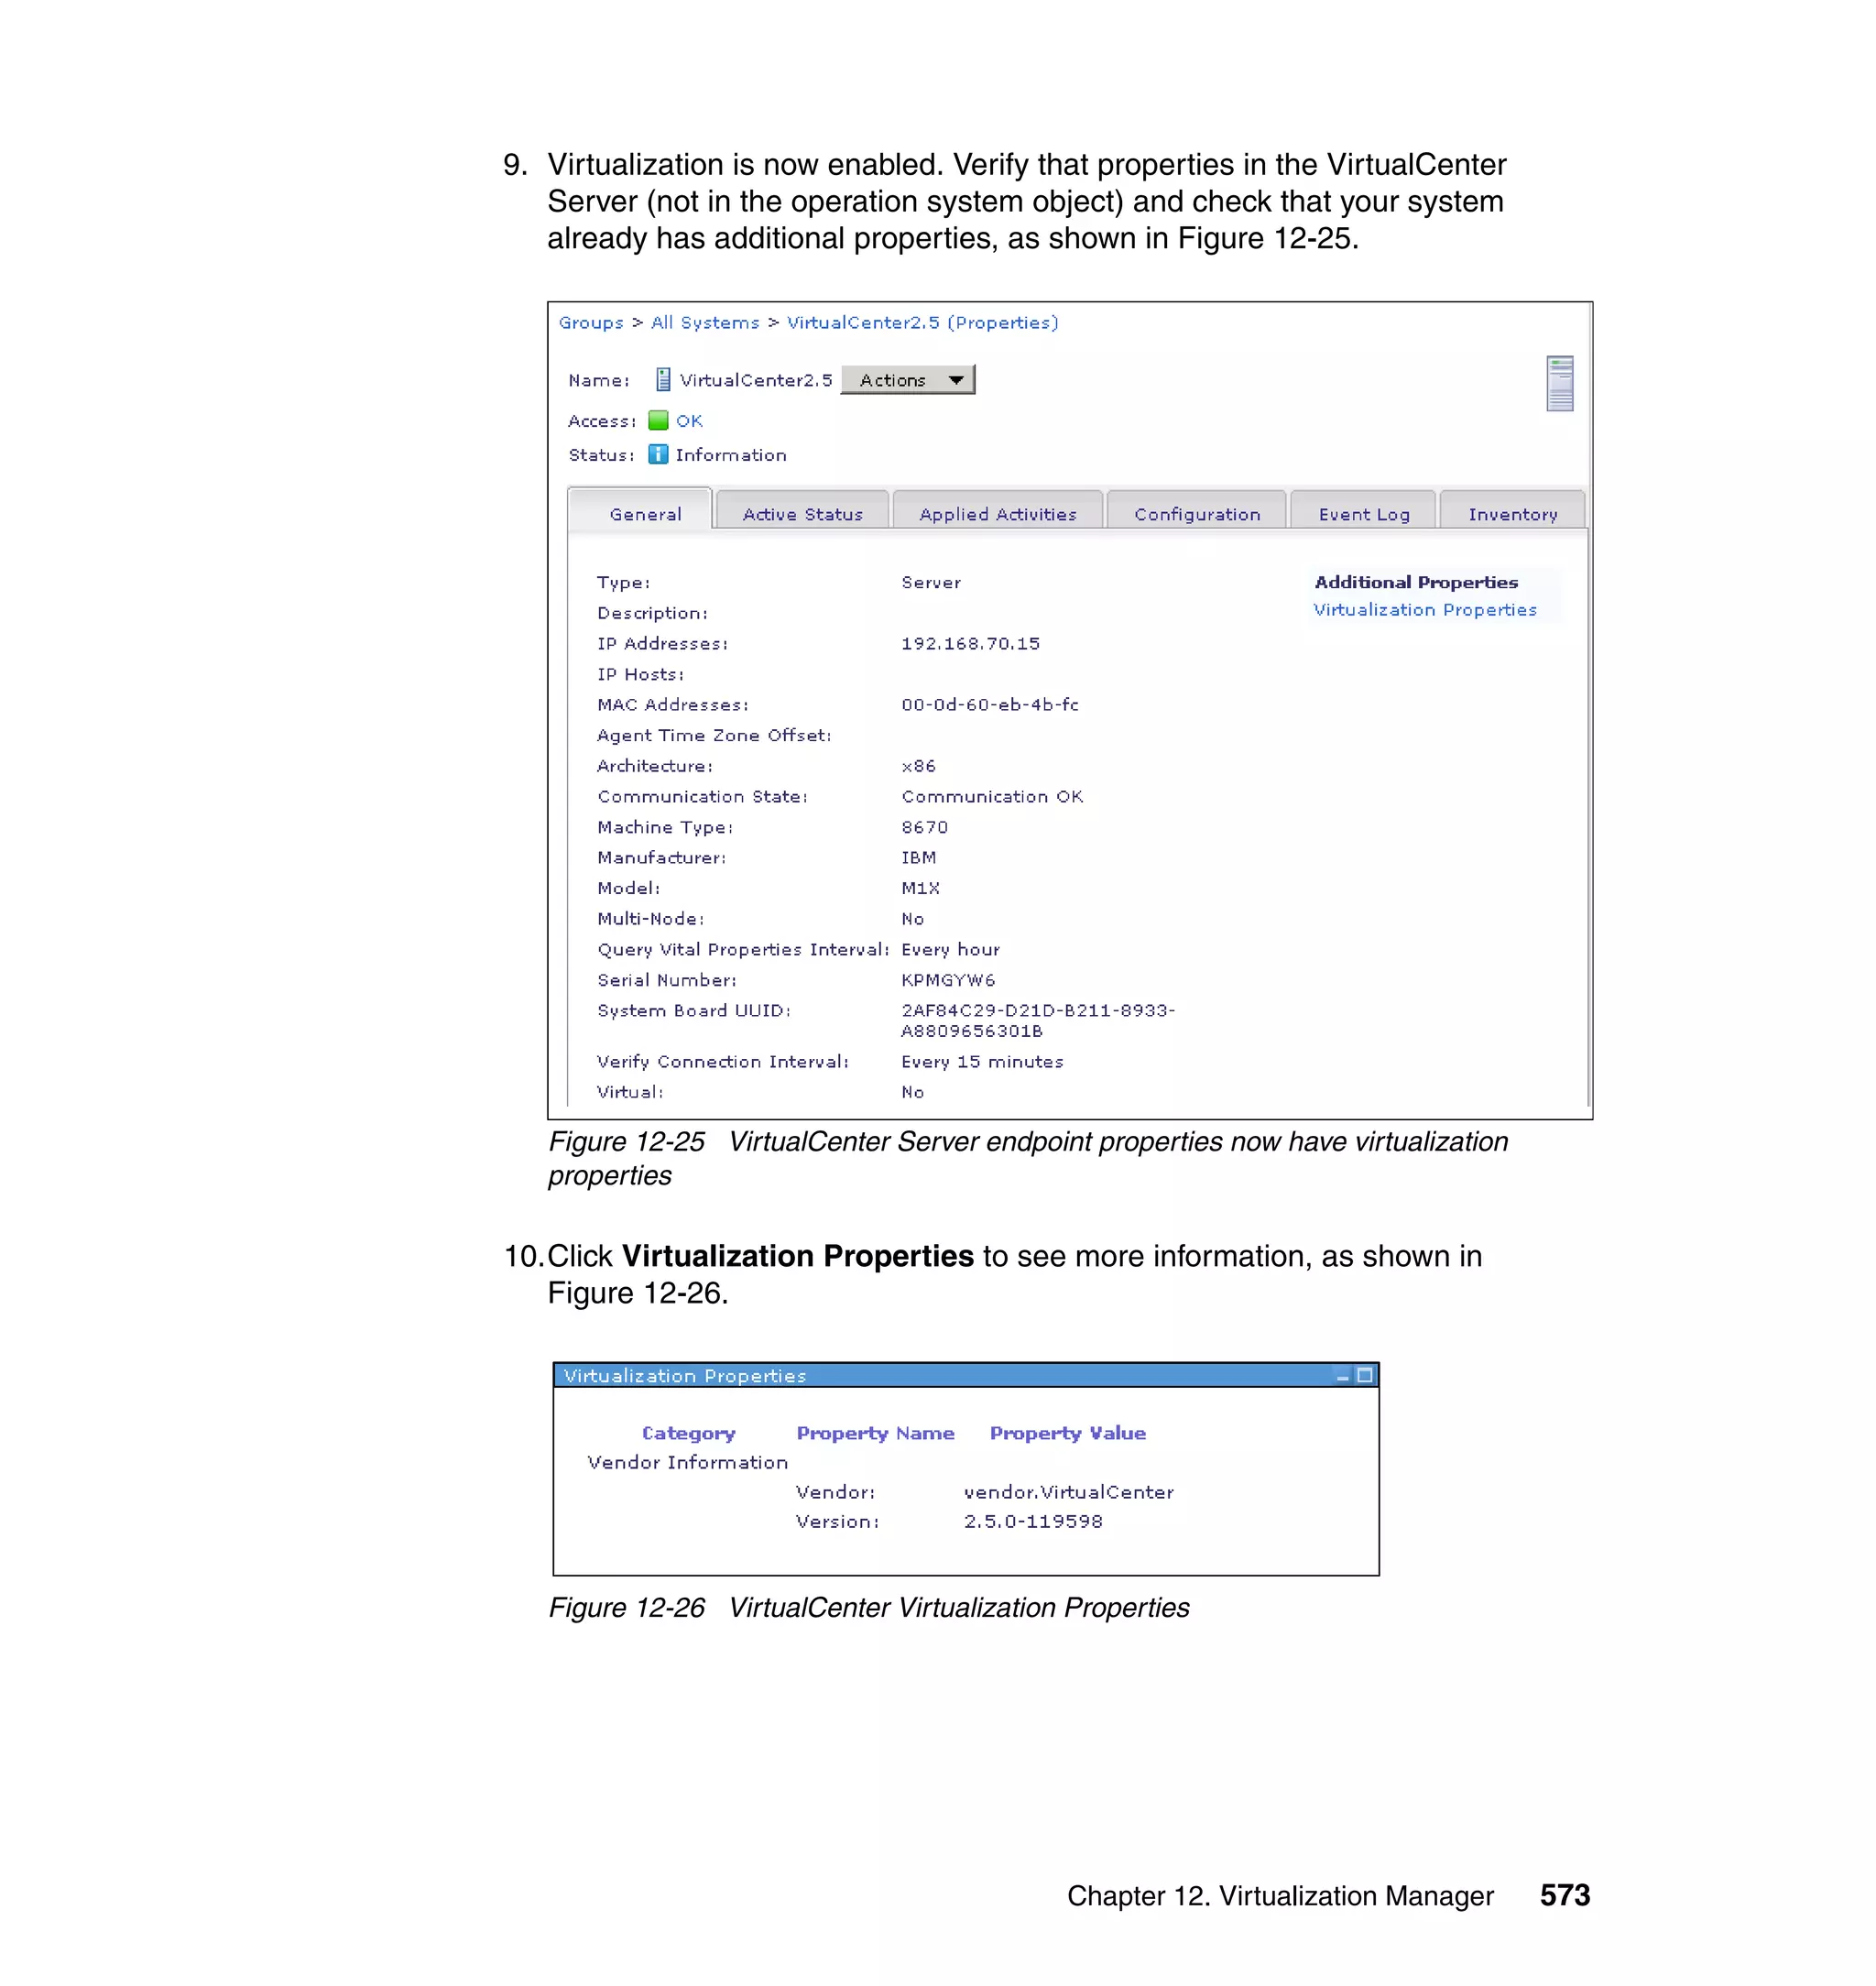
Systems Director, the Agent Manager handles credentials and authentication
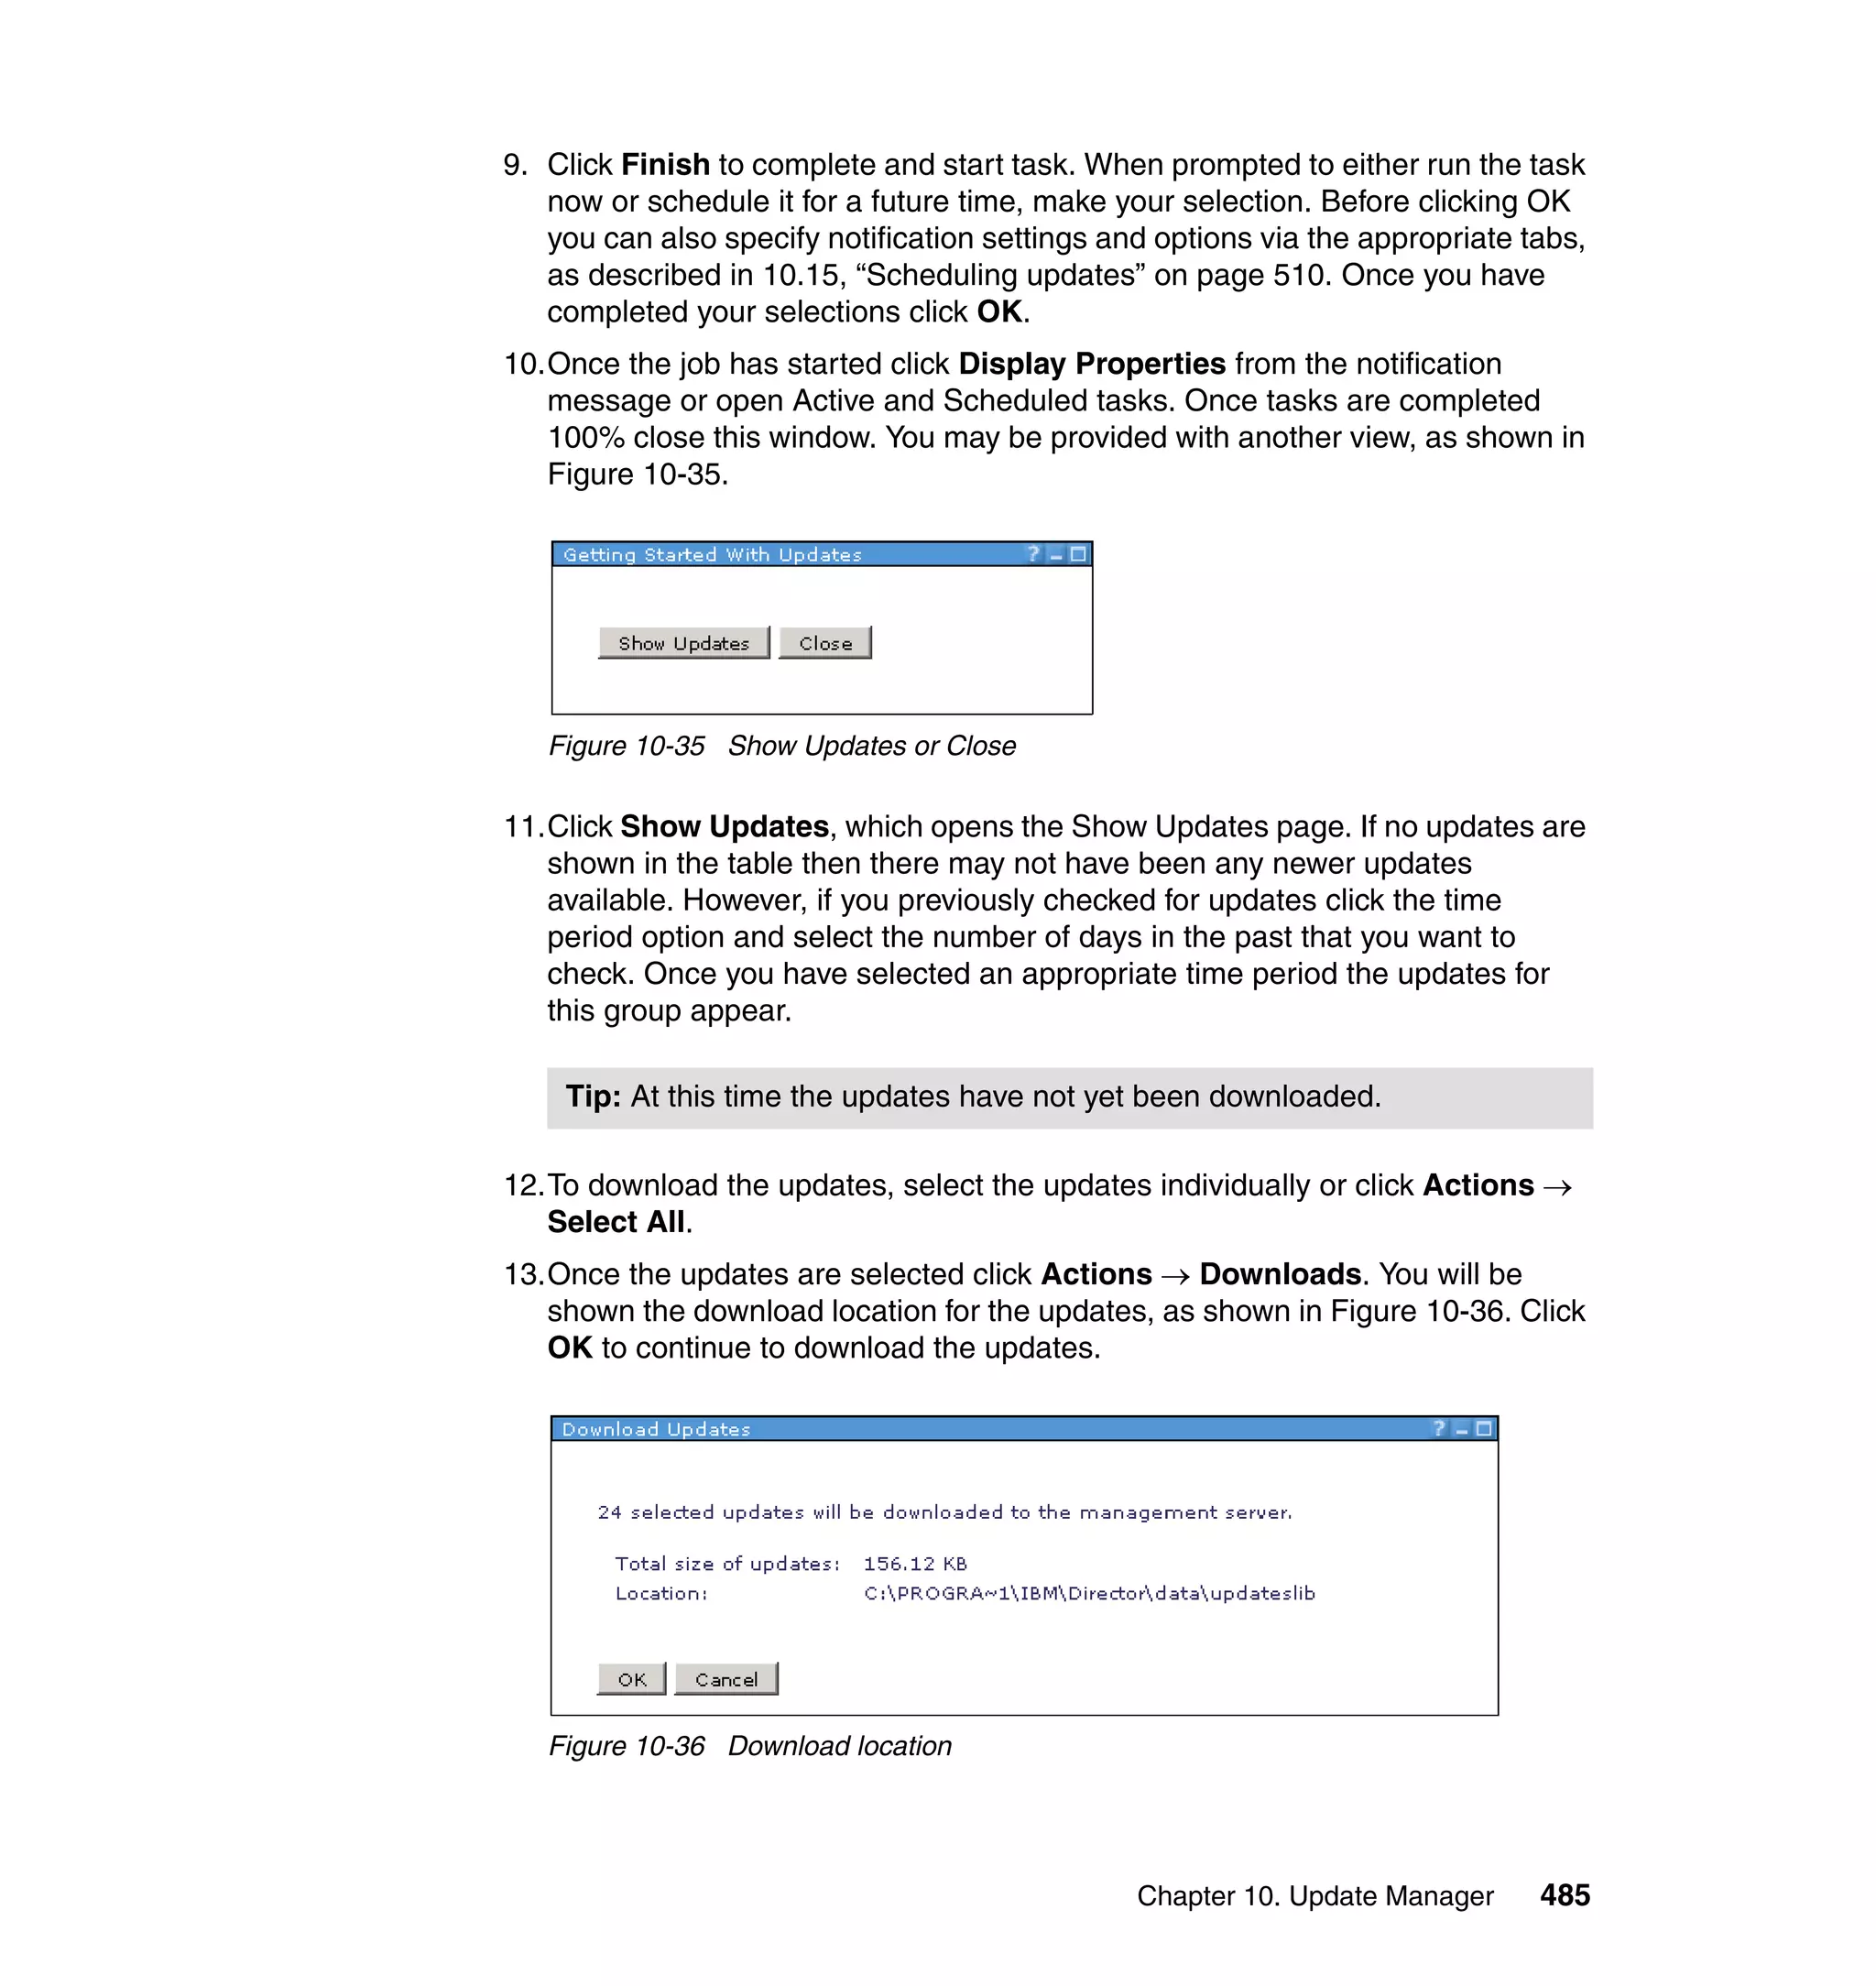
between IBM Systems Director and the Common Agent. A Common Agent can
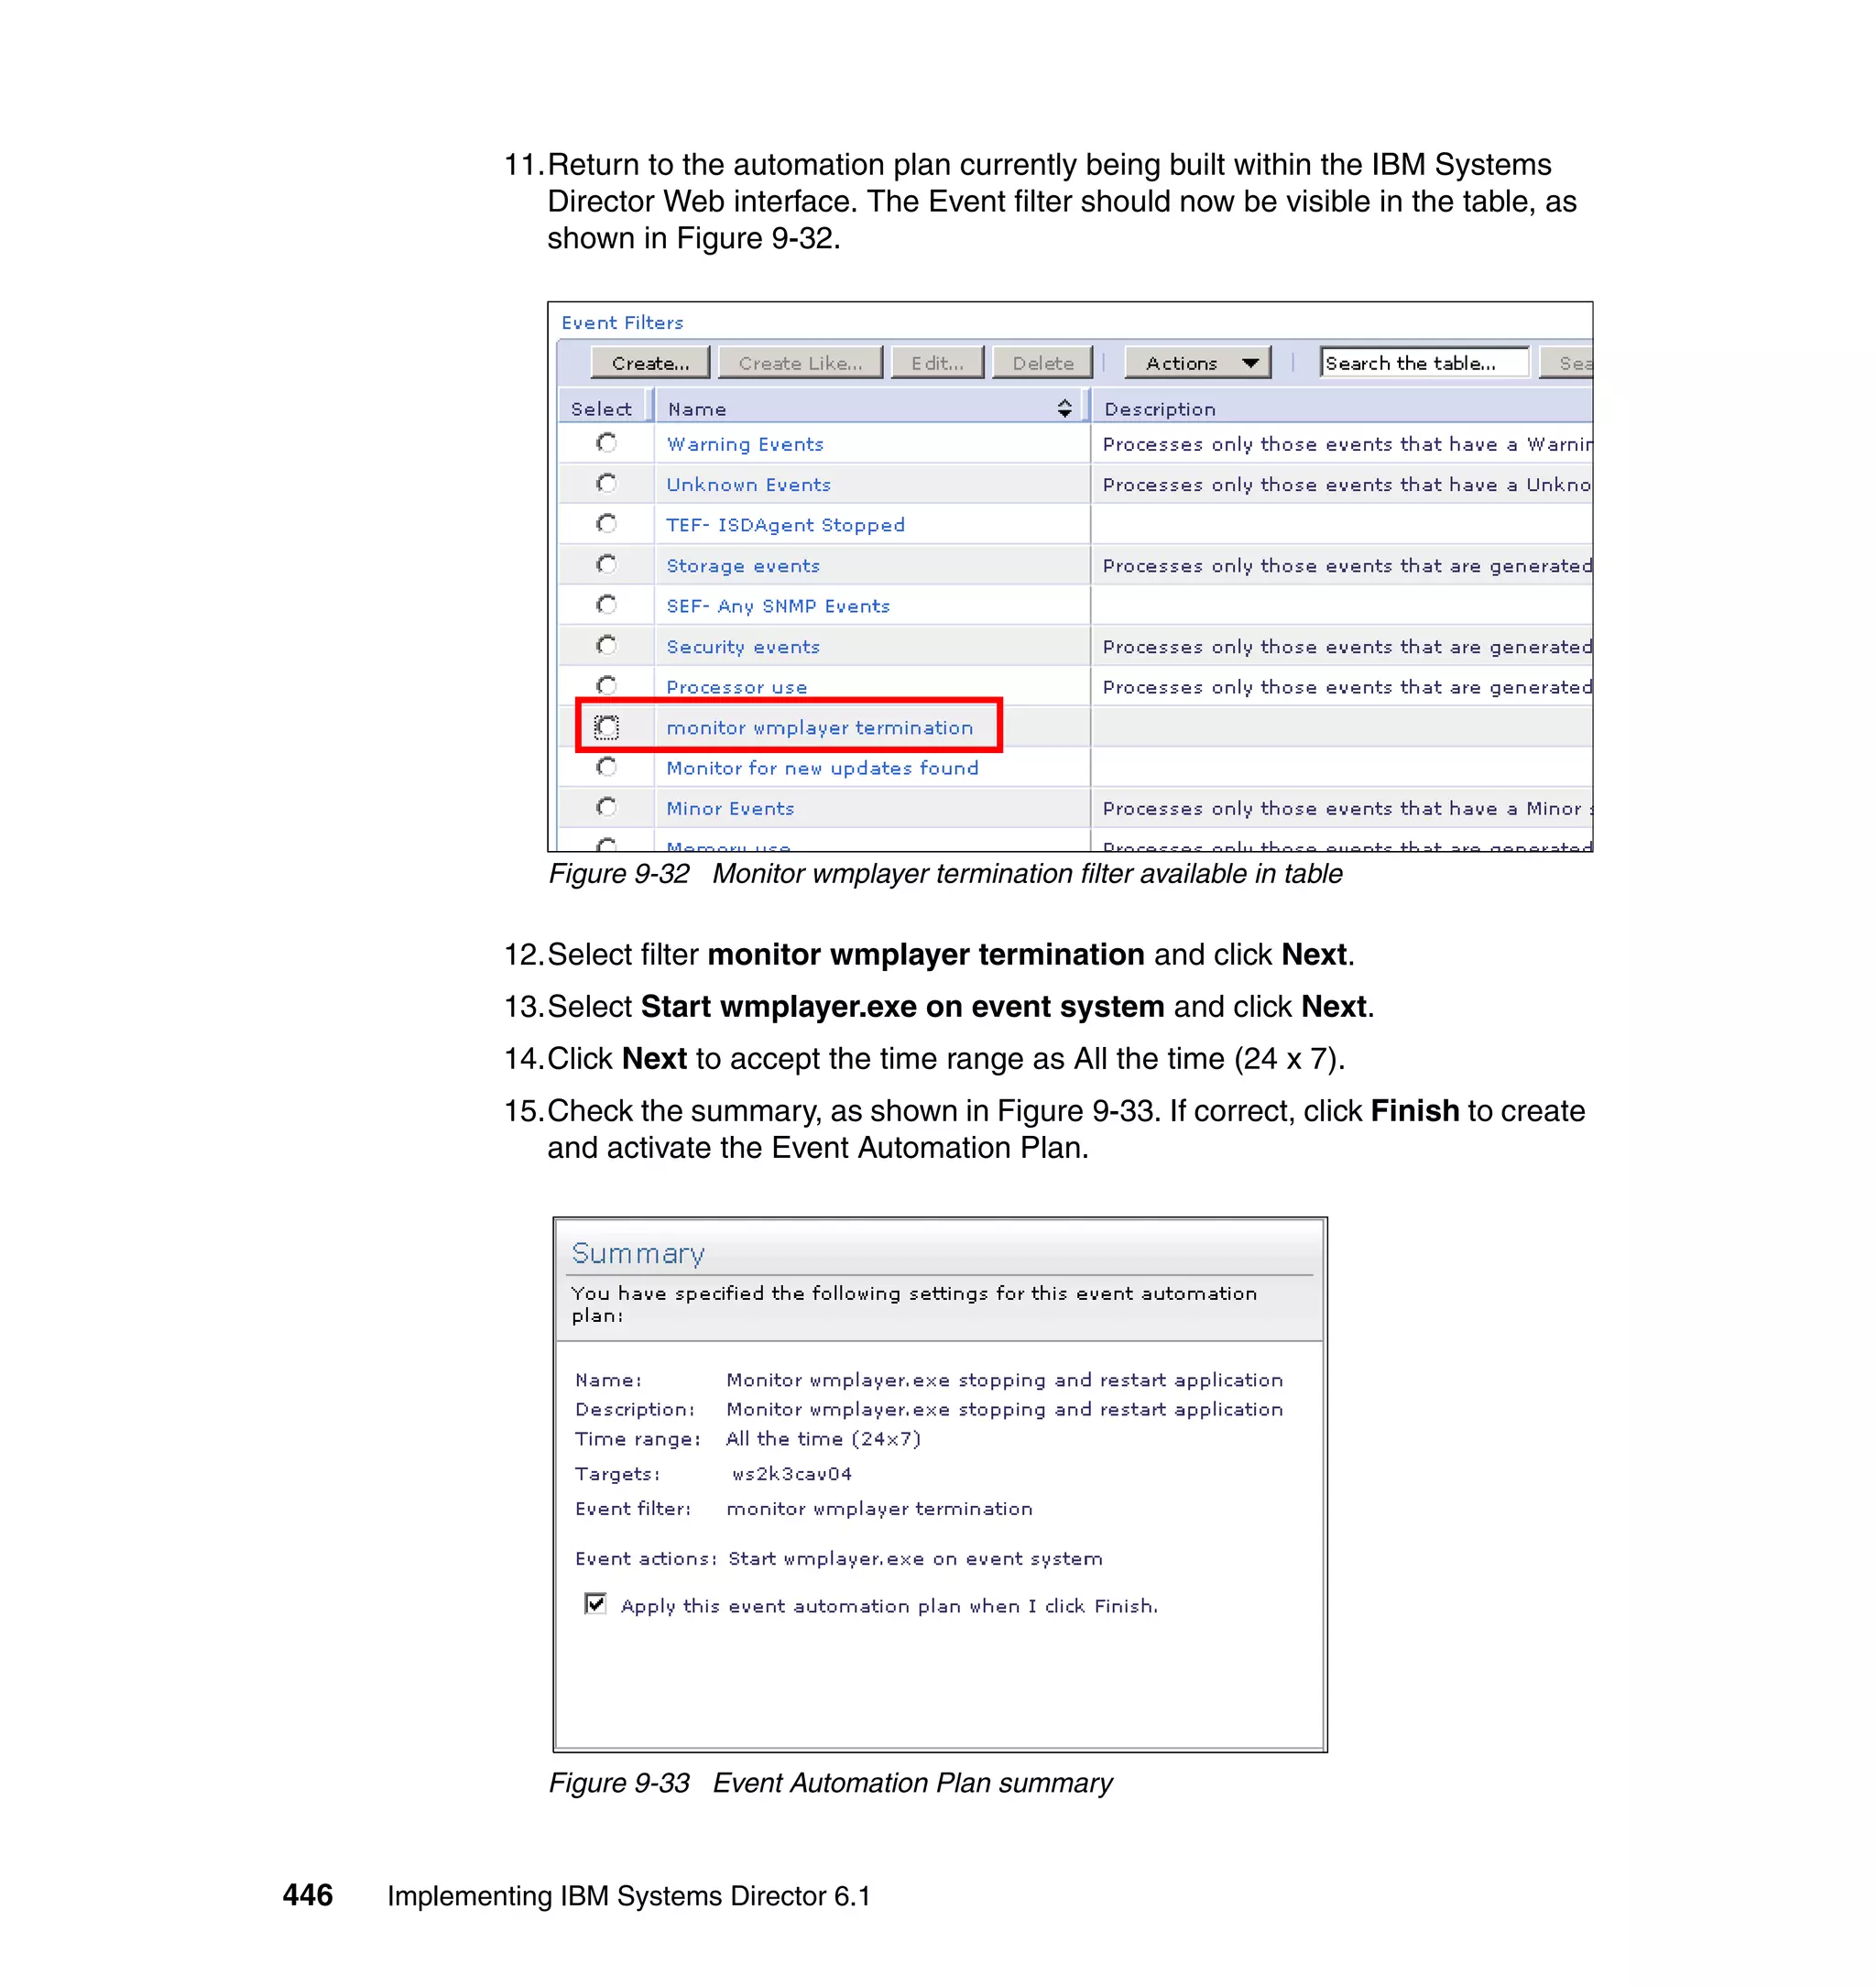
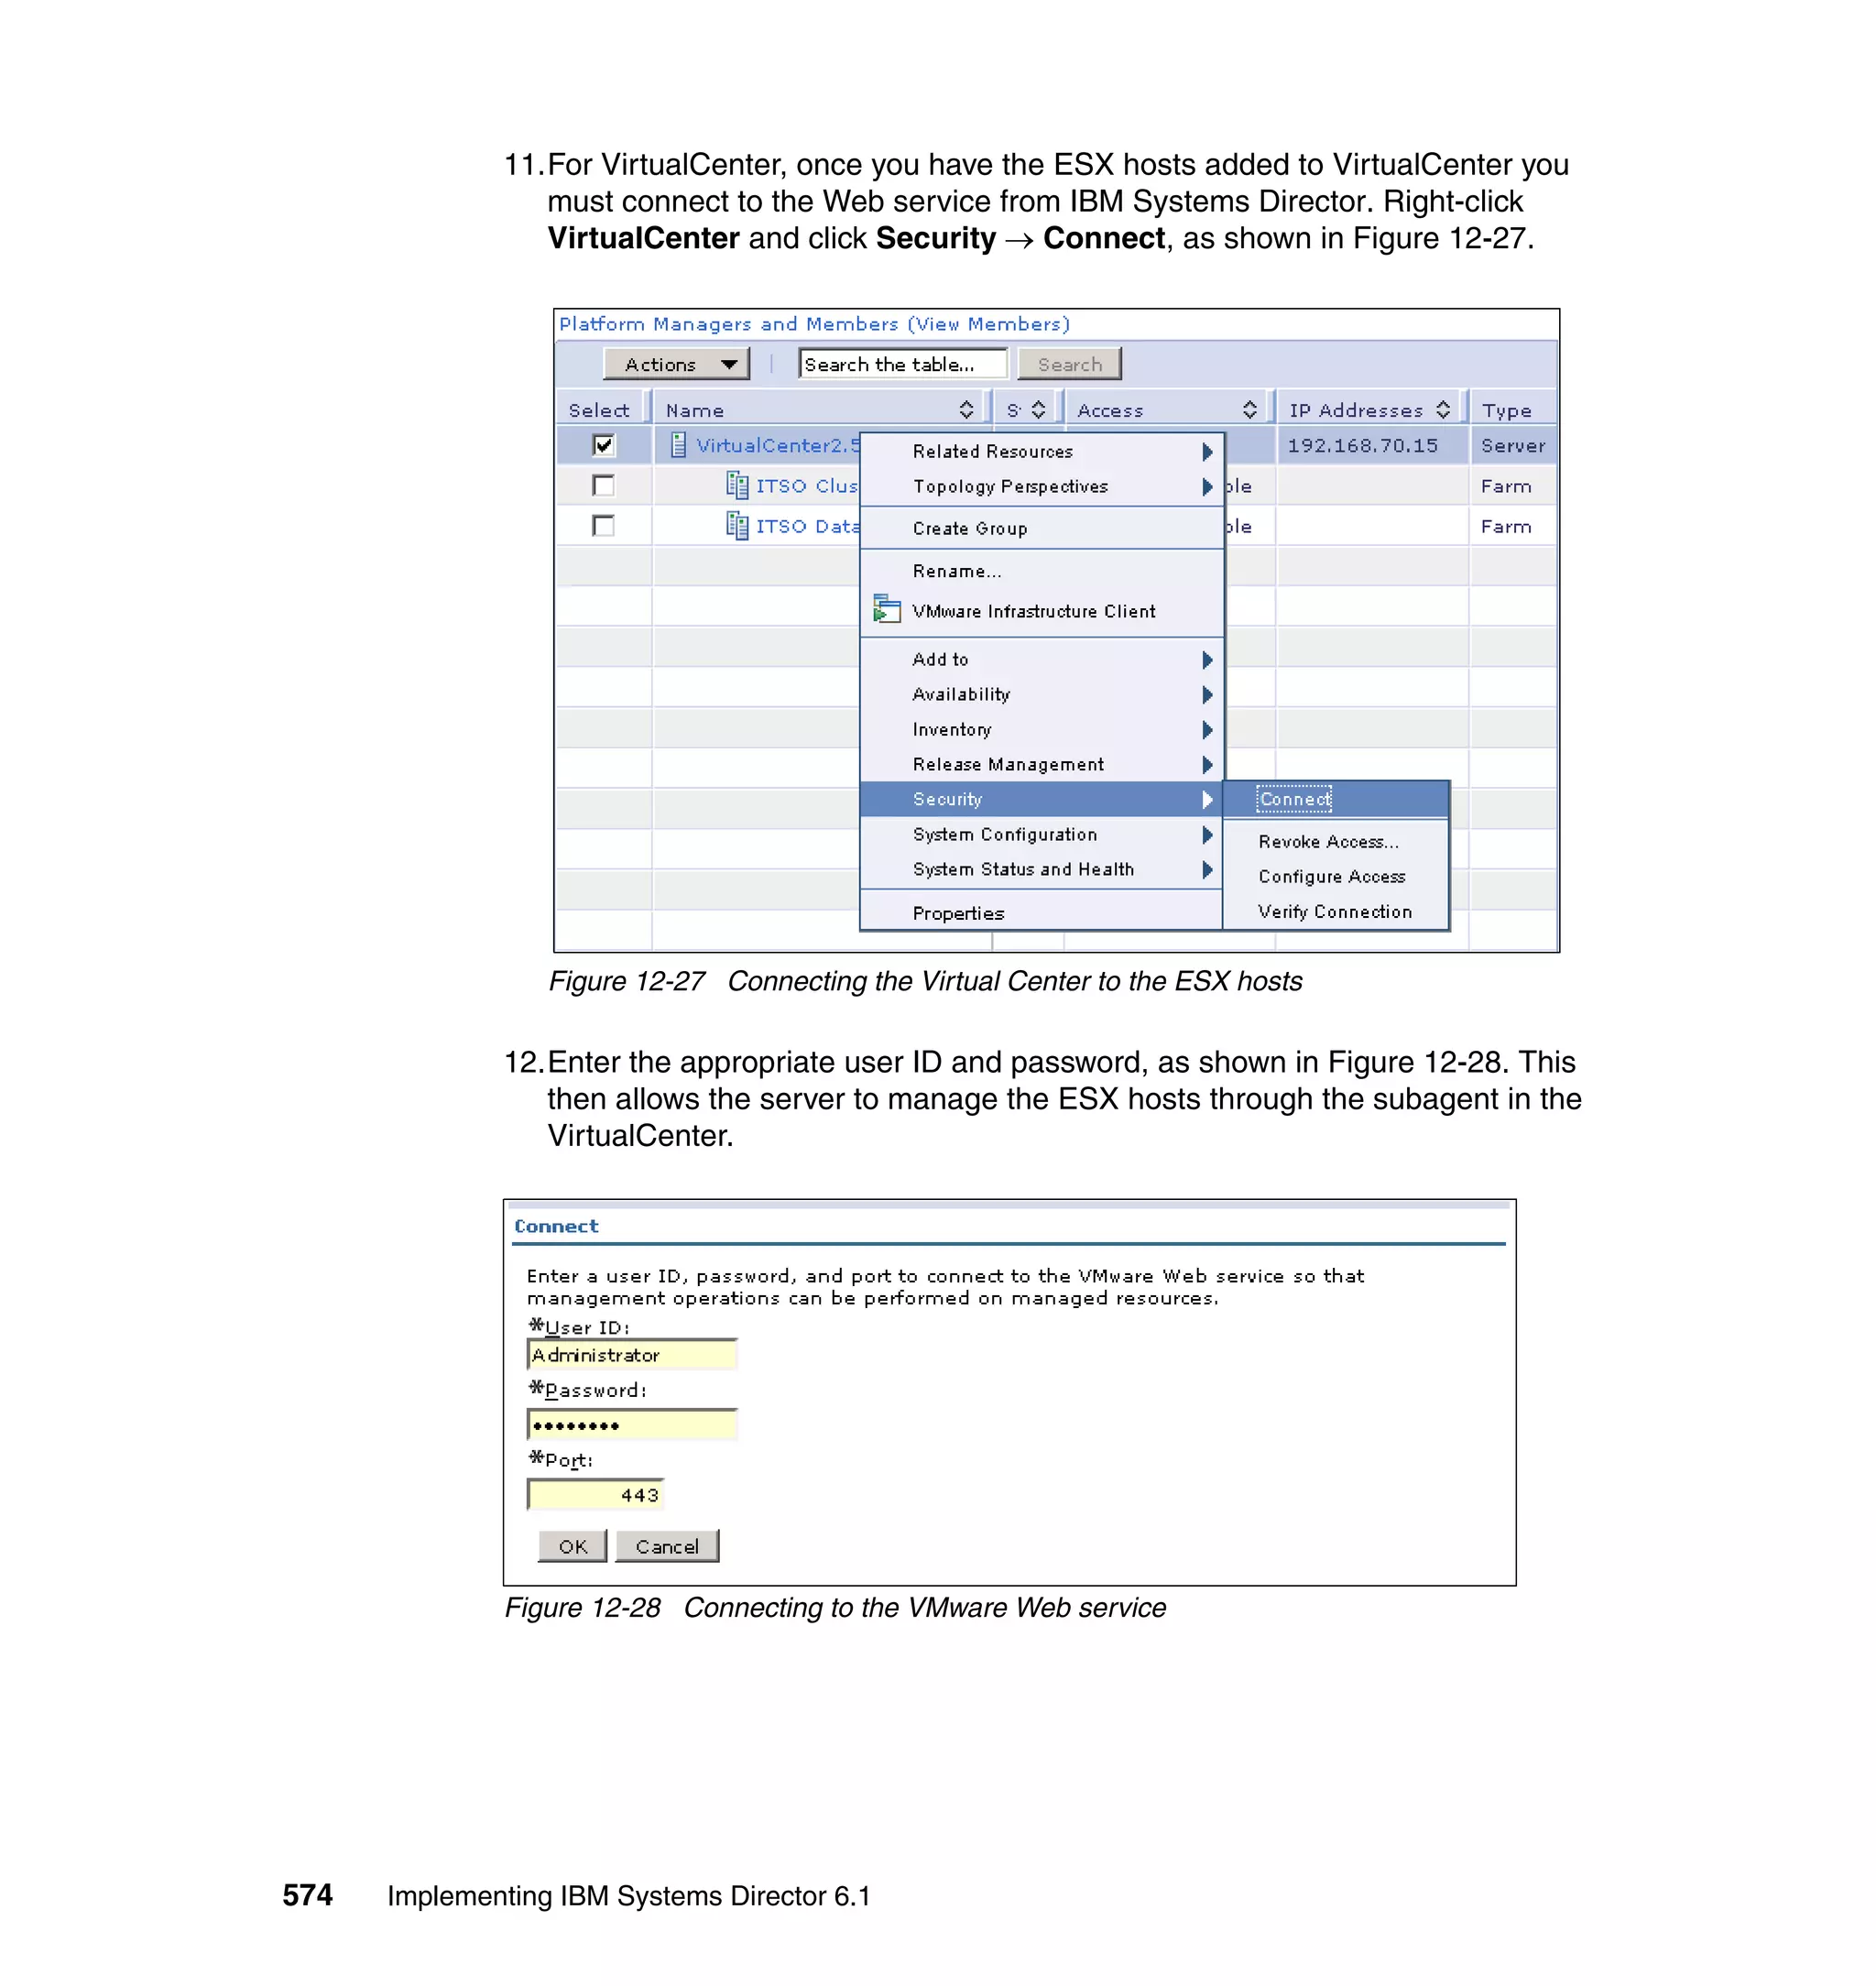
only authenticate with one Agent Manager. For this reason, if a Common Agent
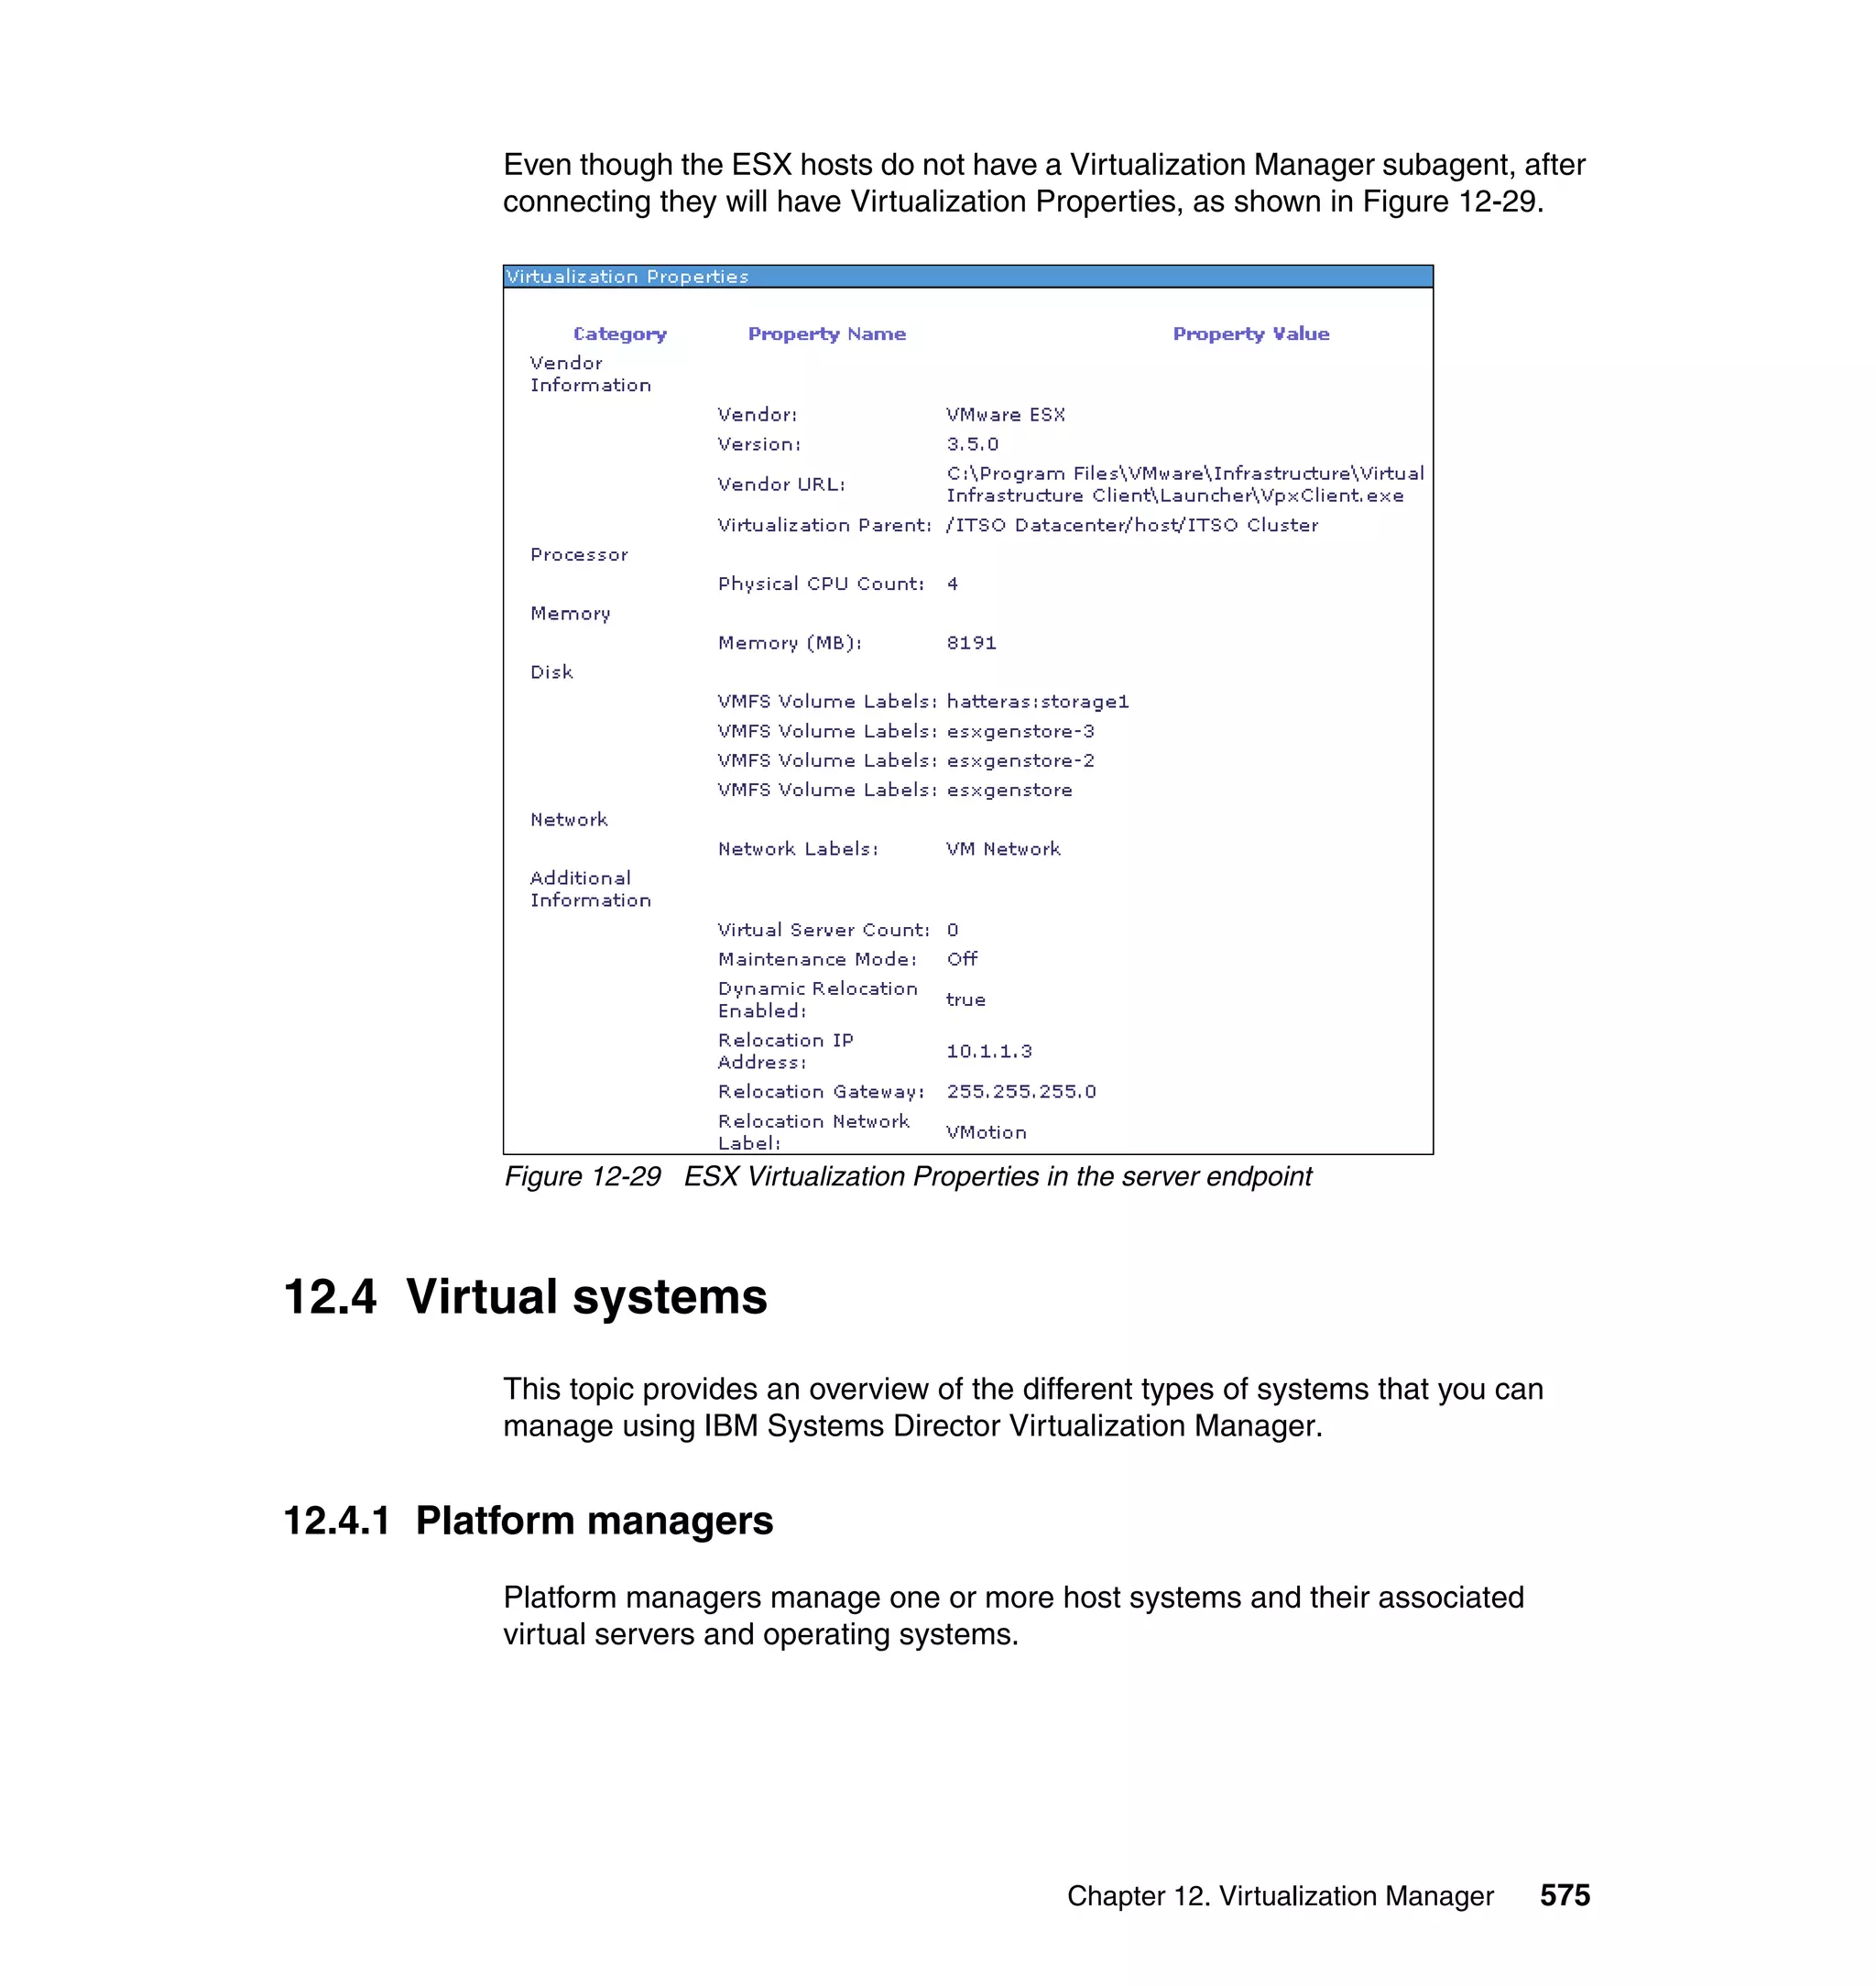
is to be managed by more than one IBM Systems Director server those servers
must use the same Agent Manager.]
Groups
In IBM Systems Director 6.1 you have nested groups (one group within another)
and a favorites group. Nested groups allow you to include one group inside
another. The favorites group allows you to keep all of your favorite systems
together in one group. See 7.2, “Health summary” on page 340, to see one way
that the favorites group is used in IBM Systems Director.
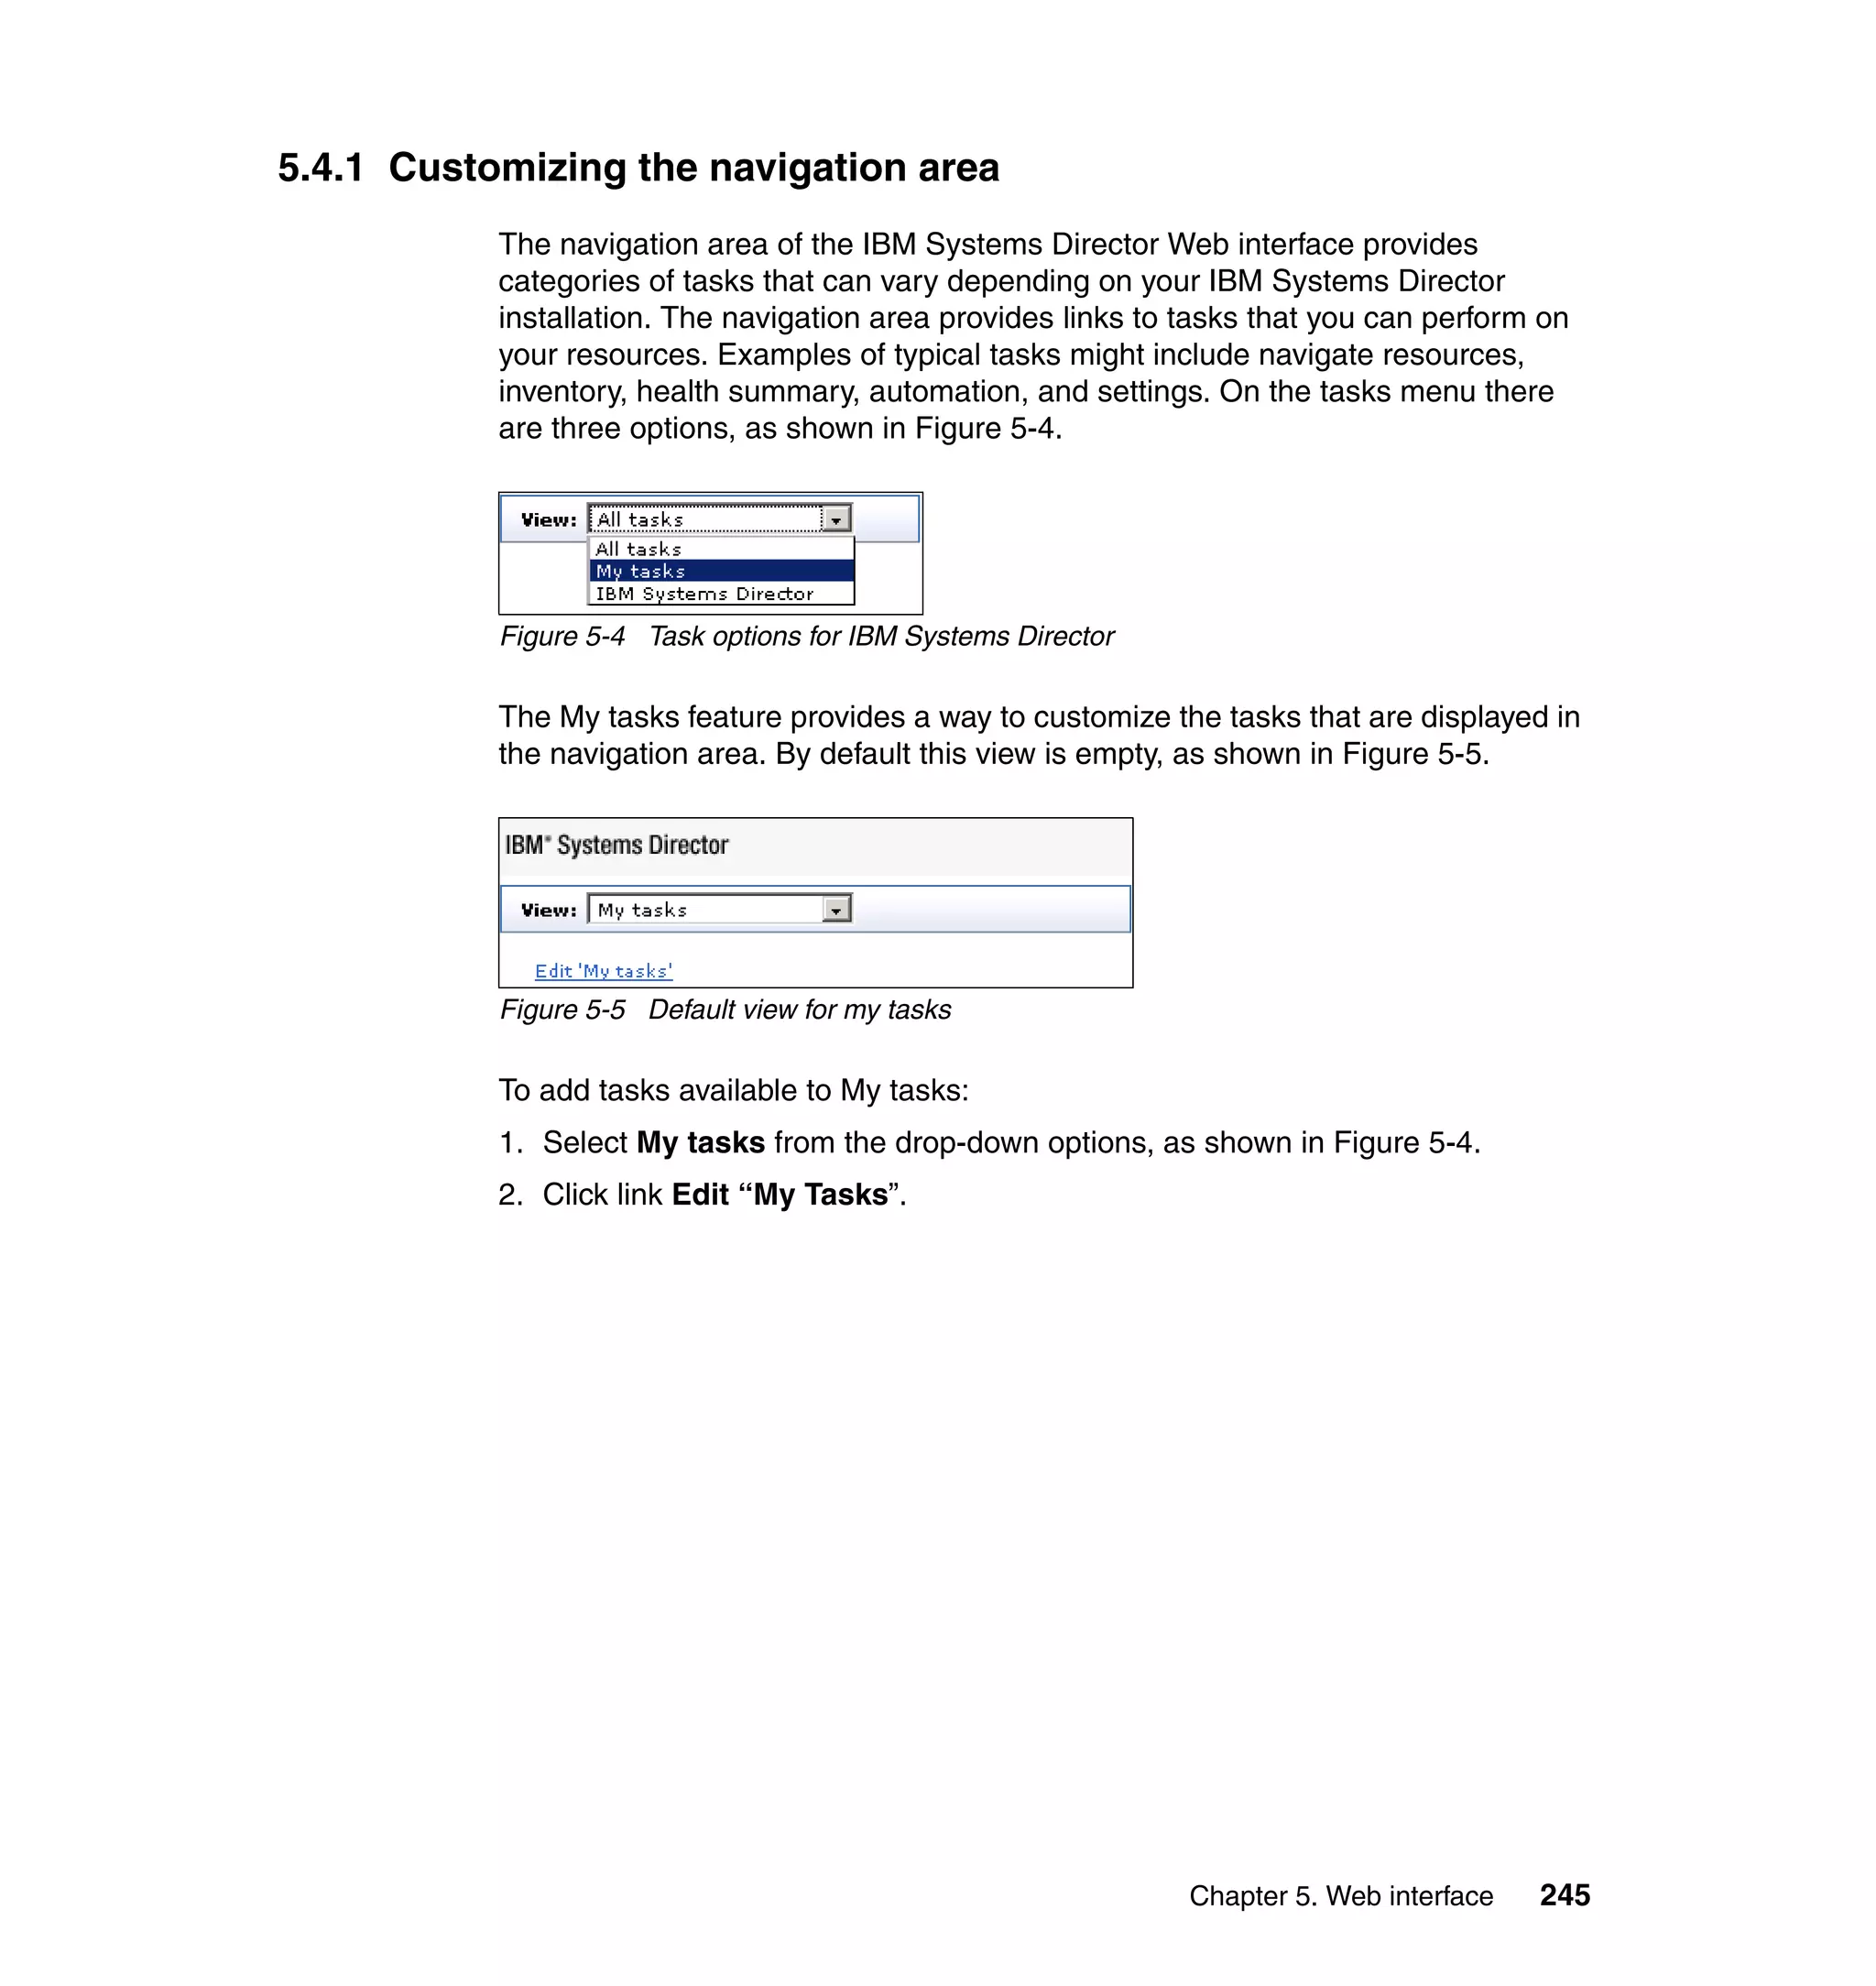
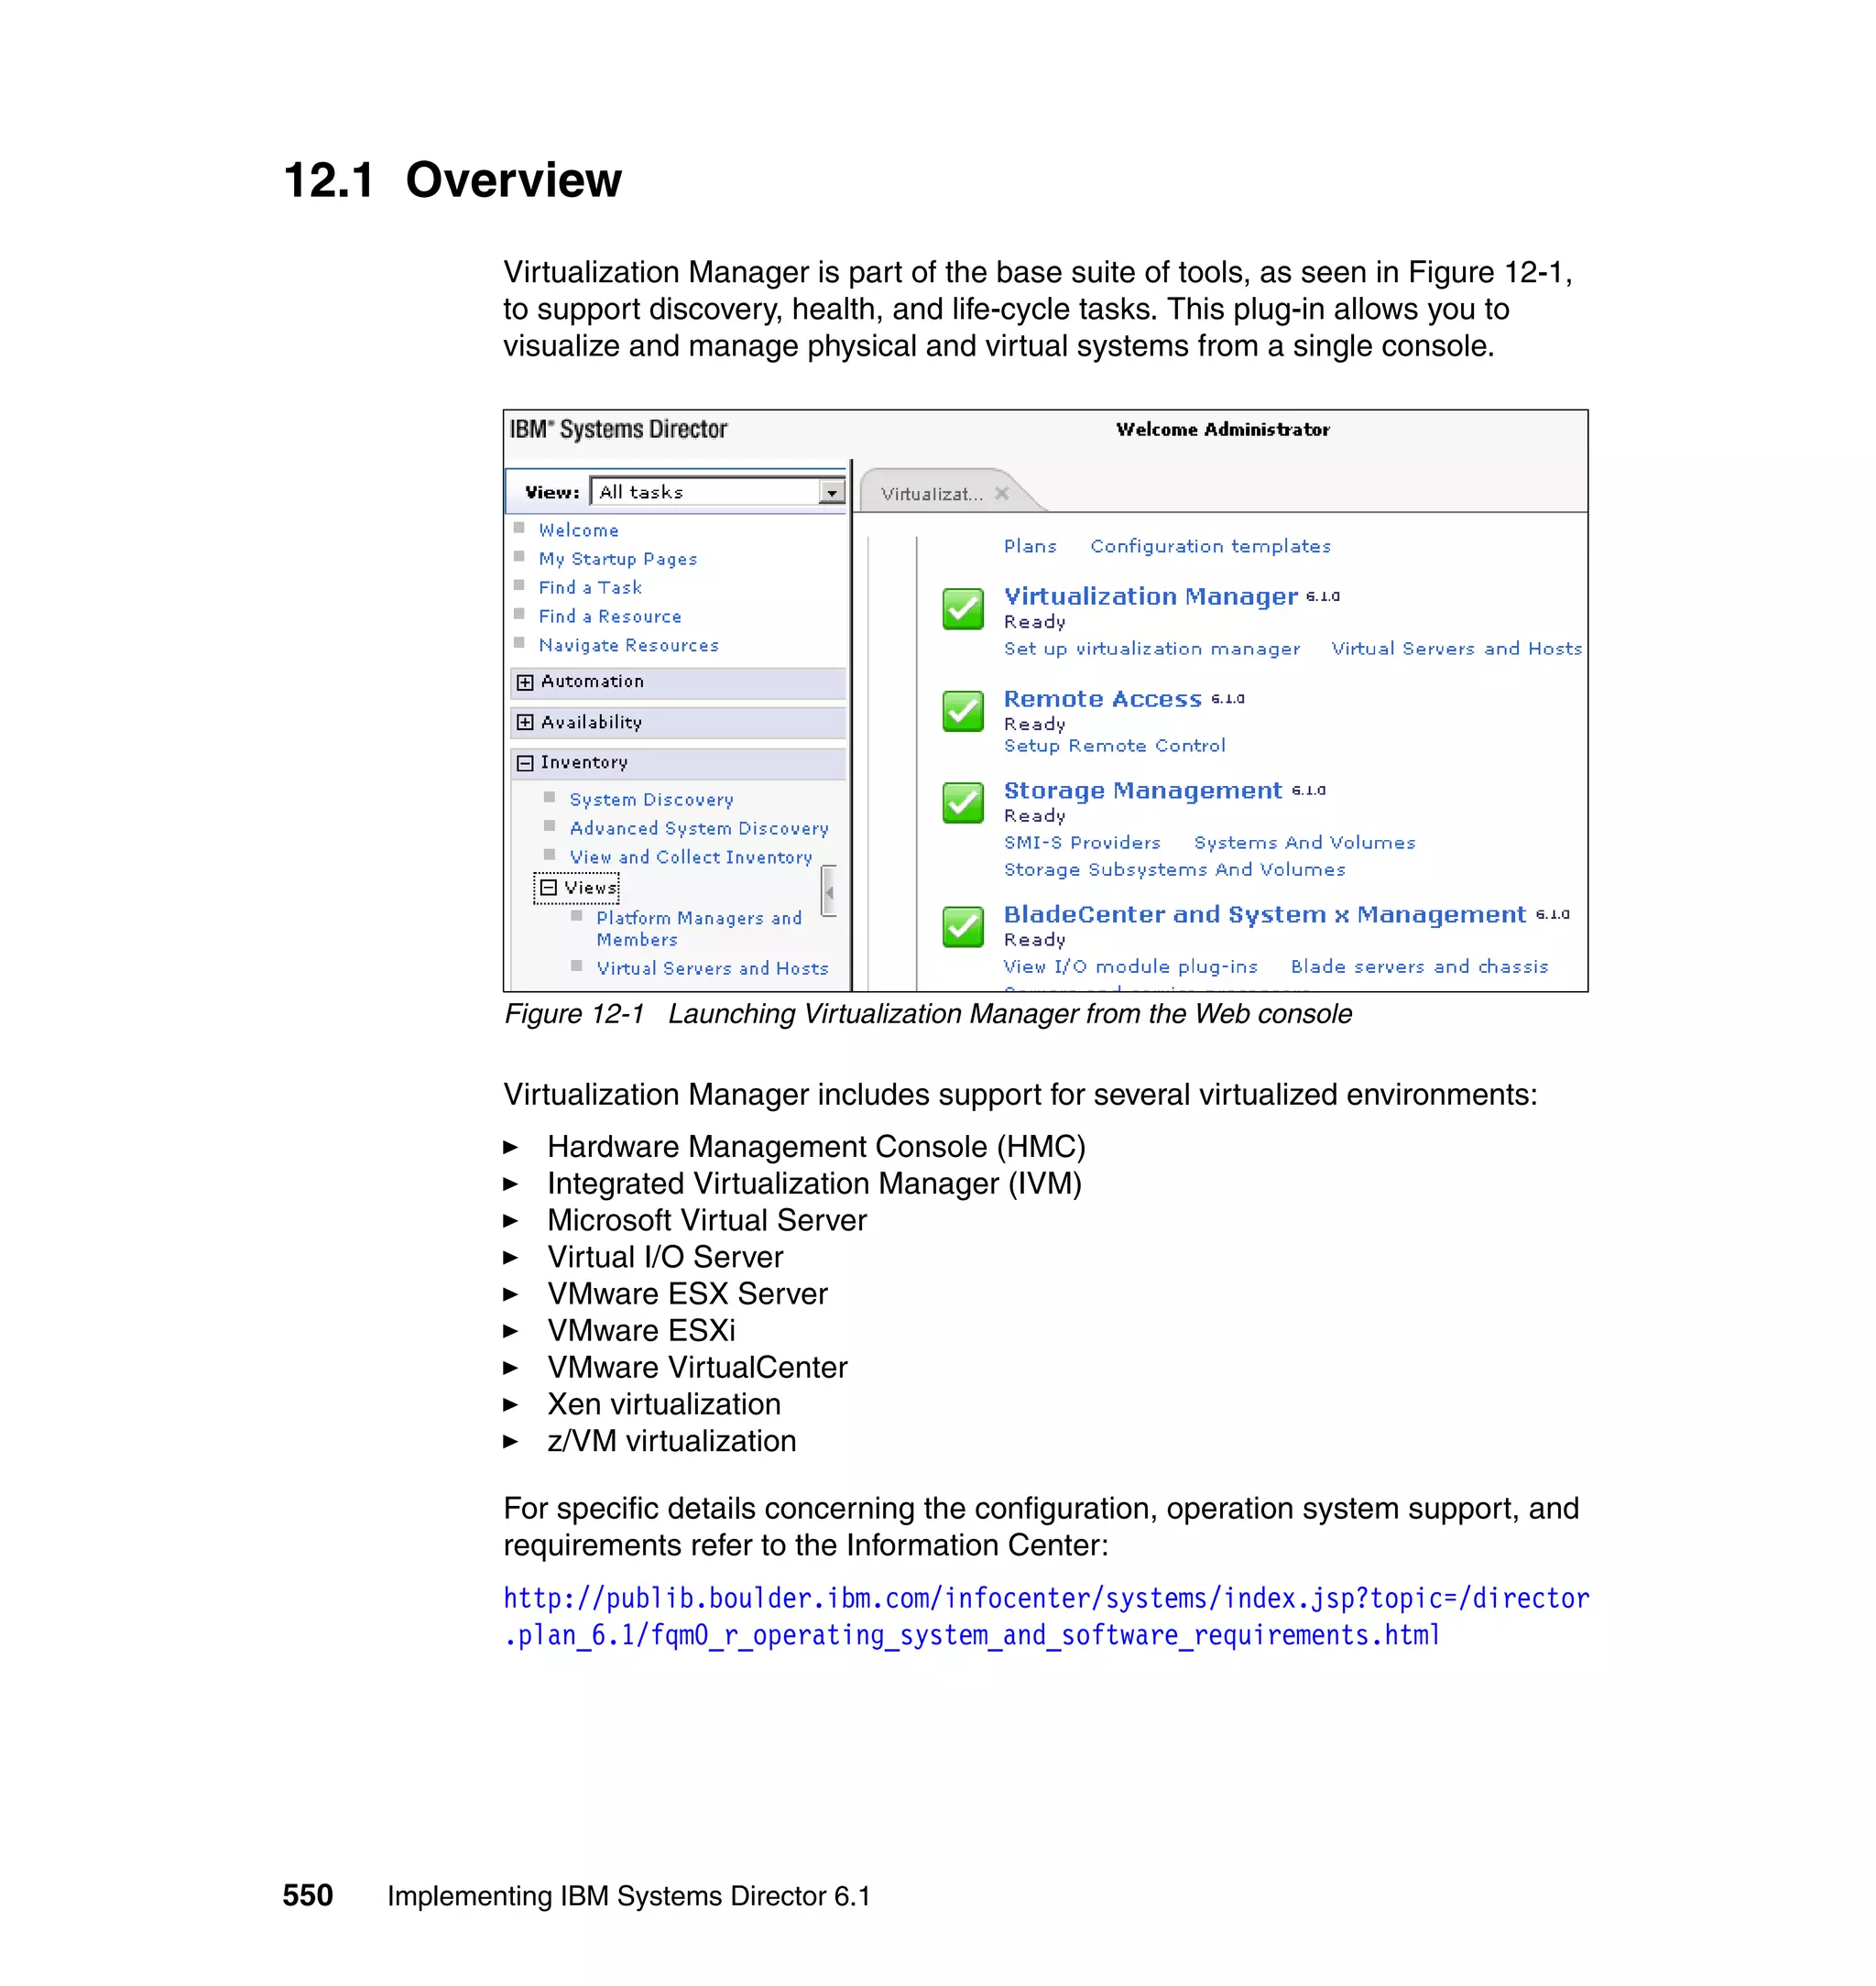
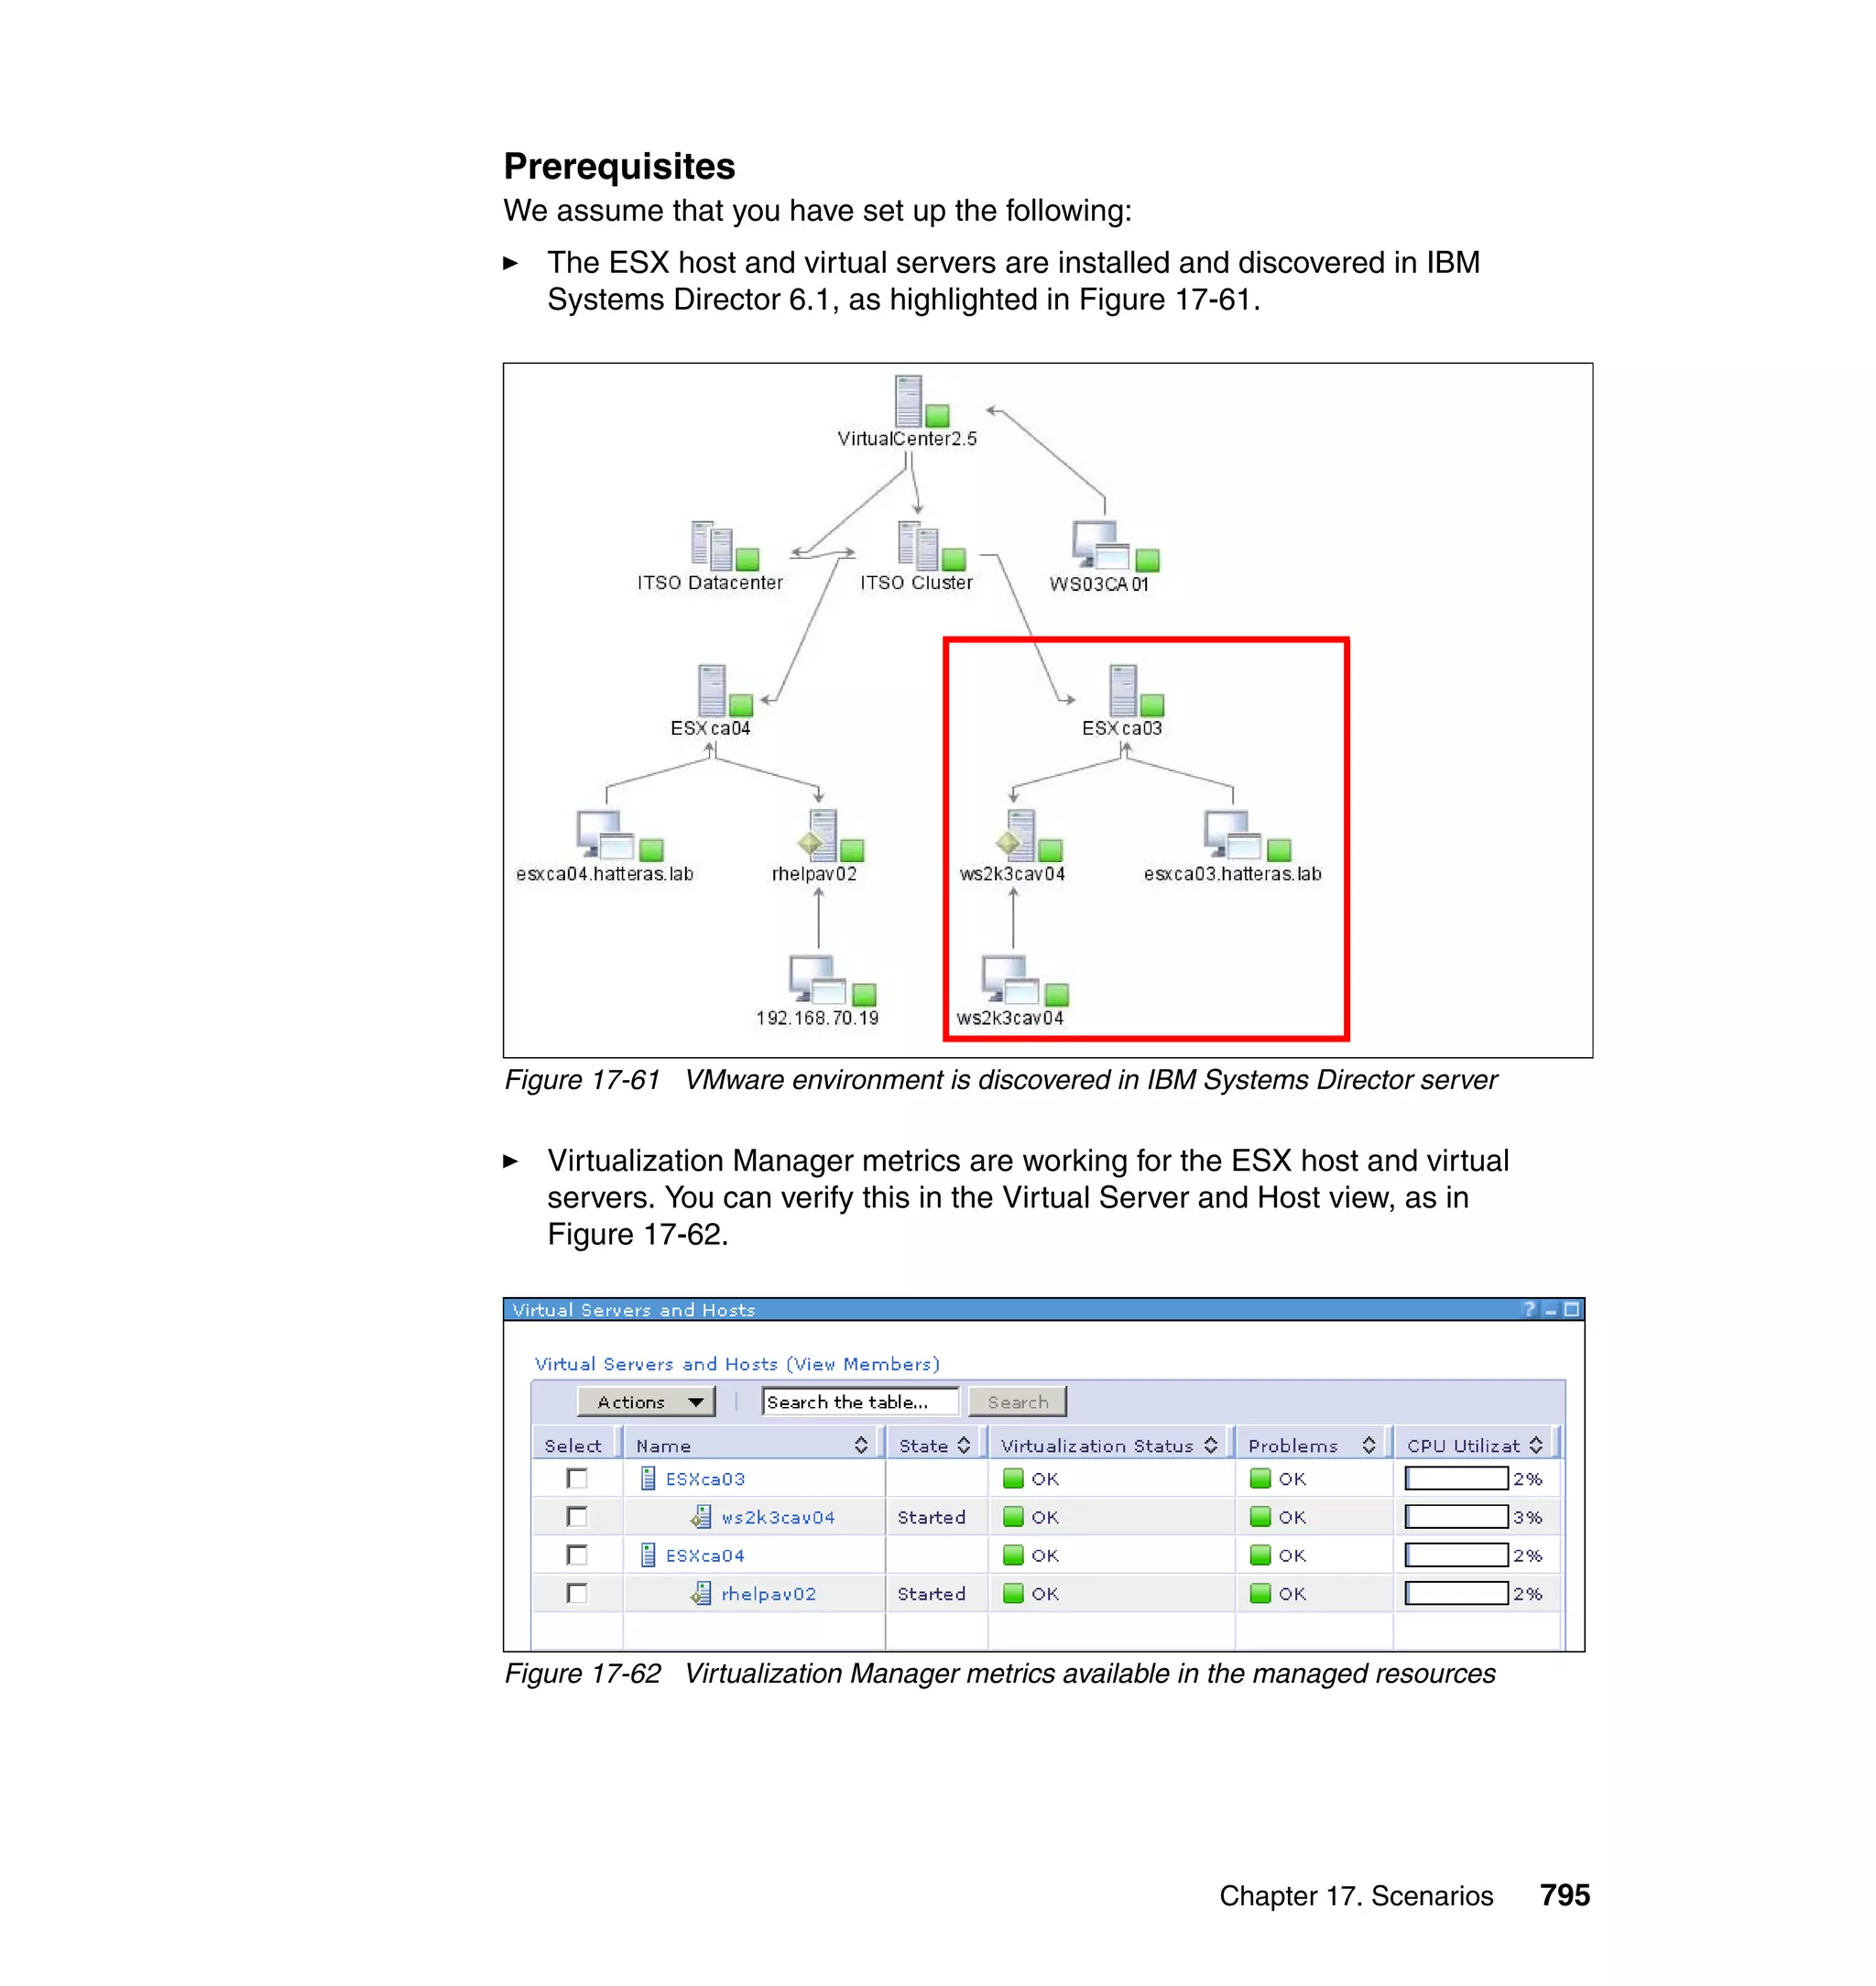
2.2 What you need before you start
When you first start your IBM Systems Director 6.1 deployment you may be
tempted to jump right in and start installing. If yours is a small test environment
and you are just looking to get familiar with IBM Systems Director 6.1 this may
work. However, taking some time to determine what you will need and planning
your deployment will not only make it easier to get IBM Systems Director up and
running, but will leave you with a more stable environment.
2.2.1 The size of your deployment
While many of the tasks and considerations that are included in this chapter are
the same whether you’re deploying five systems or 5,000 systems, planning
based on the size of your environment will help save you from redundant or
unnecessary tasks. Some of the things that you must consider are:
How many systems must be installed?
What types of agents will you be using (Common Agents, Platform Agents,
storage devices, IBM BladeCenter chassis, and so on)?](https://image.slidesharecdn.com/implementingibmsystemdirectory6-151014004841-lva1-app6892/75/BOOK-IBM-Implementing-ibm-system-directory-6-1-82-2048.jpg)


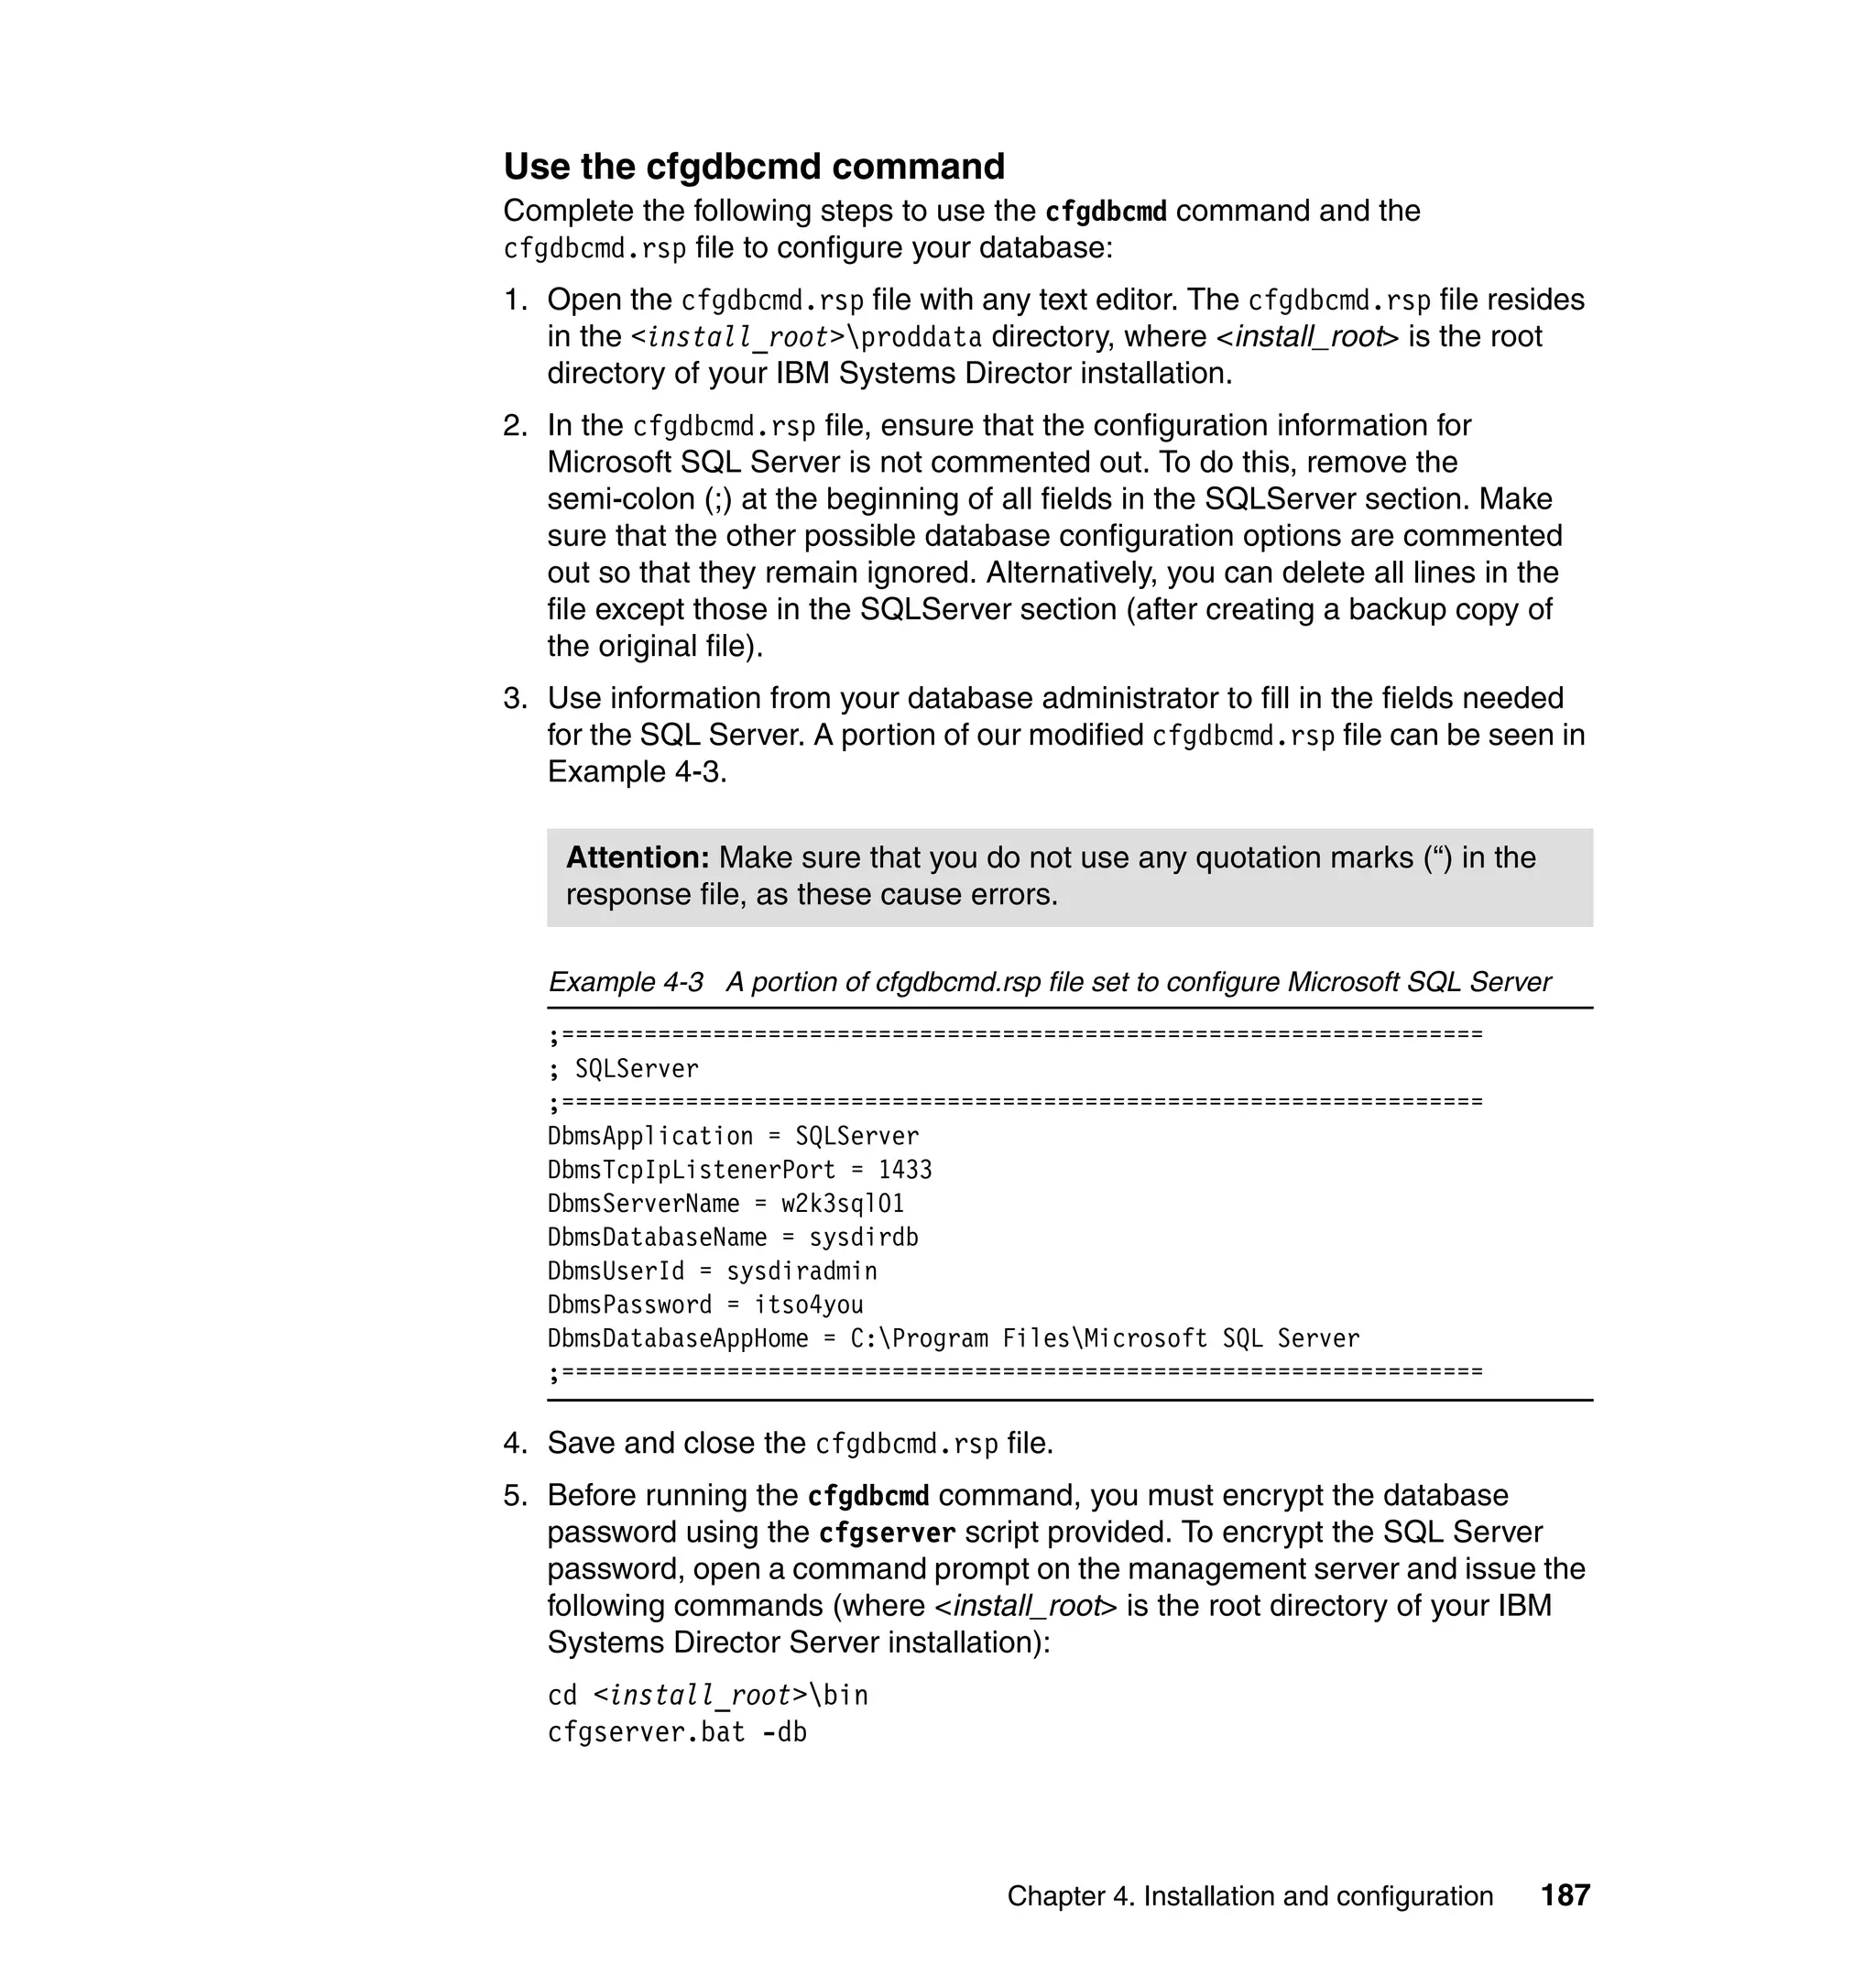
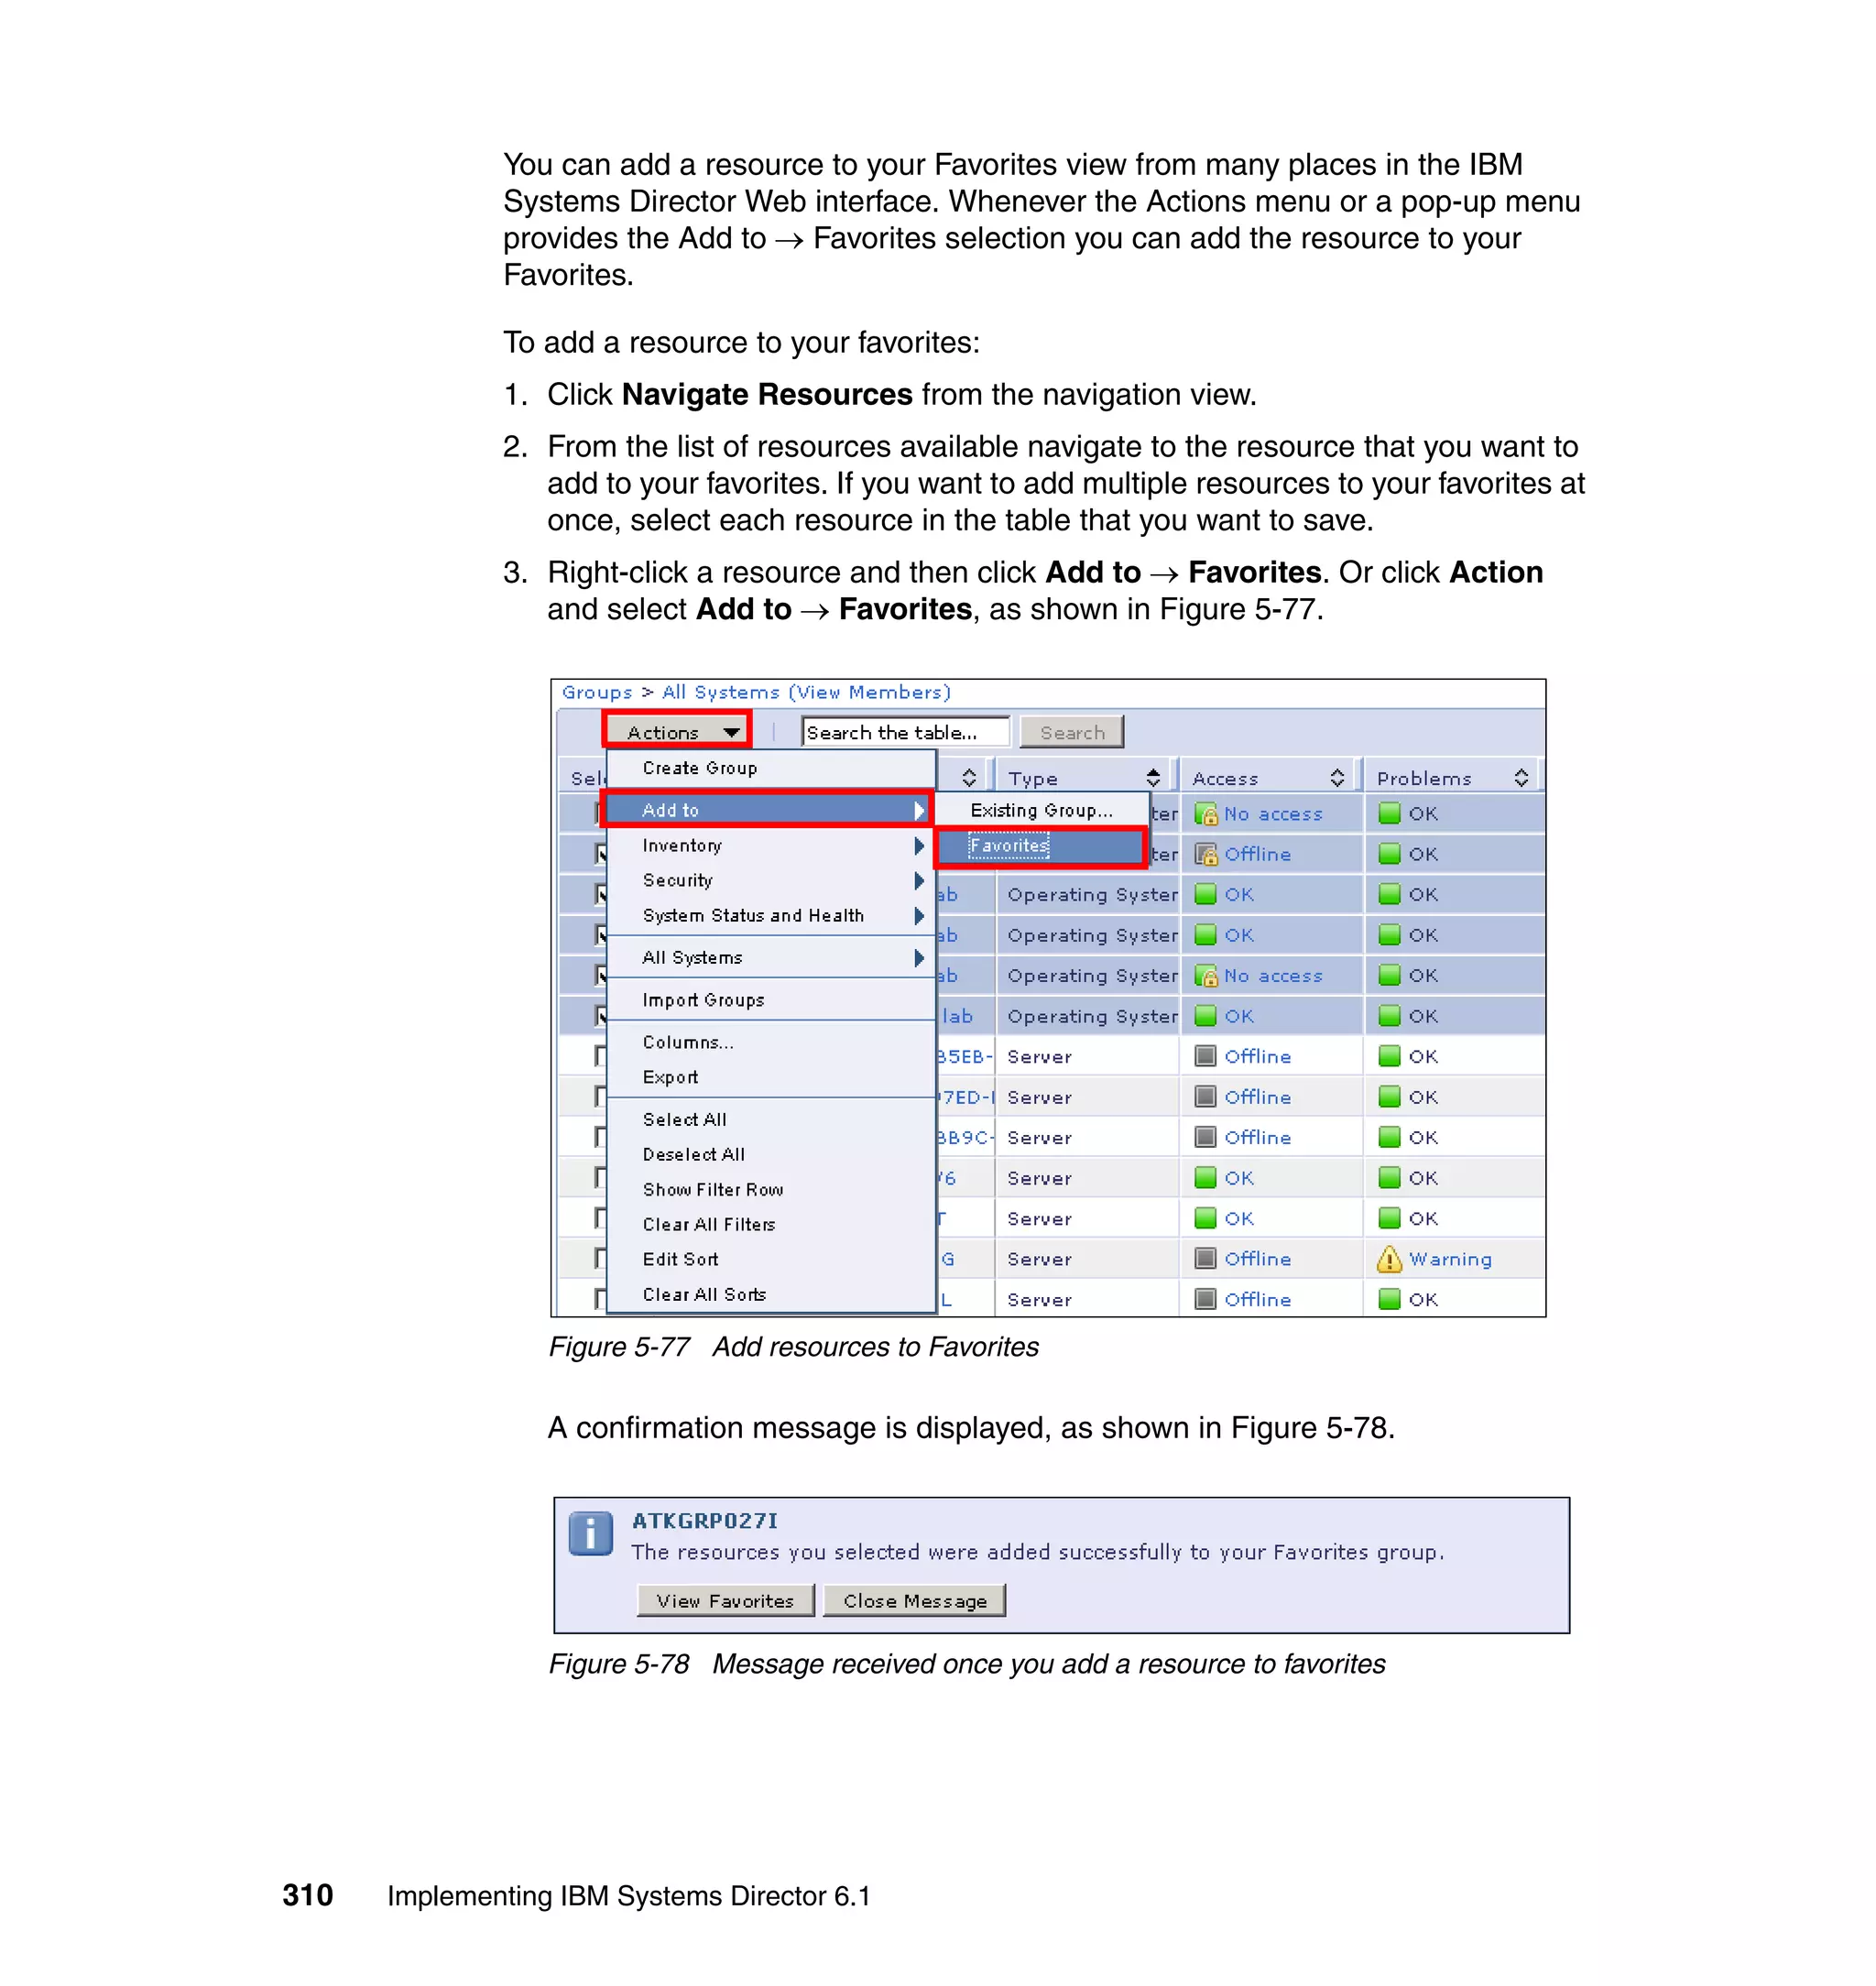
![188 Implementing IBM Systems Director 6.1
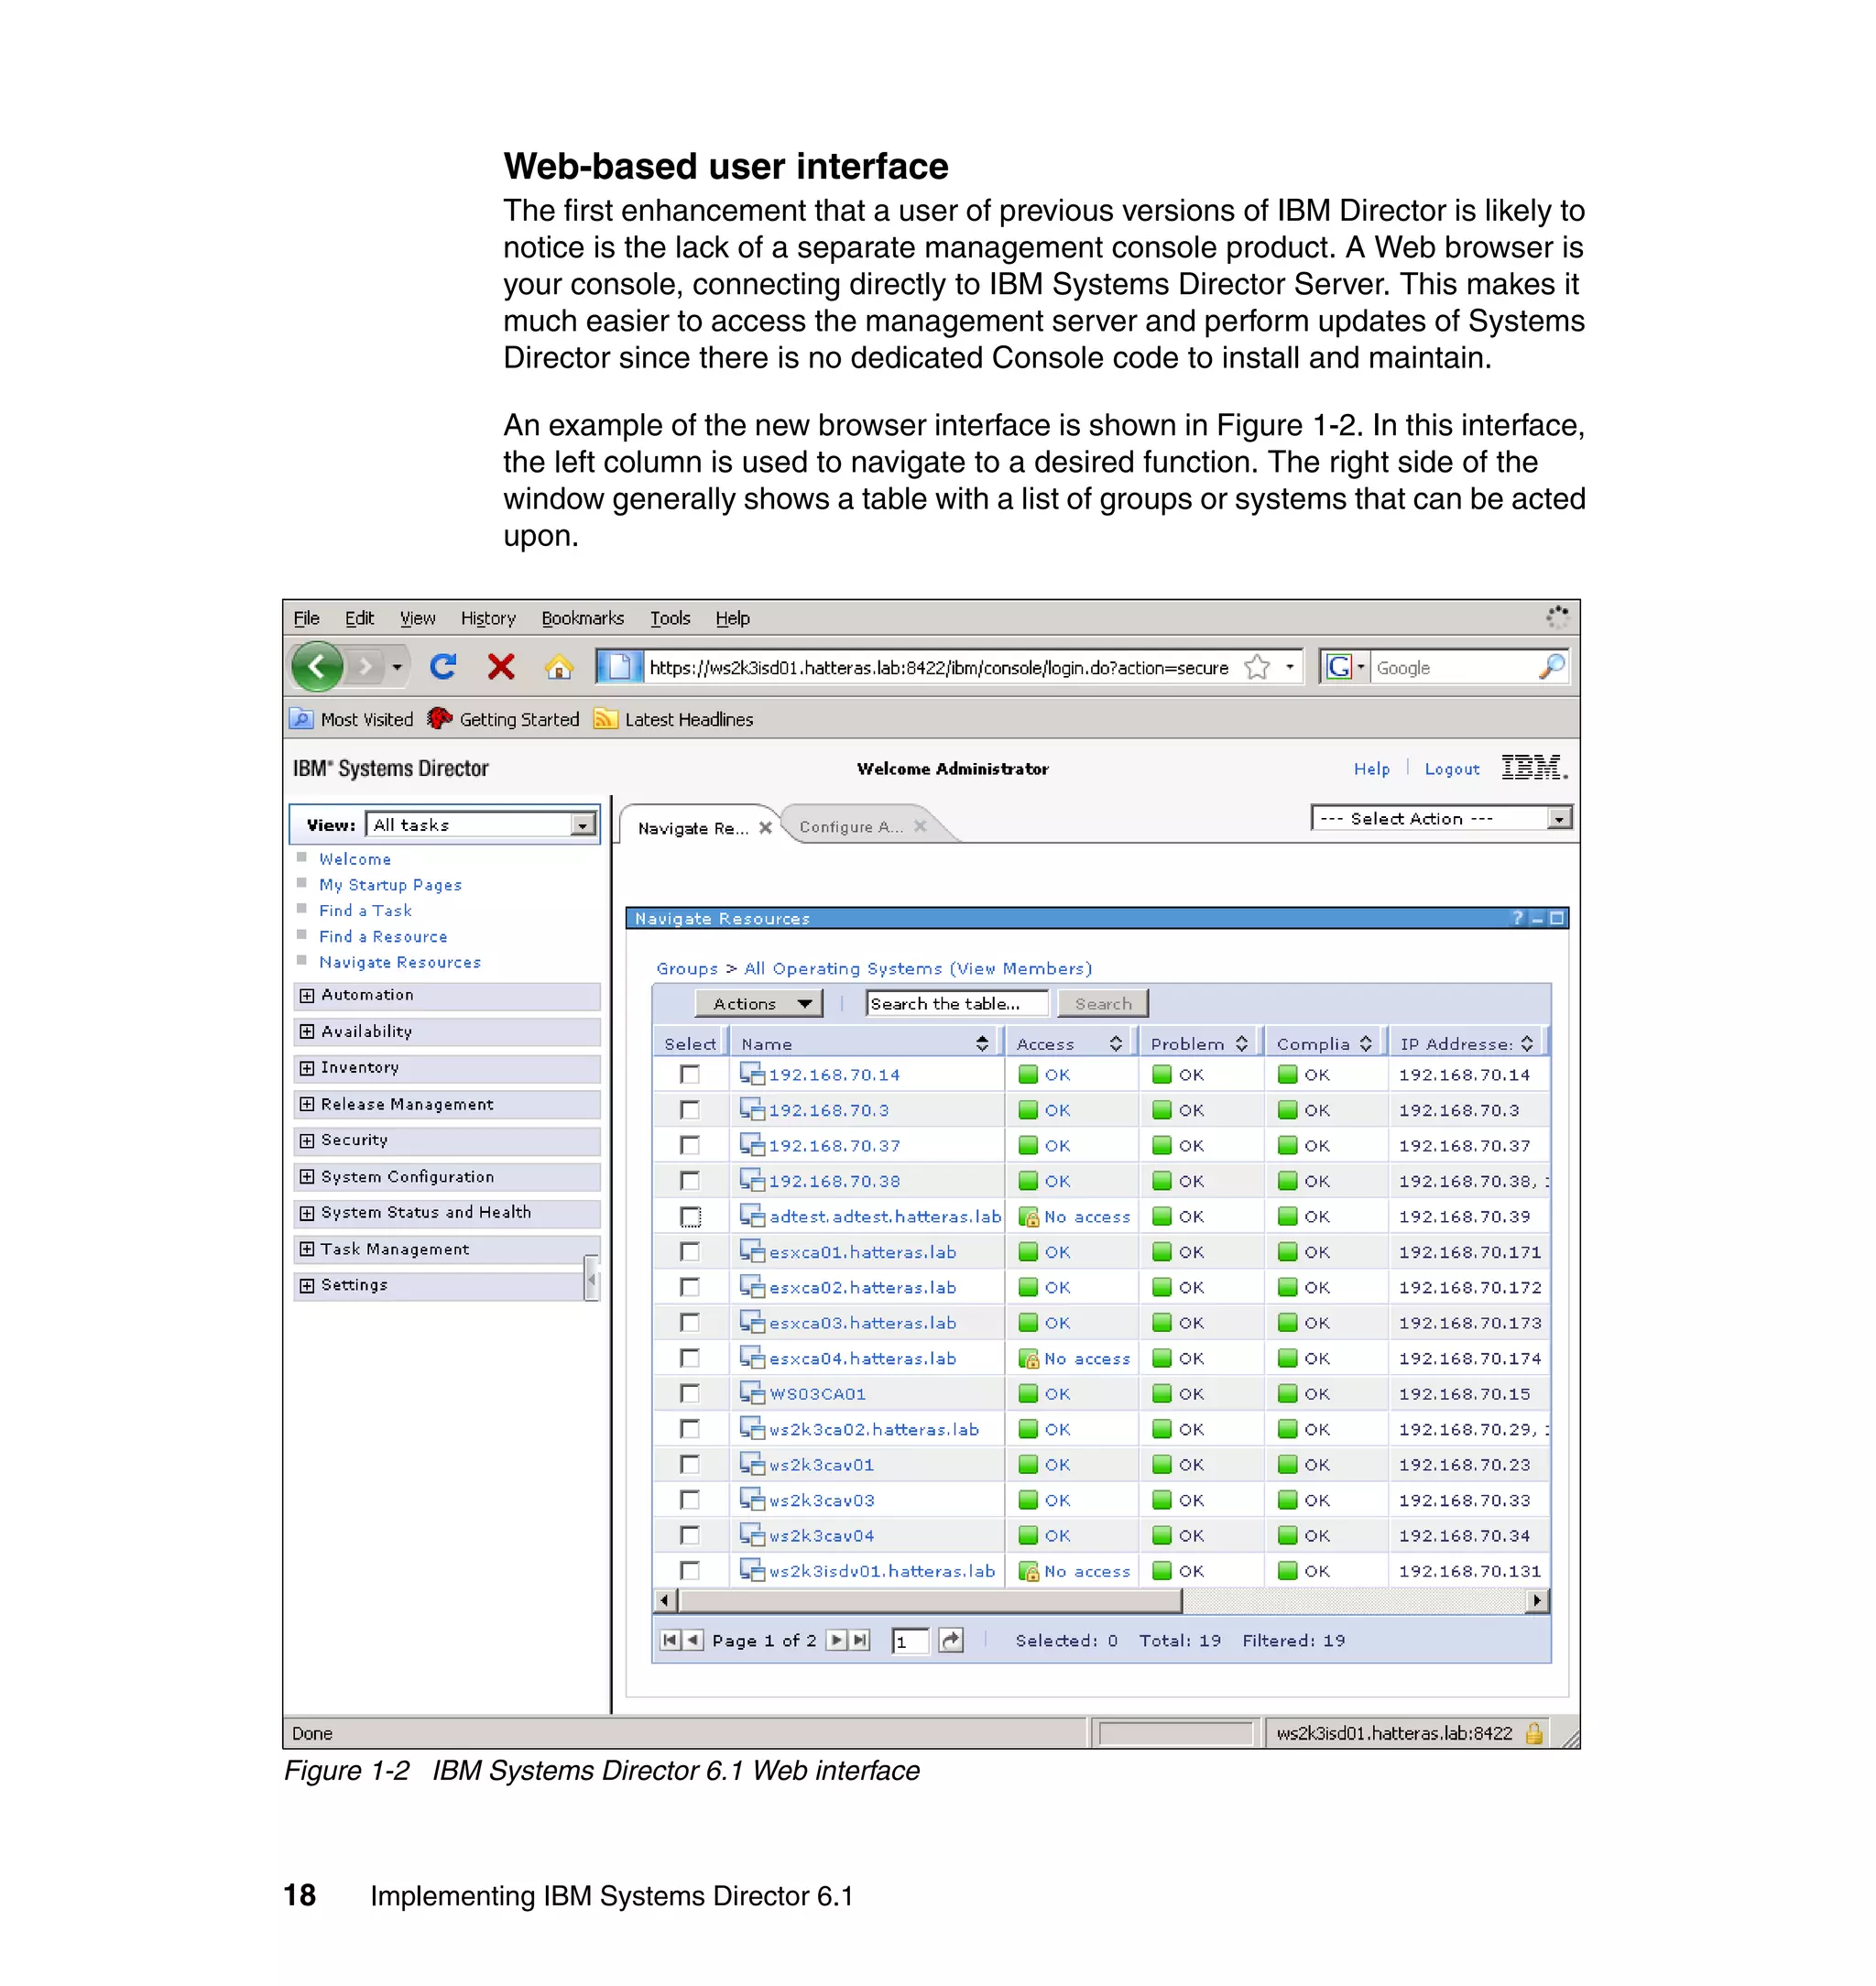
6. Provide the information requested by the script. This script prompts for the
user ID and password for the SQL Server and writes the encrypted password
to the response file in the DbmsPassword field. Example 4-4 shows this
process on our management server.
Example 4-4 Database password encryption script in action
C:Program FilesIBMDirectorbin>cfgserver.bat -db
Enter Database username : sysdiradmin
Enter Database password :
Re-Enter Database password :
[Configuration-Key]: y9ODudWbUviklxzsp5KUReAl9LDWbgtY
[Database-Password]: YNKtCJxOqYhcWN4wKT3pwQ==
[Update] [File]: C:Program FilesIBMDirector/proddata/cfgdbcmd.rsp
[Update] [Element]: DbmsUserId [Value]: sysdiradmin
[Update] [Element]: DbmsPassword [Value]: YNKtCJxOqYhcWN4wKT3pwQ==
Example 4-5 shows our cfgdbcmd.rsp file after password encryption.
Compare the DbmsPassword entry with the one in Example 4-3 on page 187.
Example 4-5 Same portion of the cfgdbcmd.rsp file after password encryption
;===================================================================
; SQLServer
;===================================================================
DbmsApplication = SQLServer
DbmsTcpIpListenerPort = 1433
DbmsServerName = w2k3sql01sysdirdb
DbmsDatabaseName = sysdirdb
DbmsUserId = sysdiradmin
DbmsPassword = YNKtCJxOqYhcWN4wKT3pwQ==
DbmsDatabaseAppHome = C:Program FilesMicrosoft SQL Server
;===================================================================
7. After the encryption script is complete, run the cfgdbcmd tool. The cfgdbcmd
tool uses the response file to configure your IBM Systems Director Server to
use the Microsoft SQL Server 2005 Express Edition database.
To run the tool and configure our SQL Server database, we entered (all on
one line):
cfgdbcmd.cmd -dbLocal false -rspfile
"C:Program FilesIBMDirectorproddatacfgdbcmd.rsp"
Note: The -dbLocal false parameter is only required if the database server
is not local to the IBM Systems Director Server.](https://image.slidesharecdn.com/implementingibmsystemdirectory6-151014004841-lva1-app6892/75/BOOK-IBM-Implementing-ibm-system-directory-6-1-212-2048.jpg)


![224 Implementing IBM Systems Director 6.1
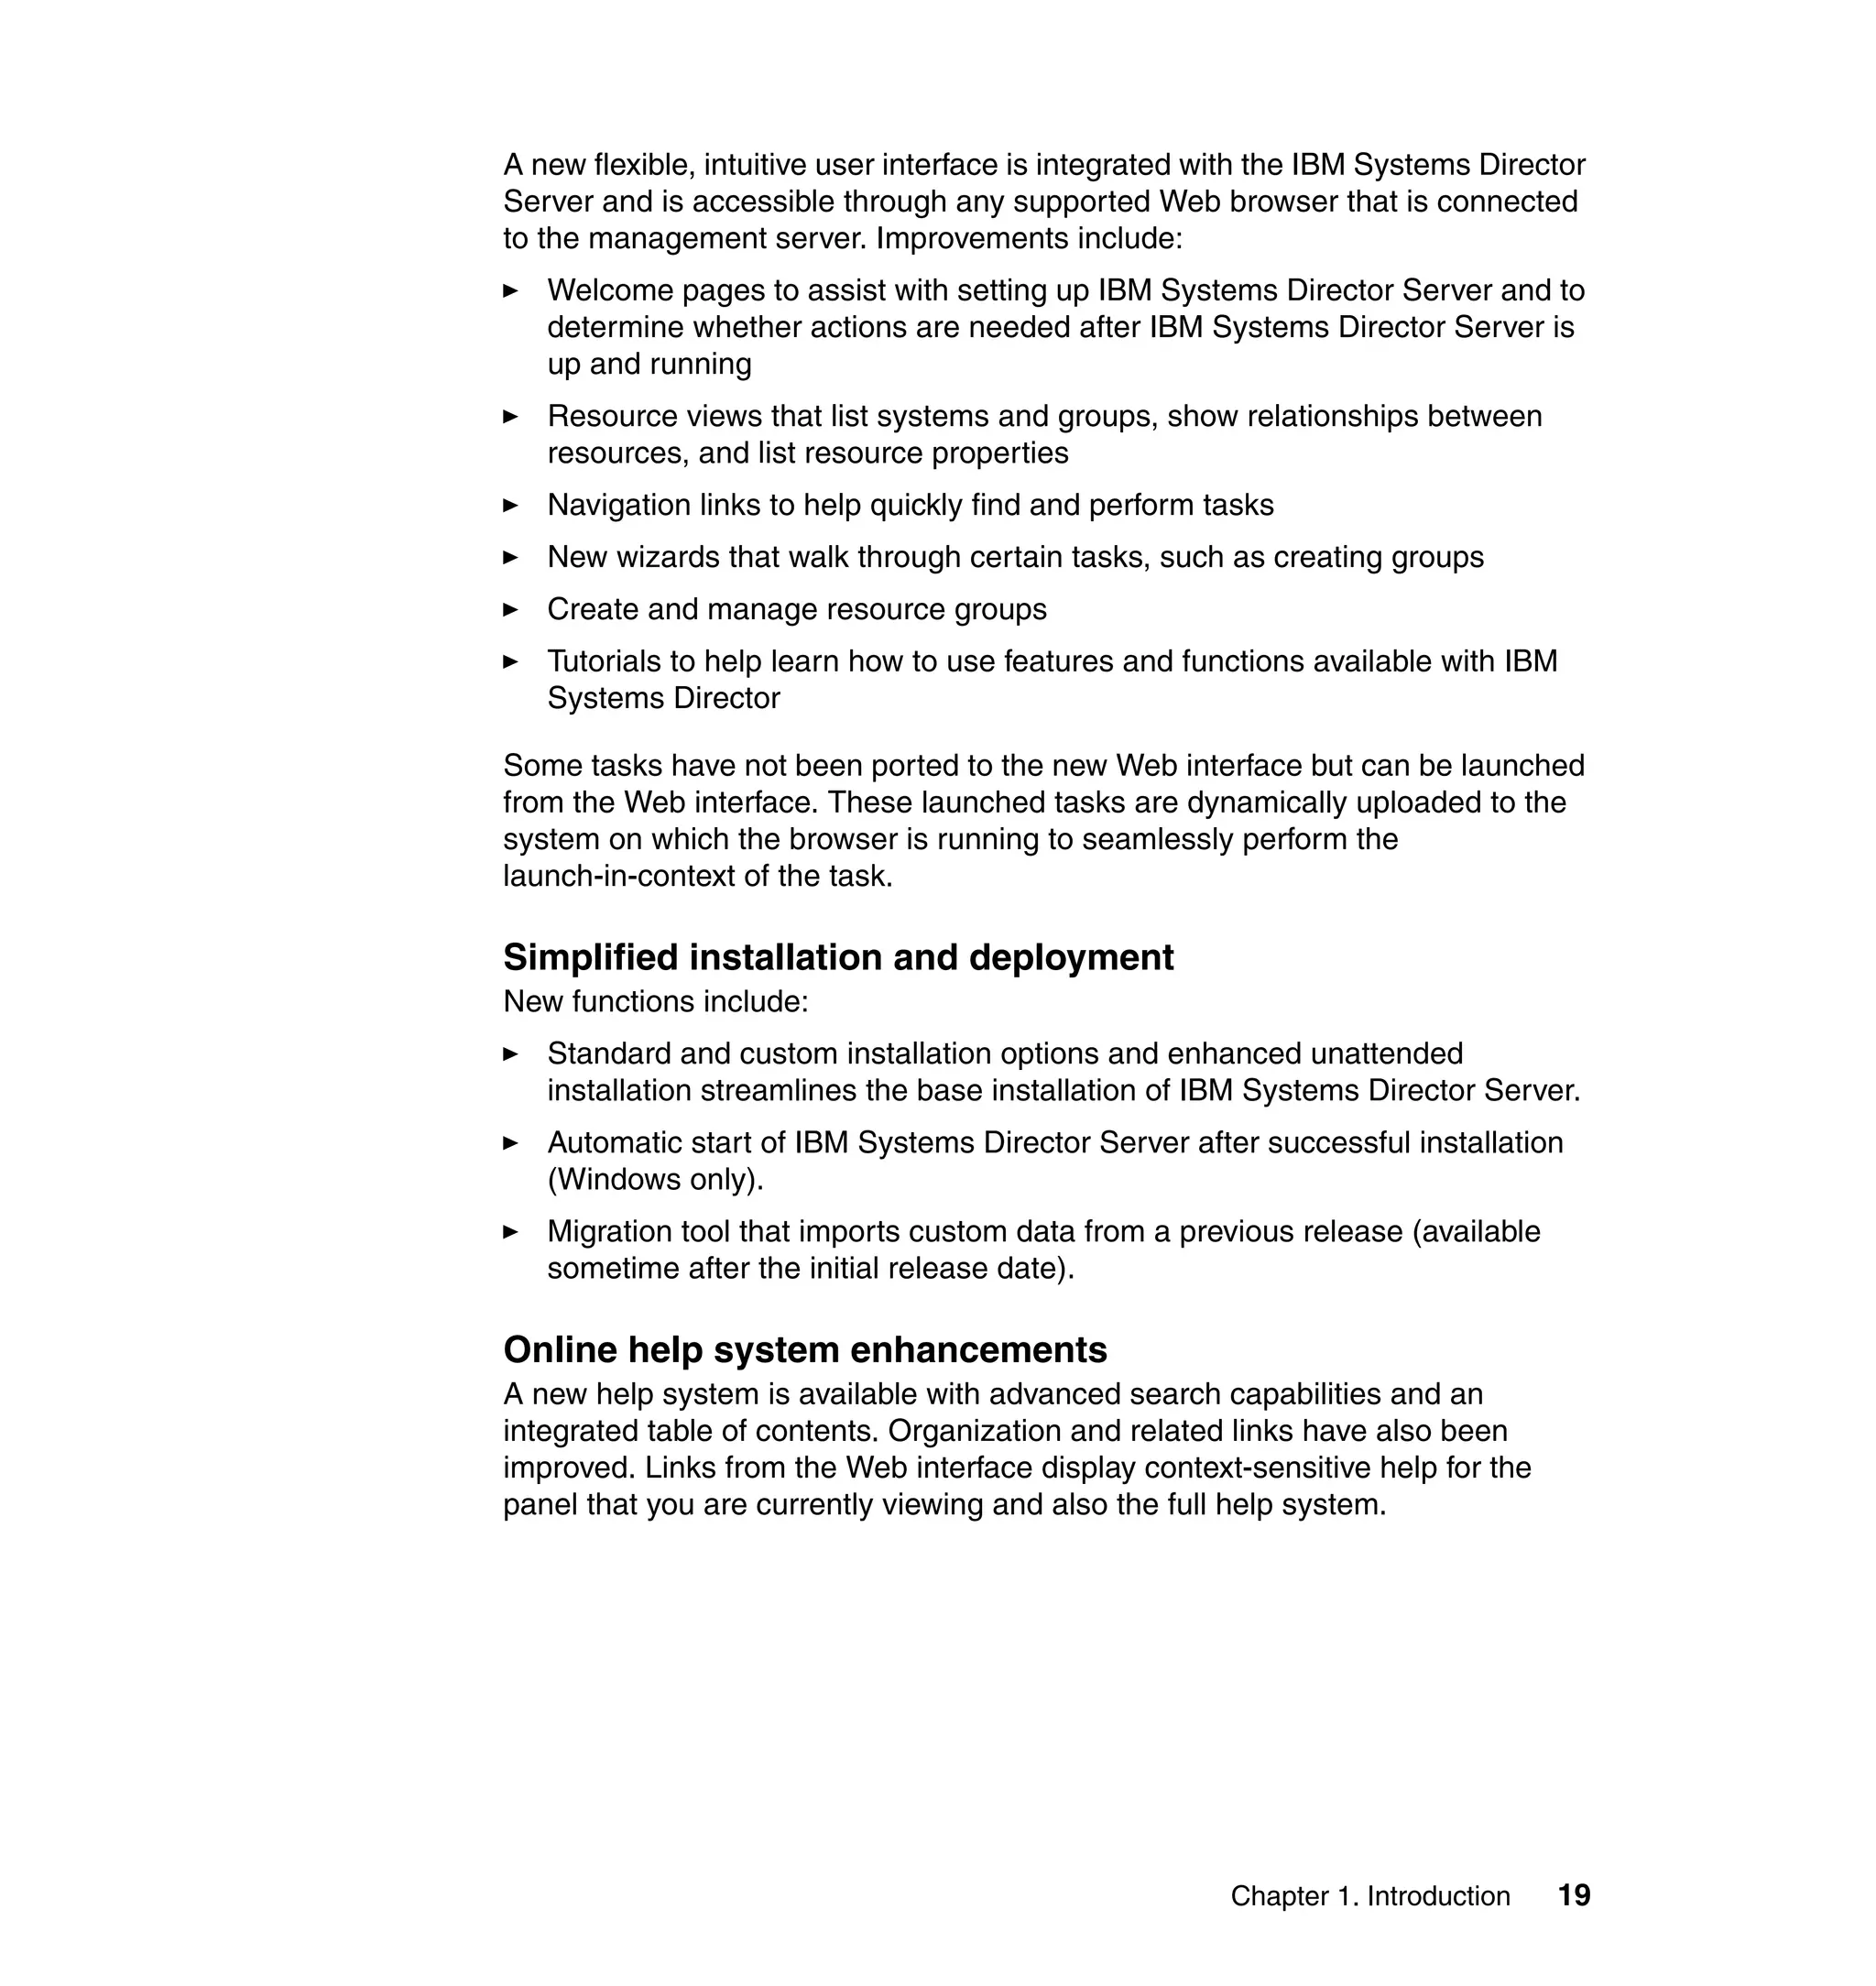
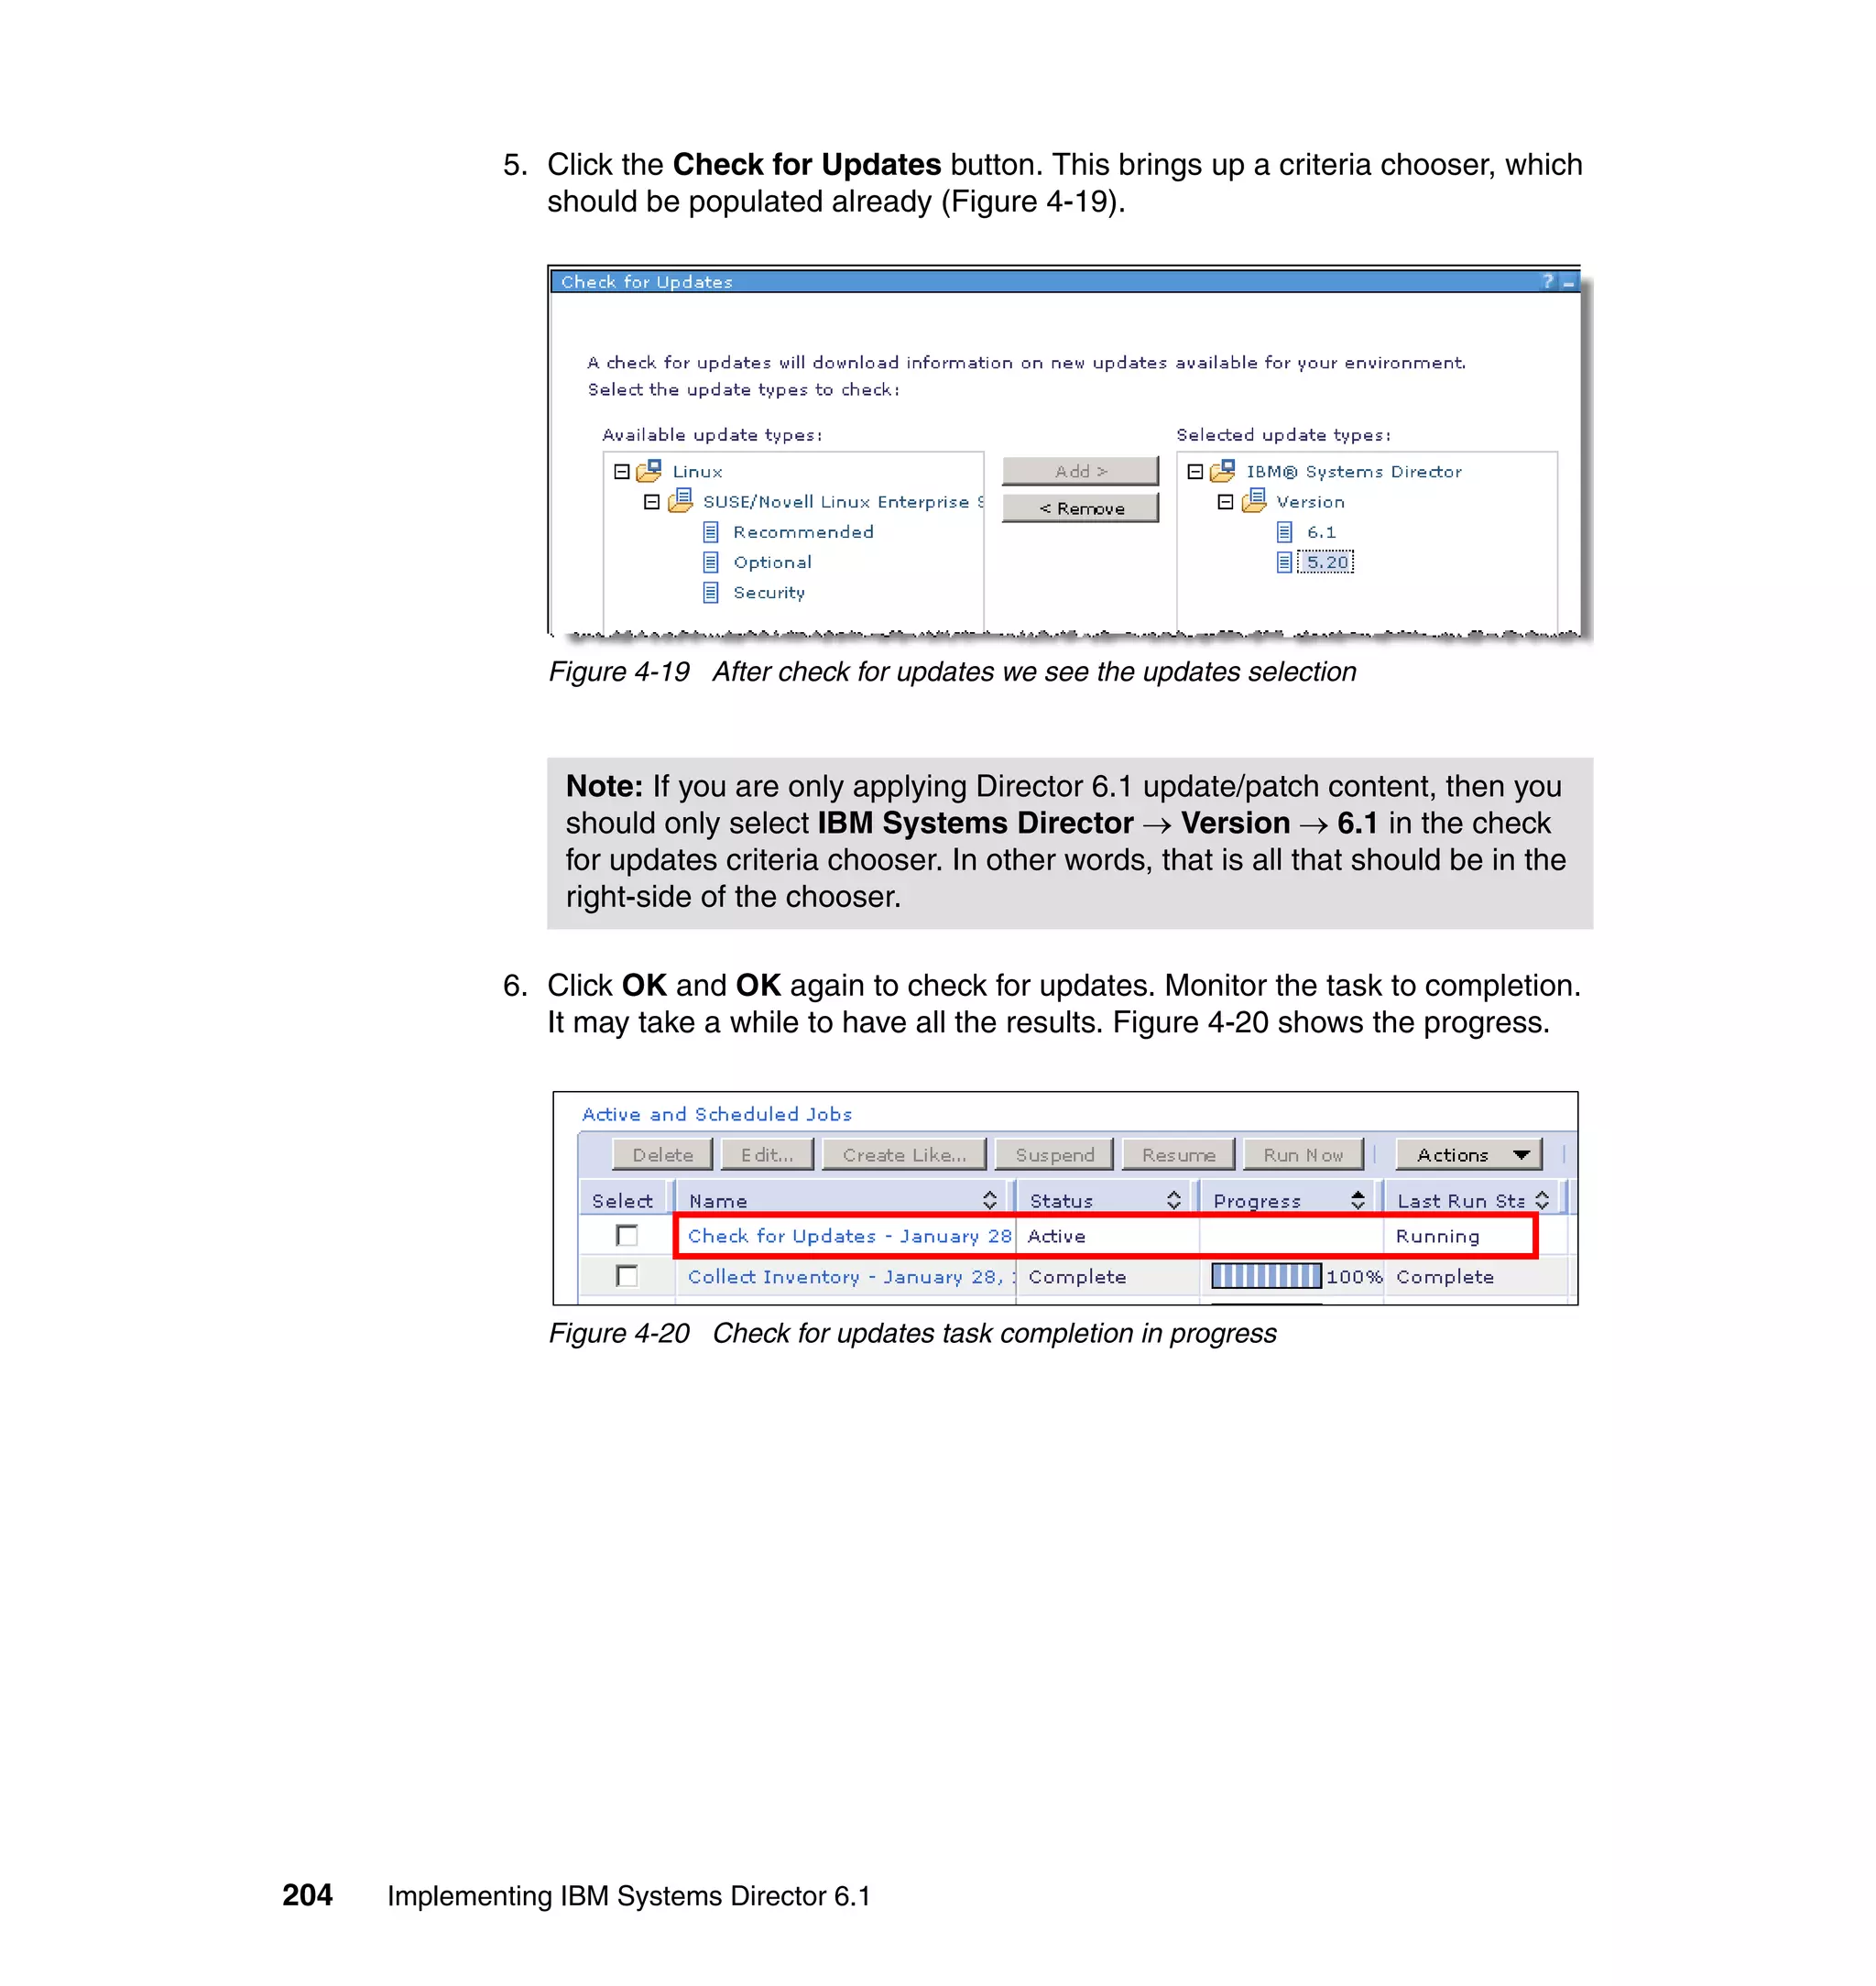
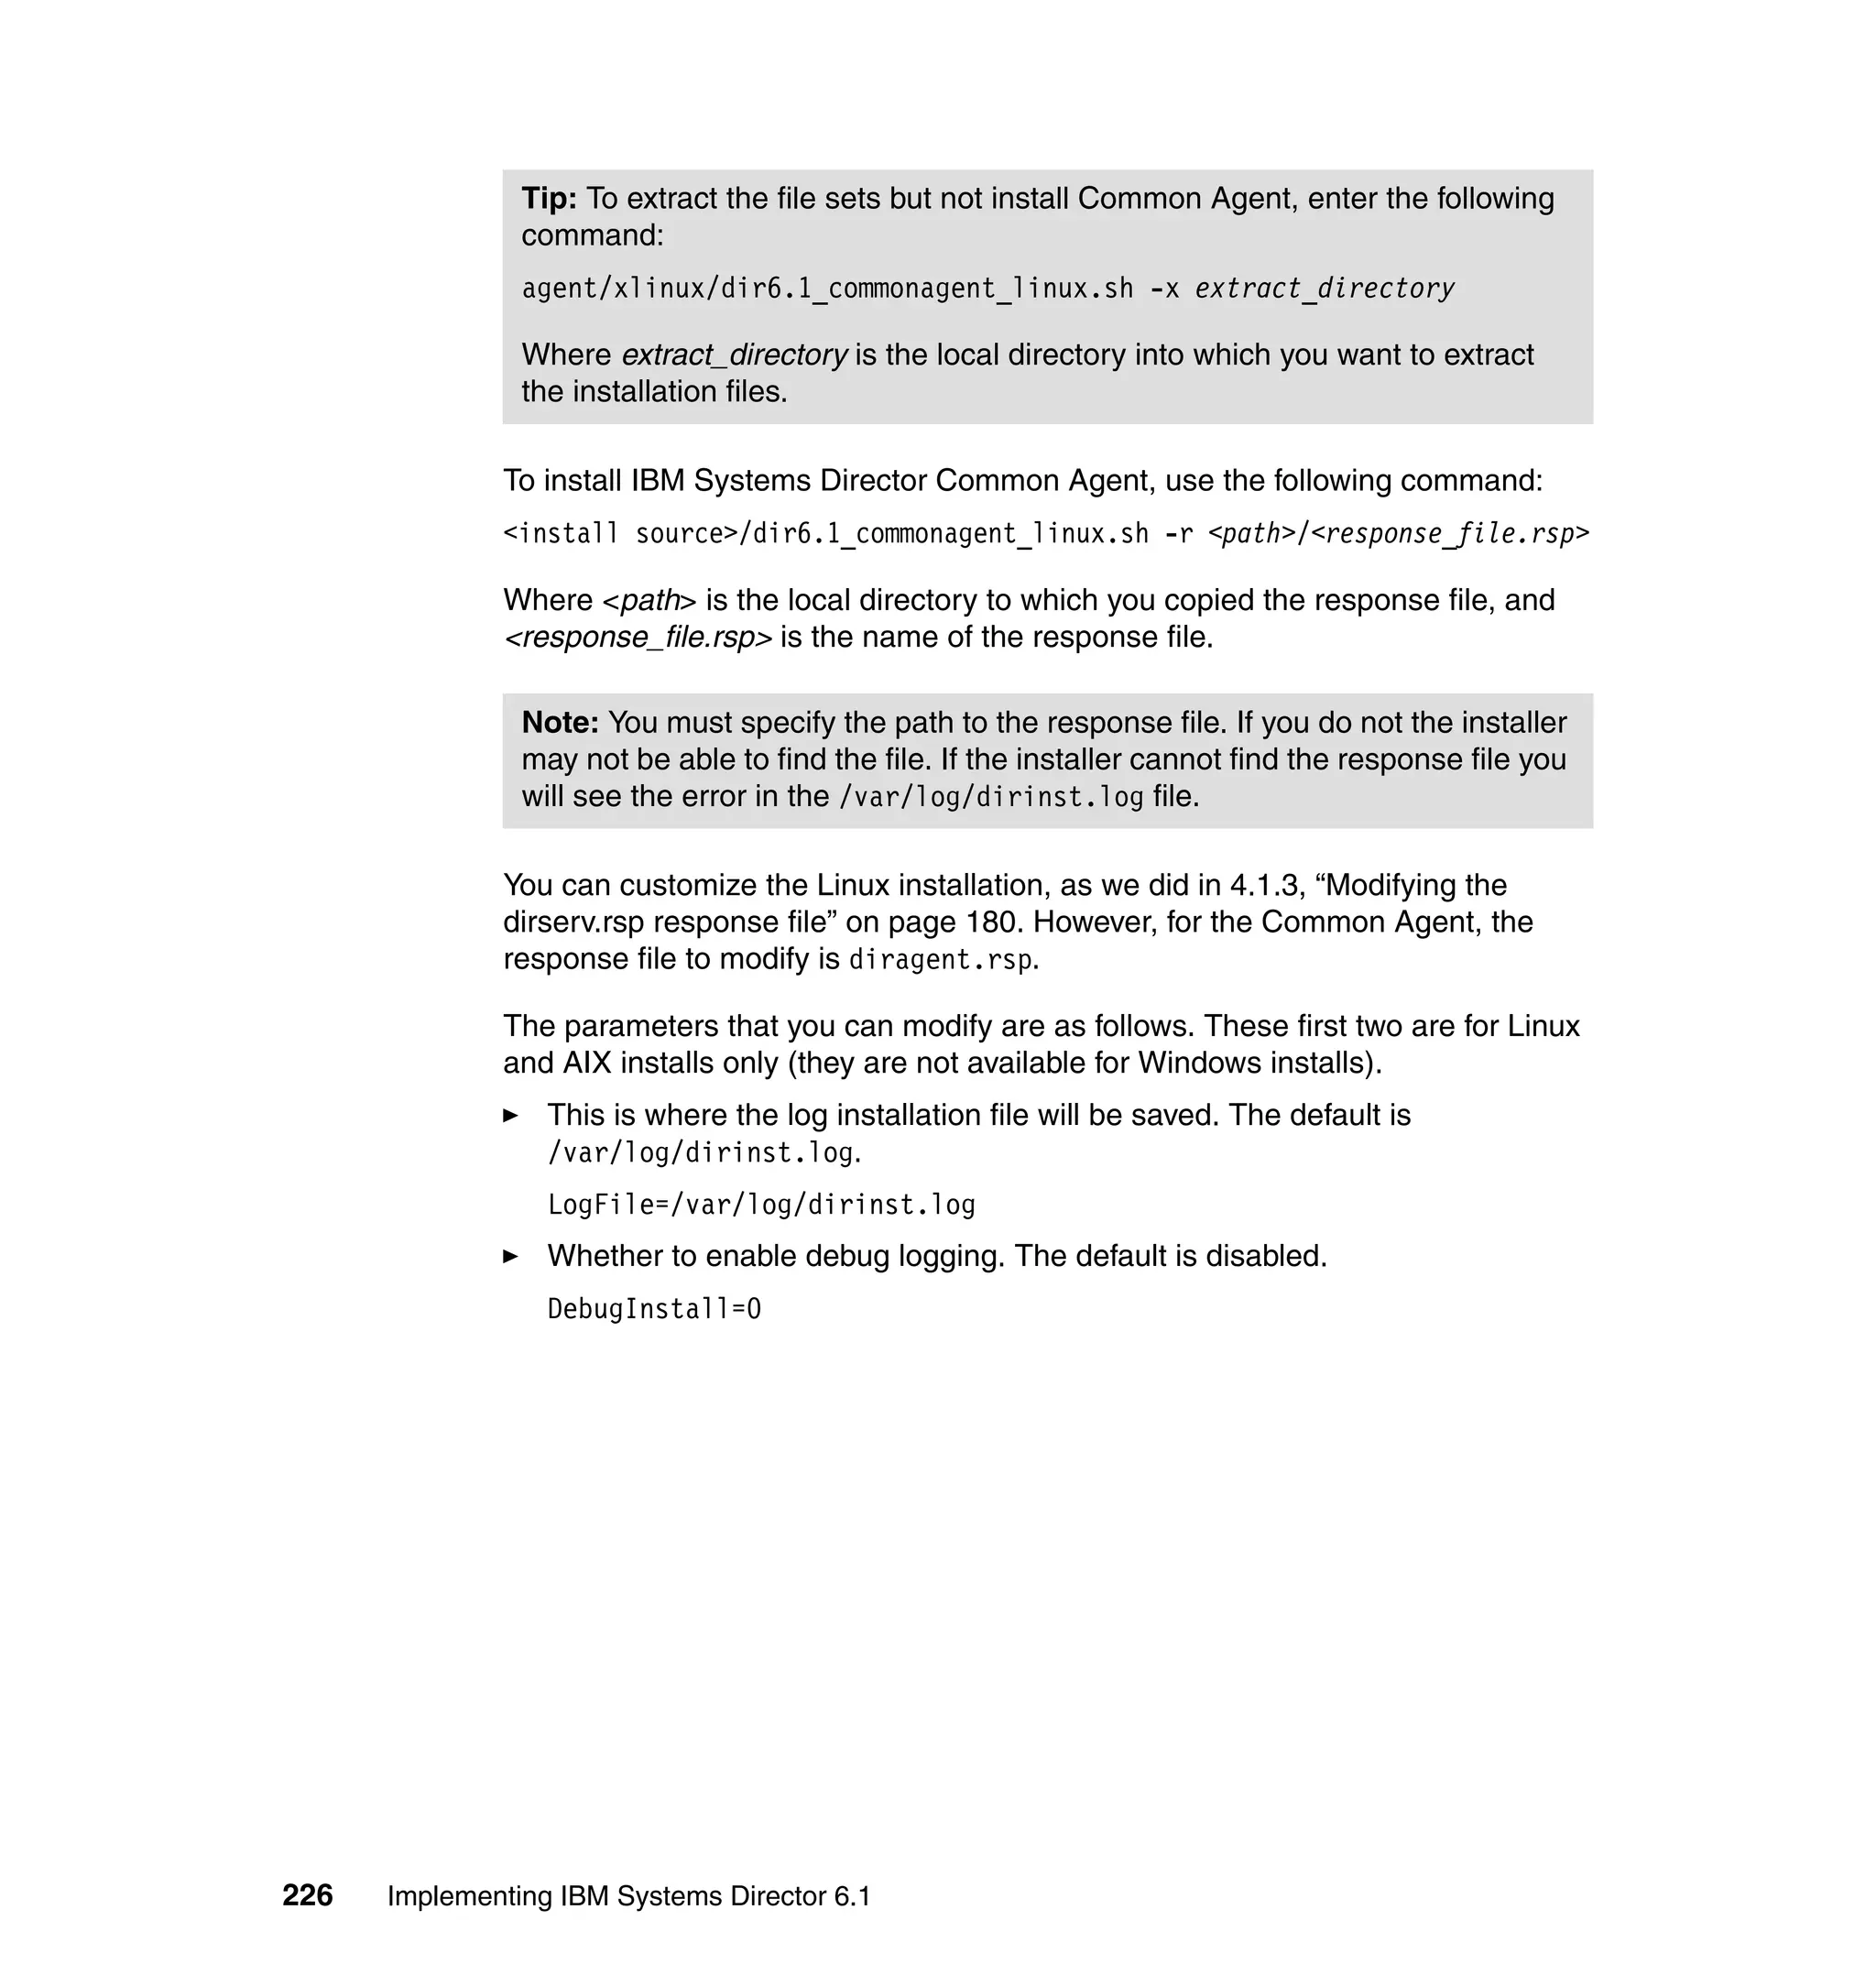
4.6.3 Installing Common Agent on Linux and AIX
To install IBM Systems Director Common Agent using the default settings in
Linux on System x, and Linux or AIX on System p, use the following packages:
Installation packages for AIX
– SysDir6_1_Common_Agent_AIX.tar.gz (for script installation)
– SysDir6_1_Server_Agent_Installp_AIX.tar.gz (for installp or NIM
installation)
– SysDir6_1_Common_Agent_AIX.tcdriver (agent package for Agent
Installation Wizard installation)
Installation packages for Power Linux
– SysDir6_1_Common_Agent_Linux_Power.tar.gz
– SysDir6_1_Common_Agent_Linux_Power.tcdriver (agent package for
Agent Installation Wizard installation)
Installation packages for Linux on System x or x86
– SysDir6_1_Common_Agent_Linux_x86.tar.gz
– SysDir6_1_Common_Agent_Linux_x86.tcdriver (agent package for Agent
Installation Wizard installation)
Log in as the root user and run the following command:
dir6.1_commonagent_<LinuxPackage>.sh
Where <LinuxPackage> represents any of the particular packages supported by
the platform and the operating system. The script runs and installs all the
Common Agent products, as shown in Example 4-7.
Example 4-7 Installing the Common Agent for Linux and AIX
[root@xnv9167]# ./dir6.1_commonagent_linux.sh
./dir6.1_commonagent_linux.sh self-extracting installation
program... Please wait...
(The installation process continues until it finish in this way:)
Installation of selected components is successful.
Attempting to install Common Agent Services.
Note: You can perform a standard installation, install using installp or
Network Installation Management (NIM), or you can use a response file to
customize the installation for your organization.](https://image.slidesharecdn.com/implementingibmsystemdirectory6-151014004841-lva1-app6892/75/BOOK-IBM-Implementing-ibm-system-directory-6-1-248-2048.jpg)
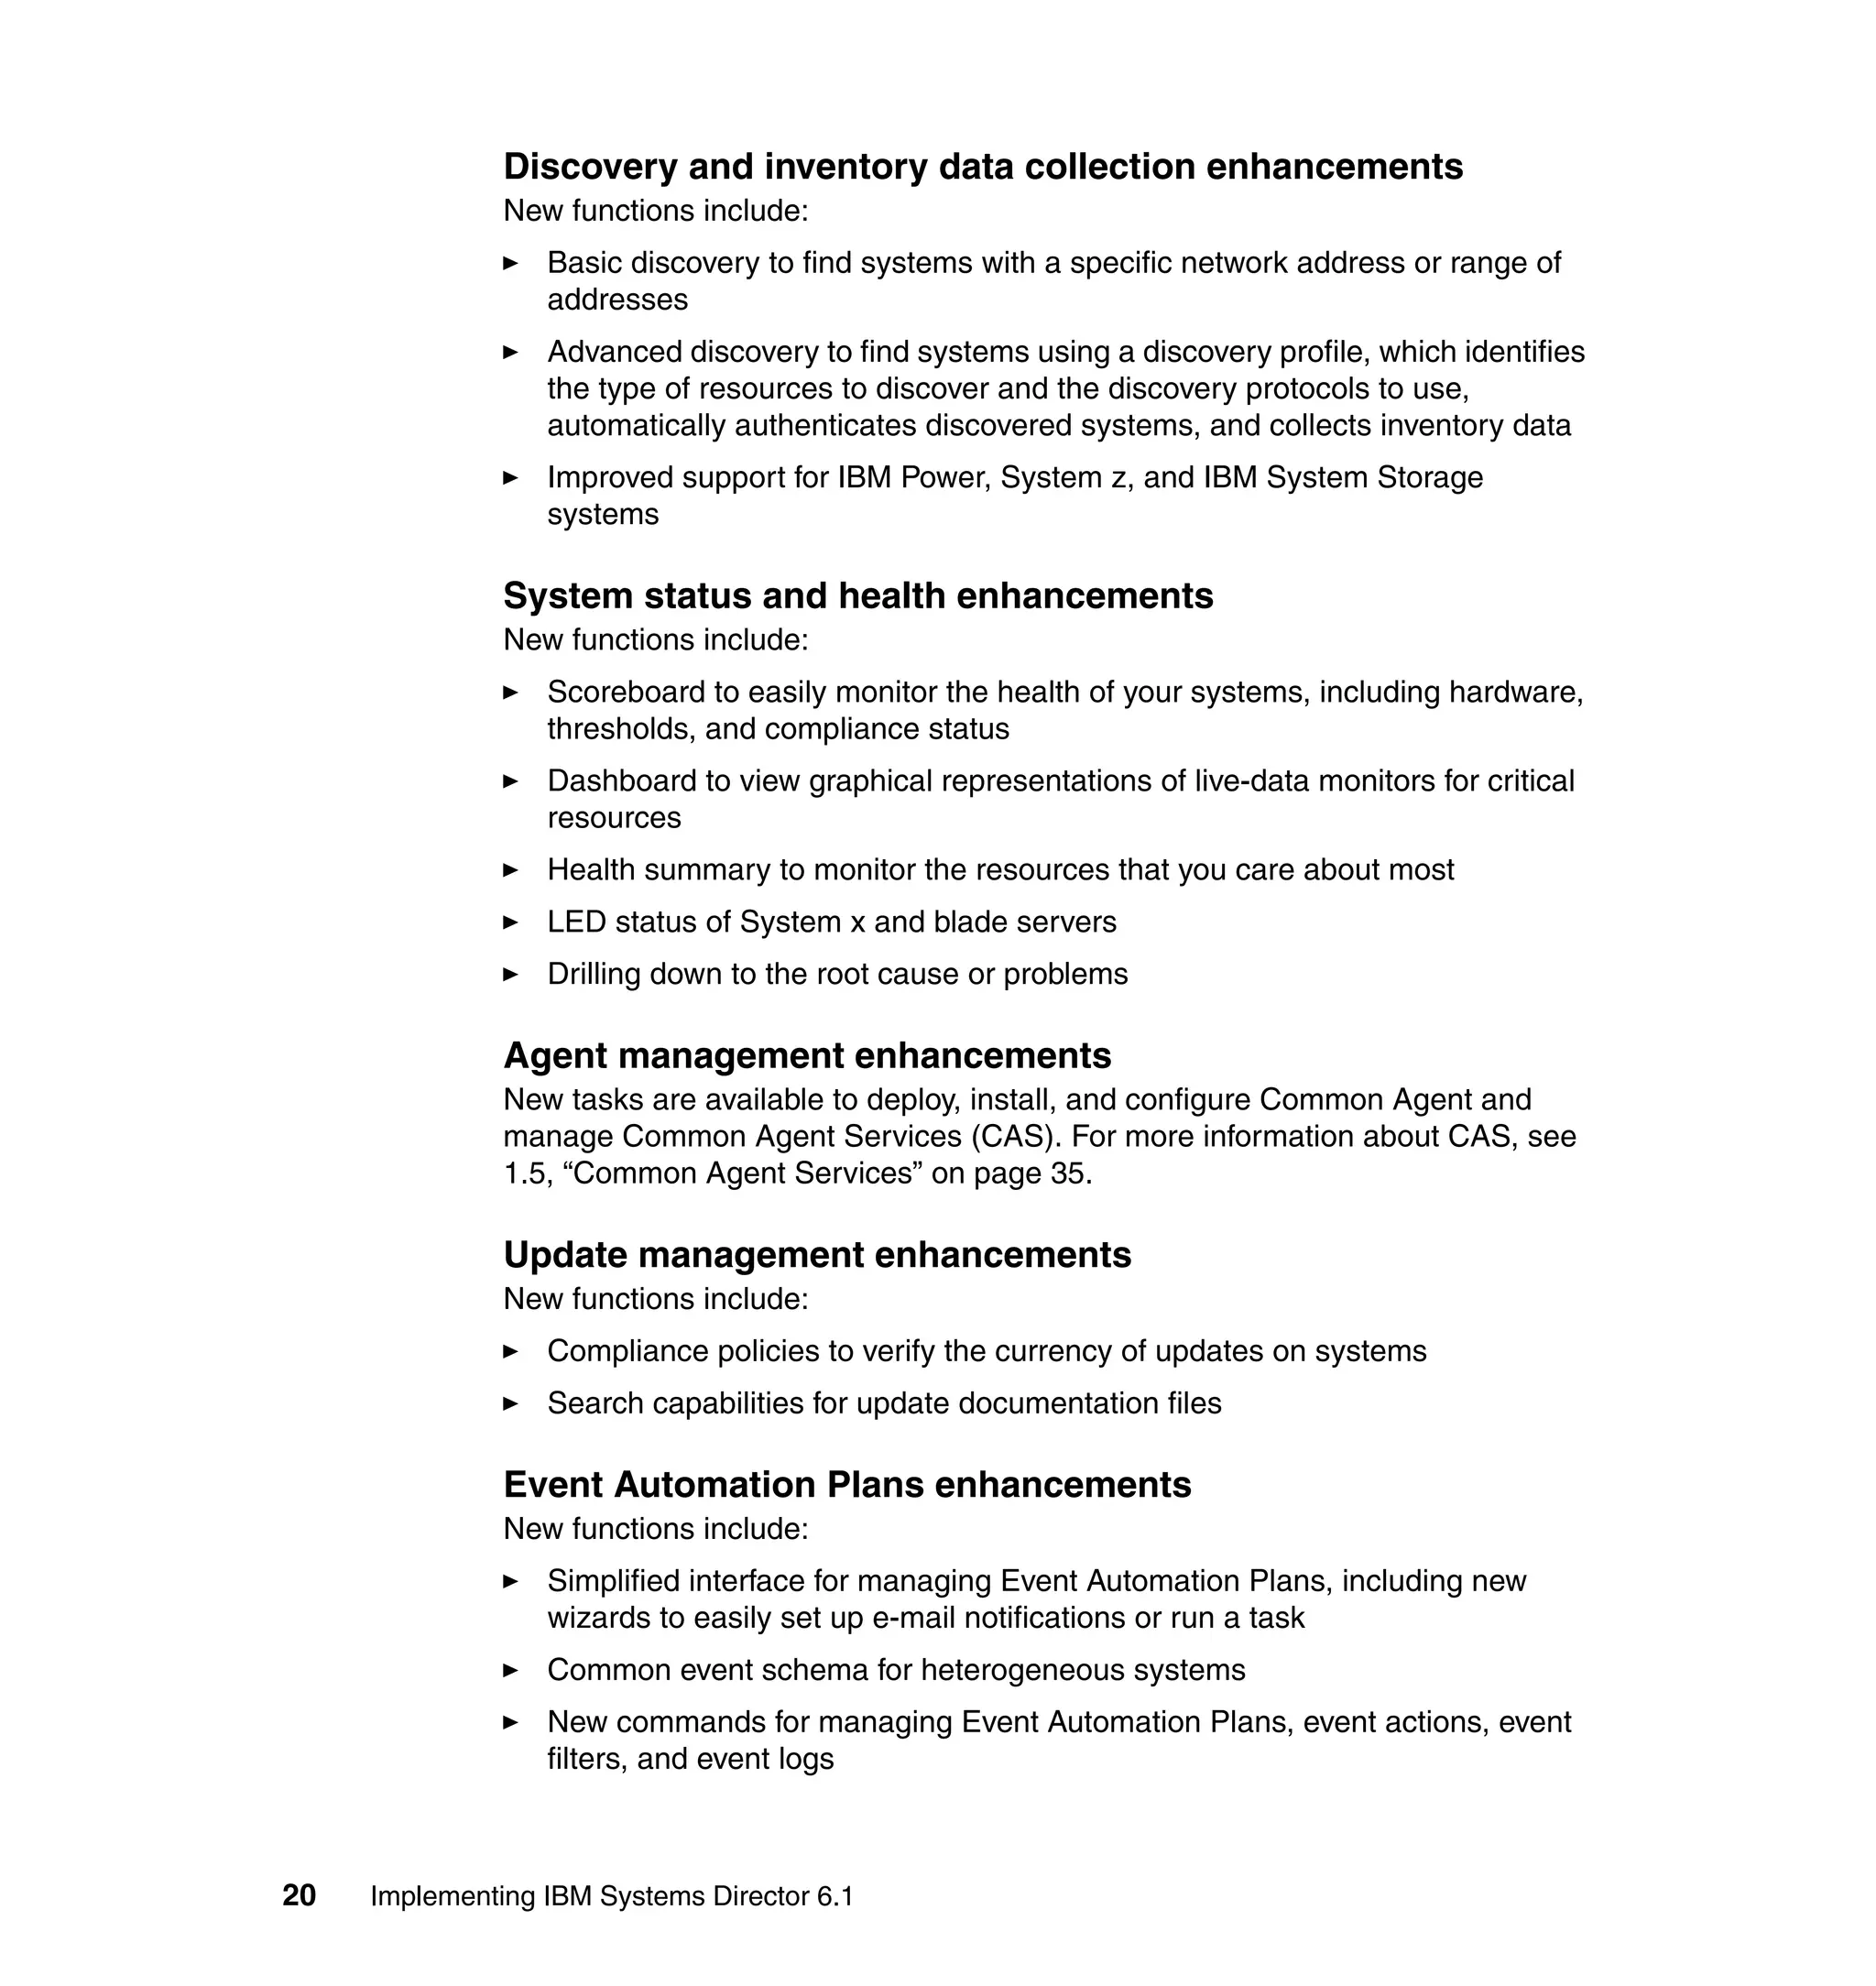
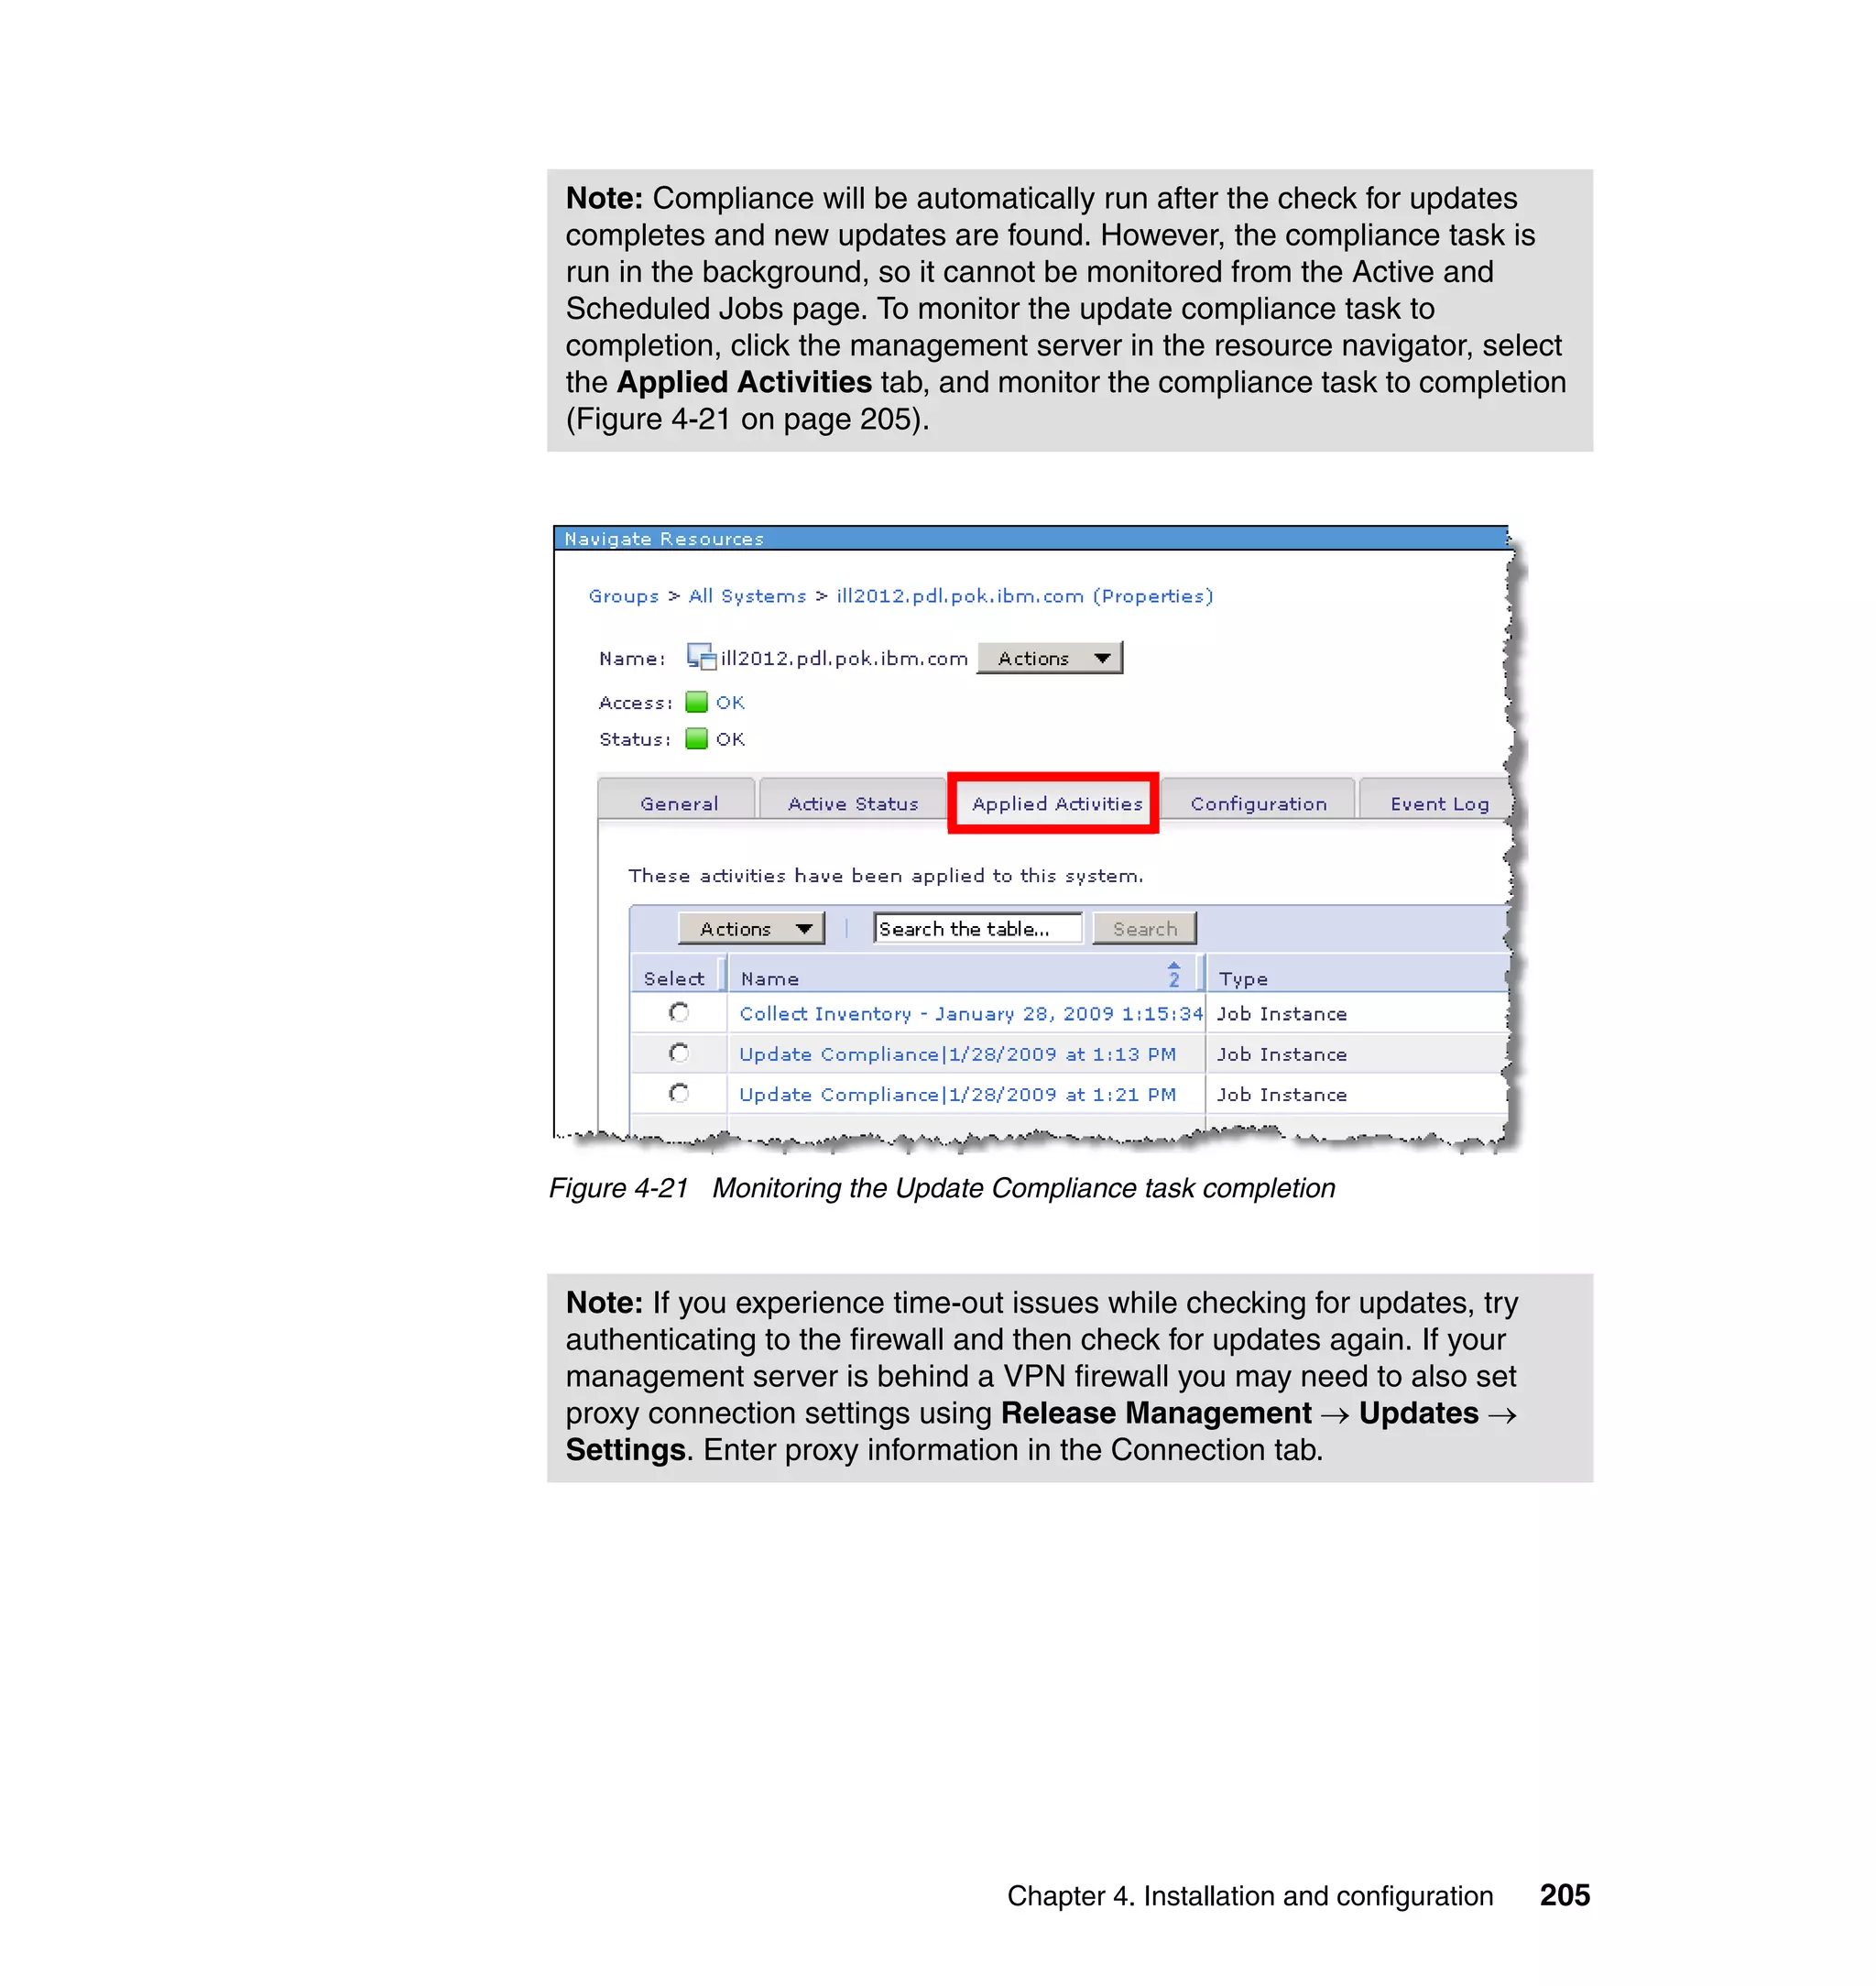
![Chapter 4. Installation and configuration 225
Preparing...
########################################### [100%]
1:ISDCommonAgent
########################################### [100%]
Attempting to install features.
Restarting the agent runtime.
Feature installation complete.
Configuring VMware firewall
Restarting the agent runtime.
Installation of IBM Systems Director Agent completed successfully.
[root@xnv9167]#
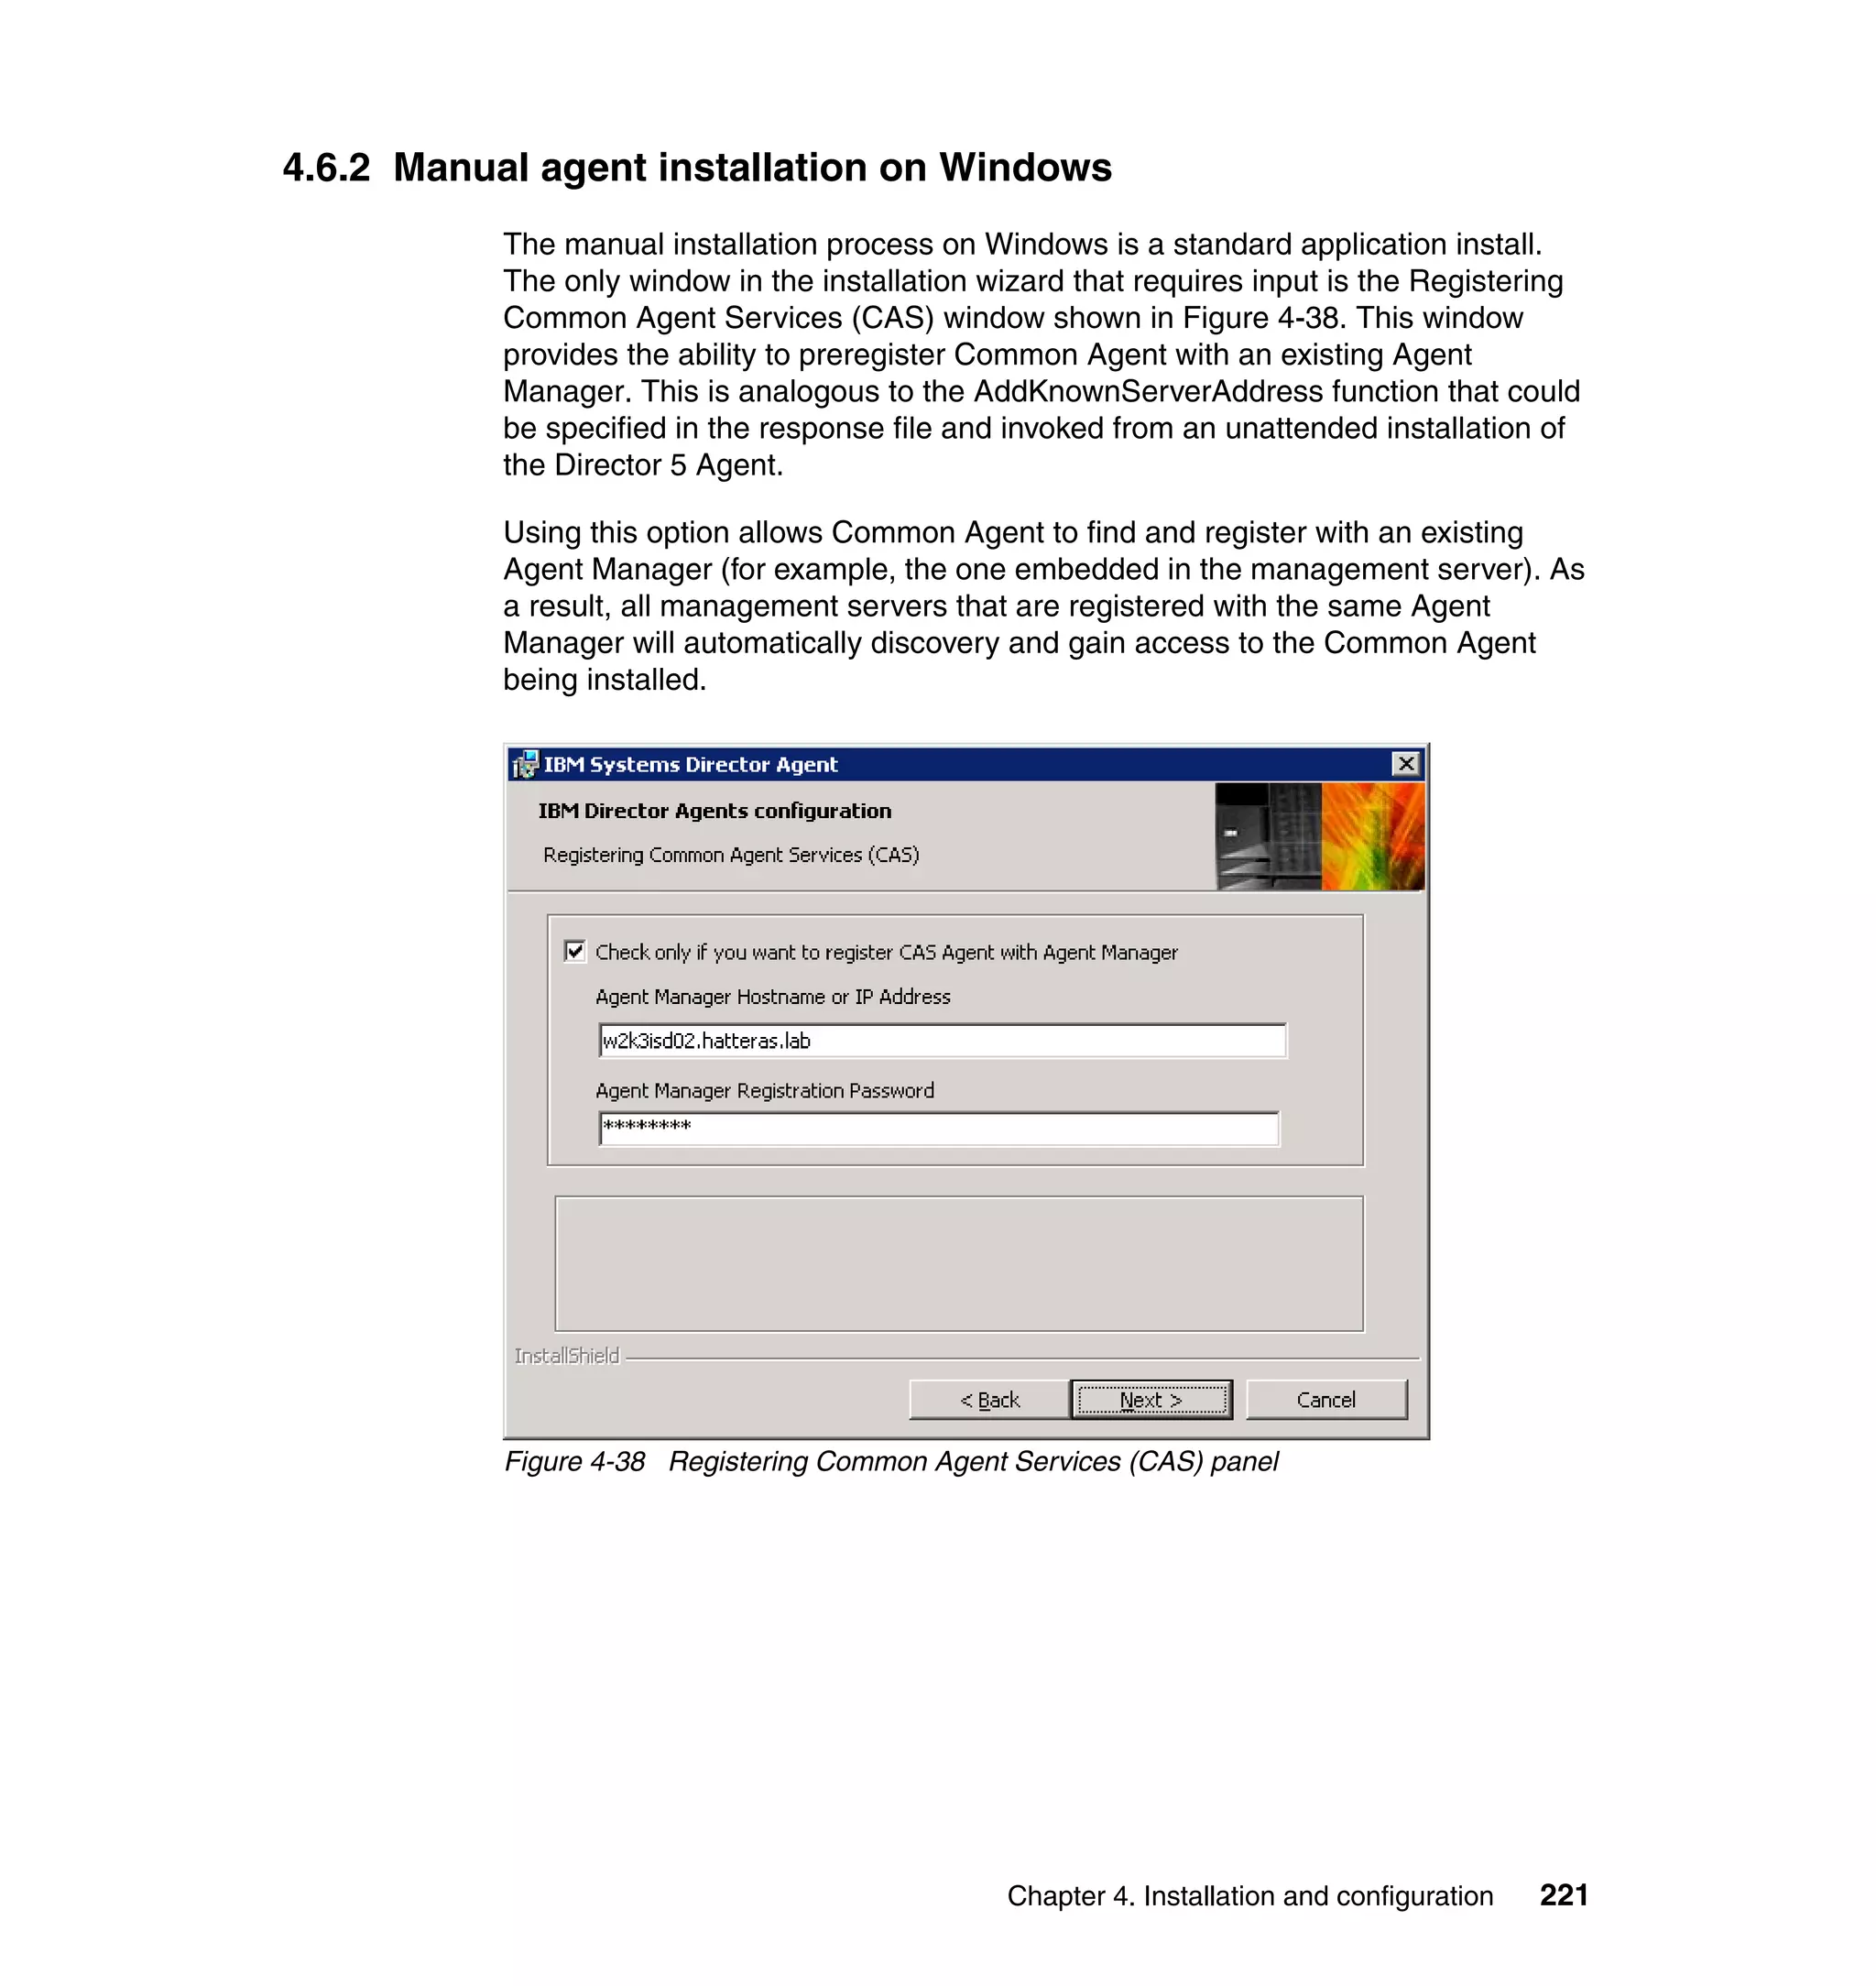
You use the same script to perform scripted installs, as described in 4.6.4,
“Unattended Common Agent installation” on page 225.
4.6.4 Unattended Common Agent installation
It is possible to use a response file to perform an unattended installation of
Common Agent. The response file is used to set the switches used to configure
several options during installation.
Linux and AIX
If you download the Common Agent from the IBM Systems Director 6.1 Web
download page it is in a compressed tar.gz file. Simply unpack these files before
starting your customization. The Common Agent that is delivered on the DVD (or
in the DVD ISO image) is in a self-extracting shell script for Linux and AIX.
To extract the contents of the installation package, type the following command:
tar -xvf install_package
Where install_package is the file name of the downloaded installation package.
To see a list of the different kinds of packages for AIX and Linux refer to 4.6.3,
“Installing Common Agent on Linux and AIX” on page 224.
Notes: The response file for a Windows install is different from that of a Linux
install.
There is no Common Agent for IBM i. You must use the Platform Agent
instead.](https://image.slidesharecdn.com/implementingibmsystemdirectory6-151014004841-lva1-app6892/75/BOOK-IBM-Implementing-ibm-system-directory-6-1-249-2048.jpg)


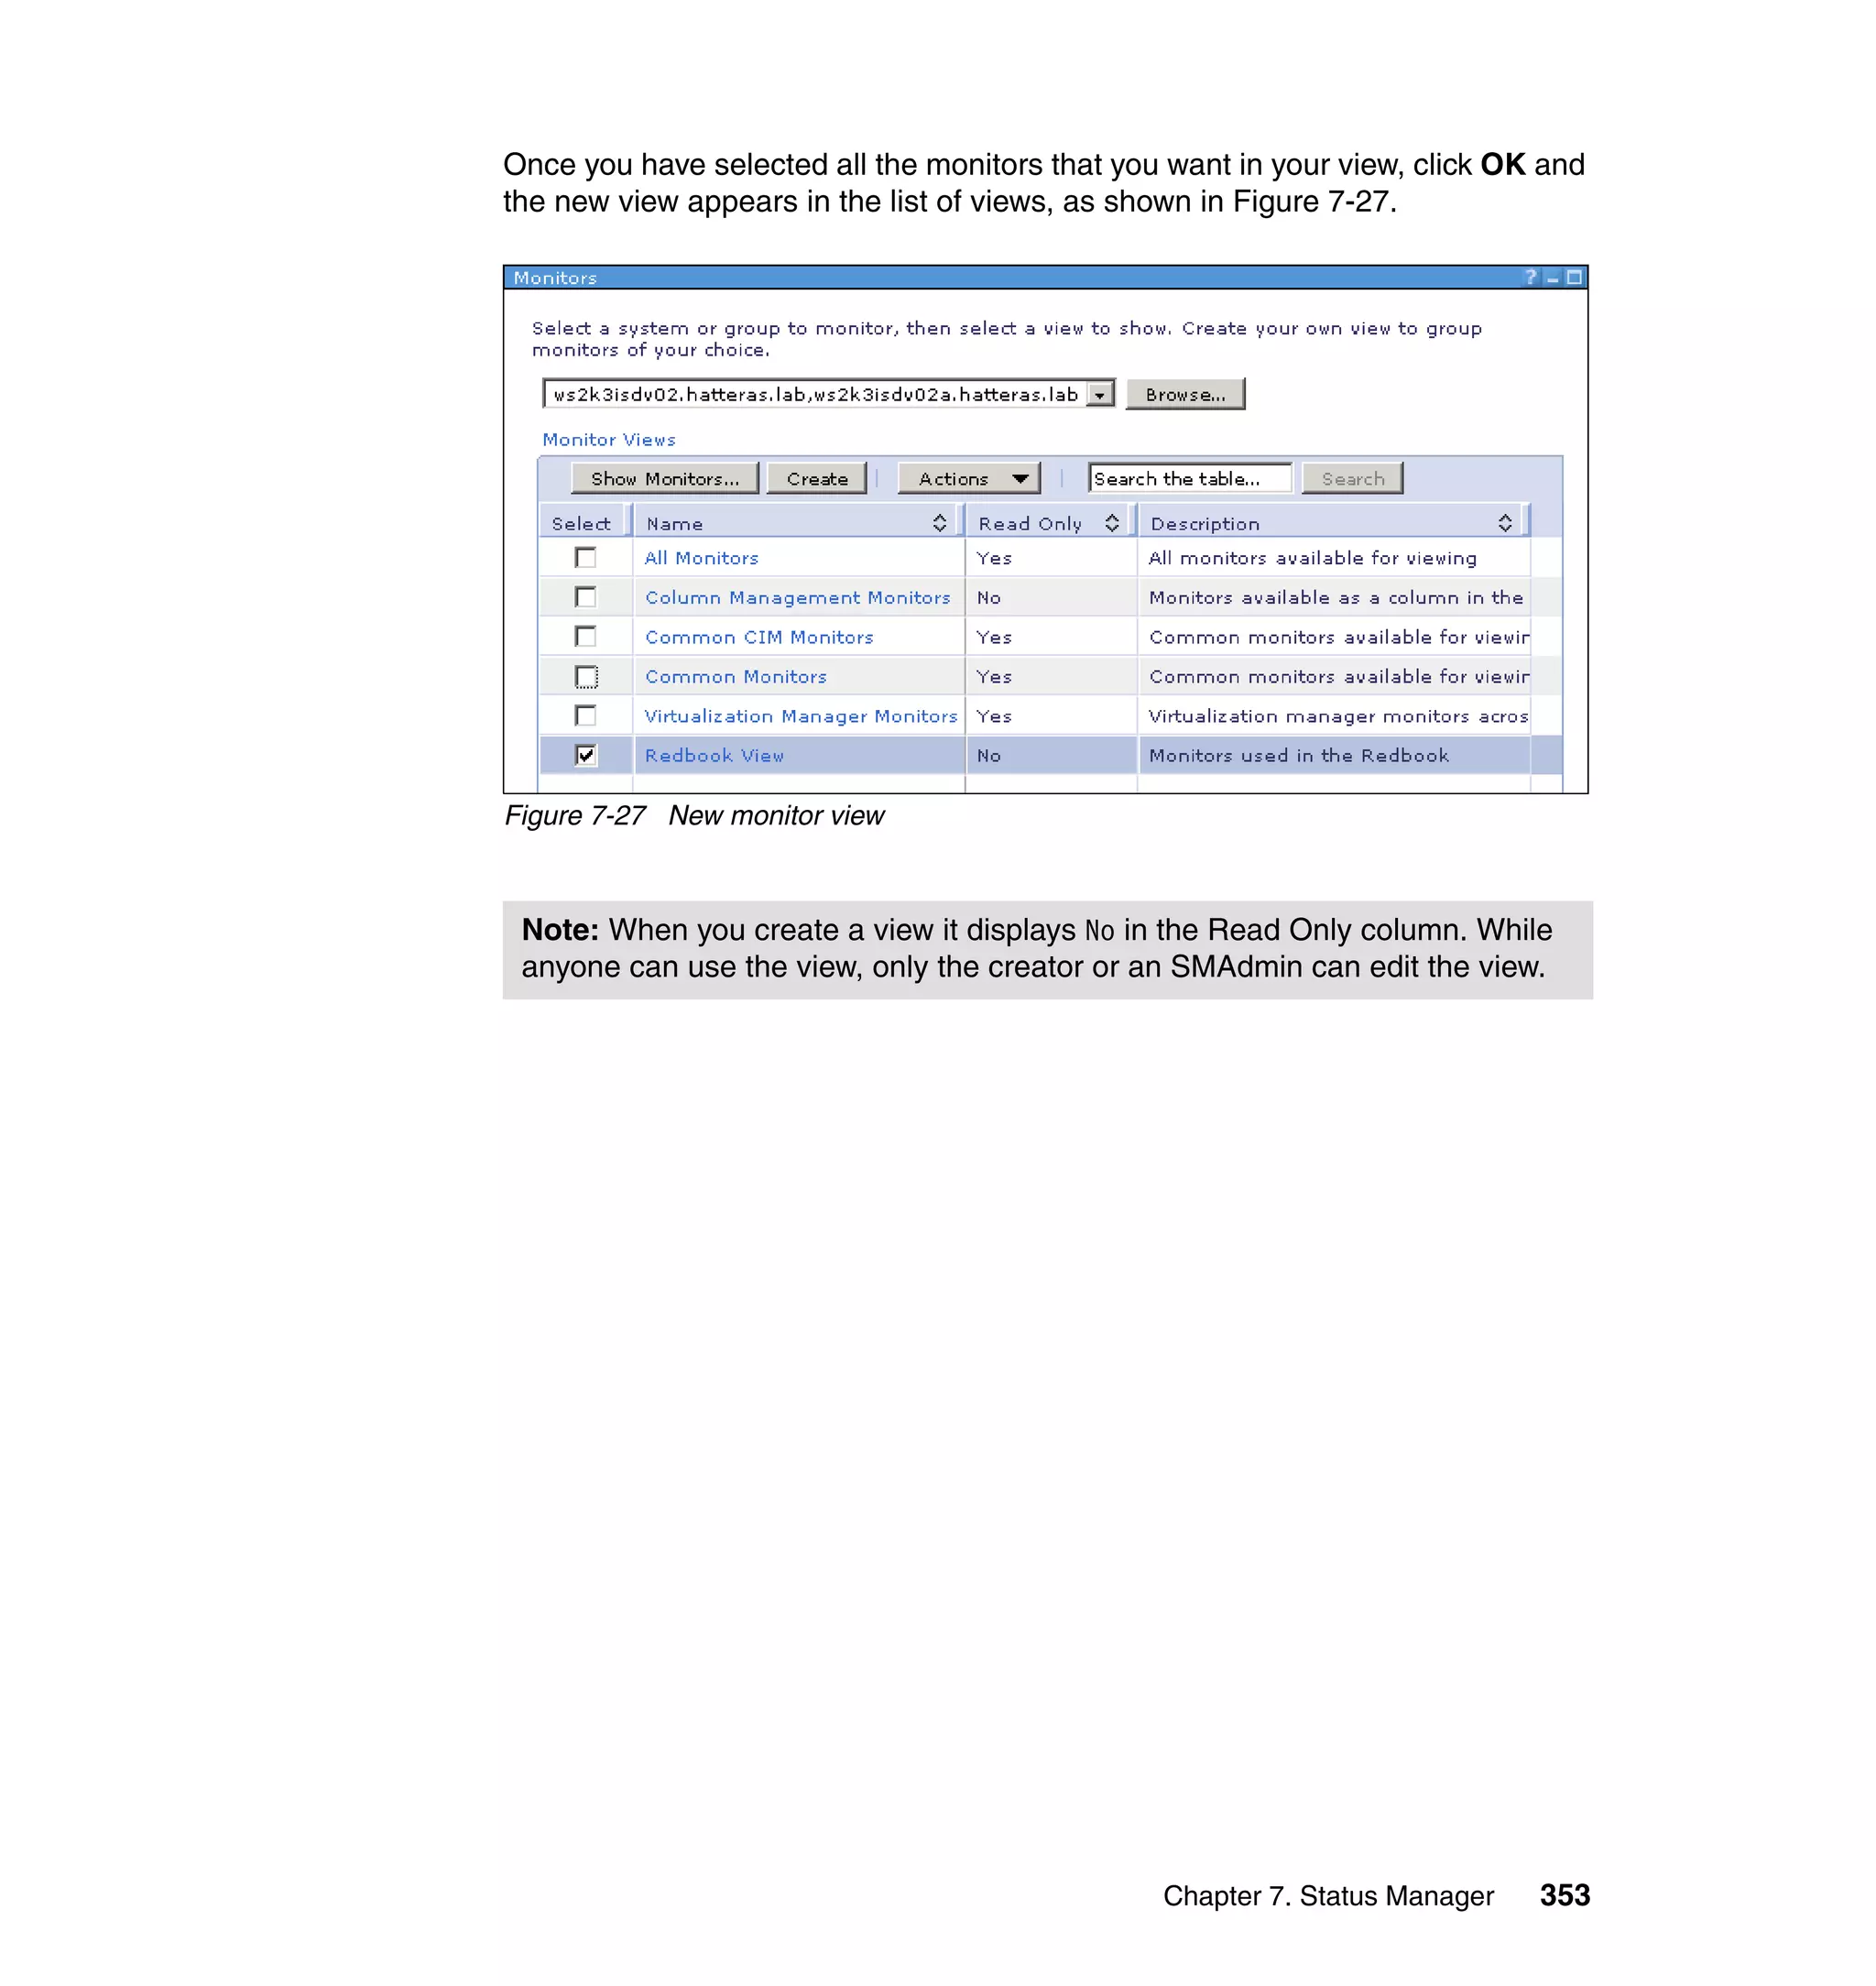

![Chapter 7. Status Manager 369
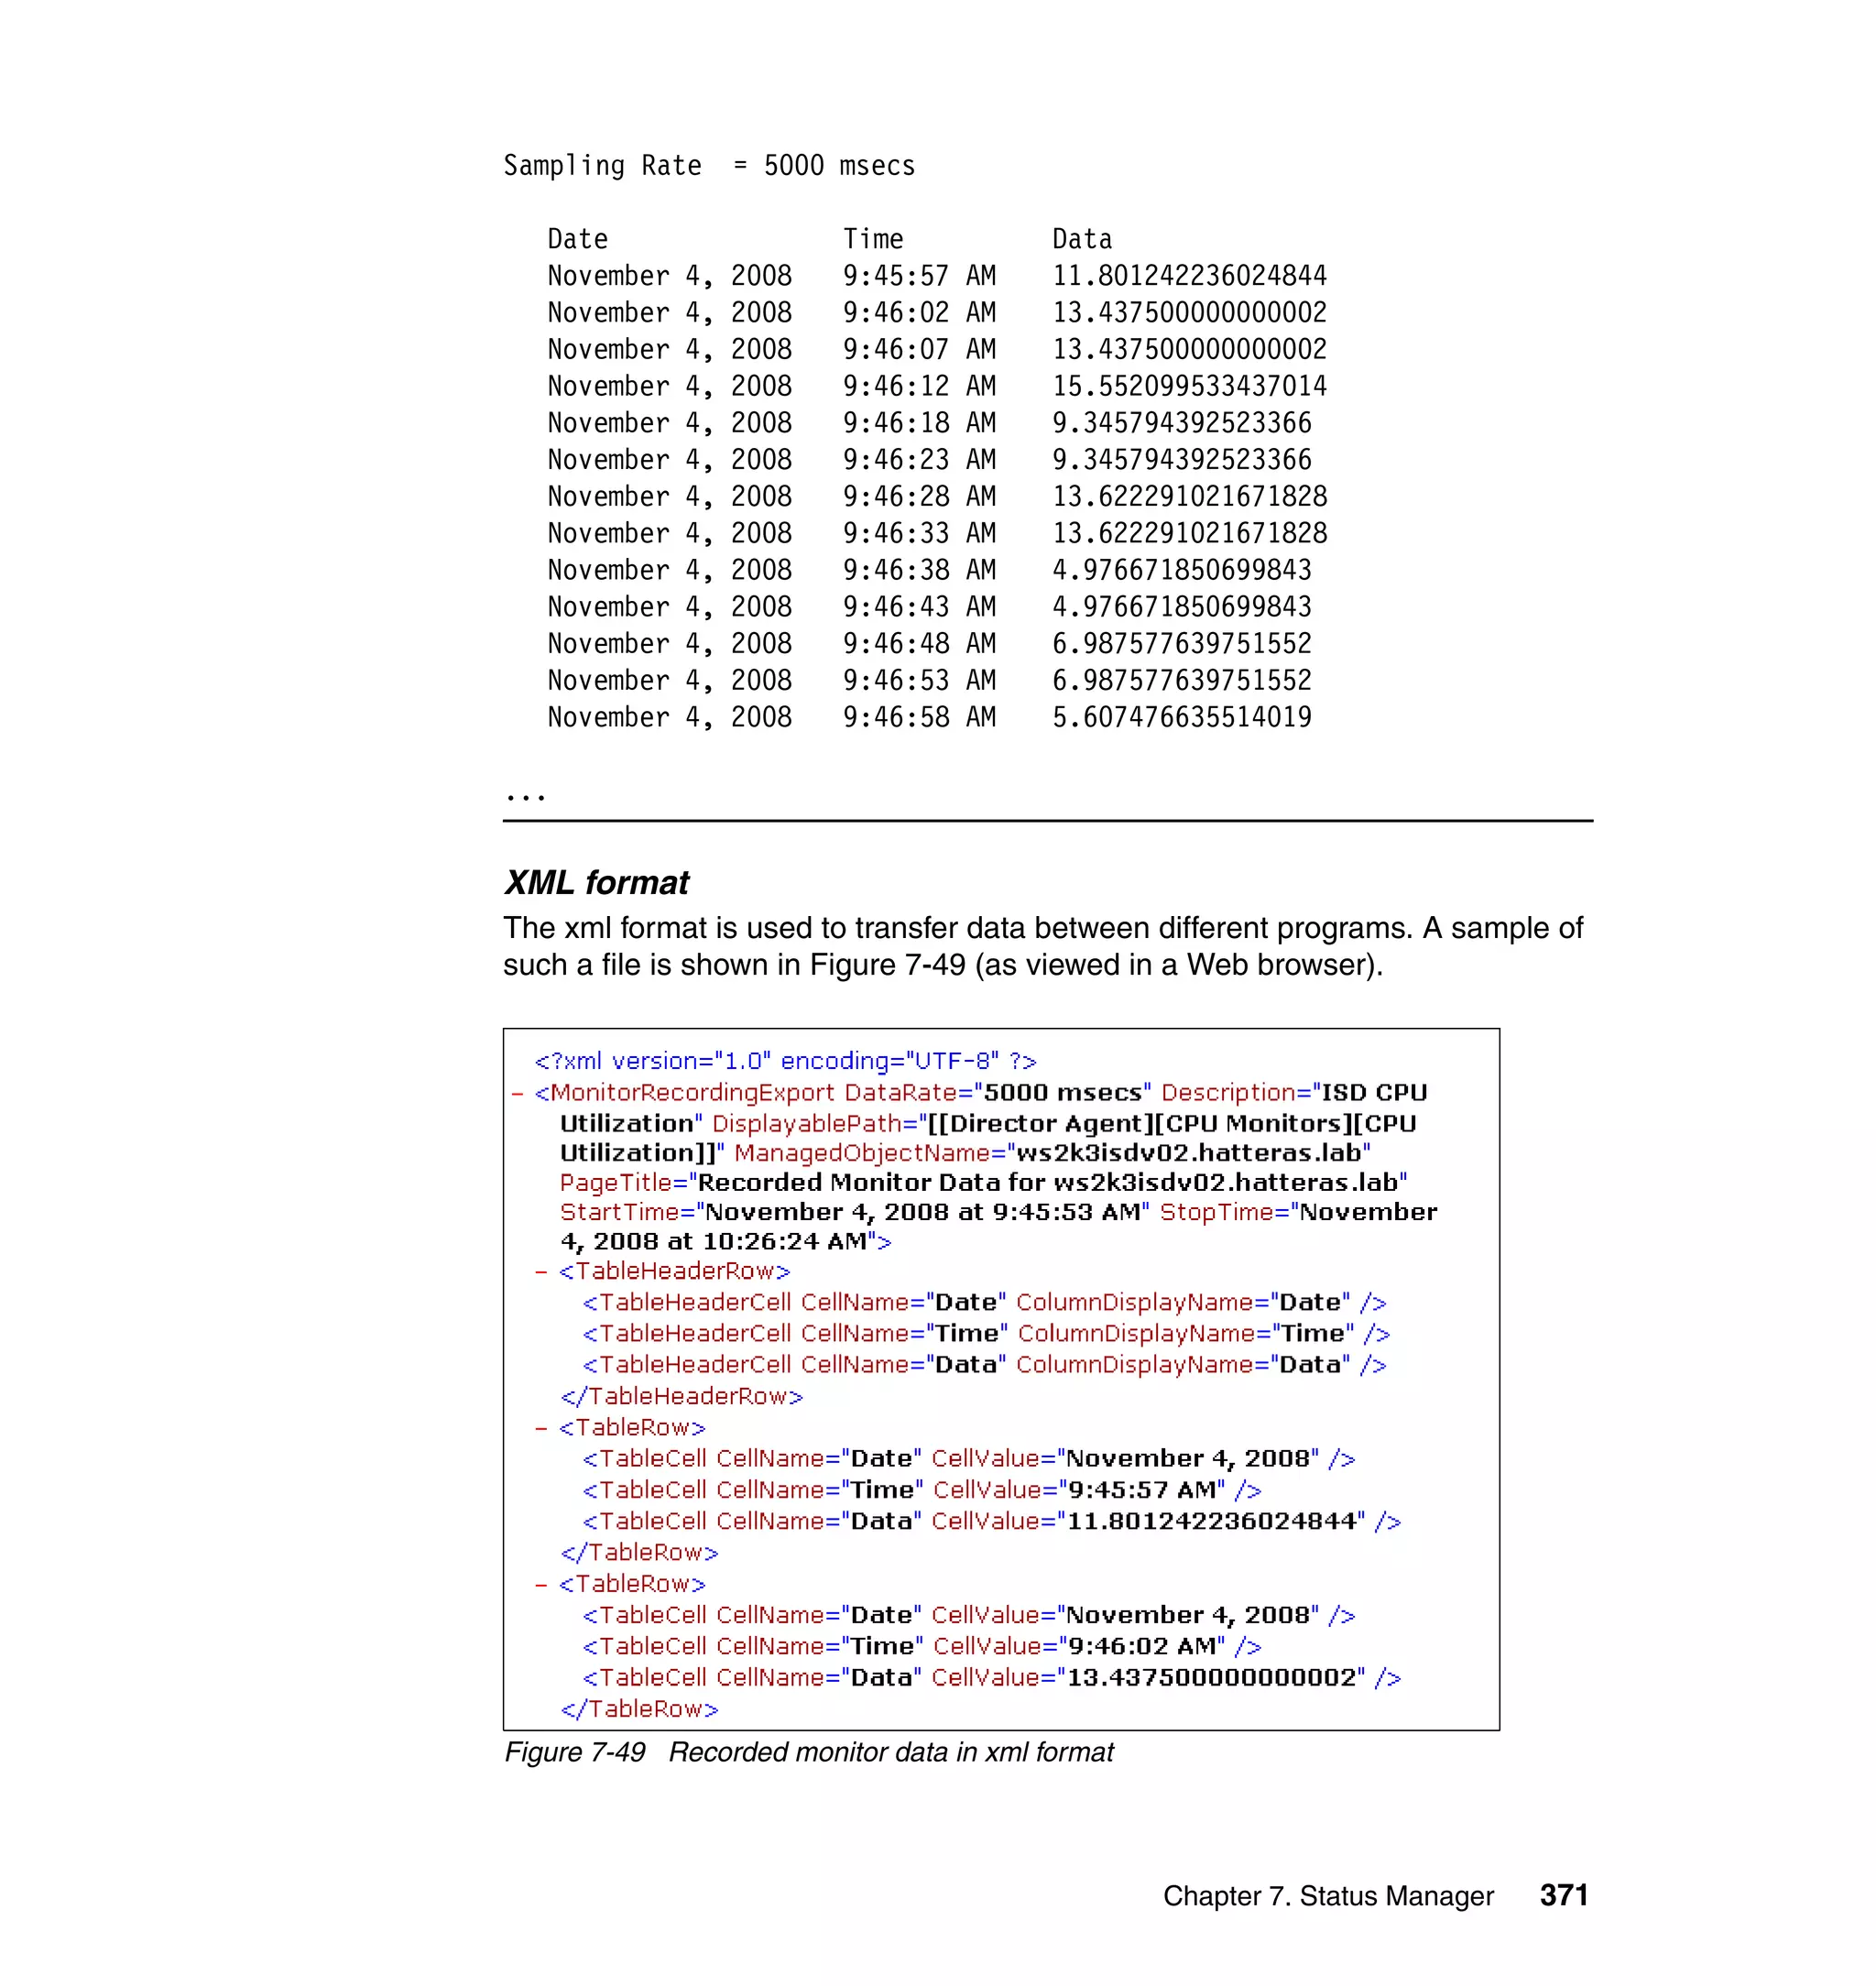
CSV format
This format is most commonly used to import data into different analysis
programs, databases, and spreadsheets. Data exported as a csv file will look
similar to that shown in Example 7-1.
Example 7-1 Monitor Recording csv file
"Machine Name = ws2k3isdv02.hatteras.lab","",""
"Attribute Path = [[Director Agent][CPU Monitors][CPU Utilization]]","",""
"Description = ISD CPU Utilization","",""
"Start Time = November 4, 2008 at 9:45:53 AM","",""
"Stop Time = November 4, 2008 at 10:26:24 AM","",""
"Sampling Rate = 5000 msecs","",""
"","",""
"Date","Time","Data"
"November 4, 2008","9:45:57 AM","11.801242236024844"
"November 4, 2008","9:46:02 AM","13.437500000000002"
"November 4, 2008","9:46:07 AM","13.437500000000002"
"November 4, 2008","9:46:12 AM","15.552099533437014"
"November 4, 2008","9:46:18 AM","9.345794392523366"
"November 4, 2008","9:46:23 AM","9.345794392523366"
"November 4, 2008","9:46:28 AM","13.622291021671828"
"November 4, 2008","9:46:33 AM","13.622291021671828"
"November 4, 2008","9:46:38 AM","4.976671850699843"
"November 4, 2008","9:46:43 AM","4.976671850699843"
"November 4, 2008","9:46:48 AM","6.987577639751552"
"November 4, 2008","9:46:53 AM","6.987577639751552"
"November 4, 2008","9:46:58 AM","5.607476635514019"
...](https://image.slidesharecdn.com/implementingibmsystemdirectory6-151014004841-lva1-app6892/75/BOOK-IBM-Implementing-ibm-system-directory-6-1-393-2048.jpg)
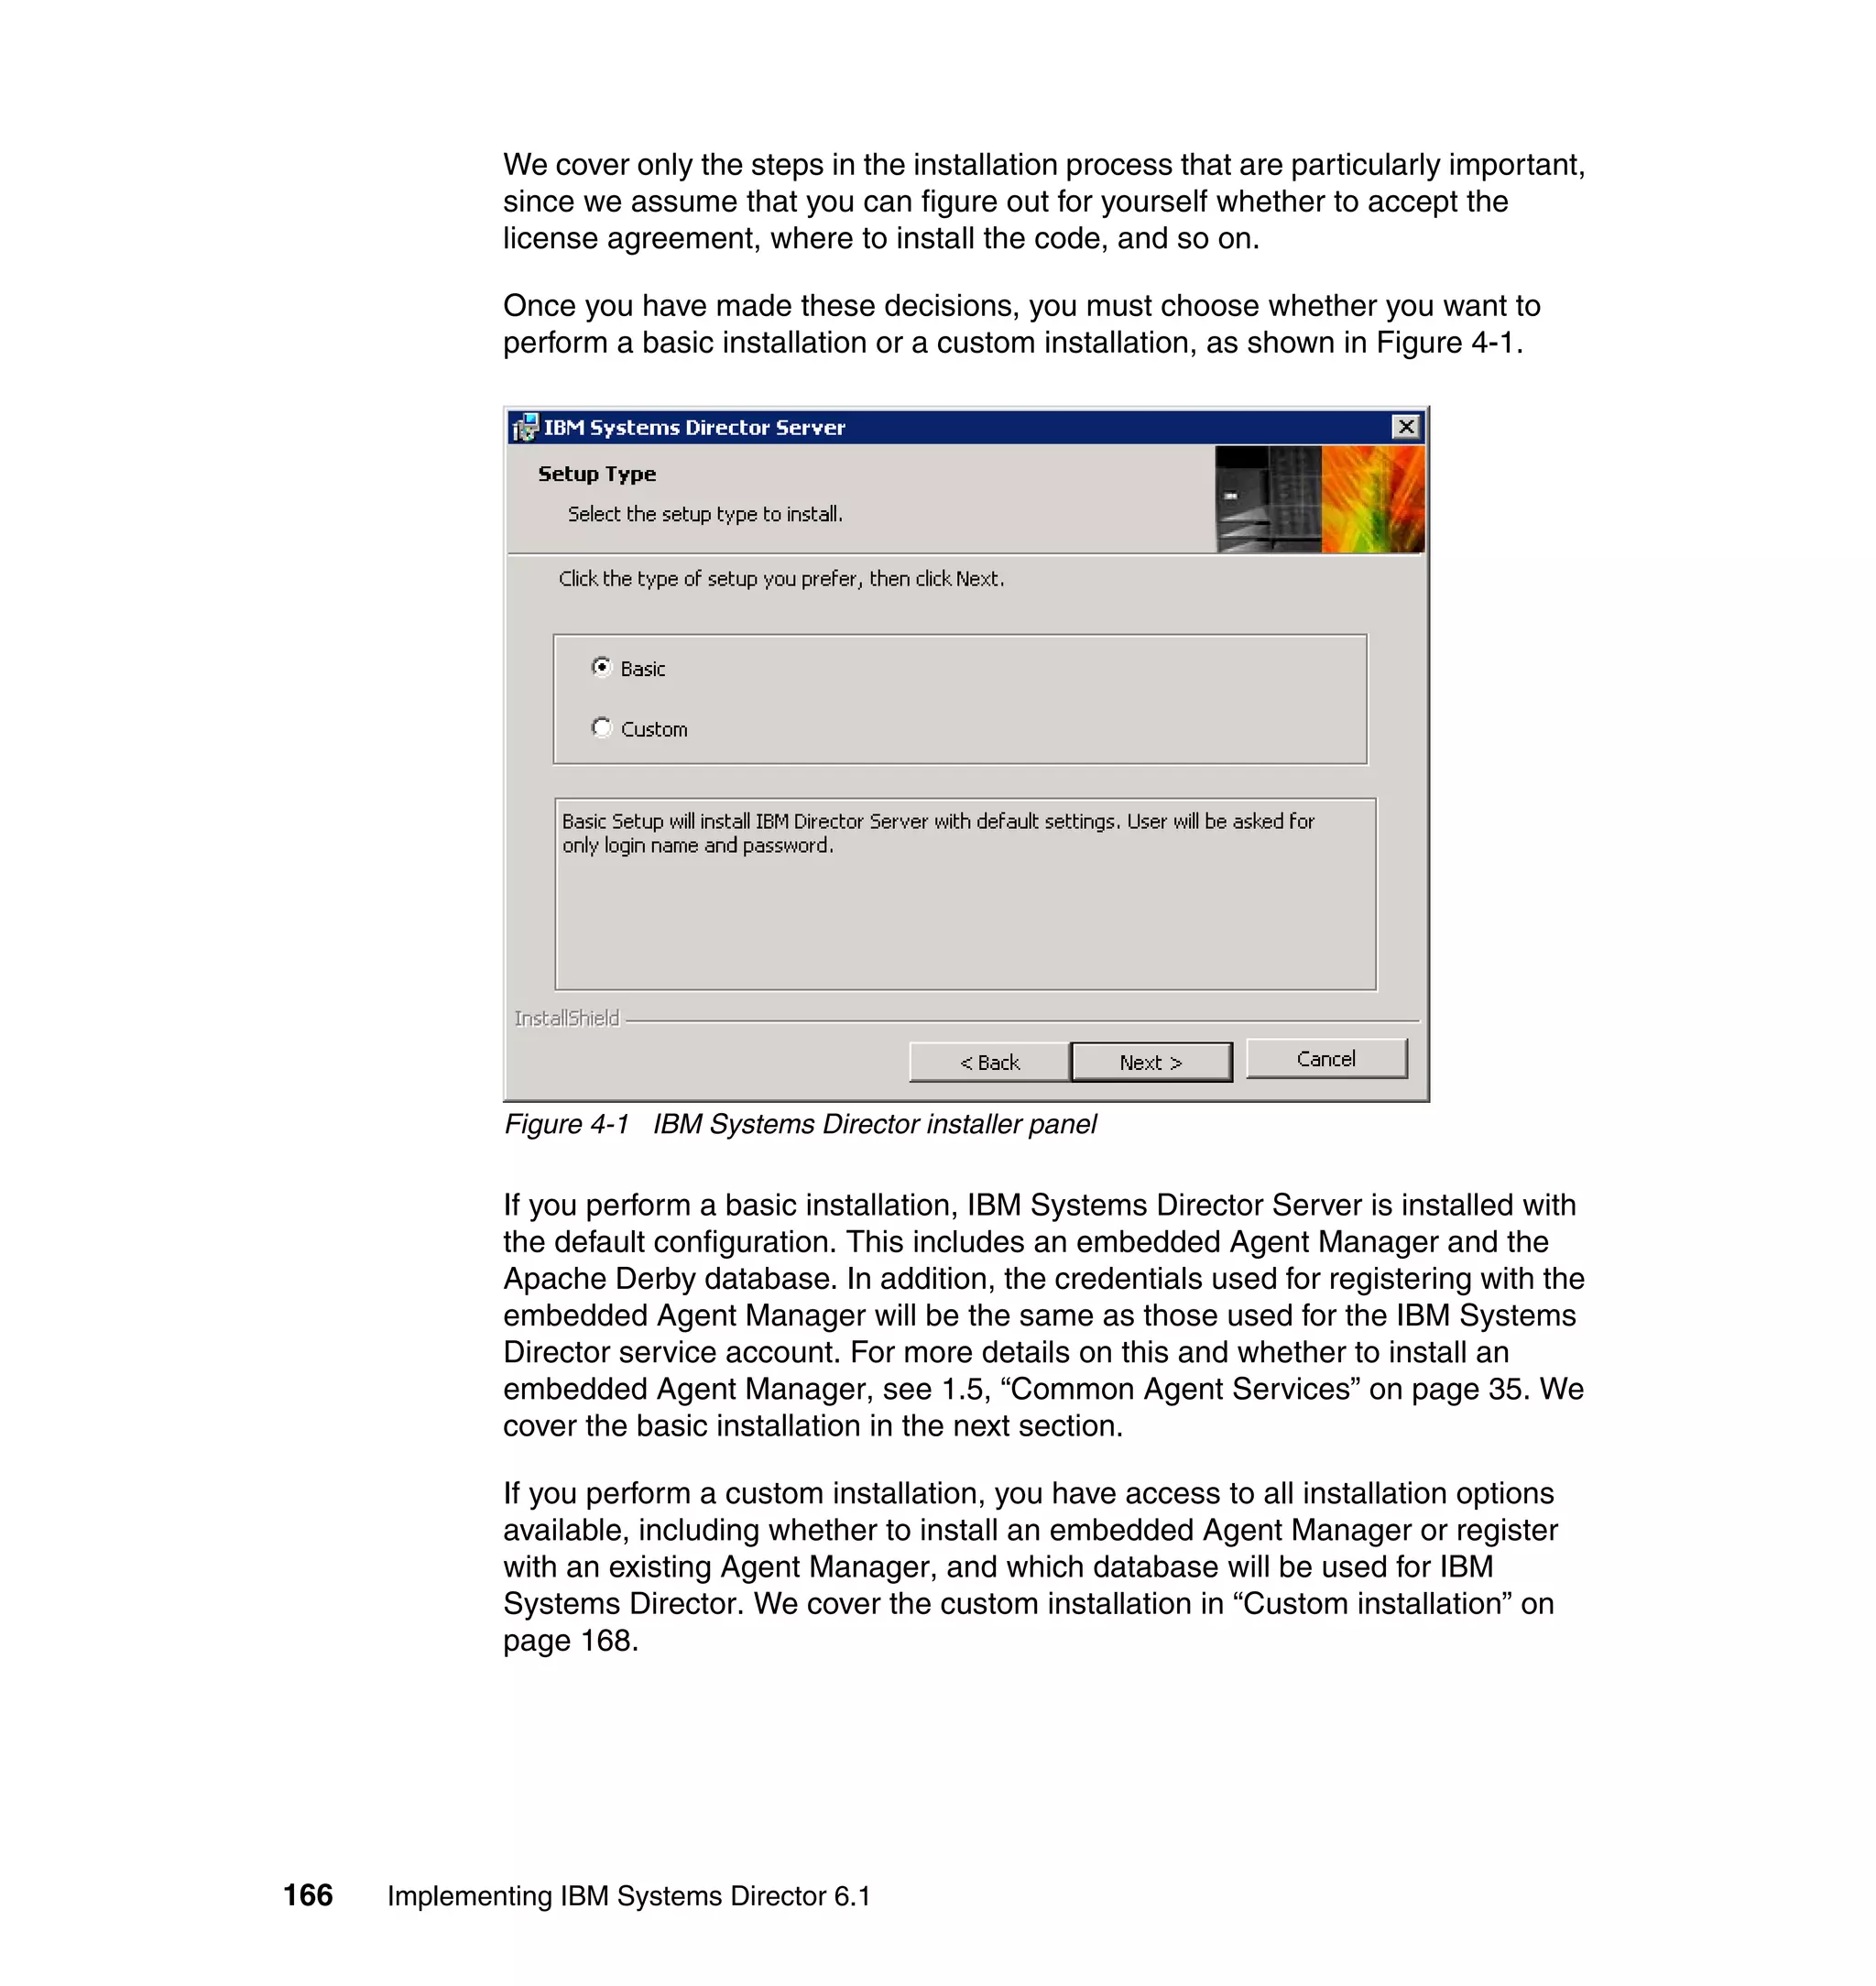
![370 Implementing IBM Systems Director 6.1
HTM format
Use the format shown in Figure 7-48 to view the data in a Web browser.
Figure 7-48 Recorded Monitor data in htm file
TXT format
The text format is a tab-separated file. Use this to read the data in a standard text
editor since it is easier to read than the csv format. Example 7-2 provides a
sample of a txt export.
Example 7-2 Recorded monitor data txt file
Machine Name = ws2k3isdv02.hatteras.lab
Attribute Path = [[Director Agent][CPU Monitors][CPU Utilization]]
Description = ISD CPU Utilization
Start Time = November 4, 2008 at 9:45:53 AM
Stop Time = November 4, 2008 at 10:26:24 AM](https://image.slidesharecdn.com/implementingibmsystemdirectory6-151014004841-lva1-app6892/75/BOOK-IBM-Implementing-ibm-system-directory-6-1-394-2048.jpg)


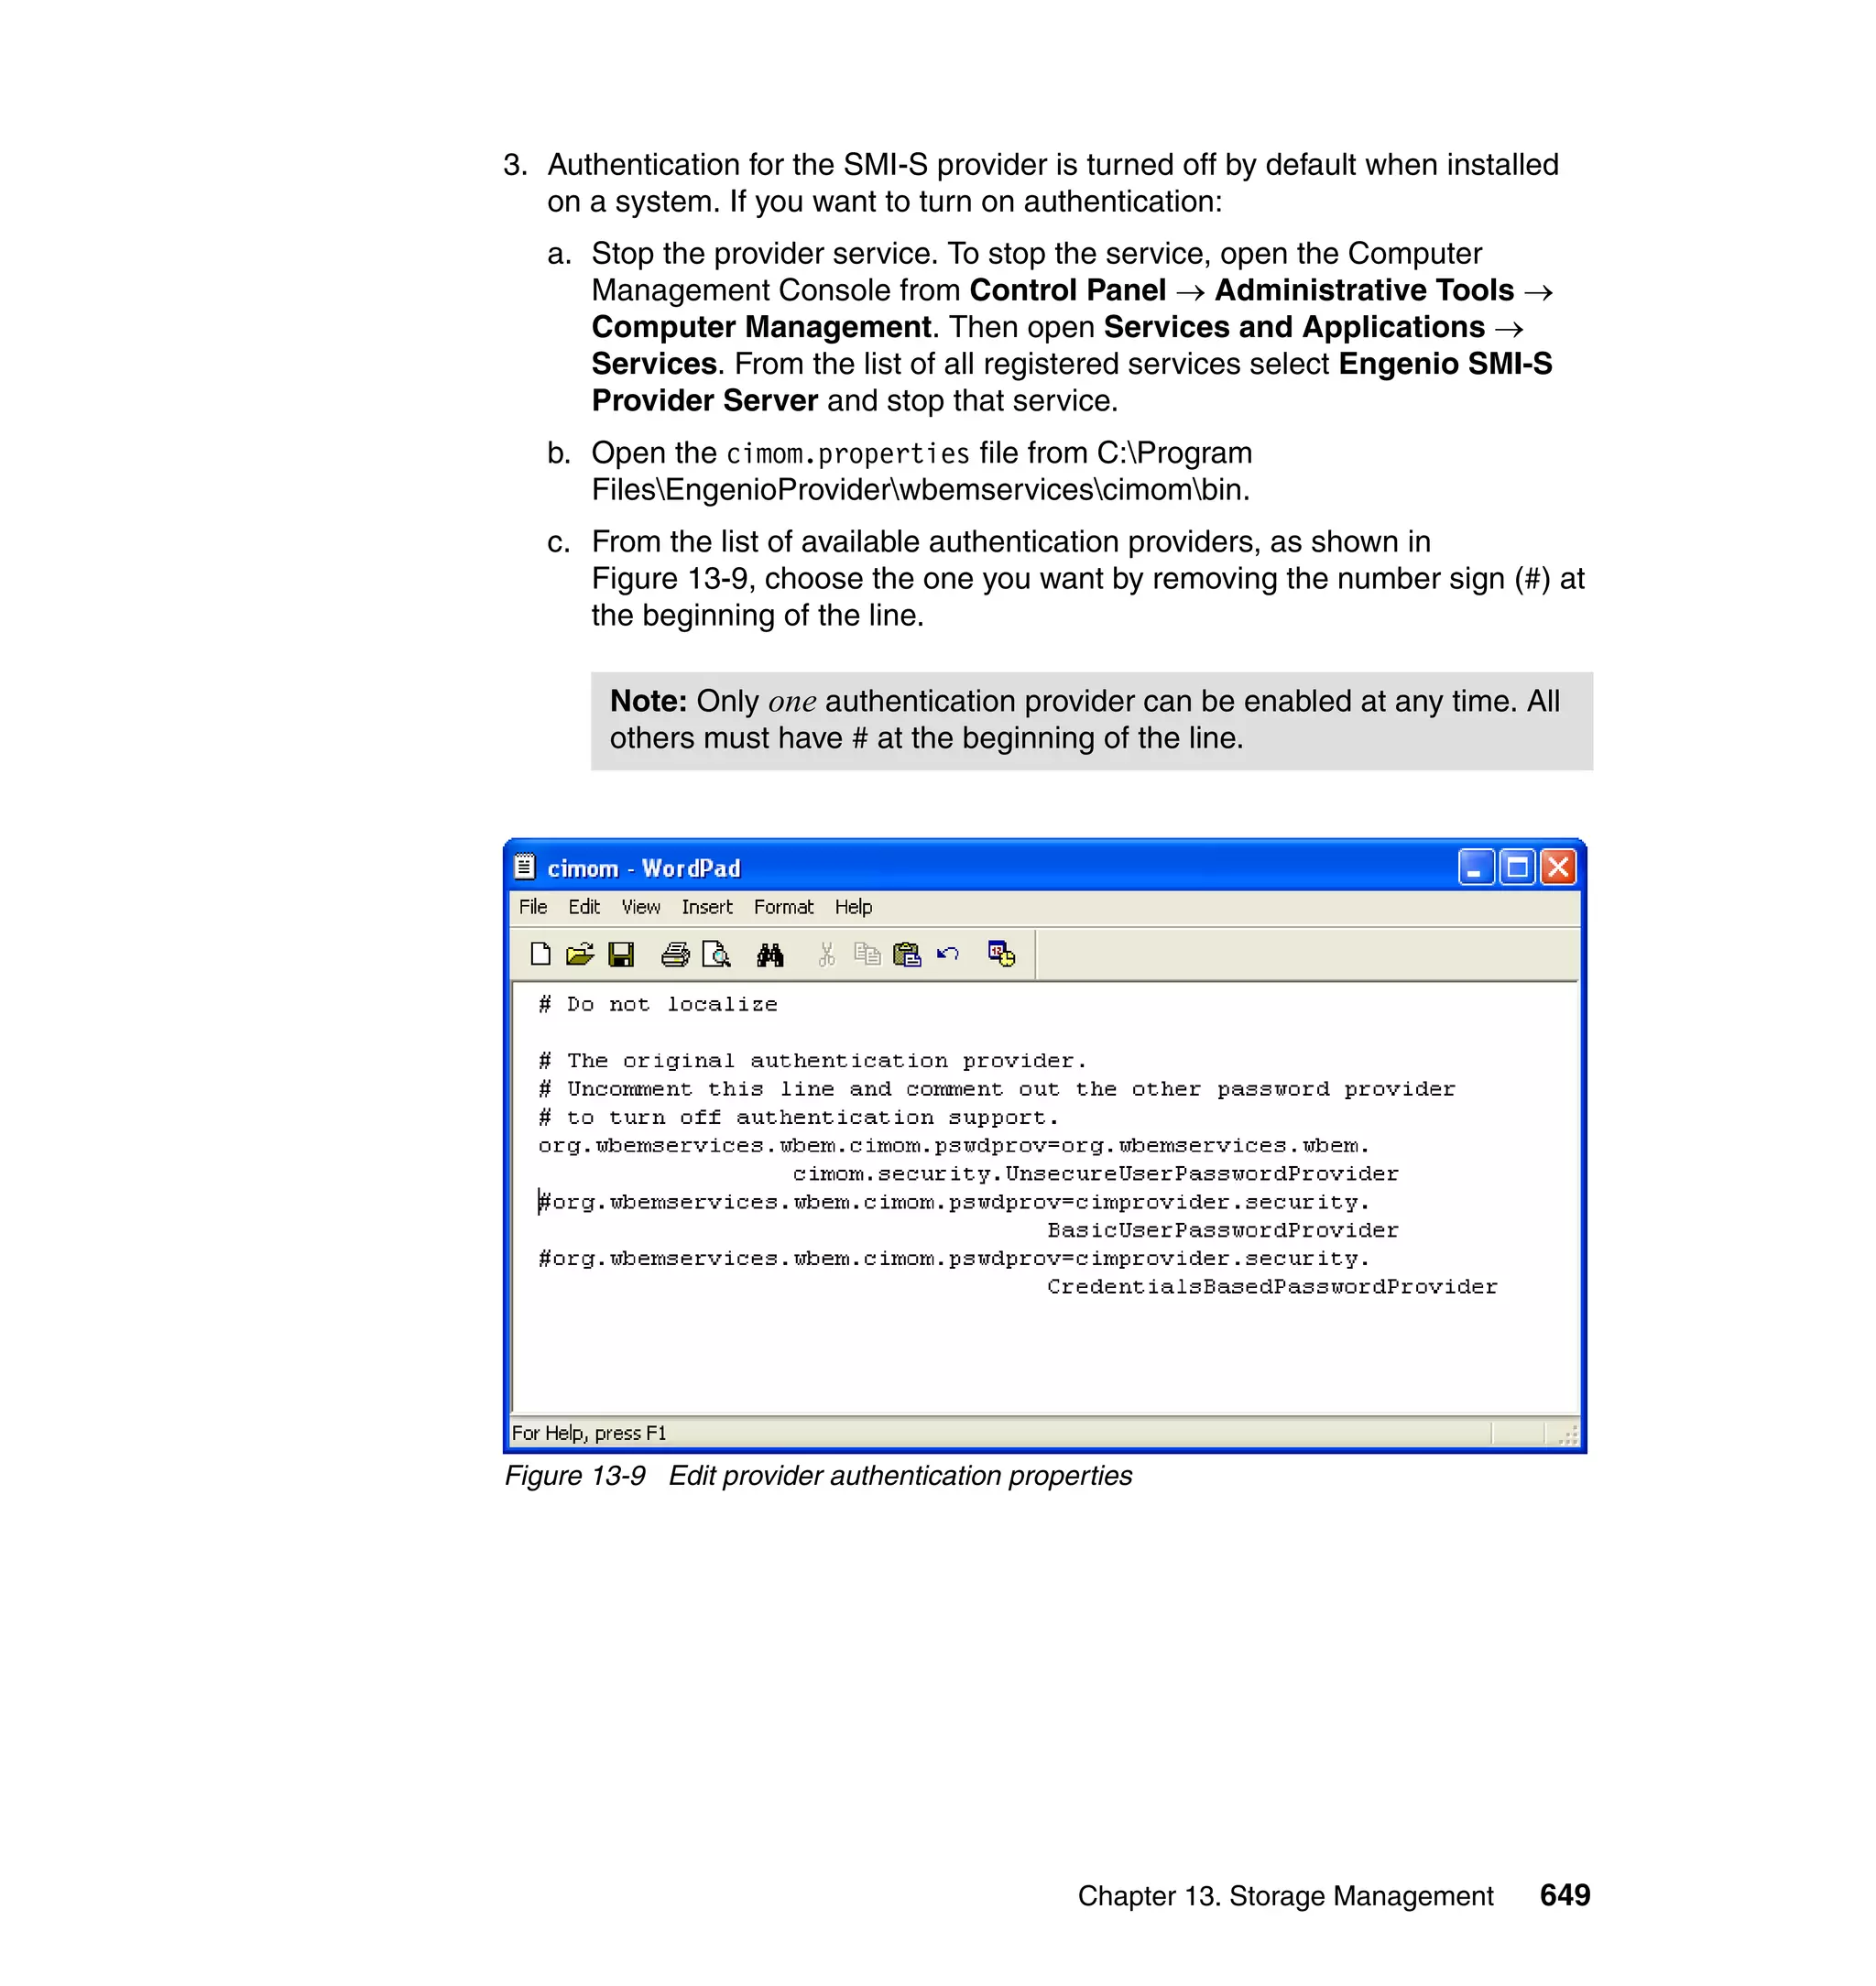
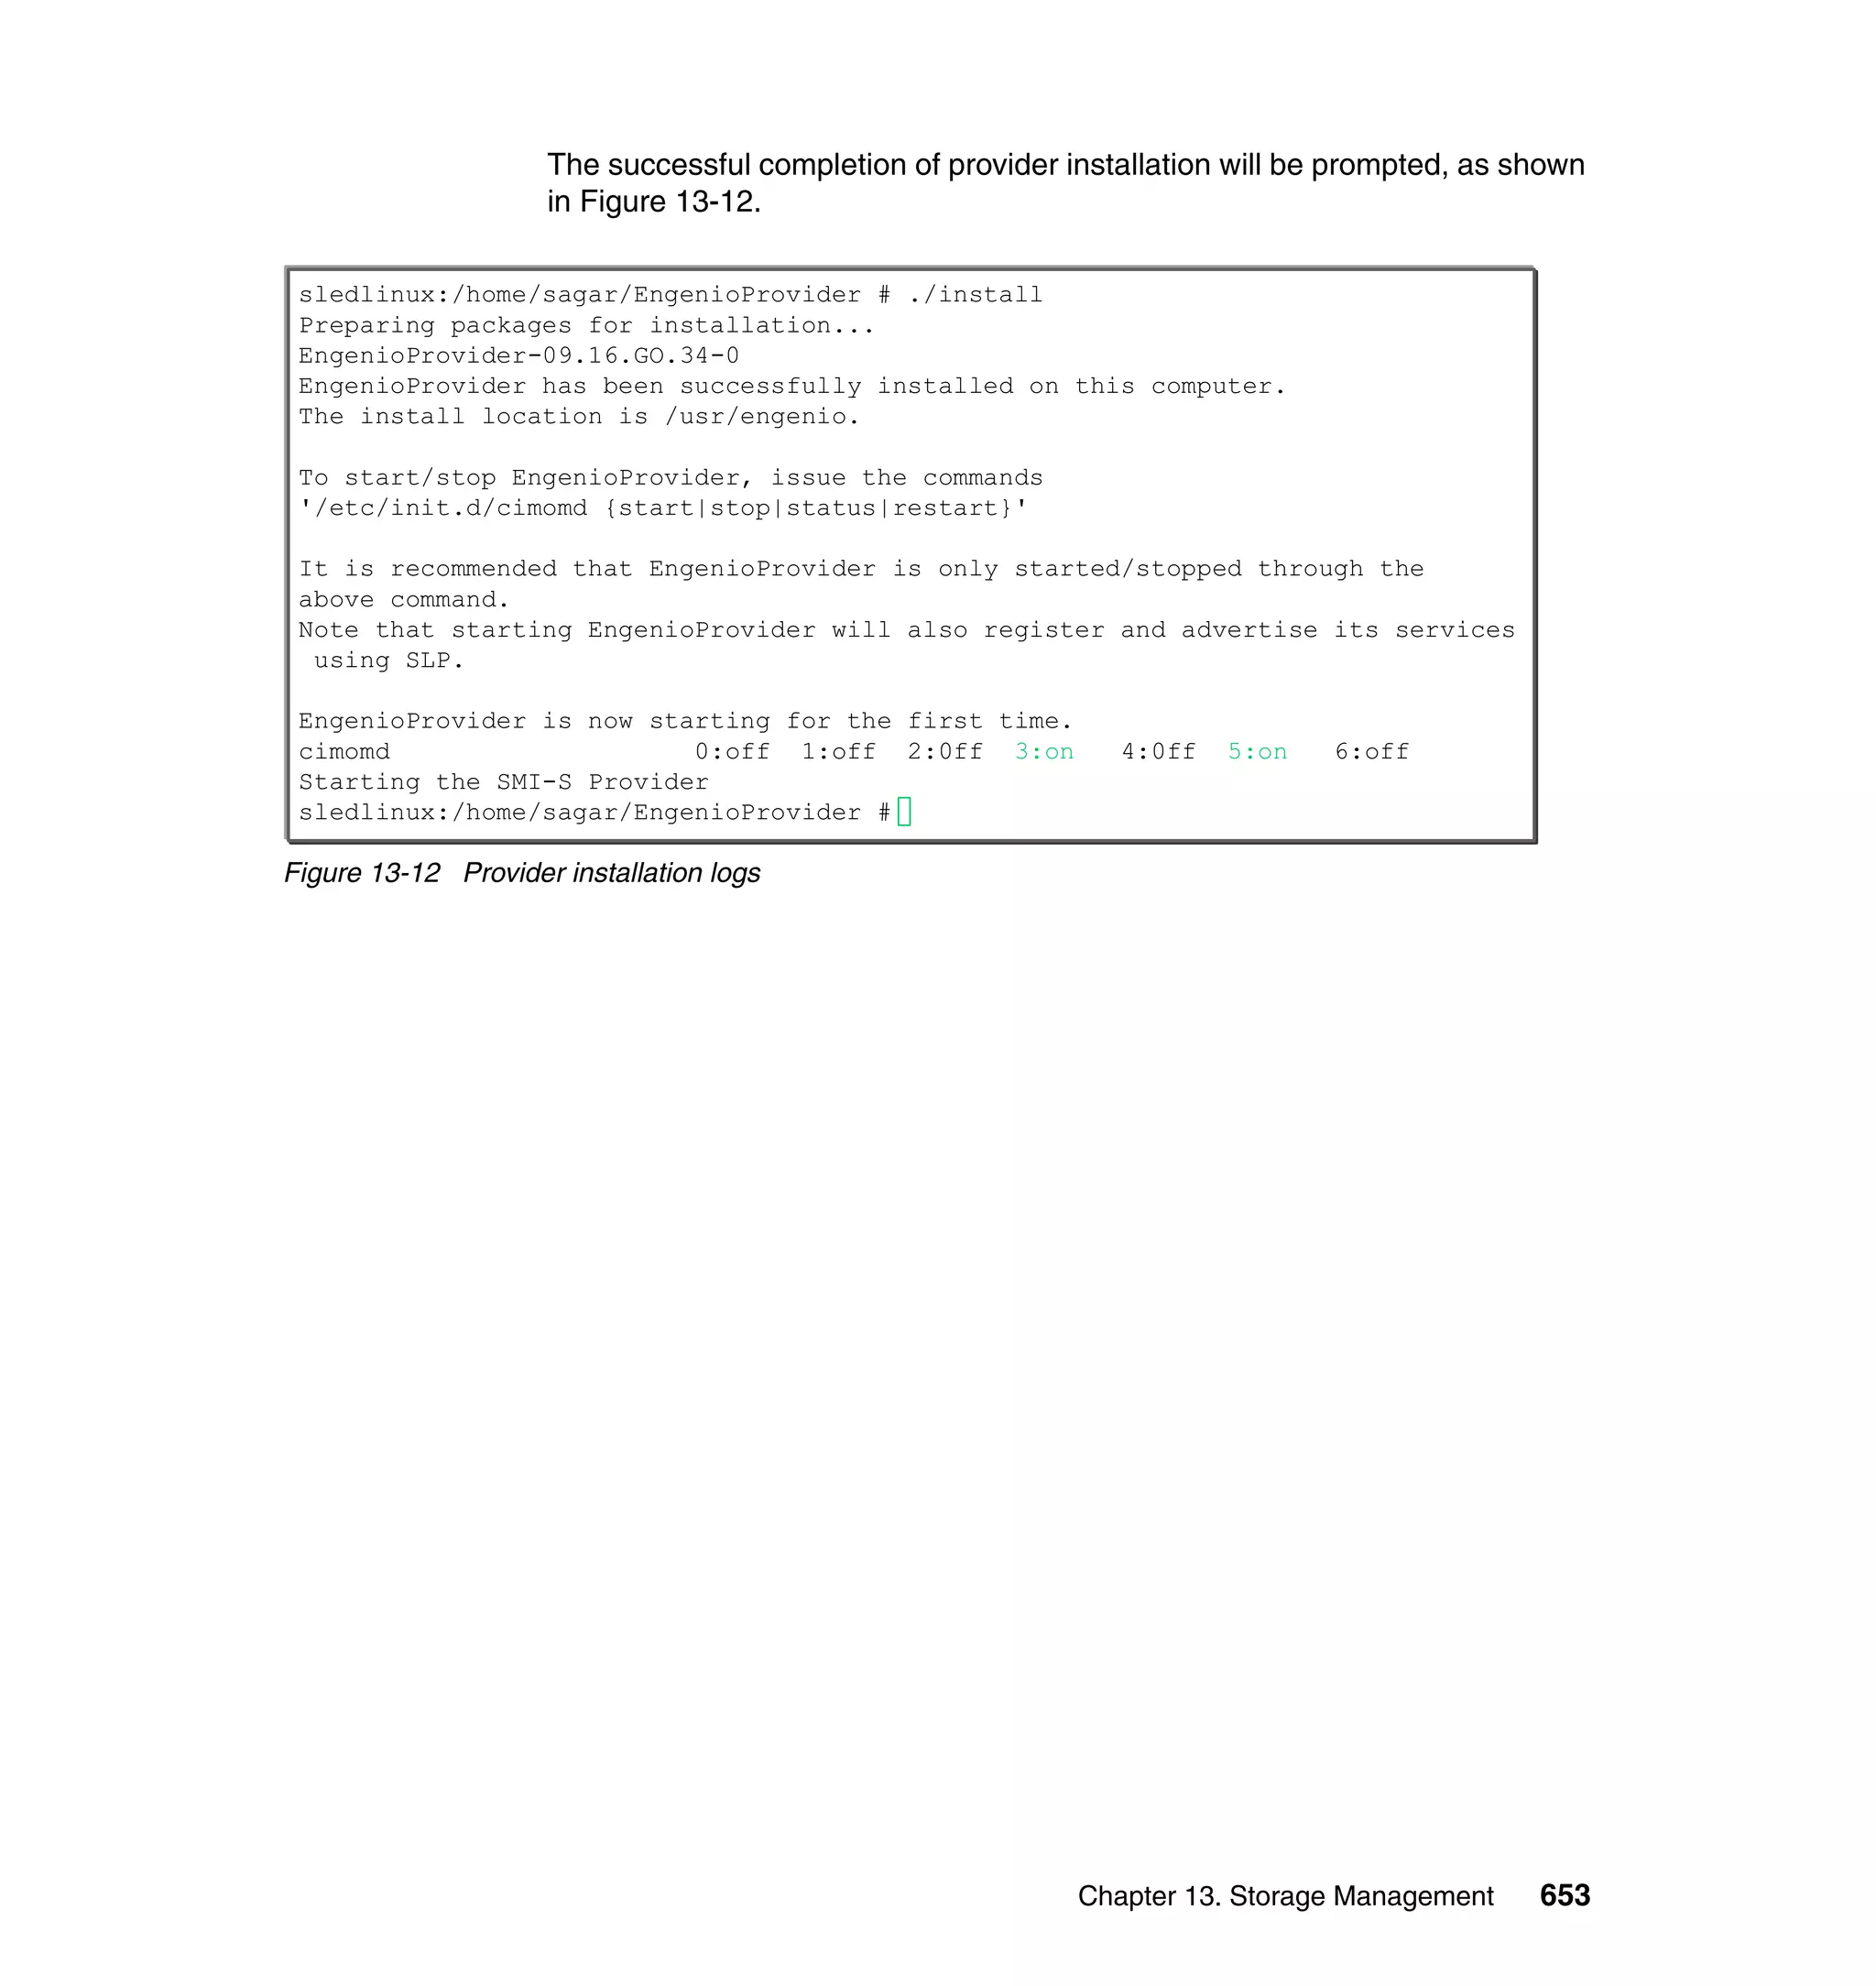
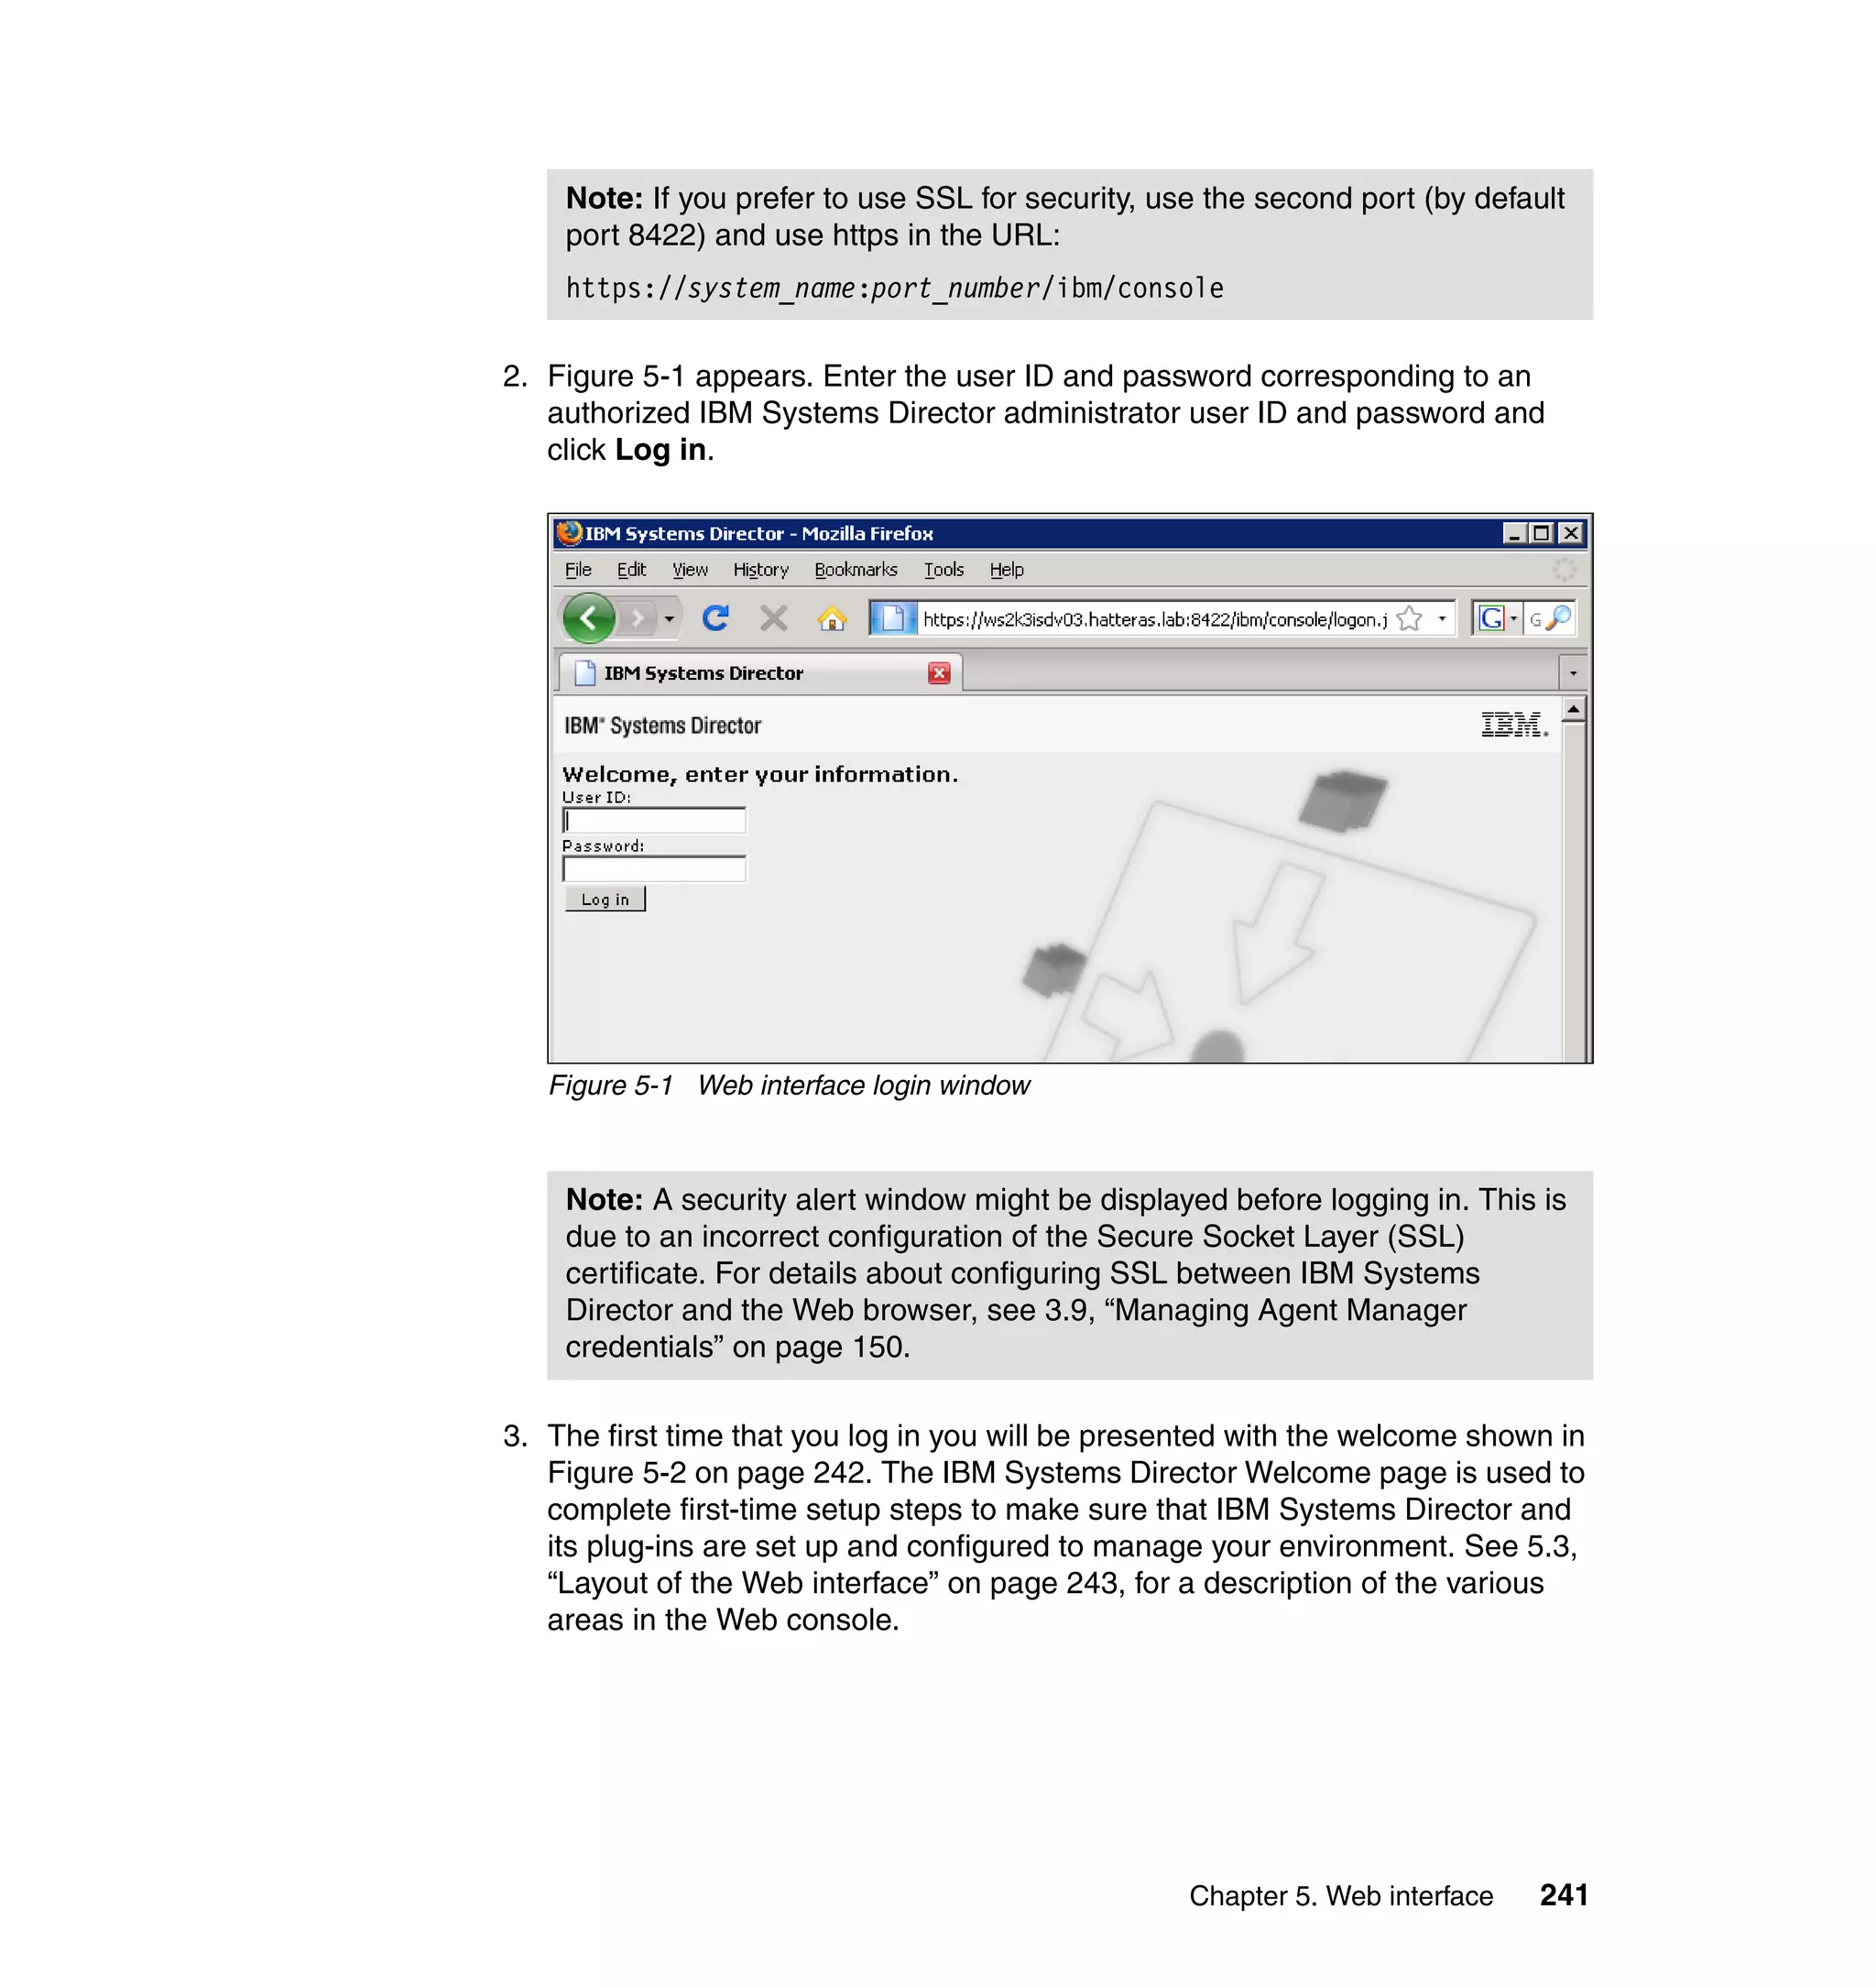
![654 Implementing IBM Systems Director 6.1
2. During the installation of the SMI provider, you will not be prompted to add the
DS4000 controllers. This must be done manually though the command line.
To add the DS4000 controllers, issue the command (Figure 13-13):
/usr/engenio/SMI_SProvider/bin/ProviderUtil
When prompted, enter the following information:
– CIMOM username: Any user name of your choosing
– CIMOM password: Any password of your choosing
– Input CIMOM port: 5988 for non-SSL or 5989 for SSL
Figure 13-13 Adding Storage Controller to provider
3. You are then prompted to select an input operation:
– add for Adddevice
– rem for RemoveDevice
4. Enter add to add a new device.
5. You will be prompted to enter an IP or host name for the array. Enter the IP
address for the DS4000 or DS3000 series controller.
6. When prompted with the input array password, you can leave this blank.
Note: By default, the SMI-S provider does not require any authentication,
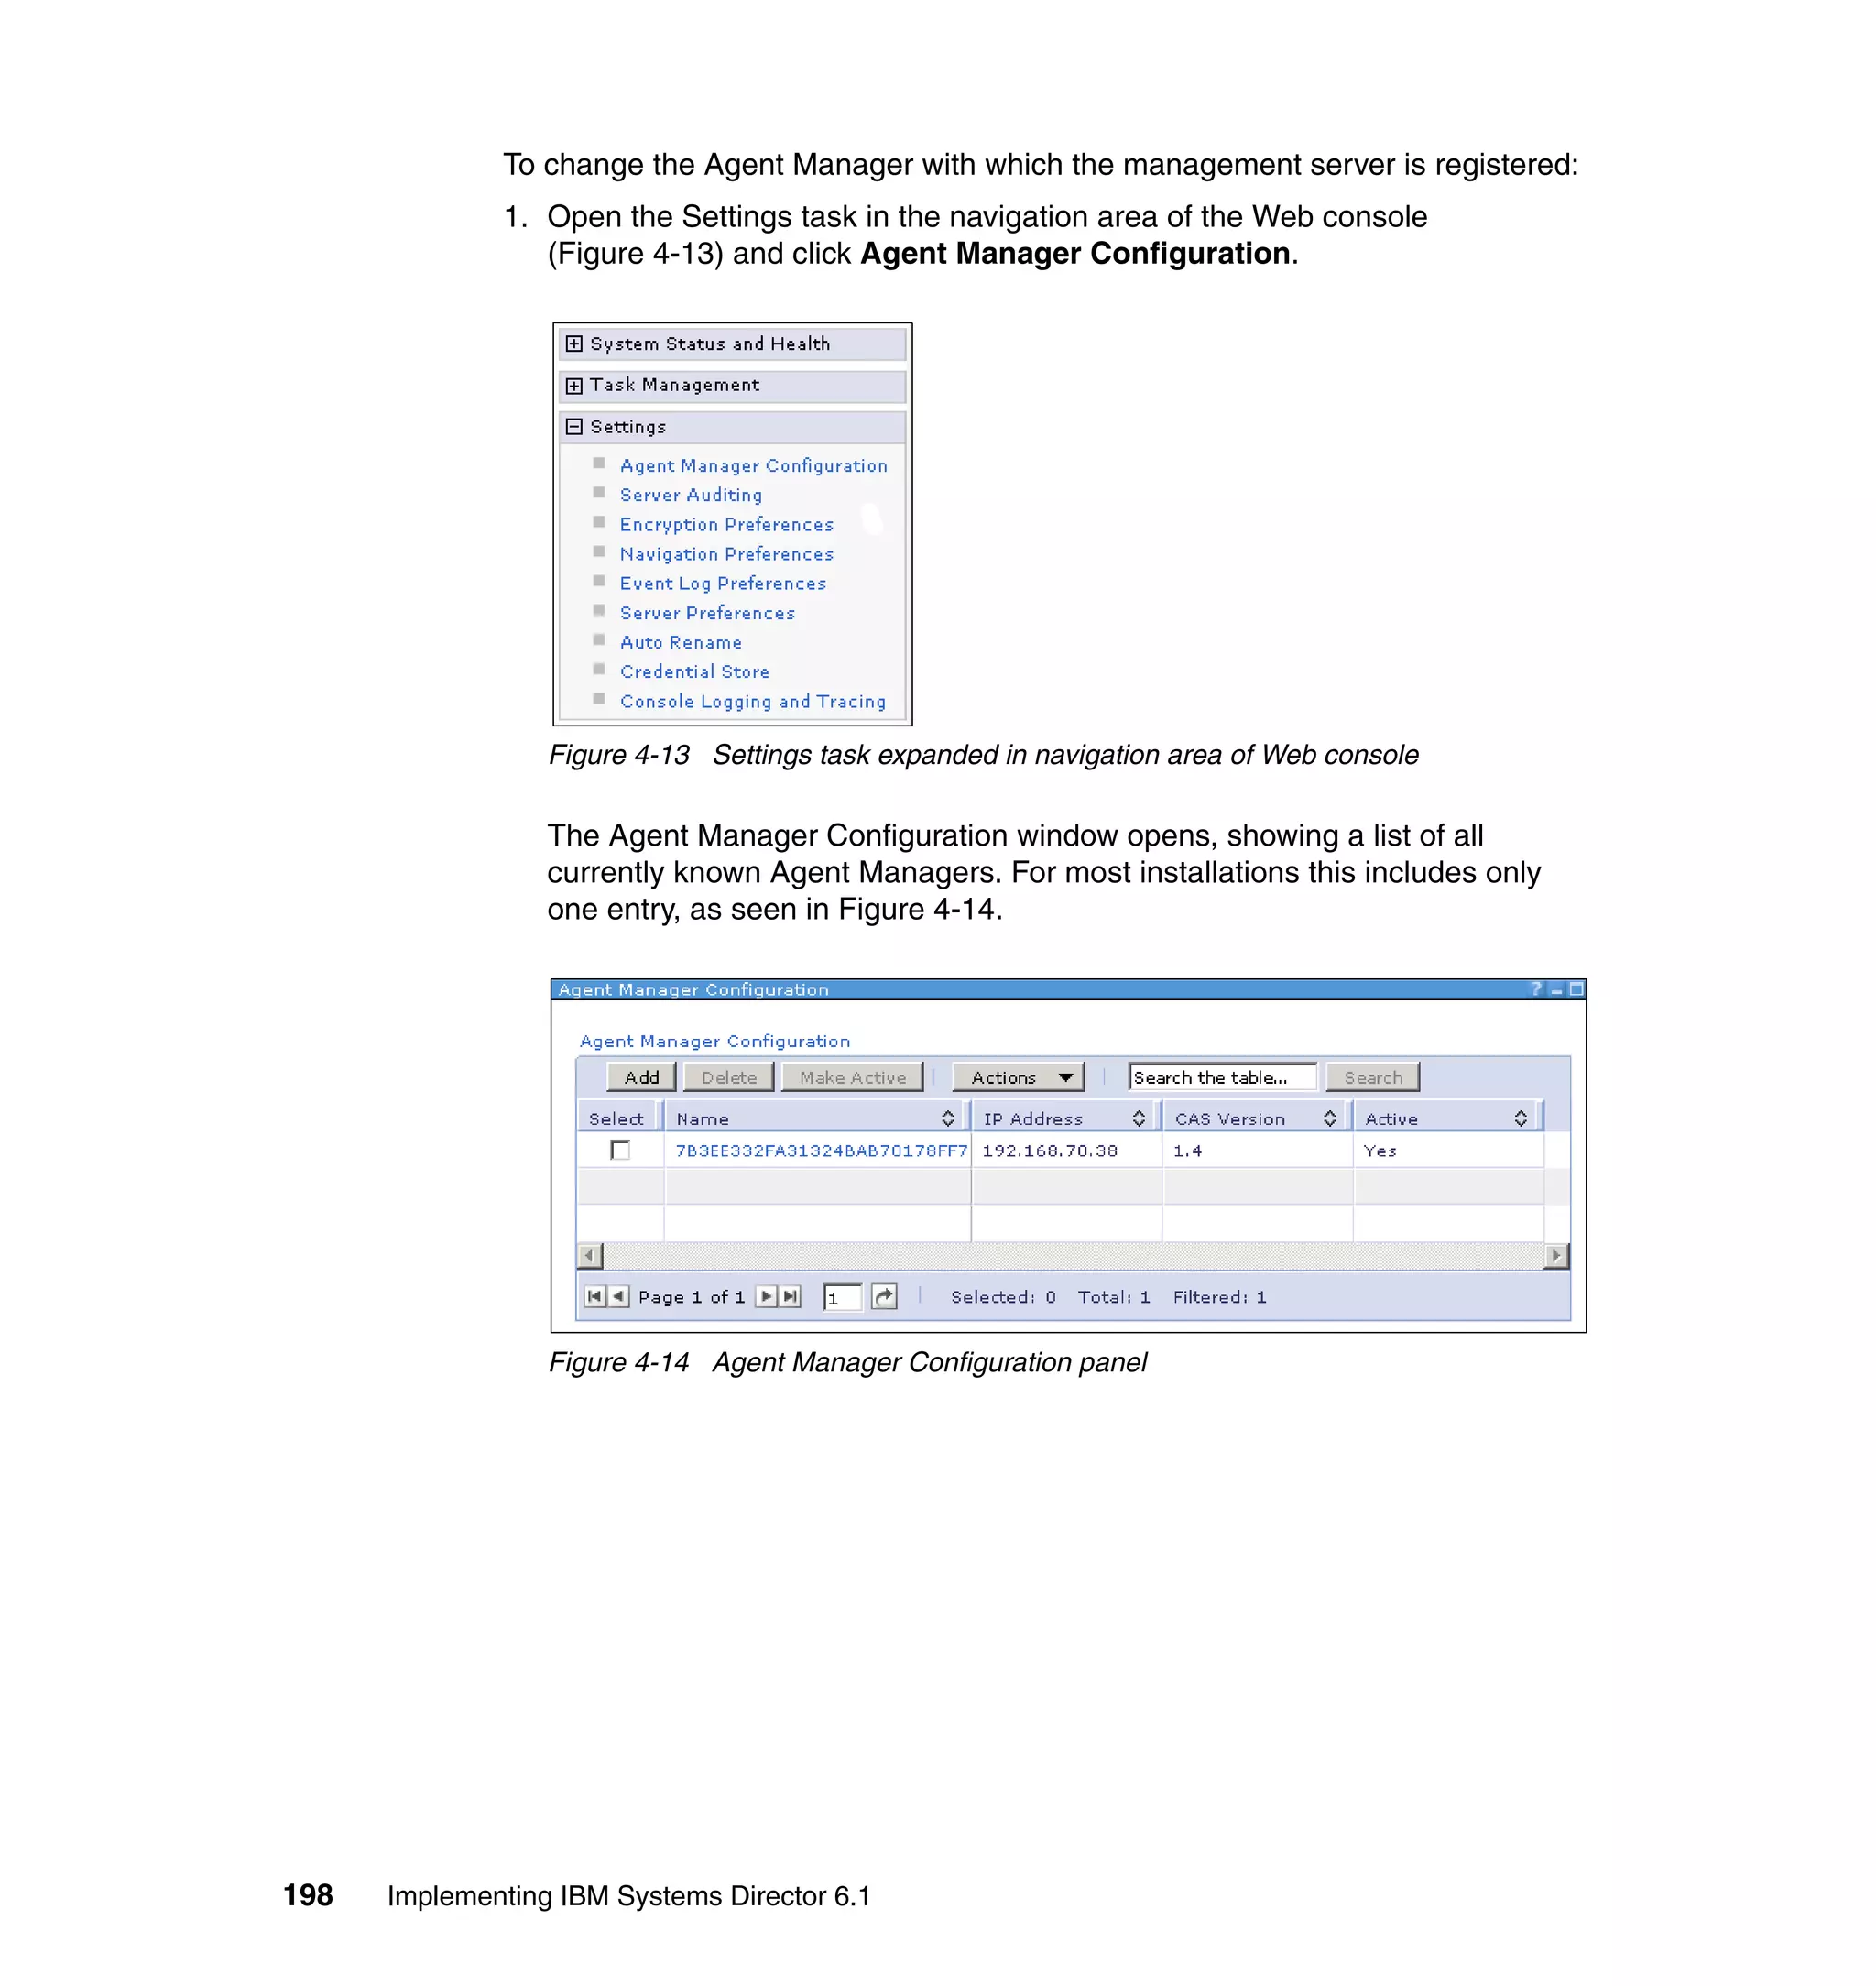
but once installed can be configured for specific authentication.
sledlinux:/usr/engenio/SMI_SProvider/bin # ./ProviderUtil
CIMOM username: c
cimuser
CIMOM Password: c
Input CIMOM Port [5988]: c
Input operation:
'add' for AddDevice,
'rem' for RemoveDevice: c
add
Input IP or hostname for array: c
9.182.193.134
Input Array password: c
Attempting extrinsic method call.
The extrinsic call succeeded.
sledlinux:/usr/engenio/SMI_SProvider/bin #](https://image.slidesharecdn.com/implementingibmsystemdirectory6-151014004841-lva1-app6892/75/BOOK-IBM-Implementing-ibm-system-directory-6-1-678-2048.jpg)
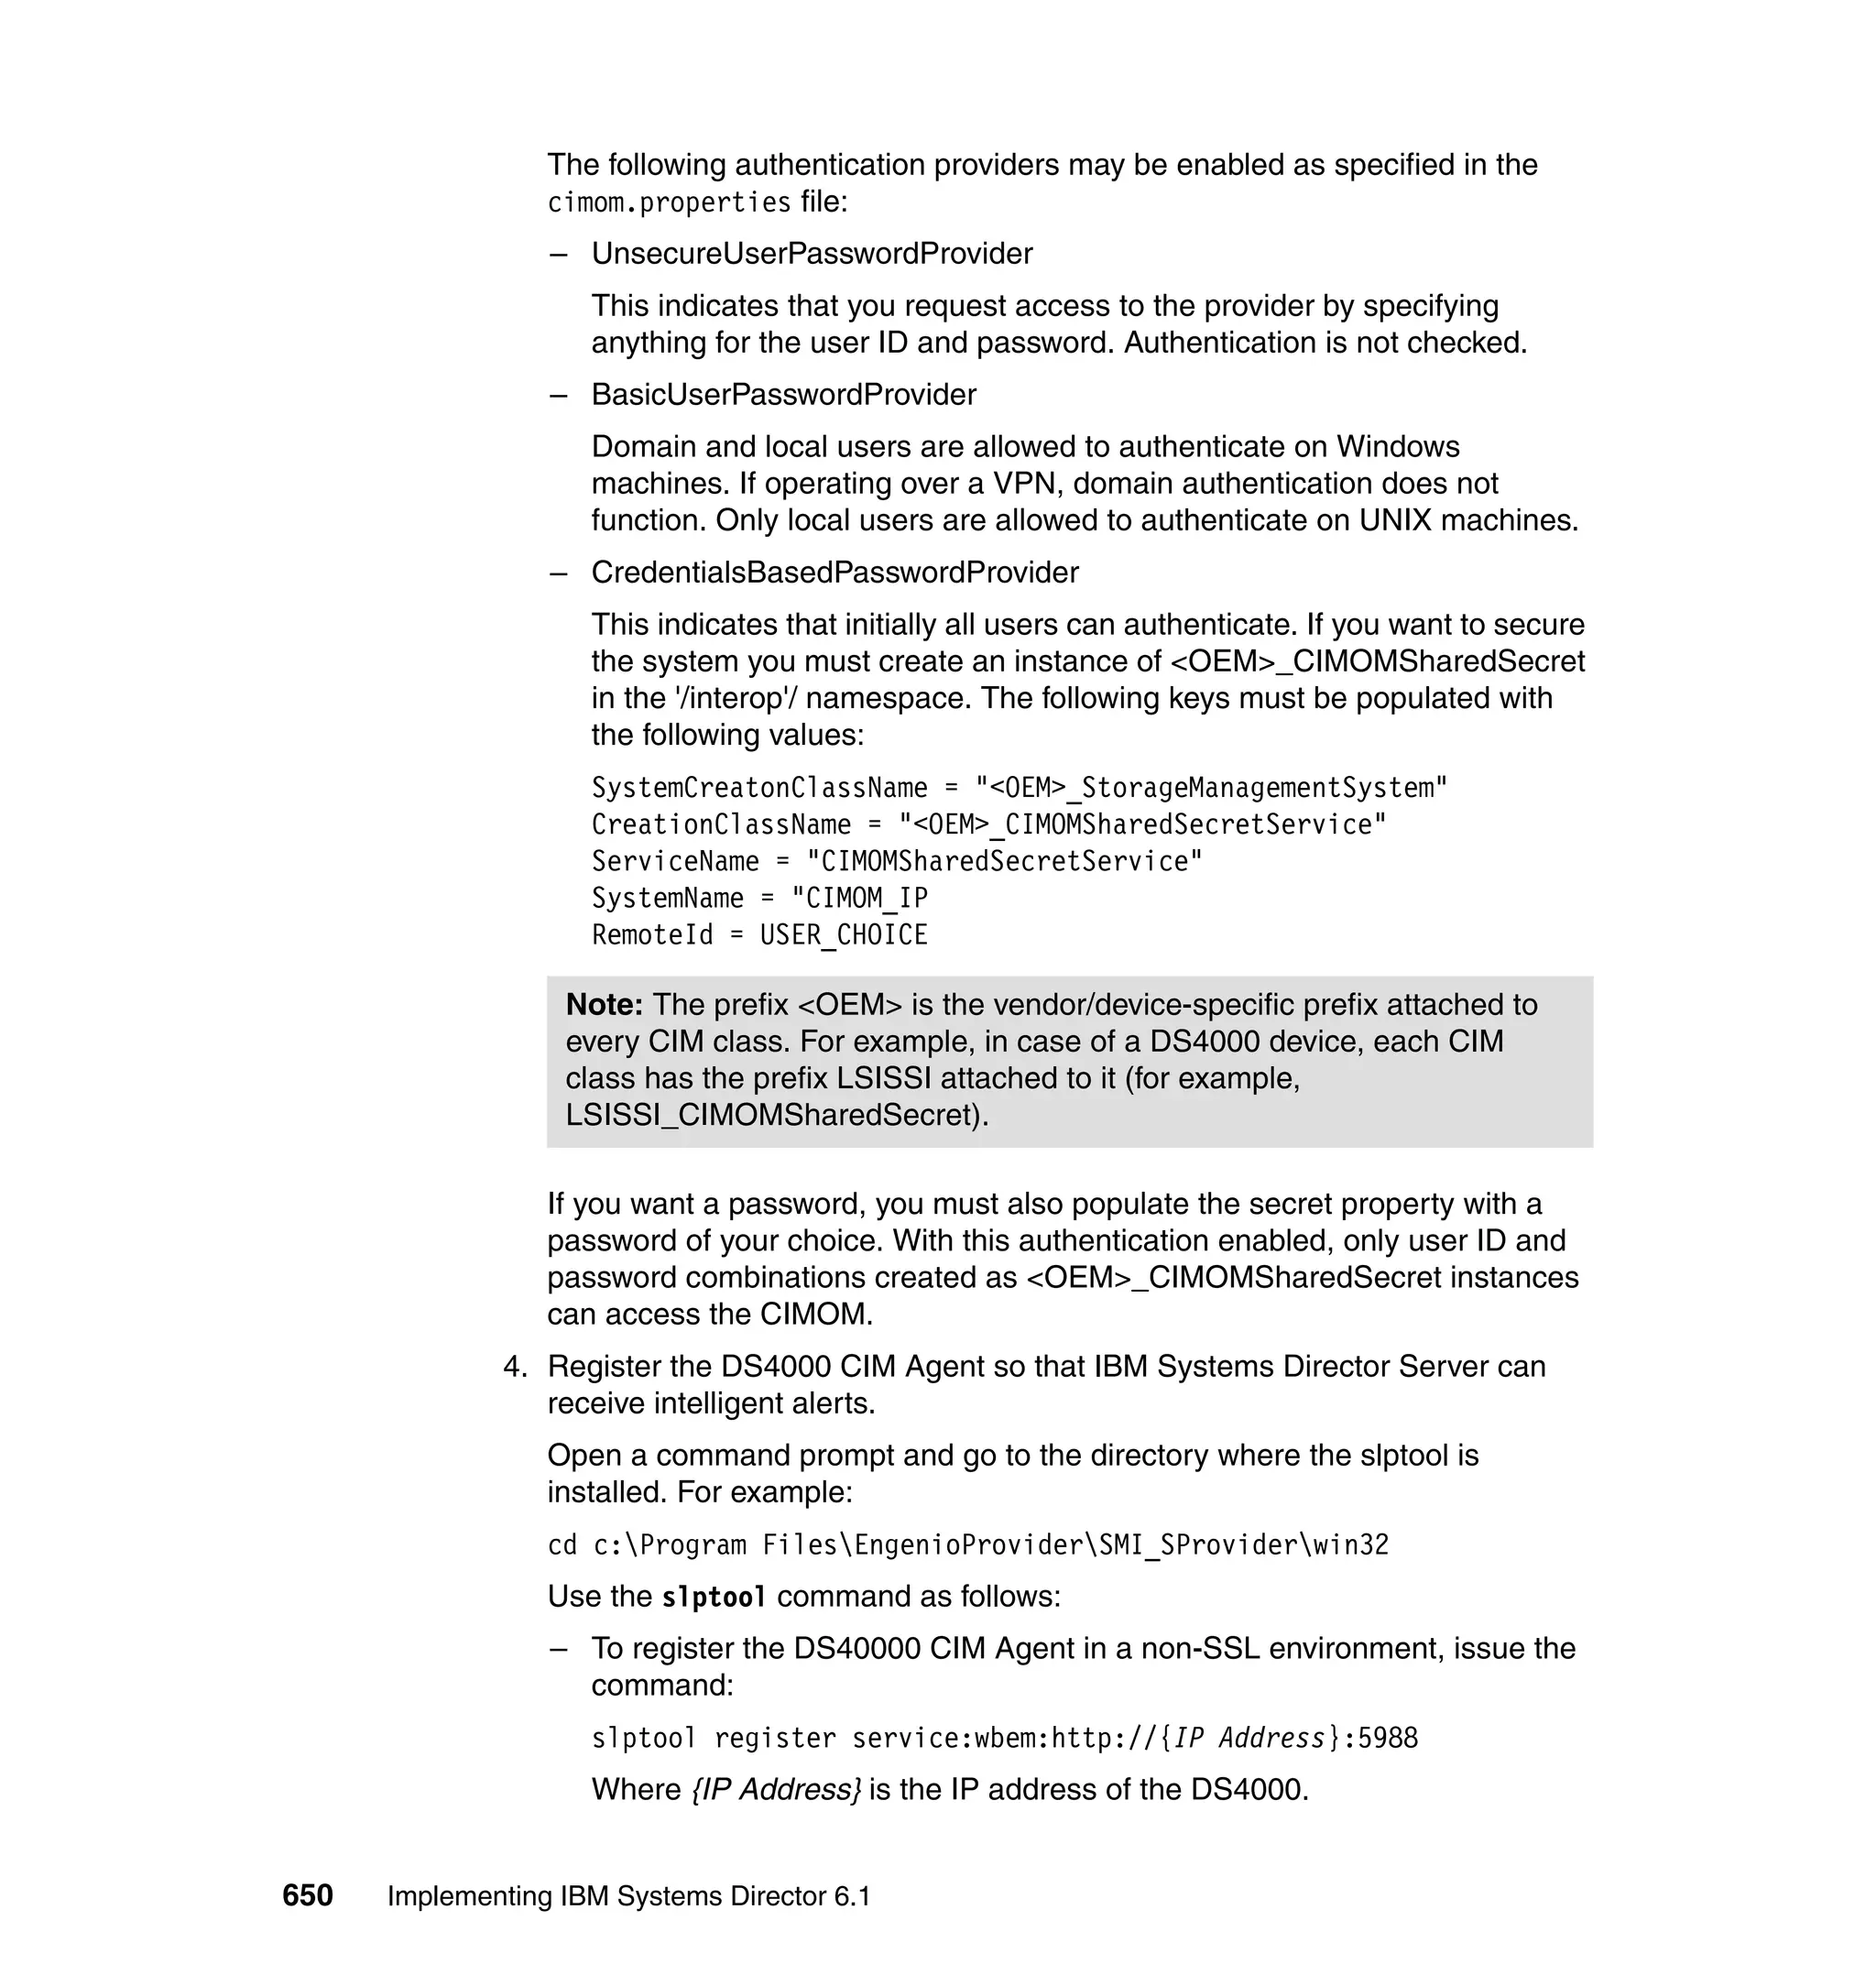
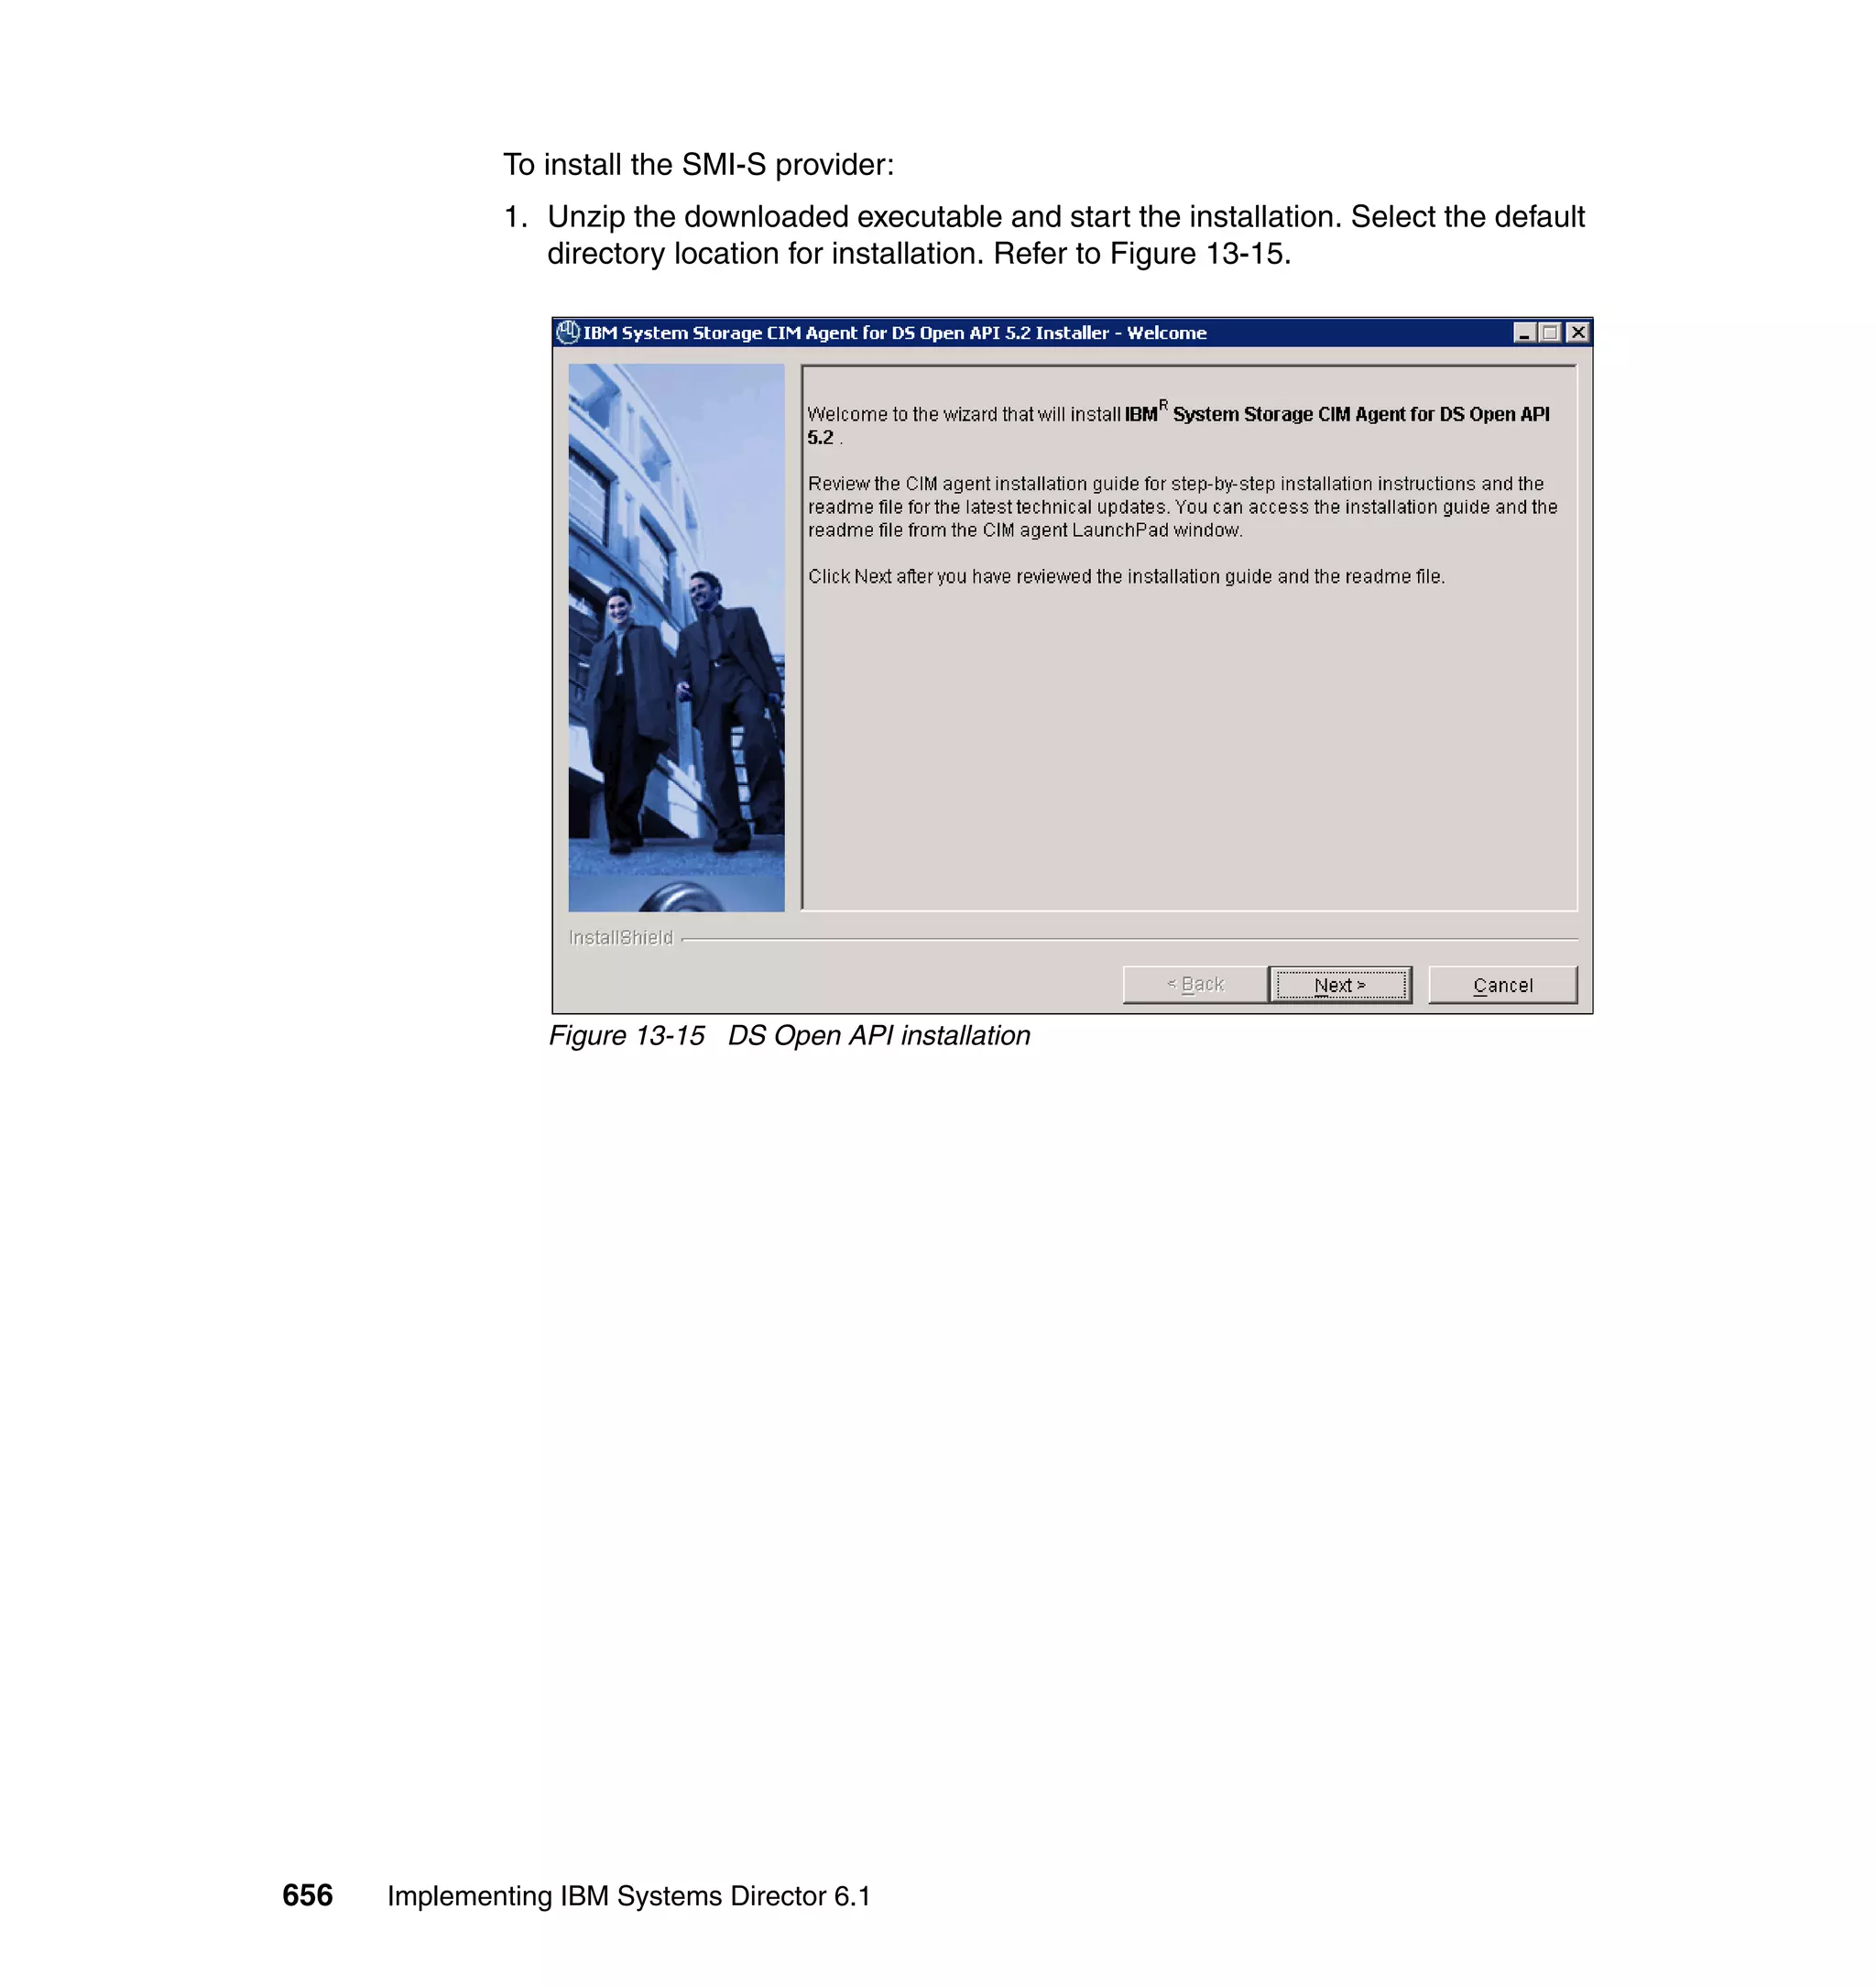
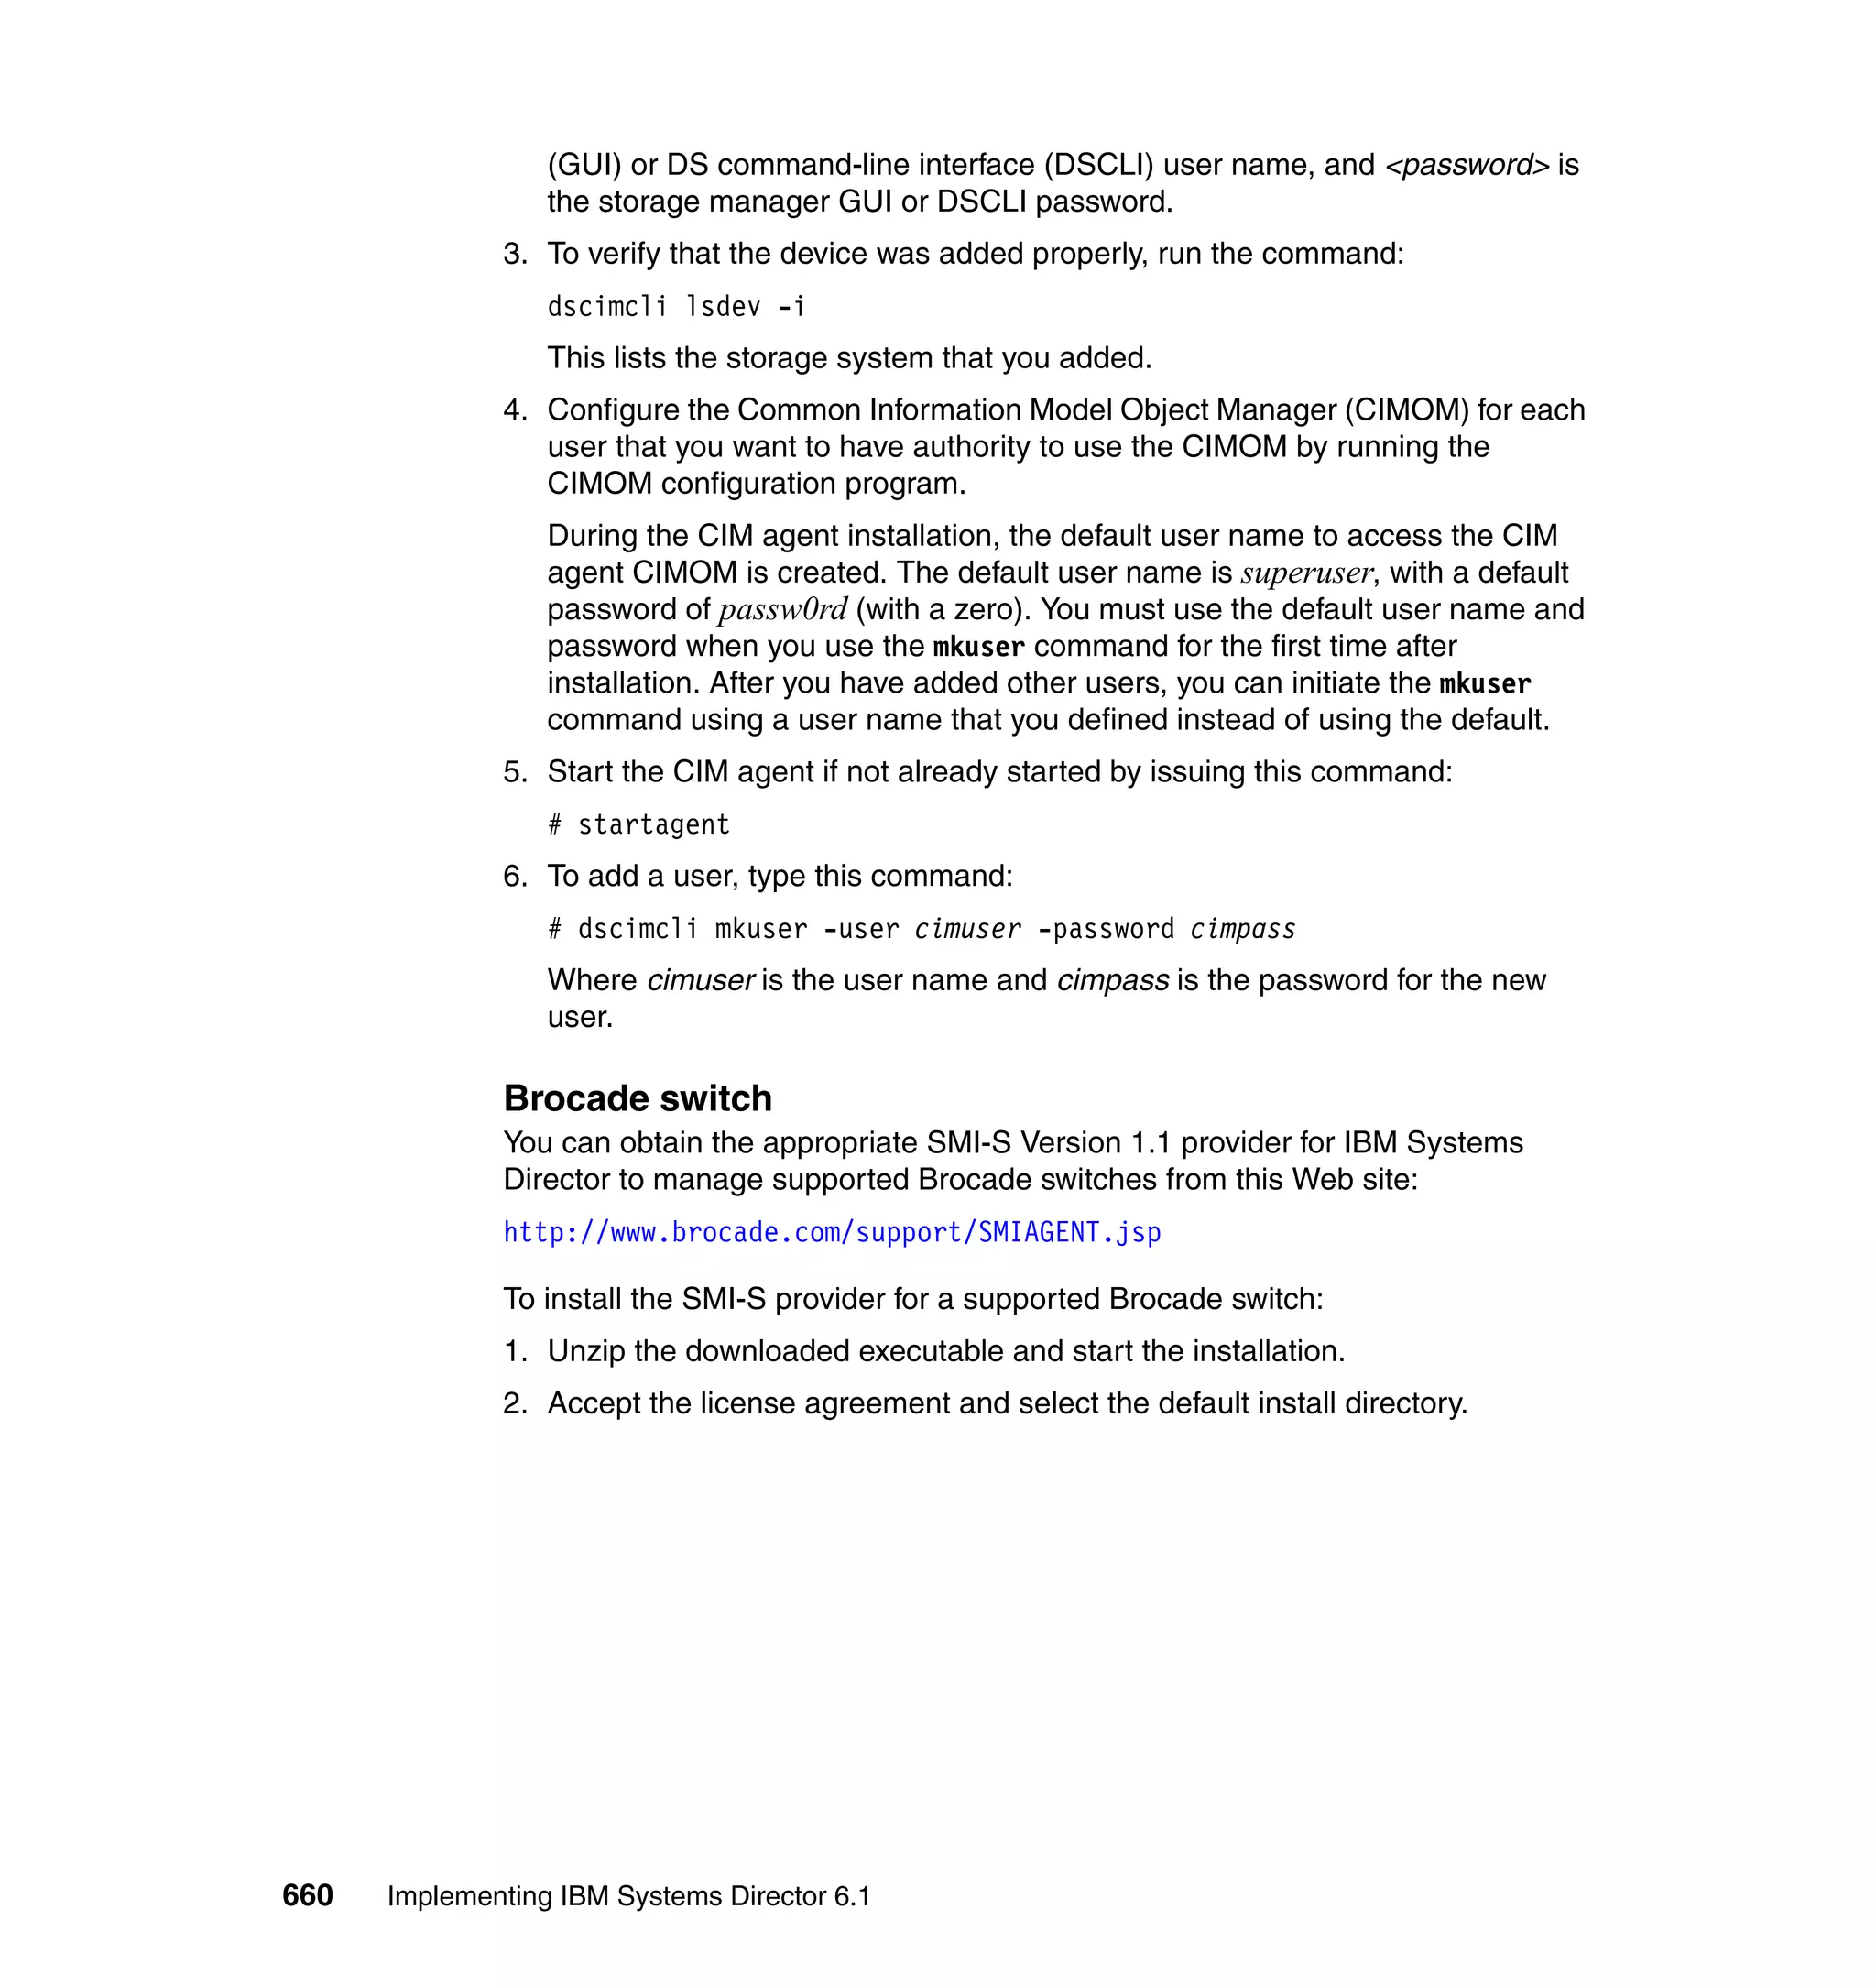
![Chapter 13. Storage Management 655
7. Follow steps 5 and 6 discussed in “Installing an SMI-S provider on Windows”
on page 648 to configure the CIM agent to communicate with IBM Systems
Director Server and verify correct SMI-S provider installation.
8. The same ProviderUtility can be used to remove Storage controller from the
provider, as shown in Figure 13-14.
Figure 13-14 Removing storage controller from provider
IBM TotalStorage DS6000 series storage systems
You can obtain the appropriate SMI-S Version 1.1 provider for IBM Systems
Director to manage IBM TotalStorage DS6000 series storage systems from this
Web page:
http://www-304.ibm.com/systems/support/supportsite.wss/supportresources
?taskind=2&brandind=5000033&familyind=5329497
sledlinux:/usr/engenio/SMI_SProvider/bin # ./ProviderUtil
CIMOM username: c
cimuser
CIMOM Password: c
Input CIMOM Port [5988]: c
Input operation:
'add' for AddDevice,
'rem' for RemoveDevice: c
rem
Input IP or hostname for array: c
9.182.193.134
Attempting extrinsic method call.
The extrinsic call succeeded.
sledlinux:/usr/engenio/SMI_SProvider/bin #](https://image.slidesharecdn.com/implementingibmsystemdirectory6-151014004841-lva1-app6892/75/BOOK-IBM-Implementing-ibm-system-directory-6-1-679-2048.jpg)


![734 Implementing IBM Systems Director 6.1
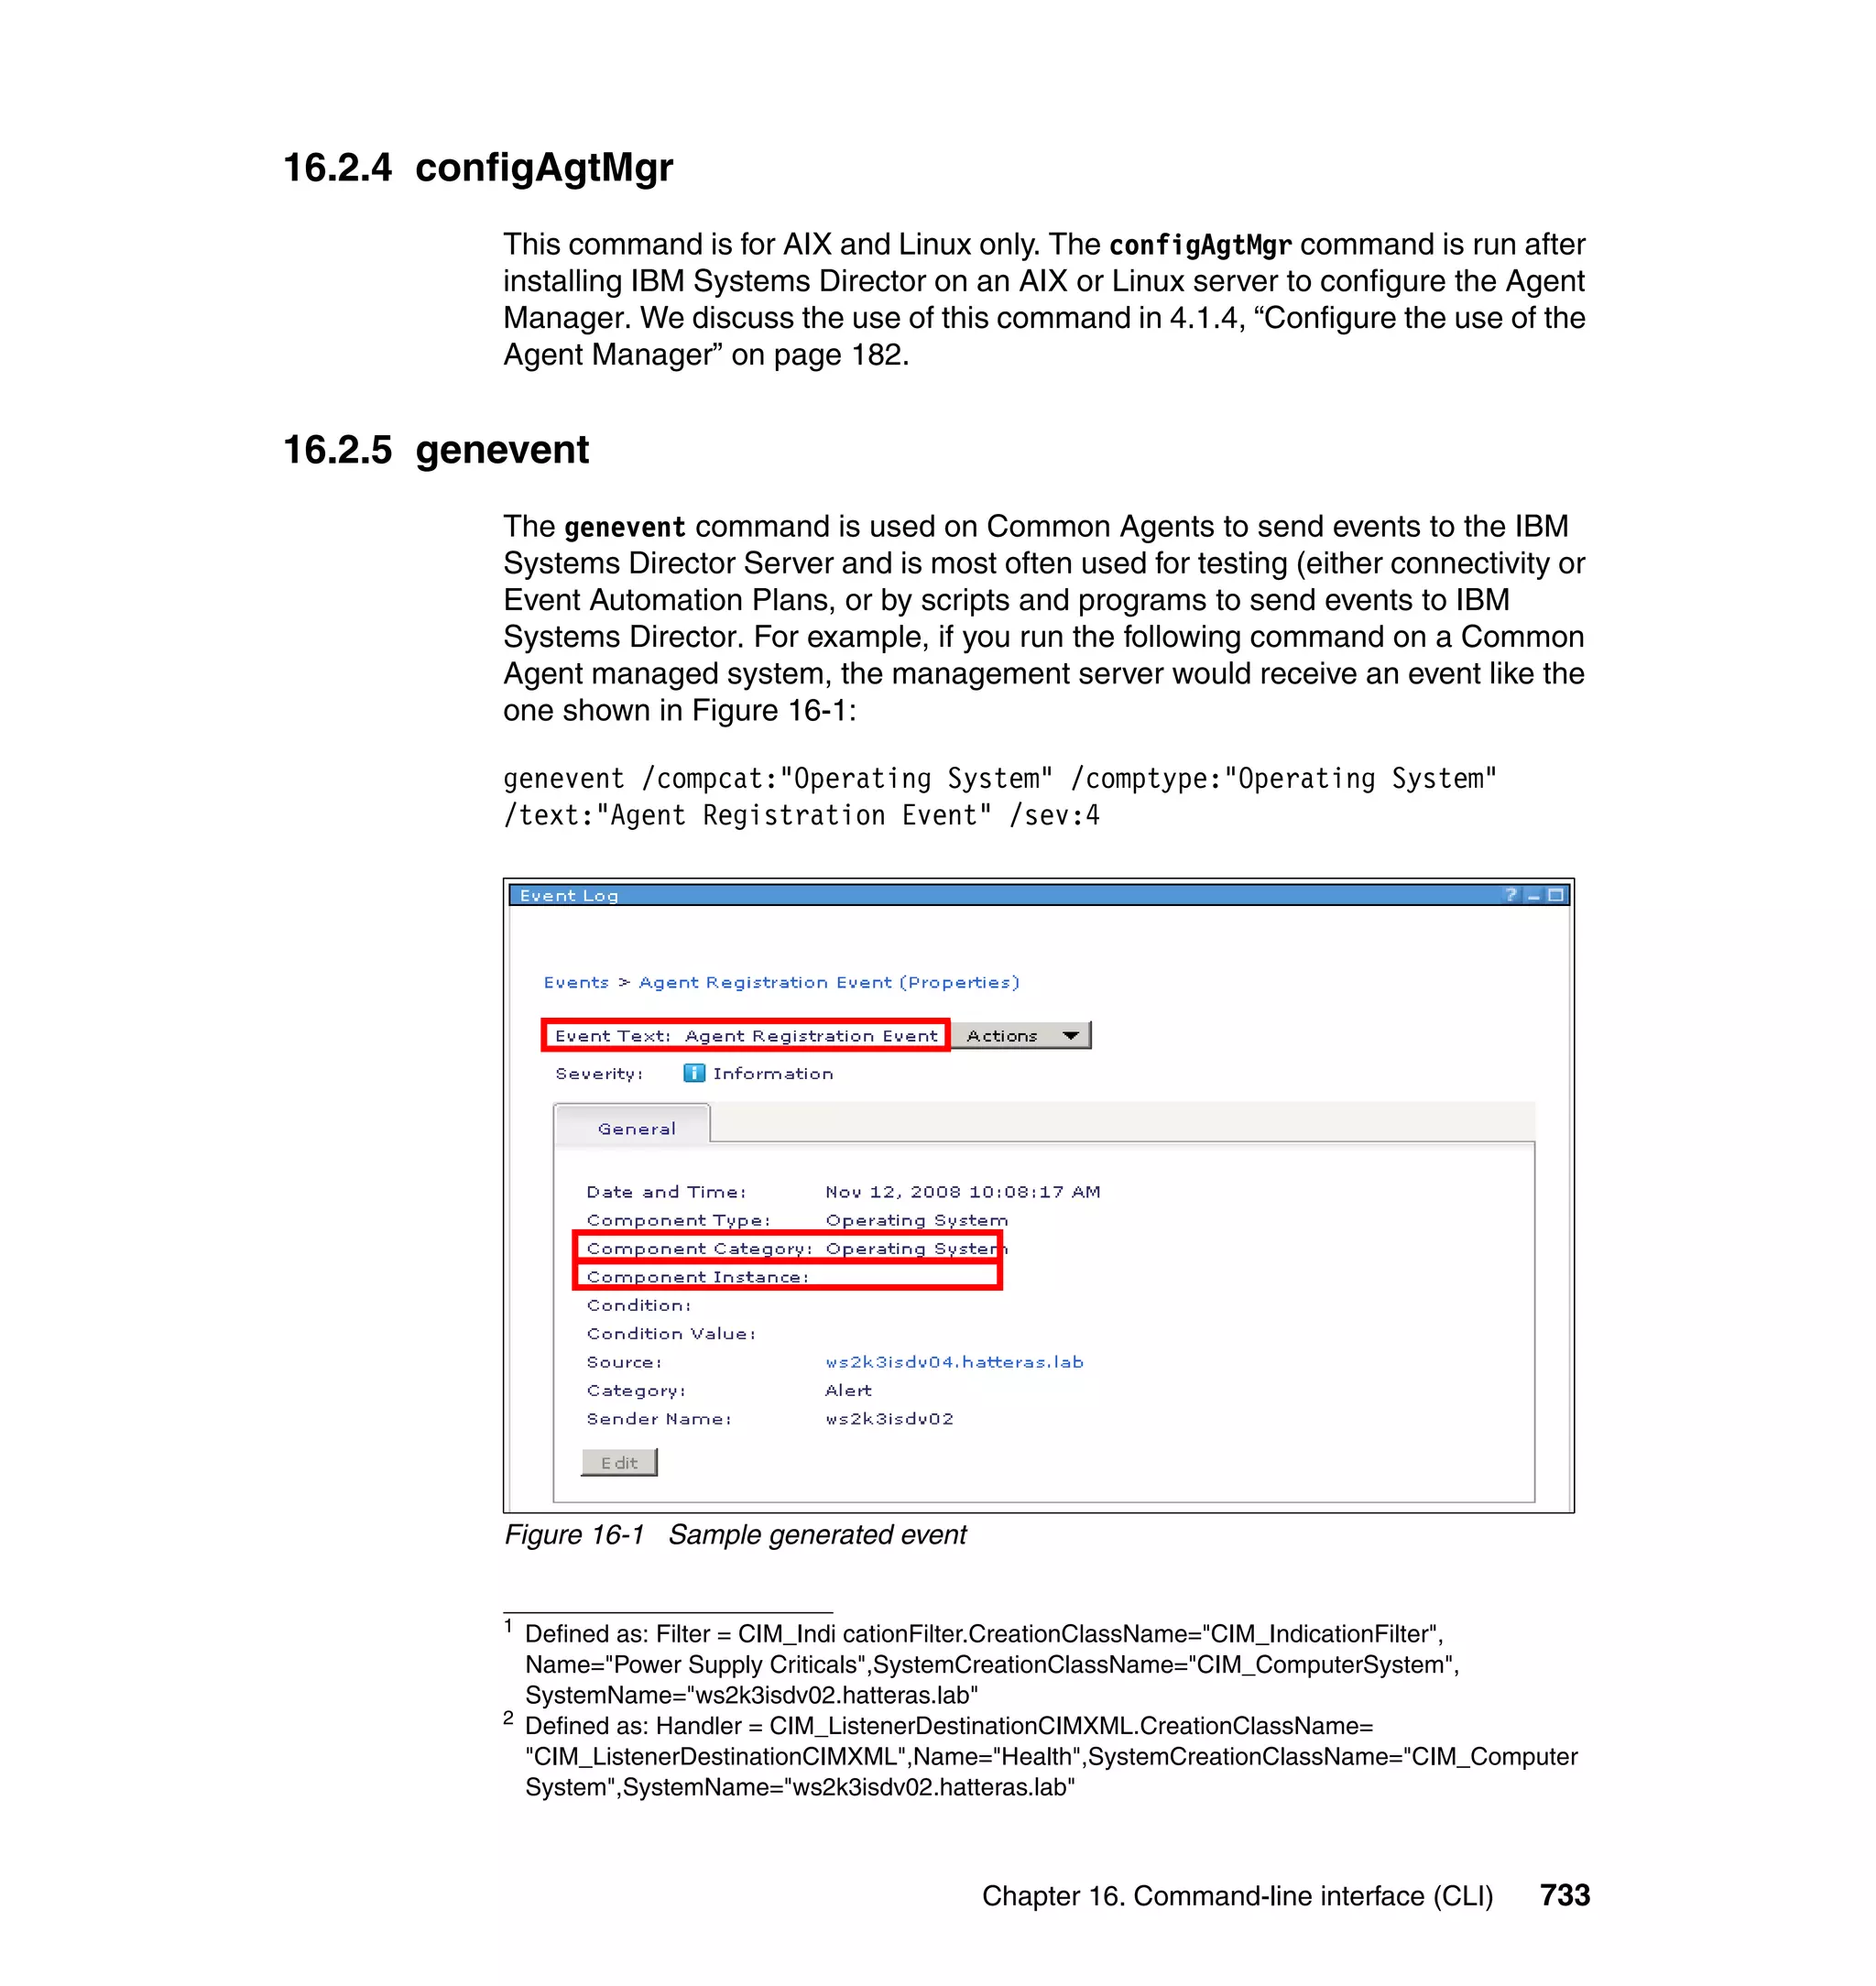
16.2.6 getfru
The getfru command is run from Platform Agents and Common Agents to
retrieve part number information categorized as the Field Replaceable Unit
(FRU) data for the system.
16.2.7 smreset
Use smreset to reset the IBM Systems Director Server to the installation defaults.
After running the smreset command all changes that you made to the
management server will be reset, including discovered systems, inventory, Event
Automation Plans, monitors, and so on, so use this command with care.
16.2.8 smrestore
The smrestore command restores a backup created by smsave:
smrestore [-dbUserName user_name] [-dbUserPwd password] {-sourceDir
directory} {-dbsourceDir directory} {-timestamp timestamp} [-noPrompt
{true|false}]
Where:
-dbUserName and -dbUserPwd are used to specify access to the database.
This user must have privileges to back up the database.
-sourceDir and -dbSourceDir point to the data previously backed up with
smsave.
If you have more than one backup in the source directory you must specify the
-timestamp option. The timestamp is in the format of yyyymmddhhss where yyyy
is the year, mm is the month, dd is the day, hh is the hour, and ss is the seconds.
You can find the timestamp in the <install_root>tpmconfiglogsbackup.log
file.
Note: The system that you run getfru from must have File Transfer Protocol
(FTP) access to the IBM FTP site.](https://image.slidesharecdn.com/implementingibmsystemdirectory6-151014004841-lva1-app6892/75/BOOK-IBM-Implementing-ibm-system-directory-6-1-758-2048.jpg)
![Chapter 16. Command-line interface (CLI) 735
16.2.9 smsave
The smsave command backs up all data associated with IBM Systems Director
Server, including any file-systems data (called the master data) and database
data:
smsave [-dbUserName user_name] [-dbUserPwd password] [-targetDir
directory] [-dbTargetDir directory] [-noPrompt {true|false}]
Where
-dbUserName and -dbUserPwd are used to specify access to the database.
This user must have privileges to back up the database.
The -targetDir and -dbTargetDir options determine where the data will be
stored. The data is saved to <install_root>backupstime_stamp and the
database data set is stored with the master set unless otherwise specified.
Notes: If the database is remote you must specify the -dbSourceDir option.
The -dbUserName and -dbUserPwd options do not apply to the Apache Derby
database.
You must stop the IBM Systems Director Server before using the smrestore
command to restore data.
Notes: The -dbUserName and -dbUserPwd options do not apply to the
Apache Derby database.
If your management server is running on AIX ensure that the Bash shell is
installed.
The database data is stored in a format specific to the type. You cannot
restore data from one database type to another (that is, from an Apache Derby
database to a DB/2 database).
If you have a remote database, the smsave command produces two data sets,
one on the remote database server and another on the IBM Systems Director
Server. These data sets are mated sets. You must maintain and restore these
two data sets together.
The IP address of the management server and the database server can
change from the original installation without any adverse effects.](https://image.slidesharecdn.com/implementingibmsystemdirectory6-151014004841-lva1-app6892/75/BOOK-IBM-Implementing-ibm-system-directory-6-1-759-2048.jpg)


This document provides an overview and guide to implementing IBM Systems Director 6.1. It discusses the key features and components of IBM Systems Director 6.1. It also covers planning considerations for hardware, software, security and other aspects. The document aims to help readers get the most out of IBM Systems Director 6.1 through practical implementation guidance and real-world scenarios.