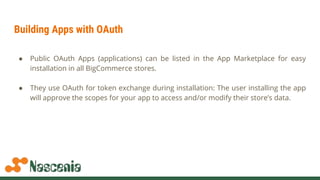
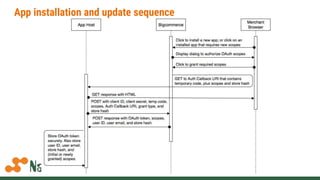
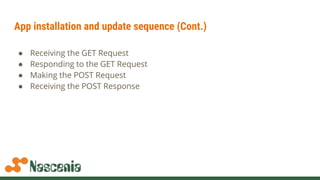
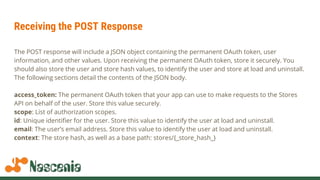
The document discusses building apps for BigCommerce using OAuth authentication. It covers registering an app to get client IDs and secrets, handling billing for paid apps, and the app installation and update sequence which involves exchanging a temporary code for a permanent OAuth token through callback URLs. Code examples show making API requests using the OAuth token to access a store's data on behalf of the authenticated user.
2. Building Apps with OAuth
● Public OAuth Apps (applications) can be listed in the App Marketplace for easy
installation in all BigCommerce stores.
● They use OAuth for token exchange during installation: The user installing the app
will approve the scopes for your app to access and/or modify their store’s data.
3. Monetizing Your App
● If you want to charge merchants for your app, please note that BigCommerce
expects you to handle the billing aspects of the transaction. Your app needs to take
care of collecting the fee from the merchant.
● Under the standard contract, within 30 days of collecting this revenue, you must
send BigCommerce 20% and retain the remaining 80% for yourself. Once your app
is published, a mandatory revenue-share reporting form will be sent to the primary
contact on your partner account, at the beginning of each month.
4. App Registration
● Once you have a sandbox store, you must register your app to get your Client ID
and Client Secret.
● The Client ID value uniquely identifies your app and you will need to pass it in the
header of all your requests to the Stores API.
● The Client Secret value is a secret that your app and BigCommerce share. You do
need to pass the Client Secret value once during the app installation sequence.
Thereafter, BigCommerce uses it to sign payloads in load, uninstall, and remove
user requests, and your app uses it to verify the signature to ensure that the
request is coming from BigCommerce.
5. Technical Prerequisites
Before you register your app, consider the required and optional steps below.
Auth Callback and Load Callback URIs
● You must have an Auth Callback URI and a Load Callback URI to register your app.
● Because the Auth Callback URI and Load Callback URI requests originate from the
browser and not from BigCommerce, you can use non–publicly-available URIs and
a self-signed certificate for a quick start. However, you must switch to – and test
your app with – a publicly available Auth Callback URI and Load Callback URI before
submitting your app for consideration in the App Store.
7. Technical Prerequisites(Cont.)
Requesting OAuth Scopes
If you know the OAuth scopes that your app requires, you should select these. If you do
not yet know the scopes that you need, you can just request minimal permissions (such
as Information: Read-Only) to get started. However, once you determine the scopes you
need, you must:
● Modify the scopes of your app in My Apps and save the changes.
● Obtain the new OAuth token during the App Installation or Update flow.
● Retest your app to make sure it still functions properly with the new token.
9. App installation and update sequence (Cont.)
● Receiving the GET Request
● Responding to the GET Request
● Making the POST Request
● Receiving the POST Response
10. Receiving the GET Request
● The GET request to your Auth Callback URI contains a temporary code that you can exchange
for a permanent OAuth token. It also includes a unique value that identifies the store installing
or updating your app, as well as other values.
11. Receiving the GET Request(Cont.)
Parameters
Here, we discuss the details of the full list of parameters and values included in the GET request from BigCommerce
to your Auth Callback URI. BigCommerce passes these within the URI itself as query parameters.
● code: Temporary code to exchange for a permanent OAuth token.
● scope: List of scopes authorized by the user. As a best practice, your app should validate this list to ensure that
it matches the app’s needs, and fail if it does not. However, at this time, the user does not have any
opportunity to pick and choose between scopes. The dialog presented to the user requires the user to approve
all scopes or none.
● context: The store hash: a unique value that identifies the store on which a logged-in user has clicked to install
or your app. BigCommerce passes this along with a context path, as follows: stores/{store_hash}. Save the
store hash value, because you will need to pass it in all your requests to the Stores API.
12. Receiving the GET Request(Cont.)
Example – Initial Installation
This example initiates the token exchange, with a requested scope of store_v2_orders:
GET /auth?code=qr6h3thvbvag2ffq&scope=store_v2_orders&context=stores/g5cd38 HTTP/1.1
Host: app.example.com
(Note that when your app receives a new token, any previously issued token is invalidated.)
13. Responding to the GET Request
● Upon receiving the GET request at your Auth Callback URI, your app should return some HTML
to the merchant browser.
● BigCommerce renders this in an iframe inside of the control panel. It could be a form that
collects further information from the user, or you could redirect the user to your app’s main
page.
14. Making the POST Request
● The POST request’s primary purpose is to exchange the temporary access code for a
permanent OAuth token. However, your app must pass a number of additional values to
accomplish the exchange. Pass the parameters and their values inside the request body, using
query parameters and URL-encoding. To achieve this, you must include the following HTTP
header:
Content-Type: application/x-www-form-urlencoded
● Make the POST request to the following address:
https://login.bigcommerce.com/oauth2/token
15. Making the POST Request(Cont.)
Parameters
Include values for each of the following parameters.
client_id: The Client ID for your app, obtained during registration.
client_secret: The Client Secret for your app, obtained during registration.
code: Temporary access code received in the GET request discussed above.
scope: List of OAuth scopes received in the GET request discussed above.
grant_type: Always use the following: authorization_code.
redirect_uri: Must be identical to your registered Auth Callback URI.
context: The store hash received in the GET request, in the format: stores/{_store_hash_}
16. Making the POST Request(Cont.)
POST /oauth2/token HTTP/1.1
Host: login.bigcommerce.com
Content-Type: application/x-www-form-urlencoded
Content-Length: 186
client_id={CLIENT_ID}&client_secret={CLIENT_SECRET}&code=qr6h3thvbvag2ffq&scope=store_v2_ord
ers&grant_type=authorization_code&redirect_uri=https://app.example.com/oauth&context=stores/{
STORE_HASH}
17. Receiving the POST Response
The POST response will include a JSON object containing the permanent OAuth token, user
information, and other values. Upon receiving the permanent OAuth token, store it securely. You
should also store the user and store hash values, to identify the user and store at load and uninstall.
The following sections detail the contents of the JSON body.
access_token: The permanent OAuth token that your app can use to make requests to the Stores
API on behalf of the user. Store this value securely.
scope: List of authorization scopes.
id: Unique identifier for the user. Store this value to identify the user at load and uninstall.
email: The user’s email address. Store this value to identify the user at load and uninstall.
context: The store hash, as well as a base path: stores/{_store_hash_}