Razorpay Payment Gateway Integration In iOS Swift
•
0 likes•546 views

Razorpay is a popular payment gateway solution in India that provides APIs and SDKs for integrating payments into mobile apps. This document discusses how to integrate Razorpay payments into an iOS app built with Swift. It involves installing the Razorpay pod, setting up a basic UI, importing Razorpay, initializing it with the public key, handling payment callbacks, and calling the open method to launch the Razorpay payment screen when a user clicks pay. Possible error codes for failed transactions are also provided. The complete demo project code is available on GitHub.

Recommended
Recommended
More Related Content
What's hot
What's hot (20)
Similar to Razorpay Payment Gateway Integration In iOS Swift
Similar to Razorpay Payment Gateway Integration In iOS Swift (20)
More from InnovationM
More from InnovationM (20)
Recently uploaded
Recently uploaded (20)
Razorpay Payment Gateway Integration In iOS Swift
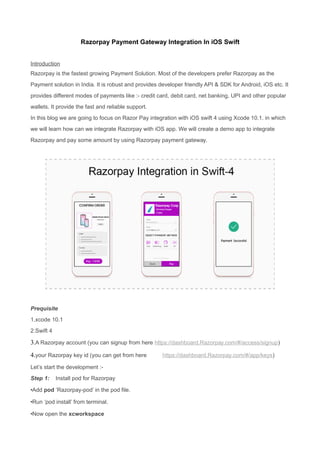
- 1. Razorpay Payment Gateway Integration In iOS Swift Introduction Razorpay is the fastest growing Payment Solution. Most of the developers prefer Razorpay as the Payment solution in India. It is robust and provides developer friendly API & SDK for Android, iOS etc. It provides different modes of payments like :- credit card, debit card, net banking, UPI and other popular wallets. It provide the fast and reliable support. In this blog we are going to focus on Razor Pay integration with iOS swift 4 using Xcode 10.1. in which we will learn how can we integrate Razorpay with iOS app. We will create a demo app to integrate Razorpay and pay some amount by using Razorpay payment gateway. Prequisite 1.xcode 10.1 2.Swift 4 3.A Razorpay account (you can signup from here https://dashboard.Razorpay.com/#/access/signup) 4.your Razorpay key id (you can get from here https://dashboard.Razorpay.com/#/app/keys) Let’s start the development :- Step 1: Install pod for Razorpay •Add pod ‘Razorpay-pod’ in the pod file. •Run ‘pod install’ from terminal. •Now open the xcworkspace
- 2. Step 2: Develop a basic UI as given below. Step 3: Import Razorpay to your view Controller. import Razorpay step 4 : 1.Create action outlet of pay now button in your view controller. 1 2 @IBAction func payNowClicked(_ sender: Any) { } 2. Create instance reference variable of type Razorpay. 1 private var razorpay:Razorpay? 3. Initialise that reference variable in viewDidLoad method of view controller by calling init method with public key and delegate. 1 2 3 4 override func viewDidLoad() { super.viewDidLoad() razorpay = Razorpay.initWithKey("rzp_test _FYCQAsmKTFF8FR", andDelegate: self) } 4. Create extension of view controller and confirm RazorpayPaymentCompletionProtocol as given below :- a) onPaymentSuccess(_ payment_id: String) b) onPaymentError(_ code: Int32, description str: String)
- 3. 1 2 3 4 5 6 7 8 9 10 11 12 13 14 15 extension ViewController: RazorpayPaymentCompletionProtocol { func onPaymentSuccess(_ payment_id: String) { let alert = UIAlertController(title: "Paid", message: "Payment Success", preferredStyle: .alert) let action = UIAlertAction(title: "OK", style: .cancel, handler: nil) alert.addAction(action) self.present(alert, animated: true, completion: nil) } func onPaymentError(_ code: Int32, description str: String) { let alert = UIAlertController(title: "Error", message: " (code)n(str)", preferredStyle: .alert) let action = UIAlertAction(title: "OK", style: .cancel, handler: nil) alert.addAction(action) self.present(alert, animated: true, completion: nil) } } As you can see in above code we have two methods onPaymentSuccess and onPaymentError the success method will be called if payment transaction is completed successfully where the onPaymentError will be called if the transaction is not completed successfully. it provides some error codes as given below :- Possible values for a failure code are: •0: Network error •1: Initialization failure / Unexpected behavior •2: Payment cancelled by user Now inside action outlet of pay button create parameter for razor pay like.
- 4. 1 2 3 4 5 6 7 8 9 10 11 12 13 let options: [String:Any] = [ "amount" : "100" //mandatory in paise like:- 1000 paise == 10 rs "description": "purchase description" "image": "https://url- to-image.png", "name": "business or product name" "prefill": [ "contact": "9797979797", "email": "foo@bar.com" ], "theme": [ "color": "#F37254" ] ] Progress Bar: To support theme color in the progress bar, pass HEX color values only. after setting all parameters call the open method of Razorpay 1 razorpay?.open(options) Complete Demo Project you can download here :- https://github.com/swiftserieschannel/RazorPayTest