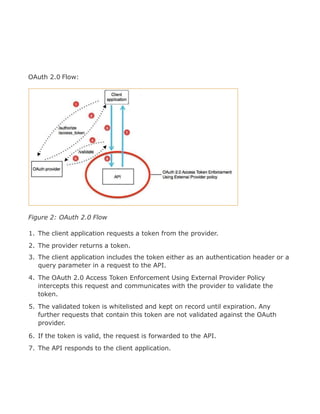
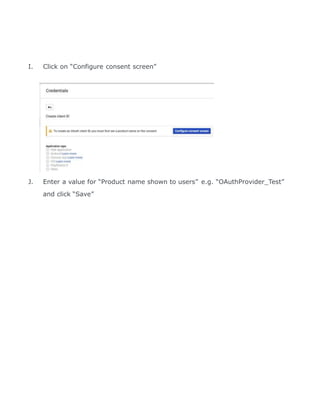
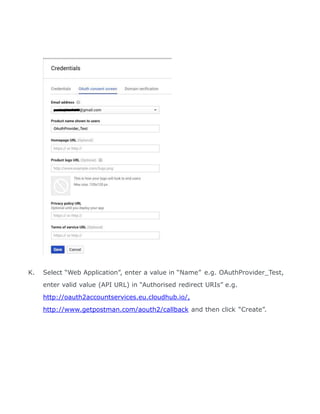
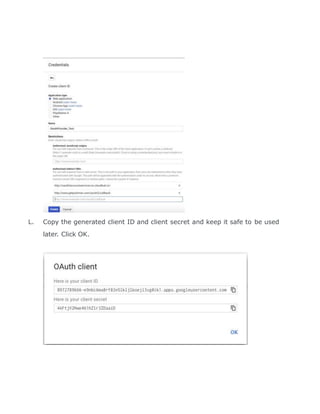
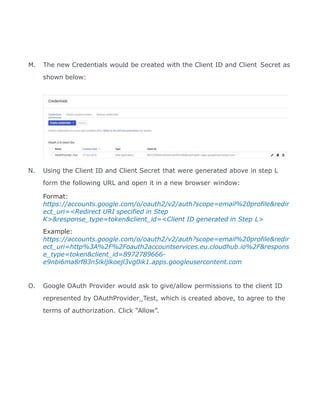
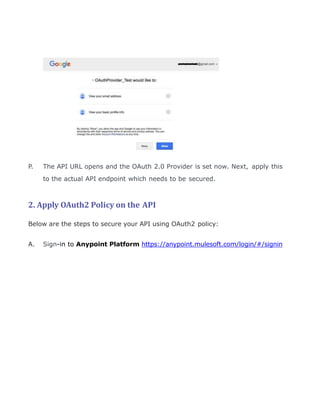
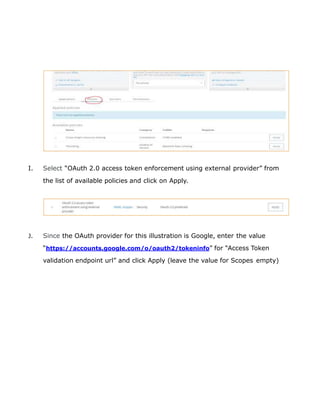
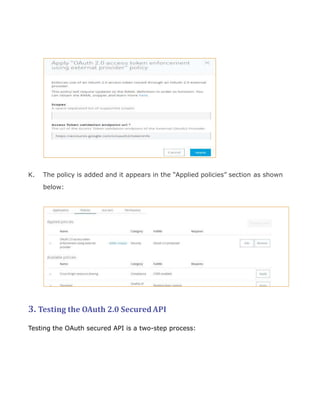
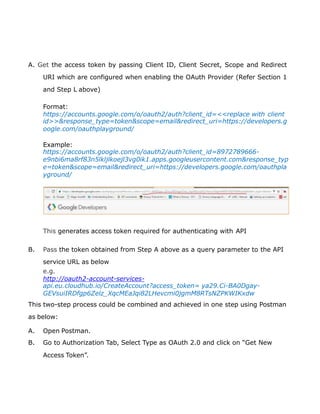
call girls in Kamla Market (DELHI) 🔝 >༒9953330565🔝 genuine Escort Service 🔝✔️✔️
Securing api with_o_auth2
1. Implementing OAUTH2 on an API
The objective of this recipe is to secure a RAML based API using OAuth2.
Figure 1: API management
2. OAuth 2.0 Flow:
Figure 2: OAuth 2.0 Flow
1. The client application requests a token from the provider.
2. The provider returns a token.
3. The client application includes the token either as an authentication header or a
query parameter in a request to the API.
4. The OAuth 2.0 Access Token Enforcement Using External Provider Policy
intercepts this request and communicates with the provider to validate the
token.
5. The validated token is whitelisted and kept on record until expiration. Any
further requests that contain this token are not validated against the OAuth
provider.
6. If the token is valid, the request is forwarded to the API.
7. The API responds to the client application.
3. Pre requisites
1. Anypoint Platform
a. MuleSoft Anypoint Studio
b. CloudHub
c. Anypoint API Gateway
The application could be deployed to an on premise environment as well, but
for this recipe the cloud-based MuleSoft integration platform CloudHub, also
called as iPaaS (Integration Platform as a Service) would be used.
2. OAuth 2.0 Provider - Google OAuth
3. Postman for testing the API
4. An API for extracting Account information from Salesforce is already available
to be consumed
The Process
High Level Steps:
1. Enabling OAuth 2.0 Provider to ensure that the API requires valid OAuth
tokens through the simple application of policies on-the fly using Anypoint API
Manager
2. Applying OAuth 2.0 Policy on an API by specifying an OAuth 2.0 security
scheme in its RAML specification and implementing it with Anypoint Studio.
3. Testing OAuth 2.0 Secured API and interacting with the API’s OAuth
protected resources through its RAML console with client ID and client secrets
that can be obtained through the Anypoint API Portal’s application registration
feature
4. 1. Enabling OAuth 2.0 Provider
Any OAuth provider could be used, but for this case using Google OAuth Provider.
Below are the steps to configure Google as OAuth provider:
A. Create a developer account at https://console.developers.google.com/, if you
don’t have one.
B. Login with this developer account at https://console.developers.google.com/
C. Click "CREATE PROJECT".
D. Enter the project name “oauth2-test-provider” as shown below:
5. E. Click “CREATE”. Google will now create the project and this will take a
minute or so.
F. Click “Credentials” in the screen that follows as shown below:
G. Click “Create credentials”
7. I. Click on “Configure consent screen”
J. Enter a value for “Product name shown to users” e.g. “OAuthProvider_Test”
and click “Save”
8. K. Select “Web Application”, enter a value in “Name” e.g. OAuthProvider_Test,
enter valid value (API URL) in “Authorised redirect URIs” e.g.
http://oauth2accountservices.eu.cloudhub.io/,
http://www.getpostman.com/aouth2/callback and then click “Create”.
9. L. Copy the generated client ID and client secret and keep it safe to be used
later. Click OK.
10. M. The new Credentials would be created with the Client ID and Client Secret as
shown below:
N. Using the Client ID and Client Secret that were generated above in step L
form the following URL and open it in a new browser window:
Format:
https://accounts.google.com/o/oauth2/v2/auth?scope=email%20profile&redir
ect_uri=<Redirect URI specified in Step
K>&response_type=token&client_id=<Client ID generated in Step L>
Example:
https://accounts.google.com/o/oauth2/v2/auth?scope=email%20profile&redir
ect_uri=http%3A%2F%2Foauth2accountservices.eu.cloudhub.io%2F&respons
e_type=token&client_id=8972789666-
e9nbi6ma8rf83n5lkljlkoejl3vg0ik1.apps.googleusercontent.com
O. Google OAuth Provider would ask to give/allow permissions to the client ID
represented by OAuthProvider_Test, which is created above, to agree to the
terms of authorization. Click “Allow”.
11. P. The API URL opens and the OAuth 2.0 Provider is set now. Next, apply this
to the actual API endpoint which needs to be secured.
2. Apply OAuth2 Policy on the API
Below are the steps to secure your API using OAuth2 policy:
A. Sign-in to Anypoint Platform https://anypoint.mulesoft.com/login/#/signin
12. B. After successful login, the following screen shall be displayed:
C. Click on “API Manager” (or can also be navigated through the top left menu)
D. The API administration page appears, listing all active APIs, if there are any
and which the user is authorized to see.
E. Search for the API over which the policy needs to be applied. (e.g.
AccountCreation depicted below for demonstration).
13. F. Click on the version as indicated above (1.0 in this case)
G. API administration screen shall be presented to the user as shown below:
H. Click on Policies tab that appears as you scroll down the API administration
page.
14. I. Select “OAuth 2.0 access token enforcement using external provider” from
the list of available policies and click on Apply.
J. Since the OAuth provider for this illustration is Google, enter the value
“https://accounts.google.com/o/oauth2/tokeninfo” for “Access Token
validation endpoint url” and click Apply (leave the value for Scopes empty)
15. K. The policy is added and it appears in the “Applied policies” section as shown
below:
3. Testing the OAuth 2.0 SecuredAPI
Testing the OAuth secured API is a two-step process:
16. A. Get the access token by passing Client ID, Client Secret, Scope and Redirect
URI which are configured when enabling the OAuth Provider (Refer Section 1
and Step L above)
Format:
https://accounts.google.com/o/oauth2/auth?client_id=<<replace with client
id>>&response_type=token&scope=email&redirect_uri=https://developers.g
oogle.com/oauthplayground/
Example:
https://accounts.google.com/o/oauth2/auth?client_id=8972789666-
e9nbi6ma8rf83n5lkljlkoejl3vg0ik1.apps.googleusercontent.com&response_typ
e=token&scope=email&redirect_uri=https://developers.google.com/oauthpla
yground/
This generates access token required for authenticating with API
B. Pass the token obtained from Step A above as a query parameter to the API
service URL as below
e.g.
http://oauth2-account-services-
api.eu.cloudhub.io/CreateAccount?access_token= ya29.Ci-BA0Dgay-
GEVsuiIRDfgp6Zelz_XqcMEaJqi82LHevcmi0jgmM8RTsNZPKWIKxdw
This two-step process could be combined and achieved in one step using Postman
as below:
A. Open Postman.
B. Go to Authorization Tab, Select Type as OAuth 2.0 and click on “Get New
Access Token”.
17. C. Provide all the details as shown below along with the Client ID and Client
Secret generated in Section 1 and Step L above.
18. NOTE: The Callback URL of Postman which is shown in this screenshot
should be configured as Authorized Redirect URI while configuring
project (Shown in Step L), which we already did.
D. Click on “Request Token”. This will generate the access_token as shown
below. Change “Add token to” from ‘Header’ to ‘Query Parameter’, the access
token will be appended to URL as query parameter and click “Use Token”
NOTE: Keep ‘Add token to’ as is if you want to pass the token in the
header
E. Trigger a POST request with the URL “http://oauth2-account-services-
api.eu.cloudhub.io/CreateAccount“ and a JSON request body as shown below.
A valid API response should be shown in the Body tab of Response section.
19. Anticipated Issues
1. If an invalid access_token is passed the following error response
“invalid_token” should be shown. Please validate and confirm a right
access_token is used.