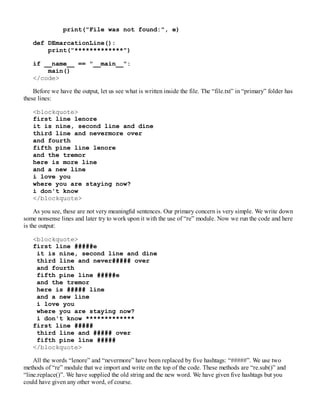
- Ethical hacking involves legally testing a system's security vulnerabilities for defensive purposes. It is important for ethical hackers to understand cybercrime laws.
- Any unauthorized access or penetration of other systems is illegal. Ethical hackers should only experiment on virtual machines and not any real systems without permission.
- Examples of illegal computer crimes include generating fake credit cards, setting up fraudulent websites to steal credit card numbers, and hacking into other systems. As an ethical hacker, all experiments must be conducted legally and on one's own virtual systems.


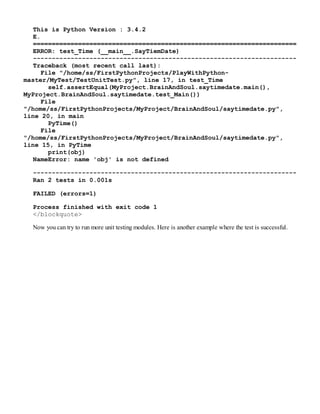
![We first issue the command and in the next step we check with the “ls” command to see whether those
directories exist anymore.
hagudu@hagudu-H81M-S1:∼$ sudo rm -rf Ethical/ Hacking/
[sudo] password for hagudu:
hagudu@hagudu-H81M-S1:∼$ ls
It worked—two directories have been removed successfully. Let us try to understand it more. We already
know that the “rm” command stands for the word “remove” But what about the “-rf” command that follows it?
The command “-rf” means “do it recursively with force.” Generally this “-rf” command is used to remove
directories. You have to be very careful about using this command because in Linux, once you have used this
command, the file or directory is deleted permanently. It is next to impossible to retrieve them. It is wise to be
very careful about using it.
Hopefully you have also noticed that we have started our command line with “sudo” . And you write
“sudo”, it asks for the password. In this case, you always give the password that you usually type down to log
into the system.
Let us again make the directory properly and this time we name it “Ethical-Hacking”, so that the system
will no longer interpret it as two separate directories.
hagudu@hagudu-H81M-S1:∼$ mkdir Ethical-Hacking
hagudu@hagudu-H81M-S1:∼$ cd Ethical-Hacking/
hagudu@hagudu-H81M-S1:∼/Ethical-Hacking$ ls
hagudu@hagudu-H81M-S1:∼/Ethical-Hacking$ touch file1 file2
hagudu@hagudu-H81M-S1:∼/Ethical-Hacking$ ls
file1 file2
hagudu@hagudu-H81M-S1:∼/Ethical-Hacking$
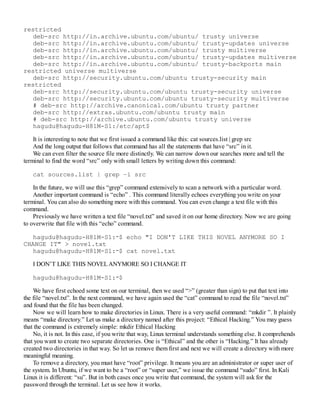
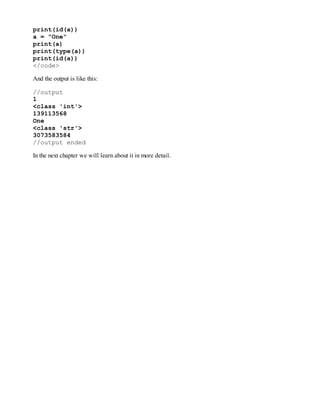
First we have made directory “Ethical-Hacking ”. Then we use “cd” to go inside it and, with the help of
“ls”, we checked that the directory is empty. Afterwards we issue the “touch” command to create two files:
“file1” and “file2”. Again we issue the “ls” command to check that two files have been created successfully.
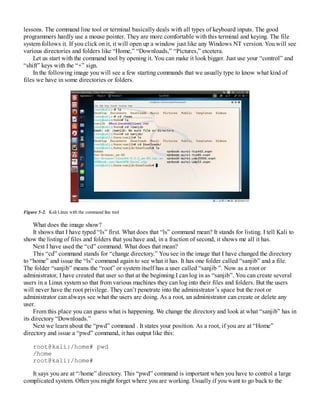
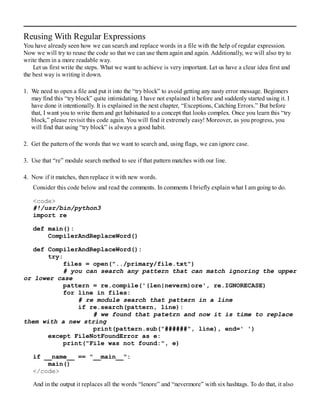
In Ethical Hacking, anonymity is a very big deal. In the next chapter we learn it in great detail. Before that
you need to understand that, in the process of being anonymous, it is good to be any user rather than the root
user. As the root or super user, you first add a user in your virtual Kali Linux. Set a password. Shut down
Kali. Reboot and log in as the new user. It is a good practice.
Now how could you add a user? Let us open our virtual Kali and as the root user we’d use the “adduser”
command on the terminal. Suppose our new user has a name like “xman”. In that case, the command will be
very simple: adduser xman.
Once you have issued this command, Kali asks for the password and other details. Give a strong password
of at least eight characters with alphanumeric characters. Now shut down your machine and log in as “xman”.
For other details, it is not mandatory that you need to give your real identity. You can fill them with any data.
As the root or super user you can add as many users as you wish. You can delete them any time. You can
restrict their activities from any angle. As an administrator you can add a user who will not be able to log in
after six months. You can create groups and set a rule so that entry is restricted. Some users can enter into that
group. Some can’t.
Primarily you need to add one user, “xman”, and log in the system as the new one. A user is not permitted
to access or tamper any file of the root or super user. But as super user you can always change the file
permission. It is a very important concept from every angle. On the Internet, the concept of file permission is
extremely important.
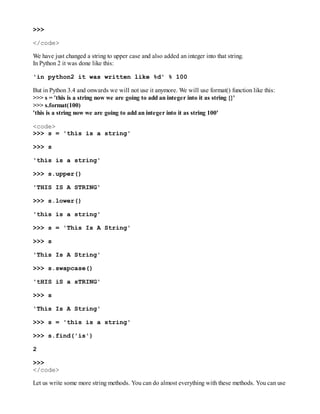
Any file has three types of permissions related to it. It can be only “read only.” The meaning is clear. You
can’t write on it or execute it. It can be “write only.” Another state of file is “executable mode .” If it is
executable, you can perform any action by running it. You can write a simple Python program. This program](https://image.slidesharecdn.com/beginningethicalhackingwithpython-220329051229/85/Beginning-Ethical-Hacking-with-Python-pdf-35-320.jpg)
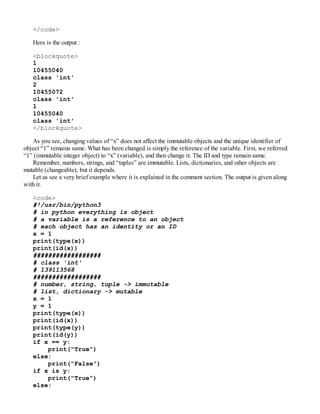
![will take inputs from users and give outputs. After writing a Python file you can make it executable.
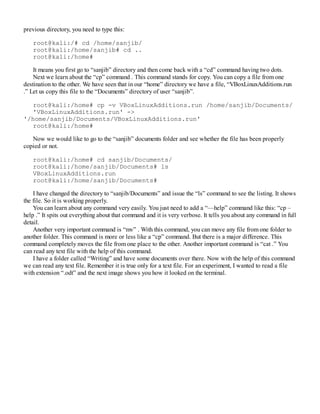
Let us see how it happens. Let us open our Kali Linux terminal and, with the help of the “ls” command ,
we see what we have there presently.
sanjib@kali:∼$ cd Documents/
sanjib@kali:∼/Documents$ ls
VBoxLinuxAdditions.run
sanjib@kali:∼/Documents$ ls -la
total 7048
drwxr-xr-x 2 sanjib sanjib 4096 May 29 10:30 .
drwxr-xr-x 18 sanjib sanjib 4096 Jun 3 09:59 ..
-r-xr-xr-x 1 root root 7208397 May 29 10:30
VBoxLinuxAdditions.run
sanjib@kali:∼/Documents$
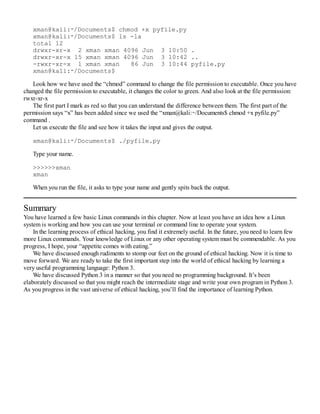
First we go to the “Documents” folder and issue the “ls” command. That shows only one file:
“VBoxLinuxAdditions.run ”. Our next command is “ls –la” . It means: we want a listing of all files with all
details. You can see the difference above. The output is in red. It shows two hidden files with the previously
seen file. And it also shows the owners of files and it also shows the permissions. Let us consider this line
minutely.
-r-xr-xr-x 1 root root 7208397 May 29 10:30
VBoxLinuxAdditions.run
It tells us that the owner of this file is “root”. And the starting line is also very important. It handles file
permissions.
r-xr-xr-x
What does this mean? It has three distinct parts. The first part is “r-x ”. The second and third parts are also
the same: “r-x”. The first part is for the owner of the file or current user. The second part is for “group .” And
the final or third part is for the super user who is viewing this file. I have already created another user,
“sanjib”, and have logged in as “sanjib”. That is why you see this kind of output: sanjib@kali:∼/Documents$
ls -la
Now to make this concept more clear we will create a user named “xman”. And we will log in as “xman”
and see what we have in our Documents folder.
To create a new user, you need to log in as a root or super user. Let us assume we have logged in as
“root”. The commands and the output are given below.
root@kali:∼# adduser xman
Adding user `xman' ...
Adding new group `xman' (1002) ...
Adding new user `xman' (1001) with group `xman' ...
Creating home directory `/home/xman' ...
Copying files from `/etc/skel' ...
Enter new UNIX password:
Retype new UNIX password:
passwd: password updated successfully
Changing the user information for xman
Enter the new value, or press ENTER for the default
Full Name []: xman anonymous
Room Number []: 123](https://image.slidesharecdn.com/beginningethicalhackingwithpython-220329051229/85/Beginning-Ethical-Hacking-with-Python-pdf-36-320.jpg)
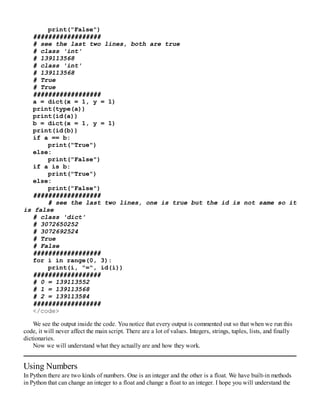
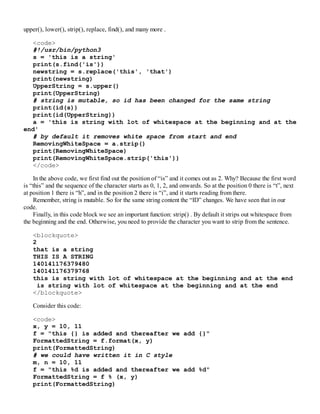
![Work Phone []: 321
Home Phone []: 213
Other []: anon
Is the information correct? [Y/n] y
root@kali:∼#
Congratulation! You have just successfully created a new user called
'xman'. You notice that it had asked for the password and told you to
retype the UNIX password again.
Let us log out as “root” and log in as “xman”. Let us also go to the “Documents” folder of “xman” and see
what we have.
xman@kali:∼$ cd Documents/
xman@kali:∼/Documents$ ls
xman@kali:∼/Documents$ ls -la
total 8
drwxr-xr-x 2 xman xman 4096 Jun 3 10:33 .
drwxr-xr-x 14 xman xman 4096 Jun 3 10:33 ..
xman@kali:∼/Documents$
Everything goes as expected. Only one thing is missing. This new user does not have this line: -r-xr-xr-x 1
root root 7208397 May 29 10:30 VBoxLinuxAdditions.run.
Maybe we had moved that executable file from any root folder to the “Documents” folder of user “sanjib”
before.
Now we already know how to create a file using “nano” text editor. So we can move on and have a very
small Python file . Presumably you don’t know Python, so I keep it very simple just to show how we can
change file permissions.
#!/usr/bin/python3
print("TYpe your name.")
inputs = input(">>>>>>")
outputs = inputs
def main():
print(outputs)
if __name__ == '__main__':
main()
Inside “nano” editor we write a simple program that will take input and give output. Save the file as
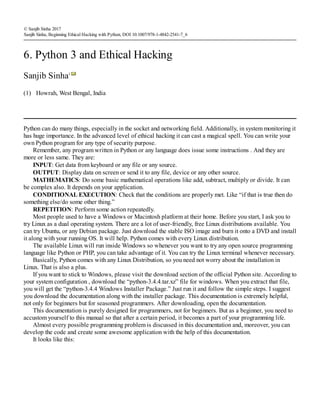
“pyfile.py” and exit “nano,” and let us issue “ls –la” to see what it shows.
xman@kali:∼/Documents$ ls -la
total 12
drwxr-xr-x 2 xman xman 4096 Jun 3 10:50 .
drwxr-xr-x 15 xman xman 4096 Jun 3 10:42 ..
-rw-r--r-- 1 xman xman 86 Jun 3 10:44 pyfile.py
xman@kali:∼/Documents$
As you see, the file says everything. It says that now “Documents” folder has one new file, “pyfile.py ”,
and it has been created at 10:44. The owner is “xman” and it has file permissions like this: rw-r--r--
Now you know what this means. It means: the user “xman” can read and write this file but he can’t
“execute” this file.](https://image.slidesharecdn.com/beginningethicalhackingwithpython-220329051229/85/Beginning-Ethical-Hacking-with-Python-pdf-37-320.jpg)

![(1)
© Sanjib Sinha 2017
Sanjib Sinha, Beginning Ethical Hacking with Python, DOI 10.1007/978-1-4842-2541-7_7
7. Python Environment
Sanjib Sinha1
Howrah, West Bengal, India
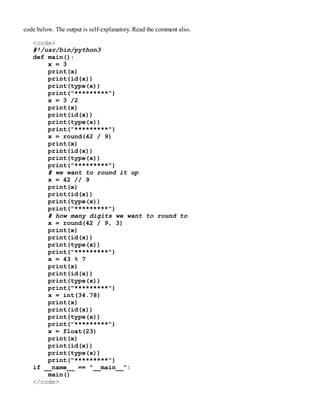
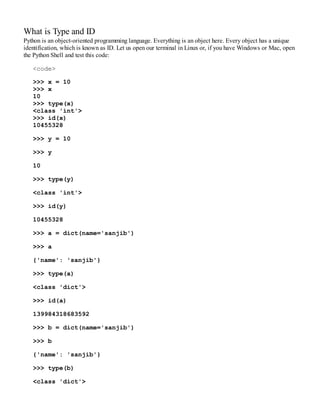
You are going to learn Python 3. Python 2 has been around for a long time and has a huge library and module
support, but Python 3 is the future language. You can also easily install Python 3. Consult the download section
of the official web site. In any modern Linux distribution , open your terminal and type “python3”. It will give
you the Python interpreter or shell where you can write your code.
Remember, Python comes with every modern Linux distribution. So you need not install it anymore. But a
few packages you might need to install. There are tons of tutorials and a lot of community help you can get
over the Internet.
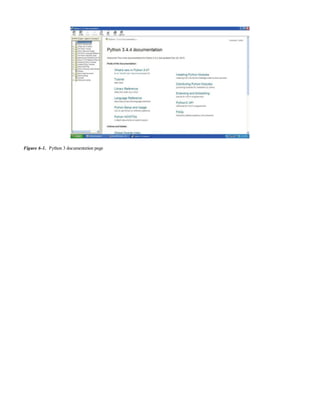
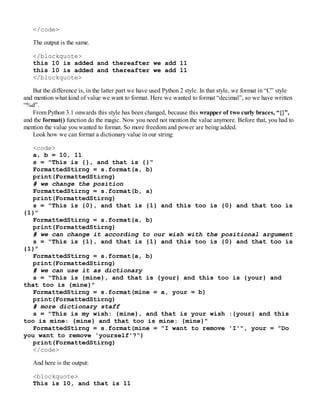
The Python interpreter on a typical Linux distribution looks like this:
Figure 7-1. Image of Python interpreter
In any modern Linux distribution, you need not do anything. Open the terminal and type “python3”, and you
will have an output like this:
hagudu@hagudu-H81M-S1:∼$ python3
Python 3.4.3 (default, Oct 14 2015, 20:28:29)
[GCC 4.8.4] on linux
Type "help", "copyright", "credits" or "license" for more information.
>>>](https://image.slidesharecdn.com/beginningethicalhackingwithpython-220329051229/85/Beginning-Ethical-Hacking-with-Python-pdf-42-320.jpg)


![for i in x:
print(i)
</code>
It will give all the numbers you have inside the tuple.
On the contrary, “list” is another sequential type that is mutable and you can change it as necessary .
Consider this code:
<code>
a = [1, 2, 3, 4]
print(a)
print(type(a))
</code>
It has output like this:
<blockquote>
[1, 2, 3, 4]
class 'list'
</blockquote>
You can insert or update it as you need. Suppose you want to append the “tuple x” in this list and you also
want to insert the “tuple x” in the beginning. So the full code looks like this:
<code>
#!/usr/bin/python3
# tuple
x = (1, 2, 3, 4)
# list
a = [1, 2, 3, 4]
# appending tuple x to list
a.append(x)
print(a)
# inserting tuple x in the first position
a.insert(0, x)
print(a)
# Now iterating the final list a
for i in a:
print(i)
</code>
And the output is like this:
<blockquote>
[1, 2, 3, 4, (1, 2, 3, 4)] # after appending
[(1, 2, 3, 4), 1, 2, 3, 4, (1, 2, 3, 4)] # after inserting
# When we iterate the list 'a' the output looks like this
(1, 2, 3, 4)](https://image.slidesharecdn.com/beginningethicalhackingwithpython-220329051229/85/Beginning-Ethical-Hacking-with-Python-pdf-61-320.jpg)
![1
2
3
4
(1, 2, 3, 4)
</blockquote>
In Python, a string is also a sequential type and you can iterate through it. Consider this code:
<code>
strings = "This is a string."
for WeWillIterateThroughIt in strings:
print(WeWillIterateThroughIt)
</code>
And the output is as usual:
<blockquote>
T
h
i
s
i
s
a
s
t
r
i
n
g
.
</blockquote>
A string is a sequential type . Consider this code:
<code>
strings = "string."
print(strings[1:3])
</code>
It means the string goes like this:
0 = s
1 = t
2 = r
3 = i
4 = n
5 = g](https://image.slidesharecdn.com/beginningethicalhackingwithpython-220329051229/85/Beginning-Ethical-Hacking-with-Python-pdf-62-320.jpg)
![So strings[1:3] means the sequence starts from position 1 and it goes up to position 3, excluding the 3rd
position. It means it stops at 2nd position. So the output is as expected :
<blockquote>
tr
</blockquote>
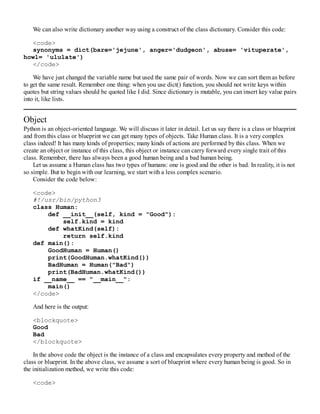
Dictionary
Python has another very strong aggregate type of values: dictionary. It is a class, as usual. It is more like
associative array or hash in other languages.
Consider this code:
<code>
#!usr/bin/python3
EnglishDictionaries = {'bare':'jejune', 'anger':'dudgeon',
'abuse':'vituperate', 'howl':'ululate'}
print(EnglishDictionaries)
# getting in a nmore human readable form
for keys in EnglishDictionaries:
print(keys, "=", EnglishDictionaries[keys])
</code>
And the output is:
<blockquote>
{'abuse': 'vituperate', 'bare': 'jejune', 'howl': 'ululate', 'anger':
'dudgeon'}
abuse = vituperate
bare = jejune
howl = ululate
anger = dudgeon
</blockquote>
Now we can sort this dictionary in an alphabetical order like this:
<code>
EnglishDictionaries = {'bare':'jejune', 'anger':'dudgeon',
'abuse':'vituperate', 'howl':'ululate'}
for keys in sorted(EnglishDictionaries.keys()):
print(keys, "=", EnglishDictionaries[keys])
</code>
And we get a nice clean output in alphabetical order:
<blockquote>
abuse = vituperate
anger = dudgeon
bare = jejune
howl = ululate
</blockquote>](https://image.slidesharecdn.com/beginningethicalhackingwithpython-220329051229/85/Beginning-Ethical-Hacking-with-Python-pdf-63-320.jpg)


![def CheckFileExtension():
try:
RaisingError("../primary/file.rtf")
except IOError as e:
print("Could not open file:", e)
except ValueError as e:
print("Bad Filename:", e)
def DemarcationLine():
print("******************")
if __name__ == "__main __":
main()
</code>
Run this file and you get this output:
<blockquote>
Could not open file: [Errno 2] No such file or directory:
'../primary/files.txt'
******************
Could not open file: [Errno 2] No such file or directory:
'primary/files.txt'
******************
Bad Filename: File must end with .txt
</blockquote>
As an exercise, try to write this code with “Try” and “Except” and catch if there is any error.
<code>
#!/usr/bin/python3
def main():
GetARangeOfNumber()
def GetARangeOfNumber():
for index in IteratingStepByStep(1,123, 7):
print(index, end=' ')
def IteratingStepByStep(start, stop, step):
number = start
while number <= stop:
yield number
number += step
if __name__ == "__main__":
main()
</code>](https://image.slidesharecdn.com/beginningethicalhackingwithpython-220329051229/85/Beginning-Ethical-Hacking-with-Python-pdf-80-320.jpg)
![for index in RangeFunctions(15, 1025, 102):
print(index, end=' ')
The output will be:
15 117 219 321 423 525 627 729 831 933.
As you have seen, we can set the value of any argument as default. So we can write this function like this:
<code>
def AnotherRangeFunctions(start = 0, stop, step = 1):
i = start
while i <= stop:
yield i
i += step
</code>
And we may try to get the output by :
<code>
for index in AnotherRangeFunctions(25):
print(index, end=' ')
</code>
But it gives us an error message:
File
"/home/hagudu/PycharmProjects/FirstPythonProject/functions/generate-
functions.py", line 18
def AnotherRangeFunctions(start = 0, stop, step = 1):
SyntaxError: non-default argument follows default argument
Python does not support this. Can we solve this problem so that we can pass any number of arguments and
control it without having any error message?
Consider this code:
<code>
def AnotherRangeFunctions(*args):
numberOfArguments = len(args)
if numberOfArguments < 1: raise TypeError('At least one argument
is required.')
elif numberOfArguments == 1:
stop = args[0]
start = 0
step = 1
elif numberOfArguments == 2:
# start and stop will be tuple
(start, stop) = args
step = 1
elif numberOfArguments == 3:
# all start and stop and step will be tuple](https://image.slidesharecdn.com/beginningethicalhackingwithpython-220329051229/85/Beginning-Ethical-Hacking-with-Python-pdf-87-320.jpg)
![them. In code
def PassingListsOfArguments(arg1, arg2, arg3, arg4, *args):
means you need to pass four arguments first. That is compulsory. After that, the number of arguments may
vary. But the arbitrary number of arguments comes out as “tuple”. See the output of this function :
1 2 3 5 (7, 45, 98, 56, 4356, 90876543)
The latter part is obviously a tuple and you can iterate through it.
Named Arguments
Sometimes it is important to use named arguments in Python. And we get those named arguments in a
dictionary format.
Consider this code:
<code>
#!/usr/bin/python3
def main():
NamedArguments(name = 'Sanjib', address = 'Pluto', hobby =
"Gardening")
def NamedArguments(**kwargs):
for key in kwargs:
print(key, "=", kwargs[key])
if __name__ == "__main__":
main()
</code>
And the output:
<blockquote>
hobby = Gardening
name = Sanjib
address = Pluto
</blockquote>
As it is a dictionary output, it is not ordered. You can sort it alphabetically.
Let us consider a fairly long code where we can use every kind of passing argument.
<code>
#!/usr/bin/python3
def main():
NamedArguments(name = 'Sanjib', address = 'Pluto', hobby =
"Gardening")
DemarcationLine()
AnotherNamedArguments('Hi', 1235, 1,2,3, one = 1, two = 2, three =
3)
def NamedArguments(**kwargs):
for key in kwargs:](https://image.slidesharecdn.com/beginningethicalhackingwithpython-220329051229/85/Beginning-Ethical-Hacking-with-Python-pdf-89-320.jpg)
![print(key, "=", kwargs[key])
def AnotherNamedArguments(arg1, arg2, *args, **kwargs):
print(arg1, arg2)
for index in args:
print(index, end=' ')
DemarcationLine()
for keys in kwargs:
print(keys, "=", kwargs[keys])
def DemarcationLine():
print("********")
if __name__ == "__main__":
main()
</code>
Here is the output:
<blockquote>
hobby = Gardening
address = Pluto
name = Sanjib
********
Hi 1235
1 2 3 ********
three = 3
two = 2
one = 1
</blockquote>](https://image.slidesharecdn.com/beginningethicalhackingwithpython-220329051229/85/Beginning-Ethical-Hacking-with-Python-pdf-90-320.jpg)
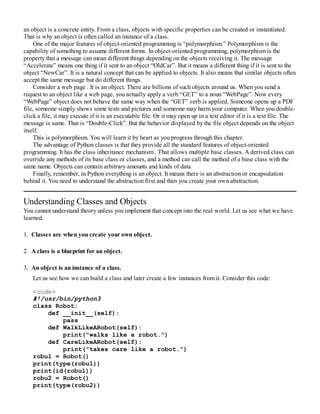
![you run this code, it gives us an output like this:
<blockquote>
takes care like a robot.
walks like a robot
good
need not repeat, a good human being is always good
bad
need not repeat, bad human being is always bad.
he is human but walks like a robot
</blockquote>
When a Robot instance walks like a robot, it displays: walks like a robot; but when an instance of Human
walks like a robot, it displays: he is human but walks like a robot. This is nothing but a simple example of
polymorphism. When the same verb applies to two different objects, depending on the nature of the object it
gives a different output.
Actually, we change this behavior by passing two different arguments . Suppose, instead of a single
argument, we pass a dictionary of values. See how the power is magnified. Consider a simple code below:
<code>
print(type(BadMan.WalkLikeARobot(dict(one=1, two=2))))
st = BadMan.WalkLikeARobot(dict(one=1, two=2))
for keys in sorted(st):
print(keys, st[keys])
ws = BadMan.WalkLikeARobot({'one':56, 'two':2})
for keys in sorted(ws):
print(keys, ws[keys])
</code>
Here is the output:
<blockquote>
<class 'dict'>
one 1
two 2
one 56
two 2
</blockquote>
You can add more key, value pairs to this dictionary and run this code to see what happens.
Write Your Own Game, “Good Vs Bad”
So far we have learned many things. I hope you have written the codes and tested them and it executed
perfectly. Now the time has come to write a simple game in Python. It is a game called “Good Vs Bad.” The
game is simple. But as a beginner you may find this code a bit longer. Write it down. Try to add more features.
If you are in a Linux environment, save this file as “good-vs-bad.py” and change the file executable by
running this command:
Sudo chmod +x good-vs-bad.py](https://image.slidesharecdn.com/beginningethicalhackingwithpython-220329051229/85/Beginning-Ethical-Hacking-with-Python-pdf-95-320.jpg)
![return self.WalkingStyle
def main():
robu = Robots()
# robu.CareLikeARobot()
# print(robu.WalkLikeARobot("A robot walks like a robot and
nothing happens."))
GoodMan = Humans()
# print(GoodMan.nature)
# GoodMan.GoodHumanBeing()
BadMan = Humans()
# BadMan.nature = "bad"
# print(BadMan.nature)
# BadMan.BadHUmanBeing()
# print(BadMan.WalkLikeARobot("he is human but walks like a
robot"))
# when a bad man wlaks like a robot many things happen
WhenABadManWalksLikeARobot = BadMan.WalkLikeARobot(dict(change =
'he becomes a monster inside',
act = 'he kills fellow people',
feel = 'he enjoys torturing animals',
care = 'he cares for none',
look = 'he looks a normal human being',
state = 'finally he destroys himself'))
# there are lot of actions that take place
print("What happens when a Bad Man walks like a Robot?")
change = input("Tell us what kind of change may take place inside
him?n Choose between 'monster' and 'angel',"
"and type here...>>>>")
WhenABadManWalksLikeARobot['change'] = change
reward = 0
if change == 'monster':
print("You have won the first round:", change)
reward = 1000
print("You have won ", reward, "points.")
print("What does he do? :", WhenABadManWalksLikeARobot['act'])
change = input("Now tell us what the monster feels inside
while killing people?n Choose between 'great' and 'sad',"
"and type here...>>>>")
WhenABadManWalksLikeARobot['change'] = change
if change == 'great':
print("You have won the second round:")
reward = 10000
print("You have won ", reward, "points.")
print("What he feels inside? :",
WhenABadManWalksLikeARobot['feel'])
change = input("Tell us does the monster care for anyone?
n Choose between 'yes' and 'no',"
"and type here...>>>>")
WhenABadManWalksLikeARobot['change'] = change
if change == 'no':](https://image.slidesharecdn.com/beginningethicalhackingwithpython-220329051229/85/Beginning-Ethical-Hacking-with-Python-pdf-97-320.jpg)
![print("You have won the third round:")
reward = 100000
print("You have won ", reward, "points.")
print("What he feels inside? :",
WhenABadManWalksLikeARobot['care'])
change = input("Tell us does the monster look like a
normal human being?n Choose between 'yes' and 'no',"
"and type here...>>>>")
WhenABadManWalksLikeARobot['change'] = change
if change == 'yes':
print("You have won the fourth round:")
reward = 1000000
print("You have won ", reward, "points.")
print("What does he look like? :",
WhenABadManWalksLikeARobot['look'])
change = input("Tell us what happens to the
monster finally? Does he destroy himselfn Choose between 'yes' and
'no',"
"and type here...>>>>")
WhenABadManWalksLikeARobot['change'] = change
if change == 'yes':
print("You have won the fifth round:")
reward = 100000000
print("You have won Jackpot.", reward,
"points.")
else:
print("You have changed the course of game. It
ends here. You have lost", reward - 100000, "points.")
else:
print("You have changed the course of game. It
ends here. You have lost", reward - 1000, "points.")
else:
print("You have changed the course of game. It ends
here. You have lost", reward - 100, "points.")
else:
print("You have changed the course of game. It ends here.
You have lost", reward - 10, "points.")
else:
print("You have changed the course of game. It ends here and
you have won no point.")
if __name__ == "__main __":
main()
</code>
And the output on your Python Shell looks like this:
<blockquote>
What happens when a Bad Man walks like a Robot?
Tell us what kind of change may take place inside him?
Choose between 'monster' and 'angel',and type here...>>>>monster](https://image.slidesharecdn.com/beginningethicalhackingwithpython-220329051229/85/Beginning-Ethical-Hacking-with-Python-pdf-98-320.jpg)
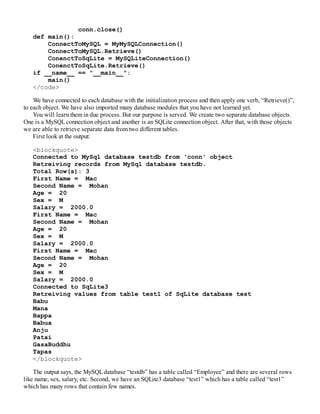
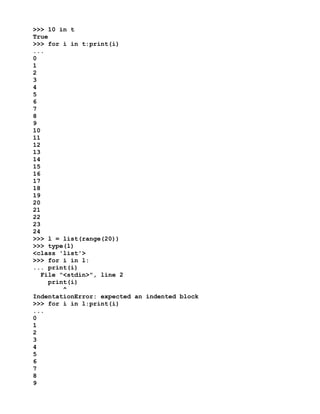
![import sqlite3
import mysql.connector
from mysql.connector import MySQLConnection, Error
class MySQLiteConnection:
def __init__(self, db = sqlite3.connect('test.db')):
self.db = db
db.row_factory = sqlite3.Row
print("Connected to SqLite3")
def Retrieve(self):
print("Retreiving values from table test1 of SqLite database
test")
read = self.db.execute('select * from test1 order by i1')
for row in read:
print(row['t1'])
class MyMySQLConnection:
def __init__(self, kwargs = dict(host = 'localhost', database =
'testdb', user = 'root', password = 'pass')):
try:
### you can either use a dictionary object or you can connect
directly ###
### using a dictioanry object ###
self.kwargs = kwargs
conn = mysql.connector.connect(**kwargs)
if conn.is_connected():
print("Connected to MySql database testdb from 'conn'
object")
except Error as e:
print(e)
finally:
conn.close()
def Retrieve(self):
print("Retreiving records from MySql database testdb.")
try:
conn = MySQLConnection(**self.kwargs)
cursor = conn.cursor()
cursor.execute("SELECT * FROM EMPLOYEE")
rows = cursor.fetchall()
print('Total Row(s):', cursor.rowcount)
for row in rows:
print("First Name = ", row[0])
print("Second Name = ", row[1])
print("Age = ", row[2])
print("Sex = ", row[3])
print("Salary = ", row[4])
except Error as e:
print(e)
finally:
cursor.close()](https://image.slidesharecdn.com/beginningethicalhackingwithpython-220329051229/85/Beginning-Ethical-Hacking-with-Python-pdf-102-320.jpg)
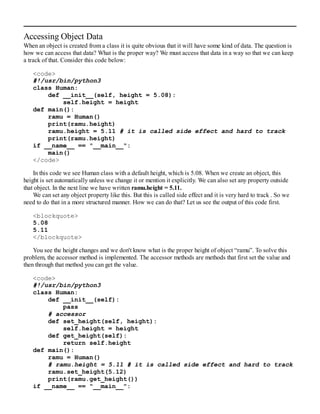
![main()
</code>
<blockquote>
5.12
</blockquote>
But we’re still missing something . We want to add more flexibilities so that with less code we can get
more jobs done.
<code>
#!/usr/bin/python3
class Human:
def __init__(self, **kwargs):
self.variables = kwargs
def set_manyVariables(self, **kwargs):
self.variables = kwargs
def set_variables(self, key, value):
self.variables[key] = value
def get_variables(self, key):
return self.variables.get(key, None)
def main():
mana = Human(name = 'Mana')
print("Object Mana's name:", mana.variables['name'])
ManaName = mana.variables['name']
mana.set_variables('class', 'two')
print(ManaName, "reads at class", mana.get_variables('class'))
mana.set_manyVariables(school = 'balika school', height = 4.54)
print(ManaName, "has height of", mana.variables['height'], "and
her school's name is", mana.variables['school'])
babu = Human(name = 'Babu', student_of = 'Class Three', reads_at =
' Balak School', height = 5.21)
BabuName = babu.variables['name']
print(BabuName, "he is a student of",
babu.variables['student_of'], "and he reads at",
babu.variables['reads_at'], "and his height is",
babu.variables['height'])
if __name__ == "__main__":
main()
</code>
In this code snippet we have many options open to us. We have set our variables in a dictionary format .
After that we can get the value through the key.
<blockquote>
Object Mana's name: Mana
Mana reads at class two
Mana has height of 4.54 and her school's name is balika school
Babu he is a student of Class Three and he reads at Balak School and
his height is 5.21
</blockquote>](https://image.slidesharecdn.com/beginningethicalhackingwithpython-220329051229/85/Beginning-Ethical-Hacking-with-Python-pdf-105-320.jpg)
![Using Generators
In Python, a generator object is used in a context where iteration is necessary. Normally, in this case, we rely
on two methods: def __init__(self, *args) and def __iter__(self). We set the logic in the constructor method
and iterate through it by the def __iter__(self) function.
<code>
#!/usr/bin/python3
class InclusiveRange:
def __init__(self, *args):
numberOfArguments = len(args)
if numberOfArguments < 1: raise TypeError('At least one
argument is required.')
elif numberOfArguments == 1:
self.stop = args[0]
self.start = 0
self.step = 1
elif numberOfArguments == 2:
# start and stop will be tuple
(self.start, stop) = args
self.step = 1
elif numberOfArguments == 3:
# all start and stop and step will be tuple
(self.start, self.stop, self.step) = args
else: raise TypeError("Maximum three arguments. You gave
{}".format(numberOfArguments))
def __iter__(self):
i = self.start
while i <= self.stop:
yield i
i += self.step
def main():
ranges = InclusiveRange(5, 210, 10)
for x in ranges:
print(x, end=' ')
if __name__ == "__main__":
main()
</code>
This code means you can control the range of iteration . We start from 5 and then end at 210. In each step
we progress by 10.
<blockquote>
5 15 25 35 45 55 65 75 85 95 105 115 125 135 145 155 165 175 185 195
205
</blockquote>
We can get the same effect without using those methods. We can simply write this way.
<code>](https://image.slidesharecdn.com/beginningethicalhackingwithpython-220329051229/85/Beginning-Ethical-Hacking-with-Python-pdf-108-320.jpg)
![## the function below is perfectly working also but that is not a
generator ##
def RangeFunctions(self, *args):
numberOfArguments = len(args)
if numberOfArguments < 1: raise TypeError('At least one
argument is required.')
elif numberOfArguments == 1:
self.stop = args[0]
self.start = 0
self.step = 1
elif numberOfArguments == 2:
# start and stop will be tuple
(self.start, stop) = args
self.step = 1
elif numberOfArguments == 3:
# all start and stop and step will be tuple
(self.start, self.stop, self.step) = args
else: raise TypeError("Maximum three arguments. You gave
{}".format(numberOfArguments))
i = self.start
while i <= self.stop:
yield i
i += self. step
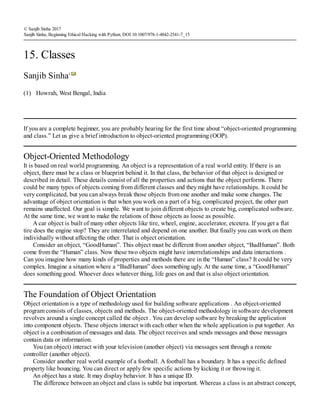
</code>
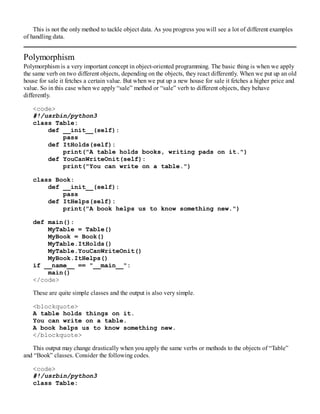
Inheritance
Inheritance is an equally important concept in object-oriented programming. There is a parent class and a
child class. The child class usually inherits all the properties and methods from the parent class. At the same
time, it can change all the properties and methods according to the situation.
The way a child class inherits is very simple. When we declare a child class we write the name of the
parent class inside the child class like this: ChildClass(ParentClass).
<code>
#!/usr/bin/python3
class AllUsers:
def __init__(self):
pass
def Register(self):
print("Please Register")
def Login(self):
print("Welcome Member.")
class Admin(AllUsers):
def __init__(self):
pass
def Register(self):
print("Admins need not register")
def Login(self):](https://image.slidesharecdn.com/beginningethicalhackingwithpython-220329051229/85/Beginning-Ethical-Hacking-with-Python-pdf-109-320.jpg)

![</code>
The output is quite simple.
<blockquote>
obedient
</blockquote>
In Python, “Decorator” is simply a method by which we decorate an accessor method for a variable, and
the function starts behaving like a property. The beauty of this decorator is, you can use the function as a
property and after creating the object you can control the property—setting and getting it. See the following
code.
<code>
#!/usr/bin/python3
class Dog:
def __init__(self, **kwargs):
self.properties = kwargs
@property
def Color(self):
return self.properties.get('color', None)
@Color.setter
def Color(self, color):
self.properties['color'] = color
@Color.deleter
def Color(self):
del self.properties['color']
def main():
lucky = Dog()
# now we are going to use the decorator function as a normal property
lucky.Color = 'black and yellow'
print(lucky.Color)
if __name__ == "__main__":
main()
</code>
The output is as expected:
<blockquote>
black and yellow
</blockquote>
It is a very simple example where we see that a usual syntax of function can be written as a property
syntax. It is more convenient when we use this decorator method in saving files inside a database.
In the last chapter, we will see the web application “Flask.” We will see how we can use this decorator to
route our web pages.](https://image.slidesharecdn.com/beginningethicalhackingwithpython-220329051229/85/Beginning-Ethical-Hacking-with-Python-pdf-111-320.jpg)
![(1)
© Sanjib Sinha 2017
Sanjib Sinha, Beginning Ethical Hacking with Python, DOI 10.1007/978-1-4842-2541-7_16
16. String Methods
Sanjib Sinha1
Howrah, West Bengal, India
In Python a string is an object. As an instance of “class string” it can call any function or property. We can
change a string into upper case by simply calling a function upper() .
Let us open our terminal and type this:
<code>
hagudu@hagudu-H81M-S1:∼$ python3
Python 3.4.0 (default, Jun 19 2015, 14:20:21)
[GCC 4.8.2] on linux
Type "help", "copyright", "credits" or "license" for more information.
>>> 'this is a string'
'this is a string'
>>> s = 'this is a string'
>>> s
'this is a string'
>>> s.upper()
'THIS IS A STRING'
>>> s = 'this is a string now we are going to add an integer into it
as string {}'
>>> s.format(100)
'this is a string now we are going to add an integer into it as string
100'
>>> 'in python2 it was written like %d' % 100
'in python2 it was written like 100'](https://image.slidesharecdn.com/beginningethicalhackingwithpython-220329051229/85/Beginning-Ethical-Hacking-with-Python-pdf-112-320.jpg)
![This is 11, and that is 10
This is 10, and that is 11 and this too is 10 and that too is 11
This is 11, and that is 11 and this too is 10 and that too is 11
This is 10, and that is 11 and this too is 11 and that too is 10
This is my wish: I want to remove 'I', and that is your wish :Do you
want to remove 'yourself'? and this too is mine: I want to remove 'I'
and that too is mine: I want to remove 'I'
</blockquote>
How can we test that the string is immutable ?
<code>
strings = "This is a string"
print(type(strings))
print(id(strings))
AnotherStrings = "This is a string"
print(type(AnotherStrings))
print(id(AnotherStrings))
print(strings.split())
words = strings.split()
words.append("and that ia also a string.")
print(type(words))
print(words[0])
NewWords = ":".join(words)
print(NewWords)
NewWords = ",".join(words)
print(NewWords)
words[0] = "That"
print(words)
</code>
<blockquote>
<class 'str'>
139956209543256
<class 'str'>
139956209543256
['This', 'is', 'a', 'string']
<class 'list'>
This
This:is:a:string:and that ia also a string.
This,is,a,string,and that ia also a string.
['That', 'is', 'a', 'string', 'and that ia also a string.']
</blockquote>](https://image.slidesharecdn.com/beginningethicalhackingwithpython-220329051229/85/Beginning-Ethical-Hacking-with-Python-pdf-116-320.jpg)

![(1)
© Sanjib Sinha 2017
Sanjib Sinha, Beginning Ethical Hacking with Python, DOI 10.1007/978-1-4842-2541-7_18
18. Containers
Sanjib Sinha1
Howrah, West Bengal, India
In Python tuples and lists are array types. Tuples are immutable but lists are mutable. Tuples are used with
comma operator and you can iterate through the tuple quite easily. As tuples are immutable, you can not add or
update the value of a tuple. In lists, you can update or add new values quite easily. Open up your terminal in
Linux and IDLE in Windows. Write down the code below and see the output yourself. Please read the
comments that are attached with the code .
<code>
#!/usr/bin/python3
tuples1 = 1, 2, 3, 4
print(type(tuples1))
print(id(tuples1))
tuples2 = (1, 2, 3, 4)
print(type(tuples2))
print(id(tuples2))
print(tuples1[0])
print(tuples2[0])
# it will give the last item
print(tuples2[-1])
print(type(tuples1[0]))
print(type(tuples2[0]))
print(id(tuples1[0]))
print(id(tuples2[0]))
# tuple is immutable we can not change any value
# 'tuple' object does not support item assignment
# tuples2[0] = 120
# print(tuples2)
# to make an integer tuple you need to add comma separator
IsItTuple = (1)
print(type(IsItTuple))
IsItTuple = (1,)
print(type(IsItTuple))
# let us see how list behaves
list1 = [1, 2, 3, 4]
print(type(list1))
print(id(list1))
# first item](https://image.slidesharecdn.com/beginningethicalhackingwithpython-220329051229/85/Beginning-Ethical-Hacking-with-Python-pdf-119-320.jpg)
![print(list1[0])
# last item
print(list1[-1])
# we can change the value of a list item
list1[0] = 120
print(list1) # output: [120, 2, 3, 4]
</code>
The output is like this:
<blockquote>
<class 'tuple'>
139794725901080
<class 'tuple'>
139794725900920
1
1
4
<class 'int'>
<class 'int'>
10455040
10455040
<class 'int'>
<class 'tuple'>
<class 'list'>
139794725273480
1
4
[120, 2, 3, 4]
</blockquote>
Operating on Tuple and List Object
Let us open up our terminal and test how tuples and lists work together.
<code>
root@kali:∼# python3
Python 3.4.4 (default, Jan 5 2016, 15:35:18)
[GCC 5.3.1 20160101] on linux
Type "help", "copyright", "credits" or "license" for more information.
>>> t = (1,2,3,4)
>>> t
(1, 2, 3, 4)
>>> t[0]
1
>>> t = tuple(range(25))
>>> type(t)
<class 'tuple'>
>>> 50 in t
False](https://image.slidesharecdn.com/beginningethicalhackingwithpython-220329051229/85/Beginning-Ethical-Hacking-with-Python-pdf-120-320.jpg)
![10
11
12
13
14
15
16
17
18
19
>>> l[2]
2
>>> 50 in l
False
>>> 12 in l
True
>>> t[0] = 25
Traceback (most recent call last):
File "<stdin>", line 1, in <module>
TypeError: 'tuple' object does not support item assignment
>>> l[0] = 25
>>> print(l)
[25, 1, 2, 3, 4, 5, 6, 7, 8, 9, 10, 11, 12, 13, 14, 15, 16, 17, 18,
19]
>>> t.append(50)
Traceback (most recent call last):
File "<stdin>", line 1, in <module>
AttributeError: 'tuple' object has no attribute 'append'
>>> l.append(120)
>>> print(l
l lambda len( license( list( locals(
>>> print(l)
[25, 1, 2, 3, 4, 5, 6, 7, 8, 9, 10, 11, 12, 13, 14, 15, 16, 17, 18,
19, 120]
>>> t.count()
Traceback (most recent call last):
File "<stdin>", line 1, in <module>
TypeError: count() takes exactly one argument (0 given)
>>> t.count(5)
1
>>> l.append(25)
>>> l.count(25)
2
>>> t.index(10)
10
>>> l.index(10)
10
>>> l.extend(range(25))
>>> for i in l:print(i)
...](https://image.slidesharecdn.com/beginningethicalhackingwithpython-220329051229/85/Beginning-Ethical-Hacking-with-Python-pdf-122-320.jpg)
![25
1
2
3
4
5
6
7
8
9
10
11
12
13
14
15
16
17
18
19
120
25
0
1
2
3
4
5
6
7
8
9
10
11
12
13
14
15
16
17
18
19
20
21
22
23
24
>>> l.insert(0, 4656)
>>> l[0]
4656](https://image.slidesharecdn.com/beginningethicalhackingwithpython-220329051229/85/Beginning-Ethical-Hacking-with-Python-pdf-123-320.jpg)
![>>> l.insert(12, 147)
>>> l.index(12)
14
>>> l[12]
147
>>> l.remove(12)
>>> l[12]
147
>>> print(l)
[4656, 25, 1, 2, 3, 4, 5, 6, 7, 8, 9, 10, 147, 11, 13, 14, 15, 16, 17,
18, 19, 120, 25, 0, 1, 2, 3, 4, 5, 6, 7, 8, 9, 10, 11, 12, 13, 14, 15,
16, 17, 18, 19, 20, 21, 22, 23, 24]
>>> l.remove(12)
>>> print(l)
[4656, 25, 1, 2, 3, 4, 5, 6, 7, 8, 9, 10, 147, 11, 13, 14, 15, 16, 17,
18, 19, 120, 25, 0, 1, 2, 3, 4, 5, 6, 7, 8, 9, 10, 11, 13, 14, 15, 16,
17, 18, 19, 20, 21, 22, 23, 24]
>>> l.pop(0)
4656
>>> print(l)
[25, 1, 2, 3, 4, 5, 6, 7, 8, 9, 10, 147, 11, 13, 14, 15, 16, 17, 18,
19, 120, 25, 0, 1, 2, 3, 4, 5, 6, 7, 8, 9, 10, 11, 13, 14, 15, 16, 17,
18, 19, 20, 21, 22, 23, 24]
>>> l.pop()
24
>>> print(l)
[25, 1, 2, 3, 4, 5, 6, 7, 8, 9, 10, 147, 11, 13, 14, 15, 16, 17, 18,
19, 120, 25, 0, 1, 2, 3, 4, 5, 6, 7, 8, 9, 10, 11, 13, 14, 15, 16, 17,
18, 19, 20, 21, 22, 23]
>>>
</code>
Write down the same code and see how it works in your machine. Errors may come out as happened in the
above code. But remember, each error will help you to learn a few new things.
Operating on Dictionary Object
As you have tested tuples and lists, you can test the dictionary object and see how it works.
<code>
root@kali:∼# python3
Python 3.4.4 (default, Jan 5 2016, 15:35:18)
[GCC 5.3.1 20160101] on linux
Type "help", "copyright", "credits" or "license" for more information.
>>> x = {'one':1, 'two':2, 'three':3}
>>> type(x)
<class 'dict'>
>>> y = dict(four = 4, five = 5, six = 6)
>>> type(y)
<class 'dict'>](https://image.slidesharecdn.com/beginningethicalhackingwithpython-220329051229/85/Beginning-Ethical-Hacking-with-Python-pdf-124-320.jpg)
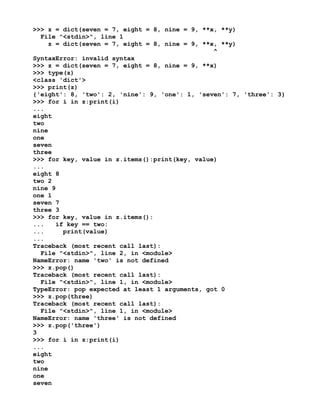
![for row in DatabaseRead:
# print(dict(row))
print(row['t1'])
# print(row['t1'], row['i1'])
# print(type(row))
if __name__ == "__main__":main()
</code>
If you run this code, you will see a list of names I just added. As you see, we have connected with a
database, “test”. Next we added a table with two columns. The first column is the id integer and we keep the
ID of each name inside it. The second column is the placeholder of text. We keep a few names there.
You can write the same code and test it. It will give you the same result. Once you run the code, you will
find that a file “test.db” has been created inside your project.
MySQL for Big Project
SQLite3 is good for a small amount of work. But for a big project, it is better to opt for a database like
MySQL. To work with MySQLin Python3 you need to download and install MySQLconnector . The
download and installation part is quite easy.
In Python2* you can by default import MySQLConnector. But for Python3, you need to download the file.
Open https://python.org and search for MySQLConnector. Download the file and run “setup.py ”.
Once you download and install the MySQLConnector module it is fairly simple and easy to connect to any
MySQLdatabase.
Consider this code where we simply connect to a MySQLdatabase and have a printout “connected.”
If MySQLor any database operation is completely new to you, it is better to learn about the simple
database operations and database query language. In Windows or Linux, installing PHPMyAdmin is very easy.
Just install it and you need not write all the SQLcode to build a database and all the tables.
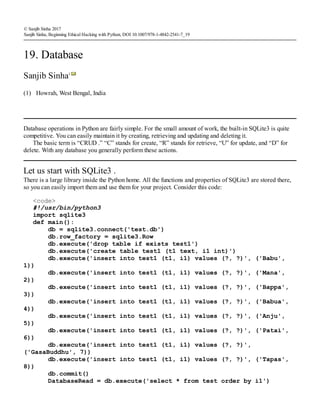
Let us assume that we have a database called “python-mysql ”. In that database we have some tables. Now
we are going to connect to that database first.
<code>
#!/usr/bin/python3
import mysql.connector
from mysql.connector import Error
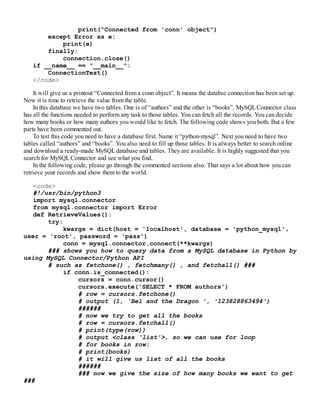
def ConnectionTest():
### connecting to MySQL Database ###
try:
### you can either use a dictionary object or you can connect
directly ###
### using a dictioanry connection object ###
kwargs = dict(host = 'localhost', database = 'python_mysql',
user = 'root', password = 'pass')
conn = mysql.connector.connect(**kwargs)
### connecting directly ###
connection = mysql.connector.connect(host = 'localhost',
database =
'python_mysql',
user = 'root',
password = 'pass')
if conn.is_connected():](https://image.slidesharecdn.com/beginningethicalhackingwithpython-220329051229/85/Beginning-Ethical-Hacking-with-Python-pdf-128-320.jpg)
![# HowManyBooks = 8
# row = cursors.fetchmany(HowManyBooks)
# for books in row:
# print(books)
# we get the output of 8 books
row = cursors.fetchall()
for books in row:
print(books)
except Error as e:
print(e)
finally: conn.close()
if __name__ == "__main__":
RetrieveValues()
</code>
We have used the try and error method so that if connection fails, it would not show an ugly “Error”
message on your project. Second, this method is quite direct. You can also use a configuration file to do the
same thing.
It is strongly advisable to use a configuration file (we say “config file”). The configuration file has all the
things necessary to connect to the database.
We can write in the configuration file like this and save it as “mysql_config.ini”.
<code>
[mysql]
host = localhost
database = YourDatabaseName
user = root
password = pass
</code>
Let us see how this “.ini” file can be parsed through our Python code. We save this file as
“MySQL_Connector.py”.
<code>
#!/usr/bin/python3
from configparser import ConfigParser
def ReadingMySQLConfig(filemame = 'mysql_config.ini', section =
'mysql'):
parser = ConfigParser()
parser.read(filemame)
db = dict()
if parser.has_section(section):
items = parser.items(section)
for item in items:
db[item[0]] = item[1]
else:
raise Exception('{0} not found in the {1}
file'.format(section, filemame))
return db
</code>](https://image.slidesharecdn.com/beginningethicalhackingwithpython-220329051229/85/Beginning-Ethical-Hacking-with-Python-pdf-130-320.jpg)
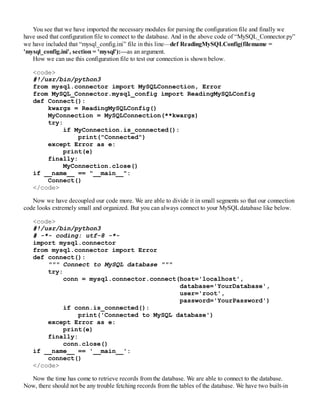
![methods in our Python library. The methods are “fetchmany()” and “fetchall() ”. The first method,
“fetchmany()”, gives you the liberty to decide how many rows you are going to fetch. Let us see the code:
//query with fetchmany()
<code>
#!/usr/bin/python3
from mysql.connector import MySQLConnection, Error
from Databases.python_mysql_dbconfig import read_db_config
def iter_row(cursor, size=10):
while True:
rows = cursor.fetchmany(size)
if not rows:
break
for row in rows:
yield row
def query_with_fetchmany():
try:
dbconfig = read_db_config()
conn = MySQLConnection(**dbconfig)
cursor = conn.cursor()
cursor.execute("SELECT * FROM EMPLOYEE")
# EMPLOYEE is the table name
for row in iter_row(cursor, 10):
print(row)
except Error as e:
print(e)
finally:
cursor.close()
conn.close()
if __name__ == '__main__':
query_with_fetchmany()
</code>
The method “fetchall() ” brings all the records from a table.
<code>
#!/usr/bin/python3
from mysql.connector import MySQLConnection, Error
from Databases.python_mysql_dbconfig import read_db_config
def query_with_fetchall():
try:
dbconfig = read_db_config()
conn = MySQLConnection(**dbconfig)
cursor = conn.cursor()
cursor.execute("SELECT * FROM EMPLOYEE")
rows = cursor.fetchall()
print('Total Row(s):', cursor.rowcount)
for row in rows:
print("First Name = ", row[0])
print("Second Name = ", row[1])
print("Age = ", row[2])](https://image.slidesharecdn.com/beginningethicalhackingwithpython-220329051229/85/Beginning-Ethical-Hacking-with-Python-pdf-132-320.jpg)
![print("Sex = ", row[3])
print("Salary = ", row[4])
except Error as e:
print(e)
finally:
cursor.close()
conn.close()
if __name__ == '__main__':
query_with_fetchall()
</code>
You see how we can fetch the records as our requirements. Now let us try to test the insertion process. In
our CRUD application , the first “C” stands for “Create.” Here the word “Create” means nothing but insertion
of new records. Through MySQLConnector it is quite simple. All you need is that the connection must be on.
After that you need to insert your records.
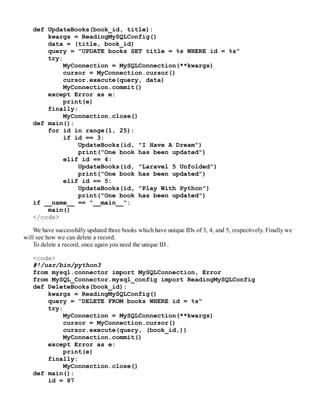
Here is the code. We have a “Book” table in our database and we are going to insert two records into it.
One is the title of the book and the other is the ISBN code of the book.
<code>
#!/usr/bin/python3
from mysql.connector import MySQLConnection, Error
from MySQL_Connector.mysql_config import ReadingMySQLConfig
def InsertBooks(books):
query = "INSERT INTO books(title, isbn) VALUES(%s, %s)"
try:
kwargs = ReadingMySQLConfig()
MyConnection = MySQLConnection(**kwargs)
if MyConnection.is_connected():
cursor = MyConnection.cursor()
cursor.executemany(query, books)
MyConnection.commit()
except Error as e:
print(e)
finally:
MyConnection.close()
def main():
books = [("TestBook", 1236547890)]
InsertBooks(books)
print("Inserted one book")
if __name__ == "__main__":
main()
</code>
We have successfully inserted one book title and ISBN code. The next process will be updating that title
and ISBN code. That is also very easy. All you need is the unique ID of the book. Once you have provided the
unique ID of the book, you can update it easily.
<ocde>
#!/usr/bin/python3
from mysql.connector import MySQLConnection, Error
from MySQL_Connector.mysql_config import ReadingMySQLConfig](https://image.slidesharecdn.com/beginningethicalhackingwithpython-220329051229/85/Beginning-Ethical-Hacking-with-Python-pdf-133-320.jpg)
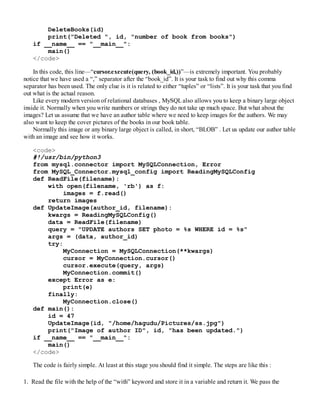
![parameter through the function. See the first function: “ReadFile(filename)”.
2. The second function is crucial because it passes the same file name as one of the parameters. It also
connects to the database and commits. See the second function: “UpdateImage(author_id, filename)”.
3. Finally, we call the second function and pass the path of the image file as an argument so that our Python
code reaches there and retrieves the image by opening it and finally committing to the database .
Now we are going to retrieve one image from the database and write it on our local disk. In the previous
code we have read the file. Now it is time to write the file on our disk. The code is almost similar except for a
few changes .
<code>
#!/usr/bin/python3
from mysql.connector import MySQLConnection, Error
from MySQL_Connector.mysql_config import ReadingMySQLConfig
def WriteFile(data, filename):
with open(filename, 'wb') as files:
files.write(data)
def ReadImage(author_id, filename):
kwargs = ReadingMySQLConfig()
query = 'SELECT photo FROM authors WHERE id = %s'
try:
MyConnection = MySQLConnection(**kwargs)
cursor = MyConnection.cursor()
cursor.execute(query, (author_id,))
photo = cursor.fetchone()[0]
WriteFile(photo, filename)
except Error as e:
print(e)
finally:
MyConnection.close()
def main():
id = 47
ReadImage(id, "/home/hagudu/Pictures/ss1.jpg")
if __name__ == "__main__":
main()
</code>](https://image.slidesharecdn.com/beginningethicalhackingwithpython-220329051229/85/Beginning-Ethical-Hacking-with-Python-pdf-136-320.jpg)


![def main():
print("This is Python Version : {}.{}.
{}".format(*sys.version_info))
# random module
print(random.randint(1, 1000))
x = list(range(25))
print(x)
random.shuffle(x)
print(x)
random.shuffle(x)
print(x)
random.shuffle(x)
print(x)
PresentTime = datetime.datetime.now()
print(PresentTime)
print(PresentTime.year, PresentTime.month, PresentTime.day,
PresentTime.hour, PresentTime.minute, PresentTime.second,
PresentTime.microsecond)
if __name__ == "__main__":
main()
</code>
In this code we add two more modules. They are “random” and “datetime” . We get the output below to
see how they work.
</blockquote>
This is Python Version : 3.4.3
366
[0, 1, 2, 3, 4, 5, 6, 7, 8, 9, 10, 11, 12, 13, 14, 15, 16, 17, 18, 19,
20, 21, 22, 23, 24]
[23, 6, 22, 3, 7, 19, 10, 16, 8, 12, 15, 21, 11, 17, 9, 13, 4, 14, 24,
18, 0, 2, 1, 20, 5]
[0, 8, 21, 5, 13, 3, 2, 18, 24, 12, 4, 19, 14, 17, 20, 10, 11, 22, 15,
9, 6, 23, 1, 7, 16]
[11, 6, 23, 14, 9, 7, 3, 5, 15, 2, 19, 0, 16, 24, 21, 12, 4, 13, 22,
20, 10, 8, 1, 17, 18]
//here is the output of date and time module
2016-03-23 08:34:37.253888
2016 3 23 8 34 37 253888
</blockquote>
Each time you run the code, you get a new number as the “random” module always produces new numbers
. To get more ideas, you need to go through the Python Standard Library in the official Python web site or
download the Python 3.4.4 documentation. It is available in many file types, including simple text file or PDF.
The “datetime” module page in Python Standard Library in the documentation looks like this:](https://image.slidesharecdn.com/beginningethicalhackingwithpython-220329051229/85/Beginning-Ethical-Hacking-with-Python-pdf-139-320.jpg)
![(1)
© Sanjib Sinha 2017
Sanjib Sinha, Beginning Ethical Hacking with Python, DOI 10.1007/978-1-4842-2541-7_23
23. Importing Nmap Module
Sanjib Sinha1
Howrah, West Bengal, India
Nmap (Network Mapper) is a security scanner. It was originally written by Gordon Lyon (also known by his
pseudonym Fyodor Vaskovich). This tool is particularly used to discover hosts and services on a computer
network. While finding the hosts and services it creates a “map” of the network. For this reasom it has been
widely called ‘Nmap’ or you can also call it ‘Network Mapper’. It is regarded as an essential tool in your
pursuit to be a good and competent ethical hacker.
To get the best results, Nmap usually sends specially crafted packets to the target host and then analyzes
the responses and finds what ports are open. It also assesses the vulnerability of a computer network.
This software widely used by the hackers has number of features. It actually probes computer networks,
discovering hosts and services. It also detects operating system and it decides the vulnerability of the systems
by finding the open ports.
Python actually extends these features so that you can easily do more advanced service detection,
vulnerability detection and other things.
Let us first check whether ‘Nmap’ module of python has already been installed in our system or not by
issuing a simple command on the terminal.
nmap
It gives us a long listing which is very important. Many things you can learn from this listing as it says
about the version, usages and at the end it also says where you can get the manual for more reading.
Nmap 6.40 ( http://nmap.org )
Usage: nmap [Scan Type(s)] [Options] {target specification}
TARGET SPECIFICATION:
Can pass hostnames, IP addresses, networks, etc.
Ex: scanme.nmap.org, microsoft.com/24, 192.168.0.1; 10.0.0-255.1-254
-iL <inputfilename>: Input from list of hosts/networks
-iR <num hosts>: Choose random targets
--exclude <host1[,host2][,host3],...>: Exclude hosts/networks
--excludefile <exclude_file>: Exclude list from file
HOST DISCOVERY:
-sL: List Scan - simply list targets to scan
-sn: Ping Scan - disable port scan
-Pn: Treat all hosts as online -- skip host discovery
-PS/PA/PU/PY[portlist]: TCP SYN/ACK, UDP or SCTP discovery to given
ports
-PE/PP/PM: ICMP echo, timestamp, and netmask request discovery
probes
-PO[protocol list]: IP Protocol Ping](https://image.slidesharecdn.com/beginningethicalhackingwithpython-220329051229/85/Beginning-Ethical-Hacking-with-Python-pdf-146-320.jpg)
![-n/-R: Never do DNS resolution/Always resolve [default: sometimes]
--dns-servers <serv1[,serv2],...>: Specify custom DNS servers
--system-dns: Use OS's DNS resolver
--traceroute: Trace hop path to each host
SCAN TECHNIQUES:
-sS/sT/sA/sW/sM: TCP SYN/Connect()/ACK/Window/Maimon scans
-sU: UDP Scan
-sN/sF/sX: TCP Null, FIN, and Xmas scans
--scanflags <flags>: Customize TCP scan flags
-sI <zombie host[:probeport]>: Idle scan
-sY/sZ: SCTP INIT/COOKIE-ECHO scans
-sO: IP protocol scan
-b <FTP relay host>: FTP bounce scan
PORT SPECIFICATION AND SCAN ORDER:
-p <port ranges>: Only scan specified ports
Ex: -p22; -p1-65535; -p U:53,111,137,T:21-25,80,139,8080,S:9
-F: Fast mode - Scan fewer ports than the default scan
-r: Scan ports consecutively - don't randomize
--top-ports <number>: Scan <number> most common ports
--port-ratio <ratio>: Scan ports more common than <ratio>
SERVICE/VERSION DETECTION:
-sV: Probe open ports to determine service/version info
--version-intensity <level>: Set from 0 (light) to 9 (try all
probes)
--version-light: Limit to most likely probes (intensity 2)
--version-all: Try every single probe (intensity 9)
--version-trace: Show detailed version scan activity (for debugging)
SCRIPT SCAN:
-sC: equivalent to --script=default
--script=<Lua scripts>: <Lua scripts> is a comma separated list of
directories, script-files or script-categories
--script-args=<n1=v1,[n2=v2,...]>: provide arguments to scripts
--script-args-file=filename: provide NSE script args in a file
--script-trace: Show all data sent and received
--script-updatedb: Update the script database.
--script-help=<Lua scripts>: Show help about scripts.
<Lua scripts> is a comma separted list of script-files or
script-categories.
OS DETECTION:
-O: Enable OS detection
--osscan-limit: Limit OS detection to promising targets
--osscan-guess: Guess OS more aggressively
TIMING AND PERFORMANCE:
Options which take <time> are in seconds, or append 'ms'
(milliseconds),
's' (seconds), 'm' (minutes), or 'h' (hours) to the value (e.g.
30m).
-T<0-5>: Set timing template (higher is faster)
--min-hostgroup/max-hostgroup <size>: Parallel host scan group sizes
--min-parallelism/max-parallelism <numprobes>: Probe parallelization
--min-rtt-timeout/max-rtt-timeout/initial-rtt-timeout <time>:
Specifies](https://image.slidesharecdn.com/beginningethicalhackingwithpython-220329051229/85/Beginning-Ethical-Hacking-with-Python-pdf-147-320.jpg)
![probe round trip time.
--max-retries <tries>: Caps number of port scan probe
retransmissions.
--host-timeout <time>: Give up on target after this long
--scan-delay/--max-scan-delay <time>: Adjust delay between probes
--min-rate <number>: Send packets no slower than <number> per second
--max-rate <number>: Send packets no faster than <number> per second
FIREWALL/IDS EVASION AND SPOOFING:
-f; --mtu <val>: fragment packets (optionally w/given MTU)
-D <decoy1,decoy2[,ME],...>: Cloak a scan with decoys
-S <IP_Address>: Spoof source address
-e <iface>: Use specified interface
-g/--source-port <portnum>: Use given port number
--data-length <num>: Append random data to sent packets
--ip-options <options>: Send packets with specified ip options
--ttl <val>: Set IP time-to-live field
--spoof-mac <mac address/prefix/vendor name>: Spoof your MAC address
--badsum: Send packets with a bogus TCP/UDP/SCTP checksum
OUTPUT:
-oN/-oX/-oS/-oG <file>: Output scan in normal, XML, s|<rIpt kIddi3,
and Grepable format, respectively, to the given filename.
-oA <basename>: Output in the three major formats at once
-v: Increase verbosity level (use -vv or more for greater effect)
-d: Increase debugging level (use -dd or more for greater effect)
--reason: Display the reason a port is in a particular state
--open: Only show open (or possibly open) ports
--packet-trace: Show all packets sent and received
--iflist: Print host interfaces and routes (for debugging)
--log-errors: Log errors/warnings to the normal-format output file
--append-output: Append to rather than clobber specified output
files
--resume <filename>: Resume an aborted scan
--stylesheet <path/URL>: XSL stylesheet to transform XML output to
HTML
--webxml: Reference stylesheet from Nmap.Org for more portable XML
--no-stylesheet: Prevent associating of XSL stylesheet w/XML output
MISC:
-6: Enable IPv6 scanning
-A: Enable OS detection, version detection, script scanning, and
traceroute
--datadir <dirname>: Specify custom Nmap data file location
--send-eth/--send-ip: Send using raw ethernet frames or IP packets
--privileged: Assume that the user is fully privileged
--unprivileged: Assume the user lacks raw socket privileges
-V: Print version number
-h: Print this help summary page.
EXAMPLES:
nmap -v -A scanme.nmap.org
nmap -v -sn 192.168.0.0/16 10.0.0.0/8
nmap -v -iR 10000 -Pn -p 80
SEE THE MAN PAGE (http://nmap.org/book/man.html) FOR MORE OPTIONS AND
EXAMPLES](https://image.slidesharecdn.com/beginningethicalhackingwithpython-220329051229/85/Beginning-Ethical-Hacking-with-Python-pdf-148-320.jpg)

![helps us to discriminate web traffic. This traffic is destined for different applications or services, like some
for ‘mail’, some for ‘HTTP’ and so and so.
Next we’re interested about the Port scanning . In one word, it’s a type of process and this process usually
tries to connect to a number of sequential ports, as you have just seen in the above output. We want to know
which ports are open and what services and operating system are behind them.
Let us scan another IP address ( http://nmap.org ) and in doing that we have changed the python
script a little bit.
#!/usr/bin/python
import nmap
nm = nmap.PortScanner()
print (nm.nmap_version())
nm.scan('192.168.146.1', '1-1024', '-v')
print(nm.scaninfo())
print(nm.csv())
The output is like this:
(6, 40)
{'tcp': {'services': '1-1024', 'method': 'connect'}}
host;hostname;hostname_type;protocol;port;name;state;product;extrainfo
;reason;version;conf;cpe
192.168.146.1;;;tcp;25;smtp;open;;;syn-ack;;3;
192.168.146.1;;;tcp;53;domain;open;;;syn-ack;;3;
192.168.146.1;;;tcp;80;http;open;;;syn-ack;;3;
The open ports are 25, 53 and 80. There are no filtered ports showing on this machine.
Let us get all hosts from that IP with a little change in our previous script. This time we reduce the range
so that our program won’t run for long.
#!/usr/bin/python
import nmap
nm = nmap.PortScanner()
print (nm.nmap_version())
nm.scan('192.168.146.1', '22-455', '-v --version-all')
print(nm.all_hosts())
We have changed the number of ports in line number five. We also removed last two lines and want to see
if we can get more data from that machine.
The output shows that there is only one host.
(6, 40)
{'tcp': {'services': '22-455', 'method': 'connect'}}
['192.168.146.1']
Let us change and go back to the previous IP and see the output.
#!/usr/bin/python
import nmap
nm = nmap.PortScanner()
print (nm.nmap_version())
nm.scan('x.x.xx.xxx', '22-455', '-v --version-all')](https://image.slidesharecdn.com/beginningethicalhackingwithpython-220329051229/85/Beginning-Ethical-Hacking-with-Python-pdf-152-320.jpg)
![print(nm.all_hosts())
Nothing changes. The output tells us about the only one host.
There are more to come.
As we want more information we should ideally change our ‘test.py’ code.
#!/usr/bin/python
import nmap
nm = nmap.PortScanner()
print (nm.nmap_version())
nm.scan('192.168.146.1', '22-1024', '-v --version-all')
print (nm.scanstats())
print (nm['192.168.146.1'].state())
print (nm['192.168.146.1'].all_protocols())
print (nm['192.168.146.1']['tcp'].keys())
This time the output is more verbose.
(6, 40)
{'uphosts': '1', 'timestr': 'Mon Oct 3 09:53:35 2016', 'downhosts':
'0', 'totalhosts': '1', 'elapsed': '5.73'}
up
['tcp']
[80, 25, 53]
You see that one host is up.
There is no downhosts and the number of total host is 1 as expected. We also see the exact time when the
scan is being excuted and the time elapsed.
Let us dig a bit further.
We have used the port range ‘1-1024’. Normally ports below 1024 are associated with Linux and Unix
like services. This operating systems are considered to be vital for essential network functions. For that
reason you must have root privileges to assign services to these type of OS.
If you want to go beyond 1024, there are either ‘registered’ or ‘private’ ports. Ports between 49152 and
65535 are supposed to be for private use.
Let us consider the first output and try to understand what port is used for what purposes.
x.x.xx.xxx;host3.x0x;PTR;tcp;22;ssh;open;;;syn-ack;;3;
x.x.xx.xxx;host3.x0x;PTR;tcp;25;smtp;open;;;syn-ack;;3;
x.x.xx.xxx;host3.x0x;PTR;tcp;53;domain;open;;;syn-ack;;3;
x.x.xx.xxx;host3.x0x;PTR;tcp;80;http;open;;;syn-ack;;3;
x.x.xx.xxx;host3.x0x;PTR;tcp;137;netbios-ns;filtered;;;no-response;;3;
x.x.xx.xxx;host3.x0x;PTR;tcp;138;netbios-dgm;filtered;;;no-
response;;3;
x.x.xx.xxx;host3.x0x;PTR;tcp;139;netbios-ssn;filtered;;;no-
response;;3;
x.x.xx.xxx;host3.x0x;PTR;tcp;445;microsoft-ds;filtered;;;no-
response;;3;
Port 22 is used for ‘SSH’. It stands for ‘Secure Socket Shell’. It’s a network protocol with which
administrators access a remote computer in a secure way.
Port 25 is for SMTP or mail.
Port 53 stands for DNS Services.](https://image.slidesharecdn.com/beginningethicalhackingwithpython-220329051229/85/Beginning-Ethical-Hacking-with-Python-pdf-153-320.jpg)


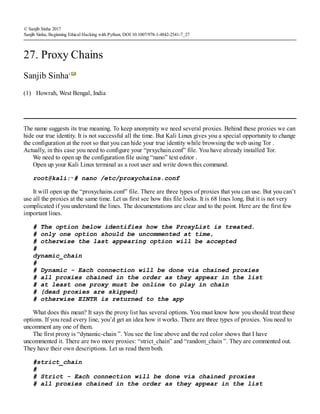
![# all proxies must be online to play in chain
# otherwise EINTR is returned to the app
#
#random_chain
#
# Random - Each connection will be done via random proxy
# (or proxy chain, see chain_len) from the list.
# this option is good to test your IDS :)
It is described clearly in the documentation that comes up along with it. So I don’t elaborate it again. The
advantage of choosing “dynamic_chain ” over others is clearly stated. If your connection does not get one
“working proxy” then it automatically jumps to the other. The other two don’t give you that opportunity to
route your traffic.
Let me explain it more. Suppose you have two proxies in place: A and B. What happens in the case of
“strict_chain ” is that when you browse web pages, your connection is routed through A and B strictly. It
means A and B should be in order and live. Otherwise your connection simply fails. In the case of
“dynamic_chain” this does not happen. If A is down then it jumps to take B. It works that way.
I hope the first step is clear. Let us consider a few other important steps.
In between you get a line like this:
# Proxy DNS requests - no leak for DNS data
proxy_dns
It is a very important line to be considered seriously. You see I have uncommented the “proxy_dns”. You
can’t allow DNS data to be leaked. In other words, your real IP address should not be leaked by any chance.
That is why I have uncommented this line, so that your proxies are in proper place working without any hitch.
At the end of the list you’d find this line:
[Proxy List]
# add proxy here ...
# meanwile
# defaults set to "tor"
socks4 127.0.0.1 9050
socks5 127.0.0.1 9050
socks5 185.43.7.146 1080
socks5 75.98.148.183 45021
Please inspect the last two lines in red. I have added them. Let me explain why I added them. But before
doing that, I’d like to explain the example lines just given before. They read like this:
# ProxyList format
# type host port [user pass]
# (values separated by 'tab' or 'blank')
#
#
# Examples:
#
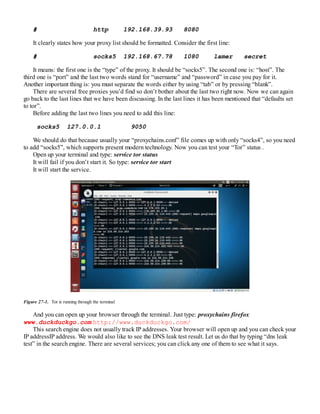
# socks5 192.168.67.78 1080 lamer secret
# http 192.168.89.3 8080 justu hidden
# socks4 192.168.1.49 1080](https://image.slidesharecdn.com/beginningethicalhackingwithpython-220329051229/85/Beginning-Ethical-Hacking-with-Python-pdf-162-320.jpg)

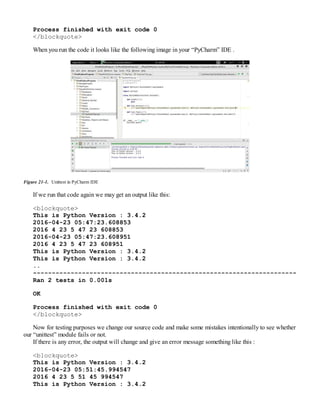
![Permanent MAC: 08:00:27:f4:16:ec (CADMUS COMPUTER SYSTEMS)
As you see, it shows two MAC address—one is current and the other is permanent. You may ask why I’m
checking this here. I have checked it once by issuing command “ifconfig”. Isn’t that enough?
It’s because the command “ifconfig ” will only show the current MAC address. It won’t show the
permanent MAC address. It means when you have changed the MAC address and issued the “ifconfig ”
command, it only show the changed one, not the permanent one.
Now we’d like to change our MAC address. Let us issue this command:
root@kali:∼# macchanger –h
And it will produce an output like this :
GNU MAC Changer
Usage: macchanger [options] device
-h, --help Print this help
-V, --version Print version and exit
-s, --show Print the MAC address and exit
-e, --ending Don't change the vendor bytes
-a, --another Set random vendor MAC of the same kind
-A Set random vendor MAC of any kind
-p, --permanent Reset to original, permanent hardware
MAC
-r, --random Set fully random MAC
-l, --list[=keyword] Print known vendors
-b, --bia Pretend to be a burned-in-address
-m, --mac=XX:XX:XX:XX:XX:XX
--mac XX:XX:XX:XX:XX:XX Set the MAC XX:XX:XX:XX:XX:XX
Report bugs to https://github.com/alobbs/macchanger/issues
The three red-colored lines are important. It is explicitly defined what they mean. The green colored line
is also important.
The first two lines— -a, --another Set random vendor MAC of the same kind
-A Set random vendor MAC of any kind
—mean you can change the MAC address but you can’t change the vendor. In this case, there is every
possibility of losing your anonymity. The first three sets belong to the net card manufacturer and, since that has
not been changed, you can be identified.
The third red-colored line is quite obvious and self-explanatory in its meaning. It says: you can change
back to the original MAC address.
So far, the best option available for us is the green colored line— -r, --random Set fully random
MAC—where it is clearly said that you can set fully random MAC. That is, the six sets are completely
random—which we prefer.
The most important of them is the last blue-colored line. Why is it important? It is because you can change
the MAC address completely.
We can have a list of all vendors with a simple command: l. If you issue that command it will give a very
long list. Let us pick up a few of them.
root@kali:∼# macchanger -l
Misc MACs:](https://image.slidesharecdn.com/beginningethicalhackingwithpython-220329051229/85/Beginning-Ethical-Hacking-with-Python-pdf-170-320.jpg)