1. Basic HTML Tutorial
by Robert Frank, Team 358
HTML Structure
HTML, or hypertext markup language, is very simple to learn and very simple to use. HTML is used in most
modern websites. HTML has two basic forms:
<name attribute1="value1" attribute2="value2">Content of 'name'</name>
and
<name attribute1="value1" attribute2="value2">
After you learn the basic form of HTML, you are ready to do some HTML coding. And just so you know, the
capitalization of the name's of the basic structure and the attributes does not matter, while the capitalization of the
values and contents of them do.
HTML pages always start with a DTD, or document type definition. This allows the web-browser to determine what
type of HTML you are using as well as what language the characters are in. The type of DTD that I would
recommend is:
<!DOCTYPE HTML PUBLIC "-//W3C//DTD HTML 4.01 Transitional//EN">
After the DTD, you would continue with the HTML tag, like so:
<HTML>
...
</HTML>
HTML pages are broken into two main sections: the HEAD and the BODY, both contained within the HTML tags.
The head contains the title and sometimes meta tags. The body contains the main page that everyone sees. A typical
website looks something like this:
<!DOCTYPE HTML PUBLIC "-//W3C//DTD HTML 4.01 Transitional//EN">
<HTML>
<HEAD>
...
</HEAD>
<BODY>
...
</BODY>
</HTML>
Page Title
The title is the most important element of a quality web page. The title allows people to know what they are visiting
and represents the page. When search engines add your website to their database, they add the title as what you see
when searching for what you want. Page titles are very useful for letting your guests know just what is on you
website. There can only be one title per page, so only the first code read containing the title will be shown. In order
to add a title use the following code:
<TITLE>this is the title</TITLE>
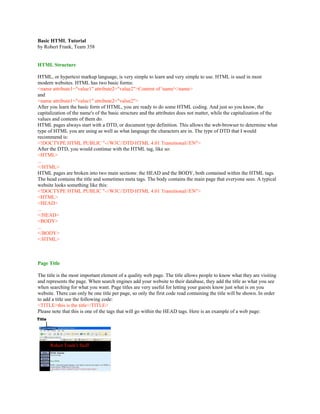
Please note that this is one of the tags that will go within the HEAD tags. Here is an example of a web page:
2. Simple Headings
There are six different simple headings that can be used (H1 to H6). Many websites use headings. You can use the
following code to make headers.
<H1>This is the Heading</H1>
<H2>This is the Heading</H2>
<H6>This is the Heading</H6>
Of the six different headings, <H1> produces the biggest, and <H6> produces the smallest. You can also center the
headings by using the align attribute, as you can see here:
<H1 ALIGN="center">This is the centered Heading</H1>
Paragraphs
Paragraphs are very useful and should be used. They can be created by using the following code:
<P>This is a paragraph.</P>
<P>This is a second paragraph.</P>
New Lines/Spacing
New lines are very important for making any website. In order to create a new line you would add the following
code:
<BR>
Spacing is also very important. When using HTML, you can use just a space, but only up to the first space. Beyond
the first space, the web-browser will just ignore. In order to do any amount, you must use the following code for
each space wanted:
Horizontal rules
Horizontal lines can be added by doing the following code:
<HR>
You can also change the width of the line as well as align them to the left or right, as can be seen here:
<HR ALIGN="left" WIDTH="50%">
Please note that you can have the width in pixels instead of percentages as well. You can also change the height in
pixels by doing the following:
<HR SIZE="5">
Comments
Comments are very useful for people that want to identify things in their HTML. They are used when multiple
people update website. They are also used to "block" the HTML code. The user does not see a comment unless they
view the source code. You can add a comment by doing the following:
<!-- This is the comment -->
3. Changing Font Color/Face/Size
Changing the font color, face and size are all relatively simple, and are all contained within the same HTML
function. In order to just change the color, you can do the following:
<FONT COLOR="red">This is the text that the color applies to</FONT>
This is the text that the color applies to
Within the color field you may name a color, as shown, or you may use the HEX code of the color, which is the
preferred method, as seen below:
<FONT COLOR="#FF0000">This is the text that the color applies to</FONT>
This is the text that the color applies to
The color in hex code has a lot more ability and I would recommend that you use it so that you can have a unique
website. The hex code of red then green and blue, all up to 255 but in hexadecimal code. Please note that not all
monitors display all colors.
Changing the face of a font is also very simple and useful. You can change the face of the font to whatever font you
wish, but be careful, if a user does not have that font installed on their computer, then it will just show the default
font. You can change the face by using the following code:
<FONT FACE="Webdings">This is the text that it applies to</FONT>
Because people may not have the specific font type that you want it is a good idea to have backup font types
separating them by commas, as seen here:
<FONT FACE="BobsFont,Wingdings,Times New Roman,Times,Courier New">This is the text that it applies
to</FONT>
You can change the font size using two basic methods. You can do it by using the size attribute, or by using the style
attribute. The code for the size attribute:
<FONT SIZE="5">This is the text that it applies to</FONT>
This is the text that it applies to
Using this method, you can change the font from 1 to 7. I would not recommend this method. You could also make
the font change, compared to what it was right before as can be seen here:
<FONT SIZE="+2">This is the text that it applies to</FONT>
This is the text that it applies to
As you can notice the font size increased by two font sizes from what it was right before. You can go from -7 to +7,
where the -7 decreases the font size by seven and the positive increases it by seven. Another method of changing the
font size it by using the following:
<SMALL>The small text<SMALL>
The small text
<BIG>The big text<BIG>
The big text
The more commonly seen font size can be changed by using the font style attribute. You can use this code for
modifying that:
<FONT STYLE="Font-Size:20px;">This is the text that it applies to</FONT>
This is the text that it applies to
By using this, you can easily modify the font size from 1 and on. this is what most programs and websites use as
their font size.
Bolding/Italicizing/Underlining/Striking
You may also want to bold, italicize, or underline some of you website. It is very good for making things stand out.
You can bold something using the following code:
<B>This is the text that it applies to</B>
This is the text that it applies to
4. Or you may bold by doing the following:
<STRONG>This is the text that it applies to</STRONG>
This is the text that it applies to
Or you may italicize using the following:
<I>This is the text that it applies to</I>
This is the text that it applies to
And another way to italicize is:
<EM>This is the text that it applies to</EM>
This is the text that it applies to
Or you may underline using the following:
<U>This is the text that it applies to</U>
This is the text that it applies to
Or you may strikethrough text by using the following:
<STRIKE>This is the text that it applies to</STRIKE>
This is the text that it applies to
Making Links
Links are extremely useful for bringing the user to another page that may be within your website, or may be another
website that you think would be useful to others. You can create a simple link using the following code:
<A HREF="tutorials.php">This is the text that it applies to</A>
This is the text that it applies to
There are several different types of links, for local pages, you would use something like the above. For links to other
sites, you may use something like the following:
<A HREF="http://bobbys.us/tutorials.php">This is the text that it applies to</A>
This is the text that it applies to
There are many different things that you can do besides just simple links, but this is still very useful.
Making Links in new windows
You may occasionally need to open a new window for the user because you may not want them to leave you website
or another reason. Many people these days do not like new windows though, and will just block all new windows. In
fact in many 'top ten website mistakes', people place having new windows within the list. But if you want to make
new windows, you can use the following code:
<A HREF="http://bobbys.us/tutorials.php" TARGET="_BLANK">This is the text that it applies to</A>
This is the text that it applies to
Making Links to email addresses
Many times you may also want to have a link to your email address. I personally do not like the method and would
recommend using a script to send the mail for you, but it is always a good thing to know. To add a link to ayou can
use the following code:
<A HREF="mailto:admin@bobbys.us">E-mail me</A>
E-mail me
Please be warned, it is dangerous to place your email address like this, there are many crawlers out there just looking
for emails like this. Once crawlers collect emails, lists are sold to spammers. This is how many people get a lot of
spam.
6. be guided by. Here is an example of an ordered list:
<OL>
<LI>Item one</LI>
<LI>Item two</LI>
<LI>Item three</LI>
</OL>
1. Item one
2. Item two
3. Item three
There are also different types of ordered lists. Here is an example of a specific type of ordered list:
<OL TYPE="I">
<LI>Item one</LI>
<LI>Item two</LI>
<LI>Item three</LI>
</OL>
I. Item one
II. Item two
III. Item three
The 'TYPE' attribute can contain one the following types: 1, a, A, i, or I.
Unordered lists are similar to ordered lists, except that they have bullets instead of numbers. Here is an example of
an unordered list:
<UL>
<LI>Item one</LI>
<LI>Item two</LI>
<LI>Item three</LI>
</UL>
• Item one
• Item two
• Item three
Tables
Tables are used in many websites. Although they are not always seen, tables are very good at aligning certain things.
In fact, this website uses tables, but you probably cannot see them. Tables have many attributes that can be modified
to fit exactly what you want. Simple tables can be added by doing the following:
<TABLE BORDER="1">
<TR>
<TD>top left</TD>
<TD>top right</TD>
</TR>
<TR>
<TD>bottom left</TD>
<TD>bottom right</TD>
</TR>
</TABLE>
top left top right
bottom left bottom right
Here is what it would look like without a border:
<TABLE>
7. <TR>
<TD>top left</TD>
<TD>top right</TD>
</TR>
<TR>
<TD>bottom left</TD>
<TD>bottom right</TD>
</TR>
</TABLE>
top left top right
bottom left bottom right
You can simple add more rows by adding another <TR> with the columns. Here is an example with five rows:
<TABLE BORDER="1">
<TR>
<TD>top left</TD>
<TD>top right</TD>
</TR>
<TR>
<TD>row 2 - left</TD>
<TD>row 2 - right</TD>
</TR>
<TR>
<TD>row 3 - left</TD>
<TD>row 3 - right</TD>
</TR>
<TR>
<TD>row 4 - left</TD>
<TD>row 4 - right</TD>
</TR>
<TR>
<TD>bottom left</TD>
<TD>bottom right</TD>
</TR>
</TABLE>
top left top right
row 2 - left row 2 - right
row 3 - left row 3 - right
row 4 - left row 4 - right
bottom left bottom right
You can also add columns by just adding a <TD> in each of the rows. Here is an example:
<TABLE BORDER="1">
<TR>
<TD>top left</TD>
<TD>top - column 2</TD>
<TD>top - column 3</TD>
<TD>top right</TD>
</TR>
<TR>
<TD>bottom left</TD>
<TD>bottom - column 2</TD>
<TD>bottom - column 3</TD>
<TD>bottom right</TD>
8. </TR>
</TABLE>
top left top - column 2 top - column 3 top right
bottom left bottom - column 2 bottom - column 3 bottom right
<TH> can be used instead of <TD>. The difference between the two is that TH is bolded and centered, whereas TD
is left aligned and unbolded. There are also many more attributes for each column and row as well as the tables.
Much more...
There are also many more attributes and elements that I did not cover. You can visit http://www.w3.org/ to find all
of the types of elements, now that you know the basics of HTML. One good HTMl cheatsheet is located at
http://www.webmonkey.com/. And of course, look at what people have done on their website, by going to 'View
Source,' it is a great way to learn HTML code.
Validity of your page
When you are done making your page, it is a good idea to make sure that it is valid. w3.org has created an online
website validator. You can find their validator here: The W3C Markup Validation Service