
Recommended
More Related Content
Similar to In Class Assignment 1 .docx
Similar to In Class Assignment 1 .docx (20)
More from jaggernaoma
More from jaggernaoma (20)
Recently uploaded
Recently uploaded (20)
In Class Assignment 1 .docx
- 1. In Class Assignment 1 WebServices-CSET3200 September 28th, 2016 HTML & CSSWhat is Bootstrap? · Bootstrap is a free front-end framework for faster and easier web development · Bootstrap includes HTML and CSS based design templates for forms, buttons, tables, navigation, and many other, as well as optional JavaScript plugins · Bootstrap also gives you the ability to easily create responsive designs What is Responsive Web Design? Responsive web design is about creating web sites, which automatically adjust themselves to look good on all devices, from small phones to large desktops. Why Use Bootstrap? Advantages of Bootstrap: · Easy to use: Anybody with just basic knowledge of HTML and CSS can start using Bootstrap · Responsive features: Bootstrap's responsive CSS adjusts to phones, tablets, and desktops · Mobile-first approach: In Bootstrap 3, mobile-first styles are part of the core framework · Browser compatibility: Bootstrap is compatible with all modern browsers (Chrome, Firefox, Internet Explorer, Safari, and Opera) Where to Get Bootstrap? There are two ways to start using Bootstrap on your own web site. You can: · Download Bootstrap from getbootstrap.com · Include Bootstrap from a CDN
- 2. · There are several templates available including Portfolio Template. Quick Reminders: * Browser opens the index page as the homepage automatically. Three quick points before we go on to the next lesson: 1. What you made in lab 1 and 2 is a skeleton HTML document. This is the minimum required information for a web document and all web documents should contain these basic components. 2. The document title is what appears at the very top of the browser window. 3. Of all the things on your web page, the title is what search engines consider most when ranking a page. Choose your titles carefully, and keep them brief. IMPORTANT NOTE: Whenever you make a change to your document, just save it, then hit the Refresh/Reload button on your browser. In many instances, just hitting the refresh button does not quite do the trick. Agenda: Today we will see and document the output/results we get after writing these code snippets and different exercises. The aim of today’s lab is to be able to communicate your concept in a technical manner using the technical terminologies, in addition to learning new skill set. You can earn up to 30 points at the completion of this lab. In case you find it extremely hard to express a specific outcome in words, then you are allowed to take a screen shot of the outcome and submit it in your document. However, there is a limit to screen shots. You can add a maximum of 7 images for this lab. Introduction to Nav Area: 1. In an html file, add the following snippets in the body section.
- 3. 2. Add the following for Styling: 3. State the major differences you have noticed so far. <body bgcolor="#ccffcc"> Something really cool </body> #ccffcc is computerese (the symbols and rules of a computer programming language) for light green. You can specify a background image instead. (Note the image should be in the same folder as your HTML file.) <body background="swirlies.gif"> Something really cool. </body> 4. State the outcome you have noticed so far. <body background="bluebar.gif">Something really cool.</body> Save in the same folder you saved page1.html. In order to have a fixed background and the page that just scrolls over it, you can add the following: style="background-attachment:fixed" to the <body> tag...<body background="mybackground.gif" style="background-attachment:fixed"> 5. State the major differences you have noticed so far. We can make things bold.<body>Something really
- 4. <b>cool</b></body>Something <i>really</i> <b>cool</b> We can use tags in combination if we wish to do so.<body>Something really <i><b>cool</b></i></body> This is an example of nested tags. 6. State the major differences you have noticed so far. We can change the font size too... It is super easy!<body>Something really <font size="6">cool</font></body> The font will only display if your visitor has that font installed on their computer. If the person looking at the page doesn't have installed on their computer the font you specify, then they will only see the default font. So be very judicious in your use of fonts. Arial and Comic Sans MS are widely distributed with Windows. You can hedge your bets a little by specifying more than one font. <font face="arial,helvetica,lucida sans">Hidee Ho</font> 7. State the major differences you have noticed so far. Q. What are some common fonts that are on *most* computers and are pretty safe bets? Arial Arial Black Arial Narrow Bookman Old Style Century Gothic Comic Sans MS Courier New Georgia Impact Lucida Console Tahoma Times New Roman Trebuchet MS Verdana ** A handy way to make big or small text is the big tag and
- 5. the small tag.<body><big>Something</big> really <small>cool</small></body> big bumps the text up one size, small bumps it down one size. ** We can, of course use more than one attribute in a <font> tag.<body>Something really <font color="#ff0000" face="arial" size="7">cool</font></body><body bgcolor="#ccffcc">Something really <u><i><b><font color="#ff0000" face="arial" size="7">cool</font></b></i></u></body> 8. State the output. ** Section headings come in sizes 1-6. A useful heading attribute is align. <h2 align="left">Something really cool</h2><h2 align="center">Something really cool</h2><h2 align="right">Something really cool</h2> The browser has default settings for text color, link color, active link color and visited link color in addition to the background color. The defaults are as follows: Background is usually white Text is usually black Links are usually blueVisited links are usually purpleActive links are often red : a link when it has focus, either by clicking on it or tabbing to it. You can change these defaults for the entire document in the <body> tag.<body bgcolor="#000000" text="#ffff66" link="#00ff33" vlink="#00bb33" alink="#00ddff">Something really cool</body> 9. State the major differences you have noticed so far. 10. You could even make a rollercoaster!You could even make a <fontsize="3">r</font><fontsize="4">o</font><fontsize="4">l </font><fontsize="5">l</font><fontsize="6">e</font><fontsize ="7">r</font><fontsize="7">c</font><fontsize="6">o</font><f ontsize="5">a</font><fontsize="4">s</font><fontsize="3">t</f ont><fontsize="2">e</font><fontsize="1">r!</font> Or a RAINBOWOr a <b><font
- 6. color="#ee0000"size="5">R</font><font color="#ff7700"size="5">A</font><font color="#eeee00"size="5">I</font><font color="#00bb00"size="5">N</font><font color="#0000ee"size="5">B</font><font color="#dd00dd"size="5">O</font><font color="#880088"size="5">W</font></b> 11. State the amazing differences you have noticed so far. Remember: You can view the HTML code of any page you happen to be viewing by choosing View/Document Source in your browser. Your browser may word this a little differently, but nearly all browsers have this facility. <body><p align="left">Something really cool</p><p align="center">like an icecube</p><p align="right">or a popsicle</p> 12. State the major differences you have noticed so far. ** A nifty little code that means "space" to the browser: The & means we are beginning a special character, the; means ending a special character, and the letters in between are sort of an abbreviation. There are quite a few of these special characters. Here are five more. (Note: these should always be lower case.) non-breaking space < < less-than symbol > > greater-than symbol & & ampersand " " quotation mark ** We must also specify the source and the size.<body><img src="chef.gif" width="130" height="101"></body> Another method is to use a text or html editor that imports the size when you insert the image. NoteTab, and an image tag of your design is built for you when you simply drag the filename on to the current file. You can insert an image in about 6 tenths of a second. ++++++++++++++++++++++++++++++++++++++++++
- 7. <!-- CSS file: -- > #wrapper { width: 700px; height: 1000px; margin-left: auto; margin-right: auto; border-style: solid; border-width: thin; } #header { width: 600px; height: 100px; margin-left: auto; margin-right: auto; border-style: solid; border-width: thin; background-color: #CCC; } #menu { width: 100px; height: 600px; margin-left: 50px; border-style: solid; border-width: thin; float: left; } #content { width: 475px; height: 600px; margin-right: 50px; border-style: solid; border-width: thin;
- 8. float: right; } 13. State the major differences you have noticed so far. +++++++++++++++++++++++++++++++++++++++++++++++ +++++++++++++ <!-- HTML file: -- > <!DOCTYPE html> <HTML lang="en-US"> <HEAD> <TITLE> Divs in HTML and CSS </TITLE> <META charset="utf-8" /> <META name="keywords" content="" /> <META name="description" content="" /> <link rel="stylesheet" href="Stylesheet.css" type="text/css" /> </HEAD> <BODY> <div id="wrapper"> <div id="header">Header</div> <div id="menu">This is the menu</div> <div id="content">This is content</div> </div> </BODY> </HTML> 14. State the major differences you have noticed so far. +++++++++++++++++++++++++++++++++++++++++++++++ +++++++++++++ How to create TABLES <!-- CSS file table#sample { border-style: solid; border-width: thin;
- 9. border-color: #000; border-collapse: collapse; } .tableheader { font-weight: bold; font-size: 22px; background-color: #FF0; border-color: #000; border-style: solid; border-width: thin; color: #000; } .tdgrey { font-weight: bold; font-size: 15px; background-color: #999; border-color: #000; border-style: solid; border-width: thin; color: #FFF; } .tdwhite { font-weight: bold; font-size: 15px; background-color: #FFF; border-color: #000; border-style: solid; border-width: thin; color: #999; } 15. State the major differences you have noticed so far. +++++++++++++++++++++++++++++++++++++++++++++++
- 10. +++++ <!-- HTML file: -- > <!DOCTYPE html> <HTML lang="en-US"> <HEAD> <TITLE> Table styling CSS </TITLE> <META charset="utf-8" /> <META name="keywords" content="" /> <META name="description" content="" /> <link rel="stylesheet" href="Stylesheet.css" type="text/css" /> </HEAD> <BODY> <table id="sample"> <tr> <th class="tableheader"> Heading 1 </th> <th class="tableheader"> Heading 2 </th> </tr> <tr> <td class="tdgrey"> Data 1 </td> <td class="tdgrey"> Data 2 </td> </tr> <tr> <td class="tdwhite"> Data 1 </td> <td class="tdwhite"> Data 2 </td> </tr> </table> </BODY> </HTML> 16. State the major differences you have noticed so far. +++++++++++++ Second way ++++++++++++++++ <HEAD> <TITLE> Table styling CSS </TITLE> <META charset="utf-8" />
- 11. <style> table, th, td { border:1px solid black; <!-- border-collapse: collapse; --> } Table { width: 500 px; } </HEAD> 17. State the major differences you have noticed so far. +++++++++++++ Link Styles ++++++++++++++++ The order matters here. 1. a: link { color: red; } 2. a: visited { color: brown; } 3. a: hover { color: orange; } 4. a: active { color: green; } 18. State the amazing differences you have noticed so far. +++++++++++++ NAV Bar and Styles ++++++++++++++++ <!-- CSS file: -- > #nav { list-style-type: none; padding: 0px;
- 12. width: 840px; } .linav { float: left; } a.nav:link, a.nav:visited { display: block; width: 200px; font-weight: bold; color: #FFF; background-color: #999; text-align: center; padding: 5px; } a.nav:hover, a.nav:active { background-color: #CCC; } 19. State what you see on screen. ++++++++++++++++++++++++++++++++++++++++++++++ <!-- HTML file: -- > <!DOCTYPE html> <HTML lang="en-US"> <HEAD> <TITLE> HTML and CSS navigation bar </TITLE> <META charset="utf-8" /> <META name="keywords" content="" /> <META name="description" content="" /> <link type="text/css" rel="stylesheet" href="Stylesheet.css" type="text/css" /> </HEAD> <BODY> <ul id="nav"> <li class="linav"><a href="#"
- 13. class="nav">HOME</a></li> <li class="linav"><a href="#" class="nav">ABOUT</a></li> <li class="linav"><a href="#" class="nav">NEWS</a></li> <li class="linav"><a href="#" class="nav">CONTACT</a></li> </ul> <p class= " main-class" > Style for paragraph goes here </p> </BODY> </HTML> 20. State the output. ++++++++++++++++++++++++++++++++++++++++++++ Remember, Styling could be Block level or Inline styling. +++++++++++++ Box Model ++++++++++++++++ Check out the screen resolution on your machine. Control Panel > Display > Resolution> Screen Resolution W X H = 1260 px X 650 px, could be an estimated size of your screen. <div id=" div1"> The div tag </div> Or <head> <!-- for your assignment <link rel="stylesheet" href=" style.css"> --> <style> div { color: red; background-color: lightblue; width: 300 px; height: 300 px; margin: 500 px;
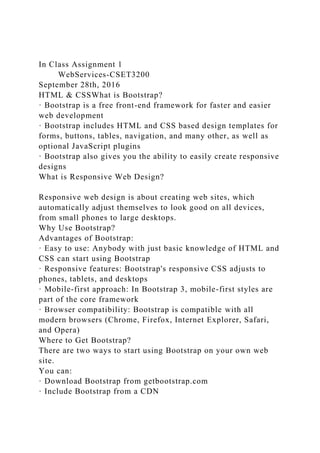
- 14. } </style> </head> 21. Explain the output. The CSS Box Model --- M B P C As per W3School, all HTML elements can be considered as boxes. In CSS, the term "box model" is used when talking about design and layout. The CSS box model is essentially a box that wraps around every HTML element. It consists of: margins, borders, padding, and the actual content. The image below illustrates the box model: Explanation of the different parts: · Content - The content of the box, where text and images appear · Padding - Clears an area around the content. The padding is transparent · Border - A border that goes around the padding and content · Margin - Clears an area outside the border. The margin is transparent The box model allows us to add a border around elements, and to define space between elements. The total width of an element should be calculated like this: Total element width = width + left padding + right padding + left border + right border + left margin + right margin The total height of an element should be calculated like this: Total element height = height + top padding + bottom padding + top border + bottom border + top margin + bottom margin <! DOCTYPE html> <html> <head>
- 15. <style> div { background-color: lightblue; width: 200px; padding: 25px; border: 25px solid navy; margin: 25px; } </style> </head> <body> <div>Lorem ipsum dolor sit amet, consectetur adipiscing elit, sed do eiusmod tempor incididunt ut labore et dolore magna aliqua.</div> </body> </html> 22. State the output. +++++++++++++++++++++++++++++++++++++++++++++++ +++ <style> p{ outline-color: red; outline-style:dotted; /* outline-style: double; */ outline-width: 10px; text-indent: 20px; } </style> 23. State the major differences you have noticed so far. <! DOCTYPE html>
- 16. <html> <head> <style> h1{ text-transform:uppercase; } p.capitalize { text-transform: capitalize; } </style> </head> <body> <h1>This is a Heading</h1> <p>This is a paragraph.</p> <p>This is another paragraph.</p> </body> </html> 24. State the major differences you have noticed so far. +++++++++++++++++++++++++++++++++++++++++++++++ +++ </body> </html> 25. State the output. In the Body Section, 26. State the output.
- 17. +++++++++++++++++++++++++++++++++++++++++++++++ +++ Q. How to float block elements? Values left Is a keyword indicating that the element must float on the left side of its containing block. right Is a keyword indicating that the element must float on the right side of its containing block. none Is a keyword indicating that the element must not float. inline-start Is a keyword indicating that the element must float on the start side of its containing block, that is the left side on ltr scripts and the right side on rtl scripts. inline-end Is a keyword indicating that the element must float on the end side of its containing block, that is the right side on ltr scripts and the left side on rtl scripts. Example Styling Sheet // Generals body padding: 80px hr margin: 50px clear: both border-color: #ccc
- 18. img vertical-align: baseline .show-bg background: pink padding: 20px box-shadow: 0px 0px 0px 20px orange inset font-size: 0 border: 4px solid #FF4136 .box +size(100px) background: lightblue .box-wide background: lightblue height: 100px width: 100% // Floats .float-left float: left margin: 0 10px 10px 0 .float-right float: right margin: 0 0 10px 10px // Clear //; to clean up floats. .clear clear: both The simplest way to clear the floats in this example is to add the clear property. HTML
- 19. <hr> <h1>Many floats, No words + invisible non floating clearing object</h1> <div class="show-bg"> <div class="float-left box"></div> <div class="float-left box"></div> <div class="float-left box"></div> <div class="float-left box"></div> <div class="float-left box"></div> <div class="float-left box"></div> <div class="float-left box"></div> <div class="float-left box"></div> <div class="float-left box"></div> <div class="float-left box"></div> <div class="float-left box"></div> <div class="float-left box"></div> <div class="float-left box"></div> <div class="float-left box"></div> <div class="float-left box"></div> <div class="float-left box"></div> <div class="clear"></div> </div> <p> Paste any Paragraph of 3-4 lines here to see the difference. </p> <hr> 27. State the output. Other Examples of internal Styling sheet. Positioninginclude fixed, absolute, relative, static, initial.
- 20. 28. State the output. Add some different background-color for div#block3 Add in few more div ids. </div> <!-- end of block container --> 29. State the major differences you have noticed so far. Try both left and right, one after the other: float : left; All the divs are now side by side. If the div has concealed some pre-existing element, simply add in the following line after padding declaration. overflow: hidden; } 30. State the major differences you have noticed so far. +++++++++++++++++++++++++++++++++++++++++++++++ +++