Download to read offline

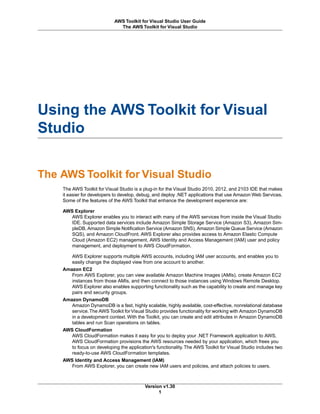


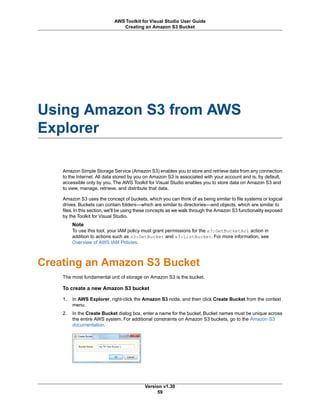
![In order to deploy your web application using the deployment tool, you will need to package it as a .zip
file. For more information about how to package your application for deployment, go to the following topic
at MSDN: How to: Create a Web Deployment Package in Visual Studio.
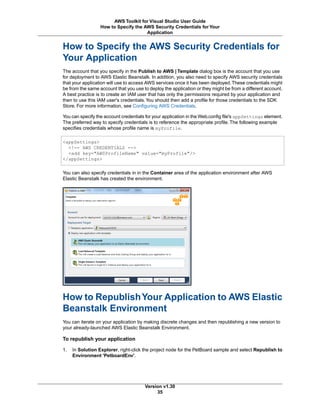
Installation and Invocation
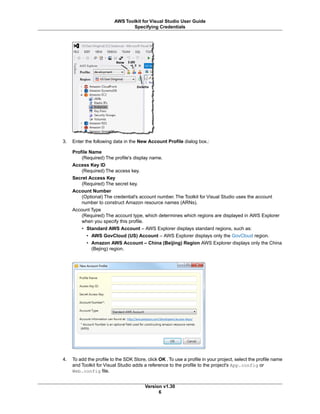
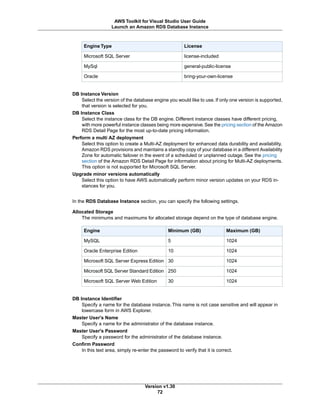
The deployment tool is typically installed in the following directory:
C:Program FilesAWS ToolsDeployment Toolawsdeploy.exe
Or in the following directory on Microsoft Windows 64-bit:
C:Program Files (x86)AWS ToolsDeployment Toolawsdeploy.exe
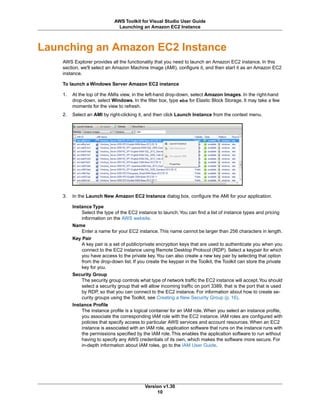
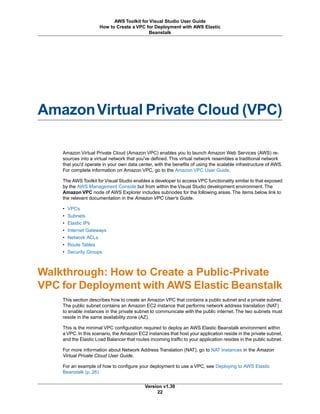
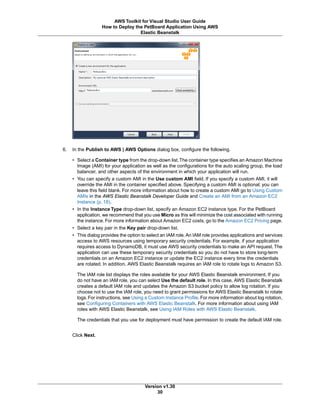
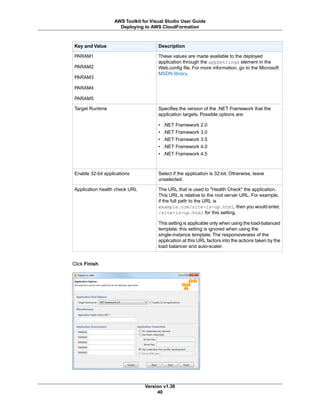
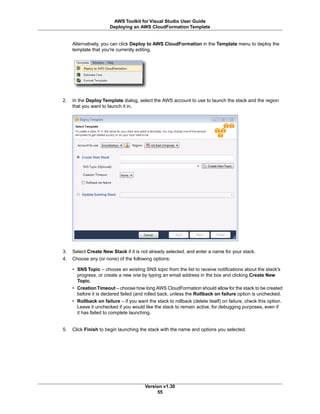
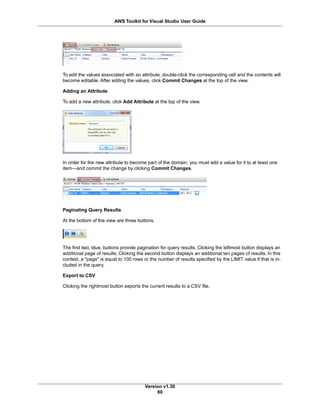
Invocation Syntax
awsdeploy [options] configFile
The configuration file must be the last item specified on the command line.
Command line options can be specified using a forward slash ("/") or a hyphen ("-").
Except for the "D" option, each command line option has a long form as well as a single letter abbreviation.
For example, you can specify silent mode in any of the following ways.
/s
-s
/silent
-silent
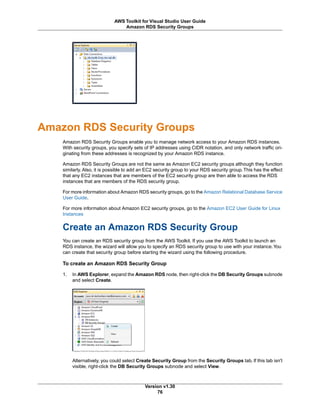
Other command line options follow a similar form. The following table shows the available command line
options.
Version v1.30
43
AWS Toolkit for Visual Studio User Guide
Installation and Invocation](https://image.slidesharecdn.com/aws-tkv-ug-150928082533-lva1-app6891/85/Aws-tkv-ug-47-320.jpg)
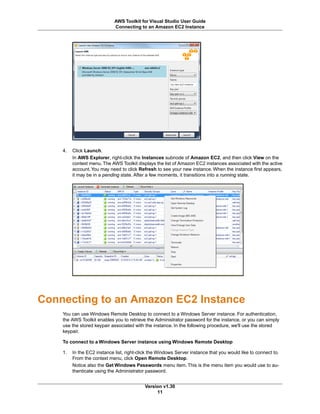
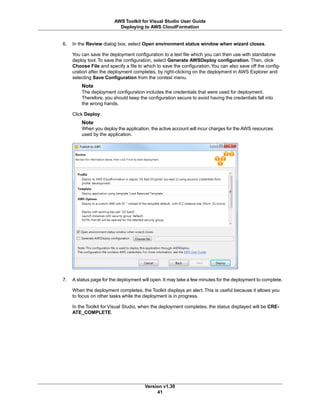
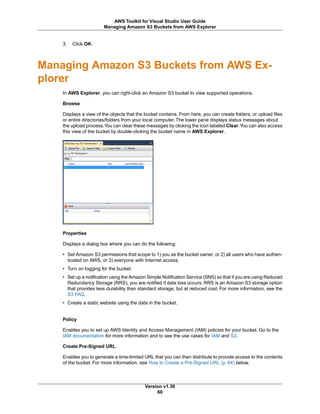
![How to Update the Configuration for an Existing
Deployment
The updateStack feature of the deployment tool enables you to modify the AWS CloudFormation con-
figuration of an existing deployment. This configuration—the application's environment—comprises the
cloud resources that your application runs on and has access to. The updateStack feature does this
without changing the application itself. In other words, updateStack does not redeploy the application,
it only updates the application's environment. In this way, the updateStack feature complements the
redeployment feature; redeployment provides a way to update your application without changing the en-
vironment.
There are various scenarios in which you might use updateStack. For example, you might develop your
application using the single-instance template. Then, as the application nears production readiness, you
could update its configuration to use a load-balanced template, either for public beta testing or live release
deployment. A related scenario would be a deployment that is using a load-balanced configuration, but
which could be optimized by modifying some of the configuration parameters—for example, by increasing
the maximum number of supporting EC2 instances or changing the size of the instances, say from micro
to large.You could implement either of these scenarios—as well as others—using the updateStack
feature of the deployment tool.
There are scenarios in which you might use both the /updateStack option and the /redeploy option, effect-
ively modifying both the application itself and the environment in which the application is running. In some
cases, this approach is more efficient than just performing a regular deployment. For example, you might
change your environment to add an Amazon S3 bucket and also update your application to use that
bucket. With a combination of /updateStack and /redeploy, you could implement both changes, but leave
any already provisioned Amazon EC2 instances up and running. A regular deployment would result in
all of the environment being taken down and rebuilt.
The updateStack feature is available only through the deployment tool. It is not available through the
deployment wizard in Visual Studio.You could use updateStack to update a deployment that was de-
ployed initially using the deployment wizard, but not vice versa.
The invocation syntax for updating an existing deployment is similar to the syntax for a new deployment.
awsdeploy /updateStack [other options] updatedConfigFile
Keep the following in mind when attempting to update a deployment.
• You cannot update a deployment that is in the process of being created or being taken down.
• The specified config file must use the same value for the StackName parameter as the original deploy-
ment.
• You cannot change the region for your deployment using updateStack. However, you can change
the Availability Zones for your deployment.
• If you use updateStack to transition your deployment from SingleInstance to LoadBalanced, the en-
dpoint for your deployment will necessarily change. In the SingleInstance case, the endpoint refers to
an Amazon EC2 instance. However, in the LoadBalanced template, the endpoint refers to the Elastic
Load Balancer (ELB), a computer that distributes computing load across all the EC2 instances.
Therefore, if you are using a CNAME record to associate a domain name with your deployment, you
should update the CNAME record so that it points to the ELB of the load-balanced template.
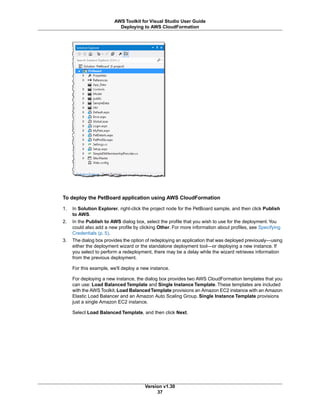
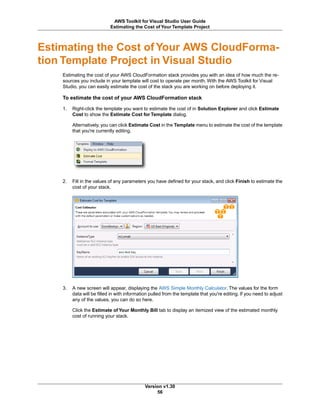
The Deploy tool implements the updateStack feature by calling the AWS CloudFormation UpdateStack
API. For more information about AWS CloudFormation, go to the AWS CloudFormation User Guide.
Version v1.30
51
AWS Toolkit for Visual Studio User Guide
How to Update the Configuration for an Existing Deploy-
ment](https://image.slidesharecdn.com/aws-tkv-ug-150928082533-lva1-app6891/85/Aws-tkv-ug-55-320.jpg)

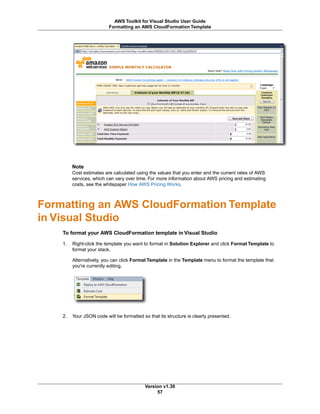
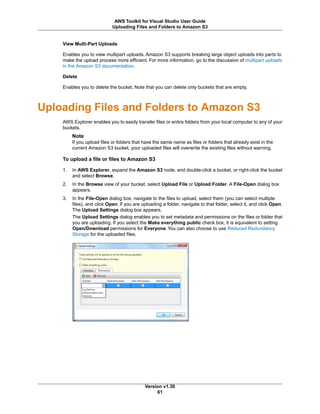

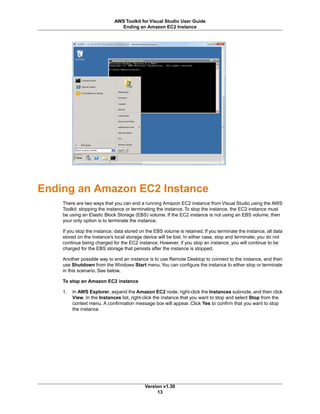
![Identity and Access Management
Topics
• Create and Configure an IAM User (p. 84)
• Create an IAM Group (p. 85)
• Add an IAM User to an IAM Group (p. 86)
• Generate Credentials for an IAM User (p. 87)
• Create an IAM Role (p. 88)
• Create an IAM Policy (p. 89)
[For in-depth information of AWS Identity and Access Management (IAM), go to the IAM User Guide.]
AWS Identity and Access Management (IAM) enables you to more securely manage access to your AWS
accounts and resources. With IAM, you can create multiple users within your primary AWS account--
known as your root account. Each of these users can have their own credentials: password, Access Key
ID, and Secret Key. Note, however, that all IAM users share a single account number.
You can manage the level of resource access that each IAM user has by attaching IAM policies to the
user. For example, you could attach a policy to an IAM user that gives them access to the Amazon S3
service and related resources within your account, but which doesn't provide access to any other services
or resources.
For more efficient access management, your can create IAM groups which are collections of users.You
can then attach a policy to the group and it will affect all users that are members of that group.
In addition to managing permissions at the user and group level, IAM also supports the concept of IAM
roles. Similarly to users and groups, you can attach policies to IAM roles.You can then associate the
IAM role with an Amazon EC2 instance. Applications that run on the EC2 instance are able to access
AWS using the permissions provided by the IAM role. For more information about using IAM roles with
the Toolkit, see Create an IAM Role (p. 88).
Create and Configure an IAM User
IAM users enable you to grant others access to your AWS account. Because you are able to attach
policies to IAM users, you can precisely limit what resources an IAM user can access and what operations
they can perform on those resources.
Version v1.30
84
AWS Toolkit for Visual Studio User Guide
Create and Configure an IAM User](https://image.slidesharecdn.com/aws-tkv-ug-150928082533-lva1-app6891/85/Aws-tkv-ug-88-320.jpg)


The document provides instructions for setting up the AWS Toolkit for Visual Studio, including: 1. Installing the toolkit by running the installation wizard which is packaged as an MSI file. 2. Specifying AWS credentials by adding profiles to the SDK Store which stores the encrypted credentials. Profiles require an access key, secret key, and account type. 3. The SDK Store is separate from project directories and supports multiple credential profiles from different accounts. At least one profile must be added to use the toolkit.


![谷歌留痕技术教程[ 𝙩𝙤𝙥 𝟮𝟯𝟯. 𝙘 𝙤𝙢 ]](https://cdn.slidesharecdn.com/ss_thumbnails/top233-260130173900-2eb784f9-thumbnail.jpg?width=640&height=640&fit=bounds)


![20260201 [FOSDEM] gomodjail - library sandboxing for Go modules.pdf](https://cdn.slidesharecdn.com/ss_thumbnails/20260201fosdemgomodjail-librarysandboxingforgomodules-260201225659-76609ec4-thumbnail.jpg?width=640&height=640&fit=bounds)
