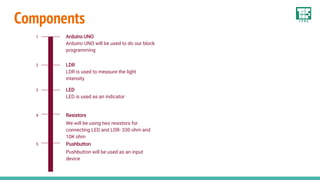
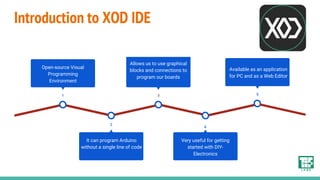
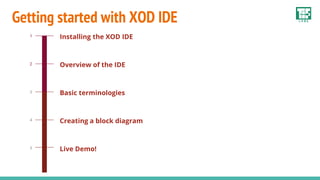
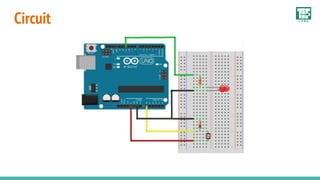
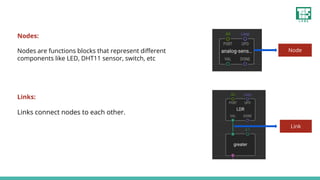
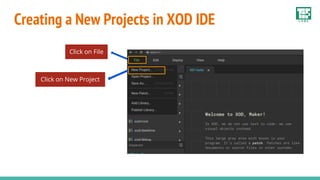
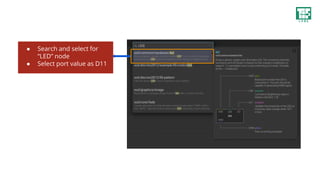
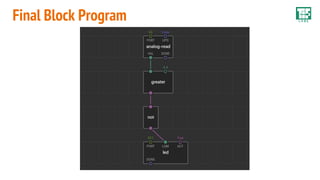
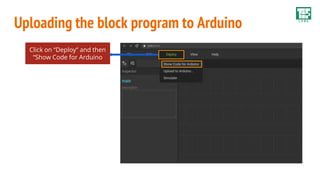
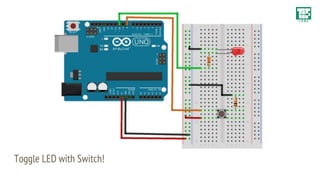
XOD IDE
Arduino Block Programming
Overview
Introduction to XOD IDE
and installing the IDE
Overview of the XOD IDE
Tutorial on how to
create blocks on XOD
Few demo experiments
using XOD IDE
Q&A
Overview of Arduino
Week
Components
Arduino UNO
Arduino UNO will be used to do our block
programming
1
LDR
LDR is used to measure the light
intensity
2
LED
LED is used as an indicator
3
Resistors
We will be using two resistors for
connecting LED and LDR- 330 ohm and
10K ohm
4
Pushbutton
Pushbutton will be used as an input
device
5
Introduction to XOD IDE
4
Very useful for getting
started with DIY-
Electronics
2
It can program Arduino
without a single line of code
1
Open-source Visual
Programming
Environment
5
Available as an application
for PC and as a Web Editor
3
Allows us to use graphical
blocks and connections to
program our boards
Advantages
● Smaller learning curve due to graphical nature
● Easier to visualize and more easier to understand
● No confusing syntax
Getting started with XOD IDE
Installing the XOD IDE
1
Overview of the IDE
2
Basic terminologies
3
Creating a block diagram
4
Live Demo!
5
Circuit
Elements of XOD IDE
Patches:
● A “patch” is the working area for your
XOD program
● It is similar in a sense to a “sketch” in
the Arduino IDE
● It is possible to have several patches in
the same XOD program
Patch
Elements of XOD IDE
Patch
Working Area
Working area of the XOD program
Sketch
Similar to sketch in the Arduino IDE
Patches:
You can have several patches in the same XOD program
Node
Link
Nodes:
Nodes are functions blocks that represent different
components like LED, DHT11 sensor, switch, etc
Links:
Links connect nodes to each other.
Blink LED Demonstration!
Creating a New Projects in XOD IDE
Click on File
Click on New Project
LDR Programming in XOD IDE
● Press button “i” on
keyboard
● Search and select
analog-read node.
● Reads analog values.
● Search “greater” node. This node works as if
else statement.
● Set the IN2 value to 0.4 (may need to vary)
Search and select for
“Not” node
● Search and select for
“LED” node
● Select port value as D11
Final Block Program
Uploading the block program to Arduino
Click on “Deploy” and then
“Show Code for Arduino
Toggle LED with Switch!
Q&A
Day 1
March 21
Introduction to Arduino
Overview of Various
Arduino Boards
Getting Started with
Arduino
Day 2
March 22
Averse to writing code?
Program Arduino using
Blocks
Day 3
March 24
Arduino & Industry
Day 5
March 26
End to End TinyML
application using
Sensa & AIFES with
Arduino
Day 4
March 25
Exploring TinyML with
Arduino & Edge
Impulse
Overview of the Arduino Week

Arduino - Block Programming using XOD IDE (No Code)

  • 1.
  • 2.
    Overview Introduction to XODIDE and installing the IDE Overview of the XOD IDE Tutorial on how to create blocks on XOD Few demo experiments using XOD IDE Q&A Overview of Arduino Week
  • 3.
    Components Arduino UNO Arduino UNOwill be used to do our block programming 1 LDR LDR is used to measure the light intensity 2 LED LED is used as an indicator 3 Resistors We will be using two resistors for connecting LED and LDR- 330 ohm and 10K ohm 4 Pushbutton Pushbutton will be used as an input device 5
  • 4.
    Introduction to XODIDE 4 Very useful for getting started with DIY- Electronics 2 It can program Arduino without a single line of code 1 Open-source Visual Programming Environment 5 Available as an application for PC and as a Web Editor 3 Allows us to use graphical blocks and connections to program our boards
  • 5.
    Advantages ● Smaller learningcurve due to graphical nature ● Easier to visualize and more easier to understand ● No confusing syntax
  • 6.
    Getting started withXOD IDE Installing the XOD IDE 1 Overview of the IDE 2 Basic terminologies 3 Creating a block diagram 4 Live Demo! 5
  • 7.
  • 8.
    Elements of XODIDE Patches: ● A “patch” is the working area for your XOD program ● It is similar in a sense to a “sketch” in the Arduino IDE ● It is possible to have several patches in the same XOD program Patch
  • 9.
    Elements of XODIDE Patch Working Area Working area of the XOD program Sketch Similar to sketch in the Arduino IDE Patches: You can have several patches in the same XOD program
  • 10.
    Node Link Nodes: Nodes are functionsblocks that represent different components like LED, DHT11 sensor, switch, etc Links: Links connect nodes to each other.
  • 11.
  • 12.
    Creating a NewProjects in XOD IDE Click on File Click on New Project
  • 13.
    LDR Programming inXOD IDE ● Press button “i” on keyboard ● Search and select analog-read node. ● Reads analog values.
  • 14.
    ● Search “greater”node. This node works as if else statement. ● Set the IN2 value to 0.4 (may need to vary)
  • 15.
    Search and selectfor “Not” node
  • 16.
    ● Search andselect for “LED” node ● Select port value as D11
  • 17.
  • 18.
    Uploading the blockprogram to Arduino Click on “Deploy” and then “Show Code for Arduino
  • 19.
  • 20.
  • 21.
    Day 1 March 21 Introductionto Arduino Overview of Various Arduino Boards Getting Started with Arduino Day 2 March 22 Averse to writing code? Program Arduino using Blocks Day 3 March 24 Arduino & Industry Day 5 March 26 End to End TinyML application using Sensa & AIFES with Arduino Day 4 March 25 Exploring TinyML with Arduino & Edge Impulse Overview of the Arduino Week

Editor's Notes

  • #6 Smaller Learning Curve Easy to Get Started No confusing syntax