#StandardsGoals for 2024: What’s new for BISAC - Tech Forum 2024
QR Scanner Tutorial
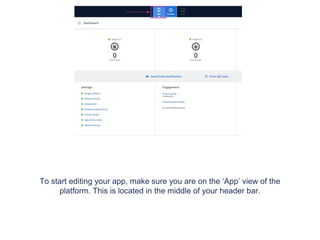
1. To start editing your app, make sure you are on the ‘App’ view of the
platform. This is located in the middle of your header bar.
2. Go to the ‘features’ tab on the navigation panel to start customising
out your content.
3. Once the ‘Features’ tab has been selected the app panel will appear with
a list of the features that are already applied to your app. On the top right
of the panel there is a ‘Manage’ button, click this to access the features
menu where you can pick and choose which features you would like on
your app.
4. Select the ‘QR Scanner’ feature. ’Add’ the feature and then move it to
where you would like it to be placed on your app panel. Press ‘Close'
once you’ve finished.
5. Select the ‘QR Scanner’ tab now located on your app panel.
6. Click the customise button to change the name or the icon
of your QR Scanner feature.
7. To chose an icon or to upload your own custom icon press
the ‘Browse’ button.
8. Choose an icon from the list provided, or to upload your own
icon press the ‘Upload custom icon’ tab.
9. To upload your custom icon drag and drop your 60 x 60 pixel image into the
blue area, or press browse to find your icon manually. Press set when you
have chosen your icon.
10. Press ‘Save’ once you have finished customising your
features name and icon.
11. Preview App
To view your new app feature download the Putti Preview
App and navigate to your QR Scanner tab.
12. Once you are in the QR Scanner you will be able to scan any
QR Code