
Recommended
More Related Content
What's hot
Viewers also liked
Viewers also liked (20)
Similar to Membership Feature
Similar to Membership Feature (20)
More from My App Editor
Recently uploaded
Recently uploaded (20)
Membership Feature
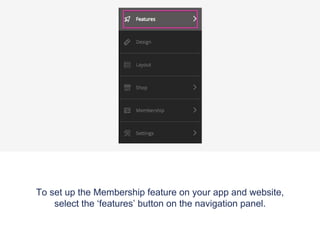
- 1. To set up the Membership feature on your app and website, select the ‘features’ button on the navigation panel.
- 2. *Note* When adding or removing a feature, you can be on either the ‘App’ or ‘Web’ view as any changes that are made will be updated on both.
- 3. To turn on Membership, press the blue ‘manage’ button on the right of the features tab.
- 4. Once pressed, your feature library will appear.
- 5. Press the ‘add’ button on the membership feature to add it to your app or website.
- 6. To save any changes press the blue close button on the right of the feature tab.
- 7. Your membership module will now appear on your navigation panel under ‘features’.
- 8. Select the membership tab to start making edits.
- 9. Click on the customise button to customise the feature’s name or icon.
- 10. You can choose to upload your own icon or use one from the default list.
- 11. Press the blue ‘Save’ button on the top right of your customisation bar to save the changes.
- 12. To start editing your membership settings go to the ‘Membership module’ on the navigation panel. * Please Note; this is not the one listed underneath ‘Features’.
- 13. Click on the ‘Settings Tab’ underneath the membership module.
- 14. Decide if you would like to make a force login/sign up, so that when your app or website is visited, a user might sign in.
- 15. Fill out the details you would like to appear on the membership screen, if you want a custom field, click ‘Add another custom field’ and fill out the details you would like to appear.
- 16. Insert some Terms and Conditions if necessary, by filling out the text box.
- 17. Press the blue ‘Save’ button on the top right to make sure you don’t lose any changes.
- 18. If your membership feature is live and you would like to view the subscriber list then navigate to ‘Subscriber List’, under the Membership tab. Here you will be able to see a list of all your subscribers including when they subscribed, their name and their email.
- 19. You can see the other details for a specific subscriber by pressing the blue ‘View’ button alongside the subscribers details.
- 20. Filter the subscription list by pressing the blue ‘Filter Subscription List’ button.
- 21. Add a filter option and choose how you would like to order the subscription. Eg: by latest first and press filter subscriptions. You can also add a filter option by choosing from the Default Fields and setting a condition for that option.
- 22. You can choose to send a push notification to all subscribers or to groups of subscribers (based on the current filter applied to the list) by pressing the ‘Send Notifications’ button.
- 23. Fill out your message and press ‘Send’.
- 24. Your Push Notification History will be updated to list the notifications sent to members with a simple icon to display the filter applied when sending the notification.