The document is an Apache web server tutorial for Linux that describes how to install and configure Apache, mod_ssl, and PHP on a Linux server. It discusses installing Apache and additional modules using yum, configuring Apache to start on boot with chkconfig, editing httpd.conf to set server settings and enable virtual hosts, creating a website directory structure, and starting the Apache service. The tutorial provides guidance for setting up the basic components needed to host a dynamic website on Apache.
Apache is the most popular web server software. The course is geared to make you a Apache pro. Once you digest all basics, the course will help you create your very own production Web Server!
Here I covered the cores of Apache and also discuss each and every core. Virtual host, resistance server process some protocols like HTTP, SMTP, DNS FTP, are also be highlighted.
Focus on some installing part of apache.
Here I covered the cores of Apache and also discuss each and every core. Virtual host, resistance server process some protocols like HTTP, SMTP, DNS FTP, are also be highlighted.
Focus on some installing part of apache.
Hello Everyone,
How to Reset New Root Passwd or Fix Broken Sudo.......
Errors that you are getting..........
Error 1:- you may notice an error saying you're not in the sudoers file and the incident is going to be reported.
Error 2:- sorry user usuario is not allowed to execute '/usr/bin/passwd root' as root on.
Cause and symptoms :-
the /etc/sudoers file has been altered to no longer allow users in the admin group to escalate privilege
the permissions on the /etc/sudoers file are changed to something other than 0440
a user who should not have been has been taken out of the admin group.
By above error and cause can be done by following steps.....
To Reset Root Passwd
step1 :- Restart your server or desktop
step2 :- press continue shift untill boot menu show
step3 :- select ubuntu generic second option press Enter
step4 :- then select root shell press Enter
step5 :- type mount -o rw,remount /
step6 :- sudo passwd root or passwd root assign passwd and then repeat again the same passwd
Note :- inplace of root you can set your name,hostname any name that u assign during installation OR Login.
You can also Create NEW USER
step7 :-sudo adduser ubuntu and give new passwd
Thanking You
Synthetic Fiber Construction in lab .pptxPavel ( NSTU)
Synthetic fiber production is a fascinating and complex field that blends chemistry, engineering, and environmental science. By understanding these aspects, students can gain a comprehensive view of synthetic fiber production, its impact on society and the environment, and the potential for future innovations. Synthetic fibers play a crucial role in modern society, impacting various aspects of daily life, industry, and the environment. ynthetic fibers are integral to modern life, offering a range of benefits from cost-effectiveness and versatility to innovative applications and performance characteristics. While they pose environmental challenges, ongoing research and development aim to create more sustainable and eco-friendly alternatives. Understanding the importance of synthetic fibers helps in appreciating their role in the economy, industry, and daily life, while also emphasizing the need for sustainable practices and innovation.
Francesca Gottschalk - How can education support child empowerment.pptxEduSkills OECD
Francesca Gottschalk from the OECD’s Centre for Educational Research and Innovation presents at the Ask an Expert Webinar: How can education support child empowerment?
Unit 8 - Information and Communication Technology (Paper I).pdfThiyagu K
This slides describes the basic concepts of ICT, basics of Email, Emerging Technology and Digital Initiatives in Education. This presentations aligns with the UGC Paper I syllabus.
June 3, 2024 Anti-Semitism Letter Sent to MIT President Kornbluth and MIT Cor...Levi Shapiro
Letter from the Congress of the United States regarding Anti-Semitism sent June 3rd to MIT President Sally Kornbluth, MIT Corp Chair, Mark Gorenberg
Dear Dr. Kornbluth and Mr. Gorenberg,
The US House of Representatives is deeply concerned by ongoing and pervasive acts of antisemitic
harassment and intimidation at the Massachusetts Institute of Technology (MIT). Failing to act decisively to ensure a safe learning environment for all students would be a grave dereliction of your responsibilities as President of MIT and Chair of the MIT Corporation.
This Congress will not stand idly by and allow an environment hostile to Jewish students to persist. The House believes that your institution is in violation of Title VI of the Civil Rights Act, and the inability or
unwillingness to rectify this violation through action requires accountability.
Postsecondary education is a unique opportunity for students to learn and have their ideas and beliefs challenged. However, universities receiving hundreds of millions of federal funds annually have denied
students that opportunity and have been hijacked to become venues for the promotion of terrorism, antisemitic harassment and intimidation, unlawful encampments, and in some cases, assaults and riots.
The House of Representatives will not countenance the use of federal funds to indoctrinate students into hateful, antisemitic, anti-American supporters of terrorism. Investigations into campus antisemitism by the Committee on Education and the Workforce and the Committee on Ways and Means have been expanded into a Congress-wide probe across all relevant jurisdictions to address this national crisis. The undersigned Committees will conduct oversight into the use of federal funds at MIT and its learning environment under authorities granted to each Committee.
• The Committee on Education and the Workforce has been investigating your institution since December 7, 2023. The Committee has broad jurisdiction over postsecondary education, including its compliance with Title VI of the Civil Rights Act, campus safety concerns over disruptions to the learning environment, and the awarding of federal student aid under the Higher Education Act.
• The Committee on Oversight and Accountability is investigating the sources of funding and other support flowing to groups espousing pro-Hamas propaganda and engaged in antisemitic harassment and intimidation of students. The Committee on Oversight and Accountability is the principal oversight committee of the US House of Representatives and has broad authority to investigate “any matter” at “any time” under House Rule X.
• The Committee on Ways and Means has been investigating several universities since November 15, 2023, when the Committee held a hearing entitled From Ivory Towers to Dark Corners: Investigating the Nexus Between Antisemitism, Tax-Exempt Universities, and Terror Financing. The Committee followed the hearing with letters to those institutions on January 10, 202
Palestine last event orientationfvgnh .pptxRaedMohamed3
An EFL lesson about the current events in Palestine. It is intended to be for intermediate students who wish to increase their listening skills through a short lesson in power point.
Macroeconomics- Movie Location
This will be used as part of your Personal Professional Portfolio once graded.
Objective:
Prepare a presentation or a paper using research, basic comparative analysis, data organization and application of economic information. You will make an informed assessment of an economic climate outside of the United States to accomplish an entertainment industry objective.
The French Revolution, which began in 1789, was a period of radical social and political upheaval in France. It marked the decline of absolute monarchies, the rise of secular and democratic republics, and the eventual rise of Napoleon Bonaparte. This revolutionary period is crucial in understanding the transition from feudalism to modernity in Europe.
For more information, visit-www.vavaclasses.com
Welcome to TechSoup New Member Orientation and Q&A (May 2024).pdfTechSoup
In this webinar you will learn how your organization can access TechSoup's wide variety of product discount and donation programs. From hardware to software, we'll give you a tour of the tools available to help your nonprofit with productivity, collaboration, financial management, donor tracking, security, and more.
The Roman Empire A Historical Colossus.pdfkaushalkr1407
The Roman Empire, a vast and enduring power, stands as one of history's most remarkable civilizations, leaving an indelible imprint on the world. It emerged from the Roman Republic, transitioning into an imperial powerhouse under the leadership of Augustus Caesar in 27 BCE. This transformation marked the beginning of an era defined by unprecedented territorial expansion, architectural marvels, and profound cultural influence.
The empire's roots lie in the city of Rome, founded, according to legend, by Romulus in 753 BCE. Over centuries, Rome evolved from a small settlement to a formidable republic, characterized by a complex political system with elected officials and checks on power. However, internal strife, class conflicts, and military ambitions paved the way for the end of the Republic. Julius Caesar’s dictatorship and subsequent assassination in 44 BCE created a power vacuum, leading to a civil war. Octavian, later Augustus, emerged victorious, heralding the Roman Empire’s birth.
Under Augustus, the empire experienced the Pax Romana, a 200-year period of relative peace and stability. Augustus reformed the military, established efficient administrative systems, and initiated grand construction projects. The empire's borders expanded, encompassing territories from Britain to Egypt and from Spain to the Euphrates. Roman legions, renowned for their discipline and engineering prowess, secured and maintained these vast territories, building roads, fortifications, and cities that facilitated control and integration.
The Roman Empire’s society was hierarchical, with a rigid class system. At the top were the patricians, wealthy elites who held significant political power. Below them were the plebeians, free citizens with limited political influence, and the vast numbers of slaves who formed the backbone of the economy. The family unit was central, governed by the paterfamilias, the male head who held absolute authority.
Culturally, the Romans were eclectic, absorbing and adapting elements from the civilizations they encountered, particularly the Greeks. Roman art, literature, and philosophy reflected this synthesis, creating a rich cultural tapestry. Latin, the Roman language, became the lingua franca of the Western world, influencing numerous modern languages.
Roman architecture and engineering achievements were monumental. They perfected the arch, vault, and dome, constructing enduring structures like the Colosseum, Pantheon, and aqueducts. These engineering marvels not only showcased Roman ingenuity but also served practical purposes, from public entertainment to water supply.
Introduction to AI for Nonprofits with Tapp NetworkTechSoup
Dive into the world of AI! Experts Jon Hill and Tareq Monaur will guide you through AI's role in enhancing nonprofit websites and basic marketing strategies, making it easy to understand and apply.
Introduction to AI for Nonprofits with Tapp Network
Apache web server tutorial for linux
1. 12/20/12 Apache Web Server Tutorial for Linux
Home Tutorials Forum Blog Advertising Links Contact About Search
Apache Web Server Tutorial for Linux
Written by Tony Bhimani
Posted on August 2, 2006
Requirements
*nix based Operating System
Apache HTTP Server
mod_ssl Apache Interface
PHP Scripting Language
Contents
Introduction
Installing Apache HTTP Web Server
Installing mod_ssl for Secure Sockets Layer (SSL) Support
Installing PHP for Dynamic Web Pages
Setting Apache to Start on Bootup with chkconfig
C onfiguring Apache Server Settings (httpd.conf)
C reating the Web Site Directory Structure
C reating VirtualHost C onfiguration Files
Starting Apache and Viewing the Web Site
Other Things to Know for Using Apache
C onclusion
Introduction
The Apache Web Server is one of the most popular open-source HTTP Servers that exists today. It's a powerful, secure, and
fully featured web server that can be found hosting anything from personal web sites to corporate domains. If you have a DSL
or C able connection with a static IP then you can use the Apache web server to host your web site (as long as your ISP
doesn't have a problem with you running a server on their network). This tutorial will teach you how to set up your own
Apache web server on Linux so you can host your own web sites either at home or work. You'll learn how to install the Apache
HTP Server with SSL and PHP support, use chkconfig to set Apache to auto-start on boot, edit the Apache httpd.conf
configuration file for your server settings, create a directory structure for your web site, create the VirtualHost configuration
file for your web site, start the Apache service, verify your site is working, go over the init script options, and finally show you
some additional options and settings for Apache such as graceful restarts, htaccess usage, user name and password directory
protection, and custom error pages. The two things I won't be covering are setting up DNS for your domain and configuring
your firewall to open ports 80 and 443 for HTTP and SSL respectively, however you can read my Bind DNS tutorial and
iptables firewall tutorial for information on how to do it. I'll be using C entOS 4.2 and Apache 2.x will be installed using yum
instead of source. Let's get started.
Installing Apache HTTP Web Server
We'll be using yum to download and install the Apache RPM's from the C entOS repository. Apache shouldn't be loaded on your
server unless you selected it during the operating system installation process. If you know you have Apache installed then you
can skip this section, but if it's not or you're not sure then you should perform the following tests to see if the Apache web
server is on your system. To do this we'll use the which command to look for the httpd binary in the environment variable
PATH.
which httpd
If you see something similar to the above image then the Apache binary doesn't seem to be found on the server. Our next
step is to install Apache by using yum. Issue the next command.
yum install httpd
w w w .xenocafe.com/tutorials/linux/centos/apache_w eb_server/index.php 1/18
2. 12/20/12 Apache Web Server Tutorial for Linux
Two RPM packages will be downloaded from the C entOS repository (httpd-2.0.52-22.ent.centos4.i386.rpm and httpd-suexec-
2.0.52-22.ent.centos4.i386.rpm) and installed automatically. If everything goes well you should now have the Apache web
server on your system. You might also want to load the Apache documentation so you'll have the man pages available. This is
optional but highly recommended. Use yum again and download the Apache manual (yum install httpd-manual). Next we'll
use yum to install mod_ssl for Secure Sockets Layer (SSL) support.
Installing mod_ssl for Secure Sockets Layer (SSL) Support
Secure Sockets Layer, also known as SSL for short, provides encrypted commnications between hosts. SSL can be found in e-
commerce web sites and any other site that requires sensitive information being transmitted protected from eavesdropping. In
a nutshell, the hosts negotiate a protocol they both can understand and then switch to secure communications. The data
passed back and forth between the hosts is encrypted with a 128-bit key (hence 128-bit SSL). In a typical SSL setup, the web
server has SSL support enabled and a certificate that verifies the company's identity. These certificates are initially generated
as C ertificate Signing Requests (C SR) by the server's administrator. The C SR is then signed by a third party, a C ertificate
Authority (C A), that validates the company's identity and makes the C SR into a full certificate. There are many C A's like
VeriSign, Thawte, GeoTrust, InstantSSL (aka The C omodo Group), FreeSSL, and many others that sign C SR's. Prices vary
from company to company, but as long as they support the mainstream browsers you shouldn't run into any problems. If
you'd like to learn more about Secure Sockets Layer then you should check out the Wikipedia Transport Layer Security page.
You may be wondering where does mod_ssl fits into all of this? On Linux and Unix distributions, there is a software package
called OpenSSL that performs all the cryptography and mod_ssl is the Apache interface to OpenSSL. It's mod_ssl that makes it
possible for Apache to have SSL capability. We'll now install the mod_ssl RPM (mod_ssl-2.0.52-22.ent.centos4.i386.rpm) for
Apache using yum.
yum install mod_ssl
w w w .xenocafe.com/tutorials/linux/centos/apache_w eb_server/index.php 2/18
3. 12/20/12 Apache Web Server Tutorial for Linux
mod_ssl should now be installed. If you didnt have OpenSSL installed then it should have been picked up as a dependency and
was installed as well. We have one more package to install and that's the PHP scripting language.
Installing PHP for Dynamic Web Pages
PHP is a scripting language for creating dynamic web pages. PHP allows you to include code in your web pages to be
processed server-side and the resulting HTML is sent to the user's web browser. With PHP you can add database access, read
and write files to the server's filesystem, generate dynamic graphics like graphs and security image codes, and create security
control mechanisms for fencing off parts of your web site. PHP has many other uses and that's what makes it a powerful tool
for creating dynamic web pages.
If you're not a programmer or will only he hosting a static HTML web pages, then PHP won't be of any use to you. However, if
you want to learn PHP then you should install the PHP modules for Apache. We'll use yum one last time to install PHP on our
server. There are many PHP RPM modules, one being the actually binary and modules for Apache and the rest are support
features for MySQL, XML, ODBC , and others to tie those subsystems into PHP. It's a good idea to install all the PHP modules
since you never know what you'll need now or in the future. Now we'll use yum to install PHP.
yum install php*
w w w .xenocafe.com/tutorials/linux/centos/apache_w eb_server/index.php 3/18
4. 12/20/12 Apache Web Server Tutorial for Linux
As you can see above, we used a wildcard to tell yum to install anything starting with the word 'php'. On my server yum
downloaded and installed fifteen packages, however yours may be different depending on its configuration. Now that PHP is
installed we can move on to setting the Apache service to automatically start on bootup or in the event of a reboot.
Setting Apache to Start on Bootup with chkconfig
The Apache web server will need to be set to autostart when the server boots. The Apache RPM didn't set this up for us so
we'll have to do it ourselves using chkconfig (Note: you can also use setup to turn on the Apache service). We're going to
have Apache start on run levels 2, 3, and 5.
chkconfig --level 235 httpd on
chkconfig --list httpd
The second chkconfig command lists the run levels Apache is configured to start on. If you don't have X Windows installed
then you may want to omit run level 5 (Multi-User Mode - boot up in X Windows). To learn more about Linux Run Levels you
may want to check out this page on NetworkC lue. Now that Apache is installed and set to start up we'll move on to configuring
the Apache web server by editing httpd.conf, the Apache server configuration file.
Configuring Apache Server Settings (httpd.conf)
Apache's main configuration file is called httpd.conf and is located in /etc/httpd/conf/. The default httpd.conf will work without
any changes, however we want to customize Apache a little bit. Our main focus is to setup the use of Virtual Hosts so we can
run as many web sites as we want using a single IP address. Also, we want to simplify the management of our Virtual Hosts
without cluttering httpd.conf with our entries. Before we get to any of that we will first configure our Apache web server.
I will make the assumption that you have a single WAN based IP address. For this example I'm using 192.168.1.210 with a
hostname of node2.centos (yes, it's a LAN IP but pretend it's WAN). You can use your IP or hostname from /etc/hosts, but I
suggest using your hostname because if you ever change IP's all you have to do is update /etc/hosts with the new address. If
you do use an IP then you'll have to change all instances of it in httpd.conf. If you don't know what your IP address is or never
set up /etc/hosts, you can find your address by using ifconfig (look at the number to the right of 'inet addr:').
We'll start with opening httpd.conf in the nano text editor, but before that you should make a copy of your existing httpd.conf
file. If you encounter any problems you'll still have the original to fall back to.
cd /etc/httpd/conf
cp httpd.conf httpd.conf.old
nano httpd.conf
Apache's httpd.conf is filled with many helpful comments to tell you what each configuration directive does. Scroll down to line
133 as shown in the picture below. FYI, if you ever want to know what line number you're on in nano, press CTRL-C and nano
will show you. We're looking for the line that says 'Listen 80'. We won't be changing this directive since we want Apache listen
on all IP addresses set up on the server. I wanted to show you where to change it if you needed to bind Apache to only one
address.
w w w .xenocafe.com/tutorials/linux/centos/apache_w eb_server/index.php 4/18
5. 12/20/12 Apache Web Server Tutorial for Linux
Move on down to line number 235 where it says 'ServerAdmin root@localhost'. The Apache ServerAdmin directive is for the
administrator's email address of the server. End users encountering any problems with the server would use this email
address to notify the sysadmin. C omment out the existing ServerAdmin line with a pound symbol and enter a new line below
with your email address. For this example I used admin@node2.centos.
#ServerAdmin root@localhost
ServerAdmin admin@your-domain.com
Below the ServerAdmin directive is ServerName. The Apache ServerName directive is for Apache to identify itself which is
typically the hostname of the server. You'll want to specify your hostname or IP address instead of a valid DNS name
especially if you're hosting many web sites. There are some people that may disagree with this method but I think it's better to
keep all the generic information in httpd.conf and use specifics in the VirtualHost configuration files. Add a new blank line
below the commented ServerName directive and add your hostname or IP. For this server I used my hostname node2.centos.
#ServerName new.host.name:80
w w w .xenocafe.com/tutorials/linux/centos/apache_w eb_server/index.php 5/18
6. 12/20/12 Apache Web Server Tutorial for Linux
ServerName yourhostname
The next directive we'll edit is very close to the end of the file. Scroll all the way down to line number 1005 (tip: use the Page
Down key on your keyboard) and look for '#NameVirtualHost *:80'. The NameVirtualHost directive tells Apache that we want
to use name-based virtual hosting, or in simpler terms, a bunch of web sites all using the same IP address. Virtual hosting is
made possible because when a web browser goes to a site, for example www.xenocafe.com, the web site address is passed as
part of the HTTP header (Host: www.xenocafe.com). This allows Apache to distinguish between different hosts sharing the
same IP address. Add a couple blank lines underneath '#NameVirtualHost *:80' and on the line right below put
NameVirtualHost and your hostname or IP address followed by a :80. The ':80' means we're using name-based virtual hosting
for the HTTP protocol. SSL will be configured through VirtualHost configuration files due to its nature. You'll learn why when we
create our virtual hosts. For this server I used my hostname node2.centos.
#NameVirtualHost *:80
NameVirtualHost yourhostname:80
6/18
7. We're almost done. The last thing we need to do is create a default virtual host to respond to requests when someone vists our
IP address and not our domain name. You may or may not want to add this virtual host and it's totally up to you, but I
personally don't want anyone going directly to my IP address. I prefer they visit my web site by name only. A VirtualHost
entry can have many directives which I'll explain later, but what you need to know for now is the example I provide responds
by IP address visits. At the very end of the file there is a line that instructs Apache to load any configuration files found in the
/etc/httpd/conf/vhosts/ directory (which we'll create later). This is my way of keeping the virtual hosts separate from
httpd.conf and most importantly, making hosts easier to manage.
<itaHs yuhsnm:0
Vrulot orotae8>
SreAmnyuyu-oancm
evrdi o@ordmi.o
SreNm yu_pades
evrae ori_drs
DcmnRo /w
ouetot ww
Erro lg/ro_o
roLg oserrlg
CsoLglg/ceslgcmie
utmo osacs_o obnd
<Vrulot
/itaHs>
#icueVrulot cni fls
nld itaHss ofg ie
Icuecn/hss*cn
nld ofvot/.of
8. 12/20/12 Apache Web Server Tutorial for Linux
We're done editing httpd.conf. Let's save our changes (CTRL-O) and exit nano (CTRL-X). Now we'll move on to creating a web
site directory structure and user account for SSH access and S/FTP file uploads.
Creating the Web Site Directory Structure
Our web site directory schema should be simple yet structured. The common approach would be to use /home as the root but
we won't be doing that. Our web site parent root will be /www and from within it create a directory for each domain we'll be
hosting. Within each domain directory there will be a set of common directories (html, html/cgi-bin, databases, and logs).
Reading what I wrote doesn't make much sense so here it is visually. For this example and the rest of the tutorial, we'll say we
acquired the domain your-domain.com and will be configuring our server for it.
/w
ww (otfralhse dmis
ro o l otd oan)
/w/ordmi
wwyu-oan (oandrcoy
dmi ietr)
/w/ordmi/tl
wwyu-oanhm (ietr fryu wbst fls
drcoy o or e ie ie)
/w/ordmi/tlcibn(G drcoyfreeuigPr srps
wwyu-oanhm/g-i CI ietr o xctn el cit)
/w/ordmi/aaae
wwyu-oandtbss (aaae frti wbst soe o aprst bss
dtbss o hs e ie trd n e ie ai)
/w/ordmi/os
wwyu-oanlg (e st acs aderrlg aesoe hr)
wb ie ces n ro os r trd ee
The databases directory is optional. If you read my mapping mysql databases tutorial then you can migrate your databases
outside the default /var/lib/mysql into the databases directory. This will allow you to store your databases on a per site basis
in the web site's home directory.
Creating the Directory Root (one-time only)
We'll start creating our web site directory structure by making /www. C reating this directory is a one-time process and will be
home to all our domains we're hosting (any domains we add will be stored in the /www directory).
mkdir /www
chown root.root /www
w w w .xenocafe.com/tutorials/linux/centos/apache_w eb_server/index.php 8/18
9. 12/20/12 Apache Web Server Tutorial for Linux
chown root.root /www
After we create the directory we chown it to uid:root gid:root.
Creating Web Site Domain Directories
For each web site you're hosting you'll create a directory structure within the parent /www. The directory should be named the
same as the domain name with or without the TLD (.com, .net, etc). I'll let you decide which way you want your directories to
be named, but I tend to prefer them without the TLD. Now we'll create our domain's directories.
cd /www
mkdir your-domain
cd your-domain
mkdir html
mkdir html/cgi-bin
mkdir databases
mkdir logs
Now that the directory structure is created we'll need to add a system user that owns the directory base and can log in to
upload files.
Adding a Linux User Account for the Web Site
The user account will be able to FTP or Secure FTP (SFTP) into the server to upload and download web site content files like
HTML, C GI scripts, and PHP pages. This user account will have ownership of the domain's directory base and be locked into it.
The user name we'll assign will be the same as the domain name (your-domain) to make it easier to distinguish between it and
the other Linux accounts, however you can use any name you want for your account. One thing to keep in mind is when you
create this account you'll have to make a choice whether this account will be granted SSH access. If you want to disallow SSH
access then you'll need to change the shell to /sbin/nologin. SSH login attempts will fail when you use /sbin/nologin as the
account's shell (valid login credentials will be accepted but the connection will be terminated). To create the web site system
account, use one of the following commands.
useradd -d /www/your-domain/ domain_user
or
useradd -d /www/your-domain/ -s /sbin/nologin domain_user
The first command will set the account's home directory (-d path) to /www/your-domain and creates a new system account
with the user name of domain_user (last parameter of the command). The shell will be set to the default, which is typically
w w w .xenocafe.com/tutorials/linux/centos/apache_w eb_server/index.php
10. 12/20/12 Apache Web Server Tutorial for Linux
with the user name of domain_user (last parameter of the command). The shell will be set to the default, which is typically
bash unless you changed it. The second command is identical to the first except that the shell (-s shell) is set to /sbin/nologin
to prevent SSH logins.
After the account has been created you'll need to set a password using the passwd command.
passwd domain_user
[enter password]
[confirm password]
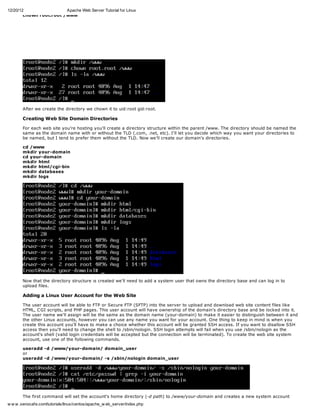
Now that the system account is ready we'll move on to changing the directory base ownership.
Changing Web Site Directory Ownership & Permissions
We've created the directories, added the account, the only thing left to do is change the ownership of the directories to the
new user account. Right now the directories are owned by root and if you were to try using FTP to upload some files you'd get
the dreaded Permission Denied error. To change ownership of the domain directory and all its subdirectories we'll use the
chown command with the -R flag for recursive.
cd /www
chown -R domain_user:domain_user your-domain
If you created the databases directory then you'll need to change the owner to the mysql user otherwise MySQL won't be able
to write to the database files. All directories, subdirectories, and files starting from databases should be owned by the mysql
user (or whatever user account you have the MySQL server running as).
cd your-domain
chown -R mysql:mysql databases
w w w .xenocafe.com/tutorials/linux/centos/apache_w eb_server/index.php 10/18
11. That's it for creating our directory structure. If you have more domains to add then repeat the steps we went through except
for the first one of creating the /www directory root. Next we'll create the VirtualHost configuration files to let Apache know the
details of our web site.
Creating VirtualHost Configuration Files
A VirtualHost configuration file tells Apache the specifics about your web site. It contains information like what IP and port
number your site runs on, the server name and any aliases, the local filesystem path (or document root) of your web pages,
location of your cgi-bin, file names and paths of your access and error logs, custom error documents for HTTP errors like 404
File Not Found, and can have many other items. For every web site you want Apache to host you must create a virtual host
configuration. You've already gotten a taste of a virtual host config when we added the default VirtualHost for handling IP
address requests in httpd.conf, so what we're going to be doing now is nothing new. I'm now going to show you an easy way
of managing all your virtual hosts.
The VirtualHost Configuration File Directory (/etc/httpd/conf/vhosts)
When I first learned Linux from a friend some years ago, he showed me how to configure Apache so I could set up my web
server. I looked at his httpd.conf and he had all his virtual hosts in there, so I figured there was nothing unusual about that as
I'm sure there are many people that did the same thing. He hosted a lot of domains for friends, his business, and his own
stuff, and I noticed that trying to locate a web site in his massive httpd.conf file was nothing short of a headache. Although I
didn't doubt his knowledge of Apache I kept thinking there had to be an easier way of managing virtual hosts. Through reading
the online Apache Web Server documentation I came across the Include directive.
The Include directive, much like in C /C ++, PHP, and other languages, allows you to insert the contents of another file into the
calling file. However, in the case of Apache, the contents of a single file or of several files located in a directory that match the
Include statement would be included. If you remember when we were editing httpd.conf, at the very end we added the line
'Include conf/vhosts/*.conf'. That line tells Apache to look in /etc/httpd/conf/vhosts for any *.conf files and include their
contents as part of httpd.conf. This allows us to separate out our VirtualHost definitions as their own unique files, on a per
domain basis, from the main httpd.conf file. This makes administration easy for several reasons. Finding a virtual host is easy
because all you do is look in the vhosts directory for its file, disabling a domain is as simple as renaming the file so it doesn't
end in .conf, and adding new domains is accomplished by creating a new virtual host file (copy an exisiting file and edit the
changes). Include makes virtual host management a piece of cake.
We'll now create the /etc/httpd/conf/vhosts directory (this is a one-time process).
cd /etc/httpd/conf
mkdir vhosts
cd vhosts
We can start creating VirtualHost configuration files now. I'll show you how to create one for the HTTP protocol as well as one
for Secure Sockets Layer (SSL).
Creating a HTTP Virtual Host
When creating virtual host config files we should use a good naming convention that's as descriptive as possible. What's
worked for me is the format of host.domain.tld.port.conf or in simple terms your-domain.com.80.conf. You may have noticed I
excluded host from the file name. When you visit a domain such as redhat.com, or www.redhat.com, they most likely take you
to the same web site, so www as a host can be excluded. The only time I use host as part of the file name is when I am
adding a subdomain such as forum.example.com or blog.example.com and so forth. Let's create the HTTP virtual host file.
nano your-domain.com.80.conf
Type in or copy/paste the configuration data below. Be sure to replace yourhostname with your system's hostname or IP
address, ServerAdmin with your email address, ServerName and ServerAlias with your real domain name, and your-domain
with the directory name you created earlier for your web site. When you're done, save your changes (CTRL-O) and exit nano
(CTRL-X).
<itaHs yuhsnm:0
Vrulot orotae8>
SreAmnamnyu-oancm
evrdi di@ordmi.o
SreNm yu-oancm
evrae ordmi.o
w w w .xenocafe.com/tutorials/linux/centos/apache_w eb_server/index.php 11/18
12. 12/20/12 Apache Web Server Tutorial for Linux
SreNm yu-oancm
evrae ordmi.o
SreAiswwyu-oancm
evrla w.ordmi.o
DcmnRo /w/ordmi/tl
ouetot wwyu-oanhm
SrpAis/g-i//w/ordmi/tlcibn
citla cibn wwyu-oanhm/g-i/
Erro /w/ordmi/oserrlg
roLg wwyu-oanlg/ro_o
CsoLg/w/ordmi/osacs_o cmie
utmo wwyu-oanlg/ceslg obnd
<Vrulot
/itaHs>
I'll clarify what each line does in the virtual host configuration file between the <VirtualHost></VirtualHost> tags.
ServerAdmin is used to specify the server administrator's email address. User's will see this address on server
generated error pages.
ServerName is the name of the server or DNS name. Apache will match this name against the HTTP host header
sent by the user's browser. If it's a match then this is the configuration data used to process the request.
ServerAlias is identical to ServerName except ServerName is used once and ServerAlias can be used many
times. If your web site will respond to more than one DNS name, make sure you use one ServerName directive
and all other names are specified using ServerAlias. DNS names can be separated by commas for a single
ServerAlias directive (ServerAlias dns_name1,dns_name2,dns_name3) or you can use many ServerAlias directives
for each DNS name placed on a line each their own.
DocumentRoot defines the file system path to where the web page files are located. This is the same directory
where you will place your HTML, PHP, and image files. For our setup, this is the /www/your-domain/html directory.
ScriptAlias defines the directory for executing cgi scripts, commonly known as cgi-bin. It takes two parameters
with the first being the cgi-bin directory from your web site root path and the second being the full physical
directory path on the filesystem. You can have as many cgi-cin directories as you need and they don't need to be
called cgi-bin.
ErrorLog defines the file to log any errors Apache encounters. Errors can include PHP script failures and files that
don't exist.
CustomLog defines the file to log any requests to the server. Requests include accessing pages, images, and
other files like robots.txt. The second parameter sets the log entry format. We use the combined format since it is
used by many Web Server Log Analysis scripts like Awstats.
You should read the online Apache 2.0 documentation for more information on these directives as well as other Apache web
server features.
Creating a SSL Virtual Host
When we installed mod_ssl, a file called ssl.conf was written to /etc/httpd/conf.d that contains basic SSL configuration
information. We're going to use this as our template for adding a SSL based virtual host. What we'll do is make a copy of it to
our vhosts directory and remove the non-website specific information since it should only be loaded once by Apache. This non-
website specific information pertains to loading the mod_ssl Apache module among other things while everything else in the
file relates to configuring the SSL web site (what we're interested in).
Let's make a copy of ssl.conf to the vhosts directory which you should still be in (cd /etc/httpd/conf/vhosts). Following the
same format for our virtual host config files (host.domain.tld.port.conf) as before, we will be naming our SSL virtual host file
as your-domain.com.443.conf. The port number for SSL is 443 so we'll use that as opposed to port 80 when we created the
HTTP VirtualHost. After that we'l open the config file in nano so we can begin editing it.
cp /etc/httpd/conf.d/ssl.conf ./your-domain.com.443.conf
nano your-domain.com.443.conf
w w w .xenocafe.com/tutorials/linux/centos/apache_w eb_server/index.php 12/18
13. 12/20/12 Apache Web Server Tutorial for Linux
Now comes the fun part. We need to delete a good portion of this file starting from the top and all the way down to the part
that says '### SSL Virtual Host C ontext' (roughly 83 lines total). Instead of using the DEL key, you can use CTRL-K to cut the
text line by line in nano. Starting from the top of the file, remove the lines of text until you reach the blank line above '###
SSL Virtual Host C ontext'. Your file should look like the image below when you're done.
w w w .xenocafe.com/tutorials/linux/centos/apache_w eb_server/index.php 13/18
14. 12/20/12 Apache Web Server Tutorial for Linux
Next we'll edit the default web site specific directives to mold them to our web site. They're actually the same directives we
used when creating our HTTP virtual host, so you can see how easy this will be. I should point out that we have been using our
hostname for the VirtualHost tag, but in the case of SSL I'd advise against unless you want to set up each host and their
binding IP address in /etc/hosts (it's a good idea if you have many IP's). Secure Sockets Layer doesn't work at the Application
layer of the OSI model like HTTP does, so the Host part of the HTTP header doesn't apply. So in regards to name-based virtual
hosting with SSL, it's non-existent. Replace '_default_' with your IP address when editing your-domain.com.443.conf. The
same rules apply as before with ServerName, ServerAlias, and the your-domain directory.
Here is a stripped down version of our SSL VirtualHost file minus the comments.
<itaHs yui:4>
Vrulot orp43
DcmnRo "wwyu-oanhm"
ouetot /w/ordmi/tl
SreNm yu-oancm
evrae ordmi.o
SreAiswwyu-oancm
evrla w.ordmi.o
SrpAis/g-i//w/ordmi/tlcibn
citla cibn wwyu-oanhm/g-i/
Erro lg/s_ro_o
roLg osslerrlg
TaseLglg/s_ceslg
rnfro osslacs_o
Lgee wr
oLvl an
SLnieo
SEgn n
SLihrut AL!D:EPR5:C+S:HG:MDU:LW+Sv:EP
SCpeSie L:AH!XOT6R4RA+IH+EIM+O:SL2+X
SLetfctFl /t/tp/ofslctsre.r
SCriiaeie echtdcn/s.r/evrct
SLetfctKyie/t/tp/ofslkysre.e
SCriiaeeFl echtdcn/s.e/evrky
<ie ~".cistlptlpp?$>
Fls (g|hm|hm|h3)"
SLpin +tEvas
SOtos SdnVr
<Fls
/ie>
<ietr "vrwwcibn>
Drcoy /a/w/g-i"
SLpin +tEvas
SOtos SdnVr
<Drcoy
/ietr>
StnI Ue-gn "*SE*
eEvf srAet .MI."
nkeaieslucensudw
oeplv s-nla-hton
dwgae10frersos-.
onrd-. oc-epne10
CsoLglg/s_eus_o
utmo osslrqetlg
"t% %SLPOOO} %SLCPE} % %"
% h {S_RTCLx {S_IHRx "r" b
<Vrulot
/itaHs>
This configuration uses mod_ssl's default SSL certificate and private key for encrypted communications. It's not signed by a
trusted authority nor does it have your personal or company credentials. Your web browser will complain about the certificate
and throw up a dialog box when you visit your web site (unless you instruct the browser to save the certificate). If you're
w w w .xenocafe.com/tutorials/linux/centos/apache_w eb_server/index.php 14/18
15. 12/20/12 Apache Web Server Tutorial for Linux
and throw up a dialog box when you visit your web site (unless you instruct the browser to save the certificate). If you're
thinking about doing e-commerce then you'll need to invest in a real SSL certificate because nothing kills a customer's
confidence level like a warning screen while making a purchase online. What you would do is generate your C ertificate Signing
Request (C SR) on your server and then send the data to a C ertificate Authority (C A) like Verisign. Once you pay the fees and
prove your identity, they'll sign your certificate to make it legitimate and then you can replace the values of SSLC ertificateFile
and SSLC ertificateKeyFile with your files (in the case of C omodo SSL, you'd have to set the SSLC AC ertificateFile directive with
their Bundle C ertificate file as well). On the other hand, if you're setting up SSL for your own personal use or for an intranet at
work, self-signed SSL certificates work just fine. There is no difference between legitimate and self-signed certs except for the
C A taking your money and stamping it with their sign of approval. The encryption protection is the same either way.
Save your changes (CTRL-O) to your-domain.com.443.conf and exit nano (CTRL-X). I don't have a tutorial up for generating
SSL certificates using OpenSSL, but I will soon. You can check Google for a site that details those instructions or wait for mine
to be posted. Also, you should read up on the Apache SSL/TLS Encryption documention for more information about the
directives and virtual host configurations for Apache SSL.
Starting Apache and Viewing the Web Site
Apache is set up, our directories have been created, and the VirtualHost config files are done, now is the time to start the
Apache web server and see if everything worked. It's taken us a long time to get here and if all goes well then Apache should
start without any errors and your HTTP and SSL web sites should be available.
service httpd start
If Apache failed to start for you, you should double check httpd.conf, your directories, and your virtual host configs for any
typos or syntax mistakes. Apache can be cryptic at times when errors occur. You can verify virtual host files using httpd -S
(or for older an older Apache version use httpd -t -D DUMP_VHOSTS). In the next section I'll show you some tips for
tracking down Apache errors.
httpd -S
With the Apache web server running you should have already opened ports 80 and 443 on your firewall so you can connect to
Apache with a web browser to view your web site. Open up your favorite browser and navigate to your site. You should get the
default C entOS Apache 2 Test Page unless you have already logged in and uploaded your content via S/FTP.
w w w .xenocafe.com/tutorials/linux/centos/apache_w eb_server/index.php 15/18
16. 12/20/12 Apache Web Server Tutorial for Linux
Standard HTTP works so how about our SSL version of the web site? C hange the http:// to https:// in the address bar of your
browser. You should be prompted by the security dialog I mentioned before. This is just a warning about your self-signed SSL
certificate not being trusted by your browser.
w w w .xenocafe.com/tutorials/linux/centos/apache_w eb_server/index.php 16/18
17. 12/20/12
C lick OK in FireFox or Yes in Internet Explorer to continue to the secure web site.
As you can see up in the FireFox address bar, there is a little yellow padlock icon that informs us that we are on a secure web
site. All communications with this site will be 128-bit encrypted. At this time you may want to log in to your web site via Secure
FTP (SFTP) or regular FTP to upload your web site files to the html directory using the system account you created earlier.
You're done! You've successfully configured the Apache web server on Linux.
Other Things to Know for Using Apache
Here are some common questions that users new to the Apache HTTP Server may ask (well, the questions I could think of at
the time).
How can I restart Apache so that it sees the changes I made to httpd.conf and/or virtual hosts?
The Apache init script (/etc/init.d/httpd) accepts a number of options, four of the important ones being start, stop, restart, and
graceful.
start tells the init script to start the Apache process and spawns the child processes.
stop tells the init script to terminate the Apache's running process and in turn kills off the child processes. Any
existing connections to the server will be terminated.
restart tells the init script to stop the Apache process and start it back up. Any changes to httpd.conf or virtual
hosts will be read back in. Any existing connections will be terminated, so if users are in the middle of a download
the transfers will stop.
graceful tells the init script to alert Apache to reload httpd.conf and virtual hosts. Existing connections will not be
terminated but changes won't be noticed until a new connection is established (pulling up another page or file from
the server). Requests are handled by Apache child workers.
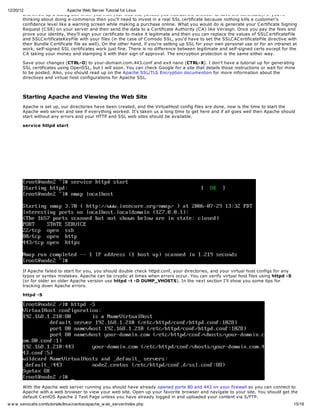
There are two ways of using these options. You can use the init script or the service command. To use the init script, enter this
w w w .xenocafe.com/tutorials/linux/centos/apache_w eb_server/index.php 17/18