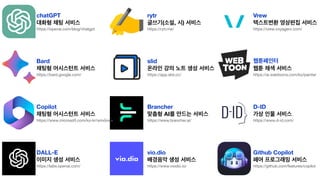
chatGPT
대화형 채팅 서비스
https://openai.com/blog/chatgpt
Bard
채팅형어시스턴트 서비스
https://bard.google.com/
Copilot
채팅형 어시스턴트 서비스
https://www.microsoft.com/ko-kr/windows
DALL-E
이미지 생성 서비스
https://labs.openai.com/
rytr
글쓰기(소설, 시) 서비스
https://rytr.me/
slid
온라인 강의 노트 생성 서비스
https://app.slid.cc/
Brancher
맞춤형 AI를 만드는 서비스
https://www.brancher.ai/
vio.dio
배경음악 생성 서비스
https://www.viodio.io/
Vrew
텍스트변환 영상편집 서비스
https://vrew.voyagerx.com/
웹툰페인터
웹툰 채색 서비스
https://ai.webtoons.com/ko/painter
D-ID
가상 인물 서비스
https://www.d-id.com/
Github Copilot
페어 프로그래밍 서비스
https://github.com/features/copilot
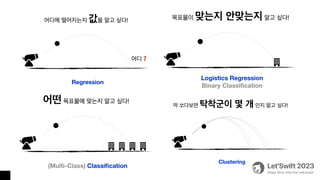
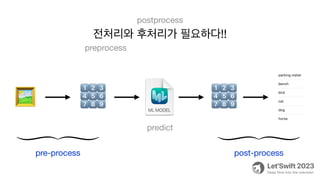
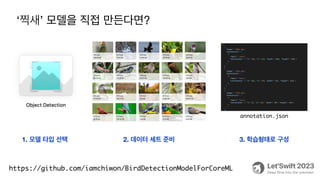
1. Machine Learning
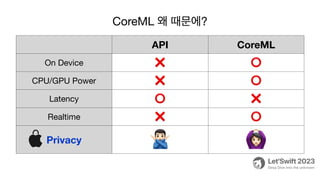
2.Why CoreML
3. How to use Pre-Trained Model
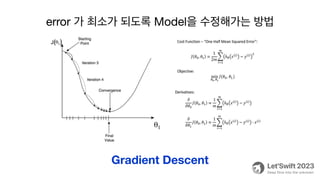
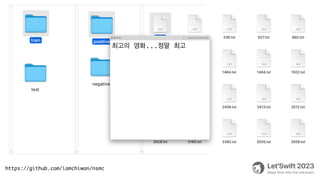
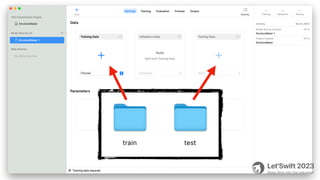
4. How to train Model
5. How to convert Model
Contents
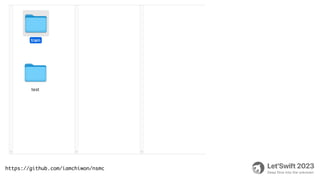
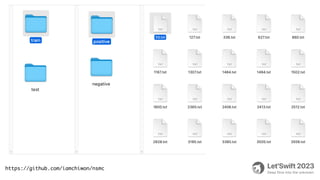
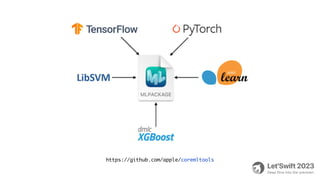
https://github.com/iamchiwon/LetMeTryCoreML
🏊 Deep Dive into the CODE 🥽
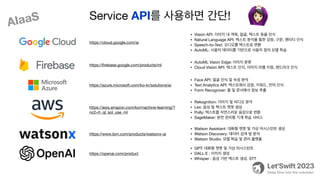
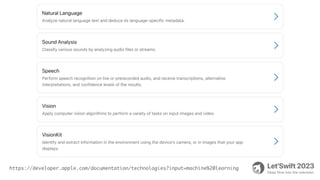
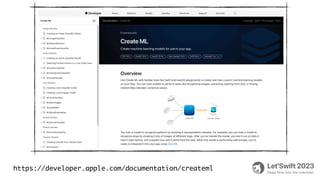
https://cloud.google.com/ai
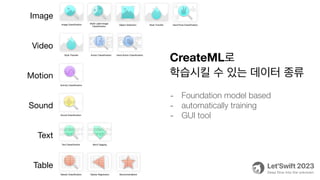
• Vision API:이미지 내 객체, 얼굴, 텍스트 등을 인식
• Natural Language API: 텍스트 분석을 통한 감정, 구문, 엔터티 인식
• Speech-to-Text: 오디오를 텍스트로 변환
• AutoML: 사용자 데이터를 기반으로 사용자 정의 모델 학습
https://
fi
rebase.google.com/products/ml
• AutoML Vision Edge: 이미지 분류
• Cloud Vision API: 텍스트 인식, 이미지 라벨 지정, 랜드마크 인식
https://azure.microsoft.com/ko-kr/solutions/ai
• Face API: 얼굴 인식 및 속성 분석
• Text Analytics API: 텍스트에서 감정, 키워드, 언어 인식
• Form Recognizer: 폼 및 문서에서 정보 추출
https://aws.amazon.com/ko/machine-learning/?
nc2=h_ql_sol_use_ml
• Rekognition: 이미지 및 비디오 분석
• Lex: 음성 및 텍스트 챗봇 생성
• Polly: 텍스트를 자연스러운 음성으로 변환
• SageMaker: 완전 관리형 기계 학습 서비스
https://www.ibm.com/products/watsonx-ai
• Watson Assistant: 대화형 챗봇 및 가상 어시스턴트 생성
• Watson Discovery: 데이터 검색 및 분석
• Watson Studio: 모델 학습 및 관리 플랫폼
https://openai.com/product
• GPT: 대화형 챗봇 및 가상 어시스턴트
• DALL·E : 이미지 생성
• Whisper : 음성 기반 텍스트 생성. STT
Service API를 사용하면 간단! 🙆
AIaaS
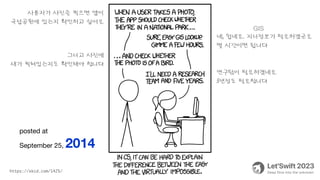
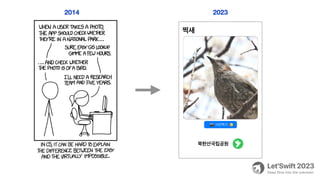
https://xkcd.com/1425/
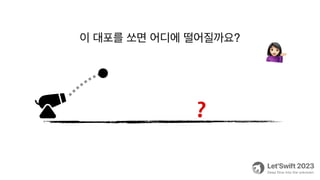
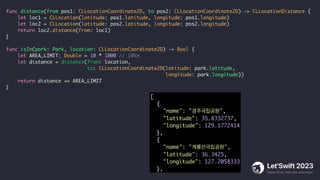
사용자가 사진을 찍으면앱이
국립공원에 있는지 확인하고 싶어요
네, 쉽네요. 지리정보가 필요하겠군요
몇 시간이면 됩니다
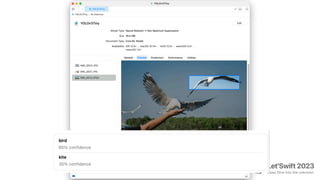
그리고 사진에
새가 찍혀있는지도 확인해야 합니다
연구팀이 필요하겠네요
5년정도 필요합니다
posted at
September 25, 2014
GIS
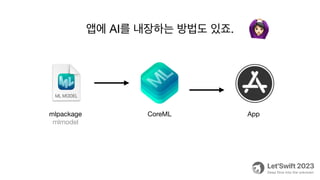
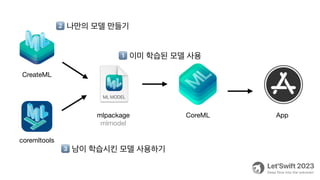
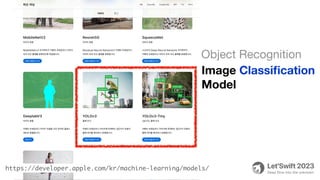
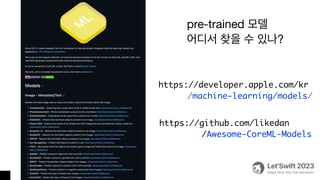
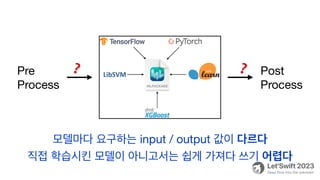
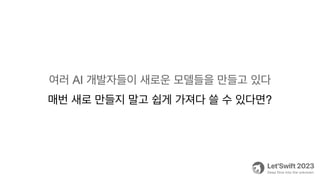
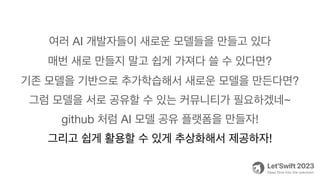
여러 AI 개발자들이새로운 모델들을 만들고 있다
매번 새로 만들지 말고 쉽게 가져다 쓸 수 있다면?
99.
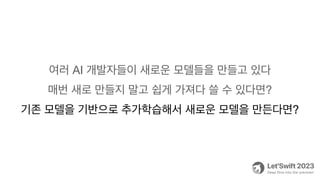
여러 AI 개발자들이새로운 모델들을 만들고 있다
매번 새로 만들지 말고 쉽게 가져다 쓸 수 있다면?
기존 모델을 기반으로 추가학습해서 새로운 모델을 만든다면?
100.
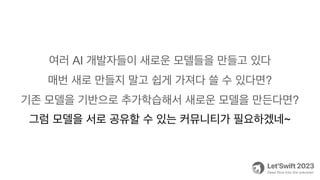
여러 AI 개발자들이새로운 모델들을 만들고 있다
매번 새로 만들지 말고 쉽게 가져다 쓸 수 있다면?
기존 모델을 기반으로 추가학습해서 새로운 모델을 만든다면?
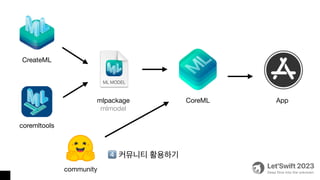
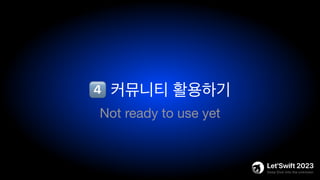
그럼 모델을 서로 공유할 수 있는 커뮤니티가 필요하겠네~
101.
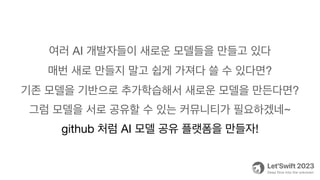
여러 AI 개발자들이새로운 모델들을 만들고 있다
매번 새로 만들지 말고 쉽게 가져다 쓸 수 있다면?
기존 모델을 기반으로 추가학습해서 새로운 모델을 만든다면?
그럼 모델을 서로 공유할 수 있는 커뮤니티가 필요하겠네~
github 처럼 AI 모델 공유 플랫폼을 만들자!
102.
여러 AI 개발자들이새로운 모델들을 만들고 있다
매번 새로 만들지 말고 쉽게 가져다 쓸 수 있다면?
기존 모델을 기반으로 추가학습해서 새로운 모델을 만든다면?
그럼 모델을 서로 공유할 수 있는 커뮤니티가 필요하겠네~
github 처럼 AI 모델 공유 플랫폼을 만들자!
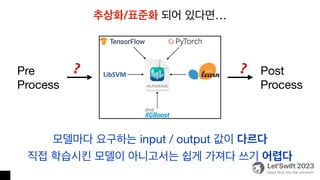
그리고 쉽게 활용할 수 있게 추상화해서 제공하자!
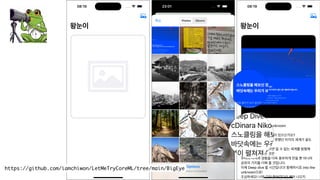
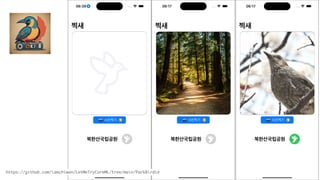
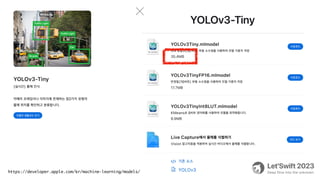
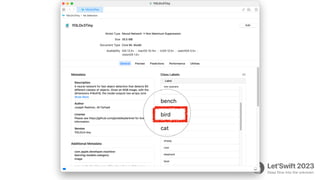
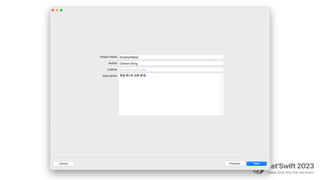
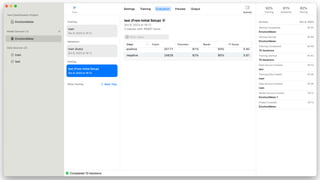
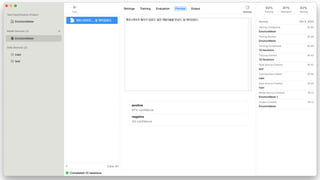
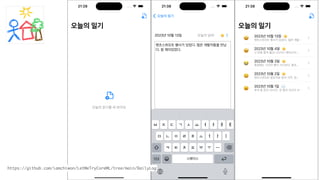
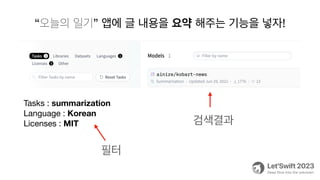
“오늘의 일기” 앱에글 내용을 요약 해주는 기능을 넣자!
Tasks : summarization
Language : Korean
Licenses : MIT
필터
검색결과
105.
from transformers importpipeline
text = '스노클링을 해보신 경험이 있으신가요? 바닷속에는 우리가 보지 못했던 미지의 세계가 끝도 없이 펼
쳐져 있습니다. 직접 들어가 보지 않으면 알 수 없는 세계를 탐험해 봤던 경험을 나누는 것은 우리의 지식과
경험을 더욱 풍부하게 만들 뿐 아니라 공유의 가치를 더해 줄 것입니다. 이제 Deep dive 할 시간입니다! 함
께하시죠 into the unknown으로! 조심하세요! 너무 깊이 들어갔다간 헤어 나오지 못할지도 모릅니다
Let’Swift 2023에서는 이전보다 더 깊은 기술적인 내용을 다루고자 합니다. 작년, Let’Swift 2022는 엔데
믹을 맞이하며 모두가 즐길 수 있는 자리를 마련한 바 있습니다. 오랜 기간 커뮤니티를 지켜온 시니어, 기여하
고 싶지만 선뜻 용기를 내지 못했던 주니어, 이제 막 첫발을 때고자 하는 학생들 모두가 모여 즐거운 대화를
나누는 축제의 장이었습니다.'
pipe = pipeline("summarization", model="ainize/kobart-news")
summary = pipe(text)
print(summary)
#print(summary[0]['summary_text'])
106.
from transformers importpipeline
text = '스노클링을 해보신 경험이 있으신가요? 바닷속에는 우리가 보지 못했던 미지의 세계가 끝도 없이 펼
쳐져 있습니다. 직접 들어가 보지 않으면 알 수 없는 세계를 탐험해 봤던 경험을 나누는 것은 우리의 지식과
경험을 더욱 풍부하게 만들 뿐 아니라 공유의 가치를 더해 줄 것입니다. 이제 Deep dive 할 시간입니다! 함
께하시죠 into the unknown으로! 조심하세요! 너무 깊이 들어갔다간 헤어 나오지 못할지도 모릅니다
Let’Swift 2023에서는 이전보다 더 깊은 기술적인 내용을 다루고자 합니다. 작년, Let’Swift 2022는 엔데
믹을 맞이하며 모두가 즐길 수 있는 자리를 마련한 바 있습니다. 오랜 기간 커뮤니티를 지켜온 시니어, 기여하
고 싶지만 선뜻 용기를 내지 못했던 주니어, 이제 막 첫발을 때고자 하는 학생들 모두가 모여 즐거운 대화를
나누는 축제의 장이었습니다.'
pipe = pipeline("summarization", model="ainize/kobart-news")
summary = pipe(text)
print(summary)
#print(summary[0]['summary_text'])
[{
‘summary_text': '작년, Let’Swift 2022는 엔데
믹을 맞이하며 모두가 즐길 수 있는 자리를 마련하여 오랜 기
간 커뮤니티를 지켜온 시니어, 기여하고 싶지만 선뜻 용기를
내지 못했던 주니어, 이제 막 첫발을 때고자 하는 학생들 모
두가 모여 즐거운 대화를 나누는 축제의 장이었다’
}]
대충 쓸만 하네~
107.
from transformers importAutoTokenizer, AutoModelForSeq2SeqLM
text = '스노클링을 해보신 경험이 있으신가요? 바닷속에는 우리가 보지 못했던 미지의 세계가 끝도 없이 펼쳐져
있습니다. 직접 들어가 보지 않으면 알 수 없는 세계를 탐험해 봤던 경험을 나누는 것은 우리의 지식과 경험을 더욱
풍부하게 만들 뿐 아니라 공유의 가치를 더해 줄 것입니다. 이제 Deep dive 할 시간입니다! 함께하시죠 into
the unknown으로! 조심하세요! 너무 깊이 들어갔다간 헤어 나오지 못할지도 모릅니다 Let’Swift 2023에서는
이전보다 더 깊은 기술적인 내용을 다루고자 합니다. 작년, Let’Swift 2022는 엔데믹을 맞이하며 모두가 즐길
수 있는 자리를 마련한 바 있습니다. 오랜 기간 커뮤니티를 지켜온 시니어, 기여하고 싶지만 선뜻 용기를 내지 못했
던 주니어, 이제 막 첫발을 때고자 하는 학생들 모두가 모여 즐거운 대화를 나누는 축제의 장이었습니다.'
tokenizer = AutoTokenizer.from_pretrained("ainize/kobart-news")
model = AutoModelForSeq2SeqLM.from_pretrained("ainize/kobart-news")
input_ids = tokenizer.encode(text, return_tensors="pt")
summary_ids = model.generate(input_ids)
summary = tokenizer.decode(summary_ids[0], skip_special_tokens=True)
print(summary)
텍스트->숫자
숫자 -> 텍스트
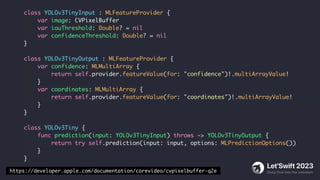
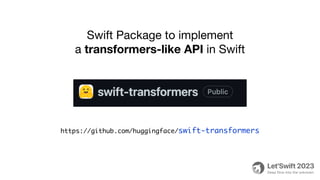
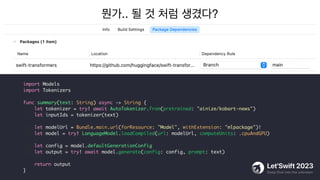
Swift Package toimplement
a transformers-like API in Swift
https://github.com/huggingface/swift-transformers
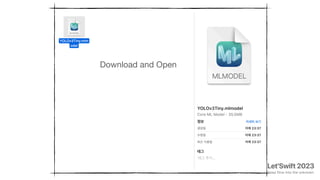
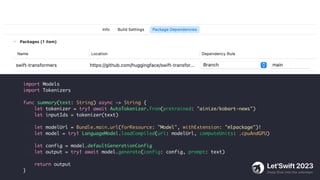
110.
import Models
import Tokenizers
funcsummary(text: String) async -> String {
let tokenizer = try! await AutoTokenizer.from(pretrained: "ainize/kobart-news")
let inputIds = tokenizer(text)
let modelUrl = Bundle.main.url(forResource: "Model", withExtension: "mlpackage")!
let model = try! LanguageModel.loadCompiled(url: modelUrl, computeUnits: .cpuAndGPU)
let config = model.defaultGenerationConfig
let output = try! await model.generate(config: config, prompt: text)
return output
}
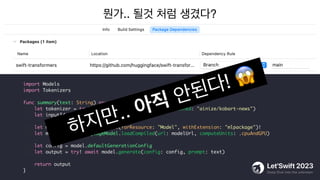
111.
뭔가.. 될 것처럼 생겼다?
import Models
import Tokenizers
func summary(text: String) async -> String {
let tokenizer = try! await AutoTokenizer.from(pretrained: "ainize/kobart-news")
let inputIds = tokenizer(text)
let modelUrl = Bundle.main.url(forResource: "Model", withExtension: "mlpackage")!
let model = try! LanguageModel.loadCompiled(url: modelUrl, computeUnits: .cpuAndGPU)
let config = model.defaultGenerationConfig
let output = try! await model.generate(config: config, prompt: text)
return output
}
112.
뭔가.. 될것 처럼생겼다?
import Models
import Tokenizers
func summary(text: String) async -> String {
let tokenizer = try! await AutoTokenizer.from(pretrained: "ainize/kobart-news")
let inputIds = tokenizer(text)
let modelUrl = Bundle.main.url(forResource: "Model", withExtension: "mlpackage")!
let model = try! LanguageModel.loadCompiled(url: modelUrl, computeUnits: .cpuAndGPU)
let config = model.defaultGenerationConfig
let output = try! await model.generate(config: config, prompt: text)
return output
}
하지만.. 아직 안된다! 😱
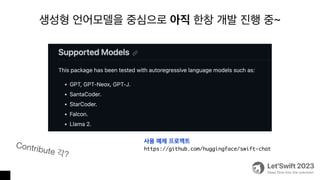
113.
생성형 언어모델을 중심으로아직 한창 개발 진행 중~
Contribute 각?
사용 예제 프로젝트
https://github.com/huggingface/swift-chat
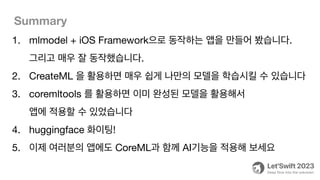
114.
Summary
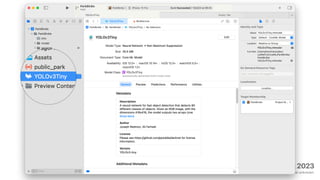
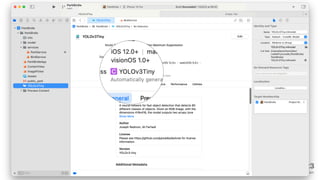
1. mlmodel +iOS Framework으로 동작하는 앱을 만들어 봤습니다.
그리고 매우 잘 동작했습니다.
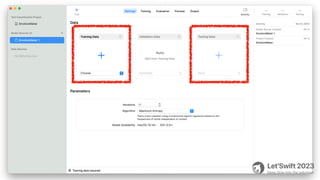
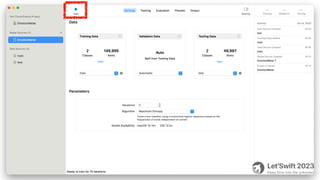
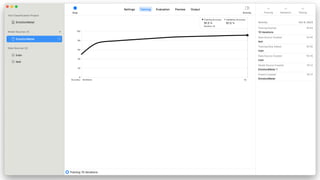
2. CreateML 을 활용하면 매우 쉽게 나만의 모델을 학습시킬 수 있습니다
3. coremltools 를 활용하면 이미 완성된 모델을 활용해서
앱에 적용할 수 있었습니다
4. huggingface 화이팅!
5. 이제 여러분의 앱에도 CoreML과 함께 AI기능을 적용해 보세요


![import Vision
import VisionKit
func recognaizeText(image: UIImage) {
let Image = image.cgImage!
let request = VNRecognizeTextRequest { request, error in
let result = request.results as! [VNRecognizedTextObservation]
let text = result.compactMap { $0.topCandidates(1).first?.string }
.joined(separator: "n")
}
request.revision = VNRecognizeTextRequestRevision3
request.recognitionLanguages = ["ko-KR"]
request.recognitionLevel = .accurate
request.usesLanguageCorrection = true
try! VNImageRequestHandler(cgImage: Image, options: [:]).perform([request])
}](https://image.slidesharecdn.com/aicoreml-231014072011-fc7159a7/85/AI-feat-CoreML-33-320.jpg)
![import Vision
import VisionKit
func recognaizeText(image: UIImage) {
let Image = image.cgImage!
let request = VNRecognizeTextRequest { request, error in
let result = request.results as! [VNRecognizedTextObservation]
let text = result.compactMap { $0.topCandidates(1).first?.string }
.joined(separator: "n")
}
request.revision = VNRecognizeTextRequestRevision3
request.recognitionLanguages = ["ko-KR"]
request.recognitionLevel = .accurate
request.usesLanguageCorrection = true
try! VNImageRequestHandler(cgImage: Image, options: [:]).perform([request])
}](https://image.slidesharecdn.com/aicoreml-231014072011-fc7159a7/85/AI-feat-CoreML-34-320.jpg)
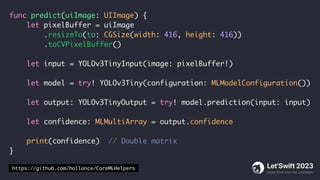

![import Vision
func predict(uiImage: UIImage) {
let model = try! YOLOv3Tiny(configuration: MLModelConfiguration())
let coreMLModel = try! VNCoreMLModel(for: model.model)
let request = VNCoreMLRequest(model: coreMLModel) { request, _ in
let results = request.results as! [VNRecognizedObjectObservation]
let hasBird = results
.map { $0.labels.first!.identifier }
.contains { $0 == "bird" }
// found bird !!
}
let pixelBuffer = uiImage.toCVPixelBuffer()
try! VNImageRequestHandler(cvPixelBuffer: pixelBuffer!).perform([request])
}](https://image.slidesharecdn.com/aicoreml-231014072011-fc7159a7/85/AI-feat-CoreML-53-320.jpg)

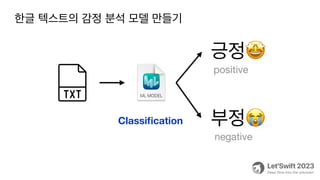

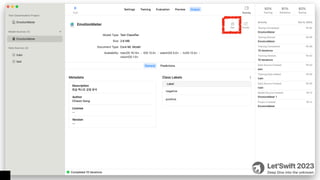

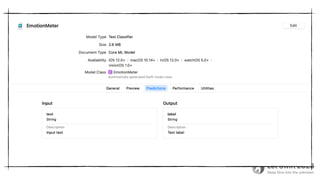
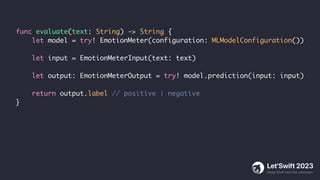
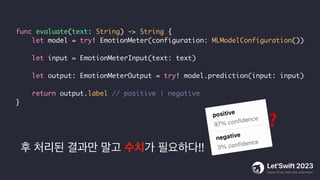
![import NaturalLanguage
func evaluate(text: String) -> Emotion {
let model = try! EmotionMeter(configuration: MLModelConfiguration())
let predictor = try! NLModel(mlModel: model.model)
let label = predictor.predictedLabel(for: text)!
let result = predictor.predictedLabelHypotheses(for: text, maximumCount: 2)
let value = result[label] ?? 0.5
if label == "positive" {
if value > 0.8 { return .happy } else { return .good }
}
if label == "negative" {
if value > 0.8 { return .sad } else { return .bad }
}
return .normal
}](https://image.slidesharecdn.com/aicoreml-231014072011-fc7159a7/85/AI-feat-CoreML-82-320.jpg)

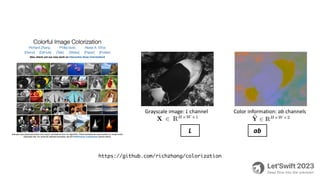
![from colorizers import *
import coremltools as ct
import torch
#torch_model = eccv16(pretrained=True).eval()
torch_model = siggraph17(pretrained=True).eval()
example_input = torch.rand(1, 1, 256, 256)
traced_model = torch.jit.trace(torch_model, example_input)
coreml_model = ct.convert(
traced_model,
inputs=[ct.TensorType(name="input1", shape=(1, 1, 256, 256))]
)
coreml_model.save("Colorizer.mlpackage")
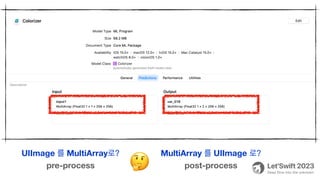
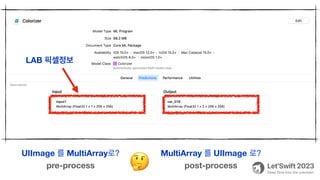
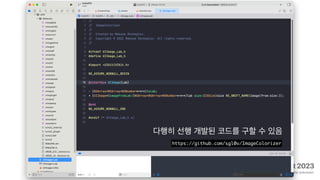
coremltools 는 python 라이브러리
https://github.com/iamchiwon/colorization](https://image.slidesharecdn.com/aicoreml-231014072011-fc7159a7/85/AI-feat-CoreML-89-320.jpg)

![from transformers import pipeline
text = '스노클링을 해보신 경험이 있으신가요? 바닷속에는 우리가 보지 못했던 미지의 세계가 끝도 없이 펼
쳐져 있습니다. 직접 들어가 보지 않으면 알 수 없는 세계를 탐험해 봤던 경험을 나누는 것은 우리의 지식과
경험을 더욱 풍부하게 만들 뿐 아니라 공유의 가치를 더해 줄 것입니다. 이제 Deep dive 할 시간입니다! 함
께하시죠 into the unknown으로! 조심하세요! 너무 깊이 들어갔다간 헤어 나오지 못할지도 모릅니다
Let’Swift 2023에서는 이전보다 더 깊은 기술적인 내용을 다루고자 합니다. 작년, Let’Swift 2022는 엔데
믹을 맞이하며 모두가 즐길 수 있는 자리를 마련한 바 있습니다. 오랜 기간 커뮤니티를 지켜온 시니어, 기여하
고 싶지만 선뜻 용기를 내지 못했던 주니어, 이제 막 첫발을 때고자 하는 학생들 모두가 모여 즐거운 대화를
나누는 축제의 장이었습니다.'
pipe = pipeline("summarization", model="ainize/kobart-news")
summary = pipe(text)
print(summary)
#print(summary[0]['summary_text'])](https://image.slidesharecdn.com/aicoreml-231014072011-fc7159a7/85/AI-feat-CoreML-105-320.jpg)
![from transformers import pipeline
text = '스노클링을 해보신 경험이 있으신가요? 바닷속에는 우리가 보지 못했던 미지의 세계가 끝도 없이 펼
쳐져 있습니다. 직접 들어가 보지 않으면 알 수 없는 세계를 탐험해 봤던 경험을 나누는 것은 우리의 지식과
경험을 더욱 풍부하게 만들 뿐 아니라 공유의 가치를 더해 줄 것입니다. 이제 Deep dive 할 시간입니다! 함
께하시죠 into the unknown으로! 조심하세요! 너무 깊이 들어갔다간 헤어 나오지 못할지도 모릅니다
Let’Swift 2023에서는 이전보다 더 깊은 기술적인 내용을 다루고자 합니다. 작년, Let’Swift 2022는 엔데
믹을 맞이하며 모두가 즐길 수 있는 자리를 마련한 바 있습니다. 오랜 기간 커뮤니티를 지켜온 시니어, 기여하
고 싶지만 선뜻 용기를 내지 못했던 주니어, 이제 막 첫발을 때고자 하는 학생들 모두가 모여 즐거운 대화를
나누는 축제의 장이었습니다.'
pipe = pipeline("summarization", model="ainize/kobart-news")
summary = pipe(text)
print(summary)
#print(summary[0]['summary_text'])
[{
‘summary_text': '작년, Let’Swift 2022는 엔데
믹을 맞이하며 모두가 즐길 수 있는 자리를 마련하여 오랜 기
간 커뮤니티를 지켜온 시니어, 기여하고 싶지만 선뜻 용기를
내지 못했던 주니어, 이제 막 첫발을 때고자 하는 학생들 모
두가 모여 즐거운 대화를 나누는 축제의 장이었다’
}]
대충 쓸만 하네~](https://image.slidesharecdn.com/aicoreml-231014072011-fc7159a7/85/AI-feat-CoreML-106-320.jpg)
![from transformers import AutoTokenizer, AutoModelForSeq2SeqLM
text = '스노클링을 해보신 경험이 있으신가요? 바닷속에는 우리가 보지 못했던 미지의 세계가 끝도 없이 펼쳐져
있습니다. 직접 들어가 보지 않으면 알 수 없는 세계를 탐험해 봤던 경험을 나누는 것은 우리의 지식과 경험을 더욱
풍부하게 만들 뿐 아니라 공유의 가치를 더해 줄 것입니다. 이제 Deep dive 할 시간입니다! 함께하시죠 into
the unknown으로! 조심하세요! 너무 깊이 들어갔다간 헤어 나오지 못할지도 모릅니다 Let’Swift 2023에서는
이전보다 더 깊은 기술적인 내용을 다루고자 합니다. 작년, Let’Swift 2022는 엔데믹을 맞이하며 모두가 즐길
수 있는 자리를 마련한 바 있습니다. 오랜 기간 커뮤니티를 지켜온 시니어, 기여하고 싶지만 선뜻 용기를 내지 못했
던 주니어, 이제 막 첫발을 때고자 하는 학생들 모두가 모여 즐거운 대화를 나누는 축제의 장이었습니다.'
tokenizer = AutoTokenizer.from_pretrained("ainize/kobart-news")
model = AutoModelForSeq2SeqLM.from_pretrained("ainize/kobart-news")
input_ids = tokenizer.encode(text, return_tensors="pt")
summary_ids = model.generate(input_ids)
summary = tokenizer.decode(summary_ids[0], skip_special_tokens=True)
print(summary)
텍스트->숫자
숫자 -> 텍스트](https://image.slidesharecdn.com/aicoreml-231014072011-fc7159a7/85/AI-feat-CoreML-107-320.jpg)


![[기초개념] Graph Convolutional Network (GCN)](https://cdn.slidesharecdn.com/ss_thumbnails/agistdkimgcn190507-190507153736-thumbnail.jpg?width=640&height=640&fit=bounds)


![[DL輪読会]画像を使ったSim2Realの現況](https://cdn.slidesharecdn.com/ss_thumbnails/imagesim2real-201030025320-thumbnail.jpg?width=640&height=640&fit=bounds)


![[DL輪読会]Dense Captioning分野のまとめ](https://cdn.slidesharecdn.com/ss_thumbnails/dlseminar-201202012355-thumbnail.jpg?width=640&height=640&fit=bounds)


![[第2回3D勉強会 研究紹介] Neural 3D Mesh Renderer (CVPR 2018)](https://cdn.slidesharecdn.com/ss_thumbnails/201807263dv-180728060959-thumbnail.jpg?width=640&height=640&fit=bounds)


![[Let's Swift 2019] iOS 앱에서 머신러닝이 해결 할 수 있는 문제들](https://cdn.slidesharecdn.com/ss_thumbnails/ios-ml-demos4-191113114831-thumbnail.jpg?width=640&height=640&fit=bounds)


![[2017 AWS Startup Day] 스타트업이 인공지능을 만날 때 : 딥러닝 활용사례와 아키텍쳐](https://cdn.slidesharecdn.com/ss_thumbnails/20171102awsstartupday2017-with-171102040932-thumbnail.jpg?width=640&height=640&fit=bounds)


![[생성형 AI] 이미지 AI 사용팁](https://cdn.slidesharecdn.com/ss_thumbnails/ai240119-240120015946-08a02df8-thumbnail.jpg?width=640&height=640&fit=bounds)

![[2018] iPhone으로 무엇을 더 할 수 있을까?](https://cdn.slidesharecdn.com/ss_thumbnails/webapp04-190201074440-thumbnail.jpg?width=640&height=640&fit=bounds)

![[오컴 Clip IT 세미나] 머신러닝과 인공지능의 현재와 미래](https://cdn.slidesharecdn.com/ss_thumbnails/kthoccamseminar-180416013406-thumbnail.jpg?width=640&height=640&fit=bounds)


![[20190601] 직업훈련교사_수업의실행_교안](https://cdn.slidesharecdn.com/ss_thumbnails/planmockclass-190614020025-thumbnail.jpg?width=640&height=640&fit=bounds)
![[20190601] 직업훈련교사_수업의실행](https://cdn.slidesharecdn.com/ss_thumbnails/mockclass-190614015437-thumbnail.jpg?width=640&height=640&fit=bounds)


![[5] 아두이노로 만드는 IoT](https://cdn.slidesharecdn.com/ss_thumbnails/5iot-160816180757-thumbnail.jpg?width=640&height=640&fit=bounds)