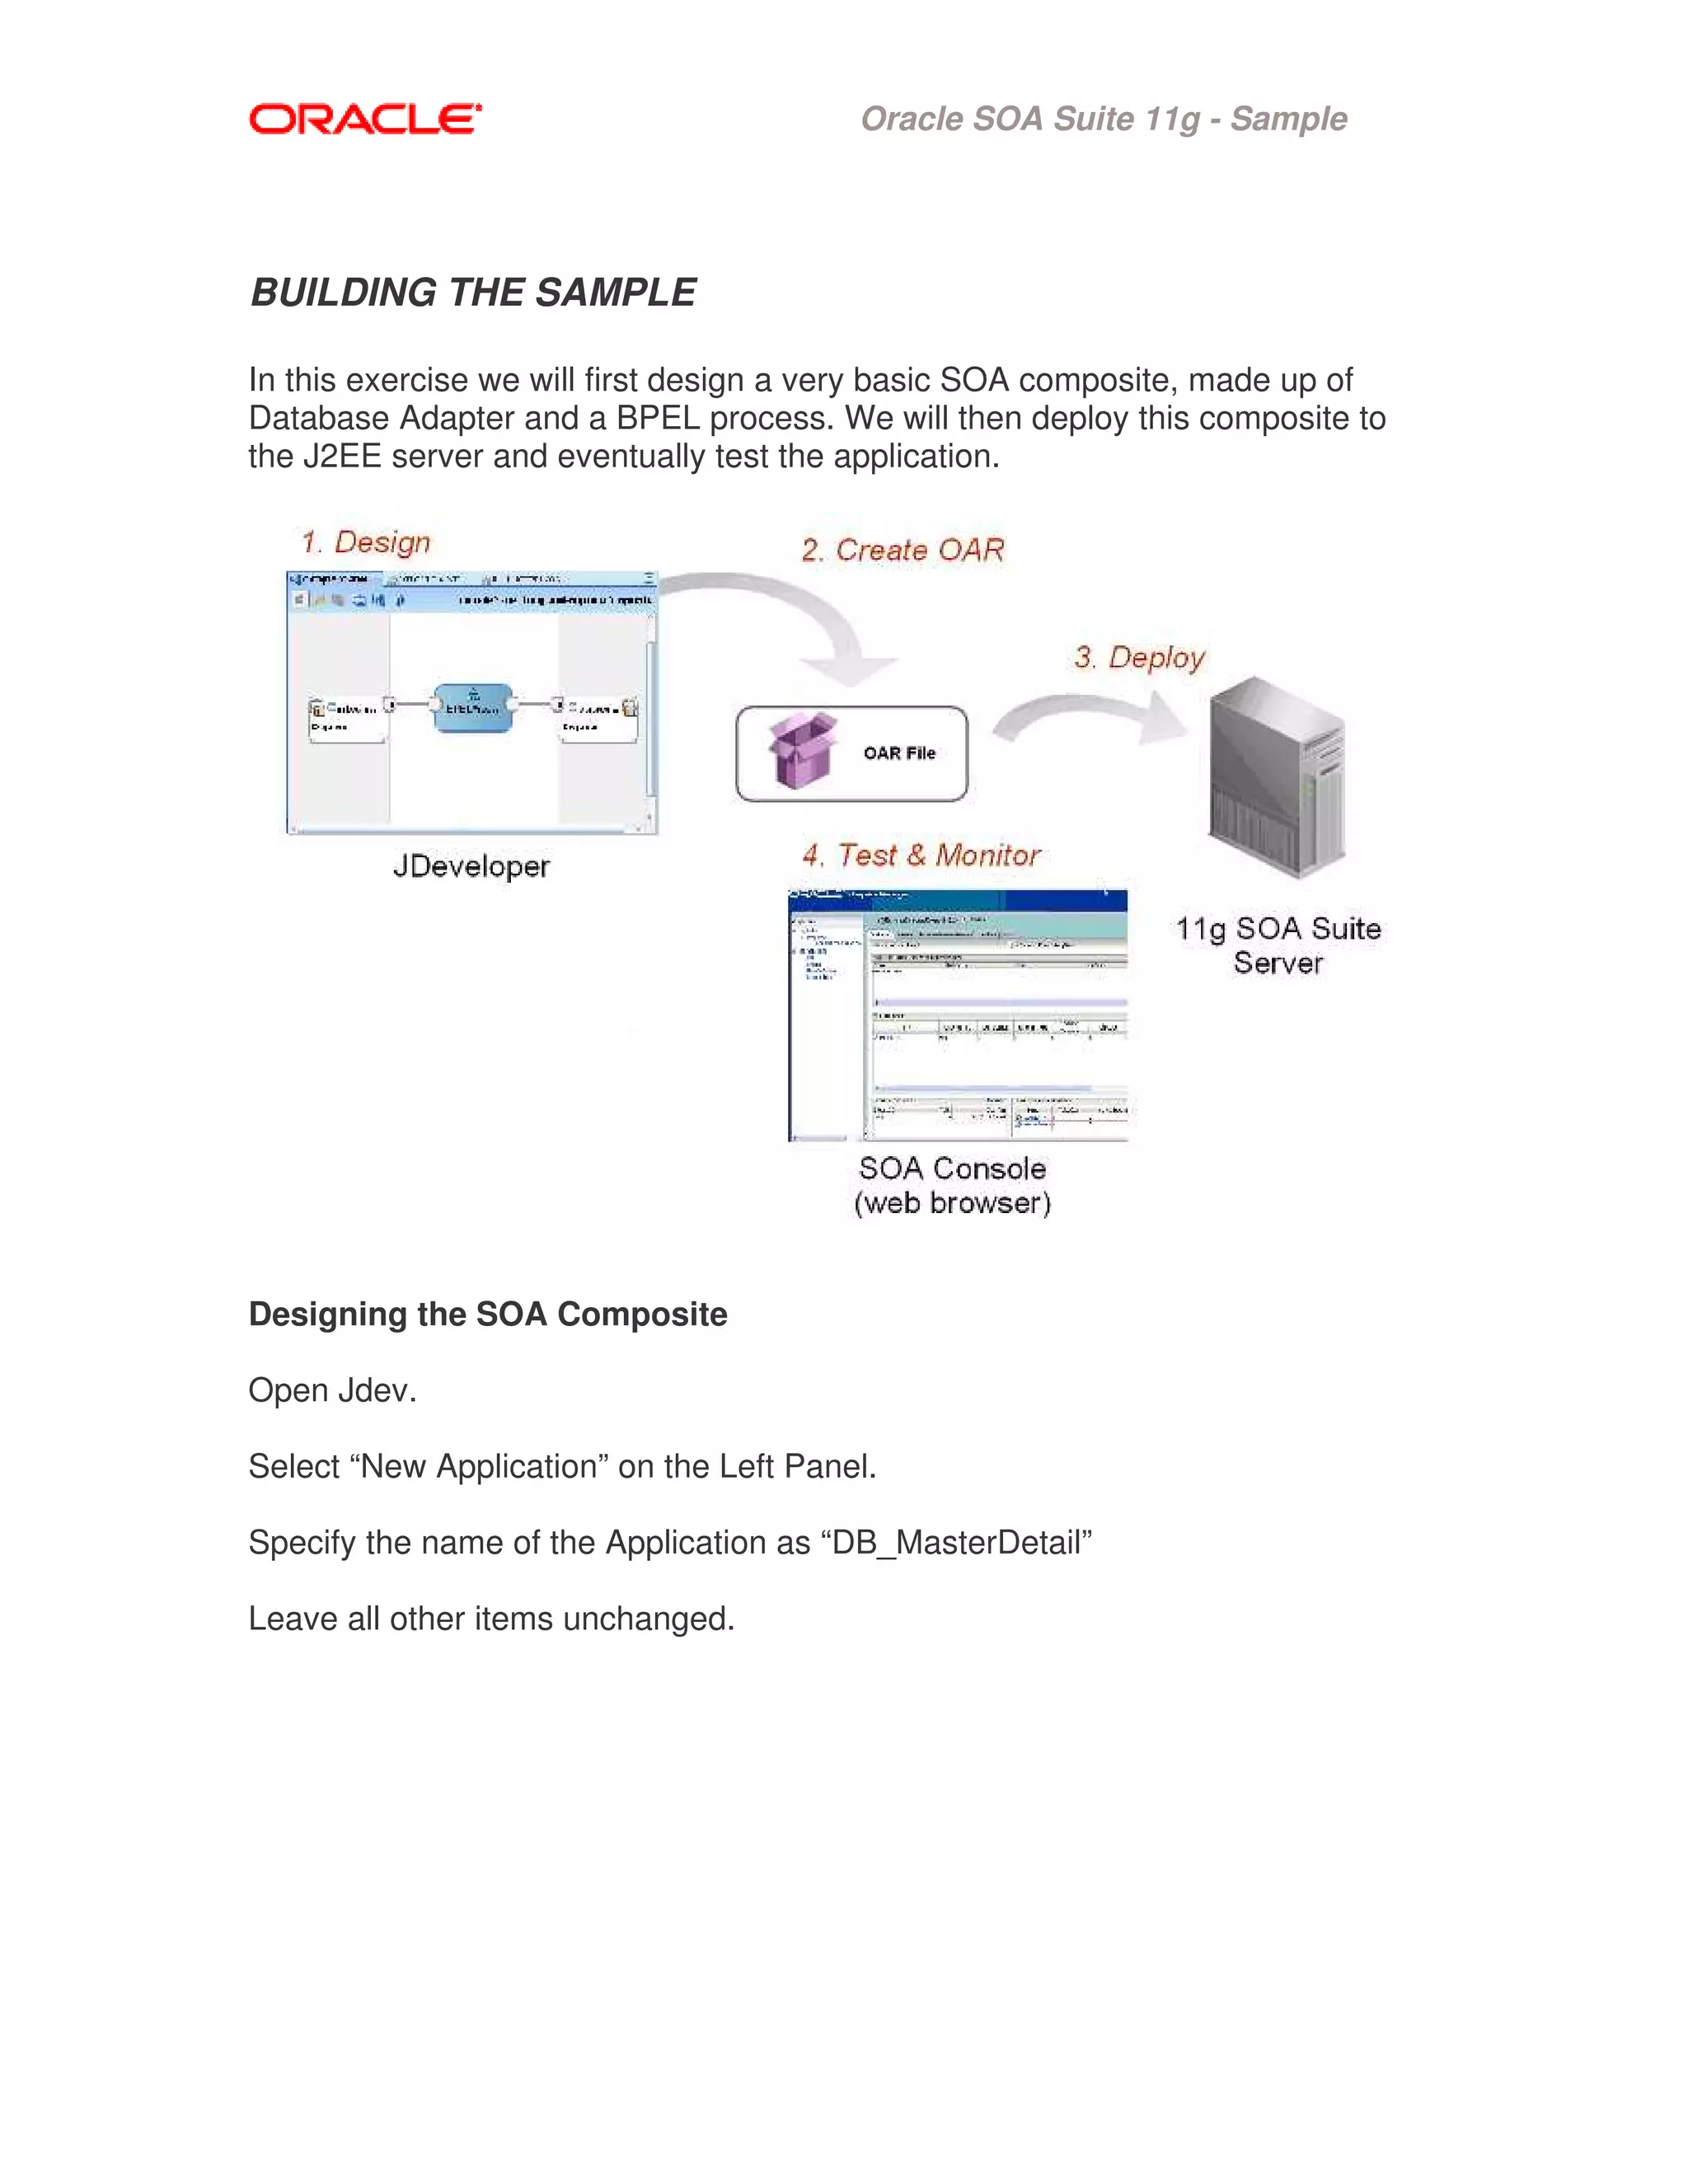
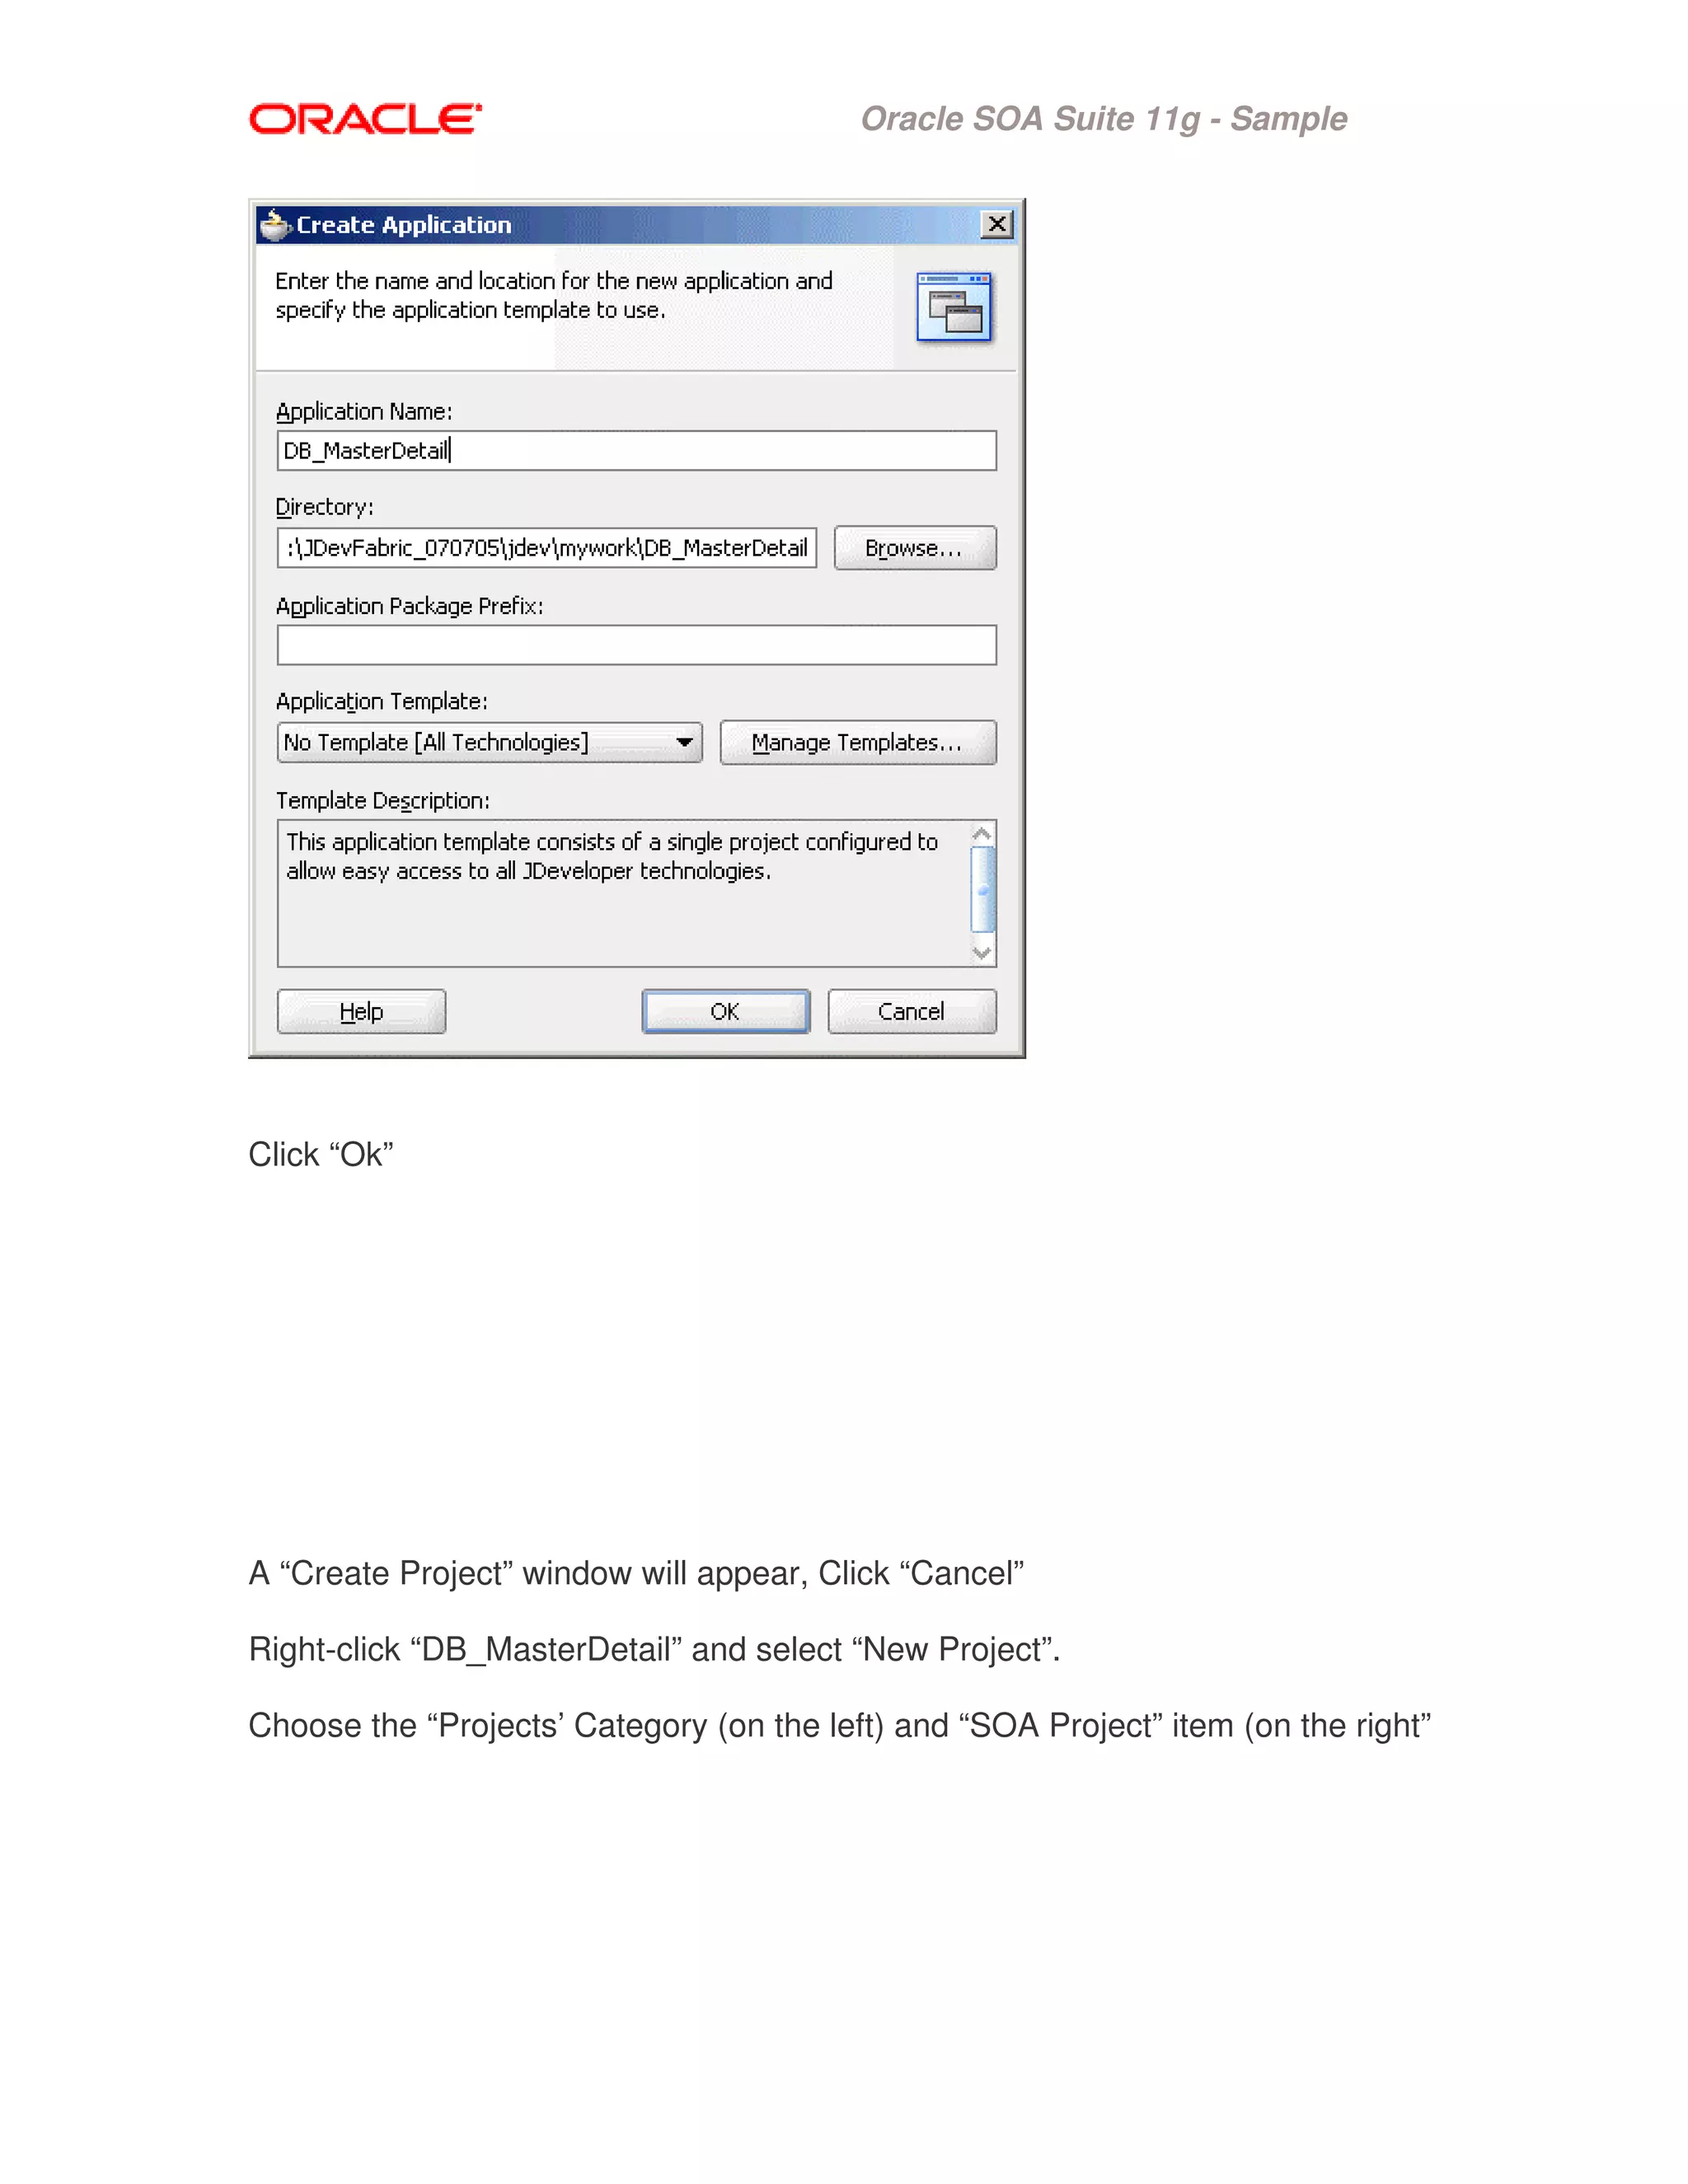
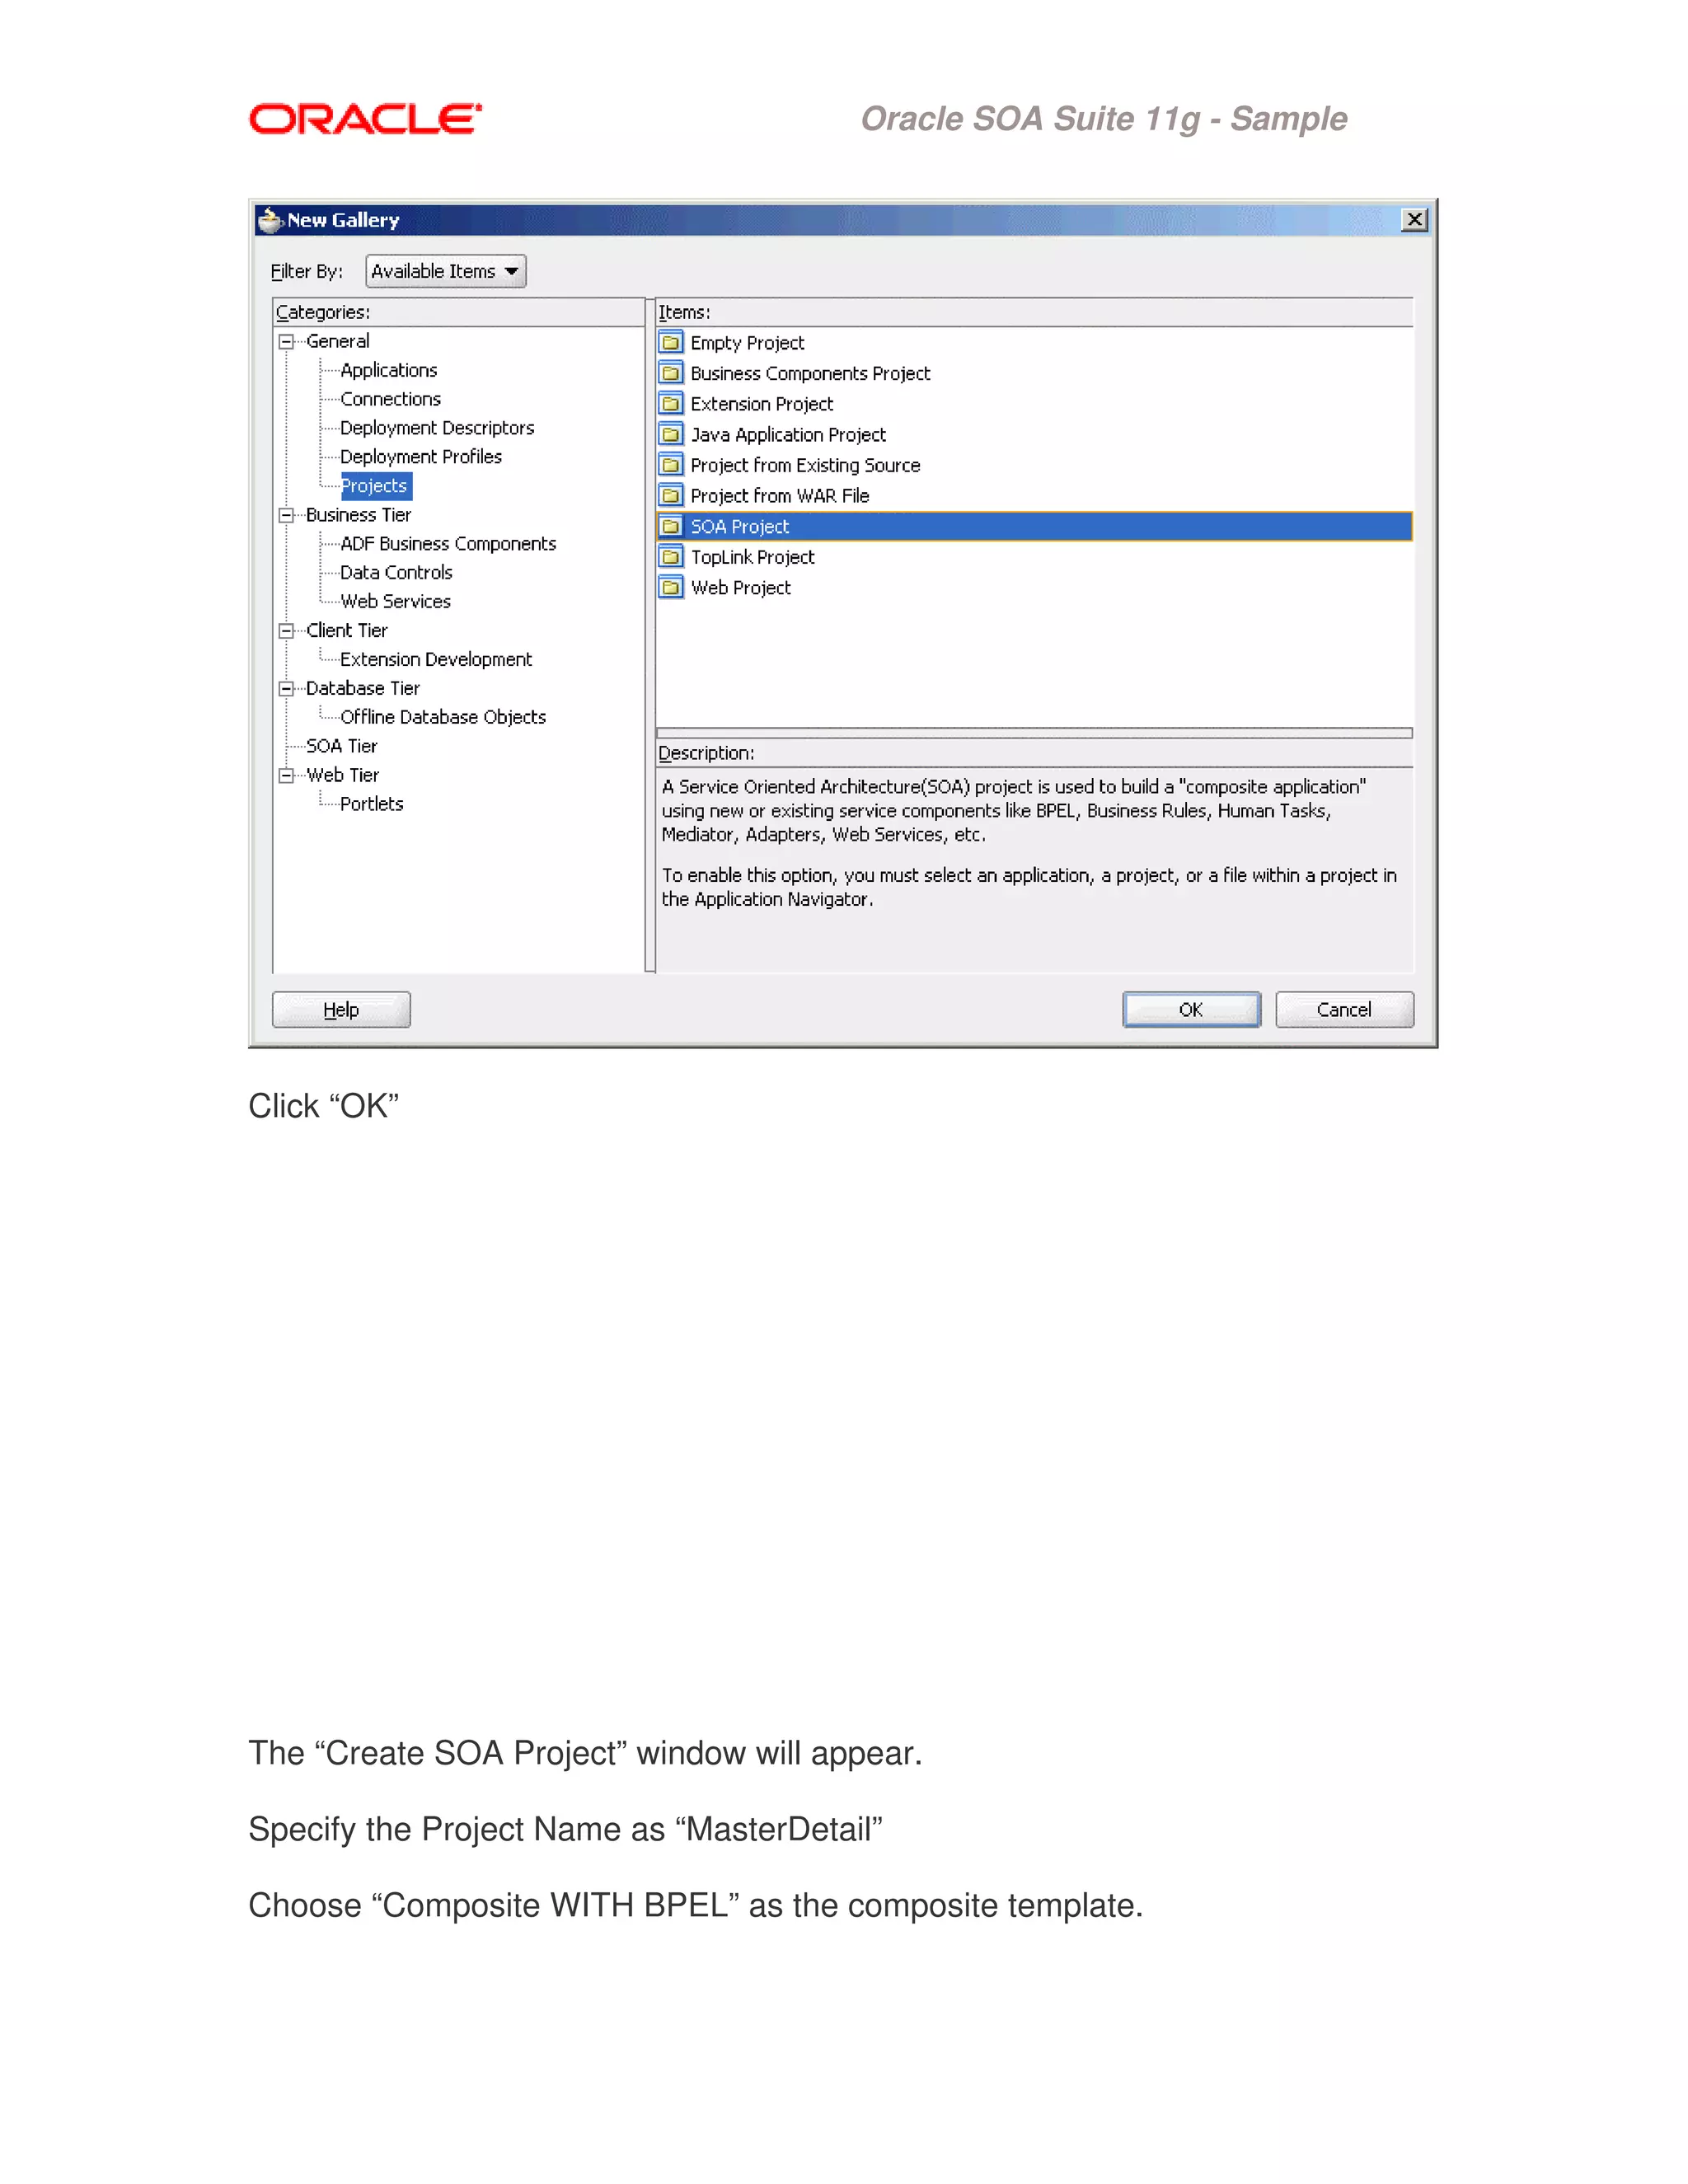
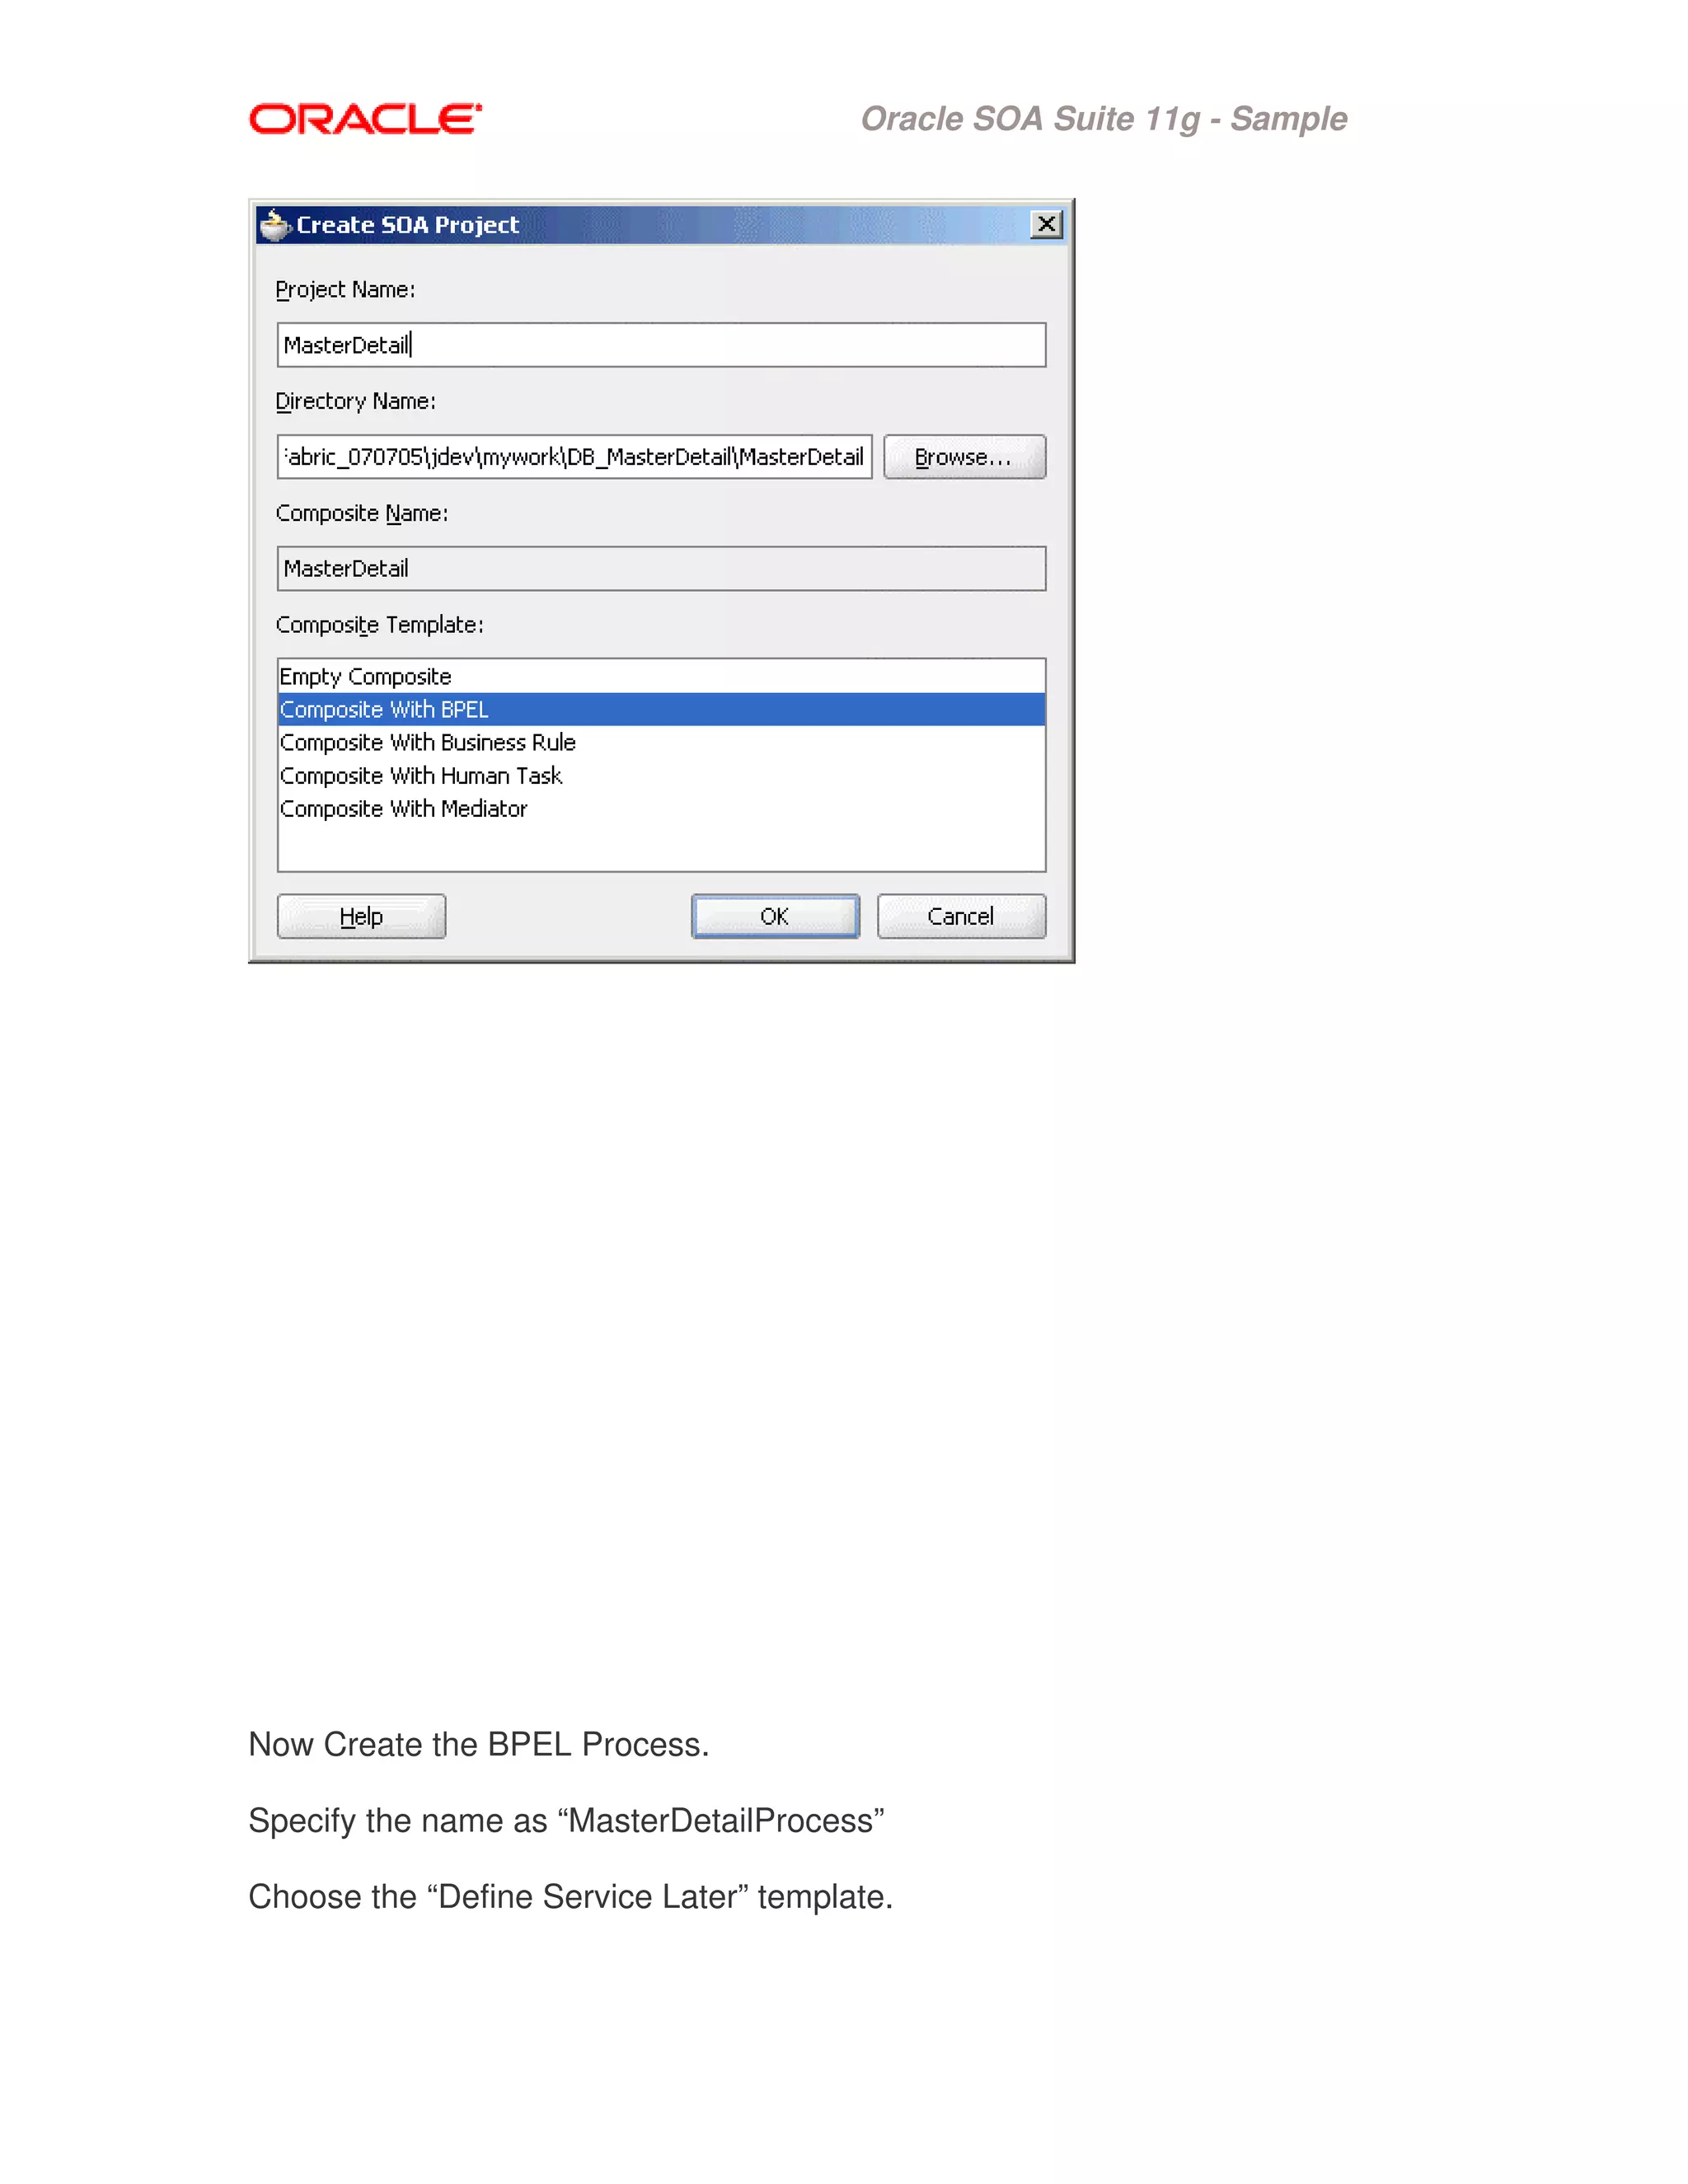
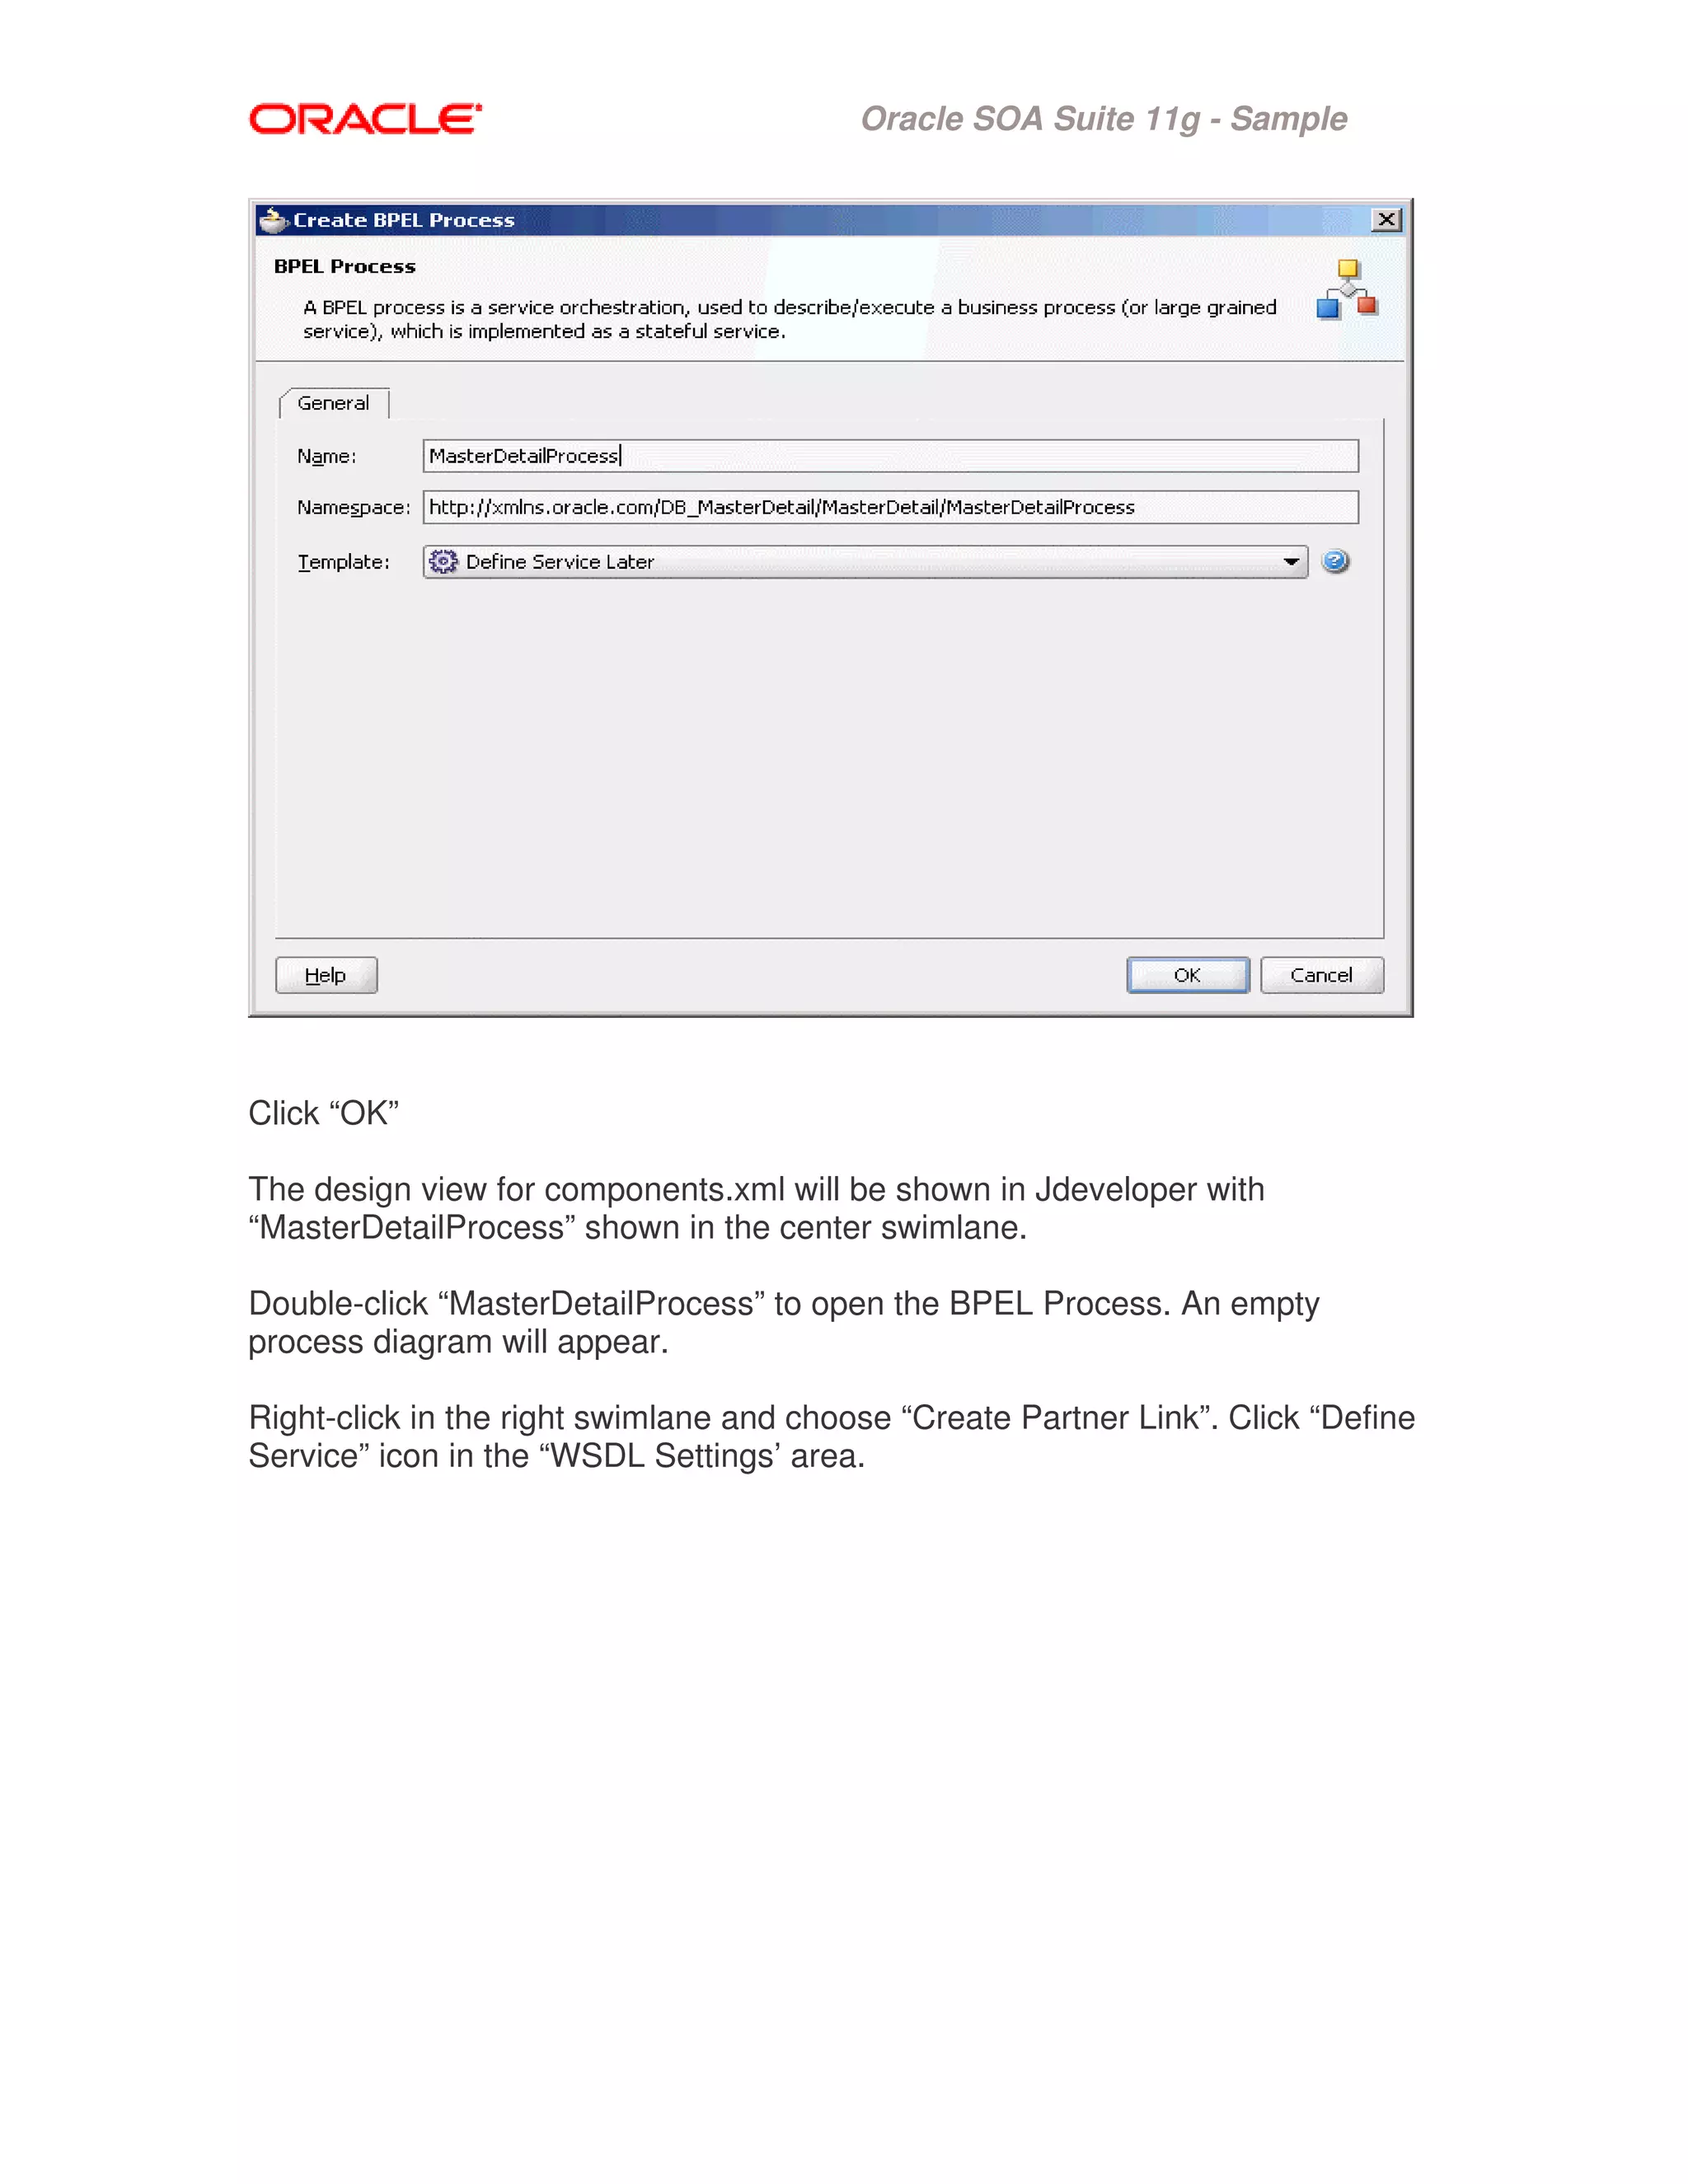
Oracle SOA Suite 11g - Sample
SAMPLE NAME : MasterDetail
COMPONENT : Database Adapter for Tables/Views
OVERVIEW
The MasterDetail tutorial shows a simple scenario for replicating data in one set
of tables on one database to tables on same/another database. It involves an
inbound polling read on the source tables, and an outbound write/merge to the
destination tables. In this example, there are two sets of department and
employee tables, one of which is used for inbound data, and the other set for
outbound data.
WHAT YOU WILL LEARN
In this tutorial you will learn the basic steps and tools involved in:
- Designing a SOA composite using Database Adapter wizard
- Deploying a SOA composite using JDeveloper
- Testing and monitoring a SOA composite
PROVIDED FILES
• artifacts
o sql/create_schemas.sql – SQL file for creating the schema objects
o sql/ insert_data.sql – SQL file for inserting the data into inbound
tables
• adapters-db-102-MasterDetail.pdf – Instruction to Deploy the sample and
Build a sample
• DB_MasterDetail –JDeveloper Application
• Readme.txt - Manifest
STEP BY STEP INSTRUCTIONS
RUNNING THE PREBUILT SAMPLE
• Create the schema objects in the database
Oracle SOA Suite 11g - Sample
• Configure the Deployment Descriptor ( oc4j-ra.xml ) and the datasources
• Start the SOA Server
• Open the DB_MasterDetail.jws in Jdeveloper
• Deploy the Application to the SOA Server
• Insert the data into the inbound tables (insert_data.sql )
INSTALLING & CONFIGURING
1. Connect to the database as SCOTT/TIGER and load the schema objects
SQL> @D:adapters-db-102-MasterDetailartifactssqlcreate_schemas.sql
2. Add the following entries to data-sources.xml in the directory
${OC4J_HOME}/j2ee/oc4j_soa/config/data-sources.xml
<managed-data-source connection-pool-name="PCBPELDataSource-
ConnectionPool" jndi-name="jdbc/PCBPELDataSource"
name="PCBPELDataSource"/>
<connection-pool name="PCBPELDataSource-ConnectionPool">
<connection-factory factory-class="oracle.jdbc.OracleDriver"
url="jdbc:oracle:thin:scott/tiger@staco17.us.oracle.com:16677:db9180" />
</connection-pool>
Note: Hostname, port and sid may vary depending on the installation.
3. Add the following entry in the oc4j-ra.xml in the directory
${OC4J_SOA}/j2ee/oc4j_soa/application-
deployments/default/DbAdapter/oc4j-ra.xml
<connector-factory location="eis/DB/pcbpel" connector-name="Database
Adapter">
<config-property name="xADataSourceName"
value="jdbc/PCBPELDataSource"/>
<config-property name="dataSourceName" value=""/>
<config-property name="platformClassName"
value="oracle.toplink.platform.database.Oracle9Platform"/>
<config-property name="usesNativeSequencing" value="true"/>
<config-property name="sequencePreallocationSize" value="50"/>
<config-property name="defaultNChar" value="false"/>
<config-property name="usesBatchWriting" value="false"/>
<connection-pooling use="none">
</connection-pooling>
<security-config use="none">
</security-config>
Oracle SOA Suite 11g - Sample
</connector-factory>
Note: After editing the files stop and restart the server
RUNNING THE SAMPLE
1. Open the DB_MasterDetail.jws in Jdeveloper
2. Deploy the Application to the SOA Server
3. Connect to the database as SCOTT/TIGER and Insert the data into the
inbound tables (insert_data.sql )
SQL> D:adapters-db-102-MasterDetailartifactssqlinsert_data.sql
VERIFYING EXECUTION
1. Data should be inserted to the SENDER_EMP and SENDER_DEPT
tables.
SQL> select count(*) from sender_Emp;
COUNT(*)
----------
14
SQL> select count(*) from sender_dept;
COUNT(*)
----------
4
2. Data should be deleted from the RECEIVER_EMP and RECEIVER_DEPT
tables.
SQL> select count(*) from receiver_emp;
COUNT(*)
----------
0
SQL> select count(*) from receiver_dept;
COUNT(*)
----------
0
Oracle SOA Suite 11g - Sample
BUILDING THE SAMPLE
In this exercise we will first design a very basic SOA composite, made up of
Database Adapter and a BPEL process. We will then deploy this composite to
the J2EE server and eventually test the application.
Designing the SOA Composite
Open Jdev.
Select “New Application” on the Left Panel.
Specify the name of the Application as “DB_MasterDetail”
Leave all other items unchanged.
Oracle SOA Suite 11g - Sample
Click “Ok”
A “Create Project” window will appear, Click “Cancel”
Right-click “DB_MasterDetail” and select “New Project”.
Choose the “Projects’ Category (on the left) and “SOA Project” item (on the right”
Oracle SOA Suite 11g - Sample
Click “OK”
The “Create SOA Project” window will appear.
Specify the Project Name as “MasterDetail”
Choose “Composite WITH BPEL” as the composite template.
Oracle SOA Suite 11g - Sample
Now Create the BPEL Process.
Specify the name as “MasterDetailProcess”
Choose the “Define Service Later” template.
Oracle SOA Suite 11g - Sample
Click “OK”
The design view for components.xml will be shown in Jdeveloper with
“MasterDetailProcess” shown in the center swimlane.
Double-click “MasterDetailProcess” to open the BPEL Process. An empty
process diagram will appear.
Right-click in the right swimlane and choose “Create Partner Link”. Click “Define
Service” icon in the “WSDL Settings’ area.
Oracle SOA Suite 11g - Sample
Choose “Database Adapter”.
Click “Ok”.
Click “Next”.
Enter “InboundService as the Service Name.
Click “Next”
Click the green “+” symbol to create a new Database Connection.
Oracle SOA Suite 11g - Sample
Specify “pcbpel” as the Connection Name.
The Username is “SCOTT”
The Password is “TIGER”
Use the thin Oracle( JDBC ) Driver.
Specify the hostname, port number and SID.
Click “Test Connection” to test the connection.
“Success” indiacates Test connection is Valid.
Click “Ok”
Click “Next”
Oracle SOA Suite 11g - Sample
Select “Poll for New or Changed Records in a Table”
Click “Next”
Click on the “Import Tables” and Import the RECEIVER_DEPT and
RECEIVER_EMP tables.
Click “Ok”
Oracle SOA Suite 11g - Sample
Select “RECEIVER_DEPT” as the root table.
Click “Next”
Click “Next”
Oracle SOA Suite 11g - Sample
Click “Next”
Select “Delete the Row(s) that were Read”.
Click “Next”
Oracle SOA Suite 11g - Sample
Click “Next”
Click “Next”
Oracle SOA Suite 11g - Sample
Click “Finish”
The PartnerLink for the Database Adapter Inbound Operation is complete now.
Click “OK”
Oracle SOA Suite 11g - Sample
Right-click in the right swimlane and choose “Create Partner Link”. Click “Define
Service” icon in the “WSDL Settings’ area.
Choose “Database Adapter”.
Click “Ok”.
Click “Next”.
Enter “OutboundService as the Service Name.
Oracle SOA Suite 11g - Sample
Click “Next”
Select “pcbpel” from the Application Connection.
Click “Next”
Check only “Insert or Update (Merge)”.
Click “Next”.
Oracle SOA Suite 11g - Sample
Click on the “Import Tables” and Import the SENDER_DEPT and SENDER_EMP
tables.
Click “OK”
Select “SENDER_DEPT” as the root table.
Click “Next”
Oracle SOA Suite 11g - Sample
Click “Next”
Click “Finish”
The Partner Link for the Database Adapter Outbound Operation is complete now.
Oracle SOA Suite 11g - Sample
At this point there will be two Partner Links, one in the left Swimlane (
InboundService ) and one in the right swim lane ( OutboundService).
Now begin modelling the process.
Drag and Drop a “Receive” Activity from the BPEL Process Component Palette
to the empty box in the process diagram that says “Drop Activity Here”.
Right Click on the Receive Activity and choose Edit.
Use the Partner Link flashlight and choose the “InboundService” Partner Link.
Click “OK”
Click the green “+” sign to auto create the input Variable.
Oracle SOA Suite 11g - Sample
Check the “Create Instance” check box.
Click “OK”
The “InboundService” Partner Link should now be linked to the Receive Activity.
Drag and Drop a “Invoke” Activity from the BPEL Process Component Palette to
the empty box in the process diagram that says “Drop Activity Here”.
Right Click on the Invoke Activity and choose Edit.
Use the Partner Link flashlight and choose the “OutboundService” Partner Link.
Click “OK”
Click the green “+” sign to auto create the input Variable.
Click “OK”
Click “OK”
The “OutboundService” Partner Link should now be linked to the Invoke Activity.
Oracle SOA Suite 11g - Sample
Drag and Drop a “Transform” Activity between the Receive and Invoke Activity.
Double click on the “Transform Activity”.
Click the green “+” sign and Select “Receive_1_receive_InputVariable” as the
Source Variable.
Select “Invoke_1_merge_InputVariable” as the Target Variable.
Click “OK”
Oracle SOA Suite 11g - Sample
Click and hold on ReceiverDeptCollection, and drag your cursor onto
SenderDeptCollection. A line will appear as you drag the cursor.
Click and hold on ReceiverEmp, and drag your cursor onto SenderEmp. A line
will appear as you drag the cursor.
This should automatically draw a line between all the elements in the two
schemas.
Save all and close the Transform.
Modelling the BPEL Process is complete now. Below is the process diagram
from the Design View of Jdeveloper.
Oracle SOA Suite 11g - Sample
Below is the Composite diagram from the Design View of Jdeveloper.
Oracle SOA Suite 11g - Sample
Creating an Application Deployment Profile and a Server Connection
The next step after designing your project is to deploy it to a server, so that you
can test it
Right-click on the Application menu, select “Deploy”.
Click the “New Connection” to create connection to Application Server.
Click “Next”
Oracle SOA Suite 11g - Sample
Enter the Connection Name as “AppServerConnection1”
Select the Connection Type as “Standalone OC4J11g” if it is a standalone Zip
based install.
Click “Next”
Enter the Password as “welcome1”.
Click “Next”
Oracle SOA Suite 11g - Sample
Enter the Hostname on which the Application Server is Running.
Click “Next”
Click on “Test Connection” to the check if the Connection was successful.
“Success” indicates that the Application Server is up and running and SOA
Application can be deployed.
Click “Next”
Click “Finish”
Oracle SOA Suite 11g - Sample
Click “OK”
Oracle SOA Suite 11g - Sample
Click “OK”
Make sure to check the message console at the bottom of your JDeveloper
screen for eventual errors. The SOA compilation errors would show up under the
“Apache Ant” tab, while generic deployment errors would be visible under the
“Deployment” tab.
Oracle SOA Suite 11g - Sample
Testing and Monitoring using the SOA Console
We will now switch to the browser-based SOA Console to test and monitor our
newly-deployed SOA composite.
Go to http://<yourservername>:8888/SOAConsole
(ex: http://stacl24.us.oracle.com:8888/SOAConsole)
You should see your composite in the left-hand Applications navigation tree.
Select it to bring up the following screen:
(note that it can take some time for this page to be generated the first time you
open it).
Click on the Composite i.e MasterDetail(1.0)
Oracle SOA Suite 11g - Sample
Click on the Instances Tab. There should be 4 instances created sucessfully.
Oracle SOA Suite 11g - Sample
Click on any instance to see the flow.
Click on the “Instance ID” to drill-down and have a closer look. This will open a
new browser window with the “Flow Trace” for our instance:
Oracle SOA Suite 11g - Sample

dbadapters

  • 1.
    Oracle SOA Suite11g - Sample SAMPLE NAME : MasterDetail COMPONENT : Database Adapter for Tables/Views OVERVIEW The MasterDetail tutorial shows a simple scenario for replicating data in one set of tables on one database to tables on same/another database. It involves an inbound polling read on the source tables, and an outbound write/merge to the destination tables. In this example, there are two sets of department and employee tables, one of which is used for inbound data, and the other set for outbound data. WHAT YOU WILL LEARN In this tutorial you will learn the basic steps and tools involved in: - Designing a SOA composite using Database Adapter wizard - Deploying a SOA composite using JDeveloper - Testing and monitoring a SOA composite PROVIDED FILES • artifacts o sql/create_schemas.sql – SQL file for creating the schema objects o sql/ insert_data.sql – SQL file for inserting the data into inbound tables • adapters-db-102-MasterDetail.pdf – Instruction to Deploy the sample and Build a sample • DB_MasterDetail –JDeveloper Application • Readme.txt - Manifest STEP BY STEP INSTRUCTIONS RUNNING THE PREBUILT SAMPLE • Create the schema objects in the database
  • 2.
    Oracle SOA Suite11g - Sample • Configure the Deployment Descriptor ( oc4j-ra.xml ) and the datasources • Start the SOA Server • Open the DB_MasterDetail.jws in Jdeveloper • Deploy the Application to the SOA Server • Insert the data into the inbound tables (insert_data.sql ) INSTALLING & CONFIGURING 1. Connect to the database as SCOTT/TIGER and load the schema objects SQL> @D:adapters-db-102-MasterDetailartifactssqlcreate_schemas.sql 2. Add the following entries to data-sources.xml in the directory ${OC4J_HOME}/j2ee/oc4j_soa/config/data-sources.xml <managed-data-source connection-pool-name="PCBPELDataSource- ConnectionPool" jndi-name="jdbc/PCBPELDataSource" name="PCBPELDataSource"/> <connection-pool name="PCBPELDataSource-ConnectionPool"> <connection-factory factory-class="oracle.jdbc.OracleDriver" url="jdbc:oracle:thin:scott/tiger@staco17.us.oracle.com:16677:db9180" /> </connection-pool> Note: Hostname, port and sid may vary depending on the installation. 3. Add the following entry in the oc4j-ra.xml in the directory ${OC4J_SOA}/j2ee/oc4j_soa/application- deployments/default/DbAdapter/oc4j-ra.xml <connector-factory location="eis/DB/pcbpel" connector-name="Database Adapter"> <config-property name="xADataSourceName" value="jdbc/PCBPELDataSource"/> <config-property name="dataSourceName" value=""/> <config-property name="platformClassName" value="oracle.toplink.platform.database.Oracle9Platform"/> <config-property name="usesNativeSequencing" value="true"/> <config-property name="sequencePreallocationSize" value="50"/> <config-property name="defaultNChar" value="false"/> <config-property name="usesBatchWriting" value="false"/> <connection-pooling use="none"> </connection-pooling> <security-config use="none"> </security-config>
  • 3.
    Oracle SOA Suite11g - Sample </connector-factory> Note: After editing the files stop and restart the server RUNNING THE SAMPLE 1. Open the DB_MasterDetail.jws in Jdeveloper 2. Deploy the Application to the SOA Server 3. Connect to the database as SCOTT/TIGER and Insert the data into the inbound tables (insert_data.sql ) SQL> D:adapters-db-102-MasterDetailartifactssqlinsert_data.sql VERIFYING EXECUTION 1. Data should be inserted to the SENDER_EMP and SENDER_DEPT tables. SQL> select count(*) from sender_Emp; COUNT(*) ---------- 14 SQL> select count(*) from sender_dept; COUNT(*) ---------- 4 2. Data should be deleted from the RECEIVER_EMP and RECEIVER_DEPT tables. SQL> select count(*) from receiver_emp; COUNT(*) ---------- 0 SQL> select count(*) from receiver_dept; COUNT(*) ---------- 0
  • 4.
    Oracle SOA Suite11g - Sample BUILDING THE SAMPLE In this exercise we will first design a very basic SOA composite, made up of Database Adapter and a BPEL process. We will then deploy this composite to the J2EE server and eventually test the application. Designing the SOA Composite Open Jdev. Select “New Application” on the Left Panel. Specify the name of the Application as “DB_MasterDetail” Leave all other items unchanged.
  • 5.
    Oracle SOA Suite11g - Sample Click “Ok” A “Create Project” window will appear, Click “Cancel” Right-click “DB_MasterDetail” and select “New Project”. Choose the “Projects’ Category (on the left) and “SOA Project” item (on the right”
  • 6.
    Oracle SOA Suite11g - Sample Click “OK” The “Create SOA Project” window will appear. Specify the Project Name as “MasterDetail” Choose “Composite WITH BPEL” as the composite template.
  • 7.
    Oracle SOA Suite11g - Sample Now Create the BPEL Process. Specify the name as “MasterDetailProcess” Choose the “Define Service Later” template.
  • 8.
    Oracle SOA Suite11g - Sample Click “OK” The design view for components.xml will be shown in Jdeveloper with “MasterDetailProcess” shown in the center swimlane. Double-click “MasterDetailProcess” to open the BPEL Process. An empty process diagram will appear. Right-click in the right swimlane and choose “Create Partner Link”. Click “Define Service” icon in the “WSDL Settings’ area.
  • 9.
    Oracle SOA Suite11g - Sample Choose “Database Adapter”. Click “Ok”. Click “Next”. Enter “InboundService as the Service Name. Click “Next” Click the green “+” symbol to create a new Database Connection.
  • 10.
    Oracle SOA Suite11g - Sample Specify “pcbpel” as the Connection Name. The Username is “SCOTT” The Password is “TIGER” Use the thin Oracle( JDBC ) Driver. Specify the hostname, port number and SID. Click “Test Connection” to test the connection. “Success” indiacates Test connection is Valid. Click “Ok” Click “Next”
  • 11.
    Oracle SOA Suite11g - Sample Select “Poll for New or Changed Records in a Table” Click “Next” Click on the “Import Tables” and Import the RECEIVER_DEPT and RECEIVER_EMP tables. Click “Ok”
  • 12.
    Oracle SOA Suite11g - Sample Select “RECEIVER_DEPT” as the root table. Click “Next” Click “Next”
  • 13.
    Oracle SOA Suite11g - Sample Click “Next” Select “Delete the Row(s) that were Read”. Click “Next”
  • 14.
    Oracle SOA Suite11g - Sample Click “Next” Click “Next”
  • 15.
    Oracle SOA Suite11g - Sample Click “Finish” The PartnerLink for the Database Adapter Inbound Operation is complete now. Click “OK”
  • 16.
    Oracle SOA Suite11g - Sample Right-click in the right swimlane and choose “Create Partner Link”. Click “Define Service” icon in the “WSDL Settings’ area. Choose “Database Adapter”. Click “Ok”. Click “Next”. Enter “OutboundService as the Service Name.
  • 17.
    Oracle SOA Suite11g - Sample Click “Next” Select “pcbpel” from the Application Connection. Click “Next” Check only “Insert or Update (Merge)”. Click “Next”.
  • 18.
    Oracle SOA Suite11g - Sample Click on the “Import Tables” and Import the SENDER_DEPT and SENDER_EMP tables. Click “OK” Select “SENDER_DEPT” as the root table. Click “Next”
  • 19.
    Oracle SOA Suite11g - Sample Click “Next” Click “Finish” The Partner Link for the Database Adapter Outbound Operation is complete now.
  • 20.
    Oracle SOA Suite11g - Sample At this point there will be two Partner Links, one in the left Swimlane ( InboundService ) and one in the right swim lane ( OutboundService). Now begin modelling the process. Drag and Drop a “Receive” Activity from the BPEL Process Component Palette to the empty box in the process diagram that says “Drop Activity Here”. Right Click on the Receive Activity and choose Edit. Use the Partner Link flashlight and choose the “InboundService” Partner Link. Click “OK” Click the green “+” sign to auto create the input Variable.
  • 21.
    Oracle SOA Suite11g - Sample Check the “Create Instance” check box. Click “OK” The “InboundService” Partner Link should now be linked to the Receive Activity. Drag and Drop a “Invoke” Activity from the BPEL Process Component Palette to the empty box in the process diagram that says “Drop Activity Here”. Right Click on the Invoke Activity and choose Edit. Use the Partner Link flashlight and choose the “OutboundService” Partner Link. Click “OK” Click the green “+” sign to auto create the input Variable. Click “OK” Click “OK” The “OutboundService” Partner Link should now be linked to the Invoke Activity.
  • 22.
    Oracle SOA Suite11g - Sample Drag and Drop a “Transform” Activity between the Receive and Invoke Activity. Double click on the “Transform Activity”. Click the green “+” sign and Select “Receive_1_receive_InputVariable” as the Source Variable. Select “Invoke_1_merge_InputVariable” as the Target Variable. Click “OK”
  • 23.
    Oracle SOA Suite11g - Sample Click and hold on ReceiverDeptCollection, and drag your cursor onto SenderDeptCollection. A line will appear as you drag the cursor. Click and hold on ReceiverEmp, and drag your cursor onto SenderEmp. A line will appear as you drag the cursor. This should automatically draw a line between all the elements in the two schemas. Save all and close the Transform. Modelling the BPEL Process is complete now. Below is the process diagram from the Design View of Jdeveloper.
  • 24.
    Oracle SOA Suite11g - Sample Below is the Composite diagram from the Design View of Jdeveloper.
  • 25.
    Oracle SOA Suite11g - Sample Creating an Application Deployment Profile and a Server Connection The next step after designing your project is to deploy it to a server, so that you can test it Right-click on the Application menu, select “Deploy”. Click the “New Connection” to create connection to Application Server. Click “Next”
  • 26.
    Oracle SOA Suite11g - Sample Enter the Connection Name as “AppServerConnection1” Select the Connection Type as “Standalone OC4J11g” if it is a standalone Zip based install. Click “Next” Enter the Password as “welcome1”. Click “Next”
  • 27.
    Oracle SOA Suite11g - Sample Enter the Hostname on which the Application Server is Running. Click “Next” Click on “Test Connection” to the check if the Connection was successful. “Success” indicates that the Application Server is up and running and SOA Application can be deployed. Click “Next” Click “Finish”
  • 28.
    Oracle SOA Suite11g - Sample Click “OK”
  • 29.
    Oracle SOA Suite11g - Sample Click “OK” Make sure to check the message console at the bottom of your JDeveloper screen for eventual errors. The SOA compilation errors would show up under the “Apache Ant” tab, while generic deployment errors would be visible under the “Deployment” tab.
  • 30.
    Oracle SOA Suite11g - Sample
  • 31.
    Oracle SOA Suite11g - Sample Testing and Monitoring using the SOA Console We will now switch to the browser-based SOA Console to test and monitor our newly-deployed SOA composite. Go to http://<yourservername>:8888/SOAConsole (ex: http://stacl24.us.oracle.com:8888/SOAConsole) You should see your composite in the left-hand Applications navigation tree. Select it to bring up the following screen: (note that it can take some time for this page to be generated the first time you open it). Click on the Composite i.e MasterDetail(1.0)
  • 32.
    Oracle SOA Suite11g - Sample Click on the Instances Tab. There should be 4 instances created sucessfully.
  • 33.
    Oracle SOA Suite11g - Sample Click on any instance to see the flow. Click on the “Instance ID” to drill-down and have a closer look. This will open a new browser window with the “Flow Trace” for our instance:
  • 34.
    Oracle SOA Suite11g - Sample