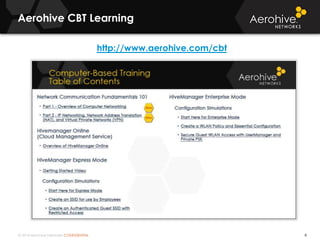
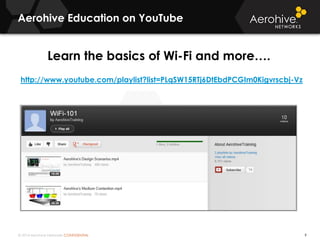
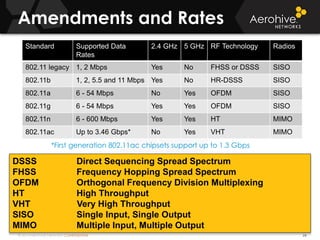
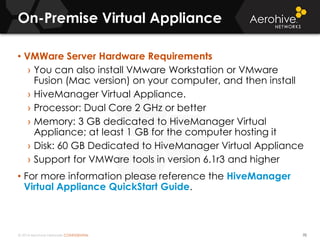
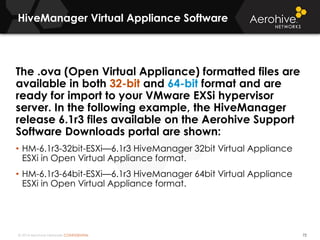
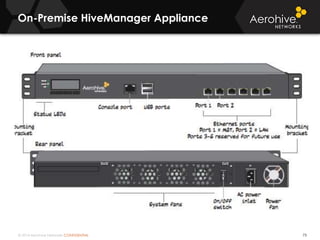
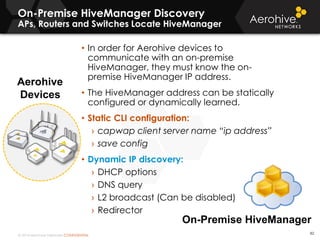
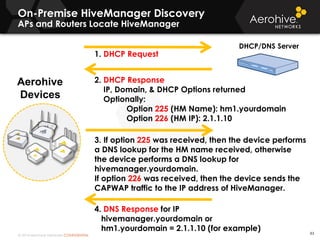
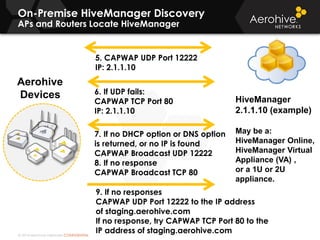
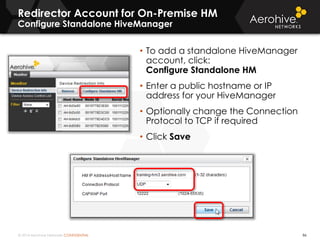
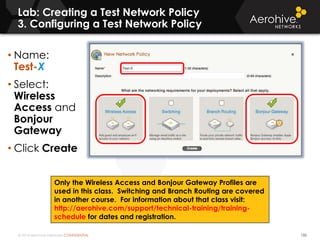
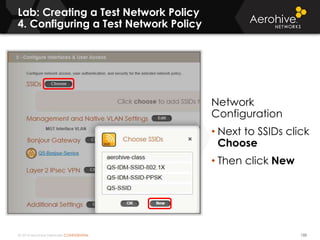
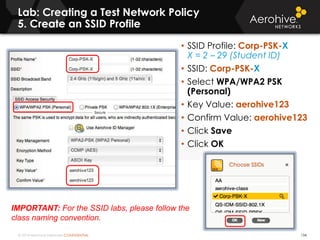
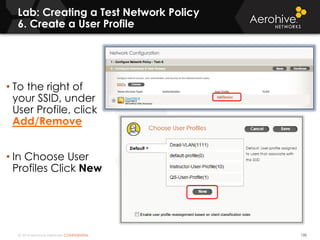
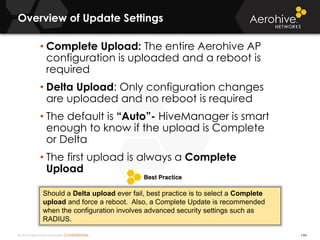
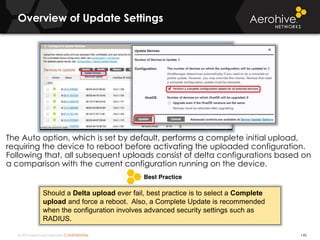
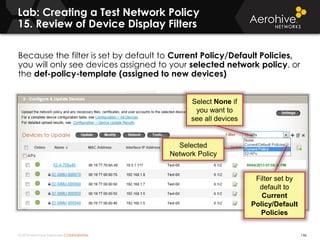
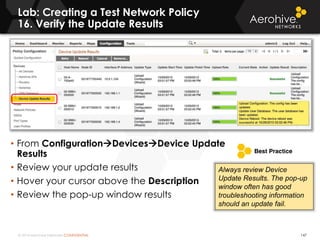
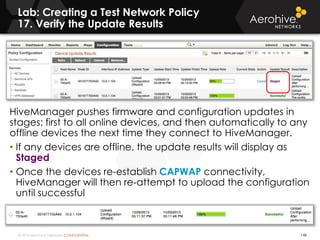
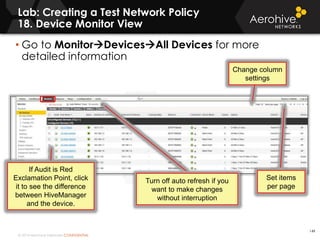
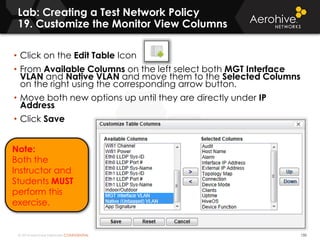
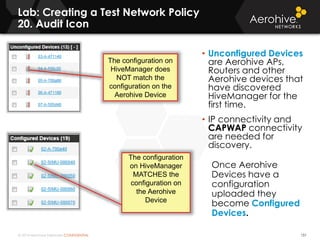
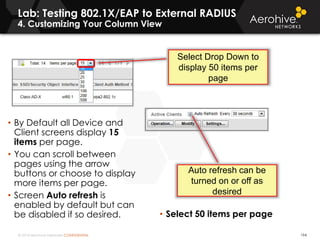
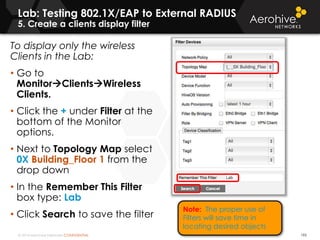
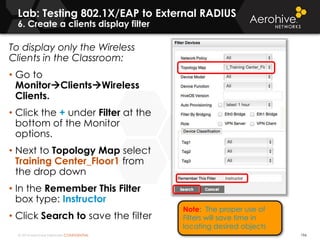
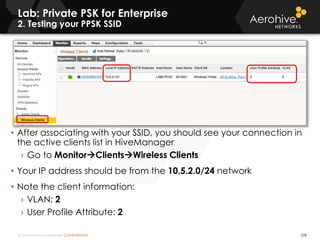
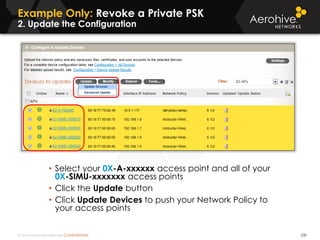
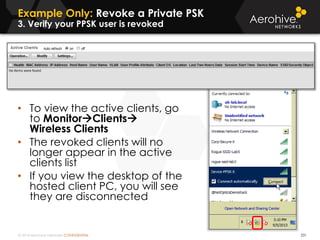
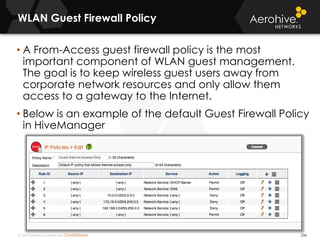
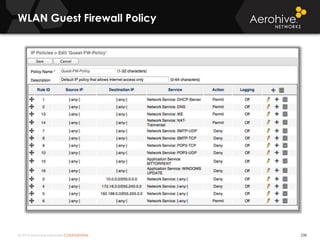
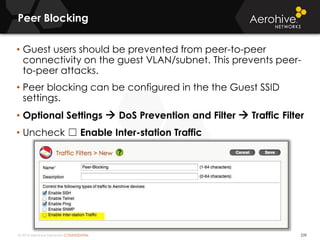
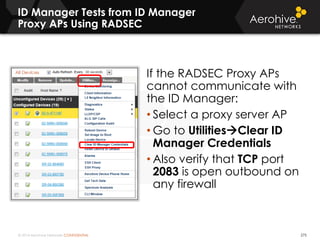
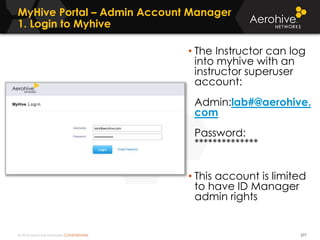
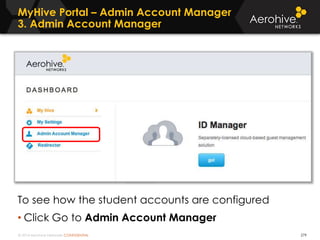
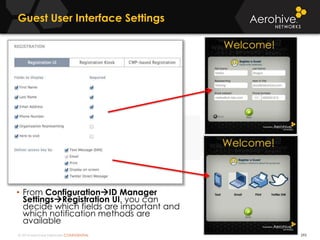
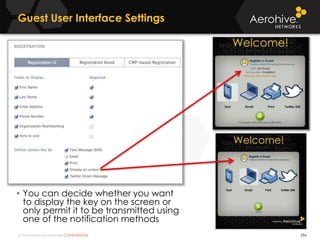
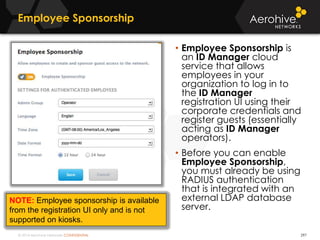
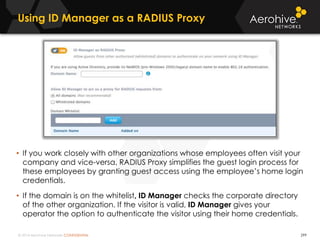
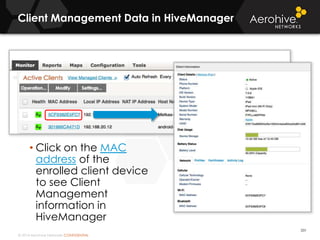
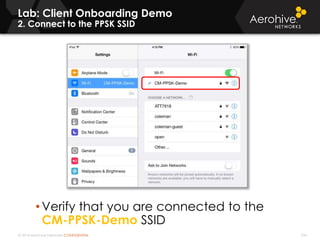
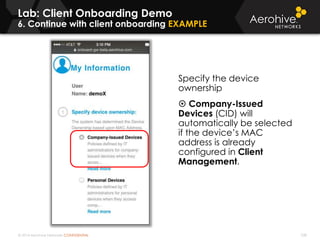
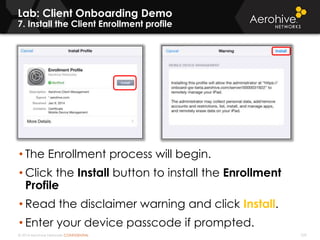
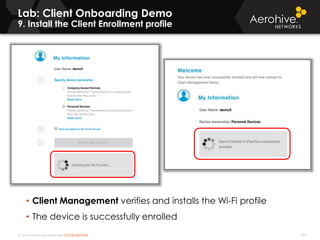
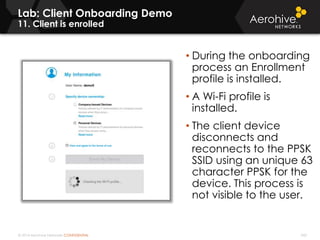
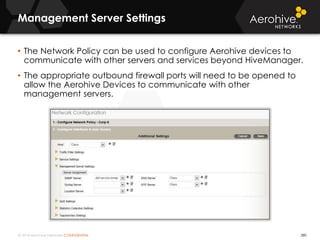
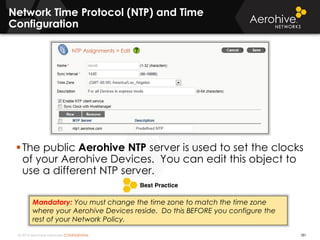
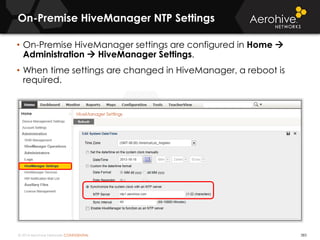
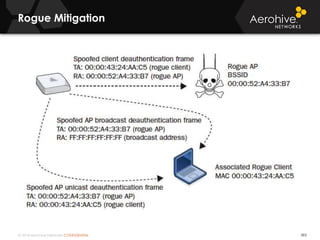
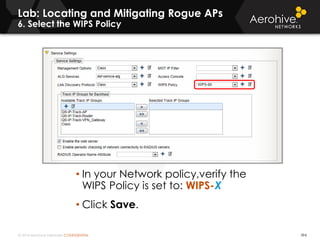
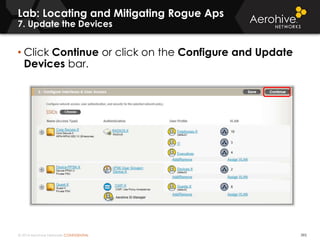
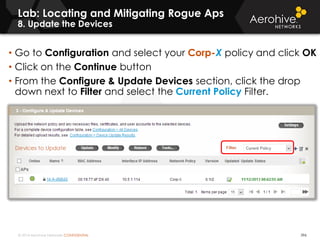
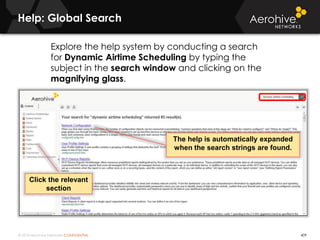
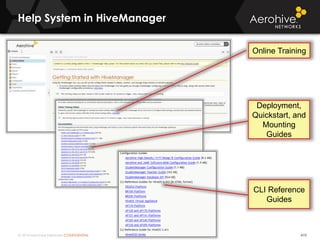
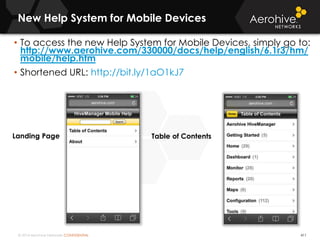
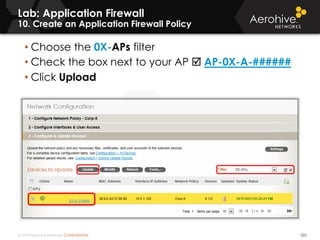
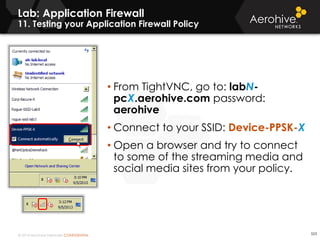
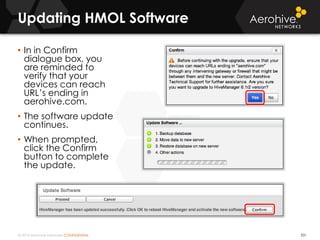
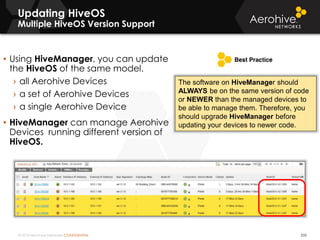
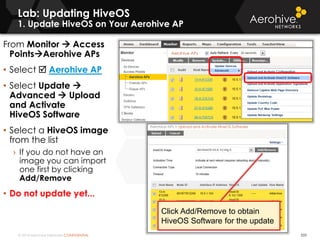
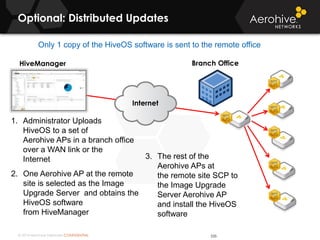
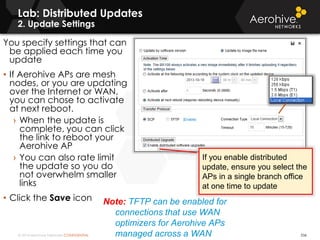
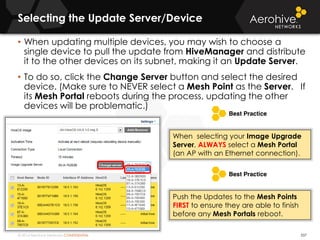
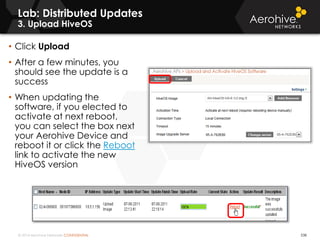
© 2014 Aerohive Networks Inc.
AEROHIVE CERTIFIED WIRELESS
ADMINISTRATOR (ACWA)
Aerohive’s
Instructor-led Training
© 2014 Aerohive Networks CONFIDENTIAL
Welcome
2
• Introductions
• Facilities Discussion
• Course Overview
• Extra Training
Resources
• Questions
© 2014 Aerohive Networks CONFIDENTIAL
Introductions
3
•What is your name?
•What is your organizations name?
•How long have you worked in Wi-Fi?
•Are you currently using Aerohive?
© 2014 Aerohive Networks CONFIDENTIAL
Facilities Discussion
4
• Course Material
Distribution
• Course Times
• Restrooms
• Break room
• Smoking Area
• Break Schedule
› Morning Break
› Lunch Break
› Afternoon Break
© 2014 Aerohive Networks CONFIDENTIAL
Aerohive Essentials WLAN Configuration
(ACWA) – Course Overview
5
Each student connects to HiveManager, a remote PC, and a Aerohive AP over
the Internet from their wireless enabled laptop in the classroom, and then performs
hands on labs the cover the following topics:
• Predictive modeling and WLAN design
• HiveManager overview
• Mobility solutions and Unified Policy Management
• HiveManager initial configuration
• Topology Maps: Real-time monitoring of AP coverage
• Scenario: Create a secure access network for employees
• Scenario: Create a secure access network for legacy devices using PPSK
• Secure WLAN Guest Management
• Scenario: Create a guest secure WLAN with unique user credentials
• Device specific settings
• Deployment optimization
• Device monitoring and troubleshooting
• Firmware updates
• Bring Your Own Device (BYOD)
• Auto-provisioning
• Cooperative Control Protocols
2 Day Hands on Class
© 2014 Aerohive Networks CONFIDENTIAL
Copyright ©2011
Aerohive Training Remote Lab
6
Aerohive Access Points using external
antenna connections and RF cables to
connect to USB Wi-Fi client cards
(Black cables)
Access Points are connected from eth0 to
Aerohive Managed Switches with 802.1Q
VLAN trunk support providing PoE to the APs
(Yellow cables)
Firewall with routing support, NAT, and
multiple Virtual Router Instances
Access Points are connected from their
console port to a console server
(White Cables)
Console server to permit SSH access into the
serial console of Aerohive Access Points
Server running VMware ESXi running Active
Directory, RADIUS, NPS and hosting the
virtual clients used for testing configurations
to support the labs
© 2014 Aerohive Networks CONFIDENTIAL
Hosted Lab for Data Center
7
10.5.1.*/24
No Gateway
10.5.1.*/24
No Gateway
10.5.1.*/24
No Gateway
HiveManager
MGT 10.5.1.20/24
Win2008 AD Server
MGT 10.5.1.10/24
Linux Server
MGT 10.6.1.150./24
L3 Switch/Router/Firewall
eth0 10.5.1.1/24 VLAN 1
eth0.1 10.5.2.1/24 VLAN 2
eth0.2 10.5.8.1/24 VLAN 8
eth0.3 10.5.10.1/24 VLAN 10
eth1 10.6.1.1/24 (DMZ)
L2 Switch
Native VLAN 1
Aerohive AP Common Settings in
VLAN 1
Default Gateway: None
MGT0 VLAN 1
Native VLAN 1
LAN ports connected to
L2-Switch with 802.1Q
VLAN Trunks
X=2
X=3
X=N
X=2
X=3
X=N
Ethernet: 10.5.1.202/24
No Gateway
Wireless: 10.5.10.X/24
Gateway: 10.5.10.1
Ethernet: 10.5.1.203/24
No Gateway
Wireless: 10.5.10.X/24
Gateway: 10.5.10.1
Ethernet : 10.5.1.20N/24
No Gateway
Wireless: 10.5.10.X/24
Gateway: 10.5.10.1
14 Client PCs
For Wireless Access
14 Aerohive APs
Terminal Server
10.5.1.5/24
Services for Hosted Class
Win2008 AD Server:
- RADIUS(IAS)
- DNS
- DHCP
Linux Server:
- Web Server
- FTP Server
© 2014 Aerohive Networks CONFIDENTIAL
Aerohive CBT Learning
8
http://www.aerohive.com/cbt
© 2014 Aerohive Networks CONFIDENTIAL
Aerohive Education on YouTube
9
http://www.youtube.com/playlist?list=PLqSW15RTj6DtEbdPCGIm0Kigvrscbj-Vz
Learn the basics of Wi-Fi and more….
© 2014 Aerohive Networks CONFIDENTIAL
The 20 Minute Getting Started Video
Explains the Details
10
Please view the Aerohive Getting Started Videos:
http://www.aerohive.com/330000/docs/help/english/cbt/Start.htm
© 2014 Aerohive Networks CONFIDENTIAL
Aerohive Technical Documentation
11
All the latest technical documentation is available for download at:
http://www.aerohive.com/techdocs
© 2014 Aerohive Networks CONFIDENTIAL
Aerohive Instructor Led Training
12
• Aerohive Education Services offers a complete curriculum that provides
you with the courses you will need as a customer or partner to properly
design, deploy, administer, and troubleshoot all Aerohive WLAN solutions.
• Aerohive Certified WLAN Administrator (ACWA) – First-level course
• Aerohive Cerified WLAN Professional (ACWP) – Second-level course
• Aerohive Certified Network Professional (ACNP) – Switching/Routing course
• www.aerohive.com/training – Aerohive Class Schedule
© 2014 Aerohive Networks CONFIDENTIAL
Over 20 books about networking have been written
by Aerohive Employees
13
CWNA Certified Wireless Network Administrator
Official Study Guide by David D. Coleman and David
A. Westcott
CWSP Certified Wireless Security Professional
Official Study Guide by David D. Coleman, David A.
Westcott, Bryan E. Harkins and Shawn M.
Jackman
CWAP Certified Wireless Analysis Professional Official
Study Guide by David D. Coleman, David A. Westcott,
Ben Miller and Peter MacKenzie
802.11 Wireless Networks: The Definitive Guide,
Second Edition by Matthew Gast
802.11n: A Survival Guide by Matthew Gast
Aerohive
Employees
802.11ac: A Survival Guide by Matthew Gast
Over 30 books about networking have
been written by Aerohive Employees
© 2014 Aerohive Networks CONFIDENTIAL
Aerohive Exams and Certifications
14
• Aerohive Certified Wireless Administrator
(ACWA) is a first- level certification that
validates your knowledge and
understanding about Aerohive Network’s
WLAN Cooperative Control Architecture.
(Based upon Instructor Led Course)
• Aerohive Certified Wireless Professional
(ACWP) is the second-level certification
that validates your knowledge and
understanding about Aerohive
advanced configuration and
troubleshooting. (Based upon Instructor
Led Course)
• Aerohive Certified Network Professional
(ACNP) is another second-level
certification that validates your
knowledge about Aerohive switching
and branch routing. (Based upon
Instructor Led Course)
© 2014 Aerohive Networks CONFIDENTIAL
Aerohive Forums
15
• Aerohive’s online community – HiveNation
Have a question, an idea or praise you want to share? Join the HiveNation
Community - a place where customers, evaluators, thought leaders and students
like yourselves can learn about Aerohive and our products while engaging with
like-minded individuals.
• Please, take a moment and register during class if you are not already a
member of HiveNation.
Go to http://community.aerohive.com/aerohive and sign up!
© 2014 Aerohive Networks CONFIDENTIAL
Aerohive Social Media
16
The HiveMind Blog:
http://blogs.aerohive.com
Follow us on Twitter: @Aerohive
Instructor: David Coleman: @mistermultipath
Instructor: Bryan Harkins: @80211University
Instructor: Gregor Vucajnk: @GregorVucajnk
Instructor: Metka Dragos: @MetkaDragos
Please feel free to tweet about #Aerohive training
during class.
© 2014 Aerohive Networks CONFIDENTIAL
Copyright ©2011
Aerohive Technical Support – General
17
I want to talk to somebody live.
Call us at 408-510-6100 / Option 2. We also provide service
toll-free from within the US & Canada by dialing (866) 365-9918.
Aerohive has Support Engineers in the US, China, and the UK,
providing coverage 24 hours a day.
Support Contracts are sold on a yearly basis, with
discounts for multi-year purchases. Customers can
purchase Support in either 8x5 format or in a 24 hour
format.
How do I buy Technical Support?
I have different expiration dates on several Entitlement keys, may
I combine all my support so it all expires on the same date?
Your Aerohive Sales Rep can help you set-up Co-Term, which allows
you to select matching expiration dates for all your support.
© 2014 Aerohive Networks CONFIDENTIAL
Copyright ©2011
Aerohive Technical Support – The
Americas
18
Aerohive Technical Support is available 24 hours a
day. This can be via the Aerohive Support Portal or
by calling. For the Support Portal, an authorized
customer can open a Support Case.
Communication is managed via the portal with
new messages and replies. Once the issue is
resolved, the case is closed, and can be retrieved
at any time in the future.
How do I reach Technical Support?
I want to talk to somebody live.
For those who wish to speak with an engineer call us at 408-
510-6100 / Option 2. We also provide service toll-free from
within the US & Canada by dialing (866) 365-9918.
I need an RMA in The Americas
An RMA is generated via the Support Portal, or by calling our Technical
Support group. After troubleshooting, should the unit require repair, we will
overnight* a replacement to the US and Canada. Other countries are
international. If the unit is DOA, it’s replaced with a brand new item, if not it is
replaced with a like new reburbished item.
*Restrictions may apply: time of day, location, etc.
© 2014 Aerohive Networks CONFIDENTIAL
Copyright ©2011
Aerohive Technical Support – International
19
Aerohive international Partners provide dedicated
Technical Support to their customers. The Partner has
received specialized training on Aerohive Networks’
product line, and has access to 24 hour Internal
Aerohive Technical Support via the Support Portal, or
by calling 408-510-6100 / Option 2.
How Do I get Technical Support outside The Americas?
World customer’s defective
units are quickly replaced by
our Partners, and Aerohive
replaces the Partner’s stock
once it arrives at our location.
Partners are responsible for all
shipping charges, duties, taxes,
etc.
I need an RMA internationally
© 2014 Aerohive Networks CONFIDENTIAL
Copyright Notice
20
Copyright © 2014 Aerohive Networks, Inc. All rights
reserved.
Aerohive Networks, the Aerohive Networks logo,
HiveOS, Aerohive AP, HiveManager, and
GuestManager are trademarks of Aerohive Networks,
Inc. All other trademarks and registered trademarks
are the property of their respective companies.
© 2014 Aerohive Networks CONFIDENTIAL© 2014 Aerohive Networks CONFIDENTIAL
QUESTIONS?
© 2014 Aerohive Networks Inc.
SECTION 1:
PLANNING AND DESIGNING YOUR
NETWORK
22
Aerohive’s
Instructor-led Training
© 2014 Aerohive Networks CONFIDENTIAL
The Relationship between the OSI Model
and Wi-Fi
23
Wi-Fi operates at layers one and two
Wireless LAN’s provide
access to the distribution
systems of wired networks.
This allows the users the
ability to have
connections to wired
network resources.
Session
Application
Network
Transport
Physical
Presentation
Data Link
© 2014 Aerohive Networks CONFIDENTIAL
Where Wi-Fi Fits into the OSI Model –
Physical Layer
24
Layer 1 ( Physical )
The medium through which Data is transferred
802.3 Uses Cables
802.11 RF Medium
Key Term: Medium
© 2014 Aerohive Networks CONFIDENTIAL
Where Wi-Fi Fits into the OSI Model –
Data Link Layer
25
Layer 2 ( Data-Link )
 The MAC sublayer manages access to the physical medium
 The LLC sublayer manages the flow of multiple simultaneous
network protocols over the same network medium
 Devices operating no higher than Layer 2 include: network
interface cards (NICs), Layer-2 Ethernet switches, and wireless
access points
Header
with MAC
addressing
Trailer
with
CRC
3-7 Data
© 2014 Aerohive Networks CONFIDENTIAL
Amendments and Rates
26
DSSS Direct Sequencing Spread Spectrum
FHSS Frequency Hopping Spread Spectrum
OFDM Orthogonal Frequency Division Multiplexing
HT High Throughput
VHT Very High Throughput
SISO Single Input, Single Output
MIMO Multiple Input, Multiple Output
Standard Supported Data
Rates
2.4 GHz 5 GHz RF Technology Radios
802.11 legacy 1, 2 Mbps Yes No FHSS or DSSS SISO
802.11b 1, 2, 5.5 and 11 Mbps Yes No HR-DSSS SISO
802.11a 6 - 54 Mbps No Yes OFDM SISO
802.11g 6 - 54 Mbps Yes Yes OFDM SISO
802.11n 6 - 600 Mbps Yes Yes HT MIMO
802.11ac Up to 3.46 Gbps* No Yes VHT MIMO
*First generation 802.11ac chipsets support up to 1.3 Gbps
© 2014 Aerohive Networks CONFIDENTIAL
Class Scenario
27
• You have been tasked with designing the WLAN for a new
building that has two floors, each 200 feet in length.
• Employees and Guests require high data rate connectivity.
• Your customer plans to implement a voice over WLAN
solution in the future as well.
• This is an office environment although the customer has
already purchased AP350’s for the deployment.
• Many commercial products exist for predictive coverage
planning. For example: AirMagnet, Ekahau and Tamosoft.
• For this deployment the customer is using Aerohive’s Free
planner tool.
© 2014 Aerohive Networks CONFIDENTIAL
Defining the Lab
28
• Information Gathering (Site Survey)
• Types of Environments
• Client device types to be used
• Applications to be used
• Expected Growth vs. Current Needs
• Aerohive Devices to be used
• Mounting Concerns
• Coverage vs. Capacity Planning
• Device Density
• Security Enterprise and Guest use
• Using the Aerohive Planning Tool
• Questions
© 2014 Aerohive Networks CONFIDENTIAL
Every Environment is different
29
• Education
• K-12 Public and Private Schools
• University
• School Facilities
• Campus Housing
• Health Care
• Hospital
• Assisted Living
• Retail
• Stores
• Offices
• Warehousing
• Corporate Offices
• Logistics
• Ground Freight
• Air Freight
• Public Sector
• Emergency Services
• Civic Offices
• Outdoor Use
• Bridges
• Mesh
• Public Access
• Questions
© 2014 Aerohive Networks CONFIDENTIAL
Devices and Applications
30
• Devices
• Laptops
• Wi-Fi Phones
• Wi-Fi Enabled Cell Phones
• Barcode Scanners
• Tablets
• Point of Sale Systems
• BYOD
• Infrastructure
• Access Points
• Switches
• Routers
• Applications
• Internet Only
• Point of Sale Applications
• Medical Applications
• Voice
• Mobile Applications
• Standardized Testing
• Productivity Applications
• Custom Applications
Knowing the Device Types and Applications to be
used will greatly assist you in planning and
deploying successful networking solutions.
© 2014 Aerohive Networks CONFIDENTIAL
Lab: Planning a Wireless Network
1. Connect to the Hosted Training HiveManager
31
• Securely browse to the appropriate HiveManager for class
› TRAINING LAB 1
https://training-hm1.aerohive.com
https://72.20.106.120
› TRAINING LAB 2
https://training-hm2.aerohive.com
https://72.20.106.66
› TRAINING LAB 3
https://training-hm3.aerohive.com
https://209.128.124.220
› TRAINING LAB 4
https://training-hm4.aerohive.com
https://203.214.188.200
› TRAINING LAB 5
https://training-hm5.aerohive.com
https://209.128.124.230
• Supported Browsers:
› Firefox, Internet Explorer, Chrome, Safari
• Class Login Credentials:
› Login: adminX
X = Student ID 2 - 29
› Password: aerohive123
NOTE: In order to access the
HiveManager, someone at your
location needs to enter the
training firewall credentials given
to them by the instructor first.
© 2014 Aerohive Networks CONFIDENTIAL
Lab: Planning a Wireless Network
2. formatting your Plan Building
32
• Click on the Maps Tab
• Expand World in the Navigation Pane
• Expand Planner Maps in the Navigation Pane
• Expand 0X Plan Building (Where 0X is your Student Number)
• Click on Floor 1
© 2014 Aerohive Networks CONFIDENTIAL
Lab: Planning a Wireless Network
3. Formatting your Plan Building
33
• To scale the map, move one red crosshair over the far left of the
building image and the other to the far right of the building
image
• In the Scale Map Section, use the drop down arrow to select feet
• Enter a value of 200 feet and click the Update button
© 2014 Aerohive Networks CONFIDENTIAL
Lab: Planning a Wireless Network
4. Formatting your Plan Building
34
• Click on the Walls tab
• Click the Draw Perimeter button
• Click the upper left corner of your building image to begin tracing the
perimeter of your floor
• Move the cursor + clockwise and click and release on each of the remaining
corners
• When you are back to the first corner, double click to close the perimeter
© 2014 Aerohive Networks CONFIDENTIAL
Lab: Planning a Wireless Network
5. Formatting your Plan Building
35
• Click the drop down arrow next to Wall Type and select any of
the material types you would like to use
• Click the / icon and trace over a few walls
• Click the drop down arrow next to Wall Type again and select
another material type
• Click the / icon and trace over a few different walls
© 2014 Aerohive Networks CONFIDENTIAL
802.11n, 802.11ac and MIMO radios
36
Aerohive AP 141 Aerohive AP 350
3x3:32x2:2 1x1:1
iPhone
3x3:3
Transmit Receive Spatial Streams
1x1:1
iPad
© 2014 Aerohive Networks CONFIDENTIAL
2x2:2 300 Mbps
11n High
Power Radios
1X Gig.E
-40 to 55°C
PoE (802.3at)
N/A
Outdoor
Water Proof (IP
68)
Aerohive AP Platforms
AP170
2X Gig E
/w PoE Failover
3x3:3 450 + 1300 Mbps High Power Radios
Dual Radio 802.11ac/n
Plenum/Plenum
Dust Proof
-20 to 55°C
AP390
Indoor Industrial
Dual Radio
802.11n
AP230
Dual Radio 802.11n
2X Gig.E - 10/100 link
aggregation
-20 to
55°C
0 to 40°C
3x3:3
450 Mbps High Power
Radios
TPM Security Chip
PoE (802.3af + 802.3at) and AC Power
Indoor
Industrial
Indoor
Plenum/D
ust
Plenum Rated
AP121 AP330 AP350
1X Gig.E
2x2:2
300 Mbps High
Power Radios
USB for 3G/4G Modem
AP141
USB for future use
Indoor
2X Gig.E w/ link
aggregation
Plenum Rated
0 to 40°C
USB for future use
AP370*
* Includes 5 GHz Transmit Beamforming and in 2.4 GHz has TurboQAM
© 2014 Aerohive Networks CONFIDENTIAL
Lab: Planning a Wireless Network
6. Formatting your Plan Building
38
• Click the Planned APs tab
• Click the drop down arrow next to AP Type and select the AP350
• Leave the Channel and Power settings as default
• Click the Add AP button
© 2014 Aerohive Networks CONFIDENTIAL
Lab: Planning a Wireless Network
7. Formatting your Plan Building
39
• Examine the predicted coverage provided by a single AP of the
type you selected earlier
• Click and drag the AP to another location and observe the
predicted coverage in the new location
• Click the Remove All APs button
• Click Yes to confirm the removal
© 2014 Aerohive Networks CONFIDENTIAL
dBm and mW conversions
40
Very Strong-
Great -
Weak-
Do not care-
No Signal-
dBm milliwatts
+30 dBm 1000 mW 1 Watt
+20 dBm 100 mW 1/10th of 1 Watt
+10 dBm 10 mW 1/100th of 1 Watt
0 dBm 1 mW 1/1,000th of 1 Watt
–10 dBm .1 mW 1/10th of 1 milliwatt
–20 dBm .01 mW 1/100th of 1 milliwatt
–30 dBm .001 mW 1/1,000th of 1 milliwatt
–40 dBm .0001 mW 1/10,000th of 1 milliwatt
–50 dBm .00001 mW 1/100,000th of 1 milliwatt
–60 dBm .000001 mW 1 millionth of 1 milliwatt
–70 dBm .0000001 mW 1 ten-millionth of 1 milliwatt
–80 dBm .00000001 mW 1 hundred-millionth of 1 milliwatt
–90 dBm .000000001 mW 1 billionth of 1 milliwatt
–95 dBm .0000000002511 mW Noise Floor
Notes Below
© 2014 Aerohive Networks CONFIDENTIAL
11Mbps DSSS
5.5Mbps DSSS
2Mbps DSSS
1Mbps DSSS
Dynamic Rate Switching
41
Lowest Rate
Higher Rate
Higher Rate
Highest Rate
To use higher data rates a
station requires a stronger
signal from the AP.
As stations move they adjust
the data rate used in order to
remain connected (moving
away) or to achieve a better
signal (moving closer).
© 2014 Aerohive Networks CONFIDENTIAL
Interference and
Signal to Noise Ratio
42
• Based on the SNR, the client and AP negotiate a data rate in which to send the packet, so the higher the SNR the
better
• For good performance, the SNR should be greater than 20 dB
• For optimal performance, the SNR should be at least 25 dB
Great Poor
Signal Strength -70dBm -70dBm
- Noise Level - (-95dBm) - (-80dBm)
= SNR = 25dB = 10dB
Notes Below
© 2014 Aerohive Networks CONFIDENTIAL
Planning Coverage for Different Scenarios
43
•-80 dBm Basic Connectivity
•-70 dBm High Speed Connectivity
•-67 dBm Voice
•-62 dBm Location Tracking – RTLS
When planning you should always take into
consideration future uses of Wi-Fi and projected
growth.
© 2014 Aerohive Networks CONFIDENTIAL
Lab: Planning a Wireless Network
8. Formatting your Plan Building
44
• Click the Auto Placement Tab
• Using the drop down arrow next to Application, select Voice
• Ensure that the Signal Strength is set to -67 dBm
• Click the Auto Place APs button
• Observe the coverage patterns and move APs as needed to
create a hole in the coverage if needed
© 2014 Aerohive Networks CONFIDENTIAL
Lab: Planning a Wireless Network
9. Formatting your Plan Building
45
• Click the Planned APs Tab
• Click the Add AP button
• Observe the new planned AP filling in a hole in coverage
© 2014 Aerohive Networks CONFIDENTIAL
Lab: Planning a Wireless Network
10. Formatting your Plan Building
46
• In the Navigation pane, right click on your Floor 1 and
select Clone
• Name your Clone Floor 2
• Click the Create button
© 2014 Aerohive Networks CONFIDENTIAL
Lab: Planning a Wireless Network
Multiple Floors
47
What if there are multiple
floors?
 Not all buildings are
symmetrical.
 If you have multiple
floors you can adjust
the X and Y
coordinates to align
the floors.
 Use an anchor point
such as an elevator
shaft to align the
floors.
© 2014 Aerohive Networks CONFIDENTIAL
Lab: Planning a Wireless Network
11. Formatting your Plan Building
48
• In the Navigation pane, click Floor 2
• Click the Auto Placement Tab
• Click the Auto Place APs button
• Observe the device placement
© 2014 Aerohive Networks CONFIDENTIAL
Lab: Planning a Wireless Network
12. Formatting your Plan Building
49
• In the Navigation
pane, click on 0X
Plan Building (where
0X is your student
number)
• Observe the
placement and
channel selection of
the Planned APs on
both floors
• Remember RF signals
propagate in three
dimensions not just
two. Planning should
take this into account
for AP placement.
© 2014 Aerohive Networks CONFIDENTIAL
Lab: Planning a Wireless Network
13. Formatting your Plan Building
50
• Click Floor 1 and then click on the View Tab
• Uncheck ☐RSSI and check Channels
• Change the Band to 2.4 GHz
• Observe the predicted channel coverage
© 2014 Aerohive Networks CONFIDENTIAL
2.4 GHz Channels
Used for 802.11b/g/n
51
• Channels 1, 6, and 11 are the only non-overlapping channels
between channels 1 and 11
› Using channels that cause overlap may cause CRC and other
wireless interference and errors
• If you are in a country that has channels 1 – 13 or 14 available,
you may still want to use 1, 6, and 11 for compatibility with mobile
users from other countries
© 2014 Aerohive Networks CONFIDENTIAL
Channel Reuse Pattern
52
In this plan only the non-overlapping channels of 1, 6 and 11 are used.
© 2014 Aerohive Networks CONFIDENTIAL
Adjacent Cell Interference
53
Improper designs use overlapping channels in the same physical area.
© 2014 Aerohive Networks CONFIDENTIAL
Co-Channel
Interference/Cooperation
54
Improper design using the same channel on all AP’s in the same physical area.
© 2014 Aerohive Networks CONFIDENTIAL
Lab: Planning a Wireless Network
14. Formatting your Plan Building
55
• Change the Band from 2.4 GHz to 5 GHz
• Observe the predicted channel coverage
© 2014 Aerohive Networks CONFIDENTIAL
5 GHz Channels
Used for 802.11a/n/ac
56
• The 5 GHz spectrum has more non-overlapping channels available.
• Channels increment by 4 starting with channel 36.
• The available 5 GHz channels varies greatly by country and some are enabled
if the AP complies with DFS.
• The 5 GHz UNII-2 and UNII-2 Extended are enabled with DFS compliance.
© 2014 Aerohive Networks CONFIDENTIAL
Channel Reuse Plan-5 GHz
57
8-channel reuse plan using the channels in the UNII-1 and UNII-3
© 2014 Aerohive Networks CONFIDENTIAL
Quick and Easy mounting scheme of the
300 series now on the 121/141
58
ALL AP121/141 and AP330/350 Mountings are identical
All AP121/141 and AP330/350 Power Adaptor are identical
Note: Always use the mounting security screw
© 2014 Aerohive Networks CONFIDENTIAL
New Accessory: Suspend mount kits
59
© 2014 Aerohive Networks CONFIDENTIAL
New Accessory: Plenum mount kit
60
© 2014 Aerohive Networks CONFIDENTIAL
Antenna Patterns and Gain
61
• Aerohive AP 390, 350 &141
external omnidirectional
antennas radiate equally in all
directions, forming a toroidial
(donut-shaped) pattern
• Aerohive AP 370, 330, 121, and
110 internal antennas form a
cardioid (heart-shaped) pattern
• By using a directional antenna,
the power that you see with a
omnidirectional antenna can
redistributed to provide more
radiated power in a certain
direction called gain
In this case, the power is not
increased, instead it is
redistributed to provide more
gain in a certain direction
Aerohive AP350 Aerohive AP330, 121, 110
© 2014 Aerohive Networks CONFIDENTIAL
AP 141 MIMO Antenna Alignment
62
With external omnidirectional antennas, the
positioning of the antennas helps with de-correlation
of spatial streams, which is critical to maintaining high
data rates.
© 2014 Aerohive Networks CONFIDENTIAL
AP 350 MIMO Antenna Alignment
63
With external omnidirectional antennas, the
positioning of the antennas helps with
de-correlation of spatial streams, which is critical
to maintaining high data rates.
© 2014 Aerohive Networks CONFIDENTIAL
Indoor 5 GHz MIMO Patch Antenna
64
• 120 degree beamwidth
• 5 dBi gain
• 3x3 MIMO Patch
• Use with AP-350
• Use with AP-141(middle connector not used
with AP-141)
For High User Density
Deployments indoor Patch
Antennas are recommended for
sectorized coverage. For
example the patch antennas can
be mounted from the ceiling to
provide unidirectional coverage
in an auditorium.
© 2014 Aerohive Networks CONFIDENTIAL
Outdoor 5 GHz MIMO Patch Antenna
65
• 17 degree beamwidth
• 18 dBi gain
• 2x2 MIMO Patch
• Use with AP-170
Outdoor Patch Antennas
are well suited for point to
point connections between
buildings.
© 2014 Aerohive Networks CONFIDENTIAL© 2014 Aerohive Networks CONFIDENTIAL
QUESTIONS?
© 2014 Aerohive Networks Inc.
SECTION 2:
HIVEMANAGER OVERVIEW
67
Aerohive’s
Instructor-led Training
© 2014 Aerohive Networks CONFIDENTIAL
What is HiveManager?
68
We have completed the predictive model and have deployed
and physically mounted the APs. Now we need a way to centrally
manage the WLAN.
We will us Aerohive’s network management server (NMS) called
HiveManager. HiveManager can be used to monitor, configure
and update the WLAN.
• HiveManager can be deployed as a public cloud solution or as a
private cloud solution (on premise).
• The on premise HiveManager is available in different form factors.
• The Aerohive Devices use an IP discovery process to locate on
premise HiveManagers.
• A redirector service is used to guide Aerohive Devices to the
Public Cloud HiveManager.
• HiveManager uses CAPWAP as the protocol to monitor and
manage Aerohive Devices.
© 2014 Aerohive Networks CONFIDENTIAL
Copyright ©2011
HiveManager Form Factors
69
SW Config, & Policy, RF Planning, Reporting, SLA Compliance,
Guest Management, Trouble Shooting, Spectrum Analysis
HiveManager Online
Scalable multi-tenant platform, Redundant data
centers with diversity, Backup & Recovery, Zero
touch device provisioning, Flexible expansion, On
demand upgrades, Pay as you grow
HiveManager On-Premise - VA
VMware ESX & Player, HA redundancy,
5000 APs with minimum configuration
HiveManager On-Premise Appliance
Redundant power & fans, HA redundancy
8000 APs and devices
© 2014 Aerohive Networks CONFIDENTIAL
On-Premise Virtual Appliance
70
• VMWare Server Hardware Requirements
› You can also install VMware Workstation or VMware
Fusion (Mac version) on your computer, and then install
› HiveManager Virtual Appliance.
› Processor: Dual Core 2 GHz or better
› Memory: 3 GB dedicated to HiveManager Virtual
Appliance; at least 1 GB for the computer hosting it
› Disk: 60 GB Dedicated to HiveManager Virtual Appliance
› Support for VMWare tools in version 6.1r3 and higher
• For more information please reference the HiveManager
Virtual Appliance QuickStart Guide.
© 2014 Aerohive Networks CONFIDENTIAL
HiveManager Virtual Appliance Software
71
The HiveManager Virtual Appliance software is
available from two sources:
• USB flash drive delivered to you by Aerohive
› Connect the drive to a USB port on your host or VMware ESXi
server and follow the procedure for "Installing the HiveManager
Virtual Appliance" on page 3 of the HiveManager Virtual
Appliance QuickStart Guide to import the .ova file to your
VMware ESXi server.
• Software download from the Aerohive Support Software
Downloads portal
› Log in to the Aerohive Support Software Downloads portal,
download the HiveManager Virtual Appliance OVA-formatted
file to your local directory, and follow the procedure for
"Installing the HiveManager Virtual Appliance" on page 3 of
the HiveManager Virtual Appliance QuickStart Guide to import
the .ova file to your VMware ESXi hypervisor server.
© 2014 Aerohive Networks CONFIDENTIAL
HiveManager Virtual Appliance Software
72
The .ova (Open Virtual Appliance) formatted files are
available in both 32-bit and 64-bit format and are
ready for import to your VMware EXSi hypervisor
server. In the following example, the HiveManager
release 6.1r3 files available on the Aerohive Support
Software Downloads portal are shown:
• HM-6.1r3-32bit-ESXi—6.1r3 HiveManager 32bit Virtual Appliance
ESXi in Open Virtual Appliance format.
• HM-6.1r3-64bit-ESXi—6.1r3 HiveManager 64bit Virtual Appliance
ESXi in Open Virtual Appliance format.
© 2014 Aerohive Networks CONFIDENTIAL
On-Premise HiveManager Appliance
73
© 2014 Aerohive Networks CONFIDENTIAL
On-Premise HiveManager Databases
74
© 2014 Aerohive Networks CONFIDENTIAL
HiveManager Online (HMOL)
75
• Customers can manage Aerohive Devices from
the Cloud using their HMOL accounts.
• http://myhive.aerohive.com
© 2014 Aerohive Networks CONFIDENTIAL
MyHive – Aerohive AP Redirection Server
76
• MyHive is a secure site
that allows you to log in
once and then
navigate to
HiveManager Online
• The Redirector/Staging
Server is built inside of
your HMOL account
• New HMOL accounts
will also have the ability
for a 30-day free trial of
ID Manager
© 2014 Aerohive Networks CONFIDENTIAL
HiveManager Online (HMOL)
77
• The Super-User administrator for your HMOL account
has the ability to create additional admins with other
access rights
© 2014 Aerohive Networks CONFIDENTIAL
MyHive – Aerohive device Redirector Server
78
• The redirector is used to tie
your devices to your HMOL
account.
• From Monitor All Devices
Device Inventory select
Add
© 2014 Aerohive Networks CONFIDENTIAL
MyHive – Aerohive device Redirector Server
79
• Simply enter in the serial
number of your APs,
routers, switches and
Virtual Appliances.
• Once the serial number
is entered into the
Redirector (Staging
Server) – your devices
will now be permanently
tied to your HMOL
account.
• You can also import a
CSV file with multiple
serial numbers
© 2014 Aerohive Networks CONFIDENTIAL
MyHive – Aerohive AP Redirection Server
80
• Devices that have not yet made a CAPWAP connection
with HMOL will display under the Unmanaged Devices tab.
• Once devices make a CAPWAP connection with HMOL,
they will be displayed under Managed Devices.
© 2014 Aerohive Networks CONFIDENTIAL
HiveManager
Online
Aerohive Device Redirection Services
For HiveManager Online
81
APs and Routers
Aerohive Redirector
at myhive.aerohive.com
Serial numbers are
entered into the
redirector
© 2014 Aerohive Networks CONFIDENTIAL
On-Premise HiveManager Discovery
APs, Routers and Switches Locate HiveManager
Aerohive
Devices
82
• In order for Aerohive devices to
communicate with an on-premise
HiveManager, they must know the on-
premise HiveManager IP address.
• The HiveManager address can be statically
configured or dynamically learned.
• Static CLI configuration:
› capwap client server name “ip address”
› save config
• Dynamic IP discovery:
› DHCP options
› DNS query
› L2 broadcast (Can be disabled)
› Redirector
On-Premise HiveManager
© 2014 Aerohive Networks CONFIDENTIAL
On-Premise HiveManager Discovery
APs and Routers Locate HiveManager
Aerohive
Devices
DHCP/DNS Server
1. DHCP Request
2. DHCP Response
IP, Domain, & DHCP Options returned
Optionally:
Option 225 (HM Name): hm1.yourdomain
Option 226 (HM IP): 2.1.1.10
3. If option 225 was received, then the device performs
a DNS lookup for the HM name received, otherwise
the device performs a DNS lookup for
hivemanager.yourdomain.
If option 226 was received, then the device sends the
CAPWAP traffic to the IP address of HiveManager.
4. DNS Response for IP
hivemanager.yourdomain or
hm1.yourdomain = 2.1.1.10 (for example) 83
© 2014 Aerohive Networks CONFIDENTIAL
On-Premise HiveManager Discovery
APs and Routers Locate HiveManager
5. CAPWAP UDP Port 12222
IP: 2.1.1.10
7. If no DHCP option or DNS option
is returned, or no IP is found
CAPWAP Broadcast UDP 12222
8. If no response
CAPWAP Broadcast TCP 80
HiveManager
2.1.1.10 (example)
May be a:
HiveManager Online,
HiveManager Virtual
Appliance (VA) ,
or a 1U or 2U
appliance.
6. If UDP fails:
CAPWAP TCP Port 80
IP: 2.1.1.10
9. If no responses
CAPWAP UDP Port 12222 to the IP address
of staging.aerohive.com
If no response, try CAPWAP TCP Port 80 to the
IP address of staging.aerohive.com
Aerohive
Devices
© 2014 Aerohive Networks CONFIDENTIAL
Redirector Account for On-Premise HM
Free account is available from Aerohive support
85
• You can go to:
myhive.aerohive.com
• Login with your redirector account
provided by Aerohive
• You can redirect your devices to an
on-premise HiveManager
Ask Aerohive support for the
required separate HiveManager
redirection username account.
© 2014 Aerohive Networks CONFIDENTIAL
Copyright ©2011
Redirector Account for On-Premise HM
Configure Standalone HiveManager
• To add a standalone HiveManager
account, click:
Configure Standalone HM
• Enter a public hostname or IP
address for your HiveManager
• Optionally change the Connection
Protocol to TCP if required
• Click Save
86
© 2014 Aerohive Networks CONFIDENTIAL
Redirector Account for On-Premise HM
Enter Device Serial Numbers
87
• To add your device serial
numbers so they can be
redirected click Device Access
Control List
• Click Enter
• ACL Category: Standalone HM
• Enter Your 14 digit serial
numbers
• Click Save
00112233445566
00112233445567
00112233445568
00112233445569
© 2014 Aerohive Networks CONFIDENTIAL
HiveManager
Online
Aerohive On-Premise HiveManager Discovery
APs, Routers and Switches Locate HiveManager
88
APs and
Routers
Your Private Cloud
or Company
HiveManager
hm1.yourdomain
Aerohive
Redirector
Redirect device to:
hm1.yourdomain
(Require a standalone
redirector account)
12. Connect to HM
returned from redirector:
hm1.yourdomain
13. Finally, if the redirector is
not configured, the complete
discovery process is restarted.
© 2014 Aerohive Networks CONFIDENTIAL
HiveManager DNS “A” Record
Example with Microsoft 2003 DNS
89
On your DNS server, create a DNS Host record with the IP address
of the HiveManager
A host record creates an A record, and can select the option to
automatically create the reverse (PTR) record as well
© 2014 Aerohive Networks CONFIDENTIAL
Management protocols & device updates
90
HiveManager
• Aerohive Device to Aerohive Device
management Traffic (Cooperative
Control Protocols)
› AMRP, DNXP, INXP and ACSP
› Encrypted with the Hive Key
» Cooperative Control discussed later in class
• Aerohive Device to HiveManager
management traffic
› CAPWAP - UDP port 12222 (default) or
TCP ports 80, 443 (HTTP/HTTPS
encapsulation)
› SCP - Port 22
Aerohive
Devices
© 2014 Aerohive Networks CONFIDENTIAL
Aerohive Device Configuration Updates
91
Complete Upload
DRAM
Running Config
Flash
Permanent
Storage
1. Over CAPWAP, HiveManager
tells the Aerohive AP to SCP its
config to its flash
2. Aerohive AP uses SCP to get the
config file from HiveManager and
store in flash
3. The Aerohive AP must be
rebooted to activate the new
configuration
1. Over CAPWAP HiveManager
obtains configuration from
Aerohive AP and compares with
its database
2. Over CAPWAP HiveManager
sends the delta configuration
changes directly to RAM which
are immediately activated, and
the running configuration is then
saved to flash

Delta Upload
DRAM
Running Config
Flash
Permanent
Storage
© 2014 Aerohive Networks CONFIDENTIAL
Cooperative Control Protocols
In-depth information located in section 16
92
Hive – Cooperative control for a group of Hive Devices that
share the same Hive name and Hive password.
› There is no limit to the number of Hive Devices that can
exist in a single Hive
› Aerohive APs in a Hive cooperate with each other using
Aerohive’s cooperative control protocols:
»AMRP (Aerohive Mobility Routing Protocol)
–Layer 2 and Layer 3 Roaming, Load Balancing, Band Steering, Layer
2 GRE Tunnel Authentication and Keepalives
»DNXP (Dynamic Network Extensions Protocol)
–Dynamic GRE tunnels to support layer 3 roaming
»INXP (Identity-Based Network Extensions Protocol)
–GRE tunnels for guest tunnels
»ACSP (Automatic Channel Selection & Power) Protocol
–Radio Channel and Power Management
© 2014 Aerohive Networks CONFIDENTIAL
Lab: HiveManager Menu navigation
1. Connect to the Hosted Training HiveManager
93
• Securely browse to the appropriate HiveManager for class
› TRAINING LAB 1
https://training-hm1.aerohive.com
https://72.20.106.120
› TRAINING LAB 2
https://training-hm2.aerohive.com
https://72.20.106.66
› TRAINING LAB 3
https://training-hm3.aerohive.com
https://209.128.124.220
› TRAINING LAB 4
https://training-hm4.aerohive.com
https://203.214.188.200
› TRAINING LAB 5
https://training-hm5.aerohive.com
https://209.128.124.230
• Supported Browsers:
› Firefox, Internet Explorer, Chrome, Safari
• Class Login Credentials:
› Login: adminX
X = Student ID 2 - 29
› Password: aerohive123
NOTE: In order to access the
HiveManager, someone at your
location needs to enter the
training firewall credentials given
to them by the instructor first.
© 2014 Aerohive Networks CONFIDENTIAL
Lab: HiveManager Menu Navigation
2. Dashboard
94
• The HiveManager dashboard provides detailed visibility into
wired and wireless network activity.
• From the dashboard, you can view comprehensive information
by application, user, client device and operating system, and a
wide variety of other options.
© 2014 Aerohive Networks CONFIDENTIAL
Lab: HiveManager Menu Navigation
3. Home
95
The Home section of the GUI is where you configure a number of
fundamental HiveManager settings, such as the following:
• Express and Enterprise modes
• VHM (virtual HiveManager) settings HiveManager administrator
accounts
• Settings for HiveManager time and network (including HA), admin
access and session timeout, HTTPS, SSH/SCP, Aerohive product
improvement program participation, and routing
• CAPWAP and e-mail notification settings, SNMP and TFTP services,
and HiveManager administrator authentication options
• Click on
the Home
Tab
© 2014 Aerohive Networks CONFIDENTIAL
Lab: HiveManager Menu Navigation
4. Monitor
96
• From the Monitor menu, you can view commonly needed information and link
to more detailed information about all the Aerohive devices that have
contacted HiveManager.
• With an On-Premise HiveManager, those listed in the Unconfigured Devices
section are not under HiveManager management and those in the
Configured Devices are being managed by HiveManager.
• When using HiveManager Online (HMOL) devices appear as Managed
Devices or Unmanaged Devices to illustrate if devices are being managed by
HiveManager or not.
• Click on
the
Monitor
Tab
© 2014 Aerohive Networks CONFIDENTIAL
Lab: HiveManager Menu Navigation
5. Reports
97
• Detailed reports can be created and customized
using the information the Aerohive Devices deliver to
HiveManager.
• Reports are covered in greater detail later in the class.
• Click on
the
Reports
Tab
© 2014 Aerohive Networks CONFIDENTIAL
Lab: HiveManager Menu Navigation
6. Maps
98
• Use the tools in the Maps section to plan network deployments, and
or to track and monitor the operational status of managed devices.
• Maps can be used in pre-deployment for predictive modeling.
• Maps can be used in post-deployment for coverage visualization,
troubleshooting, and client and rogue location tracking.
• Click on
the Maps
Tab
© 2014 Aerohive Networks CONFIDENTIAL
Lab: HiveManager Menu Navigation
7. Configuration
99
• The Configuration Tab allows you access to the Guided
Configuration.
• Here you build your Network Policies, and Configure and
Update Devices.
• Click on the
Configuration
Tab
© 2014 Aerohive Networks CONFIDENTIAL
Lab: HiveManager Menu Navigation
8. Configuration
100
• The Tools Tab allows you access additional testing and monitoring
abilities.
• Here you can access such things as:
› The Planning Tool
› The Client Monitor
› The VLAN Probe
› The Device/Client Simulator
› The Server Access Tests
• Click on the
Tools Tab
© 2014 Aerohive Networks CONFIDENTIAL© 2014 Aerohive Networks CONFIDENTIAL
QUESTIONS?
© 2014 Aerohive Networks Inc.
SECTION 3.
MOBILITY SOLUTIONS AND UNIFIED
POLICY MANAGEMENT
102
Aerohive’s
Instructor-led Training
© 2014 Aerohive Networks CONFIDENTIAL
2x2:2 300 Mbps
11n High
Power Radios
1X Gig.E
-40 to 55°C
PoE (802.3at)
N/A
Outdoor
Water Proof (IP
68)
Aerohive AP Platforms
AP170
2X Gig E
/w PoE Failover
3x3:3 450 + 1300 Mbps High Power Radios
Dual Radio 802.11ac/n
Plenum/Plenum
Dust Proof
-20 to 55°C
AP390
Indoor Industrial
Dual Radio
802.11n
AP230
Dual Radio 802.11n
2X Gig.E - 10/100 link
aggregation
-20 to
55°C
0 to 40°C
3x3:3
450 Mbps High Power
Radios
TPM Security Chip
PoE (802.3af + 802.3at) and AC Power
Indoor
Industrial
Indoor
Plenum/D
ust
Plenum Rated
AP121 AP330 AP350
1X Gig.E
2x2:2
300 Mbps High
Power Radios
USB for 3G/4G Modem
AP141
USB for future use
Indoor
2X Gig.E w/ link
aggregation
Plenum Rated
0 to 40°C
USB for future use
AP370*
* Includes 5 GHz Transmit Beamforming and in 2.4 GHz has TurboQAM
© 2014 Aerohive Networks CONFIDENTIAL© 2014 Aerohive Networks CONFIDENTIAL
Aerohive AP 230
Performance, Functionality & Economy
104
• Performance
› Dual radio 802.11ac 3x3:3 - three spatial stream
» Radio 1 (802.11n + Turbo-QAM)
– 2.4GHz 802.11b/g/n: 3x3:3
» Radio 2 (802.11ac)
– 5GHz 802.11a/n/ac: 3x3:3 with TxBF
» 256-QAM, Supports up to 80 MHz channel for 5 GHz
• Functionality
› Application Visibility AND Control at Gigabit speeds
› 2x Gig Ethernet ports with link aggregation
› HiveOS enterprise feature set
• Economy
› 3 Stream .11ac at ~ price of 2 stream .11n
› Full Wi-Fi functionality with existing PoE infrastructure
› Full .11n legacy support – with improvements in mixed environments
© 2014 Aerohive Networks CONFIDENTIAL
Copyright ©2011
Aerohive Routing Platforms
105
BR 100 BR 200 AP 330 AP 350
Single Radio Dual Radio
2X 10/100/1000 Ethernet
5-10 Mbps
FW/VPN
30-50Mbps FW/VPN
1x1 11bgn 3x3:3 450 Mbps 11abgn
5X 10/100
5X
10/100/1000
0 PoE PSE0 PoE PSE 2X PoE PSE
*
* Also available as a non-Wi-Fi device
L3 IPSec
VPN
Gateway
~500 Mbps
VPN
4000/1024
Tunnels
Physical/Vi
rtual
VPN Gateways
© 2014 Aerohive Networks CONFIDENTIAL
BR100 vs. BR200
106
BR100 BR200/BR200WP
5x FastEthernet 5x Gigabit Ethernet
1x1 11bgn (2.4Ghz) single radio 3x3:3 11abgn dual-band single radio (WP)
No integrated PoE PoE (in WP model)
No console port Console Port
No Spectrum Analysis Integrated Spectrum Analysis (WP)
No Wireless Intrusion Detection Full Aerohive WIPS (WP)
No local RADIUS or AD integration Full Aerohive RADIUS, proxy, and AD
No SNMP logging SNMP Support
© 2014 Aerohive Networks CONFIDENTIAL
Aerohive Switching Platforms
107
SR2124P SR2148P
24 Gigabit Ethernet 48 Gbps Ethernet
4 Ports 1G SFP Uplinks 4 Ports 10 G SFP/SFP+ Uplinks
24 PoE+ (408 W)
128 Gbps switch56Gbps switching 176 Gbps switch
48 PoE+ (779 W)
Routing with 3G/4G USB support and Line rate
switching
Redundant Power Supply CapableSingle Power Supply
24 PoE+ (195 W)
SR2024P
Switching Only
© 2014 Aerohive Networks CONFIDENTIAL
VPN Gateway Virtual Appliance
108
• Supports the following
› GRE Tunnel Gateway
› L2 IPSec VPN Gateway
› L3 IPSec VPN Gateway
› RADIUS Authentication Server
› RADIUS Relay Agent
› Bonjour Gateway
› DHCP server
• Use a VPN Gateway Virtual Appliance instead of an AP when higher
scalability for these features are required
Function Scale
VPN Tunnels 1024 Tunnels
RADIUS – Local users per VPN Gateway 9999
# Users Cache (RADIUS Server) 1024
# Simultaneous (RADIUS Server)
authentications
256
© 2014 Aerohive Networks CONFIDENTIAL
VPN Gateway Physical Appliance
109
• Supports the following
› GRE Tunnel Gateway
› L2 IPSec VPN Gateway
› L3 IPSec VPN Gateway
› RADIUS Authentication Server
› RADIUS Relay Agent
› Bonjour Gateway
› DHCP server
• Use a VPN Gateway Appliance instead of an AP when higher scalability
for these features are required
Function Scale
VPN Tunnels 4000 Tunnels
RADIUS – Local users per VPN Gateway 9999
# Users Cache (RADIUS Server) 1024
# Simultaneous (RADIUS Server)
authentications
256
Ports: One 10/100/1000 WAN port
Four LAN ports two support PoE
© 2014 Aerohive Networks CONFIDENTIAL
Aerohive Devices
are assigned to
Network Policy:
Corp1
Note: A Aerohive
Devices configured
with the same
Network Policy will
be in the same
Hive, and can use
cooperative control
protocols for mesh,
dynamic RF, layer
2/3 fast secure
roaming, VPN
failover, etc..
Network Policy = Configuration
Hive = Cooperative Control Protocols
110
Network Policy
Corp1
SSID
Voice
SSID
Employee
SSID
Guest
User
Profile
IT
Staff(9)
User
Profile
Staff(10)
User
Profile
Guests(8)
User
Profile
Voice(2)
Hive - Corp
WIPS
L2 IPsec VPN
Location Services
Access Console
VLAN
QoS
Firewall
L3 Roaming
VLAN
L3 Roaming
OS/Domain
SLA
VLAN
L3 Roaming
OS/Domain
SLA
VLAN
QoS Rate Limit
Firewall
Guest Tunnel
Schedule
OS/Domain
© 2014 Aerohive Networks CONFIDENTIAL
Network Policy
Guided Configuration
111
Network
Configuration
• There are three
main panels, you
can click on a
panel header to
go to the panel
• Clicking on the
Configure &
Update Devices
panel saves the
configuration, as
does Save, or
Continue
1. Configure
Network Policy
2. Configure
Interface &
User Access
3. Configure &
Update
Devices
© 2014 Aerohive Networks CONFIDENTIAL
Setting Up a Wireless Network
Building your Initial Unified Network Policy
112
• Click on
Configuration
• Under Choose
Network
Policy Click
New
© 2014 Aerohive Networks CONFIDENTIAL
Setting Up a Wireless Network
Building your Initial Unified Network Policy
113
• Network
Policies are
used to assign
the same
basic
configurations
to multiple
devices.
• One Network
Policy can
configure all
device types.
© 2014 Aerohive Networks CONFIDENTIAL
Network Policy Types
114
• Wireless Access – Use when you have an AP only
deployment, or you require specific wireless policies
for APs in a mixed AP and router deployment
• Branch Routing– Use when you are managing routers,
or APs behind routers that do not require different
Network Policies than the router they connect through
BR100
BR200 AP
AP
Internet
Internet
Small Branch Office
or Teleworker Site Small to Medium Size Branch Office
that may have APs behind the router
© 2014 Aerohive Networks CONFIDENTIAL
• Bonjour Gateway
› Allows Bonjour services to be seen in multiple subnets
• Switching
› Used to manage wired traffic using Aerohive Switches
Network Policy Types
115
Internet
AP
AP
PoE
SR2024
AP
© 2014 Aerohive Networks CONFIDENTIAL
Unified Policy Management (Instructor Demo)
116
• Students and Instructor should open and view and discuss the
Network Policy called Wireless-Access-Demo.
• Students and Instructor should open and view and discuss the
Network Policy called Wireless-Routing-Demo.
• Students and Instructor should open and view and discuss the
Network Policy called Wireless-Switching-Demo.
© 2014 Aerohive Networks CONFIDENTIAL© 2014 Aerohive Networks CONFIDENTIAL
QUESTIONS?
© 2014 Aerohive Networks Inc.
SECTION 4.
HIVEMANAGER WELCOME AND
INITIAL CONFIGURATION
118
Aerohive’s
Instructor-led Training
© 2014 Aerohive Networks CONFIDENTIAL
Scenario: First Login and Test Configuration
119
Upon initial login, there is a set of Welcome
screens for the Super-User Administrator.
If you are new to HiveManager it is
recommended to create a Test Network Policy
within HiveManager. Then upload the network
policy to some Aerohive Devices in a staging
area for testing purposes.
© 2014 Aerohive Networks CONFIDENTIAL
Informational
HiveManager Welcome Page
-Only Seen at First Login-
120
Verify your Aerohive Device Inventory and the click
Next
© 2014 Aerohive Networks CONFIDENTIAL
Informational
HiveManager Welcome Page
-Only Seen at First Login-
121
Welcome Page
Settings...
• New HiveManager
Password: <password
for HiveManager and
Aerohive APs>
• Administrative Mode:
 Enterprise Mode
• Time Zone:
<Your time zone>
• Click FinishNote: Express mode is a legacy simplified
configuration option. Enterprise mode is
more robust and is recommended.
© 2014 Aerohive Networks CONFIDENTIAL
Informational
HiveManager Welcome Page
-Only Seen at First Login-
122
NOTE: Setting the HiveManager Password Here sets the default
Aerohive AP Access Console SSID Key and the CLI admin password.
You can change some of these settings individually by going to
HomeDevice Management Settings
© 2014 Aerohive Networks CONFIDENTIAL
Informational
HiveManager Initial Configuration
123
 Device CLI passwords can be
globally set from Home/Device
Management Settings
 Individual managed device
passwords can be set from
Monitor/ Modify
It is recommended that Aerohive Devices
have a unique admin password for CLI
login.
© 2014 Aerohive Networks CONFIDENTIAL
Copyright ©2011
Informational
HiveManager Initial Configuration
• At first login, the
administrator is prompted
to fill out settings for
Username, the
administrator password
for HiveManager, and a
Quick start SSID password
• HiveManager uses the Username as the
name for automatically generated
Quick Start objects such as the DNS
service, NTP service, QoS Classification
profile, LLDP profile, ALG profile, etc.. that
will work in most cases without need for
modification. You can create your own
objects, or use the quick start ones.
124
© 2014 Aerohive Networks CONFIDENTIAL
Copyright ©2011
Informational
HiveManager Initial Configuration
• For example,
› a DNS service
object with the
name “Class” is
automatically
generated
› an NTP service
object with the
name “Class” is
automatically
generated
• These objects are
used when
configuring WLAN
and routing settings
125
© 2014 Aerohive Networks CONFIDENTIAL
Informational
HiveManager Initial Configuration
126
Note: Quick Start Objects are automatically created in
every new Network Policy.
The Object names will be based upon the name from
the initial welcome screen.
© 2014 Aerohive Networks CONFIDENTIAL
Informational
HiveManager Initial Configuration
127
The IP addresses for the QuickStart DNS object are
Public DNS servers.
It is recommended that you edit the QuickStart DNS object to use DNS
server IP addresses that are relevant to your deployment. Do this BEFORE
you configure the rest of your Network Policy.
© 2014 Aerohive Networks CONFIDENTIAL
Informational
HiveManager Initial Configuration
128
The public Aerohive NTP server is used to set the clocks
of your Aerohive Devices. You can edit this object to
use a different NTP server.
Mandatory: You must change the time zone to match the time zone
where your Aerohive Devices reside. Do this BEFORE you configure the
rest of your Network Policy.
© 2014 Aerohive Networks CONFIDENTIAL
Lab: Creating a Test Network Policy
1. Connect to the Hosted Training HiveManager
129
• Securely browse to the appropriate HiveManager for class
› TRAINING LAB 1
https://training-hm1.aerohive.com
https://72.20.106.120
› TRAINING LAB 2
https://training-hm2.aerohive.com
https://72.20.106.66
› TRAINING LAB 3
https://training-hm3.aerohive.com
https://209.128.124.220
› TRAINING LAB 4
https://training-hm4.aerohive.com
https://203.214.188.200
› TRAINING LAB 5
https://training-hm5.aerohive.com
https://209.128.124.230
• Supported Browsers:
› Firefox, Internet Explorer, Chrome, Safari
• Class Login Credentials:
› Login: adminX
X = Student ID 2 - 29
› Password: aerohive123
NOTE: In order to access the
HiveManager, someone at your
location needs to enter the
training firewall credentials given
to them by the instructor first.
© 2014 Aerohive Networks CONFIDENTIAL
Aerohive Devices
are assigned to
Network Policy:
Corp1
Note: A Aerohive
Devices configured
with the same
Network Policy will
be in the same
Hive, and can use
cooperative control
protocols for mesh,
dynamic RF, layer
2/3 fast secure
roaming, VPN
failover, etc..
Network Policy = Configuration
Hive = Cooperative Control Protocols
130
Network Policy
Corp1
SSID
Voice
SSID
Employee
SSID
Guest
User
Profile
IT
Staff(9)
User
Profile
Staff(10)
User
Profile
Guests(8)
User
Profile
Voice(2)
Hive - Corp
WIPS
L2 IPsec VPN
Location Services
Access Console
VLAN
QoS
Firewall
L3 Roaming
VLAN
L3 Roaming
OS/Domain
SLA
VLAN
L3 Roaming
OS/Domain
SLA
VLAN
QoS Rate Limit
Firewall
Guest Tunnel
Schedule
OS/Domain
© 2014 Aerohive Networks CONFIDENTIAL
Lab: Creating a Test Network Policy
2. Configuring a Test Network Policy
131
• Go to
Configuration
• Click the New
Button
© 2014 Aerohive Networks CONFIDENTIAL
Lab: Creating a Test Network Policy
3. Configuring a Test Network Policy
132
• Name:
Test-X
• Select:
Wireless
Access and
Bonjour
Gateway
• Click Create
Only the Wireless Access and Bonjour Gateway Profiles are
used in this class. Switching and Branch Routing are covered
in another course. For information about that class visit:
http://aerohive.com/support/technical-training/training-
schedule for dates and registration.
© 2014 Aerohive Networks CONFIDENTIAL
Lab: Creating a Test Network Policy
4. Configuring a Test Network Policy
133
Network
Configuration
• Next to SSIDs click
Choose
• Then click New
© 2014 Aerohive Networks CONFIDENTIAL
Lab: Creating a Test Network Policy
5. Create an SSID Profile
134
• SSID Profile: Corp-PSK-X
X = 2 – 29 (Student ID)
• SSID: Corp-PSK-X
• Select WPA/WPA2 PSK
(Personal)
• Key Value: aerohive123
• Confirm Value: aerohive123
• Click Save
• Click OK
IMPORTANT: For the SSID labs, please follow the
class naming convention.
© 2014 Aerohive Networks CONFIDENTIAL
Lab: Creating a Test Network Policy
6. Create a User Profile
135
• To the right of
your SSID, under
User Profile, click
Add/Remove
• In Choose User
Profiles Click New
© 2014 Aerohive Networks CONFIDENTIAL
Lab: Creating a Test Network Policy
7. Create a User Profile
136
• Name: Staff-X
• Attribute Number: 1
• Default VLAN: 1
• Click Save
The attribute value and VLAN value do not
need to match.
However, it is recommended that the
attribute values and VLAN values match
each other when ever possible for clarity
and uniform configuration.
© 2014 Aerohive Networks CONFIDENTIAL
Lab: Creating a Test Network Policy
8. Save the User Profile
137
•Ensure Staff-X
User Profile is
highlighted
•Click Save
© 2014 Aerohive Networks CONFIDENTIAL
Lab: Creating a Test Network Policy
9. Save the Network Policy
138
• Click the
Configure &
Update Devices
bar or click the
Continue button
Note: The Save button saves
your Network Policy. The
Continue Button saves your
Network Policy and allows
you to proceed to the
Configure and Update
Devices area
simultaneously.
© 2014 Aerohive Networks CONFIDENTIAL
Lab: Creating a Test Network Policy
10. Create a Display Filter
139
From the Configure & Update Devices section, click the +
next to Filter to create a device display filter.
© 2014 Aerohive Networks CONFIDENTIAL
Lab: Creating a Test Network Policy
11. Create a Display Filter
140
• Device Model:
AP350
• Host Name: 0X-
• Remember This
Filter: 0X-APs
• Click Search
• Five APs will
display
© 2014 Aerohive Networks CONFIDENTIAL
Lab: Creating a Test Network Policy
12. Upload the Network Policy
141
• Select your 0X-A-xxxxxx access point and
all of your 0X-SIMU-xxxxxxx access points
• Click the Update button
• Click Update Devices to push your
Network Policy to your access points
• Click Yes in the Confirm window
© 2014 Aerohive Networks CONFIDENTIAL
Lab: Creating a Test Network Policy
13. Upload the Network Policy
142
• Click the Update Button
• Click OK in the Reboot Warning window
© 2014 Aerohive Networks CONFIDENTIAL
Copyright ©2011
Lab: Creating a Test Network Policy
14. Upload the Network Policy
Once the Update
is pushed, you will
see the Update
Status and the
devices
rebooting.
When the devices
have rebooted and
start reporting to
HiveManager, you
will see their new up
time and that the
configuration on the
devices matches
the expected
configuration in
HiveManager.
143
© 2014 Aerohive Networks CONFIDENTIAL
Overview of Update Settings
144
• Complete Upload: The entire Aerohive AP
configuration is uploaded and a reboot is
required
• Delta Upload: Only configuration changes
are uploaded and no reboot is required
• The default is “Auto”- HiveManager is smart
enough to know if the upload is Complete
or Delta
• The first upload is always a Complete
Upload
Should a Delta upload ever fail, best practice is to select a Complete
upload and force a reboot. Also, a Complete Update is recommended
when the configuration involves advanced security settings such as
RADIUS.
© 2014 Aerohive Networks CONFIDENTIAL
Overview of Update Settings
145
The Auto option, which is set by default, performs a complete initial upload,
requiring the device to reboot before activating the uploaded configuration.
Following that, all subsequent uploads consist of delta configurations based on
a comparison with the current configuration running on the device.
Should a Delta upload ever fail, best practice is to select a Complete
upload and force a reboot. Also, a Complete Update is recommended
when the configuration involves advanced security settings such as
RADIUS.
© 2014 Aerohive Networks CONFIDENTIAL
Because the filter is set by default to Current Policy/Default Policies,
you will only see devices assigned to your selected network policy, or
the def-policy-template (assigned to new devices)
Lab: Creating a Test Network Policy
15. Review of Device Display Filters
146
Filter set by
default to
Current
Policy/Default
Policies
Selected
Network Policy
Select None if
you want to
see all devices
© 2014 Aerohive Networks CONFIDENTIAL
Lab: Creating a Test Network Policy
16. Verify the Update Results
147
• From ConfigurationDevicesDevice Update
Results
• Review your update results
• Hover your cursor above the Description
• Review the pop-up window results
Always review Device
Update Results. The pop-up
window often has good
troubleshooting information
should an update fail.
© 2014 Aerohive Networks CONFIDENTIAL
Lab: Creating a Test Network Policy
17. Verify the Update Results
148
HiveManager pushes firmware and configuration updates in
stages: first to all online devices, and then automatically to any
offline devices the next time they connect to HiveManager.
• If any devices are offline, the update results will display as
Staged
• Once the devices re-establish CAPWAP connectivity,
HiveManager will then re-attempt to upload the configuration
until successful
© 2014 Aerohive Networks CONFIDENTIAL
• Go to MonitorDevicesAll Devices for more
detailed information
Lab: Creating a Test Network Policy
18. Device Monitor View
Set items
per page
Change column
settings
Turn off auto refresh if you
want to make changes
without interruption
If Audit is Red
Exclamation Point, click
it to see the difference
between HiveManager
and the device.
149
© 2014 Aerohive Networks CONFIDENTIAL
Lab: Creating a Test Network Policy
19. Customize the Monitor View Columns
150
• Click on the Edit Table Icon
• From Available Columns on the left select both MGT Interface
VLAN and Native VLAN and move them to the Selected Columns
on the right using the corresponding arrow button.
• Move both new options up until they are directly under IP
Address
• Click Save
Note:
Both the
Instructor and
Students MUST
perform this
exercise.
© 2014 Aerohive Networks CONFIDENTIAL
Lab: Creating a Test Network Policy
20. Audit Icon
151
• Unconfigured Devices
are Aerohive APs,
Routers and other
Aerohive devices that
have discovered
HiveManager for the
first time.
• IP connectivity and
CAPWAP connectivity
are needed for
discovery.
Once Aerohive
Devices have a
configuration
uploaded they
become Configured
Devices.
The configuration on
HiveManager does
NOT match the
configuration on the
Aerohive Device
The configuration
on HiveManager
MATCHES the
configuration on
the Aerohive
Device
© 2014 Aerohive Networks CONFIDENTIAL
Lab: Test Hosted Client Access to SSID
Test SSID Access at Hosted Site
152
SSID:
Authentication:
Encryption:
Preshared Key:
User Profile 1:
Attribute:
VLAN:
IP Firewall:
QoS:
Corp-PSK-X
WPA or WPA2 Personal
TKIP or AES
aerohive123
Staff-X
1
1
None
def-user-qos
Hosted PC
Student-X VLANs 1-20
Mgt0 IP: 10.5.1.N/24 VLAN 1
Network Policy: Test-X
Internal Network
AD Server:
10.5.1.10
DHCP Settings:
(VLAN 1)
network 10.5.1.0/24
10.5.1.140 – 10.5.1.240
Internet
Connect to SSID:
IP:
Gateway:
Corp-PSK-X
10.5.1.N/24
10.5.1.1
Use VNC client to access Hosted PC:
password: aerohive123
© 2014 Aerohive Networks CONFIDENTIAL
Lab: Test Hosted Client Access to SSID
1. For Windows: Use TightVNC client
153
• If you are using a windows PC
› Use TightVNC
› TightVNC has good compression so
please use this for class instead of
any other application
• Start TightVNC
› For Lab 1
› lab1-pcX.aerohive.com
› For Lab 2
› lab2-pcX.aerohive.com
› For Lab 3
lab3-pcX.aerohive.com
› For Lab 4
lab4-pcX.aerohive.com
› For Lab 5
lab5-pcX.aerohive.com
› Select  Low-bandwidth
connection
› Click Connect
› Password: aerohive123123
› Click OK
© 2014 Aerohive Networks CONFIDENTIAL
Lab: Test Hosted Client Access to SSID
2. For Mac: Use the Real VNC client
154
• If you are using a Mac
› RealVNC has good compression
so please use this for class
instead of any other application
• Start RealVNC
› For Lab 1
› lab1-pcX.aerohive.com
› For Lab 2
› lab2-pcX.aerohive.com
› For Lab 3
lab3-pcX.aerohive.com
› For Lab 4
lab4-pcX.aerohive.com
› For Lab 5
lab5-pcX.aerohive.com
› Click Connect
› Password: aerohive123.
› Click OK
© 2014 Aerohive Networks CONFIDENTIAL
Lab: Test Hosted Client Access to SSID
3. Connect to Your Class-PSK-X SSID
155
• Single-click the
wireless icon on
the bottom right
corner of the
windows task bar
• Click your SSID
Corp-PSK-X
• Click Connect
› Security Key:
aerohive123
› Click OK
© 2014 Aerohive Networks CONFIDENTIAL
Lab: Test Hosted Client Access to SSID
4. View Active Clients List
156
• After associating with your SSID, you should see your
connection in the active clients list in HiveManager
› Go to MonitorClientsWireless Clients
• Your IP address should be from the 10.5.1.0/24
network
© 2014 Aerohive Networks CONFIDENTIAL© 2014 Aerohive Networks CONFIDENTIAL
QUESTIONS?
© 2014 Aerohive Networks Inc.
SECTION 5.
CONFIGURING ACCESS POINTS FOR
MAPS AND MONITORING
158
Aerohive’s
Instructor-led Training
© 2014 Aerohive Networks CONFIDENTIAL
Design Implementation
159
Now that the initial planning
and testing phases are
completed, you are ready
to begin creating the
framework for your live
deployment.
To accomplish the remaining goals you will:
Clone your predictive model maps you created
earlier
Add your APs to Floor 1 of your cloned maps
Position the APs as required for the needed
coverage
© 2014 Aerohive Networks CONFIDENTIAL
LAB: Design Implementation
1. Clone of the Plan Building
160
• Click on the Maps Tab
• Expand Planner Maps and right click on your 0X Plan
Building
• Select Clone
© 2014 Aerohive Networks CONFIDENTIAL
LAB: Design Implementation
2. Clone of the Plan Building
161
• Name your cloned building 0X Building
• Click the drop down arrow and select the Locations folder
• Click Create
© 2014 Aerohive Networks CONFIDENTIAL
LAB: Design Implementation
3. Planning the Production Network
162
• Expand the Locations folder
• Expand your 0X Building
• Select Floor 1
• Click the Devices Tab
© 2014 Aerohive Networks CONFIDENTIAL
LAB: Design Implementation
4. Adding your APs to the map
163
• Select all of your 0X APs
• Click the arrow to move them to the Devices on Floor 1
section
• Click Update to place your devices on your 0X Building Floor 1
map
© 2014 Aerohive Networks CONFIDENTIAL
LAB: Design Implementation
5. Placing your APs
164
• ☐ Uncheck the Ethernet and Mesh check boxes
• ☐ Uncheck the Nodes Locked check box
• Position the APs on your map as planned in the predictive model
•  Check the Nodes Locked check box
© 2014 Aerohive Networks CONFIDENTIAL
Design Implementation
165
Once the APs are located properly you can use you map for post
deployment validation processes such as:
 RSSI values
 Interference source locationing
 Channel verification
 Display of Ethernet and Mesh connections
© 2014 Aerohive Networks CONFIDENTIAL
Topology Maps
With RSSI and Power (Heatmap)
166
• Both 5 GHz or 2.4 GHz
Bands can be view
separately
• Ethernet and Mesh
Connections can be
displayed
• RSSI values can be used
to display coverage
• The coverage areas
range from red being
the strongest to dark
blue being the weakest
coverageThe blue lines show the
perimeter for an AP that a
client within its boundaries
should connect.
Select the Band
5 GHz or 2.4 GHz
Select the
coverage you
want to view
Here you can see
the subnet the
MGT0 interface
on the Aerohive
APs
© 2014 Aerohive Networks CONFIDENTIAL
Topology Maps
With Rogue AP Detection and Client Location
167
• If three or more
Aerohive APs on a
map detect a
rogue,
HiveManager can
estimate the
location of the
rogue on the
topology map
• Also, if the
Aerohive AP
location service is
enabled, you can
view clients as well
Friendly AP
Rogue AP
Client
© 2014 Aerohive Networks CONFIDENTIAL© 2014 Aerohive Networks CONFIDENTIAL
QUESTIONS?
© 2014 Aerohive Networks CONFIDENTIAL
Classroom LAB Scenario
169
• We'll start with the types of users we have in the network. We have
different types of employees, and different types of guests.
• Employees should have secure access to the wireless network, and
the most secure method is 802.1X/EAP
• We can create 1 SSID for all Employee access, but have different
access policies depending on the type of employee.
• For devices that do not support 802.1X, or require fast roaming and
do not support 802.11r or OKC, then you should consider Private PSK
for that
• For guests, there is the legacy open SSID method, that we don't feel
it does provide security for guests, and leave them extremely
vulnerable. So instead we should provide a Private PSK infrastructure
and a captive web portal for use policy acceptance. We can also
provide a way for self registration, employee sponsorship, etc…
• We will need to consider the best practice AP settings to meet our
network design goals. After which we will need to show how to
maintain and monitor a network.
© 2014 Aerohive Networks Inc.
SECTION 6:
CREATING THE EMPLOYEE SECURE
ACCESS NETWORK
170
Aerohive’s
Instructor-led Training
© 2014 Aerohive Networks CONFIDENTIAL
Classroom Employee WLAN
Scenario
171
• Employees should have secure access to the
wireless network, and the most secure method is
to use 802.1X EAP.
• You are going to build an 802.1X EAP solution
using the customers existing RADIUS server.
• RADIUS attributes can be leveraged to assign
different types of employees to VLANs and user
traffic settings by assigning them to the
appropriate User Profiles.
• Employees will assigned to three different User
Profiles: Employees, IT and Executives. User profiles
will be used to assign different types access rights
to different types of employees.
© 2014 Aerohive Networks CONFIDENTIAL
Lab: Creating the Employee Secure Access Network
1. Creating the Corporate Network Policy
172
• Click on the Configuration Tab
• Under Choose Network Policy Click the New
Button
© 2014 Aerohive Networks CONFIDENTIAL
Lab: Creating the Employee Secure Access Network
2. Creating the Corporate Network Policy
173
• Fill in the Name box using Corp-X as your Network Policy Name3
• Click the Create button
It is recommended that you ALWAYS add descriptions about the objects
you are building whenever possible.
© 2014 Aerohive Networks CONFIDENTIAL
Lab: Creating the Employee Secure Access Network
3. Creating the Secure SSID Profile
174
To configure a
802.1X/EAP SSID
for Secure Wireless
Access
• Next to SSIDs,
click Choose
• Click New
© 2014 Aerohive Networks CONFIDENTIAL
Copyright ©2011
Lab: Creating the Employee Secure Access Network
4. Creating the Secure SSID Profile
• Profile Name:
Corp-Secure-X
• SSID:
Corp-Secure-X
• Under SSID
Access Security
select
 WPA/WPA2
802.1X
(Enterprise)
• Click Save
175
© 2014 Aerohive Networks CONFIDENTIAL
Lab: Creating the Employee Secure Access Network
5. Saving the Secure SSID Profile
176
• Ensure the
Corp-Secure-X SSID
is selected
• Click OK
Ensure
Corp-Secure-X
is highlighted
then click OK
© 2014 Aerohive Networks CONFIDENTIAL
Lab: Creating the Employee Secure Access Network
6. Creating the RADIUS Object
177
• Under Authentication, click <RADIUS Settings>
• Choose RADIUS, click New
Click
Click
© 2014 Aerohive Networks CONFIDENTIAL 178
• RADIUS Name:
RADIUS-X
• IP Address/Domain
Name: 10.5.1.10
• Shared Secret:
aerohive123
• Confirm Secret:
aerohive123
• Click Apply
• Click Save
Click Apply
When Done!
Lab: Creating the Employee Secure Access Network
7. Creating the RADIUS Object
© 2014 Aerohive Networks CONFIDENTIAL 179
• Under User Profile,
click Add/Remove
• Click New
Lab: Creating the Employee Secure Access Network
8. Creating the User Profile
© 2014 Aerohive Networks CONFIDENTIAL 180
• Name: Employees-X
• Attribute Number: 10
• Default VLAN: 10
• Click Save
Lab: Creating the Employee Secure Access Network
9. Creating the User Profile
© 2014 Aerohive Networks CONFIDENTIAL 181
• With the Default tab
selected, ensure the
Employees-X user
profile is highlighted
› IMPORTANT: This user
profile will be
assigned if no
attribute value is
returned from RADIUS
after successful
authentication, or if
attribute value 10 is
returned.
• Click the Authentication
tab
Default Tab
Authentication Tab
Lab: Creating the Employee Secure Access Network
10. User Profile – no returned RADIUS attributes
© 2014 Aerohive Networks CONFIDENTIAL 182
• Select the
Authentication tab
• Select (highlight)
both the IT and
Executives User
Profiles
NOTE: The (User
Profile Attribute) is
appended to the
User Profile Name
• Click Save
Authentication Tab
Lab: Creating the Employee Secure Access Network
11. User profiles for returned RADIUS attributes
© 2014 Aerohive Networks CONFIDENTIAL 183
• Ensure Employees-X, IT and the Executives
user profiles are assigned to the Corp-Secure-
X SSID
Lab: Creating the Employee Secure Access Network
12. Verify the User Profiles
© 2014 Aerohive Networks CONFIDENTIAL 184
• Click the Continue button
Lab: Creating the Employee Secure Access Network
13. Saving the work and preparing to update devices
© 2014 Aerohive Networks CONFIDENTIAL 185
From the Configure & Update Devices section, click the
drop down next to Filter and select your 0X-APs Filter.
Lab: Creating the Employee Secure Access Network
14. Saving the work and preparing to update devices
© 2014 Aerohive Networks CONFIDENTIAL 186
• Select your 0X-A-xxxxxx access point and
all of your 0X-SIMU-xxxxxxx access points
• Click the Update button
• Click Update Devices to push your
Network Policy to your access points
• Click Yes in the Confirm window
Lab: Creating the Employee Secure Access Network
15. Update the devices
© 2014 Aerohive Networks CONFIDENTIAL 187
• Click the Update Button
• Click OK in the Reboot Warning window
Lab: Creating the Employee Secure Access Network
16. Update the devices
© 2014 Aerohive Networks CONFIDENTIAL
Copyright ©2011
Once the Update
is pushed, you will
see the Update
Status and the
devices
rebooting.
When the devices
have rebooted and
start reporting to
HiveManager, you
will see their new up
time and that the
configuration on the
devices matches
the expected
configuration in
HiveManager.
188
Lab: Creating the Employee Secure Access Network
17. Update the devices
© 2014 Aerohive Networks CONFIDENTIAL
Lab: Test Hosted Client Access to SSID
1. For Windows: Use TightVNC client
189
• If you are using a windows PC
› Use TightVNC
› TightVNC has good compression so
please use this for class instead of
any other application
• Start TightVNC
› For Lab 1
› lab1-pcX.aerohive.com
› For Lab 2
› lab2-pcX.aerohive.com
› For Lab 3
lab3-pcX.aerohive.com
› For Lab 4
lab4-pcX.aerohive.com
› For Lab 5
lab5-pcX.aerohive.com
› Select  Low-bandwidth
connection
› Click Connect
› Password: aerohive123123
› Click OK
© 2014 Aerohive Networks CONFIDENTIAL
Lab: Test Hosted Client Access to SSID
2. For Mac: Use the Real VNC client
190
• If you are using a Mac
› RealVNC has good compression
so please use this for class
instead of any other application
• Start RealVNC
› For Lab 1
› lab1-pcX.aerohive.com
› For Lab 2
› lab2-pcX.aerohive.com
› For Lab 3
lab3-pcX.aerohive.com
› For Lab 4
lab4-pcX.aerohive.com
› For Lab 5
lab5-pcX.aerohive.com
› Click Connect
› Password: aerohive123.
› Click OK
© 2014 Aerohive Networks CONFIDENTIAL
Lab: Testing 802.1X/EAP to External RADIUS
1. Connect to Secure Wireless Network
191
• From the bottom task
bar, and click the locate
wireless networks icon
• Click Corp-Secure-X
• Click Connect
© 2014 Aerohive Networks CONFIDENTIAL 192
After associating with your SSID, you should see your
connection in the active clients list in HiveManager
• Go to MonitorClientsWireless Clients
• User Name: DOMAINuser
• VLAN: 10
Lab: Testing 802.1X/EAP to External RADIUS
2. Connect to Secure Wireless Network
© 2014 Aerohive Networks CONFIDENTIAL 193
• To change the layout of the
columns in the Wireless Clients
list, you can click the
spreadsheet icon
• Select User Profile Attribute
from the Available Columns
list and click the right arrow
• With User Profile Attribute
selected, click the Up button
so that the column is moved
after VLAN
• Click Save
Click to change
column layout
Lab: Testing 802.1X/EAP to External RADIUS
3. Customizing Your Column View
© 2014 Aerohive Networks CONFIDENTIAL 194
• By Default all Device and
Client screens display 15
items per page.
• You can scroll between
pages using the arrow
buttons or choose to display
more items per page.
• Screen Auto refresh is
enabled by default but can
be disabled if so desired.
Select Drop Down to
display 50 items per
page
Auto refresh can be
turned on or off as
desired
• Select 50 items per page
Lab: Testing 802.1X/EAP to External RADIUS
4. Customizing Your Column View
© 2014 Aerohive Networks CONFIDENTIAL 195
To display only the wireless
Clients in the Lab:
• Go to
MonitorClientsWireless
Clients.
• Click the + under Filter at the
bottom of the Monitor
options.
• Next to Topology Map select
0X Building_Floor 1 from the
drop down
• In the Remember This Filter
box type: Lab
• Click Search to save the filter
Lab: Testing 802.1X/EAP to External RADIUS
5. Create a clients display filter
Note: The proper use of
Filters will save time in
locating desired objects
© 2014 Aerohive Networks CONFIDENTIAL 196
To display only the Wireless
Clients in the Classroom:
• Go to
MonitorClientsWireless
Clients.
• Click the + under Filter at the
bottom of the Monitor
options.
• Next to Topology Map select
Training Center_Floor1 from
the drop down
• In the Remember This Filter
box type: Instructor
• Click Search to save the filter
Lab: Testing 802.1X/EAP to External RADIUS
6. Create a clients display filter
Note: The proper use of
Filters will save time in
locating desired objects
© 2014 Aerohive Networks CONFIDENTIAL© 2014 Aerohive Networks CONFIDENTIAL
QUESTIONS?
© 2014 Aerohive Networks Inc.
SECTION 7:
PRIVATE PSK FOR DEVICES
198
Aerohive’s
Instructor-led Training
© 2014 Aerohive Networks CONFIDENTIAL
Private PSK (PPSK) for Legacy Devices
Scenario
199
 Your customer has legacy devices that
do not support 802.1X, or require fast
roaming and do not support 802.11r or
Opportunistic Pairwise Master Key
Caching (OKC).
 There is a requirement that all devices
have unique credentials.
 Aerohive offers a security solution called
Private PSK (PPSK) that meets these
needs.
© 2014 Aerohive Networks CONFIDENTIAL
SSIDs with WPA or WPA2 Personal
Use Legacy Pre Shared Keys (PSKs)
200
• All users share the same key
› If a user leaves or if a PC or portable device is lost, for security
reasons, the shared key should be changed, and every client will
have to update the keys on their wireless clients
• All users share the same network policy
› Because all users share the same SSID with the same key, they will
also have the same network policies, such as their VLAN,
because there have no way to uniquely identify users or types of
users
User 1
User 2
User 3
SSID: Corp-Wi-Fi
Authentication: WPA2 Personal
Shared Key: aSecretPhrase
User Profile: Employee-Profile
SSID: Corp-Wi-Fi
Shared Key: aSecretPhrase
SSID: Corp-Wi-Fi
Shared Key: aSecretPhrase
SSID: Corp-Wi-Fi
Shared Key: aSecretPhrase
AP
© 2014 Aerohive Networks CONFIDENTIAL
SSID with 802.1X/EAP Dynamically Create
Pairwise Master Keys (PMKs)
201
• With 802.1X, after a user successfully authenticates with RADIUS,
a unique key is created for each user and AP pair called a PMK
› If a user leaves the company or a user loses a device, the user
account can be disabled and passwords can be changed to
prevent access to corporate resources
• New PMKs are created every time user authenticates
• Users can have unique network policies
› Because users are identified by their user name, based on the
user or group, they can be assigned to different network policies
User 1
User 2
User 3
SSID: Corp-W-iFi
Authentication: WPA2 Enterprise (802.1X)
- User 1 - PMK: d6#$%^98f..
- User 2 - PMK: 87fe@#$%a..
- User 3 - PMK: 90)356*&f..
SSID: Corp-Wi-Fi
PMK: d6#$%^98f..
SSID: Corp-Wi-Fi
PMK: 87fe@#$%a..
SSID: Corp-Wi-Fi
PMK: 90)356*&f..
AP RADIUS
© 2014 Aerohive Networks CONFIDENTIAL
Private Preshared Key (PSK)
Allows creation of unique PSKs per user
202
• Private PSKs are unique pre shared keys created for individual users on the
same SSID
• Client configuration is simple, just enter the SSID shared key for WPA or
WPA2 personal (PSK)
› No 802.1X supplicant configuration is required
› Works with devices that do not support 802.1X/EAP
• You can automatically generate unique keys for users, and distribute via
email, or any way you see fit
• If a user leaves or a device is lost or stolen, the PSK for that user or device
can simply be revoked
User 1
User 2
User 3
SSID: Corp-Wi-Fi
SSID Type: Private PSK
Authentication: WPA2 Personal
- User 1 – Private PSK: d6#$%^98f..
- User 2 – Private PSK: 87fe@#$%a..
- User 3 – Private PSK: 90)356*&f..
SSID: Corp-Wi-Fi
Key: d6#$%^98f..
SSID: Corp-Wi-Fi
Key: 87fe@#$%a..
SSID: Corp-Wi-Fi
Key: 90)356*&f..
Aerohive AP
© 2014 Aerohive Networks CONFIDENTIAL
Private Preshared Key (PSK)
Use Cases
203
• Use Case #1: Private PSK is recommended for augmenting
WLAN deployments that authenticate clients with WPA or
WPA2 Enterprise (802.1X/EAP), but have some devices that:
› Support WPA or WPA2 Personal, but do not support WPA
or WPA2 Enterprise with 802.1X/EAP
› Do not support opportunistic key caching (OKC) for
seamless roaming
• Use Case #2: Recommended use in place of using
traditional PSKs for environments that do not have a WLAN
deployment using WPA or WPA2 Enterprise with 802.1X/EAP
• Use Case #3: Recommended for secure credentials with
guest WLANs (secure guest management covered in a
later section)
© 2014 Aerohive Networks CONFIDENTIAL
Private Preshared Key (PSK)
Maximum PPSKS per Aerohive Device
204
© 2014 Aerohive Networks CONFIDENTIAL
Verify On-Premise HiveManager Time
Settings
205
• HiveManager and Aerohive Devices should have up to date time
settings, preferably by NTP (HMOL Time Settings are automatic).
• Go to HomeAdministrationHiveManager Settings
• Next to System Date/Time click Settings
Private PSKs are
credentials that have a
start time. Private
PSKs, like other
credentials, can also
be time limited.
Therefore, it is
imperative that the
HiveManager Time
Settings be in proper
synchronization with
your network. The use
of an NTP server is
highly recommended.
© 2014 Aerohive Networks CONFIDENTIAL 206
• Go to Configuration
• Select your Network
Policy: Corp-X and click
OK
• Next to Additional
Settings Click Edit
• Expand Management
Server Settings
Note: Upon first login to a
new HiveManager system,
an NTP server policy is
automatically created with
the same name as the User
name. However, the
object should be edited
with the proper time zones.
• Next to NTP Server
› Click the + Icon
Private PSKs are credentials that have a start
time. Private PSKs, like other credentials, can
also be time limited. Even more important than
the HiveManager Time Settings, Aerohive Device
Clock Settings must be properly synchronized.
The use of an NTP server is MANDATORY.
Verify Device Time Settings
© 2014 Aerohive Networks CONFIDENTIAL 207
• Name the service NTP-X
• Time Zone: <Please use
the Pacific time Zone>
• Uncheck  Sync clock
with HiveManager
• NTP Server:
ntp1.aerohive.com
• Click Apply
• Click Save
Verify Device Time Settings
MANDATORY: You must change the time zone to match the time zone
where your Aerohive Devices reside. Do this BEFORE you configure the
rest of your Network Policy.
Instructor note: When using Lab #4 the Time Zone
MUST be set to (GMT +10 Australia/Sydney)
© 2014 Aerohive Networks CONFIDENTIAL
Lab: Private PSK for Enterprise
1. Modify your Network Policy to Create an SSID
208
To configure a
Private PSK SSID
• Go to Configuration
• Select your Network
Policy: Corp-X and
click OK
• Next to SSIDs,
click Choose
• Click New
© 2014 Aerohive Networks CONFIDENTIAL
Copyright ©2011
Lab: Private PSK for Enterprise
2. Create a Private PSK SSID
• Profile Name: Device-PPSK-X
• SSID: Device-PPSK-X
• Under SSID Access Security
select Private PSK
• Set maximum clients per
private PSK to: 1
› This limits how many times a
single Private PSK can be
concurrently used in a Hive
• Click Save
209
© 2014 Aerohive Networks CONFIDENTIAL
Lab: Private PSK for Enterprise
3. Create a Private PSK SSID
210
• Ensure the
Device-PPSK-X SSID
is selected
• Ensure the Corp-
Secure-X SSID is
selected
• Click OK
Ensure both
Device-PPSK-X
and Corp-
Secure-X are
highlighted then
click OK
© 2014 Aerohive Networks CONFIDENTIAL
Lab: Private PSK for Enterprise
4. Create a Private PSK User Group
211
• Under Authentication, click <PSK User Groups>
• Click New
Click
Click
© 2014 Aerohive Networks CONFIDENTIAL
Lab: Private PSK for Enterprise
5. Create a Private PSK Group
212
• User Group Name:
Devices-X
User Type:
 Automatically
generated private PSK
users
• User Profile
Attribute: 2
• VLAN: <empty>
Inherited from user profile
• User Name Prefix: 0X-
• Click the Generate
button to create a
seed
• Expand Private PSK
Advanced Options
© 2014 Aerohive Networks CONFIDENTIAL
Lab: Private PSK for Enterprise
6. Create a Private PSK User Group
213
• Password length: 20
• Click Save
Note: You can define
the strength of the PSKs
Although each of the PPSKs will be unique, they are still susceptible to
brute-force offline dictionary attacks. The Wi-Fi Alliance recommends a
passphrase key strength of 20 characters or longer.
© 2014 Aerohive Networks CONFIDENTIAL
Lab: Private PSK for Enterprise
7. Save the Private PSK User Group
214
• Ensure your Devices-X is highlighted
• Click OK
© 2014 Aerohive Networks CONFIDENTIAL
Lab: Private PSK for Enterprise
9. Create a user profile for the PPSK SSID
215
• Under User Profile,
click Add/Remove
• Click New
© 2014 Aerohive Networks CONFIDENTIAL 216
• Name: Devices-X
• Attribute Number: 2
• Default VLAN: 2
• Verify the settings, and click Save
Lab: Private PSK for Enterprise
10. Create a user profile for the PPSK SSID
Although these are corporate devices, they are using a shared key
security. Since they are not using 802.1X, a more secure authentication
method, it is a recommended practice to separate their traffic to
protect you network from unwanted use.
© 2014 Aerohive Networks CONFIDENTIAL
Lab: Private PSK for Enterprise
10. Review Settings and Click Save
217
• Ensure your Devices-X
User Profile is selected
• Click Save
• Verify the settings, and
click Save
© 2014 Aerohive Networks CONFIDENTIAL
Lab: Private PSK for Enterprise
11. Creating your User Accounts
218
• In the Navigation pane go to:
Advanced Configuration
AuthenticationLocal Users
• Click Bulk
Note: In a live
deployment, each
device and or user
should be uniquely
identifiable. We are
using the Bulk option in
class simply as a way to
save time.
© 2014 Aerohive Networks CONFIDENTIAL
Lab: Private PSK for Enterprise
12. Creating your User Accounts
219
• Create Users Under Group: Devices-X
• Number of New Users: 10
• Description: 0X-
• Enter your REAL email address
• Click Create
© 2014 Aerohive Networks CONFIDENTIAL 220
Apply a filter to view your Private PSK users
• In the Navigation pane, navigate to:
Advanced ConfigurationAuthenticationLocal Users
• Click the Filter button
• Next to Description: Type 0X- and Click Search
• Results shown on next slide
Lab: Private PSK for Enterprise
13. Viewing your User Accounts
© 2014 Aerohive Networks CONFIDENTIAL
Lab: Private PSK for Enterprise
14. View your Private PSK users
221
• Locate your PPSK users
› Sort on the user name or use the filter
• You can click (Clear Text PPSK) to view the
PPSK
Click here to
obscure or show or
obscure your clear
text PSK
© 2014 Aerohive Networks CONFIDENTIAL
Copyright ©2011
Lab: Private PSK for Enterprise
15. Email your user their private PSK
• Check the box next to one of your user
user accounts, and click Email PSK
IMPORTANT: Please check your Junk
Email folder if you do not receive this
email
IMPORTANT: In order for the
email to work, you MUST
have the email service
settings configured under
HomeAdministration
HiveManager Services
Update Email Settings
Email the private PSK to
the user
Email Message
Email Address
© 2014 Aerohive Networks CONFIDENTIAL 223
• Go to Configuration and select your Corp-X policy and click OK
• Click on the Continue button
• From the Configure & Update Devices section, click the drop
down next to Filter and select your 0X-APs Filter.
Lab: Private PSK for Enterprise
16. Updating your Aerohive Devices
© 2014 Aerohive Networks CONFIDENTIAL 224
• Select your 0X-A-xxxxxx access point and all of
your 0X-SIMU-xxxxxxx access points
• Click the Update button
• Click Update Devices to push your Network
Policy to your access points
Lab: Private PSK for Enterprise
17. Updating your Aerohive Devices
© 2014 Aerohive Networks CONFIDENTIAL 225
• Click the Update Button
• Click OK in the Reboot Warning window
Lab: Private PSK for Enterprise
18. Updating your Aerohive Devices
© 2014 Aerohive Networks CONFIDENTIAL
Copyright ©2011
The physical APs will not need to reboot this time
because this is a Delta update. The simulated APs will
reboot. Only the configuration changes in the
Network Policy were uploaded. Because a reboot is
not necessary, clients already connected to the
Corp-Secure-X SSID are not affected.
226
Lab: Private PSK for Enterprise
19. Updating your Aerohive Devices
© 2014 Aerohive Networks CONFIDENTIAL
Lab: Private PSK for Enterprise
1. Testing your PPSK SSID
227
• From TightVNC, go to: labN-
pcX.aerohive.com password: aerohive123
• Copy the PPSK key either from the user
account display or your email, make sure not
to copy any extra spaces
• Connect to your SSID: Device-PPSK-X
• Paste your Passphrase/Network Key:
<Paste your 20 character PSK>
• Click OK
© 2014 Aerohive Networks CONFIDENTIAL 228
• After associating with your SSID, you should see your connection in
the active clients list in HiveManager
› Go to MonitorClientsWireless Clients
• Your IP address should be from the 10.5.2.0/24 network
• Note the client information:
› VLAN: 2
› User Profile Attribute: 2
Lab: Private PSK for Enterprise
2. Testing your PPSK SSID
© 2014 Aerohive Networks CONFIDENTIAL
Example Only: Revoke a Private PSK
1. Revoking Private PSK Users
229
If a user leaves the company, or if their device is lost or stolen, you
can revoke a users key and de-authenticate any active client using
the individual private PSK
• Go to ConfigurationAdvanced Configuration
AuthenticationLocal Users
•  Check the box next to your user account and click Remove
• Click Yes to continue
› Note: For this change to take effect, you will have to update the
configuration of every Aerohive AP using this Private PSK account...
© 2014 Aerohive Networks CONFIDENTIAL 230
• Select your 0X-A-xxxxxx access point and all of your
0X-SIMU-xxxxxxx access points
• Click the Update button
• Click Update Devices to push your Network Policy to
your access points
Example Only: Revoke a Private PSK
2. Update the Configuration
© 2014 Aerohive Networks CONFIDENTIAL
Example Only: Revoke a Private PSK
3. Verify your PPSK user is revoked
231
• To view the active clients, go
to MonitorClients
Wireless Clients
• The revoked clients will no
longer appear in the active
clients list
• If you view the desktop of the
hosted client PC, you will see
they are disconnected
© 2014 Aerohive Networks CONFIDENTIAL© 2014 Aerohive Networks CONFIDENTIAL
QUESTIONS?
© 2014 Aerohive Networks Inc.
SECTION 8:
AEROHIVE WLAN GUEST
MANAGEMENT
Aerohive’s
Instructor-led Training
© 2014 Aerohive Networks CONFIDENTIAL
Why Provide Guest Access?
234
Many studies have shown that providing WLAN guest
access is beneficial to your business
• Improved Productivity: Customers and contractors often need
access to the Internet to accomplish job-related duties. If
customers and contractors are more productive, your company
employees will also be more productive.
• Customer Loyalty: In today’s world, business customers have
come to expect Guest WLAN access. Free guest access is often
considered a value-added service. There is a good chance that
your customers will move towards your competitors if you do not
provide WLAN guest access.
© 2014 Aerohive Networks CONFIDENTIAL
Guest WLAN Essentials
235
Guest user traffic should always be segmented from
employee user traffic. Four guest WLAN best practices
include:
• Guest SSID: Wireless guest users should always connect to a
separate guest SSID because it will have different security policies
than a corporate or employee SSID.
• Guest VLAN: Guest user traffic should be segmented into a
unique VLAN tied to an IP subnet that does not mix with the
employee user VLANs.
• Captive Web Portal: A captive web portal can be used to
accept guest login credentials. More importantly, the captive web
portal should have a legal disclaimer.
• Guest Firewall Policy: A From-Access guest firewall policy is
the most important component of WLAN guest management.
© 2014 Aerohive Networks CONFIDENTIAL
WLAN Guest Firewall Policy
236
• A From-Access guest firewall policy is the most
important component of WLAN guest management.
The goal is to keep wireless guest users away from
corporate network resources and only allow them
access to a gateway to the Internet.
• Below is an example of the default Guest Firewall Policy
in HiveManager
© 2014 Aerohive Networks CONFIDENTIAL
WLAN Guest Firewall Policy
237
• The guest firewall policy can be much more
restrictive. A good practice is to block SMTP so
users cannot SPAM through the guest WLAN.
• If necessary, many more ports and/or
applications can be blocked.
• Ports that should be permitted include DNS UDP
port 53, DHCP-server UDP port 67, HTTP TCP port
80 and HTTPS TCP port 443 should be permitted.
• So that guest users can use an IPsec VPN: IKE
UDP port 500 and IPsec NAT-T UDP port 4500
should be permitted.
© 2014 Aerohive Networks CONFIDENTIAL
WLAN Guest Firewall Policy
238
© 2014 Aerohive Networks CONFIDENTIAL
Peer Blocking
239
• Guest users should be prevented from peer-to-peer
connectivity on the guest VLAN/subnet. This prevents peer-
to-peer attacks.
• Peer blocking can be configured in the the Guest SSID
settings.
• Optional Settings  DoS Prevention and Filter  Traffic Filter
• Uncheck ☐ Enable Inter-station Traffic
© 2014 Aerohive Networks CONFIDENTIAL
Rate Limiting
240
• The bandwidth of
guest traffic can be
throttled with a rate
control policy
• User Profiles 
Optional Settings 
QoS Settings  Rate
Control and Queuing
Policy
© 2014 Aerohive Networks CONFIDENTIAL
Captive Web Portals
241
DNS lookup = whois www.google.com
DNS response = www.google.com = 1.1.1.1
1.1.1.1
If guest user
authentication
is required, the
AP will then
query a RADIUS
server with an
authentication
protocol such
as MS-CHAPv2.
When a guest user browses to a URL, a DNS redirect
is used to send the guest user to the captive portal
login pages. If a captive portal stops working, there
is most likely a DNS problem.
© 2014 Aerohive Networks CONFIDENTIAL
Captive Web Portals
242
• Aerohive has a large
selection of available
captive web portals
• The CWP pages use
cascading style
sheets so that they
display properly on a
computer screen,
tablet screen or smart
phone screen
• Upon authentication,
guests can be
redirected to external
URL or the initially
requested URL
© 2014 Aerohive Networks CONFIDENTIAL
Captive Web Portals
243
• Pages can be
customized within
HiveManager
• Advanced
customization can be
done with an external
HTML editor and
pages can be
imported back into
the system and then
used as templates
© 2014 Aerohive Networks CONFIDENTIAL
Captive Web Portals
244
Captive Web Portal Login Page Examples
User Authentication Self Registration User Policy Acceptance
© 2014 Aerohive Networks CONFIDENTIAL
Captive Web Portals
245
Multi-Language Support
© 2014 Aerohive Networks CONFIDENTIAL
Guest VLAN in a DMZ
246
Sometimes a customer may have a written security policy that
mandates that the guest VLAN not reside at the edge of the
network. The guest VLAN can only exist in a DMZ
• GRE Tunneling – Aerohive APs can be configured to tunnel the
guest traffic back to a HiveOS Appliance server that resides in the
DMZ
• Guest GRE Tunnel LAB – This lab is performed in the Aerohive
Advanced WLAN Configuration (AAWC) class
HiveOS VA
© 2014 Aerohive Networks CONFIDENTIAL
Open Guest WLANs
247
• OPEN is BAD - Most Aerohive competitors recommend “open” guest
WLANs with no encryption.
• Attack - If encryption is not being used, the Layer 3 – 7 payload of
any 802.11 data frame will also be exposed.
• Attack - Any clear-text communications such as email and Telnet
passwords can be captured if no encryption is provided.
• Attack - Furthermore, any unencrypted 802.11 frame transmissions
can be reassembled at the upper layers of the OSI model. For
example, email messages can be reassembled and therefore read
by an eavesdropper. Web pages and instant messages can also be
reassembled. VoIP packets can be reassembled and saved as a
WAV sound file.
• More Attacks - Guest users are also susceptible to man-in-the-
middle-attacks and wireless hijacking attacks
© 2014 Aerohive Networks CONFIDENTIAL
Secure Guest WLANs
248
Aerohive does not believe in “open” guest WLANs. You
should always use encryption to protect your guest users.
Aerohive has many ways for you to provide secure guest
management:
• ID Manager – Cloud-Based Secure Guest Management
• Private PPSK – User Manager – Even better, unique PPSK time-
based credentials can be used to provide encryption. User
Manager is a HiveManager admin account that a receptionist can
use to hand-out secure PPSK credentials to guest user
• Private PPSK – Self Registration – Guest users can also self-
register to obtain secure PPSK credentials
• Static PSK – At the very least a static shared PSK can be used to
provide encryption
More information is available about PPSK User Manager and PPSK self-
registration in the supplemental materials provided by your instructor.
© 2014 Aerohive Networks CONFIDENTIAL
ID MANAGER
USER EXPERIENCE
249
© 2014 Aerohive Networks CONFIDENTIAL
Secure Guest WLANs
Scenario
250
• Your customer has a requirement for secure
guest access for both contractors and visitors.
• Guest users should not be permitted on the
secure corporate network.
• Each guest is required to use their own secure
credentials for access to the guest network.
• Aerohive offers a secure guest access solution
called ID Manager.
© 2014 Aerohive Networks CONFIDENTIAL
Internet
ID Manager
Workflow
251
• An operator who may be a lobby ambassador, an
employee with ID manager operator rights, or the guest
themselves using the web-based self-registration kiosk on
an iPad for instance, can enter the Guest information
• The operator if permitted can activate a Kiosk which is a
secure web interface into ID Manager for self-registration
APs
HTTPS
ID Manager
© 2014 Aerohive Networks CONFIDENTIAL
Internet
ID Manager
Workflow
252
• The Guest arrives and would like secure guest Wi-Fi access
• An operator who may be a lobby ambassador, an employee
with ID manager operator rights, or the guest themselves using
the web-based self-registration kiosk on an iPad for instance, can
enter the Guest information
• Guest information includes who the guest is representing, who
they are visiting, their email, and a phone number
APs
Guest
HTTPS
ID Manager
© 2014 Aerohive Networks CONFIDENTIAL
Internet
ID Manager
Workflow
253
• Next, the guest or the operator creating the guest account
can select the type of guest access needed, such as a
contractor, visitor, or guest secured with Private PSK
• For this example a Visitor using Private PSK will be selected
APs
Guest
HTTPS
ID Manager
© 2014 Aerohive Networks CONFIDENTIAL
Internet
ID Manager
Workflow
254
• ID Manager generates a Private PSK for the guest which is
optionally displayed on the screen
• Next, the guest or operator selects the delivery method for
sending guest access key or user credentials to the guest
› Text via SMS, Email, Print out, or Twitter Direct Messages
may be used
APs
Guest
HTTPS
ID Manager
Private PSK:
9LHA82v3
© 2014 Aerohive Networks CONFIDENTIAL
Internet
ID Manager
Secure Guest Connections
255
1. After the guest receives their Private PSK, they can use it as the
WPA2 Personal network key when connecting to the guest SSID
2. The AP forwards a verification request to a RADSEC proxy AP on
the local subnet, which could be itself, and that AP uses a secure
RADSEC connection to ID Manager to verify the Private PSK is
valid
3. The Private PSK and user session information is securely distributed
to neighboring APs to permit secure and fast roaming
ID Manager
APs
Guest
2. The AP uses
RADSEC to verify
the Private PSK:
9LHA82v3
1. The Guest connects to the Guest SSID
using WPA2 Personal and enters their
Private PSK: 9LHA82v3
3. If validated, the private PSK and user
session info is distributed to neighbor APs
RADSEC uses
TCP Port 2083
© 2014 Aerohive Networks CONFIDENTIAL
ID Manager Features
256
• Private PSK for Guest Access
• Customizable key creation and expiration times
• 802.1X and Captive Web Portal RADIUS authentication
• Third-party support with 802.1X
• RADIUS Proxy
• Customizable Interface for Guest Access
• Dashboards and Authentication Logs
• Notifications via Email, SMS, Twitter, Printer, and Screen
• Self service kiosk support for tablets and computers
• Anonymous access with time limits or bandwidth limits
• Employee Approval for Guest Self-Registration from CWP
• Employee Sponsorship – Authentication (Using SAML)
• Employee Sponsorship with AD integration
© 2014 Aerohive Networks CONFIDENTIAL
INTEGRATING ID MANAGER FOR
STANDALONE A HIVEMANAGER AS
PHYSICAL OR VIRTUAL APPLIANCES
HIVEMANAGER ONLINE IS LINKED
AUTOMATICALLY
257
© 2014 Aerohive Networks CONFIDENTIAL
ID Manager
258
To integrate your
standalone
HiveManager with ID
Manager
• From Home
Administration
HiveManager Services
• Select  Retrieve ID
Manager Customer ID
• Enter your ID Manager
account email and
password
• Click Retrieve
© 2014 Aerohive Networks CONFIDENTIAL
Lab: ID Manager - Secure Guest WLAN
1. Configure Guest IDM SSID
259
• Go to Configuration and
select your Corp-X Network
Policy and click OK
• Next to SSIDs, click Choose
• In Choose SSID click New
© 2014 Aerohive Networks CONFIDENTIAL
Lab: ID Manager - Secure Guest WLAN
2. Configure Guest IDM SSID
260
• SSID Profile:
Guest-X
X = 2 – 29 (Student ID)
• SSID: Guest-X
• Select  Private PSK
• Check  Use Aerohive ID
Manager
• Check  Set the maximum
number of clients per
private PSK to: 3
• Check  Enable a captive
web portal with use policy
acceptance
• Click Save
© 2014 Aerohive Networks CONFIDENTIAL
Lab: ID Manager - Secure Guest WLAN
3. Save the Guest IDM SSID
261
• Ensure that all three
SSIDs are selected
• Click OK
© 2014 Aerohive Networks CONFIDENTIAL 262
Configure the captive
web portal for user
policy acceptance
• Click <CWP>
• Click New
Lab: ID Manager - Secure Guest WLAN
4. Configure Captive Web Portal
© 2014 Aerohive Networks CONFIDENTIAL 263
• Name: CWP-X
NOTE: In each section, you can click Customize… if you want to
modify the default web pages or import your own pages.
• Expand Captive Web Portal Success Page Settings
› Select  Redirect to an external page and enter a URL:
http://www.aerohive.com
• Save your Captive Web Portal Settings
Lab: ID Manager - Secure Guest WLAN
5. Configure Captive Web Portal
© 2014 Aerohive Networks CONFIDENTIAL 264
Assign a user
profile to the
SSID
• To the right of
your SSID,
under User
Profile, click
Add/Remove
• Choose User
Profiles
• Click New
Lab: ID Manager - Secure Guest WLAN
6. Create User Profile
© 2014 Aerohive Networks CONFIDENTIAL 265
• Name: Guest-X
• Attribute Number: 500
• VLAN-Only Assignment: 8
• Under Optional Settings
expand User Firewalls and
specify a guest firewall
policy
• Under IP Firewall Policy
› From-Access: Guest-
Internet-Access-Only
› To-Access:
<Leave Empty>
› Default Action: Deny
› Click Save
Lab: ID Manager - Secure Guest WLAN
7. Create User Profile
© 2014 Aerohive Networks CONFIDENTIAL 266
• Select
Guest-X(500)
• Click Save
Lab: ID Manager - Secure Guest WLAN
8. Save User Profile
© 2014 Aerohive Networks CONFIDENTIAL 267
• Verify your policy settings
• Click Continue
Lab: ID Manager - Secure Guest WLAN
9. Save Network Policy
© 2014 Aerohive Networks CONFIDENTIAL
Lab: ID Manager - Secure Guest WLAN
10. Perform a Complete Upload
268
• Select your 0X-A-xxxxxx access point and all of your 0X-SIMU-
xxxxxxx access points
• Click the Update button
• Check  Perform a complete configuration update for all selected
devices check box
• Click Update Devices and click OK in the Reboot Warning window
© 2014 Aerohive Networks CONFIDENTIAL
Copyright ©2011
Once the Update
is pushed, you will
see the Update
Status and the
devices
rebooting.
When the devices
have rebooted and
start reporting to
HiveManager, you
will see their new up
time and that the
configuration on the
devices matches
the expected
configuration in
HiveManager.
269
Lab: ID Manager - Secure Guest WLAN
11. Perform a Complete Upload
© 2014 Aerohive Networks CONFIDENTIAL
ID MANAGER
RADSEC PROXY APS
270
© 2014 Aerohive Networks CONFIDENTIAL
Internet
ID Manager
Secure Guest Connections - Recap
271
• 1. After the guest receives their Private PSK, they can use it as the
WPA2 Personal network key when connecting to the guest SSID
• 2. The AP forwards a verification request to a RADSEC proxy AP on the
local subnet, which could be itself, and that AP uses a secure RADSEC
connection to ID Manager to verify the Private PSK is valid
• 3. The Private PSK and user session information is securely distributed to
neighboring APs to permit secure and fast roaming
ID Manager
APs
Guest
2. The AP uses
RADSEC to verify
the Private PSK:
9LHA82v3
1. The Guest connects to the Guest SSID
using WPA2 Personal and enters their
Private PSK: 9LHA82v3
3. If validated, the private PSK and user
session info is distributed to neighbor APs
RADSEC uses
TCP Port 2083
© 2014 Aerohive Networks CONFIDENTIAL
ID Manager Radsec Proxy APs
272
Within a
management
subnet for APs,
two APs get
elected as ID
Manager
RADSEC proxy
APs
The ID Manager
RADSEC proxy
APs have
icons that
look like this
© 2014 Aerohive Networks CONFIDENTIAL
ID MANAGER TEST
273
© 2014 Aerohive Networks CONFIDENTIAL
ID Manager Tests from ID Manager
Proxy APs Using RADSEC
274
You can test that
the ID Manager
proxy APs can
communicate with
the ID Manager
RADSEC server on
the Internet
• Go to ToolsServer
Access Tests ID
Manager Test
• Select RADSEC
Proxy
• Select a proxy
server AP
• Click TestNote: ID Manager Proxy APs use RADSEC
with TCP port 2083 to the Internet
© 2014 Aerohive Networks CONFIDENTIAL
ID Manager Tests from ID Manager
Proxy APs Using RADSEC
275
If the RADSEC Proxy APs
cannot communicate with
the ID Manager:
• Select a proxy server AP
• Go to UtilitiesClear ID
Manager Credentials
• Also verify that TCP port
2083 is open outbound on
any firewall
© 2014 Aerohive Networks CONFIDENTIAL
INSTRUCTOR
EXAMPLE OF ID MANAGER
ACCOUNT ADMINISTRATION
276
© 2014 Aerohive Networks CONFIDENTIAL
MyHive Portal – Admin Account Manager
1. Login to Myhive
277
• The Instructor can log
into myhive with an
instructor superuser
account:
Admin:lab#@aerohive.
com
Password:
**************
• This account is limited
to have ID Manager
admin rights
© 2014 Aerohive Networks CONFIDENTIAL
MyHive Portal – Admin Account Manager
2. Different views based on HM or HMOL
278
The configuration options
here are based on your
accounts access rights
HiveManager Online
+ ID Manager
ID Manager Only
© 2014 Aerohive Networks CONFIDENTIAL
MyHive Portal – Admin Account Manager
3. Admin Account Manager
279
To see how the student accounts are configured
• Click Go to Admin Account Manager
© 2014 Aerohive Networks CONFIDENTIAL
MyHive Portal – Admin Account Manager
4. Create new accounts
280
From here you can create one or more admin
accounts that have access to HiveManager, the
Redirector, and ID Manager depending on your access
rights
• Click New
© 2014 Aerohive Networks CONFIDENTIAL
MyHive Portal – Admin Account Manager
5. Example of accounts
281
• Here you create a user
account, and select the
product and group
permissions
• The Products are:
› VHM-XXXXXX –
HiveManager
› IDM-XXXXXX –
ID Manager
› Redirector
• Each of the products
has a set of group
permissions you can set
as shown in the graphic
• Specify the time zone
where the user is
located
• Click Save
Note: The instructor account will only have
ID Manager permissions, but this screen
shows other permissions you can create.
© 2014 Aerohive Networks CONFIDENTIAL
MyHive Portal – Admin Account Manager
6. View idm#-user
282
• The training ID Manager
accounts are:
idm#-user@ah-lab.com
and
idm#-admin@ah-lab.com
Where # is lab=1,2,3,4, or 5
• Passwords aerohive123
Click Save, or Click Cancel
if you are just viewing the
existing account
© 2014 Aerohive Networks CONFIDENTIAL
MyHive Portal – Admin Account Manager
7. Automatic Email with Account Password
283
• An email is automatically sent to the email address
listed in the admin account containing the
randomly generated password to log in to MyHive
› Check your junk or deleted items folder
• Click Logout
© 2014 Aerohive Networks CONFIDENTIAL
ID Manager Configuration
1. Launch ID Manager
284
• Click on the Configure Interfaces & User Access bar
• Click on Aerohive ID Manager
© 2014 Aerohive Networks CONFIDENTIAL
ID Manager Configuration
2. Log into ID Manager
285
Admin: idm#-admin@ah-lab.com
Where # is lab=1,2,3,4, or 5
Password: aerohive123
© 2014 Aerohive Networks CONFIDENTIAL
ID Manager Configuration
2. Go to ID Manager
286
• Click Go
© 2014 Aerohive Networks CONFIDENTIAL
ID Manager Configuration
3. Configure a Guest Type
287
• From Configuration
› Click the Guest Types tab
› Click New
© 2014 Aerohive Networks CONFIDENTIAL
Guest types are
selectable by the
operator when creating a
guest account
• Type Name: Guest-X
• Ensure  Wireless Access
is checked
• Network: Guest-X
Note: This is the SSID that
is displayed in the
notification
• User Profile Attribute: 500
• Do not save yet
ID Manager Configuration
4. Define Guest Type
288
Guest Types
are Displayed
On Guest Kiosk
or
Guest Operator
Console
© 2014 Aerohive Networks CONFIDENTIAL 289
ID Manager Wired Access
•Authentication
for both
wireless and
wired access
can be
granted using
a user name
and password.
•Wireless
authentication
methods also
remain for
Private PSK or
open access.
© 2014 Aerohive Networks CONFIDENTIAL
ID Manager Configuration
5. Define more Guest Type settings
290
• Auth Types:
Select Private PSK
• Account Expires:
in 24 hours
• Select Access key
must be used within:
2 days
Note: This restricts the
validity period of the
key causing the key to
automatically expire
within desired time
frame
• Click Save
© 2014 Aerohive Networks CONFIDENTIAL
ID Manager Configuration
7. Verify your Guest Type was created
291
© 2014 Aerohive Networks CONFIDENTIAL
ID MANAGER CUSTOMIZATION
292
© 2014 Aerohive Networks CONFIDENTIAL
Guest User Interface Settings
293
• From ConfigurationID Manager SettingsRegistration UI
• You can customize the look and feel of the guest
registration page.
© 2014 Aerohive Networks CONFIDENTIAL
Guest User Interface Settings
294
• From the Private PSK
Settings you can
configure the complexity
of the access keys.
• From ConfigurationID Manager
SettingsRegistration UI, you
can decide which fields are
important and which
notification methods are
available.
© 2014 Aerohive Networks CONFIDENTIAL
Guest User Interface Settings
295
• From ConfigurationID Manager
SettingsRegistration UI, you can
decide which fields are important and
which notification methods are
available
© 2014 Aerohive Networks CONFIDENTIAL
Guest User Interface Settings
296
• You can decide whether you want
to display the key on the screen or
only permit it to be transmitted using
one of the notification methods
© 2014 Aerohive Networks CONFIDENTIAL
Employee Sponsorship
297
• Employee Sponsorship is
an ID Manager cloud
service that allows
employees in your
organization to log in to
the ID Manager
registration UI using their
corporate credentials and
register guests (essentially
acting as ID Manager
operators).
• Before you can enable
Employee Sponsorship,
you must already be using
RADIUS authentication
that is integrated with an
external LDAP database
server.
NOTE: Employee sponsorship is available
from the registration UI only and is not
supported on kiosks.
© 2014 Aerohive Networks CONFIDENTIAL
Using ID Manager as an External RADIUS
Server for 802.1X or Captive Web Portal
298
• You can use ID Manager as a standalone RADIUS
server for simple guest account creation.
• RADIUS can be used for 802.1X authentication or
Captive Web Portal authentication.
© 2014 Aerohive Networks CONFIDENTIAL
Using ID Manager as a RADIUS Proxy
299
• If you work closely with other organizations whose employees often visit your
company and vice-versa, RADIUS Proxy simplifies the guest login process for
these employees by granting guest access using the employee’s home login
credentials.
• If the domain is on the whitelist, ID Manager checks the corporate directory
of the other organization. If the visitor is valid, ID Manager gives your
operator the option to authenticate the visitor using their home credentials.
© 2014 Aerohive Networks CONFIDENTIAL
Note: Your ID Manager Operator
has Limited Access
300
• Next you will be
accessing ID
Manager as an
operator
• An ID Manager
operator has limited
access as displayed
in Configuration
Admin Accounts
Admin Groups
• Lobby personnel
typically log in as ID
Manager operators
Note: The permissions are set in the
ConfigurationAdmin Accounts
From here you can create an
administrator with access to ID
Manager specific permissions
© 2014 Aerohive Networks CONFIDENTIAL
Lab: Guest Registration Interface
1. Go to Guest Registration Interface
301
Login into ID Manager as an
operator
• Open an additional window
in your web browser and go
to:
https://idmanager.aerohive.com
Admin: idm#-user@ah-lab.com
Where # is lab=1,2,3,4, or 5
Password: aerohive123
© 2014 Aerohive Networks CONFIDENTIAL
Lab: Guest Registration Interface
2. Register as Guest, Group, or Kiosk
302
• Here you have a few
different options
› Register a Guest or
Register a Group– These
are options available for
an authorized employee
or lobby ambassador
who is responsible for
creating guest accounts
› The Kiosk is used for guest
self registration
› The options displayed
here are configurable
• Select Register a Guest
© 2014 Aerohive Networks CONFIDENTIAL 303
• Scroll to the right
to see your guest
type
› click the >
button to scroll
• Click Guest-X
Lab: Guest Registration Interface
3. Select your guest type
© 2014 Aerohive Networks CONFIDENTIAL
Lab: Guest Registration Interface
4. Enter Guest Information
304
For the Kiosk, the
guest enters their own
information
For the register a
guest or register a
group options, the
authorized operator
enters the information
on behalf of the guest
• Enter your
information
› Note: The
phone number
requires a
country code
• Click the green
Next arrow
button
© 2014 Aerohive Networks CONFIDENTIAL
Lab: Guest Registration Interface
5. Confirm Settings
305
• Confirm your
settings
• Click the green
arrow button to
Confirm
© 2014 Aerohive Networks CONFIDENTIAL
Lab: Guest Registration Interface
6. Confirm Settings
306
• Verify the SSID
and notice the
access key
• DO NOT click the
green arrow
button to
Complete yet.
• Click on the link:
< Send
Notification
© 2014 Aerohive Networks CONFIDENTIAL
Lab: Guest Registration Interface
7. Select credential delivery method
307
• Use the option of
your choice to send
the guest credentials
© 2014 Aerohive Networks CONFIDENTIAL
Lab: Guest Registration Interface
8. Note your SSID and Key
308
• Optionally, your
SSID and Key
information is
displayed on
the screen
• Click Done
© 2014 Aerohive Networks CONFIDENTIAL
Lab: Guest Registration Interface
9. Note your SSID and Key
309
• Click on View Active Guests
• Verify the Guest List and click the Back button
• Click Log Out
• Next you will test the PPSK guest credentials
© 2014 Aerohive Networks CONFIDENTIAL
Lab: Connect to the Secure Guest Network
Example Email
310
Here is an example of the
email sent from ID
Manager
It provides 2 steps to
access the network
Please check your email
for your guest credentials
© 2014 Aerohive Networks CONFIDENTIAL
Lab: Connect to the Secure Guest Network
1. Connected to the Guest SSID
311
• From the hosted PC, connect
to the Guest-X SSID
• Enter the security key
provided in the email, SMS, or
copied from the screen
• The key is not configured on
your AP, so your AP will use
RADSEC to contact ID
Manager and determine if
the key is valid
• If it is, the key is set and
distributed to neighboring
APs for fast and secure
roaming
© 2014 Aerohive Networks CONFIDENTIAL
Lab: Connect to the Secure Guest Network
2. Login through the captive web portal
312
• Open a web
browser
• Click Accept
once the
captive web
portal page
appears
© 2014 Aerohive Networks CONFIDENTIAL
Lab: Connect to the Secure Guest Network
3. Verify Guest VLAN in HiveManager
313
To view the active Guests
• Go to MonitorClientsWireless Clients
• You can modify the columns to see important
information like: IP, hostname, Client OS, User Profile,
VLAN, Encryption Method, SSID, Data consumption,
and more
• Your client should have User Profile Attribute 500, and
be in VLAN 8
© 2014 Aerohive Networks CONFIDENTIAL
ID Manager Logs and Reports
314
• From the ID Manager  Monitor  Logs view you can
get a detailed history and current logs for users that
have authenticated, SMS Log, active sessions and
more.
© 2014 Aerohive Networks CONFIDENTIAL
ID Manager Logs & Reports
315
• From the ID
Manager 
Monitor 
Reports view
you can
create
authentication
reports, session
reports and
more.
© 2014 Aerohive Networks CONFIDENTIAL
Lab Clean Up
In labs that follow, HiveManager will not allow you to place a physical
device on a Topology Map that contains simulated devices.
316
• Go to Monitor select all of your simulated APs, 0X-SIMU-XXXXX
• Click the Device Inventory... button and select Remove, to
delete the simulated devices from earlier labs.
• In the Remove Selected Devices Window, click the Remove
button to ensure that they are removed from HiveManager.
© 2014 Aerohive Networks CONFIDENTIAL© 2014 Aerohive Networks CONFIDENTIAL
QUESTIONS?
© 2014 Aerohive Networks Inc.
SECTION 9:
BRING YOUR OWN DEVICE (BYOD)
318
Aerohive’s
Instructor-led Training
© 2014 Aerohive Networks CONFIDENTIAL
Bring Your Own Device (BYOD) Solutions
319
Aerohive has partnerships with several Mobile Device
Management (MDM) companies such as AirWatch and JAMF
Software.
© 2014 Aerohive Networks CONFIDENTIAL 320
In SSID profiles, Aerohive Devices can be integrated with an MDM
server as seen below.
Bring Your Own Device (BYOD) Solutions
© 2014 Aerohive Networks Inc.
AEROHIVE CLIENT MANAGEMENT
Aerohive’s
Instructor-led Training
© 2014 Aerohive Networks CONFIDENTIAL
Is the device a Corporate or
Personally owned client?
322
Can you tell the difference between
these two iPads?
Company Issued Device
• Owned and Managed by IT
• Provided for a Specific Purpose
• Enables New Working Models
Personal Device
• Employee-owned and Managed
• Wide Range of Potential Devices
• Improves Employee Satisfaction
and Productivity
© 2014 Aerohive Networks CONFIDENTIAL
How Aerohive Solves the Problem
Mobile user connects
to corporate SSID
with a static PSK
1
User is authenticated
against Active
Directory or
other user store
such as LDAP
2
AP checks to see if device
is already enrolled with
HiveManager client
management
3
If device is not enrolled, it is
redirected to enrollment URL to
acquire a custom device certificate
and secure profile based on whether
it is personal or corporate issued
device in the MAC address list
5
6
Device is
reconnected
to the SAME
SSID with a
unique PPSK
HiveManager with
Client Management
7 Policy is applied based on all
available context, including: identity,
device type, device ownership,
location, and time
Device is checked against a list of
known corporate devices (MAC
addresses) imported by IT admin
4
323
© 2014 Aerohive Networks CONFIDENTIAL
Client Management Concepts
Customer Issued or Bring Your Own Device (BYOD) ?
324
• Is a device
Company Issued
Device(CID) or is the
device brought from
home Bring Your
Own Device
(BYOD)?
• Enter MAC
addresses of devices
to automatically
select Corporate
Issued Devices
• Or the user decide
during Enrollment
© 2014 Aerohive Networks CONFIDENTIAL
Client Management Overview
• Support for the following solutions:
› Single SSID based onboarding: requiring 802.1X on the SSID
› Single SSID based onboarding for PPSK: requires an initial static PSK
› Two SSIDs based onboarding:
» Open (for provisioning)
» Second SSID using PPSK (for secured access)
• Support both HMOL and on-premises HM
• Requires 6.1r3 HiveOS or later on APs
• Supports Mac OS X, iOS, Android devices and
Chrome OS (Chrome Books)
325
© 2014 Aerohive Networks CONFIDENTIAL
Firewall Considerations by the
Device types and Ports used
326
Source Destination Service
(Protocol and Port)
Apple Client Devices Apple Push Notification
Service (APNS) 17.0.0.0/8
TCP 5223
TCP 5223, 5229, 5330
Android & Chromebook
Devices
Google GCM Servers
HiveManager Client Management Service
(onboard.aerohive.com)
HTTPS 443
Access Points Client Management Service
(onboard.aerohive.com)
HTTPS 443
Access Points Apple Push Notification
Service (APNS) 17.0.0.0/8
TCP 5223
© 2014 Aerohive Networks CONFIDENTIAL
Enable Client Management in
HiveManager
327
• Enable Client
Management
• Test is an HTTPS test
to the Client
Management
Cluster which verifies
all Client
Management
services are working
• Do this for On-
Premise and HMOL
• For On-Premise you
will also have to
retrieve the
Customer ID
© 2014 Aerohive Networks CONFIDENTIAL
Copyright ©2011
Monitor enrolled devices in Client
Management
• From Home in Client Management you can view reported device
data.
• Placing your cursor over a chart reveals more information.
• Clicking on a chart will take you to the location in Client
Management from which the information was gathered.
58
© 2014 Aerohive Networks CONFIDENTIAL 329
• Monitor Clients  Active Clients or Wireless Clients
• New Column to display Client Management
Enrollment
• Grey icon indicates the client is enrolled in CM
Client Management Data in HiveManager
© 2014 Aerohive Networks CONFIDENTIAL
Client Management Data in HiveManager
330
• Hover over the icon and it changes to Aerohive yellow
• Click on the popup and the admin is redirected to the CM server
monitor view for the client
© 2014 Aerohive Networks CONFIDENTIAL
Client Management Data in HiveManager
331
• Click on the MAC
address of the
enrolled client device
to see Client
Management
information in
HiveManager
© 2014 Aerohive Networks CONFIDENTIAL© 2014 Aerohive Networks CONFIDENTIAL
OPTIONAL CLIENT MANAGEMENT
INSTRUCTOR DEMONSTRATION
Because our lab is in a remote location we
cannot test the client management lab. If time
permits, the instructor will now demonstrate
client management in class
Should students wish to participate with their
personal devices in the demonstration,
ensure that they select the BYOD profile. The
Enrollment profile can be removed from their
personal devices after class.
© 2014 Aerohive Networks CONFIDENTIAL 333
Lab: Client Onboarding Demo
1. Connect to PPSK SSID
On the instructor iOS device and/or student iOS devices:
• Go to Settings  Wi-Fi
• Click on the CM-PPSK-Demo SSID
• Passphrase: aerohive123
© 2014 Aerohive Networks CONFIDENTIAL 334
Lab: Client Onboarding Demo
2. Connect to the PPSK SSID
• Verify that you are connected to the
CM-PPSK-Demo SSID
© 2014 Aerohive Networks CONFIDENTIAL 335
Lab: Client Onboarding Demo
3. Continue with client onboarding
• Open a browser and
type a URL
• You will be redirected to
a Captive Web Portal for
authentication
• Username: demoX
› X=Student number
› 1=Instructor number
• Password: aerohive123
© 2014 Aerohive Networks CONFIDENTIAL 336
Lab: Client Onboarding Demo
4. Continue with client onboarding
• You will be redirected to
the Client Management
captive web portal for
onboarding
© 2014 Aerohive Networks CONFIDENTIAL 337
Lab: Client Onboarding Demo
5. Continue with client onboarding
Specify the device
ownership
 Personal Devices (BYOD)
will automatically be
selected.
• Check  View and agree
to the terms of use
• Click Enroll My Device
 Company-Issued Devices
(CID) would automatically
be selected if this device’s
MAC address is configured
in Client Management.
© 2014 Aerohive Networks CONFIDENTIAL 338
Lab: Client Onboarding Demo
6. Continue with client onboarding EXAMPLE
Specify the device
ownership
 Company-Issued
Devices (CID) will
automatically be selected
if the device’s MAC
address is already
configured in Client
Management.
© 2014 Aerohive Networks CONFIDENTIAL 339
Lab: Client Onboarding Demo
7. Install the Client Enrollment profile
• The Enrollment process will begin.
• Click the Install button to install the Enrollment
Profile
• Read the disclaimer warning and click Install.
• Enter your device passcode if prompted.
© 2014 Aerohive Networks CONFIDENTIAL 340
Lab: Client Onboarding Demo
8. Install the Client Enrollment profile
• Click Done and the selected profile will
begin to install.
© 2014 Aerohive Networks CONFIDENTIAL 341
Lab: Client Onboarding Demo
9. Install the Client Enrollment profile
• Client Management verifies and installs the Wi-Fi profile
• The device is successfully enrolled
© 2014 Aerohive Networks CONFIDENTIAL 342
Lab: Client Onboarding Demo
10. Client is enrolled
• Browser begins redirection
• Redirection is completed
© 2014 Aerohive Networks CONFIDENTIAL 343
Lab: Client Onboarding Demo
11. Client is enrolled
• During the onboarding
process an Enrollment
profile is installed.
• A Wi-Fi profile is
installed.
• The client device
disconnects and
reconnects to the PPSK
SSID using an unique 63
character PPSK for the
device. This process is
not visible to the user.
© 2014 Aerohive Networks CONFIDENTIAL 344
Lab: Client Onboarding Demo
12. Client is enrolled
• Go to Settings 
General  Profiles
• Expand the profiles.
• Verify Certificates.
• Verify Restrictions.
• Verify that the
camera icon is not on
your device.
© 2014 Aerohive Networks CONFIDENTIAL 345
Lab: Client Onboarding Demo
13. Verify Web Clip
• Go to devices home
screen
• Find Web Clip
• Play Web Clip
© 2014 Aerohive Networks CONFIDENTIAL© 2014 Aerohive Networks CONFIDENTIAL
QUESTIONS?
© 2014 Aerohive Networks Inc.
SECTION 11:
DEVICE SPECIFIC SETTINGS
347
Aerohive’s
Instructor-led Training
© 2014 Aerohive Networks CONFIDENTIAL
Device Settings
348
• All devices including Access Points, Routers, Switches and HiveOS
Virtual Appliances have settings specific to their device type and
or model.
• For example, an AP’s device settings are different than those
found on a Switch
Radio Profiles do not exist on SwitchesSTP Settings do not exist on APs
© 2014 Aerohive Networks CONFIDENTIAL
Device Settings
349
• Device Settings can be configured on a single device.
• Devices of the same make and model can be mass configured
using multi select. However, some options are unit specific and
are not able to be configured on more than one device at a time.
Single Device Configuration Multiple Device Configuration
© 2014 Aerohive Networks CONFIDENTIAL
LAB: AP Device Settings Review
1. Modify an AP’s settings
350
• Go to Monitor  Devices  Access Points  Aerohive APs
• Click on Host Name to put the APs in alphabetical order
•  Select your 0X-A-xxxxxx and click Modify
© 2014 Aerohive Networks CONFIDENTIAL
LAB: AP Device Settings Review
2. View the AP device specific settings
351
Radio Functions
WLAN Interface Configuration
Radio Power Settings
Radio Channel Settings
Classifier Tags
Topology Map
Host Name
© 2014 Aerohive Networks CONFIDENTIAL 352
LAB: AP Device Settings Review
3. View the AP Optional Settings
Advanced Settings Routing
MGT0 Interface Settings
Ethernet Setup
Service Settings
The MGT0
Interface is a
logical IP
interface for the
AP which is a
Layer two device
© 2014 Aerohive Networks CONFIDENTIAL 353
• If both radios are
used for client access
only, no mesh link is
available.
• If the 5 GHz radio is
used for a mesh link
only, no client access
is available in 5 GHz.
Clients can connect
to the 2.4 GHz radio.
• If the 5 GHz radio
allows client access
and a mesh link,
clients can connect
to either radio. The
5 GHz mesh link will
also be available.
LAB: AP Device Settings Review
4. View the AP Radio Function Settings
© 2014 Aerohive Networks CONFIDENTIAL
Wireless Mesh
354
User traffic can be routed to the wired network
via a mesh backhaul, reducing installation cost
and providing fault tolerance.
Mesh Portals
Mesh Points
© 2014 Aerohive Networks CONFIDENTIAL
Mesh and Access on 5 GHz
Each Aerohive AP is a Portal
355
By default, if each Aerohive AP is a portal (Ethernet
connected) it selects a different channel for its
mesh/access interface so that more bandwidth is
available for clients
© 2014 Aerohive Networks CONFIDENTIAL
Mesh and Access on 5 GHz
Two Aerohive APs are Portals and Two are Mesh Nodes
356
The channel map shows two Aerohive APs using channel 153 and
two Aerohive APs using 161 which provides double the bandwidth
than an single channel mesh solution
© 2014 Aerohive Networks CONFIDENTIAL
Radio Profiles
357
A Radio Profile determines the behavior of one of the two radios on
Aerohive AP to which you apply it. Each Aerohive AP has two radios.
The wifi0 radio operates in the 2.4 GHz band as specified in the IEEE
802.11b/g/n standards. The wifi1 radio operates in the 5 GHz band
as specified in the IEEE 802.11a/n/ac standards.
Note: Each radio can have its
own unique Radio Profile that
defines radio specific settings.
© 2014 Aerohive Networks CONFIDENTIAL
Lab: Radio Profile
1. Create a New Radio Profile for 2.4 GHz Radio
358
• From Monitor
All Devices
Select your  0X-A-
xxxxxx Aerohive AP
and click and
Modify
• For the 2.4 GHz
radio, click + to
create a new radio
profile
• Click More Settings…
© 2014 Aerohive Networks CONFIDENTIAL
Lab: Radio Profile
2. Set name and radio mode
359
• Profile Name:
2.4GHz-X
• Radio Mode:
11g/n
Optional Advanced Settings
• Important Notes:
› Background scanning is
used for auto channel
selection, and rogue AP
detection
› You can select a region
or just modify an existing
region to select your
own channel plan. The
default is USA with
channels 1, 6, and 11
• Do not save yet...
© 2014 Aerohive Networks CONFIDENTIAL
Copyright ©2011
Lab: Radio Profile (Band Steering)
3. Enable Band Steering
• Band steering
modes
› Urge 5 GHz band
use: Most clients will
go, but if they insist
on 2.4, let them stay.
› Balance band use:
Clients can be
steered to either
band. Allocate a
50/50 mix to
balance the clients
between the bands.
› Enforce 5 GHz band
use
If a client supports 5
GHz, only let them
on 5 GHz and not
the 2.4 GHz
360
• Expand Optimizing Management Traffic
Settings
• Check  Enable the steering of clients from the
2.4 to 5 GHz bands and select the Urge 5 GHz
band use option
© 2014 Aerohive Networks CONFIDENTIAL
Band Steering Animation
361
2.4GHz Client
2.4GHz
Probe
2.4GHz
Response
2.4GHz & 5GHz Client
(Out of Range of 5GHz)
2.4GHz
& 5GHz
Probe
5GHz
Response
2.4GHz &
5GHz
Response
2.4GHz & 5GHz Client
(In of Range of 5GHz)
2.4GHz
& 5GHz
Probe
5GHz
Response
Connected
at 5GHz
Connected
at 2.4GHz
Connected
at 2.4GHz
© 2014 Aerohive Networks CONFIDENTIAL
Copyright ©2011
Lab: Radio Profile (Load Balancing)
4. Load Balancing
• Check  Enable Client
Load Balancing and
select the Load Balancing
Mode: Station-Number
• Click Save
362
Note: When using client load
balancing, the same type of load-
balancing mode must be selected
on both radios since this is an AP
function vs. an individual radio.
© 2014 Aerohive Networks CONFIDENTIAL
Load Balancing Animation
363
3 clients 6 clients 60 clients 21 clients21 clients 21 clients 24 clients 21 clients
© 2014 Aerohive Networks CONFIDENTIAL
Lab: Radio Profile
4. Assign 11na Profile and Create 11ng Profile
364
• Verify your 2.4
GHz radio (wifi0) is
assigned to your
new radio profile:
2.4GHz-X
• Create a profile
for your 5 GHz
radio(wifi1)
› Click +
› Click More
Settings...
© 2014 Aerohive Networks CONFIDENTIAL
Lab: Radio Profile
5. Enable High Density WLAN and Band Steering
365
• Profile Name:
5GHz-X
• Radio Mode:
11a/n
• NOTE: If the AP supports DFS in
your country, you can enable
it here
• Expand Channel and Power
• Select 40 MHz and Above
• Expand Optimizing
Management Traffic Settings
• Enable Client Load
Balancing and select the
Load Balancing Mode
Station-Number
• Click Save
© 2014 Aerohive Networks CONFIDENTIAL
Copyright ©2011
1 2 6 113 4 5 7 8 9 12 13 1410
Channel Bonding (2.4 & 5 GHz)
5.25
GHz
5.35
GHz
5.470
GHz
5.725
GHz
5.825
GHz
5.15
GHz
UNII-1 UNII-2 UNII-3UNII-2e
40MHz 802.11n channel2.402 GHz 2.483 GHz
366
© 2014 Aerohive Networks CONFIDENTIAL
Copyright ©2011
802.11ac Channel Bonding
367
• The 5 GHz radios in the
Aerohive AP370 and
AP390 can be configured
for 80 MHz wide channels.
• More frequency space
will need to be available
for the 80 MHz wide
channel use. Therefore
you should enable DFS
channel use for optimal
configuration.
• However, legacy clients
may not support the DFS
channels.
© 2014 Aerohive Networks CONFIDENTIAL
Lab: Radio Profile
6. Assign 11na Profile and Create 11ng Profile
368
• Verify your 5 GHz
radio (wifi1) is
assigned to your
new radio profile:
5GHz-X
• Click Save
© 2014 Aerohive Networks CONFIDENTIAL
Radio Profiles
Local Demo If Possible
369
The radio profile settings cannot be
demonstrated in this lab environment.
However, your instructor may be able to
demonstrate band steering locally.
Remember: Some devices will not allow
themselves to be steered, since the client
makes its own roaming decisions.
© 2014 Aerohive Networks CONFIDENTIAL
Radio Profiles
Local Demo If Possible
370
• Students and Instructor: Observe the connected data rate of
your classroom laptop. Are you connected to 2.4 GHz or 5 GHz?
• Instructor ONLY repeat the previous lab using the Aerohive APs in
the Training Room and Update the Training Room Aerohive APs.
• Students and Instructor disconnect from the Aerohive Class SSID
and then reconnect.
• Go to MonitorClientsActive Clients and apply the Training
Room-X Filter you made in an earlier lab.
• Determine how many devices were able to be guided into 5
GHz. Note the data rates of the clients.
• Go to MonitorAccess PointsAerohive Access Points.
• Locate the Training Room Aerohive APs.
• Examine the Client load on each Aerohive AP to see the
balance of Client Devices among the Aerohive APs
• On the desktop of your laptop verify the data rate you are using.
© 2014 Aerohive Networks CONFIDENTIAL© 2014 Aerohive Networks CONFIDENTIAL
QUESTIONS?
© 2014 Aerohive Networks Inc.
SECTION 12:
DEPLOYMENT OPTIMIZATION
372
Aerohive’s
Instructor-led Training
© 2014 Aerohive Networks CONFIDENTIAL
User Profiles – Provide User Policy
Assigned to SSIDs or Bridge Interfaces
373
User Profiles provide the policy to
assign to users when they access
an SSID or bridge interface
• Attribute Number
Used to identify the user profile in a
Hive – returned by Private PSK Group
or from RADIUS after successful
authentication
• VLAN Assignment
The VLAN assigned to clients
• GRE Tunnels
L3-Roaming & Identity-based Tunnels
• User Firewalls
MAC level Firewall and
Stateful IP (L3/L4) Firewall Policies
• QoS Settings
Specifies rate limits and weights for
user queues, users, and user profiles
© 2014 Aerohive Networks CONFIDENTIAL
User Profiles – Provide User Policy
Yes, there is more!
374
• Availability Schedules
Permitted User Access Times
• SLA Settings
Specify a service level agreement
and decide to report on and/or
boost client performance to meet a
client’s SLA with help from the
dynamic airtime scheduling engine
• Client Classification Rules
Reassign user profiles based on the
MAC OUI, Operating System, Domain
membership or BYOD/CID ownership
of a user device.
© 2014 Aerohive Networks CONFIDENTIAL
SSID Profiles and User Profiles
375
• An SSID that uses a Pre-shared Secret (PSK) or
Open Authentication can be mapped to 1 User
Profile if no authentication is being used
• An SSID that uses 802.1X, Captive Web Portal, or
MAC authentication , or user profile
reassignment can be mapped to 63 additional
user profiles
• When a user is assigned to a user profile, they get
assigned their VLAN, Firewall Policies, QoS
Settings, Tunnel Polices, Service Level
Agreement Settings, and Time of Day Access
SSID: Guest-WiFi
Map to Guest-Profile
SSID: Corp-WiFi
Map to Employee-Profile
User Profile Examples
Employee-Profile
- Employee FW Policy
Full Access
- Employee QoS Policy
High QoS
- Employee VLAN = 10
Guest-Profile
- Guest FW Policy
Internet Access
only
- Guest QoS Policy
2 Mbps Max
- Guest VLAN = 8
GuestEmployee
© 2014 Aerohive Networks CONFIDENTIAL
Management and Native VLAN Configuration
376
• Management and Native
VLANS are configured in
the Network Policy.
• CAPWAP, Cooperative
Control protocols, SSH
and other management
traffic reside in the
Management VLAN.
• The Native VLAN is for
untagged traffic.
Although the default MGT VLAN setting is 1, a good security best practice
is to change the setting for the MGT VLAN to a non-default value.
© 2014 Aerohive Networks CONFIDENTIAL
Using Trunked Ports and VLANS
377
802.1Q
VLAN 1 – Native VLAN
VLAN 2 – Management VLAN
VLAN 5,10,20
SSIDs
Employee 802.1X VLAN 5
Device PPSK VLAN 10
IDM/Guest VLAN 20
802.1Q
Multiple user VLANs will require
802.1Q tagging.
© 2014 Aerohive Networks CONFIDENTIAL
Aerohive APs and VLANs
Guidelines
378
• The Native VLAN (Untagged VLAN) setting must match the same
setting for the Native VLAN ID on the switch
• Any traffic from an access client on a Aerohive AP that is assigned to a
VLAN, which does not match the native VLAN ID, is tagged with the
VLAN identifier before being sent out of the Ethernet interface
• If the mgt0 VLAN ID does not match the mgt0 Native VLAN ID, and
management traffic will be tagged with the VLAN id assigned to the
mgt0 interface
int mgt0 vlan 1
int mgt0 native-vlan 1
Switch port trunk VLANs 1-100
Switch port native (untagged) VLAN1
© 2014 Aerohive Networks CONFIDENTIAL
Aerohive APs and VLANs
Example – Wrong Settings
379
• Traffic from the AP management interface to the LAN will be
untagged and dropped by the switch which expects the
management traffic to be tagged. VLAN 1 traffic is untagged.
• To correct this: The native VLAN on the Aerohive AP must match the
native VLAN on the switch
int mgt0 VLAN 2
int mgt0 native-VLAN 2
User Profile: Employee VLAN 20
Switch port trunk
Switch port native VLAN 1
Switch port trunk VLANs 1-100
Employee
Client PC
LAN
© 2014 Aerohive Networks CONFIDENTIAL
Management Server Settings
380
• The Network Policy can be used to configure Aerohive devices to
communicate with other servers and services beyond HiveManager.
• The appropriate outbound firewall ports will need to be opened to
allow the Aerohive Devices to communicate with other
management servers.
© 2014 Aerohive Networks CONFIDENTIAL
Network Time Protocol (NTP) and Time
Configuration
381
The public Aerohive NTP server is used to set the clocks
of your Aerohive Devices. You can edit this object to
use a different NTP server.
Mandatory: You must change the time zone to match the time zone
where your Aerohive Devices reside. Do this BEFORE you configure the
rest of your Network Policy.
© 2014 Aerohive Networks CONFIDENTIAL
Network Time Protocol (NTP)
382
• Time settings must be correctly configured for 802.1X or PPSK to work
properly.
• PPSKs have a start time and a validity period that must be verified for
their use.
• When using certificates with 802.1X, proper time settings are
required.
• NTP settings are also important for the correct time stamps in log files.
802.1X authentication mechanisms require
proper time settings to function correctly.
Certificates have validity periods that must
be valid for 802.1X authentication to work.
It is a best practice to use an NTP server
to synchronize time settings on all devices
used in 802.1X processes.
Private PSKs are credentials that have a
start time. Private PSKs, like other
credentials, can also be time limited.
Therefore, it is imperative that the
HiveManager Time Settings be in proper
synchronization with your network. The
use of an NTP server is highly
recommended.
© 2014 Aerohive Networks CONFIDENTIAL
On-Premise HiveManager NTP Settings
383
• On-Premise HiveManager settings are configured in Home 
Administration  HiveManager Settings.
• When time settings are changed in HiveManager, a reboot is
required.
© 2014 Aerohive Networks CONFIDENTIAL
Syslog
384
• The use of NTP to synchronize the timestamp on messages from all syslog
clients ensures that all messages reported to the Syslog server appear in
the proper chronological order.
• You can set up to four Syslog servers to which Aerohive devices can
save event log entries.
• Remember that devices send Syslog messages for the severity level you
choose plus messages for all the more severe levels above it. Choose to
send information you must collect.
It is a recommended best practice for PCI
compliance that the Syslog server and the
Aerohive devices using it are on the same
internal network.
© 2014 Aerohive Networks CONFIDENTIAL
For Your Information Outside US
Set the Country Code for World Mode Devices
385
IMPORTANT: The Class APs are
in the U.S., so DO NOT
change the country code!
Note: Updating the country
code on an AP configures
the radios to meet
government requirements
for the chosen country
You can update the country
by going to MonitorAll
Devices
• Select all the devices that
within a single country
• Click Update...Advanced
Update Country Code
• Select the appropriate
country code
• Click Upload
• Repeat these steps if you
have devices in additional
countries
© 2014 Aerohive Networks CONFIDENTIAL
Rogue Classification – WIPS Policy
WIPS Policy used to detect and classify access points:
• Aerohive AP – Authorized Aerohive access point
• Friendly AP – Manual classification of a neighboring AP
• Rogue AP – Unauthorized access point
• Rogue AP (In-Net) – Unauthorized access point that is
connected to the wired network
386
© 2014 Aerohive Networks CONFIDENTIAL
Rogue Mitigation
387
In Network
Rogue
1. Rogue AP sends
ARP or any broadcast
2. Switch floods out all ports
3. APs learn MAC of rogue
device on their Ethernet
port
4. BSSID of rogue is detected when
Aerohive APs perform scans
5. Aerohive AP compares BSSID of all
learned MAC addresses, and if it
is within a range of 64 above or
64 below a learned MAC address
then BSSID is considered in the network
1.
2.
3.
6. If a Aerohive AP sees a station
attached to the rogue, it will
send spoofed unicast 802.11
deauths from the MAC of the
station to the BSSID, and from
the BSSID to the MAC of the client
7. The 4 deauths in each direction
are sent per second per
mitigating AP
8. With one mitigating AP, the
station may get some packets
transmitted, but with two or more
mitigating APs, the client is
contained
6.
© 2014 Aerohive Networks CONFIDENTIAL
Lab: Locating and Mitigating Rogue APs
1. Modify Additional Settings
388
Rogue AP Detection
and other features
can be found in
Additional Settings
• Go to
Configuration
• Select your
Network Policy:
Corp-X and
click OK
• Next to Additional
Settings click Edit
© 2014 Aerohive Networks CONFIDENTIAL
Lab: Locating and Mitigating Rogue APs
2. Create a WIPS Policy
389
• Expand
Service
Settings
• Next to WIPS
Policy
- Click +
• Name: WIPS-X
© 2014 Aerohive Networks CONFIDENTIAL
Lab: Locating and Mitigating Rogue APs
3. Define Rogue AP Parameters
390
• Select  Enable short preamble
check
• Select  Enable short beacon
interval check
• Select  Enable WMM check
• Select  Enable BSSID Detection
• Select  Aerohive-MAC-OUI
• Select  Determine if detected
rogue APs are in the backhaul
network
• Do not save yet...
© 2014 Aerohive Networks CONFIDENTIAL
Lab: Locating and Mitigating Rogue APs
4. Define Rogue Mitigation Parameters
391
• Do not select  Enable SSID detection
› Note: Aerohive APs can check if the SSID names that other access
points advertise along with the type of encryption other APs might
use match those in a checklist. - In this lab, all students have a
different SSID, so do not enable SSID detection.
• Select  Enable ad hoc network detection
› Note: When stations in an ad hoc network transmit 802.11 beacons
and probe responses, the ESS (extended service set) bit is set to 0
and the IBSS bit is set to 1, indicating add hoc capability.
Do not save yet..
© 2014 Aerohive Networks CONFIDENTIAL
Lab: Locating and Mitigating Rogue APs
5. Define Rogue Mitigation Parameters
392
• Expand Optional Settings
• Change mitigation mode to: Semi-Automatic
› IMPORTANT: If you use Automatic, it should only be enabled for rogue APs that
are detected as in network, otherwise you may mitigate valid APs and clients
from neighboring companies which is illegal.
• Set the Max number of mitigator APs per rogue AP to: 3
› Note: this means that up to 3 APs which detect a rogue AP can send de-
authentication frames to the rogue AP and any attached client every second
• Select  Enable Rogue Client Reporting
• Click Save
IMPORTANT: For class, do not
enable Automatic, because that
will impact other classes that
are going on at the same time.
© 2014 Aerohive Networks CONFIDENTIAL
Rogue Mitigation
393
© 2014 Aerohive Networks CONFIDENTIAL
Lab: Locating and Mitigating Rogue APs
6. Select the WIPS Policy
394
• In your Network policy,verify the
WIPS Policy is set to: WIPS-X
• Click Save.
© 2014 Aerohive Networks CONFIDENTIAL 395
• Click Continue or click on the Configure and Update
Devices bar.
Lab: Locating and Mitigating Rogue Aps
7. Update the Devices
© 2014 Aerohive Networks CONFIDENTIAL 396
• Go to Configuration and select your Corp-X policy and click OK
• Click on the Continue button
• From the Configure & Update Devices section, click the drop
down next to Filter and select the Current Policy Filter.
Lab: Locating and Mitigating Rogue Aps
8. Update the Devices
© 2014 Aerohive Networks CONFIDENTIAL 397
• Select your 0X-A-xxxxxx access point
• Click the Update button
• Click Update Devices to push your Network
Policy to your access points
Lab: Locating and Mitigating Rogue Aps
9. Update the Devices
© 2014 Aerohive Networks CONFIDENTIAL 398
• Click the Update Button
• The Delta update will be pushed to your AP
Lab: Locating and Mitigating Rogue Aps
10. Update the Devices
© 2014 Aerohive Networks CONFIDENTIAL
Copyright ©2011
The AP will not need to reboot this time because
this is a Delta update. Only the configuration
changes in the Network Policy were uploaded.
399
Lab: Locating and Mitigating Rogue Aps
11. Update the Devices
© 2014 Aerohive Networks CONFIDENTIAL
Email Notification of In Network Rogue APs
(View Only Permissions in Class)
400
• You can be alerted
when In Network
rogue APs are
detected
• Go to Home
Administration
HiveManager Services
• Select  Update Email
Service Settings
• Select  Enable Email
Notification
• Select In-net Rogue AP
• Deselect any setting
you do not want to
receive
• Click Update
NOTE: Your permissions do not allow you to modify these settings for class
© 2014 Aerohive Networks CONFIDENTIAL
Lab: Locating and Mitigating Rogue Aps
12. Verify Rogue AP Policy Settings
401
1. Verify Wireless IPS Policy
› Go to MonitorAccess PointsRogue APs
› Change Items per page to 100
› Select the Reporting Aerohive AP column
› See if you can find the MAC address of your Aerohive AP
reporting a rogue AP
NOTE: You can go to Settings
Signal Strength Threshold
and define a strong signal strength
RSSI value so that you can filter
on strong RSSI values instead
of showing all Rogue APs
regardless of signal strength.
© 2014 Aerohive Networks CONFIDENTIAL
Semi-Automatic Rogue Mitigation
• When mitigation is set to Semi-Automatic, you can mitigate in-net
rogues by going to: MonitorAccess PointsRogue APs
• Select a BSSID for a rogue SSID to mitigate
• Click Mitigation...Start Mitigation, and click Yes
• The APs will cooperate among themselves to determine which APs
should participate in mitigation, which is similar to automatic
mitigation
402
Reason(s) why
considered rogue
Found to be
attached to the
wired network
© 2014 Aerohive Networks CONFIDENTIAL
Topology Maps
With Rogue AP Detection and Client Location
403
• Select the box
next to  Rogues
• If three or more
Aerohive APs on a
map detect a
rogue,
HiveManager can
estimate the
location of the
rogue on the
topology map
• Also, if the
Aerohive AP
location service is
enabled, you can
view clients as well
Friendly AP
Rogue AP
Client
© 2014 Aerohive Networks CONFIDENTIAL© 2014 Aerohive Networks CONFIDENTIAL
QUESTIONS?
© 2014 Aerohive Networks Inc.
SECTION 12:
AEROHIVE DEVICE MONITORING
AND TROUBLESHOOTING
Aerohive’s
Instructor-led Training
© 2014 Aerohive Networks CONFIDENTIAL
HiveManager Help
406
HiveManager provides a rich and powerful online help
Click Help on the top menu bar to get a menu of the
help options
Click
Help
© 2014 Aerohive Networks CONFIDENTIAL
Help System in HiveManager
407
When you click Help in the upper right hand corner of
the HiveManager Settings you have several options.
› HiveManager Help
» Context sensitive help based on where you are when you
select this option
› Settings
» Lets you specify a path to host the online help web pages
locally on your network
› Videos and Guides
» Contains links to all Aerohive documentation and
computer-based training modules
» You can also download the web-based help system from
here as well
› Check for Updates
» Checks Aerohive’s latest code
› About HiveManager
© 2014 Aerohive Networks CONFIDENTIAL
Help: Context Sensitive
408
• Context sensitive
help can be
viewed in any
configuration
window
• By default your
PC must be
connected to
the Internet to
view the help
files unless you
have
downloaded
them and
hosted on your
own web server
© 2014 Aerohive Networks CONFIDENTIAL
Help: Global Search
409
Click the relevant
section
The help is automatically expanded
when the search strings are found.
Explore the help system by conducting a search
for Dynamic Airtime Scheduling by typing the
subject in the search window and clicking on the
magnifying glass.
© 2014 Aerohive Networks CONFIDENTIAL
Help System in HiveManager
410
Deployment,
Quickstart, and
Mounting
Guides
Online Training
CLI Reference
Guides
© 2014 Aerohive Networks CONFIDENTIAL 411
• To access the new Help System for Mobile Devices, simply go to:
http://www.aerohive.com/330000/docs/help/english/6.1r3/hm/
mobile/help.htm
• Shortened URL: http://bit.ly/1aO1kJ7
New Help System for Mobile Devices
Landing Page Table of Contents
© 2014 Aerohive Networks CONFIDENTIAL
New Help System for Mobile Devices
412
• By using a smart
phone or Internet-
accessible device,
you can view a
mobile-friendly
version of the Help
system.
• This allows you
access to Help on
a mobile device
while access
HiveManager from
your desktop
without obstructing
your view of HM.
© 2014 Aerohive Networks CONFIDENTIAL
Aerohive Utilities, Tools and their
Functions
413
From basic to advanced device
troubleshooting and configuration within the
GUI.
© 2014 Aerohive Networks CONFIDENTIAL
Aerohive Utilities, Tools and their Functions
Lab: Getting Connected to the Hosted Training HiveManager
414
• Securely browse to the appropriate HiveManager for class
› TRAINING LAB 1
https://training-hm1.aerohive.com
https://72.20.106.120
› TRAINING LAB 2
https://training-hm2.aerohive.com
https://72.20.106.66
› TRAINING LAB 3
https://training-hm3.aerohive.com
https://209.128.124.220
› TRAINING LAB 4
https://training-hm4.aerohive.com
https://203.214.188.200
› TRAINING LAB 5
https://training-hm5.aerohive.com
https://209.128.124.230
• Supported Browsers:
› Firefox, Internet Explorer, Chrome, Safari
• Class Login Credentials:
› Login: adminX
X = Student ID 2 - 29
› Password: aerohive123
NOTE: In order to access the
HiveManager, someone at your
location needs to enter the
training firewall credentials given
to them by the instructor first.
© 2014 Aerohive Networks CONFIDENTIAL
Client Visibility at a Glance
Without Diving Into Statistics
Good connection
High data rates & high
successful transmission rates
Marginal connection
Lower data rates / lower
successful transmission rates
Poor connection
Low data rates / low
successful transmission rates
Client HealthClient Statistics
Calibrated to the organizations deployment goals
• High density, performance oriented network
• Normal density network
• Low density, coverage oriented network
415
© 2014 Aerohive Networks CONFIDENTIAL
Client Health = Sum of Its Parts
416
Radio health
Application health
Based on SLA
Overall: “sum” of
components to
the right
IP network health
(DHCP, DNS, etc)
© 2014 Aerohive Networks CONFIDENTIAL
Client Health Example
417
•At a glance
understanding of
a clients health
•Easy to drill into
problem client
info
© 2014 Aerohive Networks CONFIDENTIAL
Client Health Blog
418
http://blogs.aerohive.com/blog/living-on-the-edge/diagnosing-
wi-fi-with-aerohives-client-health-tool
© 2014 Aerohive Networks CONFIDENTIAL 419
Client Monitor allows you to monitor the process a wireless client
goes through when connecting with an Aerohive AP as well as
other ongoing client activity such as probe requests and
responses.
Client Monitor
© 2014 Aerohive Networks CONFIDENTIAL
Client & Aerohive AP Layer 2
Handshakes
420
© 2014 Aerohive Networks CONFIDENTIAL
Lab: Client Monitor
1. Select a client to monitor
421
• To start monitoring a clients
connection state go to:
MonitorClientsActive Clients
• Select the  check box next your
client to monitor
Note: If your client does not appear, you
can skip this step for now
• Click Operation...Client Monitor
• For class, ensure your Associated
Aerohive AP is selected (Do not
select All)
• The MAC address of your client will
be selected
Note: You can manually enter a the
wireless client MAC address without
delimiters
• Write down your clients MAC address
• Note: Remember the Client MAC address
for the next step in the lab.
• Click Add
Click Client Monitor
Click Operation...
Click Add
Select your
Aerohive AP
© 2014 Aerohive Networks CONFIDENTIAL
Lab: Client Monitor
2. Start the client monitor
422
• Select  Filter Probe
Note: This removes all the
probe requests and responses
you will see from clients and
APs so you can focus on
protocol connectivity
• Click Start
Note: Your client will be
monitored until you click Stop.
You can leave this window,
and if you go back to
Operation...
Client Monitor, you will see the
list of all clients being
monitored
• You can expand the window
by dragging the bottom right
corner
• Select your client to see the
connection logs for your client
as they occur
1. Select 
Filter Probe
2. Click Start
3. Drag bottom right corner
of window to expand
© 2014 Aerohive Networks CONFIDENTIAL
Lab: Client Monitor
3. Create a client problem to troubleshoot
423
From the bottom task bar, click the
locate wireless networks icon
› Select Open Network and Sharing
Center
› Click Manage wireless Networks
› Select your SSID and remove it
© 2014 Aerohive Networks CONFIDENTIAL
Lab: Client Monitor
4. Enter Wrong Security Key for your SSID
• Single-click the
wireless icon on the
bottom right corner of
the windows task bar
• Try to connect to your
Device-PSK-X SSID,
but enter an
INCORRECT security
key
• Click Connect
› Security Key:
aerohive456
› Click OK
424
© 2014 Aerohive Networks CONFIDENTIAL
Lab: Client Monitor
5. Analyze client monitor output
425
• Go back to the Active ClientsOperations...Client Monitor
• View the output to look for a problem
• Here you can see that a 4-way handshake is failing
› This requires some knowledge of the protocol, but the first two
messages are to validate the PSK, and that is what is failing
• You can Export the data and send to support to help troubleshoot
PSK authentication
4-way handshake fails
and client is
de-authenticated
© 2014 Aerohive Networks CONFIDENTIAL
Lab: Client Monitor
6. Connect to your SSID with the correct security key
426
Correct the problem:
• Single-click the
wireless icon on the
bottom right corner
of the windows task
bar
• Click your SSID
Device-PPSK-X
› Click Connect
› Enter the correct
Security Key: PPSK
from earlier lab
› Click OK
© 2014 Aerohive Networks CONFIDENTIAL
Lab: Client Monitor
7. Fix PSK and view connection results
427
After correcting the problem:
View the client monitor again to view the results
4-way handshake
completes
Client is assigned IP
address from DHCP
© 2014 Aerohive Networks CONFIDENTIAL
Client Monitor
If Client Does Not Exist In Active Clients
428
You do not need to know the client location or associated Aerohive AP. If you leave
the fields blank, they will automatically be found
2. Note Wireless
MAC Address
1. On a windows PC for example: Have client open a
CMD prompt then type ipconfig /all
Make sure to view the Wireless Network Connection
5. Select 
Filter Probe6. Click Start
3. From Active
Clients, click
Operation...
Client Monitor
4. Enter the
wireless
client MAC
address
© 2014 Aerohive Networks CONFIDENTIAL
Client Monitor Troubleshooting 802.1X Blog
429
Client Monitor is the perfect tool to troubleshoot 802.1X/EAP
problems
More information can be found at:
http://blogs.aerohive.com/blog/the-wireless-lan-training-
blog/troubleshooting-wi-fi-connectivity-with-hivemanager-tools
© 2014 Aerohive Networks CONFIDENTIAL
Copyright ©2011
Virtual Access Console
Overview
430
Track IP
(Default Gateway)
Default gateway is
not responding to
PING
The AP advertises a
WPA2 SSID that is its
hostname_ac
The administrator
connects to the SSID,
and opens an SSH
connection to the AP
© 2014 Aerohive Networks CONFIDENTIAL
Lab: Virtual Access Console
1. Create an Wireless Access Console Object
431
To create a Wireless Access
Console object
• In your Network Policy go
to: Additional Settings
Service Settings
and next to
Access Console click +
• Name: Console-X
• Mode: Auto
› Note: Auto requires Track-IP
to trigger an action of
access console if access to
one or more specified IP
addresses is lost
› Recommendation: Set
mode to enable during
Aerohive AP installation and
set back to Auto after your
installation is complete.
Optionally you can
specify the MAC
addresses of
permitted
administrators then
deny the rest.
© 2014 Aerohive Networks CONFIDENTIAL
Lab: Virtual Access Console
2. Create an Wireless Access Console Object
432
Access Security
• Select WPA2-PSK
(WPA2-Personal)
› Encryption Method:
CCMP(AES)
› ASCII Key: aerohive123
› Confirm ASCII Key:
aerohive123
Optional Settings
• Use the default settings
Note: Telnet is secured because
you are using it over an
encrypted Wi-Fi connection.
Also, if you know the MAC
addresses of the wireless cards
on administrator PCs, you can
add them here as well to limit
access.
• Click Save
© 2014 Aerohive Networks CONFIDENTIAL
• In your network policy, verify the Access Console is set
to: Console-X
Lab: Virtual Access Console
3. Verify Access Console
433
Do not save yet...
© 2014 Aerohive Networks CONFIDENTIAL
Lab: Virtual Access Console
4. Create a Track IP Group
434
To create a track IP group to track the default gateway
and enable the access console if the gateway is
unreachable..
• Under Track IP Groups for Backhaul
• Click +
© 2014 Aerohive Networks CONFIDENTIAL
Lab: Virtual Access Console
5. Configure a Track IP Group
435
• Name: Track-X
•  Enable IP tracking
Track the following targets
•  Default Gateway
• Take action when:
all targets become
unresponsive
Action
•  Enable the virtual
access console
•  Disable all active SSIDs
• Click Save
Note: Note, disabling active SSIDs when the tracked IPs
are not available may lead people to believe the Wi-Fi is
not working, although the real problem is that the wired
network is down. If you enable this, please realize that
you may have to explain that to people.
© 2014 Aerohive Networks CONFIDENTIAL
Lab: Virtual Access Console
6. Active the Track IP Group
436
• Click on the Track-X IP Group object
• Click on the > arrow and move the object to
the right window to activate
• Click Save
© 2014 Aerohive Networks CONFIDENTIAL
Additional Actions using the Access
Console policy
437
In addition to bringing up the Virtual Access
Console when the Track IP group is not reachable,
you can also select to start the Backhaul(mesh)
failover procedure. This triggers mesh failover on a
loss of IP connectivity instead of link-sate.
© 2014 Aerohive Networks CONFIDENTIAL
Lab: Virtual Access Console
7. Updating the devices
438
• Click Continue or click on the Configure and Update
Devices bar.
© 2014 Aerohive Networks CONFIDENTIAL 439
• Select your 0X-A-xxxxxx access point
• Click the Update button
• Click Update Devices to push your Network
Policy to your access point
Lab: Virtual Access Console
8. Updating the Devices
© 2014 Aerohive Networks CONFIDENTIAL 440
• Click the Update Button
• The Delta update will be pushed to your AP
Lab: Virtual Access Console
9. Updating the Devices
© 2014 Aerohive Networks CONFIDENTIAL
Virtual Access Console
Test loss of connectivity to default gateway
441
• The instructor will disable ping on the default gateway
› This will cause track-ip to fail and enable the access
console
• The access console will appear as an SSID with the
following format: <AP_Hostname>_ac
Access Console IP:
Access Console SSID:
Broadcast SSID:
Services:
1.1.2.1/24
01-A-001122_ac (Hostname_ac)
Yes or No
SSHv2 Access
Telnet Optional
Client
MGT0 IP:10.5.2.10
MAC: 0019:7700:1122
Hostname: 01-A-001122
Firewall/Gateway
10.5.2.1Connect to SSID:
IP:
Gateway:
01-A-001122_ac
1.1.2.2/24
1.1.2.1
The Gateway
provided by
Aerohive AP is IP of
the Access Console
Track IP Will Fail
© 2014 Aerohive Networks CONFIDENTIAL
Lab: Virtual Access Console
10. Determine your Aerohive APs Access Console SSID
442
• Your Wireless Access
Console SSID is the
hostname of your
AP appended with _ac
• In this example, the
access console SSID for
the Aerohive AP
above is:
15-A-06b840_ac
• The access console is
set to Auto mode,
which means it will be
enabled if track IP fails
to get a response, or if
its Ethernet interface is
disconnected.
Hostname
© 2014 Aerohive Networks CONFIDENTIAL
Lab: Virtual Access Console
11. Connect to Your Aerohive APs Access Console
443
• View the SSIDs from your
hosted computer
• Within a moment or two,
after track IP fails, you will
see the SSID:
X-A-######_ac
• Click Connect
• Enter the
Passphrase/Network Key
you created for the
access console SSID:
aerohive123
© 2014 Aerohive Networks CONFIDENTIAL
Lab: Virtual Access Console
12. Verify the IP address of your laptop
444
• The hosted computer will obtain an IP from the Aerohive
AP
• The default gateway provided is an access console IP
to access the Aerohive AP from the CLI
› You do not have to worry about IP conflicts, because the IP is
only accessible via the unique Access Console SSID
C:> ipconfig | more
Ethernet adapter Wireless Network Connection:
IP Address. . . . . . . . . . . . : 1.1.2.2
Subnet Mask . . . . . . .. . : 255.255.255.0
Default Gateway . . . . . . : 1.1.2.1
© 2014 Aerohive Networks CONFIDENTIAL
Lab: Virtual Access Console
13. Telnet to your Aerohive APs Access Console
445
From the hosted computer:
Telnet to your Access Console IP
C:> telnet 1.1.2.1
login: admin
Password: aerohive123
Aerohive Networks Inc.
Copyright (C) 2006-2012
0X-A-NNNNNN# show run
© 2014 Aerohive Networks CONFIDENTIAL
Lab: Virtual Access Console
14. Troubleshoot the AP’s connection problem
446
• Some commands to try out to help see where the problem is
access-console mode enable (Keeps the access console enabled)
show int mgt0
show int mgt0 dhcp client
show ip route
ping <default gateway>
VLAN PROBE:
int mgt0 dhcp-probe vlan-range 1 10 timeout 2
© 2014 Aerohive Networks CONFIDENTIAL
Copyright ©2011
VLAN Probe Educational Blog
A more detailed explanation on how to use VLAN probe to
troubleshoot the wired network can be found at:
http://blogs.aerohive.com/blog/the-wireless-lan-training-
blog/its-not-a-wi-fi-problem-use-vlan-probe-to-troubleshoot-
the-wired-network
447
© 2014 Aerohive Networks CONFIDENTIAL
Lab: Virtual Access Console
15. View CAPWAP Status
To view the CAPWAP status
AH-0021c0# show capwap client
CAPWAP client: Enabled
RUN state: Connected securely to the HiveManager
CAPWAP Aerohive AP IP: 10.5.1.101
CAPWAP HiveManager IP: 10.5.1.20
CAPWAP Destination Port: 12222
CAPWAP Send Event: Disabled
CAPWAP DTLS status: Enabled
. . .
448
Notes Below
© 2014 Aerohive Networks CONFIDENTIAL
Lab: Virtual Access Console
16. CAPWAP Ping
If your Aerohive AP is not connecting to HiveManager, use CAPWAP
Ping
 This will verify routes and firewall access to your HiveManager
 Works when CAPWAP transport is UDP
02-A-064200# capwap ping hivemanager
CAPWAP ping parameters:
Destination server: hivemanager (10.5.1.20)
Destination port: 12222
Count: 5
Size: 56(82) bytes
Timeout: 5 seconds
• Turn off the access console
access-console mode auto (resets the access console to automatic)
449
© 2014 Aerohive Networks CONFIDENTIAL
Virtual Access Console
Instructor fixes the to default gateway
450
• The instructor will now re-enable ping to the default
gateway
› The access console SSID will disappear
• The Device-PPSK-X SSID will reappear
Client
Firewall/Gateway
10.5.2.1
SSID: Device-PPSK-X
© 2014 Aerohive Networks CONFIDENTIAL
The Utilities Menu
451
To bring up the Utilities Menu:
• Go to Monitor Devices
• Select the desired Device Type
• Select the box  next to the desired Device
• Click Utilities
© 2014 Aerohive Networks CONFIDENTIAL 452
• The Utilities Menu can be accessed from both the Utilities button
and from the MAPS view
• To access the Utilities from MAPS, right click on an AP and select
the desired tool
The Utilities Menu
© 2014 Aerohive Networks CONFIDENTIAL
Tools Available Within the Utilities Menu
453
• There are Utilities in the initial dropdown list
that are quite useful
• Some of the items offer even more
functionality through dropdown lists of
their own
• Many of the Utilities offer the same
functionality as directly accessing a
device and using CLI tools, without the
need of console access
• The tools available in the Utilities menu
can be used on any Aerohive Device
found in your HiveManager
• Functionality and tools may vary based
upon device type
© 2014 Aerohive Networks CONFIDENTIAL
Examining the Utilities
Client Information
454
• Client Information is available by navigating to the following
location Utilities  Client Information
• Client Information provides useful data such as:
› MAC Address
› IP Address
› Host Name
› Connection Time
› RSSI values, SSID, VLAN
› Authentication Method
› Encryption Method
› Client CWP Used, User Profile ID
› Radio Mode
› Channel
› Last Transmission Rate
© 2014 Aerohive Networks CONFIDENTIAL 455
• L2 Neighbor Information is available by navigating to the
following location Utilities  L2 Neighbor Information
• L2 Neighbor Information reveals information such as:
› Host Names of Neighbors
› MAC addresses of Neighbors
› Connection Time
› Link Cost
› RSSI Values
› Link Type
Examining the Utilities
L2 Neighbor Information
© 2014 Aerohive Networks CONFIDENTIAL 456
• Diagnostics reveals a list of
extremely useful troubleshooting
tools
• Some tools allow you to
troubleshoot the device and it’s
configuration
• Some tools allow you to
troubleshoot networking issues
• You may wish to use a few of these
before your Aerohive network
installation is complete, to
document network configurations
prior to deployment
Examining the Utilities
Diagnostics
© 2014 Aerohive Networks CONFIDENTIAL 457
• Navigate to Monitor and place a check in the box  next
to your 0X-A-###### AP
• Click Utilities and select Diagnostics  Ping from the
available list
Examining the Utilities
LAB 1. Ping
© 2014 Aerohive Networks CONFIDENTIAL 458
• By default, the device is configured to PING it’s HiveManager
• You can enter any other IP address and use the PING
tool to test connectivity from the AP to that device
Examining the Utilities
LAB 2. Ping
© 2014 Aerohive Networks CONFIDENTIAL 459
• Navigate to Monitor and place a check in the box  next
to your 0X-A-###### AP
• Click Utilities and select Diagnostics  Show Running
Config from the list
Examining the Utilities
LAB 3. Launch Utilities/Diagnostics
© 2014 Aerohive Networks CONFIDENTIAL 460
• Examine the output
• Find your device Hostname and IP address
• Locate your DNS server address
Examining the Utilities
LAB 4. Show Running Config View Output
© 2014 Aerohive Networks CONFIDENTIAL 461
Examining the Utilities Diagnostics
LAB 5. Show Version
• Navigate to Monitor and place a check in the box  next
to your 0X-A-###### AP
• Click Utilities and select Diagnostics  Show Version
from the list and find out which version of HiveOS is on
your device
© 2014 Aerohive Networks CONFIDENTIAL 462
Examining the Utilities Diagnostics
LAB 6. Show DNXP Neighbors
• Navigate to Monitor and place a check in the box  next to
your 0X-A-###### AP
• Click Utilities and select Diagnostics  Show DNXP
Neighbors from the list and see Layer 2 and Layer 3
neighbor relationships
© 2014 Aerohive Networks CONFIDENTIAL 463
Examining the Utilities Diagnostics
LAB 7. Show CPU
• Navigate to Monitor and place a check in the box  next
to your 0X-A-###### AP
• Click Utilities and select Diagnostics  Show CPU from
the list and view the device CPU usage
© 2014 Aerohive Networks CONFIDENTIAL 464
Examining the Utilities Diagnostics
LAB 8. VLAN Probe
• Navigate to Monitor  Aerohive APs and place a check in
the box  next to your 0X-A-###### AP
• Click Utilities and select Diagnostics  VLAN Probe
© 2014 Aerohive Networks CONFIDENTIAL
Copyright ©2011
• A DHCP Discover is sent out on each specified VLAN in the
range from the Aerohive AP
• If a DHCP offer is received from the DHCP server, the Aerohive
AP will NAK will be sent to free up the offer
• This tool ensures the switches, routers, DHCP relays, and DHCP
server all work for the VLANs that are available
• Enter a range of 1 to 10
• Click Start
• View the results
465
You can also see the
subnet of the IP
address that was
returned from DHCP!
Examining the Utilities Diagnostics
LAB 9. VLAN Probe
© 2014 Aerohive Networks CONFIDENTIAL 466
• To view Status after selecting a device go to Utilities >
Status
• Status allows you to see the following:
› Advanced Channel Selection Protocol
› Interface
› Wi-Fi Status Summary
Examining the Utilities
Status
© 2014 Aerohive Networks CONFIDENTIAL 467
Examining the Utilities
LAB 10. Advanced Channel Selection Protocol
• Navigate to Monitor and place a check in the box  next to
your 0X-A-###### AP
• Click Utilities and select Status  Advanced Channel
Selection Protocol
• Examine the Channels and power settings being used by
your AP
© 2014 Aerohive Networks CONFIDENTIAL 468
Examining the Utilities
LAB 11. Interface
• Navigate to Monitor and place a check in the box  next
to your 0X-A-###### AP
• Click Utilities and select Status  Interface
• Examine the configuration of both your wireless and
wired interfaces
© 2014 Aerohive Networks CONFIDENTIAL 469
Examining the Utilities
LAB 12. Wi-Fi Status Summary
• Navigate to Monitor and place a check in the box  next
to your 0X-A-###### AP
• Click Utilities and select Status  Wi-Fi Status Summary
• Examine the status of your wireless interfaces
© 2014 Aerohive Networks CONFIDENTIAL 470
• LLDP/CDP can be enabled to allow your device to collect and
transmit Link Layer Discovery Protocol data and Collect Cisco
Discovery Protocol data
• Typically this would be enabled via your Network Policy
• Here in Utilities you will have many of the same LLDP/CDP options
expected to be found in the CLI
Examining the Utilities
Status
© 2014 Aerohive Networks CONFIDENTIAL 471
• This option allows the viewing of all currently active Session
Initiation Protocol (SIP) calls
• The ALG SIP calls option is only available from Aerohive APs
• SIP is used for controlling multimedia communication sessions
such as voice and video calls over Internet Protocol (IP) networks
• SIP works with several other Layer 7 protocols that identify and
carry the session media
Examining the Utilities
ALG SIP Calls
© 2014 Aerohive Networks CONFIDENTIAL 472
• Displays configurations in HiveManager that are different than
those on the device being audited
• Allows you to see if any configuration changes are required
Examining the Utilities
Configuration Audit
© 2014 Aerohive Networks CONFIDENTIAL 473
• Reboot Device allows you to reboot devices from the Utilities
menu
• Set Image to Boot allows you to select either the Active or
Backup image stored on the device
Examining the Utilities
Reboot Device and Set Image to Boot
© 2014 Aerohive Networks CONFIDENTIAL 474
• Locate Device allows you to alter the LED status on Aerohive APs
• Facilitates rapid physical location of Aerohive APs
• You can select the LED Color
• You can alter the Blink Mode
Examining the Utilities
Locate Device
© 2014 Aerohive Networks CONFIDENTIAL 475
• Same action as reset config in the CLI
• Restores the device to factory settings
• Can restore devices to a Bootstrap configuration if you have
created and set one on the devices
• Once executed, upon next report to HiveManager, the devices
will appear as Unconfigured Devices
Examining the Utilities
Reset Device to Default
© 2014 Aerohive Networks CONFIDENTIAL 476
• Displays any alarms generated by the
selected device in HiveManager
Examining the Utilities
Alarms
© 2014 Aerohive Networks CONFIDENTIAL 477
• Launches a Secure Shell (SSH) connection to the device from
HiveManager
• Uses the Device Credentials from within HiveManager
• Provides remote access with console commands
Examining the Utilities
SSH Client
© 2014 Aerohive Networks CONFIDENTIAL 478
• Allows you to use a different SSH client than the one provided in
HiveManager should you so desire
• Provides an opportunity to configure the SSH Proxy credentials
and settings
Examining the Utilities
SSH Proxy
© 2014 Aerohive Networks CONFIDENTIAL 479
• Allows Aerohive Devices located behind firewalls to make a
secure connection to Aerohive Support
• Allows Aerohive support to more easily assist in troubleshooting
Examining the Utilities
Aerohive Device Phone Home
© 2014 Aerohive Networks CONFIDENTIAL 480
• Allows you to retrieve the output of the show tech command
through the HiveManager GUI
• Displays a wealth of important technical support information
Examining the Utilities
Get Tech Data
© 2014 Aerohive Networks CONFIDENTIAL 481
• Helps locate the source of Layer 1 interference
• Works on most APs and the BR200WP
Examining the Utilities
Spectrum Analysis
© 2014 Aerohive Networks CONFIDENTIAL 482
Examining the Utilities
LAB 13. Spectrum Analysis
• Navigate to Monitor and place a check in the box  next
to your 0X-A-###### AP
• Click Utilities and select Spectrum Analysis
• Click YES in the Confirm window
While conducting Layer 1 analysis, Layer 2
functions will be disrupted.
© 2014 Aerohive Networks CONFIDENTIAL 483
• Analyze the output in 2.4 GHz
• Click on Settings and change the Interface to 5 GHz
• Set the 5 GHz Channels to 36-165 and click Update
• Analyze the output in 5 GHz
Examining the Utilities
LAB 14. Spectrum Analysis
© 2014 Aerohive Networks CONFIDENTIAL
Configuration Rollback
Provides Safeguarded Configuration Updates
484
2. HiveManager Sends New Configuration (NC) Update
and adds configuration rollback settings to configuration for Aerohive
AP
3. The current configuration (CC)
becomes the rollback (RB)
configuration, and the new
configuration (NC) is then loaded
4. If the Aerohive AP cannot
contact HiveManager with
CAPWAP after the configuration
update, the Aerohive AP will start a
configuration rollback timer, which
is 10 minutes, and after the timer
expires, the Aerohive AP will reboot
and use the rollback configuration
to regain connectivity back to
HiveManager
RB
1. Administrator updates
complete or delta
configuration of Aerohive APs
NC
CC
NC
© 2014 Aerohive Networks CONFIDENTIAL
Configuration Rollback
Configuration rollback is enabled by default
Occurs after Updates when an Aerohive Device cannot
establish CAPWAP connectivity with HiveManager
Wait time is 10 minutes
485
© 2014 Aerohive Networks CONFIDENTIAL
Configuration Rollback
Example – Configuration Update
• In this example the Aerohive AP’s MGT0 interface is set to a VLAN
that does not exist on the switch the AP is connected to
• When updating the configuration, if you view the configuration, you
can see that the config rollback command is set
486
Here the MGT0 interface is
set to the wrong VLAN
“by accident ”
The configuration audit shows
that the configuration rollback
command is set
© 2014 Aerohive Networks CONFIDENTIAL
Configuration Rollback
Example – Configuration Update Results
• It takes 15 minutes for a configuration upload to
timeout if there are connectivity issues after the
update
• The Hive Device waits 10 minutes then it will
rollback its configuration, reboots then contacts
HiveManager, which may take around 12
minutes
• The Hive Device update timer takes about 15
minutes to expire before the Hive Device can
be updated again
487
© 2014 Aerohive Networks CONFIDENTIAL
Contextual Application Dashboard
HTML 5 based Dashboard loads and navigates faster
488
© 2014 Aerohive Networks CONFIDENTIAL
Customizable Tab Views
489
• Click the + button to add your own Perspective
• Select the Widgets you wish to use and
Click the Save button
• Your Customized Tab will appear as My Perspective
© 2014 Aerohive Networks CONFIDENTIAL
Lab: Customized Dashboard
1. Experiment with customizing the dashboard
490
• Click Dashboard to view a customizable widgetized display
• Select Add Content to select up to 10 widgets to display
• The changes are saved per administrator account
Click and drag the widget
bar to move the widget to a
new location on the screen
Click Edit to select up to 10
widgets to be displayed
© 2014 Aerohive Networks CONFIDENTIAL 491
Lab: Reporting
1. Building a Network Summary Report
• Click the Dashboard tab and select the Network Summary tab
• Select World
• Click the dropdown arrow on the far right
• Click Save as Report
© 2014 Aerohive Networks CONFIDENTIAL 492
Lab: Reporting
2. Building a Network Summary Report
• Name the report Reports-X
• For Report Frequency select Daily
• For Email Delivery Address use your real email address
and Click Save
© 2014 Aerohive Networks CONFIDENTIAL 493
Lab: Reporting
3. Viewing the Report
• In the Information dialogue box Click the here link.
© 2014 Aerohive Networks CONFIDENTIAL 494
• Select the top four applications on the left
• Click the Save button on the right
Lab: Reporting
4. Viewing the Report
© 2014 Aerohive Networks CONFIDENTIAL 495
Notice that your custom report has been saved
Lab: Reporting
5. Viewing the Report
© 2014 Aerohive Networks CONFIDENTIAL 496
• From the Dashboard tab click on the dropdown arrow
on the far right
• Select Export from the dropdown choices
Lab: Reporting
6. Exporting the Report
© 2014 Aerohive Networks CONFIDENTIAL 497
• Save and open the report
• Scroll through the information
Lab: Reporting
7. Download and view the Report
Viewing reports requires a PDF reader.
© 2014 Aerohive Networks CONFIDENTIAL
Application Discovery
498
• Over 700 Applications are AUTO-DISCOVERED with detailed
context
› Identify traffic patterns and most popular applications without
any configuration
› No need to create user-defined watch lists
• Detailed context and drilldowns supported
© 2014 Aerohive Networks CONFIDENTIAL
Copyright ©2011
Application Visibility
499
Historical Filters
Most Used
Applications By
Bandwidth Usage
Heaviest
Users
Top Apps by
# of usersAll Applications
© 2014 Aerohive Networks CONFIDENTIAL
Copyright ©2011
500
Application Visibility
• Application usage can be viewed at an individual user basis
• Individual users can be identified by 802.1X or PPSK credentials.
• With static PSK or Open SSIDs, the MAC address is the identifier.
© 2014 Aerohive Networks CONFIDENTIAL
Signature Update Mechanism
501
• Signature Update Mechanism similar to HiveOS update
mechanism
› Expect new signatures released quarterly
› Upload new signatures to HiveOS Devices (~5 MB
files)
› No reboot needed.
» File loads onto AP, L7 service stops temporarily on AP to load new signatures.
© 2014 Aerohive Networks CONFIDENTIAL
Signature Update Mechanism
502
• When new HiveOS
versions are released
application signature
updates are
automatic.
• Signature updates
can also be done
manually.
• L7 visibility is available
for wireless clients on
all Aerohive APs and
wired clients on BR-200
router.
© 2014 Aerohive Networks CONFIDENTIAL
Custom Application Detection Rules
503
Monitor and Prioritize applications that REALLY matter to your
business. Some examples include:
• Online testing applications
› E.g. Port based rule for Pearson TestNav
application
• CITRIX based applications in healthcare
› E.g. Distinguish imaging versus EMR applications
over CITRIX via IP Address range + Port rules
• Track custom web-applications
› E.g. Hostname rule to detect Outlook email over
HTTPS
› E.g. Proprietary hosted web applications
Monitoring
Application
Prioritization
Firewall
© 2014 Aerohive Networks CONFIDENTIAL
Custom Application Detection Rules
504
• Multiple rules can be created and are evaluated from
top to bottom
• Rules can be created using a Host Name, Server IP
Address & Port Number or just a Port Number
© 2014 Aerohive Networks CONFIDENTIAL 505
• Click on
Configuration 
Advanced
Configuration 
Common Objects
 Application
Services
• Click on the
Custom
Applications tab
• Click on the Add
button
Lab: Custom Application Detection Rules
1. Create a Custom Application object
Note: This lab must
be done by the
instructor or one
student chosen by
the instructor
© 2014 Aerohive Networks CONFIDENTIAL 506
Lab: Custom Application Detection Rules
2. Create a Custom Application object
• Application Name:
Aerohive-X
• Host Name - HTTP
• www.aerohive.*
› Wildcards can be
used
• Click Add
• Host Name - HTTPS
• www.aerohive.*
• Click Add
• Click Save
© 2014 Aerohive Networks CONFIDENTIAL 507
• From Monitor, All
Device, Aerohive
APs
• Check the box next
to your AP  AP-0X-
A-######
• Click Update
Updates Devices
• Click Update
Lab: Custom Application Detection Rules
3. Update your Access Point
© 2014 Aerohive Networks CONFIDENTIAL 508
• From your hosted PC,
browse to some of the
Aerohive web pages:
www.aerohive.com
• Wait about 20 minutes
• From the 1 hour view in
the Application
Dashboard, notice your
custom application has
been detected.
Lab: Custom Application Detection Rules
4. View Custom Application Visibility
© 2014 Aerohive Networks CONFIDENTIAL
APPLICATION CONTROL
WITH AP QOS AND FIREWALL
POLICIES
509
© 2014 Aerohive Networks CONFIDENTIAL
Application Control
510
•QoS
›Voice
›Video
•Firewall
›Application
›Ports
© 2014 Aerohive Networks CONFIDENTIAL
L7 Aware Classifier Maps for QoS queues
• Configuration  Advanced Configuration  QOS
Configuration  Classifier Maps  New
• QoS policies can be created based on L7 applications
© 2014 Aerohive Networks CONFIDENTIAL
Rate Control & Queuing
512
• Maintain different Rate
Control & Queuing
settings for different user
profiles
› Executives get Netflix
access at normal
bandwidth
› Employees get Netflix
at 250 kbps
• Use Policing Rates on a
Queue for 802.11g and
802.11n devices
› Netflix classified into
Class 1/ Best Effort 2
› Set Policing Rate for
each PHY down to
250 kbps
© 2014 Aerohive Networks CONFIDENTIAL 513
• Go to
Configuration,
select your Corp-X
policy and click OK.
• Under User Profile,
click on the link for
your Devices-X User
Profile
• Under Optional
Settings, expand
Firewalls
• Under IP Firewall
Policy click + next
to From-Access
Lab: Application Firewall
1. Create an Application Firewall Policy
© 2014 Aerohive Networks CONFIDENTIAL 514
• ddd
Lab: Application Firewall
2. Create an Application Firewall Policy
• Name the Policy Application-X.
• Click the + button to the right.
• Under Service, select Application
Services.
© 2014 Aerohive Networks CONFIDENTIAL 515
•Choose Group
•Type streaming
•Select  3-4
streaming apps
and move them to
the right >.
•Click OK.
Lab: Application Firewall
3. Create an Application Firewall Policy
© 2014 Aerohive Networks CONFIDENTIAL 516
• ddd
Lab: Application Firewall
4. Create an Application Firewall Policy
• Under Action select Deny.
• Click the save icon to the right.
• Click + to create another rule.
© 2014 Aerohive Networks CONFIDENTIAL 517
Lab: Application Firewall
5. Create an Application Firewall Policy
• Under Service, select Application Services.
• Select Application
• Type the name of a social media app such as Facebook
and Twitter.
• Select  2-3 social media apps and move them to the
right >.
• Click OK
© 2014 Aerohive Networks CONFIDENTIAL 518
Lab: Application Firewall
6. Create an Application Firewall Policy
•Under Actions choose Deny.
•Click the Save icon.
© 2014 Aerohive Networks CONFIDENTIAL 519
• ddd
Lab: Application Firewall
7. Create an Application Firewall Policy
•Click the Save button.
© 2014 Aerohive Networks CONFIDENTIAL 520
• Verify that your From-Access policy is selected.
• Default Action = Permit
• Click the Save button.
Lab: Application Firewall
8. Create an Application Firewall Policy
© 2014 Aerohive Networks CONFIDENTIAL 521
• ddd
Lab: Application Firewall
9. Create an Application Firewall Policy
• Click the Continue button to configure
and update devices.
© 2014 Aerohive Networks CONFIDENTIAL 522
• Choose the 0X-APs filter
• Check the box next to your AP  AP-0X-A-######
• Click Upload
Lab: Application Firewall
10. Create an Application Firewall Policy
© 2014 Aerohive Networks CONFIDENTIAL 523
• From TightVNC, go to: labN-
pcX.aerohive.com password:
aerohive
• Connect to your SSID: Device-PPSK-X
• Open a browser and try to connect
to some of the streaming media and
social media sites from your policy.
Lab: Application Firewall
11. Testing your Application Firewall Policy
© 2014 Aerohive Networks CONFIDENTIAL 524
• If time permits, the instructor can create
their own Application Firewall Policy and
upload it to the classroom access points.
• Students connected to the classroom APs,
can try to use any of the blocked
applications.
• Discuss results.
OPTIONAL Instructor Demo
© 2014 Aerohive Networks CONFIDENTIAL© 2014 Aerohive Networks CONFIDENTIAL
QUESTIONS?
© 2014 Aerohive Networks Inc.
SECTION 13:
FIRMWARE UPDATES
526
Aerohive’s
Instructor-led Training
© 2014 Aerohive Networks CONFIDENTIAL
Updating On-Premise HiveManager Software
Do not perform this operation in class
You can upgrade your
HiveManager by going to:
 HomeAdministration
HiveManager Operations
Update Software
 You can update from a
local file, SCP, or the
Aerohive update server
 Click OK to update
Note: The wireless LAN is
completely operational when
HiveManager is being updated.
Depending on whether the
HiveManager software is
accessible over a high speed link,
the size of the database, and the
number of logs to convert, the
update can take a few minutes to
a few hours.
527
IMPORTANT! Before performing
the software update, you should
backup the database and store
it in a safe place.
© 2014 Aerohive Networks CONFIDENTIAL
On-Premise HiveManager Partitions
(Do not reboot the HiveManager in Class)
• The updated HiveManager will be in a new disk partition
• The old partition remains in tact
› This allows you to Reboot back into your old partition and HiveManager
software version if needed
• Go to HomeAdministrationHiveManager Operations
Reboot Appliance
› Here you can see the partition that is active, and the one that is in standby
› You can reboot into either of the partitions
528
© 2014 Aerohive Networks CONFIDENTIAL
Updating HMOL Software
529
• When the “Flashing Bee” appears, new software updates are
available.
• HomeAdministrationHiveManager OperationsUpdate Software
• Click OK and follow the prompts
© 2014 Aerohive Networks CONFIDENTIAL 530
• By clicking Continue,
the update verifies that
your Aerohive Devices
will have CAPWAP
connectivity with the
new servers.
• Once the validation is
complete, the Update
test results will be
displayed.
Updating HMOL Software
© 2014 Aerohive Networks CONFIDENTIAL 531
• In in Confirm
dialogue box, you
are reminded to
verify that your
devices can reach
URL’s ending in
aerohive.com.
• The software update
continues.
• When prompted,
click the Confirm
button to complete
the update.
Updating HMOL Software
© 2014 Aerohive Networks CONFIDENTIAL
Updating HiveOS
Multiple HiveOS Version Support
• Using HiveManager, you can update
the HiveOS of the same model.
› all Aerohive Devices
› a set of Aerohive Devices
› a single Aerohive Device
• HiveManager can manage Aerohive
Devices running different version of
HiveOS.
532
The software on HiveManager should
ALWAYS be on the same version of code
or NEWER than the managed devices to
be able to manage them. Therefore, you
should upgrade HiveManager before
updating your devices to newer code.
© 2014 Aerohive Networks CONFIDENTIAL
Lab: Updating HiveOS
1. Update HiveOS on Your Aerohive AP
From Monitor  Access
PointsAerohive APs
• Select  Aerohive AP
• Select Update 
Advanced  Upload
and Activate
HiveOS Software
• Select a HiveOS image
from the list
› If you do not have an
image you can import
one first by clicking
Add/Remove
• Do not update yet...
533
Click Add/Remove to obtain
HiveOS Software for the update
© 2014 Aerohive Networks CONFIDENTIAL
Adding HiveOS Versions for Updates
534
• There is different
software for each
Aerohive Device
platform.
• You can select from
existing software on
HiveManager.
• Device software not
already on
HiveManager can be
obtained from the
support site and
uploaded to your
HiveManager or
obtained via the
Aerohive Update
Server
© 2014 Aerohive Networks CONFIDENTIAL
Optional: Distributed Updates
535
Only 1 copy of the HiveOS software is sent to the remote office
1. Administrator Uploads
HiveOS to a set of
Aerohive APs in a branch office
over a WAN link or the
Internet 3. The rest of the
Aerohive APs at
the remote site SCP to
the Image Upgrade
Server Aerohive AP
and install the HiveOS
software
2. One Aerohive AP at the remote
site is selected as the Image
Upgrade Server and obtains the
HiveOS software
from HiveManager
Internet
HiveManager Branch Office
© 2014 Aerohive Networks CONFIDENTIAL
Lab: Distributed Updates
2. Update Settings
536
You specify settings that can
be applied each time you
update
• If Aerohive APs are mesh
nodes, or you are updating
over the Internet or WAN,
you can chose to activate
at next reboot.
› When the update is
complete, you can click
the link to reboot your
Aerohive AP
› You can also rate limit
the update so you do
not overwhelm smaller
links
• Click the Save icon Note: TFTP can be enabled for
connections that use WAN
optimizers for Aerohive APs
managed across a WAN
If you enable distributed
update, ensure you select the
APs in a single branch office
at one time to update
© 2014 Aerohive Networks CONFIDENTIAL
Selecting the Update Server/Device
537
• When updating multiple devices, you may wish to choose a
single device to pull the update from HiveManager and distribute
it to the other devices on its subnet, making it an Update Server.
• To do so, click the Change Server button and select the desired
device. (Make sure to NEVER select a Mesh Point as the Server. If
its Mesh Portal reboots during the process, updating the other
devices will be problematic.)
Push the Updates to the Mesh Points
FIRST to ensure they are able to finish
before any Mesh Portals reboot.
When selecting your Image Upgrade
Server, ALWAYS select a Mesh Portal
(an AP with an Ethernet connection).
© 2014 Aerohive Networks CONFIDENTIAL
Lab: Distributed Updates
3. Upload HiveOS
538
• Click Upload
• After a few minutes, you
should see the update is a
success
• When updating the
software, if you elected to
activate at next reboot,
you can select the box next
your Aerohive Device and
reboot it or click the Reboot
link to activate the new
HiveOS version
© 2014 Aerohive Networks CONFIDENTIAL© 2014 Aerohive Networks CONFIDENTIAL
QUESTIONS?
© 2014 Aerohive Networks Inc.
SECTION 14:
CLASS REVIEW LAB
540
Aerohive’s
Instructor-led Training
© 2014 Aerohive Networks CONFIDENTIAL
Class Review Lab
You will now create a brand new Network Policy based upon what
you have learned in this class.
• Lab Scenario
› Your customer, a large school, is deploying a new WLAN using
Aerohive access points.
› Use Aerohive’s Planning Tool to plan AP placement and coverage.
You will be using the school.jpg floor plan already in HiveManager.
This floor plan has no scale. You must use a door way referenced
as 3 feet to scale the map.
› You must plan the network including allowance for two SSIDs
» Teachers/Staff using an 802.1X security solution using VLAN 10
» Students will be using a PPSK security solution using VLAN 8 and a Firewall policy
blocking social media access.
• Upload the new policy to your 0X-AP and test from your VNC client.
• Ask the instructor for guidance if needed.
• The instructor will review your results.
541
© 2014 Aerohive Networks CONFIDENTIAL© 2014 Aerohive Networks CONFIDENTIAL
QUESTIONS?
© 2014 Aerohive Networks Inc.
SECTION 15:
AUTO PROVISIONING
543
Aerohive’s
Instructor-led Training
© 2014 Aerohive Networks CONFIDENTIAL
Instructor Demo: Auto Provisioning
544
• Click Configuration
• Select Auto Provisioning in the
Navigation Pane
• Click the New Button
© 2014 Aerohive Networks CONFIDENTIAL
Instructor Demo: Auto Provisioning
545
• Click the IP Management Button
• In the Imported Device
IP Subnetworks box
Click the Enter IP
Button
© 2014 Aerohive Networks CONFIDENTIAL
Instructor Demo: Auto Provisioning
546
• Enter the IP Subnetwork upon which your APs reside using CIDR
notation as seen in the example used in the image below
• Click Save
• Click OK and close the import dialog box
© 2014 Aerohive Networks CONFIDENTIAL
Instructor Demo: Auto Provisioning
547
• Enable Auto Provisioning
• Name your Profile InstructorDemo
• Select the device model being used
• Select  Use Serial Numbers or IP
Subnetworks to identify devices
for Auto Provisioning
• Move your subnetwork to the right
© 2014 Aerohive Networks CONFIDENTIAL
Instructor Demo: Auto Provisioning
548
• Under Provisioning Configurations select a STUDENTS
policy from the dropdown list
• Select the Building1_Floor1 Default Topology Map
© 2014 Aerohive Networks CONFIDENTIAL
Instructor Demo: Auto Provisioning
549
• Expand Advanced Settings
• Select  Upload configuration
automatically
• Select  Reboot after uploading
• Scroll up and click Save
© 2014 Aerohive Networks CONFIDENTIAL
Instructor Demo: Auto Provisioning
550
• Go to Monitor-All Devices
• Select all of the students APs
• Click Remove
• When the APs relocate HiveManager they will be provisioned as
you have configured (This may take a few minutes)
© 2014 Aerohive Networks CONFIDENTIAL© 2014 Aerohive Networks CONFIDENTIAL
QUESTIONS?
© 2014 Aerohive Networks Inc.
SECTION 16:
COOPERATIVE CONTROL
OVERVIEW
552
Aerohive’s
Instructor-led Training
© 2014 Aerohive Networks CONFIDENTIAL
Control Plane
In the Hive Using Cooperative Control
553
• Uses Distributed Control, the devices cooperate with each other
rather than using an expensive bottleneck device (Controller)
• The Control Plane in Aerohive Deployments Is implemented at the
edge of an Aerohive network
› Responsible for making forwarding decisions and programming
the data plane
› Is implemented at the edge of an Aerohive network, closer to
the users
› Operates within a Hive for fast and secure layer 2 and layer 3
roaming
› Used for best path forwarding with mesh routing and
redundancy, client isolation, locationing
› Responsible for layer 2 tunnel authentication, layer 2 tunnel
failover, dynamic NAS secret creation for Aerohive AP RADIUS
servers, dynamic RF, band steering, cooperative client load
balancing, etc..
© 2014 Aerohive Networks CONFIDENTIAL
Cooperative Control Within a Hive
554
Hive – Cooperative control for a group of Hive Devices that
share the same Hive name and Hive password.
› There is no limit to the number of Hive Devices that can
exist in a single Hive
› Aerohive APs in a Hive cooperate with each other using
Aerohive’s cooperative control protocols:
»AMRP (Aerohive Mobility Routing Protocol)
–Layer 2 and Layer 3 Roaming, Load Balancing, Band Steering, Layer
2 GRE Tunnel Authentication and Keepalives
»DNXP (Dynamic Network Extensions Protocol)
–Dynamic GRE tunnels to support layer 3 roaming
»INXP (Identity-Based Network Extensions Protocol)
–GRE tunnels for guest tunnels
»ACSP (Automatic Channel Selection & Power) Protocol
–Radio Channel and Power Management
© 2014 Aerohive Networks CONFIDENTIAL
Aerohive APs in Same Hive Use
Cooperative Control Protocols to Enable:
555
Wireless Mesh,
Dynamic Mesh
Routing,
Ethernet Bridging
over Wireless
Mesh,
Fast and Secure L2 and L3 Roaming,
L3
L2L2
Aerohive APs must be configured to be in the same Hive to interoperate with these
features
Layer 2 IPsec VPN,Branch Office HQ Network
Guest Tunneling with GRE,
and more...DMZInternal Network
Guest Client
Ethernet
Devices
Client
Aerohive APs
Cooperative
Radio Channel and
Power Management
with,
Cooperative client
load balancing, and
band steering,
© 2014 Aerohive Networks CONFIDENTIAL
Copyright ©2011
Roam
556
Cooperative Control Example: Roaming
Handoffs using AMRP
• User authenticates and
associates then keys are
distributed
• The Aerohive AP
predicatively pushes
keys and session state to
one hop neighbors
• As the client roams and
associates with another
Aerohive AP the traffic
continues uninterrupted
by the roam
556
RADIUS Server
© 2014 Aerohive Networks CONFIDENTIAL
Copyright ©2011
How does it work?
557
A single HiveAP by itself acts as
a full-featured enterprise class
access point
Identity-based security, including stateful
inspection FW, rogue detection & mitigation
Airtime Scheduling, SLA compliance and local
forwarding implemented at the edge
HiveAPs are discovered,
policy is pushed and the
WLAN is operational
HiveManager is a single mgmt interface
for configuration, OS updates &
monitoring of thousands of devices
With a second HiveAP, fast
stateful roaming,
cooperative RF, station
load balancing and
seamless resiliency are
enabled
Mesh networking and best
path forwarding can be
used for extra resiliency
and reachability
Dynamically reroutes around
failures
As more HiveAPs are
added, coverage,
reliability and backhaul
bandwidth increases
Cooperative RF power
levels minimize
co-channel interference
With Cooperative Control,
clients can securely
and seamlessly roam
across the WLAN
Dynamic best path
forwarding and stateful
roaming provides
resiliency without a single
point of failure
With Cooperative Control,
clients can securely
and seamlessly roam
across the WLAN
Wireless
Network
Wired
Network

 Secure Fast L2/L3 Roaming
Traffic Flow Comparison
Resiliency Comparison
Seamless Wired Integration
Reporting Heat
Maps
SLA
Compliance
Policy
Configuration
HiveManager NMS
© 2014 Aerohive Networks CONFIDENTIAL
Copyright ©2011
Client Roaming In Action
558
6 7
12
9
3
16 17
22
19
13
4 5
10
8
2
14 15
20
18
11
26 27
32
29
23
36 37
39
33
24 25
30
28
21
34 35
40
38
31
10
6 7
12
9
3
16 17
22
19
13
4 5
10
8
2
14 15
20
18
11
26 27
32
29
23
36 37
39
33
24 25
30
28
21
34 35
40
38
31
10
X AP to which client is Connected
X APs Sharing Clients information
X APs Removing Clients information
6 7
12
9
3
16 17
22
19
13
4 5
10
8
2
14 15
20
18
11
26 27
32
29
23
36 37
39
33
24 25
30
28
21
34 35
40
38
31
10
6 7
12
9
3
16 17
22
19
13
4 5
10
8
2
14 15
20
18
11
26 27
32
29
23
36 37
39
33
24 25
30
28
21
34 35
40
38
31
10
6 7
12
9
3
16 17
22
19
13
4 5
10
8
2
14 15
20
18
11
26 27
32
29
23
36 37
39
33
24 25
30
28
21
34 35
40
38
31
10
6 7
12
9
3
16 17
22
19
13
4 5
10
8
2
14 15
20
18
11
26 27
32
29
23
36 37
39
33
24 25
30
28
21
34 35
40
38
31
10
6 7
12
9
3
16 17
22
19
13
4 5
10
8
2
14 15
20
18
11
26 27
32
29
23
36 37
39
33
24 25
30
28
21
34 35
40
38
31
10
6 7
12
9
3
16 17
22
19
13
4 5
10
8
2
14 15
20
18
11
26 27
32
29
23
36 37
39
33
24 25
30
28
21
34 35
40
38
31
10
6 7
12
9
3
16 17
22
19
13
4 5
10
8
2
14 15
20
18
11
26 27
32
29
23
36 37
39
33
24 25
30
28
21
34 35
40
38
31
10
6 7
12
9
3
16 17
22
19
13
4 5
10
8
2
14 15
20
18
11
26 27
32
29
23
36 37
39
33
24 25
30
28
21
34 35
40
38
31
10As Clients
Roam, APs
Constantly
Update
Neighbours
© 2014 Aerohive Networks CONFIDENTIAL
Cooperative Control Example: Roaming
Cache
559
• AMRP forwards the
Pairwise Master
Key (PMK)
between APs
within the same
subnet.
• DNXP forwards the
PMK across Layer
3 boundaries.
• PMKs are also
forwarded to
next-hop
neighbors
• Next-hop
neighbors are APs
that within radio
range.
© 2014 Aerohive Networks CONFIDENTIAL
Hive - AMRP Operation Modes
Attach Message, DA and BDA roles
560
• AMRP Aerohive AP Operational Modes for Aerohive APs in the
same subnet of a Hive
› Attach – sends topology and load info to DA
» If DA exists, it takes <3 seconds for a new Aerohive AP to attach
» Sends unicast heartbeats and topology updates to DA
› DA (Designated AP) – AMRP Hello protocol automatically elects one DA
per subnet
» Broadcasts Hello Packets to neighbors every 3 seconds
» Periodically broadcast topology table to the Ethernet every 60 seconds
– Triggered update when other APs attach
› BDA (Backup Designated AP) – Is the backup for the DA
» Periodically broadcast Hello packets to neighbors every 3 seconds
» Syncs with DA every 20 seconds in unicast
. . .
Designated AP Backup Designated AP
The rest of the APs are in Attach Mode
© 2014 Aerohive Networks CONFIDENTIAL
Responsibilities of DA
561
• Arbitrator for Auto-channel Selection (ACSP) –
If multiple APs request the same channel at
the same time, the arbitrator determines which
AP should get the channel
• Responsible for sending link state updates to
Aerohive APs that are located in the same
subnet
• Layer 3 Roaming - Responsible for designating
APs responsible for being tunnel end points
based on tunnel load
© 2014 Aerohive Networks CONFIDENTIAL© 2014 Aerohive Networks CONFIDENTIAL
QUESTIONS?
© 2014 Aerohive Networks Inc.
Please review the supplemental information provided in
this class.
THE END
THANK YOU
563

Acwa AEROHIVE CONFIGURATION GIUDE.

  • 1.
    © 2014 AerohiveNetworks Inc. AEROHIVE CERTIFIED WIRELESS ADMINISTRATOR (ACWA) Aerohive’s Instructor-led Training
  • 2.
    © 2014 AerohiveNetworks CONFIDENTIAL Welcome 2 • Introductions • Facilities Discussion • Course Overview • Extra Training Resources • Questions
  • 3.
    © 2014 AerohiveNetworks CONFIDENTIAL Introductions 3 •What is your name? •What is your organizations name? •How long have you worked in Wi-Fi? •Are you currently using Aerohive?
  • 4.
    © 2014 AerohiveNetworks CONFIDENTIAL Facilities Discussion 4 • Course Material Distribution • Course Times • Restrooms • Break room • Smoking Area • Break Schedule › Morning Break › Lunch Break › Afternoon Break
  • 5.
    © 2014 AerohiveNetworks CONFIDENTIAL Aerohive Essentials WLAN Configuration (ACWA) – Course Overview 5 Each student connects to HiveManager, a remote PC, and a Aerohive AP over the Internet from their wireless enabled laptop in the classroom, and then performs hands on labs the cover the following topics: • Predictive modeling and WLAN design • HiveManager overview • Mobility solutions and Unified Policy Management • HiveManager initial configuration • Topology Maps: Real-time monitoring of AP coverage • Scenario: Create a secure access network for employees • Scenario: Create a secure access network for legacy devices using PPSK • Secure WLAN Guest Management • Scenario: Create a guest secure WLAN with unique user credentials • Device specific settings • Deployment optimization • Device monitoring and troubleshooting • Firmware updates • Bring Your Own Device (BYOD) • Auto-provisioning • Cooperative Control Protocols 2 Day Hands on Class
  • 6.
    © 2014 AerohiveNetworks CONFIDENTIAL Copyright ©2011 Aerohive Training Remote Lab 6 Aerohive Access Points using external antenna connections and RF cables to connect to USB Wi-Fi client cards (Black cables) Access Points are connected from eth0 to Aerohive Managed Switches with 802.1Q VLAN trunk support providing PoE to the APs (Yellow cables) Firewall with routing support, NAT, and multiple Virtual Router Instances Access Points are connected from their console port to a console server (White Cables) Console server to permit SSH access into the serial console of Aerohive Access Points Server running VMware ESXi running Active Directory, RADIUS, NPS and hosting the virtual clients used for testing configurations to support the labs
  • 7.
    © 2014 AerohiveNetworks CONFIDENTIAL Hosted Lab for Data Center 7 10.5.1.*/24 No Gateway 10.5.1.*/24 No Gateway 10.5.1.*/24 No Gateway HiveManager MGT 10.5.1.20/24 Win2008 AD Server MGT 10.5.1.10/24 Linux Server MGT 10.6.1.150./24 L3 Switch/Router/Firewall eth0 10.5.1.1/24 VLAN 1 eth0.1 10.5.2.1/24 VLAN 2 eth0.2 10.5.8.1/24 VLAN 8 eth0.3 10.5.10.1/24 VLAN 10 eth1 10.6.1.1/24 (DMZ) L2 Switch Native VLAN 1 Aerohive AP Common Settings in VLAN 1 Default Gateway: None MGT0 VLAN 1 Native VLAN 1 LAN ports connected to L2-Switch with 802.1Q VLAN Trunks X=2 X=3 X=N X=2 X=3 X=N Ethernet: 10.5.1.202/24 No Gateway Wireless: 10.5.10.X/24 Gateway: 10.5.10.1 Ethernet: 10.5.1.203/24 No Gateway Wireless: 10.5.10.X/24 Gateway: 10.5.10.1 Ethernet : 10.5.1.20N/24 No Gateway Wireless: 10.5.10.X/24 Gateway: 10.5.10.1 14 Client PCs For Wireless Access 14 Aerohive APs Terminal Server 10.5.1.5/24 Services for Hosted Class Win2008 AD Server: - RADIUS(IAS) - DNS - DHCP Linux Server: - Web Server - FTP Server
  • 8.
    © 2014 AerohiveNetworks CONFIDENTIAL Aerohive CBT Learning 8 http://www.aerohive.com/cbt
  • 9.
    © 2014 AerohiveNetworks CONFIDENTIAL Aerohive Education on YouTube 9 http://www.youtube.com/playlist?list=PLqSW15RTj6DtEbdPCGIm0Kigvrscbj-Vz Learn the basics of Wi-Fi and more….
  • 10.
    © 2014 AerohiveNetworks CONFIDENTIAL The 20 Minute Getting Started Video Explains the Details 10 Please view the Aerohive Getting Started Videos: http://www.aerohive.com/330000/docs/help/english/cbt/Start.htm
  • 11.
    © 2014 AerohiveNetworks CONFIDENTIAL Aerohive Technical Documentation 11 All the latest technical documentation is available for download at: http://www.aerohive.com/techdocs
  • 12.
    © 2014 AerohiveNetworks CONFIDENTIAL Aerohive Instructor Led Training 12 • Aerohive Education Services offers a complete curriculum that provides you with the courses you will need as a customer or partner to properly design, deploy, administer, and troubleshoot all Aerohive WLAN solutions. • Aerohive Certified WLAN Administrator (ACWA) – First-level course • Aerohive Cerified WLAN Professional (ACWP) – Second-level course • Aerohive Certified Network Professional (ACNP) – Switching/Routing course • www.aerohive.com/training – Aerohive Class Schedule
  • 13.
    © 2014 AerohiveNetworks CONFIDENTIAL Over 20 books about networking have been written by Aerohive Employees 13 CWNA Certified Wireless Network Administrator Official Study Guide by David D. Coleman and David A. Westcott CWSP Certified Wireless Security Professional Official Study Guide by David D. Coleman, David A. Westcott, Bryan E. Harkins and Shawn M. Jackman CWAP Certified Wireless Analysis Professional Official Study Guide by David D. Coleman, David A. Westcott, Ben Miller and Peter MacKenzie 802.11 Wireless Networks: The Definitive Guide, Second Edition by Matthew Gast 802.11n: A Survival Guide by Matthew Gast Aerohive Employees 802.11ac: A Survival Guide by Matthew Gast Over 30 books about networking have been written by Aerohive Employees
  • 14.
    © 2014 AerohiveNetworks CONFIDENTIAL Aerohive Exams and Certifications 14 • Aerohive Certified Wireless Administrator (ACWA) is a first- level certification that validates your knowledge and understanding about Aerohive Network’s WLAN Cooperative Control Architecture. (Based upon Instructor Led Course) • Aerohive Certified Wireless Professional (ACWP) is the second-level certification that validates your knowledge and understanding about Aerohive advanced configuration and troubleshooting. (Based upon Instructor Led Course) • Aerohive Certified Network Professional (ACNP) is another second-level certification that validates your knowledge about Aerohive switching and branch routing. (Based upon Instructor Led Course)
  • 15.
    © 2014 AerohiveNetworks CONFIDENTIAL Aerohive Forums 15 • Aerohive’s online community – HiveNation Have a question, an idea or praise you want to share? Join the HiveNation Community - a place where customers, evaluators, thought leaders and students like yourselves can learn about Aerohive and our products while engaging with like-minded individuals. • Please, take a moment and register during class if you are not already a member of HiveNation. Go to http://community.aerohive.com/aerohive and sign up!
  • 16.
    © 2014 AerohiveNetworks CONFIDENTIAL Aerohive Social Media 16 The HiveMind Blog: http://blogs.aerohive.com Follow us on Twitter: @Aerohive Instructor: David Coleman: @mistermultipath Instructor: Bryan Harkins: @80211University Instructor: Gregor Vucajnk: @GregorVucajnk Instructor: Metka Dragos: @MetkaDragos Please feel free to tweet about #Aerohive training during class.
  • 17.
    © 2014 AerohiveNetworks CONFIDENTIAL Copyright ©2011 Aerohive Technical Support – General 17 I want to talk to somebody live. Call us at 408-510-6100 / Option 2. We also provide service toll-free from within the US & Canada by dialing (866) 365-9918. Aerohive has Support Engineers in the US, China, and the UK, providing coverage 24 hours a day. Support Contracts are sold on a yearly basis, with discounts for multi-year purchases. Customers can purchase Support in either 8x5 format or in a 24 hour format. How do I buy Technical Support? I have different expiration dates on several Entitlement keys, may I combine all my support so it all expires on the same date? Your Aerohive Sales Rep can help you set-up Co-Term, which allows you to select matching expiration dates for all your support.
  • 18.
    © 2014 AerohiveNetworks CONFIDENTIAL Copyright ©2011 Aerohive Technical Support – The Americas 18 Aerohive Technical Support is available 24 hours a day. This can be via the Aerohive Support Portal or by calling. For the Support Portal, an authorized customer can open a Support Case. Communication is managed via the portal with new messages and replies. Once the issue is resolved, the case is closed, and can be retrieved at any time in the future. How do I reach Technical Support? I want to talk to somebody live. For those who wish to speak with an engineer call us at 408- 510-6100 / Option 2. We also provide service toll-free from within the US & Canada by dialing (866) 365-9918. I need an RMA in The Americas An RMA is generated via the Support Portal, or by calling our Technical Support group. After troubleshooting, should the unit require repair, we will overnight* a replacement to the US and Canada. Other countries are international. If the unit is DOA, it’s replaced with a brand new item, if not it is replaced with a like new reburbished item. *Restrictions may apply: time of day, location, etc.
  • 19.
    © 2014 AerohiveNetworks CONFIDENTIAL Copyright ©2011 Aerohive Technical Support – International 19 Aerohive international Partners provide dedicated Technical Support to their customers. The Partner has received specialized training on Aerohive Networks’ product line, and has access to 24 hour Internal Aerohive Technical Support via the Support Portal, or by calling 408-510-6100 / Option 2. How Do I get Technical Support outside The Americas? World customer’s defective units are quickly replaced by our Partners, and Aerohive replaces the Partner’s stock once it arrives at our location. Partners are responsible for all shipping charges, duties, taxes, etc. I need an RMA internationally
  • 20.
    © 2014 AerohiveNetworks CONFIDENTIAL Copyright Notice 20 Copyright © 2014 Aerohive Networks, Inc. All rights reserved. Aerohive Networks, the Aerohive Networks logo, HiveOS, Aerohive AP, HiveManager, and GuestManager are trademarks of Aerohive Networks, Inc. All other trademarks and registered trademarks are the property of their respective companies.
  • 21.
    © 2014 AerohiveNetworks CONFIDENTIAL© 2014 Aerohive Networks CONFIDENTIAL QUESTIONS?
  • 22.
    © 2014 AerohiveNetworks Inc. SECTION 1: PLANNING AND DESIGNING YOUR NETWORK 22 Aerohive’s Instructor-led Training
  • 23.
    © 2014 AerohiveNetworks CONFIDENTIAL The Relationship between the OSI Model and Wi-Fi 23 Wi-Fi operates at layers one and two Wireless LAN’s provide access to the distribution systems of wired networks. This allows the users the ability to have connections to wired network resources. Session Application Network Transport Physical Presentation Data Link
  • 24.
    © 2014 AerohiveNetworks CONFIDENTIAL Where Wi-Fi Fits into the OSI Model – Physical Layer 24 Layer 1 ( Physical ) The medium through which Data is transferred 802.3 Uses Cables 802.11 RF Medium Key Term: Medium
  • 25.
    © 2014 AerohiveNetworks CONFIDENTIAL Where Wi-Fi Fits into the OSI Model – Data Link Layer 25 Layer 2 ( Data-Link )  The MAC sublayer manages access to the physical medium  The LLC sublayer manages the flow of multiple simultaneous network protocols over the same network medium  Devices operating no higher than Layer 2 include: network interface cards (NICs), Layer-2 Ethernet switches, and wireless access points Header with MAC addressing Trailer with CRC 3-7 Data
  • 26.
    © 2014 AerohiveNetworks CONFIDENTIAL Amendments and Rates 26 DSSS Direct Sequencing Spread Spectrum FHSS Frequency Hopping Spread Spectrum OFDM Orthogonal Frequency Division Multiplexing HT High Throughput VHT Very High Throughput SISO Single Input, Single Output MIMO Multiple Input, Multiple Output Standard Supported Data Rates 2.4 GHz 5 GHz RF Technology Radios 802.11 legacy 1, 2 Mbps Yes No FHSS or DSSS SISO 802.11b 1, 2, 5.5 and 11 Mbps Yes No HR-DSSS SISO 802.11a 6 - 54 Mbps No Yes OFDM SISO 802.11g 6 - 54 Mbps Yes Yes OFDM SISO 802.11n 6 - 600 Mbps Yes Yes HT MIMO 802.11ac Up to 3.46 Gbps* No Yes VHT MIMO *First generation 802.11ac chipsets support up to 1.3 Gbps
  • 27.
    © 2014 AerohiveNetworks CONFIDENTIAL Class Scenario 27 • You have been tasked with designing the WLAN for a new building that has two floors, each 200 feet in length. • Employees and Guests require high data rate connectivity. • Your customer plans to implement a voice over WLAN solution in the future as well. • This is an office environment although the customer has already purchased AP350’s for the deployment. • Many commercial products exist for predictive coverage planning. For example: AirMagnet, Ekahau and Tamosoft. • For this deployment the customer is using Aerohive’s Free planner tool.
  • 28.
    © 2014 AerohiveNetworks CONFIDENTIAL Defining the Lab 28 • Information Gathering (Site Survey) • Types of Environments • Client device types to be used • Applications to be used • Expected Growth vs. Current Needs • Aerohive Devices to be used • Mounting Concerns • Coverage vs. Capacity Planning • Device Density • Security Enterprise and Guest use • Using the Aerohive Planning Tool • Questions
  • 29.
    © 2014 AerohiveNetworks CONFIDENTIAL Every Environment is different 29 • Education • K-12 Public and Private Schools • University • School Facilities • Campus Housing • Health Care • Hospital • Assisted Living • Retail • Stores • Offices • Warehousing • Corporate Offices • Logistics • Ground Freight • Air Freight • Public Sector • Emergency Services • Civic Offices • Outdoor Use • Bridges • Mesh • Public Access • Questions
  • 30.
    © 2014 AerohiveNetworks CONFIDENTIAL Devices and Applications 30 • Devices • Laptops • Wi-Fi Phones • Wi-Fi Enabled Cell Phones • Barcode Scanners • Tablets • Point of Sale Systems • BYOD • Infrastructure • Access Points • Switches • Routers • Applications • Internet Only • Point of Sale Applications • Medical Applications • Voice • Mobile Applications • Standardized Testing • Productivity Applications • Custom Applications Knowing the Device Types and Applications to be used will greatly assist you in planning and deploying successful networking solutions.
  • 31.
    © 2014 AerohiveNetworks CONFIDENTIAL Lab: Planning a Wireless Network 1. Connect to the Hosted Training HiveManager 31 • Securely browse to the appropriate HiveManager for class › TRAINING LAB 1 https://training-hm1.aerohive.com https://72.20.106.120 › TRAINING LAB 2 https://training-hm2.aerohive.com https://72.20.106.66 › TRAINING LAB 3 https://training-hm3.aerohive.com https://209.128.124.220 › TRAINING LAB 4 https://training-hm4.aerohive.com https://203.214.188.200 › TRAINING LAB 5 https://training-hm5.aerohive.com https://209.128.124.230 • Supported Browsers: › Firefox, Internet Explorer, Chrome, Safari • Class Login Credentials: › Login: adminX X = Student ID 2 - 29 › Password: aerohive123 NOTE: In order to access the HiveManager, someone at your location needs to enter the training firewall credentials given to them by the instructor first.
  • 32.
    © 2014 AerohiveNetworks CONFIDENTIAL Lab: Planning a Wireless Network 2. formatting your Plan Building 32 • Click on the Maps Tab • Expand World in the Navigation Pane • Expand Planner Maps in the Navigation Pane • Expand 0X Plan Building (Where 0X is your Student Number) • Click on Floor 1
  • 33.
    © 2014 AerohiveNetworks CONFIDENTIAL Lab: Planning a Wireless Network 3. Formatting your Plan Building 33 • To scale the map, move one red crosshair over the far left of the building image and the other to the far right of the building image • In the Scale Map Section, use the drop down arrow to select feet • Enter a value of 200 feet and click the Update button
  • 34.
    © 2014 AerohiveNetworks CONFIDENTIAL Lab: Planning a Wireless Network 4. Formatting your Plan Building 34 • Click on the Walls tab • Click the Draw Perimeter button • Click the upper left corner of your building image to begin tracing the perimeter of your floor • Move the cursor + clockwise and click and release on each of the remaining corners • When you are back to the first corner, double click to close the perimeter
  • 35.
    © 2014 AerohiveNetworks CONFIDENTIAL Lab: Planning a Wireless Network 5. Formatting your Plan Building 35 • Click the drop down arrow next to Wall Type and select any of the material types you would like to use • Click the / icon and trace over a few walls • Click the drop down arrow next to Wall Type again and select another material type • Click the / icon and trace over a few different walls
  • 36.
    © 2014 AerohiveNetworks CONFIDENTIAL 802.11n, 802.11ac and MIMO radios 36 Aerohive AP 141 Aerohive AP 350 3x3:32x2:2 1x1:1 iPhone 3x3:3 Transmit Receive Spatial Streams 1x1:1 iPad
  • 37.
    © 2014 AerohiveNetworks CONFIDENTIAL 2x2:2 300 Mbps 11n High Power Radios 1X Gig.E -40 to 55°C PoE (802.3at) N/A Outdoor Water Proof (IP 68) Aerohive AP Platforms AP170 2X Gig E /w PoE Failover 3x3:3 450 + 1300 Mbps High Power Radios Dual Radio 802.11ac/n Plenum/Plenum Dust Proof -20 to 55°C AP390 Indoor Industrial Dual Radio 802.11n AP230 Dual Radio 802.11n 2X Gig.E - 10/100 link aggregation -20 to 55°C 0 to 40°C 3x3:3 450 Mbps High Power Radios TPM Security Chip PoE (802.3af + 802.3at) and AC Power Indoor Industrial Indoor Plenum/D ust Plenum Rated AP121 AP330 AP350 1X Gig.E 2x2:2 300 Mbps High Power Radios USB for 3G/4G Modem AP141 USB for future use Indoor 2X Gig.E w/ link aggregation Plenum Rated 0 to 40°C USB for future use AP370* * Includes 5 GHz Transmit Beamforming and in 2.4 GHz has TurboQAM
  • 38.
    © 2014 AerohiveNetworks CONFIDENTIAL Lab: Planning a Wireless Network 6. Formatting your Plan Building 38 • Click the Planned APs tab • Click the drop down arrow next to AP Type and select the AP350 • Leave the Channel and Power settings as default • Click the Add AP button
  • 39.
    © 2014 AerohiveNetworks CONFIDENTIAL Lab: Planning a Wireless Network 7. Formatting your Plan Building 39 • Examine the predicted coverage provided by a single AP of the type you selected earlier • Click and drag the AP to another location and observe the predicted coverage in the new location • Click the Remove All APs button • Click Yes to confirm the removal
  • 40.
    © 2014 AerohiveNetworks CONFIDENTIAL dBm and mW conversions 40 Very Strong- Great - Weak- Do not care- No Signal- dBm milliwatts +30 dBm 1000 mW 1 Watt +20 dBm 100 mW 1/10th of 1 Watt +10 dBm 10 mW 1/100th of 1 Watt 0 dBm 1 mW 1/1,000th of 1 Watt –10 dBm .1 mW 1/10th of 1 milliwatt –20 dBm .01 mW 1/100th of 1 milliwatt –30 dBm .001 mW 1/1,000th of 1 milliwatt –40 dBm .0001 mW 1/10,000th of 1 milliwatt –50 dBm .00001 mW 1/100,000th of 1 milliwatt –60 dBm .000001 mW 1 millionth of 1 milliwatt –70 dBm .0000001 mW 1 ten-millionth of 1 milliwatt –80 dBm .00000001 mW 1 hundred-millionth of 1 milliwatt –90 dBm .000000001 mW 1 billionth of 1 milliwatt –95 dBm .0000000002511 mW Noise Floor Notes Below
  • 41.
    © 2014 AerohiveNetworks CONFIDENTIAL 11Mbps DSSS 5.5Mbps DSSS 2Mbps DSSS 1Mbps DSSS Dynamic Rate Switching 41 Lowest Rate Higher Rate Higher Rate Highest Rate To use higher data rates a station requires a stronger signal from the AP. As stations move they adjust the data rate used in order to remain connected (moving away) or to achieve a better signal (moving closer).
  • 42.
    © 2014 AerohiveNetworks CONFIDENTIAL Interference and Signal to Noise Ratio 42 • Based on the SNR, the client and AP negotiate a data rate in which to send the packet, so the higher the SNR the better • For good performance, the SNR should be greater than 20 dB • For optimal performance, the SNR should be at least 25 dB Great Poor Signal Strength -70dBm -70dBm - Noise Level - (-95dBm) - (-80dBm) = SNR = 25dB = 10dB Notes Below
  • 43.
    © 2014 AerohiveNetworks CONFIDENTIAL Planning Coverage for Different Scenarios 43 •-80 dBm Basic Connectivity •-70 dBm High Speed Connectivity •-67 dBm Voice •-62 dBm Location Tracking – RTLS When planning you should always take into consideration future uses of Wi-Fi and projected growth.
  • 44.
    © 2014 AerohiveNetworks CONFIDENTIAL Lab: Planning a Wireless Network 8. Formatting your Plan Building 44 • Click the Auto Placement Tab • Using the drop down arrow next to Application, select Voice • Ensure that the Signal Strength is set to -67 dBm • Click the Auto Place APs button • Observe the coverage patterns and move APs as needed to create a hole in the coverage if needed
  • 45.
    © 2014 AerohiveNetworks CONFIDENTIAL Lab: Planning a Wireless Network 9. Formatting your Plan Building 45 • Click the Planned APs Tab • Click the Add AP button • Observe the new planned AP filling in a hole in coverage
  • 46.
    © 2014 AerohiveNetworks CONFIDENTIAL Lab: Planning a Wireless Network 10. Formatting your Plan Building 46 • In the Navigation pane, right click on your Floor 1 and select Clone • Name your Clone Floor 2 • Click the Create button
  • 47.
    © 2014 AerohiveNetworks CONFIDENTIAL Lab: Planning a Wireless Network Multiple Floors 47 What if there are multiple floors?  Not all buildings are symmetrical.  If you have multiple floors you can adjust the X and Y coordinates to align the floors.  Use an anchor point such as an elevator shaft to align the floors.
  • 48.
    © 2014 AerohiveNetworks CONFIDENTIAL Lab: Planning a Wireless Network 11. Formatting your Plan Building 48 • In the Navigation pane, click Floor 2 • Click the Auto Placement Tab • Click the Auto Place APs button • Observe the device placement
  • 49.
    © 2014 AerohiveNetworks CONFIDENTIAL Lab: Planning a Wireless Network 12. Formatting your Plan Building 49 • In the Navigation pane, click on 0X Plan Building (where 0X is your student number) • Observe the placement and channel selection of the Planned APs on both floors • Remember RF signals propagate in three dimensions not just two. Planning should take this into account for AP placement.
  • 50.
    © 2014 AerohiveNetworks CONFIDENTIAL Lab: Planning a Wireless Network 13. Formatting your Plan Building 50 • Click Floor 1 and then click on the View Tab • Uncheck ☐RSSI and check Channels • Change the Band to 2.4 GHz • Observe the predicted channel coverage
  • 51.
    © 2014 AerohiveNetworks CONFIDENTIAL 2.4 GHz Channels Used for 802.11b/g/n 51 • Channels 1, 6, and 11 are the only non-overlapping channels between channels 1 and 11 › Using channels that cause overlap may cause CRC and other wireless interference and errors • If you are in a country that has channels 1 – 13 or 14 available, you may still want to use 1, 6, and 11 for compatibility with mobile users from other countries
  • 52.
    © 2014 AerohiveNetworks CONFIDENTIAL Channel Reuse Pattern 52 In this plan only the non-overlapping channels of 1, 6 and 11 are used.
  • 53.
    © 2014 AerohiveNetworks CONFIDENTIAL Adjacent Cell Interference 53 Improper designs use overlapping channels in the same physical area.
  • 54.
    © 2014 AerohiveNetworks CONFIDENTIAL Co-Channel Interference/Cooperation 54 Improper design using the same channel on all AP’s in the same physical area.
  • 55.
    © 2014 AerohiveNetworks CONFIDENTIAL Lab: Planning a Wireless Network 14. Formatting your Plan Building 55 • Change the Band from 2.4 GHz to 5 GHz • Observe the predicted channel coverage
  • 56.
    © 2014 AerohiveNetworks CONFIDENTIAL 5 GHz Channels Used for 802.11a/n/ac 56 • The 5 GHz spectrum has more non-overlapping channels available. • Channels increment by 4 starting with channel 36. • The available 5 GHz channels varies greatly by country and some are enabled if the AP complies with DFS. • The 5 GHz UNII-2 and UNII-2 Extended are enabled with DFS compliance.
  • 57.
    © 2014 AerohiveNetworks CONFIDENTIAL Channel Reuse Plan-5 GHz 57 8-channel reuse plan using the channels in the UNII-1 and UNII-3
  • 58.
    © 2014 AerohiveNetworks CONFIDENTIAL Quick and Easy mounting scheme of the 300 series now on the 121/141 58 ALL AP121/141 and AP330/350 Mountings are identical All AP121/141 and AP330/350 Power Adaptor are identical Note: Always use the mounting security screw
  • 59.
    © 2014 AerohiveNetworks CONFIDENTIAL New Accessory: Suspend mount kits 59
  • 60.
    © 2014 AerohiveNetworks CONFIDENTIAL New Accessory: Plenum mount kit 60
  • 61.
    © 2014 AerohiveNetworks CONFIDENTIAL Antenna Patterns and Gain 61 • Aerohive AP 390, 350 &141 external omnidirectional antennas radiate equally in all directions, forming a toroidial (donut-shaped) pattern • Aerohive AP 370, 330, 121, and 110 internal antennas form a cardioid (heart-shaped) pattern • By using a directional antenna, the power that you see with a omnidirectional antenna can redistributed to provide more radiated power in a certain direction called gain In this case, the power is not increased, instead it is redistributed to provide more gain in a certain direction Aerohive AP350 Aerohive AP330, 121, 110
  • 62.
    © 2014 AerohiveNetworks CONFIDENTIAL AP 141 MIMO Antenna Alignment 62 With external omnidirectional antennas, the positioning of the antennas helps with de-correlation of spatial streams, which is critical to maintaining high data rates.
  • 63.
    © 2014 AerohiveNetworks CONFIDENTIAL AP 350 MIMO Antenna Alignment 63 With external omnidirectional antennas, the positioning of the antennas helps with de-correlation of spatial streams, which is critical to maintaining high data rates.
  • 64.
    © 2014 AerohiveNetworks CONFIDENTIAL Indoor 5 GHz MIMO Patch Antenna 64 • 120 degree beamwidth • 5 dBi gain • 3x3 MIMO Patch • Use with AP-350 • Use with AP-141(middle connector not used with AP-141) For High User Density Deployments indoor Patch Antennas are recommended for sectorized coverage. For example the patch antennas can be mounted from the ceiling to provide unidirectional coverage in an auditorium.
  • 65.
    © 2014 AerohiveNetworks CONFIDENTIAL Outdoor 5 GHz MIMO Patch Antenna 65 • 17 degree beamwidth • 18 dBi gain • 2x2 MIMO Patch • Use with AP-170 Outdoor Patch Antennas are well suited for point to point connections between buildings.
  • 66.
    © 2014 AerohiveNetworks CONFIDENTIAL© 2014 Aerohive Networks CONFIDENTIAL QUESTIONS?
  • 67.
    © 2014 AerohiveNetworks Inc. SECTION 2: HIVEMANAGER OVERVIEW 67 Aerohive’s Instructor-led Training
  • 68.
    © 2014 AerohiveNetworks CONFIDENTIAL What is HiveManager? 68 We have completed the predictive model and have deployed and physically mounted the APs. Now we need a way to centrally manage the WLAN. We will us Aerohive’s network management server (NMS) called HiveManager. HiveManager can be used to monitor, configure and update the WLAN. • HiveManager can be deployed as a public cloud solution or as a private cloud solution (on premise). • The on premise HiveManager is available in different form factors. • The Aerohive Devices use an IP discovery process to locate on premise HiveManagers. • A redirector service is used to guide Aerohive Devices to the Public Cloud HiveManager. • HiveManager uses CAPWAP as the protocol to monitor and manage Aerohive Devices.
  • 69.
    © 2014 AerohiveNetworks CONFIDENTIAL Copyright ©2011 HiveManager Form Factors 69 SW Config, & Policy, RF Planning, Reporting, SLA Compliance, Guest Management, Trouble Shooting, Spectrum Analysis HiveManager Online Scalable multi-tenant platform, Redundant data centers with diversity, Backup & Recovery, Zero touch device provisioning, Flexible expansion, On demand upgrades, Pay as you grow HiveManager On-Premise - VA VMware ESX & Player, HA redundancy, 5000 APs with minimum configuration HiveManager On-Premise Appliance Redundant power & fans, HA redundancy 8000 APs and devices
  • 70.
    © 2014 AerohiveNetworks CONFIDENTIAL On-Premise Virtual Appliance 70 • VMWare Server Hardware Requirements › You can also install VMware Workstation or VMware Fusion (Mac version) on your computer, and then install › HiveManager Virtual Appliance. › Processor: Dual Core 2 GHz or better › Memory: 3 GB dedicated to HiveManager Virtual Appliance; at least 1 GB for the computer hosting it › Disk: 60 GB Dedicated to HiveManager Virtual Appliance › Support for VMWare tools in version 6.1r3 and higher • For more information please reference the HiveManager Virtual Appliance QuickStart Guide.
  • 71.
    © 2014 AerohiveNetworks CONFIDENTIAL HiveManager Virtual Appliance Software 71 The HiveManager Virtual Appliance software is available from two sources: • USB flash drive delivered to you by Aerohive › Connect the drive to a USB port on your host or VMware ESXi server and follow the procedure for "Installing the HiveManager Virtual Appliance" on page 3 of the HiveManager Virtual Appliance QuickStart Guide to import the .ova file to your VMware ESXi server. • Software download from the Aerohive Support Software Downloads portal › Log in to the Aerohive Support Software Downloads portal, download the HiveManager Virtual Appliance OVA-formatted file to your local directory, and follow the procedure for "Installing the HiveManager Virtual Appliance" on page 3 of the HiveManager Virtual Appliance QuickStart Guide to import the .ova file to your VMware ESXi hypervisor server.
  • 72.
    © 2014 AerohiveNetworks CONFIDENTIAL HiveManager Virtual Appliance Software 72 The .ova (Open Virtual Appliance) formatted files are available in both 32-bit and 64-bit format and are ready for import to your VMware EXSi hypervisor server. In the following example, the HiveManager release 6.1r3 files available on the Aerohive Support Software Downloads portal are shown: • HM-6.1r3-32bit-ESXi—6.1r3 HiveManager 32bit Virtual Appliance ESXi in Open Virtual Appliance format. • HM-6.1r3-64bit-ESXi—6.1r3 HiveManager 64bit Virtual Appliance ESXi in Open Virtual Appliance format.
  • 73.
    © 2014 AerohiveNetworks CONFIDENTIAL On-Premise HiveManager Appliance 73
  • 74.
    © 2014 AerohiveNetworks CONFIDENTIAL On-Premise HiveManager Databases 74
  • 75.
    © 2014 AerohiveNetworks CONFIDENTIAL HiveManager Online (HMOL) 75 • Customers can manage Aerohive Devices from the Cloud using their HMOL accounts. • http://myhive.aerohive.com
  • 76.
    © 2014 AerohiveNetworks CONFIDENTIAL MyHive – Aerohive AP Redirection Server 76 • MyHive is a secure site that allows you to log in once and then navigate to HiveManager Online • The Redirector/Staging Server is built inside of your HMOL account • New HMOL accounts will also have the ability for a 30-day free trial of ID Manager
  • 77.
    © 2014 AerohiveNetworks CONFIDENTIAL HiveManager Online (HMOL) 77 • The Super-User administrator for your HMOL account has the ability to create additional admins with other access rights
  • 78.
    © 2014 AerohiveNetworks CONFIDENTIAL MyHive – Aerohive device Redirector Server 78 • The redirector is used to tie your devices to your HMOL account. • From Monitor All Devices Device Inventory select Add
  • 79.
    © 2014 AerohiveNetworks CONFIDENTIAL MyHive – Aerohive device Redirector Server 79 • Simply enter in the serial number of your APs, routers, switches and Virtual Appliances. • Once the serial number is entered into the Redirector (Staging Server) – your devices will now be permanently tied to your HMOL account. • You can also import a CSV file with multiple serial numbers
  • 80.
    © 2014 AerohiveNetworks CONFIDENTIAL MyHive – Aerohive AP Redirection Server 80 • Devices that have not yet made a CAPWAP connection with HMOL will display under the Unmanaged Devices tab. • Once devices make a CAPWAP connection with HMOL, they will be displayed under Managed Devices.
  • 81.
    © 2014 AerohiveNetworks CONFIDENTIAL HiveManager Online Aerohive Device Redirection Services For HiveManager Online 81 APs and Routers Aerohive Redirector at myhive.aerohive.com Serial numbers are entered into the redirector
  • 82.
    © 2014 AerohiveNetworks CONFIDENTIAL On-Premise HiveManager Discovery APs, Routers and Switches Locate HiveManager Aerohive Devices 82 • In order for Aerohive devices to communicate with an on-premise HiveManager, they must know the on- premise HiveManager IP address. • The HiveManager address can be statically configured or dynamically learned. • Static CLI configuration: › capwap client server name “ip address” › save config • Dynamic IP discovery: › DHCP options › DNS query › L2 broadcast (Can be disabled) › Redirector On-Premise HiveManager
  • 83.
    © 2014 AerohiveNetworks CONFIDENTIAL On-Premise HiveManager Discovery APs and Routers Locate HiveManager Aerohive Devices DHCP/DNS Server 1. DHCP Request 2. DHCP Response IP, Domain, & DHCP Options returned Optionally: Option 225 (HM Name): hm1.yourdomain Option 226 (HM IP): 2.1.1.10 3. If option 225 was received, then the device performs a DNS lookup for the HM name received, otherwise the device performs a DNS lookup for hivemanager.yourdomain. If option 226 was received, then the device sends the CAPWAP traffic to the IP address of HiveManager. 4. DNS Response for IP hivemanager.yourdomain or hm1.yourdomain = 2.1.1.10 (for example) 83
  • 84.
    © 2014 AerohiveNetworks CONFIDENTIAL On-Premise HiveManager Discovery APs and Routers Locate HiveManager 5. CAPWAP UDP Port 12222 IP: 2.1.1.10 7. If no DHCP option or DNS option is returned, or no IP is found CAPWAP Broadcast UDP 12222 8. If no response CAPWAP Broadcast TCP 80 HiveManager 2.1.1.10 (example) May be a: HiveManager Online, HiveManager Virtual Appliance (VA) , or a 1U or 2U appliance. 6. If UDP fails: CAPWAP TCP Port 80 IP: 2.1.1.10 9. If no responses CAPWAP UDP Port 12222 to the IP address of staging.aerohive.com If no response, try CAPWAP TCP Port 80 to the IP address of staging.aerohive.com Aerohive Devices
  • 85.
    © 2014 AerohiveNetworks CONFIDENTIAL Redirector Account for On-Premise HM Free account is available from Aerohive support 85 • You can go to: myhive.aerohive.com • Login with your redirector account provided by Aerohive • You can redirect your devices to an on-premise HiveManager Ask Aerohive support for the required separate HiveManager redirection username account.
  • 86.
    © 2014 AerohiveNetworks CONFIDENTIAL Copyright ©2011 Redirector Account for On-Premise HM Configure Standalone HiveManager • To add a standalone HiveManager account, click: Configure Standalone HM • Enter a public hostname or IP address for your HiveManager • Optionally change the Connection Protocol to TCP if required • Click Save 86
  • 87.
    © 2014 AerohiveNetworks CONFIDENTIAL Redirector Account for On-Premise HM Enter Device Serial Numbers 87 • To add your device serial numbers so they can be redirected click Device Access Control List • Click Enter • ACL Category: Standalone HM • Enter Your 14 digit serial numbers • Click Save 00112233445566 00112233445567 00112233445568 00112233445569
  • 88.
    © 2014 AerohiveNetworks CONFIDENTIAL HiveManager Online Aerohive On-Premise HiveManager Discovery APs, Routers and Switches Locate HiveManager 88 APs and Routers Your Private Cloud or Company HiveManager hm1.yourdomain Aerohive Redirector Redirect device to: hm1.yourdomain (Require a standalone redirector account) 12. Connect to HM returned from redirector: hm1.yourdomain 13. Finally, if the redirector is not configured, the complete discovery process is restarted.
  • 89.
    © 2014 AerohiveNetworks CONFIDENTIAL HiveManager DNS “A” Record Example with Microsoft 2003 DNS 89 On your DNS server, create a DNS Host record with the IP address of the HiveManager A host record creates an A record, and can select the option to automatically create the reverse (PTR) record as well
  • 90.
    © 2014 AerohiveNetworks CONFIDENTIAL Management protocols & device updates 90 HiveManager • Aerohive Device to Aerohive Device management Traffic (Cooperative Control Protocols) › AMRP, DNXP, INXP and ACSP › Encrypted with the Hive Key » Cooperative Control discussed later in class • Aerohive Device to HiveManager management traffic › CAPWAP - UDP port 12222 (default) or TCP ports 80, 443 (HTTP/HTTPS encapsulation) › SCP - Port 22 Aerohive Devices
  • 91.
    © 2014 AerohiveNetworks CONFIDENTIAL Aerohive Device Configuration Updates 91 Complete Upload DRAM Running Config Flash Permanent Storage 1. Over CAPWAP, HiveManager tells the Aerohive AP to SCP its config to its flash 2. Aerohive AP uses SCP to get the config file from HiveManager and store in flash 3. The Aerohive AP must be rebooted to activate the new configuration 1. Over CAPWAP HiveManager obtains configuration from Aerohive AP and compares with its database 2. Over CAPWAP HiveManager sends the delta configuration changes directly to RAM which are immediately activated, and the running configuration is then saved to flash  Delta Upload DRAM Running Config Flash Permanent Storage
  • 92.
    © 2014 AerohiveNetworks CONFIDENTIAL Cooperative Control Protocols In-depth information located in section 16 92 Hive – Cooperative control for a group of Hive Devices that share the same Hive name and Hive password. › There is no limit to the number of Hive Devices that can exist in a single Hive › Aerohive APs in a Hive cooperate with each other using Aerohive’s cooperative control protocols: »AMRP (Aerohive Mobility Routing Protocol) –Layer 2 and Layer 3 Roaming, Load Balancing, Band Steering, Layer 2 GRE Tunnel Authentication and Keepalives »DNXP (Dynamic Network Extensions Protocol) –Dynamic GRE tunnels to support layer 3 roaming »INXP (Identity-Based Network Extensions Protocol) –GRE tunnels for guest tunnels »ACSP (Automatic Channel Selection & Power) Protocol –Radio Channel and Power Management
  • 93.
    © 2014 AerohiveNetworks CONFIDENTIAL Lab: HiveManager Menu navigation 1. Connect to the Hosted Training HiveManager 93 • Securely browse to the appropriate HiveManager for class › TRAINING LAB 1 https://training-hm1.aerohive.com https://72.20.106.120 › TRAINING LAB 2 https://training-hm2.aerohive.com https://72.20.106.66 › TRAINING LAB 3 https://training-hm3.aerohive.com https://209.128.124.220 › TRAINING LAB 4 https://training-hm4.aerohive.com https://203.214.188.200 › TRAINING LAB 5 https://training-hm5.aerohive.com https://209.128.124.230 • Supported Browsers: › Firefox, Internet Explorer, Chrome, Safari • Class Login Credentials: › Login: adminX X = Student ID 2 - 29 › Password: aerohive123 NOTE: In order to access the HiveManager, someone at your location needs to enter the training firewall credentials given to them by the instructor first.
  • 94.
    © 2014 AerohiveNetworks CONFIDENTIAL Lab: HiveManager Menu Navigation 2. Dashboard 94 • The HiveManager dashboard provides detailed visibility into wired and wireless network activity. • From the dashboard, you can view comprehensive information by application, user, client device and operating system, and a wide variety of other options.
  • 95.
    © 2014 AerohiveNetworks CONFIDENTIAL Lab: HiveManager Menu Navigation 3. Home 95 The Home section of the GUI is where you configure a number of fundamental HiveManager settings, such as the following: • Express and Enterprise modes • VHM (virtual HiveManager) settings HiveManager administrator accounts • Settings for HiveManager time and network (including HA), admin access and session timeout, HTTPS, SSH/SCP, Aerohive product improvement program participation, and routing • CAPWAP and e-mail notification settings, SNMP and TFTP services, and HiveManager administrator authentication options • Click on the Home Tab
  • 96.
    © 2014 AerohiveNetworks CONFIDENTIAL Lab: HiveManager Menu Navigation 4. Monitor 96 • From the Monitor menu, you can view commonly needed information and link to more detailed information about all the Aerohive devices that have contacted HiveManager. • With an On-Premise HiveManager, those listed in the Unconfigured Devices section are not under HiveManager management and those in the Configured Devices are being managed by HiveManager. • When using HiveManager Online (HMOL) devices appear as Managed Devices or Unmanaged Devices to illustrate if devices are being managed by HiveManager or not. • Click on the Monitor Tab
  • 97.
    © 2014 AerohiveNetworks CONFIDENTIAL Lab: HiveManager Menu Navigation 5. Reports 97 • Detailed reports can be created and customized using the information the Aerohive Devices deliver to HiveManager. • Reports are covered in greater detail later in the class. • Click on the Reports Tab
  • 98.
    © 2014 AerohiveNetworks CONFIDENTIAL Lab: HiveManager Menu Navigation 6. Maps 98 • Use the tools in the Maps section to plan network deployments, and or to track and monitor the operational status of managed devices. • Maps can be used in pre-deployment for predictive modeling. • Maps can be used in post-deployment for coverage visualization, troubleshooting, and client and rogue location tracking. • Click on the Maps Tab
  • 99.
    © 2014 AerohiveNetworks CONFIDENTIAL Lab: HiveManager Menu Navigation 7. Configuration 99 • The Configuration Tab allows you access to the Guided Configuration. • Here you build your Network Policies, and Configure and Update Devices. • Click on the Configuration Tab
  • 100.
    © 2014 AerohiveNetworks CONFIDENTIAL Lab: HiveManager Menu Navigation 8. Configuration 100 • The Tools Tab allows you access additional testing and monitoring abilities. • Here you can access such things as: › The Planning Tool › The Client Monitor › The VLAN Probe › The Device/Client Simulator › The Server Access Tests • Click on the Tools Tab
  • 101.
    © 2014 AerohiveNetworks CONFIDENTIAL© 2014 Aerohive Networks CONFIDENTIAL QUESTIONS?
  • 102.
    © 2014 AerohiveNetworks Inc. SECTION 3. MOBILITY SOLUTIONS AND UNIFIED POLICY MANAGEMENT 102 Aerohive’s Instructor-led Training
  • 103.
    © 2014 AerohiveNetworks CONFIDENTIAL 2x2:2 300 Mbps 11n High Power Radios 1X Gig.E -40 to 55°C PoE (802.3at) N/A Outdoor Water Proof (IP 68) Aerohive AP Platforms AP170 2X Gig E /w PoE Failover 3x3:3 450 + 1300 Mbps High Power Radios Dual Radio 802.11ac/n Plenum/Plenum Dust Proof -20 to 55°C AP390 Indoor Industrial Dual Radio 802.11n AP230 Dual Radio 802.11n 2X Gig.E - 10/100 link aggregation -20 to 55°C 0 to 40°C 3x3:3 450 Mbps High Power Radios TPM Security Chip PoE (802.3af + 802.3at) and AC Power Indoor Industrial Indoor Plenum/D ust Plenum Rated AP121 AP330 AP350 1X Gig.E 2x2:2 300 Mbps High Power Radios USB for 3G/4G Modem AP141 USB for future use Indoor 2X Gig.E w/ link aggregation Plenum Rated 0 to 40°C USB for future use AP370* * Includes 5 GHz Transmit Beamforming and in 2.4 GHz has TurboQAM
  • 104.
    © 2014 AerohiveNetworks CONFIDENTIAL© 2014 Aerohive Networks CONFIDENTIAL Aerohive AP 230 Performance, Functionality & Economy 104 • Performance › Dual radio 802.11ac 3x3:3 - three spatial stream » Radio 1 (802.11n + Turbo-QAM) – 2.4GHz 802.11b/g/n: 3x3:3 » Radio 2 (802.11ac) – 5GHz 802.11a/n/ac: 3x3:3 with TxBF » 256-QAM, Supports up to 80 MHz channel for 5 GHz • Functionality › Application Visibility AND Control at Gigabit speeds › 2x Gig Ethernet ports with link aggregation › HiveOS enterprise feature set • Economy › 3 Stream .11ac at ~ price of 2 stream .11n › Full Wi-Fi functionality with existing PoE infrastructure › Full .11n legacy support – with improvements in mixed environments
  • 105.
    © 2014 AerohiveNetworks CONFIDENTIAL Copyright ©2011 Aerohive Routing Platforms 105 BR 100 BR 200 AP 330 AP 350 Single Radio Dual Radio 2X 10/100/1000 Ethernet 5-10 Mbps FW/VPN 30-50Mbps FW/VPN 1x1 11bgn 3x3:3 450 Mbps 11abgn 5X 10/100 5X 10/100/1000 0 PoE PSE0 PoE PSE 2X PoE PSE * * Also available as a non-Wi-Fi device L3 IPSec VPN Gateway ~500 Mbps VPN 4000/1024 Tunnels Physical/Vi rtual VPN Gateways
  • 106.
    © 2014 AerohiveNetworks CONFIDENTIAL BR100 vs. BR200 106 BR100 BR200/BR200WP 5x FastEthernet 5x Gigabit Ethernet 1x1 11bgn (2.4Ghz) single radio 3x3:3 11abgn dual-band single radio (WP) No integrated PoE PoE (in WP model) No console port Console Port No Spectrum Analysis Integrated Spectrum Analysis (WP) No Wireless Intrusion Detection Full Aerohive WIPS (WP) No local RADIUS or AD integration Full Aerohive RADIUS, proxy, and AD No SNMP logging SNMP Support
  • 107.
    © 2014 AerohiveNetworks CONFIDENTIAL Aerohive Switching Platforms 107 SR2124P SR2148P 24 Gigabit Ethernet 48 Gbps Ethernet 4 Ports 1G SFP Uplinks 4 Ports 10 G SFP/SFP+ Uplinks 24 PoE+ (408 W) 128 Gbps switch56Gbps switching 176 Gbps switch 48 PoE+ (779 W) Routing with 3G/4G USB support and Line rate switching Redundant Power Supply CapableSingle Power Supply 24 PoE+ (195 W) SR2024P Switching Only
  • 108.
    © 2014 AerohiveNetworks CONFIDENTIAL VPN Gateway Virtual Appliance 108 • Supports the following › GRE Tunnel Gateway › L2 IPSec VPN Gateway › L3 IPSec VPN Gateway › RADIUS Authentication Server › RADIUS Relay Agent › Bonjour Gateway › DHCP server • Use a VPN Gateway Virtual Appliance instead of an AP when higher scalability for these features are required Function Scale VPN Tunnels 1024 Tunnels RADIUS – Local users per VPN Gateway 9999 # Users Cache (RADIUS Server) 1024 # Simultaneous (RADIUS Server) authentications 256
  • 109.
    © 2014 AerohiveNetworks CONFIDENTIAL VPN Gateway Physical Appliance 109 • Supports the following › GRE Tunnel Gateway › L2 IPSec VPN Gateway › L3 IPSec VPN Gateway › RADIUS Authentication Server › RADIUS Relay Agent › Bonjour Gateway › DHCP server • Use a VPN Gateway Appliance instead of an AP when higher scalability for these features are required Function Scale VPN Tunnels 4000 Tunnels RADIUS – Local users per VPN Gateway 9999 # Users Cache (RADIUS Server) 1024 # Simultaneous (RADIUS Server) authentications 256 Ports: One 10/100/1000 WAN port Four LAN ports two support PoE
  • 110.
    © 2014 AerohiveNetworks CONFIDENTIAL Aerohive Devices are assigned to Network Policy: Corp1 Note: A Aerohive Devices configured with the same Network Policy will be in the same Hive, and can use cooperative control protocols for mesh, dynamic RF, layer 2/3 fast secure roaming, VPN failover, etc.. Network Policy = Configuration Hive = Cooperative Control Protocols 110 Network Policy Corp1 SSID Voice SSID Employee SSID Guest User Profile IT Staff(9) User Profile Staff(10) User Profile Guests(8) User Profile Voice(2) Hive - Corp WIPS L2 IPsec VPN Location Services Access Console VLAN QoS Firewall L3 Roaming VLAN L3 Roaming OS/Domain SLA VLAN L3 Roaming OS/Domain SLA VLAN QoS Rate Limit Firewall Guest Tunnel Schedule OS/Domain
  • 111.
    © 2014 AerohiveNetworks CONFIDENTIAL Network Policy Guided Configuration 111 Network Configuration • There are three main panels, you can click on a panel header to go to the panel • Clicking on the Configure & Update Devices panel saves the configuration, as does Save, or Continue 1. Configure Network Policy 2. Configure Interface & User Access 3. Configure & Update Devices
  • 112.
    © 2014 AerohiveNetworks CONFIDENTIAL Setting Up a Wireless Network Building your Initial Unified Network Policy 112 • Click on Configuration • Under Choose Network Policy Click New
  • 113.
    © 2014 AerohiveNetworks CONFIDENTIAL Setting Up a Wireless Network Building your Initial Unified Network Policy 113 • Network Policies are used to assign the same basic configurations to multiple devices. • One Network Policy can configure all device types.
  • 114.
    © 2014 AerohiveNetworks CONFIDENTIAL Network Policy Types 114 • Wireless Access – Use when you have an AP only deployment, or you require specific wireless policies for APs in a mixed AP and router deployment • Branch Routing– Use when you are managing routers, or APs behind routers that do not require different Network Policies than the router they connect through BR100 BR200 AP AP Internet Internet Small Branch Office or Teleworker Site Small to Medium Size Branch Office that may have APs behind the router
  • 115.
    © 2014 AerohiveNetworks CONFIDENTIAL • Bonjour Gateway › Allows Bonjour services to be seen in multiple subnets • Switching › Used to manage wired traffic using Aerohive Switches Network Policy Types 115 Internet AP AP PoE SR2024 AP
  • 116.
    © 2014 AerohiveNetworks CONFIDENTIAL Unified Policy Management (Instructor Demo) 116 • Students and Instructor should open and view and discuss the Network Policy called Wireless-Access-Demo. • Students and Instructor should open and view and discuss the Network Policy called Wireless-Routing-Demo. • Students and Instructor should open and view and discuss the Network Policy called Wireless-Switching-Demo.
  • 117.
    © 2014 AerohiveNetworks CONFIDENTIAL© 2014 Aerohive Networks CONFIDENTIAL QUESTIONS?
  • 118.
    © 2014 AerohiveNetworks Inc. SECTION 4. HIVEMANAGER WELCOME AND INITIAL CONFIGURATION 118 Aerohive’s Instructor-led Training
  • 119.
    © 2014 AerohiveNetworks CONFIDENTIAL Scenario: First Login and Test Configuration 119 Upon initial login, there is a set of Welcome screens for the Super-User Administrator. If you are new to HiveManager it is recommended to create a Test Network Policy within HiveManager. Then upload the network policy to some Aerohive Devices in a staging area for testing purposes.
  • 120.
    © 2014 AerohiveNetworks CONFIDENTIAL Informational HiveManager Welcome Page -Only Seen at First Login- 120 Verify your Aerohive Device Inventory and the click Next
  • 121.
    © 2014 AerohiveNetworks CONFIDENTIAL Informational HiveManager Welcome Page -Only Seen at First Login- 121 Welcome Page Settings... • New HiveManager Password: <password for HiveManager and Aerohive APs> • Administrative Mode:  Enterprise Mode • Time Zone: <Your time zone> • Click FinishNote: Express mode is a legacy simplified configuration option. Enterprise mode is more robust and is recommended.
  • 122.
    © 2014 AerohiveNetworks CONFIDENTIAL Informational HiveManager Welcome Page -Only Seen at First Login- 122 NOTE: Setting the HiveManager Password Here sets the default Aerohive AP Access Console SSID Key and the CLI admin password. You can change some of these settings individually by going to HomeDevice Management Settings
  • 123.
    © 2014 AerohiveNetworks CONFIDENTIAL Informational HiveManager Initial Configuration 123  Device CLI passwords can be globally set from Home/Device Management Settings  Individual managed device passwords can be set from Monitor/ Modify It is recommended that Aerohive Devices have a unique admin password for CLI login.
  • 124.
    © 2014 AerohiveNetworks CONFIDENTIAL Copyright ©2011 Informational HiveManager Initial Configuration • At first login, the administrator is prompted to fill out settings for Username, the administrator password for HiveManager, and a Quick start SSID password • HiveManager uses the Username as the name for automatically generated Quick Start objects such as the DNS service, NTP service, QoS Classification profile, LLDP profile, ALG profile, etc.. that will work in most cases without need for modification. You can create your own objects, or use the quick start ones. 124
  • 125.
    © 2014 AerohiveNetworks CONFIDENTIAL Copyright ©2011 Informational HiveManager Initial Configuration • For example, › a DNS service object with the name “Class” is automatically generated › an NTP service object with the name “Class” is automatically generated • These objects are used when configuring WLAN and routing settings 125
  • 126.
    © 2014 AerohiveNetworks CONFIDENTIAL Informational HiveManager Initial Configuration 126 Note: Quick Start Objects are automatically created in every new Network Policy. The Object names will be based upon the name from the initial welcome screen.
  • 127.
    © 2014 AerohiveNetworks CONFIDENTIAL Informational HiveManager Initial Configuration 127 The IP addresses for the QuickStart DNS object are Public DNS servers. It is recommended that you edit the QuickStart DNS object to use DNS server IP addresses that are relevant to your deployment. Do this BEFORE you configure the rest of your Network Policy.
  • 128.
    © 2014 AerohiveNetworks CONFIDENTIAL Informational HiveManager Initial Configuration 128 The public Aerohive NTP server is used to set the clocks of your Aerohive Devices. You can edit this object to use a different NTP server. Mandatory: You must change the time zone to match the time zone where your Aerohive Devices reside. Do this BEFORE you configure the rest of your Network Policy.
  • 129.
    © 2014 AerohiveNetworks CONFIDENTIAL Lab: Creating a Test Network Policy 1. Connect to the Hosted Training HiveManager 129 • Securely browse to the appropriate HiveManager for class › TRAINING LAB 1 https://training-hm1.aerohive.com https://72.20.106.120 › TRAINING LAB 2 https://training-hm2.aerohive.com https://72.20.106.66 › TRAINING LAB 3 https://training-hm3.aerohive.com https://209.128.124.220 › TRAINING LAB 4 https://training-hm4.aerohive.com https://203.214.188.200 › TRAINING LAB 5 https://training-hm5.aerohive.com https://209.128.124.230 • Supported Browsers: › Firefox, Internet Explorer, Chrome, Safari • Class Login Credentials: › Login: adminX X = Student ID 2 - 29 › Password: aerohive123 NOTE: In order to access the HiveManager, someone at your location needs to enter the training firewall credentials given to them by the instructor first.
  • 130.
    © 2014 AerohiveNetworks CONFIDENTIAL Aerohive Devices are assigned to Network Policy: Corp1 Note: A Aerohive Devices configured with the same Network Policy will be in the same Hive, and can use cooperative control protocols for mesh, dynamic RF, layer 2/3 fast secure roaming, VPN failover, etc.. Network Policy = Configuration Hive = Cooperative Control Protocols 130 Network Policy Corp1 SSID Voice SSID Employee SSID Guest User Profile IT Staff(9) User Profile Staff(10) User Profile Guests(8) User Profile Voice(2) Hive - Corp WIPS L2 IPsec VPN Location Services Access Console VLAN QoS Firewall L3 Roaming VLAN L3 Roaming OS/Domain SLA VLAN L3 Roaming OS/Domain SLA VLAN QoS Rate Limit Firewall Guest Tunnel Schedule OS/Domain
  • 131.
    © 2014 AerohiveNetworks CONFIDENTIAL Lab: Creating a Test Network Policy 2. Configuring a Test Network Policy 131 • Go to Configuration • Click the New Button
  • 132.
    © 2014 AerohiveNetworks CONFIDENTIAL Lab: Creating a Test Network Policy 3. Configuring a Test Network Policy 132 • Name: Test-X • Select: Wireless Access and Bonjour Gateway • Click Create Only the Wireless Access and Bonjour Gateway Profiles are used in this class. Switching and Branch Routing are covered in another course. For information about that class visit: http://aerohive.com/support/technical-training/training- schedule for dates and registration.
  • 133.
    © 2014 AerohiveNetworks CONFIDENTIAL Lab: Creating a Test Network Policy 4. Configuring a Test Network Policy 133 Network Configuration • Next to SSIDs click Choose • Then click New
  • 134.
    © 2014 AerohiveNetworks CONFIDENTIAL Lab: Creating a Test Network Policy 5. Create an SSID Profile 134 • SSID Profile: Corp-PSK-X X = 2 – 29 (Student ID) • SSID: Corp-PSK-X • Select WPA/WPA2 PSK (Personal) • Key Value: aerohive123 • Confirm Value: aerohive123 • Click Save • Click OK IMPORTANT: For the SSID labs, please follow the class naming convention.
  • 135.
    © 2014 AerohiveNetworks CONFIDENTIAL Lab: Creating a Test Network Policy 6. Create a User Profile 135 • To the right of your SSID, under User Profile, click Add/Remove • In Choose User Profiles Click New
  • 136.
    © 2014 AerohiveNetworks CONFIDENTIAL Lab: Creating a Test Network Policy 7. Create a User Profile 136 • Name: Staff-X • Attribute Number: 1 • Default VLAN: 1 • Click Save The attribute value and VLAN value do not need to match. However, it is recommended that the attribute values and VLAN values match each other when ever possible for clarity and uniform configuration.
  • 137.
    © 2014 AerohiveNetworks CONFIDENTIAL Lab: Creating a Test Network Policy 8. Save the User Profile 137 •Ensure Staff-X User Profile is highlighted •Click Save
  • 138.
    © 2014 AerohiveNetworks CONFIDENTIAL Lab: Creating a Test Network Policy 9. Save the Network Policy 138 • Click the Configure & Update Devices bar or click the Continue button Note: The Save button saves your Network Policy. The Continue Button saves your Network Policy and allows you to proceed to the Configure and Update Devices area simultaneously.
  • 139.
    © 2014 AerohiveNetworks CONFIDENTIAL Lab: Creating a Test Network Policy 10. Create a Display Filter 139 From the Configure & Update Devices section, click the + next to Filter to create a device display filter.
  • 140.
    © 2014 AerohiveNetworks CONFIDENTIAL Lab: Creating a Test Network Policy 11. Create a Display Filter 140 • Device Model: AP350 • Host Name: 0X- • Remember This Filter: 0X-APs • Click Search • Five APs will display
  • 141.
    © 2014 AerohiveNetworks CONFIDENTIAL Lab: Creating a Test Network Policy 12. Upload the Network Policy 141 • Select your 0X-A-xxxxxx access point and all of your 0X-SIMU-xxxxxxx access points • Click the Update button • Click Update Devices to push your Network Policy to your access points • Click Yes in the Confirm window
  • 142.
    © 2014 AerohiveNetworks CONFIDENTIAL Lab: Creating a Test Network Policy 13. Upload the Network Policy 142 • Click the Update Button • Click OK in the Reboot Warning window
  • 143.
    © 2014 AerohiveNetworks CONFIDENTIAL Copyright ©2011 Lab: Creating a Test Network Policy 14. Upload the Network Policy Once the Update is pushed, you will see the Update Status and the devices rebooting. When the devices have rebooted and start reporting to HiveManager, you will see their new up time and that the configuration on the devices matches the expected configuration in HiveManager. 143
  • 144.
    © 2014 AerohiveNetworks CONFIDENTIAL Overview of Update Settings 144 • Complete Upload: The entire Aerohive AP configuration is uploaded and a reboot is required • Delta Upload: Only configuration changes are uploaded and no reboot is required • The default is “Auto”- HiveManager is smart enough to know if the upload is Complete or Delta • The first upload is always a Complete Upload Should a Delta upload ever fail, best practice is to select a Complete upload and force a reboot. Also, a Complete Update is recommended when the configuration involves advanced security settings such as RADIUS.
  • 145.
    © 2014 AerohiveNetworks CONFIDENTIAL Overview of Update Settings 145 The Auto option, which is set by default, performs a complete initial upload, requiring the device to reboot before activating the uploaded configuration. Following that, all subsequent uploads consist of delta configurations based on a comparison with the current configuration running on the device. Should a Delta upload ever fail, best practice is to select a Complete upload and force a reboot. Also, a Complete Update is recommended when the configuration involves advanced security settings such as RADIUS.
  • 146.
    © 2014 AerohiveNetworks CONFIDENTIAL Because the filter is set by default to Current Policy/Default Policies, you will only see devices assigned to your selected network policy, or the def-policy-template (assigned to new devices) Lab: Creating a Test Network Policy 15. Review of Device Display Filters 146 Filter set by default to Current Policy/Default Policies Selected Network Policy Select None if you want to see all devices
  • 147.
    © 2014 AerohiveNetworks CONFIDENTIAL Lab: Creating a Test Network Policy 16. Verify the Update Results 147 • From ConfigurationDevicesDevice Update Results • Review your update results • Hover your cursor above the Description • Review the pop-up window results Always review Device Update Results. The pop-up window often has good troubleshooting information should an update fail.
  • 148.
    © 2014 AerohiveNetworks CONFIDENTIAL Lab: Creating a Test Network Policy 17. Verify the Update Results 148 HiveManager pushes firmware and configuration updates in stages: first to all online devices, and then automatically to any offline devices the next time they connect to HiveManager. • If any devices are offline, the update results will display as Staged • Once the devices re-establish CAPWAP connectivity, HiveManager will then re-attempt to upload the configuration until successful
  • 149.
    © 2014 AerohiveNetworks CONFIDENTIAL • Go to MonitorDevicesAll Devices for more detailed information Lab: Creating a Test Network Policy 18. Device Monitor View Set items per page Change column settings Turn off auto refresh if you want to make changes without interruption If Audit is Red Exclamation Point, click it to see the difference between HiveManager and the device. 149
  • 150.
    © 2014 AerohiveNetworks CONFIDENTIAL Lab: Creating a Test Network Policy 19. Customize the Monitor View Columns 150 • Click on the Edit Table Icon • From Available Columns on the left select both MGT Interface VLAN and Native VLAN and move them to the Selected Columns on the right using the corresponding arrow button. • Move both new options up until they are directly under IP Address • Click Save Note: Both the Instructor and Students MUST perform this exercise.
  • 151.
    © 2014 AerohiveNetworks CONFIDENTIAL Lab: Creating a Test Network Policy 20. Audit Icon 151 • Unconfigured Devices are Aerohive APs, Routers and other Aerohive devices that have discovered HiveManager for the first time. • IP connectivity and CAPWAP connectivity are needed for discovery. Once Aerohive Devices have a configuration uploaded they become Configured Devices. The configuration on HiveManager does NOT match the configuration on the Aerohive Device The configuration on HiveManager MATCHES the configuration on the Aerohive Device
  • 152.
    © 2014 AerohiveNetworks CONFIDENTIAL Lab: Test Hosted Client Access to SSID Test SSID Access at Hosted Site 152 SSID: Authentication: Encryption: Preshared Key: User Profile 1: Attribute: VLAN: IP Firewall: QoS: Corp-PSK-X WPA or WPA2 Personal TKIP or AES aerohive123 Staff-X 1 1 None def-user-qos Hosted PC Student-X VLANs 1-20 Mgt0 IP: 10.5.1.N/24 VLAN 1 Network Policy: Test-X Internal Network AD Server: 10.5.1.10 DHCP Settings: (VLAN 1) network 10.5.1.0/24 10.5.1.140 – 10.5.1.240 Internet Connect to SSID: IP: Gateway: Corp-PSK-X 10.5.1.N/24 10.5.1.1 Use VNC client to access Hosted PC: password: aerohive123
  • 153.
    © 2014 AerohiveNetworks CONFIDENTIAL Lab: Test Hosted Client Access to SSID 1. For Windows: Use TightVNC client 153 • If you are using a windows PC › Use TightVNC › TightVNC has good compression so please use this for class instead of any other application • Start TightVNC › For Lab 1 › lab1-pcX.aerohive.com › For Lab 2 › lab2-pcX.aerohive.com › For Lab 3 lab3-pcX.aerohive.com › For Lab 4 lab4-pcX.aerohive.com › For Lab 5 lab5-pcX.aerohive.com › Select  Low-bandwidth connection › Click Connect › Password: aerohive123123 › Click OK
  • 154.
    © 2014 AerohiveNetworks CONFIDENTIAL Lab: Test Hosted Client Access to SSID 2. For Mac: Use the Real VNC client 154 • If you are using a Mac › RealVNC has good compression so please use this for class instead of any other application • Start RealVNC › For Lab 1 › lab1-pcX.aerohive.com › For Lab 2 › lab2-pcX.aerohive.com › For Lab 3 lab3-pcX.aerohive.com › For Lab 4 lab4-pcX.aerohive.com › For Lab 5 lab5-pcX.aerohive.com › Click Connect › Password: aerohive123. › Click OK
  • 155.
    © 2014 AerohiveNetworks CONFIDENTIAL Lab: Test Hosted Client Access to SSID 3. Connect to Your Class-PSK-X SSID 155 • Single-click the wireless icon on the bottom right corner of the windows task bar • Click your SSID Corp-PSK-X • Click Connect › Security Key: aerohive123 › Click OK
  • 156.
    © 2014 AerohiveNetworks CONFIDENTIAL Lab: Test Hosted Client Access to SSID 4. View Active Clients List 156 • After associating with your SSID, you should see your connection in the active clients list in HiveManager › Go to MonitorClientsWireless Clients • Your IP address should be from the 10.5.1.0/24 network
  • 157.
    © 2014 AerohiveNetworks CONFIDENTIAL© 2014 Aerohive Networks CONFIDENTIAL QUESTIONS?
  • 158.
    © 2014 AerohiveNetworks Inc. SECTION 5. CONFIGURING ACCESS POINTS FOR MAPS AND MONITORING 158 Aerohive’s Instructor-led Training
  • 159.
    © 2014 AerohiveNetworks CONFIDENTIAL Design Implementation 159 Now that the initial planning and testing phases are completed, you are ready to begin creating the framework for your live deployment. To accomplish the remaining goals you will: Clone your predictive model maps you created earlier Add your APs to Floor 1 of your cloned maps Position the APs as required for the needed coverage
  • 160.
    © 2014 AerohiveNetworks CONFIDENTIAL LAB: Design Implementation 1. Clone of the Plan Building 160 • Click on the Maps Tab • Expand Planner Maps and right click on your 0X Plan Building • Select Clone
  • 161.
    © 2014 AerohiveNetworks CONFIDENTIAL LAB: Design Implementation 2. Clone of the Plan Building 161 • Name your cloned building 0X Building • Click the drop down arrow and select the Locations folder • Click Create
  • 162.
    © 2014 AerohiveNetworks CONFIDENTIAL LAB: Design Implementation 3. Planning the Production Network 162 • Expand the Locations folder • Expand your 0X Building • Select Floor 1 • Click the Devices Tab
  • 163.
    © 2014 AerohiveNetworks CONFIDENTIAL LAB: Design Implementation 4. Adding your APs to the map 163 • Select all of your 0X APs • Click the arrow to move them to the Devices on Floor 1 section • Click Update to place your devices on your 0X Building Floor 1 map
  • 164.
    © 2014 AerohiveNetworks CONFIDENTIAL LAB: Design Implementation 5. Placing your APs 164 • ☐ Uncheck the Ethernet and Mesh check boxes • ☐ Uncheck the Nodes Locked check box • Position the APs on your map as planned in the predictive model •  Check the Nodes Locked check box
  • 165.
    © 2014 AerohiveNetworks CONFIDENTIAL Design Implementation 165 Once the APs are located properly you can use you map for post deployment validation processes such as:  RSSI values  Interference source locationing  Channel verification  Display of Ethernet and Mesh connections
  • 166.
    © 2014 AerohiveNetworks CONFIDENTIAL Topology Maps With RSSI and Power (Heatmap) 166 • Both 5 GHz or 2.4 GHz Bands can be view separately • Ethernet and Mesh Connections can be displayed • RSSI values can be used to display coverage • The coverage areas range from red being the strongest to dark blue being the weakest coverageThe blue lines show the perimeter for an AP that a client within its boundaries should connect. Select the Band 5 GHz or 2.4 GHz Select the coverage you want to view Here you can see the subnet the MGT0 interface on the Aerohive APs
  • 167.
    © 2014 AerohiveNetworks CONFIDENTIAL Topology Maps With Rogue AP Detection and Client Location 167 • If three or more Aerohive APs on a map detect a rogue, HiveManager can estimate the location of the rogue on the topology map • Also, if the Aerohive AP location service is enabled, you can view clients as well Friendly AP Rogue AP Client
  • 168.
    © 2014 AerohiveNetworks CONFIDENTIAL© 2014 Aerohive Networks CONFIDENTIAL QUESTIONS?
  • 169.
    © 2014 AerohiveNetworks CONFIDENTIAL Classroom LAB Scenario 169 • We'll start with the types of users we have in the network. We have different types of employees, and different types of guests. • Employees should have secure access to the wireless network, and the most secure method is 802.1X/EAP • We can create 1 SSID for all Employee access, but have different access policies depending on the type of employee. • For devices that do not support 802.1X, or require fast roaming and do not support 802.11r or OKC, then you should consider Private PSK for that • For guests, there is the legacy open SSID method, that we don't feel it does provide security for guests, and leave them extremely vulnerable. So instead we should provide a Private PSK infrastructure and a captive web portal for use policy acceptance. We can also provide a way for self registration, employee sponsorship, etc… • We will need to consider the best practice AP settings to meet our network design goals. After which we will need to show how to maintain and monitor a network.
  • 170.
    © 2014 AerohiveNetworks Inc. SECTION 6: CREATING THE EMPLOYEE SECURE ACCESS NETWORK 170 Aerohive’s Instructor-led Training
  • 171.
    © 2014 AerohiveNetworks CONFIDENTIAL Classroom Employee WLAN Scenario 171 • Employees should have secure access to the wireless network, and the most secure method is to use 802.1X EAP. • You are going to build an 802.1X EAP solution using the customers existing RADIUS server. • RADIUS attributes can be leveraged to assign different types of employees to VLANs and user traffic settings by assigning them to the appropriate User Profiles. • Employees will assigned to three different User Profiles: Employees, IT and Executives. User profiles will be used to assign different types access rights to different types of employees.
  • 172.
    © 2014 AerohiveNetworks CONFIDENTIAL Lab: Creating the Employee Secure Access Network 1. Creating the Corporate Network Policy 172 • Click on the Configuration Tab • Under Choose Network Policy Click the New Button
  • 173.
    © 2014 AerohiveNetworks CONFIDENTIAL Lab: Creating the Employee Secure Access Network 2. Creating the Corporate Network Policy 173 • Fill in the Name box using Corp-X as your Network Policy Name3 • Click the Create button It is recommended that you ALWAYS add descriptions about the objects you are building whenever possible.
  • 174.
    © 2014 AerohiveNetworks CONFIDENTIAL Lab: Creating the Employee Secure Access Network 3. Creating the Secure SSID Profile 174 To configure a 802.1X/EAP SSID for Secure Wireless Access • Next to SSIDs, click Choose • Click New
  • 175.
    © 2014 AerohiveNetworks CONFIDENTIAL Copyright ©2011 Lab: Creating the Employee Secure Access Network 4. Creating the Secure SSID Profile • Profile Name: Corp-Secure-X • SSID: Corp-Secure-X • Under SSID Access Security select  WPA/WPA2 802.1X (Enterprise) • Click Save 175
  • 176.
    © 2014 AerohiveNetworks CONFIDENTIAL Lab: Creating the Employee Secure Access Network 5. Saving the Secure SSID Profile 176 • Ensure the Corp-Secure-X SSID is selected • Click OK Ensure Corp-Secure-X is highlighted then click OK
  • 177.
    © 2014 AerohiveNetworks CONFIDENTIAL Lab: Creating the Employee Secure Access Network 6. Creating the RADIUS Object 177 • Under Authentication, click <RADIUS Settings> • Choose RADIUS, click New Click Click
  • 178.
    © 2014 AerohiveNetworks CONFIDENTIAL 178 • RADIUS Name: RADIUS-X • IP Address/Domain Name: 10.5.1.10 • Shared Secret: aerohive123 • Confirm Secret: aerohive123 • Click Apply • Click Save Click Apply When Done! Lab: Creating the Employee Secure Access Network 7. Creating the RADIUS Object
  • 179.
    © 2014 AerohiveNetworks CONFIDENTIAL 179 • Under User Profile, click Add/Remove • Click New Lab: Creating the Employee Secure Access Network 8. Creating the User Profile
  • 180.
    © 2014 AerohiveNetworks CONFIDENTIAL 180 • Name: Employees-X • Attribute Number: 10 • Default VLAN: 10 • Click Save Lab: Creating the Employee Secure Access Network 9. Creating the User Profile
  • 181.
    © 2014 AerohiveNetworks CONFIDENTIAL 181 • With the Default tab selected, ensure the Employees-X user profile is highlighted › IMPORTANT: This user profile will be assigned if no attribute value is returned from RADIUS after successful authentication, or if attribute value 10 is returned. • Click the Authentication tab Default Tab Authentication Tab Lab: Creating the Employee Secure Access Network 10. User Profile – no returned RADIUS attributes
  • 182.
    © 2014 AerohiveNetworks CONFIDENTIAL 182 • Select the Authentication tab • Select (highlight) both the IT and Executives User Profiles NOTE: The (User Profile Attribute) is appended to the User Profile Name • Click Save Authentication Tab Lab: Creating the Employee Secure Access Network 11. User profiles for returned RADIUS attributes
  • 183.
    © 2014 AerohiveNetworks CONFIDENTIAL 183 • Ensure Employees-X, IT and the Executives user profiles are assigned to the Corp-Secure- X SSID Lab: Creating the Employee Secure Access Network 12. Verify the User Profiles
  • 184.
    © 2014 AerohiveNetworks CONFIDENTIAL 184 • Click the Continue button Lab: Creating the Employee Secure Access Network 13. Saving the work and preparing to update devices
  • 185.
    © 2014 AerohiveNetworks CONFIDENTIAL 185 From the Configure & Update Devices section, click the drop down next to Filter and select your 0X-APs Filter. Lab: Creating the Employee Secure Access Network 14. Saving the work and preparing to update devices
  • 186.
    © 2014 AerohiveNetworks CONFIDENTIAL 186 • Select your 0X-A-xxxxxx access point and all of your 0X-SIMU-xxxxxxx access points • Click the Update button • Click Update Devices to push your Network Policy to your access points • Click Yes in the Confirm window Lab: Creating the Employee Secure Access Network 15. Update the devices
  • 187.
    © 2014 AerohiveNetworks CONFIDENTIAL 187 • Click the Update Button • Click OK in the Reboot Warning window Lab: Creating the Employee Secure Access Network 16. Update the devices
  • 188.
    © 2014 AerohiveNetworks CONFIDENTIAL Copyright ©2011 Once the Update is pushed, you will see the Update Status and the devices rebooting. When the devices have rebooted and start reporting to HiveManager, you will see their new up time and that the configuration on the devices matches the expected configuration in HiveManager. 188 Lab: Creating the Employee Secure Access Network 17. Update the devices
  • 189.
    © 2014 AerohiveNetworks CONFIDENTIAL Lab: Test Hosted Client Access to SSID 1. For Windows: Use TightVNC client 189 • If you are using a windows PC › Use TightVNC › TightVNC has good compression so please use this for class instead of any other application • Start TightVNC › For Lab 1 › lab1-pcX.aerohive.com › For Lab 2 › lab2-pcX.aerohive.com › For Lab 3 lab3-pcX.aerohive.com › For Lab 4 lab4-pcX.aerohive.com › For Lab 5 lab5-pcX.aerohive.com › Select  Low-bandwidth connection › Click Connect › Password: aerohive123123 › Click OK
  • 190.
    © 2014 AerohiveNetworks CONFIDENTIAL Lab: Test Hosted Client Access to SSID 2. For Mac: Use the Real VNC client 190 • If you are using a Mac › RealVNC has good compression so please use this for class instead of any other application • Start RealVNC › For Lab 1 › lab1-pcX.aerohive.com › For Lab 2 › lab2-pcX.aerohive.com › For Lab 3 lab3-pcX.aerohive.com › For Lab 4 lab4-pcX.aerohive.com › For Lab 5 lab5-pcX.aerohive.com › Click Connect › Password: aerohive123. › Click OK
  • 191.
    © 2014 AerohiveNetworks CONFIDENTIAL Lab: Testing 802.1X/EAP to External RADIUS 1. Connect to Secure Wireless Network 191 • From the bottom task bar, and click the locate wireless networks icon • Click Corp-Secure-X • Click Connect
  • 192.
    © 2014 AerohiveNetworks CONFIDENTIAL 192 After associating with your SSID, you should see your connection in the active clients list in HiveManager • Go to MonitorClientsWireless Clients • User Name: DOMAINuser • VLAN: 10 Lab: Testing 802.1X/EAP to External RADIUS 2. Connect to Secure Wireless Network
  • 193.
    © 2014 AerohiveNetworks CONFIDENTIAL 193 • To change the layout of the columns in the Wireless Clients list, you can click the spreadsheet icon • Select User Profile Attribute from the Available Columns list and click the right arrow • With User Profile Attribute selected, click the Up button so that the column is moved after VLAN • Click Save Click to change column layout Lab: Testing 802.1X/EAP to External RADIUS 3. Customizing Your Column View
  • 194.
    © 2014 AerohiveNetworks CONFIDENTIAL 194 • By Default all Device and Client screens display 15 items per page. • You can scroll between pages using the arrow buttons or choose to display more items per page. • Screen Auto refresh is enabled by default but can be disabled if so desired. Select Drop Down to display 50 items per page Auto refresh can be turned on or off as desired • Select 50 items per page Lab: Testing 802.1X/EAP to External RADIUS 4. Customizing Your Column View
  • 195.
    © 2014 AerohiveNetworks CONFIDENTIAL 195 To display only the wireless Clients in the Lab: • Go to MonitorClientsWireless Clients. • Click the + under Filter at the bottom of the Monitor options. • Next to Topology Map select 0X Building_Floor 1 from the drop down • In the Remember This Filter box type: Lab • Click Search to save the filter Lab: Testing 802.1X/EAP to External RADIUS 5. Create a clients display filter Note: The proper use of Filters will save time in locating desired objects
  • 196.
    © 2014 AerohiveNetworks CONFIDENTIAL 196 To display only the Wireless Clients in the Classroom: • Go to MonitorClientsWireless Clients. • Click the + under Filter at the bottom of the Monitor options. • Next to Topology Map select Training Center_Floor1 from the drop down • In the Remember This Filter box type: Instructor • Click Search to save the filter Lab: Testing 802.1X/EAP to External RADIUS 6. Create a clients display filter Note: The proper use of Filters will save time in locating desired objects
  • 197.
    © 2014 AerohiveNetworks CONFIDENTIAL© 2014 Aerohive Networks CONFIDENTIAL QUESTIONS?
  • 198.
    © 2014 AerohiveNetworks Inc. SECTION 7: PRIVATE PSK FOR DEVICES 198 Aerohive’s Instructor-led Training
  • 199.
    © 2014 AerohiveNetworks CONFIDENTIAL Private PSK (PPSK) for Legacy Devices Scenario 199  Your customer has legacy devices that do not support 802.1X, or require fast roaming and do not support 802.11r or Opportunistic Pairwise Master Key Caching (OKC).  There is a requirement that all devices have unique credentials.  Aerohive offers a security solution called Private PSK (PPSK) that meets these needs.
  • 200.
    © 2014 AerohiveNetworks CONFIDENTIAL SSIDs with WPA or WPA2 Personal Use Legacy Pre Shared Keys (PSKs) 200 • All users share the same key › If a user leaves or if a PC or portable device is lost, for security reasons, the shared key should be changed, and every client will have to update the keys on their wireless clients • All users share the same network policy › Because all users share the same SSID with the same key, they will also have the same network policies, such as their VLAN, because there have no way to uniquely identify users or types of users User 1 User 2 User 3 SSID: Corp-Wi-Fi Authentication: WPA2 Personal Shared Key: aSecretPhrase User Profile: Employee-Profile SSID: Corp-Wi-Fi Shared Key: aSecretPhrase SSID: Corp-Wi-Fi Shared Key: aSecretPhrase SSID: Corp-Wi-Fi Shared Key: aSecretPhrase AP
  • 201.
    © 2014 AerohiveNetworks CONFIDENTIAL SSID with 802.1X/EAP Dynamically Create Pairwise Master Keys (PMKs) 201 • With 802.1X, after a user successfully authenticates with RADIUS, a unique key is created for each user and AP pair called a PMK › If a user leaves the company or a user loses a device, the user account can be disabled and passwords can be changed to prevent access to corporate resources • New PMKs are created every time user authenticates • Users can have unique network policies › Because users are identified by their user name, based on the user or group, they can be assigned to different network policies User 1 User 2 User 3 SSID: Corp-W-iFi Authentication: WPA2 Enterprise (802.1X) - User 1 - PMK: d6#$%^98f.. - User 2 - PMK: 87fe@#$%a.. - User 3 - PMK: 90)356*&f.. SSID: Corp-Wi-Fi PMK: d6#$%^98f.. SSID: Corp-Wi-Fi PMK: 87fe@#$%a.. SSID: Corp-Wi-Fi PMK: 90)356*&f.. AP RADIUS
  • 202.
    © 2014 AerohiveNetworks CONFIDENTIAL Private Preshared Key (PSK) Allows creation of unique PSKs per user 202 • Private PSKs are unique pre shared keys created for individual users on the same SSID • Client configuration is simple, just enter the SSID shared key for WPA or WPA2 personal (PSK) › No 802.1X supplicant configuration is required › Works with devices that do not support 802.1X/EAP • You can automatically generate unique keys for users, and distribute via email, or any way you see fit • If a user leaves or a device is lost or stolen, the PSK for that user or device can simply be revoked User 1 User 2 User 3 SSID: Corp-Wi-Fi SSID Type: Private PSK Authentication: WPA2 Personal - User 1 – Private PSK: d6#$%^98f.. - User 2 – Private PSK: 87fe@#$%a.. - User 3 – Private PSK: 90)356*&f.. SSID: Corp-Wi-Fi Key: d6#$%^98f.. SSID: Corp-Wi-Fi Key: 87fe@#$%a.. SSID: Corp-Wi-Fi Key: 90)356*&f.. Aerohive AP
  • 203.
    © 2014 AerohiveNetworks CONFIDENTIAL Private Preshared Key (PSK) Use Cases 203 • Use Case #1: Private PSK is recommended for augmenting WLAN deployments that authenticate clients with WPA or WPA2 Enterprise (802.1X/EAP), but have some devices that: › Support WPA or WPA2 Personal, but do not support WPA or WPA2 Enterprise with 802.1X/EAP › Do not support opportunistic key caching (OKC) for seamless roaming • Use Case #2: Recommended use in place of using traditional PSKs for environments that do not have a WLAN deployment using WPA or WPA2 Enterprise with 802.1X/EAP • Use Case #3: Recommended for secure credentials with guest WLANs (secure guest management covered in a later section)
  • 204.
    © 2014 AerohiveNetworks CONFIDENTIAL Private Preshared Key (PSK) Maximum PPSKS per Aerohive Device 204
  • 205.
    © 2014 AerohiveNetworks CONFIDENTIAL Verify On-Premise HiveManager Time Settings 205 • HiveManager and Aerohive Devices should have up to date time settings, preferably by NTP (HMOL Time Settings are automatic). • Go to HomeAdministrationHiveManager Settings • Next to System Date/Time click Settings Private PSKs are credentials that have a start time. Private PSKs, like other credentials, can also be time limited. Therefore, it is imperative that the HiveManager Time Settings be in proper synchronization with your network. The use of an NTP server is highly recommended.
  • 206.
    © 2014 AerohiveNetworks CONFIDENTIAL 206 • Go to Configuration • Select your Network Policy: Corp-X and click OK • Next to Additional Settings Click Edit • Expand Management Server Settings Note: Upon first login to a new HiveManager system, an NTP server policy is automatically created with the same name as the User name. However, the object should be edited with the proper time zones. • Next to NTP Server › Click the + Icon Private PSKs are credentials that have a start time. Private PSKs, like other credentials, can also be time limited. Even more important than the HiveManager Time Settings, Aerohive Device Clock Settings must be properly synchronized. The use of an NTP server is MANDATORY. Verify Device Time Settings
  • 207.
    © 2014 AerohiveNetworks CONFIDENTIAL 207 • Name the service NTP-X • Time Zone: <Please use the Pacific time Zone> • Uncheck  Sync clock with HiveManager • NTP Server: ntp1.aerohive.com • Click Apply • Click Save Verify Device Time Settings MANDATORY: You must change the time zone to match the time zone where your Aerohive Devices reside. Do this BEFORE you configure the rest of your Network Policy. Instructor note: When using Lab #4 the Time Zone MUST be set to (GMT +10 Australia/Sydney)
  • 208.
    © 2014 AerohiveNetworks CONFIDENTIAL Lab: Private PSK for Enterprise 1. Modify your Network Policy to Create an SSID 208 To configure a Private PSK SSID • Go to Configuration • Select your Network Policy: Corp-X and click OK • Next to SSIDs, click Choose • Click New
  • 209.
    © 2014 AerohiveNetworks CONFIDENTIAL Copyright ©2011 Lab: Private PSK for Enterprise 2. Create a Private PSK SSID • Profile Name: Device-PPSK-X • SSID: Device-PPSK-X • Under SSID Access Security select Private PSK • Set maximum clients per private PSK to: 1 › This limits how many times a single Private PSK can be concurrently used in a Hive • Click Save 209
  • 210.
    © 2014 AerohiveNetworks CONFIDENTIAL Lab: Private PSK for Enterprise 3. Create a Private PSK SSID 210 • Ensure the Device-PPSK-X SSID is selected • Ensure the Corp- Secure-X SSID is selected • Click OK Ensure both Device-PPSK-X and Corp- Secure-X are highlighted then click OK
  • 211.
    © 2014 AerohiveNetworks CONFIDENTIAL Lab: Private PSK for Enterprise 4. Create a Private PSK User Group 211 • Under Authentication, click <PSK User Groups> • Click New Click Click
  • 212.
    © 2014 AerohiveNetworks CONFIDENTIAL Lab: Private PSK for Enterprise 5. Create a Private PSK Group 212 • User Group Name: Devices-X User Type:  Automatically generated private PSK users • User Profile Attribute: 2 • VLAN: <empty> Inherited from user profile • User Name Prefix: 0X- • Click the Generate button to create a seed • Expand Private PSK Advanced Options
  • 213.
    © 2014 AerohiveNetworks CONFIDENTIAL Lab: Private PSK for Enterprise 6. Create a Private PSK User Group 213 • Password length: 20 • Click Save Note: You can define the strength of the PSKs Although each of the PPSKs will be unique, they are still susceptible to brute-force offline dictionary attacks. The Wi-Fi Alliance recommends a passphrase key strength of 20 characters or longer.
  • 214.
    © 2014 AerohiveNetworks CONFIDENTIAL Lab: Private PSK for Enterprise 7. Save the Private PSK User Group 214 • Ensure your Devices-X is highlighted • Click OK
  • 215.
    © 2014 AerohiveNetworks CONFIDENTIAL Lab: Private PSK for Enterprise 9. Create a user profile for the PPSK SSID 215 • Under User Profile, click Add/Remove • Click New
  • 216.
    © 2014 AerohiveNetworks CONFIDENTIAL 216 • Name: Devices-X • Attribute Number: 2 • Default VLAN: 2 • Verify the settings, and click Save Lab: Private PSK for Enterprise 10. Create a user profile for the PPSK SSID Although these are corporate devices, they are using a shared key security. Since they are not using 802.1X, a more secure authentication method, it is a recommended practice to separate their traffic to protect you network from unwanted use.
  • 217.
    © 2014 AerohiveNetworks CONFIDENTIAL Lab: Private PSK for Enterprise 10. Review Settings and Click Save 217 • Ensure your Devices-X User Profile is selected • Click Save • Verify the settings, and click Save
  • 218.
    © 2014 AerohiveNetworks CONFIDENTIAL Lab: Private PSK for Enterprise 11. Creating your User Accounts 218 • In the Navigation pane go to: Advanced Configuration AuthenticationLocal Users • Click Bulk Note: In a live deployment, each device and or user should be uniquely identifiable. We are using the Bulk option in class simply as a way to save time.
  • 219.
    © 2014 AerohiveNetworks CONFIDENTIAL Lab: Private PSK for Enterprise 12. Creating your User Accounts 219 • Create Users Under Group: Devices-X • Number of New Users: 10 • Description: 0X- • Enter your REAL email address • Click Create
  • 220.
    © 2014 AerohiveNetworks CONFIDENTIAL 220 Apply a filter to view your Private PSK users • In the Navigation pane, navigate to: Advanced ConfigurationAuthenticationLocal Users • Click the Filter button • Next to Description: Type 0X- and Click Search • Results shown on next slide Lab: Private PSK for Enterprise 13. Viewing your User Accounts
  • 221.
    © 2014 AerohiveNetworks CONFIDENTIAL Lab: Private PSK for Enterprise 14. View your Private PSK users 221 • Locate your PPSK users › Sort on the user name or use the filter • You can click (Clear Text PPSK) to view the PPSK Click here to obscure or show or obscure your clear text PSK
  • 222.
    © 2014 AerohiveNetworks CONFIDENTIAL Copyright ©2011 Lab: Private PSK for Enterprise 15. Email your user their private PSK • Check the box next to one of your user user accounts, and click Email PSK IMPORTANT: Please check your Junk Email folder if you do not receive this email IMPORTANT: In order for the email to work, you MUST have the email service settings configured under HomeAdministration HiveManager Services Update Email Settings Email the private PSK to the user Email Message Email Address
  • 223.
    © 2014 AerohiveNetworks CONFIDENTIAL 223 • Go to Configuration and select your Corp-X policy and click OK • Click on the Continue button • From the Configure & Update Devices section, click the drop down next to Filter and select your 0X-APs Filter. Lab: Private PSK for Enterprise 16. Updating your Aerohive Devices
  • 224.
    © 2014 AerohiveNetworks CONFIDENTIAL 224 • Select your 0X-A-xxxxxx access point and all of your 0X-SIMU-xxxxxxx access points • Click the Update button • Click Update Devices to push your Network Policy to your access points Lab: Private PSK for Enterprise 17. Updating your Aerohive Devices
  • 225.
    © 2014 AerohiveNetworks CONFIDENTIAL 225 • Click the Update Button • Click OK in the Reboot Warning window Lab: Private PSK for Enterprise 18. Updating your Aerohive Devices
  • 226.
    © 2014 AerohiveNetworks CONFIDENTIAL Copyright ©2011 The physical APs will not need to reboot this time because this is a Delta update. The simulated APs will reboot. Only the configuration changes in the Network Policy were uploaded. Because a reboot is not necessary, clients already connected to the Corp-Secure-X SSID are not affected. 226 Lab: Private PSK for Enterprise 19. Updating your Aerohive Devices
  • 227.
    © 2014 AerohiveNetworks CONFIDENTIAL Lab: Private PSK for Enterprise 1. Testing your PPSK SSID 227 • From TightVNC, go to: labN- pcX.aerohive.com password: aerohive123 • Copy the PPSK key either from the user account display or your email, make sure not to copy any extra spaces • Connect to your SSID: Device-PPSK-X • Paste your Passphrase/Network Key: <Paste your 20 character PSK> • Click OK
  • 228.
    © 2014 AerohiveNetworks CONFIDENTIAL 228 • After associating with your SSID, you should see your connection in the active clients list in HiveManager › Go to MonitorClientsWireless Clients • Your IP address should be from the 10.5.2.0/24 network • Note the client information: › VLAN: 2 › User Profile Attribute: 2 Lab: Private PSK for Enterprise 2. Testing your PPSK SSID
  • 229.
    © 2014 AerohiveNetworks CONFIDENTIAL Example Only: Revoke a Private PSK 1. Revoking Private PSK Users 229 If a user leaves the company, or if their device is lost or stolen, you can revoke a users key and de-authenticate any active client using the individual private PSK • Go to ConfigurationAdvanced Configuration AuthenticationLocal Users •  Check the box next to your user account and click Remove • Click Yes to continue › Note: For this change to take effect, you will have to update the configuration of every Aerohive AP using this Private PSK account...
  • 230.
    © 2014 AerohiveNetworks CONFIDENTIAL 230 • Select your 0X-A-xxxxxx access point and all of your 0X-SIMU-xxxxxxx access points • Click the Update button • Click Update Devices to push your Network Policy to your access points Example Only: Revoke a Private PSK 2. Update the Configuration
  • 231.
    © 2014 AerohiveNetworks CONFIDENTIAL Example Only: Revoke a Private PSK 3. Verify your PPSK user is revoked 231 • To view the active clients, go to MonitorClients Wireless Clients • The revoked clients will no longer appear in the active clients list • If you view the desktop of the hosted client PC, you will see they are disconnected
  • 232.
    © 2014 AerohiveNetworks CONFIDENTIAL© 2014 Aerohive Networks CONFIDENTIAL QUESTIONS?
  • 233.
    © 2014 AerohiveNetworks Inc. SECTION 8: AEROHIVE WLAN GUEST MANAGEMENT Aerohive’s Instructor-led Training
  • 234.
    © 2014 AerohiveNetworks CONFIDENTIAL Why Provide Guest Access? 234 Many studies have shown that providing WLAN guest access is beneficial to your business • Improved Productivity: Customers and contractors often need access to the Internet to accomplish job-related duties. If customers and contractors are more productive, your company employees will also be more productive. • Customer Loyalty: In today’s world, business customers have come to expect Guest WLAN access. Free guest access is often considered a value-added service. There is a good chance that your customers will move towards your competitors if you do not provide WLAN guest access.
  • 235.
    © 2014 AerohiveNetworks CONFIDENTIAL Guest WLAN Essentials 235 Guest user traffic should always be segmented from employee user traffic. Four guest WLAN best practices include: • Guest SSID: Wireless guest users should always connect to a separate guest SSID because it will have different security policies than a corporate or employee SSID. • Guest VLAN: Guest user traffic should be segmented into a unique VLAN tied to an IP subnet that does not mix with the employee user VLANs. • Captive Web Portal: A captive web portal can be used to accept guest login credentials. More importantly, the captive web portal should have a legal disclaimer. • Guest Firewall Policy: A From-Access guest firewall policy is the most important component of WLAN guest management.
  • 236.
    © 2014 AerohiveNetworks CONFIDENTIAL WLAN Guest Firewall Policy 236 • A From-Access guest firewall policy is the most important component of WLAN guest management. The goal is to keep wireless guest users away from corporate network resources and only allow them access to a gateway to the Internet. • Below is an example of the default Guest Firewall Policy in HiveManager
  • 237.
    © 2014 AerohiveNetworks CONFIDENTIAL WLAN Guest Firewall Policy 237 • The guest firewall policy can be much more restrictive. A good practice is to block SMTP so users cannot SPAM through the guest WLAN. • If necessary, many more ports and/or applications can be blocked. • Ports that should be permitted include DNS UDP port 53, DHCP-server UDP port 67, HTTP TCP port 80 and HTTPS TCP port 443 should be permitted. • So that guest users can use an IPsec VPN: IKE UDP port 500 and IPsec NAT-T UDP port 4500 should be permitted.
  • 238.
    © 2014 AerohiveNetworks CONFIDENTIAL WLAN Guest Firewall Policy 238
  • 239.
    © 2014 AerohiveNetworks CONFIDENTIAL Peer Blocking 239 • Guest users should be prevented from peer-to-peer connectivity on the guest VLAN/subnet. This prevents peer- to-peer attacks. • Peer blocking can be configured in the the Guest SSID settings. • Optional Settings  DoS Prevention and Filter  Traffic Filter • Uncheck ☐ Enable Inter-station Traffic
  • 240.
    © 2014 AerohiveNetworks CONFIDENTIAL Rate Limiting 240 • The bandwidth of guest traffic can be throttled with a rate control policy • User Profiles  Optional Settings  QoS Settings  Rate Control and Queuing Policy
  • 241.
    © 2014 AerohiveNetworks CONFIDENTIAL Captive Web Portals 241 DNS lookup = whois www.google.com DNS response = www.google.com = 1.1.1.1 1.1.1.1 If guest user authentication is required, the AP will then query a RADIUS server with an authentication protocol such as MS-CHAPv2. When a guest user browses to a URL, a DNS redirect is used to send the guest user to the captive portal login pages. If a captive portal stops working, there is most likely a DNS problem.
  • 242.
    © 2014 AerohiveNetworks CONFIDENTIAL Captive Web Portals 242 • Aerohive has a large selection of available captive web portals • The CWP pages use cascading style sheets so that they display properly on a computer screen, tablet screen or smart phone screen • Upon authentication, guests can be redirected to external URL or the initially requested URL
  • 243.
    © 2014 AerohiveNetworks CONFIDENTIAL Captive Web Portals 243 • Pages can be customized within HiveManager • Advanced customization can be done with an external HTML editor and pages can be imported back into the system and then used as templates
  • 244.
    © 2014 AerohiveNetworks CONFIDENTIAL Captive Web Portals 244 Captive Web Portal Login Page Examples User Authentication Self Registration User Policy Acceptance
  • 245.
    © 2014 AerohiveNetworks CONFIDENTIAL Captive Web Portals 245 Multi-Language Support
  • 246.
    © 2014 AerohiveNetworks CONFIDENTIAL Guest VLAN in a DMZ 246 Sometimes a customer may have a written security policy that mandates that the guest VLAN not reside at the edge of the network. The guest VLAN can only exist in a DMZ • GRE Tunneling – Aerohive APs can be configured to tunnel the guest traffic back to a HiveOS Appliance server that resides in the DMZ • Guest GRE Tunnel LAB – This lab is performed in the Aerohive Advanced WLAN Configuration (AAWC) class HiveOS VA
  • 247.
    © 2014 AerohiveNetworks CONFIDENTIAL Open Guest WLANs 247 • OPEN is BAD - Most Aerohive competitors recommend “open” guest WLANs with no encryption. • Attack - If encryption is not being used, the Layer 3 – 7 payload of any 802.11 data frame will also be exposed. • Attack - Any clear-text communications such as email and Telnet passwords can be captured if no encryption is provided. • Attack - Furthermore, any unencrypted 802.11 frame transmissions can be reassembled at the upper layers of the OSI model. For example, email messages can be reassembled and therefore read by an eavesdropper. Web pages and instant messages can also be reassembled. VoIP packets can be reassembled and saved as a WAV sound file. • More Attacks - Guest users are also susceptible to man-in-the- middle-attacks and wireless hijacking attacks
  • 248.
    © 2014 AerohiveNetworks CONFIDENTIAL Secure Guest WLANs 248 Aerohive does not believe in “open” guest WLANs. You should always use encryption to protect your guest users. Aerohive has many ways for you to provide secure guest management: • ID Manager – Cloud-Based Secure Guest Management • Private PPSK – User Manager – Even better, unique PPSK time- based credentials can be used to provide encryption. User Manager is a HiveManager admin account that a receptionist can use to hand-out secure PPSK credentials to guest user • Private PPSK – Self Registration – Guest users can also self- register to obtain secure PPSK credentials • Static PSK – At the very least a static shared PSK can be used to provide encryption More information is available about PPSK User Manager and PPSK self- registration in the supplemental materials provided by your instructor.
  • 249.
    © 2014 AerohiveNetworks CONFIDENTIAL ID MANAGER USER EXPERIENCE 249
  • 250.
    © 2014 AerohiveNetworks CONFIDENTIAL Secure Guest WLANs Scenario 250 • Your customer has a requirement for secure guest access for both contractors and visitors. • Guest users should not be permitted on the secure corporate network. • Each guest is required to use their own secure credentials for access to the guest network. • Aerohive offers a secure guest access solution called ID Manager.
  • 251.
    © 2014 AerohiveNetworks CONFIDENTIAL Internet ID Manager Workflow 251 • An operator who may be a lobby ambassador, an employee with ID manager operator rights, or the guest themselves using the web-based self-registration kiosk on an iPad for instance, can enter the Guest information • The operator if permitted can activate a Kiosk which is a secure web interface into ID Manager for self-registration APs HTTPS ID Manager
  • 252.
    © 2014 AerohiveNetworks CONFIDENTIAL Internet ID Manager Workflow 252 • The Guest arrives and would like secure guest Wi-Fi access • An operator who may be a lobby ambassador, an employee with ID manager operator rights, or the guest themselves using the web-based self-registration kiosk on an iPad for instance, can enter the Guest information • Guest information includes who the guest is representing, who they are visiting, their email, and a phone number APs Guest HTTPS ID Manager
  • 253.
    © 2014 AerohiveNetworks CONFIDENTIAL Internet ID Manager Workflow 253 • Next, the guest or the operator creating the guest account can select the type of guest access needed, such as a contractor, visitor, or guest secured with Private PSK • For this example a Visitor using Private PSK will be selected APs Guest HTTPS ID Manager
  • 254.
    © 2014 AerohiveNetworks CONFIDENTIAL Internet ID Manager Workflow 254 • ID Manager generates a Private PSK for the guest which is optionally displayed on the screen • Next, the guest or operator selects the delivery method for sending guest access key or user credentials to the guest › Text via SMS, Email, Print out, or Twitter Direct Messages may be used APs Guest HTTPS ID Manager Private PSK: 9LHA82v3
  • 255.
    © 2014 AerohiveNetworks CONFIDENTIAL Internet ID Manager Secure Guest Connections 255 1. After the guest receives their Private PSK, they can use it as the WPA2 Personal network key when connecting to the guest SSID 2. The AP forwards a verification request to a RADSEC proxy AP on the local subnet, which could be itself, and that AP uses a secure RADSEC connection to ID Manager to verify the Private PSK is valid 3. The Private PSK and user session information is securely distributed to neighboring APs to permit secure and fast roaming ID Manager APs Guest 2. The AP uses RADSEC to verify the Private PSK: 9LHA82v3 1. The Guest connects to the Guest SSID using WPA2 Personal and enters their Private PSK: 9LHA82v3 3. If validated, the private PSK and user session info is distributed to neighbor APs RADSEC uses TCP Port 2083
  • 256.
    © 2014 AerohiveNetworks CONFIDENTIAL ID Manager Features 256 • Private PSK for Guest Access • Customizable key creation and expiration times • 802.1X and Captive Web Portal RADIUS authentication • Third-party support with 802.1X • RADIUS Proxy • Customizable Interface for Guest Access • Dashboards and Authentication Logs • Notifications via Email, SMS, Twitter, Printer, and Screen • Self service kiosk support for tablets and computers • Anonymous access with time limits or bandwidth limits • Employee Approval for Guest Self-Registration from CWP • Employee Sponsorship – Authentication (Using SAML) • Employee Sponsorship with AD integration
  • 257.
    © 2014 AerohiveNetworks CONFIDENTIAL INTEGRATING ID MANAGER FOR STANDALONE A HIVEMANAGER AS PHYSICAL OR VIRTUAL APPLIANCES HIVEMANAGER ONLINE IS LINKED AUTOMATICALLY 257
  • 258.
    © 2014 AerohiveNetworks CONFIDENTIAL ID Manager 258 To integrate your standalone HiveManager with ID Manager • From Home Administration HiveManager Services • Select  Retrieve ID Manager Customer ID • Enter your ID Manager account email and password • Click Retrieve
  • 259.
    © 2014 AerohiveNetworks CONFIDENTIAL Lab: ID Manager - Secure Guest WLAN 1. Configure Guest IDM SSID 259 • Go to Configuration and select your Corp-X Network Policy and click OK • Next to SSIDs, click Choose • In Choose SSID click New
  • 260.
    © 2014 AerohiveNetworks CONFIDENTIAL Lab: ID Manager - Secure Guest WLAN 2. Configure Guest IDM SSID 260 • SSID Profile: Guest-X X = 2 – 29 (Student ID) • SSID: Guest-X • Select  Private PSK • Check  Use Aerohive ID Manager • Check  Set the maximum number of clients per private PSK to: 3 • Check  Enable a captive web portal with use policy acceptance • Click Save
  • 261.
    © 2014 AerohiveNetworks CONFIDENTIAL Lab: ID Manager - Secure Guest WLAN 3. Save the Guest IDM SSID 261 • Ensure that all three SSIDs are selected • Click OK
  • 262.
    © 2014 AerohiveNetworks CONFIDENTIAL 262 Configure the captive web portal for user policy acceptance • Click <CWP> • Click New Lab: ID Manager - Secure Guest WLAN 4. Configure Captive Web Portal
  • 263.
    © 2014 AerohiveNetworks CONFIDENTIAL 263 • Name: CWP-X NOTE: In each section, you can click Customize… if you want to modify the default web pages or import your own pages. • Expand Captive Web Portal Success Page Settings › Select  Redirect to an external page and enter a URL: http://www.aerohive.com • Save your Captive Web Portal Settings Lab: ID Manager - Secure Guest WLAN 5. Configure Captive Web Portal
  • 264.
    © 2014 AerohiveNetworks CONFIDENTIAL 264 Assign a user profile to the SSID • To the right of your SSID, under User Profile, click Add/Remove • Choose User Profiles • Click New Lab: ID Manager - Secure Guest WLAN 6. Create User Profile
  • 265.
    © 2014 AerohiveNetworks CONFIDENTIAL 265 • Name: Guest-X • Attribute Number: 500 • VLAN-Only Assignment: 8 • Under Optional Settings expand User Firewalls and specify a guest firewall policy • Under IP Firewall Policy › From-Access: Guest- Internet-Access-Only › To-Access: <Leave Empty> › Default Action: Deny › Click Save Lab: ID Manager - Secure Guest WLAN 7. Create User Profile
  • 266.
    © 2014 AerohiveNetworks CONFIDENTIAL 266 • Select Guest-X(500) • Click Save Lab: ID Manager - Secure Guest WLAN 8. Save User Profile
  • 267.
    © 2014 AerohiveNetworks CONFIDENTIAL 267 • Verify your policy settings • Click Continue Lab: ID Manager - Secure Guest WLAN 9. Save Network Policy
  • 268.
    © 2014 AerohiveNetworks CONFIDENTIAL Lab: ID Manager - Secure Guest WLAN 10. Perform a Complete Upload 268 • Select your 0X-A-xxxxxx access point and all of your 0X-SIMU- xxxxxxx access points • Click the Update button • Check  Perform a complete configuration update for all selected devices check box • Click Update Devices and click OK in the Reboot Warning window
  • 269.
    © 2014 AerohiveNetworks CONFIDENTIAL Copyright ©2011 Once the Update is pushed, you will see the Update Status and the devices rebooting. When the devices have rebooted and start reporting to HiveManager, you will see their new up time and that the configuration on the devices matches the expected configuration in HiveManager. 269 Lab: ID Manager - Secure Guest WLAN 11. Perform a Complete Upload
  • 270.
    © 2014 AerohiveNetworks CONFIDENTIAL ID MANAGER RADSEC PROXY APS 270
  • 271.
    © 2014 AerohiveNetworks CONFIDENTIAL Internet ID Manager Secure Guest Connections - Recap 271 • 1. After the guest receives their Private PSK, they can use it as the WPA2 Personal network key when connecting to the guest SSID • 2. The AP forwards a verification request to a RADSEC proxy AP on the local subnet, which could be itself, and that AP uses a secure RADSEC connection to ID Manager to verify the Private PSK is valid • 3. The Private PSK and user session information is securely distributed to neighboring APs to permit secure and fast roaming ID Manager APs Guest 2. The AP uses RADSEC to verify the Private PSK: 9LHA82v3 1. The Guest connects to the Guest SSID using WPA2 Personal and enters their Private PSK: 9LHA82v3 3. If validated, the private PSK and user session info is distributed to neighbor APs RADSEC uses TCP Port 2083
  • 272.
    © 2014 AerohiveNetworks CONFIDENTIAL ID Manager Radsec Proxy APs 272 Within a management subnet for APs, two APs get elected as ID Manager RADSEC proxy APs The ID Manager RADSEC proxy APs have icons that look like this
  • 273.
    © 2014 AerohiveNetworks CONFIDENTIAL ID MANAGER TEST 273
  • 274.
    © 2014 AerohiveNetworks CONFIDENTIAL ID Manager Tests from ID Manager Proxy APs Using RADSEC 274 You can test that the ID Manager proxy APs can communicate with the ID Manager RADSEC server on the Internet • Go to ToolsServer Access Tests ID Manager Test • Select RADSEC Proxy • Select a proxy server AP • Click TestNote: ID Manager Proxy APs use RADSEC with TCP port 2083 to the Internet
  • 275.
    © 2014 AerohiveNetworks CONFIDENTIAL ID Manager Tests from ID Manager Proxy APs Using RADSEC 275 If the RADSEC Proxy APs cannot communicate with the ID Manager: • Select a proxy server AP • Go to UtilitiesClear ID Manager Credentials • Also verify that TCP port 2083 is open outbound on any firewall
  • 276.
    © 2014 AerohiveNetworks CONFIDENTIAL INSTRUCTOR EXAMPLE OF ID MANAGER ACCOUNT ADMINISTRATION 276
  • 277.
    © 2014 AerohiveNetworks CONFIDENTIAL MyHive Portal – Admin Account Manager 1. Login to Myhive 277 • The Instructor can log into myhive with an instructor superuser account: Admin:lab#@aerohive. com Password: ************** • This account is limited to have ID Manager admin rights
  • 278.
    © 2014 AerohiveNetworks CONFIDENTIAL MyHive Portal – Admin Account Manager 2. Different views based on HM or HMOL 278 The configuration options here are based on your accounts access rights HiveManager Online + ID Manager ID Manager Only
  • 279.
    © 2014 AerohiveNetworks CONFIDENTIAL MyHive Portal – Admin Account Manager 3. Admin Account Manager 279 To see how the student accounts are configured • Click Go to Admin Account Manager
  • 280.
    © 2014 AerohiveNetworks CONFIDENTIAL MyHive Portal – Admin Account Manager 4. Create new accounts 280 From here you can create one or more admin accounts that have access to HiveManager, the Redirector, and ID Manager depending on your access rights • Click New
  • 281.
    © 2014 AerohiveNetworks CONFIDENTIAL MyHive Portal – Admin Account Manager 5. Example of accounts 281 • Here you create a user account, and select the product and group permissions • The Products are: › VHM-XXXXXX – HiveManager › IDM-XXXXXX – ID Manager › Redirector • Each of the products has a set of group permissions you can set as shown in the graphic • Specify the time zone where the user is located • Click Save Note: The instructor account will only have ID Manager permissions, but this screen shows other permissions you can create.
  • 282.
    © 2014 AerohiveNetworks CONFIDENTIAL MyHive Portal – Admin Account Manager 6. View idm#-user 282 • The training ID Manager accounts are: idm#-user@ah-lab.com and idm#-admin@ah-lab.com Where # is lab=1,2,3,4, or 5 • Passwords aerohive123 Click Save, or Click Cancel if you are just viewing the existing account
  • 283.
    © 2014 AerohiveNetworks CONFIDENTIAL MyHive Portal – Admin Account Manager 7. Automatic Email with Account Password 283 • An email is automatically sent to the email address listed in the admin account containing the randomly generated password to log in to MyHive › Check your junk or deleted items folder • Click Logout
  • 284.
    © 2014 AerohiveNetworks CONFIDENTIAL ID Manager Configuration 1. Launch ID Manager 284 • Click on the Configure Interfaces & User Access bar • Click on Aerohive ID Manager
  • 285.
    © 2014 AerohiveNetworks CONFIDENTIAL ID Manager Configuration 2. Log into ID Manager 285 Admin: idm#-admin@ah-lab.com Where # is lab=1,2,3,4, or 5 Password: aerohive123
  • 286.
    © 2014 AerohiveNetworks CONFIDENTIAL ID Manager Configuration 2. Go to ID Manager 286 • Click Go
  • 287.
    © 2014 AerohiveNetworks CONFIDENTIAL ID Manager Configuration 3. Configure a Guest Type 287 • From Configuration › Click the Guest Types tab › Click New
  • 288.
    © 2014 AerohiveNetworks CONFIDENTIAL Guest types are selectable by the operator when creating a guest account • Type Name: Guest-X • Ensure  Wireless Access is checked • Network: Guest-X Note: This is the SSID that is displayed in the notification • User Profile Attribute: 500 • Do not save yet ID Manager Configuration 4. Define Guest Type 288 Guest Types are Displayed On Guest Kiosk or Guest Operator Console
  • 289.
    © 2014 AerohiveNetworks CONFIDENTIAL 289 ID Manager Wired Access •Authentication for both wireless and wired access can be granted using a user name and password. •Wireless authentication methods also remain for Private PSK or open access.
  • 290.
    © 2014 AerohiveNetworks CONFIDENTIAL ID Manager Configuration 5. Define more Guest Type settings 290 • Auth Types: Select Private PSK • Account Expires: in 24 hours • Select Access key must be used within: 2 days Note: This restricts the validity period of the key causing the key to automatically expire within desired time frame • Click Save
  • 291.
    © 2014 AerohiveNetworks CONFIDENTIAL ID Manager Configuration 7. Verify your Guest Type was created 291
  • 292.
    © 2014 AerohiveNetworks CONFIDENTIAL ID MANAGER CUSTOMIZATION 292
  • 293.
    © 2014 AerohiveNetworks CONFIDENTIAL Guest User Interface Settings 293 • From ConfigurationID Manager SettingsRegistration UI • You can customize the look and feel of the guest registration page.
  • 294.
    © 2014 AerohiveNetworks CONFIDENTIAL Guest User Interface Settings 294 • From the Private PSK Settings you can configure the complexity of the access keys. • From ConfigurationID Manager SettingsRegistration UI, you can decide which fields are important and which notification methods are available.
  • 295.
    © 2014 AerohiveNetworks CONFIDENTIAL Guest User Interface Settings 295 • From ConfigurationID Manager SettingsRegistration UI, you can decide which fields are important and which notification methods are available
  • 296.
    © 2014 AerohiveNetworks CONFIDENTIAL Guest User Interface Settings 296 • You can decide whether you want to display the key on the screen or only permit it to be transmitted using one of the notification methods
  • 297.
    © 2014 AerohiveNetworks CONFIDENTIAL Employee Sponsorship 297 • Employee Sponsorship is an ID Manager cloud service that allows employees in your organization to log in to the ID Manager registration UI using their corporate credentials and register guests (essentially acting as ID Manager operators). • Before you can enable Employee Sponsorship, you must already be using RADIUS authentication that is integrated with an external LDAP database server. NOTE: Employee sponsorship is available from the registration UI only and is not supported on kiosks.
  • 298.
    © 2014 AerohiveNetworks CONFIDENTIAL Using ID Manager as an External RADIUS Server for 802.1X or Captive Web Portal 298 • You can use ID Manager as a standalone RADIUS server for simple guest account creation. • RADIUS can be used for 802.1X authentication or Captive Web Portal authentication.
  • 299.
    © 2014 AerohiveNetworks CONFIDENTIAL Using ID Manager as a RADIUS Proxy 299 • If you work closely with other organizations whose employees often visit your company and vice-versa, RADIUS Proxy simplifies the guest login process for these employees by granting guest access using the employee’s home login credentials. • If the domain is on the whitelist, ID Manager checks the corporate directory of the other organization. If the visitor is valid, ID Manager gives your operator the option to authenticate the visitor using their home credentials.
  • 300.
    © 2014 AerohiveNetworks CONFIDENTIAL Note: Your ID Manager Operator has Limited Access 300 • Next you will be accessing ID Manager as an operator • An ID Manager operator has limited access as displayed in Configuration Admin Accounts Admin Groups • Lobby personnel typically log in as ID Manager operators Note: The permissions are set in the ConfigurationAdmin Accounts From here you can create an administrator with access to ID Manager specific permissions
  • 301.
    © 2014 AerohiveNetworks CONFIDENTIAL Lab: Guest Registration Interface 1. Go to Guest Registration Interface 301 Login into ID Manager as an operator • Open an additional window in your web browser and go to: https://idmanager.aerohive.com Admin: idm#-user@ah-lab.com Where # is lab=1,2,3,4, or 5 Password: aerohive123
  • 302.
    © 2014 AerohiveNetworks CONFIDENTIAL Lab: Guest Registration Interface 2. Register as Guest, Group, or Kiosk 302 • Here you have a few different options › Register a Guest or Register a Group– These are options available for an authorized employee or lobby ambassador who is responsible for creating guest accounts › The Kiosk is used for guest self registration › The options displayed here are configurable • Select Register a Guest
  • 303.
    © 2014 AerohiveNetworks CONFIDENTIAL 303 • Scroll to the right to see your guest type › click the > button to scroll • Click Guest-X Lab: Guest Registration Interface 3. Select your guest type
  • 304.
    © 2014 AerohiveNetworks CONFIDENTIAL Lab: Guest Registration Interface 4. Enter Guest Information 304 For the Kiosk, the guest enters their own information For the register a guest or register a group options, the authorized operator enters the information on behalf of the guest • Enter your information › Note: The phone number requires a country code • Click the green Next arrow button
  • 305.
    © 2014 AerohiveNetworks CONFIDENTIAL Lab: Guest Registration Interface 5. Confirm Settings 305 • Confirm your settings • Click the green arrow button to Confirm
  • 306.
    © 2014 AerohiveNetworks CONFIDENTIAL Lab: Guest Registration Interface 6. Confirm Settings 306 • Verify the SSID and notice the access key • DO NOT click the green arrow button to Complete yet. • Click on the link: < Send Notification
  • 307.
    © 2014 AerohiveNetworks CONFIDENTIAL Lab: Guest Registration Interface 7. Select credential delivery method 307 • Use the option of your choice to send the guest credentials
  • 308.
    © 2014 AerohiveNetworks CONFIDENTIAL Lab: Guest Registration Interface 8. Note your SSID and Key 308 • Optionally, your SSID and Key information is displayed on the screen • Click Done
  • 309.
    © 2014 AerohiveNetworks CONFIDENTIAL Lab: Guest Registration Interface 9. Note your SSID and Key 309 • Click on View Active Guests • Verify the Guest List and click the Back button • Click Log Out • Next you will test the PPSK guest credentials
  • 310.
    © 2014 AerohiveNetworks CONFIDENTIAL Lab: Connect to the Secure Guest Network Example Email 310 Here is an example of the email sent from ID Manager It provides 2 steps to access the network Please check your email for your guest credentials
  • 311.
    © 2014 AerohiveNetworks CONFIDENTIAL Lab: Connect to the Secure Guest Network 1. Connected to the Guest SSID 311 • From the hosted PC, connect to the Guest-X SSID • Enter the security key provided in the email, SMS, or copied from the screen • The key is not configured on your AP, so your AP will use RADSEC to contact ID Manager and determine if the key is valid • If it is, the key is set and distributed to neighboring APs for fast and secure roaming
  • 312.
    © 2014 AerohiveNetworks CONFIDENTIAL Lab: Connect to the Secure Guest Network 2. Login through the captive web portal 312 • Open a web browser • Click Accept once the captive web portal page appears
  • 313.
    © 2014 AerohiveNetworks CONFIDENTIAL Lab: Connect to the Secure Guest Network 3. Verify Guest VLAN in HiveManager 313 To view the active Guests • Go to MonitorClientsWireless Clients • You can modify the columns to see important information like: IP, hostname, Client OS, User Profile, VLAN, Encryption Method, SSID, Data consumption, and more • Your client should have User Profile Attribute 500, and be in VLAN 8
  • 314.
    © 2014 AerohiveNetworks CONFIDENTIAL ID Manager Logs and Reports 314 • From the ID Manager  Monitor  Logs view you can get a detailed history and current logs for users that have authenticated, SMS Log, active sessions and more.
  • 315.
    © 2014 AerohiveNetworks CONFIDENTIAL ID Manager Logs & Reports 315 • From the ID Manager  Monitor  Reports view you can create authentication reports, session reports and more.
  • 316.
    © 2014 AerohiveNetworks CONFIDENTIAL Lab Clean Up In labs that follow, HiveManager will not allow you to place a physical device on a Topology Map that contains simulated devices. 316 • Go to Monitor select all of your simulated APs, 0X-SIMU-XXXXX • Click the Device Inventory... button and select Remove, to delete the simulated devices from earlier labs. • In the Remove Selected Devices Window, click the Remove button to ensure that they are removed from HiveManager.
  • 317.
    © 2014 AerohiveNetworks CONFIDENTIAL© 2014 Aerohive Networks CONFIDENTIAL QUESTIONS?
  • 318.
    © 2014 AerohiveNetworks Inc. SECTION 9: BRING YOUR OWN DEVICE (BYOD) 318 Aerohive’s Instructor-led Training
  • 319.
    © 2014 AerohiveNetworks CONFIDENTIAL Bring Your Own Device (BYOD) Solutions 319 Aerohive has partnerships with several Mobile Device Management (MDM) companies such as AirWatch and JAMF Software.
  • 320.
    © 2014 AerohiveNetworks CONFIDENTIAL 320 In SSID profiles, Aerohive Devices can be integrated with an MDM server as seen below. Bring Your Own Device (BYOD) Solutions
  • 321.
    © 2014 AerohiveNetworks Inc. AEROHIVE CLIENT MANAGEMENT Aerohive’s Instructor-led Training
  • 322.
    © 2014 AerohiveNetworks CONFIDENTIAL Is the device a Corporate or Personally owned client? 322 Can you tell the difference between these two iPads? Company Issued Device • Owned and Managed by IT • Provided for a Specific Purpose • Enables New Working Models Personal Device • Employee-owned and Managed • Wide Range of Potential Devices • Improves Employee Satisfaction and Productivity
  • 323.
    © 2014 AerohiveNetworks CONFIDENTIAL How Aerohive Solves the Problem Mobile user connects to corporate SSID with a static PSK 1 User is authenticated against Active Directory or other user store such as LDAP 2 AP checks to see if device is already enrolled with HiveManager client management 3 If device is not enrolled, it is redirected to enrollment URL to acquire a custom device certificate and secure profile based on whether it is personal or corporate issued device in the MAC address list 5 6 Device is reconnected to the SAME SSID with a unique PPSK HiveManager with Client Management 7 Policy is applied based on all available context, including: identity, device type, device ownership, location, and time Device is checked against a list of known corporate devices (MAC addresses) imported by IT admin 4 323
  • 324.
    © 2014 AerohiveNetworks CONFIDENTIAL Client Management Concepts Customer Issued or Bring Your Own Device (BYOD) ? 324 • Is a device Company Issued Device(CID) or is the device brought from home Bring Your Own Device (BYOD)? • Enter MAC addresses of devices to automatically select Corporate Issued Devices • Or the user decide during Enrollment
  • 325.
    © 2014 AerohiveNetworks CONFIDENTIAL Client Management Overview • Support for the following solutions: › Single SSID based onboarding: requiring 802.1X on the SSID › Single SSID based onboarding for PPSK: requires an initial static PSK › Two SSIDs based onboarding: » Open (for provisioning) » Second SSID using PPSK (for secured access) • Support both HMOL and on-premises HM • Requires 6.1r3 HiveOS or later on APs • Supports Mac OS X, iOS, Android devices and Chrome OS (Chrome Books) 325
  • 326.
    © 2014 AerohiveNetworks CONFIDENTIAL Firewall Considerations by the Device types and Ports used 326 Source Destination Service (Protocol and Port) Apple Client Devices Apple Push Notification Service (APNS) 17.0.0.0/8 TCP 5223 TCP 5223, 5229, 5330 Android & Chromebook Devices Google GCM Servers HiveManager Client Management Service (onboard.aerohive.com) HTTPS 443 Access Points Client Management Service (onboard.aerohive.com) HTTPS 443 Access Points Apple Push Notification Service (APNS) 17.0.0.0/8 TCP 5223
  • 327.
    © 2014 AerohiveNetworks CONFIDENTIAL Enable Client Management in HiveManager 327 • Enable Client Management • Test is an HTTPS test to the Client Management Cluster which verifies all Client Management services are working • Do this for On- Premise and HMOL • For On-Premise you will also have to retrieve the Customer ID
  • 328.
    © 2014 AerohiveNetworks CONFIDENTIAL Copyright ©2011 Monitor enrolled devices in Client Management • From Home in Client Management you can view reported device data. • Placing your cursor over a chart reveals more information. • Clicking on a chart will take you to the location in Client Management from which the information was gathered. 58
  • 329.
    © 2014 AerohiveNetworks CONFIDENTIAL 329 • Monitor Clients  Active Clients or Wireless Clients • New Column to display Client Management Enrollment • Grey icon indicates the client is enrolled in CM Client Management Data in HiveManager
  • 330.
    © 2014 AerohiveNetworks CONFIDENTIAL Client Management Data in HiveManager 330 • Hover over the icon and it changes to Aerohive yellow • Click on the popup and the admin is redirected to the CM server monitor view for the client
  • 331.
    © 2014 AerohiveNetworks CONFIDENTIAL Client Management Data in HiveManager 331 • Click on the MAC address of the enrolled client device to see Client Management information in HiveManager
  • 332.
    © 2014 AerohiveNetworks CONFIDENTIAL© 2014 Aerohive Networks CONFIDENTIAL OPTIONAL CLIENT MANAGEMENT INSTRUCTOR DEMONSTRATION Because our lab is in a remote location we cannot test the client management lab. If time permits, the instructor will now demonstrate client management in class Should students wish to participate with their personal devices in the demonstration, ensure that they select the BYOD profile. The Enrollment profile can be removed from their personal devices after class.
  • 333.
    © 2014 AerohiveNetworks CONFIDENTIAL 333 Lab: Client Onboarding Demo 1. Connect to PPSK SSID On the instructor iOS device and/or student iOS devices: • Go to Settings  Wi-Fi • Click on the CM-PPSK-Demo SSID • Passphrase: aerohive123
  • 334.
    © 2014 AerohiveNetworks CONFIDENTIAL 334 Lab: Client Onboarding Demo 2. Connect to the PPSK SSID • Verify that you are connected to the CM-PPSK-Demo SSID
  • 335.
    © 2014 AerohiveNetworks CONFIDENTIAL 335 Lab: Client Onboarding Demo 3. Continue with client onboarding • Open a browser and type a URL • You will be redirected to a Captive Web Portal for authentication • Username: demoX › X=Student number › 1=Instructor number • Password: aerohive123
  • 336.
    © 2014 AerohiveNetworks CONFIDENTIAL 336 Lab: Client Onboarding Demo 4. Continue with client onboarding • You will be redirected to the Client Management captive web portal for onboarding
  • 337.
    © 2014 AerohiveNetworks CONFIDENTIAL 337 Lab: Client Onboarding Demo 5. Continue with client onboarding Specify the device ownership  Personal Devices (BYOD) will automatically be selected. • Check  View and agree to the terms of use • Click Enroll My Device  Company-Issued Devices (CID) would automatically be selected if this device’s MAC address is configured in Client Management.
  • 338.
    © 2014 AerohiveNetworks CONFIDENTIAL 338 Lab: Client Onboarding Demo 6. Continue with client onboarding EXAMPLE Specify the device ownership  Company-Issued Devices (CID) will automatically be selected if the device’s MAC address is already configured in Client Management.
  • 339.
    © 2014 AerohiveNetworks CONFIDENTIAL 339 Lab: Client Onboarding Demo 7. Install the Client Enrollment profile • The Enrollment process will begin. • Click the Install button to install the Enrollment Profile • Read the disclaimer warning and click Install. • Enter your device passcode if prompted.
  • 340.
    © 2014 AerohiveNetworks CONFIDENTIAL 340 Lab: Client Onboarding Demo 8. Install the Client Enrollment profile • Click Done and the selected profile will begin to install.
  • 341.
    © 2014 AerohiveNetworks CONFIDENTIAL 341 Lab: Client Onboarding Demo 9. Install the Client Enrollment profile • Client Management verifies and installs the Wi-Fi profile • The device is successfully enrolled
  • 342.
    © 2014 AerohiveNetworks CONFIDENTIAL 342 Lab: Client Onboarding Demo 10. Client is enrolled • Browser begins redirection • Redirection is completed
  • 343.
    © 2014 AerohiveNetworks CONFIDENTIAL 343 Lab: Client Onboarding Demo 11. Client is enrolled • During the onboarding process an Enrollment profile is installed. • A Wi-Fi profile is installed. • The client device disconnects and reconnects to the PPSK SSID using an unique 63 character PPSK for the device. This process is not visible to the user.
  • 344.
    © 2014 AerohiveNetworks CONFIDENTIAL 344 Lab: Client Onboarding Demo 12. Client is enrolled • Go to Settings  General  Profiles • Expand the profiles. • Verify Certificates. • Verify Restrictions. • Verify that the camera icon is not on your device.
  • 345.
    © 2014 AerohiveNetworks CONFIDENTIAL 345 Lab: Client Onboarding Demo 13. Verify Web Clip • Go to devices home screen • Find Web Clip • Play Web Clip
  • 346.
    © 2014 AerohiveNetworks CONFIDENTIAL© 2014 Aerohive Networks CONFIDENTIAL QUESTIONS?
  • 347.
    © 2014 AerohiveNetworks Inc. SECTION 11: DEVICE SPECIFIC SETTINGS 347 Aerohive’s Instructor-led Training
  • 348.
    © 2014 AerohiveNetworks CONFIDENTIAL Device Settings 348 • All devices including Access Points, Routers, Switches and HiveOS Virtual Appliances have settings specific to their device type and or model. • For example, an AP’s device settings are different than those found on a Switch Radio Profiles do not exist on SwitchesSTP Settings do not exist on APs
  • 349.
    © 2014 AerohiveNetworks CONFIDENTIAL Device Settings 349 • Device Settings can be configured on a single device. • Devices of the same make and model can be mass configured using multi select. However, some options are unit specific and are not able to be configured on more than one device at a time. Single Device Configuration Multiple Device Configuration
  • 350.
    © 2014 AerohiveNetworks CONFIDENTIAL LAB: AP Device Settings Review 1. Modify an AP’s settings 350 • Go to Monitor  Devices  Access Points  Aerohive APs • Click on Host Name to put the APs in alphabetical order •  Select your 0X-A-xxxxxx and click Modify
  • 351.
    © 2014 AerohiveNetworks CONFIDENTIAL LAB: AP Device Settings Review 2. View the AP device specific settings 351 Radio Functions WLAN Interface Configuration Radio Power Settings Radio Channel Settings Classifier Tags Topology Map Host Name
  • 352.
    © 2014 AerohiveNetworks CONFIDENTIAL 352 LAB: AP Device Settings Review 3. View the AP Optional Settings Advanced Settings Routing MGT0 Interface Settings Ethernet Setup Service Settings The MGT0 Interface is a logical IP interface for the AP which is a Layer two device
  • 353.
    © 2014 AerohiveNetworks CONFIDENTIAL 353 • If both radios are used for client access only, no mesh link is available. • If the 5 GHz radio is used for a mesh link only, no client access is available in 5 GHz. Clients can connect to the 2.4 GHz radio. • If the 5 GHz radio allows client access and a mesh link, clients can connect to either radio. The 5 GHz mesh link will also be available. LAB: AP Device Settings Review 4. View the AP Radio Function Settings
  • 354.
    © 2014 AerohiveNetworks CONFIDENTIAL Wireless Mesh 354 User traffic can be routed to the wired network via a mesh backhaul, reducing installation cost and providing fault tolerance. Mesh Portals Mesh Points
  • 355.
    © 2014 AerohiveNetworks CONFIDENTIAL Mesh and Access on 5 GHz Each Aerohive AP is a Portal 355 By default, if each Aerohive AP is a portal (Ethernet connected) it selects a different channel for its mesh/access interface so that more bandwidth is available for clients
  • 356.
    © 2014 AerohiveNetworks CONFIDENTIAL Mesh and Access on 5 GHz Two Aerohive APs are Portals and Two are Mesh Nodes 356 The channel map shows two Aerohive APs using channel 153 and two Aerohive APs using 161 which provides double the bandwidth than an single channel mesh solution
  • 357.
    © 2014 AerohiveNetworks CONFIDENTIAL Radio Profiles 357 A Radio Profile determines the behavior of one of the two radios on Aerohive AP to which you apply it. Each Aerohive AP has two radios. The wifi0 radio operates in the 2.4 GHz band as specified in the IEEE 802.11b/g/n standards. The wifi1 radio operates in the 5 GHz band as specified in the IEEE 802.11a/n/ac standards. Note: Each radio can have its own unique Radio Profile that defines radio specific settings.
  • 358.
    © 2014 AerohiveNetworks CONFIDENTIAL Lab: Radio Profile 1. Create a New Radio Profile for 2.4 GHz Radio 358 • From Monitor All Devices Select your  0X-A- xxxxxx Aerohive AP and click and Modify • For the 2.4 GHz radio, click + to create a new radio profile • Click More Settings…
  • 359.
    © 2014 AerohiveNetworks CONFIDENTIAL Lab: Radio Profile 2. Set name and radio mode 359 • Profile Name: 2.4GHz-X • Radio Mode: 11g/n Optional Advanced Settings • Important Notes: › Background scanning is used for auto channel selection, and rogue AP detection › You can select a region or just modify an existing region to select your own channel plan. The default is USA with channels 1, 6, and 11 • Do not save yet...
  • 360.
    © 2014 AerohiveNetworks CONFIDENTIAL Copyright ©2011 Lab: Radio Profile (Band Steering) 3. Enable Band Steering • Band steering modes › Urge 5 GHz band use: Most clients will go, but if they insist on 2.4, let them stay. › Balance band use: Clients can be steered to either band. Allocate a 50/50 mix to balance the clients between the bands. › Enforce 5 GHz band use If a client supports 5 GHz, only let them on 5 GHz and not the 2.4 GHz 360 • Expand Optimizing Management Traffic Settings • Check  Enable the steering of clients from the 2.4 to 5 GHz bands and select the Urge 5 GHz band use option
  • 361.
    © 2014 AerohiveNetworks CONFIDENTIAL Band Steering Animation 361 2.4GHz Client 2.4GHz Probe 2.4GHz Response 2.4GHz & 5GHz Client (Out of Range of 5GHz) 2.4GHz & 5GHz Probe 5GHz Response 2.4GHz & 5GHz Response 2.4GHz & 5GHz Client (In of Range of 5GHz) 2.4GHz & 5GHz Probe 5GHz Response Connected at 5GHz Connected at 2.4GHz Connected at 2.4GHz
  • 362.
    © 2014 AerohiveNetworks CONFIDENTIAL Copyright ©2011 Lab: Radio Profile (Load Balancing) 4. Load Balancing • Check  Enable Client Load Balancing and select the Load Balancing Mode: Station-Number • Click Save 362 Note: When using client load balancing, the same type of load- balancing mode must be selected on both radios since this is an AP function vs. an individual radio.
  • 363.
    © 2014 AerohiveNetworks CONFIDENTIAL Load Balancing Animation 363 3 clients 6 clients 60 clients 21 clients21 clients 21 clients 24 clients 21 clients
  • 364.
    © 2014 AerohiveNetworks CONFIDENTIAL Lab: Radio Profile 4. Assign 11na Profile and Create 11ng Profile 364 • Verify your 2.4 GHz radio (wifi0) is assigned to your new radio profile: 2.4GHz-X • Create a profile for your 5 GHz radio(wifi1) › Click + › Click More Settings...
  • 365.
    © 2014 AerohiveNetworks CONFIDENTIAL Lab: Radio Profile 5. Enable High Density WLAN and Band Steering 365 • Profile Name: 5GHz-X • Radio Mode: 11a/n • NOTE: If the AP supports DFS in your country, you can enable it here • Expand Channel and Power • Select 40 MHz and Above • Expand Optimizing Management Traffic Settings • Enable Client Load Balancing and select the Load Balancing Mode Station-Number • Click Save
  • 366.
    © 2014 AerohiveNetworks CONFIDENTIAL Copyright ©2011 1 2 6 113 4 5 7 8 9 12 13 1410 Channel Bonding (2.4 & 5 GHz) 5.25 GHz 5.35 GHz 5.470 GHz 5.725 GHz 5.825 GHz 5.15 GHz UNII-1 UNII-2 UNII-3UNII-2e 40MHz 802.11n channel2.402 GHz 2.483 GHz 366
  • 367.
    © 2014 AerohiveNetworks CONFIDENTIAL Copyright ©2011 802.11ac Channel Bonding 367 • The 5 GHz radios in the Aerohive AP370 and AP390 can be configured for 80 MHz wide channels. • More frequency space will need to be available for the 80 MHz wide channel use. Therefore you should enable DFS channel use for optimal configuration. • However, legacy clients may not support the DFS channels.
  • 368.
    © 2014 AerohiveNetworks CONFIDENTIAL Lab: Radio Profile 6. Assign 11na Profile and Create 11ng Profile 368 • Verify your 5 GHz radio (wifi1) is assigned to your new radio profile: 5GHz-X • Click Save
  • 369.
    © 2014 AerohiveNetworks CONFIDENTIAL Radio Profiles Local Demo If Possible 369 The radio profile settings cannot be demonstrated in this lab environment. However, your instructor may be able to demonstrate band steering locally. Remember: Some devices will not allow themselves to be steered, since the client makes its own roaming decisions.
  • 370.
    © 2014 AerohiveNetworks CONFIDENTIAL Radio Profiles Local Demo If Possible 370 • Students and Instructor: Observe the connected data rate of your classroom laptop. Are you connected to 2.4 GHz or 5 GHz? • Instructor ONLY repeat the previous lab using the Aerohive APs in the Training Room and Update the Training Room Aerohive APs. • Students and Instructor disconnect from the Aerohive Class SSID and then reconnect. • Go to MonitorClientsActive Clients and apply the Training Room-X Filter you made in an earlier lab. • Determine how many devices were able to be guided into 5 GHz. Note the data rates of the clients. • Go to MonitorAccess PointsAerohive Access Points. • Locate the Training Room Aerohive APs. • Examine the Client load on each Aerohive AP to see the balance of Client Devices among the Aerohive APs • On the desktop of your laptop verify the data rate you are using.
  • 371.
    © 2014 AerohiveNetworks CONFIDENTIAL© 2014 Aerohive Networks CONFIDENTIAL QUESTIONS?
  • 372.
    © 2014 AerohiveNetworks Inc. SECTION 12: DEPLOYMENT OPTIMIZATION 372 Aerohive’s Instructor-led Training
  • 373.
    © 2014 AerohiveNetworks CONFIDENTIAL User Profiles – Provide User Policy Assigned to SSIDs or Bridge Interfaces 373 User Profiles provide the policy to assign to users when they access an SSID or bridge interface • Attribute Number Used to identify the user profile in a Hive – returned by Private PSK Group or from RADIUS after successful authentication • VLAN Assignment The VLAN assigned to clients • GRE Tunnels L3-Roaming & Identity-based Tunnels • User Firewalls MAC level Firewall and Stateful IP (L3/L4) Firewall Policies • QoS Settings Specifies rate limits and weights for user queues, users, and user profiles
  • 374.
    © 2014 AerohiveNetworks CONFIDENTIAL User Profiles – Provide User Policy Yes, there is more! 374 • Availability Schedules Permitted User Access Times • SLA Settings Specify a service level agreement and decide to report on and/or boost client performance to meet a client’s SLA with help from the dynamic airtime scheduling engine • Client Classification Rules Reassign user profiles based on the MAC OUI, Operating System, Domain membership or BYOD/CID ownership of a user device.
  • 375.
    © 2014 AerohiveNetworks CONFIDENTIAL SSID Profiles and User Profiles 375 • An SSID that uses a Pre-shared Secret (PSK) or Open Authentication can be mapped to 1 User Profile if no authentication is being used • An SSID that uses 802.1X, Captive Web Portal, or MAC authentication , or user profile reassignment can be mapped to 63 additional user profiles • When a user is assigned to a user profile, they get assigned their VLAN, Firewall Policies, QoS Settings, Tunnel Polices, Service Level Agreement Settings, and Time of Day Access SSID: Guest-WiFi Map to Guest-Profile SSID: Corp-WiFi Map to Employee-Profile User Profile Examples Employee-Profile - Employee FW Policy Full Access - Employee QoS Policy High QoS - Employee VLAN = 10 Guest-Profile - Guest FW Policy Internet Access only - Guest QoS Policy 2 Mbps Max - Guest VLAN = 8 GuestEmployee
  • 376.
    © 2014 AerohiveNetworks CONFIDENTIAL Management and Native VLAN Configuration 376 • Management and Native VLANS are configured in the Network Policy. • CAPWAP, Cooperative Control protocols, SSH and other management traffic reside in the Management VLAN. • The Native VLAN is for untagged traffic. Although the default MGT VLAN setting is 1, a good security best practice is to change the setting for the MGT VLAN to a non-default value.
  • 377.
    © 2014 AerohiveNetworks CONFIDENTIAL Using Trunked Ports and VLANS 377 802.1Q VLAN 1 – Native VLAN VLAN 2 – Management VLAN VLAN 5,10,20 SSIDs Employee 802.1X VLAN 5 Device PPSK VLAN 10 IDM/Guest VLAN 20 802.1Q Multiple user VLANs will require 802.1Q tagging.
  • 378.
    © 2014 AerohiveNetworks CONFIDENTIAL Aerohive APs and VLANs Guidelines 378 • The Native VLAN (Untagged VLAN) setting must match the same setting for the Native VLAN ID on the switch • Any traffic from an access client on a Aerohive AP that is assigned to a VLAN, which does not match the native VLAN ID, is tagged with the VLAN identifier before being sent out of the Ethernet interface • If the mgt0 VLAN ID does not match the mgt0 Native VLAN ID, and management traffic will be tagged with the VLAN id assigned to the mgt0 interface int mgt0 vlan 1 int mgt0 native-vlan 1 Switch port trunk VLANs 1-100 Switch port native (untagged) VLAN1
  • 379.
    © 2014 AerohiveNetworks CONFIDENTIAL Aerohive APs and VLANs Example – Wrong Settings 379 • Traffic from the AP management interface to the LAN will be untagged and dropped by the switch which expects the management traffic to be tagged. VLAN 1 traffic is untagged. • To correct this: The native VLAN on the Aerohive AP must match the native VLAN on the switch int mgt0 VLAN 2 int mgt0 native-VLAN 2 User Profile: Employee VLAN 20 Switch port trunk Switch port native VLAN 1 Switch port trunk VLANs 1-100 Employee Client PC LAN
  • 380.
    © 2014 AerohiveNetworks CONFIDENTIAL Management Server Settings 380 • The Network Policy can be used to configure Aerohive devices to communicate with other servers and services beyond HiveManager. • The appropriate outbound firewall ports will need to be opened to allow the Aerohive Devices to communicate with other management servers.
  • 381.
    © 2014 AerohiveNetworks CONFIDENTIAL Network Time Protocol (NTP) and Time Configuration 381 The public Aerohive NTP server is used to set the clocks of your Aerohive Devices. You can edit this object to use a different NTP server. Mandatory: You must change the time zone to match the time zone where your Aerohive Devices reside. Do this BEFORE you configure the rest of your Network Policy.
  • 382.
    © 2014 AerohiveNetworks CONFIDENTIAL Network Time Protocol (NTP) 382 • Time settings must be correctly configured for 802.1X or PPSK to work properly. • PPSKs have a start time and a validity period that must be verified for their use. • When using certificates with 802.1X, proper time settings are required. • NTP settings are also important for the correct time stamps in log files. 802.1X authentication mechanisms require proper time settings to function correctly. Certificates have validity periods that must be valid for 802.1X authentication to work. It is a best practice to use an NTP server to synchronize time settings on all devices used in 802.1X processes. Private PSKs are credentials that have a start time. Private PSKs, like other credentials, can also be time limited. Therefore, it is imperative that the HiveManager Time Settings be in proper synchronization with your network. The use of an NTP server is highly recommended.
  • 383.
    © 2014 AerohiveNetworks CONFIDENTIAL On-Premise HiveManager NTP Settings 383 • On-Premise HiveManager settings are configured in Home  Administration  HiveManager Settings. • When time settings are changed in HiveManager, a reboot is required.
  • 384.
    © 2014 AerohiveNetworks CONFIDENTIAL Syslog 384 • The use of NTP to synchronize the timestamp on messages from all syslog clients ensures that all messages reported to the Syslog server appear in the proper chronological order. • You can set up to four Syslog servers to which Aerohive devices can save event log entries. • Remember that devices send Syslog messages for the severity level you choose plus messages for all the more severe levels above it. Choose to send information you must collect. It is a recommended best practice for PCI compliance that the Syslog server and the Aerohive devices using it are on the same internal network.
  • 385.
    © 2014 AerohiveNetworks CONFIDENTIAL For Your Information Outside US Set the Country Code for World Mode Devices 385 IMPORTANT: The Class APs are in the U.S., so DO NOT change the country code! Note: Updating the country code on an AP configures the radios to meet government requirements for the chosen country You can update the country by going to MonitorAll Devices • Select all the devices that within a single country • Click Update...Advanced Update Country Code • Select the appropriate country code • Click Upload • Repeat these steps if you have devices in additional countries
  • 386.
    © 2014 AerohiveNetworks CONFIDENTIAL Rogue Classification – WIPS Policy WIPS Policy used to detect and classify access points: • Aerohive AP – Authorized Aerohive access point • Friendly AP – Manual classification of a neighboring AP • Rogue AP – Unauthorized access point • Rogue AP (In-Net) – Unauthorized access point that is connected to the wired network 386
  • 387.
    © 2014 AerohiveNetworks CONFIDENTIAL Rogue Mitigation 387 In Network Rogue 1. Rogue AP sends ARP or any broadcast 2. Switch floods out all ports 3. APs learn MAC of rogue device on their Ethernet port 4. BSSID of rogue is detected when Aerohive APs perform scans 5. Aerohive AP compares BSSID of all learned MAC addresses, and if it is within a range of 64 above or 64 below a learned MAC address then BSSID is considered in the network 1. 2. 3. 6. If a Aerohive AP sees a station attached to the rogue, it will send spoofed unicast 802.11 deauths from the MAC of the station to the BSSID, and from the BSSID to the MAC of the client 7. The 4 deauths in each direction are sent per second per mitigating AP 8. With one mitigating AP, the station may get some packets transmitted, but with two or more mitigating APs, the client is contained 6.
  • 388.
    © 2014 AerohiveNetworks CONFIDENTIAL Lab: Locating and Mitigating Rogue APs 1. Modify Additional Settings 388 Rogue AP Detection and other features can be found in Additional Settings • Go to Configuration • Select your Network Policy: Corp-X and click OK • Next to Additional Settings click Edit
  • 389.
    © 2014 AerohiveNetworks CONFIDENTIAL Lab: Locating and Mitigating Rogue APs 2. Create a WIPS Policy 389 • Expand Service Settings • Next to WIPS Policy - Click + • Name: WIPS-X
  • 390.
    © 2014 AerohiveNetworks CONFIDENTIAL Lab: Locating and Mitigating Rogue APs 3. Define Rogue AP Parameters 390 • Select  Enable short preamble check • Select  Enable short beacon interval check • Select  Enable WMM check • Select  Enable BSSID Detection • Select  Aerohive-MAC-OUI • Select  Determine if detected rogue APs are in the backhaul network • Do not save yet...
  • 391.
    © 2014 AerohiveNetworks CONFIDENTIAL Lab: Locating and Mitigating Rogue APs 4. Define Rogue Mitigation Parameters 391 • Do not select  Enable SSID detection › Note: Aerohive APs can check if the SSID names that other access points advertise along with the type of encryption other APs might use match those in a checklist. - In this lab, all students have a different SSID, so do not enable SSID detection. • Select  Enable ad hoc network detection › Note: When stations in an ad hoc network transmit 802.11 beacons and probe responses, the ESS (extended service set) bit is set to 0 and the IBSS bit is set to 1, indicating add hoc capability. Do not save yet..
  • 392.
    © 2014 AerohiveNetworks CONFIDENTIAL Lab: Locating and Mitigating Rogue APs 5. Define Rogue Mitigation Parameters 392 • Expand Optional Settings • Change mitigation mode to: Semi-Automatic › IMPORTANT: If you use Automatic, it should only be enabled for rogue APs that are detected as in network, otherwise you may mitigate valid APs and clients from neighboring companies which is illegal. • Set the Max number of mitigator APs per rogue AP to: 3 › Note: this means that up to 3 APs which detect a rogue AP can send de- authentication frames to the rogue AP and any attached client every second • Select  Enable Rogue Client Reporting • Click Save IMPORTANT: For class, do not enable Automatic, because that will impact other classes that are going on at the same time.
  • 393.
    © 2014 AerohiveNetworks CONFIDENTIAL Rogue Mitigation 393
  • 394.
    © 2014 AerohiveNetworks CONFIDENTIAL Lab: Locating and Mitigating Rogue APs 6. Select the WIPS Policy 394 • In your Network policy,verify the WIPS Policy is set to: WIPS-X • Click Save.
  • 395.
    © 2014 AerohiveNetworks CONFIDENTIAL 395 • Click Continue or click on the Configure and Update Devices bar. Lab: Locating and Mitigating Rogue Aps 7. Update the Devices
  • 396.
    © 2014 AerohiveNetworks CONFIDENTIAL 396 • Go to Configuration and select your Corp-X policy and click OK • Click on the Continue button • From the Configure & Update Devices section, click the drop down next to Filter and select the Current Policy Filter. Lab: Locating and Mitigating Rogue Aps 8. Update the Devices
  • 397.
    © 2014 AerohiveNetworks CONFIDENTIAL 397 • Select your 0X-A-xxxxxx access point • Click the Update button • Click Update Devices to push your Network Policy to your access points Lab: Locating and Mitigating Rogue Aps 9. Update the Devices
  • 398.
    © 2014 AerohiveNetworks CONFIDENTIAL 398 • Click the Update Button • The Delta update will be pushed to your AP Lab: Locating and Mitigating Rogue Aps 10. Update the Devices
  • 399.
    © 2014 AerohiveNetworks CONFIDENTIAL Copyright ©2011 The AP will not need to reboot this time because this is a Delta update. Only the configuration changes in the Network Policy were uploaded. 399 Lab: Locating and Mitigating Rogue Aps 11. Update the Devices
  • 400.
    © 2014 AerohiveNetworks CONFIDENTIAL Email Notification of In Network Rogue APs (View Only Permissions in Class) 400 • You can be alerted when In Network rogue APs are detected • Go to Home Administration HiveManager Services • Select  Update Email Service Settings • Select  Enable Email Notification • Select In-net Rogue AP • Deselect any setting you do not want to receive • Click Update NOTE: Your permissions do not allow you to modify these settings for class
  • 401.
    © 2014 AerohiveNetworks CONFIDENTIAL Lab: Locating and Mitigating Rogue Aps 12. Verify Rogue AP Policy Settings 401 1. Verify Wireless IPS Policy › Go to MonitorAccess PointsRogue APs › Change Items per page to 100 › Select the Reporting Aerohive AP column › See if you can find the MAC address of your Aerohive AP reporting a rogue AP NOTE: You can go to Settings Signal Strength Threshold and define a strong signal strength RSSI value so that you can filter on strong RSSI values instead of showing all Rogue APs regardless of signal strength.
  • 402.
    © 2014 AerohiveNetworks CONFIDENTIAL Semi-Automatic Rogue Mitigation • When mitigation is set to Semi-Automatic, you can mitigate in-net rogues by going to: MonitorAccess PointsRogue APs • Select a BSSID for a rogue SSID to mitigate • Click Mitigation...Start Mitigation, and click Yes • The APs will cooperate among themselves to determine which APs should participate in mitigation, which is similar to automatic mitigation 402 Reason(s) why considered rogue Found to be attached to the wired network
  • 403.
    © 2014 AerohiveNetworks CONFIDENTIAL Topology Maps With Rogue AP Detection and Client Location 403 • Select the box next to  Rogues • If three or more Aerohive APs on a map detect a rogue, HiveManager can estimate the location of the rogue on the topology map • Also, if the Aerohive AP location service is enabled, you can view clients as well Friendly AP Rogue AP Client
  • 404.
    © 2014 AerohiveNetworks CONFIDENTIAL© 2014 Aerohive Networks CONFIDENTIAL QUESTIONS?
  • 405.
    © 2014 AerohiveNetworks Inc. SECTION 12: AEROHIVE DEVICE MONITORING AND TROUBLESHOOTING Aerohive’s Instructor-led Training
  • 406.
    © 2014 AerohiveNetworks CONFIDENTIAL HiveManager Help 406 HiveManager provides a rich and powerful online help Click Help on the top menu bar to get a menu of the help options Click Help
  • 407.
    © 2014 AerohiveNetworks CONFIDENTIAL Help System in HiveManager 407 When you click Help in the upper right hand corner of the HiveManager Settings you have several options. › HiveManager Help » Context sensitive help based on where you are when you select this option › Settings » Lets you specify a path to host the online help web pages locally on your network › Videos and Guides » Contains links to all Aerohive documentation and computer-based training modules » You can also download the web-based help system from here as well › Check for Updates » Checks Aerohive’s latest code › About HiveManager
  • 408.
    © 2014 AerohiveNetworks CONFIDENTIAL Help: Context Sensitive 408 • Context sensitive help can be viewed in any configuration window • By default your PC must be connected to the Internet to view the help files unless you have downloaded them and hosted on your own web server
  • 409.
    © 2014 AerohiveNetworks CONFIDENTIAL Help: Global Search 409 Click the relevant section The help is automatically expanded when the search strings are found. Explore the help system by conducting a search for Dynamic Airtime Scheduling by typing the subject in the search window and clicking on the magnifying glass.
  • 410.
    © 2014 AerohiveNetworks CONFIDENTIAL Help System in HiveManager 410 Deployment, Quickstart, and Mounting Guides Online Training CLI Reference Guides
  • 411.
    © 2014 AerohiveNetworks CONFIDENTIAL 411 • To access the new Help System for Mobile Devices, simply go to: http://www.aerohive.com/330000/docs/help/english/6.1r3/hm/ mobile/help.htm • Shortened URL: http://bit.ly/1aO1kJ7 New Help System for Mobile Devices Landing Page Table of Contents
  • 412.
    © 2014 AerohiveNetworks CONFIDENTIAL New Help System for Mobile Devices 412 • By using a smart phone or Internet- accessible device, you can view a mobile-friendly version of the Help system. • This allows you access to Help on a mobile device while access HiveManager from your desktop without obstructing your view of HM.
  • 413.
    © 2014 AerohiveNetworks CONFIDENTIAL Aerohive Utilities, Tools and their Functions 413 From basic to advanced device troubleshooting and configuration within the GUI.
  • 414.
    © 2014 AerohiveNetworks CONFIDENTIAL Aerohive Utilities, Tools and their Functions Lab: Getting Connected to the Hosted Training HiveManager 414 • Securely browse to the appropriate HiveManager for class › TRAINING LAB 1 https://training-hm1.aerohive.com https://72.20.106.120 › TRAINING LAB 2 https://training-hm2.aerohive.com https://72.20.106.66 › TRAINING LAB 3 https://training-hm3.aerohive.com https://209.128.124.220 › TRAINING LAB 4 https://training-hm4.aerohive.com https://203.214.188.200 › TRAINING LAB 5 https://training-hm5.aerohive.com https://209.128.124.230 • Supported Browsers: › Firefox, Internet Explorer, Chrome, Safari • Class Login Credentials: › Login: adminX X = Student ID 2 - 29 › Password: aerohive123 NOTE: In order to access the HiveManager, someone at your location needs to enter the training firewall credentials given to them by the instructor first.
  • 415.
    © 2014 AerohiveNetworks CONFIDENTIAL Client Visibility at a Glance Without Diving Into Statistics Good connection High data rates & high successful transmission rates Marginal connection Lower data rates / lower successful transmission rates Poor connection Low data rates / low successful transmission rates Client HealthClient Statistics Calibrated to the organizations deployment goals • High density, performance oriented network • Normal density network • Low density, coverage oriented network 415
  • 416.
    © 2014 AerohiveNetworks CONFIDENTIAL Client Health = Sum of Its Parts 416 Radio health Application health Based on SLA Overall: “sum” of components to the right IP network health (DHCP, DNS, etc)
  • 417.
    © 2014 AerohiveNetworks CONFIDENTIAL Client Health Example 417 •At a glance understanding of a clients health •Easy to drill into problem client info
  • 418.
    © 2014 AerohiveNetworks CONFIDENTIAL Client Health Blog 418 http://blogs.aerohive.com/blog/living-on-the-edge/diagnosing- wi-fi-with-aerohives-client-health-tool
  • 419.
    © 2014 AerohiveNetworks CONFIDENTIAL 419 Client Monitor allows you to monitor the process a wireless client goes through when connecting with an Aerohive AP as well as other ongoing client activity such as probe requests and responses. Client Monitor
  • 420.
    © 2014 AerohiveNetworks CONFIDENTIAL Client & Aerohive AP Layer 2 Handshakes 420
  • 421.
    © 2014 AerohiveNetworks CONFIDENTIAL Lab: Client Monitor 1. Select a client to monitor 421 • To start monitoring a clients connection state go to: MonitorClientsActive Clients • Select the  check box next your client to monitor Note: If your client does not appear, you can skip this step for now • Click Operation...Client Monitor • For class, ensure your Associated Aerohive AP is selected (Do not select All) • The MAC address of your client will be selected Note: You can manually enter a the wireless client MAC address without delimiters • Write down your clients MAC address • Note: Remember the Client MAC address for the next step in the lab. • Click Add Click Client Monitor Click Operation... Click Add Select your Aerohive AP
  • 422.
    © 2014 AerohiveNetworks CONFIDENTIAL Lab: Client Monitor 2. Start the client monitor 422 • Select  Filter Probe Note: This removes all the probe requests and responses you will see from clients and APs so you can focus on protocol connectivity • Click Start Note: Your client will be monitored until you click Stop. You can leave this window, and if you go back to Operation... Client Monitor, you will see the list of all clients being monitored • You can expand the window by dragging the bottom right corner • Select your client to see the connection logs for your client as they occur 1. Select  Filter Probe 2. Click Start 3. Drag bottom right corner of window to expand
  • 423.
    © 2014 AerohiveNetworks CONFIDENTIAL Lab: Client Monitor 3. Create a client problem to troubleshoot 423 From the bottom task bar, click the locate wireless networks icon › Select Open Network and Sharing Center › Click Manage wireless Networks › Select your SSID and remove it
  • 424.
    © 2014 AerohiveNetworks CONFIDENTIAL Lab: Client Monitor 4. Enter Wrong Security Key for your SSID • Single-click the wireless icon on the bottom right corner of the windows task bar • Try to connect to your Device-PSK-X SSID, but enter an INCORRECT security key • Click Connect › Security Key: aerohive456 › Click OK 424
  • 425.
    © 2014 AerohiveNetworks CONFIDENTIAL Lab: Client Monitor 5. Analyze client monitor output 425 • Go back to the Active ClientsOperations...Client Monitor • View the output to look for a problem • Here you can see that a 4-way handshake is failing › This requires some knowledge of the protocol, but the first two messages are to validate the PSK, and that is what is failing • You can Export the data and send to support to help troubleshoot PSK authentication 4-way handshake fails and client is de-authenticated
  • 426.
    © 2014 AerohiveNetworks CONFIDENTIAL Lab: Client Monitor 6. Connect to your SSID with the correct security key 426 Correct the problem: • Single-click the wireless icon on the bottom right corner of the windows task bar • Click your SSID Device-PPSK-X › Click Connect › Enter the correct Security Key: PPSK from earlier lab › Click OK
  • 427.
    © 2014 AerohiveNetworks CONFIDENTIAL Lab: Client Monitor 7. Fix PSK and view connection results 427 After correcting the problem: View the client monitor again to view the results 4-way handshake completes Client is assigned IP address from DHCP
  • 428.
    © 2014 AerohiveNetworks CONFIDENTIAL Client Monitor If Client Does Not Exist In Active Clients 428 You do not need to know the client location or associated Aerohive AP. If you leave the fields blank, they will automatically be found 2. Note Wireless MAC Address 1. On a windows PC for example: Have client open a CMD prompt then type ipconfig /all Make sure to view the Wireless Network Connection 5. Select  Filter Probe6. Click Start 3. From Active Clients, click Operation... Client Monitor 4. Enter the wireless client MAC address
  • 429.
    © 2014 AerohiveNetworks CONFIDENTIAL Client Monitor Troubleshooting 802.1X Blog 429 Client Monitor is the perfect tool to troubleshoot 802.1X/EAP problems More information can be found at: http://blogs.aerohive.com/blog/the-wireless-lan-training- blog/troubleshooting-wi-fi-connectivity-with-hivemanager-tools
  • 430.
    © 2014 AerohiveNetworks CONFIDENTIAL Copyright ©2011 Virtual Access Console Overview 430 Track IP (Default Gateway) Default gateway is not responding to PING The AP advertises a WPA2 SSID that is its hostname_ac The administrator connects to the SSID, and opens an SSH connection to the AP
  • 431.
    © 2014 AerohiveNetworks CONFIDENTIAL Lab: Virtual Access Console 1. Create an Wireless Access Console Object 431 To create a Wireless Access Console object • In your Network Policy go to: Additional Settings Service Settings and next to Access Console click + • Name: Console-X • Mode: Auto › Note: Auto requires Track-IP to trigger an action of access console if access to one or more specified IP addresses is lost › Recommendation: Set mode to enable during Aerohive AP installation and set back to Auto after your installation is complete. Optionally you can specify the MAC addresses of permitted administrators then deny the rest.
  • 432.
    © 2014 AerohiveNetworks CONFIDENTIAL Lab: Virtual Access Console 2. Create an Wireless Access Console Object 432 Access Security • Select WPA2-PSK (WPA2-Personal) › Encryption Method: CCMP(AES) › ASCII Key: aerohive123 › Confirm ASCII Key: aerohive123 Optional Settings • Use the default settings Note: Telnet is secured because you are using it over an encrypted Wi-Fi connection. Also, if you know the MAC addresses of the wireless cards on administrator PCs, you can add them here as well to limit access. • Click Save
  • 433.
    © 2014 AerohiveNetworks CONFIDENTIAL • In your network policy, verify the Access Console is set to: Console-X Lab: Virtual Access Console 3. Verify Access Console 433 Do not save yet...
  • 434.
    © 2014 AerohiveNetworks CONFIDENTIAL Lab: Virtual Access Console 4. Create a Track IP Group 434 To create a track IP group to track the default gateway and enable the access console if the gateway is unreachable.. • Under Track IP Groups for Backhaul • Click +
  • 435.
    © 2014 AerohiveNetworks CONFIDENTIAL Lab: Virtual Access Console 5. Configure a Track IP Group 435 • Name: Track-X •  Enable IP tracking Track the following targets •  Default Gateway • Take action when: all targets become unresponsive Action •  Enable the virtual access console •  Disable all active SSIDs • Click Save Note: Note, disabling active SSIDs when the tracked IPs are not available may lead people to believe the Wi-Fi is not working, although the real problem is that the wired network is down. If you enable this, please realize that you may have to explain that to people.
  • 436.
    © 2014 AerohiveNetworks CONFIDENTIAL Lab: Virtual Access Console 6. Active the Track IP Group 436 • Click on the Track-X IP Group object • Click on the > arrow and move the object to the right window to activate • Click Save
  • 437.
    © 2014 AerohiveNetworks CONFIDENTIAL Additional Actions using the Access Console policy 437 In addition to bringing up the Virtual Access Console when the Track IP group is not reachable, you can also select to start the Backhaul(mesh) failover procedure. This triggers mesh failover on a loss of IP connectivity instead of link-sate.
  • 438.
    © 2014 AerohiveNetworks CONFIDENTIAL Lab: Virtual Access Console 7. Updating the devices 438 • Click Continue or click on the Configure and Update Devices bar.
  • 439.
    © 2014 AerohiveNetworks CONFIDENTIAL 439 • Select your 0X-A-xxxxxx access point • Click the Update button • Click Update Devices to push your Network Policy to your access point Lab: Virtual Access Console 8. Updating the Devices
  • 440.
    © 2014 AerohiveNetworks CONFIDENTIAL 440 • Click the Update Button • The Delta update will be pushed to your AP Lab: Virtual Access Console 9. Updating the Devices
  • 441.
    © 2014 AerohiveNetworks CONFIDENTIAL Virtual Access Console Test loss of connectivity to default gateway 441 • The instructor will disable ping on the default gateway › This will cause track-ip to fail and enable the access console • The access console will appear as an SSID with the following format: <AP_Hostname>_ac Access Console IP: Access Console SSID: Broadcast SSID: Services: 1.1.2.1/24 01-A-001122_ac (Hostname_ac) Yes or No SSHv2 Access Telnet Optional Client MGT0 IP:10.5.2.10 MAC: 0019:7700:1122 Hostname: 01-A-001122 Firewall/Gateway 10.5.2.1Connect to SSID: IP: Gateway: 01-A-001122_ac 1.1.2.2/24 1.1.2.1 The Gateway provided by Aerohive AP is IP of the Access Console Track IP Will Fail
  • 442.
    © 2014 AerohiveNetworks CONFIDENTIAL Lab: Virtual Access Console 10. Determine your Aerohive APs Access Console SSID 442 • Your Wireless Access Console SSID is the hostname of your AP appended with _ac • In this example, the access console SSID for the Aerohive AP above is: 15-A-06b840_ac • The access console is set to Auto mode, which means it will be enabled if track IP fails to get a response, or if its Ethernet interface is disconnected. Hostname
  • 443.
    © 2014 AerohiveNetworks CONFIDENTIAL Lab: Virtual Access Console 11. Connect to Your Aerohive APs Access Console 443 • View the SSIDs from your hosted computer • Within a moment or two, after track IP fails, you will see the SSID: X-A-######_ac • Click Connect • Enter the Passphrase/Network Key you created for the access console SSID: aerohive123
  • 444.
    © 2014 AerohiveNetworks CONFIDENTIAL Lab: Virtual Access Console 12. Verify the IP address of your laptop 444 • The hosted computer will obtain an IP from the Aerohive AP • The default gateway provided is an access console IP to access the Aerohive AP from the CLI › You do not have to worry about IP conflicts, because the IP is only accessible via the unique Access Console SSID C:> ipconfig | more Ethernet adapter Wireless Network Connection: IP Address. . . . . . . . . . . . : 1.1.2.2 Subnet Mask . . . . . . .. . : 255.255.255.0 Default Gateway . . . . . . : 1.1.2.1
  • 445.
    © 2014 AerohiveNetworks CONFIDENTIAL Lab: Virtual Access Console 13. Telnet to your Aerohive APs Access Console 445 From the hosted computer: Telnet to your Access Console IP C:> telnet 1.1.2.1 login: admin Password: aerohive123 Aerohive Networks Inc. Copyright (C) 2006-2012 0X-A-NNNNNN# show run
  • 446.
    © 2014 AerohiveNetworks CONFIDENTIAL Lab: Virtual Access Console 14. Troubleshoot the AP’s connection problem 446 • Some commands to try out to help see where the problem is access-console mode enable (Keeps the access console enabled) show int mgt0 show int mgt0 dhcp client show ip route ping <default gateway> VLAN PROBE: int mgt0 dhcp-probe vlan-range 1 10 timeout 2
  • 447.
    © 2014 AerohiveNetworks CONFIDENTIAL Copyright ©2011 VLAN Probe Educational Blog A more detailed explanation on how to use VLAN probe to troubleshoot the wired network can be found at: http://blogs.aerohive.com/blog/the-wireless-lan-training- blog/its-not-a-wi-fi-problem-use-vlan-probe-to-troubleshoot- the-wired-network 447
  • 448.
    © 2014 AerohiveNetworks CONFIDENTIAL Lab: Virtual Access Console 15. View CAPWAP Status To view the CAPWAP status AH-0021c0# show capwap client CAPWAP client: Enabled RUN state: Connected securely to the HiveManager CAPWAP Aerohive AP IP: 10.5.1.101 CAPWAP HiveManager IP: 10.5.1.20 CAPWAP Destination Port: 12222 CAPWAP Send Event: Disabled CAPWAP DTLS status: Enabled . . . 448 Notes Below
  • 449.
    © 2014 AerohiveNetworks CONFIDENTIAL Lab: Virtual Access Console 16. CAPWAP Ping If your Aerohive AP is not connecting to HiveManager, use CAPWAP Ping  This will verify routes and firewall access to your HiveManager  Works when CAPWAP transport is UDP 02-A-064200# capwap ping hivemanager CAPWAP ping parameters: Destination server: hivemanager (10.5.1.20) Destination port: 12222 Count: 5 Size: 56(82) bytes Timeout: 5 seconds • Turn off the access console access-console mode auto (resets the access console to automatic) 449
  • 450.
    © 2014 AerohiveNetworks CONFIDENTIAL Virtual Access Console Instructor fixes the to default gateway 450 • The instructor will now re-enable ping to the default gateway › The access console SSID will disappear • The Device-PPSK-X SSID will reappear Client Firewall/Gateway 10.5.2.1 SSID: Device-PPSK-X
  • 451.
    © 2014 AerohiveNetworks CONFIDENTIAL The Utilities Menu 451 To bring up the Utilities Menu: • Go to Monitor Devices • Select the desired Device Type • Select the box  next to the desired Device • Click Utilities
  • 452.
    © 2014 AerohiveNetworks CONFIDENTIAL 452 • The Utilities Menu can be accessed from both the Utilities button and from the MAPS view • To access the Utilities from MAPS, right click on an AP and select the desired tool The Utilities Menu
  • 453.
    © 2014 AerohiveNetworks CONFIDENTIAL Tools Available Within the Utilities Menu 453 • There are Utilities in the initial dropdown list that are quite useful • Some of the items offer even more functionality through dropdown lists of their own • Many of the Utilities offer the same functionality as directly accessing a device and using CLI tools, without the need of console access • The tools available in the Utilities menu can be used on any Aerohive Device found in your HiveManager • Functionality and tools may vary based upon device type
  • 454.
    © 2014 AerohiveNetworks CONFIDENTIAL Examining the Utilities Client Information 454 • Client Information is available by navigating to the following location Utilities  Client Information • Client Information provides useful data such as: › MAC Address › IP Address › Host Name › Connection Time › RSSI values, SSID, VLAN › Authentication Method › Encryption Method › Client CWP Used, User Profile ID › Radio Mode › Channel › Last Transmission Rate
  • 455.
    © 2014 AerohiveNetworks CONFIDENTIAL 455 • L2 Neighbor Information is available by navigating to the following location Utilities  L2 Neighbor Information • L2 Neighbor Information reveals information such as: › Host Names of Neighbors › MAC addresses of Neighbors › Connection Time › Link Cost › RSSI Values › Link Type Examining the Utilities L2 Neighbor Information
  • 456.
    © 2014 AerohiveNetworks CONFIDENTIAL 456 • Diagnostics reveals a list of extremely useful troubleshooting tools • Some tools allow you to troubleshoot the device and it’s configuration • Some tools allow you to troubleshoot networking issues • You may wish to use a few of these before your Aerohive network installation is complete, to document network configurations prior to deployment Examining the Utilities Diagnostics
  • 457.
    © 2014 AerohiveNetworks CONFIDENTIAL 457 • Navigate to Monitor and place a check in the box  next to your 0X-A-###### AP • Click Utilities and select Diagnostics  Ping from the available list Examining the Utilities LAB 1. Ping
  • 458.
    © 2014 AerohiveNetworks CONFIDENTIAL 458 • By default, the device is configured to PING it’s HiveManager • You can enter any other IP address and use the PING tool to test connectivity from the AP to that device Examining the Utilities LAB 2. Ping
  • 459.
    © 2014 AerohiveNetworks CONFIDENTIAL 459 • Navigate to Monitor and place a check in the box  next to your 0X-A-###### AP • Click Utilities and select Diagnostics  Show Running Config from the list Examining the Utilities LAB 3. Launch Utilities/Diagnostics
  • 460.
    © 2014 AerohiveNetworks CONFIDENTIAL 460 • Examine the output • Find your device Hostname and IP address • Locate your DNS server address Examining the Utilities LAB 4. Show Running Config View Output
  • 461.
    © 2014 AerohiveNetworks CONFIDENTIAL 461 Examining the Utilities Diagnostics LAB 5. Show Version • Navigate to Monitor and place a check in the box  next to your 0X-A-###### AP • Click Utilities and select Diagnostics  Show Version from the list and find out which version of HiveOS is on your device
  • 462.
    © 2014 AerohiveNetworks CONFIDENTIAL 462 Examining the Utilities Diagnostics LAB 6. Show DNXP Neighbors • Navigate to Monitor and place a check in the box  next to your 0X-A-###### AP • Click Utilities and select Diagnostics  Show DNXP Neighbors from the list and see Layer 2 and Layer 3 neighbor relationships
  • 463.
    © 2014 AerohiveNetworks CONFIDENTIAL 463 Examining the Utilities Diagnostics LAB 7. Show CPU • Navigate to Monitor and place a check in the box  next to your 0X-A-###### AP • Click Utilities and select Diagnostics  Show CPU from the list and view the device CPU usage
  • 464.
    © 2014 AerohiveNetworks CONFIDENTIAL 464 Examining the Utilities Diagnostics LAB 8. VLAN Probe • Navigate to Monitor  Aerohive APs and place a check in the box  next to your 0X-A-###### AP • Click Utilities and select Diagnostics  VLAN Probe
  • 465.
    © 2014 AerohiveNetworks CONFIDENTIAL Copyright ©2011 • A DHCP Discover is sent out on each specified VLAN in the range from the Aerohive AP • If a DHCP offer is received from the DHCP server, the Aerohive AP will NAK will be sent to free up the offer • This tool ensures the switches, routers, DHCP relays, and DHCP server all work for the VLANs that are available • Enter a range of 1 to 10 • Click Start • View the results 465 You can also see the subnet of the IP address that was returned from DHCP! Examining the Utilities Diagnostics LAB 9. VLAN Probe
  • 466.
    © 2014 AerohiveNetworks CONFIDENTIAL 466 • To view Status after selecting a device go to Utilities > Status • Status allows you to see the following: › Advanced Channel Selection Protocol › Interface › Wi-Fi Status Summary Examining the Utilities Status
  • 467.
    © 2014 AerohiveNetworks CONFIDENTIAL 467 Examining the Utilities LAB 10. Advanced Channel Selection Protocol • Navigate to Monitor and place a check in the box  next to your 0X-A-###### AP • Click Utilities and select Status  Advanced Channel Selection Protocol • Examine the Channels and power settings being used by your AP
  • 468.
    © 2014 AerohiveNetworks CONFIDENTIAL 468 Examining the Utilities LAB 11. Interface • Navigate to Monitor and place a check in the box  next to your 0X-A-###### AP • Click Utilities and select Status  Interface • Examine the configuration of both your wireless and wired interfaces
  • 469.
    © 2014 AerohiveNetworks CONFIDENTIAL 469 Examining the Utilities LAB 12. Wi-Fi Status Summary • Navigate to Monitor and place a check in the box  next to your 0X-A-###### AP • Click Utilities and select Status  Wi-Fi Status Summary • Examine the status of your wireless interfaces
  • 470.
    © 2014 AerohiveNetworks CONFIDENTIAL 470 • LLDP/CDP can be enabled to allow your device to collect and transmit Link Layer Discovery Protocol data and Collect Cisco Discovery Protocol data • Typically this would be enabled via your Network Policy • Here in Utilities you will have many of the same LLDP/CDP options expected to be found in the CLI Examining the Utilities Status
  • 471.
    © 2014 AerohiveNetworks CONFIDENTIAL 471 • This option allows the viewing of all currently active Session Initiation Protocol (SIP) calls • The ALG SIP calls option is only available from Aerohive APs • SIP is used for controlling multimedia communication sessions such as voice and video calls over Internet Protocol (IP) networks • SIP works with several other Layer 7 protocols that identify and carry the session media Examining the Utilities ALG SIP Calls
  • 472.
    © 2014 AerohiveNetworks CONFIDENTIAL 472 • Displays configurations in HiveManager that are different than those on the device being audited • Allows you to see if any configuration changes are required Examining the Utilities Configuration Audit
  • 473.
    © 2014 AerohiveNetworks CONFIDENTIAL 473 • Reboot Device allows you to reboot devices from the Utilities menu • Set Image to Boot allows you to select either the Active or Backup image stored on the device Examining the Utilities Reboot Device and Set Image to Boot
  • 474.
    © 2014 AerohiveNetworks CONFIDENTIAL 474 • Locate Device allows you to alter the LED status on Aerohive APs • Facilitates rapid physical location of Aerohive APs • You can select the LED Color • You can alter the Blink Mode Examining the Utilities Locate Device
  • 475.
    © 2014 AerohiveNetworks CONFIDENTIAL 475 • Same action as reset config in the CLI • Restores the device to factory settings • Can restore devices to a Bootstrap configuration if you have created and set one on the devices • Once executed, upon next report to HiveManager, the devices will appear as Unconfigured Devices Examining the Utilities Reset Device to Default
  • 476.
    © 2014 AerohiveNetworks CONFIDENTIAL 476 • Displays any alarms generated by the selected device in HiveManager Examining the Utilities Alarms
  • 477.
    © 2014 AerohiveNetworks CONFIDENTIAL 477 • Launches a Secure Shell (SSH) connection to the device from HiveManager • Uses the Device Credentials from within HiveManager • Provides remote access with console commands Examining the Utilities SSH Client
  • 478.
    © 2014 AerohiveNetworks CONFIDENTIAL 478 • Allows you to use a different SSH client than the one provided in HiveManager should you so desire • Provides an opportunity to configure the SSH Proxy credentials and settings Examining the Utilities SSH Proxy
  • 479.
    © 2014 AerohiveNetworks CONFIDENTIAL 479 • Allows Aerohive Devices located behind firewalls to make a secure connection to Aerohive Support • Allows Aerohive support to more easily assist in troubleshooting Examining the Utilities Aerohive Device Phone Home
  • 480.
    © 2014 AerohiveNetworks CONFIDENTIAL 480 • Allows you to retrieve the output of the show tech command through the HiveManager GUI • Displays a wealth of important technical support information Examining the Utilities Get Tech Data
  • 481.
    © 2014 AerohiveNetworks CONFIDENTIAL 481 • Helps locate the source of Layer 1 interference • Works on most APs and the BR200WP Examining the Utilities Spectrum Analysis
  • 482.
    © 2014 AerohiveNetworks CONFIDENTIAL 482 Examining the Utilities LAB 13. Spectrum Analysis • Navigate to Monitor and place a check in the box  next to your 0X-A-###### AP • Click Utilities and select Spectrum Analysis • Click YES in the Confirm window While conducting Layer 1 analysis, Layer 2 functions will be disrupted.
  • 483.
    © 2014 AerohiveNetworks CONFIDENTIAL 483 • Analyze the output in 2.4 GHz • Click on Settings and change the Interface to 5 GHz • Set the 5 GHz Channels to 36-165 and click Update • Analyze the output in 5 GHz Examining the Utilities LAB 14. Spectrum Analysis
  • 484.
    © 2014 AerohiveNetworks CONFIDENTIAL Configuration Rollback Provides Safeguarded Configuration Updates 484 2. HiveManager Sends New Configuration (NC) Update and adds configuration rollback settings to configuration for Aerohive AP 3. The current configuration (CC) becomes the rollback (RB) configuration, and the new configuration (NC) is then loaded 4. If the Aerohive AP cannot contact HiveManager with CAPWAP after the configuration update, the Aerohive AP will start a configuration rollback timer, which is 10 minutes, and after the timer expires, the Aerohive AP will reboot and use the rollback configuration to regain connectivity back to HiveManager RB 1. Administrator updates complete or delta configuration of Aerohive APs NC CC NC
  • 485.
    © 2014 AerohiveNetworks CONFIDENTIAL Configuration Rollback Configuration rollback is enabled by default Occurs after Updates when an Aerohive Device cannot establish CAPWAP connectivity with HiveManager Wait time is 10 minutes 485
  • 486.
    © 2014 AerohiveNetworks CONFIDENTIAL Configuration Rollback Example – Configuration Update • In this example the Aerohive AP’s MGT0 interface is set to a VLAN that does not exist on the switch the AP is connected to • When updating the configuration, if you view the configuration, you can see that the config rollback command is set 486 Here the MGT0 interface is set to the wrong VLAN “by accident ” The configuration audit shows that the configuration rollback command is set
  • 487.
    © 2014 AerohiveNetworks CONFIDENTIAL Configuration Rollback Example – Configuration Update Results • It takes 15 minutes for a configuration upload to timeout if there are connectivity issues after the update • The Hive Device waits 10 minutes then it will rollback its configuration, reboots then contacts HiveManager, which may take around 12 minutes • The Hive Device update timer takes about 15 minutes to expire before the Hive Device can be updated again 487
  • 488.
    © 2014 AerohiveNetworks CONFIDENTIAL Contextual Application Dashboard HTML 5 based Dashboard loads and navigates faster 488
  • 489.
    © 2014 AerohiveNetworks CONFIDENTIAL Customizable Tab Views 489 • Click the + button to add your own Perspective • Select the Widgets you wish to use and Click the Save button • Your Customized Tab will appear as My Perspective
  • 490.
    © 2014 AerohiveNetworks CONFIDENTIAL Lab: Customized Dashboard 1. Experiment with customizing the dashboard 490 • Click Dashboard to view a customizable widgetized display • Select Add Content to select up to 10 widgets to display • The changes are saved per administrator account Click and drag the widget bar to move the widget to a new location on the screen Click Edit to select up to 10 widgets to be displayed
  • 491.
    © 2014 AerohiveNetworks CONFIDENTIAL 491 Lab: Reporting 1. Building a Network Summary Report • Click the Dashboard tab and select the Network Summary tab • Select World • Click the dropdown arrow on the far right • Click Save as Report
  • 492.
    © 2014 AerohiveNetworks CONFIDENTIAL 492 Lab: Reporting 2. Building a Network Summary Report • Name the report Reports-X • For Report Frequency select Daily • For Email Delivery Address use your real email address and Click Save
  • 493.
    © 2014 AerohiveNetworks CONFIDENTIAL 493 Lab: Reporting 3. Viewing the Report • In the Information dialogue box Click the here link.
  • 494.
    © 2014 AerohiveNetworks CONFIDENTIAL 494 • Select the top four applications on the left • Click the Save button on the right Lab: Reporting 4. Viewing the Report
  • 495.
    © 2014 AerohiveNetworks CONFIDENTIAL 495 Notice that your custom report has been saved Lab: Reporting 5. Viewing the Report
  • 496.
    © 2014 AerohiveNetworks CONFIDENTIAL 496 • From the Dashboard tab click on the dropdown arrow on the far right • Select Export from the dropdown choices Lab: Reporting 6. Exporting the Report
  • 497.
    © 2014 AerohiveNetworks CONFIDENTIAL 497 • Save and open the report • Scroll through the information Lab: Reporting 7. Download and view the Report Viewing reports requires a PDF reader.
  • 498.
    © 2014 AerohiveNetworks CONFIDENTIAL Application Discovery 498 • Over 700 Applications are AUTO-DISCOVERED with detailed context › Identify traffic patterns and most popular applications without any configuration › No need to create user-defined watch lists • Detailed context and drilldowns supported
  • 499.
    © 2014 AerohiveNetworks CONFIDENTIAL Copyright ©2011 Application Visibility 499 Historical Filters Most Used Applications By Bandwidth Usage Heaviest Users Top Apps by # of usersAll Applications
  • 500.
    © 2014 AerohiveNetworks CONFIDENTIAL Copyright ©2011 500 Application Visibility • Application usage can be viewed at an individual user basis • Individual users can be identified by 802.1X or PPSK credentials. • With static PSK or Open SSIDs, the MAC address is the identifier.
  • 501.
    © 2014 AerohiveNetworks CONFIDENTIAL Signature Update Mechanism 501 • Signature Update Mechanism similar to HiveOS update mechanism › Expect new signatures released quarterly › Upload new signatures to HiveOS Devices (~5 MB files) › No reboot needed. » File loads onto AP, L7 service stops temporarily on AP to load new signatures.
  • 502.
    © 2014 AerohiveNetworks CONFIDENTIAL Signature Update Mechanism 502 • When new HiveOS versions are released application signature updates are automatic. • Signature updates can also be done manually. • L7 visibility is available for wireless clients on all Aerohive APs and wired clients on BR-200 router.
  • 503.
    © 2014 AerohiveNetworks CONFIDENTIAL Custom Application Detection Rules 503 Monitor and Prioritize applications that REALLY matter to your business. Some examples include: • Online testing applications › E.g. Port based rule for Pearson TestNav application • CITRIX based applications in healthcare › E.g. Distinguish imaging versus EMR applications over CITRIX via IP Address range + Port rules • Track custom web-applications › E.g. Hostname rule to detect Outlook email over HTTPS › E.g. Proprietary hosted web applications Monitoring Application Prioritization Firewall
  • 504.
    © 2014 AerohiveNetworks CONFIDENTIAL Custom Application Detection Rules 504 • Multiple rules can be created and are evaluated from top to bottom • Rules can be created using a Host Name, Server IP Address & Port Number or just a Port Number
  • 505.
    © 2014 AerohiveNetworks CONFIDENTIAL 505 • Click on Configuration  Advanced Configuration  Common Objects  Application Services • Click on the Custom Applications tab • Click on the Add button Lab: Custom Application Detection Rules 1. Create a Custom Application object Note: This lab must be done by the instructor or one student chosen by the instructor
  • 506.
    © 2014 AerohiveNetworks CONFIDENTIAL 506 Lab: Custom Application Detection Rules 2. Create a Custom Application object • Application Name: Aerohive-X • Host Name - HTTP • www.aerohive.* › Wildcards can be used • Click Add • Host Name - HTTPS • www.aerohive.* • Click Add • Click Save
  • 507.
    © 2014 AerohiveNetworks CONFIDENTIAL 507 • From Monitor, All Device, Aerohive APs • Check the box next to your AP  AP-0X- A-###### • Click Update Updates Devices • Click Update Lab: Custom Application Detection Rules 3. Update your Access Point
  • 508.
    © 2014 AerohiveNetworks CONFIDENTIAL 508 • From your hosted PC, browse to some of the Aerohive web pages: www.aerohive.com • Wait about 20 minutes • From the 1 hour view in the Application Dashboard, notice your custom application has been detected. Lab: Custom Application Detection Rules 4. View Custom Application Visibility
  • 509.
    © 2014 AerohiveNetworks CONFIDENTIAL APPLICATION CONTROL WITH AP QOS AND FIREWALL POLICIES 509
  • 510.
    © 2014 AerohiveNetworks CONFIDENTIAL Application Control 510 •QoS ›Voice ›Video •Firewall ›Application ›Ports
  • 511.
    © 2014 AerohiveNetworks CONFIDENTIAL L7 Aware Classifier Maps for QoS queues • Configuration  Advanced Configuration  QOS Configuration  Classifier Maps  New • QoS policies can be created based on L7 applications
  • 512.
    © 2014 AerohiveNetworks CONFIDENTIAL Rate Control & Queuing 512 • Maintain different Rate Control & Queuing settings for different user profiles › Executives get Netflix access at normal bandwidth › Employees get Netflix at 250 kbps • Use Policing Rates on a Queue for 802.11g and 802.11n devices › Netflix classified into Class 1/ Best Effort 2 › Set Policing Rate for each PHY down to 250 kbps
  • 513.
    © 2014 AerohiveNetworks CONFIDENTIAL 513 • Go to Configuration, select your Corp-X policy and click OK. • Under User Profile, click on the link for your Devices-X User Profile • Under Optional Settings, expand Firewalls • Under IP Firewall Policy click + next to From-Access Lab: Application Firewall 1. Create an Application Firewall Policy
  • 514.
    © 2014 AerohiveNetworks CONFIDENTIAL 514 • ddd Lab: Application Firewall 2. Create an Application Firewall Policy • Name the Policy Application-X. • Click the + button to the right. • Under Service, select Application Services.
  • 515.
    © 2014 AerohiveNetworks CONFIDENTIAL 515 •Choose Group •Type streaming •Select  3-4 streaming apps and move them to the right >. •Click OK. Lab: Application Firewall 3. Create an Application Firewall Policy
  • 516.
    © 2014 AerohiveNetworks CONFIDENTIAL 516 • ddd Lab: Application Firewall 4. Create an Application Firewall Policy • Under Action select Deny. • Click the save icon to the right. • Click + to create another rule.
  • 517.
    © 2014 AerohiveNetworks CONFIDENTIAL 517 Lab: Application Firewall 5. Create an Application Firewall Policy • Under Service, select Application Services. • Select Application • Type the name of a social media app such as Facebook and Twitter. • Select  2-3 social media apps and move them to the right >. • Click OK
  • 518.
    © 2014 AerohiveNetworks CONFIDENTIAL 518 Lab: Application Firewall 6. Create an Application Firewall Policy •Under Actions choose Deny. •Click the Save icon.
  • 519.
    © 2014 AerohiveNetworks CONFIDENTIAL 519 • ddd Lab: Application Firewall 7. Create an Application Firewall Policy •Click the Save button.
  • 520.
    © 2014 AerohiveNetworks CONFIDENTIAL 520 • Verify that your From-Access policy is selected. • Default Action = Permit • Click the Save button. Lab: Application Firewall 8. Create an Application Firewall Policy
  • 521.
    © 2014 AerohiveNetworks CONFIDENTIAL 521 • ddd Lab: Application Firewall 9. Create an Application Firewall Policy • Click the Continue button to configure and update devices.
  • 522.
    © 2014 AerohiveNetworks CONFIDENTIAL 522 • Choose the 0X-APs filter • Check the box next to your AP  AP-0X-A-###### • Click Upload Lab: Application Firewall 10. Create an Application Firewall Policy
  • 523.
    © 2014 AerohiveNetworks CONFIDENTIAL 523 • From TightVNC, go to: labN- pcX.aerohive.com password: aerohive • Connect to your SSID: Device-PPSK-X • Open a browser and try to connect to some of the streaming media and social media sites from your policy. Lab: Application Firewall 11. Testing your Application Firewall Policy
  • 524.
    © 2014 AerohiveNetworks CONFIDENTIAL 524 • If time permits, the instructor can create their own Application Firewall Policy and upload it to the classroom access points. • Students connected to the classroom APs, can try to use any of the blocked applications. • Discuss results. OPTIONAL Instructor Demo
  • 525.
    © 2014 AerohiveNetworks CONFIDENTIAL© 2014 Aerohive Networks CONFIDENTIAL QUESTIONS?
  • 526.
    © 2014 AerohiveNetworks Inc. SECTION 13: FIRMWARE UPDATES 526 Aerohive’s Instructor-led Training
  • 527.
    © 2014 AerohiveNetworks CONFIDENTIAL Updating On-Premise HiveManager Software Do not perform this operation in class You can upgrade your HiveManager by going to:  HomeAdministration HiveManager Operations Update Software  You can update from a local file, SCP, or the Aerohive update server  Click OK to update Note: The wireless LAN is completely operational when HiveManager is being updated. Depending on whether the HiveManager software is accessible over a high speed link, the size of the database, and the number of logs to convert, the update can take a few minutes to a few hours. 527 IMPORTANT! Before performing the software update, you should backup the database and store it in a safe place.
  • 528.
    © 2014 AerohiveNetworks CONFIDENTIAL On-Premise HiveManager Partitions (Do not reboot the HiveManager in Class) • The updated HiveManager will be in a new disk partition • The old partition remains in tact › This allows you to Reboot back into your old partition and HiveManager software version if needed • Go to HomeAdministrationHiveManager Operations Reboot Appliance › Here you can see the partition that is active, and the one that is in standby › You can reboot into either of the partitions 528
  • 529.
    © 2014 AerohiveNetworks CONFIDENTIAL Updating HMOL Software 529 • When the “Flashing Bee” appears, new software updates are available. • HomeAdministrationHiveManager OperationsUpdate Software • Click OK and follow the prompts
  • 530.
    © 2014 AerohiveNetworks CONFIDENTIAL 530 • By clicking Continue, the update verifies that your Aerohive Devices will have CAPWAP connectivity with the new servers. • Once the validation is complete, the Update test results will be displayed. Updating HMOL Software
  • 531.
    © 2014 AerohiveNetworks CONFIDENTIAL 531 • In in Confirm dialogue box, you are reminded to verify that your devices can reach URL’s ending in aerohive.com. • The software update continues. • When prompted, click the Confirm button to complete the update. Updating HMOL Software
  • 532.
    © 2014 AerohiveNetworks CONFIDENTIAL Updating HiveOS Multiple HiveOS Version Support • Using HiveManager, you can update the HiveOS of the same model. › all Aerohive Devices › a set of Aerohive Devices › a single Aerohive Device • HiveManager can manage Aerohive Devices running different version of HiveOS. 532 The software on HiveManager should ALWAYS be on the same version of code or NEWER than the managed devices to be able to manage them. Therefore, you should upgrade HiveManager before updating your devices to newer code.
  • 533.
    © 2014 AerohiveNetworks CONFIDENTIAL Lab: Updating HiveOS 1. Update HiveOS on Your Aerohive AP From Monitor  Access PointsAerohive APs • Select  Aerohive AP • Select Update  Advanced  Upload and Activate HiveOS Software • Select a HiveOS image from the list › If you do not have an image you can import one first by clicking Add/Remove • Do not update yet... 533 Click Add/Remove to obtain HiveOS Software for the update
  • 534.
    © 2014 AerohiveNetworks CONFIDENTIAL Adding HiveOS Versions for Updates 534 • There is different software for each Aerohive Device platform. • You can select from existing software on HiveManager. • Device software not already on HiveManager can be obtained from the support site and uploaded to your HiveManager or obtained via the Aerohive Update Server
  • 535.
    © 2014 AerohiveNetworks CONFIDENTIAL Optional: Distributed Updates 535 Only 1 copy of the HiveOS software is sent to the remote office 1. Administrator Uploads HiveOS to a set of Aerohive APs in a branch office over a WAN link or the Internet 3. The rest of the Aerohive APs at the remote site SCP to the Image Upgrade Server Aerohive AP and install the HiveOS software 2. One Aerohive AP at the remote site is selected as the Image Upgrade Server and obtains the HiveOS software from HiveManager Internet HiveManager Branch Office
  • 536.
    © 2014 AerohiveNetworks CONFIDENTIAL Lab: Distributed Updates 2. Update Settings 536 You specify settings that can be applied each time you update • If Aerohive APs are mesh nodes, or you are updating over the Internet or WAN, you can chose to activate at next reboot. › When the update is complete, you can click the link to reboot your Aerohive AP › You can also rate limit the update so you do not overwhelm smaller links • Click the Save icon Note: TFTP can be enabled for connections that use WAN optimizers for Aerohive APs managed across a WAN If you enable distributed update, ensure you select the APs in a single branch office at one time to update
  • 537.
    © 2014 AerohiveNetworks CONFIDENTIAL Selecting the Update Server/Device 537 • When updating multiple devices, you may wish to choose a single device to pull the update from HiveManager and distribute it to the other devices on its subnet, making it an Update Server. • To do so, click the Change Server button and select the desired device. (Make sure to NEVER select a Mesh Point as the Server. If its Mesh Portal reboots during the process, updating the other devices will be problematic.) Push the Updates to the Mesh Points FIRST to ensure they are able to finish before any Mesh Portals reboot. When selecting your Image Upgrade Server, ALWAYS select a Mesh Portal (an AP with an Ethernet connection).
  • 538.
    © 2014 AerohiveNetworks CONFIDENTIAL Lab: Distributed Updates 3. Upload HiveOS 538 • Click Upload • After a few minutes, you should see the update is a success • When updating the software, if you elected to activate at next reboot, you can select the box next your Aerohive Device and reboot it or click the Reboot link to activate the new HiveOS version
  • 539.
    © 2014 AerohiveNetworks CONFIDENTIAL© 2014 Aerohive Networks CONFIDENTIAL QUESTIONS?
  • 540.
    © 2014 AerohiveNetworks Inc. SECTION 14: CLASS REVIEW LAB 540 Aerohive’s Instructor-led Training
  • 541.
    © 2014 AerohiveNetworks CONFIDENTIAL Class Review Lab You will now create a brand new Network Policy based upon what you have learned in this class. • Lab Scenario › Your customer, a large school, is deploying a new WLAN using Aerohive access points. › Use Aerohive’s Planning Tool to plan AP placement and coverage. You will be using the school.jpg floor plan already in HiveManager. This floor plan has no scale. You must use a door way referenced as 3 feet to scale the map. › You must plan the network including allowance for two SSIDs » Teachers/Staff using an 802.1X security solution using VLAN 10 » Students will be using a PPSK security solution using VLAN 8 and a Firewall policy blocking social media access. • Upload the new policy to your 0X-AP and test from your VNC client. • Ask the instructor for guidance if needed. • The instructor will review your results. 541
  • 542.
    © 2014 AerohiveNetworks CONFIDENTIAL© 2014 Aerohive Networks CONFIDENTIAL QUESTIONS?
  • 543.
    © 2014 AerohiveNetworks Inc. SECTION 15: AUTO PROVISIONING 543 Aerohive’s Instructor-led Training
  • 544.
    © 2014 AerohiveNetworks CONFIDENTIAL Instructor Demo: Auto Provisioning 544 • Click Configuration • Select Auto Provisioning in the Navigation Pane • Click the New Button
  • 545.
    © 2014 AerohiveNetworks CONFIDENTIAL Instructor Demo: Auto Provisioning 545 • Click the IP Management Button • In the Imported Device IP Subnetworks box Click the Enter IP Button
  • 546.
    © 2014 AerohiveNetworks CONFIDENTIAL Instructor Demo: Auto Provisioning 546 • Enter the IP Subnetwork upon which your APs reside using CIDR notation as seen in the example used in the image below • Click Save • Click OK and close the import dialog box
  • 547.
    © 2014 AerohiveNetworks CONFIDENTIAL Instructor Demo: Auto Provisioning 547 • Enable Auto Provisioning • Name your Profile InstructorDemo • Select the device model being used • Select  Use Serial Numbers or IP Subnetworks to identify devices for Auto Provisioning • Move your subnetwork to the right
  • 548.
    © 2014 AerohiveNetworks CONFIDENTIAL Instructor Demo: Auto Provisioning 548 • Under Provisioning Configurations select a STUDENTS policy from the dropdown list • Select the Building1_Floor1 Default Topology Map
  • 549.
    © 2014 AerohiveNetworks CONFIDENTIAL Instructor Demo: Auto Provisioning 549 • Expand Advanced Settings • Select  Upload configuration automatically • Select  Reboot after uploading • Scroll up and click Save
  • 550.
    © 2014 AerohiveNetworks CONFIDENTIAL Instructor Demo: Auto Provisioning 550 • Go to Monitor-All Devices • Select all of the students APs • Click Remove • When the APs relocate HiveManager they will be provisioned as you have configured (This may take a few minutes)
  • 551.
    © 2014 AerohiveNetworks CONFIDENTIAL© 2014 Aerohive Networks CONFIDENTIAL QUESTIONS?
  • 552.
    © 2014 AerohiveNetworks Inc. SECTION 16: COOPERATIVE CONTROL OVERVIEW 552 Aerohive’s Instructor-led Training
  • 553.
    © 2014 AerohiveNetworks CONFIDENTIAL Control Plane In the Hive Using Cooperative Control 553 • Uses Distributed Control, the devices cooperate with each other rather than using an expensive bottleneck device (Controller) • The Control Plane in Aerohive Deployments Is implemented at the edge of an Aerohive network › Responsible for making forwarding decisions and programming the data plane › Is implemented at the edge of an Aerohive network, closer to the users › Operates within a Hive for fast and secure layer 2 and layer 3 roaming › Used for best path forwarding with mesh routing and redundancy, client isolation, locationing › Responsible for layer 2 tunnel authentication, layer 2 tunnel failover, dynamic NAS secret creation for Aerohive AP RADIUS servers, dynamic RF, band steering, cooperative client load balancing, etc..
  • 554.
    © 2014 AerohiveNetworks CONFIDENTIAL Cooperative Control Within a Hive 554 Hive – Cooperative control for a group of Hive Devices that share the same Hive name and Hive password. › There is no limit to the number of Hive Devices that can exist in a single Hive › Aerohive APs in a Hive cooperate with each other using Aerohive’s cooperative control protocols: »AMRP (Aerohive Mobility Routing Protocol) –Layer 2 and Layer 3 Roaming, Load Balancing, Band Steering, Layer 2 GRE Tunnel Authentication and Keepalives »DNXP (Dynamic Network Extensions Protocol) –Dynamic GRE tunnels to support layer 3 roaming »INXP (Identity-Based Network Extensions Protocol) –GRE tunnels for guest tunnels »ACSP (Automatic Channel Selection & Power) Protocol –Radio Channel and Power Management
  • 555.
    © 2014 AerohiveNetworks CONFIDENTIAL Aerohive APs in Same Hive Use Cooperative Control Protocols to Enable: 555 Wireless Mesh, Dynamic Mesh Routing, Ethernet Bridging over Wireless Mesh, Fast and Secure L2 and L3 Roaming, L3 L2L2 Aerohive APs must be configured to be in the same Hive to interoperate with these features Layer 2 IPsec VPN,Branch Office HQ Network Guest Tunneling with GRE, and more...DMZInternal Network Guest Client Ethernet Devices Client Aerohive APs Cooperative Radio Channel and Power Management with, Cooperative client load balancing, and band steering,
  • 556.
    © 2014 AerohiveNetworks CONFIDENTIAL Copyright ©2011 Roam 556 Cooperative Control Example: Roaming Handoffs using AMRP • User authenticates and associates then keys are distributed • The Aerohive AP predicatively pushes keys and session state to one hop neighbors • As the client roams and associates with another Aerohive AP the traffic continues uninterrupted by the roam 556 RADIUS Server
  • 557.
    © 2014 AerohiveNetworks CONFIDENTIAL Copyright ©2011 How does it work? 557 A single HiveAP by itself acts as a full-featured enterprise class access point Identity-based security, including stateful inspection FW, rogue detection & mitigation Airtime Scheduling, SLA compliance and local forwarding implemented at the edge HiveAPs are discovered, policy is pushed and the WLAN is operational HiveManager is a single mgmt interface for configuration, OS updates & monitoring of thousands of devices With a second HiveAP, fast stateful roaming, cooperative RF, station load balancing and seamless resiliency are enabled Mesh networking and best path forwarding can be used for extra resiliency and reachability Dynamically reroutes around failures As more HiveAPs are added, coverage, reliability and backhaul bandwidth increases Cooperative RF power levels minimize co-channel interference With Cooperative Control, clients can securely and seamlessly roam across the WLAN Dynamic best path forwarding and stateful roaming provides resiliency without a single point of failure With Cooperative Control, clients can securely and seamlessly roam across the WLAN Wireless Network Wired Network   Secure Fast L2/L3 Roaming Traffic Flow Comparison Resiliency Comparison Seamless Wired Integration Reporting Heat Maps SLA Compliance Policy Configuration HiveManager NMS
  • 558.
    © 2014 AerohiveNetworks CONFIDENTIAL Copyright ©2011 Client Roaming In Action 558 6 7 12 9 3 16 17 22 19 13 4 5 10 8 2 14 15 20 18 11 26 27 32 29 23 36 37 39 33 24 25 30 28 21 34 35 40 38 31 10 6 7 12 9 3 16 17 22 19 13 4 5 10 8 2 14 15 20 18 11 26 27 32 29 23 36 37 39 33 24 25 30 28 21 34 35 40 38 31 10 X AP to which client is Connected X APs Sharing Clients information X APs Removing Clients information 6 7 12 9 3 16 17 22 19 13 4 5 10 8 2 14 15 20 18 11 26 27 32 29 23 36 37 39 33 24 25 30 28 21 34 35 40 38 31 10 6 7 12 9 3 16 17 22 19 13 4 5 10 8 2 14 15 20 18 11 26 27 32 29 23 36 37 39 33 24 25 30 28 21 34 35 40 38 31 10 6 7 12 9 3 16 17 22 19 13 4 5 10 8 2 14 15 20 18 11 26 27 32 29 23 36 37 39 33 24 25 30 28 21 34 35 40 38 31 10 6 7 12 9 3 16 17 22 19 13 4 5 10 8 2 14 15 20 18 11 26 27 32 29 23 36 37 39 33 24 25 30 28 21 34 35 40 38 31 10 6 7 12 9 3 16 17 22 19 13 4 5 10 8 2 14 15 20 18 11 26 27 32 29 23 36 37 39 33 24 25 30 28 21 34 35 40 38 31 10 6 7 12 9 3 16 17 22 19 13 4 5 10 8 2 14 15 20 18 11 26 27 32 29 23 36 37 39 33 24 25 30 28 21 34 35 40 38 31 10 6 7 12 9 3 16 17 22 19 13 4 5 10 8 2 14 15 20 18 11 26 27 32 29 23 36 37 39 33 24 25 30 28 21 34 35 40 38 31 10 6 7 12 9 3 16 17 22 19 13 4 5 10 8 2 14 15 20 18 11 26 27 32 29 23 36 37 39 33 24 25 30 28 21 34 35 40 38 31 10As Clients Roam, APs Constantly Update Neighbours
  • 559.
    © 2014 AerohiveNetworks CONFIDENTIAL Cooperative Control Example: Roaming Cache 559 • AMRP forwards the Pairwise Master Key (PMK) between APs within the same subnet. • DNXP forwards the PMK across Layer 3 boundaries. • PMKs are also forwarded to next-hop neighbors • Next-hop neighbors are APs that within radio range.
  • 560.
    © 2014 AerohiveNetworks CONFIDENTIAL Hive - AMRP Operation Modes Attach Message, DA and BDA roles 560 • AMRP Aerohive AP Operational Modes for Aerohive APs in the same subnet of a Hive › Attach – sends topology and load info to DA » If DA exists, it takes <3 seconds for a new Aerohive AP to attach » Sends unicast heartbeats and topology updates to DA › DA (Designated AP) – AMRP Hello protocol automatically elects one DA per subnet » Broadcasts Hello Packets to neighbors every 3 seconds » Periodically broadcast topology table to the Ethernet every 60 seconds – Triggered update when other APs attach › BDA (Backup Designated AP) – Is the backup for the DA » Periodically broadcast Hello packets to neighbors every 3 seconds » Syncs with DA every 20 seconds in unicast . . . Designated AP Backup Designated AP The rest of the APs are in Attach Mode
  • 561.
    © 2014 AerohiveNetworks CONFIDENTIAL Responsibilities of DA 561 • Arbitrator for Auto-channel Selection (ACSP) – If multiple APs request the same channel at the same time, the arbitrator determines which AP should get the channel • Responsible for sending link state updates to Aerohive APs that are located in the same subnet • Layer 3 Roaming - Responsible for designating APs responsible for being tunnel end points based on tunnel load
  • 562.
    © 2014 AerohiveNetworks CONFIDENTIAL© 2014 Aerohive Networks CONFIDENTIAL QUESTIONS?
  • 563.
    © 2014 AerohiveNetworks Inc. Please review the supplemental information provided in this class. THE END THANK YOU 563