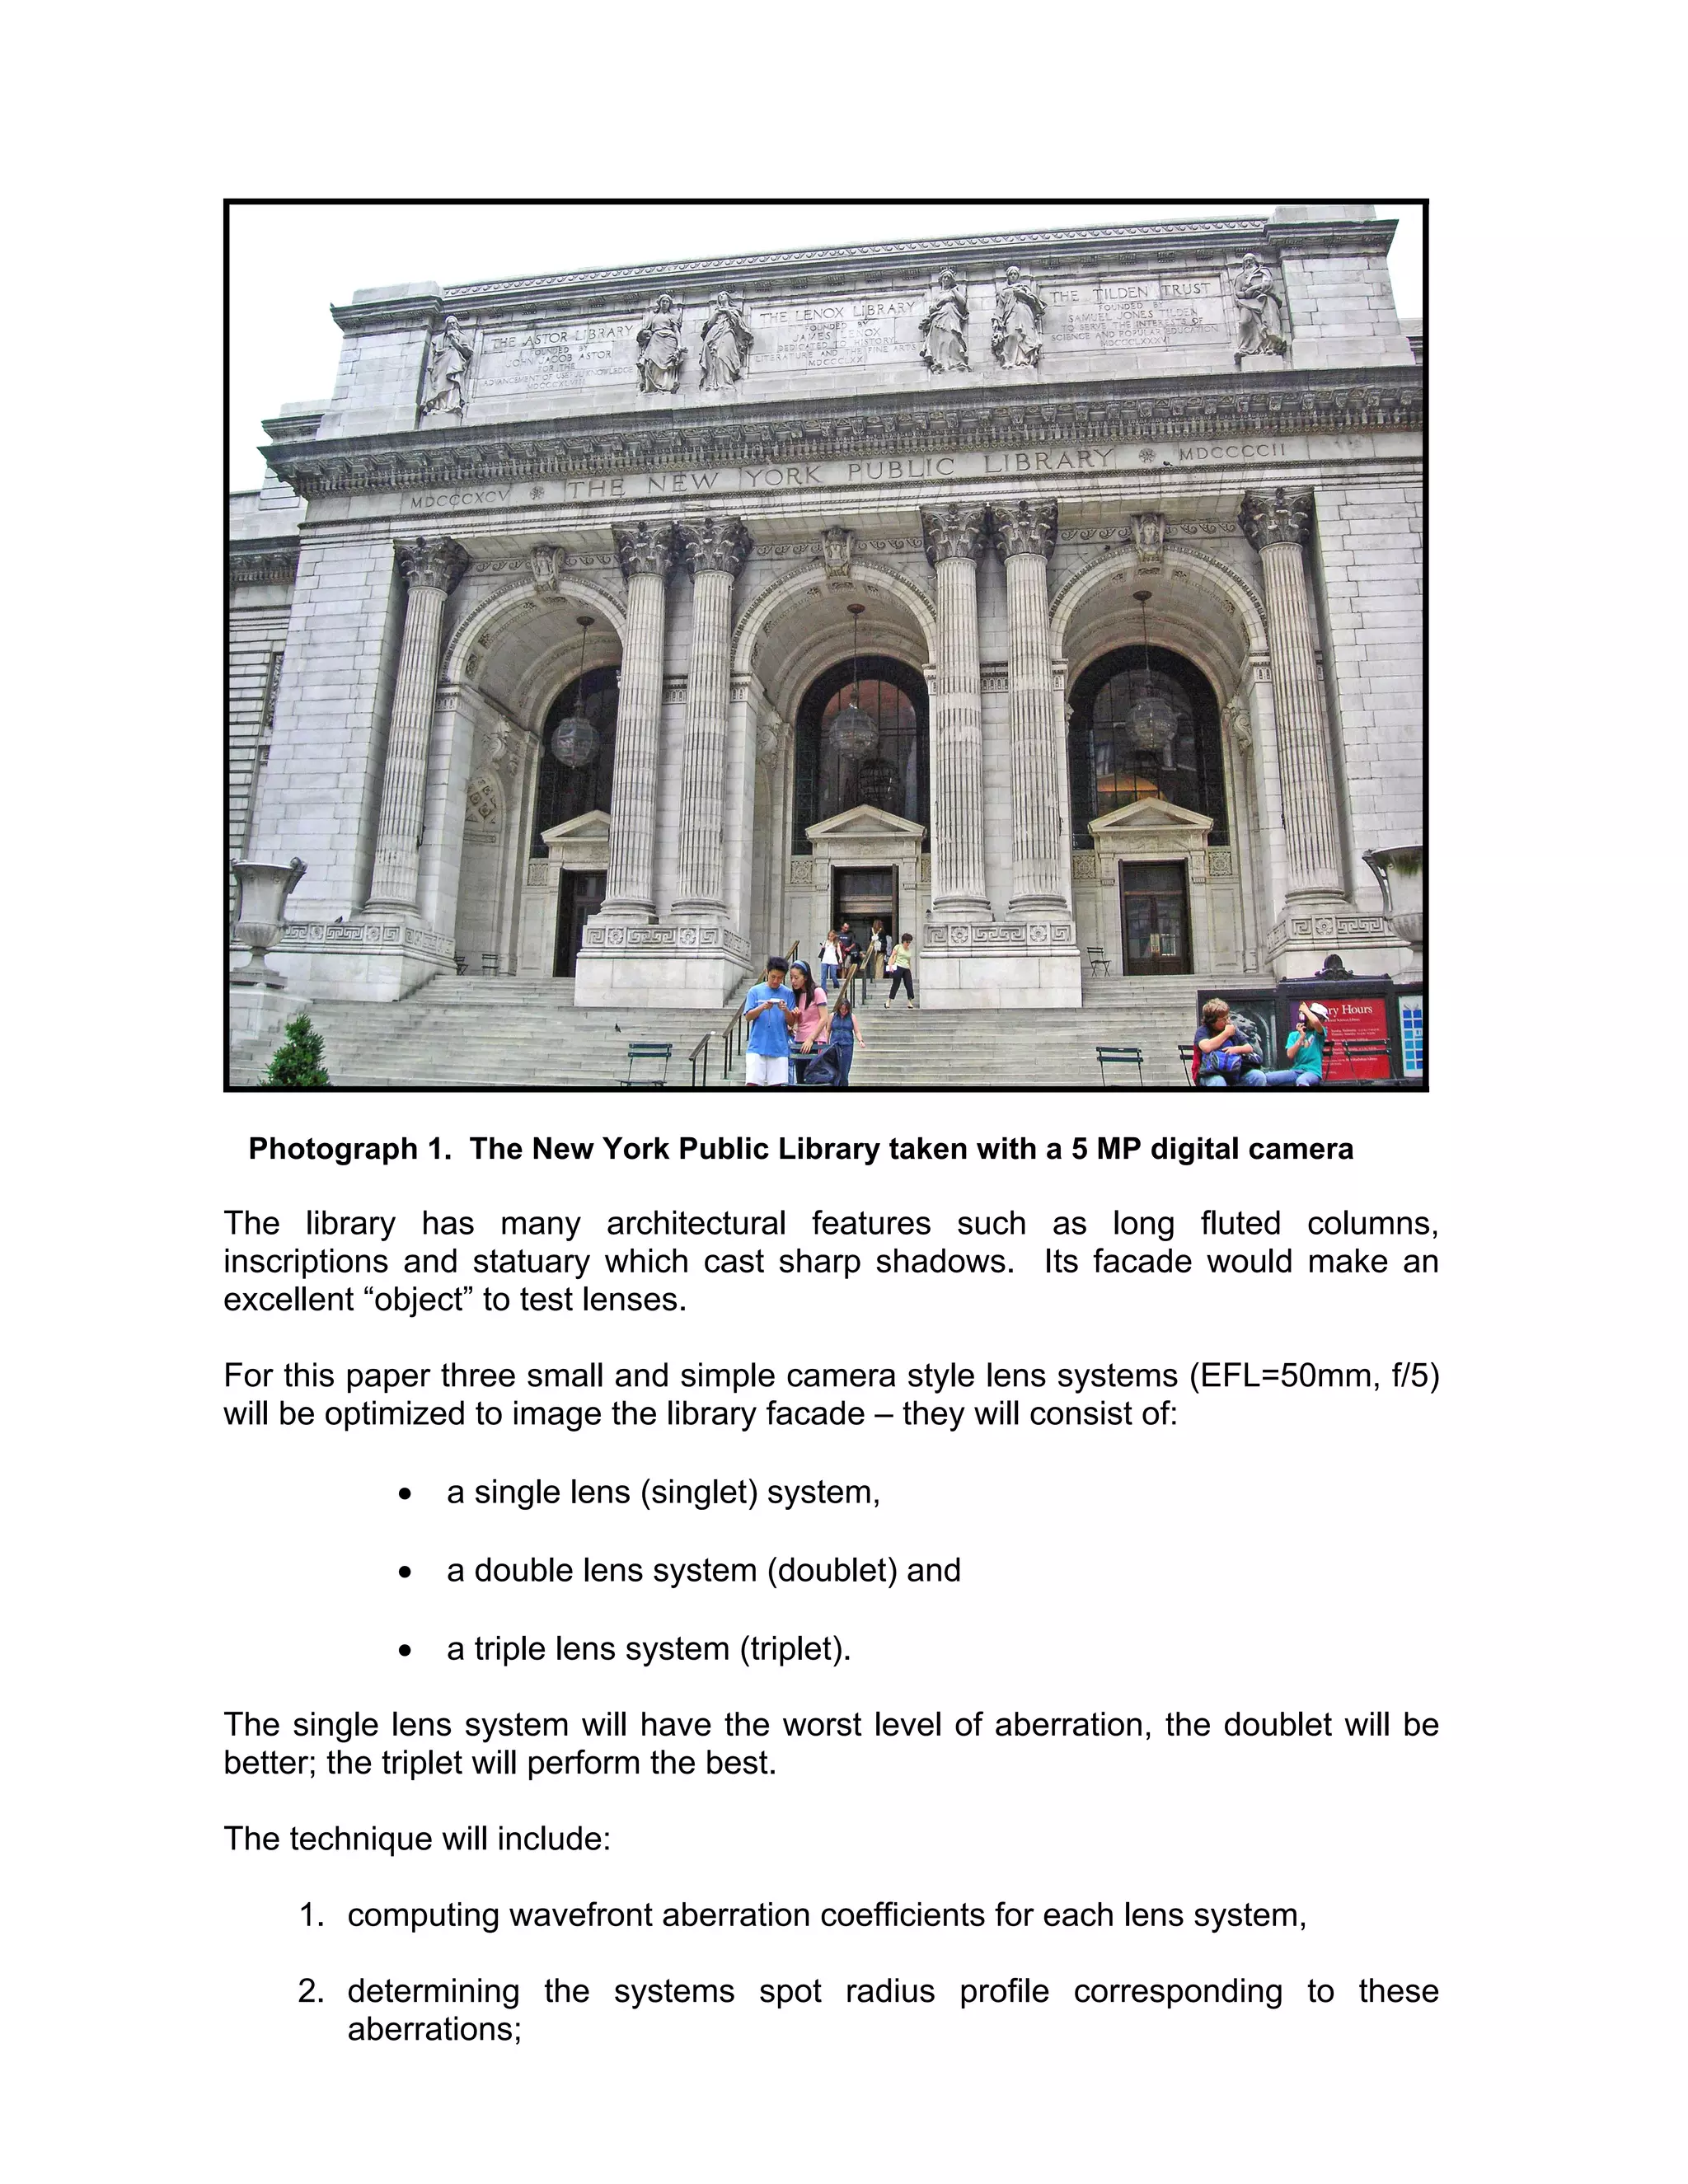
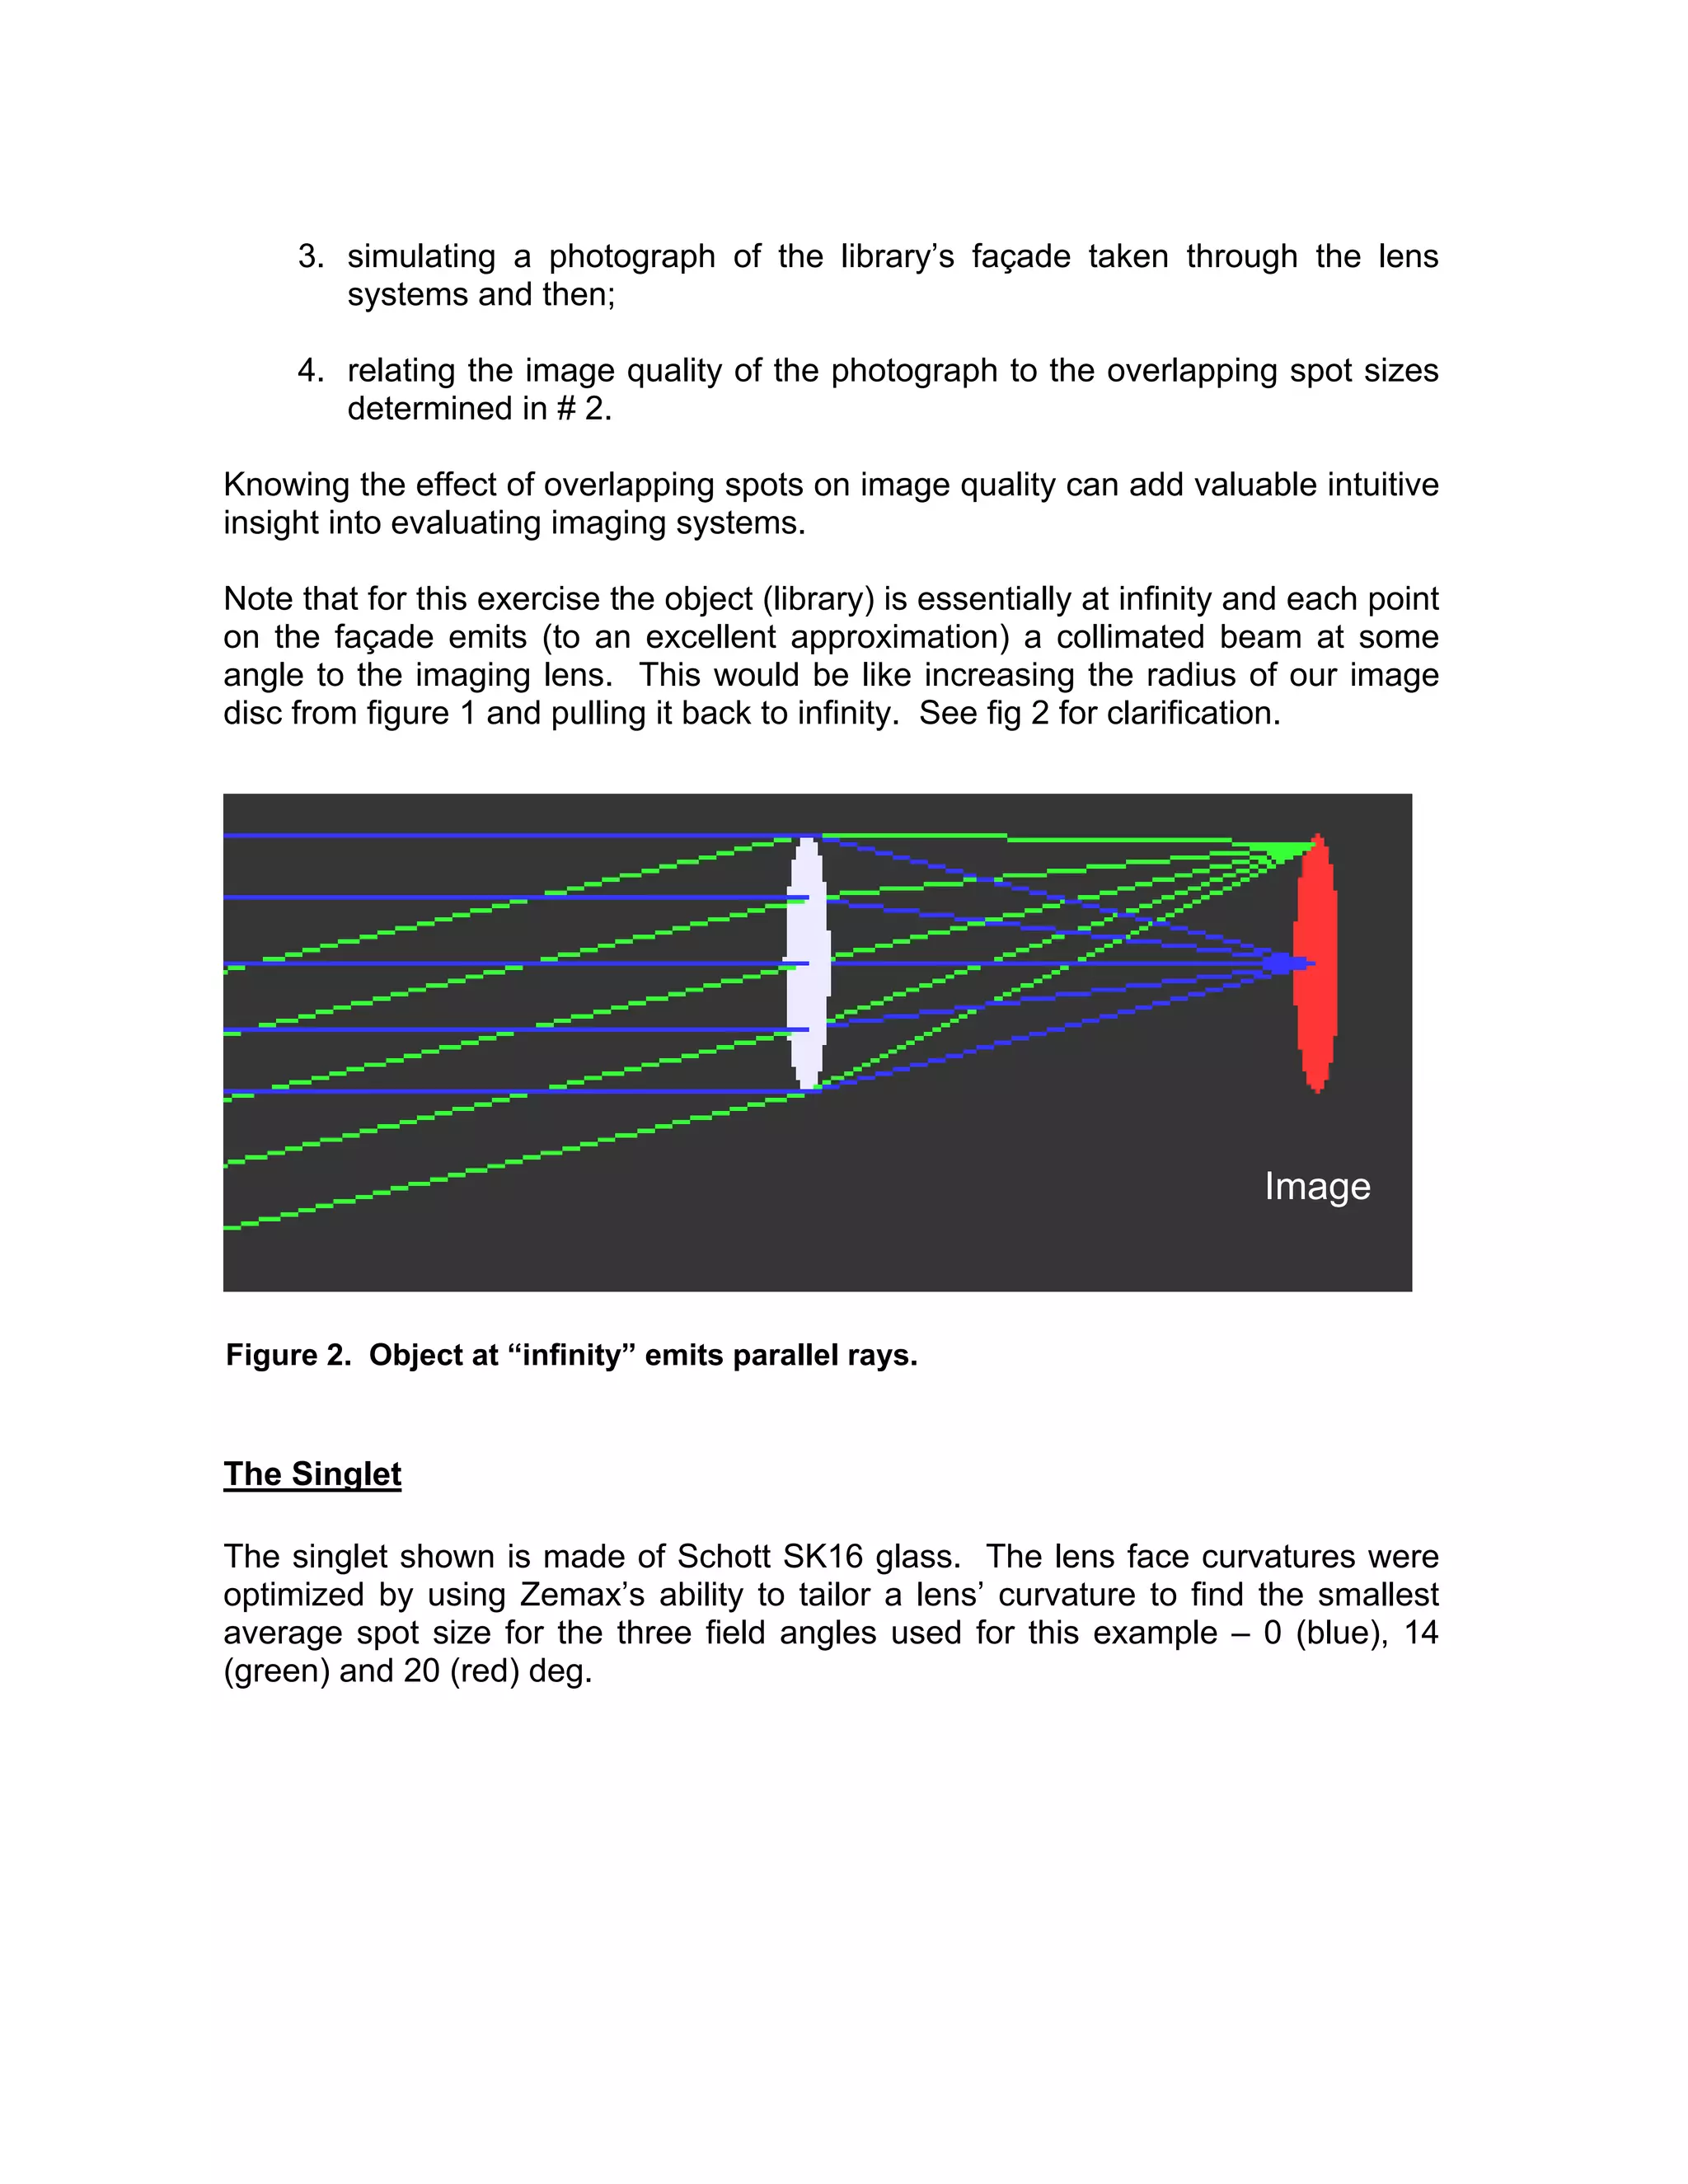
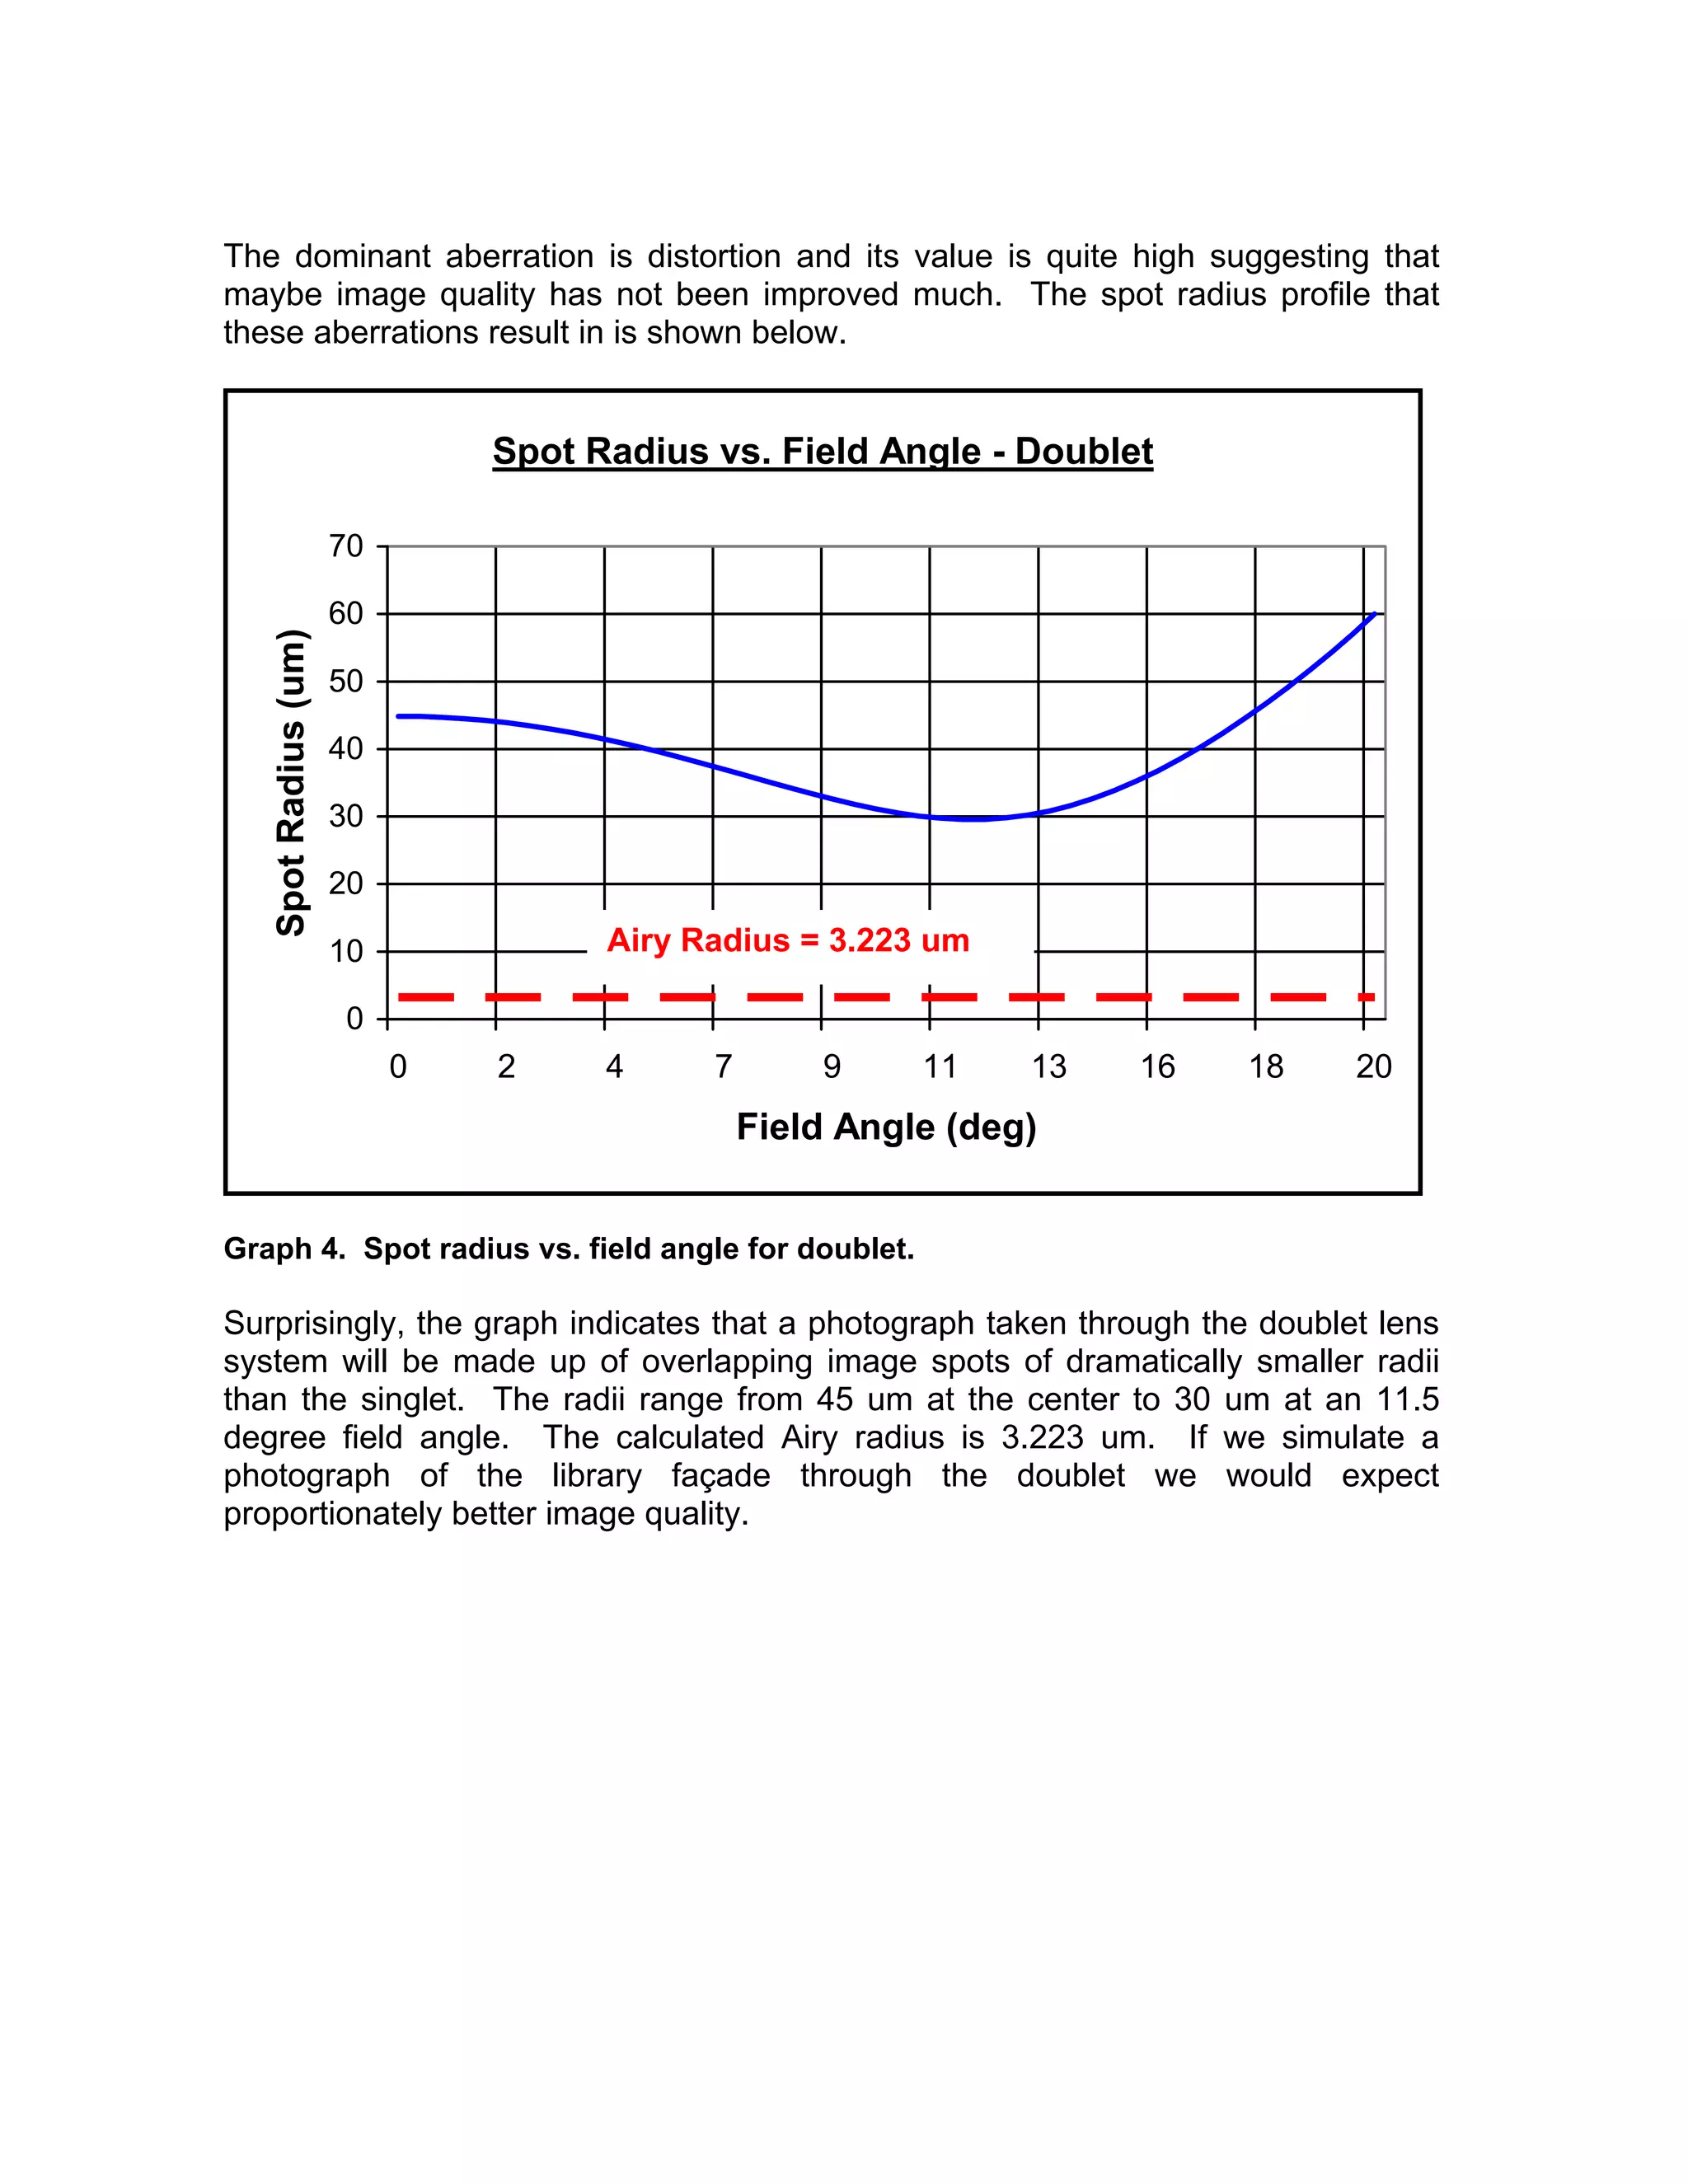
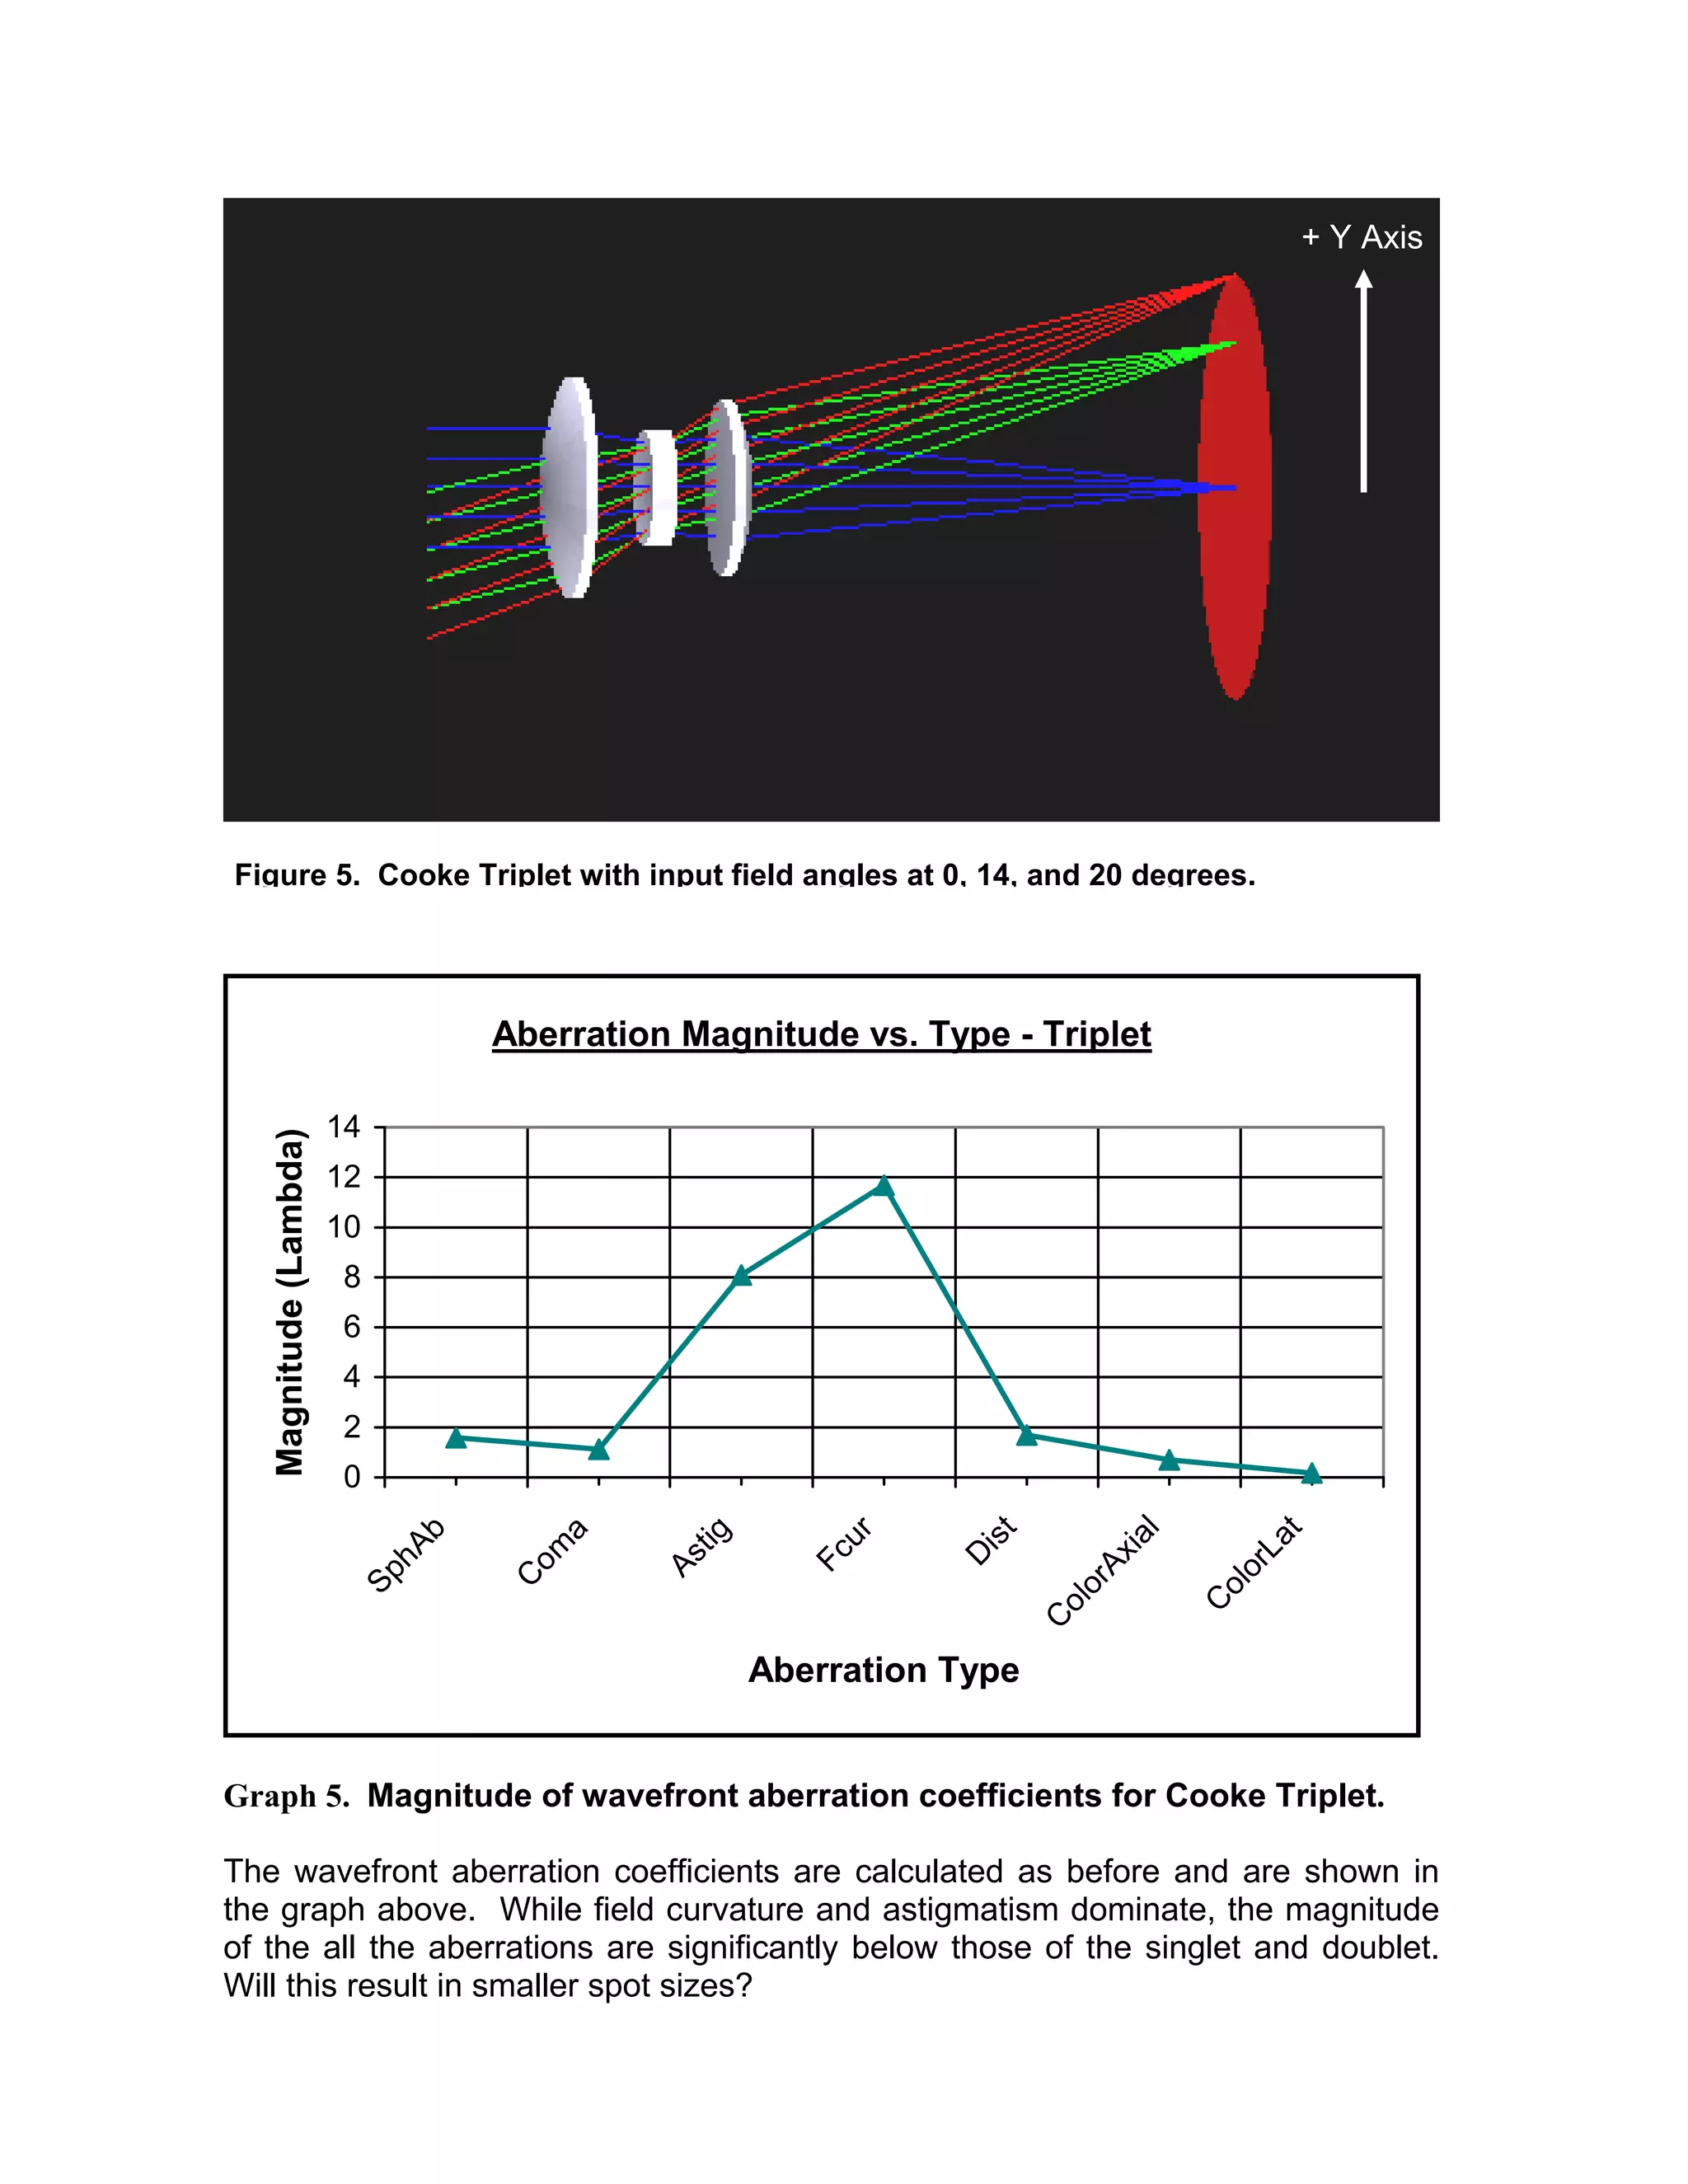
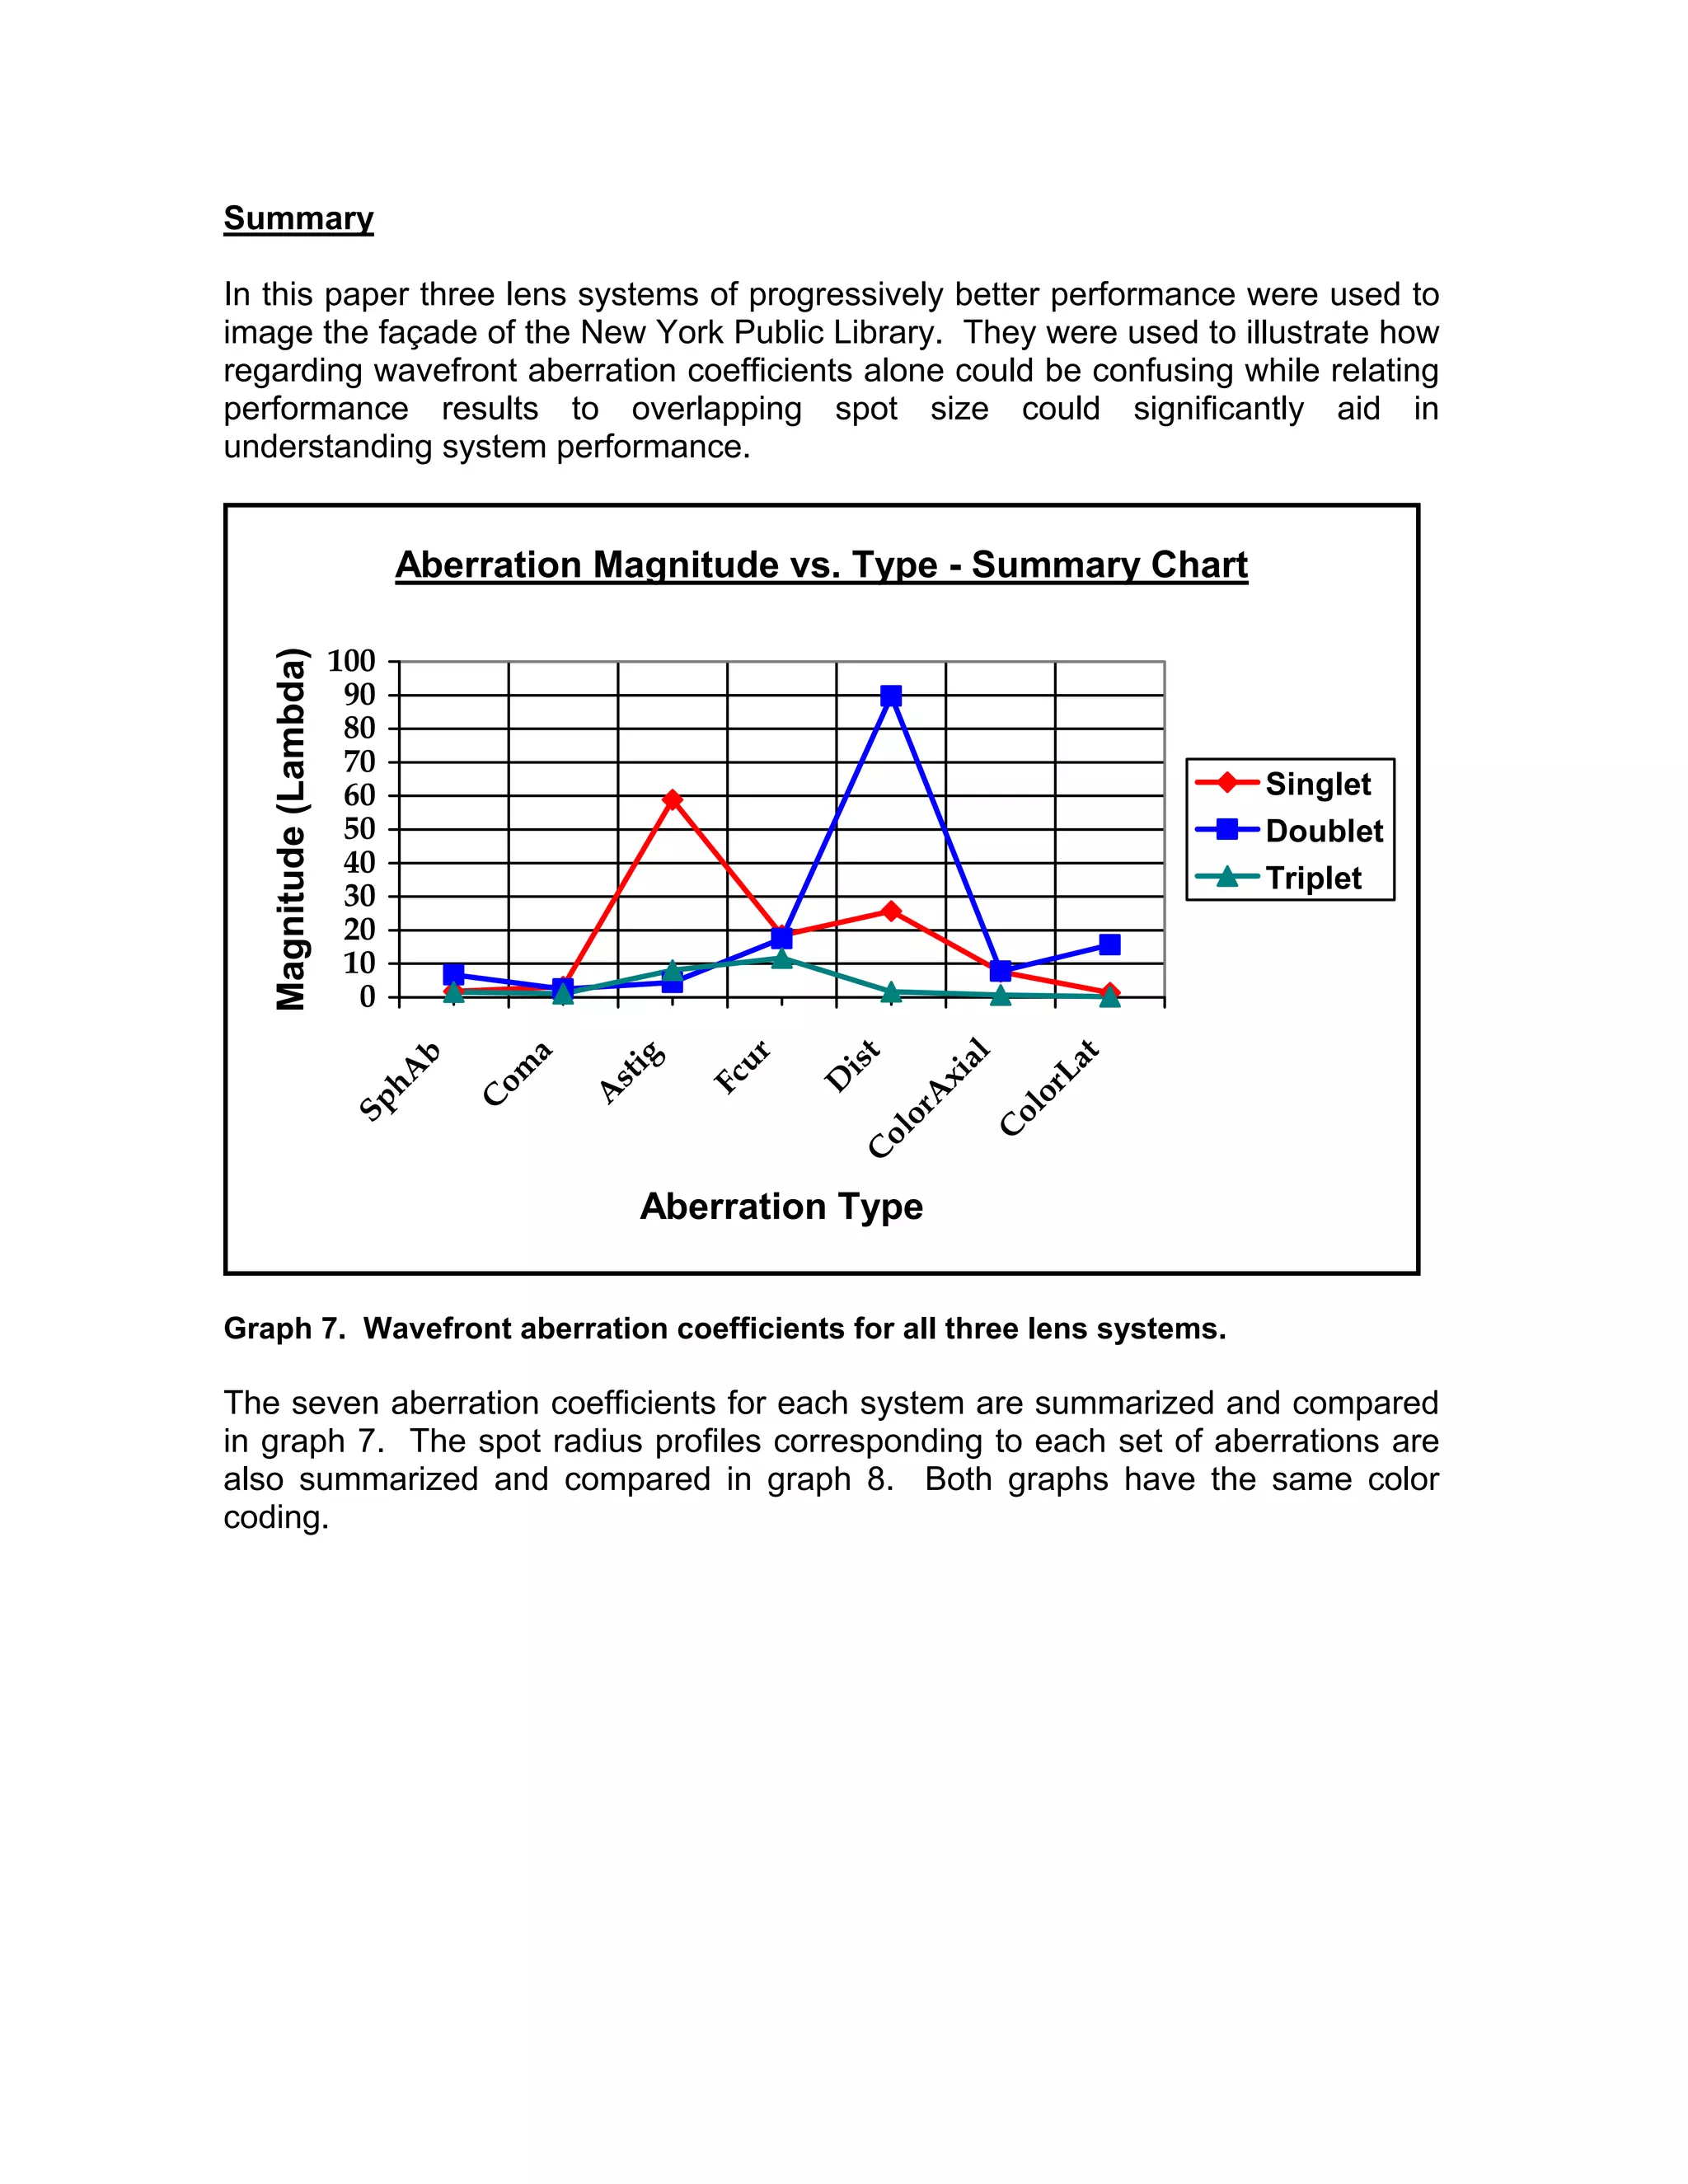
A Simple Technique for Relating Aberration Errors in Lens
Systems to Final Image Quality
K. Peter Dimitrov- Kuhl
President
Optimized Photonic Systems, Inc.
www.ops-photonics.com
Introduction
The design of imaging systems typically requires that an optical specialist select
and then balance lens components to compensate for aberration errors which
degrade image quality. Presentations and reports describing these aberrations are
frequently confusing to non-specialists. Technical reporting needs to quickly
convey information at both the engineering and executive level. This paper
describes a method which relates aberration errors in optical lens elements to
image spot size and then demonstrates how image spot size impacts the resulting
output photographic image quality of an optical system. Use of this image spot
size technique should quickly facilitate understanding of the reported performance
of lens systems particularly to general audiences.
Imaging Basics
Figure 1 is used to illustrate a “perfect” imaging system. The grey disc on the left
is the object to be imaged by the central, idealized optical system onto the red
image plane.
By definition a perfect imaging system translates the diverging rays from a perfect,
infinitesimal point on the object plane to a perfect, infinitesimal focused point on the
image plane. Figure 1 shows a blue fan of rays from the center point on the object
Object Optical
System
Image
Figure 1. The Perfect Imaging System
plane being focused by the idealized lens system onto the center of the image
plane. The green ray fan is shown at the object plane edge but could also
represent the rays from any off–axis point which is also focused to a point on the
image plane. In this perfect imaging system every point on the object plane has a
corresponding, perfect point on the image plane (the image will be inverted). The
image points are true points - they do not overlap.
In the real world imaging is accomplished with combinations of lenses of various
shapes and sizes. Some combinations form better images than others. None are
perfect. They all fail to focus light down into a true point because lens elements
introduce aberrations into the ray fans passing through them. These (wavefront)
aberrations have interesting sounding names:
1. spherical aberration,
2. coma,
3. astigmatism,
4. field curvature,
5. distortion,
6. axial color, and
7. lateral color.
An optical engineer understands these aberrations and speaks of them with
reverence and excitement. Everyone else quickly grows bored and irritated when
forced to listen to reports based on these quantities. They want the bottom line.
Wavefront aberrations do not impress them (I never understood this).
Recall that a perfect imaging system takes an object point and maps it into a
perfect image point. A real system cannot do this due to aberrations. Real image
points are not points at all. They are spots and will have some finite radius. More
importantly, adjacent spots must overlap and therefore result in image degradation.
Relating wavefront aberrations to spot sizes and then demonstrating how
overlapping spots degrade image quality will yield another perspective to better
understand the effects of aberrations in imaging systems.
Technique Outlined
The technique used to correlate aberrations to image quality through spot size
begins at the New York Public Library.
Photograph 1. The New York Public Library taken with a 5 MP digital camera
The library has many architectural features such as long fluted columns,
inscriptions and statuary which cast sharp shadows. Its facade would make an
excellent “object” to test lenses.
For this paper three small and simple camera style lens systems (EFL=50mm, f/5)
will be optimized to image the library facade – they will consist of:
• a single lens (singlet) system,
• a double lens system (doublet) and
• a triple lens system (triplet).
The single lens system will have the worst level of aberration, the doublet will be
better; the triplet will perform the best.
The technique will include:
1. computing wavefront aberration coefficients for each lens system,
2. determining the systems spot radius profile corresponding to these
aberrations;
3. simulating a photograph of the library’s façade taken through the lens
systems and then;
4. relating the image quality of the photograph to the overlapping spot sizes
determined in # 2.
Knowing the effect of overlapping spots on image quality can add valuable intuitive
insight into evaluating imaging systems.
Note that for this exercise the object (library) is essentially at infinity and each point
on the façade emits (to an excellent approximation) a collimated beam at some
angle to the imaging lens. This would be like increasing the radius of our image
disc from figure 1 and pulling it back to infinity. See fig 2 for clarification.
The Singlet
The singlet shown is made of Schott SK16 glass. The lens face curvatures were
optimized by using Zemax’s ability to tailor a lens’ curvature to find the smallest
average spot size for the three field angles used for this example – 0 (blue), 14
(green) and 20 (red) deg.
Image
Figure 2. Object at “infinity” emits parallel rays.
+ Y Axis
The magnitudes of the wavefront aberration coefficients corresponding to each
aberration type are graphed below. Quantities can be negative or positive – for the
purposes of this discussion only magnitudes are plotted.
Aberration Magnitude vs. Type - Singlet
0
10
20
30
40
50
60
70
SphAb
C
om
a
Astig
Fcur
D
ist
C
olorAxial
C
olorLat
Aberration Type
Magnitude(Lambda)
Graph 1. Magnitude of wavefront aberration coefficients for singlet lens.
Unless you are an optics guy you wouldn’t know if this was good or bad (it’s bad!).
For the aberrations graphed above we can determine how the image spot radius
varies as a function of field angle along the + Y axis of the image plane.
Figure 3. Singlet with input field angles at 0, 14, and 20 degrees.
+Y Axis
Spot Radius vs. Field Angle - Singlet
0
50
100
150
200
250
300
350
400
0 2 4 7 9 11 13 16 18 20
+ Y Field Angle (deg)
SpotRadius(um)
Graph 2. Spot radius vs. field angle for singlet lens.
It is the wave nature of light that dictates the limit of how small the spot radius can
be. This limit is known as the Airy radius and for this singlet its value is 3.343 um.
The spot radii at the center of this lens are almost 100 X the Airy radius limit! The
spot radius reduces to about 110 um around 13 degrees but still remains very
large when compared to the Airy radius.
This graph indicates that the image formed by the singlet will consist of large
overlapping spots.
This doesn’t sound good at all. We simulate a photograph taken through the
singlet to determine what this means visually.
Photograph 2. Library imaged with singlet. Center image spot size approximately
300 um.
The photograph obtained through the singlet indicates a highly degraded image of
the library’s façade. The highest degree of degradation exists in the center of the
photograph. The dominant aberrations are astigmatism followed by distortion and
field curvature. These aberrations result in a central region which is formed by
overlapping spots 100 times larger than the theoretical limit.
Note that the graph for spot radius vs. field angle for the singlet indicates that the
spot radius decreases from 300 um to 110 um at a field angle of 13 degrees. This
corresponds to the region of the photograph indicated by the red arrows. While the
fluted columns in the center of the photo (300 um spots) show no detail the
columns at 13 deg begin to show some. This is directly related to the smaller radii
of the overlapping image spots.
By translating aberration coefficients to the idea of overlapping image spots on a
photograph we can visually analyze, it becomes possible to gain greater insight
into how aberrations affect the quality of an image.
The Doublet
The doublet system is illustrated above. After optimization the wavefront
aberration coefficients were calculated and are shown in the graph below.
Aberration Magnitude vs. Type - Doublet
0
10
20
30
40
50
60
70
80
90
100
SphAb
C
om
a
Astig
Fcur
D
ist
C
olorAxial
C
olorLat
Aberration Type
Magnitude(Lambda)
Graph 3. Magnitude of wavefront aberration coefficients for doublet.
Figure 4. Doublet with input field angles at 0, 14, and 20 degrees.
+ Y Axis
The dominant aberration is distortion and its value is quite high suggesting that
maybe image quality has not been improved much. The spot radius profile that
these aberrations result in is shown below.
Spot Radius vs. Field Angle - Doublet
0
10
20
30
40
50
60
70
0 2 4 7 9 11 13 16 18 20
Field Angle (deg)
SpotRadius(um)
Graph 4. Spot radius vs. field angle for doublet.
Surprisingly, the graph indicates that a photograph taken through the doublet lens
system will be made up of overlapping image spots of dramatically smaller radii
than the singlet. The radii range from 45 um at the center to 30 um at an 11.5
degree field angle. The calculated Airy radius is 3.223 um. If we simulate a
photograph of the library façade through the doublet we would expect
proportionately better image quality.
Airy Radius = 3.223 um
Photograph 3. Library imaged with doublet. Center spot size 45 um.
When we regard the photograph simulated through the doublet we are not
disappointed. The image quality is much improved over that of the singlet – clearly
adding another lens made a significant difference although the high level of
distortion might suggest otherwise. The fluted columns are recognizable and the
larger inscriptions can be read.
Note that the functional dependence of the spot radius with field angle is similar to
that of the singlet. The central region spot radius is greater than that of the field
angle of about 11.5 degrees. However the difference in spot radii is not nearly so
great so the effect on the image is not as pronounced.
While the improvement is obvious we also observe that details in the photo look
blurred and indistinct. This is not a lens configuration which would satisfy
photographic requirements.
The Triplet
For our final example we will add a third lens made of a different glass in between
the elements of our doublet and then optimize as before. This is a classic design
referred to as a Cooke Triplet and is known to deliver good performance.
Aberration Magnitude vs. Type - Triplet
0
2
4
6
8
10
12
14
SphAb
C
om
a
Astig
Fcur
D
ist
C
olorAxial
C
olorLat
Aberration Type
Magnitude(Lambda)
Graph 5. Magnitude of wavefront aberration coefficients for Cooke Triplet.
The wavefront aberration coefficients are calculated as before and are shown in
the graph above. While field curvature and astigmatism dominate, the magnitude
of the all the aberrations are significantly below those of the singlet and doublet.
Will this result in smaller spot sizes?
Figure 5. Cooke Triplet with input field angles at 0, 14, and 20 degrees.
+ Y Axis
Spot Radius vs. Field Angle - Triplet
0
2.5
5
7.5
10
12.5
15
17.5
0 2 4 7 9 11 13 16 18 20
Field Angle (deg)
SpotRadius(um)
Graph 6. Spot radius vs. field angle for Cooke Triplet.
The spot radius vs. field angle result determined for these degrees of aberration
reveals another dramatic improvement. Spot radii at the center of the image are
only 4 um while at higher angles they increase to about 15 um. The Airy radius
calculated for the triplet is 3.34 um. The center of the photograph consists of
overlapping spots very close to the physical limit of the lens system!
Airy Radius = 3.34 um
Photograph 4. Library imaged with Cooke Triplet. Center spot size is 4 um.
The simulated photograph of the library façade indicates that we have arrived at a
lens system which delivers photographic quality. All features are sharp and clear
and for our purposes are satisfactory. It is important to relate the image to
overlapping spot size and to recognize that it is built up of overlapping image spots
ranging in radii from 4 um to 15 um - close to the Airy radius (diffraction limit) of
3.34 um.
Further improvement would include adding more lens elements and optimizing to
flatten the spot radius vs. field angle curve and reduce the overlapping image spot
sizes at higher viewing angles.
Summary
In this paper three lens systems of progressively better performance were used to
image the façade of the New York Public Library. They were used to illustrate how
regarding wavefront aberration coefficients alone could be confusing while relating
performance results to overlapping spot size could significantly aid in
understanding system performance.
Aberration Magnitude vs. Type - Summary Chart
0
10
20
30
40
50
60
70
80
90
100
SphA
b
C
om
a
A
stig
Fcur
D
istC
olorA
xial
C
olorLat
Aberration Type
Magnitude(Lambda)
Singlet
Doublet
Triplet
Graph 7. Wavefront aberration coefficients for all three lens systems.
The seven aberration coefficients for each system are summarized and compared
in graph 7. The spot radius profiles corresponding to each set of aberrations are
also summarized and compared in graph 8. Both graphs have the same color
coding.
Spot Radius vs. Field Angle - Summary Chart
0
50
100
150
200
250
300
350
400
0 2 4 7 9 11 13 16 18 20
Field Angle (deg)
SpotRadius(um)
Singlet
Doublet
Triplet
Graph 8. Comparison of spot radius vs. field angle for all three lens systems.
Through visual comparison it has been verified that smaller image spots result in
higher quality images and it has become possible to attach numbers onto what
acceptable could mean (central spot radii of 300 um to 45 um to 4 um).
When we compare aberration curves to their corresponding spot radii we
encounter what a non-specialist might consider an anomaly. The aberration
distributions for both the singlet and doublet lens systems suggest that lens
performance may be about equivalent but the spot radius vs. field angle data
reveals that the doublet has much smaller spot radii and therefore much better
optical performance than the singlet. This would seem counter-intuitive when we
consider the magnitude of distortion for the doublet and could confuse someone
unfamiliar with the nature of optical aberrations.
Using spot radius profiles and the concept of overlapping imaging spots can now
be seen as an important tool to augment the description of the performance of an
optical system and would be particularly useful when reporting optical results to a
general audience.

Aberration_Errors

  • 1.
    A Simple Techniquefor Relating Aberration Errors in Lens Systems to Final Image Quality K. Peter Dimitrov- Kuhl President Optimized Photonic Systems, Inc. www.ops-photonics.com Introduction The design of imaging systems typically requires that an optical specialist select and then balance lens components to compensate for aberration errors which degrade image quality. Presentations and reports describing these aberrations are frequently confusing to non-specialists. Technical reporting needs to quickly convey information at both the engineering and executive level. This paper describes a method which relates aberration errors in optical lens elements to image spot size and then demonstrates how image spot size impacts the resulting output photographic image quality of an optical system. Use of this image spot size technique should quickly facilitate understanding of the reported performance of lens systems particularly to general audiences. Imaging Basics Figure 1 is used to illustrate a “perfect” imaging system. The grey disc on the left is the object to be imaged by the central, idealized optical system onto the red image plane. By definition a perfect imaging system translates the diverging rays from a perfect, infinitesimal point on the object plane to a perfect, infinitesimal focused point on the image plane. Figure 1 shows a blue fan of rays from the center point on the object Object Optical System Image Figure 1. The Perfect Imaging System
  • 2.
    plane being focusedby the idealized lens system onto the center of the image plane. The green ray fan is shown at the object plane edge but could also represent the rays from any off–axis point which is also focused to a point on the image plane. In this perfect imaging system every point on the object plane has a corresponding, perfect point on the image plane (the image will be inverted). The image points are true points - they do not overlap. In the real world imaging is accomplished with combinations of lenses of various shapes and sizes. Some combinations form better images than others. None are perfect. They all fail to focus light down into a true point because lens elements introduce aberrations into the ray fans passing through them. These (wavefront) aberrations have interesting sounding names: 1. spherical aberration, 2. coma, 3. astigmatism, 4. field curvature, 5. distortion, 6. axial color, and 7. lateral color. An optical engineer understands these aberrations and speaks of them with reverence and excitement. Everyone else quickly grows bored and irritated when forced to listen to reports based on these quantities. They want the bottom line. Wavefront aberrations do not impress them (I never understood this). Recall that a perfect imaging system takes an object point and maps it into a perfect image point. A real system cannot do this due to aberrations. Real image points are not points at all. They are spots and will have some finite radius. More importantly, adjacent spots must overlap and therefore result in image degradation. Relating wavefront aberrations to spot sizes and then demonstrating how overlapping spots degrade image quality will yield another perspective to better understand the effects of aberrations in imaging systems. Technique Outlined The technique used to correlate aberrations to image quality through spot size begins at the New York Public Library.
  • 3.
    Photograph 1. TheNew York Public Library taken with a 5 MP digital camera The library has many architectural features such as long fluted columns, inscriptions and statuary which cast sharp shadows. Its facade would make an excellent “object” to test lenses. For this paper three small and simple camera style lens systems (EFL=50mm, f/5) will be optimized to image the library facade – they will consist of: • a single lens (singlet) system, • a double lens system (doublet) and • a triple lens system (triplet). The single lens system will have the worst level of aberration, the doublet will be better; the triplet will perform the best. The technique will include: 1. computing wavefront aberration coefficients for each lens system, 2. determining the systems spot radius profile corresponding to these aberrations;
  • 4.
    3. simulating aphotograph of the library’s façade taken through the lens systems and then; 4. relating the image quality of the photograph to the overlapping spot sizes determined in # 2. Knowing the effect of overlapping spots on image quality can add valuable intuitive insight into evaluating imaging systems. Note that for this exercise the object (library) is essentially at infinity and each point on the façade emits (to an excellent approximation) a collimated beam at some angle to the imaging lens. This would be like increasing the radius of our image disc from figure 1 and pulling it back to infinity. See fig 2 for clarification. The Singlet The singlet shown is made of Schott SK16 glass. The lens face curvatures were optimized by using Zemax’s ability to tailor a lens’ curvature to find the smallest average spot size for the three field angles used for this example – 0 (blue), 14 (green) and 20 (red) deg. Image Figure 2. Object at “infinity” emits parallel rays. + Y Axis
  • 5.
    The magnitudes ofthe wavefront aberration coefficients corresponding to each aberration type are graphed below. Quantities can be negative or positive – for the purposes of this discussion only magnitudes are plotted. Aberration Magnitude vs. Type - Singlet 0 10 20 30 40 50 60 70 SphAb C om a Astig Fcur D ist C olorAxial C olorLat Aberration Type Magnitude(Lambda) Graph 1. Magnitude of wavefront aberration coefficients for singlet lens. Unless you are an optics guy you wouldn’t know if this was good or bad (it’s bad!). For the aberrations graphed above we can determine how the image spot radius varies as a function of field angle along the + Y axis of the image plane. Figure 3. Singlet with input field angles at 0, 14, and 20 degrees. +Y Axis
  • 6.
    Spot Radius vs.Field Angle - Singlet 0 50 100 150 200 250 300 350 400 0 2 4 7 9 11 13 16 18 20 + Y Field Angle (deg) SpotRadius(um) Graph 2. Spot radius vs. field angle for singlet lens. It is the wave nature of light that dictates the limit of how small the spot radius can be. This limit is known as the Airy radius and for this singlet its value is 3.343 um. The spot radii at the center of this lens are almost 100 X the Airy radius limit! The spot radius reduces to about 110 um around 13 degrees but still remains very large when compared to the Airy radius. This graph indicates that the image formed by the singlet will consist of large overlapping spots. This doesn’t sound good at all. We simulate a photograph taken through the singlet to determine what this means visually.
  • 7.
    Photograph 2. Libraryimaged with singlet. Center image spot size approximately 300 um. The photograph obtained through the singlet indicates a highly degraded image of the library’s façade. The highest degree of degradation exists in the center of the photograph. The dominant aberrations are astigmatism followed by distortion and field curvature. These aberrations result in a central region which is formed by overlapping spots 100 times larger than the theoretical limit. Note that the graph for spot radius vs. field angle for the singlet indicates that the spot radius decreases from 300 um to 110 um at a field angle of 13 degrees. This corresponds to the region of the photograph indicated by the red arrows. While the fluted columns in the center of the photo (300 um spots) show no detail the columns at 13 deg begin to show some. This is directly related to the smaller radii of the overlapping image spots. By translating aberration coefficients to the idea of overlapping image spots on a photograph we can visually analyze, it becomes possible to gain greater insight into how aberrations affect the quality of an image.
  • 8.
    The Doublet The doubletsystem is illustrated above. After optimization the wavefront aberration coefficients were calculated and are shown in the graph below. Aberration Magnitude vs. Type - Doublet 0 10 20 30 40 50 60 70 80 90 100 SphAb C om a Astig Fcur D ist C olorAxial C olorLat Aberration Type Magnitude(Lambda) Graph 3. Magnitude of wavefront aberration coefficients for doublet. Figure 4. Doublet with input field angles at 0, 14, and 20 degrees. + Y Axis
  • 9.
    The dominant aberrationis distortion and its value is quite high suggesting that maybe image quality has not been improved much. The spot radius profile that these aberrations result in is shown below. Spot Radius vs. Field Angle - Doublet 0 10 20 30 40 50 60 70 0 2 4 7 9 11 13 16 18 20 Field Angle (deg) SpotRadius(um) Graph 4. Spot radius vs. field angle for doublet. Surprisingly, the graph indicates that a photograph taken through the doublet lens system will be made up of overlapping image spots of dramatically smaller radii than the singlet. The radii range from 45 um at the center to 30 um at an 11.5 degree field angle. The calculated Airy radius is 3.223 um. If we simulate a photograph of the library façade through the doublet we would expect proportionately better image quality. Airy Radius = 3.223 um
  • 10.
    Photograph 3. Libraryimaged with doublet. Center spot size 45 um. When we regard the photograph simulated through the doublet we are not disappointed. The image quality is much improved over that of the singlet – clearly adding another lens made a significant difference although the high level of distortion might suggest otherwise. The fluted columns are recognizable and the larger inscriptions can be read. Note that the functional dependence of the spot radius with field angle is similar to that of the singlet. The central region spot radius is greater than that of the field angle of about 11.5 degrees. However the difference in spot radii is not nearly so great so the effect on the image is not as pronounced. While the improvement is obvious we also observe that details in the photo look blurred and indistinct. This is not a lens configuration which would satisfy photographic requirements. The Triplet For our final example we will add a third lens made of a different glass in between the elements of our doublet and then optimize as before. This is a classic design referred to as a Cooke Triplet and is known to deliver good performance.
  • 11.
    Aberration Magnitude vs.Type - Triplet 0 2 4 6 8 10 12 14 SphAb C om a Astig Fcur D ist C olorAxial C olorLat Aberration Type Magnitude(Lambda) Graph 5. Magnitude of wavefront aberration coefficients for Cooke Triplet. The wavefront aberration coefficients are calculated as before and are shown in the graph above. While field curvature and astigmatism dominate, the magnitude of the all the aberrations are significantly below those of the singlet and doublet. Will this result in smaller spot sizes? Figure 5. Cooke Triplet with input field angles at 0, 14, and 20 degrees. + Y Axis
  • 12.
    Spot Radius vs.Field Angle - Triplet 0 2.5 5 7.5 10 12.5 15 17.5 0 2 4 7 9 11 13 16 18 20 Field Angle (deg) SpotRadius(um) Graph 6. Spot radius vs. field angle for Cooke Triplet. The spot radius vs. field angle result determined for these degrees of aberration reveals another dramatic improvement. Spot radii at the center of the image are only 4 um while at higher angles they increase to about 15 um. The Airy radius calculated for the triplet is 3.34 um. The center of the photograph consists of overlapping spots very close to the physical limit of the lens system! Airy Radius = 3.34 um
  • 13.
    Photograph 4. Libraryimaged with Cooke Triplet. Center spot size is 4 um. The simulated photograph of the library façade indicates that we have arrived at a lens system which delivers photographic quality. All features are sharp and clear and for our purposes are satisfactory. It is important to relate the image to overlapping spot size and to recognize that it is built up of overlapping image spots ranging in radii from 4 um to 15 um - close to the Airy radius (diffraction limit) of 3.34 um. Further improvement would include adding more lens elements and optimizing to flatten the spot radius vs. field angle curve and reduce the overlapping image spot sizes at higher viewing angles.
  • 14.
    Summary In this paperthree lens systems of progressively better performance were used to image the façade of the New York Public Library. They were used to illustrate how regarding wavefront aberration coefficients alone could be confusing while relating performance results to overlapping spot size could significantly aid in understanding system performance. Aberration Magnitude vs. Type - Summary Chart 0 10 20 30 40 50 60 70 80 90 100 SphA b C om a A stig Fcur D istC olorA xial C olorLat Aberration Type Magnitude(Lambda) Singlet Doublet Triplet Graph 7. Wavefront aberration coefficients for all three lens systems. The seven aberration coefficients for each system are summarized and compared in graph 7. The spot radius profiles corresponding to each set of aberrations are also summarized and compared in graph 8. Both graphs have the same color coding.
  • 15.
    Spot Radius vs.Field Angle - Summary Chart 0 50 100 150 200 250 300 350 400 0 2 4 7 9 11 13 16 18 20 Field Angle (deg) SpotRadius(um) Singlet Doublet Triplet Graph 8. Comparison of spot radius vs. field angle for all three lens systems. Through visual comparison it has been verified that smaller image spots result in higher quality images and it has become possible to attach numbers onto what acceptable could mean (central spot radii of 300 um to 45 um to 4 um). When we compare aberration curves to their corresponding spot radii we encounter what a non-specialist might consider an anomaly. The aberration distributions for both the singlet and doublet lens systems suggest that lens performance may be about equivalent but the spot radius vs. field angle data reveals that the doublet has much smaller spot radii and therefore much better optical performance than the singlet. This would seem counter-intuitive when we consider the magnitude of distortion for the doublet and could confuse someone unfamiliar with the nature of optical aberrations. Using spot radius profiles and the concept of overlapping imaging spots can now be seen as an important tool to augment the description of the performance of an optical system and would be particularly useful when reporting optical results to a general audience.