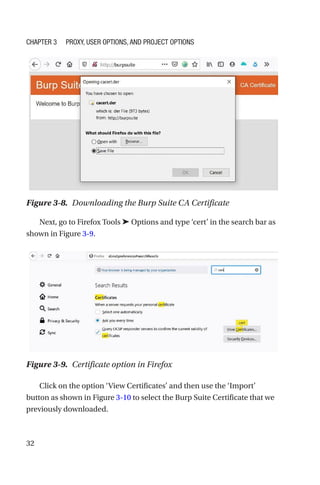
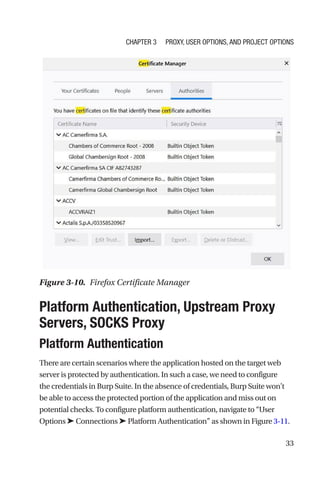
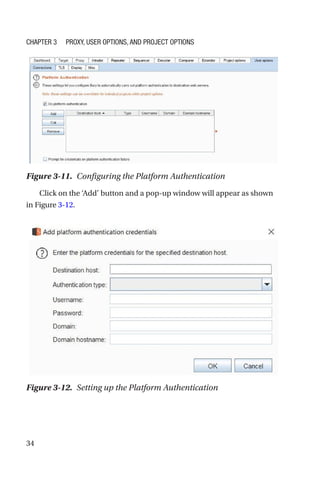
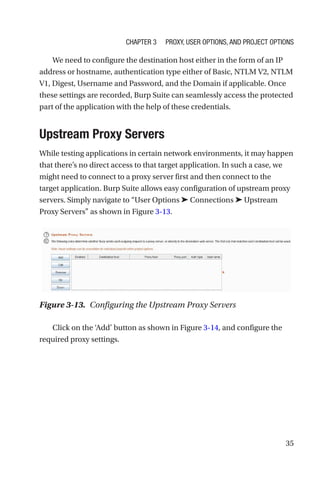
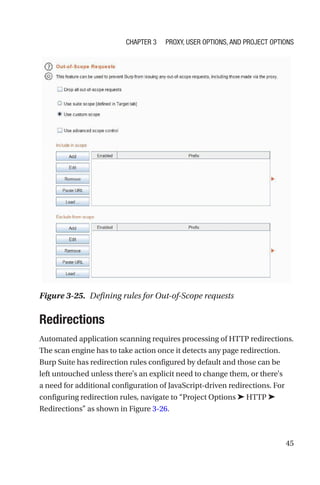
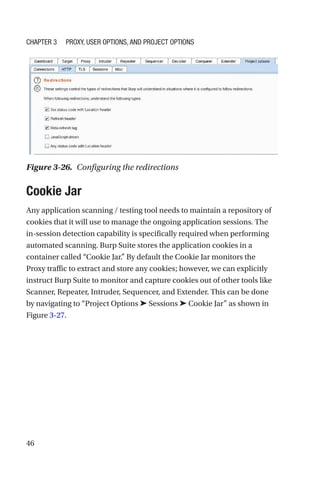
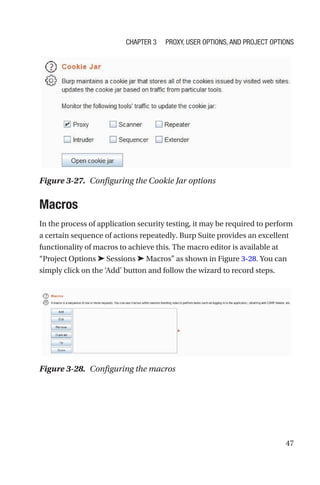
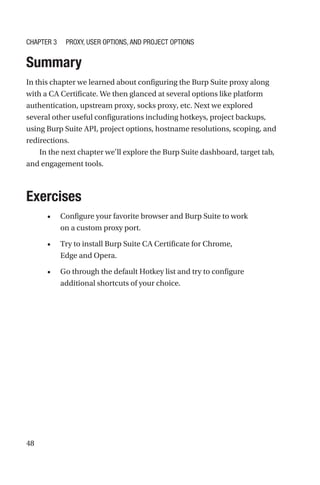
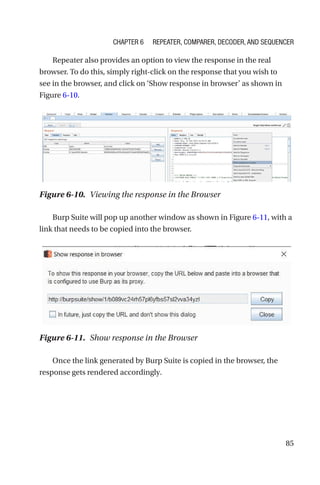
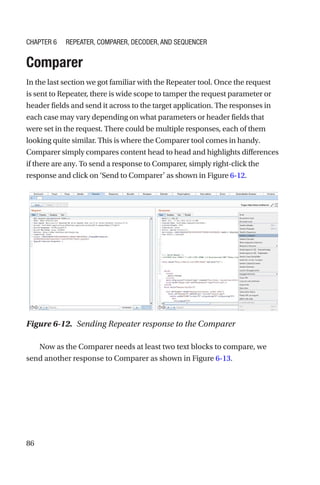
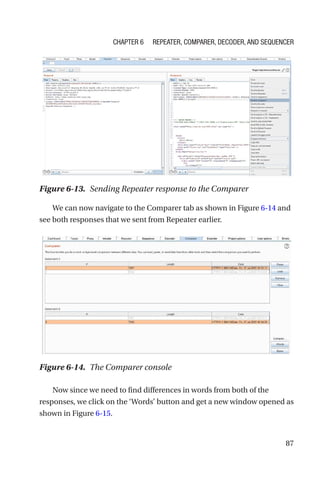
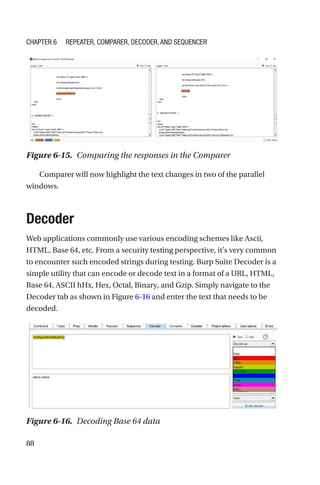
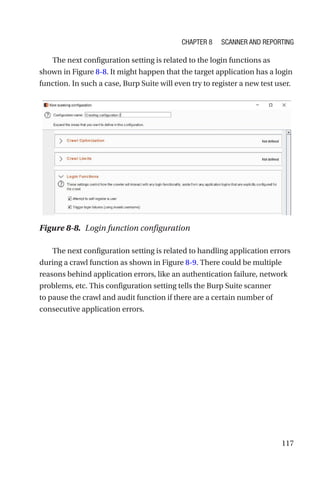
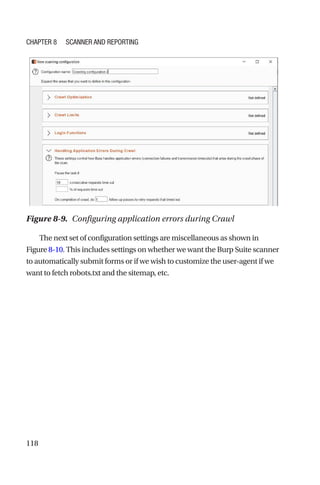
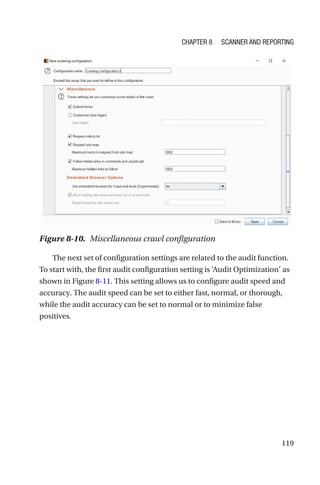
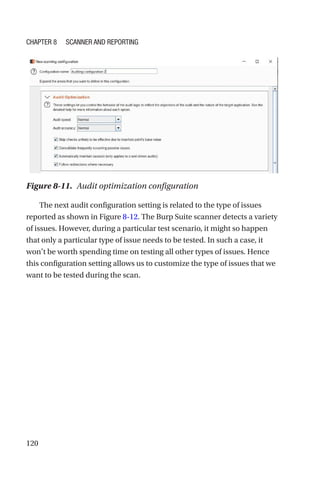
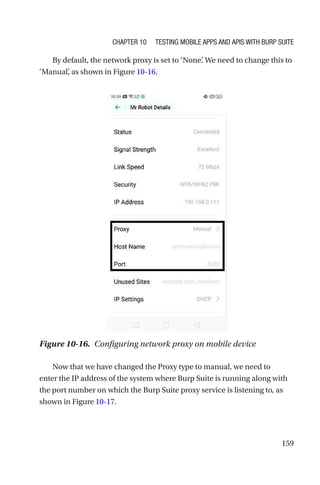
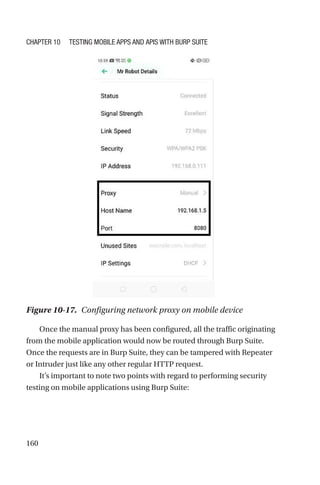
A Complete
Guide to
Burp Suite
Learn to Detect Application
Vulnerabilities
—
Sagar Rahalkar
A Complete Guide to
Burp Suite
Learn to Detect Application
Vulnerabilities
Sagar Rahalkar
A Complete Guide to Burp Suite
ISBN-13 (pbk): 978-1-4842-6401-0		 ISBN-13 (electronic): 978-1-4842-6402-7
https://doi.org/10.1007/978-1-4842-6402-7
Copyright © 2021 by Sagar Rahalkar
This work is subject to copyright. All rights are reserved by the Publisher, whether the whole or
part of the material is concerned, specifically the rights of translation, reprinting, reuse of
illustrations, recitation, broadcasting, reproduction on microfilms or in any other physical way,
and transmission or information storage and retrieval, electronic adaptation, computer software,
or by similar or dissimilar methodology now known or hereafter developed.
Trademarked names, logos, and images may appear in this book. Rather than use a trademark
symbol with every occurrence of a trademarked name, logo, or image we use the names, logos,
and images only in an editorial fashion and to the benefit of the trademark owner, with no
intention of infringement of the trademark.
The use in this publication of trade names, trademarks, service marks, and similar terms, even if
they are not identified as such, is not to be taken as an expression of opinion as to whether or not
they are subject to proprietary rights.
While the advice and information in this book are believed to be true and accurate at the date of
publication, neither the authors nor the editors nor the publisher can accept any legal
responsibility for any errors or omissions that may be made. The publisher makes no warranty,
express or implied, with respect to the material contained herein.
Managing Director, Apress Media LLC: Welmoed Spahr
Acquisitions Editor: Divya Modi
Development Editor: Laura Berendson
Coordinating Editor: Divya Modi
Cover designed by eStudioCalamar
Cover image designed by Pixabay
Distributed to the book trade worldwide by Springer Science+Business Media New York,
1 New York Plaza, Suite 4600, New York, NY 10004-1562, USA. Phone 1-800-SPRINGER, fax (201)
348-4505, e-mail orders-ny@springer-sbm.com, or visit www.springeronline.com. Apress Media,
LLC is a California LLC and the sole member (owner) is Springer Science + Business Media
Finance Inc (SSBM Finance Inc). SSBM Finance Inc is a Delaware corporation.
For information on translations, please e-mail booktranslations@springernature.com; for
reprint, paperback, or audio rights, please e-mail bookpermissions@springernature.com.
Apress titles may be purchased in bulk for academic, corporate, or promotional use. eBook
versions and licenses are also available for most titles. For more information, reference our Print
and eBook Bulk Sales web page at http://www.apress.com/bulk-sales.
Any source code or other supplementary material referenced by the author in this book is available
to readers on GitHub via the book’s product page, located at www.apress.com/978-1-4842-6401-0.
For more detailed information, please visit http://www.apress.com/source-code.
Printed on acid-free paper
Sagar Rahalkar
Pune, Maharashtra, India
iii
About the Author���������������������������������������������������������������������������������ix
About the Technical Reviewer�������������������������������������������������������������xi
Introduction���������������������������������������������������������������������������������������xiii
Chapter 1: 
Introduction to Burp Suite���������������������������������������������������1
Some Basics of Application Security��������������������������������������������������������������������1
A Brief Introduction to Burp Suite�������������������������������������������������������������������������5
Need for Burp Suite�����������������������������������������������������������������������������������������������6
Editions�����������������������������������������������������������������������������������������������������������������6
Burp Suite Alternatives�����������������������������������������������������������������������������������������8
High-Level Feature Overview��������������������������������������������������������������������������������9
Summary������������������������������������������������������������������������������������������������������������10
Exercises�������������������������������������������������������������������������������������������������������������10
Chapter 2: 
Setting Up the Environment����������������������������������������������11
Burp Suite Installation�����������������������������������������������������������������������������������������11
Setting Up Vulnerable Target Web Application����������������������������������������������������14
Configuring the Browser�������������������������������������������������������������������������������������15
Firefox�����������������������������������������������������������������������������������������������������������17
Chrome����������������������������������������������������������������������������������������������������������19
Edge��������������������������������������������������������������������������������������������������������������21
Opera�������������������������������������������������������������������������������������������������������������22
Table of Contents
iv
Summary������������������������������������������������������������������������������������������������������������25
Exercises�������������������������������������������������������������������������������������������������������������26
Chapter 3: 
Proxy, User Options, and Project Options��������������������������27
Proxy�������������������������������������������������������������������������������������������������������������������27
Burp Suite CA Certificate������������������������������������������������������������������������������������31
Platform Authentication, Upstream Proxy Servers, SOCKS Proxy�����������������������33
Platform Authentication���������������������������������������������������������������������������������33
Upstream Proxy Servers��������������������������������������������������������������������������������35
SOCKS Proxy��������������������������������������������������������������������������������������������������36
Hotkeys���������������������������������������������������������������������������������������������������������������37
Project Backups��������������������������������������������������������������������������������������������������39
Rest API���������������������������������������������������������������������������������������������������������������39
Performance Feedback���������������������������������������������������������������������������������������41
Project Options����������������������������������������������������������������������������������������������������41
Timeouts��������������������������������������������������������������������������������������������������������42
Hostname Resolutions�����������������������������������������������������������������������������������42
Out-of-Scope Requests���������������������������������������������������������������������������������44
Redirections��������������������������������������������������������������������������������������������������45
Cookie Jar������������������������������������������������������������������������������������������������������46
Macros�����������������������������������������������������������������������������������������������������������47
Summary������������������������������������������������������������������������������������������������������������48
Exercises�������������������������������������������������������������������������������������������������������������48
Table of Contents
v
Chapter 4: 
Dashboard, Target, and Engagement Tools�����������������������49
Dashboard�����������������������������������������������������������������������������������������������������������49
Target Tab������������������������������������������������������������������������������������������������������������53
Engagement Tools�����������������������������������������������������������������������������������������������58
Summary������������������������������������������������������������������������������������������������������������65
Exercises�������������������������������������������������������������������������������������������������������������65
Chapter 5: Intruder�����������������������������������������������������������������������������67
Introduction to Intruder���������������������������������������������������������������������������������������67
Target Tab������������������������������������������������������������������������������������������������������������69
Positions�������������������������������������������������������������������������������������������������������������69
Payloads��������������������������������������������������������������������������������������������������������������73
Options����������������������������������������������������������������������������������������������������������������76
Summary������������������������������������������������������������������������������������������������������������77
Exercises�������������������������������������������������������������������������������������������������������������78
Chapter 6: 
Repeater, Comparer, Decoder, and Sequencer������������������79
Repeater�������������������������������������������������������������������������������������������������������������79
Comparer������������������������������������������������������������������������������������������������������������86
Decoder���������������������������������������������������������������������������������������������������������������88
Sequencer�����������������������������������������������������������������������������������������������������������89
Summary������������������������������������������������������������������������������������������������������������92
Exercises�������������������������������������������������������������������������������������������������������������93
Table of Contents
vi
Chapter 7: Infiltrator, Collaborator, Clickbandit, and CSRF PoC
Generator��������������������������������������������������������������������������������������������95
Infiltrator�������������������������������������������������������������������������������������������������������������95
Collaborator��������������������������������������������������������������������������������������������������������99
Clickbandit��������������������������������������������������������������������������������������������������������101
CSRF�����������������������������������������������������������������������������������������������������������������106
Summary����������������������������������������������������������������������������������������������������������109
Exercises�����������������������������������������������������������������������������������������������������������110
Chapter 8: 
Scanner and Reporting���������������������������������������������������111
Scan Types��������������������������������������������������������������������������������������������������������111
Crawl and Audit�������������������������������������������������������������������������������������������������112
Scan Configuration��������������������������������������������������������������������������������������������115
Application Login����������������������������������������������������������������������������������������������123
Resource Pools�������������������������������������������������������������������������������������������������124
Reporting����������������������������������������������������������������������������������������������������������125
Summary����������������������������������������������������������������������������������������������������������130
Exercises�����������������������������������������������������������������������������������������������������������130
Chapter 9: 
Extending Burp Suite������������������������������������������������������131
Burp Suite Extensions���������������������������������������������������������������������������������������131
BApp Store��������������������������������������������������������������������������������������������������������132
Manual Installation��������������������������������������������������������������������������������������������136
Settings�������������������������������������������������������������������������������������������������������������140
Other Useful Extensions������������������������������������������������������������������������������������142
APIs�������������������������������������������������������������������������������������������������������������������143
Table of Contents
vii
Summary����������������������������������������������������������������������������������������������������������144
Exercises�����������������������������������������������������������������������������������������������������������145
Chapter 10: 
Testing Mobile Apps and APIs with Burp Suite�������������147
API Security Testing with Burp Suite�����������������������������������������������������������������147
Mobile Application Security Testing with Burp Suite����������������������������������������155
Security Testing Workflow with Burp Suite�������������������������������������������������������161
Summary����������������������������������������������������������������������������������������������������������164
Exercises�����������������������������������������������������������������������������������������������������������164
Index�������������������������������������������������������������������������������������������������165
Table of Contents
ix
About the Author
Sagar Rahalkar is a seasoned information security professional with more
than 13 years of experience in various verticals of information security.
His domain expertise is mainly in AppsSec, cybercrime investigations,
vulnerability assessments, penetration testing, and IT GRC. He holds a
master’s degree in computer science and several industry-recognized
certifications such as CISM, ISO 27001LA, and ECSA. He has been closely
associated with Indian law enforcement agencies for more than three
years, dealing with digital crime investigations and related training, and
he has received awards from senior officials of the police and defense
organizations in India. He is also an author and reviewer for several
publications.
xi
About the Technical Reviewer
Parag Patil (www.linkedin.com/in/
paragpatil2006) is an information security
professional currently associated with Coupa
Managing Security for the SaaS platform.
For more than the last 12 years, Parag
has worked extensively on digital forensics,
IAM, security monitoring/SecOps, security
trainings, security compliance audits,
vulnerability management, penetration
testing, information security research, and ISMS/governance. He is the
author for CIS benchmarks for AWS, Azure, and GCP.
Reviewer Acknowledgment: Thanks to my mentors (Dattatray Bhat,
Yogesh Patil, Steve O'Callaghan, Shailesh Athlye, and Hans Gustavson)
who have believed in me and have provided all possible opportunities to
learn and grow professionally in the information security domain.
Thanks to Mahesh Navaghane, Sagar Rahalkar (author of this book),
Aditi Sahasrabuddhe (my sister), Monika (my wife,) and Ira (my daughter)
for their commitment toward keeping me possibly the happiest person
that I have ever known.
xiii
The number of applications is growing and so are the number of application
vulnerabilities. Enterprises have shifted a lot of focus on making the
applications secure. While there are a variety of solutions and products for
application security, Burp Suite is really the tool of choice for many.
Burp Suite is a simple yet powerful tool used for application security
testing. It is widely used for manual application security testing of not
just web applications but also APIs and mobile apps. For effectively
testing security of web applications, one needs to understand various web
application vulnerabilities; at the same time, one also needs to have an
in-depth understanding of the tools used for testing. This book helps you
understand Burp Suite comprehensively, so that it can be used precisely to
uncover vulnerabilities.
The book starts with basics about Burp Suite and guides you on setting
up the testing environment. The following chapters cover basic building
blocks of Burp Suite and take you through its various components such
as the intruder, repeater, decoder, comparer, sequencer etc., in depth. In
the last chapters, we will cover other useful features such as the infiltrator,
collaborator, scanner, extender, and using Burp Suite for API and mobile
app security testing.
Introduction
1
© Sagar Rahalkar 2021
S. Rahalkar, A Complete Guide to Burp Suite,
https://doi.org/10.1007/978-1-4842-6402-7_1
CHAPTER 1
Introduction to
Burp Suite
Application Security has evolved to a large extent in the last decade or so.
A decade ago, finding SQL Injections in applications was easier than it is
today. The applications were more prone to vulnerabilities as there were
fewer defenses and less awareness among the developers. However, the
situation has drastically changed today. Developers are much more aware
and conscious about security, and security controls are placed throughout
the Software Development Life Cycle (SDLC), making the end application
comparatively secure.
Though the development processes have become more secure, today’s
applications are not just limited to the web. Modern applications have
services and Application Programming Interfaces (API’s) exposed as well
as a mobile and cloud presence. This clearly increases the complexities
and attack surfaces.
For an application security tester, it is vital to find all possible
vulnerabilities in the entire application ecosystem.

Some Basics of Application Security
Going into details of application security and various vulnerabilities are
beyond the scope of this book. In this book we will be focusing specifically
on how to use the Burp Suite tool in the most efficient manner.
2
However, we’ll quickly glance through what the common and top
application vulnerabilities are. The de facto standard referred to for
application vulnerabilities is OWASP. OWASP stands for Open Web
Application Security Project. The last Top 10 list for web application
vulnerabilities was published in 2017. The vulnerabilities are as follows:
1. Injection – This includes vulnerabilities that
are exploited by sending untrusted input to an
interpreter either as part of a query or command.
Specially crafted input tricks are what the interpreter
uses in executing the commands or even giving
unauthorized access to data. The most common
type of injection is a database injection. Other
types include the Operating System (OS) command
injection or LDAP Injection, etc.
2. Broken Authentication – This includes
vulnerabilities arising out of poor implementation of
authentication and session management functions.
Exploiting such vulnerabilities can give attackers
access to passwords, credentials, session tokens,
keys, etc.
3. Sensitive Data Exposure – Many times,
applications lack controls to protect sensitive user
data like personally identifiable information (PII),
health data, or even financial data. Attackers can
steal such sensitive data. Lack of data encryption at
rest and in transit cause most of the vulnerabilities
related to sensitive data exposure.
4. XML External Entities – This is a special type of
vulnerability wherein an attacker exploits the entity
tag within the XML documents to launch several
attacks like disclosing sensitive internal files, denial
of service, remote code execution, etc.
Chapter 1 Introduction to Burp Suite
3
5. Broken Access Control – Even if a user is
authenticated with valid credentials, it might not be
necessary to have access to all of the application.
Authorization defines what an authenticated
user can access. Broken authorization gives
unauthorized access to the attacker to view other
user accounts, sensitive files, or even modify other
users’ data.
6. Security Misconfiguration – Security
misconfiguration issues are the most common
in the underlying infrastructure like web servers.
Insecure configurations, default credentials,
unreferenced backup files, unwanted services, open
cloud storage, missing security headers and cookie
flags, and missing security patches all contribute to
the security misconfiguration category.
7. Cross-Site Scripting – This is indeed the classic web
application vulnerability that has been part of the
OWASP list for so long. This commonly occurs when
an attacker is able to inject and execute a script
through an application input field. This attack can
be used to hijack user sessions by stealing cookies,
defacing websites, etc. Common types of cross-site
scripting include Persistent, Reflected, and DOM
Based.
8. Insecure Deserialization – Attackers can
manipulate the object serialization and
deserialization process to introduce malicious
payloads resulting in code execution.
Chapter 1 Introduction to Burp Suite
4
9. Using Components with known Vulnerabilities –
It’s very common for developers to import and use
third-party code to avoid reinventing the wheel.
However, at times the third-party code comes along
with inherent vulnerabilities. An example is using
the OpenSSL library, which is vulnerable to a Heart
Bleed attack.
10. Insufficient Logging and Monitoring – Quite often,
applications lack capabilities to log events that
would help in case of an incident. In the absence of
audit logging and detection capabilities, attackers
can simply continue to infiltrate without getting
detected or raising alarms.
While the OWASP Top 10 list is probably the first place to go for web
application vulnerabilities, there are many potential vulnerabilities
beyond this Top 10 list. Following are some of the strongly recommended
references in order to get a broader perspective for application security
testing:
1. OWASP Testing Guide – This guide is a very
comprehensive resource covering many security
test cases and a very handy reference guide. It is
available at https://owasp.org/www-project-
web-security-testing-guide/assets/archive/
OWASP_Testing_Guide_v4.pdf
2. SANS Top 25 Programming Errors – Beyond
the OWASP Top 10 list, SANS has published a list
of the 25 most dangerous programming errors.
It is available at https://www.sans.org/top25-
software-errors
Chapter 1 Introduction to Burp Suite
5
3. OWASP API Top 10 – Application Programming
Interfaces (API’s) are very commonly used these
days and have some unique vulnerabilities. OWASP
has published a special API Top 10 vulnerability
list and is available at https://owasp.org/www-
project-api-security/
4. OWASP Mobile Top 10 – Mobile applications have
different sets of vulnerabilities, and some even
vary based on the type of platform. However, the
most common and top mobile vulnerabilities are
available at https://owasp.org/www-project-
mobile-top-10/
5. OWASP IoT Top 10 – Today even household
devices are getting smarter and connected. Such
Internet of Things (IoT devices) are prone to many
vulnerabilities. OWASP has published an IoT Top 10
vulnerability list available at https://owasp.org/
www-project-internet-of-things/

A Brief Introduction to Burp Suite
The birth of Burp Suite dates back to 2004 when Dafydd Stuttard gauged
the need for a robust web application security testing tool. In the past 16
years, the tool has evolved leaps and bounds and has added numerous
capabilities that benefit the security testing community. Burp Suite has
undoubtedly become a tool of choice for web application security testing.
Also it has evolved in a way that it can now be used to find vulnerabilities
in API’s and Mobile Apps as well.
Chapter 1 Introduction to Burp Suite
6

Need for Burp Suite
Today the market for application security scanning and testing tools is
rapidly growing. There are so many tools available, commercial as well as
free, from different vendors, supporting various technologies and features.
Most of these tools are inclined toward automated scanning of software
to find vulnerabilities. This is achieved either by triggering the scanner
after spidering or crawling the target application or integrating the scanner
directly in the DevOps cycle. While this is certainly an advantage and
increases efficiency of scanning with minimum manual intervention, there
are certain vulnerabilities that can be better understood and exploited
through manual testing.
Manual Testing is largely dependent on two factors: the skills of the
tester and the tool used for testing. A tool like Burp Suite significantly
aids in fulfilling the needs of manual testing from a tooling perspective. It
provides a powerful and flexible platform where the tester can efficiently
find and exploit potential vulnerabilities. So, for application security
scanning and testing, the best strategy would be to use a combination
of both automated and manual testing. Burp Suite has excellent manual
testing capabilities along with an automated scanner. So it gives the tester
benefits of manual testing as well as automated scanning of vulnerabilities.
Editions
Like most of the other tools, Burp Suite comes in different forms. Different
users might have different needs and one size may not fit all. Keeping
in mind the varying needs of users, Burp Suite comes in three different
editions.
Chapter 1 Introduction to Burp Suite
7
1. Burp Suite Community Edition – The Burp Suite
Community Edition is the most basic version, which
is free to download and use. It comes with a limited
set of tools and features to get started with web
application security testing. If you are completely
new to application security and want to explore the
basics, then the Burp Suite Community Edition is
certainly a very good starting point. It does have
good tools and features required for basic manual
web application security testing like the interception
proxy, tamper and relay requests using repeater,
encode and decode data, etc.
2. Burp Suite Professional Edition – Once you have
a very good understanding of web application
security and you are regularly required to test
applications as part of your profession, then
the Burp Suite Professional Edition is definitely
recommended. The Burp Suite Professional Edition
comes along with many advanced features that
significantly improve your ability to find potential
vulnerabilities in applications. This is the most
suitable edition for individual professionals looking
for excellent manual and automated security testing
capabilities. Some of the advanced features include
the following:
• Testing out-of-band vulnerabilities
• Advanced brute-force and fuzzing capabilities
• Quickly generating exploits for CSRF,
Clickjacking, etc.
Chapter 1 Introduction to Burp Suite
8
• Automated scanning for vulnerabilities
• Useful extensions to further enhance vulnerability
detection capabilities
More details on the Burp Suite Professional Edition can be found
here - https://portswigger.net/burp/pro
3. Burp Suite Enterprise Edition – While the Burp
Suite Community Edition and the Burp Suite
Professional Edition were aimed at individual
professionals, the Burp Suite Enterprise Edition is
useful to the organizations looking for integrating
security scanning in software pipelines. It doesn’t
have the manual testing tools as compared to the
earlier editions. This edition is recommended for
enterprises looking out for DevSecOps solutions.
As part of this book, we will be covering the Burp Suite Professional
Edition.

Burp Suite Alternatives
We have already discussed that the market for application security
scanning tools is largely growing. While Burp Suite fulfills most of the
manual and automated testing needs, it is rivaled by some other tools such
as those shown in Table 1-1.
Chapter 1 Introduction to Burp Suite
9
More information and comparative analysis on various application
security Testing tools can be found at https://www.gartner.com/
reviews/market/application-security-testing

High-Level Feature Overview
The Burp Suite Professional Edition comes with a wide range of features
for manual penetration testing as well as for automated scanning. Some of
the useful features include the following:
1. Manual Penetration Testing – Intercept and tamper
requests (HTTP / HTTPS), manually testing for out-
of-band vulnerabilities, testing web sockets, testing
token strength, easily test clickjacking and Cross-Site
Request Forgery (CSRF) vulnerabilities.
2. Advanced Automated Attacks – Passive and active
scanning to find potential vulnerabilities, advanced
capabilities to brute-force and fuzz inputs.
3. Productivity – Detailed message analysis, efficient
project options, tools to make code more readable,
easy and simple vulnerability reporting.
Table 1-1. Scanning Tools
Commercial Free / Open Source
Acunetix OWASP ZAP
Netsparker W3af
IBM AppScan Arachni
WebInspect Iron Wasp
Chapter 1 Introduction to Burp Suite
10
4. Extensions – Burp Suite Application Store to install
extensions for significantly enhancing the existing
tool capabilities.
We’ll be going through the above features more in detail as we proceed
through the book.
Summary
We started off this chapter by explaining how application security has
evolved over the last decade or so. We then glanced at some of the top
web application vulnerabilities. Next we tried to understand the need for
a tool like Burp Suite followed by its editions and alternatives. Finally, we
concluded with a high-level overview of the features provided by Burp
Suite Professional.
In the next chapter, we’ll get started with installation and setup of the
tool.
Exercises
• Read about the OWASP Top 10 vulnerabilities and the
OWASP Testing Guide in detail.
• Read more details about the features of all the Burp
Suite editions on the official website - https://
portswigger.net/
Chapter 1 Introduction to Burp Suite
11
© Sagar Rahalkar 2021
S. Rahalkar, A Complete Guide to Burp Suite,
https://doi.org/10.1007/978-1-4842-6402-7_2
CHAPTER 2
Setting Up the
Environment
In the last chapter, we discussed some basics of application security and
the need for tools like Burp Suite. In this chapter we’ll get started with
setting up our environment for Burp Suite.

Burp Suite Installation
Before we attempt to either install or run the Burp Suite, we need to ensure
that Java is installed on the system. It is an essential prerequisite to run
Burp Suite. On a Windows system, you can simply open up the command
prompt and type command “java –version” to check if Java is installed, as
shown in Figure 2-1.
Figure 2-1. Check if Java is installed
12
If you don’t have Java installed on your system, you can download and
install Java from https://www.oracle.com/java/technologies/javase-­
jre8-­downloads.html
Once we are sure that Java is installed on our system, we can now
proceed with Burp Suite. We first need to download the Burp Suite from
https://portswigger.net/burp/releases/community/latest as shown
in Figure 2-2.
You’ll notice there are several forms in which you can download
the Burp Suite. There are individual installers for Linux, Mac OSX, and
Windows. There’s also an option to download a JAR file, which can be used
directly to launch Burp Suite without installing. Downloading the JAR file
is the easiest way to get started. If you choose to download the installer, it
is just like any other software installer and installs the Burp Suite in a few
clicks. However, Java is required to be installed in both cases. Once the JAR
file is downloaded, you can simply double-click it to launch the Burp Suite.
Figure 2-2. Types of Burp Suite downloads
Chapter 2 Setting Up the Environment
13
At times, while running large projects, it might happen that Burp
Suite runs out of memory. To solve this problem, it is possible to launch
Burp Suite by allocating a fixed amount of memory at startup. This will
ensure that it doesn’t run out of memory once launched. This can be done
using command java -jar -Xmx2G /path/to/burp.jar where 2G
indicates 2GB of memory. This step is completely optional. We can skip
it and directly execute the JAR file to launch Burp Suite with the default
configuration.
If all prerequisites are met correctly, we get a startup screen as shown
in Figure 2-3.
Figure 2-3. Burp Suite Startup Screen
Chapter 2 Setting Up the Environment
14

Setting Up Vulnerable Target Web
Application
While we set up the Burp Suite on our system, it’s important to have
a target application on which you will be using the tool. If you are a
professional working on application security testing and penetration
testing then you would be authorized to use Burp Suite on the application
under the test. However, if you are just a beginner trying to get started with
learning Burp Suite, then you would need to have some target application
on which you could test your skills. Remember, running Burp Suite on an
application on which you are not authorized can invite legal troubles. So,
from a learning perspective, it’s important to try your Burp Suite skills only
on a test application. There are several alternatives available as shown
below:
1. Set Up OWASP Juice Shop locally – OWASP
Juice Shop is a modern web application that is
deliberately made vulnerable. This can be an
excellent starting point. The easiest way to get
OWASP Juice Shop up and running is using its
docker image. The docker image is available at
https://hub.docker.com/r/bkimminich/juice-
shop. You can simply pull the image and run it in the
docker engine on any platform (Windows / Linux /
MacOS).
2. Try out online version of OWASP Juice Shop –
As a beginner, it is always recommended to set up
your own copy of Juice Shop; however if you want to
quickly try it out before setting it up, you can try the
online version at https://juice-shop.herokuapp.
com/#/
Chapter 2 Setting Up the Environment
15
3. Damn Vulnerable Web Application (DVWA) –
Another great application that has been made
vulnerable intentionally for testing is DVWA. You
can quickly set up the DVWA using docker or on a
local web server. Detailed instructions on setting up
and using DVWA are available at https://github.
com/ethicalhack3r/DVWA
4. Damn Vulnerable Web Services – OWASP Juice
Shop and DVWA would suffice for your learning
needs for web application vulnerabilities.
However, if you wish to explore more specifically
the vulnerabilities in web services, then Damn
Vulnerable Web Services is a good option. More
details on setup and usage can be found at ­https://
github.com/snoopysecurity/dvws
Configuring the Browser
Now that we have Burp Suite up and running, we need to configure
our browser to work along with it. First let's consider a normal scenario
without Burp Suite in the picture as shown in Figure 2-4.
Figure 2-4. A user accessing a website directly without Burp Suite
Chapter 2 Setting Up the Environment
16
Referring to the image above, at a very high level and in simple terms,
the following sequence of events happens:
1. The end user opens up any browser of choice.
2. The user then enters the URL of website he/she
wishes to browse.
3. The browser processes the URL of the website and
renders the website for the user (a series of request
and response happens in the background).
Now let’s consider another scenario wherein we have configured Burp
Suite with the browser as shown in Figure 2-5.
Referring to the image above, at a very high level and in simple terms,
the following sequence of events happens:
1. The end user opens up any browser of choice.
2. The user then enters the URL of the website he/she
wishes to browse.
3. The browser redirects the request to Burp Suite,
which then forwards the request to the target
website.
4. The target website responds to the request and
sends a response back to Burp Suite, which then
passes on the response to be rendered in the
browser.
Figure 2-5. A user accessing a website with Burp Suite
Chapter 2 Setting Up the Environment
17
So in this scenario, Burp Suite is acting as ‘Man-in-the-Middle’
between the browser and the target website. Burp Suite is able to intercept
and tamper all the traffic passing through it.
We’ll now see how we can configure the most popular browsers to
work with Burp Suite.
Firefox
For configuring Firefox with Burp Suite:
Go to Tools ➤ Options as shown in Figure 2-6.
In the search field, enter the keyword ‘network’ as shown in Figure 2-7
and click on ‘Settings’
.
Figure 2-6. Navigating the Tools ➤ Options menu in Firefox
Chapter 2 Setting Up the Environment
18
Select ‘Manual proxy configuration’ as shown in Figure 2-8 and enter
the IP as 127.0.0.1 (or localhost) and port as 8080.
Note: By default the Burp Suite proxy listens on port 8080. This can be
customized and we’ll see that in the next chapter. However, the same port
number must be entered both in the browser as well as in the Burp Suite in
case you wish to change the same.
Figure 2-7. Searching for ‘Network Settings’ within Firefox options
Figure 2-8. Setting up the manual proxy configuration
Chapter 2 Setting Up the Environment
19
Simply click ‘OK’ once the proxy details have been configured.
Chrome
For configuring Chrome with Burp Suite:
Click on the three vertical dots in the right-hand corner and select
‘Settings’ as shown in Figure 2-9.
Search for the keyword ‘proxy’ as shown in Figure 2-10, and click on
the ‘Open your computer’s proxy settings’ option.
Now enable the ‘Use a proxy server’ option and enter the address and
port number as shown in Figure 2-11.
Figure 2-9. Navigating to the Chrome Settings
Figure 2-10. Opening the proxy settings in Chrome
Chapter 2 Setting Up the Environment
20
Once the proxy is configured, simply click on the ‘Save’ option.
Figure 2-11. Configuring the system proxy
Chapter 2 Setting Up the Environment
21
Edge
For configuring Edge with Burp Suite:
Click on the three horizontal dots in the right-hand corner and select
the ‘Open proxy settings’ as shown in Figure 2-12.
Now enable the ‘Use a proxy server’ option and enter the address and
port number as shown in Figure 2-13.
Figure 2-12. Opening the Proxy Settings in Edge browser
Chapter 2 Setting Up the Environment
22
Once the proxy is configured, simply click on the ‘Save’ option.
Opera
For configuring Opera with Burp Suite:
Click on the settings in the top right-hand corner and select the option
‘Go to browser settings’ as shown in Figure 2-14.
Figure 2-13. Configuring the system proxy
Chapter 2 Setting Up the Environment
23
In the search field, type proxy and then select the option ‘Open your
computer’s proxy settings’ as shown in Figure 2-15.
Now enable the ‘Use a proxy server’ option and enter the address and
port number as shown in Figure 2-16.
Figure 2-14. Opening the browser settings in Opera
Figure 2-15. Opening up the system proxy settings
Chapter 2 Setting Up the Environment
24
Once the proxy is configured, simply click on the ‘Save’ option.
So far we have seen how to configure browsers like Firefox, Chrome,
Edge, and Opera to work along with Burp Suite. It simply requires
configuring the network proxy option. However, it is important to note
that once the browser proxy is configured, all the traffic initiating from the
browser will compulsorily pass through Burp Suite. If you are working on
multiple tabs within a browser and testing an application in one tab while
Figure 2-16. Configuring the system proxy
Chapter 2 Setting Up the Environment
25
accessing email in another, all this traffic will be routed through Burp
Suite. In case you with to pass only selective traffic through Burp Suite, you
need to make use of additional browser plugins such as those shown in
Table 2-1.
The above plugins are simple to use and allow custom selective traffic
to pass through Burp Suite. Using these plugins is completely optional.
If you don’t wish to use these plugins, you can simply use two separate
instances of browser, one for application testing and the other for personal
use. Or it is also possible to scope out only the required traffic in Burp Suite
that we will be learning in an upcoming chapter.
Summary
In this chapter we saw how to download, install, and get started with the
Burp Suite tool. We then explored various options available for setting up
vulnerable targets to practice Burp Suite skills. We also learned how to
configure different browsers to work along with the Burp Suite.
In the next chapter, we’ll see how to configure some of the basic
settings in the Burp Suite like the Proxy, User Options, and Project Options.
Table 2-1. Additional Browser Plugins for Proxy
Firefox Proxy SwitchyOmega, FoxyProxy
Chrome Proxy SwitchyOmega, FoxyProxy
Edge N/A
Opera Proxy Switcher  Manager
Chapter 2 Setting Up the Environment
26
Exercises
• Download the latest version of the Burp Suite.
• Try to launch Burp Suite from the command line,
allocating custom memory size.
• Try and explore how to use the FoxyProxy plugin for
Firefox and Chrome.
Chapter 2 Setting Up the Environment
27
© Sagar Rahalkar 2021
S. Rahalkar, A Complete Guide to Burp Suite,
https://doi.org/10.1007/978-1-4842-6402-7_3
CHAPTER 3
Proxy, User Options,
and Project Options
In the last chapter, we saw some basics of Burp Suite installation, setting
up the vulnerable application and configuring different browsers to work
along. In this chapter, we’ll get started with some basics of Burp Suite
proxy along with several user and project options.
Proxy
Proxy is really the essence of Burp Suite. Leveraging the proxy
functionality, Burp Suite is able to see all the traffic passing through it. In
the previous chapters, we have already seen how Burp Suite works as
Man-­
in-­
the-Middle and helps us intercept requests.
In order to make Burp Suite functional, we have to have a complete
configuration at two different ends. One part is configuring the network
proxy in the browser that we saw in the previous chapter. Another part is
ensuring the Burp Suite proxy is configured properly. By default, when we
start the Burp Suite, its proxy listens on port 8080. In this case you don’t
need to do any more configurations. However, if port 8080 is already being
used by some other application on your system, then there would be a port
conflict and the Burp Suite proxy service would fail to start. In this case you
can start the Burp Suite proxy listener on any other custom port that is not
already in use. To do this, navigate to the Proxy tab as shown in Figure 3-1.
28
Then go to the ‘Options’ tab as shown in Figure 3-2. You’ll notice that
the Burp Suite proxy is running by default on localhost and port 8080.
To enable the Burp Suite proxy on the custom port, click the ‘Add’
button as shown in Figure 3-3.
Figure 3-1. Proxy Option in the Burp Suite
Figure 3-2. Proxy options
Chapter 3 Proxy, User Options, and Project Options
29
Now you can bind the Burp Suite proxy to any custom port. After
configuring the custom port, you can leave the bind address to default as
‘Loopback only’ or if there are multiple network interfaces on your system,
you can select any one of them using the drop-down menu in the “Specific
address” option.
Once the Burp Suite proxy is configured, we are all set to intercept
application requests. By default, the Burp Suite will intercept only requests.
In any particular scenario, if you are required to intercept responses as
well, then it can be done through additional configuration. To enable
interception of responses, go to Proxy ➤ Options and check the option
“Intercept responses based on the following rules:” as shown in Figure 3-4.
Figure 3-3. Adding new proxy listener
Figure 3-4. Intercepting server responses
Chapter 3 Proxy, User Options, and Project Options
30
Through this option, you can specify different rules based on which the
Burp Suite proxy would intercept responses.
Now that we have the browser configuration in place along with the
Burp Suite proxy, we can try to intercept a request. Navigate to “Proxy ➤
Intercept” and Click on “Intercept if off” (to turn on the intercept). Now
in the browser enter any URL and observe the proxy tab in Burp Suite as
shown in Figure 3-5.
You will notice the request you made from the browser is trapped in
Burp Suite. You can now click on Forward if you want to allow rendering
the URL in the browser. You can drop the request and the browser won’t
load the URL. If you turn off the Intercept option, then all requests and
responses will be captured in Burp Suite without any manual intervention.
The right-hand corner also gives an option to give a color to the request if
you want to highlight it for some reason along with comments.
The HTTP History tab shows all the requests that have passed through
Burp Suite so far as shown in Figure 3-6.
Figure 3-5. Intercepting HTTP request
Figure 3-6. HTTP Proxy History
Chapter 3 Proxy, User Options, and Project Options
31
The proxy history captures important information like host, method,
URL, parameters (if any), status on whether the request was edited/
tampered, HTTP Status code, Content Length, MIME Type, Extensions,
Title, IP, cookies, and time of the request. This is really a wealth of
information to start with. Burp Suite is also capable of capturing Web
Socket traffic by default and it can be seen in the Web Sockets history tab.

Burp Suite CA Certificate
We have already seen in the previous chapter that Burp Suite proxy works
as Man-in-the-Middle. While accessing an application over HTTPS
through Burp Suite, the proxy will generate a TLS certificate signed by its
certificate authority and store it on the client system. To use Burp Suite
most efficiently in case of HTTPS, it is advisable to download and install
the Burp Suite CA Certificate as trusted in the browser.
To import and install the Burp Suite CA certificate, first ensure your
Firefox browser is configured to work along with the Burp Suite proxy.
Then in the address bar, type URL “http://burpsuite” as shown in
Figure 3-7.
Notice the right-hand corner for “CA Certificate.” Click on that option
to and download the file “cacert.der” as shown in Figure 3-8.
Figure 3-7. Burp Suite CA Certificate
Chapter 3 Proxy, User Options, and Project Options
32
Next, go to Firefox Tools ➤ Options and type ‘cert’ in the search bar as
shown in Figure 3-9.
Click on the option ‘View Certificates’ and then use the ‘Import’
button as shown in Figure 3-10 to select the Burp Suite Certificate that we
previously downloaded.
Figure 3-8. Downloading the Burp Suite CA Certificate
Figure 3-9. Certificate option in Firefox
Chapter 3 Proxy, User Options, and Project Options
33

Platform Authentication, Upstream Proxy
Servers, SOCKS Proxy
Platform Authentication
There are certain scenarios where the application hosted on the target web
server is protected by authentication. In such a case, we need to configure
the credentials in Burp Suite. In the absence of credentials, Burp Suite won't
be able to access the protected portion of the application and miss out on
potential checks. To configure platform authentication, navigate to “User
Options ➤ Connections ➤ Platform Authentication” as shown in Figure 3-11.
Figure 3-10. Firefox Certificate Manager
Chapter 3 Proxy, User Options, and Project Options
34
Click on the ‘Add’ button and a pop-up window will appear as shown
in Figure 3-12.
Figure 3-11. Configuring the Platform Authentication
Figure 3-12. Setting up the Platform Authentication
Chapter 3 Proxy, User Options, and Project Options
35
We need to configure the destination host either in the form of an IP
address or hostname, authentication type either of Basic, NTLM V2, NTLM
V1, Digest, Username and Password, and the Domain if applicable. Once
these settings are recorded, Burp Suite can seamlessly access the protected
part of the application with the help of these credentials.

Upstream Proxy Servers
While testing applications in certain network environments, it may happen
that there’s no direct access to that target application. In such a case, we
might need to connect to a proxy server first and then connect to the
target application. Burp Suite allows easy configuration of upstream proxy
servers. Simply navigate to “User Options ➤ Connections ➤ Upstream
Proxy Servers” as shown in Figure 3-13.
Click on the ‘Add’ button as shown in Figure 3-14, and configure the
required proxy settings.
Figure 3-13. Configuring the Upstream Proxy Servers
Chapter 3 Proxy, User Options, and Project Options
36
SOCKS Proxy
Burp Suite also allows you to make all connection requests through a
SOCKS proxy. To configure Burp Suite with SOCKS Proxy, navigate to
“User Options ➤ Connections ➤ SOCKS Proxy” as shown in Figure 3-15,
and configure the required proxy settings.
Figure 3-14. Adding the upstream proxy rule
Chapter 3 Proxy, User Options, and Project Options
37
Hotkeys
The Burp Suite tool has many tabs, tools, and options that we can work
with. We’ll be discussing them in detail in upcoming chapters. At first,
the Burp Suite tools and tabs might seem overwhelming. But they all get
familiar as you start using them. While all these tools and tabs can be
accessed with the click of a button, at times while working on projects, it is
much easier to use keyboard shortcuts than using mouse clicks.
The Burp Suite tool offers configuration of Hotkeys, which are nothing
but the keyboard shortcuts to access certain tools or tabs. To configure
Hotkeys, navigate to User Options ➤ Misc ➤ Hotkeys as shown in Figure 3-­16.
Figure 3-16. Configuring the Burp Suite Hotkeys
Figure 3-15. Adding SOCKS proxy
Chapter 3 Proxy, User Options, and Project Options
38
By default, Hotkeys for common functionalities within the Burp
Suite are already configured. However there’s an option ‘Edit hotkeys’
either to change the default hotkeys or configure hotkeys for additional
functionalities.
The Table 3-1 lists some of the common default hotkeys.
Apart from the hotkeys in the above table, all other standard keyboard
shortcuts for selecting all text, cut, copy, and paste work in the standard way.
Table 3-1. Default Hotkeys in Burp Suite
Hotkey Purpose
Ctrl + R Send to Repeater
Ctrl + I Send to Intruder
Ctrl + F Forward intercepted proxy
message
Ctrl + Shift + T Switch to Target
Ctrl + Shift + P Switch to Proxy
Ctrl + Shift + I Switch to Intruder
Ctrl + Shift + R Switch to Repeater
Ctrl + Shift + O Switch to Project Options
Ctrl + Shift + U URL Decode
Ctrl + Shift + B Base-64 Decode
Ctrl + B Base-64 Encode
Chapter 3 Proxy, User Options, and Project Options
39
Project Backups
While working on projects using Burp Suite, large amounts of data in
the form of requests and responses get generated. It becomes necessary
to save a copy of this data at regular intervals. Instead of doing this task
manually, Burp Suite offers a feature to take a backup of data automatically
after specified intervals.
To enable automatic backups, navigate to User Options ➤ Misc ➤
Automatic Project Backup as shown in Figure 3-17.
Using this feature, we can specify the duration in minutes after which
Burp Suite will automatically trigger the backup.
Rest API
While we use the Burp Suite mostly for manual application security
testing, there could be so many other tools and use cases that need to work
along with the Burp Suite. There could be other security tools that need to
integrate with Burp Suite or certain custom automation scenarios as well
that need to automatically trigger actions in Burp Suite.
Figure 3-17. Configuring automatic project backups
Chapter 3 Proxy, User Options, and Project Options
40
For all such purposes, Burp Suite provides users with a REST API
interface. REST stands for Representational State Transfer and API stands
for Application Programming Interface. REST API is the most popular way
of interconnecting different applications.
To enable the Burp Suite REST API, go to “User Options ➤ Misc” as
shown in Figure 3-18.
To enable the Burp Suite REST API, simply check the option
“Service running.” The REST API will be available by default on
http://127.0.0.1:1337 as shown in Figure 3-19.
Figure 3-18. Setting up the Burp Suite REST API interface
Figure 3-19. The Burp Suite REST API Interface
Chapter 3 Proxy, User Options, and Project Options
41
The REST API interface lists all the verbs or methods supported, the
endpoints to be called, the parameters to be passed, and the expected
responses. Now it completely depends on a particular scenario or use case
on how this REST API interface can be utilized.
Performance Feedback
As like with any other tool, Burp Suite has a provision to capture and send
certain diagnostic data that could be useful in improving Burp Suite’s
performance. This is a completely optional feature, and if enabled it only
collects data about internal functioning and not about specific users or
project data. Burp Suite also provides features to log all exceptions or to
report a specific bug to the Burp Suite team.
To use Performance Feedback options, navigate to User Options ➤
Misc ➤ Performance Feedback as shown in Figure 3-20.
Project Options
These options include Hostname resolution, Out-of-Scope Requests,
Redirections, TLS Configuration, Session Handling Rules, Cookie Jar. and
Macros.
Figure 3-20. Configuring the performance feedback
Chapter 3 Proxy, User Options, and Project Options
42
Timeouts
Handling requests and responses is the core functionality of Burp Suite.
There could be scenarios like the target application is down, or there are
connectivity issues wherein Burp Suite needs to decide how long it should
wait for a response for a request before dropping it off. These settings are
defined by the timeout values. They are configured by default and can
be left untouched unless there’s an explicit need to change the timeout
values. For changing the default timeout values, navigate to “Project
Options ➤ Connections ➤ Time Outs” as shown in Figure 3-21.
Hostname Resolutions
Hostname resolution usually happens with the help of either the local
host file or the network DNS. However, Burp Suite allows for custom
hostname resolutions. This might be useful in particular scenarios where
an application hosted on an intranet needs to be accessed using a specific
hostname or URL.
To define custom hostname resolution rules, navigate to “Project
Options ➤ Connections ➤ Hostname Resolutions” as shown in Figure 3-­22.
Figure 3-21. Configuring the request timeouts
Chapter 3 Proxy, User Options, and Project Options
43
Click on the ‘Add’ button and then you’ll get a pop-up window to enter
a custom Hostname and associated IP address as shown in Figure 3-23.
Figure 3-23. Adding the hostname resolution rule
Figure 3-22. Configuring the hostname resolution
Chapter 3 Proxy, User Options, and Project Options
44
Out-of-Scope Requests
Once the browser is configured to work along with Burp Suite, Burp Suite
will capture all the HTTP traffic across all tabs by default. This traffic can
be overwhelming and distracting. Out of all the traffic that is captured, we
need to concentrate only on the required target that we are testing. This
can be achieved using a scope that we will be covering in a later chapter.
Burp Suite provides a feature to simply drop all the requests that are out of
scope. This can be done by navigating to “Project Options ➤ Connections
➤ Out-of-scope Requests” as shown in Figure 3-24.
Selecting the “Use custom scope” option we can explicitly add URLs
that we wish to exclude from the scope and drop off the proxy as shown in
Figure 3-25.
Figure 3-24. Configuring the rules for Out-of-Scope requests
Chapter 3 Proxy, User Options, and Project Options
45
Redirections
Automated application scanning requires processing of HTTP redirections.
The scan engine has to take action once it detects any page redirection.
Burp Suite has redirection rules configured by default and those can be
left untouched unless there's an explicit need to change them, or there's
a need for additional configuration of JavaScript-driven redirections. For
configuring redirection rules, navigate to “Project Options ➤ HTTP ➤
Redirections” as shown in Figure 3-26.
Figure 3-25. Defining rules for Out-of-Scope requests
Chapter 3 Proxy, User Options, and Project Options
46
Cookie Jar
Any application scanning / testing tool needs to maintain a repository of
cookies that it will use to manage the ongoing application sessions. The
in-session detection capability is specifically required when performing
automated scanning. Burp Suite stores the application cookies in a
container called “Cookie Jar.” By default the Cookie Jar monitors the
Proxy traffic to extract and store any cookies; however, we can explicitly
instruct Burp Suite to monitor and capture cookies out of other tools like
Scanner, Repeater, Intruder, Sequencer, and Extender. This can be done
by navigating to “Project Options ➤ Sessions ➤ Cookie Jar” as shown in
Figure 3-27.
Figure 3-26. Configuring the redirections
Chapter 3 Proxy, User Options, and Project Options
47
Macros
In the process of application security testing, it may be required to perform
a certain sequence of actions repeatedly. Burp Suite provides an excellent
functionality of macros to achieve this. The macro editor is available at
“Project Options ➤ Sessions ➤ Macros” as shown in Figure 3-28. You can
simply click on the ‘Add’ button and follow the wizard to record steps.
Figure 3-27. Configuring the Cookie Jar options
Figure 3-28. Configuring the macros
Chapter 3 Proxy, User Options, and Project Options
48
Summary
In this chapter we learned about configuring the Burp Suite proxy along
with a CA Certificate. We then glanced at several options like platform
authentication, upstream proxy, socks proxy, etc. Next we explored
several other useful configurations including hotkeys, project backups,
using Burp Suite API, project options, hostname resolutions, scoping, and
redirections.
In the next chapter we’ll explore the Burp Suite dashboard, target tab,
and engagement tools.
Exercises
• Configure your favorite browser and Burp Suite to work
on a custom proxy port.
• Try to install Burp Suite CA Certificate for Chrome,
Edge and Opera.
• Go through the default Hotkey list and try to configure
additional shortcuts of your choice.
Chapter 3 Proxy, User Options, and Project Options
49
© Sagar Rahalkar 2021
S. Rahalkar, A Complete Guide to Burp Suite,
https://doi.org/10.1007/978-1-4842-6402-7_4
CHAPTER 4
Dashboard, Target,
and Engagement
Tools
In the last chapter, we saw some basics about configuring the proxy, user
options, and project options. In this chapter we’ll get started with getting
familiar with the Burp Suite dashboard, target, and engagement tools.
Dashboard
Dashboard, as the name suggests, is that important part of Burp Suite
that essentially summarizes different activities and tasks that are running
across components. Figure 4-1 shows a typical view of the Burp Suite
dashboard.
50
For better understanding, we’ll divide the dashboard into four parts
and try to explain each in detail. For learning purposes, refer to the
numbers from 1 to 4 in Figure 4-1.
The first part of the dashboard shows data around the ongoing scans
as shown in Figure 4-2. The scans can be either passive or active. If there
are multiple scans running, then we can filter them based on their state:
running, paused, or finished. We also get to see a high-level summary of
issues found in the scans. There’s also an option to create a new scan task,
which we will be exploring separately in an upcoming chapter.
Figure 4-1. The Burp Suite Dashboard
Chapter 4 Dashboard, Target, and Engagement Tools
51
The second part of the dashboard is as shown in Figure 4-3. It might
happen that either a passive scan or an active scan is running, and in either
case the list of vulnerabilities found is highlighted in this section. This
section also highlights information like time when the issue was found, the
issue type, the host or target on which the issue was found, the vulnerable
URL Path, severity of the issue, and the confidence level. Burp Suite may
flag different confidence levels for different issues based on the responses;
however, the issues need manual verification to ascertain their validity.
Figure 4-2. Tasks in the Burp Suite Dashboard
Figure 4-3. Issue activity in the Burp Suite Dashboard
Chapter 4 Dashboard, Target, and Engagement Tools
52
The third part of the dashboard summarizes the Burp Suite functional
events as shown in Figure 4-4. These mainly include the status of the
proxy service, TLS connection failures (if any), authentication failures,
timeouts, etc. For example, if your system already has port 8080 configured
with some other service, this part of the dashboard will highlight that
proxy service couldn’t be started on port 8080. Or if for any reason the
proxy service stops, then it will also get highlighted here. Overall, it gives
a picture about whether the Burp Suite proxy and related services are
running properly or not.
The last part of the dashboard as shown in Figure 4-5 highlights issue
details. If you wish to see details of any of the issues highlighted during the
passive or active scan, then simply click that issue as shown in Figure 4-­3
and details will be available accordingly. The issue details include the
complete issue description and remediation recommendation, along with
the actual request and response.
Figure 4-4. The event log in the Burp Suite Dashboard
Chapter 4 Dashboard, Target, and Engagement Tools
53
Target Tab
Like the Burp Suite dashboard that we saw in the previous section, the
Target tab is an equally important work area. The target tab again has
multiple panes as shown in Figure 4-6.
Figure 4-5. Issue details in the Burp Suite Dashboard
Figure 4-6. Target tab in Burp Suite
Chapter 4 Dashboard, Target, and Engagement Tools
54
To understand different parts of the target tab, let’s take one part at a
time referring to the numbers 1 to 6 as per Figure 4-6.
The leftmost section in the target tab numbers as ‘1’ in Figure 4-6 is
shown in Figure 4-7. This section creates the hierarchy of the site that we
are browsing through. It lists all the leaf nodes, folders, etc., in the form of a
well-defined tree structure. This helps in getting an idea about how big the
site / application could be or what its contents are in common. It is very
similar to a sitemap.
The next section numbered as ‘2’ as per Figure 4-6 is shown in
Figure 4-8. This section lists down all the HTTP requests that were made
along with other details like the exact host, HTTP method used, target
URL, if the URL had any parameters, HTTP status response code, content
length, MIME type, and the title of the page, if any. Simply going through
this section can help you find interesting URLs especially those having
parameters to inject.
Figure 4-7. Application map / hierarchy
Chapter 4 Dashboard, Target, and Engagement Tools
55
The next section numbered as ‘3’ as per Figure 4-6 is shown in
Figure 4-9. This section shows the actual HTTP request and response.
You can see the raw request by default but also see the request in form of
parameters. You can also see all of the headers used in the response.
Figure 4-8. List of requests
Figure 4-9. The request and response viewer
Chapter 4 Dashboard, Target, and Engagement Tools
56
The next section numbered as ‘4’ as per Figure 4-6 is shown in
Figure 4-10. This section shows the list of issues that were found either
during the passive scan or active scan. The issues are classified as per the
severity, with highest severity issues being shown at the top.
The next section numbered as ‘5’ as per Figure 4-6 is shown in
Figure 4-11. This section shows the issue details for any of the selected
issues. It contains the issue description along with remediation
recommendations. In this section it is also possible to view the actual
request and response based on which the issue was highlighted.
Figure 4-10. Issues found in the target application
Chapter 4 Dashboard, Target, and Engagement Tools
57
The next section numbered as ‘6’ as per Figure 4-6 is shown in
Figure 4-12. Once we configure our browser to work along with the Burp
Suite, a lot of traffic may get captured. Hence to filter out only the required
data, several filters can be used. Some common and useful filters include
filtering by request type, MIME type, status code, extension, etc. This
feature also allows searching for a particular item within the data collected
through proxy.
Figure 4-11. Issue details
Chapter 4 Dashboard, Target, and Engagement Tools
58
Engagement Tools
Engagement tools are nothing but small utilities that help in performing
some additional tasks within Burp Suite. In this section we’ll go through
several such engagement tools serving different purposes. To access the
engagement tools, simply right-click the target URL against which you wish
to run the engagement tools as shown in Figure 4-13.
Figure 4-12. Site map filters
Chapter 4 Dashboard, Target, and Engagement Tools
59
The first engagement tool is the simple search as shown in Figure 4-­14.
This allows users to search for any keyword within the requests or responses
from the target selected.
Figure 4-13. The Burp Suite Engagement Tools
Chapter 4 Dashboard, Target, and Engagement Tools
60
The next engagement tool is the ‘Find comments’ as shown in
Figure 4-15. This simply crawls through the collected data and finds any
code comments. It is worthwhile to go through these comments as there’s
always a possibility of finding something sensitive in the comments.
Figure 4-15. Comment finder tool
Figure 4-14. Search tool
Chapter 4 Dashboard, Target, and Engagement Tools
61
Thenextengagementtoolisthe‘Findscripts’asshowninFigure4-16.This
tool simply searches for all scripts within the scope of the target being selected.
The next engagement tool is the ‘Find references’ as shown in Figure 4-­17.
This tool lists down all the Burp Suite components where it is able to find
any reference of the selected target. For example, the URL ­
‘demo.testfire.
net’ appeared in Scanner as well as Target within the Burp Suite as shown
in Figure 4-17.
Figure 4-16. Script searching tool
Chapter 4 Dashboard, Target, and Engagement Tools
62
The next engagement tool is the ‘Target Analyzer’ as shown in Figure 4-­18.
This utility provides statistics mostly around sizing of the application in
terms of the number of dynamic URLs, number of static URLs, number of
parameters, etc. These statistics help the tester to get an estimate of effort
that will be required to test the application.
Figure 4-17. Reference finder tool
Figure 4-18. The target analyzer
Chapter 4 Dashboard, Target, and Engagement Tools
63
The next engagement tool is the ‘Content Discovery’ as shown in
Figure 4-19. This tool helps define the spidering or crawling rules. For
instance, this helps define spidering rules when a new target is discovered,
like how much length and breadth of it should be spidered or whether
to spider only files or directories as well. This creates a well-structured
sitemap. This is optional and can be left as the default.
The next engagement tool is the ‘Schedule Task’ as shown in Figure 4-­20.
This is a simple utility to schedule any of the Burp Suite tasks. Using this
you can either pause or resume any of the tasks.
Figure 4-19. The content discovery tool
Chapter 4 Dashboard, Target, and Engagement Tools
64
The next engagement tool is the ‘Manual Testing Simulator’ as shown
in Figure 4-21. This tool will send out HTTP requests to the target at
random intervals and can help keep the session alive. This can be helpful
in a scenario where the tester is on break and there’s a possibility of the
application session getting timed out due to inactivity.
Figure 4-20. The Burp Suite task scheduler
Chapter 4 Dashboard, Target, and Engagement Tools
65
Summary
In this chapter we learned the basics of the Burp Suite dashboard, target
tab, and also discussed several useful engagement tools.
In the next chapter we’ll learn about how the Burp Suite Intruder can
be used to automate attack scenarios like Brute Force, etc.
Exercises
• Browse through any of the target URLs of choice and
observe the changes in the dashboard and target tab.
• Run each of the engagement tools against the selected
target.
Figure 4-21. Manual testing simulator
Chapter 4 Dashboard, Target, and Engagement Tools
67
© Sagar Rahalkar 2021
S. Rahalkar, A Complete Guide to Burp Suite,
https://doi.org/10.1007/978-1-4842-6402-7_5
CHAPTER 5
Intruder
In the last chapter, we saw some basics about the Burp Suite dashboard,
target, and engagement tools. Now that we have seen the basics of
intercepting requests and interpreting the summary on the dashboard,
we will move ahead with using the Intruder tool. Intruder has advanced
fuzzing capabilities that can be used in various attack scenarios.
Introduction to Intruder
Before we get into the details of various options within Intruder, it’s
important to understand what Intruder is and how it can be helpful in web
application security testing. Intruder is part of Burp Suite, which can be
used effectively for fuzzing and performing a brute force attack.
There might be an application with a login page wherein the user
needs to enter credentials to proceed further. From a security testing
perspective, it would be worthwhile to test this login page for default
credentials, weak passwords, or lockout mechanisms. This is where
Intruder can come in handy. Given a list of usernames and passwords,
Intruder can try all those combinations to see if any of them match.
We can also consider another scenario wherein we have an interesting
request that we wish to investigate further to check if it’s vulnerable to SQL
injection or cross-site scripting. Again, Intruder can help with this. We can
simply point Intruder to the URL and parameter we wish to test and feed
68
it with a list of SQL injection or cross- site scripting payloads. It will then
try and insert all the payloads we provided into the parameter we want
to test and get us the responses. Once this is done, we need to check the
responses to see if any of the payload actually resulted in exploitation of
the vulnerability.
Thus Intruder tremendously helps in any of the test scenarios where
we have two of the following things:
1. A URL and a parameter to test
2. List of payloads to be submitted to the parameter
Now let’s try to understand how we can send a request to Intruder. We
have already seen the target tab and the hotkeys in previous chapters. Any
request can be sent to Intruder in two ways:
1. Right-click the request you wish to send and click on
‘Send to Intruder’ as shown in Figure 5-1.
Figure 5-1. Send request to Intruder
Chapter 5 Intruder
69
2. Select the request you want to send and press the
hotkey combination ‘Ctrl + I’
.
Now that we have sent the request to Intruder, let’s see what options
need to be configured further.
Target Tab
The first tab in Intruder is the Target tab. This lists the target URL and port
that we wish to attack through Intruder as shown in Figure 5-2.
There’s also an option to use HTTPS in case the target URL is using a
secure communication channel.
Positions
The next tab within Intruder is the Positions tab as shown in Figure 5-3.
Figure 5-2. Configuring the attack target in Intruder
Chapter 5 Intruder
70
Whenever a request is sent to Intruder, it scans the request for probable
insertion points and marks them as variables preceding and ending with
the ‘$’ sign. There are three options with regard to selecting the insertion
points:
1. Add $ – This option is used to add a new insertion
point. Simply point the cursor to the start and end of
the insertion point and click on ‘Add $’
.
2. Clear $ – This option will simply remove all the
insertion points that were either selected manually
or automatically.
3. Auto $ – This option will scan the request and try
to automatically set insertion points marking them
with the ‘$’ sign.
Once we are sure about the insertion points or parameters that we
want to target, the next step is selecting the type of attack. There are four
different attack types available as shown in Figure 5-4.
Figure 5-3. Configuring the positions in Intruder
Chapter 5 Intruder
71
The four attack types are the following:
1. Sniper – This type of attack uses a single set of
payloads. In this case Intruder inserts payloads into
each of the insertion points at once and then iterates
through it.
2. Battering ram – This type of attack uses a single set
of payloads. In this case Intruder iterates through
payloads by inserting the same payload at all
insertion points at once.
3. Pitchfork – This type of attack uses multiple sets
of payloads. In this case Intruder uses different
payload for each of the insertion points.
Figure 5-4. Selecting the attack type in Intruder
Chapter 5 Intruder
72
4. Cluster bomb – This type of attack uses multiple
sets of payloads. For each of the defined insertion
points, there’s a different payload set. Intruder
iterates through each of the payload sets and all
permutations of payload combinations are then
tested. Due to the number of possible permutations
and combinations in the case of a cluster bomb, a
large number of requests would be generated.
Choosing the correct attack type depends on the attack scenario and
the number of insertion points that need to be targeted simultaneously.
See Figure 5-5.
Once the payload positions are configured and type of attack is
selected, we can move ahead to configuring the actual payloads.
Figure 5-5. Attack type and positions in Intruder
Chapter 5 Intruder
73
Payloads
Payload is the data that Intruder would iteratively insert in the selected
insertion points. Payloads can differ widely based on the scenario or
the attack that we are targeting. In the case of the login page that we are
discussing, the payload would be a list of probable passwords. Burp Suite
provides various payload types and the most commonly used one is the
list. You can create your own list by adding elements one at a time as
shown in Figure 5-6 or you can also select a predefined list that Burp Suite
offers readily.
Burp Suite has several predefined lists in the form of usernames,
passwords, short words, fuzzing payloads for SQL injection and cross-site
scripting, directories, extensions, etc. Depending on the type of attack,
we can either use the predefined list or create our own list as shown in
Figure 5-7.
Figure 5-6. Selecting payloads in Intruder
Chapter 5 Intruder
74
Now that we have configured the positions as well as the payloads, we
can launch the attack by clicking the ‘Start attack’ button. A new window
will pop up as shown in Figure 5-8, and the payloads we provided will be
submitted in insertion points we defined earlier – one request at a time.
Figure 5-7. Selecting Intruder payloads from various options
Chapter 5 Intruder
75
From Figure 5-8, we can see that Intruder sent five requests each with
a different payload. Upon observing and comparing the content length,
we can notice that for payload ‘admin’ the response was different. Hence
it could be the password for the admin user we are trying to log in. We can
then easily verify this by manually logging into the target application.
Figure 5-8. Intruder attack results
Chapter 5 Intruder
76
Options
The last part of Intruder is the ‘Options’ tab. We have already seen that
Intruder works as a fuzzing tool or it can perform a brute force attack.
This implies the Burp Suite engine would have to send a large number
of requests, await the responses, and then process them based on a
predefined ruleset. The ‘Request Engine’ option as shown in Figure 5-9
helps configure the number of parallel threads, number of retries on the
network failure, and pause before the retry duration. The values as shown
in Figure 5-9 are default and preconfigured. However depending on
specific use cases, these values can be tailored accordingly.
Intruder sends a large number of requests to the target along with
several permutations and combinations of payloads. The responses can be
overwhelming to go through. This is where the ‘Grep Match’ feature comes
in handy as shown in Figure 5-10. With this feature we can configure the
Intruder engine to flag or highlight interesting responses having keywords
Figure 5-9. Intruder configuration options
Chapter 5 Intruder
77
like error, exception, illegal, fail, stack, access, directory, etc. If Intruder
finds these keywords in any of the responses, they will be explicitly
highlighted, making the analysis much easier.
Summary
In this chapter we learned about using the Intruder tool to perform fuzzing
and brute force attacks. We started off the chapter by learning how to
send requests to Intruder, configuring positions, payloads, and finally
launching the attack and interpreting the results. We also saw some of the
configurable options for Intruder.
In the next chapter we’ll see some additional useful tools within the
Burp Suite like Repeater, Comparer, Decoder, and Sequencer.
Figure 5-10. Extracting relevant data from Intruder results
Chapter 5 Intruder
78
Exercises
1. Use Intruder to detect cross-site scripting
vulnerability in any of the vulnerable applications.
2. Use Intruder to detect SQL injection vulnerability in
any of the vulnerable applications.
Chapter 5 Intruder
79
© Sagar Rahalkar 2021
S. Rahalkar, A Complete Guide to Burp Suite,
https://doi.org/10.1007/978-1-4842-6402-7_6
CHAPTER 6
Repeater, Comparer,
Decoder, and
Sequencer
In the last chapter we learned about how Intruder can be used for fuzzing
and performing brute force attacks. In this chapter we will look at some
more Burp Suite tools like Repeater, Comparer, Decoder, and Sequencer.
Repeater
Repeater, as the name suggests, is a simple tool within Burp Suite that
helps in replaying requests. We have already seen in previous chapters
that when we browse an application through Burp Suite, a large number of
requests are captured. Not all of the captured requests can be helpful for
further testing or analysis. However, there could be a handful of requests
with interesting parameters that are worth spending time on for further
analysis. Repeater helps precisely in this scenario. If we find a particular
request worth investigating further, we can simply send it to Repeater.
Once in Repeater, we can play around with the request the way we want;
tamper its headers, parameters etc.; and then send the request to the
application and see how it responds. Repeater is a very simple yet powerful
tool and has an easy interface as shown in Figure 6-1.
80
The Repeater tab can be directly accessed in Burp Suite. By default it
opens up empty and we need to feed it with an appropriate HTTP request
data. To specify the target, click on the ‘edit’ icon next to ‘Target’ and a new
window will pop up as shown in Figure 6-2, where we can enter Host and
Port details we wish to interact with.
Figure 6-1. The Repeater console
Figure 6-2. Configuring the target details in Repeater
Chapter 6 Repeater, Comparer, Decoder, and Sequencer
81
The more convenient way of sending data to Repeater is as shown in
Figure 6-3. Simply right-click any of the requests that you wish to send
to Repeater for further analysis and click on ‘Send to Repeater’
. Another
alternative is jto ust select the request to be sent to Repeater and press the
hotkey ‘Ctrl + R’
.
The request to be investigated is now sent to Repeater as shown in
Figure 6-4. The request tab contains the HTTP request we selected and the
response tab is blank as we haven’t sent the request yet.
Figure 6-3. Sending HTTP request to Repeater
Figure 6-4. Raw HTTP request in Repeater
Chapter 6 Repeater, Comparer, Decoder, and Sequencer
82
The Request window has several tabs within as shown in Figure 6-5.
One of the tabs is ‘Params’
, which lists all the parameters associated by
default with the request we loaded. We can edit the existing parameters,
add new parameters, or even delete any of the existing parameters. It
is always interesting to see how the application responds to all of these
parameter edits.
The next tab is the ‘Headers’ tab as shown in Figure 6-6, which lists all
the default headers to be sent along with the request. Again, all the header
values are editable: we can edit the existing values, add new header fields,
and remove any of the existing header fields as well.
Figure 6-5. Parameter tab in Repeater
Chapter 6 Repeater, Comparer, Decoder, and Sequencer
83
Once we set the required parameters and header values, we can click
on the ‘Send’ button as shown in Figure 6-7 and we get a response from the
application, which is shown in the ‘Response’ tab.
Figure 6-6. Headers tab in Repeater
Figure 6-7. Response tab in Repeater
Chapter 6 Repeater, Comparer, Decoder, and Sequencer
84
In this case the response received was HTTP status 302, which means
the page is meant to redirect. We can click the ‘Follow redirection’ option
and then get the final response as shown in Figure 6-8.
The response shown here is raw text and at times can be difficult
to interpret. Hence we can click the ‘Render’ tab within the ‘Response’
section to visually load the response as if we were seeing it in the browser,
as shown in Figure 6-9.
Figure 6-8. Response tab in Repeater
Figure 6-9. Rendering the response in Repeater
Chapter 6 Repeater, Comparer, Decoder, and Sequencer
85
Repeater also provides an option to view the response in the real
browser. To do this, simply right-click on the response that you wish to
see in the browser, and click on ‘Show response in browser’ as shown in
Figure 6-10.
Burp Suite will pop up another window as shown in Figure 6-11, with a
link that needs to be copied into the browser.
Once the link generated by Burp Suite is copied in the browser, the
response gets rendered accordingly.
Figure 6-10. Viewing the response in the Browser
Figure 6-11. Show response in the Browser
Chapter 6 Repeater, Comparer, Decoder, and Sequencer
86
Comparer
In the last section we got familiar with the Repeater tool. Once the request
is sent to Repeater, there is wide scope to tamper the request parameter or
header fields and send it across to the target application. The responses in
each case may vary depending on what parameters or header fields that
were set in the request. There could be multiple responses, each of them
looking quite similar. This is where the Comparer tool comes in handy.
Comparer simply compares content head to head and highlights differences
if there are any. To send a response to Comparer, simply right-­
click the
response and click on ‘Send to Comparer’ as shown in Figure 6-­12.
Now as the Comparer needs at least two text blocks to compare, we
send another response to Comparer as shown in Figure 6-13.
Figure 6-12. Sending Repeater response to the Comparer
Chapter 6 Repeater, Comparer, Decoder, and Sequencer
87
We can now navigate to the Comparer tab as shown in Figure 6-14 and
see both responses that we sent from Repeater earlier.
Now since we need to find differences in words from both of the
responses, we click on the ‘Words’ button and get a new window opened as
shown in Figure 6-15.
Figure 6-13. Sending Repeater response to the Comparer
Figure 6-14. The Comparer console
Chapter 6 Repeater, Comparer, Decoder, and Sequencer
88
Comparer will now highlight the text changes in two of the parallel
windows.
Decoder
Web applications commonly use various encoding schemes like Ascii,
HTML, Base 64, etc. From a security testing perspective, it's very common
to encounter such encoded strings during testing. Burp Suite Decoder is a
simple utility that can encode or decode text in a format of a URL, HTML,
Base 64, ASCII hHx, Hex, Octal, Binary, and Gzip. Simply navigate to the
Decoder tab as shown in Figure 6-16 and enter the text that needs to be
decoded.
Figure 6-16. Decoding Base 64 data
Figure 6-15. Comparing the responses in the Comparer
Chapter 6 Repeater, Comparer, Decoder, and Sequencer
89
In this case we entered a Base 64 encoded value and then clicked
on ‘Decode as’ Base 64 to get the decoded output in the next window as
admin:admin.
We can also use this tool to encode any plain text as shown in Figure 6-­17.
We simply entered the plain text scriptalert(“XSS”)/script and
then clicked on ‘Encode as’ the URL to get the encoded output in the next
window.
Sequencer
Web applications depend a lot on tokens, session IDs, or other such
unique and random identifiers. From a security perspective, it is important
to test the randomness or uniqueness of these tokens and identifiers. If the
tokens aren’t strong and random enough, then attackers can easily brute
force them and get unauthorized access.
Burp Suite Sequencer is a tool that helps us test the strength of
application tokens. We can send any request to Sequencer just by ­
right-­
clicking the request and clicking on ‘Send to Sequencer’ as shown in
Figure 6-18.
Figure 6-17. Encoding data using the Burp Suite Decoder
Chapter 6 Repeater, Comparer, Decoder, and Sequencer
90
We can now navigate to the Sequencer tab as shown in Figure 6-19.
We can clearly see the Sequencer has automatically parsed the request
and selected the JSESSIONID token present in the cookie. This token
would now be analyzed for its strength and randomness. To start the test,
simply click on ‘Start live capture’ and a new window will open up as
shown in Figure 6-20.
Figure 6-19. The Burp Suite Sequencer
Figure 6-18. Sending HTTP request to Sequencer
Chapter 6 Repeater, Comparer, Decoder, and Sequencer
91
The live capture starts and we can pause or resume it any time we
wish. However, it’s important to note that to effectively analyze the token
strength, a sample size of at least 100 should be considered. Once the
capture is complete, Sequencer shows us the result, which was found to
be “excellent” in this case. So the token JSESSIONID is strong, unique,
random, and hence safe to use.
Sequencer also allows us to load a sample of tokens manually and
then analyze them. To do this, simply navigate to the ‘Manual load’ tab in
Sequencer as shown in Figure 6-21.
Figure 6-20. Session ID analysis using Sequencer
Chapter 6 Repeater, Comparer, Decoder, and Sequencer
92
We can now copy and paste a sample of tokens and then analyze them
accordingly.
Summary
In this chapter we saw how to tamper and replay requests using Repeater,
then perform a head-to-head comparison of responses using Comparer.
We then learned about the Decoder tool, which helps encode and decode
text in various formats. Lastly we got familiar with the Sequencer tool,
which can be used to assess the effectiveness of tokens.
In the next chapter, we’ll learn about some additional useful tools
within the Burp Suite like Infiltrator, Collaborator, Clickbandit, and CSRF
PoC Generator.
Figure 6-21. Manually loading tokens for analysis
Chapter 6 Repeater, Comparer, Decoder, and Sequencer
93
Exercises
1. Send any of the requests to Repeater and try to
tamper with its parameters and header fields.
Then send each of the requests and analyze the
responses.
2. Compare the multiple responses using Comparer.
3. Use the Decoder tool to encode text in URL, HTML,
and Base 64 formats.
4. Assess the token strength of the token from any of
the requests captured.
Chapter 6 Repeater, Comparer, Decoder, and Sequencer
95
© Sagar Rahalkar 2021
S. Rahalkar, A Complete Guide to Burp Suite,
https://doi.org/10.1007/978-1-4842-6402-7_7
CHAPTER 7
Infiltrator,Collaborator,
Clickbandit, and
CSRF PoC Generator
In the last chapter we looked at some Burp Suite tools like Repeater,
Sequencer, Decoder, and Comparer. In this chapter we will continue to
explore more useful tools like Infiltrator, Collaborator, Clickbandit, and
CSRF PoC (proof-of-concept) generator.
Infiltrator
Burp Suite Infiltrator is a tool that instruments the target web application
so that the vulnerability detection by the Burp Suite scanner becomes
more efficient and accurate. Infiltrator makes irreversible changes in the
code and essentially hooks into the target application. This way, it helps
the Burp Suite scanner get more visibility into the application code and
potentially detect unsafe calls and functions.
96
As the Infiltrator makes irreversible changes to the target application
code, it is advisable to run it only for a test instance and not on a
production instance. Currently, the Infiltrator is supported if the target
application is using any of the following technologies:
• Java
• Groovy
• Scala
• Other JVM language (JRE versions 1.4 - 1.8)
• C#
• Visual Basic
• Other .Net language (.Net versions greater than 2.0)
To get started with the Infiltrator, click on the Burp menu and then
select ‘Burp Infiltrator’ as shown in Figure 7-1.
A new window will pop up as shown in Figure 7-2. This wizard will
help us generate the Infiltrator agent.
Figure 7-1. Navigating to the Burp Suite Infiltrator
Chapter 7 Infiltrator, Collaborator, Clickbandit, and CSRF PoC Generator
97
We need to select the technology our application is using like Java or
.NET and click on Next. Then the wizard will ask the location where we
wish to save the Infiltrator agent, as shown in Figure 7-3.
Figure 7-2. Generating the Infiltrator agent
Figure 7-3. Generating the Infiltrator agent
Chapter 7 Infiltrator, Collaborator, Clickbandit, and CSRF PoC Generator
98
Next, the wizard will simply generate the Infiltrator agent and save it to
the location we selected earlier, as shown in Figure 7-4.
The important thing to note here is the Infiltrator agent should be in
the same directory where the target application is located as shown in
Figure 7-5.
NowthatboththeInfiltratoragentandthetargetapplicationareinthesame
directory,wecanopenacommandpromptandtypecommand‘java-jarburp_
infiltrator.jar’asshowninFigure7-6.
Figure 7-4. Generating the Infiltrator agent
Figure 7-5. Newly generated Infiltrator agent
Chapter 7 Infiltrator, Collaborator, Clickbandit, and CSRF PoC Generator
99
The Infiltrator will now run and modify the Java applications in the
directory. This is a one-time procedure, and the application needs to
restart once the patched code is available. Burp Infiltrator also makes use
of Collaborator, which we will be seeing in the next section.
Collaborator
Collaborator is a tool provided by Burp Suite that helps in attacks like
Server Side Request Forgery (SSRF) or any of the out-of-band attacks. The
Burp Suite Collaborator service helps by generating random payloads
in the form of hostnames. These payloads can then be used as part of
requests in various attack scenarios. If the attack is successful, then an
interaction occurs between the target application server and the Burp
Collaborator server. Then using the Burp Collaborator client, we can poll
and check if any such interactions have happened.
To get started with the Burp Collaborator, simply click on the Burp
menu and click “Burp Collaborator client’
. A new window will pop up as
shown in Figure 7-7.
Figure 7-6. Executing the Infiltrator agent
Chapter 7 Infiltrator, Collaborator, Clickbandit, and CSRF PoC Generator
100
Now click on the ‘Copy to clipboard’ button and paste its value in the
notepad as shown in Figure 7-8.
Figure 7-7. The Burp Suite Collaborator client
Figure 7-8. Configuring the Collaborator client
Chapter 7 Infiltrator, Collaborator, Clickbandit, and CSRF PoC Generator
101
The random value generated by the Burp Collaborator can now
be used in payloads in requests sent as part of an attack. The Burp
Collaborator client automatically polls the Collaborator server after every
60 seconds to check if there has been any interaction. This duration can be
customized or you can simply click on the ‘Poll now’ button to manually
check for Collaborator interactions.
Clickbandit
Clickjacking is one of the very common attacks on web applications. Using
clickjacking, the attacker tries to trick the user into clicking something
different than what the user sees visually. If successful, the attacker can
get access to confidential information. Clickjacking is also known as a UI
redressal attack, as the attacker tries the deceptive technique of creating a
fake UI and then tricks the victim into executing malicious actions or events.
Burp Suite offers a utility called ‘Clickbandit’ that significantly
simplifies the process of generating Proof-of-Concept for an application
that is vulnerable to Clickjacking.
To get started with the Clickbandit tool, simply go to the Burp menu and
click on ‘Burp Clickbandit’
. A new window will pop up as shown in Figure 7-9.
Figure 7-9. The Burp Suite Clickbandit tool
Chapter 7 Infiltrator, Collaborator, Clickbandit, and CSRF PoC Generator
102
This window has steps listed that we need to follow in order to
generate the Clickjacking Proof-of-Concept. The first step is to click on
the ‘Copy Clickbandit to clipboard’ button. The next step is to open the
browser and press function key F12 to go into the browser console as
shown in Figure 7-10.
To proceed further, we need to paste the Clickbandit code into this
browser console, which we copied earlier as shown in Figure 7-11.
Figure 7-10. Target for Clickbandit
Chapter 7 Infiltrator, Collaborator, Clickbandit, and CSRF PoC Generator
103
Once the code is copied into the browser console, simply press Enter
and you’ll notice the Burp Clickbandit UI appears on top of the page as
shown in Figure 7-12.
Figure 7-11. Copying the Clickbandit code in browser console
Chapter 7 Infiltrator, Collaborator, Clickbandit, and CSRF PoC Generator
104
Now we need to perform and record the actions that we wish to
include as part of the Clickjacking attack. Once all the required actions are
done, click on the save button and you will be able to save a file named
‘clickjacked.html’ as shown in Figure 7-13.
Figure 7-12. The Clickbandit UI
Figure 7-13. Saving the Clickbandit code
Chapter 7 Infiltrator, Collaborator, Clickbandit, and CSRF PoC Generator
105
You can now open the file ‘clickjacked.html’ separately in the browser
as shown in Figure 7-14.
You’ll notice that the actions you captured earlier are now being
replayed, and if you click, then you get a message ‘You’ve been
clickjacked!’ as shown in Figure 7-15.
Figure 7-14. Executing the Clickbandit code
Figure 7-15. Executing the Clickbandit code
Chapter 7 Infiltrator, Collaborator, Clickbandit, and CSRF PoC Generator
106
CSRF
Cross-Site Request Forgery, commonly known as CSRF, is another type of
attack on web applications that exploits session management flaws to trick
the victim into performing unwanted actions. Burp Suite has a utility that
makes it very easy to generate Proof-of-Concept for CSRF vulnerability.
We first need to identify and confirm the request for which we wish to
generate the CSRF Proof-of-Concept code. Once the request is finalized,
simply right-click the request, go to ‘Engagement tools’
, and click on
‘Generate CSRF PoC’ as shown in Figure 7-16.
Now, a new window will pop up as shown in Figure 7-17, which has the
POST request along with the CSRF code.
Figure 7-16. Sending request to CSRF PoC generator
Chapter 7 Infiltrator, Collaborator, Clickbandit, and CSRF PoC Generator
107
It is now easy to modify the CSRF code as required and then we can
either directly test it in the browser or generate a separate HTML file. To
test the CSRF code in the browser, click on the ‘Test in browser’ button,
and a new window will pop up as shown in Figure 7-18.
Figure 7-17. CSRF PoC generator
Chapter 7 Infiltrator, Collaborator, Clickbandit, and CSRF PoC Generator
108
Now click on the ‘Copy’ button, open the browser, and paste into the
address bar as shown in Figure 7-19.
Figure 7-18. CSRF PoC generator
Figure 7-19. Verifying the CSRF PoC in browser
Chapter 7 Infiltrator, Collaborator, Clickbandit, and CSRF PoC Generator
109
Now click on the button ‘Submit request’
, and the CSRF code will get
executed as shown in Figure 7-20.
Summary
In this chapter we learned about using Intruder for instrumenting
applications and increasing detection capabilities of the Burp Scanner.
Then we saw the Burp Collaborator, which can be effectively used in out-­
of-­
band attacks like SSRF. We then looked at the Clickbandit tool that helps
generate proof-of-concept code for applications vulnerable to clickjacking;
and lastly we glanced through the CSRF PoC generator, which helps us
quickly generate and test proof-of-concept code for Cross-Site Request
Forgery attacks.
In the next chapter, we’ll see the automated scanning and reporting
capabilities of the Burp Suite.
Figure 7-20. Verifying the CSRF PoC in browser
Chapter 7 Infiltrator, Collaborator, Clickbandit, and CSRF PoC Generator
110
Exercises
1. Use Infiltrator to instrument any of your target Java
applications.
2. Find a vulnerable CSRF request and try to generate a
proof-of-concept using the CSRF PoC generator.
3. Generate a clickjacking proof-of-concept code for
your target web application.
Chapter 7 Infiltrator, Collaborator, Clickbandit, and CSRF PoC Generator
111
© Sagar Rahalkar 2021
S. Rahalkar, A Complete Guide to Burp Suite,
https://doi.org/10.1007/978-1-4842-6402-7_8
CHAPTER 8
Scanner
and Reporting
In the last chapter, we learned about various tools like Infiltrator,
Collaborator, Clickbandit, and CSRF PoC generator. In this chapter,
we’ll explore the features and capabilities of the Burp Suite scanner for
automated vulnerability detection.
Scan Types
So far throughout the book, we have seen several capabilities of Burp Suite
that are useful for manual testing. However, Burp Suite also provides a web
application vulnerability scanner that automates the process of finding
vulnerabilities. This is indeed a very feature-rich scanner and is capable of
detecting potential web vulnerabilities.
The Burp Suite offers two types of scans: Passive Scan and Active
Scan. The passive scan runs in the background, by default, while we
browse an application through Burp Suite. A passive scan simply monitors
the traffic and tries to list vulnerabilities like missing security flags in
cookies, missing security headers, traffic being sent over unencrypted
communication channels, etc. Thus the passive scanner doesn’t attempt
to inject any payloads into any of the insertion points, but rather just
highlight vulnerabilities that can be found only by passively monitoring
ongoing requests and responses. The active scan goes a step further and
112
tries to insert payloads into insertion points and check if parameters are
vulnerable. Active scanning is a more intense technique; however, it does a
better job in finding vulnerabilities that a passive scanner may never find.
We’ll now look further into the details of performing an active scan using
Burp Suite.
Crawl and Audit
Active scanning is usually a two-step process. The first step involves
crawling or spidering the application and the second step involves
attacking the parameters with payloads. The Burp Suite scanner offers two
options: either crawl and audit or just crawl. To start a new audit, go to the
Dashboard tab and click on ‘New scan’ as shown in Figure 8-1.
A new window will pop up as shown in Figure 8-2. We select the option
‘Crawl and audit’
. Next, we need to specify the target URL that we wish to
scan. In this case, we enter the target URL as ‘demo.testfire.net’
.
Figure 8-1. New scan task
Chapter 8 Scanner and Reporting
113
Next is the scoping section as shown in Figure 8-3. The URL’s that we
wish to be part of the audit need to be specified under the ‘Included URL
prefixes’ tab, and if there are any particular URLs that we don’t want to
be included in the audit, then those need to be explicitly added under
‘Excluded URL prefixes.’
Figure 8-2. New scan configuration
Chapter 8 Scanner and Reporting
114
Now that we have configured the target URL, we just need to click
on ‘OK’ and the crawl and audit activity starts as shown in Figure 8-4.
However, it's important to note that this activity will start with a default
scan configuration.
Figure 8-3. New scan configuration
Figure 8-4. Scan tasks in progress
Chapter 8 Scanner and Reporting
115
In the next section, we’ll be looking at customizing the scan
configuration.
Scan Configuration
In the previous section, we configured and initiated a crawl and audit
task on a target URL but with default configuration settings. In this
section, we’ll take a look at how the scan configuration can be tailored to
suit our needs. To customize the scan configuration, click on the ‘Scan
configuration’ tab as shown in Figure 8-5.
The scan configuration allows us to customize crawl settings as well as
the audit settings. We’ll first go through the crawl configuration settings.
Click on the ‘New’ button and select ‘Crawl’
. A new window will pop up as
shown in Figure 8-6.
Figure 8-5. Scan configuration
Chapter 8 Scanner and Reporting
116
The crawl optimization configuration allows us to set the maximum
link depth up to which we wish to crawl along with the crawl strategy,
which is set to normal by default. We can change the crawling strategy
to fast by selecting it through the drop-down menu, depending on the
particular scan scenario.
Next, we can configure the crawl time limits as shown in Figure 8-7.
If the target application is large and complex, then it might take a lot of
time for crawling. We can set a limit to this by defining the maximum time
that we wish to spend on crawling the application. We can also limit the
crawl by the number of locations discovered or the maximum number of
requests made during the crawl function.
Figure 8-7. Crawl limit configuration
Figure 8-6. Crawl optimization settings
Chapter 8 Scanner and Reporting
117
The next configuration setting is related to the login functions as
shown in Figure 8-8. It might happen that the target application has a login
function. In such a case, Burp Suite will even try to register a new test user.
The next configuration setting is related to handling application errors
during a crawl function as shown in Figure 8-9. There could be multiple
reasons behind application errors, like an authentication failure, network
problems, etc. This configuration setting tells the Burp Suite scanner
to pause the crawl and audit function if there are a certain number of
consecutive application errors.
Figure 8-8. Login function configuration
Chapter 8 Scanner and Reporting
118
The next set of configuration settings are miscellaneous as shown in
Figure 8-10. This includes settings on whether we want the Burp Suite scanner
to automatically submit forms or if we wish to customize the user-­
agent if we
want to fetch robots.txt and the sitemap, etc.
Figure 8-9. Configuring application errors during Crawl
Chapter 8 Scanner and Reporting
119
The next set of configuration settings are related to the audit function.
To start with, the first audit configuration setting is ‘Audit Optimization’ as
shown in Figure 8-11. This setting allows us to configure audit speed and
accuracy. The audit speed can be set to either fast, normal, or thorough,
while the audit accuracy can be set to normal or to minimize false
positives.
Figure 8-10. Miscellaneous crawl configuration
Chapter 8 Scanner and Reporting
120
The next audit configuration setting is related to the type of issues
reported as shown in Figure 8-12. The Burp Suite scanner detects a variety
of issues. However, during a particular test scenario, it might so happen
that only a particular type of issue needs to be tested. In such a case, it
won’t be worth spending time on testing all other types of issues. Hence
this configuration setting allows us to customize the type of issues that we
want to be tested during the scan.
Figure 8-11. Audit optimization configuration
Chapter 8 Scanner and Reporting
121
The next audit configuration setting is related to handling application
errors during the audit function, as shown in Figure 8-13. We have already
seen a similar configuration setting for the crawl function. This setting
helps configure the number of failures after which the audit task would be
paused.
Figure 8-12. Type of issues to be detected during an audit
Chapter 8 Scanner and Reporting
122
The next audit configuration setting is related to the type of insertion
points that we want the Burp Suite scanner to attack during the audit
function as shown in Figure 8-14. Selecting all the types of insertion points
will increase the possibility of finding more vulnerabilities, but at the same
time it will also take longer to finish the audit.
Figure 8-13. Configuring application errors during Audit
Figure 8-14. Configuring insertion point types
Chapter 8 Scanner and Reporting
123
All the crawl and audit scan configuration settings we saw so far are
set to optimal values by default. We can quickly trigger a new crawl and
audit task using the default scan configuration. However, depending on
particular scan scenarios, it might be required for you to customize the
scan configuration settings.
Application Login
The next important scan configuration setting is configuring the
‘Application login’ as shown in Figure 8-15. While scanning the target
application, we may come across certain pages that do not require
authentication, while there could be a few pages that can be accessed only
after authentication. If we want the Burp Suite scanner to audit the pages
behind authentication as well, then we need to provide credentials.
Figure 8-15. Configuring application login
Chapter 8 Scanner and Reporting
124
Credentials can be added by simply clicking on the ‘New’ button and
providing the required username and password.
Resource Pools
The last scan configuration option is “Resource Pool” as shown in
Figure 8-­16. The resource pool helps define the system resources that will
be used across multiple tasks. By default, the resource pool is created,
which allows for a maximum of 10 concurrent requests. We can leave this
to default unless we want to do multitasking within the same Burp Suite
project.
Figure 8-16. Configuring resource pools
Chapter 8 Scanner and Reporting
125
Reporting
Reporting the issues in a presentable format is as important as finding
them. Burp Suite offers an excellent reporting feature that helps us
generate a report in the required format with all relevant extract about
the vulnerability. The report, once generated, can be shared with relevant
stakeholders for further action.
Once the crawl and audit task is complete, all the issues that were
found during the scan are listed in the ‘Issue activity’ pane as shown in
Figure 8-17. We now simply need to select the issues that we wish to be
part of the report. To do this, simply right-click the issue that needs to be
reported and click ‘Report issue.’
The Burp Suite reporting wizard will now ask us about the format of
the report we wish to have as shown in Figure 8-18. Currently, the Burp
Suite supports generating reports in HTML or XML formats.
Figure 8-17. Exporting issues to report
Chapter 8 Scanner and Reporting
126
Next, we need to select which details about the issue are required in
the report as shown in Figure 8-19.
W then need to select whether we want full HTTP requests and
responses for the reported issues or only the relevant extracts as shown in
Figure 8-20.
Figure 8-18. Selecting format for the report
Figure 8-19. Selecting type of details to be included in the report
Chapter 8 Scanner and Reporting
127
Lastly, we need to select the name and location where we want the
report to be generated along with the title of the report as shown in
Figure 8-21.
Figure 8-20. Selecting requests and response formats for report
Chapter 8 Scanner and Reporting
128
Now the Burp Suite reporting wizard will generate a vulnerability
report as shown in Figure 8-22.
Figure 8-21. Configuring location where the report will be saved
Figure 8-22. Generating the report
Chapter 8 Scanner and Reporting
129
The generated report can them be viewed in any of the browsers as
shown in Figure 8-23. The report shows a summary of findings based on
confidence as well as severity.
The report also shows vulnerability in detail along with the relevant
request and response as shown in Figure 8-24.
Figure 8-23. Viewing the report in the browser
Chapter 8 Scanner and Reporting
130
Summary
In this chapter, we learned about the Burp Suite scanner and how it can be
customized to effectively find application vulnerabilities in an automated
manner.
In the next chapter we’ll see how to use the Burp Suite Extender to
install additional plugins and enhance the capabilities.
Exercises
1. Scan any of the target web applications using the
crawl and audit function of Burp Suite.
2. Generate an HTML report for the issues found
during the scan.
Figure 8-24. Vulnerability details in the report
Chapter 8 Scanner and Reporting
131
© Sagar Rahalkar 2021
S. Rahalkar, A Complete Guide to Burp Suite,
https://doi.org/10.1007/978-1-4842-6402-7_9
CHAPTER 9
Extending Burp Suite
In the last chapter, we learned about the Burp Suite scanner, which
effectively helps in automating vulnerability detection. In this chapter,
we’ll be exploring the Burp Suite extender feature through which we can
further enhance the capabilities of Burp Suite.

Burp Suite Extensions
So far, throughout the book, we have seen various capabilities of Burp
Suite for manual as well as automated vulnerability detection. We have
explored various tools and utilities within Burp Suite that can be leveraged
for specific tasks.
Burp Suite has now evolved more like a platform that is flexible enough
to accommodate external functionalities and utilities. As we have already
seen, Burp Suite does provide numerous capabilities out of the box.
However, these capabilities can be extended further using extensions.
The Burp Suite Extensions come in various forms as below:
Default extensions – These extensions are listed
by default, out of the box in any of the Burp Suite
setups, and can be installed through the Burp Suite
Extender.
Pro extensions – These are extensions that
can be installed and run only on the Burp Suite
Professional Edition.
132
Regular extensions – These are extensions that can
be installed and run on the Burp Suite Community
Edition as well as the Professional Edition.
Other extensions – Burp Suite has opened up
APIs that developers can write with new custom
extensions. Such extensions are not part of the
official extension store but need to be downloaded
and installed manually.
BApp Store
The easiest way to install an extension in Burp Suite is through the BApp
Store. To access the BApp Store, simply navigate to Extender ➤ BApp Store
as shown in Figure 9-1.
The BApp Store has a very easy-to-use interface with two panes as
shown in Figure 9-2.
Figure 9-1. BApp Store
Chapter 9 Extending Burp Suite
133
The left pane lists all the available extensions along with the following
information:
• Name of the extension,
• Whether it is currently installed or not,
• Rating of the extension,
• The popularity of the extension,
• Date when the extension was last updated,
• Whether the extension is only available for use with the
Burp Suite Professional Edition or if it can be used in
the Community Edition as well.
The right pane details out information for any of the extensions we
select from the left pane. This includes information like the following:
• Details on what the extension is about and how it can
be used
• Author
• Extension version
Figure 9-2. BApp Store
Chapter 9 Extending Burp Suite
134
• Source
• Date when the extension was last updated
• Rating and popularity of the extension
• Install button to install and add the extension to
current Burp Suite setup
It is important to note that new extensions keep on getting added to the
BApp Store on a regular basis. To ensure the list of extensions is the latest
one, simply click on the ‘Refresh list’ button as shown in Figure 9-3.
Some of the useful extensions from the BApp Store are as follows:
• Active Scan++ – This extension is developed to further
enhance the Burp Suite’s passive and active scanning
capabilities.
• Additional Scanner Checks – This extension adds a
few more checks to a passive scanner like DOM-based
XSS etc.
• CSRF Scanner – This extension helps passively scan for
Cross-Site Request Forgery (CSRF) vulnerabilities.
Figure 9-3. Browsing through extensions in BApp Store
Chapter 9 Extending Burp Suite
135
• Discover Reverse Tabnabbing – This extension
searches the HTML code for possible Tabnabbing
vulnerabilities.
• Error Message Checks – This extension helps passively
detect any error or exception messages that may
contain sensitive information like stack traces.
• Headers Analyzer – This extension passively checks
the response headers and flags all missing security
headers like X-XSS-Protection, X-Frame-Options, and
many more.
• HTML5 Auditor – This extension checks if any of the
potentially unsafe HTML5 functions have been used
like storing sensitive data on client-side storage, client
geolocation, etc.
• J2EEScan – This extension helps improve test coverage
for J2EE applications as well as adds additional test
cases.
• Java Deserialization Scanner – This extension adds
to the Burp Suite ability to detect Java Deserialization
vulnerabilities.
• JavaScript Security – This extension further adds several
passive checks related to JavaScript security like DOM
issues, Cross-Origin Resource Sharing (CORS), etc.
• Retire.js – This extension passively monitors the traffic
and detects the use of any vulnerable third-party library
along with necessary CVE details.
• SameSite Reporter – This extension checks if the
SameSite attribute has been set in cookies or not.
Chapter 9 Extending Burp Suite
136
• Software Version Reporter – This extension passively
parses the traffic and reports all the software version
details. This information can further help in application
enumeration.
• Upload Scanner – This extension adds capabilities
to Burp Suite to detect file upload functionality and
related vulnerabilities.
• Web Cache Deception Scanner – This extension scans
the application for the presence of any Web Cache
Deception vulnerability.
• CSP Auditor – This extension scans the response
headers and checks if Content Security Policy (CSP)
has been configured correctly or not.
• CVSS Calculator – This extension facilitates scoring
vulnerabilities using CVSS methodology from within
Burp Suite.
Manual Installation
In the previous section, we saw how we could browse through, select,
and install extensions using the BApp Store. Not all extensions that are
written are available in the BApp Store. There could be extensions written
by individual authors, published on different websites like GitHub, etc.
In such a scenario where the extension is not present in the BApp Store,
we need to download it separately and install it manually. To install
extensions manually, navigate to the ‘Extensions’ tab within Extender as
shown in Figure 9-4.
Chapter 9 Extending Burp Suite
137
Burp Suite accepts the installation of third-party extensions with the
following formats as shown in Figure 9-5.
• Java
• Python
• Ruby
The other options include whether we wish to show the output and
errors after extension installation on the console or if we wish to save it to a
file as shown in Figure 9-6.
Figure 9-4. Adding extensions manually
Figure 9-5. Selecting type of the extension
Chapter 9 Extending Burp Suite
138
To install an extension, select the extension type (Java / Python / Ruby)
and then simply browse and select the location where the extension is
located on disk as shown in Figure 9-7.
Figure 9-6. Adding extensions manually
Chapter 9 Extending Burp Suite
139
If the extension installation gets completed successfully, a message is
displayed as shown in Figure 9-8.
Figure 9-7. Selecting the extension file
Figure 9-8. Loading extensions manually
Chapter 9 Extending Burp Suite
140
Settings
Now that we have seen how to install extensions either through the BApp
Store or manually, let’s go through some additional settings related to
extensions.
• Settings can be accessed by navigating to ‘Extender ➤
Options’ as shown in Figure 9-9. The first two settings
define if you want to automatically reload extensions
when you start the Burp Suite and if you wish to
automatically update the extensions on Startup.
The next setting is related to the Java environment. Most of the
extensions are written in Java. To ensure these extensions run correctly, it
might be required to provide a path to any additional library dependencies
as shown in Figure 9-10.
Figure 9-9. BApp Store options
Chapter 9 Extending Burp Suite
141
The next setting is related to setting up the Python environment. Some
extensions require a Python interpreter implemented in Java called Jython.
Jython can be downloaded and installed from https://www.jython.
org/download. Once installed, you need to update the path to the Jython
installation directory as shown in Figure 9-11.
The last setting is related to setting up the Ruby environment. As we
have seen earlier, Burp Suite supports extensions written in Ruby as well;
hence we need to specify the path to the Ruby interpreter as shown in
Figure 9-12. In order to run a Burp Suite extension written in Ruby, JRuby
needs to be downloaded and installed from https://www.jruby.org/
download.
Figure 9-10. Configuring the Java environment
Figure 9-11. Configuring the Python environment
Chapter 9 Extending Burp Suite
142

Other Useful Extensions
Earlier in this chapter, we already saw some useful extensions available
in the BApp Store. As the Burp Suite gives Application Programming
Interface (APIs) to developers, it is easy to write and develop custom
extensions as required. Here are some additional useful extensions that
can be manually installed to Burp Suite.
• sometime – This extension can be downloaded from
https://github.com/linkedin/sometime. This
extension passively monitors the traffic to check if the
application is vulnerable to the Same Origin Method
Execution.
• burp-suite-gwt-scan – This extension can be
downloaded from https://github.com/augustd/
burp-suite-gwt-scan - This extension helps
automatically identify insertion points for GWT
(Google Web Toolkit) requests when sending them to
the active Scanner or Burp Intruder.
• Admin panel finder – This extension can be
downloaded from https://github.com/moeinfatehi/
Admin-Panel_Finder -This extension assists in the
Figure 9-12. Configuring the Ruby environment
Chapter 9 Extending Burp Suite
143
enumeration of infrastructure and application Admin
Interfaces that might have been left open by mistake.
• Pwnback – This extension can be downloaded from
https://github.com/P3GLEG/PwnBack. This extension
helps to retrieve old and archived versions of the
application if present. It can be useful to compare the
old and current versions of the application to check the
changes and associated vulnerabilities.
• Minesweeper – This extension can be downloaded
from https://github.com/codingo/Minesweeper
-This extension helps detect scripts being loaded from
over 23000+ malicious cryptocurrency mining domains
(cryptojacking).
For an additional and comprehensive list of the Burp Suite extensions,
refer to ­
https://github.com/snoopysecurity/awesome-burp-­extensions.
APIs
Throughout this chapter, we have seen the use of Extender to add
and install new extensions that significantly improve the Burp Suite
capabilities. Burp Suite offers another useful feature in the form of the
Application Programming Interface (API). Using these APIs it is possible to
write our own extensions. The list of available APIs and detailed guidance
on their usage is available under the ‘Extender ➤ APIs’ tab as shown in
Figure 9-13.
Chapter 9 Extending Burp Suite
144
Summary
In this chapter, we got familiar with the Burp Suite extender, which allows
enhancing the Burp Suite capabilities through external extensions. We
explored the BApp Store, which has a list of many useful extensions and
we also learned to install an extension manually in case it’s not present in
the BApp Store. Last, we listed a few additional extensions apart from those
officially present in the BApp Store.
In the next chapter we’ll see how we can leverage the Burp Suite
capabilities to test mobile applications and APIs. We’ll also see the
complete workflow for testing an application using the Burp Suite.
Figure 9-13. The Burp Suite Extender APIs
Chapter 9 Extending Burp Suite
145
Exercises
1. Use the BApp Store to install extensions discussed in
this chapter.
2. Perform an active scan on the target application
before installing the extensions and after installing
the extensions. Observe the difference in
vulnerabilities found in both the scans.
3. Explore the additional extensions discussed in this
chapter and try to install them manually.
Chapter 9 Extending Burp Suite
147
© Sagar Rahalkar 2021
S. Rahalkar, A Complete Guide to Burp Suite,
https://doi.org/10.1007/978-1-4842-6402-7_10
CHAPTER 10
Testing Mobile Apps
and APIs with Burp
Suite
In the last chapter, we learned about the Burp Suite extender feature,
which allows enhancing the Burp Suite’s capabilities through third-party
extensions. In this final chapter, we’ll glance through how Burp Suite can
be used to test APIs and mobile applications as well. We’ll conclude with a
quick summary of the workflow for testing any web application using Burp
Suite.

API Security Testing with Burp Suite
Throughout this book, we have been learning about various capabilities
of Burp Suite, which can be used for Web Application security testing.
However, today’s modern applications are more interoperable and
interconnected. This is achieved through the use of Application
Programming Interfaces (APIs).
148
Exposing APIs significantly helps in automating tasks; however, at
the same time, it does introduce security risks as well if not implemented
securely. While most of the web application vulnerabilities apply to
APIs, there are a few vulnerabilities that are specific to APIs. OWASP has
published the Top 10 vulnerability list for API, which can be found at
https://owasp.org/www-project-api-security/.
The approach for security testing of APIs through Burp Suite is very
similar to the regular web applications that we have seen so far in the
book. As APIs communicate over HTTP/HTTPS protocol, the traffic can
be intercepted and tampered in Burp Suite just like any other regular web
application request and response. For performing security testing on APIs
using Burp Suite, we can use one of the following approaches:
1. Crawl the application in a regular way and figure
out the endpoints belonging to APIs. Once the API
endpoints are identified, the corresponding requests
can be sent to the Repeater or Intruder for further
testing.
2. Many times, the APIs are invoked through the User-
Interface (UI) functionalities in the application. In
such a case, you can simply create a new ‘Crawl and
Audit’ task in the Burp Suite scanner and ensure all
scanner checks and tasks are complete.
3. There could be a set of APIs that are not directly
invoked from any of the UIs. Such APIs are often
tested manually using tools like Postman. We can
easily integrate Postman with Burp Suite to capture
all required API traffic. Once the required API
requests and responses are in Burp Suite, it is just
a matter of testing them further using Repeater or
Intruder as necessary.
Chapter 10 Testing Mobile Apps and APIs with Burp Suite
149
We’ll now see how we can integrate Postman with Burp Suite. Postman
is a popular tool used for manual API testing. It can be downloaded
from https://www.postman.com/downloads/. The Postman application
interface is as shown in Figure 10-1.
In order to configure Postman to work along with Burp Suite, click on
the ‘Settings’ option in the upper right corner as shown in Figure 10-2.
Figure 10-1. The Postman tool
Figure 10-2. Navigating to the settings in the Postman tool
Chapter 10 Testing Mobile Apps and APIs with Burp Suite
150
A new Settings window will open up as shown in Figure 10-3.
Now further navigate to the proxy tab and select ‘Add a custom proxy
configuration’ and enter the proxy server address as that of the machine
running the Burp Suite (usually localhost or 127.0.0.1) and port as 8080 or
the one on which we want the Burp Suite proxy listener to be active on.
Now that we are done with the configuration on the Postman side, we
need to ensure that the right proxy configuration is also done on the Burp
Suite Side. To ensure the correct proxy is configured in the Burp Suite,
navigate to the Proxy tab and Options as shown in Figure 10-4, and ensure
the IP address and port number match to what was configured earlier in
Postman.
Figure 10-3. Configuring the proxy in the Postman tool
Chapter 10 Testing Mobile Apps and APIs with Burp Suite
151
Once both the Postman and Burp Suite are configured to work
together, all the traffic generated from Postman will now pass through
Burp Suite. This is very similar to how we configured our browsers to work
along with Burp Suite.
Now that we have seen how to configure the Postman to work along
with Burp Suite, we’ll see how the reverse works; that is, how do we export
data from Burp Suite into the Postman for selective testing?
While the Burp Suite Repeater and Intruder serve most of the purposes
for performing security testing of an API, there could be a need to test a
particular API in the Postman interface. In such a case, it is possible to
export the API request from Burp Suite into the Postman tool.
For exporting an API request from Burp Suite to the Postman, we
would need to install an extension called ‘Postman Integration’
. Simply
navigate to the Extender tab and open the ‘BApp Store’ and install the
‘Postman Integration’ extension as shown in Figure 10-5.
Figure 10-4. Setting up the Burp Suite proxy listener
Chapter 10 Testing Mobile Apps and APIs with Burp Suite
152
Once the extension is installed:
1. Go to the Target tab,
2. Select the request you want to export to Postman,
3. Right-click on the request to be exported,
4. Select option ‘Export as Postman Collection’ as
shown in Figure 10-6.
Figure 10-6. Exporting requests in the Burp Suite as Postman collection
Figure 10-5. Installing the Postman Integration extension in the
Burp Suite through BApp Store
Chapter 10 Testing Mobile Apps and APIs with Burp Suite
153
A new window will pop up, as shown in Figure 10-7. Enter the required
Collection Name and Folder name and click on the Export button. The
collection would then be exported and saved to the specified location.
Next, open the Postman application and click on Import, as shown in
Figure 10-8. Click on choose files and select the file that we exported from
Burp Suite earlier.
Figure 10-7. Configuring the Postman integration settings
Chapter 10 Testing Mobile Apps and APIs with Burp Suite
154
We can now see the API request exported from the Burp Suite into the
Postman application, as shown in Figure 10-9.
Figure 10-8. Importing the collection into the Postman tool
Figure 10-9. Collection imported in the Postman tool
Chapter 10 Testing Mobile Apps and APIs with Burp Suite
155

Mobile Application Security Testing
with Burp Suite
In the previous section, we saw how Burp Suite could be configured along
with the Postman to perform security testing on APIs. In this section, we’ll
have an overview of how we could leverage the Burp Suite capabilities for
performing security testing of Mobile Applications.
Before we get into further details about Mobile Application security
testing, it is important to understand the fact that the Burp Suite literally
acts and serves as an HTTP proxy. This means we can effectively use Burp
Suite for performing security testing on any device or application that
interacts over HTTP or HTTPS protocol.
Mobile applications are no different; they use the same HTTP / HTTPS
protocol for communication; hence that traffic can be routed through the
Burp Suite just like any other regular web application. Figure 10-10 shows
a mobile application client (the equivalent of the browser on PC), which is
passing all the traffic through Burp Suite to the Application Server.
We’ll now see how we can configure Burp Suite to work along with the
mobile application. First, we need to ensure that the correct Burp Suite
proxy is set to listen on all interfaces. To do so, navigate to the Proxy ➤
Options tab, as shown in Figure 10-11.
Figure 10-10. Connecting mobile application to the Burp Suite
Chapter 10 Testing Mobile Apps and APIs with Burp Suite
156
Now click on the ‘Add’ button, and a new window will pop up as shown
in Figure 10-12. Configure the port number and select ‘Bind to address’ as
‘All interfaces’ and click ‘OK’
.
Now notice the proxy listener section as shown in Figure 10-13, which
lists the interface as ‘*:8080’
.
Figure 10-12. Setting up the Burp Suite proxy listener
Figure 10-11. Setting up the Burp Suite proxy listener
Chapter 10 Testing Mobile Apps and APIs with Burp Suite
157
Now that we have configured the Burp Suite proxy to listen on port
8080 on all available interfaces, we’ll move ahead to the mobile device
configuration.
It is important to note that in order to configure the mobile device to
work along with Burp Suite, both the system running the Burp Suite and
the mobile device need to be in the same logical network. The simplest
way to achieve this is by connecting the mobile device and the system
running Burp Suite to the same Wireless Access Point. Once the mobile
device and the system running Burp Suite are connected to the same
network, we need to configure the network settings on mobile to use Burp
Suite as a proxy.
To configure the network proxy on the mobile device, go to the
Wireless Settings and select the Wireless Network that you are connected
to, as shown in Figure 10-14.
Figure 10-13. Setting up the Burp Suite proxy listener
Chapter 10 Testing Mobile Apps and APIs with Burp Suite
158
Now click on the Proxy option, and a new configuration window will
open as shown in Figure 10-15.
Figure 10-15. Configuring network proxy on mobile device
Figure 10-14. Configuring network proxy on mobile device
Chapter 10 Testing Mobile Apps and APIs with Burp Suite
159
By default, the network proxy is set to ‘None’
. We need to change this to
‘Manual’
, as shown in Figure 10-16.
Now that we have changed the Proxy type to manual, we need to
enter the IP address of the system where Burp Suite is running along with
the port number on which the Burp Suite proxy service is listening to, as
shown in Figure 10-17.
Figure 10-16. Configuring network proxy on mobile device
Chapter 10 Testing Mobile Apps and APIs with Burp Suite
160
Once the manual proxy has been configured, all the traffic originating
from the mobile application would now be routed through Burp Suite.
Once the requests are in Burp Suite, they can be tampered with Repeater
or Intruder just like any other regular HTTP request.
It’s important to note two points with regard to performing security
testing on mobile applications using Burp Suite:
Figure 10-17. Configuring network proxy on mobile device
Chapter 10 Testing Mobile Apps and APIs with Burp Suite
161
1. The Burp Suite can only help to execute manual
security tests on the mobile application and, to
a certain extent, perform dynamic application
security testing.
2. The exact process of configuring the network proxy
on mobile devices varies as per the type and version
of the operating system they run on. However, at a
high level, the process would be similar to what we
discussed in this section.

Security Testing Workflow with Burp Suite
Throughout the book, we have seen all aspects of Burp Suite and its
capabilities. We have seen various tools and utilities that are provided out
of the box as well as the use of third-party extensions, which significantly
enhance the Burp Suite capabilities.
Now, as we are at the end of the book, it would be worth summarizing
the workflow or approach for effectively using Burp Suite to test the
security of web applications.
Following is the phased approach that one can follow for effective use
of Burp Suite:
1. Get the right setup and configuration – Before we
actually begin using Burp Suite, it is important that
it’s set up and configured correctly.
a. Make sure the right edition and the latest version of Burp
Suite are being used.
b. Configure the browser proxy settings to work along with Burp
Suite.
c. Install the Burp Suite CA certificate into the browser.
Chapter 10 Testing Mobile Apps and APIs with Burp Suite
162
d. Configure the platform authentication, upstream proxy, and
socks proxy as required.
e. Review and define the Burp Suite HotKeys.
f. Ensure automatic project backup is enabled and configured
correctly.
g. Ensure project options like Timeouts, Hostname resolution,
Out of Scope Requests, Redirections, TLS Configuration,
Session Handling Rules, Cookie Jar, and Macros are
configured as needed.
h. Make sure the proxy listener is configured and running
properly.
i. Ensure all the required extensions are installed and loaded.
j. Check that the target application can be patched using the
Burp Suite Infiltrator.
2. Crawl and understand the application – Once
the Burp Suite is appropriately configured, it is
important to crawl, surf, and browse the target
application to know more about it.
a. Use the crawl function in the scanner to browse the
application.
b. Make use of the content discovery feature.
c. Manually browse through the critical workflows.
d. Carefully observe the target tab and monitor the HTTP
requests.
e. Find out and highlight interesting requests with parameters.
f. Use the analyze target feature to get an overview of the
application scope.
Chapter 10 Testing Mobile Apps and APIs with Burp Suite
163
g. Use engagement tools to find comments, scripts, and
references.
h. Monitor the issues reported by the passive scans.
3. Attack the application – Now that we have done
enough reconnaissance, it's time to attack selective
application functionalities.
a. Run an audit task using the Burp Suite scanner.
b. Find out the interesting requests, especially the one with
parameters, and send the request to the Repeater for further
investigation.
c. Tamper and play around with the request, parameters,
headers, and body using the repeater.
d. If a request and a parameter need to be tested against bulk
payloads, then make use of Intruder.
e. Use the comparer to analyze and interpret differences in
various responses.
f. Use a sequencer to test the strength of tokens.
g. Use the decoder for encoding or decoding any of the
parameter values as required.
h. Test for the Clickjacking vulnerabilities using the Clickbandit
tool.
i. Generate proof of concept for Cross-Site Request Forgery
attack using the CSRF PoC generator.
j. Make use of the Burp Suite collaborator to effectively detect
out-of-­
the band vulnerabilities like XML External Entity
Injection (XXE) and Server Side Request Forgery (SSRF)
Chapter 10 Testing Mobile Apps and APIs with Burp Suite
164
k. Monitor the issues pane under the target tab for all
vulnerabilities found.
l. Select the required vulnerabilities and export them into an
HTML report.
Summary
In this chapter, we saw how we could leverage Burp Suite capabilities for
performing security testing on APIs as well as mobile applications. We also
summarized the workflow that can be followed to make the best use of
Burp Suite for web application security testing.
Exercises
1. Configure the Postman to work along with Burp
Suite. Capture the API requests in Burp Suite and
attack them using Repeater.
2. Test any of the target applications using the
complete workflow discussed in this chapter.
Chapter 10 Testing Mobile Apps and APIs with Burp Suite
165
© Sagar Rahalkar 2021
S. Rahalkar, A Complete Guide to Burp Suite,
https://doi.org/10.1007/978-1-4842-6402-7
Index
A
Active scanning, 112
API security testing, Burp Suite
approaches, 148, 149
Postman, 149, 150, 154
Postman integration, 152–154
proxy listener, 151
Application Programming
Interfaces (APIs), 1, 147
Application security testing, 1, 4, 5
Application vulnerabilities, 2–4
B
Burp Suite, 5
alternatives, 8, 9, 14
browser, 15
CA Certificate, 31, 32
Chrome, 19
Edge, 21
editions, 6
events, 16
features, 7, 8
Firefox, 17, 18
hotkeys, 37, 38
installation, 11
need, 6
Opera, 22
options
Cookie Jar monitors, 46, 47
hostname resolutions, 42, 43
macros, 47
Out-of-scope request, 44, 45
redirections, 45, 46
timeouts, 42
performance feedback, 41
platform authentication, 33, 34
project backups, 39
proxy server, 35, 36
Rest API, 39–41
SOCKS proxy, 36, 37
system proxy, 23, 24
types of downloads, 12, 13
useful features, 9, 10
website, 16
Burp Suite extender
APIs, 143
BApp Store, 132–136
extensions, 131
manual installation, 136–139
settings, 140–142
useful extensions, 142, 143
166
C
Clickjacking
browser console, 103
clickbandit code, 104
clickbandit UI, 104
code, 105
definition, 101
target, 102
tool, 101
Collaborator, 99, 101
Comparer, 86–88
Cookie Jar monitors, 46, 47
Crawl optimization
configuration, 116
Cross-Site Request Forgery (CSRF)
definition, 106
engagement tools, 106
POC generator, 106–109
D
Dashboard
Burp Suite, 49–53
defining, 49
Decoder, 88, 89
E, F, G
Engagement tools
Burp manual testing
simulator, 65
Burp Suite, 59
Burp Suite task scheduler, 64
comment finder, 60
content discovery, 63
definition, 58
reference finder, 62
script searching, 61
search, 60
target analyzer, 62
H
Hostname resolution, 42
I, J, K, L
Infiltrator
definition, 95
executing agent, 99
generating agent, 97, 98
navigating, 96
technologies, 96
Intruder
definition, 67
options, 76, 77
payload, 73–75
positions, 69–72
send request, 68
SQL injection/cross-site
scripting payloads, 68
target tab, 69
M, N, O
Mobile application security testing,
Burp Suite
HTTP / HTTPS protocol, 155
INDEX
167
HTTP proxy, 155
network proxy, 158–161
proxy listener, 156
P, Q
Payload, 73
Personally identifiable information
(PII), 2
Proxy, 27, 28, 30, 31
R
Repeater
configuring target detail, 80
console, 80
definition, 79
headers, 83
parameters, 82
raw HTTP request, 81
response, 83–85
sending HTTP request, 81
Reporting
exporting issues, 125
generating, 128
selecting format, 126, 127
viewing browser, 129
vulnerability, 130
S
Scanner
Application login, 123
configuration, 115–123
crawl/audit, 112–114
resource pools, 124
types, 111
Security testing
workflow, 161–163
Sequencer
Burp Suite, 90
definition, 89
HTTP request, 90
loading tokens, 92
session ID analysis, 91
Server Side Request Forgery
(SSRF), 163
Software Development Life
Cycle (SDLC), 1
T, U, V, W
Target tab
application, 56
application map/
hierarchy, 54
Burp Suite, 53
issue, 57
multiple panes, 53
requests, 55
requests/response
viewers, 55
site map filters, 58
X, Y, Z
XML External Entity Injection
(XXE), 163
INDEX

A Complete Guide to Burp Suite for Beginners.pdf

  • 1.
    A Complete Guide to BurpSuite Learn to Detect Application Vulnerabilities — Sagar Rahalkar
  • 2.
    A Complete Guideto Burp Suite Learn to Detect Application Vulnerabilities Sagar Rahalkar
  • 3.
    A Complete Guideto Burp Suite ISBN-13 (pbk): 978-1-4842-6401-0 ISBN-13 (electronic): 978-1-4842-6402-7 https://doi.org/10.1007/978-1-4842-6402-7 Copyright © 2021 by Sagar Rahalkar This work is subject to copyright. All rights are reserved by the Publisher, whether the whole or part of the material is concerned, specifically the rights of translation, reprinting, reuse of illustrations, recitation, broadcasting, reproduction on microfilms or in any other physical way, and transmission or information storage and retrieval, electronic adaptation, computer software, or by similar or dissimilar methodology now known or hereafter developed. Trademarked names, logos, and images may appear in this book. Rather than use a trademark symbol with every occurrence of a trademarked name, logo, or image we use the names, logos, and images only in an editorial fashion and to the benefit of the trademark owner, with no intention of infringement of the trademark. The use in this publication of trade names, trademarks, service marks, and similar terms, even if they are not identified as such, is not to be taken as an expression of opinion as to whether or not they are subject to proprietary rights. While the advice and information in this book are believed to be true and accurate at the date of publication, neither the authors nor the editors nor the publisher can accept any legal responsibility for any errors or omissions that may be made. The publisher makes no warranty, express or implied, with respect to the material contained herein. Managing Director, Apress Media LLC: Welmoed Spahr Acquisitions Editor: Divya Modi Development Editor: Laura Berendson Coordinating Editor: Divya Modi Cover designed by eStudioCalamar Cover image designed by Pixabay Distributed to the book trade worldwide by Springer Science+Business Media New York, 1 New York Plaza, Suite 4600, New York, NY 10004-1562, USA. Phone 1-800-SPRINGER, fax (201) 348-4505, e-mail orders-ny@springer-sbm.com, or visit www.springeronline.com. Apress Media, LLC is a California LLC and the sole member (owner) is Springer Science + Business Media Finance Inc (SSBM Finance Inc). SSBM Finance Inc is a Delaware corporation. For information on translations, please e-mail booktranslations@springernature.com; for reprint, paperback, or audio rights, please e-mail bookpermissions@springernature.com. Apress titles may be purchased in bulk for academic, corporate, or promotional use. eBook versions and licenses are also available for most titles. For more information, reference our Print and eBook Bulk Sales web page at http://www.apress.com/bulk-sales. Any source code or other supplementary material referenced by the author in this book is available to readers on GitHub via the book’s product page, located at www.apress.com/978-1-4842-6401-0. For more detailed information, please visit http://www.apress.com/source-code. Printed on acid-free paper Sagar Rahalkar Pune, Maharashtra, India
  • 4.
    iii About the Author���������������������������������������������������������������������������������ix Aboutthe Technical Reviewer�������������������������������������������������������������xi Introduction���������������������������������������������������������������������������������������xiii Chapter 1: Introduction to Burp Suite���������������������������������������������������1 Some Basics of Application Security��������������������������������������������������������������������1 A Brief Introduction to Burp Suite�������������������������������������������������������������������������5 Need for Burp Suite�����������������������������������������������������������������������������������������������6 Editions�����������������������������������������������������������������������������������������������������������������6 Burp Suite Alternatives�����������������������������������������������������������������������������������������8 High-Level Feature Overview��������������������������������������������������������������������������������9 Summary������������������������������������������������������������������������������������������������������������10 Exercises�������������������������������������������������������������������������������������������������������������10 Chapter 2: Setting Up the Environment����������������������������������������������11 Burp Suite Installation�����������������������������������������������������������������������������������������11 Setting Up Vulnerable Target Web Application����������������������������������������������������14 Configuring the Browser�������������������������������������������������������������������������������������15 Firefox�����������������������������������������������������������������������������������������������������������17 Chrome����������������������������������������������������������������������������������������������������������19 Edge��������������������������������������������������������������������������������������������������������������21 Opera�������������������������������������������������������������������������������������������������������������22 Table of Contents
  • 5.
    iv Summary������������������������������������������������������������������������������������������������������������25 Exercises�������������������������������������������������������������������������������������������������������������26 Chapter 3: Proxy,User Options, and Project Options��������������������������27 Proxy�������������������������������������������������������������������������������������������������������������������27 Burp Suite CA Certificate������������������������������������������������������������������������������������31 Platform Authentication, Upstream Proxy Servers, SOCKS Proxy�����������������������33 Platform Authentication���������������������������������������������������������������������������������33 Upstream Proxy Servers��������������������������������������������������������������������������������35 SOCKS Proxy��������������������������������������������������������������������������������������������������36 Hotkeys���������������������������������������������������������������������������������������������������������������37 Project Backups��������������������������������������������������������������������������������������������������39 Rest API���������������������������������������������������������������������������������������������������������������39 Performance Feedback���������������������������������������������������������������������������������������41 Project Options����������������������������������������������������������������������������������������������������41 Timeouts��������������������������������������������������������������������������������������������������������42 Hostname Resolutions�����������������������������������������������������������������������������������42 Out-of-Scope Requests���������������������������������������������������������������������������������44 Redirections��������������������������������������������������������������������������������������������������45 Cookie Jar������������������������������������������������������������������������������������������������������46 Macros�����������������������������������������������������������������������������������������������������������47 Summary������������������������������������������������������������������������������������������������������������48 Exercises�������������������������������������������������������������������������������������������������������������48 Table of Contents
  • 6.
    v Chapter 4: Dashboard,Target, and Engagement Tools�����������������������49 Dashboard�����������������������������������������������������������������������������������������������������������49 Target Tab������������������������������������������������������������������������������������������������������������53 Engagement Tools�����������������������������������������������������������������������������������������������58 Summary������������������������������������������������������������������������������������������������������������65 Exercises�������������������������������������������������������������������������������������������������������������65 Chapter 5: Intruder�����������������������������������������������������������������������������67 Introduction to Intruder���������������������������������������������������������������������������������������67 Target Tab������������������������������������������������������������������������������������������������������������69 Positions�������������������������������������������������������������������������������������������������������������69 Payloads��������������������������������������������������������������������������������������������������������������73 Options����������������������������������������������������������������������������������������������������������������76 Summary������������������������������������������������������������������������������������������������������������77 Exercises�������������������������������������������������������������������������������������������������������������78 Chapter 6: Repeater, Comparer, Decoder, and Sequencer������������������79 Repeater�������������������������������������������������������������������������������������������������������������79 Comparer������������������������������������������������������������������������������������������������������������86 Decoder���������������������������������������������������������������������������������������������������������������88 Sequencer�����������������������������������������������������������������������������������������������������������89 Summary������������������������������������������������������������������������������������������������������������92 Exercises�������������������������������������������������������������������������������������������������������������93 Table of Contents
  • 7.
    vi Chapter 7: Infiltrator,Collaborator, Clickbandit, and CSRF PoC Generator��������������������������������������������������������������������������������������������95 Infiltrator�������������������������������������������������������������������������������������������������������������95 Collaborator��������������������������������������������������������������������������������������������������������99 Clickbandit��������������������������������������������������������������������������������������������������������101 CSRF�����������������������������������������������������������������������������������������������������������������106 Summary����������������������������������������������������������������������������������������������������������109 Exercises�����������������������������������������������������������������������������������������������������������110 Chapter 8: Scanner and Reporting���������������������������������������������������111 Scan Types��������������������������������������������������������������������������������������������������������111 Crawl and Audit�������������������������������������������������������������������������������������������������112 Scan Configuration��������������������������������������������������������������������������������������������115 Application Login����������������������������������������������������������������������������������������������123 Resource Pools�������������������������������������������������������������������������������������������������124 Reporting����������������������������������������������������������������������������������������������������������125 Summary����������������������������������������������������������������������������������������������������������130 Exercises�����������������������������������������������������������������������������������������������������������130 Chapter 9: Extending Burp Suite������������������������������������������������������131 Burp Suite Extensions���������������������������������������������������������������������������������������131 BApp Store��������������������������������������������������������������������������������������������������������132 Manual Installation��������������������������������������������������������������������������������������������136 Settings�������������������������������������������������������������������������������������������������������������140 Other Useful Extensions������������������������������������������������������������������������������������142 APIs�������������������������������������������������������������������������������������������������������������������143 Table of Contents
  • 8.
    vii Summary����������������������������������������������������������������������������������������������������������144 Exercises�����������������������������������������������������������������������������������������������������������145 Chapter 10: TestingMobile Apps and APIs with Burp Suite�������������147 API Security Testing with Burp Suite�����������������������������������������������������������������147 Mobile Application Security Testing with Burp Suite����������������������������������������155 Security Testing Workflow with Burp Suite�������������������������������������������������������161 Summary����������������������������������������������������������������������������������������������������������164 Exercises�����������������������������������������������������������������������������������������������������������164 Index�������������������������������������������������������������������������������������������������165 Table of Contents
  • 9.
    ix About the Author SagarRahalkar is a seasoned information security professional with more than 13 years of experience in various verticals of information security. His domain expertise is mainly in AppsSec, cybercrime investigations, vulnerability assessments, penetration testing, and IT GRC. He holds a master’s degree in computer science and several industry-recognized certifications such as CISM, ISO 27001LA, and ECSA. He has been closely associated with Indian law enforcement agencies for more than three years, dealing with digital crime investigations and related training, and he has received awards from senior officials of the police and defense organizations in India. He is also an author and reviewer for several publications.
  • 10.
    xi About the TechnicalReviewer Parag Patil (www.linkedin.com/in/ paragpatil2006) is an information security professional currently associated with Coupa Managing Security for the SaaS platform. For more than the last 12 years, Parag has worked extensively on digital forensics, IAM, security monitoring/SecOps, security trainings, security compliance audits, vulnerability management, penetration testing, information security research, and ISMS/governance. He is the author for CIS benchmarks for AWS, Azure, and GCP. Reviewer Acknowledgment: Thanks to my mentors (Dattatray Bhat, Yogesh Patil, Steve O'Callaghan, Shailesh Athlye, and Hans Gustavson) who have believed in me and have provided all possible opportunities to learn and grow professionally in the information security domain. Thanks to Mahesh Navaghane, Sagar Rahalkar (author of this book), Aditi Sahasrabuddhe (my sister), Monika (my wife,) and Ira (my daughter) for their commitment toward keeping me possibly the happiest person that I have ever known.
  • 11.
    xiii The number ofapplications is growing and so are the number of application vulnerabilities. Enterprises have shifted a lot of focus on making the applications secure. While there are a variety of solutions and products for application security, Burp Suite is really the tool of choice for many. Burp Suite is a simple yet powerful tool used for application security testing. It is widely used for manual application security testing of not just web applications but also APIs and mobile apps. For effectively testing security of web applications, one needs to understand various web application vulnerabilities; at the same time, one also needs to have an in-depth understanding of the tools used for testing. This book helps you understand Burp Suite comprehensively, so that it can be used precisely to uncover vulnerabilities. The book starts with basics about Burp Suite and guides you on setting up the testing environment. The following chapters cover basic building blocks of Burp Suite and take you through its various components such as the intruder, repeater, decoder, comparer, sequencer etc., in depth. In the last chapters, we will cover other useful features such as the infiltrator, collaborator, scanner, extender, and using Burp Suite for API and mobile app security testing. Introduction
  • 12.
    1 © Sagar Rahalkar2021 S. Rahalkar, A Complete Guide to Burp Suite, https://doi.org/10.1007/978-1-4842-6402-7_1 CHAPTER 1 Introduction to Burp Suite Application Security has evolved to a large extent in the last decade or so. A decade ago, finding SQL Injections in applications was easier than it is today. The applications were more prone to vulnerabilities as there were fewer defenses and less awareness among the developers. However, the situation has drastically changed today. Developers are much more aware and conscious about security, and security controls are placed throughout the Software Development Life Cycle (SDLC), making the end application comparatively secure. Though the development processes have become more secure, today’s applications are not just limited to the web. Modern applications have services and Application Programming Interfaces (API’s) exposed as well as a mobile and cloud presence. This clearly increases the complexities and attack surfaces. For an application security tester, it is vital to find all possible vulnerabilities in the entire application ecosystem. Some Basics of Application Security Going into details of application security and various vulnerabilities are beyond the scope of this book. In this book we will be focusing specifically on how to use the Burp Suite tool in the most efficient manner.
  • 13.
    2 However, we’ll quicklyglance through what the common and top application vulnerabilities are. The de facto standard referred to for application vulnerabilities is OWASP. OWASP stands for Open Web Application Security Project. The last Top 10 list for web application vulnerabilities was published in 2017. The vulnerabilities are as follows: 1. Injection – This includes vulnerabilities that are exploited by sending untrusted input to an interpreter either as part of a query or command. Specially crafted input tricks are what the interpreter uses in executing the commands or even giving unauthorized access to data. The most common type of injection is a database injection. Other types include the Operating System (OS) command injection or LDAP Injection, etc. 2. Broken Authentication – This includes vulnerabilities arising out of poor implementation of authentication and session management functions. Exploiting such vulnerabilities can give attackers access to passwords, credentials, session tokens, keys, etc. 3. Sensitive Data Exposure – Many times, applications lack controls to protect sensitive user data like personally identifiable information (PII), health data, or even financial data. Attackers can steal such sensitive data. Lack of data encryption at rest and in transit cause most of the vulnerabilities related to sensitive data exposure. 4. XML External Entities – This is a special type of vulnerability wherein an attacker exploits the entity tag within the XML documents to launch several attacks like disclosing sensitive internal files, denial of service, remote code execution, etc. Chapter 1 Introduction to Burp Suite
  • 14.
    3 5. Broken AccessControl – Even if a user is authenticated with valid credentials, it might not be necessary to have access to all of the application. Authorization defines what an authenticated user can access. Broken authorization gives unauthorized access to the attacker to view other user accounts, sensitive files, or even modify other users’ data. 6. Security Misconfiguration – Security misconfiguration issues are the most common in the underlying infrastructure like web servers. Insecure configurations, default credentials, unreferenced backup files, unwanted services, open cloud storage, missing security headers and cookie flags, and missing security patches all contribute to the security misconfiguration category. 7. Cross-Site Scripting – This is indeed the classic web application vulnerability that has been part of the OWASP list for so long. This commonly occurs when an attacker is able to inject and execute a script through an application input field. This attack can be used to hijack user sessions by stealing cookies, defacing websites, etc. Common types of cross-site scripting include Persistent, Reflected, and DOM Based. 8. Insecure Deserialization – Attackers can manipulate the object serialization and deserialization process to introduce malicious payloads resulting in code execution. Chapter 1 Introduction to Burp Suite
  • 15.
    4 9. Using Componentswith known Vulnerabilities – It’s very common for developers to import and use third-party code to avoid reinventing the wheel. However, at times the third-party code comes along with inherent vulnerabilities. An example is using the OpenSSL library, which is vulnerable to a Heart Bleed attack. 10. Insufficient Logging and Monitoring – Quite often, applications lack capabilities to log events that would help in case of an incident. In the absence of audit logging and detection capabilities, attackers can simply continue to infiltrate without getting detected or raising alarms. While the OWASP Top 10 list is probably the first place to go for web application vulnerabilities, there are many potential vulnerabilities beyond this Top 10 list. Following are some of the strongly recommended references in order to get a broader perspective for application security testing: 1. OWASP Testing Guide – This guide is a very comprehensive resource covering many security test cases and a very handy reference guide. It is available at https://owasp.org/www-project- web-security-testing-guide/assets/archive/ OWASP_Testing_Guide_v4.pdf 2. SANS Top 25 Programming Errors – Beyond the OWASP Top 10 list, SANS has published a list of the 25 most dangerous programming errors. It is available at https://www.sans.org/top25- software-errors Chapter 1 Introduction to Burp Suite
  • 16.
    5 3. OWASP APITop 10 – Application Programming Interfaces (API’s) are very commonly used these days and have some unique vulnerabilities. OWASP has published a special API Top 10 vulnerability list and is available at https://owasp.org/www- project-api-security/ 4. OWASP Mobile Top 10 – Mobile applications have different sets of vulnerabilities, and some even vary based on the type of platform. However, the most common and top mobile vulnerabilities are available at https://owasp.org/www-project- mobile-top-10/ 5. OWASP IoT Top 10 – Today even household devices are getting smarter and connected. Such Internet of Things (IoT devices) are prone to many vulnerabilities. OWASP has published an IoT Top 10 vulnerability list available at https://owasp.org/ www-project-internet-of-things/ A Brief Introduction to Burp Suite The birth of Burp Suite dates back to 2004 when Dafydd Stuttard gauged the need for a robust web application security testing tool. In the past 16 years, the tool has evolved leaps and bounds and has added numerous capabilities that benefit the security testing community. Burp Suite has undoubtedly become a tool of choice for web application security testing. Also it has evolved in a way that it can now be used to find vulnerabilities in API’s and Mobile Apps as well. Chapter 1 Introduction to Burp Suite
  • 17.
    6 Need for BurpSuite Today the market for application security scanning and testing tools is rapidly growing. There are so many tools available, commercial as well as free, from different vendors, supporting various technologies and features. Most of these tools are inclined toward automated scanning of software to find vulnerabilities. This is achieved either by triggering the scanner after spidering or crawling the target application or integrating the scanner directly in the DevOps cycle. While this is certainly an advantage and increases efficiency of scanning with minimum manual intervention, there are certain vulnerabilities that can be better understood and exploited through manual testing. Manual Testing is largely dependent on two factors: the skills of the tester and the tool used for testing. A tool like Burp Suite significantly aids in fulfilling the needs of manual testing from a tooling perspective. It provides a powerful and flexible platform where the tester can efficiently find and exploit potential vulnerabilities. So, for application security scanning and testing, the best strategy would be to use a combination of both automated and manual testing. Burp Suite has excellent manual testing capabilities along with an automated scanner. So it gives the tester benefits of manual testing as well as automated scanning of vulnerabilities. Editions Like most of the other tools, Burp Suite comes in different forms. Different users might have different needs and one size may not fit all. Keeping in mind the varying needs of users, Burp Suite comes in three different editions. Chapter 1 Introduction to Burp Suite
  • 18.
    7 1. Burp SuiteCommunity Edition – The Burp Suite Community Edition is the most basic version, which is free to download and use. It comes with a limited set of tools and features to get started with web application security testing. If you are completely new to application security and want to explore the basics, then the Burp Suite Community Edition is certainly a very good starting point. It does have good tools and features required for basic manual web application security testing like the interception proxy, tamper and relay requests using repeater, encode and decode data, etc. 2. Burp Suite Professional Edition – Once you have a very good understanding of web application security and you are regularly required to test applications as part of your profession, then the Burp Suite Professional Edition is definitely recommended. The Burp Suite Professional Edition comes along with many advanced features that significantly improve your ability to find potential vulnerabilities in applications. This is the most suitable edition for individual professionals looking for excellent manual and automated security testing capabilities. Some of the advanced features include the following: • Testing out-of-band vulnerabilities • Advanced brute-force and fuzzing capabilities • Quickly generating exploits for CSRF, Clickjacking, etc. Chapter 1 Introduction to Burp Suite
  • 19.
    8 • Automated scanningfor vulnerabilities • Useful extensions to further enhance vulnerability detection capabilities More details on the Burp Suite Professional Edition can be found here - https://portswigger.net/burp/pro 3. Burp Suite Enterprise Edition – While the Burp Suite Community Edition and the Burp Suite Professional Edition were aimed at individual professionals, the Burp Suite Enterprise Edition is useful to the organizations looking for integrating security scanning in software pipelines. It doesn’t have the manual testing tools as compared to the earlier editions. This edition is recommended for enterprises looking out for DevSecOps solutions. As part of this book, we will be covering the Burp Suite Professional Edition. Burp Suite Alternatives We have already discussed that the market for application security scanning tools is largely growing. While Burp Suite fulfills most of the manual and automated testing needs, it is rivaled by some other tools such as those shown in Table 1-1. Chapter 1 Introduction to Burp Suite
  • 20.
    9 More information andcomparative analysis on various application security Testing tools can be found at https://www.gartner.com/ reviews/market/application-security-testing High-Level Feature Overview The Burp Suite Professional Edition comes with a wide range of features for manual penetration testing as well as for automated scanning. Some of the useful features include the following: 1. Manual Penetration Testing – Intercept and tamper requests (HTTP / HTTPS), manually testing for out- of-band vulnerabilities, testing web sockets, testing token strength, easily test clickjacking and Cross-Site Request Forgery (CSRF) vulnerabilities. 2. Advanced Automated Attacks – Passive and active scanning to find potential vulnerabilities, advanced capabilities to brute-force and fuzz inputs. 3. Productivity – Detailed message analysis, efficient project options, tools to make code more readable, easy and simple vulnerability reporting. Table 1-1. Scanning Tools Commercial Free / Open Source Acunetix OWASP ZAP Netsparker W3af IBM AppScan Arachni WebInspect Iron Wasp Chapter 1 Introduction to Burp Suite
  • 21.
    10 4. Extensions –Burp Suite Application Store to install extensions for significantly enhancing the existing tool capabilities. We’ll be going through the above features more in detail as we proceed through the book. Summary We started off this chapter by explaining how application security has evolved over the last decade or so. We then glanced at some of the top web application vulnerabilities. Next we tried to understand the need for a tool like Burp Suite followed by its editions and alternatives. Finally, we concluded with a high-level overview of the features provided by Burp Suite Professional. In the next chapter, we’ll get started with installation and setup of the tool. Exercises • Read about the OWASP Top 10 vulnerabilities and the OWASP Testing Guide in detail. • Read more details about the features of all the Burp Suite editions on the official website - https:// portswigger.net/ Chapter 1 Introduction to Burp Suite
  • 22.
    11 © Sagar Rahalkar2021 S. Rahalkar, A Complete Guide to Burp Suite, https://doi.org/10.1007/978-1-4842-6402-7_2 CHAPTER 2 Setting Up the Environment In the last chapter, we discussed some basics of application security and the need for tools like Burp Suite. In this chapter we’ll get started with setting up our environment for Burp Suite. Burp Suite Installation Before we attempt to either install or run the Burp Suite, we need to ensure that Java is installed on the system. It is an essential prerequisite to run Burp Suite. On a Windows system, you can simply open up the command prompt and type command “java –version” to check if Java is installed, as shown in Figure 2-1. Figure 2-1. Check if Java is installed
  • 23.
    12 If you don’thave Java installed on your system, you can download and install Java from https://www.oracle.com/java/technologies/javase-­ jre8-­downloads.html Once we are sure that Java is installed on our system, we can now proceed with Burp Suite. We first need to download the Burp Suite from https://portswigger.net/burp/releases/community/latest as shown in Figure 2-2. You’ll notice there are several forms in which you can download the Burp Suite. There are individual installers for Linux, Mac OSX, and Windows. There’s also an option to download a JAR file, which can be used directly to launch Burp Suite without installing. Downloading the JAR file is the easiest way to get started. If you choose to download the installer, it is just like any other software installer and installs the Burp Suite in a few clicks. However, Java is required to be installed in both cases. Once the JAR file is downloaded, you can simply double-click it to launch the Burp Suite. Figure 2-2. Types of Burp Suite downloads Chapter 2 Setting Up the Environment
  • 24.
    13 At times, whilerunning large projects, it might happen that Burp Suite runs out of memory. To solve this problem, it is possible to launch Burp Suite by allocating a fixed amount of memory at startup. This will ensure that it doesn’t run out of memory once launched. This can be done using command java -jar -Xmx2G /path/to/burp.jar where 2G indicates 2GB of memory. This step is completely optional. We can skip it and directly execute the JAR file to launch Burp Suite with the default configuration. If all prerequisites are met correctly, we get a startup screen as shown in Figure 2-3. Figure 2-3. Burp Suite Startup Screen Chapter 2 Setting Up the Environment
  • 25.
    14 Setting Up VulnerableTarget Web Application While we set up the Burp Suite on our system, it’s important to have a target application on which you will be using the tool. If you are a professional working on application security testing and penetration testing then you would be authorized to use Burp Suite on the application under the test. However, if you are just a beginner trying to get started with learning Burp Suite, then you would need to have some target application on which you could test your skills. Remember, running Burp Suite on an application on which you are not authorized can invite legal troubles. So, from a learning perspective, it’s important to try your Burp Suite skills only on a test application. There are several alternatives available as shown below: 1. Set Up OWASP Juice Shop locally – OWASP Juice Shop is a modern web application that is deliberately made vulnerable. This can be an excellent starting point. The easiest way to get OWASP Juice Shop up and running is using its docker image. The docker image is available at https://hub.docker.com/r/bkimminich/juice- shop. You can simply pull the image and run it in the docker engine on any platform (Windows / Linux / MacOS). 2. Try out online version of OWASP Juice Shop – As a beginner, it is always recommended to set up your own copy of Juice Shop; however if you want to quickly try it out before setting it up, you can try the online version at https://juice-shop.herokuapp. com/#/ Chapter 2 Setting Up the Environment
  • 26.
    15 3. Damn VulnerableWeb Application (DVWA) – Another great application that has been made vulnerable intentionally for testing is DVWA. You can quickly set up the DVWA using docker or on a local web server. Detailed instructions on setting up and using DVWA are available at https://github. com/ethicalhack3r/DVWA 4. Damn Vulnerable Web Services – OWASP Juice Shop and DVWA would suffice for your learning needs for web application vulnerabilities. However, if you wish to explore more specifically the vulnerabilities in web services, then Damn Vulnerable Web Services is a good option. More details on setup and usage can be found at ­https:// github.com/snoopysecurity/dvws Configuring the Browser Now that we have Burp Suite up and running, we need to configure our browser to work along with it. First let's consider a normal scenario without Burp Suite in the picture as shown in Figure 2-4. Figure 2-4. A user accessing a website directly without Burp Suite Chapter 2 Setting Up the Environment
  • 27.
    16 Referring to theimage above, at a very high level and in simple terms, the following sequence of events happens: 1. The end user opens up any browser of choice. 2. The user then enters the URL of website he/she wishes to browse. 3. The browser processes the URL of the website and renders the website for the user (a series of request and response happens in the background). Now let’s consider another scenario wherein we have configured Burp Suite with the browser as shown in Figure 2-5. Referring to the image above, at a very high level and in simple terms, the following sequence of events happens: 1. The end user opens up any browser of choice. 2. The user then enters the URL of the website he/she wishes to browse. 3. The browser redirects the request to Burp Suite, which then forwards the request to the target website. 4. The target website responds to the request and sends a response back to Burp Suite, which then passes on the response to be rendered in the browser. Figure 2-5. A user accessing a website with Burp Suite Chapter 2 Setting Up the Environment
  • 28.
    17 So in thisscenario, Burp Suite is acting as ‘Man-in-the-Middle’ between the browser and the target website. Burp Suite is able to intercept and tamper all the traffic passing through it. We’ll now see how we can configure the most popular browsers to work with Burp Suite. Firefox For configuring Firefox with Burp Suite: Go to Tools ➤ Options as shown in Figure 2-6. In the search field, enter the keyword ‘network’ as shown in Figure 2-7 and click on ‘Settings’ . Figure 2-6. Navigating the Tools ➤ Options menu in Firefox Chapter 2 Setting Up the Environment
  • 29.
    18 Select ‘Manual proxyconfiguration’ as shown in Figure 2-8 and enter the IP as 127.0.0.1 (or localhost) and port as 8080. Note: By default the Burp Suite proxy listens on port 8080. This can be customized and we’ll see that in the next chapter. However, the same port number must be entered both in the browser as well as in the Burp Suite in case you wish to change the same. Figure 2-7. Searching for ‘Network Settings’ within Firefox options Figure 2-8. Setting up the manual proxy configuration Chapter 2 Setting Up the Environment
  • 30.
    19 Simply click ‘OK’once the proxy details have been configured. Chrome For configuring Chrome with Burp Suite: Click on the three vertical dots in the right-hand corner and select ‘Settings’ as shown in Figure 2-9. Search for the keyword ‘proxy’ as shown in Figure 2-10, and click on the ‘Open your computer’s proxy settings’ option. Now enable the ‘Use a proxy server’ option and enter the address and port number as shown in Figure 2-11. Figure 2-9. Navigating to the Chrome Settings Figure 2-10. Opening the proxy settings in Chrome Chapter 2 Setting Up the Environment
  • 31.
    20 Once the proxyis configured, simply click on the ‘Save’ option. Figure 2-11. Configuring the system proxy Chapter 2 Setting Up the Environment
  • 32.
    21 Edge For configuring Edgewith Burp Suite: Click on the three horizontal dots in the right-hand corner and select the ‘Open proxy settings’ as shown in Figure 2-12. Now enable the ‘Use a proxy server’ option and enter the address and port number as shown in Figure 2-13. Figure 2-12. Opening the Proxy Settings in Edge browser Chapter 2 Setting Up the Environment
  • 33.
    22 Once the proxyis configured, simply click on the ‘Save’ option. Opera For configuring Opera with Burp Suite: Click on the settings in the top right-hand corner and select the option ‘Go to browser settings’ as shown in Figure 2-14. Figure 2-13. Configuring the system proxy Chapter 2 Setting Up the Environment
  • 34.
    23 In the searchfield, type proxy and then select the option ‘Open your computer’s proxy settings’ as shown in Figure 2-15. Now enable the ‘Use a proxy server’ option and enter the address and port number as shown in Figure 2-16. Figure 2-14. Opening the browser settings in Opera Figure 2-15. Opening up the system proxy settings Chapter 2 Setting Up the Environment
  • 35.
    24 Once the proxyis configured, simply click on the ‘Save’ option. So far we have seen how to configure browsers like Firefox, Chrome, Edge, and Opera to work along with Burp Suite. It simply requires configuring the network proxy option. However, it is important to note that once the browser proxy is configured, all the traffic initiating from the browser will compulsorily pass through Burp Suite. If you are working on multiple tabs within a browser and testing an application in one tab while Figure 2-16. Configuring the system proxy Chapter 2 Setting Up the Environment
  • 36.
    25 accessing email inanother, all this traffic will be routed through Burp Suite. In case you with to pass only selective traffic through Burp Suite, you need to make use of additional browser plugins such as those shown in Table 2-1. The above plugins are simple to use and allow custom selective traffic to pass through Burp Suite. Using these plugins is completely optional. If you don’t wish to use these plugins, you can simply use two separate instances of browser, one for application testing and the other for personal use. Or it is also possible to scope out only the required traffic in Burp Suite that we will be learning in an upcoming chapter. Summary In this chapter we saw how to download, install, and get started with the Burp Suite tool. We then explored various options available for setting up vulnerable targets to practice Burp Suite skills. We also learned how to configure different browsers to work along with the Burp Suite. In the next chapter, we’ll see how to configure some of the basic settings in the Burp Suite like the Proxy, User Options, and Project Options. Table 2-1. Additional Browser Plugins for Proxy Firefox Proxy SwitchyOmega, FoxyProxy Chrome Proxy SwitchyOmega, FoxyProxy Edge N/A Opera Proxy Switcher Manager Chapter 2 Setting Up the Environment
  • 37.
    26 Exercises • Download thelatest version of the Burp Suite. • Try to launch Burp Suite from the command line, allocating custom memory size. • Try and explore how to use the FoxyProxy plugin for Firefox and Chrome. Chapter 2 Setting Up the Environment
  • 38.
    27 © Sagar Rahalkar2021 S. Rahalkar, A Complete Guide to Burp Suite, https://doi.org/10.1007/978-1-4842-6402-7_3 CHAPTER 3 Proxy, User Options, and Project Options In the last chapter, we saw some basics of Burp Suite installation, setting up the vulnerable application and configuring different browsers to work along. In this chapter, we’ll get started with some basics of Burp Suite proxy along with several user and project options. Proxy Proxy is really the essence of Burp Suite. Leveraging the proxy functionality, Burp Suite is able to see all the traffic passing through it. In the previous chapters, we have already seen how Burp Suite works as Man-­ in-­ the-Middle and helps us intercept requests. In order to make Burp Suite functional, we have to have a complete configuration at two different ends. One part is configuring the network proxy in the browser that we saw in the previous chapter. Another part is ensuring the Burp Suite proxy is configured properly. By default, when we start the Burp Suite, its proxy listens on port 8080. In this case you don’t need to do any more configurations. However, if port 8080 is already being used by some other application on your system, then there would be a port conflict and the Burp Suite proxy service would fail to start. In this case you can start the Burp Suite proxy listener on any other custom port that is not already in use. To do this, navigate to the Proxy tab as shown in Figure 3-1.
  • 39.
    28 Then go tothe ‘Options’ tab as shown in Figure 3-2. You’ll notice that the Burp Suite proxy is running by default on localhost and port 8080. To enable the Burp Suite proxy on the custom port, click the ‘Add’ button as shown in Figure 3-3. Figure 3-1. Proxy Option in the Burp Suite Figure 3-2. Proxy options Chapter 3 Proxy, User Options, and Project Options
  • 40.
    29 Now you canbind the Burp Suite proxy to any custom port. After configuring the custom port, you can leave the bind address to default as ‘Loopback only’ or if there are multiple network interfaces on your system, you can select any one of them using the drop-down menu in the “Specific address” option. Once the Burp Suite proxy is configured, we are all set to intercept application requests. By default, the Burp Suite will intercept only requests. In any particular scenario, if you are required to intercept responses as well, then it can be done through additional configuration. To enable interception of responses, go to Proxy ➤ Options and check the option “Intercept responses based on the following rules:” as shown in Figure 3-4. Figure 3-3. Adding new proxy listener Figure 3-4. Intercepting server responses Chapter 3 Proxy, User Options, and Project Options
  • 41.
    30 Through this option,you can specify different rules based on which the Burp Suite proxy would intercept responses. Now that we have the browser configuration in place along with the Burp Suite proxy, we can try to intercept a request. Navigate to “Proxy ➤ Intercept” and Click on “Intercept if off” (to turn on the intercept). Now in the browser enter any URL and observe the proxy tab in Burp Suite as shown in Figure 3-5. You will notice the request you made from the browser is trapped in Burp Suite. You can now click on Forward if you want to allow rendering the URL in the browser. You can drop the request and the browser won’t load the URL. If you turn off the Intercept option, then all requests and responses will be captured in Burp Suite without any manual intervention. The right-hand corner also gives an option to give a color to the request if you want to highlight it for some reason along with comments. The HTTP History tab shows all the requests that have passed through Burp Suite so far as shown in Figure 3-6. Figure 3-5. Intercepting HTTP request Figure 3-6. HTTP Proxy History Chapter 3 Proxy, User Options, and Project Options
  • 42.
    31 The proxy historycaptures important information like host, method, URL, parameters (if any), status on whether the request was edited/ tampered, HTTP Status code, Content Length, MIME Type, Extensions, Title, IP, cookies, and time of the request. This is really a wealth of information to start with. Burp Suite is also capable of capturing Web Socket traffic by default and it can be seen in the Web Sockets history tab. Burp Suite CA Certificate We have already seen in the previous chapter that Burp Suite proxy works as Man-in-the-Middle. While accessing an application over HTTPS through Burp Suite, the proxy will generate a TLS certificate signed by its certificate authority and store it on the client system. To use Burp Suite most efficiently in case of HTTPS, it is advisable to download and install the Burp Suite CA Certificate as trusted in the browser. To import and install the Burp Suite CA certificate, first ensure your Firefox browser is configured to work along with the Burp Suite proxy. Then in the address bar, type URL “http://burpsuite” as shown in Figure 3-7. Notice the right-hand corner for “CA Certificate.” Click on that option to and download the file “cacert.der” as shown in Figure 3-8. Figure 3-7. Burp Suite CA Certificate Chapter 3 Proxy, User Options, and Project Options
  • 43.
    32 Next, go toFirefox Tools ➤ Options and type ‘cert’ in the search bar as shown in Figure 3-9. Click on the option ‘View Certificates’ and then use the ‘Import’ button as shown in Figure 3-10 to select the Burp Suite Certificate that we previously downloaded. Figure 3-8. Downloading the Burp Suite CA Certificate Figure 3-9. Certificate option in Firefox Chapter 3 Proxy, User Options, and Project Options
  • 44.
    33 Platform Authentication, UpstreamProxy Servers, SOCKS Proxy Platform Authentication There are certain scenarios where the application hosted on the target web server is protected by authentication. In such a case, we need to configure the credentials in Burp Suite. In the absence of credentials, Burp Suite won't be able to access the protected portion of the application and miss out on potential checks. To configure platform authentication, navigate to “User Options ➤ Connections ➤ Platform Authentication” as shown in Figure 3-11. Figure 3-10. Firefox Certificate Manager Chapter 3 Proxy, User Options, and Project Options
  • 45.
    34 Click on the‘Add’ button and a pop-up window will appear as shown in Figure 3-12. Figure 3-11. Configuring the Platform Authentication Figure 3-12. Setting up the Platform Authentication Chapter 3 Proxy, User Options, and Project Options
  • 46.
    35 We need toconfigure the destination host either in the form of an IP address or hostname, authentication type either of Basic, NTLM V2, NTLM V1, Digest, Username and Password, and the Domain if applicable. Once these settings are recorded, Burp Suite can seamlessly access the protected part of the application with the help of these credentials. Upstream Proxy Servers While testing applications in certain network environments, it may happen that there’s no direct access to that target application. In such a case, we might need to connect to a proxy server first and then connect to the target application. Burp Suite allows easy configuration of upstream proxy servers. Simply navigate to “User Options ➤ Connections ➤ Upstream Proxy Servers” as shown in Figure 3-13. Click on the ‘Add’ button as shown in Figure 3-14, and configure the required proxy settings. Figure 3-13. Configuring the Upstream Proxy Servers Chapter 3 Proxy, User Options, and Project Options
  • 47.
    36 SOCKS Proxy Burp Suitealso allows you to make all connection requests through a SOCKS proxy. To configure Burp Suite with SOCKS Proxy, navigate to “User Options ➤ Connections ➤ SOCKS Proxy” as shown in Figure 3-15, and configure the required proxy settings. Figure 3-14. Adding the upstream proxy rule Chapter 3 Proxy, User Options, and Project Options
  • 48.
    37 Hotkeys The Burp Suitetool has many tabs, tools, and options that we can work with. We’ll be discussing them in detail in upcoming chapters. At first, the Burp Suite tools and tabs might seem overwhelming. But they all get familiar as you start using them. While all these tools and tabs can be accessed with the click of a button, at times while working on projects, it is much easier to use keyboard shortcuts than using mouse clicks. The Burp Suite tool offers configuration of Hotkeys, which are nothing but the keyboard shortcuts to access certain tools or tabs. To configure Hotkeys, navigate to User Options ➤ Misc ➤ Hotkeys as shown in Figure 3-­16. Figure 3-16. Configuring the Burp Suite Hotkeys Figure 3-15. Adding SOCKS proxy Chapter 3 Proxy, User Options, and Project Options
  • 49.
    38 By default, Hotkeysfor common functionalities within the Burp Suite are already configured. However there’s an option ‘Edit hotkeys’ either to change the default hotkeys or configure hotkeys for additional functionalities. The Table 3-1 lists some of the common default hotkeys. Apart from the hotkeys in the above table, all other standard keyboard shortcuts for selecting all text, cut, copy, and paste work in the standard way. Table 3-1. Default Hotkeys in Burp Suite Hotkey Purpose Ctrl + R Send to Repeater Ctrl + I Send to Intruder Ctrl + F Forward intercepted proxy message Ctrl + Shift + T Switch to Target Ctrl + Shift + P Switch to Proxy Ctrl + Shift + I Switch to Intruder Ctrl + Shift + R Switch to Repeater Ctrl + Shift + O Switch to Project Options Ctrl + Shift + U URL Decode Ctrl + Shift + B Base-64 Decode Ctrl + B Base-64 Encode Chapter 3 Proxy, User Options, and Project Options
  • 50.
    39 Project Backups While workingon projects using Burp Suite, large amounts of data in the form of requests and responses get generated. It becomes necessary to save a copy of this data at regular intervals. Instead of doing this task manually, Burp Suite offers a feature to take a backup of data automatically after specified intervals. To enable automatic backups, navigate to User Options ➤ Misc ➤ Automatic Project Backup as shown in Figure 3-17. Using this feature, we can specify the duration in minutes after which Burp Suite will automatically trigger the backup. Rest API While we use the Burp Suite mostly for manual application security testing, there could be so many other tools and use cases that need to work along with the Burp Suite. There could be other security tools that need to integrate with Burp Suite or certain custom automation scenarios as well that need to automatically trigger actions in Burp Suite. Figure 3-17. Configuring automatic project backups Chapter 3 Proxy, User Options, and Project Options
  • 51.
    40 For all suchpurposes, Burp Suite provides users with a REST API interface. REST stands for Representational State Transfer and API stands for Application Programming Interface. REST API is the most popular way of interconnecting different applications. To enable the Burp Suite REST API, go to “User Options ➤ Misc” as shown in Figure 3-18. To enable the Burp Suite REST API, simply check the option “Service running.” The REST API will be available by default on http://127.0.0.1:1337 as shown in Figure 3-19. Figure 3-18. Setting up the Burp Suite REST API interface Figure 3-19. The Burp Suite REST API Interface Chapter 3 Proxy, User Options, and Project Options
  • 52.
    41 The REST APIinterface lists all the verbs or methods supported, the endpoints to be called, the parameters to be passed, and the expected responses. Now it completely depends on a particular scenario or use case on how this REST API interface can be utilized. Performance Feedback As like with any other tool, Burp Suite has a provision to capture and send certain diagnostic data that could be useful in improving Burp Suite’s performance. This is a completely optional feature, and if enabled it only collects data about internal functioning and not about specific users or project data. Burp Suite also provides features to log all exceptions or to report a specific bug to the Burp Suite team. To use Performance Feedback options, navigate to User Options ➤ Misc ➤ Performance Feedback as shown in Figure 3-20. Project Options These options include Hostname resolution, Out-of-Scope Requests, Redirections, TLS Configuration, Session Handling Rules, Cookie Jar. and Macros. Figure 3-20. Configuring the performance feedback Chapter 3 Proxy, User Options, and Project Options
  • 53.
    42 Timeouts Handling requests andresponses is the core functionality of Burp Suite. There could be scenarios like the target application is down, or there are connectivity issues wherein Burp Suite needs to decide how long it should wait for a response for a request before dropping it off. These settings are defined by the timeout values. They are configured by default and can be left untouched unless there’s an explicit need to change the timeout values. For changing the default timeout values, navigate to “Project Options ➤ Connections ➤ Time Outs” as shown in Figure 3-21. Hostname Resolutions Hostname resolution usually happens with the help of either the local host file or the network DNS. However, Burp Suite allows for custom hostname resolutions. This might be useful in particular scenarios where an application hosted on an intranet needs to be accessed using a specific hostname or URL. To define custom hostname resolution rules, navigate to “Project Options ➤ Connections ➤ Hostname Resolutions” as shown in Figure 3-­22. Figure 3-21. Configuring the request timeouts Chapter 3 Proxy, User Options, and Project Options
  • 54.
    43 Click on the‘Add’ button and then you’ll get a pop-up window to enter a custom Hostname and associated IP address as shown in Figure 3-23. Figure 3-23. Adding the hostname resolution rule Figure 3-22. Configuring the hostname resolution Chapter 3 Proxy, User Options, and Project Options
  • 55.
    44 Out-of-Scope Requests Once thebrowser is configured to work along with Burp Suite, Burp Suite will capture all the HTTP traffic across all tabs by default. This traffic can be overwhelming and distracting. Out of all the traffic that is captured, we need to concentrate only on the required target that we are testing. This can be achieved using a scope that we will be covering in a later chapter. Burp Suite provides a feature to simply drop all the requests that are out of scope. This can be done by navigating to “Project Options ➤ Connections ➤ Out-of-scope Requests” as shown in Figure 3-24. Selecting the “Use custom scope” option we can explicitly add URLs that we wish to exclude from the scope and drop off the proxy as shown in Figure 3-25. Figure 3-24. Configuring the rules for Out-of-Scope requests Chapter 3 Proxy, User Options, and Project Options
  • 56.
    45 Redirections Automated application scanningrequires processing of HTTP redirections. The scan engine has to take action once it detects any page redirection. Burp Suite has redirection rules configured by default and those can be left untouched unless there's an explicit need to change them, or there's a need for additional configuration of JavaScript-driven redirections. For configuring redirection rules, navigate to “Project Options ➤ HTTP ➤ Redirections” as shown in Figure 3-26. Figure 3-25. Defining rules for Out-of-Scope requests Chapter 3 Proxy, User Options, and Project Options
  • 57.
    46 Cookie Jar Any applicationscanning / testing tool needs to maintain a repository of cookies that it will use to manage the ongoing application sessions. The in-session detection capability is specifically required when performing automated scanning. Burp Suite stores the application cookies in a container called “Cookie Jar.” By default the Cookie Jar monitors the Proxy traffic to extract and store any cookies; however, we can explicitly instruct Burp Suite to monitor and capture cookies out of other tools like Scanner, Repeater, Intruder, Sequencer, and Extender. This can be done by navigating to “Project Options ➤ Sessions ➤ Cookie Jar” as shown in Figure 3-27. Figure 3-26. Configuring the redirections Chapter 3 Proxy, User Options, and Project Options
  • 58.
    47 Macros In the processof application security testing, it may be required to perform a certain sequence of actions repeatedly. Burp Suite provides an excellent functionality of macros to achieve this. The macro editor is available at “Project Options ➤ Sessions ➤ Macros” as shown in Figure 3-28. You can simply click on the ‘Add’ button and follow the wizard to record steps. Figure 3-27. Configuring the Cookie Jar options Figure 3-28. Configuring the macros Chapter 3 Proxy, User Options, and Project Options
  • 59.
    48 Summary In this chapterwe learned about configuring the Burp Suite proxy along with a CA Certificate. We then glanced at several options like platform authentication, upstream proxy, socks proxy, etc. Next we explored several other useful configurations including hotkeys, project backups, using Burp Suite API, project options, hostname resolutions, scoping, and redirections. In the next chapter we’ll explore the Burp Suite dashboard, target tab, and engagement tools. Exercises • Configure your favorite browser and Burp Suite to work on a custom proxy port. • Try to install Burp Suite CA Certificate for Chrome, Edge and Opera. • Go through the default Hotkey list and try to configure additional shortcuts of your choice. Chapter 3 Proxy, User Options, and Project Options
  • 60.
    49 © Sagar Rahalkar2021 S. Rahalkar, A Complete Guide to Burp Suite, https://doi.org/10.1007/978-1-4842-6402-7_4 CHAPTER 4 Dashboard, Target, and Engagement Tools In the last chapter, we saw some basics about configuring the proxy, user options, and project options. In this chapter we’ll get started with getting familiar with the Burp Suite dashboard, target, and engagement tools. Dashboard Dashboard, as the name suggests, is that important part of Burp Suite that essentially summarizes different activities and tasks that are running across components. Figure 4-1 shows a typical view of the Burp Suite dashboard.
  • 61.
    50 For better understanding,we’ll divide the dashboard into four parts and try to explain each in detail. For learning purposes, refer to the numbers from 1 to 4 in Figure 4-1. The first part of the dashboard shows data around the ongoing scans as shown in Figure 4-2. The scans can be either passive or active. If there are multiple scans running, then we can filter them based on their state: running, paused, or finished. We also get to see a high-level summary of issues found in the scans. There’s also an option to create a new scan task, which we will be exploring separately in an upcoming chapter. Figure 4-1. The Burp Suite Dashboard Chapter 4 Dashboard, Target, and Engagement Tools
  • 62.
    51 The second partof the dashboard is as shown in Figure 4-3. It might happen that either a passive scan or an active scan is running, and in either case the list of vulnerabilities found is highlighted in this section. This section also highlights information like time when the issue was found, the issue type, the host or target on which the issue was found, the vulnerable URL Path, severity of the issue, and the confidence level. Burp Suite may flag different confidence levels for different issues based on the responses; however, the issues need manual verification to ascertain their validity. Figure 4-2. Tasks in the Burp Suite Dashboard Figure 4-3. Issue activity in the Burp Suite Dashboard Chapter 4 Dashboard, Target, and Engagement Tools
  • 63.
    52 The third partof the dashboard summarizes the Burp Suite functional events as shown in Figure 4-4. These mainly include the status of the proxy service, TLS connection failures (if any), authentication failures, timeouts, etc. For example, if your system already has port 8080 configured with some other service, this part of the dashboard will highlight that proxy service couldn’t be started on port 8080. Or if for any reason the proxy service stops, then it will also get highlighted here. Overall, it gives a picture about whether the Burp Suite proxy and related services are running properly or not. The last part of the dashboard as shown in Figure 4-5 highlights issue details. If you wish to see details of any of the issues highlighted during the passive or active scan, then simply click that issue as shown in Figure 4-­3 and details will be available accordingly. The issue details include the complete issue description and remediation recommendation, along with the actual request and response. Figure 4-4. The event log in the Burp Suite Dashboard Chapter 4 Dashboard, Target, and Engagement Tools
  • 64.
    53 Target Tab Like theBurp Suite dashboard that we saw in the previous section, the Target tab is an equally important work area. The target tab again has multiple panes as shown in Figure 4-6. Figure 4-5. Issue details in the Burp Suite Dashboard Figure 4-6. Target tab in Burp Suite Chapter 4 Dashboard, Target, and Engagement Tools
  • 65.
    54 To understand differentparts of the target tab, let’s take one part at a time referring to the numbers 1 to 6 as per Figure 4-6. The leftmost section in the target tab numbers as ‘1’ in Figure 4-6 is shown in Figure 4-7. This section creates the hierarchy of the site that we are browsing through. It lists all the leaf nodes, folders, etc., in the form of a well-defined tree structure. This helps in getting an idea about how big the site / application could be or what its contents are in common. It is very similar to a sitemap. The next section numbered as ‘2’ as per Figure 4-6 is shown in Figure 4-8. This section lists down all the HTTP requests that were made along with other details like the exact host, HTTP method used, target URL, if the URL had any parameters, HTTP status response code, content length, MIME type, and the title of the page, if any. Simply going through this section can help you find interesting URLs especially those having parameters to inject. Figure 4-7. Application map / hierarchy Chapter 4 Dashboard, Target, and Engagement Tools
  • 66.
    55 The next sectionnumbered as ‘3’ as per Figure 4-6 is shown in Figure 4-9. This section shows the actual HTTP request and response. You can see the raw request by default but also see the request in form of parameters. You can also see all of the headers used in the response. Figure 4-8. List of requests Figure 4-9. The request and response viewer Chapter 4 Dashboard, Target, and Engagement Tools
  • 67.
    56 The next sectionnumbered as ‘4’ as per Figure 4-6 is shown in Figure 4-10. This section shows the list of issues that were found either during the passive scan or active scan. The issues are classified as per the severity, with highest severity issues being shown at the top. The next section numbered as ‘5’ as per Figure 4-6 is shown in Figure 4-11. This section shows the issue details for any of the selected issues. It contains the issue description along with remediation recommendations. In this section it is also possible to view the actual request and response based on which the issue was highlighted. Figure 4-10. Issues found in the target application Chapter 4 Dashboard, Target, and Engagement Tools
  • 68.
    57 The next sectionnumbered as ‘6’ as per Figure 4-6 is shown in Figure 4-12. Once we configure our browser to work along with the Burp Suite, a lot of traffic may get captured. Hence to filter out only the required data, several filters can be used. Some common and useful filters include filtering by request type, MIME type, status code, extension, etc. This feature also allows searching for a particular item within the data collected through proxy. Figure 4-11. Issue details Chapter 4 Dashboard, Target, and Engagement Tools
  • 69.
    58 Engagement Tools Engagement toolsare nothing but small utilities that help in performing some additional tasks within Burp Suite. In this section we’ll go through several such engagement tools serving different purposes. To access the engagement tools, simply right-click the target URL against which you wish to run the engagement tools as shown in Figure 4-13. Figure 4-12. Site map filters Chapter 4 Dashboard, Target, and Engagement Tools
  • 70.
    59 The first engagementtool is the simple search as shown in Figure 4-­14. This allows users to search for any keyword within the requests or responses from the target selected. Figure 4-13. The Burp Suite Engagement Tools Chapter 4 Dashboard, Target, and Engagement Tools
  • 71.
    60 The next engagementtool is the ‘Find comments’ as shown in Figure 4-15. This simply crawls through the collected data and finds any code comments. It is worthwhile to go through these comments as there’s always a possibility of finding something sensitive in the comments. Figure 4-15. Comment finder tool Figure 4-14. Search tool Chapter 4 Dashboard, Target, and Engagement Tools
  • 72.
    61 Thenextengagementtoolisthe‘Findscripts’asshowninFigure4-16.This tool simply searchesfor all scripts within the scope of the target being selected. The next engagement tool is the ‘Find references’ as shown in Figure 4-­17. This tool lists down all the Burp Suite components where it is able to find any reference of the selected target. For example, the URL ­ ‘demo.testfire. net’ appeared in Scanner as well as Target within the Burp Suite as shown in Figure 4-17. Figure 4-16. Script searching tool Chapter 4 Dashboard, Target, and Engagement Tools
  • 73.
    62 The next engagementtool is the ‘Target Analyzer’ as shown in Figure 4-­18. This utility provides statistics mostly around sizing of the application in terms of the number of dynamic URLs, number of static URLs, number of parameters, etc. These statistics help the tester to get an estimate of effort that will be required to test the application. Figure 4-17. Reference finder tool Figure 4-18. The target analyzer Chapter 4 Dashboard, Target, and Engagement Tools
  • 74.
    63 The next engagementtool is the ‘Content Discovery’ as shown in Figure 4-19. This tool helps define the spidering or crawling rules. For instance, this helps define spidering rules when a new target is discovered, like how much length and breadth of it should be spidered or whether to spider only files or directories as well. This creates a well-structured sitemap. This is optional and can be left as the default. The next engagement tool is the ‘Schedule Task’ as shown in Figure 4-­20. This is a simple utility to schedule any of the Burp Suite tasks. Using this you can either pause or resume any of the tasks. Figure 4-19. The content discovery tool Chapter 4 Dashboard, Target, and Engagement Tools
  • 75.
    64 The next engagementtool is the ‘Manual Testing Simulator’ as shown in Figure 4-21. This tool will send out HTTP requests to the target at random intervals and can help keep the session alive. This can be helpful in a scenario where the tester is on break and there’s a possibility of the application session getting timed out due to inactivity. Figure 4-20. The Burp Suite task scheduler Chapter 4 Dashboard, Target, and Engagement Tools
  • 76.
    65 Summary In this chapterwe learned the basics of the Burp Suite dashboard, target tab, and also discussed several useful engagement tools. In the next chapter we’ll learn about how the Burp Suite Intruder can be used to automate attack scenarios like Brute Force, etc. Exercises • Browse through any of the target URLs of choice and observe the changes in the dashboard and target tab. • Run each of the engagement tools against the selected target. Figure 4-21. Manual testing simulator Chapter 4 Dashboard, Target, and Engagement Tools
  • 77.
    67 © Sagar Rahalkar2021 S. Rahalkar, A Complete Guide to Burp Suite, https://doi.org/10.1007/978-1-4842-6402-7_5 CHAPTER 5 Intruder In the last chapter, we saw some basics about the Burp Suite dashboard, target, and engagement tools. Now that we have seen the basics of intercepting requests and interpreting the summary on the dashboard, we will move ahead with using the Intruder tool. Intruder has advanced fuzzing capabilities that can be used in various attack scenarios. Introduction to Intruder Before we get into the details of various options within Intruder, it’s important to understand what Intruder is and how it can be helpful in web application security testing. Intruder is part of Burp Suite, which can be used effectively for fuzzing and performing a brute force attack. There might be an application with a login page wherein the user needs to enter credentials to proceed further. From a security testing perspective, it would be worthwhile to test this login page for default credentials, weak passwords, or lockout mechanisms. This is where Intruder can come in handy. Given a list of usernames and passwords, Intruder can try all those combinations to see if any of them match. We can also consider another scenario wherein we have an interesting request that we wish to investigate further to check if it’s vulnerable to SQL injection or cross-site scripting. Again, Intruder can help with this. We can simply point Intruder to the URL and parameter we wish to test and feed
  • 78.
    68 it with alist of SQL injection or cross- site scripting payloads. It will then try and insert all the payloads we provided into the parameter we want to test and get us the responses. Once this is done, we need to check the responses to see if any of the payload actually resulted in exploitation of the vulnerability. Thus Intruder tremendously helps in any of the test scenarios where we have two of the following things: 1. A URL and a parameter to test 2. List of payloads to be submitted to the parameter Now let’s try to understand how we can send a request to Intruder. We have already seen the target tab and the hotkeys in previous chapters. Any request can be sent to Intruder in two ways: 1. Right-click the request you wish to send and click on ‘Send to Intruder’ as shown in Figure 5-1. Figure 5-1. Send request to Intruder Chapter 5 Intruder
  • 79.
    69 2. Select therequest you want to send and press the hotkey combination ‘Ctrl + I’ . Now that we have sent the request to Intruder, let’s see what options need to be configured further. Target Tab The first tab in Intruder is the Target tab. This lists the target URL and port that we wish to attack through Intruder as shown in Figure 5-2. There’s also an option to use HTTPS in case the target URL is using a secure communication channel. Positions The next tab within Intruder is the Positions tab as shown in Figure 5-3. Figure 5-2. Configuring the attack target in Intruder Chapter 5 Intruder
  • 80.
    70 Whenever a requestis sent to Intruder, it scans the request for probable insertion points and marks them as variables preceding and ending with the ‘$’ sign. There are three options with regard to selecting the insertion points: 1. Add $ – This option is used to add a new insertion point. Simply point the cursor to the start and end of the insertion point and click on ‘Add $’ . 2. Clear $ – This option will simply remove all the insertion points that were either selected manually or automatically. 3. Auto $ – This option will scan the request and try to automatically set insertion points marking them with the ‘$’ sign. Once we are sure about the insertion points or parameters that we want to target, the next step is selecting the type of attack. There are four different attack types available as shown in Figure 5-4. Figure 5-3. Configuring the positions in Intruder Chapter 5 Intruder
  • 81.
    71 The four attacktypes are the following: 1. Sniper – This type of attack uses a single set of payloads. In this case Intruder inserts payloads into each of the insertion points at once and then iterates through it. 2. Battering ram – This type of attack uses a single set of payloads. In this case Intruder iterates through payloads by inserting the same payload at all insertion points at once. 3. Pitchfork – This type of attack uses multiple sets of payloads. In this case Intruder uses different payload for each of the insertion points. Figure 5-4. Selecting the attack type in Intruder Chapter 5 Intruder
  • 82.
    72 4. Cluster bomb– This type of attack uses multiple sets of payloads. For each of the defined insertion points, there’s a different payload set. Intruder iterates through each of the payload sets and all permutations of payload combinations are then tested. Due to the number of possible permutations and combinations in the case of a cluster bomb, a large number of requests would be generated. Choosing the correct attack type depends on the attack scenario and the number of insertion points that need to be targeted simultaneously. See Figure 5-5. Once the payload positions are configured and type of attack is selected, we can move ahead to configuring the actual payloads. Figure 5-5. Attack type and positions in Intruder Chapter 5 Intruder
  • 83.
    73 Payloads Payload is thedata that Intruder would iteratively insert in the selected insertion points. Payloads can differ widely based on the scenario or the attack that we are targeting. In the case of the login page that we are discussing, the payload would be a list of probable passwords. Burp Suite provides various payload types and the most commonly used one is the list. You can create your own list by adding elements one at a time as shown in Figure 5-6 or you can also select a predefined list that Burp Suite offers readily. Burp Suite has several predefined lists in the form of usernames, passwords, short words, fuzzing payloads for SQL injection and cross-site scripting, directories, extensions, etc. Depending on the type of attack, we can either use the predefined list or create our own list as shown in Figure 5-7. Figure 5-6. Selecting payloads in Intruder Chapter 5 Intruder
  • 84.
    74 Now that wehave configured the positions as well as the payloads, we can launch the attack by clicking the ‘Start attack’ button. A new window will pop up as shown in Figure 5-8, and the payloads we provided will be submitted in insertion points we defined earlier – one request at a time. Figure 5-7. Selecting Intruder payloads from various options Chapter 5 Intruder
  • 85.
    75 From Figure 5-8,we can see that Intruder sent five requests each with a different payload. Upon observing and comparing the content length, we can notice that for payload ‘admin’ the response was different. Hence it could be the password for the admin user we are trying to log in. We can then easily verify this by manually logging into the target application. Figure 5-8. Intruder attack results Chapter 5 Intruder
  • 86.
    76 Options The last partof Intruder is the ‘Options’ tab. We have already seen that Intruder works as a fuzzing tool or it can perform a brute force attack. This implies the Burp Suite engine would have to send a large number of requests, await the responses, and then process them based on a predefined ruleset. The ‘Request Engine’ option as shown in Figure 5-9 helps configure the number of parallel threads, number of retries on the network failure, and pause before the retry duration. The values as shown in Figure 5-9 are default and preconfigured. However depending on specific use cases, these values can be tailored accordingly. Intruder sends a large number of requests to the target along with several permutations and combinations of payloads. The responses can be overwhelming to go through. This is where the ‘Grep Match’ feature comes in handy as shown in Figure 5-10. With this feature we can configure the Intruder engine to flag or highlight interesting responses having keywords Figure 5-9. Intruder configuration options Chapter 5 Intruder
  • 87.
    77 like error, exception,illegal, fail, stack, access, directory, etc. If Intruder finds these keywords in any of the responses, they will be explicitly highlighted, making the analysis much easier. Summary In this chapter we learned about using the Intruder tool to perform fuzzing and brute force attacks. We started off the chapter by learning how to send requests to Intruder, configuring positions, payloads, and finally launching the attack and interpreting the results. We also saw some of the configurable options for Intruder. In the next chapter we’ll see some additional useful tools within the Burp Suite like Repeater, Comparer, Decoder, and Sequencer. Figure 5-10. Extracting relevant data from Intruder results Chapter 5 Intruder
  • 88.
    78 Exercises 1. Use Intruderto detect cross-site scripting vulnerability in any of the vulnerable applications. 2. Use Intruder to detect SQL injection vulnerability in any of the vulnerable applications. Chapter 5 Intruder
  • 89.
    79 © Sagar Rahalkar2021 S. Rahalkar, A Complete Guide to Burp Suite, https://doi.org/10.1007/978-1-4842-6402-7_6 CHAPTER 6 Repeater, Comparer, Decoder, and Sequencer In the last chapter we learned about how Intruder can be used for fuzzing and performing brute force attacks. In this chapter we will look at some more Burp Suite tools like Repeater, Comparer, Decoder, and Sequencer. Repeater Repeater, as the name suggests, is a simple tool within Burp Suite that helps in replaying requests. We have already seen in previous chapters that when we browse an application through Burp Suite, a large number of requests are captured. Not all of the captured requests can be helpful for further testing or analysis. However, there could be a handful of requests with interesting parameters that are worth spending time on for further analysis. Repeater helps precisely in this scenario. If we find a particular request worth investigating further, we can simply send it to Repeater. Once in Repeater, we can play around with the request the way we want; tamper its headers, parameters etc.; and then send the request to the application and see how it responds. Repeater is a very simple yet powerful tool and has an easy interface as shown in Figure 6-1.
  • 90.
    80 The Repeater tabcan be directly accessed in Burp Suite. By default it opens up empty and we need to feed it with an appropriate HTTP request data. To specify the target, click on the ‘edit’ icon next to ‘Target’ and a new window will pop up as shown in Figure 6-2, where we can enter Host and Port details we wish to interact with. Figure 6-1. The Repeater console Figure 6-2. Configuring the target details in Repeater Chapter 6 Repeater, Comparer, Decoder, and Sequencer
  • 91.
    81 The more convenientway of sending data to Repeater is as shown in Figure 6-3. Simply right-click any of the requests that you wish to send to Repeater for further analysis and click on ‘Send to Repeater’ . Another alternative is jto ust select the request to be sent to Repeater and press the hotkey ‘Ctrl + R’ . The request to be investigated is now sent to Repeater as shown in Figure 6-4. The request tab contains the HTTP request we selected and the response tab is blank as we haven’t sent the request yet. Figure 6-3. Sending HTTP request to Repeater Figure 6-4. Raw HTTP request in Repeater Chapter 6 Repeater, Comparer, Decoder, and Sequencer
  • 92.
    82 The Request windowhas several tabs within as shown in Figure 6-5. One of the tabs is ‘Params’ , which lists all the parameters associated by default with the request we loaded. We can edit the existing parameters, add new parameters, or even delete any of the existing parameters. It is always interesting to see how the application responds to all of these parameter edits. The next tab is the ‘Headers’ tab as shown in Figure 6-6, which lists all the default headers to be sent along with the request. Again, all the header values are editable: we can edit the existing values, add new header fields, and remove any of the existing header fields as well. Figure 6-5. Parameter tab in Repeater Chapter 6 Repeater, Comparer, Decoder, and Sequencer
  • 93.
    83 Once we setthe required parameters and header values, we can click on the ‘Send’ button as shown in Figure 6-7 and we get a response from the application, which is shown in the ‘Response’ tab. Figure 6-6. Headers tab in Repeater Figure 6-7. Response tab in Repeater Chapter 6 Repeater, Comparer, Decoder, and Sequencer
  • 94.
    84 In this casethe response received was HTTP status 302, which means the page is meant to redirect. We can click the ‘Follow redirection’ option and then get the final response as shown in Figure 6-8. The response shown here is raw text and at times can be difficult to interpret. Hence we can click the ‘Render’ tab within the ‘Response’ section to visually load the response as if we were seeing it in the browser, as shown in Figure 6-9. Figure 6-8. Response tab in Repeater Figure 6-9. Rendering the response in Repeater Chapter 6 Repeater, Comparer, Decoder, and Sequencer
  • 95.
    85 Repeater also providesan option to view the response in the real browser. To do this, simply right-click on the response that you wish to see in the browser, and click on ‘Show response in browser’ as shown in Figure 6-10. Burp Suite will pop up another window as shown in Figure 6-11, with a link that needs to be copied into the browser. Once the link generated by Burp Suite is copied in the browser, the response gets rendered accordingly. Figure 6-10. Viewing the response in the Browser Figure 6-11. Show response in the Browser Chapter 6 Repeater, Comparer, Decoder, and Sequencer
  • 96.
    86 Comparer In the lastsection we got familiar with the Repeater tool. Once the request is sent to Repeater, there is wide scope to tamper the request parameter or header fields and send it across to the target application. The responses in each case may vary depending on what parameters or header fields that were set in the request. There could be multiple responses, each of them looking quite similar. This is where the Comparer tool comes in handy. Comparer simply compares content head to head and highlights differences if there are any. To send a response to Comparer, simply right-­ click the response and click on ‘Send to Comparer’ as shown in Figure 6-­12. Now as the Comparer needs at least two text blocks to compare, we send another response to Comparer as shown in Figure 6-13. Figure 6-12. Sending Repeater response to the Comparer Chapter 6 Repeater, Comparer, Decoder, and Sequencer
  • 97.
    87 We can nownavigate to the Comparer tab as shown in Figure 6-14 and see both responses that we sent from Repeater earlier. Now since we need to find differences in words from both of the responses, we click on the ‘Words’ button and get a new window opened as shown in Figure 6-15. Figure 6-13. Sending Repeater response to the Comparer Figure 6-14. The Comparer console Chapter 6 Repeater, Comparer, Decoder, and Sequencer
  • 98.
    88 Comparer will nowhighlight the text changes in two of the parallel windows. Decoder Web applications commonly use various encoding schemes like Ascii, HTML, Base 64, etc. From a security testing perspective, it's very common to encounter such encoded strings during testing. Burp Suite Decoder is a simple utility that can encode or decode text in a format of a URL, HTML, Base 64, ASCII hHx, Hex, Octal, Binary, and Gzip. Simply navigate to the Decoder tab as shown in Figure 6-16 and enter the text that needs to be decoded. Figure 6-16. Decoding Base 64 data Figure 6-15. Comparing the responses in the Comparer Chapter 6 Repeater, Comparer, Decoder, and Sequencer
  • 99.
    89 In this casewe entered a Base 64 encoded value and then clicked on ‘Decode as’ Base 64 to get the decoded output in the next window as admin:admin. We can also use this tool to encode any plain text as shown in Figure 6-­17. We simply entered the plain text scriptalert(“XSS”)/script and then clicked on ‘Encode as’ the URL to get the encoded output in the next window. Sequencer Web applications depend a lot on tokens, session IDs, or other such unique and random identifiers. From a security perspective, it is important to test the randomness or uniqueness of these tokens and identifiers. If the tokens aren’t strong and random enough, then attackers can easily brute force them and get unauthorized access. Burp Suite Sequencer is a tool that helps us test the strength of application tokens. We can send any request to Sequencer just by ­ right-­ clicking the request and clicking on ‘Send to Sequencer’ as shown in Figure 6-18. Figure 6-17. Encoding data using the Burp Suite Decoder Chapter 6 Repeater, Comparer, Decoder, and Sequencer
  • 100.
    90 We can nownavigate to the Sequencer tab as shown in Figure 6-19. We can clearly see the Sequencer has automatically parsed the request and selected the JSESSIONID token present in the cookie. This token would now be analyzed for its strength and randomness. To start the test, simply click on ‘Start live capture’ and a new window will open up as shown in Figure 6-20. Figure 6-19. The Burp Suite Sequencer Figure 6-18. Sending HTTP request to Sequencer Chapter 6 Repeater, Comparer, Decoder, and Sequencer
  • 101.
    91 The live capturestarts and we can pause or resume it any time we wish. However, it’s important to note that to effectively analyze the token strength, a sample size of at least 100 should be considered. Once the capture is complete, Sequencer shows us the result, which was found to be “excellent” in this case. So the token JSESSIONID is strong, unique, random, and hence safe to use. Sequencer also allows us to load a sample of tokens manually and then analyze them. To do this, simply navigate to the ‘Manual load’ tab in Sequencer as shown in Figure 6-21. Figure 6-20. Session ID analysis using Sequencer Chapter 6 Repeater, Comparer, Decoder, and Sequencer
  • 102.
    92 We can nowcopy and paste a sample of tokens and then analyze them accordingly. Summary In this chapter we saw how to tamper and replay requests using Repeater, then perform a head-to-head comparison of responses using Comparer. We then learned about the Decoder tool, which helps encode and decode text in various formats. Lastly we got familiar with the Sequencer tool, which can be used to assess the effectiveness of tokens. In the next chapter, we’ll learn about some additional useful tools within the Burp Suite like Infiltrator, Collaborator, Clickbandit, and CSRF PoC Generator. Figure 6-21. Manually loading tokens for analysis Chapter 6 Repeater, Comparer, Decoder, and Sequencer
  • 103.
    93 Exercises 1. Send anyof the requests to Repeater and try to tamper with its parameters and header fields. Then send each of the requests and analyze the responses. 2. Compare the multiple responses using Comparer. 3. Use the Decoder tool to encode text in URL, HTML, and Base 64 formats. 4. Assess the token strength of the token from any of the requests captured. Chapter 6 Repeater, Comparer, Decoder, and Sequencer
  • 104.
    95 © Sagar Rahalkar2021 S. Rahalkar, A Complete Guide to Burp Suite, https://doi.org/10.1007/978-1-4842-6402-7_7 CHAPTER 7 Infiltrator,Collaborator, Clickbandit, and CSRF PoC Generator In the last chapter we looked at some Burp Suite tools like Repeater, Sequencer, Decoder, and Comparer. In this chapter we will continue to explore more useful tools like Infiltrator, Collaborator, Clickbandit, and CSRF PoC (proof-of-concept) generator. Infiltrator Burp Suite Infiltrator is a tool that instruments the target web application so that the vulnerability detection by the Burp Suite scanner becomes more efficient and accurate. Infiltrator makes irreversible changes in the code and essentially hooks into the target application. This way, it helps the Burp Suite scanner get more visibility into the application code and potentially detect unsafe calls and functions.
  • 105.
    96 As the Infiltratormakes irreversible changes to the target application code, it is advisable to run it only for a test instance and not on a production instance. Currently, the Infiltrator is supported if the target application is using any of the following technologies: • Java • Groovy • Scala • Other JVM language (JRE versions 1.4 - 1.8) • C# • Visual Basic • Other .Net language (.Net versions greater than 2.0) To get started with the Infiltrator, click on the Burp menu and then select ‘Burp Infiltrator’ as shown in Figure 7-1. A new window will pop up as shown in Figure 7-2. This wizard will help us generate the Infiltrator agent. Figure 7-1. Navigating to the Burp Suite Infiltrator Chapter 7 Infiltrator, Collaborator, Clickbandit, and CSRF PoC Generator
  • 106.
    97 We need toselect the technology our application is using like Java or .NET and click on Next. Then the wizard will ask the location where we wish to save the Infiltrator agent, as shown in Figure 7-3. Figure 7-2. Generating the Infiltrator agent Figure 7-3. Generating the Infiltrator agent Chapter 7 Infiltrator, Collaborator, Clickbandit, and CSRF PoC Generator
  • 107.
    98 Next, the wizardwill simply generate the Infiltrator agent and save it to the location we selected earlier, as shown in Figure 7-4. The important thing to note here is the Infiltrator agent should be in the same directory where the target application is located as shown in Figure 7-5. NowthatboththeInfiltratoragentandthetargetapplicationareinthesame directory,wecanopenacommandpromptandtypecommand‘java-jarburp_ infiltrator.jar’asshowninFigure7-6. Figure 7-4. Generating the Infiltrator agent Figure 7-5. Newly generated Infiltrator agent Chapter 7 Infiltrator, Collaborator, Clickbandit, and CSRF PoC Generator
  • 108.
    99 The Infiltrator willnow run and modify the Java applications in the directory. This is a one-time procedure, and the application needs to restart once the patched code is available. Burp Infiltrator also makes use of Collaborator, which we will be seeing in the next section. Collaborator Collaborator is a tool provided by Burp Suite that helps in attacks like Server Side Request Forgery (SSRF) or any of the out-of-band attacks. The Burp Suite Collaborator service helps by generating random payloads in the form of hostnames. These payloads can then be used as part of requests in various attack scenarios. If the attack is successful, then an interaction occurs between the target application server and the Burp Collaborator server. Then using the Burp Collaborator client, we can poll and check if any such interactions have happened. To get started with the Burp Collaborator, simply click on the Burp menu and click “Burp Collaborator client’ . A new window will pop up as shown in Figure 7-7. Figure 7-6. Executing the Infiltrator agent Chapter 7 Infiltrator, Collaborator, Clickbandit, and CSRF PoC Generator
  • 109.
    100 Now click onthe ‘Copy to clipboard’ button and paste its value in the notepad as shown in Figure 7-8. Figure 7-7. The Burp Suite Collaborator client Figure 7-8. Configuring the Collaborator client Chapter 7 Infiltrator, Collaborator, Clickbandit, and CSRF PoC Generator
  • 110.
    101 The random valuegenerated by the Burp Collaborator can now be used in payloads in requests sent as part of an attack. The Burp Collaborator client automatically polls the Collaborator server after every 60 seconds to check if there has been any interaction. This duration can be customized or you can simply click on the ‘Poll now’ button to manually check for Collaborator interactions. Clickbandit Clickjacking is one of the very common attacks on web applications. Using clickjacking, the attacker tries to trick the user into clicking something different than what the user sees visually. If successful, the attacker can get access to confidential information. Clickjacking is also known as a UI redressal attack, as the attacker tries the deceptive technique of creating a fake UI and then tricks the victim into executing malicious actions or events. Burp Suite offers a utility called ‘Clickbandit’ that significantly simplifies the process of generating Proof-of-Concept for an application that is vulnerable to Clickjacking. To get started with the Clickbandit tool, simply go to the Burp menu and click on ‘Burp Clickbandit’ . A new window will pop up as shown in Figure 7-9. Figure 7-9. The Burp Suite Clickbandit tool Chapter 7 Infiltrator, Collaborator, Clickbandit, and CSRF PoC Generator
  • 111.
    102 This window hassteps listed that we need to follow in order to generate the Clickjacking Proof-of-Concept. The first step is to click on the ‘Copy Clickbandit to clipboard’ button. The next step is to open the browser and press function key F12 to go into the browser console as shown in Figure 7-10. To proceed further, we need to paste the Clickbandit code into this browser console, which we copied earlier as shown in Figure 7-11. Figure 7-10. Target for Clickbandit Chapter 7 Infiltrator, Collaborator, Clickbandit, and CSRF PoC Generator
  • 112.
    103 Once the codeis copied into the browser console, simply press Enter and you’ll notice the Burp Clickbandit UI appears on top of the page as shown in Figure 7-12. Figure 7-11. Copying the Clickbandit code in browser console Chapter 7 Infiltrator, Collaborator, Clickbandit, and CSRF PoC Generator
  • 113.
    104 Now we needto perform and record the actions that we wish to include as part of the Clickjacking attack. Once all the required actions are done, click on the save button and you will be able to save a file named ‘clickjacked.html’ as shown in Figure 7-13. Figure 7-12. The Clickbandit UI Figure 7-13. Saving the Clickbandit code Chapter 7 Infiltrator, Collaborator, Clickbandit, and CSRF PoC Generator
  • 114.
    105 You can nowopen the file ‘clickjacked.html’ separately in the browser as shown in Figure 7-14. You’ll notice that the actions you captured earlier are now being replayed, and if you click, then you get a message ‘You’ve been clickjacked!’ as shown in Figure 7-15. Figure 7-14. Executing the Clickbandit code Figure 7-15. Executing the Clickbandit code Chapter 7 Infiltrator, Collaborator, Clickbandit, and CSRF PoC Generator
  • 115.
    106 CSRF Cross-Site Request Forgery,commonly known as CSRF, is another type of attack on web applications that exploits session management flaws to trick the victim into performing unwanted actions. Burp Suite has a utility that makes it very easy to generate Proof-of-Concept for CSRF vulnerability. We first need to identify and confirm the request for which we wish to generate the CSRF Proof-of-Concept code. Once the request is finalized, simply right-click the request, go to ‘Engagement tools’ , and click on ‘Generate CSRF PoC’ as shown in Figure 7-16. Now, a new window will pop up as shown in Figure 7-17, which has the POST request along with the CSRF code. Figure 7-16. Sending request to CSRF PoC generator Chapter 7 Infiltrator, Collaborator, Clickbandit, and CSRF PoC Generator
  • 116.
    107 It is noweasy to modify the CSRF code as required and then we can either directly test it in the browser or generate a separate HTML file. To test the CSRF code in the browser, click on the ‘Test in browser’ button, and a new window will pop up as shown in Figure 7-18. Figure 7-17. CSRF PoC generator Chapter 7 Infiltrator, Collaborator, Clickbandit, and CSRF PoC Generator
  • 117.
    108 Now click onthe ‘Copy’ button, open the browser, and paste into the address bar as shown in Figure 7-19. Figure 7-18. CSRF PoC generator Figure 7-19. Verifying the CSRF PoC in browser Chapter 7 Infiltrator, Collaborator, Clickbandit, and CSRF PoC Generator
  • 118.
    109 Now click onthe button ‘Submit request’ , and the CSRF code will get executed as shown in Figure 7-20. Summary In this chapter we learned about using Intruder for instrumenting applications and increasing detection capabilities of the Burp Scanner. Then we saw the Burp Collaborator, which can be effectively used in out-­ of-­ band attacks like SSRF. We then looked at the Clickbandit tool that helps generate proof-of-concept code for applications vulnerable to clickjacking; and lastly we glanced through the CSRF PoC generator, which helps us quickly generate and test proof-of-concept code for Cross-Site Request Forgery attacks. In the next chapter, we’ll see the automated scanning and reporting capabilities of the Burp Suite. Figure 7-20. Verifying the CSRF PoC in browser Chapter 7 Infiltrator, Collaborator, Clickbandit, and CSRF PoC Generator
  • 119.
    110 Exercises 1. Use Infiltratorto instrument any of your target Java applications. 2. Find a vulnerable CSRF request and try to generate a proof-of-concept using the CSRF PoC generator. 3. Generate a clickjacking proof-of-concept code for your target web application. Chapter 7 Infiltrator, Collaborator, Clickbandit, and CSRF PoC Generator
  • 120.
    111 © Sagar Rahalkar2021 S. Rahalkar, A Complete Guide to Burp Suite, https://doi.org/10.1007/978-1-4842-6402-7_8 CHAPTER 8 Scanner and Reporting In the last chapter, we learned about various tools like Infiltrator, Collaborator, Clickbandit, and CSRF PoC generator. In this chapter, we’ll explore the features and capabilities of the Burp Suite scanner for automated vulnerability detection. Scan Types So far throughout the book, we have seen several capabilities of Burp Suite that are useful for manual testing. However, Burp Suite also provides a web application vulnerability scanner that automates the process of finding vulnerabilities. This is indeed a very feature-rich scanner and is capable of detecting potential web vulnerabilities. The Burp Suite offers two types of scans: Passive Scan and Active Scan. The passive scan runs in the background, by default, while we browse an application through Burp Suite. A passive scan simply monitors the traffic and tries to list vulnerabilities like missing security flags in cookies, missing security headers, traffic being sent over unencrypted communication channels, etc. Thus the passive scanner doesn’t attempt to inject any payloads into any of the insertion points, but rather just highlight vulnerabilities that can be found only by passively monitoring ongoing requests and responses. The active scan goes a step further and
  • 121.
    112 tries to insertpayloads into insertion points and check if parameters are vulnerable. Active scanning is a more intense technique; however, it does a better job in finding vulnerabilities that a passive scanner may never find. We’ll now look further into the details of performing an active scan using Burp Suite. Crawl and Audit Active scanning is usually a two-step process. The first step involves crawling or spidering the application and the second step involves attacking the parameters with payloads. The Burp Suite scanner offers two options: either crawl and audit or just crawl. To start a new audit, go to the Dashboard tab and click on ‘New scan’ as shown in Figure 8-1. A new window will pop up as shown in Figure 8-2. We select the option ‘Crawl and audit’ . Next, we need to specify the target URL that we wish to scan. In this case, we enter the target URL as ‘demo.testfire.net’ . Figure 8-1. New scan task Chapter 8 Scanner and Reporting
  • 122.
    113 Next is thescoping section as shown in Figure 8-3. The URL’s that we wish to be part of the audit need to be specified under the ‘Included URL prefixes’ tab, and if there are any particular URLs that we don’t want to be included in the audit, then those need to be explicitly added under ‘Excluded URL prefixes.’ Figure 8-2. New scan configuration Chapter 8 Scanner and Reporting
  • 123.
    114 Now that wehave configured the target URL, we just need to click on ‘OK’ and the crawl and audit activity starts as shown in Figure 8-4. However, it's important to note that this activity will start with a default scan configuration. Figure 8-3. New scan configuration Figure 8-4. Scan tasks in progress Chapter 8 Scanner and Reporting
  • 124.
    115 In the nextsection, we’ll be looking at customizing the scan configuration. Scan Configuration In the previous section, we configured and initiated a crawl and audit task on a target URL but with default configuration settings. In this section, we’ll take a look at how the scan configuration can be tailored to suit our needs. To customize the scan configuration, click on the ‘Scan configuration’ tab as shown in Figure 8-5. The scan configuration allows us to customize crawl settings as well as the audit settings. We’ll first go through the crawl configuration settings. Click on the ‘New’ button and select ‘Crawl’ . A new window will pop up as shown in Figure 8-6. Figure 8-5. Scan configuration Chapter 8 Scanner and Reporting
  • 125.
    116 The crawl optimizationconfiguration allows us to set the maximum link depth up to which we wish to crawl along with the crawl strategy, which is set to normal by default. We can change the crawling strategy to fast by selecting it through the drop-down menu, depending on the particular scan scenario. Next, we can configure the crawl time limits as shown in Figure 8-7. If the target application is large and complex, then it might take a lot of time for crawling. We can set a limit to this by defining the maximum time that we wish to spend on crawling the application. We can also limit the crawl by the number of locations discovered or the maximum number of requests made during the crawl function. Figure 8-7. Crawl limit configuration Figure 8-6. Crawl optimization settings Chapter 8 Scanner and Reporting
  • 126.
    117 The next configurationsetting is related to the login functions as shown in Figure 8-8. It might happen that the target application has a login function. In such a case, Burp Suite will even try to register a new test user. The next configuration setting is related to handling application errors during a crawl function as shown in Figure 8-9. There could be multiple reasons behind application errors, like an authentication failure, network problems, etc. This configuration setting tells the Burp Suite scanner to pause the crawl and audit function if there are a certain number of consecutive application errors. Figure 8-8. Login function configuration Chapter 8 Scanner and Reporting
  • 127.
    118 The next setof configuration settings are miscellaneous as shown in Figure 8-10. This includes settings on whether we want the Burp Suite scanner to automatically submit forms or if we wish to customize the user-­ agent if we want to fetch robots.txt and the sitemap, etc. Figure 8-9. Configuring application errors during Crawl Chapter 8 Scanner and Reporting
  • 128.
    119 The next setof configuration settings are related to the audit function. To start with, the first audit configuration setting is ‘Audit Optimization’ as shown in Figure 8-11. This setting allows us to configure audit speed and accuracy. The audit speed can be set to either fast, normal, or thorough, while the audit accuracy can be set to normal or to minimize false positives. Figure 8-10. Miscellaneous crawl configuration Chapter 8 Scanner and Reporting
  • 129.
    120 The next auditconfiguration setting is related to the type of issues reported as shown in Figure 8-12. The Burp Suite scanner detects a variety of issues. However, during a particular test scenario, it might so happen that only a particular type of issue needs to be tested. In such a case, it won’t be worth spending time on testing all other types of issues. Hence this configuration setting allows us to customize the type of issues that we want to be tested during the scan. Figure 8-11. Audit optimization configuration Chapter 8 Scanner and Reporting
  • 130.
    121 The next auditconfiguration setting is related to handling application errors during the audit function, as shown in Figure 8-13. We have already seen a similar configuration setting for the crawl function. This setting helps configure the number of failures after which the audit task would be paused. Figure 8-12. Type of issues to be detected during an audit Chapter 8 Scanner and Reporting
  • 131.
    122 The next auditconfiguration setting is related to the type of insertion points that we want the Burp Suite scanner to attack during the audit function as shown in Figure 8-14. Selecting all the types of insertion points will increase the possibility of finding more vulnerabilities, but at the same time it will also take longer to finish the audit. Figure 8-13. Configuring application errors during Audit Figure 8-14. Configuring insertion point types Chapter 8 Scanner and Reporting
  • 132.
    123 All the crawland audit scan configuration settings we saw so far are set to optimal values by default. We can quickly trigger a new crawl and audit task using the default scan configuration. However, depending on particular scan scenarios, it might be required for you to customize the scan configuration settings. Application Login The next important scan configuration setting is configuring the ‘Application login’ as shown in Figure 8-15. While scanning the target application, we may come across certain pages that do not require authentication, while there could be a few pages that can be accessed only after authentication. If we want the Burp Suite scanner to audit the pages behind authentication as well, then we need to provide credentials. Figure 8-15. Configuring application login Chapter 8 Scanner and Reporting
  • 133.
    124 Credentials can beadded by simply clicking on the ‘New’ button and providing the required username and password. Resource Pools The last scan configuration option is “Resource Pool” as shown in Figure 8-­16. The resource pool helps define the system resources that will be used across multiple tasks. By default, the resource pool is created, which allows for a maximum of 10 concurrent requests. We can leave this to default unless we want to do multitasking within the same Burp Suite project. Figure 8-16. Configuring resource pools Chapter 8 Scanner and Reporting
  • 134.
    125 Reporting Reporting the issuesin a presentable format is as important as finding them. Burp Suite offers an excellent reporting feature that helps us generate a report in the required format with all relevant extract about the vulnerability. The report, once generated, can be shared with relevant stakeholders for further action. Once the crawl and audit task is complete, all the issues that were found during the scan are listed in the ‘Issue activity’ pane as shown in Figure 8-17. We now simply need to select the issues that we wish to be part of the report. To do this, simply right-click the issue that needs to be reported and click ‘Report issue.’ The Burp Suite reporting wizard will now ask us about the format of the report we wish to have as shown in Figure 8-18. Currently, the Burp Suite supports generating reports in HTML or XML formats. Figure 8-17. Exporting issues to report Chapter 8 Scanner and Reporting
  • 135.
    126 Next, we needto select which details about the issue are required in the report as shown in Figure 8-19. W then need to select whether we want full HTTP requests and responses for the reported issues or only the relevant extracts as shown in Figure 8-20. Figure 8-18. Selecting format for the report Figure 8-19. Selecting type of details to be included in the report Chapter 8 Scanner and Reporting
  • 136.
    127 Lastly, we needto select the name and location where we want the report to be generated along with the title of the report as shown in Figure 8-21. Figure 8-20. Selecting requests and response formats for report Chapter 8 Scanner and Reporting
  • 137.
    128 Now the BurpSuite reporting wizard will generate a vulnerability report as shown in Figure 8-22. Figure 8-21. Configuring location where the report will be saved Figure 8-22. Generating the report Chapter 8 Scanner and Reporting
  • 138.
    129 The generated reportcan them be viewed in any of the browsers as shown in Figure 8-23. The report shows a summary of findings based on confidence as well as severity. The report also shows vulnerability in detail along with the relevant request and response as shown in Figure 8-24. Figure 8-23. Viewing the report in the browser Chapter 8 Scanner and Reporting
  • 139.
    130 Summary In this chapter,we learned about the Burp Suite scanner and how it can be customized to effectively find application vulnerabilities in an automated manner. In the next chapter we’ll see how to use the Burp Suite Extender to install additional plugins and enhance the capabilities. Exercises 1. Scan any of the target web applications using the crawl and audit function of Burp Suite. 2. Generate an HTML report for the issues found during the scan. Figure 8-24. Vulnerability details in the report Chapter 8 Scanner and Reporting
  • 140.
    131 © Sagar Rahalkar2021 S. Rahalkar, A Complete Guide to Burp Suite, https://doi.org/10.1007/978-1-4842-6402-7_9 CHAPTER 9 Extending Burp Suite In the last chapter, we learned about the Burp Suite scanner, which effectively helps in automating vulnerability detection. In this chapter, we’ll be exploring the Burp Suite extender feature through which we can further enhance the capabilities of Burp Suite. Burp Suite Extensions So far, throughout the book, we have seen various capabilities of Burp Suite for manual as well as automated vulnerability detection. We have explored various tools and utilities within Burp Suite that can be leveraged for specific tasks. Burp Suite has now evolved more like a platform that is flexible enough to accommodate external functionalities and utilities. As we have already seen, Burp Suite does provide numerous capabilities out of the box. However, these capabilities can be extended further using extensions. The Burp Suite Extensions come in various forms as below: Default extensions – These extensions are listed by default, out of the box in any of the Burp Suite setups, and can be installed through the Burp Suite Extender. Pro extensions – These are extensions that can be installed and run only on the Burp Suite Professional Edition.
  • 141.
    132 Regular extensions –These are extensions that can be installed and run on the Burp Suite Community Edition as well as the Professional Edition. Other extensions – Burp Suite has opened up APIs that developers can write with new custom extensions. Such extensions are not part of the official extension store but need to be downloaded and installed manually. BApp Store The easiest way to install an extension in Burp Suite is through the BApp Store. To access the BApp Store, simply navigate to Extender ➤ BApp Store as shown in Figure 9-1. The BApp Store has a very easy-to-use interface with two panes as shown in Figure 9-2. Figure 9-1. BApp Store Chapter 9 Extending Burp Suite
  • 142.
    133 The left panelists all the available extensions along with the following information: • Name of the extension, • Whether it is currently installed or not, • Rating of the extension, • The popularity of the extension, • Date when the extension was last updated, • Whether the extension is only available for use with the Burp Suite Professional Edition or if it can be used in the Community Edition as well. The right pane details out information for any of the extensions we select from the left pane. This includes information like the following: • Details on what the extension is about and how it can be used • Author • Extension version Figure 9-2. BApp Store Chapter 9 Extending Burp Suite
  • 143.
    134 • Source • Datewhen the extension was last updated • Rating and popularity of the extension • Install button to install and add the extension to current Burp Suite setup It is important to note that new extensions keep on getting added to the BApp Store on a regular basis. To ensure the list of extensions is the latest one, simply click on the ‘Refresh list’ button as shown in Figure 9-3. Some of the useful extensions from the BApp Store are as follows: • Active Scan++ – This extension is developed to further enhance the Burp Suite’s passive and active scanning capabilities. • Additional Scanner Checks – This extension adds a few more checks to a passive scanner like DOM-based XSS etc. • CSRF Scanner – This extension helps passively scan for Cross-Site Request Forgery (CSRF) vulnerabilities. Figure 9-3. Browsing through extensions in BApp Store Chapter 9 Extending Burp Suite
  • 144.
    135 • Discover ReverseTabnabbing – This extension searches the HTML code for possible Tabnabbing vulnerabilities. • Error Message Checks – This extension helps passively detect any error or exception messages that may contain sensitive information like stack traces. • Headers Analyzer – This extension passively checks the response headers and flags all missing security headers like X-XSS-Protection, X-Frame-Options, and many more. • HTML5 Auditor – This extension checks if any of the potentially unsafe HTML5 functions have been used like storing sensitive data on client-side storage, client geolocation, etc. • J2EEScan – This extension helps improve test coverage for J2EE applications as well as adds additional test cases. • Java Deserialization Scanner – This extension adds to the Burp Suite ability to detect Java Deserialization vulnerabilities. • JavaScript Security – This extension further adds several passive checks related to JavaScript security like DOM issues, Cross-Origin Resource Sharing (CORS), etc. • Retire.js – This extension passively monitors the traffic and detects the use of any vulnerable third-party library along with necessary CVE details. • SameSite Reporter – This extension checks if the SameSite attribute has been set in cookies or not. Chapter 9 Extending Burp Suite
  • 145.
    136 • Software VersionReporter – This extension passively parses the traffic and reports all the software version details. This information can further help in application enumeration. • Upload Scanner – This extension adds capabilities to Burp Suite to detect file upload functionality and related vulnerabilities. • Web Cache Deception Scanner – This extension scans the application for the presence of any Web Cache Deception vulnerability. • CSP Auditor – This extension scans the response headers and checks if Content Security Policy (CSP) has been configured correctly or not. • CVSS Calculator – This extension facilitates scoring vulnerabilities using CVSS methodology from within Burp Suite. Manual Installation In the previous section, we saw how we could browse through, select, and install extensions using the BApp Store. Not all extensions that are written are available in the BApp Store. There could be extensions written by individual authors, published on different websites like GitHub, etc. In such a scenario where the extension is not present in the BApp Store, we need to download it separately and install it manually. To install extensions manually, navigate to the ‘Extensions’ tab within Extender as shown in Figure 9-4. Chapter 9 Extending Burp Suite
  • 146.
    137 Burp Suite acceptsthe installation of third-party extensions with the following formats as shown in Figure 9-5. • Java • Python • Ruby The other options include whether we wish to show the output and errors after extension installation on the console or if we wish to save it to a file as shown in Figure 9-6. Figure 9-4. Adding extensions manually Figure 9-5. Selecting type of the extension Chapter 9 Extending Burp Suite
  • 147.
    138 To install anextension, select the extension type (Java / Python / Ruby) and then simply browse and select the location where the extension is located on disk as shown in Figure 9-7. Figure 9-6. Adding extensions manually Chapter 9 Extending Burp Suite
  • 148.
    139 If the extensioninstallation gets completed successfully, a message is displayed as shown in Figure 9-8. Figure 9-7. Selecting the extension file Figure 9-8. Loading extensions manually Chapter 9 Extending Burp Suite
  • 149.
    140 Settings Now that wehave seen how to install extensions either through the BApp Store or manually, let’s go through some additional settings related to extensions. • Settings can be accessed by navigating to ‘Extender ➤ Options’ as shown in Figure 9-9. The first two settings define if you want to automatically reload extensions when you start the Burp Suite and if you wish to automatically update the extensions on Startup. The next setting is related to the Java environment. Most of the extensions are written in Java. To ensure these extensions run correctly, it might be required to provide a path to any additional library dependencies as shown in Figure 9-10. Figure 9-9. BApp Store options Chapter 9 Extending Burp Suite
  • 150.
    141 The next settingis related to setting up the Python environment. Some extensions require a Python interpreter implemented in Java called Jython. Jython can be downloaded and installed from https://www.jython. org/download. Once installed, you need to update the path to the Jython installation directory as shown in Figure 9-11. The last setting is related to setting up the Ruby environment. As we have seen earlier, Burp Suite supports extensions written in Ruby as well; hence we need to specify the path to the Ruby interpreter as shown in Figure 9-12. In order to run a Burp Suite extension written in Ruby, JRuby needs to be downloaded and installed from https://www.jruby.org/ download. Figure 9-10. Configuring the Java environment Figure 9-11. Configuring the Python environment Chapter 9 Extending Burp Suite
  • 151.
    142 Other Useful Extensions Earlierin this chapter, we already saw some useful extensions available in the BApp Store. As the Burp Suite gives Application Programming Interface (APIs) to developers, it is easy to write and develop custom extensions as required. Here are some additional useful extensions that can be manually installed to Burp Suite. • sometime – This extension can be downloaded from https://github.com/linkedin/sometime. This extension passively monitors the traffic to check if the application is vulnerable to the Same Origin Method Execution. • burp-suite-gwt-scan – This extension can be downloaded from https://github.com/augustd/ burp-suite-gwt-scan - This extension helps automatically identify insertion points for GWT (Google Web Toolkit) requests when sending them to the active Scanner or Burp Intruder. • Admin panel finder – This extension can be downloaded from https://github.com/moeinfatehi/ Admin-Panel_Finder -This extension assists in the Figure 9-12. Configuring the Ruby environment Chapter 9 Extending Burp Suite
  • 152.
    143 enumeration of infrastructureand application Admin Interfaces that might have been left open by mistake. • Pwnback – This extension can be downloaded from https://github.com/P3GLEG/PwnBack. This extension helps to retrieve old and archived versions of the application if present. It can be useful to compare the old and current versions of the application to check the changes and associated vulnerabilities. • Minesweeper – This extension can be downloaded from https://github.com/codingo/Minesweeper -This extension helps detect scripts being loaded from over 23000+ malicious cryptocurrency mining domains (cryptojacking). For an additional and comprehensive list of the Burp Suite extensions, refer to ­ https://github.com/snoopysecurity/awesome-burp-­extensions. APIs Throughout this chapter, we have seen the use of Extender to add and install new extensions that significantly improve the Burp Suite capabilities. Burp Suite offers another useful feature in the form of the Application Programming Interface (API). Using these APIs it is possible to write our own extensions. The list of available APIs and detailed guidance on their usage is available under the ‘Extender ➤ APIs’ tab as shown in Figure 9-13. Chapter 9 Extending Burp Suite
  • 153.
    144 Summary In this chapter,we got familiar with the Burp Suite extender, which allows enhancing the Burp Suite capabilities through external extensions. We explored the BApp Store, which has a list of many useful extensions and we also learned to install an extension manually in case it’s not present in the BApp Store. Last, we listed a few additional extensions apart from those officially present in the BApp Store. In the next chapter we’ll see how we can leverage the Burp Suite capabilities to test mobile applications and APIs. We’ll also see the complete workflow for testing an application using the Burp Suite. Figure 9-13. The Burp Suite Extender APIs Chapter 9 Extending Burp Suite
  • 154.
    145 Exercises 1. Use theBApp Store to install extensions discussed in this chapter. 2. Perform an active scan on the target application before installing the extensions and after installing the extensions. Observe the difference in vulnerabilities found in both the scans. 3. Explore the additional extensions discussed in this chapter and try to install them manually. Chapter 9 Extending Burp Suite
  • 155.
    147 © Sagar Rahalkar2021 S. Rahalkar, A Complete Guide to Burp Suite, https://doi.org/10.1007/978-1-4842-6402-7_10 CHAPTER 10 Testing Mobile Apps and APIs with Burp Suite In the last chapter, we learned about the Burp Suite extender feature, which allows enhancing the Burp Suite’s capabilities through third-party extensions. In this final chapter, we’ll glance through how Burp Suite can be used to test APIs and mobile applications as well. We’ll conclude with a quick summary of the workflow for testing any web application using Burp Suite. API Security Testing with Burp Suite Throughout this book, we have been learning about various capabilities of Burp Suite, which can be used for Web Application security testing. However, today’s modern applications are more interoperable and interconnected. This is achieved through the use of Application Programming Interfaces (APIs).
  • 156.
    148 Exposing APIs significantlyhelps in automating tasks; however, at the same time, it does introduce security risks as well if not implemented securely. While most of the web application vulnerabilities apply to APIs, there are a few vulnerabilities that are specific to APIs. OWASP has published the Top 10 vulnerability list for API, which can be found at https://owasp.org/www-project-api-security/. The approach for security testing of APIs through Burp Suite is very similar to the regular web applications that we have seen so far in the book. As APIs communicate over HTTP/HTTPS protocol, the traffic can be intercepted and tampered in Burp Suite just like any other regular web application request and response. For performing security testing on APIs using Burp Suite, we can use one of the following approaches: 1. Crawl the application in a regular way and figure out the endpoints belonging to APIs. Once the API endpoints are identified, the corresponding requests can be sent to the Repeater or Intruder for further testing. 2. Many times, the APIs are invoked through the User- Interface (UI) functionalities in the application. In such a case, you can simply create a new ‘Crawl and Audit’ task in the Burp Suite scanner and ensure all scanner checks and tasks are complete. 3. There could be a set of APIs that are not directly invoked from any of the UIs. Such APIs are often tested manually using tools like Postman. We can easily integrate Postman with Burp Suite to capture all required API traffic. Once the required API requests and responses are in Burp Suite, it is just a matter of testing them further using Repeater or Intruder as necessary. Chapter 10 Testing Mobile Apps and APIs with Burp Suite
  • 157.
    149 We’ll now seehow we can integrate Postman with Burp Suite. Postman is a popular tool used for manual API testing. It can be downloaded from https://www.postman.com/downloads/. The Postman application interface is as shown in Figure 10-1. In order to configure Postman to work along with Burp Suite, click on the ‘Settings’ option in the upper right corner as shown in Figure 10-2. Figure 10-1. The Postman tool Figure 10-2. Navigating to the settings in the Postman tool Chapter 10 Testing Mobile Apps and APIs with Burp Suite
  • 158.
    150 A new Settingswindow will open up as shown in Figure 10-3. Now further navigate to the proxy tab and select ‘Add a custom proxy configuration’ and enter the proxy server address as that of the machine running the Burp Suite (usually localhost or 127.0.0.1) and port as 8080 or the one on which we want the Burp Suite proxy listener to be active on. Now that we are done with the configuration on the Postman side, we need to ensure that the right proxy configuration is also done on the Burp Suite Side. To ensure the correct proxy is configured in the Burp Suite, navigate to the Proxy tab and Options as shown in Figure 10-4, and ensure the IP address and port number match to what was configured earlier in Postman. Figure 10-3. Configuring the proxy in the Postman tool Chapter 10 Testing Mobile Apps and APIs with Burp Suite
  • 159.
    151 Once both thePostman and Burp Suite are configured to work together, all the traffic generated from Postman will now pass through Burp Suite. This is very similar to how we configured our browsers to work along with Burp Suite. Now that we have seen how to configure the Postman to work along with Burp Suite, we’ll see how the reverse works; that is, how do we export data from Burp Suite into the Postman for selective testing? While the Burp Suite Repeater and Intruder serve most of the purposes for performing security testing of an API, there could be a need to test a particular API in the Postman interface. In such a case, it is possible to export the API request from Burp Suite into the Postman tool. For exporting an API request from Burp Suite to the Postman, we would need to install an extension called ‘Postman Integration’ . Simply navigate to the Extender tab and open the ‘BApp Store’ and install the ‘Postman Integration’ extension as shown in Figure 10-5. Figure 10-4. Setting up the Burp Suite proxy listener Chapter 10 Testing Mobile Apps and APIs with Burp Suite
  • 160.
    152 Once the extensionis installed: 1. Go to the Target tab, 2. Select the request you want to export to Postman, 3. Right-click on the request to be exported, 4. Select option ‘Export as Postman Collection’ as shown in Figure 10-6. Figure 10-6. Exporting requests in the Burp Suite as Postman collection Figure 10-5. Installing the Postman Integration extension in the Burp Suite through BApp Store Chapter 10 Testing Mobile Apps and APIs with Burp Suite
  • 161.
    153 A new windowwill pop up, as shown in Figure 10-7. Enter the required Collection Name and Folder name and click on the Export button. The collection would then be exported and saved to the specified location. Next, open the Postman application and click on Import, as shown in Figure 10-8. Click on choose files and select the file that we exported from Burp Suite earlier. Figure 10-7. Configuring the Postman integration settings Chapter 10 Testing Mobile Apps and APIs with Burp Suite
  • 162.
    154 We can nowsee the API request exported from the Burp Suite into the Postman application, as shown in Figure 10-9. Figure 10-8. Importing the collection into the Postman tool Figure 10-9. Collection imported in the Postman tool Chapter 10 Testing Mobile Apps and APIs with Burp Suite
  • 163.
    155 Mobile Application SecurityTesting with Burp Suite In the previous section, we saw how Burp Suite could be configured along with the Postman to perform security testing on APIs. In this section, we’ll have an overview of how we could leverage the Burp Suite capabilities for performing security testing of Mobile Applications. Before we get into further details about Mobile Application security testing, it is important to understand the fact that the Burp Suite literally acts and serves as an HTTP proxy. This means we can effectively use Burp Suite for performing security testing on any device or application that interacts over HTTP or HTTPS protocol. Mobile applications are no different; they use the same HTTP / HTTPS protocol for communication; hence that traffic can be routed through the Burp Suite just like any other regular web application. Figure 10-10 shows a mobile application client (the equivalent of the browser on PC), which is passing all the traffic through Burp Suite to the Application Server. We’ll now see how we can configure Burp Suite to work along with the mobile application. First, we need to ensure that the correct Burp Suite proxy is set to listen on all interfaces. To do so, navigate to the Proxy ➤ Options tab, as shown in Figure 10-11. Figure 10-10. Connecting mobile application to the Burp Suite Chapter 10 Testing Mobile Apps and APIs with Burp Suite
  • 164.
    156 Now click onthe ‘Add’ button, and a new window will pop up as shown in Figure 10-12. Configure the port number and select ‘Bind to address’ as ‘All interfaces’ and click ‘OK’ . Now notice the proxy listener section as shown in Figure 10-13, which lists the interface as ‘*:8080’ . Figure 10-12. Setting up the Burp Suite proxy listener Figure 10-11. Setting up the Burp Suite proxy listener Chapter 10 Testing Mobile Apps and APIs with Burp Suite
  • 165.
    157 Now that wehave configured the Burp Suite proxy to listen on port 8080 on all available interfaces, we’ll move ahead to the mobile device configuration. It is important to note that in order to configure the mobile device to work along with Burp Suite, both the system running the Burp Suite and the mobile device need to be in the same logical network. The simplest way to achieve this is by connecting the mobile device and the system running Burp Suite to the same Wireless Access Point. Once the mobile device and the system running Burp Suite are connected to the same network, we need to configure the network settings on mobile to use Burp Suite as a proxy. To configure the network proxy on the mobile device, go to the Wireless Settings and select the Wireless Network that you are connected to, as shown in Figure 10-14. Figure 10-13. Setting up the Burp Suite proxy listener Chapter 10 Testing Mobile Apps and APIs with Burp Suite
  • 166.
    158 Now click onthe Proxy option, and a new configuration window will open as shown in Figure 10-15. Figure 10-15. Configuring network proxy on mobile device Figure 10-14. Configuring network proxy on mobile device Chapter 10 Testing Mobile Apps and APIs with Burp Suite
  • 167.
    159 By default, thenetwork proxy is set to ‘None’ . We need to change this to ‘Manual’ , as shown in Figure 10-16. Now that we have changed the Proxy type to manual, we need to enter the IP address of the system where Burp Suite is running along with the port number on which the Burp Suite proxy service is listening to, as shown in Figure 10-17. Figure 10-16. Configuring network proxy on mobile device Chapter 10 Testing Mobile Apps and APIs with Burp Suite
  • 168.
    160 Once the manualproxy has been configured, all the traffic originating from the mobile application would now be routed through Burp Suite. Once the requests are in Burp Suite, they can be tampered with Repeater or Intruder just like any other regular HTTP request. It’s important to note two points with regard to performing security testing on mobile applications using Burp Suite: Figure 10-17. Configuring network proxy on mobile device Chapter 10 Testing Mobile Apps and APIs with Burp Suite
  • 169.
    161 1. The BurpSuite can only help to execute manual security tests on the mobile application and, to a certain extent, perform dynamic application security testing. 2. The exact process of configuring the network proxy on mobile devices varies as per the type and version of the operating system they run on. However, at a high level, the process would be similar to what we discussed in this section. Security Testing Workflow with Burp Suite Throughout the book, we have seen all aspects of Burp Suite and its capabilities. We have seen various tools and utilities that are provided out of the box as well as the use of third-party extensions, which significantly enhance the Burp Suite capabilities. Now, as we are at the end of the book, it would be worth summarizing the workflow or approach for effectively using Burp Suite to test the security of web applications. Following is the phased approach that one can follow for effective use of Burp Suite: 1. Get the right setup and configuration – Before we actually begin using Burp Suite, it is important that it’s set up and configured correctly. a. Make sure the right edition and the latest version of Burp Suite are being used. b. Configure the browser proxy settings to work along with Burp Suite. c. Install the Burp Suite CA certificate into the browser. Chapter 10 Testing Mobile Apps and APIs with Burp Suite
  • 170.
    162 d. Configure theplatform authentication, upstream proxy, and socks proxy as required. e. Review and define the Burp Suite HotKeys. f. Ensure automatic project backup is enabled and configured correctly. g. Ensure project options like Timeouts, Hostname resolution, Out of Scope Requests, Redirections, TLS Configuration, Session Handling Rules, Cookie Jar, and Macros are configured as needed. h. Make sure the proxy listener is configured and running properly. i. Ensure all the required extensions are installed and loaded. j. Check that the target application can be patched using the Burp Suite Infiltrator. 2. Crawl and understand the application – Once the Burp Suite is appropriately configured, it is important to crawl, surf, and browse the target application to know more about it. a. Use the crawl function in the scanner to browse the application. b. Make use of the content discovery feature. c. Manually browse through the critical workflows. d. Carefully observe the target tab and monitor the HTTP requests. e. Find out and highlight interesting requests with parameters. f. Use the analyze target feature to get an overview of the application scope. Chapter 10 Testing Mobile Apps and APIs with Burp Suite
  • 171.
    163 g. Use engagementtools to find comments, scripts, and references. h. Monitor the issues reported by the passive scans. 3. Attack the application – Now that we have done enough reconnaissance, it's time to attack selective application functionalities. a. Run an audit task using the Burp Suite scanner. b. Find out the interesting requests, especially the one with parameters, and send the request to the Repeater for further investigation. c. Tamper and play around with the request, parameters, headers, and body using the repeater. d. If a request and a parameter need to be tested against bulk payloads, then make use of Intruder. e. Use the comparer to analyze and interpret differences in various responses. f. Use a sequencer to test the strength of tokens. g. Use the decoder for encoding or decoding any of the parameter values as required. h. Test for the Clickjacking vulnerabilities using the Clickbandit tool. i. Generate proof of concept for Cross-Site Request Forgery attack using the CSRF PoC generator. j. Make use of the Burp Suite collaborator to effectively detect out-of-­ the band vulnerabilities like XML External Entity Injection (XXE) and Server Side Request Forgery (SSRF) Chapter 10 Testing Mobile Apps and APIs with Burp Suite
  • 172.
    164 k. Monitor theissues pane under the target tab for all vulnerabilities found. l. Select the required vulnerabilities and export them into an HTML report. Summary In this chapter, we saw how we could leverage Burp Suite capabilities for performing security testing on APIs as well as mobile applications. We also summarized the workflow that can be followed to make the best use of Burp Suite for web application security testing. Exercises 1. Configure the Postman to work along with Burp Suite. Capture the API requests in Burp Suite and attack them using Repeater. 2. Test any of the target applications using the complete workflow discussed in this chapter. Chapter 10 Testing Mobile Apps and APIs with Burp Suite
  • 173.
    165 © Sagar Rahalkar2021 S. Rahalkar, A Complete Guide to Burp Suite, https://doi.org/10.1007/978-1-4842-6402-7 Index A Active scanning, 112 API security testing, Burp Suite approaches, 148, 149 Postman, 149, 150, 154 Postman integration, 152–154 proxy listener, 151 Application Programming Interfaces (APIs), 1, 147 Application security testing, 1, 4, 5 Application vulnerabilities, 2–4 B Burp Suite, 5 alternatives, 8, 9, 14 browser, 15 CA Certificate, 31, 32 Chrome, 19 Edge, 21 editions, 6 events, 16 features, 7, 8 Firefox, 17, 18 hotkeys, 37, 38 installation, 11 need, 6 Opera, 22 options Cookie Jar monitors, 46, 47 hostname resolutions, 42, 43 macros, 47 Out-of-scope request, 44, 45 redirections, 45, 46 timeouts, 42 performance feedback, 41 platform authentication, 33, 34 project backups, 39 proxy server, 35, 36 Rest API, 39–41 SOCKS proxy, 36, 37 system proxy, 23, 24 types of downloads, 12, 13 useful features, 9, 10 website, 16 Burp Suite extender APIs, 143 BApp Store, 132–136 extensions, 131 manual installation, 136–139 settings, 140–142 useful extensions, 142, 143
  • 174.
    166 C Clickjacking browser console, 103 clickbanditcode, 104 clickbandit UI, 104 code, 105 definition, 101 target, 102 tool, 101 Collaborator, 99, 101 Comparer, 86–88 Cookie Jar monitors, 46, 47 Crawl optimization configuration, 116 Cross-Site Request Forgery (CSRF) definition, 106 engagement tools, 106 POC generator, 106–109 D Dashboard Burp Suite, 49–53 defining, 49 Decoder, 88, 89 E, F, G Engagement tools Burp manual testing simulator, 65 Burp Suite, 59 Burp Suite task scheduler, 64 comment finder, 60 content discovery, 63 definition, 58 reference finder, 62 script searching, 61 search, 60 target analyzer, 62 H Hostname resolution, 42 I, J, K, L Infiltrator definition, 95 executing agent, 99 generating agent, 97, 98 navigating, 96 technologies, 96 Intruder definition, 67 options, 76, 77 payload, 73–75 positions, 69–72 send request, 68 SQL injection/cross-site scripting payloads, 68 target tab, 69 M, N, O Mobile application security testing, Burp Suite HTTP / HTTPS protocol, 155 INDEX
  • 175.
    167 HTTP proxy, 155 networkproxy, 158–161 proxy listener, 156 P, Q Payload, 73 Personally identifiable information (PII), 2 Proxy, 27, 28, 30, 31 R Repeater configuring target detail, 80 console, 80 definition, 79 headers, 83 parameters, 82 raw HTTP request, 81 response, 83–85 sending HTTP request, 81 Reporting exporting issues, 125 generating, 128 selecting format, 126, 127 viewing browser, 129 vulnerability, 130 S Scanner Application login, 123 configuration, 115–123 crawl/audit, 112–114 resource pools, 124 types, 111 Security testing workflow, 161–163 Sequencer Burp Suite, 90 definition, 89 HTTP request, 90 loading tokens, 92 session ID analysis, 91 Server Side Request Forgery (SSRF), 163 Software Development Life Cycle (SDLC), 1 T, U, V, W Target tab application, 56 application map/ hierarchy, 54 Burp Suite, 53 issue, 57 multiple panes, 53 requests, 55 requests/response viewers, 55 site map filters, 58 X, Y, Z XML External Entity Injection (XXE), 163 INDEX