SlideShare a Scribd company logo
www.Technicalsymposium.com
3D MACHINE VISION SYSTEMS
AS
SHOP FLOOR
METROLOGY TOOL
ABSTRACT
Machine vision refers to applications in which the PC automatically makes a decision based on
visual input from a camera. Machine vision is a term typically used in industrial manufacturing, where
applications range from culling blemished oranges from a conveyor belt to saving lives by inspecting to
ensure that the correct drug capsule has been placed in the package before the product is shipped to the
pharmacy. Three dimensional vision based measurement systems have made their presence into production
metrology applications, notably in the electronics field. However, in the more traditional fields of durable
goods now dominated by hard gauges and CMMs, 3D optical systems has been hindered by perceptions
and real limitations. This paper will review where 3D vision is today, and what advances have been made
to enable more quantitative, shop floor metrology applications. The field of 3D machine vision is a less
established field, but one that is actively growing today. Three dimensional vision based measurements
have come a long way in the past few years, moving from purely visualization tools that generate attractive
color pictures, to serious measurement tools. These 3D systems include laser scanning, structured light,
stereo viewing, and laser radar just to name a few.
INTRODUCTION
Modern day durable goods manufacturing have begun to embrace the concepts of digitization as a
means to improve productivity and quality. Moving away from expensive hard gages made for specific
parts; manufacturers are seeking the means to measure parts in a flexible manner, and capture the resulting
measurements by digital means. For higher volume parts, such as from forging or fast machining
operations, speed of gauging is still an issue.
This is the area where machine vision based tools start to excel. Machine vision in general has
been used for everything from guiding the insertion of electronic chips on circuit boards to inspecting
bottles at several per second in bottling lines. A natural extension of machine vision inspection is to provide
programmable measurements for machined parts. In many applications, these measurements can be made
in two dimensions for which there is an established based of machine vision tools working in the sub-
www.Technicalsymposium.com
thousandth of an inch range at multiple measurements per second. Each of these methods has their strong
points and weak points for a given application.
The key performance parameters needed for durable good manufacturing include:
โ€ข Resolution in the mil, and sub-mil range
โ€ข Speeds sufficient to complete all measurements in a few seconds
โ€ข Ability to look at a wide range of surface types and finishes
This last point, the ability to look at a wide range of surface finishes has perhaps been the biggest limitation
of 3D machine vision technology. In many cases, the surface needs to be diffuse to permit reflected light to
be easily seen to achieve a good signal to noise ratio.
Three dimensional optical sensors can perhaps be broken into a few basic types:-
๏ƒ˜ Point scanning sensors measure only the specific points of interest, typically in a serial fashion,
๏ƒ˜ Line sensors provide a single line of points in the form of a cross section of the contour of interest,
๏ƒ˜ Full-field sensors provide an X, Y, Z map of all the points in the scene, which must then be
analyzed down to the information of interest.
Each of these types of sensors has developed through technology which is suited to the application. In some
cases, the technology is capable of multiple modes of operation (finding point on a surface, or defining the
full surface) as well, but this often stretches the technology into a field overlapping other technologies.
There has not to date been any single sensor in industrial applications which does everything.
DISCUSSION OF TECHNOLOGIES
There are currently three basic approaches to three-dimensional machine vision:
๏‚ท range finding including structured lighting
๏‚ท stereo or binocular vision,
๏‚ท gray scale or range finding methods.
TRIANGULATION
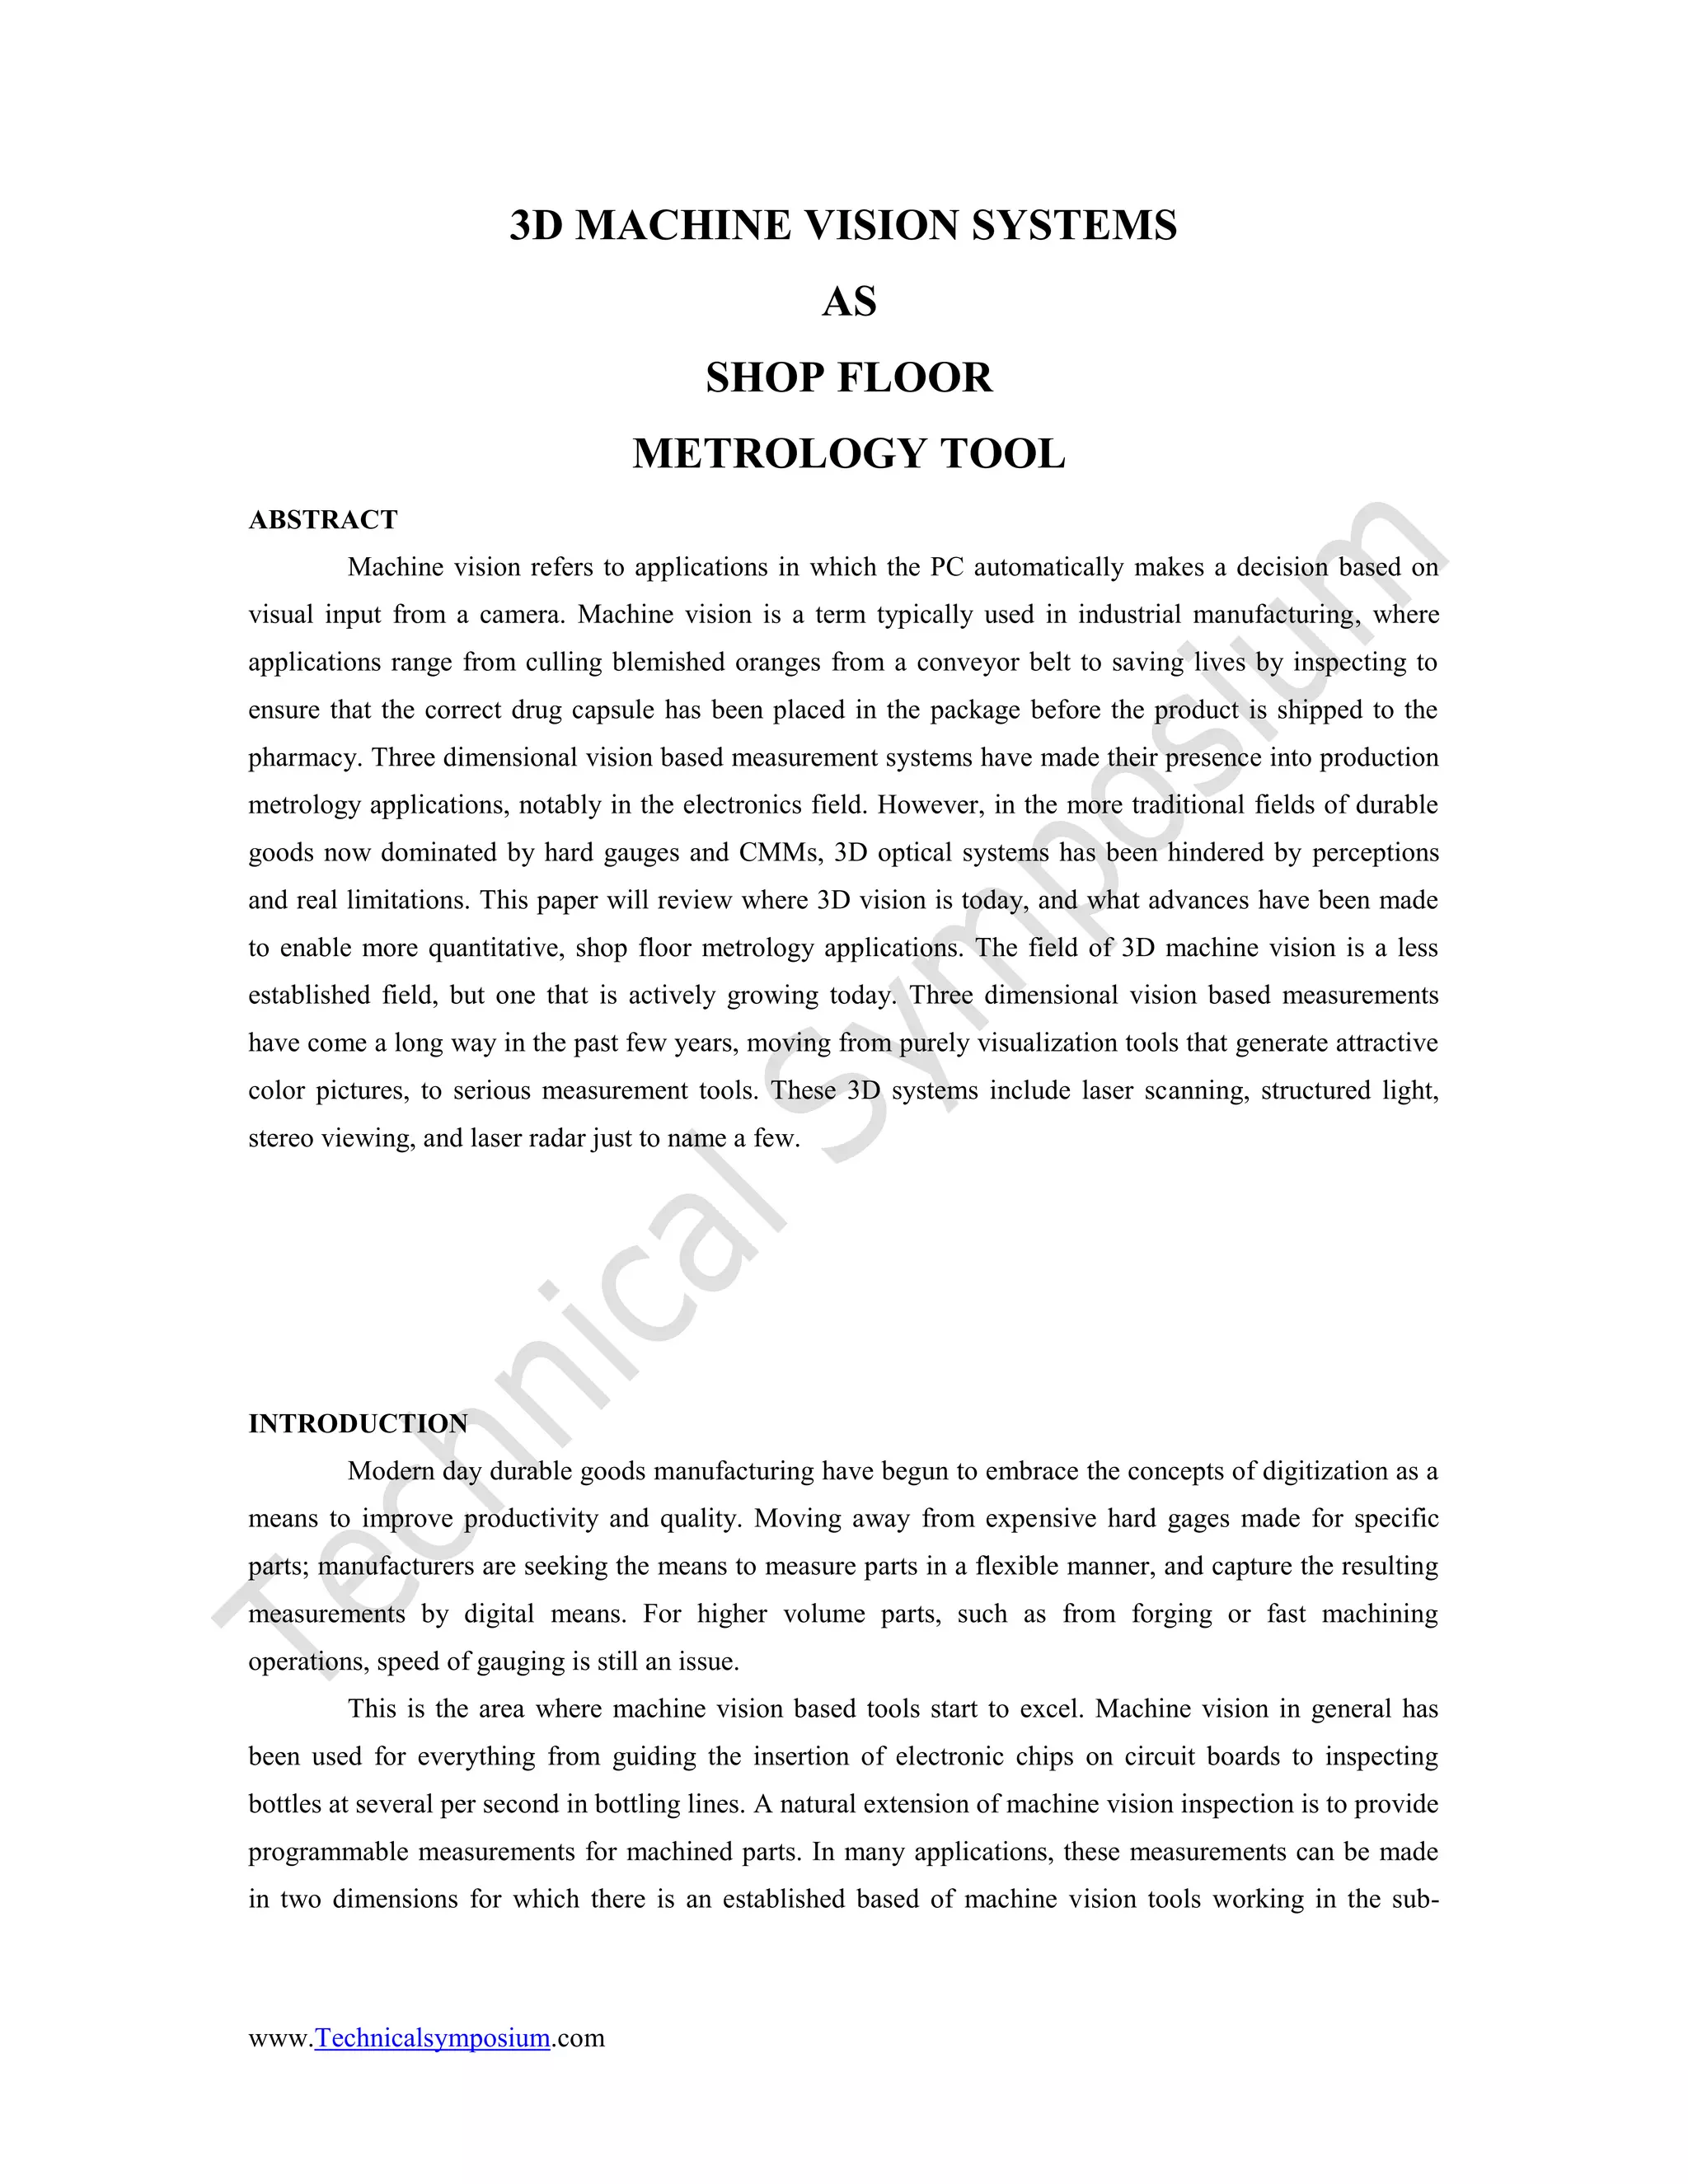
The most popular commercial versions of range finding use the triangulation method where a
beam of light is projected onto the object's surface at some angle and the image of this spot or line of light
is viewed at some other angle (see Figure 1). As the object distance changes a spot of light on the surface
will move along the surface by:
(change in spot position) = (change in distance) x (tan(incident angle) + tan(viewing angle))
www.Technicalsymposium.com
Figure 1. A triangulation based system using a point of light to obtain distance.
Good resolution of a few tens of microns have been realized with these systems. Most
triangulation gages today use laser light. When a laser beam is incident on an opaque, rough surface, the
micro-structure of the surface can act as though it is made of a range of small mirrors, pointing in numerous
directions. These micro-mirrors may reflect the light off in a particular direction, as generally machine
marks do, or may direct the light along the surface of the part. Depending on how random or directional
the pointing of these micro-mirrors may be, the apparent spot seen on the surface will not be a direct
representation of the light beam as incident on the part surface. The effects that may be seen from a laser
beam reflecting off a rough surface include:
๏‚ท directional reflection due to surface ridges
๏‚ท skewing of the apparent light distribution due to highlights
๏‚ท expansion of the incident laser spot due to micro surface piping
The result of this type of laser reflection or "speckle" is a noisy signal from some surfaces. In like manner,
there can be a problem with translucent surfaces, as the laser light will scatter through the medium and
produce a false return signal. For a laser based sensor, a smooth, non-mirror like, opaque surface produces
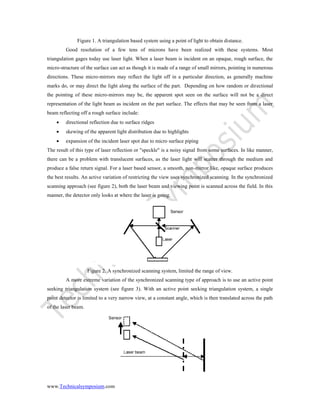
the best results. An active variation of restricting the view uses synchronized scanning. In the synchronized
scanning approach (see figure 2), both the laser beam and viewing point is scanned across the field. In this
manner, the detector only looks at where the laser is going.
Figure 2. A synchronized scanning system, limited the range of view.
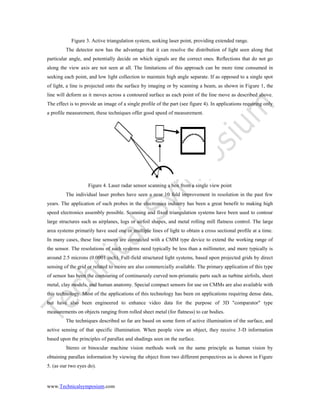
A more extreme variation of the synchronized scanning type of approach is to use an active point
seeking triangulation system (see figure 3). With an active point seeking triangulation system, a single
point detector is limited to a very narrow view, at a constant angle, which is then translated across the path
of the laser beam.
www.Technicalsymposium.com
Figure 3. Active triangulation system, seeking laser point, providing extended range.
The detector now has the advantage that it can resolve the distribution of light seen along that
particular angle, and potentially decide on which signals are the correct ones. Reflections that do not go
along the view axis are not seen at all. The limitations of this approach can be more time consumed in
seeking each point, and low light collection to maintain high angle separate. If as opposed to a single spot
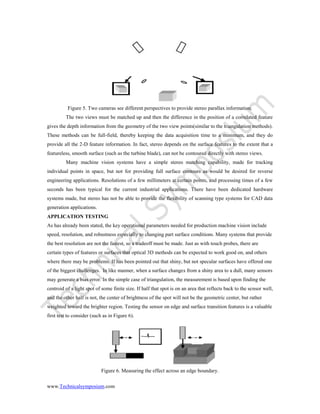
of light, a line is projected onto the surface by imaging or by scanning a beam, as shown in Figure 1, the
line will deform as it moves across a contoured surface as each point of the line move as described above.
The effect is to provide an image of a single profile of the part (see figure 4). In applications requiring only
a profile measurement, these techniques offer good speed of measurement.
Figure 4. Laser radar sensor scanning a box from a single view point
The individual laser probes have seen a near 10 fold improvement in resolution in the past few
years. The application of such probes in the electronics industry has been a great benefit to making high
speed electronics assembly possible. Scanning and fixed triangulation systems have been used to contour
large structures such as airplanes, logs or airfoil shapes, and metal rolling mill flatness control. The large
area systems primarily have used one or multiple lines of light to obtain a cross sectional profile at a time.
In many cases, these line sensors are connected with a CMM type device to extend the working range of
the sensor. The resolutions of such systems need typically be less than a millimeter, and more typically is
around 2.5 microns (0.0001 inch). Full-field structured light systems, based upon projected grids by direct
sensing of the grid or related to moire are also commercially available. The primary application of this type
of sensor has been the contouring of continuously curved non-prismatic parts such as turbine airfoils, sheet
metal, clay models, and human anatomy. Special compact sensors for use on CMMs are also available with
this technology. Most of the applications of this technology has been on applications requiring dense data,
but have also been engineered to enhance video data for the purpose of 3D "comparator" type
measurements on objects ranging from rolled sheet metal (for flatness) to car bodies.
The techniques described so far are based on some form of active illumination of the surface, and
active sensing of that specific illumination. When people view an object, they receive 3-D information
based upon the principles of parallax and shadings seen on the surface.
Stereo or binocular machine vision methods work on the same principle as human vision by
obtaining parallax information by viewing the object from two different perspectives as is shown in Figure
5. (as our two eyes do).
www.Technicalsymposium.com
Figure 5. Two cameras see different perspectives to provide stereo parallax information.
The two views must be matched up and then the difference in the position of a correlated feature
gives the depth information from the geometry of the two view points(similar to the triangulation methods).
These methods can be full-field, thereby keeping the data acquisition time to a minimum, and they do
provide all the 2-D feature information. In fact, stereo depends on the surface features to the extent that a
featureless, smooth surface (such as the turbine blade), can not be contoured directly with stereo views.
Many machine vision systems have a simple stereo matching capability, made for tracking
individual points in space, but not for providing full surface contours as would be desired for reverse
engineering applications. Resolutions of a few millimeters at certain points, and processing times of a few
seconds has been typical for the current industrial applications. There have been dedicated hardware
systems made, but stereo has not be able to provide the flexibility of scanning type systems for CAD data
generation applications.
APPLICATION TESTING
As has already been stated, the key operational parameters needed for production machine vision include
speed, resolution, and robustness especially to changing part surface conditions. Many systems that provide
the best resolution are not the fastest, so a tradeoff must be made. Just as with touch probes, there are
certain types of features or surfaces that optical 3D methods can be expected to work good on, and others
where there may be problems. If has been pointed out that shiny, but not specular surfaces have offered one
of the biggest challenges. In like manner, when a surface changes from a shiny area to a dull, many sensors
may generate a bias error. In the simple case of triangulation, the measurement is based upon finding the
centroid of a light spot of some finite size. If half that spot is on an area that reflects back to the sensor well,
and the other half is not, the center of brightness of the spot will not be the geometric center, but rather
weighted toward the brighter region. Testing the sensor on edge and surface transition features is a valuable
first test to consider (such as in Figure 6).
Figure 6. Measuring the effect across an edge boundary.
www.Technicalsymposium.com
The next area of concern is the surface texture itself. A surface with machining marks has a texture which
may scatter light into long lines that may confuse the sensor. In a similar manner, if the surface is
translucent, the spot of light may spread out in an unpredictable manner, again offsetting the spot center,
and hence the measurement made. Therefore, testing the sensor on a surface texture that matches the one to
be measured is important. A final important feature consideration for many optical gages is the slope of the
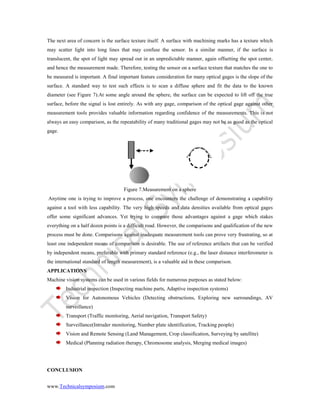
surface. A standard way to test such effects is to scan a diffuse sphere and fit the data to the known
diameter (see Figure 7).At some angle around the sphere, the surface can be expected to lift off the true
surface, before the signal is lost entirely. As with any gage, comparison of the optical gage against other
measurement tools provides valuable information regarding confidence of the measurements. This is not
always an easy comparison, as the repeatability of many traditional gages may not be as good as the optical
gage.
Figure 7.Measurement on a sphere
Anytime one is trying to improve a process, one encounters the challenge of demonstrating a capability
against a tool with less capability. The very high speeds and data densities available from optical gages
offer some significant advances. Yet trying to compare those advantages against a gage which stakes
everything on a half dozen points is a difficult road. However, the comparisons and qualification of the new
process must be done. Comparisons against inadequate measurement tools can prove very frustrating, so at
least one independent means of comparison is desirable. The use of reference artifacts that can be verified
by independent means, preferable with primary standard reference (e.g., the laser distance interferometer is
the international standard of length measurement), is a valuable aid in these comparison.
APPLICATIONS
Machine vision systems can be used in various fields for numerous purposes as stated below:
Industrial inspection (Inspecting machine parts, Adaptive inspection systems)
Vision for Autonomous Vehicles (Detecting obstructions, Exploring new surroundings, AV
surveillance)
Transport (Traffic monitoring, Aerial navigation, Transport Safety)
Surveillance(Intruder monitoring, Number plate identification, Tracking people)
Vision and Remote Sensing (Land Management, Crop classification, Surveying by satellite)
Medical (Planning radiation therapy, Chromosome analysis, Merging medical images)
CONCLUSION
www.Technicalsymposium.com
As with any technology of this nature, the performance changes with the component technology.
The primary advance that has made machine vision systems feasible for shop floor gauging applications
has been the speed up in computing power. This has brought the processing times from 15 or 20 minutes on
an expensive workstation to seconds on a standard PC. The other technologies that are influencing
performance today include lower cost, digital cameras than provide better light range and pixel resolution
with lower noise, and better light sources such as higher power laser diodes well as higher brightness and
resolution LCD projectors. The consumer market largely influences all of these technologies, which is
currently a much bigger driver than any manufacturing support system. However, as system prices decrease
and performance improves, there is a wide range of new markets these systems will likely address ranging
from dentistry to home 3D pictures.
REFERENCES
1. ASME Journal of Machine Design
2. "Machine Vision Based Gaging of Manufactured Parts," K. Harding, Proc. SME Gaging '95, Detroit,
Nov. 1995.
3. โ€œThe Promise of Machine Vision,โ€ K. Harding, Optics and Photonics News, p. 30 May 1996 Optical
Society of America
4. "Light Source Design for Machine Vision", Eric J. Sieczka and Kevin G. Harding, SPIE Proceedings
Vol. 1614, Optics, Illumination and Image Sensing for Machine Vision VI, Boston, Nov. 1991.
5. L. Bieman, "Three-Dimensional Machine Vision," Photonics Spectra, May 1988, p. 81.
6. E. L. Hall and C. A. McPherson, "Three Dimensional Perception for Robot Vision," SPIE Proceedings
Vol. 442, p. 117 (1983).

More Related Content

Similar to 76832073-3d-Machine-Vision-Systems.doc

Light Field Technology
Light Field TechnologyLight Field Technology
Light Field Technology
Jeffrey Funk
ย 
Precision measurement technology and application based on machine vision
Precision measurement technology and application based on machine visionPrecision measurement technology and application based on machine vision
Precision measurement technology and application based on machine vision
IJRES Journal
ย 
Surface reconstruction and display from range
Surface reconstruction and display from rangeSurface reconstruction and display from range
Surface reconstruction and display from rangeiaemedu
ย 
Surface reconstruction and display from range
Surface reconstruction and display from rangeSurface reconstruction and display from range
Surface reconstruction and display from rangeiaemedu
ย 
Surface reconstruction and display from range and color data under realistic ...
Surface reconstruction and display from range and color data under realistic ...Surface reconstruction and display from range and color data under realistic ...
Surface reconstruction and display from range and color data under realistic ...iaemedu
ย 
Automated Laser Scanning System For Reverse Engineering And Inspection
Automated Laser Scanning System For Reverse Engineering And InspectionAutomated Laser Scanning System For Reverse Engineering And Inspection
Automated Laser Scanning System For Reverse Engineering And Inspection
Jennifer Daniel
ย 
REVERSE ENGINEERING
REVERSE ENGINEERING REVERSE ENGINEERING
REVERSE ENGINEERING
S. Sathishkumar
ย 
3D PRINTING - REVERSE ENGINEERING
3D PRINTING - REVERSE ENGINEERING 3D PRINTING - REVERSE ENGINEERING
3D PRINTING - REVERSE ENGINEERING
S. Sathishkumar
ย 
Vision based non-invasive tool for facial swelling assessment
Vision based non-invasive tool for facial swelling assessment Vision based non-invasive tool for facial swelling assessment
Vision based non-invasive tool for facial swelling assessment
University of Moratuwa
ย 
Surface generation from point cloud.pdf
Surface generation from point cloud.pdfSurface generation from point cloud.pdf
Surface generation from point cloud.pdf
ssuserd3982b1
ย 
A Fast Single-Pixel Laser Imager for VR/AR Headset Tracking
A Fast Single-Pixel Laser Imager for VR/AR Headset TrackingA Fast Single-Pixel Laser Imager for VR/AR Headset Tracking
A Fast Single-Pixel Laser Imager for VR/AR Headset Tracking
Ping Hsu
ย 
Sensors On 3d Digitization
Sensors On 3d DigitizationSensors On 3d Digitization
Sensors On 3d DigitizationRajan Kumar
ย 
Revolutionizing Surveying: The Power of 3D Laser Scanning Servicesโ€‹.pptx
Revolutionizing Surveying: The Power of 3D Laser Scanning Servicesโ€‹.pptxRevolutionizing Surveying: The Power of 3D Laser Scanning Servicesโ€‹.pptx
Revolutionizing Surveying: The Power of 3D Laser Scanning Servicesโ€‹.pptx
falconsurveyme
ย 
DETERMINING METAL SURFACE WAVINESS PARAMETERS AND HEIGHT LIQUID SURFACE WAVE ...
DETERMINING METAL SURFACE WAVINESS PARAMETERS AND HEIGHT LIQUID SURFACE WAVE ...DETERMINING METAL SURFACE WAVINESS PARAMETERS AND HEIGHT LIQUID SURFACE WAVE ...
DETERMINING METAL SURFACE WAVINESS PARAMETERS AND HEIGHT LIQUID SURFACE WAVE ...
IAEME Publication
ย 
Intelligent indoor mobile robot navigation using stereo vision
Intelligent indoor mobile robot navigation using stereo visionIntelligent indoor mobile robot navigation using stereo vision
Intelligent indoor mobile robot navigation using stereo vision
sipij
ย 
Rapid Laser Scanning the process
Rapid Laser Scanning the processRapid Laser Scanning the process
Rapid Laser Scanning the process
Seeview Solutions
ย 
A Review on Deformation Measurement from Speckle Patterns using Digital Image...
A Review on Deformation Measurement from Speckle Patterns using Digital Image...A Review on Deformation Measurement from Speckle Patterns using Digital Image...
A Review on Deformation Measurement from Speckle Patterns using Digital Image...
IRJET Journal
ย 
PEDESTRIAN DETECTION IN LOW RESOLUTION VIDEOS USING A MULTI-FRAME HOG-BASED D...
PEDESTRIAN DETECTION IN LOW RESOLUTION VIDEOS USING A MULTI-FRAME HOG-BASED D...PEDESTRIAN DETECTION IN LOW RESOLUTION VIDEOS USING A MULTI-FRAME HOG-BASED D...
PEDESTRIAN DETECTION IN LOW RESOLUTION VIDEOS USING A MULTI-FRAME HOG-BASED D...
AM Publications
ย 
Sensors optimized for 3 d digitization
Sensors optimized for 3 d digitizationSensors optimized for 3 d digitization
Sensors optimized for 3 d digitization
Basavaraj Patted
ย 
22UPH101_Unit-1_3D Profiling.pdf
22UPH101_Unit-1_3D Profiling.pdf22UPH101_Unit-1_3D Profiling.pdf
22UPH101_Unit-1_3D Profiling.pdf
Kishors41
ย 

Similar to 76832073-3d-Machine-Vision-Systems.doc (20)

Light Field Technology
Light Field TechnologyLight Field Technology
Light Field Technology
ย 
Precision measurement technology and application based on machine vision
Precision measurement technology and application based on machine visionPrecision measurement technology and application based on machine vision
Precision measurement technology and application based on machine vision
ย 
Surface reconstruction and display from range
Surface reconstruction and display from rangeSurface reconstruction and display from range
Surface reconstruction and display from range
ย 
Surface reconstruction and display from range
Surface reconstruction and display from rangeSurface reconstruction and display from range
Surface reconstruction and display from range
ย 
Surface reconstruction and display from range and color data under realistic ...
Surface reconstruction and display from range and color data under realistic ...Surface reconstruction and display from range and color data under realistic ...
Surface reconstruction and display from range and color data under realistic ...
ย 
Automated Laser Scanning System For Reverse Engineering And Inspection
Automated Laser Scanning System For Reverse Engineering And InspectionAutomated Laser Scanning System For Reverse Engineering And Inspection
Automated Laser Scanning System For Reverse Engineering And Inspection
ย 
REVERSE ENGINEERING
REVERSE ENGINEERING REVERSE ENGINEERING
REVERSE ENGINEERING
ย 
3D PRINTING - REVERSE ENGINEERING
3D PRINTING - REVERSE ENGINEERING 3D PRINTING - REVERSE ENGINEERING
3D PRINTING - REVERSE ENGINEERING
ย 
Vision based non-invasive tool for facial swelling assessment
Vision based non-invasive tool for facial swelling assessment Vision based non-invasive tool for facial swelling assessment
Vision based non-invasive tool for facial swelling assessment
ย 
Surface generation from point cloud.pdf
Surface generation from point cloud.pdfSurface generation from point cloud.pdf
Surface generation from point cloud.pdf
ย 
A Fast Single-Pixel Laser Imager for VR/AR Headset Tracking
A Fast Single-Pixel Laser Imager for VR/AR Headset TrackingA Fast Single-Pixel Laser Imager for VR/AR Headset Tracking
A Fast Single-Pixel Laser Imager for VR/AR Headset Tracking
ย 
Sensors On 3d Digitization
Sensors On 3d DigitizationSensors On 3d Digitization
Sensors On 3d Digitization
ย 
Revolutionizing Surveying: The Power of 3D Laser Scanning Servicesโ€‹.pptx
Revolutionizing Surveying: The Power of 3D Laser Scanning Servicesโ€‹.pptxRevolutionizing Surveying: The Power of 3D Laser Scanning Servicesโ€‹.pptx
Revolutionizing Surveying: The Power of 3D Laser Scanning Servicesโ€‹.pptx
ย 
DETERMINING METAL SURFACE WAVINESS PARAMETERS AND HEIGHT LIQUID SURFACE WAVE ...
DETERMINING METAL SURFACE WAVINESS PARAMETERS AND HEIGHT LIQUID SURFACE WAVE ...DETERMINING METAL SURFACE WAVINESS PARAMETERS AND HEIGHT LIQUID SURFACE WAVE ...
DETERMINING METAL SURFACE WAVINESS PARAMETERS AND HEIGHT LIQUID SURFACE WAVE ...
ย 
Intelligent indoor mobile robot navigation using stereo vision
Intelligent indoor mobile robot navigation using stereo visionIntelligent indoor mobile robot navigation using stereo vision
Intelligent indoor mobile robot navigation using stereo vision
ย 
Rapid Laser Scanning the process
Rapid Laser Scanning the processRapid Laser Scanning the process
Rapid Laser Scanning the process
ย 
A Review on Deformation Measurement from Speckle Patterns using Digital Image...
A Review on Deformation Measurement from Speckle Patterns using Digital Image...A Review on Deformation Measurement from Speckle Patterns using Digital Image...
A Review on Deformation Measurement from Speckle Patterns using Digital Image...
ย 
PEDESTRIAN DETECTION IN LOW RESOLUTION VIDEOS USING A MULTI-FRAME HOG-BASED D...
PEDESTRIAN DETECTION IN LOW RESOLUTION VIDEOS USING A MULTI-FRAME HOG-BASED D...PEDESTRIAN DETECTION IN LOW RESOLUTION VIDEOS USING A MULTI-FRAME HOG-BASED D...
PEDESTRIAN DETECTION IN LOW RESOLUTION VIDEOS USING A MULTI-FRAME HOG-BASED D...
ย 
Sensors optimized for 3 d digitization
Sensors optimized for 3 d digitizationSensors optimized for 3 d digitization
Sensors optimized for 3 d digitization
ย 
22UPH101_Unit-1_3D Profiling.pdf
22UPH101_Unit-1_3D Profiling.pdf22UPH101_Unit-1_3D Profiling.pdf
22UPH101_Unit-1_3D Profiling.pdf
ย 

More from Kalyan Anugu

FINAL DOCUMENT Abs (Autosaved).pdf
FINAL DOCUMENT Abs (Autosaved).pdfFINAL DOCUMENT Abs (Autosaved).pdf
FINAL DOCUMENT Abs (Autosaved).pdf
Kalyan Anugu
ย 
E&HV DIGITAL NOTES.pdf
E&HV DIGITAL NOTES.pdfE&HV DIGITAL NOTES.pdf
E&HV DIGITAL NOTES.pdf
Kalyan Anugu
ย 
73633714-E-Waste-Report-Final.pdf
73633714-E-Waste-Report-Final.pdf73633714-E-Waste-Report-Final.pdf
73633714-E-Waste-Report-Final.pdf
Kalyan Anugu
ย 
234793275-Aluminum-Electrolytic-Capacitors.pdf
234793275-Aluminum-Electrolytic-Capacitors.pdf234793275-Aluminum-Electrolytic-Capacitors.pdf
234793275-Aluminum-Electrolytic-Capacitors.pdf
Kalyan Anugu
ย 
audio-watermarking-with-encryption-IJERTV6IS090174.pdf
audio-watermarking-with-encryption-IJERTV6IS090174.pdfaudio-watermarking-with-encryption-IJERTV6IS090174.pdf
audio-watermarking-with-encryption-IJERTV6IS090174.pdf
Kalyan Anugu
ย 
Diamond.pdf
Diamond.pdfDiamond.pdf
Diamond.pdf
Kalyan Anugu
ย 

More from Kalyan Anugu (6)

FINAL DOCUMENT Abs (Autosaved).pdf
FINAL DOCUMENT Abs (Autosaved).pdfFINAL DOCUMENT Abs (Autosaved).pdf
FINAL DOCUMENT Abs (Autosaved).pdf
ย 
E&HV DIGITAL NOTES.pdf
E&HV DIGITAL NOTES.pdfE&HV DIGITAL NOTES.pdf
E&HV DIGITAL NOTES.pdf
ย 
73633714-E-Waste-Report-Final.pdf
73633714-E-Waste-Report-Final.pdf73633714-E-Waste-Report-Final.pdf
73633714-E-Waste-Report-Final.pdf
ย 
234793275-Aluminum-Electrolytic-Capacitors.pdf
234793275-Aluminum-Electrolytic-Capacitors.pdf234793275-Aluminum-Electrolytic-Capacitors.pdf
234793275-Aluminum-Electrolytic-Capacitors.pdf
ย 
audio-watermarking-with-encryption-IJERTV6IS090174.pdf
audio-watermarking-with-encryption-IJERTV6IS090174.pdfaudio-watermarking-with-encryption-IJERTV6IS090174.pdf
audio-watermarking-with-encryption-IJERTV6IS090174.pdf
ย 
Diamond.pdf
Diamond.pdfDiamond.pdf
Diamond.pdf
ย 

Recently uploaded

-- June 2024 is National Volunteer Month --
-- June 2024 is National Volunteer Month ---- June 2024 is National Volunteer Month --
-- June 2024 is National Volunteer Month --
NZSG
ย 
The-McKinsey-7S-Framework. strategic management
The-McKinsey-7S-Framework. strategic managementThe-McKinsey-7S-Framework. strategic management
The-McKinsey-7S-Framework. strategic management
Bojamma2
ย 
Buy Verified PayPal Account | Buy Google 5 Star Reviews
Buy Verified PayPal Account | Buy Google 5 Star ReviewsBuy Verified PayPal Account | Buy Google 5 Star Reviews
Buy Verified PayPal Account | Buy Google 5 Star Reviews
usawebmarket
ย 
Creative Web Design Company in Singapore
Creative Web Design Company in SingaporeCreative Web Design Company in Singapore
Creative Web Design Company in Singapore
techboxsqauremedia
ย 
The Influence of Marketing Strategy and Market Competition on Business Perfor...
The Influence of Marketing Strategy and Market Competition on Business Perfor...The Influence of Marketing Strategy and Market Competition on Business Perfor...
The Influence of Marketing Strategy and Market Competition on Business Perfor...
Adam Smith
ย 
FINAL PRESENTATION.pptx12143241324134134
FINAL PRESENTATION.pptx12143241324134134FINAL PRESENTATION.pptx12143241324134134
FINAL PRESENTATION.pptx12143241324134134
LR1709MUSIC
ย 
Discover the innovative and creative projects that highlight my journey throu...
Discover the innovative and creative projects that highlight my journey throu...Discover the innovative and creative projects that highlight my journey throu...
Discover the innovative and creative projects that highlight my journey throu...
dylandmeas
ย 
Bร i tแบญp - Tiแบฟng anh 11 Global Success UNIT 1 - Bแบฃn HS.doc
Bร i tแบญp - Tiแบฟng anh 11 Global Success UNIT 1 - Bแบฃn HS.docBร i tแบญp - Tiแบฟng anh 11 Global Success UNIT 1 - Bแบฃn HS.doc
Bร i tแบญp - Tiแบฟng anh 11 Global Success UNIT 1 - Bแบฃn HS.doc
daothibichhang1
ย 
Sustainability: Balancing the Environment, Equity & Economy
Sustainability: Balancing the Environment, Equity & EconomySustainability: Balancing the Environment, Equity & Economy
Sustainability: Balancing the Environment, Equity & Economy
Operational Excellence Consulting
ย 
Affordable Stationery Printing Services in Jaipur | Navpack n Print
Affordable Stationery Printing Services in Jaipur | Navpack n PrintAffordable Stationery Printing Services in Jaipur | Navpack n Print
Affordable Stationery Printing Services in Jaipur | Navpack n Print
Navpack & Print
ย 
Cree_Rey_BrandIdentityKit.PDF_PersonalBd
Cree_Rey_BrandIdentityKit.PDF_PersonalBdCree_Rey_BrandIdentityKit.PDF_PersonalBd
Cree_Rey_BrandIdentityKit.PDF_PersonalBd
creerey
ย 
Maksym Vyshnivetskyi: PMO Quality Management (UA)
Maksym Vyshnivetskyi: PMO Quality Management (UA)Maksym Vyshnivetskyi: PMO Quality Management (UA)
Maksym Vyshnivetskyi: PMO Quality Management (UA)
Lviv Startup Club
ย 
ModelingMarketingStrategiesMKS.CollumbiaUniversitypdf
ModelingMarketingStrategiesMKS.CollumbiaUniversitypdfModelingMarketingStrategiesMKS.CollumbiaUniversitypdf
ModelingMarketingStrategiesMKS.CollumbiaUniversitypdf
fisherameliaisabella
ย 
Putting the SPARK into Virtual Training.pptx
Putting the SPARK into Virtual Training.pptxPutting the SPARK into Virtual Training.pptx
Putting the SPARK into Virtual Training.pptx
Cynthia Clay
ย 
Exploring Patterns of Connection with Social Dreaming
Exploring Patterns of Connection with Social DreamingExploring Patterns of Connection with Social Dreaming
Exploring Patterns of Connection with Social Dreaming
Nicola Wreford-Howard
ย 
Enterprise Excellence is Inclusive Excellence.pdf
Enterprise Excellence is Inclusive Excellence.pdfEnterprise Excellence is Inclusive Excellence.pdf
Enterprise Excellence is Inclusive Excellence.pdf
KaiNexus
ย 
20240425_ TJ Communications Credentials_compressed.pdf
20240425_ TJ Communications Credentials_compressed.pdf20240425_ TJ Communications Credentials_compressed.pdf
20240425_ TJ Communications Credentials_compressed.pdf
tjcomstrang
ย 
5 Things You Need To Know Before Hiring a Videographer
5 Things You Need To Know Before Hiring a Videographer5 Things You Need To Know Before Hiring a Videographer
5 Things You Need To Know Before Hiring a Videographer
ofm712785
ย 
amptalk_RecruitingDeck_english_2024.06.05
amptalk_RecruitingDeck_english_2024.06.05amptalk_RecruitingDeck_english_2024.06.05
amptalk_RecruitingDeck_english_2024.06.05
marketing317746
ย 
ikea_woodgreen_petscharity_dog-alogue_digital.pdf
ikea_woodgreen_petscharity_dog-alogue_digital.pdfikea_woodgreen_petscharity_dog-alogue_digital.pdf
ikea_woodgreen_petscharity_dog-alogue_digital.pdf
agatadrynko
ย 

Recently uploaded (20)

-- June 2024 is National Volunteer Month --
-- June 2024 is National Volunteer Month ---- June 2024 is National Volunteer Month --
-- June 2024 is National Volunteer Month --
ย 
The-McKinsey-7S-Framework. strategic management
The-McKinsey-7S-Framework. strategic managementThe-McKinsey-7S-Framework. strategic management
The-McKinsey-7S-Framework. strategic management
ย 
Buy Verified PayPal Account | Buy Google 5 Star Reviews
Buy Verified PayPal Account | Buy Google 5 Star ReviewsBuy Verified PayPal Account | Buy Google 5 Star Reviews
Buy Verified PayPal Account | Buy Google 5 Star Reviews
ย 
Creative Web Design Company in Singapore
Creative Web Design Company in SingaporeCreative Web Design Company in Singapore
Creative Web Design Company in Singapore
ย 
The Influence of Marketing Strategy and Market Competition on Business Perfor...
The Influence of Marketing Strategy and Market Competition on Business Perfor...The Influence of Marketing Strategy and Market Competition on Business Perfor...
The Influence of Marketing Strategy and Market Competition on Business Perfor...
ย 
FINAL PRESENTATION.pptx12143241324134134
FINAL PRESENTATION.pptx12143241324134134FINAL PRESENTATION.pptx12143241324134134
FINAL PRESENTATION.pptx12143241324134134
ย 
Discover the innovative and creative projects that highlight my journey throu...
Discover the innovative and creative projects that highlight my journey throu...Discover the innovative and creative projects that highlight my journey throu...
Discover the innovative and creative projects that highlight my journey throu...
ย 
Bร i tแบญp - Tiแบฟng anh 11 Global Success UNIT 1 - Bแบฃn HS.doc
Bร i tแบญp - Tiแบฟng anh 11 Global Success UNIT 1 - Bแบฃn HS.docBร i tแบญp - Tiแบฟng anh 11 Global Success UNIT 1 - Bแบฃn HS.doc
Bร i tแบญp - Tiแบฟng anh 11 Global Success UNIT 1 - Bแบฃn HS.doc
ย 
Sustainability: Balancing the Environment, Equity & Economy
Sustainability: Balancing the Environment, Equity & EconomySustainability: Balancing the Environment, Equity & Economy
Sustainability: Balancing the Environment, Equity & Economy
ย 
Affordable Stationery Printing Services in Jaipur | Navpack n Print
Affordable Stationery Printing Services in Jaipur | Navpack n PrintAffordable Stationery Printing Services in Jaipur | Navpack n Print
Affordable Stationery Printing Services in Jaipur | Navpack n Print
ย 
Cree_Rey_BrandIdentityKit.PDF_PersonalBd
Cree_Rey_BrandIdentityKit.PDF_PersonalBdCree_Rey_BrandIdentityKit.PDF_PersonalBd
Cree_Rey_BrandIdentityKit.PDF_PersonalBd
ย 
Maksym Vyshnivetskyi: PMO Quality Management (UA)
Maksym Vyshnivetskyi: PMO Quality Management (UA)Maksym Vyshnivetskyi: PMO Quality Management (UA)
Maksym Vyshnivetskyi: PMO Quality Management (UA)
ย 
ModelingMarketingStrategiesMKS.CollumbiaUniversitypdf
ModelingMarketingStrategiesMKS.CollumbiaUniversitypdfModelingMarketingStrategiesMKS.CollumbiaUniversitypdf
ModelingMarketingStrategiesMKS.CollumbiaUniversitypdf
ย 
Putting the SPARK into Virtual Training.pptx
Putting the SPARK into Virtual Training.pptxPutting the SPARK into Virtual Training.pptx
Putting the SPARK into Virtual Training.pptx
ย 
Exploring Patterns of Connection with Social Dreaming
Exploring Patterns of Connection with Social DreamingExploring Patterns of Connection with Social Dreaming
Exploring Patterns of Connection with Social Dreaming
ย 
Enterprise Excellence is Inclusive Excellence.pdf
Enterprise Excellence is Inclusive Excellence.pdfEnterprise Excellence is Inclusive Excellence.pdf
Enterprise Excellence is Inclusive Excellence.pdf
ย 
20240425_ TJ Communications Credentials_compressed.pdf
20240425_ TJ Communications Credentials_compressed.pdf20240425_ TJ Communications Credentials_compressed.pdf
20240425_ TJ Communications Credentials_compressed.pdf
ย 
5 Things You Need To Know Before Hiring a Videographer
5 Things You Need To Know Before Hiring a Videographer5 Things You Need To Know Before Hiring a Videographer
5 Things You Need To Know Before Hiring a Videographer
ย 
amptalk_RecruitingDeck_english_2024.06.05
amptalk_RecruitingDeck_english_2024.06.05amptalk_RecruitingDeck_english_2024.06.05
amptalk_RecruitingDeck_english_2024.06.05
ย 
ikea_woodgreen_petscharity_dog-alogue_digital.pdf
ikea_woodgreen_petscharity_dog-alogue_digital.pdfikea_woodgreen_petscharity_dog-alogue_digital.pdf
ikea_woodgreen_petscharity_dog-alogue_digital.pdf
ย 

76832073-3d-Machine-Vision-Systems.doc

  • 1. www.Technicalsymposium.com 3D MACHINE VISION SYSTEMS AS SHOP FLOOR METROLOGY TOOL ABSTRACT Machine vision refers to applications in which the PC automatically makes a decision based on visual input from a camera. Machine vision is a term typically used in industrial manufacturing, where applications range from culling blemished oranges from a conveyor belt to saving lives by inspecting to ensure that the correct drug capsule has been placed in the package before the product is shipped to the pharmacy. Three dimensional vision based measurement systems have made their presence into production metrology applications, notably in the electronics field. However, in the more traditional fields of durable goods now dominated by hard gauges and CMMs, 3D optical systems has been hindered by perceptions and real limitations. This paper will review where 3D vision is today, and what advances have been made to enable more quantitative, shop floor metrology applications. The field of 3D machine vision is a less established field, but one that is actively growing today. Three dimensional vision based measurements have come a long way in the past few years, moving from purely visualization tools that generate attractive color pictures, to serious measurement tools. These 3D systems include laser scanning, structured light, stereo viewing, and laser radar just to name a few. INTRODUCTION Modern day durable goods manufacturing have begun to embrace the concepts of digitization as a means to improve productivity and quality. Moving away from expensive hard gages made for specific parts; manufacturers are seeking the means to measure parts in a flexible manner, and capture the resulting measurements by digital means. For higher volume parts, such as from forging or fast machining operations, speed of gauging is still an issue. This is the area where machine vision based tools start to excel. Machine vision in general has been used for everything from guiding the insertion of electronic chips on circuit boards to inspecting bottles at several per second in bottling lines. A natural extension of machine vision inspection is to provide programmable measurements for machined parts. In many applications, these measurements can be made in two dimensions for which there is an established based of machine vision tools working in the sub-
  • 2. www.Technicalsymposium.com thousandth of an inch range at multiple measurements per second. Each of these methods has their strong points and weak points for a given application. The key performance parameters needed for durable good manufacturing include: โ€ข Resolution in the mil, and sub-mil range โ€ข Speeds sufficient to complete all measurements in a few seconds โ€ข Ability to look at a wide range of surface types and finishes This last point, the ability to look at a wide range of surface finishes has perhaps been the biggest limitation of 3D machine vision technology. In many cases, the surface needs to be diffuse to permit reflected light to be easily seen to achieve a good signal to noise ratio. Three dimensional optical sensors can perhaps be broken into a few basic types:- ๏ƒ˜ Point scanning sensors measure only the specific points of interest, typically in a serial fashion, ๏ƒ˜ Line sensors provide a single line of points in the form of a cross section of the contour of interest, ๏ƒ˜ Full-field sensors provide an X, Y, Z map of all the points in the scene, which must then be analyzed down to the information of interest. Each of these types of sensors has developed through technology which is suited to the application. In some cases, the technology is capable of multiple modes of operation (finding point on a surface, or defining the full surface) as well, but this often stretches the technology into a field overlapping other technologies. There has not to date been any single sensor in industrial applications which does everything. DISCUSSION OF TECHNOLOGIES There are currently three basic approaches to three-dimensional machine vision: ๏‚ท range finding including structured lighting ๏‚ท stereo or binocular vision, ๏‚ท gray scale or range finding methods. TRIANGULATION The most popular commercial versions of range finding use the triangulation method where a beam of light is projected onto the object's surface at some angle and the image of this spot or line of light is viewed at some other angle (see Figure 1). As the object distance changes a spot of light on the surface will move along the surface by: (change in spot position) = (change in distance) x (tan(incident angle) + tan(viewing angle))
  • 3. www.Technicalsymposium.com Figure 1. A triangulation based system using a point of light to obtain distance. Good resolution of a few tens of microns have been realized with these systems. Most triangulation gages today use laser light. When a laser beam is incident on an opaque, rough surface, the micro-structure of the surface can act as though it is made of a range of small mirrors, pointing in numerous directions. These micro-mirrors may reflect the light off in a particular direction, as generally machine marks do, or may direct the light along the surface of the part. Depending on how random or directional the pointing of these micro-mirrors may be, the apparent spot seen on the surface will not be a direct representation of the light beam as incident on the part surface. The effects that may be seen from a laser beam reflecting off a rough surface include: ๏‚ท directional reflection due to surface ridges ๏‚ท skewing of the apparent light distribution due to highlights ๏‚ท expansion of the incident laser spot due to micro surface piping The result of this type of laser reflection or "speckle" is a noisy signal from some surfaces. In like manner, there can be a problem with translucent surfaces, as the laser light will scatter through the medium and produce a false return signal. For a laser based sensor, a smooth, non-mirror like, opaque surface produces the best results. An active variation of restricting the view uses synchronized scanning. In the synchronized scanning approach (see figure 2), both the laser beam and viewing point is scanned across the field. In this manner, the detector only looks at where the laser is going. Figure 2. A synchronized scanning system, limited the range of view. A more extreme variation of the synchronized scanning type of approach is to use an active point seeking triangulation system (see figure 3). With an active point seeking triangulation system, a single point detector is limited to a very narrow view, at a constant angle, which is then translated across the path of the laser beam.
  • 4. www.Technicalsymposium.com Figure 3. Active triangulation system, seeking laser point, providing extended range. The detector now has the advantage that it can resolve the distribution of light seen along that particular angle, and potentially decide on which signals are the correct ones. Reflections that do not go along the view axis are not seen at all. The limitations of this approach can be more time consumed in seeking each point, and low light collection to maintain high angle separate. If as opposed to a single spot of light, a line is projected onto the surface by imaging or by scanning a beam, as shown in Figure 1, the line will deform as it moves across a contoured surface as each point of the line move as described above. The effect is to provide an image of a single profile of the part (see figure 4). In applications requiring only a profile measurement, these techniques offer good speed of measurement. Figure 4. Laser radar sensor scanning a box from a single view point The individual laser probes have seen a near 10 fold improvement in resolution in the past few years. The application of such probes in the electronics industry has been a great benefit to making high speed electronics assembly possible. Scanning and fixed triangulation systems have been used to contour large structures such as airplanes, logs or airfoil shapes, and metal rolling mill flatness control. The large area systems primarily have used one or multiple lines of light to obtain a cross sectional profile at a time. In many cases, these line sensors are connected with a CMM type device to extend the working range of the sensor. The resolutions of such systems need typically be less than a millimeter, and more typically is around 2.5 microns (0.0001 inch). Full-field structured light systems, based upon projected grids by direct sensing of the grid or related to moire are also commercially available. The primary application of this type of sensor has been the contouring of continuously curved non-prismatic parts such as turbine airfoils, sheet metal, clay models, and human anatomy. Special compact sensors for use on CMMs are also available with this technology. Most of the applications of this technology has been on applications requiring dense data, but have also been engineered to enhance video data for the purpose of 3D "comparator" type measurements on objects ranging from rolled sheet metal (for flatness) to car bodies. The techniques described so far are based on some form of active illumination of the surface, and active sensing of that specific illumination. When people view an object, they receive 3-D information based upon the principles of parallax and shadings seen on the surface. Stereo or binocular machine vision methods work on the same principle as human vision by obtaining parallax information by viewing the object from two different perspectives as is shown in Figure 5. (as our two eyes do).
  • 5. www.Technicalsymposium.com Figure 5. Two cameras see different perspectives to provide stereo parallax information. The two views must be matched up and then the difference in the position of a correlated feature gives the depth information from the geometry of the two view points(similar to the triangulation methods). These methods can be full-field, thereby keeping the data acquisition time to a minimum, and they do provide all the 2-D feature information. In fact, stereo depends on the surface features to the extent that a featureless, smooth surface (such as the turbine blade), can not be contoured directly with stereo views. Many machine vision systems have a simple stereo matching capability, made for tracking individual points in space, but not for providing full surface contours as would be desired for reverse engineering applications. Resolutions of a few millimeters at certain points, and processing times of a few seconds has been typical for the current industrial applications. There have been dedicated hardware systems made, but stereo has not be able to provide the flexibility of scanning type systems for CAD data generation applications. APPLICATION TESTING As has already been stated, the key operational parameters needed for production machine vision include speed, resolution, and robustness especially to changing part surface conditions. Many systems that provide the best resolution are not the fastest, so a tradeoff must be made. Just as with touch probes, there are certain types of features or surfaces that optical 3D methods can be expected to work good on, and others where there may be problems. If has been pointed out that shiny, but not specular surfaces have offered one of the biggest challenges. In like manner, when a surface changes from a shiny area to a dull, many sensors may generate a bias error. In the simple case of triangulation, the measurement is based upon finding the centroid of a light spot of some finite size. If half that spot is on an area that reflects back to the sensor well, and the other half is not, the center of brightness of the spot will not be the geometric center, but rather weighted toward the brighter region. Testing the sensor on edge and surface transition features is a valuable first test to consider (such as in Figure 6). Figure 6. Measuring the effect across an edge boundary.
  • 6. www.Technicalsymposium.com The next area of concern is the surface texture itself. A surface with machining marks has a texture which may scatter light into long lines that may confuse the sensor. In a similar manner, if the surface is translucent, the spot of light may spread out in an unpredictable manner, again offsetting the spot center, and hence the measurement made. Therefore, testing the sensor on a surface texture that matches the one to be measured is important. A final important feature consideration for many optical gages is the slope of the surface. A standard way to test such effects is to scan a diffuse sphere and fit the data to the known diameter (see Figure 7).At some angle around the sphere, the surface can be expected to lift off the true surface, before the signal is lost entirely. As with any gage, comparison of the optical gage against other measurement tools provides valuable information regarding confidence of the measurements. This is not always an easy comparison, as the repeatability of many traditional gages may not be as good as the optical gage. Figure 7.Measurement on a sphere Anytime one is trying to improve a process, one encounters the challenge of demonstrating a capability against a tool with less capability. The very high speeds and data densities available from optical gages offer some significant advances. Yet trying to compare those advantages against a gage which stakes everything on a half dozen points is a difficult road. However, the comparisons and qualification of the new process must be done. Comparisons against inadequate measurement tools can prove very frustrating, so at least one independent means of comparison is desirable. The use of reference artifacts that can be verified by independent means, preferable with primary standard reference (e.g., the laser distance interferometer is the international standard of length measurement), is a valuable aid in these comparison. APPLICATIONS Machine vision systems can be used in various fields for numerous purposes as stated below: Industrial inspection (Inspecting machine parts, Adaptive inspection systems) Vision for Autonomous Vehicles (Detecting obstructions, Exploring new surroundings, AV surveillance) Transport (Traffic monitoring, Aerial navigation, Transport Safety) Surveillance(Intruder monitoring, Number plate identification, Tracking people) Vision and Remote Sensing (Land Management, Crop classification, Surveying by satellite) Medical (Planning radiation therapy, Chromosome analysis, Merging medical images) CONCLUSION
  • 7. www.Technicalsymposium.com As with any technology of this nature, the performance changes with the component technology. The primary advance that has made machine vision systems feasible for shop floor gauging applications has been the speed up in computing power. This has brought the processing times from 15 or 20 minutes on an expensive workstation to seconds on a standard PC. The other technologies that are influencing performance today include lower cost, digital cameras than provide better light range and pixel resolution with lower noise, and better light sources such as higher power laser diodes well as higher brightness and resolution LCD projectors. The consumer market largely influences all of these technologies, which is currently a much bigger driver than any manufacturing support system. However, as system prices decrease and performance improves, there is a wide range of new markets these systems will likely address ranging from dentistry to home 3D pictures. REFERENCES 1. ASME Journal of Machine Design 2. "Machine Vision Based Gaging of Manufactured Parts," K. Harding, Proc. SME Gaging '95, Detroit, Nov. 1995. 3. โ€œThe Promise of Machine Vision,โ€ K. Harding, Optics and Photonics News, p. 30 May 1996 Optical Society of America 4. "Light Source Design for Machine Vision", Eric J. Sieczka and Kevin G. Harding, SPIE Proceedings Vol. 1614, Optics, Illumination and Image Sensing for Machine Vision VI, Boston, Nov. 1991. 5. L. Bieman, "Three-Dimensional Machine Vision," Photonics Spectra, May 1988, p. 81. 6. E. L. Hall and C. A. McPherson, "Three Dimensional Perception for Robot Vision," SPIE Proceedings Vol. 442, p. 117 (1983).