Download free for 30 days
Sign in
Upload
Language (EN)
Support
Business
Mobile
Social Media
Marketing
Technology
Art & Photos
Career
Design
Education
Presentations & Public Speaking
Government & Nonprofit
Healthcare
Internet
Law
Leadership & Management
Automotive
Engineering
Software
Recruiting & HR
Retail
Sales
Services
Science
Small Business & Entrepreneurship
Food
Environment
Economy & Finance
Data & Analytics
Investor Relations
Sports
Spiritual
News & Politics
Travel
Self Improvement
Real Estate
Entertainment & Humor
Health & Medicine
Devices & Hardware
Lifestyle
Change Language
Language
English
Español
Português
Français
Deutsche
Cancel
Save
EN
Uploaded by
KAMAUFRANCISGATHUTHI
14 views
7. Intro to Word Processing.pdf IT for medics
Introductory lecture to word
Data & Analytics
◦
Read more
0
Save
Share
Embed
Embed presentation
Download
Download to read offline
1
/ 20
2
/ 20
3
/ 20
4
/ 20
5
/ 20
6
/ 20
7
/ 20
8
/ 20
9
/ 20
10
/ 20
11
/ 20
12
/ 20
13
/ 20
14
/ 20
15
/ 20
16
/ 20
17
/ 20
18
/ 20
19
/ 20
20
/ 20
More Related Content
PPTX
Introduction to Microsoft Word Processor
by
EmmanuelOppongAfriyi1
PPTX
Word processing
by
jones brandes
PDF
Beginner-Word.pdf
by
HarlynCantorCarrera
PDF
Beginner-Word (1).pdf
by
HarlynCantorCarrera
PPT
Intermediate Microsoft Word
by
Jennifer Springfield
PDF
Pc Fundamentalspart 2 Word
by
LUZ PINGOL
PPT
Working With Text
by
Buffalo Seminary
PPTX
ICT lecture notes on INTRODUCTION TO WORD PROCESSING
by
MensahDavids
Introduction to Microsoft Word Processor
by
EmmanuelOppongAfriyi1
Word processing
by
jones brandes
Beginner-Word.pdf
by
HarlynCantorCarrera
Beginner-Word (1).pdf
by
HarlynCantorCarrera
Intermediate Microsoft Word
by
Jennifer Springfield
Pc Fundamentalspart 2 Word
by
LUZ PINGOL
Working With Text
by
Buffalo Seminary
ICT lecture notes on INTRODUCTION TO WORD PROCESSING
by
MensahDavids
Similar to 7. Intro to Word Processing.pdf IT for medics
PPT
Word Chapter 1 - Preparing Documents
by
dpd
PDF
Lab Manual CSI-321
by
ghayour abbas
PPT
Intermediate Microsoft Word Advanced User Option
by
Heather Lambert
PPTX
Ms word
by
HansRahu
PPT
Beginning Microsoft Word
by
Jennifer Springfield
PPTX
Microsoft Office Word 2007 - Lesson 4
by
Samantha TerBeest
PDF
Microsoft Office Word 2016
by
Wesley Nyandika
PPTX
4.-WORD-PROCESSING.pptx,word processing word
by
ssuser57b8d8
PPT
Microsoft word
by
sonnpb
PPTX
2010 02 Working With Text
by
Buffalo Seminary
PPTX
Unit 1.pptx
by
Leenachaudhari27
ODP
Module 3 open office writer
by
jaimemgarcia
PPT
Microsoft Word Basics
by
Heather Lambert
PDF
Using microsoftword3 textediting
by
masood2k2
PDF
Using microsoftword3 textediting
by
masood2k2
PPT
Word processing in english ms word
by
eVidhya
PPTX
Application Packages
by
umardanjumamaiwada
PPTX
application packages
by
umardanjumamaiwada
PPTX
Digital documentation.pptx
by
AshmitKashyap1
PDF
Ms word2013 complete
by
SOMITTUBE
Word Chapter 1 - Preparing Documents
by
dpd
Lab Manual CSI-321
by
ghayour abbas
Intermediate Microsoft Word Advanced User Option
by
Heather Lambert
Ms word
by
HansRahu
Beginning Microsoft Word
by
Jennifer Springfield
Microsoft Office Word 2007 - Lesson 4
by
Samantha TerBeest
Microsoft Office Word 2016
by
Wesley Nyandika
4.-WORD-PROCESSING.pptx,word processing word
by
ssuser57b8d8
Microsoft word
by
sonnpb
2010 02 Working With Text
by
Buffalo Seminary
Unit 1.pptx
by
Leenachaudhari27
Module 3 open office writer
by
jaimemgarcia
Microsoft Word Basics
by
Heather Lambert
Using microsoftword3 textediting
by
masood2k2
Using microsoftword3 textediting
by
masood2k2
Word processing in english ms word
by
eVidhya
Application Packages
by
umardanjumamaiwada
application packages
by
umardanjumamaiwada
Digital documentation.pptx
by
AshmitKashyap1
Ms word2013 complete
by
SOMITTUBE
More from KAMAUFRANCISGATHUTHI
PDF
2. EXCEL BASICS.pdf IT course for medics
by
KAMAUFRANCISGATHUTHI
PDF
ToothDevelopment.lecture for bds level 1
by
KAMAUFRANCISGATHUTHI
PPTX
Tooth Integuments. pptx lectures for bds
by
KAMAUFRANCISGATHUTHI
PPT
ORGANIC COMPOUNDS WITH CARBONYL GROUPS..ppt
by
KAMAUFRANCISGATHUTHI
PPT
ORGANIC COMPOUNDS WITH OXYGEN AND SULPHUR..ppt
by
KAMAUFRANCISGATHUTHI
PPT
INTRODUCTION TO LIPIDS..ppt biochemistry
by
KAMAUFRANCISGATHUTHI
PPTX
LIPIDS -STRUCTURE AND FUNCTION..pptx bchem
by
KAMAUFRANCISGATHUTHI
PDF
1. Body Fluid & Fluid therapy abbreviated copy.pdf
by
KAMAUFRANCISGATHUTHI
PDF
2. Homeostasis & Homeodynamism abbreviated.pdf
by
KAMAUFRANCISGATHUTHI
PDF
Complement System.pdf immunology lecture
by
KAMAUFRANCISGATHUTHI
PDF
adaptive immunity.pdf immunology lecture
by
KAMAUFRANCISGATHUTHI
PPTX
TRACTION.pptx orthopedics lecture series
by
KAMAUFRANCISGATHUTHI
PPTX
7.lect.Intro to comm skin dis 2021.pptx
by
KAMAUFRANCISGATHUTHI
PPTX
17.FRACTURE MANAGEMENT bds 2.pptx orthopedics
by
KAMAUFRANCISGATHUTHI
PPTX
1. CLASS 1 CAVITY PREP.pptx conservative dentistry
by
KAMAUFRANCISGATHUTHI
PPTX
1) TOOTH DESIGNATION SYSTEMS. Lecture 2024
by
KAMAUFRANCISGATHUTHI
PDF
Endodontic materials BDS III lecture 2024- Dr Kisumbi (1).pdf
by
KAMAUFRANCISGATHUTHI
PPTX
GROUP 3 PRESENTATION RHEOLOGICAL PROPERTIES.pptx
by
KAMAUFRANCISGATHUTHI
PDF
Group 2 presentation thermal properties.pdf
by
KAMAUFRANCISGATHUTHI
PDF
Rang and Dale Pharmacology Flashcards.pdf
by
KAMAUFRANCISGATHUTHI
2. EXCEL BASICS.pdf IT course for medics
by
KAMAUFRANCISGATHUTHI
ToothDevelopment.lecture for bds level 1
by
KAMAUFRANCISGATHUTHI
Tooth Integuments. pptx lectures for bds
by
KAMAUFRANCISGATHUTHI
ORGANIC COMPOUNDS WITH CARBONYL GROUPS..ppt
by
KAMAUFRANCISGATHUTHI
ORGANIC COMPOUNDS WITH OXYGEN AND SULPHUR..ppt
by
KAMAUFRANCISGATHUTHI
INTRODUCTION TO LIPIDS..ppt biochemistry
by
KAMAUFRANCISGATHUTHI
LIPIDS -STRUCTURE AND FUNCTION..pptx bchem
by
KAMAUFRANCISGATHUTHI
1. Body Fluid & Fluid therapy abbreviated copy.pdf
by
KAMAUFRANCISGATHUTHI
2. Homeostasis & Homeodynamism abbreviated.pdf
by
KAMAUFRANCISGATHUTHI
Complement System.pdf immunology lecture
by
KAMAUFRANCISGATHUTHI
adaptive immunity.pdf immunology lecture
by
KAMAUFRANCISGATHUTHI
TRACTION.pptx orthopedics lecture series
by
KAMAUFRANCISGATHUTHI
7.lect.Intro to comm skin dis 2021.pptx
by
KAMAUFRANCISGATHUTHI
17.FRACTURE MANAGEMENT bds 2.pptx orthopedics
by
KAMAUFRANCISGATHUTHI
1. CLASS 1 CAVITY PREP.pptx conservative dentistry
by
KAMAUFRANCISGATHUTHI
1) TOOTH DESIGNATION SYSTEMS. Lecture 2024
by
KAMAUFRANCISGATHUTHI
Endodontic materials BDS III lecture 2024- Dr Kisumbi (1).pdf
by
KAMAUFRANCISGATHUTHI
GROUP 3 PRESENTATION RHEOLOGICAL PROPERTIES.pptx
by
KAMAUFRANCISGATHUTHI
Group 2 presentation thermal properties.pdf
by
KAMAUFRANCISGATHUTHI
Rang and Dale Pharmacology Flashcards.pdf
by
KAMAUFRANCISGATHUTHI
Recently uploaded
PPTX
The Singularity Sprint (2026): Neuralink + the AI Arms Race — Ridwan Sassman
by
ridwansassman
PDF
Columbus Data and Analytics Wednesday - People Analytics 101: Making Sense of...
by
Tim Wilson
PDF
Analysis of Union Budget 2026-27: Major Announcements and their Impact
by
DeeshiPavecha
PPT
Microsoft_SQL_ServerConsolidationTWP.ppt
by
ssuser8c3398
PDF
LECTURE - Overcoming the AI Failure Rate - AIG, DQM.pdf
by
Sami Laine
PDF
Understanding Data Analytics: Concepts, Types, and Use Cases
by
The IoT Academy
PPTX
Lecture 14- Introduction to Hypothesis Testing.pptx
by
gbadamosiayomide
PDF
WORLD-LITERATURE-2ND-SEMESTER2025-2026.pdf
by
CHERIEMAYCAMO
PDF
Trustworthy AI : Governance of AI through Ethics
by
Karim Baïna
PDF
US Digital Fan Engagement Index 2026: Benchmarking Online Demand for Sports T...
by
Hyperset Group Ltd
PPTX
End to End Supply Chain Management- Analytics Case Study.
by
NandhuNandha1
PPTX
Organizational Structure and Design Topic 4
by
davenieralayaay
PPTX
Social Media Audit of Starbucks Coffee Company.pptx
by
diviap21
PDF
Step by Step Guide to Buying a Old or Aged Verified Paxful Accounts in US.pdf
by
TopSelleriTDotCom
PDF
Khan Traders Fish Meal – MSDS Material Safety Data Sheet
by
Khan Traders Karachi
PDF
chapter one introduction to Probability theory.pdf
by
Seid42
PPTX
Top Institute for Data Analyst Course in Navi Mumbai
by
Patil sagar
DOCX
Data Analyst Training Course | Advanced Data Analytics Certification | GVT Ac...
by
GVT Academy
PDF
PathRAG rag pipeline PathRAG rag pipeline .pdf
by
hotslix023
PPT
data collection tool ppt.ppttttdataadfttg
by
Muhammadodil
The Singularity Sprint (2026): Neuralink + the AI Arms Race — Ridwan Sassman
by
ridwansassman
Columbus Data and Analytics Wednesday - People Analytics 101: Making Sense of...
by
Tim Wilson
Analysis of Union Budget 2026-27: Major Announcements and their Impact
by
DeeshiPavecha
Microsoft_SQL_ServerConsolidationTWP.ppt
by
ssuser8c3398
LECTURE - Overcoming the AI Failure Rate - AIG, DQM.pdf
by
Sami Laine
Understanding Data Analytics: Concepts, Types, and Use Cases
by
The IoT Academy
Lecture 14- Introduction to Hypothesis Testing.pptx
by
gbadamosiayomide
WORLD-LITERATURE-2ND-SEMESTER2025-2026.pdf
by
CHERIEMAYCAMO
Trustworthy AI : Governance of AI through Ethics
by
Karim Baïna
US Digital Fan Engagement Index 2026: Benchmarking Online Demand for Sports T...
by
Hyperset Group Ltd
End to End Supply Chain Management- Analytics Case Study.
by
NandhuNandha1
Organizational Structure and Design Topic 4
by
davenieralayaay
Social Media Audit of Starbucks Coffee Company.pptx
by
diviap21
Step by Step Guide to Buying a Old or Aged Verified Paxful Accounts in US.pdf
by
TopSelleriTDotCom
Khan Traders Fish Meal – MSDS Material Safety Data Sheet
by
Khan Traders Karachi
chapter one introduction to Probability theory.pdf
by
Seid42
Top Institute for Data Analyst Course in Navi Mumbai
by
Patil sagar
Data Analyst Training Course | Advanced Data Analytics Certification | GVT Ac...
by
GVT Academy
PathRAG rag pipeline PathRAG rag pipeline .pdf
by
hotslix023
data collection tool ppt.ppttttdataadfttg
by
Muhammadodil
7. Intro to Word Processing.pdf IT for medics
1.
Intro to Word
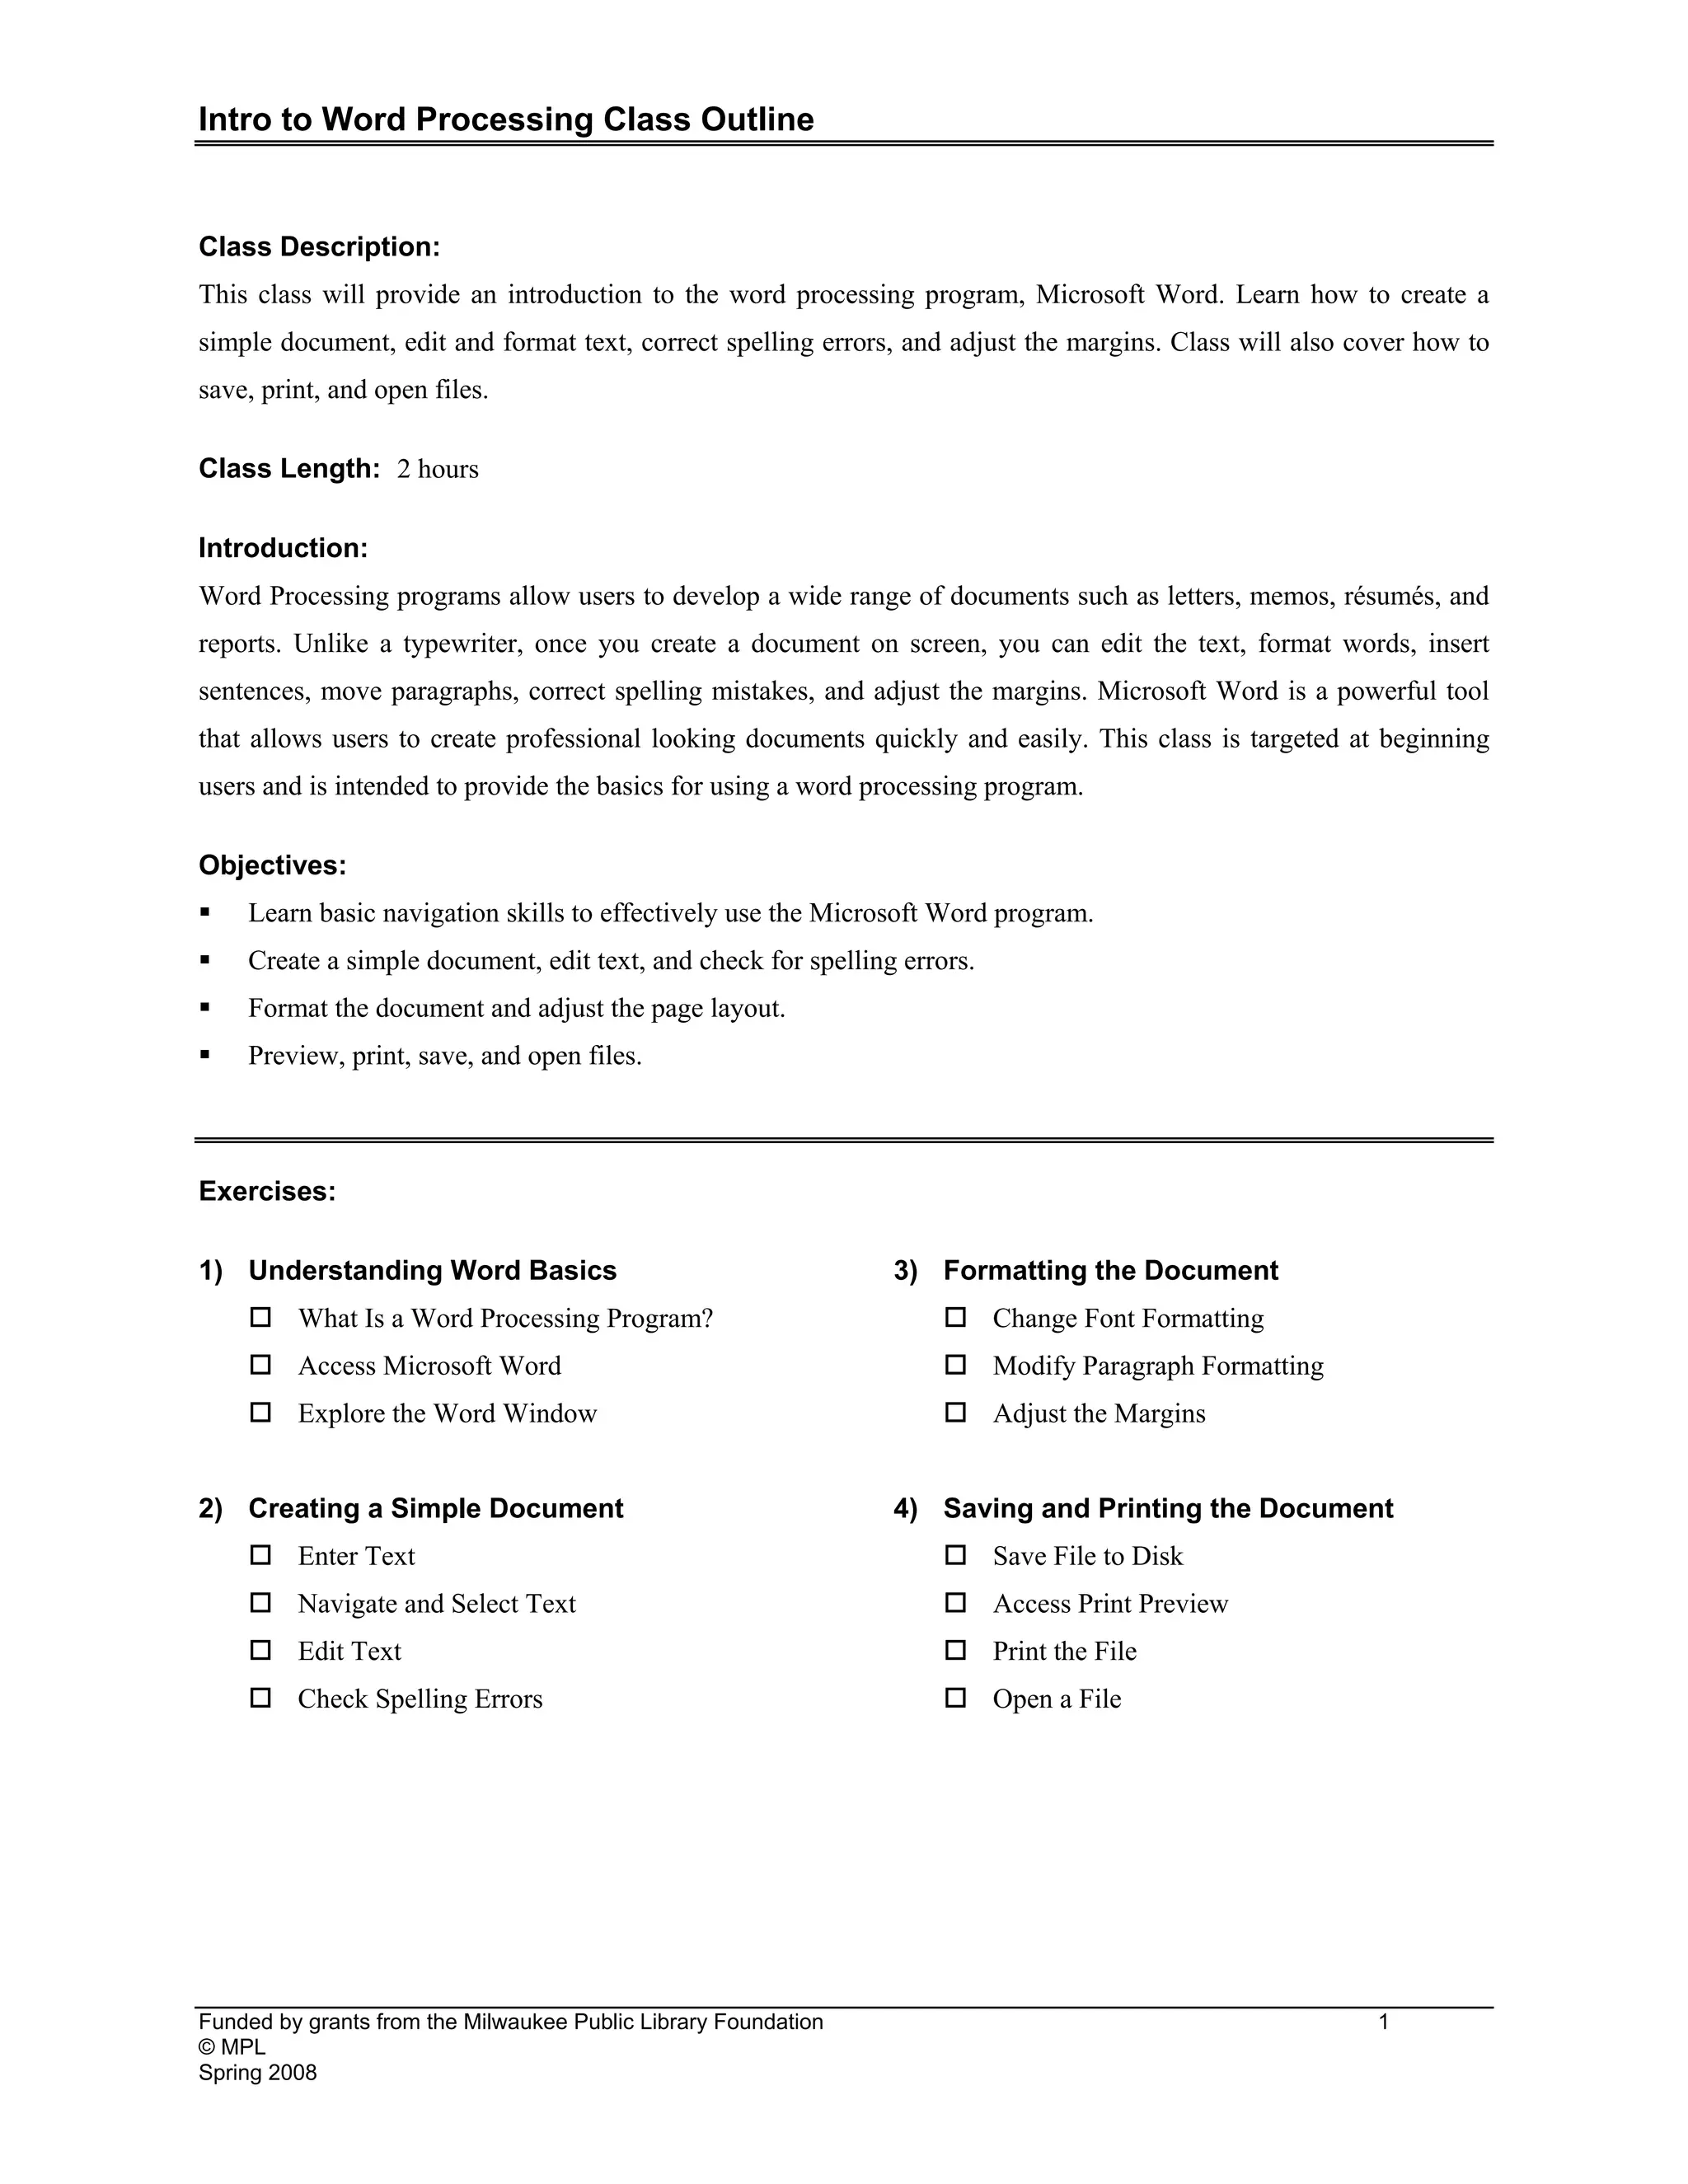
Processing Class Outline Funded by grants from the Milwaukee Public Library Foundation 1 © MPL Spring 2008 Class Description: This class will provide an introduction to the word processing program, Microsoft Word. Learn how to create a simple document, edit and format text, correct spelling errors, and adjust the margins. Class will also cover how to save, print, and open files. Class Length: 2 hours Introduction: Word Processing programs allow users to develop a wide range of documents such as letters, memos, résumés, and reports. Unlike a typewriter, once you create a document on screen, you can edit the text, format words, insert sentences, move paragraphs, correct spelling mistakes, and adjust the margins. Microsoft Word is a powerful tool that allows users to create professional looking documents quickly and easily. This class is targeted at beginning users and is intended to provide the basics for using a word processing program. Objectives: ƒ Learn basic navigation skills to effectively use the Microsoft Word program. ƒ Create a simple document, edit text, and check for spelling errors. ƒ Format the document and adjust the page layout. ƒ Preview, print, save, and open files. Exercises: 1) Understanding Word Basics † What Is a Word Processing Program? † Access Microsoft Word † Explore the Word Window 2) Creating a Simple Document † Enter Text † Navigate and Select Text † Edit Text † Check Spelling Errors 3) Formatting the Document † Change Font Formatting † Modify Paragraph Formatting † Adjust the Margins 4) Saving and Printing the Document † Save File to Disk † Access Print Preview † Print the File † Open a File
2.
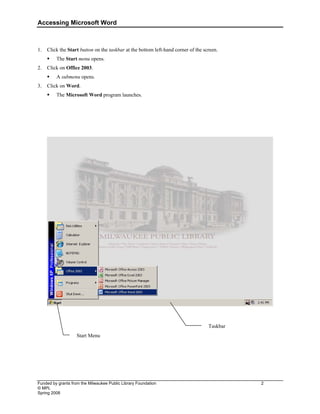
Accessing Microsoft Word Funded
by grants from the Milwaukee Public Library Foundation 2 © MPL Spring 2008 1. Click the Start button on the taskbar at the bottom left-hand corner of the screen. ƒ The Start menu opens. 2. Click on Office 2003. ƒ A submenu opens. 3. Click on Word. ƒ The Microsoft Word program launches. Taskbar Start Menu
3.
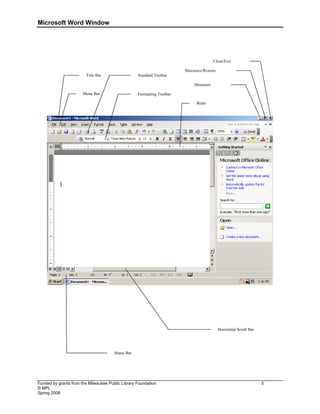
Microsoft Word Window Funded
by grants from the Milwaukee Public Library Foundation 3 © MPL Spring 2008 Title Bar Menu Bar Standard Toolbar Formatting Toolbar Minimize Maximize/Restore Close/Exit Ruler Status Bar Horizontal Scroll Bar
4.
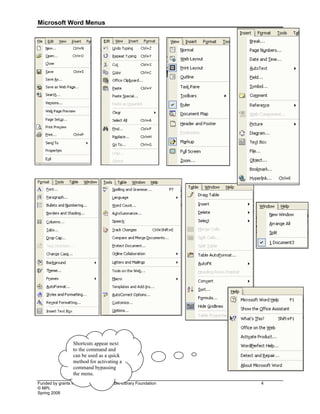
Microsoft Word Menus Funded
by grants from the Milwaukee Public Library Foundation 4 © MPL Spring 2008 Shortcuts appear next to the command and can be used as a quick method for activating a command bypassing the menu.
5.
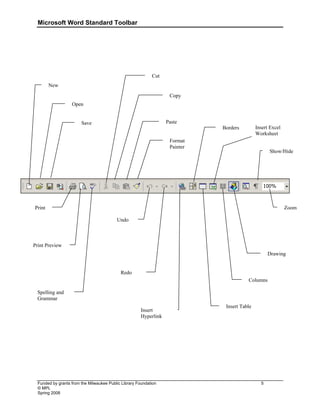
Microsoft Word Standard
Toolbar Funded by grants from the Milwaukee Public Library Foundation 5 © MPL Spring 2008 New Open Save Print Print Preview Spelling and Grammar Cut Copy Paste Format Painter Undo Redo Insert Hyperlink Borders Insert Table Columns Drawing Show/Hide Zoom Insert Excel Worksheet
6.
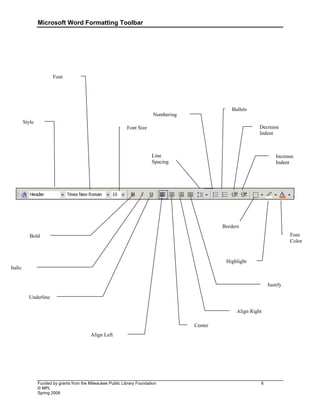
Microsoft Word Formatting
Toolbar Funded by grants from the Milwaukee Public Library Foundation 6 © MPL Spring 2008 Style Font Font Size Bold Italic Underline Align Left Center Align Right Justify Numbering Bullets Decrease Indent Increase Indent Highlight Font Color Line Spacing Borders
7.
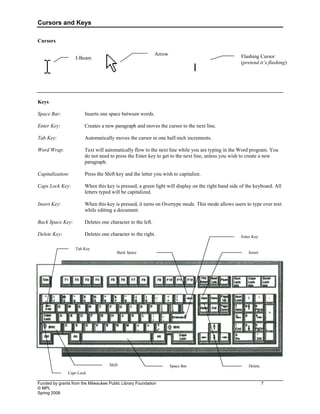
Cursors and Keys Funded
by grants from the Milwaukee Public Library Foundation 7 © MPL Spring 2008 Cursors Keys Space Bar: Inserts one space between words. Enter Key: Creates a new paragraph and moves the cursor to the next line. Tab Key: Automatically moves the cursor in one half-inch increments. Word Wrap: Text will automatically flow to the next line while you are typing in the Word program. You do not need to press the Enter key to get to the next line, unless you wish to create a new paragraph. Capitalization: Press the Shift key and the letter you wish to capitalize. Caps Lock Key: When this key is pressed, a green light will display on the right hand side of the keyboard. All letters typed will be capitalized. Insert Key: When this key is pressed, it turns on Overtype mode. This mode allows users to type over text while editing a document. Back Space Key: Deletes one character to the left. Delete Key: Deletes one character to the right. Space Bar Tab Key Enter Key Back Space Shift Caps Lock Insert Delete I-Beam Arrow Flashing Cursor (pretend it’s flashing)
8.
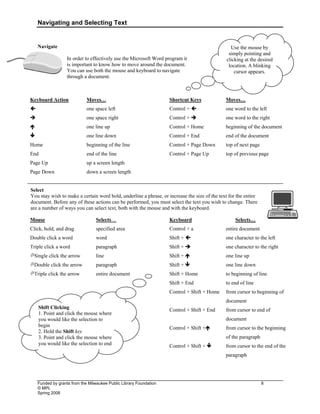
Navigating and Selecting
Text Funded by grants from the Milwaukee Public Library Foundation 8 © MPL Spring 2008 Navigate In order to effectively use the Microsoft Word program it is important to know how to move around the document. You can use both the mouse and keyboard to navigate through a document. Keyboard Action Moves… Í one space left Î one space right Ï one line up Ð one line down Home beginning of the line End end of the line Page Up up a screen length Page Down down a screen length Shortcut Keys Moves… Control + Í one word to the left Control + Î one word to the right Control + Home beginning of the document Control + End end of the document Control + Page Down top of next page Control + Page Up top of previous page Select You may wish to make a certain word bold, underline a phrase, or increase the size of the text for the entire document. Before any of these actions can be performed, you must select the text you wish to change. There are a number of ways you can select text, both with the mouse and with the keyboard. Mouse Selects… Click, hold, and drag specified area Double click a word word Triple click a word paragraph ÜSingle click the arrow line ÜDouble click the arrow paragraph ÜTriple click the arrow entire document Keyboard Selects… Control + a entire document Shift + Í one character to the left Shift + Î one character to the right Shift + Ï one line up Shift + Ð one line down Shift + Home to beginning of line Shift + End to end of line Control + Shift + Home from cursor to beginning of document Control + Shift + End from cursor to end of document Control + Shift +Ï from cursor to the beginning of the paragraph Control + Shift + Ð from cursor to the end of the paragraph Shift Clicking 1. Point and click the mouse where you would like the selection to begin 2. Hold the Shift key 3. Point and click the mouse where you would like the selection to end Use the mouse by simply pointing and clicking at the desired location. A blinking cursor appears.
9.
Editing Text Funded by
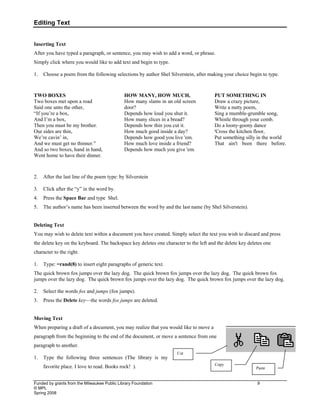
grants from the Milwaukee Public Library Foundation 9 © MPL Spring 2008 Inserting Text After you have typed a paragraph, or sentence, you may wish to add a word, or phrase. Simply click where you would like to add text and begin to type. 1. Choose a poem from the following selections by author Shel Silverstein, after making your choice begin to type. TWO BOXES Two boxes met upon a road Said one unto the other, “If you’re a box, And I’m a box, Then you must be my brother. Our sides are thin, We’re cavin’ in, And we must get no thinner.” And so two boxes, hand in hand, Went home to have their dinner. HOW MANY, HOW MUCH, How many slams in an old screen door? Depends how loud you shut it. How many slices in a bread? Depends how thin you cut it. How much good inside a day? Depends how good you live 'em. How much love inside a friend? Depends how much you give 'em. PUT SOMETHING IN Draw a crazy picture, Write a nutty poem, Sing a mumble-grumble song, Whistle through your comb. Do a loony-goony dance 'Cross the kitchen floor, Put something silly in the world That ain't been there before. 2. After the last line of the poem type: by Silverstein 3. Click after the “y” in the word by. 4. Press the Space Bar and type Shel. 5. The author’s name has been inserted between the word by and the last name (by Shel Silverstein). Deleting Text You may wish to delete text within a document you have created. Simply select the text you wish to discard and press the delete key on the keyboard. The backspace key deletes one character to the left and the delete key deletes one character to the right. 1. Type: =rand(8) to insert eight paragraphs of generic text. The quick brown fox jumps over the lazy dog. The quick brown fox jumps over the lazy dog. The quick brown fox jumps over the lazy dog. The quick brown fox jumps over the lazy dog. The quick brown fox jumps over the lazy dog. 2. Select the words fox and jumps (fox jumps). 3. Press the Delete key—the words fox jumps are deleted. Moving Text When preparing a draft of a document, you may realize that you would like to move a paragraph from the beginning to the end of the document, or move a sentence from one paragraph to another. 1. Type the following three sentences (The library is my favorite place. I love to read. Books rock! ). Cut Paste Copy
10.
____________________________________________________________________________________________________________ Funded by grants
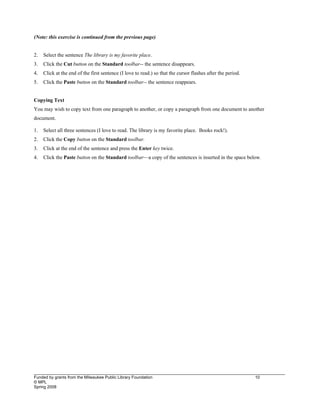
from the Milwaukee Public Library Foundation 10 © MPL Spring 2008 (Note: this exercise is continued from the previous page) 2. Select the sentence The library is my favorite place. 3. Click the Cut button on the Standard toolbar-- the sentence disappears. 4. Click at the end of the first sentence (I love to read.) so that the cursor flashes after the period. 5. Click the Paste button on the Standard toolbar-- the sentence reappears. Copying Text You may wish to copy text from one paragraph to another, or copy a paragraph from one document to another document. 1. Select all three sentences (I love to read. The library is my favorite place. Books rock!). 2. Click the Copy button on the Standard toolbar. 3. Click at the end of the sentence and press the Enter key twice. 4. Click the Paste button on the Standard toolbar—a copy of the sentences is inserted in the space below.
11.
Undo and Redo Funded
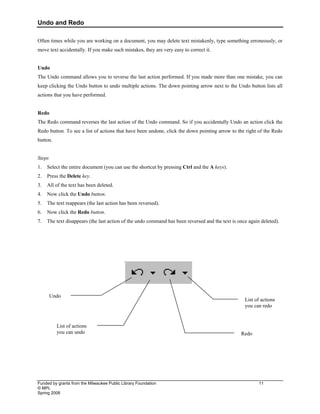
by grants from the Milwaukee Public Library Foundation 11 © MPL Spring 2008 Often times while you are working on a document, you may delete text mistakenly, type something erroneously, or move text accidentally. If you make such mistakes, they are very easy to correct it. Undo The Undo command allows you to reverse the last action performed. If you made more than one mistake, you can keep clicking the Undo button to undo multiple actions. The down pointing arrow next to the Undo button lists all actions that you have performed. Redo The Redo command reverses the last action of the Undo command. So if you accidentally Undo an action click the Redo button. To see a list of actions that have been undone, click the down pointing arrow to the right of the Redo button. Steps 1. Select the entire document (you can use the shortcut by pressing Ctrl and the A keys). 2. Press the Delete key. 3. All of the text has been deleted. 4. Now click the Undo button. 5. The text reappears (the last action has been reversed). 6. Now click the Redo button. 7. The text disappears (the last action of the undo command has been reversed and the text is once again deleted). Undo Redo List of actions you can undo List of actions you can redo
12.
Checking and Correcting
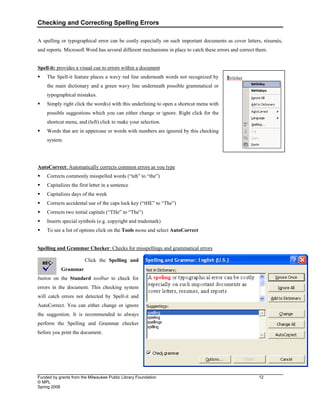
Spelling Errors Funded by grants from the Milwaukee Public Library Foundation 12 © MPL Spring 2008 A spelling or typographical error can be costly especially on such important documents as cover letters, résumés, and reports. Microsoft Word has several different mechanisms in place to catch these errors and correct them. Spell-it: provides a visual cue to errors within a document ƒ The Spell-it feature places a wavy red line underneath words not recognized by the main dictionary and a green wavy line underneath possible grammatical or typographical mistakes. ƒ Simply right click the word(s) with this underlining to open a shortcut menu with possible suggestions which you can either change or ignore. Right click for the shortcut menu, and (left) click to make your selection. ƒ Words that are in uppercase or words with numbers are ignored by this checking system. AutoCorrect: Automatically corrects common errors as you type ƒ Corrects commonly misspelled words (“teh” to “the”) ƒ Capitalizes the first letter in a sentence ƒ Capitalizes days of the week ƒ Corrects accidental use of the caps lock key (“tHE” to “The”) ƒ Corrects two initial capitals (“THe” to “The”) ƒ Inserts special symbols (e.g. copyright and trademark) ƒ To see a list of options click on the Tools menu and select AutoCorrect Spelling and Grammar Checker: Checks for misspellings and grammatical errors Click the Spelling and Grammar button on the Standard toolbar to check for errors in the document. This checking system will catch errors not detected by Spell-it and AutoCorrect. You can either change or ignore the suggestion. It is recommended to always perform the Spelling and Grammar checker before you print the document.
13.
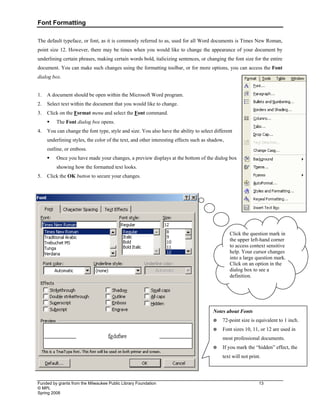
Font Formatting Funded by
grants from the Milwaukee Public Library Foundation 13 © MPL Spring 2008 The default typeface, or font, as it is commonly referred to as, used for all Word documents is Times New Roman, point size 12. However, there may be times when you would like to change the appearance of your document by underlining certain phrases, making certain words bold, italicizing sentences, or changing the font size for the entire document. You can make such changes using the formatting toolbar, or for more options, you can access the Font dialog box. 1. A document should be open within the Microsoft Word program. 2. Select text within the document that you would like to change. 3. Click on the Format menu and select the Font command. ƒ The Font dialog box opens. 4. You can change the font type, style and size. You also have the ability to select different underlining styles, the color of the text, and other interesting effects such as shadow, outline, or emboss. ƒ Once you have made your changes, a preview displays at the bottom of the dialog box showing how the formatted text looks. 5. Click the OK button to secure your changes. Notes about Fonts 72-point size is equivalent to 1 inch. Font sizes 10, 11, or 12 are used in most professional documents. If you mark the “hidden” effect, the text will not print. Click the question mark in the upper left-hand corner to access context sensitive help. Your cursor changes into a large question mark. Click on an option in the dialog box to see a definition.
14.
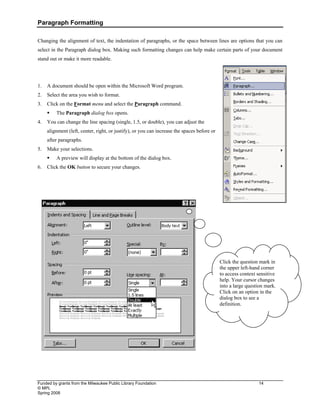
Paragraph Formatting Funded by
grants from the Milwaukee Public Library Foundation 14 © MPL Spring 2008 Changing the alignment of text, the indentation of paragraphs, or the space between lines are options that you can select in the Paragraph dialog box. Making such formatting changes can help make certain parts of your document stand out or make it more readable. 1. A document should be open within the Microsoft Word program. 2. Select the area you wish to format. 3. Click on the Format menu and select the Paragraph command. ƒ The Paragraph dialog box opens. 4. You can change the line spacing (single, 1.5, or double), you can adjust the alignment (left, center, right, or justify), or you can increase the spaces before or after paragraphs. 5. Make your selections. ƒ A preview will display at the bottom of the dialog box. 6. Click the OK button to secure your changes. Click the question mark in the upper left-hand corner to access context sensitive help. Your cursor changes into a large question mark. Click on an option in the dialog box to see a definition.
15.
Accessing Print Preview Funded
by grants from the Milwaukee Public Library Foundation 15 © MPL Spring 2008 Before you print a document, you may wish to preview the document. Print Preview has different magnifications for viewing the document. You can zoom in and out and make final adjustments before printing. 1. Click the Print Preview button on the Standard toolbar or click the File menu and select Print Preview. Print: send the document to the printer Magnifier: zoom in and out or click the button to turn it off and edit the document One Page: view one page of document Multiple Pages: view multiple pages of document at one time Zoom: zoom from 10% to 500% percent View Ruler: turn the ruler on and off Shrink to Fit: decreases the font size to reduce the number of pages Context Sensitive Help: access help topics Close: return to the Word window Full Screen: view as much of the document as possible without toolbars and other distracting elements
16.
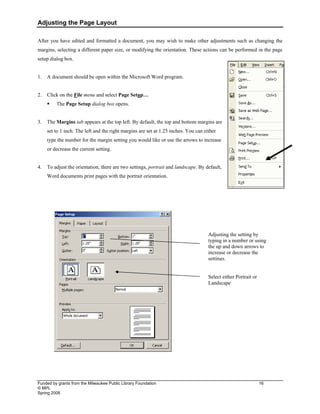
Adjusting the Page
Layout Funded by grants from the Milwaukee Public Library Foundation 16 © MPL Spring 2008 After you have edited and formatted a document, you may wish to make other adjustments such as changing the margins, selecting a different paper size, or modifying the orientation. These actions can be performed in the page setup dialog box. 1. A document should be open within the Microsoft Word program. 2. Click on the File menu and select Page Setup… ƒ The Page Setup dialog box opens. 3. The Margins tab appears at the top left. By default, the top and bottom margins are set to 1 inch. The left and the right margins are set at 1.25 inches. You can either type the number for the margin setting you would like or use the arrows to increase or decrease the current setting. 4. To adjust the orientation, there are two settings, portrait and landscape. By default, Word documents print pages with the portrait orientation. Adjusting the setting by typing in a number or using the up and down arrows to increase or decrease the settings. Select either Portrait or Landscape
17.
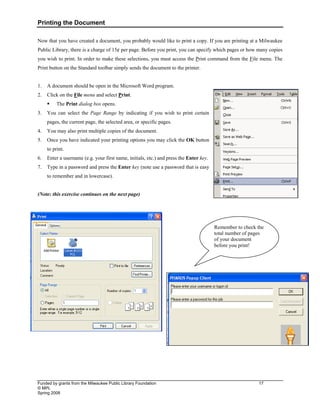
Printing the Document Funded
by grants from the Milwaukee Public Library Foundation 17 © MPL Spring 2008 Now that you have created a document, you probably would like to print a copy. If you are printing at a Milwaukee Public Library, there is a charge of 15¢ per page. Before you print, you can specify which pages or how many copies you wish to print. In order to make these selections, you must access the Print command from the File menu. The Print button on the Standard toolbar simply sends the document to the printer. 1. A document should be open in the Microsoft Word program. 2. Click on the File menu and select Print. ƒ The Print dialog box opens. 3. You can select the Page Range by indicating if you wish to print certain pages, the current page, the selected area, or specific pages. 4. You may also print multiple copies of the document. 5. Once you have indicated your printing options you may click the OK button to print. 6. Enter a username (e.g. your first name, initials, etc.) and press the Enter key. 7. Type in a password and press the Enter key (note use a password that is easy to remember and in lowercase). (Note: this exercise continues on the next page) Remember to check the total number of pages of your document before you print!
18.
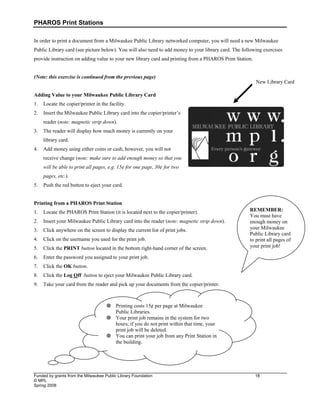
PHAROS Print Stations Funded
by grants from the Milwaukee Public Library Foundation 18 © MPL Spring 2008 In order to print a document from a Milwaukee Public Library networked computer, you will need a new Milwaukee Public Library card (see picture below). You will also need to add money to your library card. The following exercises provide instruction on adding value to your new library card and printing from a PHAROS Print Station. (Note: this exercise is continued from the previous page) Adding Value to your Milwaukee Public Library Card 1. Locate the copier/printer in the facility. 2. Insert the Milwaukee Public Library card into the copier/printer’s reader (note: magnetic strip down). 3. The reader will display how much money is currently on your library card. 4. Add money using either coins or cash, however, you will not receive change (note: make sure to add enough money so that you will be able to print all pages, e.g. 15¢ for one page, 30¢ for two pages, etc.). 5. Push the red button to eject your card. Printing from a PHAROS Print Station 1. Locate the PHAROS Print Station (it is located next to the copier/printer). 2. Insert your Milwaukee Public Library card into the reader (note: magnetic strip down). 3. Click anywhere on the screen to display the current list of print jobs. 4. Click on the username you used for the print job. 5. Click the PRINT button located in the bottom right-hand corner of the screen. 6. Enter the password you assigned to your print job. 7. Click the OK button. 8. Click the Log Off button to eject your Milwaukee Public Library card. 9. Take your card from the reader and pick up your documents from the copier/printer. New Library Card Printing costs 15¢ per page at Milwaukee Public Libraries. Your print job remains in the system for two hours; if you do not print within that time, your print job will be deleted. You can print your job from any Print Station in the building. REMEMBER: You must have enough money on your Milwaukee Public Library card to print all pages of your print job!
19.
Saving a File
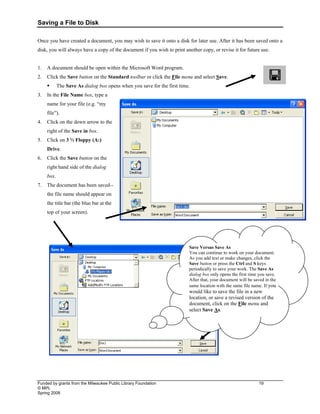
to Disk Funded by grants from the Milwaukee Public Library Foundation 19 © MPL Spring 2008 Once you have created a document, you may wish to save it onto a disk for later use. After it has been saved onto a disk, you will always have a copy of the document if you wish to print another copy, or revise it for future use. 1. A document should be open within the Microsoft Word program. 2. Click the Save button on the Standard toolbar or click the File menu and select Save. ƒ The Save As dialog box opens when you save for the first time. 3. In the File Name box, type a name for your file (e.g. “my file”). 4. Click on the down arrow to the right of the Save in box. 5. Click on 3 ½ Floppy (A:) Drive. 6. Click the Save button on the right hand side of the dialog box. 7. The document has been saved-- the file name should appear on the title bar (the blue bar at the top of your screen). Save Versus Save As You can continue to work on your document. As you add text or make changes, click the Save button or press the Ctrl and S keys periodically to save your work. The Save As dialog box only opens the first time you save. After that, your document will be saved in the same location with the same file name. If you would like to save the file in a new location, or save a revised version of the document, click on the File menu and select Save As.
20.
Opening a File Funded
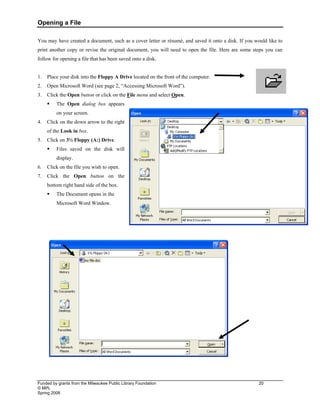
by grants from the Milwaukee Public Library Foundation 20 © MPL Spring 2008 You may have created a document, such as a cover letter or résumé, and saved it onto a disk. If you would like to print another copy or revise the original document, you will need to open the file. Here are some steps you can follow for opening a file that has been saved onto a disk. 1. Place your disk into the Floppy A Drive located on the front of the computer. 2. Open Microsoft Word (see page 2, “Accessing Microsoft Word”). 3. Click the Open button or click on the File menu and select Open. ƒ The Open dialog box appears on your screen. 4. Click on the down arrow to the right of the Look in box. 5. Click on 3½ Floppy (A:) Drive. ƒ Files saved on the disk will display. 6. Click on the file you wish to open. 7. Click the Open button on the bottom right hand side of the box. ƒ The Document opens in the Microsoft Word Window.
Download