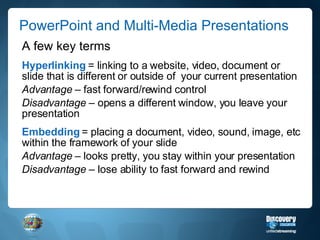
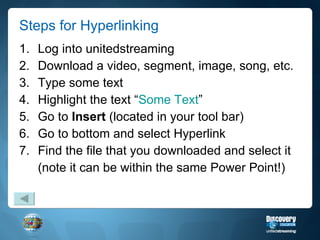
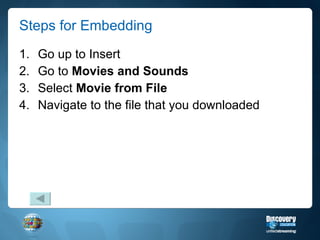
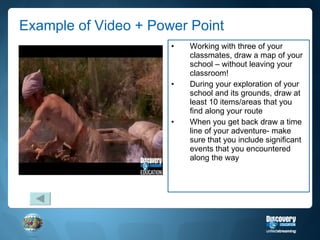
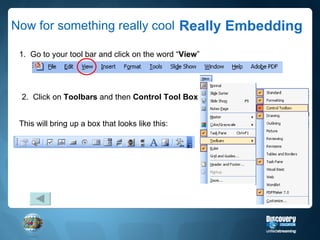
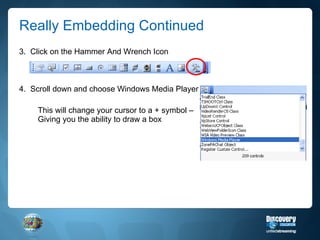
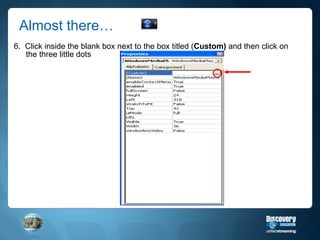
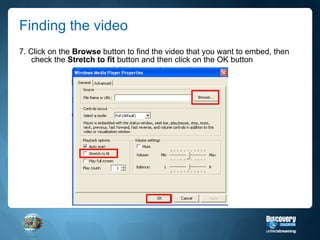
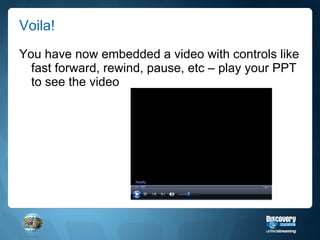
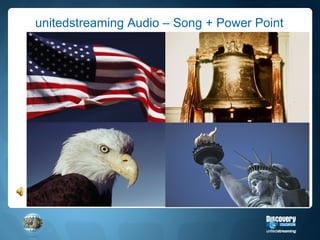
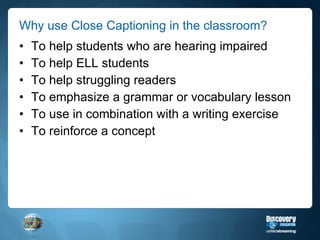
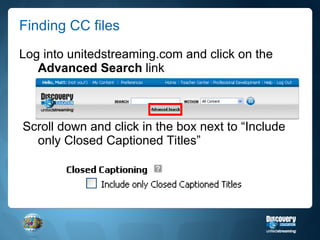
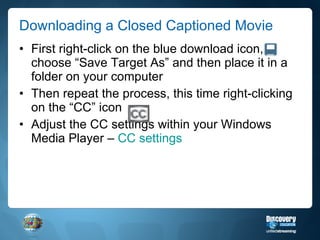
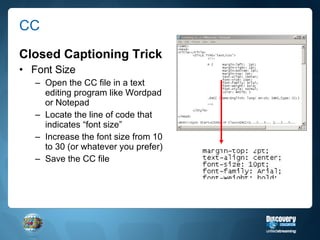
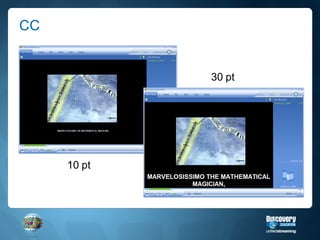
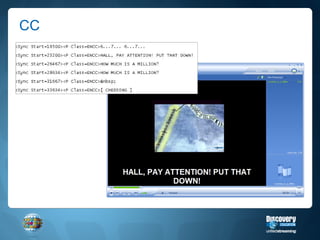
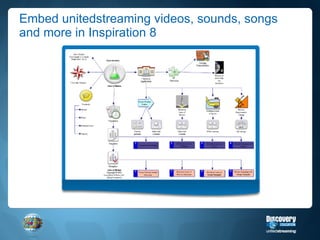
50 Ways to Integrate   unitedstreaming Matt Monjan Discovery Educator Network
Professional Development > Trainer’s Toolkit > Integration Ideas
Multimedia Presentations 1
PowerPoint and Multi-Media Presentations  A few key terms Hyperlinking  = linking to a website, video, document or slide that is different or outside of  your current presentation Advantage  – fast forward/rewind control Disadvantage  – opens a different window, you leave your presentation Embedding  = placing a document, video, sound, image, etc within the framework of your slide Advantage  – looks pretty, you stay within your presentation Disadvantage  – lose ability to fast forward and rewind
Instructions for Hyperlinking and Embedding Hyperlinking to a Video Embedding a Video Really Embedding a Video Images + Songs
Steps for Hyperlinking Log into unitedstreaming Download a video, segment, image, song, etc. Type some text Highlight the text “ Some Text ” Go to  Insert  (located in your tool bar) Go to bottom and select Hyperlink Find the file that you downloaded and select it (note it can be within the same Power Point!)
Steps for Embedding Go up to Insert Go to  Movies and Sounds Select  Movie from File Navigate to the file that you downloaded
Example of Video + Power Point Working with three of your classmates, draw a map of your school – without leaving your classroom! During your exploration of your school and its grounds, draw at least 10 items/areas that you find along your route When you get back draw a time line of your adventure- make sure that you include significant events that you encountered along the way
Now for something really cool Really Embedding 1.  Go to your tool bar and click on the word “ View ” 2.  Click on  Toolbars  and then  Control Tool Box This will bring up a box that looks like this:
Really Embedding Continued 3.  Click on the Hammer And Wrench Icon 4.  Scroll down and choose Windows Media Player This will change your cursor to a + symbol – Giving you the ability to draw a box
Really Embedding Continued 5.  Draw a box and then right-click on the box and choose  Properties
Almost there… 6.  Click inside the blank box next to the box titled ( Custom)  and then click on the three little dots
Finding the video 7. Click on the  Browse  button to find the video that you want to embed, then check the  Stretch to fit  button and then click on the OK button
Voila! You have now embedded a video with controls like fast forward, rewind, pause, etc – play your PPT to see the video
unitedstreaming Audio – Song + Power Point The National Anthem  The Star Spangled Banner
Journaling (Writing Prompt Builder) 3
Reading Support (Close Captioning) 4
Why use Close Captioning in the classroom? To help students who are hearing impaired To help ELL students To help struggling readers To emphasize a grammar or vocabulary lesson To use in combination with a writing exercise To reinforce a concept
Finding CC files Log into unitedstreaming.com and click on the  Advanced Search  link Scroll down and click in the box next to “Include only Closed Captioned Titles”
Downloading a Closed Captioned Movie First right-click on the blue download icon, choose “Save Target As” and then place it in a folder on your computer Then repeat the process, this time right-clicking on the “CC” icon Adjust the CC settings within your Windows Media Player –  CC settings
CC Closed Captioning Trick Font Size Open the CC file in a text editing program like Wordpad or Notepad Locate the line of code that indicates “font size” Increase the font size from 10 to 30 (or whatever you prefer) Save the CC file
CC 10 pt 30 pt
CC
Today is Your Birthday (Calendar) 6
Build Interest (Assignment Builder) 8
Graphic Organizers (Tools like Inspiration) 10
Embed unitedstreaming videos, sounds, songs and more in Inspiration 8
Encyclopedia 14
Extra Credit (Quiz Builder) 25
Mini-Movies (iMovie, MovieMaker, etc) 34
Learning Stations 35
Professional Development 38
 
Virtual Field Trips (Google Earth and unitedstreaming) 39
Film Festival (American Film Institute) 44
Culture Club (Discovery Interactive Atlas) 50
Explore your world with out leaving your classroom! Use the Atlas as an Activator
 
 
Engage Your Students What will you use it for? .99
Matt Monjan [email_address] unitedstreaming www.unitedstreaming.com Discovery Educator Network (DEN) www.discoveryeducatornetwork.com DEN Blog www.discoveryeducation.typepad.com Implementation Blog http://discoveryeducation.typepad.com/implementation

50 Ways to Integrate United Streaming

  • 1.
    50 Ways toIntegrate unitedstreaming Matt Monjan Discovery Educator Network
  • 2.
    Professional Development >Trainer’s Toolkit > Integration Ideas
  • 3.
  • 4.
    PowerPoint and Multi-MediaPresentations A few key terms Hyperlinking = linking to a website, video, document or slide that is different or outside of your current presentation Advantage – fast forward/rewind control Disadvantage – opens a different window, you leave your presentation Embedding = placing a document, video, sound, image, etc within the framework of your slide Advantage – looks pretty, you stay within your presentation Disadvantage – lose ability to fast forward and rewind
  • 5.
    Instructions for Hyperlinkingand Embedding Hyperlinking to a Video Embedding a Video Really Embedding a Video Images + Songs
  • 6.
    Steps for HyperlinkingLog into unitedstreaming Download a video, segment, image, song, etc. Type some text Highlight the text “ Some Text ” Go to Insert (located in your tool bar) Go to bottom and select Hyperlink Find the file that you downloaded and select it (note it can be within the same Power Point!)
  • 7.
    Steps for EmbeddingGo up to Insert Go to Movies and Sounds Select Movie from File Navigate to the file that you downloaded
  • 8.
    Example of Video+ Power Point Working with three of your classmates, draw a map of your school – without leaving your classroom! During your exploration of your school and its grounds, draw at least 10 items/areas that you find along your route When you get back draw a time line of your adventure- make sure that you include significant events that you encountered along the way
  • 9.
    Now for somethingreally cool Really Embedding 1. Go to your tool bar and click on the word “ View ” 2. Click on Toolbars and then Control Tool Box This will bring up a box that looks like this:
  • 10.
    Really Embedding Continued3. Click on the Hammer And Wrench Icon 4. Scroll down and choose Windows Media Player This will change your cursor to a + symbol – Giving you the ability to draw a box
  • 11.
    Really Embedding Continued5. Draw a box and then right-click on the box and choose Properties
  • 12.
    Almost there… 6. Click inside the blank box next to the box titled ( Custom) and then click on the three little dots
  • 13.
    Finding the video7. Click on the Browse button to find the video that you want to embed, then check the Stretch to fit button and then click on the OK button
  • 14.
    Voila! You havenow embedded a video with controls like fast forward, rewind, pause, etc – play your PPT to see the video
  • 15.
    unitedstreaming Audio –Song + Power Point The National Anthem The Star Spangled Banner
  • 16.
  • 17.
  • 18.
    Why use CloseCaptioning in the classroom? To help students who are hearing impaired To help ELL students To help struggling readers To emphasize a grammar or vocabulary lesson To use in combination with a writing exercise To reinforce a concept
  • 19.
    Finding CC filesLog into unitedstreaming.com and click on the Advanced Search link Scroll down and click in the box next to “Include only Closed Captioned Titles”
  • 20.
    Downloading a ClosedCaptioned Movie First right-click on the blue download icon, choose “Save Target As” and then place it in a folder on your computer Then repeat the process, this time right-clicking on the “CC” icon Adjust the CC settings within your Windows Media Player – CC settings
  • 21.
    CC Closed CaptioningTrick Font Size Open the CC file in a text editing program like Wordpad or Notepad Locate the line of code that indicates “font size” Increase the font size from 10 to 30 (or whatever you prefer) Save the CC file
  • 22.
    CC 10 pt30 pt
  • 23.
  • 24.
    Today is YourBirthday (Calendar) 6
  • 25.
  • 26.
    Graphic Organizers (Toolslike Inspiration) 10
  • 27.
    Embed unitedstreaming videos,sounds, songs and more in Inspiration 8
  • 28.
  • 29.
    Extra Credit (QuizBuilder) 25
  • 30.
  • 31.
  • 32.
  • 33.
  • 34.
    Virtual Field Trips(Google Earth and unitedstreaming) 39
  • 35.
    Film Festival (AmericanFilm Institute) 44
  • 36.
    Culture Club (DiscoveryInteractive Atlas) 50
  • 37.
    Explore your worldwith out leaving your classroom! Use the Atlas as an Activator
  • 38.
  • 39.
  • 40.
    Engage Your StudentsWhat will you use it for? .99
  • 41.
    Matt Monjan [email_address]unitedstreaming www.unitedstreaming.com Discovery Educator Network (DEN) www.discoveryeducatornetwork.com DEN Blog www.discoveryeducation.typepad.com Implementation Blog http://discoveryeducation.typepad.com/implementation