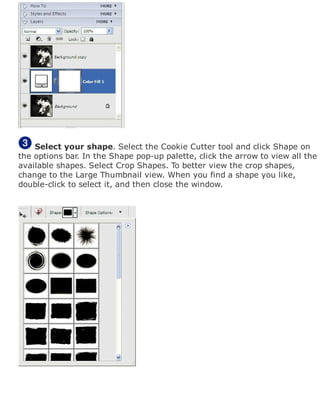
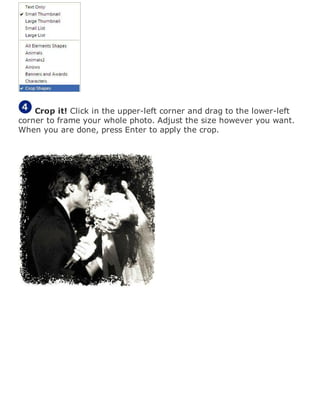
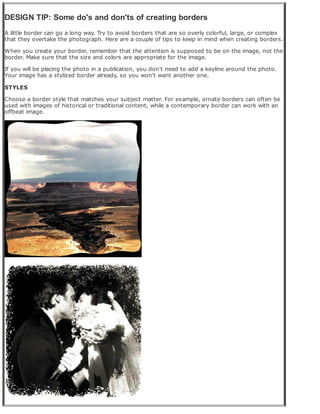
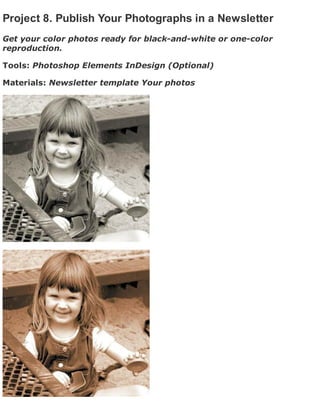
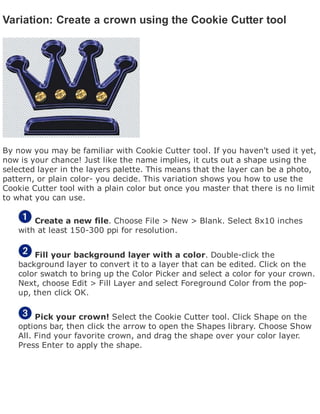
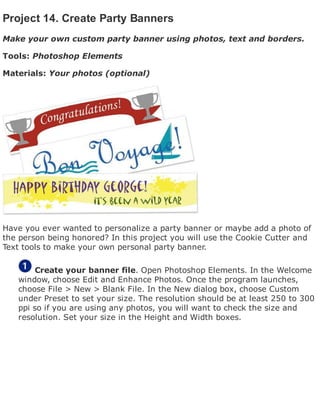
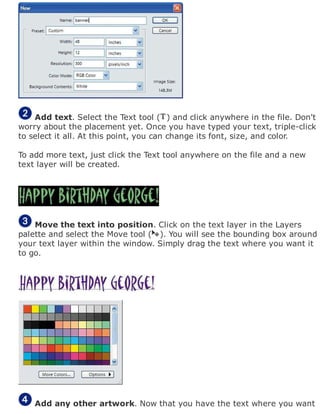
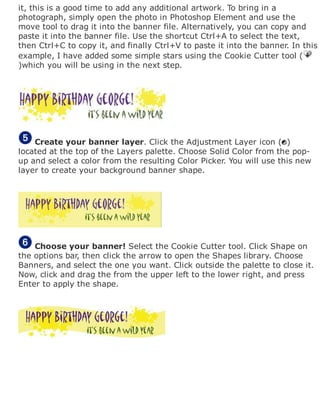
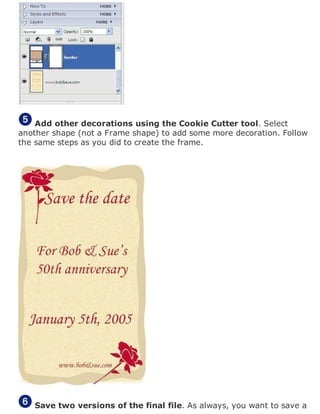
Download to read offline


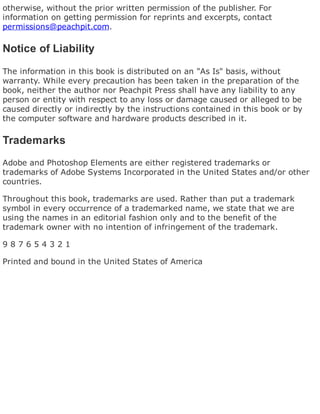
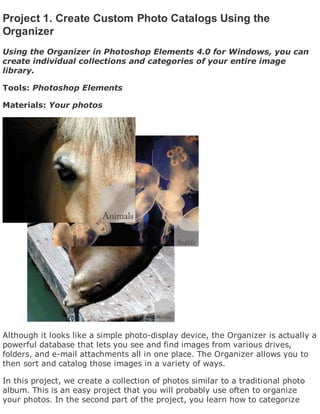


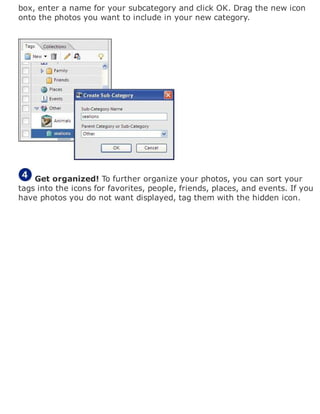


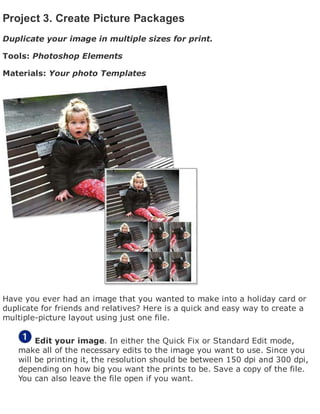
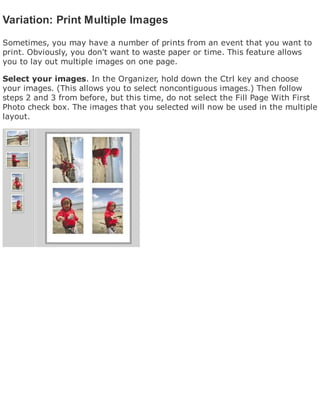
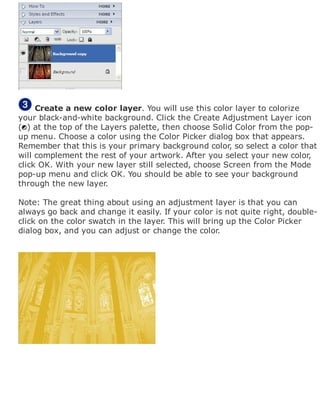
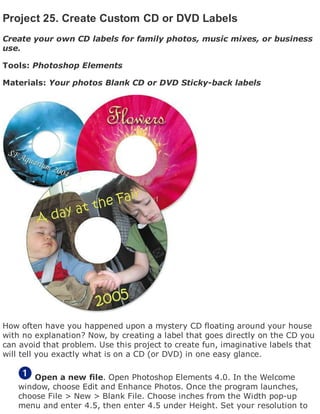
![Choose your file. Choose File > Print Multiple Photos. This will bring
up the Print Photos window, with your photo in the left-hand pane.
Set layout options. Under Select Type of Print, choose Picture
Package. Under Select a Layout, choose a template that will suit your
options. Finally, click the Fill Page With First Photo check box.
[View full size image]
Go. Click OK to create your picture package. When it is done, save the
file. Your image is now ready to print!](https://image.slidesharecdn.com/25thingstomakeanddoinadobephotoshopelements41-171208073739/85/25-things-to-make-and-do-in-adobe-photoshop-elements-4-1-39-320.jpg)

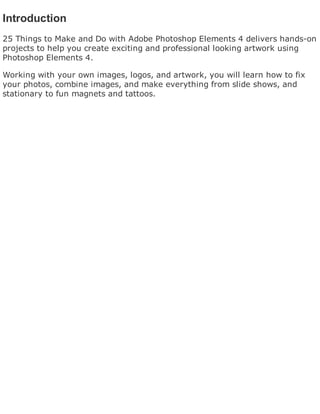
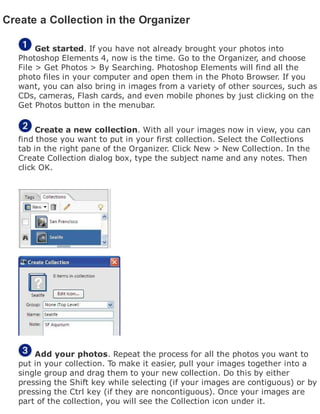
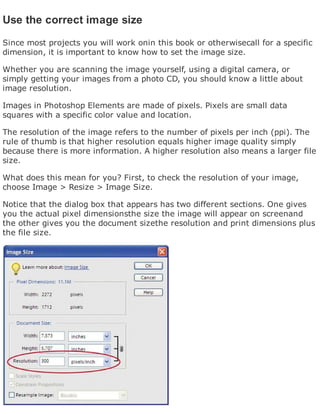
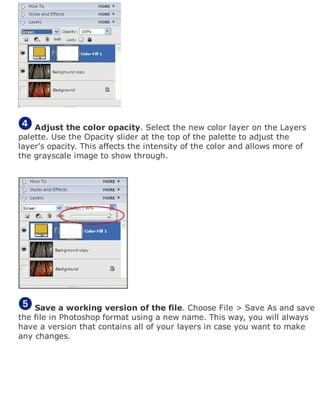
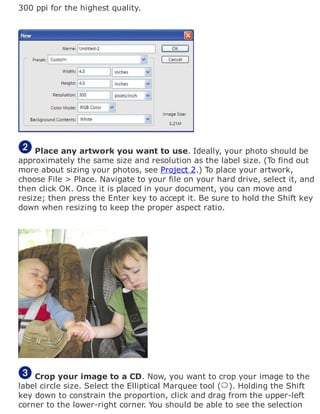
![Merge your images automatically. After you have selected all your
files, click OK. Photoshop Elements will then begin to auto-match your
images together. When it has finished, you should see the merged images
in the Photomerge dialog box, as in the example above.
Merge your images manually. Photoshop Elements may not always
be able to place all your images automatically. When this happens, it will
place your images in the thumbnail box above the arranging area. To
manually arrange your images, choose the Select Image tool ( ) from the
toolbox and then drag the thumbnail into the arranging area.
[View full size image]](https://image.slidesharecdn.com/25thingstomakeanddoinadobephotoshopelements41-171208073739/85/25-things-to-make-and-do-in-adobe-photoshop-elements-4-1-43-320.jpg)
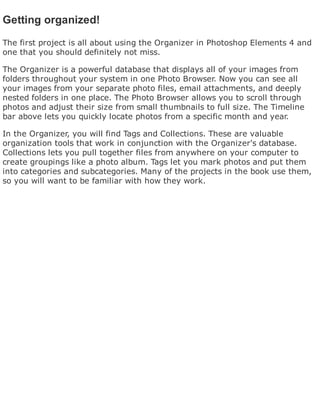
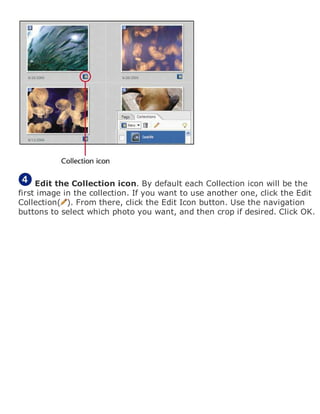
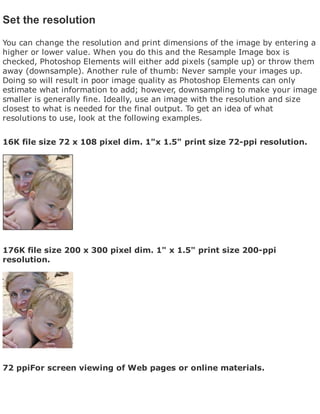
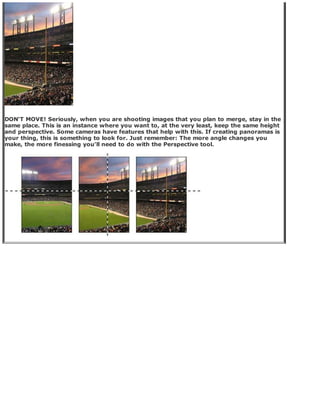
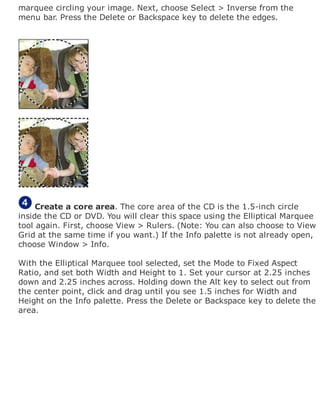
![Set up your options. When your image is selected in the arranging
area, you will see a red highlight around it. The dialog box at the right
contains all the options for merging your images.
To get things started, you may want to turn on Snap to Image. Next, click
Perspective to set the vanishing point. Select the Vanishing Point tool from
the toolbox, and click the image where the vanishing point should be. You
will see the images adjust to that perspective. Note: Depending on how
your images were shot, you may want to use the Rotate Image tool as
well.
Finally, to eliminate any differences in exposure, choose Advanced
Blending and click Preview. You may still need to do some touch-up in the
final file. If you are happy with the result, click OK. Elements will then
create a new untitled file with your combined image.
[View full size image]](https://image.slidesharecdn.com/25thingstomakeanddoinadobephotoshopelements41-171208073739/85/25-things-to-make-and-do-in-adobe-photoshop-elements-4-1-44-320.jpg)


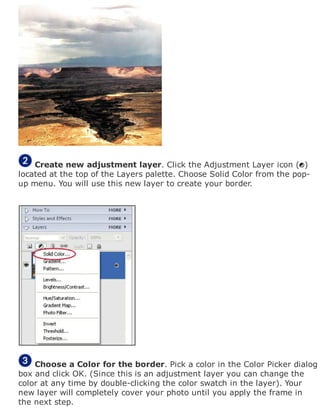


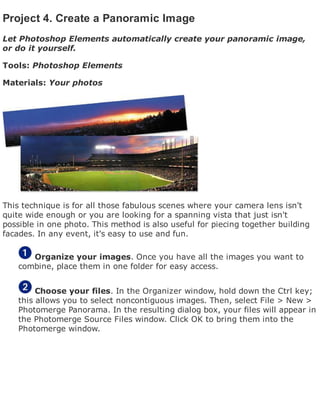
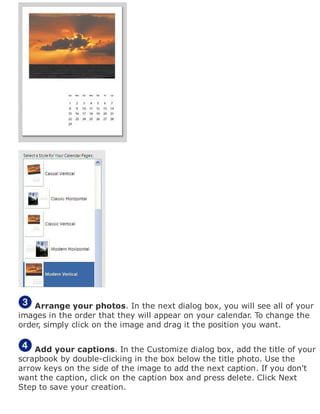
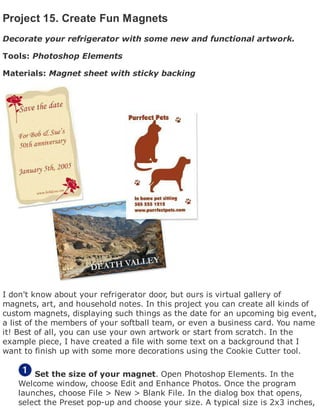
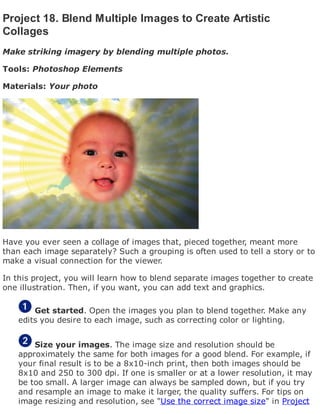
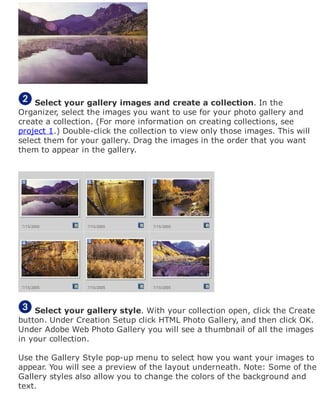
![Project 9. Create Calendars Using the Creation Feature
Let Photoshop Elements' Creation feature automatically create a
calendar using your own images.
Tools: Photoshop Elements
Materials: Your photos
[View full size image]
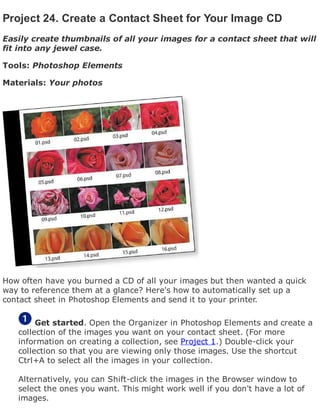
In this project you will learn how to create a calendar using the Creation
feature in Photoshop Elements.
Get started. To begin, you'll create a collection with 12 images (to
represent the months). In the Organizer's Collections tab, click New and
select the images from the Photo Browser for your new collection. Save
your new collection with the title for your scrapbook.
Note: If you need help with making a new collection, see Project 1.](https://image.slidesharecdn.com/25thingstomakeanddoinadobephotoshopelements41-171208073739/85/25-things-to-make-and-do-in-adobe-photoshop-elements-4-1-89-320.jpg)

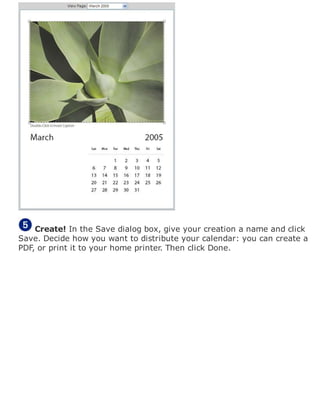


![[View full size image]
Create! In the Save dialog box, type a name for your creation and
click Save. At this point, specify how you want to distribute your new
album: create a PDF, print it, e-mail it, or post it to an online gallery. Then
click Done.](https://image.slidesharecdn.com/25thingstomakeanddoinadobephotoshopelements41-171208073739/85/25-things-to-make-and-do-in-adobe-photoshop-elements-4-1-97-320.jpg)
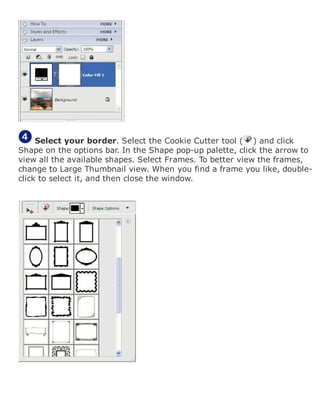
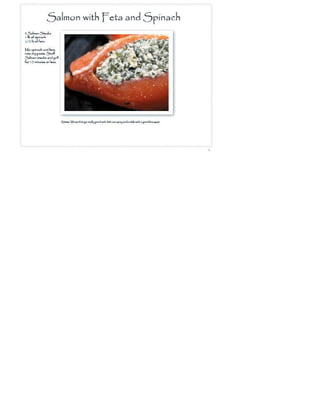
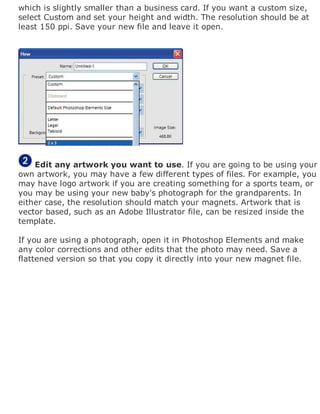
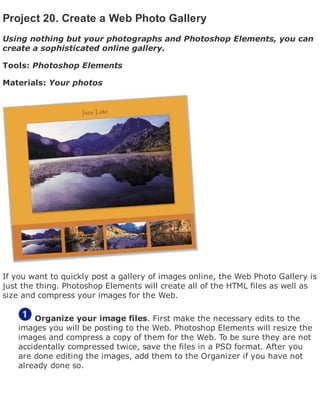
![Project 11. Create a Recipe Book
Now you can publish your own custom recipe book for friends and
family.
Tools: Photoshop Elements
Materials: Text of your recipe Photo of final dish
[View full size image]
Are you a home chef? The person everyone calls when they need to know
what they can substitute for eggs? It's time to put all those masterpieces into a
book! This project will walk you through doing just that. All you need are your
recipes and the photos that you want to accompany them. First you will size
and edit your photos in the Editor, and then move over to the Organizer to
create the final book.
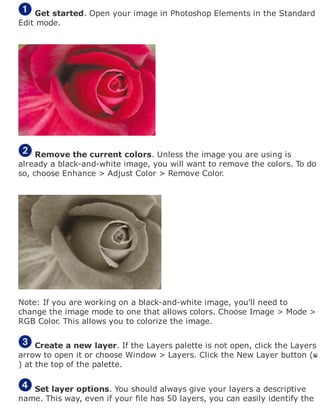
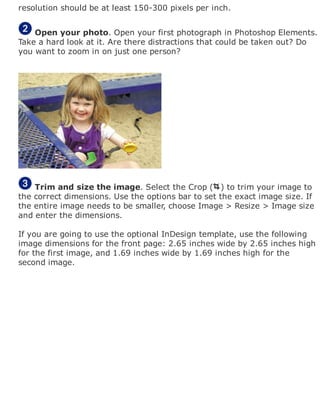
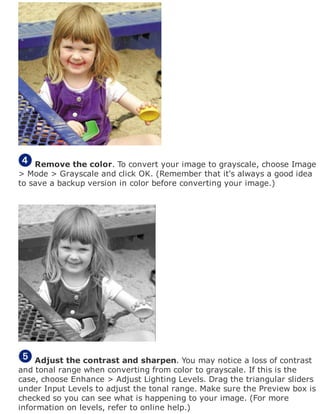
Size and edit your photos. Open Photoshop Elements, and in the
Welcome window choose Edit and Enhance Photos. Open the photos that
you plan to use for your recipes and resize them so that they are
approximately 4x6 inches. The resolution should be at least 150 to 300 dpi
for the best quality. Make any additional edits, such as lighting or color
correction.](https://image.slidesharecdn.com/25thingstomakeanddoinadobephotoshopelements41-171208073739/85/25-things-to-make-and-do-in-adobe-photoshop-elements-4-1-99-320.jpg)
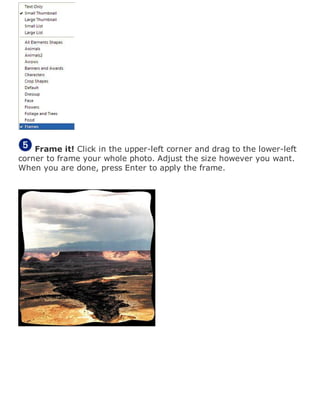
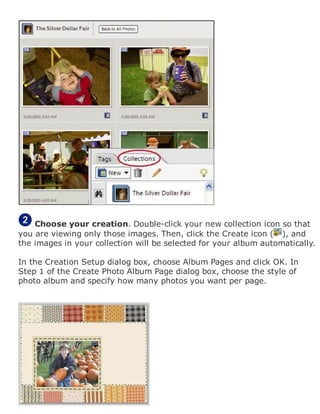
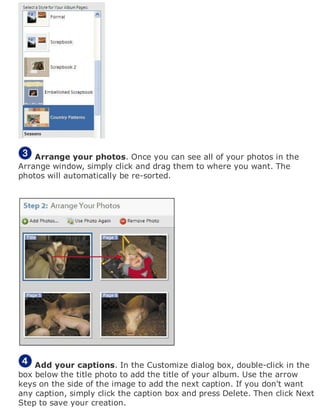
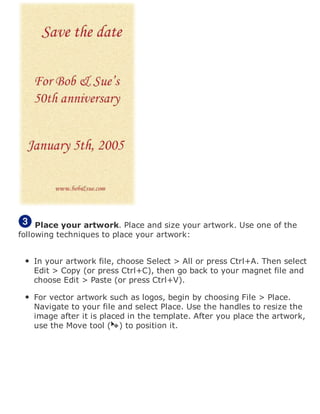
![Select your book style. Now that you have your collection open,
click the Create icon ( ). Choose Album Page and select a style. Some of
the styles that work well for this project are Simple; Casual and Classic
and Decorative; and Formal and Scrapbook.
Alternately, you can select Bound Book if you want to have your recipe
book printed by an outside source.
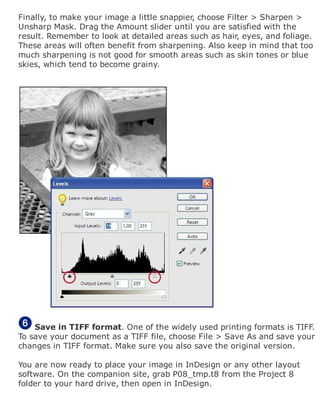
Add your recipe text. Once you have selected the style for your
book, click Next Step. At this point, you can decide if you want to include a
title page and how many photos you want per page. In this case, specify
one photo per page. Click Next Step.
Double-click the caption, and enter the recipe text that goes with each
photo. If you have text file for your recipes, you can copy and paste it into
the text window. Once you've entered the text in the window, you can
change its font, size, and color. Click Done when you have finished. Notice
that you can move the text around the page for the best placement. If you
want to add more text, such as a title or cooking notes, click the Add Text
button. Use the navigation arrows to move to the next photo.
[View full size image]](https://image.slidesharecdn.com/25thingstomakeanddoinadobephotoshopelements41-171208073739/85/25-things-to-make-and-do-in-adobe-photoshop-elements-4-1-101-320.jpg)
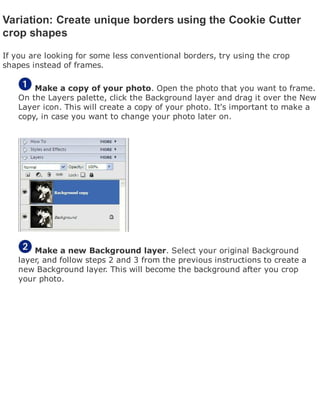
![Save your book! When you have finished adding all of your recipes,
click Next Step to save your project. Now you can create a PDF, print it
straight to your printer, or even e-mail it to a friend. Note: If you are
planning on having your recipe book printed elsewhere, choose PDF to
create one final book file. That's it!
[View full size image]](https://image.slidesharecdn.com/25thingstomakeanddoinadobephotoshopelements41-171208073739/85/25-things-to-make-and-do-in-adobe-photoshop-elements-4-1-102-320.jpg)
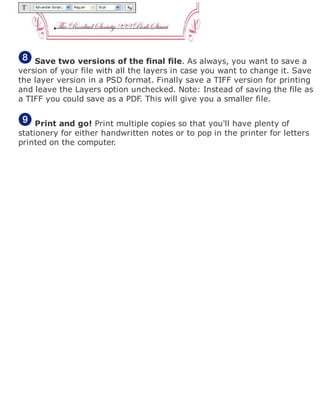
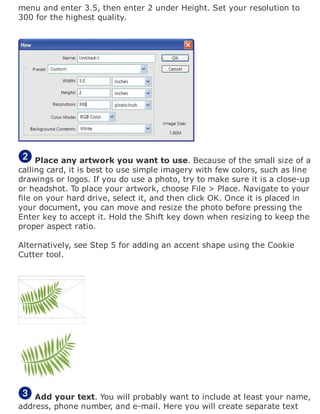
![Add your text. We all will have different ideas of how much
information we want on our stationery, but typically you will include at
least your name, and often your address. Select the Text tool in the
toolbar ( ). Click in the area where you want your text to go and enter
your text. (Use the Move tool for exact placement.)
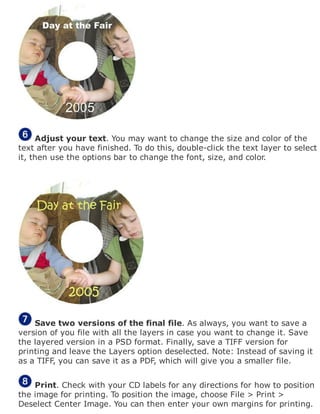
Adjust your text. You may want to change the size and color of the
text after you are finished. To do this, double-click the text layer to select
it, and then use the options bar to change the font, size, and color.
[View full size image]](https://image.slidesharecdn.com/25thingstomakeanddoinadobephotoshopelements41-171208073739/85/25-things-to-make-and-do-in-adobe-photoshop-elements-4-1-108-320.jpg)


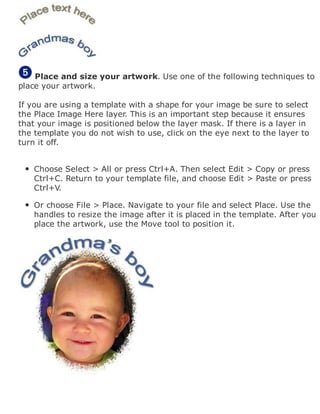
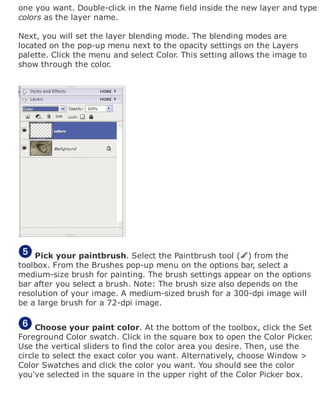
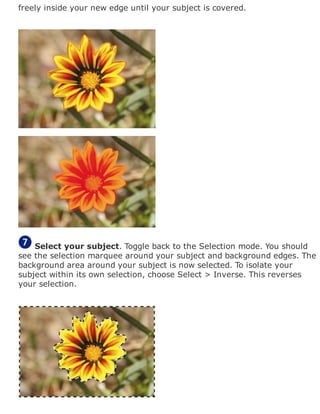
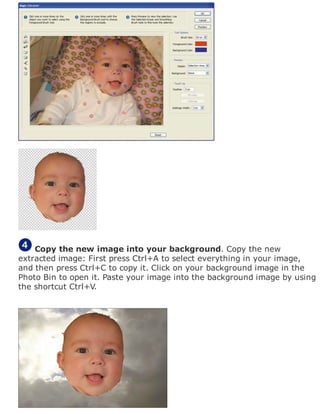
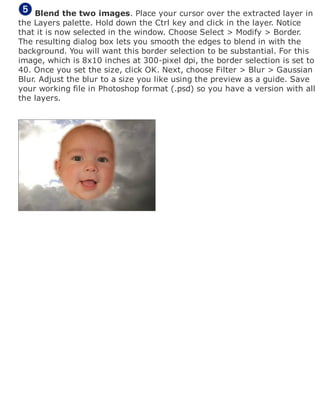
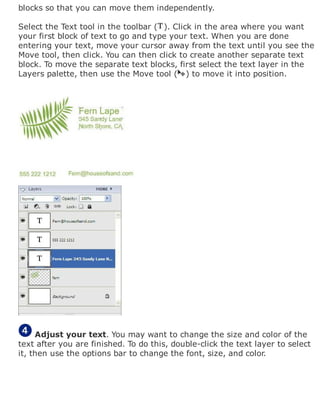
![2.
Extract your image using the new Magic Extract tool. Click the
image you want in the foreground of your illustration and choose Image >
Magic Extractor. This is a really great new feature that will allow you to
extract the part of the image you want with virtually no effort.
In the Magic Extractor dialog box, follow the steps to get the best
extraction. Don't worry if there is a little rough edge left on your image;
you will take care of that later.
As always, you should have a backup of the original file. Save the new
extracted version with a new name. This will ensure that you have an
original copy to go back to if needed.
[View full size image]](https://image.slidesharecdn.com/25thingstomakeanddoinadobephotoshopelements41-171208073739/85/25-things-to-make-and-do-in-adobe-photoshop-elements-4-1-138-320.jpg)

![[View full size image]
Create your title banner. Click in the Title box of the Banner tab and
enter your title. Enter any other information such as a subtitle or e-mail
address. If you have any caption associated with your images, you can also
select your font and font size here.
Set your image sizes. Click on the Large Photos and Thumbnails tabs
to set the sizes for your final gallery images.
Make sure that the Resize Photos check box is selected. On the pop-up
menu next to it, you can choose Large, Medium, Small, or Custom. Select
the size that you want, then set your image quality. Remember, the higher
the quality, the larger the file and the slower the download.](https://image.slidesharecdn.com/25thingstomakeanddoinadobephotoshopelements41-171208073739/85/25-things-to-make-and-do-in-adobe-photoshop-elements-4-1-150-320.jpg)

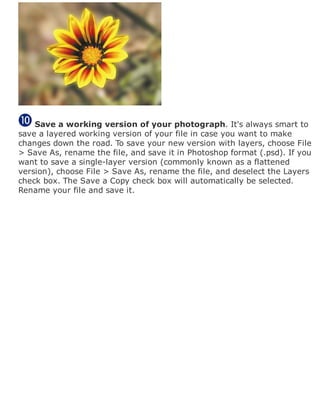
![version of your file with all the layers in case you want to change it. Save
the layered version in a PSD format. Finally save a TIFF version for
printing and leave the Layers option unchecked. Note: Instead of saving it
as a TIFF, you can save it as a PDF. This will give you a smaller file.
Set up your multiple-print layout. If you are taking this to a service
center, they will do this for you. If you are printing at home, you will want
to set it up so that you are not wasting paper. With your file open, choose
File > Print Multiple Photos. In the Print Photos dialog, choose Picture
Package under Type of Print. Next, under Select a Layout, choose Letter
(8) 2.5 x 3.5. Finally, select the check box Fill Page with First Photo. You
will see your layout in the preview window.
[View full size image]
Print and cut. Insert your card stock paper and click Print in the Print
dialog. For the cleanest cut, use an Exacto knife and a straight edge to cut
out your cards.](https://image.slidesharecdn.com/25thingstomakeanddoinadobephotoshopelements41-171208073739/85/25-things-to-make-and-do-in-adobe-photoshop-elements-4-1-163-320.jpg)
![random order, use the Ctrl key instead. If you are backing up a collection,
double-click the collection to open it and press Ctrl+A to select all of your
images.
[View full size image]
Ready, set, go! Select File > Burn. Select Copy/Move Files. This will
allow you to copy just the selected images to a CD (or even a DVD) for
either a personal backup or to share with friend. Click Next to go to the
next step.
[View full size image]](https://image.slidesharecdn.com/25thingstomakeanddoinadobephotoshopelements41-171208073739/85/25-things-to-make-and-do-in-adobe-photoshop-elements-4-1-165-320.jpg)
![Set your final option. The step allows you to decide if you want to
delete the files from your hard drive once you have burned them onto a
CD. Photoshop Elements will create a small thumbnail for preview
purposes. If you select the file for editing, you will be asked for the CD.
Decide which direction you want go, and click Next.
[View full size image]
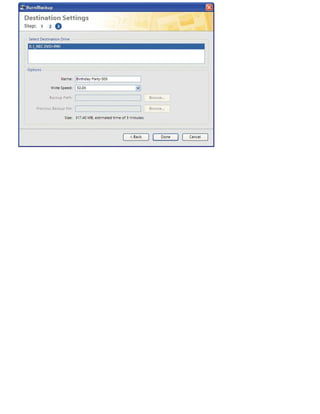
Burn that disk! In the next dialog you will be asked to insert your
disc. You will need to do this before going any further. Insert your disc and
wait for Photoshop Elements to determine the write speed time estimates.
Once it has determined the speed and time, enter the name for your CD
and click Done. That's it!
[View full size image]](https://image.slidesharecdn.com/25thingstomakeanddoinadobephotoshopelements41-171208073739/85/25-things-to-make-and-do-in-adobe-photoshop-elements-4-1-166-320.jpg)
![[View full size image]
Preview your images. Choose File > Print. All of your images will
appear in the preview pane on the left side of the Print Selected Photos
dialog box.](https://image.slidesharecdn.com/25thingstomakeanddoinadobephotoshopelements41-171208073739/85/25-things-to-make-and-do-in-adobe-photoshop-elements-4-1-169-320.jpg)
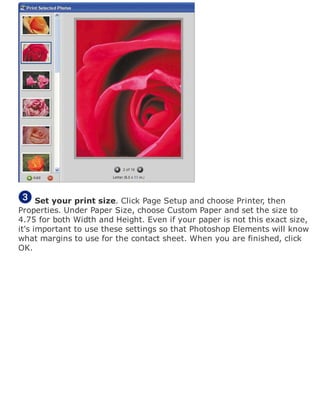
![Select the layout. Under step 2 in the Print Selected Photos dialog
box, click the Select Type of Print pop-up menu and choose Contact Sheet.
At this point you will want to set up any other options for your contact
sheet, such as date, captions, and page numbers.
[View full size image]](https://image.slidesharecdn.com/25thingstomakeanddoinadobephotoshopelements41-171208073739/85/25-things-to-make-and-do-in-adobe-photoshop-elements-4-1-171-320.jpg)

![[View full size image]](https://image.slidesharecdn.com/25thingstomakeanddoinadobephotoshopelements41-171208073739/85/25-things-to-make-and-do-in-adobe-photoshop-elements-4-1-178-320.jpg)
![Index
[A] [B] [C] [D] [E] [F] [G] [H] [I] [J] [L] [M] [N] [O] [P] [Q] [R] [S] [T] [U]
[V] [W] [Z]](https://image.slidesharecdn.com/25thingstomakeanddoinadobephotoshopelements41-171208073739/85/25-things-to-make-and-do-in-adobe-photoshop-elements-4-1-179-320.jpg)
![Index
[A] [B] [C] [D] [E] [F] [G] [H] [I] [J] [L] [M] [N] [O] [P] [Q] [R] [S] [T] [U]
[V] [W] [Z]
Adjust Color command
Adjust Color for Skin Tone command
adjustment layers 2nd 3rd 4th 5th
Advanced Blending
albums
arranging photos in
captions in
creating 2nd 3rd
customizing
distributing
selecting photos for
archiving 2nd 3rd
aspect ratio 2nd
audio, adding](https://image.slidesharecdn.com/25thingstomakeanddoinadobephotoshopelements41-171208073739/85/25-things-to-make-and-do-in-adobe-photoshop-elements-4-1-180-320.jpg)
![Index
[A] [B] [C] [D] [E] [F] [G] [H] [I] [J] [L] [M] [N] [O] [P] [Q] [R] [S] [T] [U]
[V] [W] [Z]
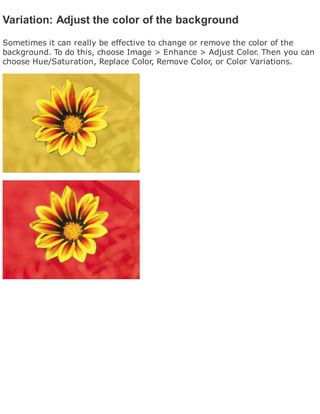
background
adding new
adjusting color of 2nd
mono-color 2nd 3rd 4th 5th
Background Eraser tool
backups
of all photos 2nd 3rd
of individual photos
banners
artwork for
creating 2nd 3rd
file size of
printing
style of
text for
Bitmap mode
black-and-white images
adding color to 2nd 3rd 4th 5th
creating 2nd
mode and
blemishes, removing 2nd
blending modes 2nd
borders
color for 2nd
creating 2nd 3rd 4th 5th 6th 7th 8th](https://image.slidesharecdn.com/25thingstomakeanddoinadobephotoshopelements41-171208073739/85/25-things-to-make-and-do-in-adobe-photoshop-elements-4-1-181-320.jpg)
![for calling cards 2nd
for magnets
for stationery 2nd
styles for
tips for
unconventional
brochure covers
Brushes pop-up menu 2nd 3rd
Burn command
business cards [See calling cards]](https://image.slidesharecdn.com/25thingstomakeanddoinadobephotoshopelements41-171208073739/85/25-things-to-make-and-do-in-adobe-photoshop-elements-4-1-182-320.jpg)
![Index
[A] [B] [C] [D] [E] [F] [G] [H] [I] [J] [L] [M] [N] [O] [P] [Q] [R] [S] [T] [U]
[V] [W] [Z]
calendars
arranging photos for
captions for
creating 2nd 3rd
customizing
distributing
selecting photos for
calling cards
accent shapes for 2nd
artwork for
borders for
creating 2nd 3rd 4th
printing
text for
captions
in albums
in calendars
in online photo galleries
CDs
archiving images to 2nd 3rd
burning 2nd
core area of
creating contact sheets for 2nd 3rd
labels for 2nd 3rd 4th 5th](https://image.slidesharecdn.com/25thingstomakeanddoinadobephotoshopelements41-171208073739/85/25-things-to-make-and-do-in-adobe-photoshop-elements-4-1-183-320.jpg)
![Index
[A] [B] [C] [D] [E] [F] [G] [H] [I] [J] [L] [M] [N] [O] [P] [Q] [R] [S] [T] [U]
[V] [W] [Z]
Deselect Center Image
downsampling
duotone 2nd
DVD
core area of
labels for 2nd 3rd 4th 5th](https://image.slidesharecdn.com/25thingstomakeanddoinadobephotoshopelements41-171208073739/85/25-things-to-make-and-do-in-adobe-photoshop-elements-4-1-186-320.jpg)
![Index
[A] [B] [C] [D] [E] [F] [G] [H] [I] [J] [L] [M] [N] [O] [P] [Q] [R] [S] [T] [U]
[V] [W] [Z]
Edit Collection button
Edit Icon button
Edit menu
Copy
Fill Layer 2nd
Paste
Step Backward
Edit Slide Show window
Elliptical Marquee tool
Enhance menu
Adjust Color 2nd 3rd
Adjust Lighting 2nd
Eraser tool
Extras palette 2nd
eyes, removing red from](https://image.slidesharecdn.com/25thingstomakeanddoinadobephotoshopelements41-171208073739/85/25-things-to-make-and-do-in-adobe-photoshop-elements-4-1-187-320.jpg)
![Index
[A] [B] [C] [D] [E] [F] [G] [H] [I] [J] [L] [M] [N] [O] [P] [Q] [R] [S] [T] [U]
[V] [W] [Z]
File menu
Burn
Get Photos
New 2nd
Open
Place 2nd
Print 2nd
Print Multiple Photos 2nd
Save As 2nd 3rd 4th 5th
Save for Web
Fill Layer command
Fill Page With First Photo check box 2nd
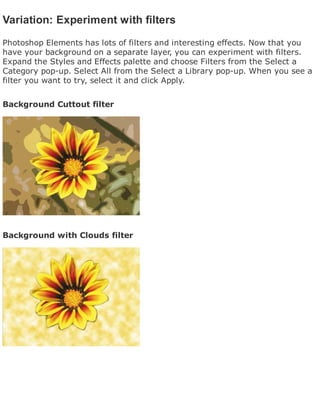
Filter menu
Blur 2nd
Sharpen 2nd
filters
Clouds
Cutout
experimenting with
Unsharp Mask 2nd
Fixed Aspect Ratio
flattened versions
Flip Layer Horizontal command
frames [See borders]](https://image.slidesharecdn.com/25thingstomakeanddoinadobephotoshopelements41-171208073739/85/25-things-to-make-and-do-in-adobe-photoshop-elements-4-1-188-320.jpg)

![Index
[A] [B] [C] [D] [E] [F] [G] [H] [I] [J] [L] [M] [N] [O] [P] [Q] [R] [S] [T] [U]
[V] [W] [Z]
galleries
creating 2nd 3rd 4th
image size for
saving
selecting images for
style of
title banner for
Gaussian Blur command 2nd
Get Photos command
gradients
Grayscale mode 2nd](https://image.slidesharecdn.com/25thingstomakeanddoinadobephotoshopelements41-171208073739/85/25-things-to-make-and-do-in-adobe-photoshop-elements-4-1-190-320.jpg)
![Index
[A] [B] [C] [D] [E] [F] [G] [H] [I] [J] [L] [M] [N] [O] [P] [Q] [R] [S] [T] [U]
[V] [W] [Z]
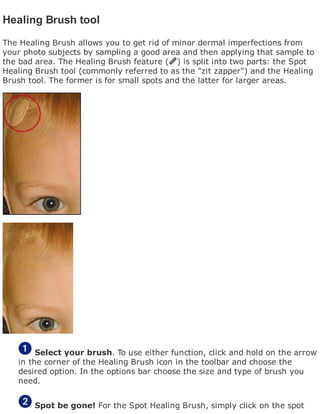
Healing Brush tool 2nd
highlights
Hue slider](https://image.slidesharecdn.com/25thingstomakeanddoinadobephotoshopelements41-171208073739/85/25-things-to-make-and-do-in-adobe-photoshop-elements-4-1-191-320.jpg)
![Index
[A] [B] [C] [D] [E] [F] [G] [H] [I] [J] [L] [M] [N] [O] [P] [Q] [R] [S] [T] [U]
[V] [W] [Z]
Image menu
Enhance
Magic Extractor
Mode 2nd 3rd
Resize 2nd
Rotate 2nd 3rd
Image Size command
images [See photos]
Include in Organizer check box
InDesign 2nd
Index color mode
Info palette
Inverse command 2nd](https://image.slidesharecdn.com/25thingstomakeanddoinadobephotoshopelements41-171208073739/85/25-things-to-make-and-do-in-adobe-photoshop-elements-4-1-192-320.jpg)
![Index
[A] [B] [C] [D] [E] [F] [G] [H] [I] [J] [L] [M] [N] [O] [P] [Q] [R] [S] [T] [U]
[V] [W] [Z]
JPEG format](https://image.slidesharecdn.com/25thingstomakeanddoinadobephotoshopelements41-171208073739/85/25-things-to-make-and-do-in-adobe-photoshop-elements-4-1-193-320.jpg)
![Index
[A] [B] [C] [D] [E] [F] [G] [H] [I] [J] [L] [M] [N] [O] [P] [Q] [R] [S] [T] [U]
[V] [W] [Z]
labels
creating 2nd 3rd 4th 5th
images for 2nd
printing
saving
text for
Layer Via Copy command
layers
adjustment 2nd 3rd 4th 5th
Background 2nd 3rd
blending modes for
creating new 2nd
naming
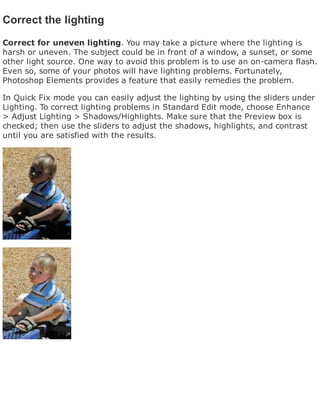
lighting, correcting](https://image.slidesharecdn.com/25thingstomakeanddoinadobephotoshopelements41-171208073739/85/25-things-to-make-and-do-in-adobe-photoshop-elements-4-1-194-320.jpg)
![Index
[A] [B] [C] [D] [E] [F] [G] [H] [I] [J] [L] [M] [N] [O] [P] [Q] [R] [S] [T] [U]
[V] [W] [Z]
Magic Eraser tool
Magic Extract tool
Magic Selection Brush tool
magnets
artwork for 2nd
borders for
creating 2nd 3rd 4th
printing
saving
size of
Mask mode 2nd
masking
mirror images
mistakes, correcting
modes 2nd
mono-color backgrounds 2nd 3rd 4th 5th
Move tool 2nd 3rd 4th 5th 6th 7th](https://image.slidesharecdn.com/25thingstomakeanddoinadobephotoshopelements41-171208073739/85/25-things-to-make-and-do-in-adobe-photoshop-elements-4-1-195-320.jpg)
![Index
[A] [B] [C] [D] [E] [F] [G] [H] [I] [J] [L] [M] [N] [O] [P] [Q] [R] [S] [T] [U]
[V] [W] [Z]
New Collection command
New Layer icon 2nd 3rd
New Sub-Category command
New Tag command
newsletters, publishing photos in 2nd 3rd 4th 5th](https://image.slidesharecdn.com/25thingstomakeanddoinadobephotoshopelements41-171208073739/85/25-things-to-make-and-do-in-adobe-photoshop-elements-4-1-196-320.jpg)
![Index
[A] [B] [C] [D] [E] [F] [G] [H] [I] [J] [L] [M] [N] [O] [P] [Q] [R] [S] [T] [U]
[V] [W] [Z]
online photo galleries
creating 2nd 3rd 4th
image size for
saving
selecting images for
style of
title banner for
Opacity slider
Open command
Organizer
backing up
benefits of
creating collections in 2nd 3rd
creating tags in
selecting multiple images in 2nd 3rd 4th](https://image.slidesharecdn.com/25thingstomakeanddoinadobephotoshopelements41-171208073739/85/25-things-to-make-and-do-in-adobe-photoshop-elements-4-1-197-320.jpg)
![Index
[A] [B] [C] [D] [E] [F] [G] [H] [I] [J] [L] [M] [N] [O] [P] [Q] [R] [S] [T] [U]
[V] [W] [Z]
paint bucket tool
Paintbrush tool
panoramic images 2nd 3rd 4th
party banners
artwork for
creating 2nd 3rd
file size of
printing
style of
text for
party hats
creating 2nd 3rd 4th
patterns for
printing
Paste command
patterns
PDF format 2nd 3rd 4th 5th
perspective
Photo Browser
photo-transfer paper 2nd
Photomerge feature 2nd
photos
adding captions to 2nd 3rd
adding color to 2nd 3rd 4th
albums of 2nd 3rd 4th
backing up 2nd 3rd 4th](https://image.slidesharecdn.com/25thingstomakeanddoinadobephotoshopelements41-171208073739/85/25-things-to-make-and-do-in-adobe-photoshop-elements-4-1-198-320.jpg)
![Index
[A] [B] [C] [D] [E] [F] [G] [H] [I] [J] [L] [M] [N] [O] [P] [Q] [R] [S] [T] [U]
[V] [W] [Z]
Quick Fix mode
Color sliders
Lighting sliders
Standard Edit vs](https://image.slidesharecdn.com/25thingstomakeanddoinadobephotoshopelements41-171208073739/85/25-things-to-make-and-do-in-adobe-photoshop-elements-4-1-201-320.jpg)
![Index
[A] [B] [C] [D] [E] [F] [G] [H] [I] [J] [L] [M] [N] [O] [P] [Q] [R] [S] [T] [U]
[V] [W] [Z]
recipe books
creating 2nd 3rd
photos for
saving
style of
text for
Red Eye Removal tool
refrigerator magnets
artwork for 2nd
borders for
creating 2nd 3rd 4th
printing
saving
size of
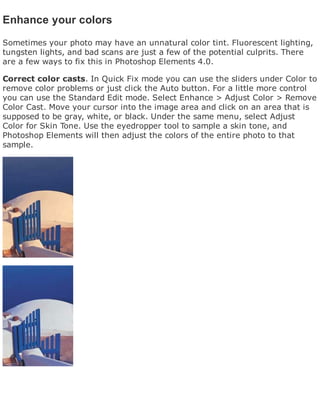
Remove Color Cast command
Remove Color command 2nd
Resample Image check box
resizing 2nd 3rd
resolution
definition of
for printing
for slideshows
for Web pages
setting
RGB mode 2nd](https://image.slidesharecdn.com/25thingstomakeanddoinadobephotoshopelements41-171208073739/85/25-things-to-make-and-do-in-adobe-photoshop-elements-4-1-202-320.jpg)

![Index
[A] [B] [C] [D] [E] [F] [G] [H] [I] [J] [L] [M] [N] [O] [P] [Q] [R] [S] [T] [U]
[V] [W] [Z]
sampling up
Saturation slider
Save a Copy check box 2nd
Save As command 2nd 3rd 4th 5th
Select Image tool
Select menu
All
Inverse 2nd
Modify
Selection Brush tool 2nd
Selection mode 2nd
Set Foreground Color 2nd 3rd
Shadows/Highlights command
Shapes palette 2nd 3rd 4th
skin tone
slideshows
audio for
choosing images for
creating 2nd 3rd 4th
options for
saving
titles for
Snap to Image check box
sound, adding
spot color
Spot Healing Brush tool 2nd
spots, removing 2nd](https://image.slidesharecdn.com/25thingstomakeanddoinadobephotoshopelements41-171208073739/85/25-things-to-make-and-do-in-adobe-photoshop-elements-4-1-204-320.jpg)
![Index
[A] [B] [C] [D] [E] [F] [G] [H] [I] [J] [L] [M] [N] [O] [P] [Q] [R] [S] [T] [U]
[V] [W] [Z]
T-shirts
artwork for 2nd
creating 2nd 3rd 4th 5th
mirror images for
printing 2nd
text for
tags
tattoos, temporary
artwork for
creating 2nd 3rd 4th
printing 2nd
reversing image for
Text tool 2nd 3rd 4th
thank-you notes
TIFF format 2nd 3rd 4th
Type options bar](https://image.slidesharecdn.com/25thingstomakeanddoinadobephotoshopelements41-171208073739/85/25-things-to-make-and-do-in-adobe-photoshop-elements-4-1-206-320.jpg)
![Index
[A] [B] [C] [D] [E] [F] [G] [H] [I] [J] [L] [M] [N] [O] [P] [Q] [R] [S] [T] [U]
[V] [W] [Z]
undo
Unsharp Mask filter 2nd](https://image.slidesharecdn.com/25thingstomakeanddoinadobephotoshopelements41-171208073739/85/25-things-to-make-and-do-in-adobe-photoshop-elements-4-1-207-320.jpg)
![Index
[A] [B] [C] [D] [E] [F] [G] [H] [I] [J] [L] [M] [N] [O] [P] [Q] [R] [S] [T] [U]
[V] [W] [Z]
Vanishing Point tool
View menu](https://image.slidesharecdn.com/25thingstomakeanddoinadobephotoshopelements41-171208073739/85/25-things-to-make-and-do-in-adobe-photoshop-elements-4-1-208-320.jpg)
![Index
[A] [B] [C] [D] [E] [F] [G] [H] [I] [J] [L] [M] [N] [O] [P] [Q] [R] [S] [T] [U]
[V] [W] [Z]
Warp Text tool
Web page backgrounds 2nd 3rd 4th 5th
Web photo galleries
creating 2nd 3rd 4th
image size for
saving
selecting images for
style of
title banner for
Window menu
Cascade
Color Swatches
Info
Layers](https://image.slidesharecdn.com/25thingstomakeanddoinadobephotoshopelements41-171208073739/85/25-things-to-make-and-do-in-adobe-photoshop-elements-4-1-209-320.jpg)
![Index
[A] [B] [C] [D] [E] [F] [G] [H] [I] [J] [L] [M] [N] [O] [P] [Q] [R] [S] [T] [U]
[V] [W] [Z]
Zoom tool 2nd](https://image.slidesharecdn.com/25thingstomakeanddoinadobephotoshopelements41-171208073739/85/25-things-to-make-and-do-in-adobe-photoshop-elements-4-1-210-320.jpg)

This document provides an overview and instructions for 25 projects for organizing, editing, and creating works with photos using Adobe Photoshop Elements 4. It begins by explaining how to use the Organizer tool to create customized photo collections and categories. It then describes how to perform common photo fixes like removing red-eye, adjusting lighting and colors, cropping, and saving edited files. The document outlines 25 subsequent hands-on projects including making panoramas, swapping colors, adding borders, and creating calendars, albums, slideshows, and more. Variations for each project are also suggested.