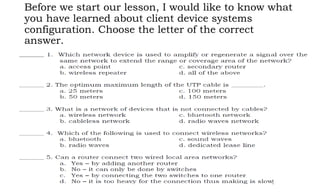
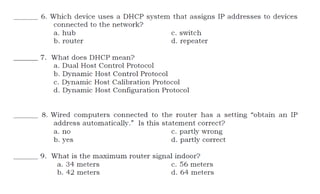
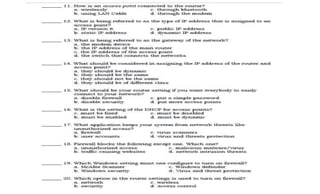
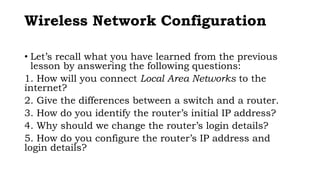
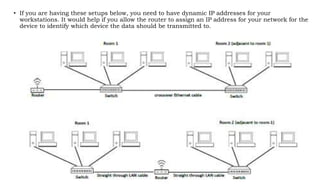
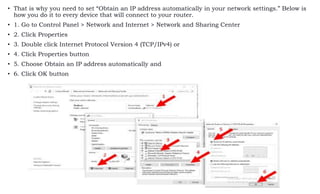
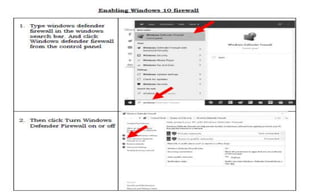
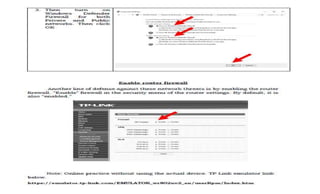
Before we start our lesson, I would like to know what
you have learned about client device systems
configuration. Choose the letter of the correct
answer.
Wireless Network Configuration
• Let’s recall what you have learned from the previous
lesson by answering the following questions:
1. How will you connect Local Area Networks to the
internet?
2. Give the differences between a switch and a router.
3. How do you identify the router’s initial IP address?
4. Why should we change the router’s login details?
5. How do you configure the router’s IP address and
login details?
Wireless Network Configuration
• From our previous lessons, the demands of creating a network are increasing. Let us recall
them again to see the progress of our network from simple to a more complex network.
• Creating a network has many demands, as inferred from our previous lesson. Let us try to
check the progress of the network we have created, from simple to a more complex network.
• Scenario 1 – You connected two computers using a crossover LAN cable
• Scenario 2 – You connected two or more computers in a network using a switch
• Scenario 3 – You connected your network to the Internet
• Now let us consider more scenarios and how will you solve the demands of each scenario.
• Scenario 4 - Your schoolmates in the adjacent room in your building also created their own
network of computers; they wanted to connect to your own network.
• Scenario 5 - Your schoolmates from another building also want to connect to your network.
• Scenario 6 - Some of your classmates and schoolmates only have wireless devices; they also
want to connect to your network too.
• Scenario 7 - Your schoolmates on the 4th floor also want to connect to your network
wirelessly.
Wireless Network Configuration
• First, you have to connect two computers to communicate with each other, and all you
need UTP cable. You also need to connect three or more computers, which means a
switch is added to your network. For this to be functional, you need to connect it to the
internet by adding a route.
• Congratulations! You have successfully connected your network to the internet. You
can add more computers in your network, depending on your switch's capacity, as to
the number of devices it can connect to its ports.
• Now it’s time for you to widen your networks. Consider this, if your schoolmates in the
adjacent room in your building also created their network of computers and want to
connect to your network, how are you going to do that?
Wireless Network Configuration
• We learned that as the demand for our network increases, we need
to add more devices in our network that would satisfy that need.
• Just connect your switches using a crossover LAN cable, assuming
that they too have their switch. You will only need to configure
your computers’ IP address so that they would belong to the same
workgroup or will have the same
• In another scenario, two networks on the same campus need to be
connected but distant. How will you set this up? Is there a need to
add one switch between the buildings? Is there a need for a smaller
device to replicate the signal? Repeaters are needed in this kind of
situation.
WHAT IS A REPEATER?
• A repeater is a network device used to amplify or regenerate a signal over the same
network to extend the network's range or coverage area. Putting a switch between
buildings can still be functional, but repeaters play a vital role in understanding
another device's concept, which we will discuss here. Therefore, hubs and switches
can function as repeaters because they connect other networks in a network (LAN).
• Now let’s connect these networks to the Internet by using a router. Here are the
setup options you can use.
WHAT IS A REPEATER?
• To make your network’s scope wider, connect additional
networks by connecting switches. The length of the cable
must not exceed its limit, which is 100 meters.
WHAT IS A REPEATER?
You may also connect other switches directly in the
router’s Ethernet ports, but you are limited to only 4
LANs and consider the length of your LAN cables. In
designing a more extensive network, one must
consider the geographical locations, cost, ease of
setup, and other factors.
The diagrams shown above are all wired. What if your classmates in the
same room want to connect to your network using their smartphones and
tablets, which do not have Ethernet cabling capability? It is where we need
to set up the wireless LAN.
What is a wireless network?
• A wireless network by its name alone is a network of
devices that are not connected through a cable. Devices
in a network are connected wirelessly using radio waves.
• A wireless network is possible using a wireless router. A
router connects wired LAN, but it also has the capacity
for a wireless LAN. Most home networks are used since
most of us now have smartphones, tablets, and even
laptops that are manufactured to be wireless ready. Can
you imagine if gadgets can only have an internet
connection using a cable? That would be very
inconvenient, especially if you are in public places.
Thanks to wireless networks, that made our access to the
internet so much easier.
Setting up a wireless network
• Using the same wiring setup (LAN Cable to the computer
and the other end to any of router’s Ethernet ports, and
modem to router’s WAN port) you may or may not reset
your router provided that you still remember your login
details and the IP address that you assigned your router
to have. If you didn’t, you better reset your router and
start configuration from scratch.
Besides typing ipconfig from the command prompt, here’s
another method of identifying your router’s initial IP address.
In the wireless tab, input the name of your wireless network in the Wireless
Network Name or the SSID. In this case, the new SSID is assigned to “TheRock.”
Then click the Save button.
After setup, you will now be able to see the new name in the available network for Wi-Fi.
Other mobile/wireless devices can now connect to your wireless network provided that they
input the correct password you set.
What is a DHCP?
• We have learned that a router is capable of assigning IP addresses to the devices connected to it. It
is done through DHCP or Dynamic Host Configuration Protocol. It is a system that assigns dynamic
IP addresses to devices on a network. Whenever a device connects to the router, it will be assigned a
dynamic IP address.
• To configure the DHCP, login to the router and go to DHCP menu.
In this setting, we set the start IP address to
192.168.1.100, which means that the first device
that will connect to the router will have the IP
address 192.168.1.100, and the last device will have
the 192.168.1.199 IP address. In short, the router
will cater to 100 devices on its network. 192.168.1.2
to 192.168.1.99 will not be assigned as well as
192.168.1.200 to 192.168.1.255.
You can customize these IP addresses depending on
your preference.
• If you are having these setups below, you need to have dynamic IP addresses for your
workstations. It would help if you allow the router to assign an IP address for your network for the
device to identify which device the data should be transmitted to.
• That is why you need to set “Obtain an IP address automatically in your network settings.” Below is
how you do it to every device that will connect to your router.
• 1. Go to Control Panel > Network and Internet > Network and Sharing Center
• 2. Click Properties
• 3. Double click Internet Protocol Version 4 (TCP/IPv4) or
• 4. Click Properties button
• 5. Choose Obtain an IP address automatically and
• 6. Click OK button
• Your next concern now is how to connect mobile (wireless) devices on the
same network in areas that are a bit farther than the router? Usually,
routers can reach around 42 meters indoor and 92 meters outdoor. The
router signal can no longer reach wireless devices farther than those. How
will you address this issue? It is time for you to use Wireless Access
Points.
What is a Wireless Access Point?
• The concept of Wireless Access Points (WAP) is the same
way that repeaters do. Only that, they give access to
“wireless” devices. It relays data between a wired network
and wireless devices. While a router is enough for a home
wireless setting due to its small coverage, access points
are used in medium to large companies where wireless
access is needed in a much more extensive coverage
where a router’s signal can no longer reach.
Configuring the Access Point
• The same way that you set up the router is pretty much the same as the access point.
• Before you configure your WAP take note on the following:
• • Make sure you are not connected to any network (wired or wireless) before you
configure the Access Point.
• • Make sure you assign DHCP in your router to start assigning IP addresses that do
not include the IP address that you will assign to your access point. In your case
earlier, you started with 192.168.1.100 to be assigned to the first device connected to
the network until 192.168.1.199. Therefore, 192.168.1.2 to 192.168.1.99 and
192.168.1.200 to 192.168.1.255 are not assigned IP addresses. You can use any of it
to be assigned to your Access Point. Again, you can customize these according to your
preference.
• 1. Connect Access Point to your Computer using the LAN cable. (Make sure you are
not connected to other networks)
• 2. Determine the IP address of your Access Point (You already learned two methods to
do this).
• 3. Once you know the IP address of your Access Point, go to a browser and type it. You
will then be brought to the Access Point’s Login portal. And Login using the default
User Name and Password found at the back of your Access Point. (For security reasons,
you may change this)
WHAT IS A FIREWALL?
• A firewall is an application that keeps your system from network threats like
unauthorized access to your system or applications that may harm your computer.
Fortunately, Windows understand these issues well that they made Windows 7, 8, and 10
with the firewall turned “on” by default. Your Windows firewall is your first line of defense
against these threats. No wonder why Windows 10 calls it “Windows Defender Firewall.”
However, if it is by any chance disabled, here’s how you are going to enable it again.
12 ict.pptx
12 ict.pptx

12 ict.pptx

  • 1.
    Before we startour lesson, I would like to know what you have learned about client device systems configuration. Choose the letter of the correct answer.
  • 4.
    Wireless Network Configuration •Let’s recall what you have learned from the previous lesson by answering the following questions: 1. How will you connect Local Area Networks to the internet? 2. Give the differences between a switch and a router. 3. How do you identify the router’s initial IP address? 4. Why should we change the router’s login details? 5. How do you configure the router’s IP address and login details?
  • 5.
    Wireless Network Configuration •From our previous lessons, the demands of creating a network are increasing. Let us recall them again to see the progress of our network from simple to a more complex network. • Creating a network has many demands, as inferred from our previous lesson. Let us try to check the progress of the network we have created, from simple to a more complex network. • Scenario 1 – You connected two computers using a crossover LAN cable • Scenario 2 – You connected two or more computers in a network using a switch • Scenario 3 – You connected your network to the Internet • Now let us consider more scenarios and how will you solve the demands of each scenario. • Scenario 4 - Your schoolmates in the adjacent room in your building also created their own network of computers; they wanted to connect to your own network. • Scenario 5 - Your schoolmates from another building also want to connect to your network. • Scenario 6 - Some of your classmates and schoolmates only have wireless devices; they also want to connect to your network too. • Scenario 7 - Your schoolmates on the 4th floor also want to connect to your network wirelessly.
  • 6.
    Wireless Network Configuration •First, you have to connect two computers to communicate with each other, and all you need UTP cable. You also need to connect three or more computers, which means a switch is added to your network. For this to be functional, you need to connect it to the internet by adding a route. • Congratulations! You have successfully connected your network to the internet. You can add more computers in your network, depending on your switch's capacity, as to the number of devices it can connect to its ports. • Now it’s time for you to widen your networks. Consider this, if your schoolmates in the adjacent room in your building also created their network of computers and want to connect to your network, how are you going to do that?
  • 7.
    Wireless Network Configuration •We learned that as the demand for our network increases, we need to add more devices in our network that would satisfy that need. • Just connect your switches using a crossover LAN cable, assuming that they too have their switch. You will only need to configure your computers’ IP address so that they would belong to the same workgroup or will have the same • In another scenario, two networks on the same campus need to be connected but distant. How will you set this up? Is there a need to add one switch between the buildings? Is there a need for a smaller device to replicate the signal? Repeaters are needed in this kind of situation.
  • 8.
    WHAT IS AREPEATER? • A repeater is a network device used to amplify or regenerate a signal over the same network to extend the network's range or coverage area. Putting a switch between buildings can still be functional, but repeaters play a vital role in understanding another device's concept, which we will discuss here. Therefore, hubs and switches can function as repeaters because they connect other networks in a network (LAN). • Now let’s connect these networks to the Internet by using a router. Here are the setup options you can use.
  • 9.
    WHAT IS AREPEATER? • To make your network’s scope wider, connect additional networks by connecting switches. The length of the cable must not exceed its limit, which is 100 meters.
  • 10.
    WHAT IS AREPEATER? You may also connect other switches directly in the router’s Ethernet ports, but you are limited to only 4 LANs and consider the length of your LAN cables. In designing a more extensive network, one must consider the geographical locations, cost, ease of setup, and other factors.
  • 11.
    The diagrams shownabove are all wired. What if your classmates in the same room want to connect to your network using their smartphones and tablets, which do not have Ethernet cabling capability? It is where we need to set up the wireless LAN.
  • 12.
    What is awireless network? • A wireless network by its name alone is a network of devices that are not connected through a cable. Devices in a network are connected wirelessly using radio waves. • A wireless network is possible using a wireless router. A router connects wired LAN, but it also has the capacity for a wireless LAN. Most home networks are used since most of us now have smartphones, tablets, and even laptops that are manufactured to be wireless ready. Can you imagine if gadgets can only have an internet connection using a cable? That would be very inconvenient, especially if you are in public places. Thanks to wireless networks, that made our access to the internet so much easier.
  • 13.
    Setting up awireless network • Using the same wiring setup (LAN Cable to the computer and the other end to any of router’s Ethernet ports, and modem to router’s WAN port) you may or may not reset your router provided that you still remember your login details and the IP address that you assigned your router to have. If you didn’t, you better reset your router and start configuration from scratch.
  • 14.
    Besides typing ipconfigfrom the command prompt, here’s another method of identifying your router’s initial IP address.
  • 15.
    In the wirelesstab, input the name of your wireless network in the Wireless Network Name or the SSID. In this case, the new SSID is assigned to “TheRock.” Then click the Save button. After setup, you will now be able to see the new name in the available network for Wi-Fi. Other mobile/wireless devices can now connect to your wireless network provided that they input the correct password you set.
  • 16.
    What is aDHCP? • We have learned that a router is capable of assigning IP addresses to the devices connected to it. It is done through DHCP or Dynamic Host Configuration Protocol. It is a system that assigns dynamic IP addresses to devices on a network. Whenever a device connects to the router, it will be assigned a dynamic IP address. • To configure the DHCP, login to the router and go to DHCP menu. In this setting, we set the start IP address to 192.168.1.100, which means that the first device that will connect to the router will have the IP address 192.168.1.100, and the last device will have the 192.168.1.199 IP address. In short, the router will cater to 100 devices on its network. 192.168.1.2 to 192.168.1.99 will not be assigned as well as 192.168.1.200 to 192.168.1.255. You can customize these IP addresses depending on your preference.
  • 17.
    • If youare having these setups below, you need to have dynamic IP addresses for your workstations. It would help if you allow the router to assign an IP address for your network for the device to identify which device the data should be transmitted to.
  • 18.
    • That iswhy you need to set “Obtain an IP address automatically in your network settings.” Below is how you do it to every device that will connect to your router. • 1. Go to Control Panel > Network and Internet > Network and Sharing Center • 2. Click Properties • 3. Double click Internet Protocol Version 4 (TCP/IPv4) or • 4. Click Properties button • 5. Choose Obtain an IP address automatically and • 6. Click OK button
  • 19.
    • Your nextconcern now is how to connect mobile (wireless) devices on the same network in areas that are a bit farther than the router? Usually, routers can reach around 42 meters indoor and 92 meters outdoor. The router signal can no longer reach wireless devices farther than those. How will you address this issue? It is time for you to use Wireless Access Points.
  • 20.
    What is aWireless Access Point? • The concept of Wireless Access Points (WAP) is the same way that repeaters do. Only that, they give access to “wireless” devices. It relays data between a wired network and wireless devices. While a router is enough for a home wireless setting due to its small coverage, access points are used in medium to large companies where wireless access is needed in a much more extensive coverage where a router’s signal can no longer reach.
  • 22.
    Configuring the AccessPoint • The same way that you set up the router is pretty much the same as the access point. • Before you configure your WAP take note on the following: • • Make sure you are not connected to any network (wired or wireless) before you configure the Access Point. • • Make sure you assign DHCP in your router to start assigning IP addresses that do not include the IP address that you will assign to your access point. In your case earlier, you started with 192.168.1.100 to be assigned to the first device connected to the network until 192.168.1.199. Therefore, 192.168.1.2 to 192.168.1.99 and 192.168.1.200 to 192.168.1.255 are not assigned IP addresses. You can use any of it to be assigned to your Access Point. Again, you can customize these according to your preference. • 1. Connect Access Point to your Computer using the LAN cable. (Make sure you are not connected to other networks) • 2. Determine the IP address of your Access Point (You already learned two methods to do this). • 3. Once you know the IP address of your Access Point, go to a browser and type it. You will then be brought to the Access Point’s Login portal. And Login using the default User Name and Password found at the back of your Access Point. (For security reasons, you may change this)
  • 26.
    WHAT IS AFIREWALL? • A firewall is an application that keeps your system from network threats like unauthorized access to your system or applications that may harm your computer. Fortunately, Windows understand these issues well that they made Windows 7, 8, and 10 with the firewall turned “on” by default. Your Windows firewall is your first line of defense against these threats. No wonder why Windows 10 calls it “Windows Defender Firewall.” However, if it is by any chance disabled, here’s how you are going to enable it again.