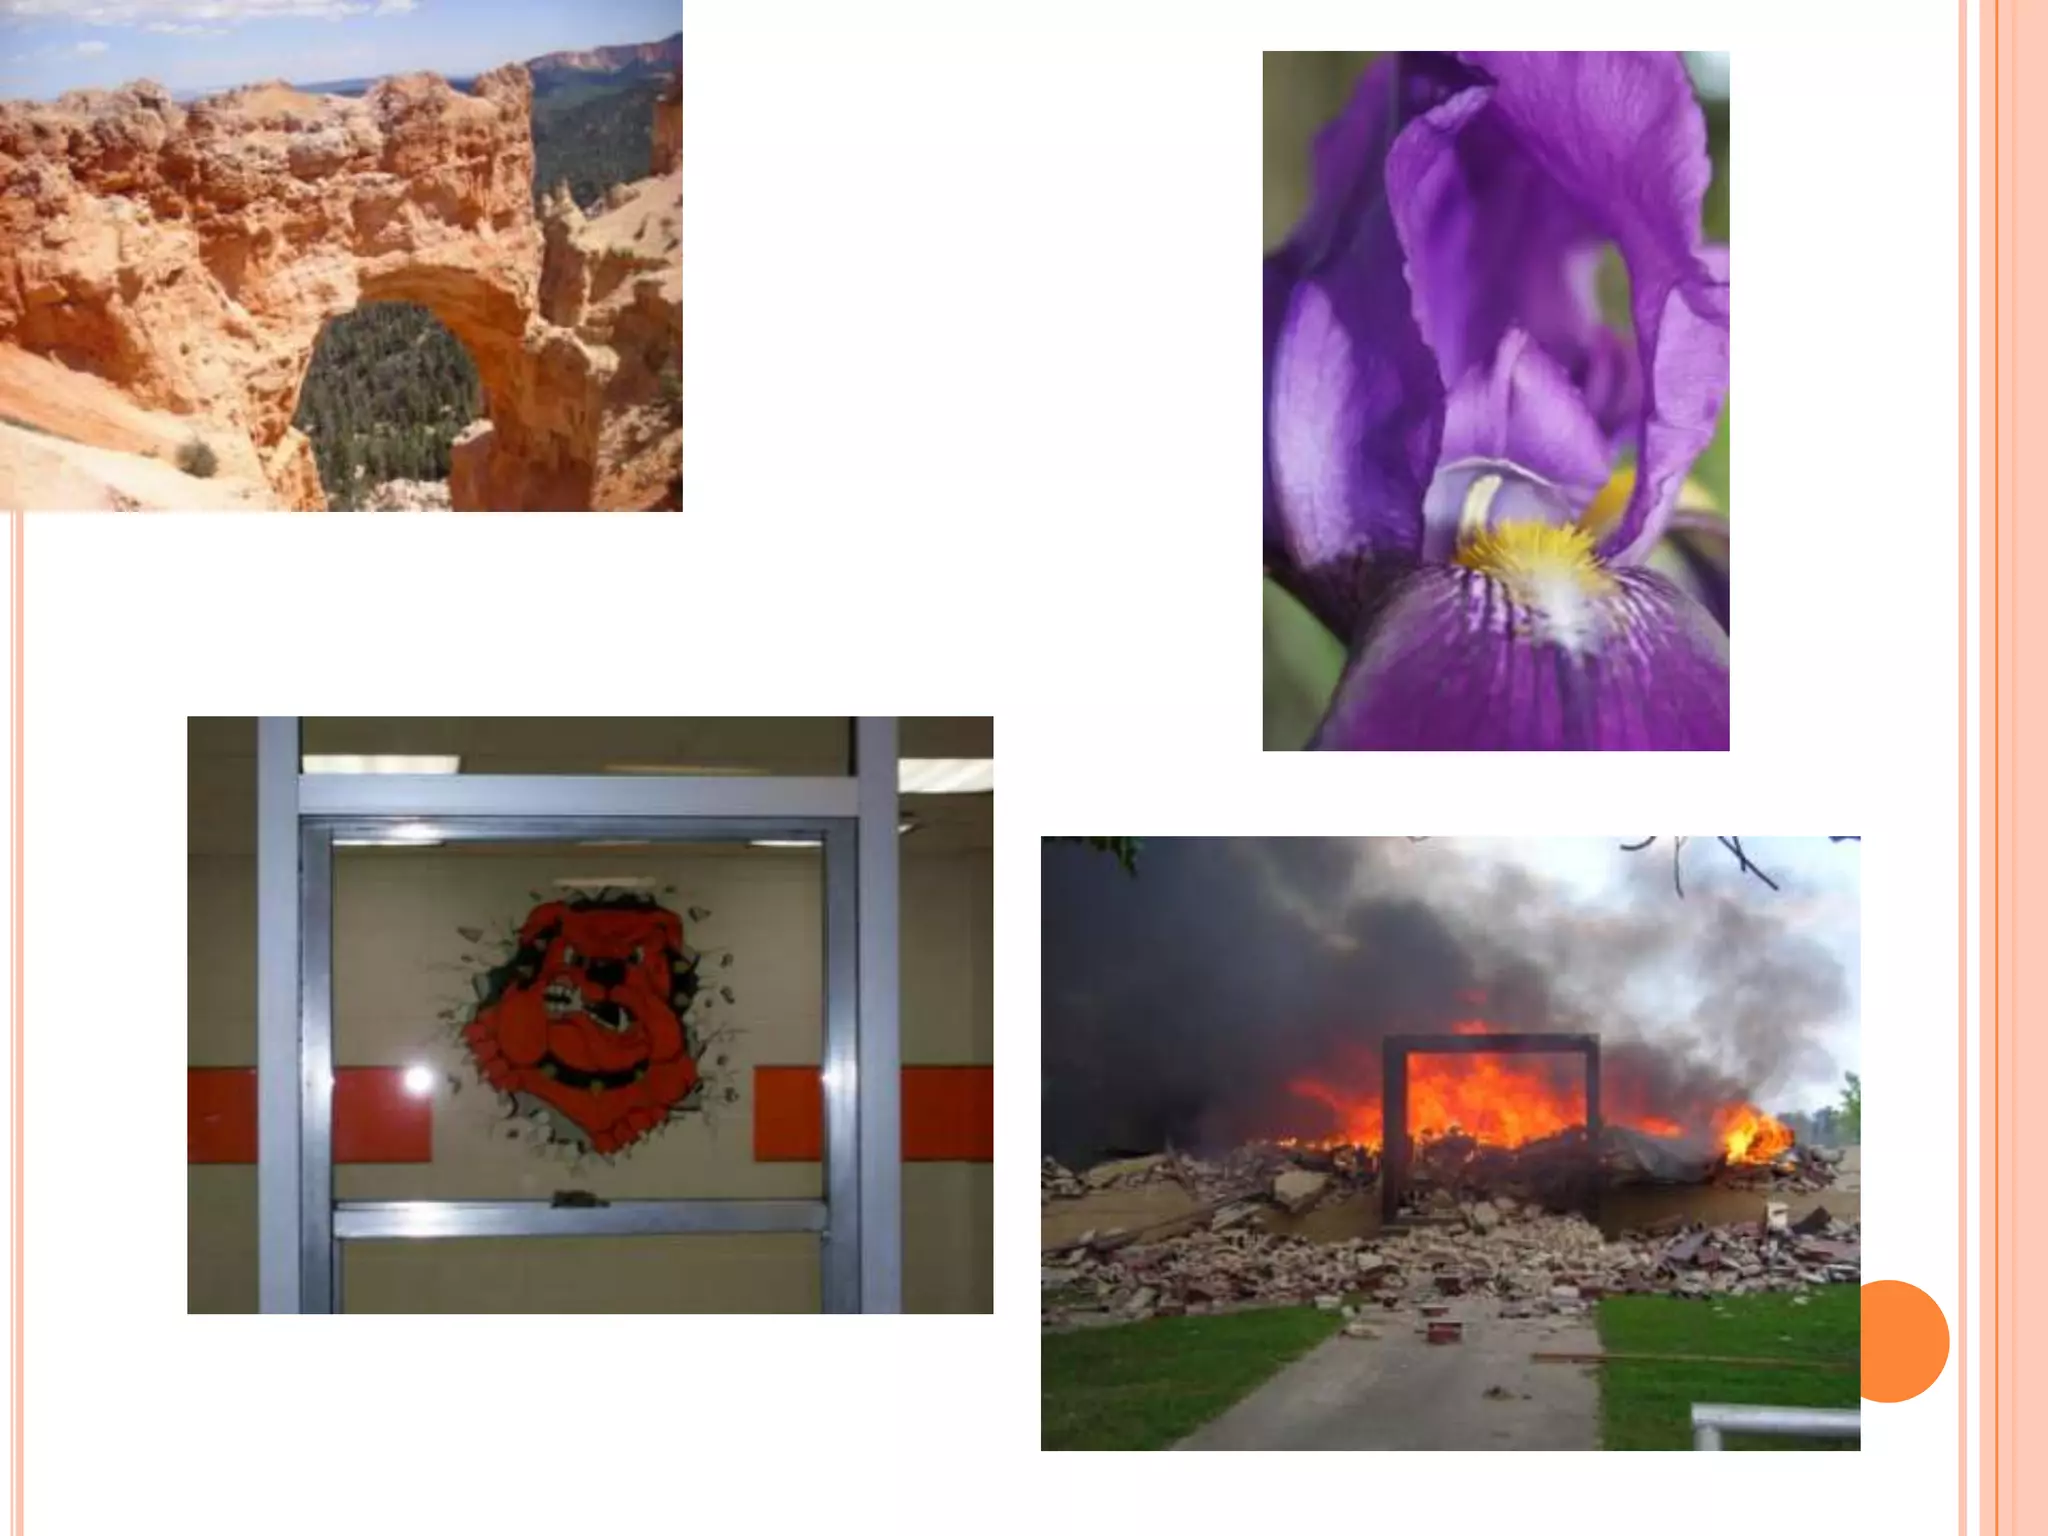
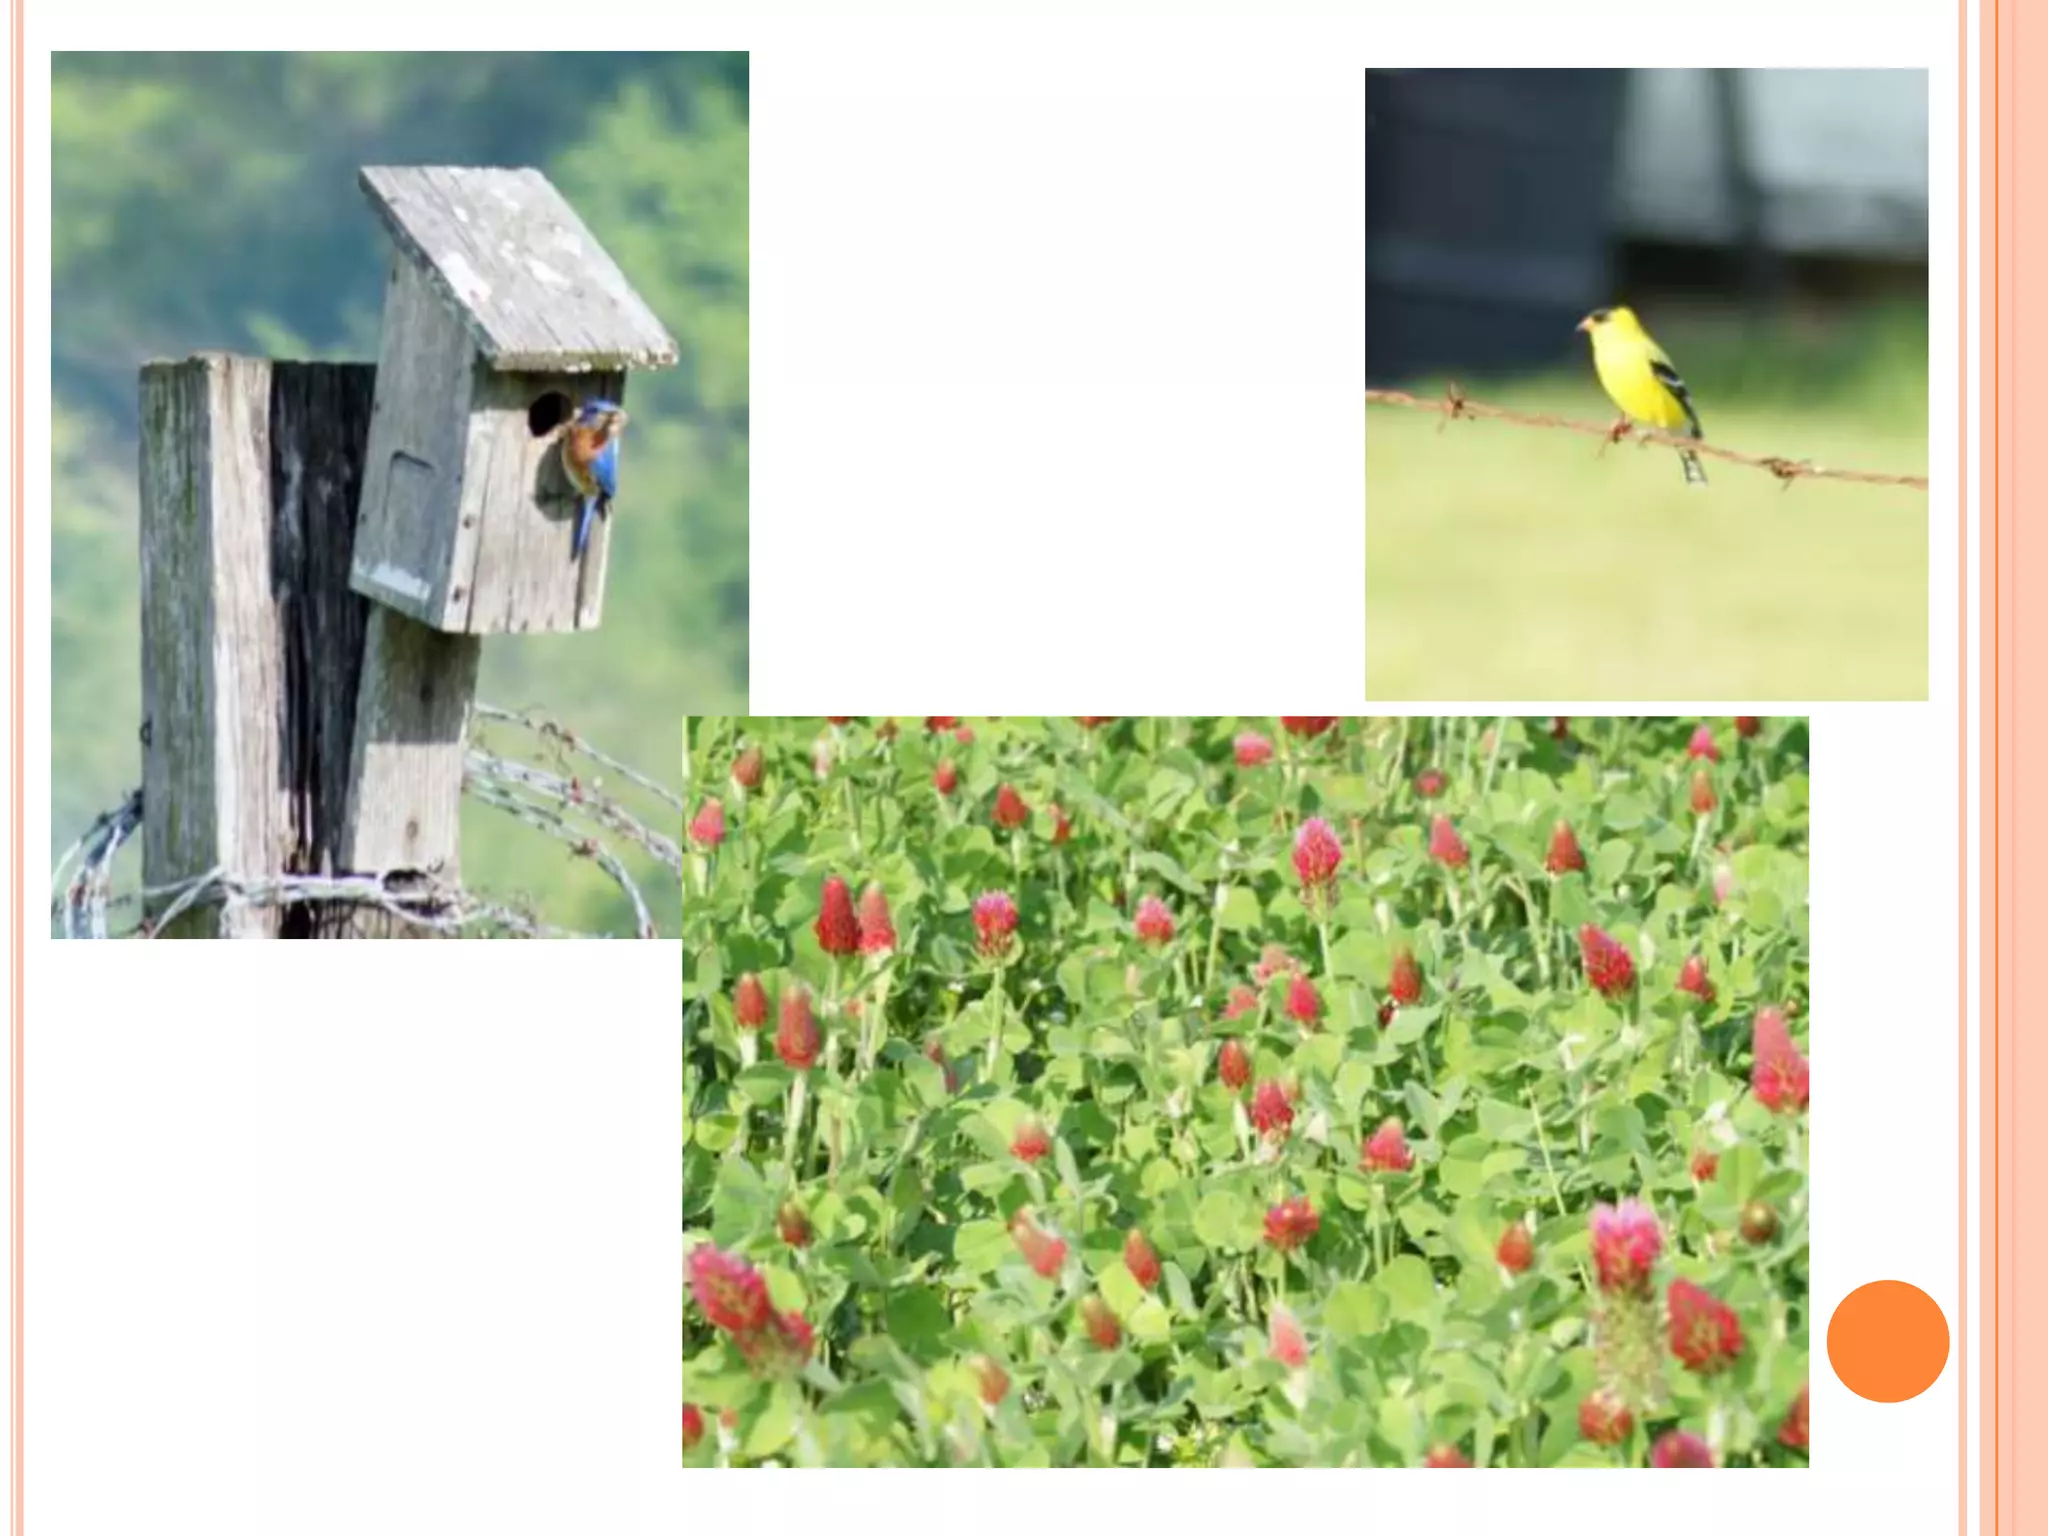
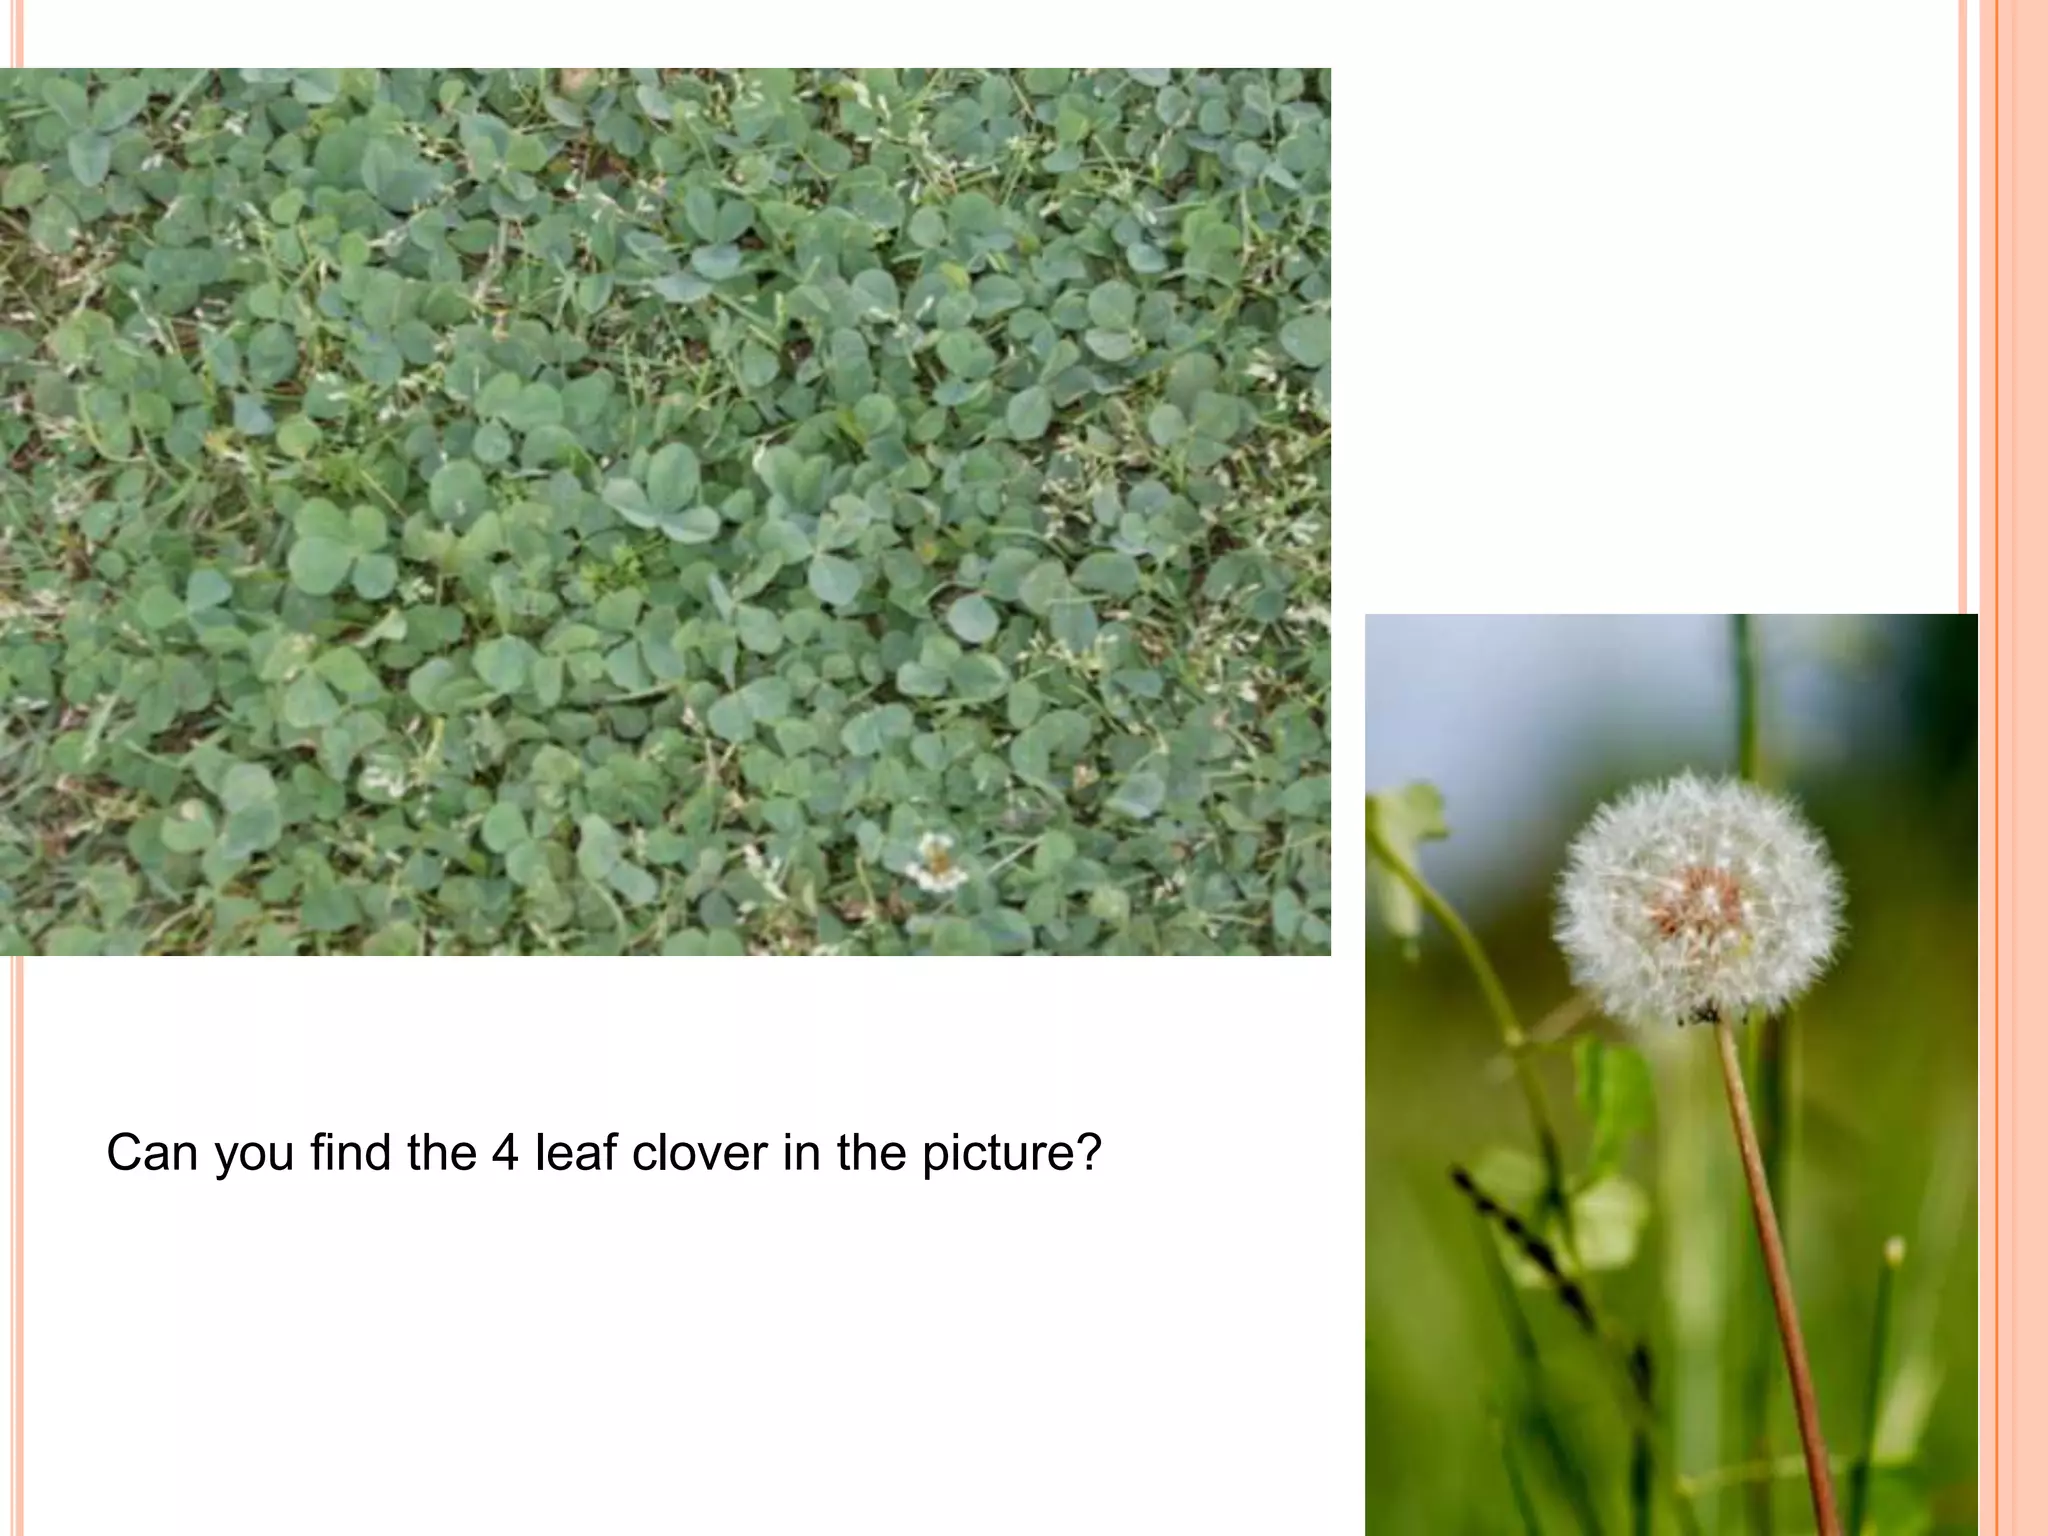
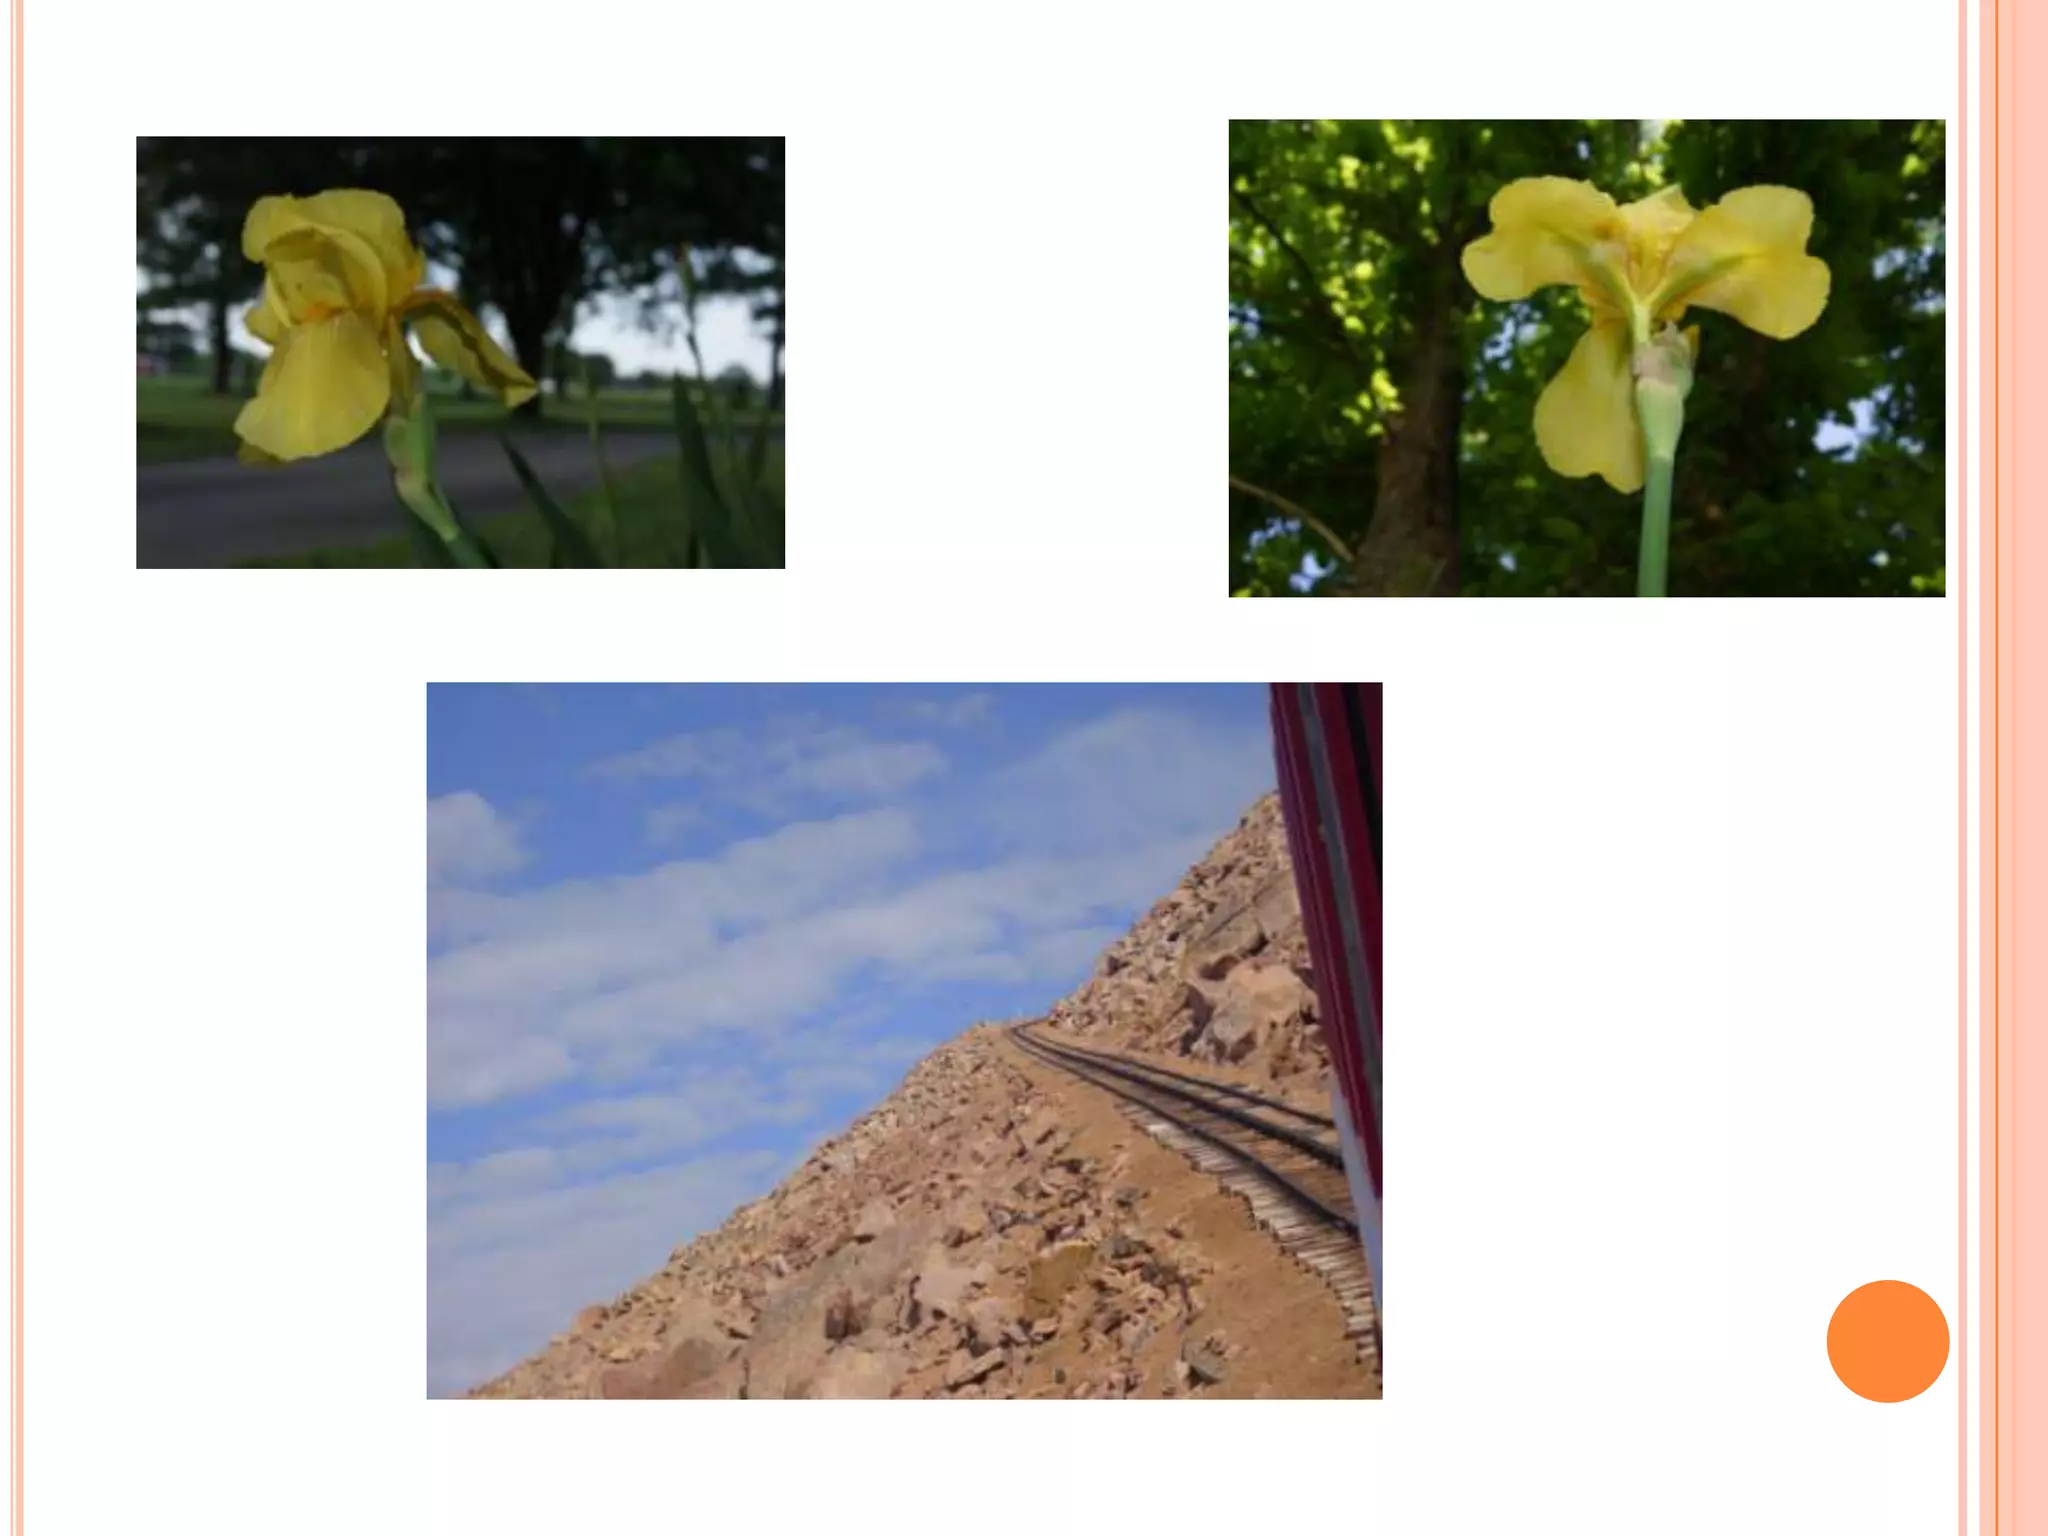
10 PHOTOGRAPHIC RULES OF
COMPOSITION AND FRAMING
By Kristi Rippy-Sigman
I WOULD FIRST INTRODUCE THE
STUDENTS TO A PHOTOGRAPH
NOTEBOOK/JOURNAL/BINDER.


THE STUDENTS, AS THEY LEARN A NEW
TECHNIQUE WILL KEEP NOTES AS WELL
AS PHOTOGRAPHIC EXAMPLES THEY
LOCATE AS WELL AS EXAMPLES THEY
TAKE IN THEIR NOTEBOOK.
1. BALANCING ELEMENTS
 Placing your main subject off center. It can leave a
  void to one side if not “balanced” with another
  element of lesser importance to fill the space.
 To teach the skill have student put main subject off
  center and find or add another object to offset the
  balance.
 Photo: Stephen taking picture of Challenger (not for
  sure on this one)
 From:
  http://www.photographymad.com/pages/view/10-
  top-photography-composition-rules
2. AVOID MERGERS
   Avoid taking a picture without careful consideration of
    the background of your subject. We see things in three
    dimensions but our photographs do not consider the
    three dimensions of the background tree for example
    and the subject.
   To teach the skill show students examples of merger
    pictures and have a “merger” background set up so
    students can take photos and see how it can impact a
    photo.
   Photo: Stephen with Christmas tree.
   From:
    http://photoinf.com/General/KODAK/guidelines_for_bett
    er_photographic_composition_avoiding_mergers.html
3. FRAMING
 Framing -- tactic of using natural surroundings to
  add more meaning to your subject. It could be
  anything such as bushes, trees, a window, or even
  a doorway.
 To teach the skill after showing students several
  examples take a nature walk and let the students
  use cameras to practice the technique.
 Photo: picture of inside of iris, bulldog at
  MS, burning of old HS.
 From:http://www.picturecorrect.com/tips/photograph
  y-the-rules-of-composition/
4. LEADING LINE
 Used to lure the eye deeper into a picture or to an
  important subject. Straight, curved, parallel, or
  diagonal lines are all good at promoting interest.
 To teach the skills have students brainstorm and
  write down 3 ideas and then locate and take the
  photograph.
 Photo: Nature trail, Stephen on tracks, gun barrel

 From:http://www.picturecorrect.com/tips/photograph
  y-the-rules-of-composition/
5. TEXTURE
   Connects the picture a person sees to what it feels like
    to touch what is in the picture. Good idea when you are
    taking pictures of rocks, walls, surfaces, someone’s
    hands, or leaves.
   To teach the skill of texture let students explore different
    textures blindfolded once their eyes are opened show
    them pictures of different textured objects they touched
    let them make the connection. Making that concrete
    connection then have them to write about a picture they
    want to take using a texture and why then let them
    explore and take the picture to go with the story they
    wrote.
   Photo: Snow? Barn door.
   From: http://www.fodors.com/travel-photography/article-
    textures-53/
6. COLORS
 Heart and emotion to your pictures. Can inspire
  onlookers, used to add all sorts of accents and
  effects, but be careful to not draw attention away
  from the main subject.
 To teach have students photograph three different
  colors of objects.
 Photo: Clover.

 From:http://www.picturecorrect.com/tips/photograph
  y-the-rules-of-composition/
7. PATTERNS
 Keeping a pattern consistent and undermining a
  pattern by putting something out of place. The
  ultimate goal is to trick the eye into seeing more
  than what is really present.
 To teach have students explore taking photographs
  of various patterns in general then have them to
  identify other students patterns and try for harder
  patterns for the eye to see.
 Photo: Clover and dandelion.

 From: http://www.phototipworld.com/2010/12/basic-
  rules-of-framing-captivating.html
Can you find the 4 leaf clover in the picture?
Now do you see it?
8. SYMMETRY
 We are surrounded by symmetry both natural and
  man-made. Can make the eye wander all across
  an image, which is pleasing to the mind of your
  viewer. It echoes your scene.
 To teach have students explore photographs and
  locate photograph examples of symmetry and
  explain why it would be considered in the category.
  Then have students to locate and photograph
  symmetry.
 Photo: US Capital also with leading lines to draw
  your eye upward, also Air Force Academy
 From:http://www.phototipworld.com/2010/12/basic-
  rules-of-framing-captivating.html
9. CROPPING
 Often a photo will lack impact because the main
  subject is so small it becomes lost among the
  clutter of its surroundings. By cropping tight around
  the subject you eliminate the background “noise”.
 To teach have students to practice with
  photographs preloaded on computers of cropping.
 Photo: Butterfly, bee pictures.

 From:http://www.photographymad.com/pages/view/
  10-top-photography-composition-rules
10. RULE OF ODDS
 States that images are more visually appealing
  when there is an odd number of subjects. Studies
  have shown that people are actually more at ease
  and comfortable when viewing imagery with odd
  number of subjects.
 To teach have students practice by taking pictures
  with odd number of items.
 Photo: Set of 3 dandelions.

 From: http://digital-photography-school.com/digital-
  photography-composition-tips
11. HEADROOM/LEADING ROOM
 Amount of room in the frame which is strategically
  left empty. Leading room -- leaving room for object
  that is moving into an area-don’t have it running off
  screen. Head room is amount of space between
  the top of the subjects head and top of the frame.
 To teach have the students practice taking pictures
  of other students walking for leading room. Have
  them practice taking photographs to demonstrate
  head room of each other.
 Photo:

 From:http://www.mediacollege.com/video/cameera/t
  utorial/01-framing.html
12. POSITION OF SHOT
   Taking pictures at eye level, looking down the scene
    (taking photographs of a person while looking down
    upon them diminishes them), looking up the scene
    (taking photographs of a person while looking upward
    on them make them appear more imposing). Diagonal
    photos -- important elements of the picture should be
    placed along diagonals. Dutch Shot -- changing camera
    angle -- not straight to capture photograph of subject.
   To teach have students locate examples online of the
    different photograph elements then practice the
    elements and write about the differences in the
    elements.
   Photo: Iris pictures, Stephen, Sassy.
   From:http://www.mediacollege.com/video/camera/tutoria
    l/01-framing.html
YOU TRY A FEW: WHAT ARE THESE?

10 photographic rules of composition and framing

  • 1.
    10 PHOTOGRAPHIC RULESOF COMPOSITION AND FRAMING By Kristi Rippy-Sigman
  • 2.
    I WOULD FIRSTINTRODUCE THE STUDENTS TO A PHOTOGRAPH NOTEBOOK/JOURNAL/BINDER. THE STUDENTS, AS THEY LEARN A NEW TECHNIQUE WILL KEEP NOTES AS WELL AS PHOTOGRAPHIC EXAMPLES THEY LOCATE AS WELL AS EXAMPLES THEY TAKE IN THEIR NOTEBOOK.
  • 3.
    1. BALANCING ELEMENTS Placing your main subject off center. It can leave a void to one side if not “balanced” with another element of lesser importance to fill the space.  To teach the skill have student put main subject off center and find or add another object to offset the balance.  Photo: Stephen taking picture of Challenger (not for sure on this one)  From: http://www.photographymad.com/pages/view/10- top-photography-composition-rules
  • 5.
    2. AVOID MERGERS  Avoid taking a picture without careful consideration of the background of your subject. We see things in three dimensions but our photographs do not consider the three dimensions of the background tree for example and the subject.  To teach the skill show students examples of merger pictures and have a “merger” background set up so students can take photos and see how it can impact a photo.  Photo: Stephen with Christmas tree.  From: http://photoinf.com/General/KODAK/guidelines_for_bett er_photographic_composition_avoiding_mergers.html
  • 7.
    3. FRAMING  Framing-- tactic of using natural surroundings to add more meaning to your subject. It could be anything such as bushes, trees, a window, or even a doorway.  To teach the skill after showing students several examples take a nature walk and let the students use cameras to practice the technique.  Photo: picture of inside of iris, bulldog at MS, burning of old HS.  From:http://www.picturecorrect.com/tips/photograph y-the-rules-of-composition/
  • 9.
    4. LEADING LINE Used to lure the eye deeper into a picture or to an important subject. Straight, curved, parallel, or diagonal lines are all good at promoting interest.  To teach the skills have students brainstorm and write down 3 ideas and then locate and take the photograph.  Photo: Nature trail, Stephen on tracks, gun barrel  From:http://www.picturecorrect.com/tips/photograph y-the-rules-of-composition/
  • 11.
    5. TEXTURE  Connects the picture a person sees to what it feels like to touch what is in the picture. Good idea when you are taking pictures of rocks, walls, surfaces, someone’s hands, or leaves.  To teach the skill of texture let students explore different textures blindfolded once their eyes are opened show them pictures of different textured objects they touched let them make the connection. Making that concrete connection then have them to write about a picture they want to take using a texture and why then let them explore and take the picture to go with the story they wrote.  Photo: Snow? Barn door.  From: http://www.fodors.com/travel-photography/article- textures-53/
  • 13.
    6. COLORS  Heartand emotion to your pictures. Can inspire onlookers, used to add all sorts of accents and effects, but be careful to not draw attention away from the main subject.  To teach have students photograph three different colors of objects.  Photo: Clover.  From:http://www.picturecorrect.com/tips/photograph y-the-rules-of-composition/
  • 15.
    7. PATTERNS  Keepinga pattern consistent and undermining a pattern by putting something out of place. The ultimate goal is to trick the eye into seeing more than what is really present.  To teach have students explore taking photographs of various patterns in general then have them to identify other students patterns and try for harder patterns for the eye to see.  Photo: Clover and dandelion.  From: http://www.phototipworld.com/2010/12/basic- rules-of-framing-captivating.html
  • 16.
    Can you findthe 4 leaf clover in the picture?
  • 17.
    Now do yousee it?
  • 18.
    8. SYMMETRY  Weare surrounded by symmetry both natural and man-made. Can make the eye wander all across an image, which is pleasing to the mind of your viewer. It echoes your scene.  To teach have students explore photographs and locate photograph examples of symmetry and explain why it would be considered in the category. Then have students to locate and photograph symmetry.  Photo: US Capital also with leading lines to draw your eye upward, also Air Force Academy  From:http://www.phototipworld.com/2010/12/basic- rules-of-framing-captivating.html
  • 20.
    9. CROPPING  Oftena photo will lack impact because the main subject is so small it becomes lost among the clutter of its surroundings. By cropping tight around the subject you eliminate the background “noise”.  To teach have students to practice with photographs preloaded on computers of cropping.  Photo: Butterfly, bee pictures.  From:http://www.photographymad.com/pages/view/ 10-top-photography-composition-rules
  • 22.
    10. RULE OFODDS  States that images are more visually appealing when there is an odd number of subjects. Studies have shown that people are actually more at ease and comfortable when viewing imagery with odd number of subjects.  To teach have students practice by taking pictures with odd number of items.  Photo: Set of 3 dandelions.  From: http://digital-photography-school.com/digital- photography-composition-tips
  • 24.
    11. HEADROOM/LEADING ROOM Amount of room in the frame which is strategically left empty. Leading room -- leaving room for object that is moving into an area-don’t have it running off screen. Head room is amount of space between the top of the subjects head and top of the frame.  To teach have the students practice taking pictures of other students walking for leading room. Have them practice taking photographs to demonstrate head room of each other.  Photo:  From:http://www.mediacollege.com/video/cameera/t utorial/01-framing.html
  • 26.
    12. POSITION OFSHOT  Taking pictures at eye level, looking down the scene (taking photographs of a person while looking down upon them diminishes them), looking up the scene (taking photographs of a person while looking upward on them make them appear more imposing). Diagonal photos -- important elements of the picture should be placed along diagonals. Dutch Shot -- changing camera angle -- not straight to capture photograph of subject.  To teach have students locate examples online of the different photograph elements then practice the elements and write about the differences in the elements.  Photo: Iris pictures, Stephen, Sassy.  From:http://www.mediacollege.com/video/camera/tutoria l/01-framing.html
  • 29.
    YOU TRY AFEW: WHAT ARE THESE?