
Recommended
More Related Content
What's hot
What's hot (19)
Viewers also liked
Viewers also liked (20)
Similar to Apache
Similar to Apache (20)
Recently uploaded
Recently uploaded (20)
Apache
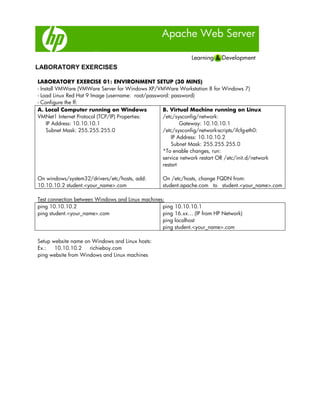
- 1. Apache Web Server LABORATORY EXERCISES LABORATORY EXERCISE 01: ENVIRONMENT SETUP (30 MINS) - Install VMWare (VMWare Server for Windows XP/VMWare Workstation 8 for Windows 7) - Load Linux Red Hat 9 Image (username: root/password: password) - Configure the ff: A. Local Computer running on Windows B. Virtual Machine running on Linux VMNet1 Internet Protocol (TCP/IP) Properties: /etc/sysconfig/network: IP Address: 10.10.10.1 Gateway: 10.10.10.1 Subnet Mask: 255.255.255.0 /etc/sysconfig/network-scripts/ifcfg-eth0: IP Address: 10.10.10.2 Subnet Mask: 255.255.255.0 *To enable changes, run: service network restart OR /etc/init.d/network restart On windows/system32/drivers/etc/hosts, add: On /etc/hosts, change FQDN from: 10.10.10.2 student.<your_name>.com student.apache.com to student.<your_name>.com Test connection between Windows and Linux machines: ping 10.10.10.2 ping 10.10.10.1 ping student.<your_name>.com ping 16.xx… (IP from HP Network) ping localhost ping student.<your_name>.com Setup website name on Windows and Linux hosts: Ex.: 10.10.10.2 richieboy.com ping website from Windows and Linux machines
- 2. Apache Web Server LABORATORY EXERCISES LABORATORY EXERCISE 02: INSTALLING APACHE (30 MINS) - Install Apache httpd on Linux and Windows cd /home/training/installers tar xzvf httpd-2.0.63.tar.gz cd httpd-2.0.63 ./configure --prefix=/usr/local/apache2 --enable-ssl make make install - Verify if apache is running ps -ef | grep httpd - Stop and Start apache cd /usr/local/apache2/bin ./apachectl stop ./apachectl start - Test default web site * Other ways of stopping apache: killall httpd kill -9 <pid> kill -TERM `cat /usr/local/apache2/logs/httpd.pid LABORATORY EXERCISE 03: FAMILIARIZATION WITH HTTPD.CONF (30 MINS) - Edit httpd.conf using vi editor - Customize your default index.html and come up with your own website
- 3. Apache Web Server LABORATORY EXERCISES LABORATORY EXERCISE 04: SECURE REVERSE PROXY (30 MINS) Use your Apache on Windows to work as an SRP to your Apache on Linux website: - On your Windows box, edit httpd.conf - Enable the mod_proxy module by uncommenting: #LoadModule proxy_module modules/mod_proxy.so #LoadModule proxy_http_module modules/mod_proxy_http.so - Make sure that ProxyRequests directive is set to "off" ProxyRequests Off - Add the following lines: ProxyPass /<extension> http://<your_linux_website> ProxyPassReverse /<extension> http://<your_linux_website> - Test the SRP by viewing each other’s website
- 4. Apache Web Server LABORATORY EXERCISES LABORATORY EXERCISE 05: BASIC SECURITY (15 MINS) - Locate the /usr/local/apache2/htdocs block from httpd.conf - Edit the "Allow from all" parameter to "Deny from all" - Restart apache - Try to access your website Note: Ensure that you are editing configurations under the correct directory.
- 5. Apache Web Server LABORATORY EXERCISES LABORATORY EXERCISE 06: USER-BASED AUTHENTICATION (1 HOUR) A. REQUIRING USERS- - Create a new directory under /htdocs to serve as your protected site - Create an index.html file under the new directory - Use the htpasswd tool to generate a password file cd /usr/local/apache2/bin ./htpasswd -c <passwordFile> <user1> - Add 2 more users to the passwordfile ./htpasswd <passwordFile> <user2> ./htpasswd <passwordFile> <user3> - On httpd.conf, append the User-Based Authentication block <Directory /usr/local/apache2/htdocs/prohibited> AuthName "Restricted Access" AuthType basic AuthUserFile <passwordFile> Require user user1 user2 </Directory> - Try accessing the URL of the protected site. You should be prompted for a username and password. - Try providing the correct username and password for user1/2/3 - Try cancelling out of the prompt. What is the page displayed? B. REQUIRING GROUPS - Place a comment on the entries in the httpd.conf from the previous activity - Create a groupfile with 2 lines: setA: user1 user2 user3 setB: user4 user5 user6 - Add user4 to the password file cd /usr/local/apache2/bin ./htpasswd <passwordFile> <user4> - On httpd.conf, append the User-Based Authentication block <Directory /usr/local/apache2/htdocs/prohibited> AuthName "Restricted Access" AuthType basic AuthUserFile <passwordFile> AuthGroupFile <groupfile> Require group setB </Directory> - Try to access the URL of the protected site. - Try providing the credentials of user1/2/3 - Try providing the credentials of user4/5/6 ***groupfile format/sample: beatles: john paul george ringo voltes5: steve littlejohn bigbert jamie mark teletubbies: tinkywinky dipsi lala pow
- 6. Apache Web Server LABORATORY EXERCISES LABORATORY EXERCISE 07: THE .HTACCESS FILE (30 MINS) - On httpd.conf, edit the value of AllowOveride directive under the /usr/local/apache2/htdocs block AllowOverride All - Make sure that AccessFileName directive is set: AccessFileName .htaccess - Restart Apache - Create 5 layers of directories under htdocs /usr/local/apache2/htdocs/layer1/layer2/layer3/layer4/layer5 - Create an .htaccess file under layer3 - Type the ff on your .htaccess file AuthName "Restricted Access" AuthType basic AuthUserFile /usr/local/apache2/.htpasswd Require user user1 user2 - Try to access the ff URLs: http://<your_site>/layer1 http://<your_site>/layer1/layer2 http://<your_site>/layer1/layer2/layer3 http://<your_site>/layer1/layer2/layer3/layer4 http://<your_site>/layer1/layer2/layer3/layer4/layer5 Additional Exercise: *Create two more layers, Layer 6 and Layer7. Place another .htaccess file on Layer 5. Page should display “Forbidden” when you access Layers 5-7.
- 7. Apache Web Server LABORATORY EXERCISES LABORATORY EXERCISE 08: VIRTUAL HOSTING (1 HOUR) A. SINGLE DAEMON, MULTIPLE SITES USING VIRTUAL HOST BLOCK AND A SINGLE IP ADDRESS: Requirements: 1. Fully qualified domain name (FQDN) resolvable/mapped for each additional website/host. 2. Document Root folder and website contents for each additional host. 3. A NameVirtualHost directive should be defined NameVirtualHost [IP Address/*]:[Port] 4. A <VirtualHost> block for each different host that you would like to serve Procedure: 1. Your websites: Primary/default Website FQDN: ________________________ Secondary Website FQDN: ______________________ 2. Update your hosts file (/etc/hosts) to define/map the FQDNs to the server’s IP address. Watch out: the host file (that is used for simulating the function of DNS) should define the default FQDN of the host server. For example, your hostname is student, you may add the following line in the hosts file: 111.111.111.1 student.<your name>.com student 3. Create a document root directory for the new host/website Secondary Website FQDN’s Document Root directory: ______________________ 4. Modify the default web page for the default webpage file. Copy/Create a default webpage file to the Secondary Website. 5. Update the httpd.conf file to define the virtual hosts. You may follow the syntax below: NameVirtualHost *:80 <VirtualHost *:80> Server name Primary_FQDN DocumentRoot Primary_DocumentRoot_folder </VirtualHost> <VirtualHost *:80> Servername Secondary_FQDN DocumentRoot Secondary_DocumentRoot_folder </VirtualHost>
- 8. Apache Web Server LABORATORY EXERCISES 6. Make sure to check if there are no syntax errors. Please note the result after running the command: _____________________________. Result: 7. Restart Apache service using the command: ________________ B. SINGLE-DAEMON, MULTIPLE SITES USING VIRTUAL HOST BLOCK AND MULTIPLE IP ADDRESSES: Requirements: 1. New IP address for the new host/website 2. Fully qualified domain name (FQDN) resolvable/mapped for each additional website/host. 3. Document Root folder and website contents for each additional host. 4. A NameVirtualHost directive should be defined 5. A <VirtualHost> block for each different host that you would like to serve Procedure: TO ADD/CREATE NEW IP INTERFACES: - Go to /etc/sysconfig/network-scripts/ - Copy eth0 and name it as eth0:1 - Edit eth0:1 content (Change the values of DEVICE & IPADDR) - Restart network interface by issuing: /etc/init.d/network restart - To confirm if the interface was successfully added, issue ifconfig command 1. Your websites: Primary/default Website FQDN: ________________________ Secondary Website FQDN: ______________________ Primary/default Website IP: ________________________ Secondary Website IP: ______________________ 2. Update your hosts file (/etc/hosts) to define/map the FQDNs to the server’s IP address. Watchout: the host file (that is used for simulating the function of DNS) should define the default FQDN of the host server. For example, your hostname is student, you may add the following line in the hosts file: 111.111.111.1 student.<your_name>.com student 3. Create a Document Root directory for the new host/website Secondary Website FQDN’s Document Root directory: ______________________ 4. Modify the default web page for the default webpage file. Copy/Create a default webpage file to the Secondary Website.
- 9. Apache Web Server LABORATORY EXERCISES 5. Update the httpd.conf file to define the virtual hosts. You may follow the syntax below: Listen IP1:80 Listen IP2:80 <VirtualHost *:80> Servername Primary_FQDN DocumentRoot Primary_DocumentRoot_folder </VirtualHost> <VirtualHost *:80> Servername Secondary_FQDN DocumentRoot Secondary_DocumentRoot_folder </VirtualHost> 6. Make sure to check if there are no syntax errors. Please note the result after running the command: _____________________________. Result: 7. Restart Apache service using the command: ________________ C. MULTIPLE-DAEMON, MULTIPLE SITES USING VIRTUAL HOST BLOCK AND MULTIPLE IP ADDRESSES: Requirements: 1. New IP address for the new host/website 2. Fully qualified domain name (FQDN) resolvable/mapped for each additional website/host. 3. Document Root folder and website contents for each additional host. 4. Different configuration file for each site 5. Different .pid file for each site Procedure: 1. Your websites: Primary/default Website FQDN: ________________________ Secondary Website FQDN: ______________________ Primary/default Website IP: ________________________ Secondary Website IP: ______________________ 2. Update your hosts file (/etc/hosts) to define/map the FQDNs to the server’s IP address. Watchout: the host file (that is used for simulating the function of DNS) should define the default FQDN of the host server. For example, your hostname is student, you may add the following line in the hosts file: 111.111.111.1 student.<your_name>.com student
- 10. Apache Web Server LABORATORY EXERCISES 3. Create a Document Root directory for the new host/website Secondary Website FQDN’s Document Root directory: ______________________ 4. Modify the default web page for the default webpage file. Copy/Create a default webpage file to the Secondary Website. 5. Your config files (include full path): a. ________________________________ b. ________________________________ 6. Update your config files to define the Listen directive (you may create a fresh copy of the backup. You may follow the syntax below: Listen IPaddress:80 7. Explicitly define a Pidfile directive for each site. 8. Update the document DocumentRoot directive that is out of any block (globally defined) to point to your DocumentRoot for each site. 9. Make sure to check if there are no syntax errors. Please note the result after running the command: _____________________________. Result: 10. Restart Apache service using the command: ________________
- 11. Apache Web Server LABORATORY EXERCISES LABORATORY EXERCISE 09: SSL (1 HOUR) A. SELF-SIGNED SSL CERTIFICATE issue command --> find / -name “openssl” –print command: openssl req -new -x509 -nodes -out server.crt -keyout server.key example: openssl req -new -x509 -nodes -out www.jbcarrot.com.crt -keyout www.jbcarrot.com.key Output should be: 1. server.crt 2. server.key Create a new folder for server.crt and server.key separately (ex. /usr/local/apache2/conf/SSL/SSL.crt or /usr/local/apache2/conf/SSL/SSL.key) and move the files respectively to each folder. Installing the SSL on your Apache website: - open the configuration file for apache using VI command or gedit 2 options: a. vi /usr/local/apache2/conf/httpd.conf b. vi /usr/local/apache2/conf/ssl.conf - identify the SSL <VirtualHost> block to configure, try to search for the “SSL” keyword /SSL - configure the <VirtualHost> block for the SSL-enabled site. <VirtualHost IP:443> DocumentRoot <path_to_your_document_root> ServerName www.yourdomain.com SSLEngine on SSLCertificateFile <path_to_server.crt> SSLCertificateKeyFile <path_to_server.key> </VirtualHost> - restart apache ./apachectl stop ./apachectl startssl B. CREATE REAL SSL CERTIFICATE 1. Create RSA private key openssl genrsa -des3 -out server.key 1024
- 12. Apache Web Server LABORATORY EXERCISES - to see details openssl rsa -noout -text -in server.key openssl rsa -noout -text -in www.jbcarrot.com.key - to remove passphrase openssl rsa -in server.key –out server.unencryted.key 2. Create a Certificate Signing Request (CSR) openssl req -new -key server.key -out server.csr - to see details of CSR openssl req -noout -text -in server.csr 3. Have the Certificate Authority sign the request. (email the csr to the acting CA) 4. Receive and examine SSL Certificate - to see details openssl x509 -noout -text -in server.crt 5. Installing the SSL on your Apache website: - open the configuration file for apache using VI command or gedit 2 options a. vi /usr/local/apache2/conf/httpd.conf b. vi /usr/local/apache2/conf/ssl.conf - identify the SSL <VirtualHost> block to configure, try to search for the “SSL” keyword /SSL - configure the <VirtualHost> block for the SSL-enabled site. <VirtualHost IP:443> DocumentRoot <path_to_your_document_root> Apache Web Server LABORATORY EXERCISES ServerName www.yourdomain.com SSLEngine on SSLCertificateFile <path_to_server.crt> SSLCertificateKeyFile <path_to_server.key> </VirtualHost> - restart apache ./apachectl stop ./apachectl startssl