4. Ron Harding Exhibits
The below module takes a uSD flash card where it has RS232 protocol interface with just TTL logic interface. So you can access and
configure it via any terminal emulator. The complexities of the SD card protocol are removed by the on board controller so you can
focus on your implementing your functionality. This might be considered to be a typical example of types of circuit that I work on;
not really circuit design, but taking these modules and interface to c# control applications. The DLP2232M is the dual port USB
device that allows for various bit bang modes and what they call Multi Protocol Synchronous Serial Engine(MPSSE). With this you
can do I2C, JTAG, SPI and bit bang modes. The semiconductor OEM of the 2232 has now come out with 4 port model. I have
created a design spec. level document for this project.
Figure 4 - uSD flash card drive test circuit
7. Ron Harding Exhibits
Setup.timer
Select the number of game rounds then press START
START
gameTime.Start()
Players = myRandom.Next(7,10)
NonstaticFunctions class
GetNextSessionPlayers()
GetAssignedPlayers()
Build player array
Assign random number to each member of the player array – 1 to 10000
GetDominantPlayerQueueHandler()
Int[] myAssignedPlayers = GetAssignedPlayers(sessionPlayers) – get the game session assigned players
GetDominantPlayer.Enqueue(myAssignedPlayers[]) – push all assigned players onto the queue for evaluation
Have we
examined all
players?
NO
YES
Remove two assigned players from the queue for evaluation
Evaluate pair of players to see which is HIGHER
A local ‘sessionWINNER’ has been found!
People = People – sessionplayers == get a new People count for next run
GameSession()
Sessionplayers = GetNextSessionPlayers() – calculate number of players in new game session.
sessionWINNER = GetDominantPlayerQueueHandler() – find the player that has the HIGHEST assigned number
GameSession() – start a new game session,
GameDataRecorder() – record the results of each game session
AND keep a running summation of total game time duration
Make gameTime random to make
simulation more realistic
After last detected game session, record results to date-time stamped
file in new date-time stamped folder.
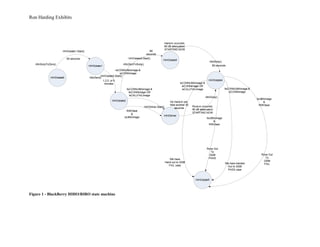
Figure 7 - c# based game that I created for a technical screen
8. Ron Harding Exhibits
Standard tests
( by default all 3 tests will be selected
automatically, the 3 tests are RI/RO
test, long call test and HI/HO test).
* The default parameters for RI/RO
test are 25 attempts, 2 min wait
time between attempts.
* For long call default parameters are
0dB attenuation level. 30 min call
duration, # of long calls to be made,
and preprogrammed radio number)
* For HIHO the default parameters
are, number of attempts = 25, wait
time between attempts = 2 min,
preprogrammed radio number, call
duration 2 min.
Custom Tests
( user can chose which of the 3 tests to run)
* options for RIRO test. # of attempts = 10,
25, 50, 100, 200, 500, wait time between
attempts = 2, 5, 15, 30 minutes.
* options for long call test. # of calls to be
made 3,6,9,12,15,18,21. Call duration =
10,20,30 minutes. Signal region, hi (0dB),
medium ( 15dB), low ( 30dB) attenuation. If
user selects 6 calls, and selects medium and
low region, the system will make 3 calls at
0dB and 3 calls at 30dB attenuation level. If
user selects all 2 levels, then it will make 2
calls on each level. Plus ability to select the
phone # to be called.
* options for HIHO test. # of attempts = 10,
25, 50, 100, 200, Wait time between attempts
= 2, 5, 15, 30 minutes. Ability to select the
phone # to be called. Call duration = 2 min.
User selects standard tests or custom
tests. The standard tests don’t provide
any configuration for user, the custom
test provide configurable options. User
enters Handset model
User selects the handset to be tested (
Blackberry, samsung, Nokia, Motorola,)
and enters HS MAC, FW # , AP model
#, FW #, Test engineer name and
location. All this info is logged in the log
file for the test.
Handset
initialization page
System will send AT commands to
the selected handset and display,
connected status, Battery status,
GSM RSSI, MSISDN, serial #,
These results are displayed and
also logged in log file.
Graphic display
* GSM/UMA status
Test Setup
* list of tests to be run
* Initial delay ( for every test
there will be 1 minute delay
before start)
Test Execution
* Button to start/stop test
* Test progress bar
* List of selected tests and
their status. ( waiting,
running, etc)
* Results summary for each
test.
Continuous Looping functions
* AT command call status ( only for tests
that make a call)
* AT commands for GSM signal strength
* AT command for battery capacity
* sniffer parsing
* capturing & saving UMA logs
* checking link status between HS and
laptop.
Automated handset test
Figure 8 - Handset functional test development – initial concept based on interview with users and supervisor