Virtualbox step by step guide
•Download as DOCX, PDF•
6 likes•23,283 views

At the end of the lesson, the student will learn to: • Install Oracle Virtualbox VM Manager • Install Windows 2003 Server as a VM • Create a shared folder between the host computer and the VM

Recommended
More Related Content
What's hot
What's hot (20)
Viewers also liked
Viewers also liked (20)
Similar to Virtualbox step by step guide
Similar to Virtualbox step by step guide (20)
More from Hock Leng PUAH
More from Hock Leng PUAH (20)
Recently uploaded
Recently uploaded (20)
Virtualbox step by step guide
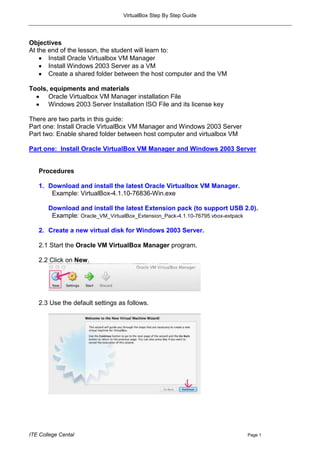
- 1. VirtualBox Step By Step Guide Objectives At the end of the lesson, the student will learn to: Install Oracle Virtualbox VM Manager Install Windows 2003 Server as a VM Create a shared folder between the host computer and the VM Tools, equipments and materials Oracle Virtualbox VM Manager installation File Windows 2003 Server Installation ISO File and its license key There are two parts in this guide: Part one: Install Oracle VirtualBox VM Manager and Windows 2003 Server Part two: Enable shared folder between host computer and virtualbox VM Part one: Install Oracle VirtualBox VM Manager and Windows 2003 Server Procedures 1. Download and install the latest Oracle Virtualbox VM Manager. Example: VirtualBox-4.1.10-76836-Win.exe Download and install the latest Extension pack (to support USB 2.0). Example: Oracle_VM_VirtualBox_Extension_Pack-4.1.10-76795.vbox-extpack 2. Create a new virtual disk for Windows 2003 Server. 2.1 Start the Oracle VM VirtualBox Manager program. 2.2 Click on New. 2.3 Use the default settings as follows. ITE College Cental Page 1
- 2. VirtualBox Step By Step Guide ITE College Cental Page 2
- 3. VirtualBox Step By Step Guide ITE College Cental Page 3
- 4. VirtualBox Step By Step Guide The VM will be created. ITE College Cental Page 4
- 5. VirtualBox Step By Step Guide 3. Install Windows 2003 Server. (We will be using the ISO image for the installation). 3.1 Select the Win 2003 Svr VM image and click on Start. 3.2 We will mount the ISO image into the virtual Drive as follows. ITE College Cental Page 5
- 6. VirtualBox Step By Step Guide The installation will start immediately. 3.3 Press Enter to continue. ITE College Cental Page 6
- 7. VirtualBox Step By Step Guide 3.4 Press function key F8 to continue. 3.5 Press Enter to start the installation 3.6 Press Enter to format the partition using NTFS file system. ITE College Cental Page 7
- 8. VirtualBox Step By Step Guide The installation will continue … After the computer restart – DoNOT press any key but wait for the restart to complete automatically!!! The installation will continue after the restart is completed automatically. ITE College Cental Page 8
- 9. VirtualBox Step By Step Guide 3.7Click on Next. 3.8 Type in the Name and Organization, then click on Next. ITE College Cental Page 9
- 10. VirtualBox Step By Step Guide 3.9 Ask the instructor for the CD key, type it in, then click on Next. 3.10Click on Next to allow 5 connections to the server at any one time. ITE College Cental Page 10
- 11. VirtualBox Step By Step Guide 3.11 Type in a password “em1101j” for the administrator and click on Next. 3.12 Click on Yes, to continue using our password which is a rather weak password. ITE College Cental Page 11
- 12. VirtualBox Step By Step Guide 3.13 Select the timezone for Singapore and click on Next. 3.14 Use the typical setting and click on Next. ITE College Cental Page 12
- 13. VirtualBox Step By Step Guide 3.15 Use the default Workgroup and click on Next. After the computer restart – DoNOT press any key but wait for the restart to complete automatically!!! The installation is completed after the restart. 3.17 Remove the disk from the VM: Click on the CD icon and select “Remove disk from virtual drive”. ITE College Cental Page 13
- 14. VirtualBox Step By Step Guide 4 Clone the VM as backup. 4.1 Close the VM. Your Close icon on windows will be on the right handside. 4.2 Select “Save the machine state” and click on OK. 4.3 Right click on the “Win 2003 Svr” VM and select Clone. ITE College Cental Page 14
- 15. VirtualBox Step By Step Guide 4.4 Type in “Win 2003 Svr Backup” and click on Continue. 4.5 Use the default “Full Clone” and click on Clone. After this just let the PC runs till the cloning process is completed. ~ The End of Part One ~ ITE College Cental Page 15
- 16. VirtualBox Step By Step Guide Part two: Enable shared folder between host computer and virtualbox VM On the host computer (the physical computer, NOT in virtualbox): 1. Right-click on desktop, select New and then Folder 2. Name the new folder: sharedfolder VirtualBox: 1. Make sure the “Win 2003 Svr” VM is in Powered Off mode. Click on Settings ITE College Cental Page 16
- 17. VirtualBox Step By Step Guide 2. Click on Shared Folders tab, then click on 3. Click on and select Other… 4. Select Desktop, then select sharedfolder and click on Choose ITE College Cental Page 17
- 18. VirtualBox Step By Step Guide 5. Check on Auto-mount and click on OK 6. Click on OK That is all to create and mount the shared folder. The next part show you where the shared folder can be found in the VirtualBox VM. 7. Select “Win 2003 Svr” VM. Click on Start ITE College Cental Page 18
- 19. VirtualBox Step By Step Guide 8. After successfully login, Select Devices and then Install Guest Additions… 9. Click on Next 10. Click on Next ITE College Cental Page 19
- 20. VirtualBox Step By Step Guide 11. Click on Install 12. Click on Yes ITE College Cental Page 20
- 21. VirtualBox Step By Step Guide 13. Click on Continue Anyway (a few times) 14. Click on Finish. The VirtualBox VM will Reboot after this step ITE College Cental Page 21
- 22. VirtualBox Step By Step Guide 15. After successfully login, Click on Start, then My Computer 16. You will see a new network drive (sharedfolder on „vboxsvr‟ (E:)). That‟s it. In future, the files you copied into sharedfolder on the host computer, they will be available in this mapped network drive. ITE College Cental Page 22