SlideShare a Scribd company logo
1 of 61
Download to read offline
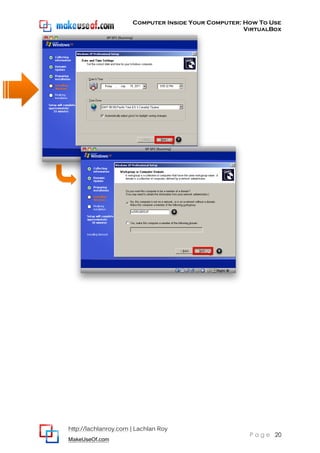
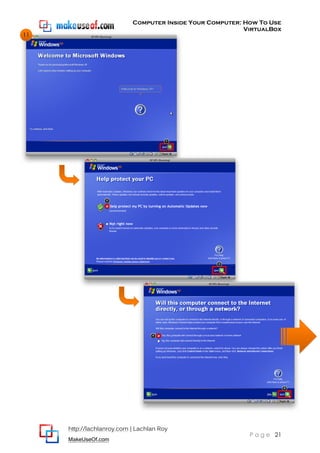
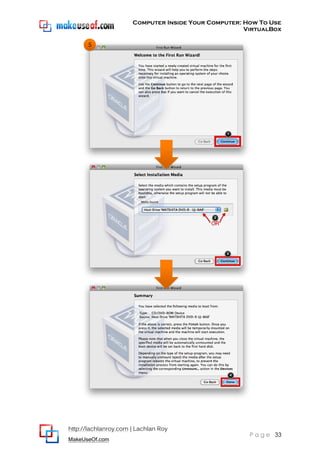
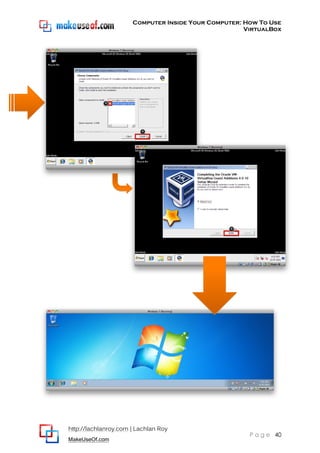
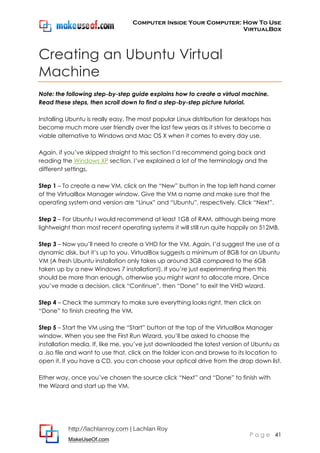
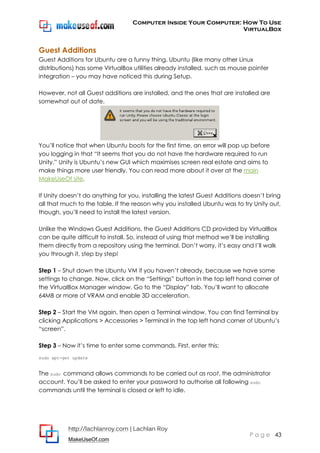
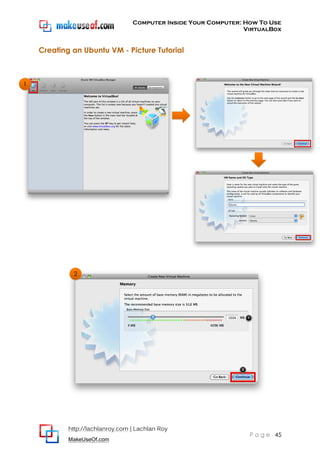
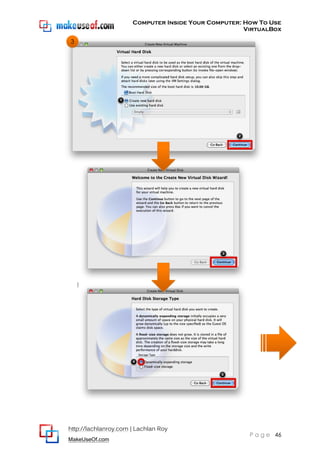
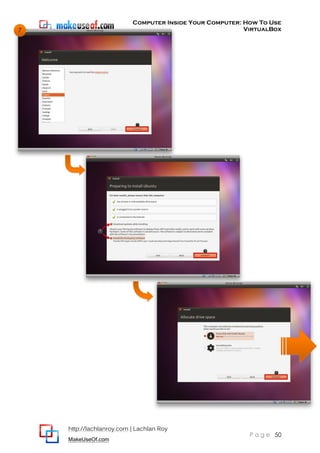
Computer Inside Your Computer: How To Use
VirtualBox
http://lachlanroy.com | Lachlan Roy
MakeUseOf.com
P a g e 2
Computer Inside Your
Computer: How To
Use VirtualBox
By: Lachlan Roy
http://lachlanroy.com
Edited by: Justin Pot
This manual is the intellectual property of MakeUseOf. It must only be published in its
original form. Using parts or republishing altered parts of this guide is prohibited.
Computer Inside Your Computer: How To Use
VirtualBox
http://lachlanroy.com | Lachlan Roy
MakeUseOf.com
P a g e 3
Table of Contents
Introduction..............................................................................................................................4
Introduction to VirtualBox.......................................................................................................5
What is VirtualBox?...........................................................................................................5
Why do I want it?..............................................................................................................5
How do I get it? ................................................................................................................5
Using VirtualBox ....................................................................................................................6
Creating a WinXP Virtual Machine .......................................................................................7
Guest Additions..................................................................................................................11
Where to go from here? ...................................................................................................12
Creating a Windows XP VM - Picture Tutorial ................................................................13
Installing XP Guest Additions - Picture Tutorial ...............................................................23
Building a Win7 Virtual Machine..........................................................................................26
Guest Additions..................................................................................................................28
Where to go from here .....................................................................................................29
Creating a Windows 7 VM - Picture Tutorial...................................................................30
Installing W7 Guest Additions - Picture Tutorial ..............................................................38
Creating an Ubuntu Virtual Machine .................................................................................41
Guest Additions..................................................................................................................43
Creating an Ubuntu VM - Picture Tutorial.......................................................................45
Installing Ubuntu Guest Additions - Picture Tutorial.......................................................54
Bonus Points............................................................................................................................57
Shared Folders ................................................................................................................57
Setting up the shared folder (regardless of guest OS) ..........................................57
Windows.......................................................................................................................57
Ubuntu..........................................................................................................................57
Conclusion..............................................................................................................................59
Computer Inside Your Computer: How To Use
VirtualBox
http://lachlanroy.com | Lachlan Roy
MakeUseOf.com
P a g e 4
Introduction
If only you had more computers.
You’ve heard a lot about Linux and you’d love to try it out, but you don’t know
enough to take the plunge and install it alongside Windows – maybe you’re worried
you’ll wipe all your files off in the process. Besides, you’d like to have another
computer handy so that you can look something up if you get stuck, but you don’t
have another computer. This is it.
Or maybe it’s the opposite. Perhaps you’ve taken a step out of your comfort zone
and ditched Windows – maybe for Ubuntu, or maybe for Mac OS X. You feel
liberated! No more Blue Screens of Death! You’re living life on the edge, getting on
with your work… and then you come to a screeching halt. You discover that a piece
of software crucial to your workflow runs on Windows… and only Windows.
What ever shall you do?
Does this mean that you have to go out and buy a new computer just to run this one
program? Or, as an only marginally better prospect, will you have to install it
alongside your current OS and restart every time you need to use it? Suddenly you
realise that your freedom is only as long as the chain around your ankle.
That is, until somebody introduces you to VirtualBox.
Suddenly you gain the power to conjure virtual computers out of thin air. They don’t
take up space on your desk, yet they work just like a real computer does. They can
be conjured up and removed with little more than a few clicks.
Intrigued? Read on.
Computer Inside Your Computer: How To Use
VirtualBox
http://lachlanroy.com | Lachlan Roy
MakeUseOf.com
P a g e 5
Introduction to VirtualBox
What is VirtualBox?
VirtualBox is a free, open source, cross-platform application
for creating, managing and running virtual machines (VMs) –
computers whose hardware components are emulated by
the host computer, the computer that runs the program.
VirtualBox can run on Windows, Mac OS X, Linux and Solaris.
This guide is based on the OS X version, but the steps are almost exactly the same
regardless of the host operating system.
Why do I want it?
Using virtual machines can be extremely useful for a number of reasons. For
example, you may want to run a virtual machine to try out software that you think
might be unsafe, or you might want to try out another operating system without
changing the way your computer is already set up.
You might also want to use it for security purposes; for example, you might want to
create a virtual machine just for online banking so that you can be sure there are no
spyware or trojans getting at your precious data.
Finally, you might want to get it because you can. VirtualBox is completely free –
there’s no reason not to download it to have a tinker!
How do I get it?
The easiest way to get the latest version of VirtualBox is to download it from the
download page of the VirtualBox website – www.virtualbox.org/wiki/Downloads.
There you can download the correct version for your platform, or if you’re using Linux
you can click through to find a list of instructions for various Linux distributions.
For each Linux distribution you’re given the option of downloading either the “i386”
or “amd64” option. “i386” is the 32 bit version, “amd64” is the 64 bit version. If you’re
not sure which version of the operating system you’re using you’re almost certainly
using the 32 bit version and so you will want to download the “i386” version of
VirtualBox.
Installing VirtualBox is just like installing any other program on your platform, so you
shouldn’t have any problem with the installation. If you do get stuck though, you
can read the installation guide on the VirtualBox website.
Computer Inside Your Computer: How To Use
VirtualBox
http://lachlanroy.com | Lachlan Roy
MakeUseOf.com
P a g e 6
Using VirtualBox
When you start up VirtualBox for the first time you’ll be greeted by the VirtualBox
Manager. This is where you can create virtual machines, turn them on or off and
make changes to the virtual hardware available to them.
Obviously, VirtualBox isn’t much good like this – we need to make a virtual machine!
I’ll be running through making virtual machines for Windows XP, Windows 7 and
Ubuntu, as these are the most likely candidates for a VM.
However, don’t think that these are the only options that virtual machines have to
offer. If you’re feeling brave, you might want to try one of the other Linux
distributions, such as Debian (which Ubuntu is based on), Fedora or OpenSUSE. Or
maybe Puppy Linux, or Arch Linux, or Linux Mint, or CentOS, or… well you get the
idea.
In the following sections you will learn to create Windows XP, Windows 7 and Ubuntu
virtual machines. Each step-by-step section is followed by numbered screenshots of
the steps described. Feel free to consult both the instructions and the pictures as you
build your machines.
Computer Inside Your Computer: How To Use
VirtualBox
http://lachlanroy.com | Lachlan Roy
MakeUseOf.com
P a g e 7
Creating a WinXP Virtual Machine
Note: the following step-by-step guide explains how to create a virtual machine.
Read these steps, then scroll down to find a step-by-step picture tutorial.
Step 1 – The first step to creating any virtual machine is to click on the
“New” button in the top left hand corner of the VirtualBox Manager
window – it’s a big blue star that’s pretty hard to miss!
This starts the “New Virtual Machine Wizard”, which will walk us through the steps
required to get a new virtual machine up and running.
Step 2 – Enter the name of the Virtual Machine. What you call it is entirely up to you –
it’s really so that you can find a specific VM easily when you have many different
VMs in the manager.
VirtualBox will try to figure out what OS you plan to run on the VM based on what
you name it. If the name of the VM has “XP” in it somewhere it assumes that you’ll be
installing Windows XP and will adjust itself accordingly. If you have a cryptic name
for it, though, don’t worry. You can manually choose the OS type from the drop-
down boxes below.
Once you’ve done that, click on “Continue” to go to the next step.
Step 3 – You’ll be asked to select the amount of RAM that you want to allocate to
the virtual machine. The more you give the VM the smoother it’ll run, but be warned;
memory allocated to the VM is memory that the host OS (that is, the computer
you’ve installed VirtualBox on) won’t be able to use.
So, how much RAM should you allocate to the VM? It depends on a number of
things. If you’re planning to use only the VM while it’s running, you can afford to give
it more RAM because you won’t be asking the host OS to be doing much
multitasking. If, on the other hand, you’ll be using the VM at the same time as doing
lots of other things on the host OS, you’ll want to be more conservative with the
amounts that you give out. However, a good general rule of thumb is to allocate
half of your computer’s RAM to the VM. So, if your computer has 4GB of RAM, give
2GB to the VM leaving the host with the other 2GB.
As far as hard numbers go, Windows XP can run well on 512MB of RAM, or if you’re
feeling generous you can push the boat out and give it a full 1024MB (1GB), so I’d
recommend allocating between these two numbers.
Time to click on “Continue” again!
Computer Inside Your Computer: How To Use
VirtualBox
http://lachlanroy.com | Lachlan Roy
MakeUseOf.com
P a g e 8
Step 4 – The next step is to create a “Virtual Hard Disk” (VHD). This creates a file on
your hard drive which can be used by VirtualBox to act like its own separate hard
drive, allowing you to install an operating system without worrying about wiping over
your existing data.
Make sure that “Boot Hard Disk” and “Create new hard disk” are selected, then click
“Continue”. This will start the “Create New Virtual Disk Wizard”. Click “Continue”
again to proceed.
Next you’ll be asked if you want to create a “dynamically expanding” disk (which I’ll
call a dynamic disk from now on) or a “fixed size” disk. Each has its own benefits.
The great thing about a dynamic disk is that it’s only as large as the data that it has
on it; you can assign it plenty of space without having to worry about whether you’ll
use it or whether you’ll run out of space. They’re also a lot faster to create than a
fixed disk of any significant size.
However, you’ll need to keep an eye on it, because its flexibility can also be its
downfall. Say you create a dynamic disk and assign it 50 GB, then put about 20GB
of data on it. The dynamic disk file will show up as taking only 20GB of space on the
hard drive according to your host OS. Great. You fill up the rest of the free space on
your physical hard drive.
Thing is, if you start up the VM and try to add more data to the dynamic disk, you’ll
run into trouble – the virtual disk says that it’s still got 30GB free, but there’s nowhere
to actually put that 30GB of data. The VM freaks out, thinking that the hard drive is
failing, but that’s not true. It just needs some more breathing room on the physical
drive to store the data it’s been told it’s able to save.
This is the advantage of the fixed size disk. Sure, it’s inconvenient when you’re trying
to figure out how much space to give it, but once it’s been made you won’t have to
worry about it ever again.
In this example we’ll be using dynamic disks, but fixed disks will work just as well.
Make sure that “Dynamically expanding storage” is selected, then click on
“Continue” again.
Next you’re asked to choose the name, location and size of the new VHD. For most
uses you won’t need to change the name or the location, but you can do this by
clicking on the folder icon next to the text box.
The size you should make the VHD depends on how much stuff you plan to put in it,
but if you’re using a dynamic disk it doesn’t really matter if you allocate it lots of
Computer Inside Your Computer: How To Use
VirtualBox
http://lachlanroy.com | Lachlan Roy
MakeUseOf.com
P a g e 9
space. If you’re just using it to run a few programs, the suggested size of 10GB should
be plenty! Make sure the settings are right then click “Continue”, then “Done”.
Step 5 – At this point all you need to do is check over everything and make sure all
the settings are as you expect them to be. Then you just need to click “Done” and
the VM will be created, ready for you to install Windows!
Step 6 – Now it’s time to start up the VM for the first time. Make sure that the new
virtual machine that you just created is selected in the VirtualBox Manager window,
then click on the “Start” button at the top of the window.
Step 7 – When the VM starts up you’ll be greeted by the “First Run Wizard”, which will
guide you through getting ready to install Windows XP. Click “Continue”.
It’ll then ask you what you want to use for installation media; that is, whether you
want to install it using a CD and the host’s optical drive, or whether you want to
install it from a disk image on your hard drive (usually in the form of a .iso file). You
can choose the former from the drop down menu or the latter by browsing for the
.iso file (using a standard “open file” dialog). Once you’ve chosen the installation
media, click on “Continue”, then “Done” after reading the summary.
Step 8 – Since there isn’t anything installed on the virtual hard disk the virtual
machine will automatically boot from the CD into Windows Setup. It’ll take a while
for setup to load all the files it needs, but eventually you’ll see a screen that shows a
list of the existing partitions and unpartitioned space on the computer. In the list all
you’ll see is an “Unpartitioned space” the size of the VHD you created in Step 3. You
want to set up XP here, so press “ENTER”.
You’ll then be asked how you want to format the drive. You’ll most definitely want to
choose the option “Format the partition using the NTFS file system (Quick)”. Make
sure you choose the “Quick” option or you’ll be waiting for a very long time!
That’s all you’ll need to do for a little while – Windows Setup will format the VHD then
start copying files to the drive. You can sit and watch or go get a cup of coffee; it
doesn’t really matter. Once it’s finished copying files Windows Setup will
automatically restart your computer to proceed to the next step.
Step 9 – When the computer restarts it will try to boot from the CD first, saying “press
any key to boot from CD…”. Ignore this! If you do this you’ll be doing step 7 all over
again for no reason. You can prevent this from happening again by right clicking the
CD icon at the bottom of the VM window and clicking “Remove disk from virtual
drive”. Once it passes, you’ll see the familiar Windows XP booting screen before the
screen switches to the second stage of installation.
You’ll probably see a dialog box come up a few times during the installation about
the guest OS not supporting “mouse pointer integration”. Don’t worry about this – tell
it not to show the option again and then click OK to dismiss it.
Computer Inside Your Computer: How To Use
VirtualBox
http://lachlanroy.com | Lachlan Roy
MakeUseOf.com
P a g e 10
You’ll be waiting for a little while longer, until…
Step 10 – The “Windows XP Setup Wizard” will pop up. Click “Next” to get started.
First you’ll be asked to set your regional and language options, which basically
involves clicking on “Customize…” to choose your country and then “Details” if you
need to change your keyboard layout. Once that’s sorted, click “Next” again.
Next you’ll need to enter in a computer name and an Administrator password. I’d
suggest a name that is actually useful instead of the random string of characters
produced automatically. How complex you want to make the administrator
password is up to you, depending on how important the security of the VM is.
After clicking “Next” you’ll see the date and time settings, which you shouldn’t have
to change. Clicking “Next” again will make the window disappear for a while as
Windows applies all the settings and continues with the installation.
After a minute or two goes by another window will pop up, this time for network
settings. You’ll almost certainly want to select the first option (a network that has no
domain). It requires that you enter the name of a workgroup – the default
workgroup name for Windows XP computers is “WORKGROUP”. Enter that into the
text box and then click “Next”.
That’s it for Windows Setup! It’ll take a few minutes for Windows to finalise the
installation, then it will restart automatically once more when it’s finished.
Step 11 – We’re at the last step for installing Windows XP itself. Now we just need to
enter in some final details like networking and creating a username.
As Windows starts up again a dialog box will pop up saying that it will adjust the
screen resolution to approve the appearance of visual elements. Just click “OK”
then “OK” again on the next window that pops up to confirm the change.
Now you’ll see the “Welcome to Windows” screen. Click “Next” in the bottom right
hand corner of the screen to get started.
You’ll be asked if you want to use Automatic Updates; you most certainly do! Make
sure the first option is selected before clicking “Next”.
The way that VirtualBox provides a network connection to the VM means that you’ll
definitely want to choose the first option (“Yes, this computer will connect through a
local area network or home network”). Make sure that’s selected, then click “Next”.
There’s little point in registering with Microsoft, so click No, then “Next”. In the next
step you’ll be asked to enter in a username – enter one then click “Next”. After that
you just need to click “Finish”, then you’re all done!
Computer Inside Your Computer: How To Use
VirtualBox
http://lachlanroy.com | Lachlan Roy
MakeUseOf.com
P a g e 11
You’ll see the “welcome” screen, and then the familiar Windows XP desktop. Great!
You’re all done with installing Windows. However, we’re not done yet! Go to the
VM’s start menu and shut it down, because there’s one thing left to do; installing
VirtualBox’s “Guest Additions”.
Guest Additions
“What are Guest Additions?” I hear you ask. The Guest Additions are a set of drivers
and software which comes with VirtualBox to make using VirtualBox in conjunction
with the host computer a little easier. Installing Guest Additions isn’t compulsory at
all, but it’s most definitely recommended.
There are a few features that you’ll get by installing Guest Additions. The main one is
called mouse pointer integration. You may have noticed that when using the VM
you had to click inside the window for the VM to detect any mouse movements (or
to type), and that you needed to press a specific key (called the host key) to
release the mouse and keyboard so that you could use them with the host
computer again.
With mouse pointer integration, you no longer have to click inside the window to use
your keyboard and mouse in the VM or use the host key to release them. As you
move your pointer over the window it is automatically “captured”, and it is
automatically released when the pointer reaches the edge of the window. This by
itself is worth installing Guest Additions for!
The second main feature is shared folders. This basically allows folders on your host
machine to show up as network shares on the guest OS, allowing you to access files
which would otherwise be inaccessible.
There are other useful features like better video support and seamless windows – you
can read more about them in the VirtualBox documentation.
To install Guest Additions properly, you’ll need to start Windows XP in Safe Mode. This
basically means that Windows starts up running nothing but the bare essential
drivers. In this mode, VirtualBox is able to install its Guest Additions without messing
with drivers which would otherwise be in use.
Step 1 – Before you start there’s a couple of settings you’ll need to change. Make
sure that the Windows XP VM is selected in the VirtualBox Manager, then click on the
“Settings” button between “New” and “Start”.
Computer Inside Your Computer: How To Use
VirtualBox
http://lachlanroy.com | Lachlan Roy
MakeUseOf.com
P a g e 12
You’ll want to go to the “Display” tab. There you’ll want to give the VM at least 32MB
of video memory; ideally, you’ll want to allocate 64MB. You’ll also want to enable
both 3D and 2D Video Acceleration.
Step 2 – It’s time to start up the VM again. To start Windows up into Safe Mode, you’ll
need to constantly press F8 (Fn+F8 on a Mac and some Windows laptops) until you
see the “Windows Advanced Options Menu”. Here you’ll want to select Safe Mode
using the arrow keys and then press Enter.
You’ll see a long list of seemingly random text – this is a list of the exact drivers that
Windows is loading to be used in Safe Mode. Windows will boot after this.
Step 3 – Once you’ve logged in as Administrator, a window mentioning Safe Mode
will pop up; it’s safe to dismiss it straight away.
Now, go to the Devices menu for the VM; on OS X this can be found in the menu bar
while the VM window is selected, or for Windows/Linux it will be at the top of the VM
window itself (you might have to press the “alt” key to reveal it). Here you’ll see an
option labelled “Install Guest Additions…”. Clicking on this will mount an .iso file as a
CD on the VM.
Step 4 – Once the Guest Additions CD has been mounted the setup wizard should
automatically pop up. If it doesn’t, go to “My Computer” and click on the CD to
start it (which should be D: by default).
The setup is fairly straightforward, and all the default values are good. You might
want to select “Direct3D Support” when asked to choose components, though.
While chances are you won’t be using the VM for anything that actually uses
Direct3D, you might as well have it installed now rather than having to do this all
again later if you do need it for some reason.
After finishing the installation you’ll be asked to reboot the computer. That’s it! When
you restart the computer allow it to boot normally. You should be logged
automatically into the standard account and able to actually start using the VM like
a normal computer.
Where to go from here?
Having said that, just like any new computer you’ll need to get some software to
make your computer actually usable. A new browser and anti-virus/malware
software are the basics, but there are other things too, like a PDF reader, multimedia
software (saving you from having to go back to your host OS to watch the odd
video or listen to the odd song).
Computer Inside Your Computer: How To Use
VirtualBox
http://lachlanroy.com | Lachlan Roy
MakeUseOf.com
P a g e 13
You could go hunt down the software individually, which is fine – I recommend
Google Chrome, Avast’s Free Antivirus and MalwareBytes Free Anti-malware.
You could do that, or you could download a package with everything you need to
get started that installs in one go. Interested? Check out the MakeUseOf Pack: a
handful of really useful Windows apps.
Creating a Windows XP VM - Picture Tutorial
1
2
Computer Inside Your Computer: How To Use
VirtualBox
http://lachlanroy.com | Lachlan Roy
MakeUseOf.com
P a g e 14
3
4
Computer Inside Your Computer: How To Use
VirtualBox
http://lachlanroy.com | Lachlan Roy
MakeUseOf.com
P a g e 15
Computer Inside Your Computer: How To Use
VirtualBox
http://lachlanroy.com | Lachlan Roy
MakeUseOf.com
P a g e 16
5
6
Computer Inside Your Computer: How To Use
VirtualBox
http://lachlanroy.com | Lachlan Roy
MakeUseOf.com
P a g e 17
7
Computer Inside Your Computer: How To Use
VirtualBox
http://lachlanroy.com | Lachlan Roy
MakeUseOf.com
P a g e 18
8
9
Computer Inside Your Computer: How To Use
VirtualBox
http://lachlanroy.com | Lachlan Roy
MakeUseOf.com
P a g e 19
10
Computer Inside Your Computer: How To Use
VirtualBox
http://lachlanroy.com | Lachlan Roy
MakeUseOf.com
P a g e 20
Computer Inside Your Computer: How To Use
VirtualBox
http://lachlanroy.com | Lachlan Roy
MakeUseOf.com
P a g e 21
11
Computer Inside Your Computer: How To Use
VirtualBox
http://lachlanroy.com | Lachlan Roy
MakeUseOf.com
P a g e 22
Computer Inside Your Computer: How To Use
VirtualBox
http://lachlanroy.com | Lachlan Roy
MakeUseOf.com
P a g e 23
Installing XP Guest Additions - Picture Tutorial
1
2
Tap F8 to
get...
Computer Inside Your Computer: How To Use
VirtualBox
http://lachlanroy.com | Lachlan Roy
MakeUseOf.com
P a g e 24
3
4
Computer Inside Your Computer: How To Use
VirtualBox
http://lachlanroy.com | Lachlan Roy
MakeUseOf.com
P a g e 25
Computer Inside Your Computer: How To Use
VirtualBox
http://lachlanroy.com | Lachlan Roy
MakeUseOf.com
P a g e 26
Creating a Win7 Virtual Machine
Note: the following step-by-step guide explains how to create a virtual machine.
Read these steps, then scroll down to find a step-by-step picture tutorial.
Installing Windows 7 isn’t much different to installing Windows XP. Having said that,
there are a few changes to make the installation a little more user friendly.
It’s important to note before we start that VirtualBox’s video drivers don’t support
Windows Aero. That means that you won’t get window transparency, Windows Snap
or window thumbnails in the taskbar, among other things. If these features are
essential for you, you might need to consider a paid alternative such as VMWare.
If you’ve jumped straight to this, you might want to go back and read the Windows
XP section first, since I’ve introduced a lot of new terminology and explained a lot of
what’s going on here. With that said, let’s get started!
Step 1 – In the VirtualBox Manager window, click on the “New” button in the top left
hand corner to create a new Virtual Machine. Give the VM a name and select
“Windows 7” as the type of OS if it’s not automatically selected based on the name
before clicking “Next” to go to the next step.
Step 2 – For Windows 7 you’ll want to provide the VM with at least 1024MB (1GB);
2GB is better, or more if you have more than 4GB in your host computer. Remember
not to give it too much, though – if your host OS starts running out of RAM it could
actually decrease performance! Click “Next” again.
Step 3 – Now it’s time to create a Virtual Hard Disk (VHD) for the VM. I’d suggest
creating a dynamic disk, but if you have plenty of desktop space you might prefer
to create a fixed disk. Windows 7 takes up a lot more space than XP, so you’ll want
to allocate at least 20GB to this VHD. Click “Continue”, then “Done” to exit the VHD
Creation Wizard.
Step 4 – Check through the summary to make sure everything is as it should be, then
click on “Done” to finish creating the VM.
Step 5 – Start the VM using the “Start” button in the top left of the VirtualBox
Manager. When the First Run Wizard comes up, select the installation media you
want to use to install Windows 7 (either your host’s CD drive or a .iso file), then click
“Next” and “Done” to get started with the installation.
Step 6 – Because there’s nothing installed Windows will automatically start loading
Windows Setup. You’ll see a progress bar labelled “Windows is loading files…” before
Computer Inside Your Computer: How To Use
VirtualBox
http://lachlanroy.com | Lachlan Roy
MakeUseOf.com
P a g e 27
a window pops up called “Install Windows”. Select the language, time and currency
format and keyboard layout that’s right for you before clicking “Next”.
Note: With some versions of VirtualBox on some platforms, you may get an error as
Windows tries to start which says “Windows failed to start” and that this could be due
to a recent hardware change. If you receive this error, power down the VM (by
closing the VM window), going to the VM’s settings (select the VM in the VirtualBox
Manager then click on the “Settings” button), choosing “System”, then under the
“Motherboard” tab selecting the option “Enable IO APIC”.
Then click on the button labelled “Install Now”.
Step 7 – The next step requires you to accept Windows 7’s license terms. Click the
check box before clicking “Next”.
When asked what kind of installation you want, you’ll need to select a “Custom”
installation as there’s nothing to upgrade from.
Next you’ll be asked where you want to install Windows. The only option will be the
unallocated space of the unformatted VHD which you created in Step 3. All you
need to do is click on “Next” to start installation.
Windows Setup will take it from there – you won’t need to touch anything until it
automatically boots into Windows once it finishes installing everything.
Step 8 – The first window you see when Windows 7 reboots will ask you to enter a
username and to give the computer a name so it can be identified on a network. To
this end, it’s probably worth giving it a name such as “Win7-VM”.
When you click on “Next”, you’ll be asked to provide a password. While this isn’t
essential (particularly since it’s probably password protected by the Host OS and
isn’t likely to have any sensitive data stored on it), you may still feel more
comfortable entering a password. It’s up to you. Either way, click on “Next” when
you’re ready to proceed.
It’s at this point that you’re asked to enter in your Windows 7 product key. You can
either enter it here and get it over and done with, or you can enter it in later once
you’re on the Windows desktop. Again, either way click on “Next” when you’re
ready to proceed.
You’ll want to use the recommended settings for Windows update, or you may
choose to install only important updates if you know what you’re doing.
Next, confirm that the time and date settings are correct, then click “Next”.
Computer Inside Your Computer: How To Use
VirtualBox
http://lachlanroy.com | Lachlan Roy
MakeUseOf.com
P a g e 28
If you’re already connected to a network, the last step will be to choose what kind
of network you’re connected to: Home, work or public.
After that, all that’s left is for Windows to finalize a few settings itself and prepare your
desktop! Then hey presto, you’ll be looking at a Windows 7 desktop, ready to go.
Well, except for Guest Additions and essential software, of course. So, shut down
Windows and we’ll get this done, shall we?
Guest Additions
Just like when we installed Windows XP, we’ll need to boot Windows into Safe Mode
to install Guest Additions properly.
Step 1 – First you’ll need to change a few VM settings. Select the VM in the VirtualBox
Manager, then click “Settings”. Choose the “Display” section. You’ll want to allocate
at least 64MB of Video Memory for Windows 7; more if you can spare it. You’ll also
want to enable 3D and 2D Video acceleration. Click “OK” to save these changes.
Step 2 – When you start up the VM again, make sure to keep pressing F8 (Fn+F8 on
Macs and some other laptops), then select “Safe Mode”.
Just like Windows XP you’ll see a long list of white text on a black background – this is
a list of the drivers that Windows is loading.
Step 3 – Windows should log straight in – if for some reason you see the login screen,
select your username and enter your password. You’ll see a notice about being in
Safe Mode; it’s fine to dismiss it straight away.
Now it’s time to mount the Guest Additions CD – go to the VM’s “Devices” menu
(found in the Menu bar on OS X while the VM is selected or at the top of the VM
window on Windows/Linux) and select “Install Guest Additions…”.
Once the CD is mounted, go to My Computer and right click on the D: Drive, then
select “Install or run program from your media”.
Step 4 – This is a very straightforward installation. All the default options are great,
although again you may wish to check “Direct3D Support” as one of the
components to be installed.
When the installation is finished you’ll be asked to restart the computer. Restart the
computer and allow it to boot up normally. There you go! There’s your Windows 7
VM ready to use. Enjoy!
Computer Inside Your Computer: How To Use
VirtualBox
http://lachlanroy.com | Lachlan Roy
MakeUseOf.com
P a g e 29
Where to go from here
Again, just like any new computer you’ll need to get some software to make your
computer actually usable. A new browser and anti-virus/malware software are the
basics, but there are other things too, like a PDF reader, multimedia software (saving
you from having to go back to your host OS to watch the odd video or listen to the
odd song).
You could go hunt down the software individually, which is fine – I recommend
Google Chrome, Avast’s Free Antivirus and MalwareBytes Free Anti-malware.
You could do that, or you could download a package with everything you need to
get started that installs in one go. Interested? Check out the MakeUseOf Pack: a
handful of really useful Windows apps.
Computer Inside Your Computer: How To Use
VirtualBox
http://lachlanroy.com | Lachlan Roy
MakeUseOf.com
P a g e 30
Creating a Windows 7 VM - Picture Tutorial
1
2
Computer Inside Your Computer: How To Use
VirtualBox
http://lachlanroy.com | Lachlan Roy
MakeUseOf.com
P a g e 31
3
Computer Inside Your Computer: How To Use
VirtualBox
http://lachlanroy.com | Lachlan Roy
MakeUseOf.com
P a g e 32
4
Computer Inside Your Computer: How To Use
VirtualBox
http://lachlanroy.com | Lachlan Roy
MakeUseOf.com
P a g e 33
5
Computer Inside Your Computer: How To Use
VirtualBox
http://lachlanroy.com | Lachlan Roy
MakeUseOf.com
P a g e 34
6
Computer Inside Your Computer: How To Use
VirtualBox
http://lachlanroy.com | Lachlan Roy
MakeUseOf.com
P a g e 35
7
Computer Inside Your Computer: How To Use
VirtualBox
http://lachlanroy.com | Lachlan Roy
MakeUseOf.com
P a g e 36
8
Computer Inside Your Computer: How To Use
VirtualBox
http://lachlanroy.com | Lachlan Roy
MakeUseOf.com
P a g e 37
Computer Inside Your Computer: How To Use
VirtualBox
http://lachlanroy.com | Lachlan Roy
MakeUseOf.com
P a g e 38
Installing W7 Guest Additions - Picture Tutorial
1
2
Tap F8 to
get...
Computer Inside Your Computer: How To Use
VirtualBox
http://lachlanroy.com | Lachlan Roy
MakeUseOf.com
P a g e 39
3
4
Computer Inside Your Computer: How To Use
VirtualBox
http://lachlanroy.com | Lachlan Roy
MakeUseOf.com
P a g e 40
Computer Inside Your Computer: How To Use
VirtualBox
http://lachlanroy.com | Lachlan Roy
MakeUseOf.com
P a g e 41
Creating an Ubuntu Virtual
Machine
Note: the following step-by-step guide explains how to create a virtual machine.
Read these steps, then scroll down to find a step-by-step picture tutorial.
Installing Ubuntu is really easy. The most popular Linux distribution for desktops has
become much more user friendly over the last few years as it strives to become a
viable alternative to Windows and Mac OS X when it comes to every day use.
Again, if you’ve skipped straight to this section I’d recommend going back and
reading the Windows XP section. I’ve explained a lot of the terminology and the
different settings.
Step 1 – To create a new VM, click on the “New” button in the top left hand corner
of the VirtualBox Manager window. Give the VM a name and make sure that the
operating system and version are “Linux” and “Ubuntu”, respectively. Click “Next”.
Step 2 – For Ubuntu I would recommend at least 1GB of RAM, although being more
lightweight than most recent operating systems it will still run quite happily on 512MB.
Step 3 – Now you’ll need to create a VHD for the VM. Again, I’d suggest the use of a
dynamic disk, but it’s up to you. VirtualBox suggests a minimum of 8GB for an Ubuntu
VM (A fresh Ubuntu installation only takes up around 3GB compared to the 6GB
taken up by a new Windows 7 installation!). If you’re just experimenting then this
should be more than enough, otherwise you might want to allocate more. Once
you’ve made a decision, click “Continue”, then “Done” to exit the VHD wizard.
Step 4 – Check the summary to make sure everything looks right, then click on
“Done” to finish creating the VM.
Step 5 – Start the VM using the “Start” button at the top of the VirtualBox Manager
window. When you see the First Run Wizard, you’ll be asked to choose the
installation media. If, like me, you’ve just downloaded the latest version of Ubuntu as
a .iso file and want to use that, click on the folder icon and browse to its location to
open it. If you have a CD, you can choose your optical drive from the drop down list.
Either way, once you’ve chosen the source click “Next” and “Done” to finish with
the Wizard and start up the VM.
Computer Inside Your Computer: How To Use
VirtualBox
http://lachlanroy.com | Lachlan Roy
MakeUseOf.com
P a g e 42
Step 6 – When the VM boots from the CD you’ll be given a list of options. You could
choose to load Ubuntu and try it before you install it, but since this is a VM you might
as well just install it straight away. Choose “Install Ubuntu” with the arrow keys on
your keyboard and press “Enter”.
Step 7 – Once Ubuntu has loaded the required files you’ll see the installation
window. Choose your language, then click “Forward”.
You’ll then be given a checklist for the best results when installing Ubuntu. You’ll
probably want to make sure that “Download updates while installing” and “Install
this third-party software” are also selected before you click “Forward” again.
Next you’re asked how you want to allocate drive space. We’ve already done this
by creating a VHD, so just click “Erase disk and install Ubuntu”, and click “Forward”,
then “Install now”. Don’t worry; this won’t erase all your data! It simply formats the
VHD which you created.
This will start the installation process, as you’ll see from the progress bar which
appears at the bottom of the wizard’s window that is labelled “Copying files…” If
you’re interested, you can click on the arrow to show the terminal and see all the
code that is being run.
Step 8 – After a little while, the next part of the installation will come up. The first step
asks you to specify your location (to set date and time as well as locality options.
You’ll then be asked to choose your keyboard layout.
Finally, you’ll be asked to enter your name, the computer’s name, a username and
password. Unlike Windows installations you must enter a password as this is used as
protection against potentially harmful operations through the terminal. Don’t worry,
though – you can opt to log in automatically without entering a password.
That’s the last step that you have any major part in – Ubuntu will finish copying files
and then automatically download repository lists for the software centre, and, if you
selected them in step 7, any updates. Once it’s finished, you’ll receive a notice that
installation is complete, at which point you’ll need to click the button to restart the
Virtual Machine.
Before the VM shuts down, you’re asked to remove any installation media before
pressing “Enter”. To do this, right click on the CD icon at the bottom of the VM
window and click “Remove disk from virtual drive”.
Computer Inside Your Computer: How To Use
VirtualBox
http://lachlanroy.com | Lachlan Roy
MakeUseOf.com
P a g e 43
Guest Additions
Guest Additions for Ubuntu are a funny thing. Ubuntu (like many other Linux
distributions) has some VirtualBox utilities already installed, such as mouse pointer
integration – you may have noticed this during Setup.
However, not all Guest additions are installed, and the ones that are installed are
somewhat out of date.
You’ll notice that when Ubuntu boots for the first time, an error will pop up before
you logging in that “It seems that you do not have the hardware required to run
Unity.” Unity is Ubuntu’s new GUI which maximises screen real estate and aims to
make things more user friendly. You can read more about it over at the main
MakeUseOf site.
If Unity doesn’t do anything for you, installing the latest Guest Additions doesn’t bring
all that much to the table. If the reason why you installed Ubuntu was to try Unity out,
though, you’ll need to install the latest version.
Unlike the Windows Guest Additions, the Guest Additions CD provided by VirtualBox
can be quite difficult to install. So, instead of using that method we’ll be installing
them directly from a repository using the terminal. Don’t worry, it’s easy and I’ll walk
you through it, step by step!
Step 1 – Shut down the Ubuntu VM if you haven’t already, because we have some
settings to change. Now, click on the “Settings” button in the top left hand corner of
the VirtualBox Manager window. Go to the “Display” tab. You’ll want to allocate
64MB or more of VRAM and enable 3D acceleration.
Step 2 – Start the VM again, then open a Terminal window. You can find Terminal by
clicking Applications > Accessories > Terminal in the top left hand corner of Ubuntu’s
“screen”.
Step 3 – Now it’s time to enter some commands. First, enter this:
sudo apt-get update
The sudo command allows commands to be carried out as root, the administrator
account. You’ll be asked to enter your password to authorise all following sudo
commands until the terminal is closed or left to idle.
Computer Inside Your Computer: How To Use
VirtualBox
http://lachlanroy.com | Lachlan Roy
MakeUseOf.com
P a g e 44
The apt-get command runs Ubuntu’s Advanced Packaging Tool (APT), which is used
to install, update and remove programs and system files. The update part is a
command for apt-get, telling it to update its index of available packages. This makes
sure that you definitely download and install the latest versions.
Next, enter:
sudo apt-get install virtualbox-ose-guest-utils –y
The install command is also for apt-get, telling it to download and install the package
called virtualbox-ose-guest-utils, which is the Guest Additions that we’re looking for. –y
is a switch, which tells apt-get to just go ahead and install the package without asking
for confirmation.
Finally, enter:
sudo reboot
Finally, the reboot command tells the VM to restart straight away. Now, if it’s all gone
without a hitch, Ubuntu will restart with the Unity interface. Ready to go!
Computer Inside Your Computer: How To Use
VirtualBox
http://lachlanroy.com | Lachlan Roy
MakeUseOf.com
P a g e 45
Creating an Ubuntu VM - Picture Tutorial
1
2
Computer Inside Your Computer: How To Use
VirtualBox
http://lachlanroy.com | Lachlan Roy
MakeUseOf.com
P a g e 46
3
Computer Inside Your Computer: How To Use
VirtualBox
http://lachlanroy.com | Lachlan Roy
MakeUseOf.com
P a g e 47
4
Computer Inside Your Computer: How To Use
VirtualBox
http://lachlanroy.com | Lachlan Roy
MakeUseOf.com
P a g e 48
5
Computer Inside Your Computer: How To Use
VirtualBox
http://lachlanroy.com | Lachlan Roy
MakeUseOf.com
P a g e 49
6
Computer Inside Your Computer: How To Use
VirtualBox
http://lachlanroy.com | Lachlan Roy
MakeUseOf.com
P a g e 50
7
Computer Inside Your Computer: How To Use
VirtualBox
http://lachlanroy.com | Lachlan Roy
MakeUseOf.com
P a g e 51
Computer Inside Your Computer: How To Use
VirtualBox
http://lachlanroy.com | Lachlan Roy
MakeUseOf.com
P a g e 52
8
Computer Inside Your Computer: How To Use
VirtualBox
http://lachlanroy.com | Lachlan Roy
MakeUseOf.com
P a g e 53
… then press “Enter”.
Computer Inside Your Computer: How To Use
VirtualBox
http://lachlanroy.com | Lachlan Roy
MakeUseOf.com
P a g e 54
Installing Ubuntu Guest Additions - Picture Tutorial
1
2
Computer Inside Your Computer: How To Use
VirtualBox
http://lachlanroy.com | Lachlan Roy
MakeUseOf.com
P a g e 55
3
Computer Inside Your Computer: How To Use
VirtualBox
http://lachlanroy.com | Lachlan Roy
MakeUseOf.com
P a g e 56
Custom resolutions: wide and long!
Computer Inside Your Computer: How To Use
VirtualBox
http://lachlanroy.com | Lachlan Roy
MakeUseOf.com
P a g e 57
Bonus Points
Shared Folders
One of the really useful features of VirtualBox’s Guest Additions that is often
overlooked is its ability to share folders between the host OS and the guest OS. This
allows you to access files from the guest OS that you would usually have to transfer
over the network or via USB (which isn’t fun, trust me!)
The procedure for setting up Folder Sharing is essentially the same for both Windows
XP and 7. In Ubuntu it’s a little more involved (and requires more terminal use – yay!),
but still straightforward.
Setting up the shared folder (regardless of guest OS)
Right click on the Folder icon down the bottom of the VM window (near where you
used the disc icon to eject the virtual CD after installing Windows), and then click on
“Shared Folders…”
You’ll then see the Folders List, which is currently empty. To add a folder to be
shared, click on the folder with a plus symbol. You can then browse to the folder you
wish to share with the VM. Once you’ve found it, click “Choose”. You can now see
the folder path as well as the folder name. You can change the name if you like.
In most cases it’s probably best to choose to “Auto-mount” and make each drive
permanent.
You will need to repeat this process for each folder you wish to share, for each VM
you wish to share the folder with. Shared folders are not shared between VMs!
It is from here that the shared folders begin to be handled differently by the different
operating systems.
Windows
Once a folder has been shared, it usually shows up as folders shared over the
network for Windows VMs. If you visit the network area (“My Network Places” in XP, or
just “Network” in Windows 7), shared folders can be found under the host
“VBOXSVR” (which one would assume is short for VirtualBox Server).
If you have made the shared folder “permanent”, it should automatically mount
and be visible in “My Computer”, usually as the E: drive. Otherwise, you can choose
“Mount network drive…” from the Tools menu to specify a drive letter and browse to
the shared folder under VBOXSVR manually.
Ubuntu
Ubuntu’s method of mounting Shared Folders is a little more convoluted. Once you
have shared the folders, start up a terminal window (you can press the button in the
Computer Inside Your Computer: How To Use
VirtualBox
http://lachlanroy.com | Lachlan Roy
MakeUseOf.com
P a g e 58
top left hand corner of the screen and type in “Terminal” to search for it with the
Unity interface).
You’ll need to use the terminal to create a folder for each shared folder to mount to,
typically in the “media” folder. The command for this is:
sudo mkdir /media/NameOfFolder
You’ll be asked to enter your password for the first one. It will appear as if nothing’s
happened – don’t panic! Going straight to a new, empty line means that the
command has been carried out successfully; if something had gone wrong you
would be given an error.
It’s important to bear in mind that file names are case sensitive in Ubuntu, so a folder
called “Example” is different to a folder called “example” which is different again to
a folder called “EXAMPLE”, and so on.
Once you’ve created a directory for each shared folder, it’s time to make sure that
each folder mounts as soon as you log in to Ubuntu. For this, we’ll need to enter a
line for each folder in to fstab, the file system table. Enter this into the terminal:
sudo gedit /etc/fstab
Gedit is the text editor which is included with Ubuntu, and /etc/fstab is the location of
fstab - that is, it is stored in the etc folder, which is in the root directory (/), the highest
level of the drive.
For each shared folder, you will need to create a new line at the bottom of the file
like this (assuming the name you gave the folder in the Shared Folder list and the
name of the mount folder in media are the same):
NameOfFolder /media/NameOfFolder vboxsf defaults 0 0
 NameOfFolder is the name you gave the shared folder in the Shared Folder List
(referred to as the filesystem-device by Ubuntu).
 /media/NameOfFolder is the path of the directory you made in the terminal to
mount the folder in (known as the mount-point).
 vboxsf is the filesystem type.
 The rest are options that you don’t really need to worry about.
Now, choose “File > Save as…”, overwrite the current fstab and then restart the VM.
Once Ubuntu has restarted you should be able to go to /media/ (go to the file
browser and then click “File System” to get to the root directory) and then browse all
the files in your shared folders. Once they’re mounted properly you can then drag
the folders into the sidebar of the file browser for easy access.
See? That wasn’t so hard, now was it?
Computer Inside Your Computer: How To Use
VirtualBox
http://lachlanroy.com | Lachlan Roy
MakeUseOf.com
P a g e 59
Conclusion
… and so you reached out, and grabbed the VirtualBox from the swirling maelstrom
of the Internets, and you brought it back to your computer, afraid that it would
disappear at any moment. Little did you know that your fortune had changed
forever.
And yea verily, you did install the VirtualBox, and it revealed unto you all its powers.
And so you did use it to rule the Operating Systems with an iron fist and smote them
into submission. Ubuntu and the Windows brothers were no match for the VirtualBox,
and they were bent to your will without the need for physical hardware.
Under your command the Operating Systems were, and through them you were
able to utilise software in ways you thought would never be possible even in your
wildest dreams.
No longer did you need to swap keyboards and mice. No longer did you need to
restart your computer for one program. No longer did the software control you, for
you had become… the Power User.
Computer Inside Your Computer: How To Use
VirtualBox
http://lachlanroy.com | Lachlan Roy
MakeUseOf.com
P a g e 60
Did you like this PDF Guide? Then why not visit MakeUseOf.com for daily posts on
cool websites, free software and internet tips.
If you want more great guides like this, why not subscribe to MakeUseOf and receive
instant access to 20+ PDF Guides like this one covering wide range of topics.
Moreover, you will be able to download free Cheat Sheets, Free Giveaways and
other cool things.
Subscribe to MakeUseOf : http://www.makeuseof.com/join
MakeUseOf Links:
Home: http://www.makeuseof.com
MakeUseOf Directory: http://www.makeuseof.com/dir
MakeUseOf Answers: http://www.makeuseof.com/answers
Geeky Fun: http://www.makeuseof.com/tech-fun
PDF Guides: http://www.makeuseof.com/pages/
Tech Deals: http://www.makeuseof.com/pages/hot-tech-deals
Follow MakeUseOf:
RSS Feed: http://feedproxy.google.com/Makeuseof
Newsletter: http://www.makeuseof.com/join
Facebook: http://www.facebook.com/makeuseof
Twitter: http://www.twitter.com/Makeuseof
Computer Inside Your Computer: How To Use
VirtualBox
http://lachlanroy.com | Lachlan Roy
MakeUseOf.com
P a g e 61
Download Other MakeUseOf PDF Guides!
Like us to download: http://makeuseof.com/pages

More Related Content

What's hot

Virtualbox step by step guide
Virtualbox step by step guideVirtualbox step by step guide
Virtualbox step by step guideHock Leng PUAH
 
Intoduction to VirtualBox English
Intoduction to VirtualBox EnglishIntoduction to VirtualBox English
Intoduction to VirtualBox EnglishKichiemon Adachi
 
WinConnections Spring, 2011 - Deploying Windows 7 without the Ridiculous Micr...
WinConnections Spring, 2011 - Deploying Windows 7 without the Ridiculous Micr...WinConnections Spring, 2011 - Deploying Windows 7 without the Ridiculous Micr...
WinConnections Spring, 2011 - Deploying Windows 7 without the Ridiculous Micr...Concentrated Technology
 
VirtualBox Ubuntu Host Windows Guest
VirtualBox Ubuntu Host Windows GuestVirtualBox Ubuntu Host Windows Guest
VirtualBox Ubuntu Host Windows Guestaindilis
 
Using XAMPP
Using XAMPPUsing XAMPP
Using XAMPPbutest
 
Free tools for rapidly deploying software
Free tools for rapidly deploying softwareFree tools for rapidly deploying software
Free tools for rapidly deploying softwareConcentrated Technology
 
Automated Deployment using Open Source
Automated Deployment using Open SourceAutomated Deployment using Open Source
Automated Deployment using Open Sourceduskglow
 
rgpv 7th sem for it & cs Cloud computing lab record
rgpv 7th sem for it & cs Cloud computing lab recordrgpv 7th sem for it & cs Cloud computing lab record
rgpv 7th sem for it & cs Cloud computing lab recordnaaaaz
 
Linux And Windows Coexistance
Linux And Windows CoexistanceLinux And Windows Coexistance
Linux And Windows Coexistancejoelavery
 
OpenSolaris On EeePc at Osc Spring
OpenSolaris On EeePc at Osc SpringOpenSolaris On EeePc at Osc Spring
OpenSolaris On EeePc at Osc SpringMasafumi Ohta
 
Manual de usuario de virtualbox
Manual de  usuario de virtualboxManual de  usuario de virtualbox
Manual de usuario de virtualboxRuben A Lozada S
 
Let’s talk virtualization
Let’s talk virtualizationLet’s talk virtualization
Let’s talk virtualizationEtienne Tremblay
 
Guide to dual booting
Guide to dual bootingGuide to dual booting
Guide to dual bootingMahfud Saja
 

What's hot (20)

Gc Atomic
Gc AtomicGc Atomic
Gc Atomic
 
Virtualbox step by step guide
Virtualbox step by step guideVirtualbox step by step guide
Virtualbox step by step guide
 
Intoduction to VirtualBox English
Intoduction to VirtualBox EnglishIntoduction to VirtualBox English
Intoduction to VirtualBox English
 
anonguide July 17 2015
anonguide July 17 2015anonguide July 17 2015
anonguide July 17 2015
 
OpenSolaris 2009.06 Workshop
OpenSolaris 2009.06 WorkshopOpenSolaris 2009.06 Workshop
OpenSolaris 2009.06 Workshop
 
WinConnections Spring, 2011 - Deploying Windows 7 without the Ridiculous Micr...
WinConnections Spring, 2011 - Deploying Windows 7 without the Ridiculous Micr...WinConnections Spring, 2011 - Deploying Windows 7 without the Ridiculous Micr...
WinConnections Spring, 2011 - Deploying Windows 7 without the Ridiculous Micr...
 
VirtualBox Ubuntu Host Windows Guest
VirtualBox Ubuntu Host Windows GuestVirtualBox Ubuntu Host Windows Guest
VirtualBox Ubuntu Host Windows Guest
 
Using XAMPP
Using XAMPPUsing XAMPP
Using XAMPP
 
xampp_server
xampp_serverxampp_server
xampp_server
 
Free tools for rapidly deploying software
Free tools for rapidly deploying softwareFree tools for rapidly deploying software
Free tools for rapidly deploying software
 
Automated Deployment using Open Source
Automated Deployment using Open SourceAutomated Deployment using Open Source
Automated Deployment using Open Source
 
rgpv 7th sem for it & cs Cloud computing lab record
rgpv 7th sem for it & cs Cloud computing lab recordrgpv 7th sem for it & cs Cloud computing lab record
rgpv 7th sem for it & cs Cloud computing lab record
 
Virtualization.pdf
Virtualization.pdfVirtualization.pdf
Virtualization.pdf
 
Linux And Windows Coexistance
Linux And Windows CoexistanceLinux And Windows Coexistance
Linux And Windows Coexistance
 
OpenSolaris On EeePc at Osc Spring
OpenSolaris On EeePc at Osc SpringOpenSolaris On EeePc at Osc Spring
OpenSolaris On EeePc at Osc Spring
 
Manual de usuario de virtualbox
Manual de  usuario de virtualboxManual de  usuario de virtualbox
Manual de usuario de virtualbox
 
Anonguide
AnonguideAnonguide
Anonguide
 
Let’s talk virtualization
Let’s talk virtualizationLet’s talk virtualization
Let’s talk virtualization
 
FIWARE Lab Cloud Portal
FIWARE Lab Cloud PortalFIWARE Lab Cloud Portal
FIWARE Lab Cloud Portal
 
Guide to dual booting
Guide to dual bootingGuide to dual booting
Guide to dual booting
 

Viewers also liked

Behind the Flame: Bowser's Story
Behind the Flame: Bowser's StoryBehind the Flame: Bowser's Story
Behind the Flame: Bowser's Storytbayer3472
 
"Examen Práctico de Computación 2do Bimestre"
"Examen Práctico de Computación 2do Bimestre""Examen Práctico de Computación 2do Bimestre"
"Examen Práctico de Computación 2do Bimestre"margothnati
 
Hendriks et al. 2016 Positieve psychologie in suriname
Hendriks et al. 2016  Positieve psychologie in surinameHendriks et al. 2016  Positieve psychologie in suriname
Hendriks et al. 2016 Positieve psychologie in surinametommyhendriks
 
EXAMEN PRÁCTICO DE COMPUTACIÓN 2DO BIM
EXAMEN PRÁCTICO DE COMPUTACIÓN 2DO BIMEXAMEN PRÁCTICO DE COMPUTACIÓN 2DO BIM
EXAMEN PRÁCTICO DE COMPUTACIÓN 2DO BIMYessy Macas
 
EXAMEN PRÁCTICO DE COMPUTACIÓN 2DO BIM
EXAMEN PRÁCTICO DE COMPUTACIÓN 2DO BIMEXAMEN PRÁCTICO DE COMPUTACIÓN 2DO BIM
EXAMEN PRÁCTICO DE COMPUTACIÓN 2DO BIMBri Guerrero
 
Program pengajian smp yappa Depok
Program pengajian smp yappa Depok Program pengajian smp yappa Depok
Program pengajian smp yappa Depok Arwan Amin
 
Sam meshach quotes
Sam meshach quotesSam meshach quotes
Sam meshach quotesSam Meshach
 

Viewers also liked (9)

Trabajo del profe eloy
Trabajo del profe eloyTrabajo del profe eloy
Trabajo del profe eloy
 
Behind the Flame: Bowser's Story
Behind the Flame: Bowser's StoryBehind the Flame: Bowser's Story
Behind the Flame: Bowser's Story
 
"Examen Práctico de Computación 2do Bimestre"
"Examen Práctico de Computación 2do Bimestre""Examen Práctico de Computación 2do Bimestre"
"Examen Práctico de Computación 2do Bimestre"
 
Hendriks et al. 2016 Positieve psychologie in suriname
Hendriks et al. 2016  Positieve psychologie in surinameHendriks et al. 2016  Positieve psychologie in suriname
Hendriks et al. 2016 Positieve psychologie in suriname
 
Infiltración en una red wireless protegida
Infiltración en una red wireless protegidaInfiltración en una red wireless protegida
Infiltración en una red wireless protegida
 
EXAMEN PRÁCTICO DE COMPUTACIÓN 2DO BIM
EXAMEN PRÁCTICO DE COMPUTACIÓN 2DO BIMEXAMEN PRÁCTICO DE COMPUTACIÓN 2DO BIM
EXAMEN PRÁCTICO DE COMPUTACIÓN 2DO BIM
 
EXAMEN PRÁCTICO DE COMPUTACIÓN 2DO BIM
EXAMEN PRÁCTICO DE COMPUTACIÓN 2DO BIMEXAMEN PRÁCTICO DE COMPUTACIÓN 2DO BIM
EXAMEN PRÁCTICO DE COMPUTACIÓN 2DO BIM
 
Program pengajian smp yappa Depok
Program pengajian smp yappa Depok Program pengajian smp yappa Depok
Program pengajian smp yappa Depok
 
Sam meshach quotes
Sam meshach quotesSam meshach quotes
Sam meshach quotes
 

Similar to How to use virtualbox

How to Create a Windows Server 2008 Virtual Lab Using VirtualBox
How to Create a Windows Server 2008 Virtual Lab Using VirtualBoxHow to Create a Windows Server 2008 Virtual Lab Using VirtualBox
How to Create a Windows Server 2008 Virtual Lab Using VirtualBoxRusty Painter
 
InstallUbuntuVirtualBox.pdf
InstallUbuntuVirtualBox.pdfInstallUbuntuVirtualBox.pdf
InstallUbuntuVirtualBox.pdfisrachatta
 
New World Studio - User Manual EN
New World Studio - User Manual ENNew World Studio - User Manual EN
New World Studio - User Manual ENvirreafr
 
Installation of oracle 12c RAC on linux vm
Installation of oracle 12c RAC  on linux vmInstallation of oracle 12c RAC  on linux vm
Installation of oracle 12c RAC on linux vmRon Morgan
 
BLCN532 Lab 1Set up your development environmentV2.0.docx
BLCN532 Lab 1Set up your development environmentV2.0.docxBLCN532 Lab 1Set up your development environmentV2.0.docx
BLCN532 Lab 1Set up your development environmentV2.0.docxmoirarandell
 
running windows 8.1 on VirtualBox tutorial
running windows 8.1 on VirtualBox tutorialrunning windows 8.1 on VirtualBox tutorial
running windows 8.1 on VirtualBox tutorial捷恩 蔡
 
Local development environment through virtualisation
Local development environment through virtualisationLocal development environment through virtualisation
Local development environment through virtualisationRadu Barbu
 
Virtualization technology "comparison vmware 9 vs virtualbox 4.2"
Virtualization  technology "comparison vmware 9 vs virtualbox 4.2"Virtualization  technology "comparison vmware 9 vs virtualbox 4.2"
Virtualization technology "comparison vmware 9 vs virtualbox 4.2"Lagendary Sheeva
 
Krenel Based Virtual Machine In Centos7
Krenel Based Virtual Machine In Centos7Krenel Based Virtual Machine In Centos7
Krenel Based Virtual Machine In Centos7a_ratra
 
Vagrant are you still develop in a non-virtual environment-
Vagrant  are you still develop in a non-virtual environment-Vagrant  are you still develop in a non-virtual environment-
Vagrant are you still develop in a non-virtual environment-Anatoly Bubenkov
 
Startup guide for kvm on cent os 6
Startup guide for kvm on cent os 6Startup guide for kvm on cent os 6
Startup guide for kvm on cent os 6Carlos Eduardo
 
Run Docker On Windows Using Vagrant
Run Docker On Windows Using VagrantRun Docker On Windows Using Vagrant
Run Docker On Windows Using VagrantJulien Barbier
 
Ci For The Web 2.0 Guy Or Gal
Ci For The Web 2.0 Guy Or GalCi For The Web 2.0 Guy Or Gal
Ci For The Web 2.0 Guy Or GalChad Woolley
 
setup-a-dedicated-web
setup-a-dedicated-websetup-a-dedicated-web
setup-a-dedicated-webfurkids
 

Similar to How to use virtualbox (20)

How to Create a Windows Server 2008 Virtual Lab Using VirtualBox
How to Create a Windows Server 2008 Virtual Lab Using VirtualBoxHow to Create a Windows Server 2008 Virtual Lab Using VirtualBox
How to Create a Windows Server 2008 Virtual Lab Using VirtualBox
 
Mac story
Mac storyMac story
Mac story
 
InstallUbuntuVirtualBox.pdf
InstallUbuntuVirtualBox.pdfInstallUbuntuVirtualBox.pdf
InstallUbuntuVirtualBox.pdf
 
Grcsvm ware
Grcsvm wareGrcsvm ware
Grcsvm ware
 
Keep calm and vagrant up
Keep calm and vagrant upKeep calm and vagrant up
Keep calm and vagrant up
 
New World Studio - User Manual EN
New World Studio - User Manual ENNew World Studio - User Manual EN
New World Studio - User Manual EN
 
Installation of oracle 12c RAC on linux vm
Installation of oracle 12c RAC  on linux vmInstallation of oracle 12c RAC  on linux vm
Installation of oracle 12c RAC on linux vm
 
BLCN532 Lab 1Set up your development environmentV2.0.docx
BLCN532 Lab 1Set up your development environmentV2.0.docxBLCN532 Lab 1Set up your development environmentV2.0.docx
BLCN532 Lab 1Set up your development environmentV2.0.docx
 
running windows 8.1 on VirtualBox tutorial
running windows 8.1 on VirtualBox tutorialrunning windows 8.1 on VirtualBox tutorial
running windows 8.1 on VirtualBox tutorial
 
Local development environment through virtualisation
Local development environment through virtualisationLocal development environment through virtualisation
Local development environment through virtualisation
 
Metasploit tutorial
Metasploit tutorialMetasploit tutorial
Metasploit tutorial
 
Virtualization technology "comparison vmware 9 vs virtualbox 4.2"
Virtualization  technology "comparison vmware 9 vs virtualbox 4.2"Virtualization  technology "comparison vmware 9 vs virtualbox 4.2"
Virtualization technology "comparison vmware 9 vs virtualbox 4.2"
 
Krenel Based Virtual Machine In Centos7
Krenel Based Virtual Machine In Centos7Krenel Based Virtual Machine In Centos7
Krenel Based Virtual Machine In Centos7
 
Vagrant are you still develop in a non-virtual environment-
Vagrant  are you still develop in a non-virtual environment-Vagrant  are you still develop in a non-virtual environment-
Vagrant are you still develop in a non-virtual environment-
 
Virtual machine (vm)
Virtual machine (vm)Virtual machine (vm)
Virtual machine (vm)
 
Vagrant
VagrantVagrant
Vagrant
 
Startup guide for kvm on cent os 6
Startup guide for kvm on cent os 6Startup guide for kvm on cent os 6
Startup guide for kvm on cent os 6
 
Run Docker On Windows Using Vagrant
Run Docker On Windows Using VagrantRun Docker On Windows Using Vagrant
Run Docker On Windows Using Vagrant
 
Ci For The Web 2.0 Guy Or Gal
Ci For The Web 2.0 Guy Or GalCi For The Web 2.0 Guy Or Gal
Ci For The Web 2.0 Guy Or Gal
 
setup-a-dedicated-web
setup-a-dedicated-websetup-a-dedicated-web
setup-a-dedicated-web
 

Recently uploaded

Low Rate Young Call Girls in Sector 63 Mamura Noida ✔️☆9289244007✔️☆ Female E...
Low Rate Young Call Girls in Sector 63 Mamura Noida ✔️☆9289244007✔️☆ Female E...Low Rate Young Call Girls in Sector 63 Mamura Noida ✔️☆9289244007✔️☆ Female E...
Low Rate Young Call Girls in Sector 63 Mamura Noida ✔️☆9289244007✔️☆ Female E...SofiyaSharma5
 
VIP Kolkata Call Girl Alambazar 👉 8250192130 Available With Room
VIP Kolkata Call Girl Alambazar 👉 8250192130  Available With RoomVIP Kolkata Call Girl Alambazar 👉 8250192130  Available With Room
VIP Kolkata Call Girl Alambazar 👉 8250192130 Available With Roomdivyansh0kumar0
 
Networking in the Penumbra presented by Geoff Huston at NZNOG
Networking in the Penumbra presented by Geoff Huston at NZNOGNetworking in the Penumbra presented by Geoff Huston at NZNOG
Networking in the Penumbra presented by Geoff Huston at NZNOGAPNIC
 
Russian Call Girls in Kolkata Ishita 🤌 8250192130 🚀 Vip Call Girls Kolkata
Russian Call Girls in Kolkata Ishita 🤌  8250192130 🚀 Vip Call Girls KolkataRussian Call Girls in Kolkata Ishita 🤌  8250192130 🚀 Vip Call Girls Kolkata
Russian Call Girls in Kolkata Ishita 🤌 8250192130 🚀 Vip Call Girls Kolkataanamikaraghav4
 
VIP 7001035870 Find & Meet Hyderabad Call Girls Dilsukhnagar high-profile Cal...
VIP 7001035870 Find & Meet Hyderabad Call Girls Dilsukhnagar high-profile Cal...VIP 7001035870 Find & Meet Hyderabad Call Girls Dilsukhnagar high-profile Cal...
VIP 7001035870 Find & Meet Hyderabad Call Girls Dilsukhnagar high-profile Cal...aditipandeya
 
Radiant Call girls in Dubai O56338O268 Dubai Call girls
Radiant Call girls in Dubai O56338O268 Dubai Call girlsRadiant Call girls in Dubai O56338O268 Dubai Call girls
Radiant Call girls in Dubai O56338O268 Dubai Call girlsstephieert
 
Hot Service (+9316020077 ) Goa Call Girls Real Photos and Genuine Service
Hot Service (+9316020077 ) Goa  Call Girls Real Photos and Genuine ServiceHot Service (+9316020077 ) Goa  Call Girls Real Photos and Genuine Service
Hot Service (+9316020077 ) Goa Call Girls Real Photos and Genuine Servicesexy call girls service in goa
 
VIP Call Girls Pune Madhuri 8617697112 Independent Escort Service Pune
VIP Call Girls Pune Madhuri 8617697112 Independent Escort Service PuneVIP Call Girls Pune Madhuri 8617697112 Independent Escort Service Pune
VIP Call Girls Pune Madhuri 8617697112 Independent Escort Service PuneCall girls in Ahmedabad High profile
 
Russian Call Girls Thane Swara 8617697112 Independent Escort Service Thane
Russian Call Girls Thane Swara 8617697112 Independent Escort Service ThaneRussian Call Girls Thane Swara 8617697112 Independent Escort Service Thane
Russian Call Girls Thane Swara 8617697112 Independent Escort Service ThaneCall girls in Ahmedabad High profile
 
How is AI changing journalism? (v. April 2024)
How is AI changing journalism? (v. April 2024)How is AI changing journalism? (v. April 2024)
How is AI changing journalism? (v. April 2024)Damian Radcliffe
 
Call Now ☎ 8264348440 !! Call Girls in Shahpur Jat Escort Service Delhi N.C.R.
Call Now ☎ 8264348440 !! Call Girls in Shahpur Jat Escort Service Delhi N.C.R.Call Now ☎ 8264348440 !! Call Girls in Shahpur Jat Escort Service Delhi N.C.R.
Call Now ☎ 8264348440 !! Call Girls in Shahpur Jat Escort Service Delhi N.C.R.soniya singh
 
Russian Call girls in Dubai +971563133746 Dubai Call girls
Russian  Call girls in Dubai +971563133746 Dubai  Call girlsRussian  Call girls in Dubai +971563133746 Dubai  Call girls
Russian Call girls in Dubai +971563133746 Dubai Call girlsstephieert
 
VIP Kolkata Call Girls Salt Lake 8250192130 Available With Room
VIP Kolkata Call Girls Salt Lake 8250192130 Available With RoomVIP Kolkata Call Girls Salt Lake 8250192130 Available With Room
VIP Kolkata Call Girls Salt Lake 8250192130 Available With Roomgirls4nights
 
GDG Cloud Southlake 32: Kyle Hettinger: Demystifying the Dark Web
GDG Cloud Southlake 32: Kyle Hettinger: Demystifying the Dark WebGDG Cloud Southlake 32: Kyle Hettinger: Demystifying the Dark Web
GDG Cloud Southlake 32: Kyle Hettinger: Demystifying the Dark WebJames Anderson
 
'Future Evolution of the Internet' delivered by Geoff Huston at Everything Op...
'Future Evolution of the Internet' delivered by Geoff Huston at Everything Op...'Future Evolution of the Internet' delivered by Geoff Huston at Everything Op...
'Future Evolution of the Internet' delivered by Geoff Huston at Everything Op...APNIC
 
Chennai Call Girls Alwarpet Phone 🍆 8250192130 👅 celebrity escorts service
Chennai Call Girls Alwarpet Phone 🍆 8250192130 👅 celebrity escorts serviceChennai Call Girls Alwarpet Phone 🍆 8250192130 👅 celebrity escorts service
Chennai Call Girls Alwarpet Phone 🍆 8250192130 👅 celebrity escorts servicevipmodelshub1
 

Recently uploaded (20)

Rohini Sector 26 Call Girls Delhi 9999965857 @Sabina Saikh No Advance
Rohini Sector 26 Call Girls Delhi 9999965857 @Sabina Saikh No AdvanceRohini Sector 26 Call Girls Delhi 9999965857 @Sabina Saikh No Advance
Rohini Sector 26 Call Girls Delhi 9999965857 @Sabina Saikh No Advance
 
Low Rate Young Call Girls in Sector 63 Mamura Noida ✔️☆9289244007✔️☆ Female E...
Low Rate Young Call Girls in Sector 63 Mamura Noida ✔️☆9289244007✔️☆ Female E...Low Rate Young Call Girls in Sector 63 Mamura Noida ✔️☆9289244007✔️☆ Female E...
Low Rate Young Call Girls in Sector 63 Mamura Noida ✔️☆9289244007✔️☆ Female E...
 
VIP Kolkata Call Girl Alambazar 👉 8250192130 Available With Room
VIP Kolkata Call Girl Alambazar 👉 8250192130  Available With RoomVIP Kolkata Call Girl Alambazar 👉 8250192130  Available With Room
VIP Kolkata Call Girl Alambazar 👉 8250192130 Available With Room
 
Networking in the Penumbra presented by Geoff Huston at NZNOG
Networking in the Penumbra presented by Geoff Huston at NZNOGNetworking in the Penumbra presented by Geoff Huston at NZNOG
Networking in the Penumbra presented by Geoff Huston at NZNOG
 
Russian Call Girls in Kolkata Ishita 🤌 8250192130 🚀 Vip Call Girls Kolkata
Russian Call Girls in Kolkata Ishita 🤌  8250192130 🚀 Vip Call Girls KolkataRussian Call Girls in Kolkata Ishita 🤌  8250192130 🚀 Vip Call Girls Kolkata
Russian Call Girls in Kolkata Ishita 🤌 8250192130 🚀 Vip Call Girls Kolkata
 
Rohini Sector 22 Call Girls Delhi 9999965857 @Sabina Saikh No Advance
Rohini Sector 22 Call Girls Delhi 9999965857 @Sabina Saikh No AdvanceRohini Sector 22 Call Girls Delhi 9999965857 @Sabina Saikh No Advance
Rohini Sector 22 Call Girls Delhi 9999965857 @Sabina Saikh No Advance
 
VIP 7001035870 Find & Meet Hyderabad Call Girls Dilsukhnagar high-profile Cal...
VIP 7001035870 Find & Meet Hyderabad Call Girls Dilsukhnagar high-profile Cal...VIP 7001035870 Find & Meet Hyderabad Call Girls Dilsukhnagar high-profile Cal...
VIP 7001035870 Find & Meet Hyderabad Call Girls Dilsukhnagar high-profile Cal...
 
Radiant Call girls in Dubai O56338O268 Dubai Call girls
Radiant Call girls in Dubai O56338O268 Dubai Call girlsRadiant Call girls in Dubai O56338O268 Dubai Call girls
Radiant Call girls in Dubai O56338O268 Dubai Call girls
 
Hot Service (+9316020077 ) Goa Call Girls Real Photos and Genuine Service
Hot Service (+9316020077 ) Goa  Call Girls Real Photos and Genuine ServiceHot Service (+9316020077 ) Goa  Call Girls Real Photos and Genuine Service
Hot Service (+9316020077 ) Goa Call Girls Real Photos and Genuine Service
 
Rohini Sector 6 Call Girls Delhi 9999965857 @Sabina Saikh No Advance
Rohini Sector 6 Call Girls Delhi 9999965857 @Sabina Saikh No AdvanceRohini Sector 6 Call Girls Delhi 9999965857 @Sabina Saikh No Advance
Rohini Sector 6 Call Girls Delhi 9999965857 @Sabina Saikh No Advance
 
VIP Call Girls Pune Madhuri 8617697112 Independent Escort Service Pune
VIP Call Girls Pune Madhuri 8617697112 Independent Escort Service PuneVIP Call Girls Pune Madhuri 8617697112 Independent Escort Service Pune
VIP Call Girls Pune Madhuri 8617697112 Independent Escort Service Pune
 
Russian Call Girls Thane Swara 8617697112 Independent Escort Service Thane
Russian Call Girls Thane Swara 8617697112 Independent Escort Service ThaneRussian Call Girls Thane Swara 8617697112 Independent Escort Service Thane
Russian Call Girls Thane Swara 8617697112 Independent Escort Service Thane
 
How is AI changing journalism? (v. April 2024)
How is AI changing journalism? (v. April 2024)How is AI changing journalism? (v. April 2024)
How is AI changing journalism? (v. April 2024)
 
Call Now ☎ 8264348440 !! Call Girls in Shahpur Jat Escort Service Delhi N.C.R.
Call Now ☎ 8264348440 !! Call Girls in Shahpur Jat Escort Service Delhi N.C.R.Call Now ☎ 8264348440 !! Call Girls in Shahpur Jat Escort Service Delhi N.C.R.
Call Now ☎ 8264348440 !! Call Girls in Shahpur Jat Escort Service Delhi N.C.R.
 
Russian Call girls in Dubai +971563133746 Dubai Call girls
Russian  Call girls in Dubai +971563133746 Dubai  Call girlsRussian  Call girls in Dubai +971563133746 Dubai  Call girls
Russian Call girls in Dubai +971563133746 Dubai Call girls
 
VIP Kolkata Call Girls Salt Lake 8250192130 Available With Room
VIP Kolkata Call Girls Salt Lake 8250192130 Available With RoomVIP Kolkata Call Girls Salt Lake 8250192130 Available With Room
VIP Kolkata Call Girls Salt Lake 8250192130 Available With Room
 
Call Girls In South Ex 📱 9999965857 🤩 Delhi 🫦 HOT AND SEXY VVIP 🍎 SERVICE
Call Girls In South Ex 📱  9999965857  🤩 Delhi 🫦 HOT AND SEXY VVIP 🍎 SERVICECall Girls In South Ex 📱  9999965857  🤩 Delhi 🫦 HOT AND SEXY VVIP 🍎 SERVICE
Call Girls In South Ex 📱 9999965857 🤩 Delhi 🫦 HOT AND SEXY VVIP 🍎 SERVICE
 
GDG Cloud Southlake 32: Kyle Hettinger: Demystifying the Dark Web
GDG Cloud Southlake 32: Kyle Hettinger: Demystifying the Dark WebGDG Cloud Southlake 32: Kyle Hettinger: Demystifying the Dark Web
GDG Cloud Southlake 32: Kyle Hettinger: Demystifying the Dark Web
 
'Future Evolution of the Internet' delivered by Geoff Huston at Everything Op...
'Future Evolution of the Internet' delivered by Geoff Huston at Everything Op...'Future Evolution of the Internet' delivered by Geoff Huston at Everything Op...
'Future Evolution of the Internet' delivered by Geoff Huston at Everything Op...
 
Chennai Call Girls Alwarpet Phone 🍆 8250192130 👅 celebrity escorts service
Chennai Call Girls Alwarpet Phone 🍆 8250192130 👅 celebrity escorts serviceChennai Call Girls Alwarpet Phone 🍆 8250192130 👅 celebrity escorts service
Chennai Call Girls Alwarpet Phone 🍆 8250192130 👅 celebrity escorts service
 

How to use virtualbox

  • 1.
  • 2. Computer Inside Your Computer: How To Use VirtualBox http://lachlanroy.com | Lachlan Roy MakeUseOf.com P a g e 2 Computer Inside Your Computer: How To Use VirtualBox By: Lachlan Roy http://lachlanroy.com Edited by: Justin Pot This manual is the intellectual property of MakeUseOf. It must only be published in its original form. Using parts or republishing altered parts of this guide is prohibited.
  • 3. Computer Inside Your Computer: How To Use VirtualBox http://lachlanroy.com | Lachlan Roy MakeUseOf.com P a g e 3 Table of Contents Introduction..............................................................................................................................4 Introduction to VirtualBox.......................................................................................................5 What is VirtualBox?...........................................................................................................5 Why do I want it?..............................................................................................................5 How do I get it? ................................................................................................................5 Using VirtualBox ....................................................................................................................6 Creating a WinXP Virtual Machine .......................................................................................7 Guest Additions..................................................................................................................11 Where to go from here? ...................................................................................................12 Creating a Windows XP VM - Picture Tutorial ................................................................13 Installing XP Guest Additions - Picture Tutorial ...............................................................23 Building a Win7 Virtual Machine..........................................................................................26 Guest Additions..................................................................................................................28 Where to go from here .....................................................................................................29 Creating a Windows 7 VM - Picture Tutorial...................................................................30 Installing W7 Guest Additions - Picture Tutorial ..............................................................38 Creating an Ubuntu Virtual Machine .................................................................................41 Guest Additions..................................................................................................................43 Creating an Ubuntu VM - Picture Tutorial.......................................................................45 Installing Ubuntu Guest Additions - Picture Tutorial.......................................................54 Bonus Points............................................................................................................................57 Shared Folders ................................................................................................................57 Setting up the shared folder (regardless of guest OS) ..........................................57 Windows.......................................................................................................................57 Ubuntu..........................................................................................................................57 Conclusion..............................................................................................................................59
  • 4. Computer Inside Your Computer: How To Use VirtualBox http://lachlanroy.com | Lachlan Roy MakeUseOf.com P a g e 4 Introduction If only you had more computers. You’ve heard a lot about Linux and you’d love to try it out, but you don’t know enough to take the plunge and install it alongside Windows – maybe you’re worried you’ll wipe all your files off in the process. Besides, you’d like to have another computer handy so that you can look something up if you get stuck, but you don’t have another computer. This is it. Or maybe it’s the opposite. Perhaps you’ve taken a step out of your comfort zone and ditched Windows – maybe for Ubuntu, or maybe for Mac OS X. You feel liberated! No more Blue Screens of Death! You’re living life on the edge, getting on with your work… and then you come to a screeching halt. You discover that a piece of software crucial to your workflow runs on Windows… and only Windows. What ever shall you do? Does this mean that you have to go out and buy a new computer just to run this one program? Or, as an only marginally better prospect, will you have to install it alongside your current OS and restart every time you need to use it? Suddenly you realise that your freedom is only as long as the chain around your ankle. That is, until somebody introduces you to VirtualBox. Suddenly you gain the power to conjure virtual computers out of thin air. They don’t take up space on your desk, yet they work just like a real computer does. They can be conjured up and removed with little more than a few clicks. Intrigued? Read on.
  • 5. Computer Inside Your Computer: How To Use VirtualBox http://lachlanroy.com | Lachlan Roy MakeUseOf.com P a g e 5 Introduction to VirtualBox What is VirtualBox? VirtualBox is a free, open source, cross-platform application for creating, managing and running virtual machines (VMs) – computers whose hardware components are emulated by the host computer, the computer that runs the program. VirtualBox can run on Windows, Mac OS X, Linux and Solaris. This guide is based on the OS X version, but the steps are almost exactly the same regardless of the host operating system. Why do I want it? Using virtual machines can be extremely useful for a number of reasons. For example, you may want to run a virtual machine to try out software that you think might be unsafe, or you might want to try out another operating system without changing the way your computer is already set up. You might also want to use it for security purposes; for example, you might want to create a virtual machine just for online banking so that you can be sure there are no spyware or trojans getting at your precious data. Finally, you might want to get it because you can. VirtualBox is completely free – there’s no reason not to download it to have a tinker! How do I get it? The easiest way to get the latest version of VirtualBox is to download it from the download page of the VirtualBox website – www.virtualbox.org/wiki/Downloads. There you can download the correct version for your platform, or if you’re using Linux you can click through to find a list of instructions for various Linux distributions. For each Linux distribution you’re given the option of downloading either the “i386” or “amd64” option. “i386” is the 32 bit version, “amd64” is the 64 bit version. If you’re not sure which version of the operating system you’re using you’re almost certainly using the 32 bit version and so you will want to download the “i386” version of VirtualBox. Installing VirtualBox is just like installing any other program on your platform, so you shouldn’t have any problem with the installation. If you do get stuck though, you can read the installation guide on the VirtualBox website.
  • 6. Computer Inside Your Computer: How To Use VirtualBox http://lachlanroy.com | Lachlan Roy MakeUseOf.com P a g e 6 Using VirtualBox When you start up VirtualBox for the first time you’ll be greeted by the VirtualBox Manager. This is where you can create virtual machines, turn them on or off and make changes to the virtual hardware available to them. Obviously, VirtualBox isn’t much good like this – we need to make a virtual machine! I’ll be running through making virtual machines for Windows XP, Windows 7 and Ubuntu, as these are the most likely candidates for a VM. However, don’t think that these are the only options that virtual machines have to offer. If you’re feeling brave, you might want to try one of the other Linux distributions, such as Debian (which Ubuntu is based on), Fedora or OpenSUSE. Or maybe Puppy Linux, or Arch Linux, or Linux Mint, or CentOS, or… well you get the idea. In the following sections you will learn to create Windows XP, Windows 7 and Ubuntu virtual machines. Each step-by-step section is followed by numbered screenshots of the steps described. Feel free to consult both the instructions and the pictures as you build your machines.
  • 7. Computer Inside Your Computer: How To Use VirtualBox http://lachlanroy.com | Lachlan Roy MakeUseOf.com P a g e 7 Creating a WinXP Virtual Machine Note: the following step-by-step guide explains how to create a virtual machine. Read these steps, then scroll down to find a step-by-step picture tutorial. Step 1 – The first step to creating any virtual machine is to click on the “New” button in the top left hand corner of the VirtualBox Manager window – it’s a big blue star that’s pretty hard to miss! This starts the “New Virtual Machine Wizard”, which will walk us through the steps required to get a new virtual machine up and running. Step 2 – Enter the name of the Virtual Machine. What you call it is entirely up to you – it’s really so that you can find a specific VM easily when you have many different VMs in the manager. VirtualBox will try to figure out what OS you plan to run on the VM based on what you name it. If the name of the VM has “XP” in it somewhere it assumes that you’ll be installing Windows XP and will adjust itself accordingly. If you have a cryptic name for it, though, don’t worry. You can manually choose the OS type from the drop- down boxes below. Once you’ve done that, click on “Continue” to go to the next step. Step 3 – You’ll be asked to select the amount of RAM that you want to allocate to the virtual machine. The more you give the VM the smoother it’ll run, but be warned; memory allocated to the VM is memory that the host OS (that is, the computer you’ve installed VirtualBox on) won’t be able to use. So, how much RAM should you allocate to the VM? It depends on a number of things. If you’re planning to use only the VM while it’s running, you can afford to give it more RAM because you won’t be asking the host OS to be doing much multitasking. If, on the other hand, you’ll be using the VM at the same time as doing lots of other things on the host OS, you’ll want to be more conservative with the amounts that you give out. However, a good general rule of thumb is to allocate half of your computer’s RAM to the VM. So, if your computer has 4GB of RAM, give 2GB to the VM leaving the host with the other 2GB. As far as hard numbers go, Windows XP can run well on 512MB of RAM, or if you’re feeling generous you can push the boat out and give it a full 1024MB (1GB), so I’d recommend allocating between these two numbers. Time to click on “Continue” again!
  • 8. Computer Inside Your Computer: How To Use VirtualBox http://lachlanroy.com | Lachlan Roy MakeUseOf.com P a g e 8 Step 4 – The next step is to create a “Virtual Hard Disk” (VHD). This creates a file on your hard drive which can be used by VirtualBox to act like its own separate hard drive, allowing you to install an operating system without worrying about wiping over your existing data. Make sure that “Boot Hard Disk” and “Create new hard disk” are selected, then click “Continue”. This will start the “Create New Virtual Disk Wizard”. Click “Continue” again to proceed. Next you’ll be asked if you want to create a “dynamically expanding” disk (which I’ll call a dynamic disk from now on) or a “fixed size” disk. Each has its own benefits. The great thing about a dynamic disk is that it’s only as large as the data that it has on it; you can assign it plenty of space without having to worry about whether you’ll use it or whether you’ll run out of space. They’re also a lot faster to create than a fixed disk of any significant size. However, you’ll need to keep an eye on it, because its flexibility can also be its downfall. Say you create a dynamic disk and assign it 50 GB, then put about 20GB of data on it. The dynamic disk file will show up as taking only 20GB of space on the hard drive according to your host OS. Great. You fill up the rest of the free space on your physical hard drive. Thing is, if you start up the VM and try to add more data to the dynamic disk, you’ll run into trouble – the virtual disk says that it’s still got 30GB free, but there’s nowhere to actually put that 30GB of data. The VM freaks out, thinking that the hard drive is failing, but that’s not true. It just needs some more breathing room on the physical drive to store the data it’s been told it’s able to save. This is the advantage of the fixed size disk. Sure, it’s inconvenient when you’re trying to figure out how much space to give it, but once it’s been made you won’t have to worry about it ever again. In this example we’ll be using dynamic disks, but fixed disks will work just as well. Make sure that “Dynamically expanding storage” is selected, then click on “Continue” again. Next you’re asked to choose the name, location and size of the new VHD. For most uses you won’t need to change the name or the location, but you can do this by clicking on the folder icon next to the text box. The size you should make the VHD depends on how much stuff you plan to put in it, but if you’re using a dynamic disk it doesn’t really matter if you allocate it lots of
  • 9. Computer Inside Your Computer: How To Use VirtualBox http://lachlanroy.com | Lachlan Roy MakeUseOf.com P a g e 9 space. If you’re just using it to run a few programs, the suggested size of 10GB should be plenty! Make sure the settings are right then click “Continue”, then “Done”. Step 5 – At this point all you need to do is check over everything and make sure all the settings are as you expect them to be. Then you just need to click “Done” and the VM will be created, ready for you to install Windows! Step 6 – Now it’s time to start up the VM for the first time. Make sure that the new virtual machine that you just created is selected in the VirtualBox Manager window, then click on the “Start” button at the top of the window. Step 7 – When the VM starts up you’ll be greeted by the “First Run Wizard”, which will guide you through getting ready to install Windows XP. Click “Continue”. It’ll then ask you what you want to use for installation media; that is, whether you want to install it using a CD and the host’s optical drive, or whether you want to install it from a disk image on your hard drive (usually in the form of a .iso file). You can choose the former from the drop down menu or the latter by browsing for the .iso file (using a standard “open file” dialog). Once you’ve chosen the installation media, click on “Continue”, then “Done” after reading the summary. Step 8 – Since there isn’t anything installed on the virtual hard disk the virtual machine will automatically boot from the CD into Windows Setup. It’ll take a while for setup to load all the files it needs, but eventually you’ll see a screen that shows a list of the existing partitions and unpartitioned space on the computer. In the list all you’ll see is an “Unpartitioned space” the size of the VHD you created in Step 3. You want to set up XP here, so press “ENTER”. You’ll then be asked how you want to format the drive. You’ll most definitely want to choose the option “Format the partition using the NTFS file system (Quick)”. Make sure you choose the “Quick” option or you’ll be waiting for a very long time! That’s all you’ll need to do for a little while – Windows Setup will format the VHD then start copying files to the drive. You can sit and watch or go get a cup of coffee; it doesn’t really matter. Once it’s finished copying files Windows Setup will automatically restart your computer to proceed to the next step. Step 9 – When the computer restarts it will try to boot from the CD first, saying “press any key to boot from CD…”. Ignore this! If you do this you’ll be doing step 7 all over again for no reason. You can prevent this from happening again by right clicking the CD icon at the bottom of the VM window and clicking “Remove disk from virtual drive”. Once it passes, you’ll see the familiar Windows XP booting screen before the screen switches to the second stage of installation. You’ll probably see a dialog box come up a few times during the installation about the guest OS not supporting “mouse pointer integration”. Don’t worry about this – tell it not to show the option again and then click OK to dismiss it.
  • 10. Computer Inside Your Computer: How To Use VirtualBox http://lachlanroy.com | Lachlan Roy MakeUseOf.com P a g e 10 You’ll be waiting for a little while longer, until… Step 10 – The “Windows XP Setup Wizard” will pop up. Click “Next” to get started. First you’ll be asked to set your regional and language options, which basically involves clicking on “Customize…” to choose your country and then “Details” if you need to change your keyboard layout. Once that’s sorted, click “Next” again. Next you’ll need to enter in a computer name and an Administrator password. I’d suggest a name that is actually useful instead of the random string of characters produced automatically. How complex you want to make the administrator password is up to you, depending on how important the security of the VM is. After clicking “Next” you’ll see the date and time settings, which you shouldn’t have to change. Clicking “Next” again will make the window disappear for a while as Windows applies all the settings and continues with the installation. After a minute or two goes by another window will pop up, this time for network settings. You’ll almost certainly want to select the first option (a network that has no domain). It requires that you enter the name of a workgroup – the default workgroup name for Windows XP computers is “WORKGROUP”. Enter that into the text box and then click “Next”. That’s it for Windows Setup! It’ll take a few minutes for Windows to finalise the installation, then it will restart automatically once more when it’s finished. Step 11 – We’re at the last step for installing Windows XP itself. Now we just need to enter in some final details like networking and creating a username. As Windows starts up again a dialog box will pop up saying that it will adjust the screen resolution to approve the appearance of visual elements. Just click “OK” then “OK” again on the next window that pops up to confirm the change. Now you’ll see the “Welcome to Windows” screen. Click “Next” in the bottom right hand corner of the screen to get started. You’ll be asked if you want to use Automatic Updates; you most certainly do! Make sure the first option is selected before clicking “Next”. The way that VirtualBox provides a network connection to the VM means that you’ll definitely want to choose the first option (“Yes, this computer will connect through a local area network or home network”). Make sure that’s selected, then click “Next”. There’s little point in registering with Microsoft, so click No, then “Next”. In the next step you’ll be asked to enter in a username – enter one then click “Next”. After that you just need to click “Finish”, then you’re all done!
  • 11. Computer Inside Your Computer: How To Use VirtualBox http://lachlanroy.com | Lachlan Roy MakeUseOf.com P a g e 11 You’ll see the “welcome” screen, and then the familiar Windows XP desktop. Great! You’re all done with installing Windows. However, we’re not done yet! Go to the VM’s start menu and shut it down, because there’s one thing left to do; installing VirtualBox’s “Guest Additions”. Guest Additions “What are Guest Additions?” I hear you ask. The Guest Additions are a set of drivers and software which comes with VirtualBox to make using VirtualBox in conjunction with the host computer a little easier. Installing Guest Additions isn’t compulsory at all, but it’s most definitely recommended. There are a few features that you’ll get by installing Guest Additions. The main one is called mouse pointer integration. You may have noticed that when using the VM you had to click inside the window for the VM to detect any mouse movements (or to type), and that you needed to press a specific key (called the host key) to release the mouse and keyboard so that you could use them with the host computer again. With mouse pointer integration, you no longer have to click inside the window to use your keyboard and mouse in the VM or use the host key to release them. As you move your pointer over the window it is automatically “captured”, and it is automatically released when the pointer reaches the edge of the window. This by itself is worth installing Guest Additions for! The second main feature is shared folders. This basically allows folders on your host machine to show up as network shares on the guest OS, allowing you to access files which would otherwise be inaccessible. There are other useful features like better video support and seamless windows – you can read more about them in the VirtualBox documentation. To install Guest Additions properly, you’ll need to start Windows XP in Safe Mode. This basically means that Windows starts up running nothing but the bare essential drivers. In this mode, VirtualBox is able to install its Guest Additions without messing with drivers which would otherwise be in use. Step 1 – Before you start there’s a couple of settings you’ll need to change. Make sure that the Windows XP VM is selected in the VirtualBox Manager, then click on the “Settings” button between “New” and “Start”.
  • 12. Computer Inside Your Computer: How To Use VirtualBox http://lachlanroy.com | Lachlan Roy MakeUseOf.com P a g e 12 You’ll want to go to the “Display” tab. There you’ll want to give the VM at least 32MB of video memory; ideally, you’ll want to allocate 64MB. You’ll also want to enable both 3D and 2D Video Acceleration. Step 2 – It’s time to start up the VM again. To start Windows up into Safe Mode, you’ll need to constantly press F8 (Fn+F8 on a Mac and some Windows laptops) until you see the “Windows Advanced Options Menu”. Here you’ll want to select Safe Mode using the arrow keys and then press Enter. You’ll see a long list of seemingly random text – this is a list of the exact drivers that Windows is loading to be used in Safe Mode. Windows will boot after this. Step 3 – Once you’ve logged in as Administrator, a window mentioning Safe Mode will pop up; it’s safe to dismiss it straight away. Now, go to the Devices menu for the VM; on OS X this can be found in the menu bar while the VM window is selected, or for Windows/Linux it will be at the top of the VM window itself (you might have to press the “alt” key to reveal it). Here you’ll see an option labelled “Install Guest Additions…”. Clicking on this will mount an .iso file as a CD on the VM. Step 4 – Once the Guest Additions CD has been mounted the setup wizard should automatically pop up. If it doesn’t, go to “My Computer” and click on the CD to start it (which should be D: by default). The setup is fairly straightforward, and all the default values are good. You might want to select “Direct3D Support” when asked to choose components, though. While chances are you won’t be using the VM for anything that actually uses Direct3D, you might as well have it installed now rather than having to do this all again later if you do need it for some reason. After finishing the installation you’ll be asked to reboot the computer. That’s it! When you restart the computer allow it to boot normally. You should be logged automatically into the standard account and able to actually start using the VM like a normal computer. Where to go from here? Having said that, just like any new computer you’ll need to get some software to make your computer actually usable. A new browser and anti-virus/malware software are the basics, but there are other things too, like a PDF reader, multimedia software (saving you from having to go back to your host OS to watch the odd video or listen to the odd song).
  • 13. Computer Inside Your Computer: How To Use VirtualBox http://lachlanroy.com | Lachlan Roy MakeUseOf.com P a g e 13 You could go hunt down the software individually, which is fine – I recommend Google Chrome, Avast’s Free Antivirus and MalwareBytes Free Anti-malware. You could do that, or you could download a package with everything you need to get started that installs in one go. Interested? Check out the MakeUseOf Pack: a handful of really useful Windows apps. Creating a Windows XP VM - Picture Tutorial 1 2
  • 14. Computer Inside Your Computer: How To Use VirtualBox http://lachlanroy.com | Lachlan Roy MakeUseOf.com P a g e 14 3 4
  • 15. Computer Inside Your Computer: How To Use VirtualBox http://lachlanroy.com | Lachlan Roy MakeUseOf.com P a g e 15
  • 16. Computer Inside Your Computer: How To Use VirtualBox http://lachlanroy.com | Lachlan Roy MakeUseOf.com P a g e 16 5 6
  • 17. Computer Inside Your Computer: How To Use VirtualBox http://lachlanroy.com | Lachlan Roy MakeUseOf.com P a g e 17 7
  • 18. Computer Inside Your Computer: How To Use VirtualBox http://lachlanroy.com | Lachlan Roy MakeUseOf.com P a g e 18 8 9
  • 19. Computer Inside Your Computer: How To Use VirtualBox http://lachlanroy.com | Lachlan Roy MakeUseOf.com P a g e 19 10
  • 20. Computer Inside Your Computer: How To Use VirtualBox http://lachlanroy.com | Lachlan Roy MakeUseOf.com P a g e 20
  • 21. Computer Inside Your Computer: How To Use VirtualBox http://lachlanroy.com | Lachlan Roy MakeUseOf.com P a g e 21 11
  • 22. Computer Inside Your Computer: How To Use VirtualBox http://lachlanroy.com | Lachlan Roy MakeUseOf.com P a g e 22
  • 23. Computer Inside Your Computer: How To Use VirtualBox http://lachlanroy.com | Lachlan Roy MakeUseOf.com P a g e 23 Installing XP Guest Additions - Picture Tutorial 1 2 Tap F8 to get...
  • 24. Computer Inside Your Computer: How To Use VirtualBox http://lachlanroy.com | Lachlan Roy MakeUseOf.com P a g e 24 3 4
  • 25. Computer Inside Your Computer: How To Use VirtualBox http://lachlanroy.com | Lachlan Roy MakeUseOf.com P a g e 25
  • 26. Computer Inside Your Computer: How To Use VirtualBox http://lachlanroy.com | Lachlan Roy MakeUseOf.com P a g e 26 Creating a Win7 Virtual Machine Note: the following step-by-step guide explains how to create a virtual machine. Read these steps, then scroll down to find a step-by-step picture tutorial. Installing Windows 7 isn’t much different to installing Windows XP. Having said that, there are a few changes to make the installation a little more user friendly. It’s important to note before we start that VirtualBox’s video drivers don’t support Windows Aero. That means that you won’t get window transparency, Windows Snap or window thumbnails in the taskbar, among other things. If these features are essential for you, you might need to consider a paid alternative such as VMWare. If you’ve jumped straight to this, you might want to go back and read the Windows XP section first, since I’ve introduced a lot of new terminology and explained a lot of what’s going on here. With that said, let’s get started! Step 1 – In the VirtualBox Manager window, click on the “New” button in the top left hand corner to create a new Virtual Machine. Give the VM a name and select “Windows 7” as the type of OS if it’s not automatically selected based on the name before clicking “Next” to go to the next step. Step 2 – For Windows 7 you’ll want to provide the VM with at least 1024MB (1GB); 2GB is better, or more if you have more than 4GB in your host computer. Remember not to give it too much, though – if your host OS starts running out of RAM it could actually decrease performance! Click “Next” again. Step 3 – Now it’s time to create a Virtual Hard Disk (VHD) for the VM. I’d suggest creating a dynamic disk, but if you have plenty of desktop space you might prefer to create a fixed disk. Windows 7 takes up a lot more space than XP, so you’ll want to allocate at least 20GB to this VHD. Click “Continue”, then “Done” to exit the VHD Creation Wizard. Step 4 – Check through the summary to make sure everything is as it should be, then click on “Done” to finish creating the VM. Step 5 – Start the VM using the “Start” button in the top left of the VirtualBox Manager. When the First Run Wizard comes up, select the installation media you want to use to install Windows 7 (either your host’s CD drive or a .iso file), then click “Next” and “Done” to get started with the installation. Step 6 – Because there’s nothing installed Windows will automatically start loading Windows Setup. You’ll see a progress bar labelled “Windows is loading files…” before
  • 27. Computer Inside Your Computer: How To Use VirtualBox http://lachlanroy.com | Lachlan Roy MakeUseOf.com P a g e 27 a window pops up called “Install Windows”. Select the language, time and currency format and keyboard layout that’s right for you before clicking “Next”. Note: With some versions of VirtualBox on some platforms, you may get an error as Windows tries to start which says “Windows failed to start” and that this could be due to a recent hardware change. If you receive this error, power down the VM (by closing the VM window), going to the VM’s settings (select the VM in the VirtualBox Manager then click on the “Settings” button), choosing “System”, then under the “Motherboard” tab selecting the option “Enable IO APIC”. Then click on the button labelled “Install Now”. Step 7 – The next step requires you to accept Windows 7’s license terms. Click the check box before clicking “Next”. When asked what kind of installation you want, you’ll need to select a “Custom” installation as there’s nothing to upgrade from. Next you’ll be asked where you want to install Windows. The only option will be the unallocated space of the unformatted VHD which you created in Step 3. All you need to do is click on “Next” to start installation. Windows Setup will take it from there – you won’t need to touch anything until it automatically boots into Windows once it finishes installing everything. Step 8 – The first window you see when Windows 7 reboots will ask you to enter a username and to give the computer a name so it can be identified on a network. To this end, it’s probably worth giving it a name such as “Win7-VM”. When you click on “Next”, you’ll be asked to provide a password. While this isn’t essential (particularly since it’s probably password protected by the Host OS and isn’t likely to have any sensitive data stored on it), you may still feel more comfortable entering a password. It’s up to you. Either way, click on “Next” when you’re ready to proceed. It’s at this point that you’re asked to enter in your Windows 7 product key. You can either enter it here and get it over and done with, or you can enter it in later once you’re on the Windows desktop. Again, either way click on “Next” when you’re ready to proceed. You’ll want to use the recommended settings for Windows update, or you may choose to install only important updates if you know what you’re doing. Next, confirm that the time and date settings are correct, then click “Next”.
  • 28. Computer Inside Your Computer: How To Use VirtualBox http://lachlanroy.com | Lachlan Roy MakeUseOf.com P a g e 28 If you’re already connected to a network, the last step will be to choose what kind of network you’re connected to: Home, work or public. After that, all that’s left is for Windows to finalize a few settings itself and prepare your desktop! Then hey presto, you’ll be looking at a Windows 7 desktop, ready to go. Well, except for Guest Additions and essential software, of course. So, shut down Windows and we’ll get this done, shall we? Guest Additions Just like when we installed Windows XP, we’ll need to boot Windows into Safe Mode to install Guest Additions properly. Step 1 – First you’ll need to change a few VM settings. Select the VM in the VirtualBox Manager, then click “Settings”. Choose the “Display” section. You’ll want to allocate at least 64MB of Video Memory for Windows 7; more if you can spare it. You’ll also want to enable 3D and 2D Video acceleration. Click “OK” to save these changes. Step 2 – When you start up the VM again, make sure to keep pressing F8 (Fn+F8 on Macs and some other laptops), then select “Safe Mode”. Just like Windows XP you’ll see a long list of white text on a black background – this is a list of the drivers that Windows is loading. Step 3 – Windows should log straight in – if for some reason you see the login screen, select your username and enter your password. You’ll see a notice about being in Safe Mode; it’s fine to dismiss it straight away. Now it’s time to mount the Guest Additions CD – go to the VM’s “Devices” menu (found in the Menu bar on OS X while the VM is selected or at the top of the VM window on Windows/Linux) and select “Install Guest Additions…”. Once the CD is mounted, go to My Computer and right click on the D: Drive, then select “Install or run program from your media”. Step 4 – This is a very straightforward installation. All the default options are great, although again you may wish to check “Direct3D Support” as one of the components to be installed. When the installation is finished you’ll be asked to restart the computer. Restart the computer and allow it to boot up normally. There you go! There’s your Windows 7 VM ready to use. Enjoy!
  • 29. Computer Inside Your Computer: How To Use VirtualBox http://lachlanroy.com | Lachlan Roy MakeUseOf.com P a g e 29 Where to go from here Again, just like any new computer you’ll need to get some software to make your computer actually usable. A new browser and anti-virus/malware software are the basics, but there are other things too, like a PDF reader, multimedia software (saving you from having to go back to your host OS to watch the odd video or listen to the odd song). You could go hunt down the software individually, which is fine – I recommend Google Chrome, Avast’s Free Antivirus and MalwareBytes Free Anti-malware. You could do that, or you could download a package with everything you need to get started that installs in one go. Interested? Check out the MakeUseOf Pack: a handful of really useful Windows apps.
  • 30. Computer Inside Your Computer: How To Use VirtualBox http://lachlanroy.com | Lachlan Roy MakeUseOf.com P a g e 30 Creating a Windows 7 VM - Picture Tutorial 1 2
  • 31. Computer Inside Your Computer: How To Use VirtualBox http://lachlanroy.com | Lachlan Roy MakeUseOf.com P a g e 31 3
  • 32. Computer Inside Your Computer: How To Use VirtualBox http://lachlanroy.com | Lachlan Roy MakeUseOf.com P a g e 32 4
  • 33. Computer Inside Your Computer: How To Use VirtualBox http://lachlanroy.com | Lachlan Roy MakeUseOf.com P a g e 33 5
  • 34. Computer Inside Your Computer: How To Use VirtualBox http://lachlanroy.com | Lachlan Roy MakeUseOf.com P a g e 34 6
  • 35. Computer Inside Your Computer: How To Use VirtualBox http://lachlanroy.com | Lachlan Roy MakeUseOf.com P a g e 35 7
  • 36. Computer Inside Your Computer: How To Use VirtualBox http://lachlanroy.com | Lachlan Roy MakeUseOf.com P a g e 36 8
  • 37. Computer Inside Your Computer: How To Use VirtualBox http://lachlanroy.com | Lachlan Roy MakeUseOf.com P a g e 37
  • 38. Computer Inside Your Computer: How To Use VirtualBox http://lachlanroy.com | Lachlan Roy MakeUseOf.com P a g e 38 Installing W7 Guest Additions - Picture Tutorial 1 2 Tap F8 to get...
  • 39. Computer Inside Your Computer: How To Use VirtualBox http://lachlanroy.com | Lachlan Roy MakeUseOf.com P a g e 39 3 4
  • 40. Computer Inside Your Computer: How To Use VirtualBox http://lachlanroy.com | Lachlan Roy MakeUseOf.com P a g e 40
  • 41. Computer Inside Your Computer: How To Use VirtualBox http://lachlanroy.com | Lachlan Roy MakeUseOf.com P a g e 41 Creating an Ubuntu Virtual Machine Note: the following step-by-step guide explains how to create a virtual machine. Read these steps, then scroll down to find a step-by-step picture tutorial. Installing Ubuntu is really easy. The most popular Linux distribution for desktops has become much more user friendly over the last few years as it strives to become a viable alternative to Windows and Mac OS X when it comes to every day use. Again, if you’ve skipped straight to this section I’d recommend going back and reading the Windows XP section. I’ve explained a lot of the terminology and the different settings. Step 1 – To create a new VM, click on the “New” button in the top left hand corner of the VirtualBox Manager window. Give the VM a name and make sure that the operating system and version are “Linux” and “Ubuntu”, respectively. Click “Next”. Step 2 – For Ubuntu I would recommend at least 1GB of RAM, although being more lightweight than most recent operating systems it will still run quite happily on 512MB. Step 3 – Now you’ll need to create a VHD for the VM. Again, I’d suggest the use of a dynamic disk, but it’s up to you. VirtualBox suggests a minimum of 8GB for an Ubuntu VM (A fresh Ubuntu installation only takes up around 3GB compared to the 6GB taken up by a new Windows 7 installation!). If you’re just experimenting then this should be more than enough, otherwise you might want to allocate more. Once you’ve made a decision, click “Continue”, then “Done” to exit the VHD wizard. Step 4 – Check the summary to make sure everything looks right, then click on “Done” to finish creating the VM. Step 5 – Start the VM using the “Start” button at the top of the VirtualBox Manager window. When you see the First Run Wizard, you’ll be asked to choose the installation media. If, like me, you’ve just downloaded the latest version of Ubuntu as a .iso file and want to use that, click on the folder icon and browse to its location to open it. If you have a CD, you can choose your optical drive from the drop down list. Either way, once you’ve chosen the source click “Next” and “Done” to finish with the Wizard and start up the VM.
  • 42. Computer Inside Your Computer: How To Use VirtualBox http://lachlanroy.com | Lachlan Roy MakeUseOf.com P a g e 42 Step 6 – When the VM boots from the CD you’ll be given a list of options. You could choose to load Ubuntu and try it before you install it, but since this is a VM you might as well just install it straight away. Choose “Install Ubuntu” with the arrow keys on your keyboard and press “Enter”. Step 7 – Once Ubuntu has loaded the required files you’ll see the installation window. Choose your language, then click “Forward”. You’ll then be given a checklist for the best results when installing Ubuntu. You’ll probably want to make sure that “Download updates while installing” and “Install this third-party software” are also selected before you click “Forward” again. Next you’re asked how you want to allocate drive space. We’ve already done this by creating a VHD, so just click “Erase disk and install Ubuntu”, and click “Forward”, then “Install now”. Don’t worry; this won’t erase all your data! It simply formats the VHD which you created. This will start the installation process, as you’ll see from the progress bar which appears at the bottom of the wizard’s window that is labelled “Copying files…” If you’re interested, you can click on the arrow to show the terminal and see all the code that is being run. Step 8 – After a little while, the next part of the installation will come up. The first step asks you to specify your location (to set date and time as well as locality options. You’ll then be asked to choose your keyboard layout. Finally, you’ll be asked to enter your name, the computer’s name, a username and password. Unlike Windows installations you must enter a password as this is used as protection against potentially harmful operations through the terminal. Don’t worry, though – you can opt to log in automatically without entering a password. That’s the last step that you have any major part in – Ubuntu will finish copying files and then automatically download repository lists for the software centre, and, if you selected them in step 7, any updates. Once it’s finished, you’ll receive a notice that installation is complete, at which point you’ll need to click the button to restart the Virtual Machine. Before the VM shuts down, you’re asked to remove any installation media before pressing “Enter”. To do this, right click on the CD icon at the bottom of the VM window and click “Remove disk from virtual drive”.
  • 43. Computer Inside Your Computer: How To Use VirtualBox http://lachlanroy.com | Lachlan Roy MakeUseOf.com P a g e 43 Guest Additions Guest Additions for Ubuntu are a funny thing. Ubuntu (like many other Linux distributions) has some VirtualBox utilities already installed, such as mouse pointer integration – you may have noticed this during Setup. However, not all Guest additions are installed, and the ones that are installed are somewhat out of date. You’ll notice that when Ubuntu boots for the first time, an error will pop up before you logging in that “It seems that you do not have the hardware required to run Unity.” Unity is Ubuntu’s new GUI which maximises screen real estate and aims to make things more user friendly. You can read more about it over at the main MakeUseOf site. If Unity doesn’t do anything for you, installing the latest Guest Additions doesn’t bring all that much to the table. If the reason why you installed Ubuntu was to try Unity out, though, you’ll need to install the latest version. Unlike the Windows Guest Additions, the Guest Additions CD provided by VirtualBox can be quite difficult to install. So, instead of using that method we’ll be installing them directly from a repository using the terminal. Don’t worry, it’s easy and I’ll walk you through it, step by step! Step 1 – Shut down the Ubuntu VM if you haven’t already, because we have some settings to change. Now, click on the “Settings” button in the top left hand corner of the VirtualBox Manager window. Go to the “Display” tab. You’ll want to allocate 64MB or more of VRAM and enable 3D acceleration. Step 2 – Start the VM again, then open a Terminal window. You can find Terminal by clicking Applications > Accessories > Terminal in the top left hand corner of Ubuntu’s “screen”. Step 3 – Now it’s time to enter some commands. First, enter this: sudo apt-get update The sudo command allows commands to be carried out as root, the administrator account. You’ll be asked to enter your password to authorise all following sudo commands until the terminal is closed or left to idle.
  • 44. Computer Inside Your Computer: How To Use VirtualBox http://lachlanroy.com | Lachlan Roy MakeUseOf.com P a g e 44 The apt-get command runs Ubuntu’s Advanced Packaging Tool (APT), which is used to install, update and remove programs and system files. The update part is a command for apt-get, telling it to update its index of available packages. This makes sure that you definitely download and install the latest versions. Next, enter: sudo apt-get install virtualbox-ose-guest-utils –y The install command is also for apt-get, telling it to download and install the package called virtualbox-ose-guest-utils, which is the Guest Additions that we’re looking for. –y is a switch, which tells apt-get to just go ahead and install the package without asking for confirmation. Finally, enter: sudo reboot Finally, the reboot command tells the VM to restart straight away. Now, if it’s all gone without a hitch, Ubuntu will restart with the Unity interface. Ready to go!
  • 45. Computer Inside Your Computer: How To Use VirtualBox http://lachlanroy.com | Lachlan Roy MakeUseOf.com P a g e 45 Creating an Ubuntu VM - Picture Tutorial 1 2
  • 46. Computer Inside Your Computer: How To Use VirtualBox http://lachlanroy.com | Lachlan Roy MakeUseOf.com P a g e 46 3
  • 47. Computer Inside Your Computer: How To Use VirtualBox http://lachlanroy.com | Lachlan Roy MakeUseOf.com P a g e 47 4
  • 48. Computer Inside Your Computer: How To Use VirtualBox http://lachlanroy.com | Lachlan Roy MakeUseOf.com P a g e 48 5
  • 49. Computer Inside Your Computer: How To Use VirtualBox http://lachlanroy.com | Lachlan Roy MakeUseOf.com P a g e 49 6
  • 50. Computer Inside Your Computer: How To Use VirtualBox http://lachlanroy.com | Lachlan Roy MakeUseOf.com P a g e 50 7
  • 51. Computer Inside Your Computer: How To Use VirtualBox http://lachlanroy.com | Lachlan Roy MakeUseOf.com P a g e 51
  • 52. Computer Inside Your Computer: How To Use VirtualBox http://lachlanroy.com | Lachlan Roy MakeUseOf.com P a g e 52 8
  • 53. Computer Inside Your Computer: How To Use VirtualBox http://lachlanroy.com | Lachlan Roy MakeUseOf.com P a g e 53 … then press “Enter”.
  • 54. Computer Inside Your Computer: How To Use VirtualBox http://lachlanroy.com | Lachlan Roy MakeUseOf.com P a g e 54 Installing Ubuntu Guest Additions - Picture Tutorial 1 2
  • 55. Computer Inside Your Computer: How To Use VirtualBox http://lachlanroy.com | Lachlan Roy MakeUseOf.com P a g e 55 3
  • 56. Computer Inside Your Computer: How To Use VirtualBox http://lachlanroy.com | Lachlan Roy MakeUseOf.com P a g e 56 Custom resolutions: wide and long!
  • 57. Computer Inside Your Computer: How To Use VirtualBox http://lachlanroy.com | Lachlan Roy MakeUseOf.com P a g e 57 Bonus Points Shared Folders One of the really useful features of VirtualBox’s Guest Additions that is often overlooked is its ability to share folders between the host OS and the guest OS. This allows you to access files from the guest OS that you would usually have to transfer over the network or via USB (which isn’t fun, trust me!) The procedure for setting up Folder Sharing is essentially the same for both Windows XP and 7. In Ubuntu it’s a little more involved (and requires more terminal use – yay!), but still straightforward. Setting up the shared folder (regardless of guest OS) Right click on the Folder icon down the bottom of the VM window (near where you used the disc icon to eject the virtual CD after installing Windows), and then click on “Shared Folders…” You’ll then see the Folders List, which is currently empty. To add a folder to be shared, click on the folder with a plus symbol. You can then browse to the folder you wish to share with the VM. Once you’ve found it, click “Choose”. You can now see the folder path as well as the folder name. You can change the name if you like. In most cases it’s probably best to choose to “Auto-mount” and make each drive permanent. You will need to repeat this process for each folder you wish to share, for each VM you wish to share the folder with. Shared folders are not shared between VMs! It is from here that the shared folders begin to be handled differently by the different operating systems. Windows Once a folder has been shared, it usually shows up as folders shared over the network for Windows VMs. If you visit the network area (“My Network Places” in XP, or just “Network” in Windows 7), shared folders can be found under the host “VBOXSVR” (which one would assume is short for VirtualBox Server). If you have made the shared folder “permanent”, it should automatically mount and be visible in “My Computer”, usually as the E: drive. Otherwise, you can choose “Mount network drive…” from the Tools menu to specify a drive letter and browse to the shared folder under VBOXSVR manually. Ubuntu Ubuntu’s method of mounting Shared Folders is a little more convoluted. Once you have shared the folders, start up a terminal window (you can press the button in the
  • 58. Computer Inside Your Computer: How To Use VirtualBox http://lachlanroy.com | Lachlan Roy MakeUseOf.com P a g e 58 top left hand corner of the screen and type in “Terminal” to search for it with the Unity interface). You’ll need to use the terminal to create a folder for each shared folder to mount to, typically in the “media” folder. The command for this is: sudo mkdir /media/NameOfFolder You’ll be asked to enter your password for the first one. It will appear as if nothing’s happened – don’t panic! Going straight to a new, empty line means that the command has been carried out successfully; if something had gone wrong you would be given an error. It’s important to bear in mind that file names are case sensitive in Ubuntu, so a folder called “Example” is different to a folder called “example” which is different again to a folder called “EXAMPLE”, and so on. Once you’ve created a directory for each shared folder, it’s time to make sure that each folder mounts as soon as you log in to Ubuntu. For this, we’ll need to enter a line for each folder in to fstab, the file system table. Enter this into the terminal: sudo gedit /etc/fstab Gedit is the text editor which is included with Ubuntu, and /etc/fstab is the location of fstab - that is, it is stored in the etc folder, which is in the root directory (/), the highest level of the drive. For each shared folder, you will need to create a new line at the bottom of the file like this (assuming the name you gave the folder in the Shared Folder list and the name of the mount folder in media are the same): NameOfFolder /media/NameOfFolder vboxsf defaults 0 0  NameOfFolder is the name you gave the shared folder in the Shared Folder List (referred to as the filesystem-device by Ubuntu).  /media/NameOfFolder is the path of the directory you made in the terminal to mount the folder in (known as the mount-point).  vboxsf is the filesystem type.  The rest are options that you don’t really need to worry about. Now, choose “File > Save as…”, overwrite the current fstab and then restart the VM. Once Ubuntu has restarted you should be able to go to /media/ (go to the file browser and then click “File System” to get to the root directory) and then browse all the files in your shared folders. Once they’re mounted properly you can then drag the folders into the sidebar of the file browser for easy access. See? That wasn’t so hard, now was it?
  • 59. Computer Inside Your Computer: How To Use VirtualBox http://lachlanroy.com | Lachlan Roy MakeUseOf.com P a g e 59 Conclusion … and so you reached out, and grabbed the VirtualBox from the swirling maelstrom of the Internets, and you brought it back to your computer, afraid that it would disappear at any moment. Little did you know that your fortune had changed forever. And yea verily, you did install the VirtualBox, and it revealed unto you all its powers. And so you did use it to rule the Operating Systems with an iron fist and smote them into submission. Ubuntu and the Windows brothers were no match for the VirtualBox, and they were bent to your will without the need for physical hardware. Under your command the Operating Systems were, and through them you were able to utilise software in ways you thought would never be possible even in your wildest dreams. No longer did you need to swap keyboards and mice. No longer did you need to restart your computer for one program. No longer did the software control you, for you had become… the Power User.
  • 60. Computer Inside Your Computer: How To Use VirtualBox http://lachlanroy.com | Lachlan Roy MakeUseOf.com P a g e 60 Did you like this PDF Guide? Then why not visit MakeUseOf.com for daily posts on cool websites, free software and internet tips. If you want more great guides like this, why not subscribe to MakeUseOf and receive instant access to 20+ PDF Guides like this one covering wide range of topics. Moreover, you will be able to download free Cheat Sheets, Free Giveaways and other cool things. Subscribe to MakeUseOf : http://www.makeuseof.com/join MakeUseOf Links: Home: http://www.makeuseof.com MakeUseOf Directory: http://www.makeuseof.com/dir MakeUseOf Answers: http://www.makeuseof.com/answers Geeky Fun: http://www.makeuseof.com/tech-fun PDF Guides: http://www.makeuseof.com/pages/ Tech Deals: http://www.makeuseof.com/pages/hot-tech-deals Follow MakeUseOf: RSS Feed: http://feedproxy.google.com/Makeuseof Newsletter: http://www.makeuseof.com/join Facebook: http://www.facebook.com/makeuseof Twitter: http://www.twitter.com/Makeuseof
  • 61. Computer Inside Your Computer: How To Use VirtualBox http://lachlanroy.com | Lachlan Roy MakeUseOf.com P a g e 61 Download Other MakeUseOf PDF Guides! Like us to download: http://makeuseof.com/pages