
Recommended
Recommended
More Related Content
Similar to All you ever wanted to know about earned value analysis.docx
Similar to All you ever wanted to know about earned value analysis.docx (14)
More from nettletondevon
More from nettletondevon (20)
Recently uploaded
Recently uploaded (20)
All you ever wanted to know about earned value analysis.docx
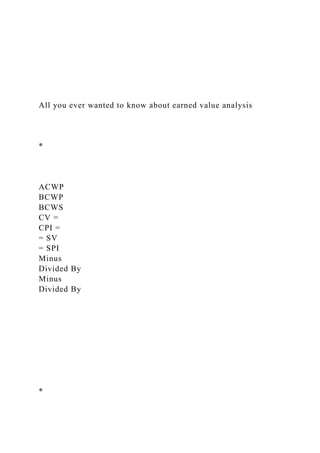
- 1. All you ever wanted to know about earned value analysis * ACWP BCWP BCWS CV = CPI = = SV = SPI Minus Divided By Minus Divided By *
- 2. IF ACWP>BCWP ACWP=BCWP ACWP<BCWP Then CV < 0 CPI < 1 CV = 0 CPI = 1 CV > 0 CPI > 1 The Project is Over Budget On Budget Under Budget *
- 3. IF BCWS>BCWP BCWS =BCWP BCWS <BCWP Then SV < 0 SPI < 1 SV = 0 SPI = 1 SV > 0 SPI > 1 The Project is Behind Schedule On Schedule Ahead of Schedule * EV – Previously called BCWP or Budgeted Cost of Work
- 4. Performed, Earned Value or actual work.PV – Previously call BCWS or Budgeted Cost of Work Scheduled, Planned Value or the project budget.AC – Previously called ACWP or Actual Cost of Work Performed, Actual CostsCV – Cost Variance = BCWP – ACWPSC – Schedule Variance = BCWP – BCWSCPI – Cost Performance Index = BCWP/ACWPSPI – Schedule Performance Index = BCWP/BCWSEAC – Estimate At Completion, a forecast of most likely total project cost based upon project performance and risk. Schedule = Original Schedule/SPI Cost = Min: Original Budget/CPI or Max: Original Budget/(CPI * SPI) * BAC – Budgeted at Completion = Σ of all the budgets (PV or BCWS)VAC – Variance at Completion = BAC – EACETC – Estimate to Complete = EAC - AC * * Value of the future of fund available today FV = PV * (1 + i) nIf you have $1,000 invested for three years
- 5. at 10% how much will you have at the end of year three? EOY 1 = $1,000 * (1 + 10%) = $1,100 EOY 2 = $1,100 * (1 + 10%) = $1,210 EOY 3 = $1,210 * (1 + 10%) = $1,331 * Value today of funds available in the future. PV = FV / (1 + i)nIf you want $1,000 in three years, how much do you have to invest today at 8% to receive your $1,000? EOY 1 = $1,000 / (1 + 10%) = $925.93 EOY 2 = $925.93 / (1 + 10%) = $857.34 EOY 3 = $857.34 / (1 + 10%) = $793.83 * Net Present Value – Present Value minus present cost.Internal Rate of Return – Average rate of return earned over the life of the project. It is where discounted cash flow minus up front cost equals zero. * PERT Weighted Average
- 6. = Optimistic + 4XMost Likely + Pessimistic 6 PERT Standard Deviation = Optimistic - Pessimistic 6 * As people learn about something, they presume they actually know and understand the subject and apply their knowledge to new situations. In reading Pell’s article, I was stuck by his description of the ‘top thinkers in project management today’ (Pells, 2010). The arrogance apparent in his comments about the characteristics of these ‘top thinkers’ was apparent. It would seem that determining the top thinkers in a group to be akin to determining the most beautiful person in a group. It is in the eye of the beholder and as such, is an opinion not based on any sort of analysis of facts. It certainly seemed like Mr. Pell was unhappy with his (and others) lack of inclusion. Pells makes his point regarding arrogance and brings up very real issues with arrogance in project
- 7. management and organizations. To paraphrase Pells, arrogance in a project manager (or an organization) can bring about such negative issues as: undervaluing expertise and experience, encouraging inappropriate shortcuts, and thus increasing risks. When planning a project, the organization and the project manager need to be careful and plan and monitor projects carefully and analytically in order to avoid arrogance (Pells 2010). The problem of project manager arrogance is a very human one. As people learn about something, they presume they actually know and understand the subject and apply their knowledge to new situations, sometimes well and sometimes poorly. In order to minimize the poor application of that knowledge, as pointed out by Krock (2010), managers cannot be right every time on every subject and they need to recognize this and make decisions based on sound, rational analysis and not rely Here the writer introduces the reader to the situation to set the stage for his premise or thesis statement. Knowledge of the reading is presented followed by the writer’s comprehension of what the reading is about.
- 8. Application of the understanding of the material is shown to prepare for the analysis and then the premise is broken down into parts and reviewed. Finally, the analysis is synthesized into a drawn conclusion from the analysis. But this is just an opinion unless it (the conclusion) is tested. This is called evaluation, using a different perspective from that used in the analysis to validate that the conclusion drawn by the writer from the analysis is supported by a different source reference or example.
- 9. on their ‘instinct’, or snap judgments because those judgments can be based on their own emotional response to the subject at hand and not sound, rational analysis. References Pells, D. (2010). The dangers of arrogance in project management. PM World Today. August, 2010 (Vol. XII, Issue VIII). Retrieved August 6, 2010 from http://www.pmworldtoday.net Krock, E. (August 16, 2010) Product Management tips and best practices: humility, agile product and project management blog web site Retrieved on February 10, 2011 from http://www.voximate.com/blog/article/89/product-management- tips-best-practices- humility/ http://www.pmworldtoday.net/ http://www.voximate.com/blog/article/author/eric-krock/
- 10. http://www.voximate.com/blog/article/89/product-management- tips-best-practices-humility/ http://www.voximate.com/blog/article/89/product-management- tips-best-practices-humility/ Robert D. Coleman, PhD © 2006 [email protected] 1 What Is Circular Reasoning? Logical fallacies are a type of error in reasoning, errors which may be recognized and corrected by observant thinkers. There are a large number of informal fallacies that are cataloged, and some have multiple names. The frequency of occurrence is one way to rank the fallacies. The ten most-frequent fallacies probably cover the overwhelming majority of illogical reasoning. With a Pareto effect, 20% of the major fallacies might account for 80% of fallacious reasoning. One of the more common fallacies is circular reasoning, a form of which was called “begging the question” by Aristotle in his book that named the fallacies of classical logic. The fallacy of circular reasoning occurs when the conclusion of an argument is essentially the same as one of the premises in the argument. Circular reasoning is an inference drawn from a premise that includes the conclusion, and used to prove the conclusion. Definitions of words are circular reasoning, but they are not inference.
- 11. Inference is the deriving of a conclusion in logic by either induction or deduction. Circular reasoning can be quite subtle, can be obfuscated when intentional, and thus can be difficult to detect. Circular reasoning as a fallacy refers to reasoning in vicious circles or vicious circular reasoning, in contrast to reasoning in virtuous circles or virtuous circular reasoning. Virtuous circular reasoning is sometimes used for pedagogical purposes, such as in math to show that two different statements are equivalent expressions of the same thing. In a logical argument, viciously circular reasoning occurs when one attempts to infer a conclusion that is based upon a premise that ultimately contains the conclusion itself. Why is vicious circular reasoning unacceptable and fatal? Genuine method proceeds from the known to the unknown. Vicious circular reasoning proceeds from the known to the equally known. Vicious circular reasoning, therefore, violates genuine method. Vicious circular reasoning does not add anything new, it does not advance learning, and it does not add to knowledge. Vicious circular reasoning goes nowhere and leads nowhere -- hence, its descriptive name “circular”. It literally moves in a circuit or a circle. Most people do not study logical fallacies as part of their formal education. Those who study them typically do so as part of a course in logic, maybe called critical thinking, in
- 12. the philosophy department. The rest of us have to learn about them on our own in order to make and detect sound arguments. Note that the word argument applies to all reasoning regardless of form, and thus it includes hypotheses, models, arguments and studies. Here are the citations for a classical text and for a modern text about logic. Prior Analytics and Topics, Aristotle The Logic of Real Arguments, Alec Fisher, Second Edition, 2004, Cambridge University Press. Robert D. Coleman, PhD © 2006 [email protected] 2 The following is a list of Internet sites with information about the fallacies of informal logic including the fallacy of circular reasoning, begging the question, or petitio principii. http://www.kcmetro.cc.mo.us/longview/CTAC/fallacy.htm Critical Thinking Across the Curriculum Project: Informal Fallacies Table of Contents (17 Fallacies) Fallacies of Deception:
- 13. Fallacies of Distraction: Fallacies involving Counterfeit: False Dilemma Affirming the Consequent Slippery Slope Denying the Antecedent Straw Man Equivocation Begging the Question or Circularity Fallacies which use Emotion or Motive in place of Support: Appeal to Pity Appeal to Authority Appeals to Tradition Prejudicial Language Appeal to Force Appeal to Mass Opinion Fallacies which employ both (Double Trouble): Ad Hominem - Abusive Ad Hominem - Ridicule Ad Hominem - Circumstantial Tu Quoque - Two wrongs http://www.ramdac.org/fallacies.php Fallacy Tutorial Pro 3.0, 1995, Dr. Michael C. Labossiere (42 fallacies) Introduction. Description of Fallacies. In order to understand what a fallacy is, one must understand what an argument is. Very briefly, an argument consists of one or more premises and one conclusion. A premise is a
- 14. statement (a sentence that is either true or false) that is offered in support of the claim being made, which is the conclusion (which is also a sentence that is either true or false). There are two main types of arguments: deductive and inductive. A deductive argument is an argument such that the premises provide (or appear to provide) complete support for the conclusion. An inductive argument is an argument such that the premises provide (or appear to provide) some degree of support (but less than complete support) for the conclusion. If the premises actually provide the required degree of support for the conclusion, then the argument is a good one. A good deductive argument is known as a valid argument and is such that if all its premises are true, then its conclusion must be true. If all the argument is valid and actually has all true premises, then it is known as a sound argument. If it is invalid or has one or more false premises, it will be unsound. A Robert D. Coleman, PhD © 2006 [email protected] 3 good inductive argument is known as a strong (or "cogent") inductive argument. It is such that if the premises are true, the conclusion is likely to be true. A fallacy is, very generally, an error in reasoning. This differs from a factual error, which
- 15. is simply being wrong about the facts. To be more specific, a fallacy is an "argument" in which the premises given for the conclusion do not provide the needed degree of support. A deductive fallacy is a deductive argument that is invalid (it is such that it could have all true premises and still have a false conclusion). An inductive fallacy is less formal than a deductive fallacy. They are simply "arguments" which appear to be inductive arguments, but the premises do not provided enough support for the conclusion. In such cases, even if the premises were true, the conclusion would not be more likely to be true. http://www.iep.utm.edu/f/fallacies.htm The Internet Encyclopedia of Philosophy (164 fallacies) A fallacy is a kind of error in reasoning. The alphabetical list below contains 164 names of the most common fallacies, and it provides explanations and examples of each of them. Fallacies should not be persuasive, but they often are. Fallacies may be created unintentionally, or they may be created intentionally in order to deceive other people. The vast majority of the commonly identified fallacies involve arguments, although some involve explanations, or definitions, or other products of reasoning. Sometimes the term "fallacy" is used even more broadly to indicate any false belief or cause of a false belief. The list below includes some fallacies of this sort, but most are fallacies that involve kinds of errors made while arguing informally in natural language.
- 16. The discussion that precedes the list begins with an account of the ways in which the term "fallacy" is vague. Attention then turns to the number of competing and overlapping ways to classify fallacies of argumentation. For pedagogical purposes, researchers in the field of fallacies disagree about the following topics: which name of a fallacy is more helpful to students' understanding; whether some fallacies should be de-emphasized in favor of others; and which is the best taxonomy of the fallacies. Researchers in the field are also deeply divided about how to define the term "fallacy," how to define certain fallacies, and whether any general theory of fallacies at all should be pursued if that theory's goal is to provide necessary and sufficient conditions for distinguishing between fallacious and non-fallacious reasoning generally. Analogously, there is doubt in the field of ethics regarding whether researchers should pursue the goal of providing necessary and sufficient conditions for distinguishing moral actions from immoral ones. Introduction The first known systematic study of fallacies was due to Aristotle in his De Sophisticis Elenchis (Sophistical Refutations), an appendix to the Topics. He listed thirteen types. After the Dark Ages, fallacies were again studied systematically in Medieval Europe. This is why so many fallacies have Latin names. The third major period of study of the
- 17. fallacies began in the later twentieth century due to renewed interest from the disciplines Robert D. Coleman, PhD © 2006 [email protected] 4 of philosophy, logic, communication studies, rhetoric, psychology, and artificial intelligence. The term "fallacy" is not a precise term. One reason is that it is ambiguous. It can refer either to (a) a kind of error in an argument, (b) a kind of error in reasoning (including arguments, definitions, explanations, etc.), (c) a false belief, or (d) the cause of any of the previous errors including what are normally referred to as "rhetorical techniques". Philosophers who are researchers in fallacy theory prefer to emphasize meaning (a), but their lead is often not followed in textbooks and public discussion. http://www.hebrew4christians.com/Clear_Thinking/Informal_Fa llacies/Informal_Fallacies.html Informal Fallacies (71 fallacies in 11 categories) You simply cannot properly begin to properly read the various texts without first being grounded in the basics of clear thinking. By familiarizing yourself with these forms of reasoning you may guard yourself from making the same sorts of errors (as well as to catch errors in the thinking of others who purport to be speaking
- 18. the truth). A brief introduction of the subject included. An informal fallacy is an attempt to persuade that obviously fails to demonstrate the truth of its conclusion, deriving its only plausibility from a misuse of ordinary language. Most scholars categorize informal fallacies as: (1) fallacies of relevance: appeal to ignorance, appeal to authority, ad hominem arguments, appeals to emotion, force, etc., irrelevant conclusions, and appeals to pity; (2) fallacies of presumption: accident, converse accident, false cause, begging the question, and complex question; (3) fallacies of ambiguity: equivocation, amphiboly, accent, composition, and division. http://www.datanation.com/fallacies/ Stephen’s Guide to the Logical Fallacies (53 fallacies) http://www.adamsmith.org/logicalfallacies/ Adam Smith Institute Logical Fallacies (76 fallacies, incuding Petito Principii, Circulus in Probando, and Blinding with Science) http://www.drury.edu/ess/Logic/Informal/Overview.html A Database of Informal Fallacies, 1987, Dr. Charles Ess (28 fallacies) http://www.csun.edu/~dgw61315/fallacies.html Logical Fallacies and the Art of Debate (21 fallacies, including Petitio Principii and Circulus in Demonstrando)
- 19. http://www.fallacyfiles.org/ and http://www.fallacyfiles.org/begquest.html The Fallacy Files (155 fallacies, including Circular Argument, Circulus in Probando, Petitio Principii, Question-Begging, and Vicious Circle) http://en.wikipedia.org/wiki/Logical_fallacy Wikipedia: Logical fallacy (111 fallacies, including Begging the Question) Robert D. Coleman, PhD © 2006 [email protected] 5 http://en.wikipedia.org/wiki/Circular_reasoning Wikipedia: Circular reasoning In logic, begging the question is the term for a type of fallacy occurring in deductive reasoning in which the proposition to be proved is assumed implicitly or explicitly in one of the premises. For an example of this, consider the following argument: "Only an untrustworthy person would run for office. The fact that politicians are untrustworthy is proof of this." Such an argument is fallacious, because it relies upon its own proposition—in this case, "politicians are untrustworthy"—in order to support its central premise. Essentially, the argument assumes that its central point is already proven, and uses this in support of itself. Begging the question is also known by its Latin name petitio principii and is related to
- 20. the fallacy known as circular argument, circulus in probando, vicious circle or circular reasoning. As a concept in logic the first known definition in the West is by the Greek philosopher Aristotle around 350 B.C., in his book Prior Analytics, where he classified it as a material fallacy. The term is usually not used to describe the broader fallacy that occurs when the evidence given for a proposition is as much in need of proof as the proposition itself. The more accepted classification for such arguments is as a fallacy of many questions. See modern usage controversy, below, over a common usage of "begs the question" with the meaning "raises the question". http://en.wikipedia.org/wiki/Category:Causal_fallacies Wikipedia: Causal fallacies This category is for questionable cause fallacies, arguments where a cause is incorrectly identified. http://en.wikipedia.org/wiki/Category:Informal_fallacies Wikipedia: Informal fallacies This category is for arguments that are fallacious for reasons other than structural ("formal") flaws, such as due to ambiguity or a common error in their premises.
- 21. Budget BCWS or, PV Actual Cost ACWP or, AC Earned Value BCWP or, EV SV = BCWP – BCWS CV = BCWP – ACWP Date Cost EAC Time S - Curves
- 22. Calculation SheetIDJob DescriptionImmediate PredecessorsPlanned Duration (Weeks)Staff (Number)Rate/Person/WeekTask Cost (BAC)A1.0 ASSEMBLE ENGINE MOUNTStart24$1,440$11,520B2.0 FIN PREPARATIONStart13$1,440$4,320C3.0 MARK FIN AND LAUNCH LUG LINESStart13$1,440$4,320D4.0 INSERTING ENGINE MOUNTA23$1,440$8,640E5.0 ATTACH FINSD13$1,440$4,320F6.0 ATTACH SHOCK CORDStart23$1,440$8,640G7.0 ASSEMBLE NOSE CONEStart12$1,440$2,880H8.0 ATTACH PARACHUTE/SHOCK CORDG11$1,440$1,440I9.0 ATTACH LAUNCH LUGE11$1,440$1,440J10.0 PAINTING THE ROCKETI14$1,440$5,760K11.0 APPLICATION OF DECALSJ11$1,440$1,440L12.0 APPLYING CLEAR COATK11$1,440$1,440M13.0 DISPLAY NOZZLE ASSEMBLYK13$1,440$4,320N14.0 ROCKET PREFLIGHTL12$1,440$2,880O15.0 PREPARE FOR TEST LAUNCHN11$1,440$1,44024 weeks Level of EffortBlended Rate=$1,44011 weeks duration Performance SheetBCWS (PV) TASKWeek 1Week 2Week 3Week 4Week 5Week 6Week 7Week 8Week 9Week 10Week 11Week 12Week 13Week 14Week 15Week 16BAC TotalsA1.0 ASSEMBLE ENGINE MOUNT$0B2.0 FIN PREPARATION$0C3.0 MARK FIN AND LAUNCH LUG LINES$0D4.0 INSERTING ENGINE MOUNT$0E5.0 ATTACH FINS$0F6.0 ATTACH SHOCK CORD$0G7.0 ASSEMBLE NOSE CONE$0H8.0 ATTACH PARACHUTE/SHOCK CORD$0I9.0 ATTACH LAUNCH LUG$0J10.0 PAINTING THE ROCKET$0K11.0 APPLICATION OF DECALS$0L12.0 APPLYING CLEAR COAT$0M13.0 DISPLAY NOZZLE ASSEMBLY$0N14.0 ROCKET PREFLIGHT$0O15.0 PREPARE FOR TEST LAUNCH$0Equipment$0Material$0$0Weekly
- 23. Total$0$0$0$0$0$0$0$0$0$0$0Cumulative Cost (PV)$0$0$0$0$0$0$0$0$0$0$0IDACWP (AC) TASKWeek 1Week 2Week 3Week 4Week 5Week 6Week 7Week 8Week 9Week 10Week 11Week 12Week 13Week 14Week 15Week 16AC TotalsA1.0 ASSEMBLE ENGINE MOUNT$0B2.0 FIN PREPARATION$0C3.0 MARK FIN AND LAUNCH LUG LINES$0D4.0 INSERTING ENGINE MOUNT$0E5.0 ATTACH FINS$0F6.0 ATTACH SHOCK CORD$0G7.0 ASSEMBLE NOSE CONE$0H8.0 ATTACH PARACHUTE/SHOCK CORD$0I9.0 ATTACH LAUNCH LUG$0J10.0 PAINTING THE ROCKET$0K11.0 APPLICATION OF DECALS$0L12.0 APPLYING CLEAR COAT$0M13.0 DISPLAY NOZZLE ASSEMBLY$0N14.0 ROCKET PREFLIGHT$0O15.0 PREPARE FOR TEST LAUNCH$0Equipment$0Material$0$0Weekly Total$0$0$0Cumulative Cost (AC)$0$0$0IDBCWP (EV) TASKWeek 1Week 2Week 3Week 4Week 5Week 6Week 7Week 8Week 9Week 10Week 11Week 12Week 13Week 14Week 15Week 16EV TotalsA1.0 ASSEMBLE ENGINE MOUNT$0B2.0 FIN PREPARATION$0C3.0 MARK FIN AND LAUNCH LUG LINES$0D4.0 INSERTING ENGINE MOUNT$0E5.0 ATTACH FINS$0F6.0 ATTACH SHOCK CORD$0G7.0 ASSEMBLE NOSE CONE$0H8.0 ATTACH PARACHUTE/SHOCK CORD$0I9.0 ATTACH LAUNCH LUG$0J10.0 PAINTING THE ROCKET$0K11.0 APPLICATION OF DECALS$0L12.0 APPLYING CLEAR COAT$0M13.0 DISPLAY NOZZLE ASSEMBLY$0N14.0 ROCKET PREFLIGHT$0O15.0 PREPARE FOR TEST LAUNCH$0Equipment$0Material$0$0Weekly Total$0$0$0Cumulative Cost (EV)$0$0$0Week 1Week 2Week 3Week 4Week 5Week 6Week 7Week 8Week 9Week 10Week 11Week 12Week 13Week 14Week 15Week 16Cumulative Cost (PV)$0$0$0$0$0$0$0$0$0$0$0Cumulative Cost (AC)$0$0$0Cumulative Cost (EV)$0$0$0BAC=0BCWS (PV)=0ACWP (AC)=0BCWP (EV)=0SV=BCWP- BCWSCV=BCWP-ACWPSV=CV=SV=$0CV=$0Project is $xxK behind scheduleProject is $xxK over
- 24. budgetSPI=BCWP/BCWSCPI=BCWP/ACWPSPI=CPI=SPI=0CP I=0For every dollar spent on scheduled effort we realize $0.xx worth of progress.For every dollar spent, we realize $0.xx of planned result.EAC =BAC/CPIPM Eval=+10% to -5% EACEAC =PM Eval=EAC/BACEAC =$0.00PM Eval=0%EACThe PM's EAC isxx% over/under BAC and is/is not in trouble. May 22-28 May 29-Jun 4 Jun 5-Jun 11 Jun 12-Jun18 Jun 19-Jun 25 Jun 26-Jul 2 Jul 3-Jul9 Jul 10-Jul 16 Jul 17-Jul23 Jul 24-Jul30 Jul 31-Aug 6 Aug 7-Aug 13 Performance Sheet Cumulative Cost (PV) Cumulative Cost (AC) Cumulative Cost (EV) BAC=$xxx,xxxx EAC=$xxx,xxx Planned Value (PV) Section Earned Value (EV) Section Actual Cost (AC) Section Cumulative or S-Curve Graph Performance Measures Section Recovered_Sheet1 SummaryApplicationRequestedPreviousDeltaIssues/Risks/Decis ionsAP$21,026$0.00-$21,026100% AP decoms dependent on purchase of final eight SAVES @ ~ $1M (UFR).BDRE$108,558$0.00-$108,558Review of this application
- 25. with customers resulted in a coonversion requirement @ $108.6K + Capital expense (UFR).DSE$126,297$100,639.25- $25,658System under delay for stress testing and code defect remediation. Delay may cause slip past morotorium.HOBICN/A$0.00$0System transferred . No langer a NIS Y2K responsibility.MM$17,675$0.00-$17,675System undergoing migration from M/F host. Y2K Compliance integral part of migration coding.NAP$17,675$0.00- $17,675Decomission dependent on NEMAS acceptance of NAP as front-end processor or utilization of TCP/IP.NIC$122,206$105,571.50-$16,634On Schedule, Under Requested Budget. Certain actuals not posted to date.SAVE$604,179$112,773.75-$491,405In order to meet Y2K Compliance by EOY, SAVE dependent on purchace of eight additional SAVEs @ $1M (UFR).TOTAL=$1,017,615$318,984.5098 Allocation$382,000$382,000.00Delta- $635,615$63,015.50JanFebMarAprMayJunJulAugSepOctNovDe cBCWS$4,655$11,780$23,332$26,173$154,454$198,992$281,1 97$331,507$387,998$462,708$996,077$1,017,615ACWP$4,655 $11,780$23,920$27,330$158,826$209,292$240,259 SummaryJanJanFebFebMarMarAprAprMayMayJunJunJulJulAug AugSepSepOctOctNovNovDecDec BCWS ACWP Cumulative Cost for NIS Y2K (7/14/98) 4655 4655 11780 11780 23332 23919.6 26172.5 27330.1 154454.197142857 158825.63952381
- 26. 198992.387619048 209292.249047619 281197.435238095 240259.106190476 331507.459047619 387998.459047619 462708.363809524 996076.720952381 1017614.86380952 Roll-UpBCWS 6/6/981998JanFebMarAprMayJunJulAugSepOctNovDecTotalInt ernal (MCI Staff)Hours122.5187.530474.7511488811206622790732332205 6,605Rate383838383838383838383838$4,6557,125.0011,552.00 2,840.5043,624.0033,478.0045,828.0023,636.0030,020.0027,81 6.0012,616.007,790.00250,981External (Contractors)GradeHours00001201762122532942481831741,66 0Rate565656565656565656565656$- 0- 0- 0- 06,722.869,860.1911,877.0514,174.0216,471.0013,893.9010,25 2.369,748.1493,000GradeHours00000070125100290650650Rate 100100100100100100100100100100100100$- 0- 0- 0- 0- 0- 07,000.0012,500.0010,000.0029,000.006,500.00- 065,000GradeHours- 0Rate- 0- 0- 0- 0- 0- 0- 0- 0- 0- 0- 0$- 0- 0- 0- 0- 0- 0- 0- 0- 0- 0- 0- 0- 0Total ContractorHours- 0- 0- 0- 01201762823783945382481742,310$- 0- 0- 0- 06,7239,86018,87726,67426,47142,89416,7529,748158,000Capi tal (Detail Items)Hardware$000001200150000010005010001000519,200So ftware$000000000000- 0Other Costs (Detail Items)Team/Factory Costs$000077934.84000000077,935Travel$00000025000030003 000300011,500$000000000000- 0Total 1998$4,6557,12511,5522,841128,28244,53882,20550,31056,491 74,710533,36821,5381,017,615ACWP 6/2/981998JanFebMarAprMayJunJulAugSepOctNovDecTotalInt ernal (MCI
- 27. Staff)Hours122.5187.517489.75784.5963.5638000002,960Rate3 83838383838383838383838$4,6557,125.006,612.003,410.5029, 811.0036,613.0024,244.00- 0- 0- 0- 0- 0112,471External (Contractors)GradeHours000016016012000000440Rate5656565 65656565656565656$- 0- 0- 0- 08,963.818,963.816,722.86- 0- 0- 0- 0- 024,650GradeHours00130082.5115000000328Rate43434343434 3434343434343$- 0- 05,527.60- 03,507.904,889.80- 0- 0- 0- 0- 0- 013,925GradeHours- 0Rate- 0- 0- 0- 0- 0- 0- 0- 0- 0- 0- 0$- 0- 0- 0- 0- 0- 0- 0- 0- 0- 0- 0- 0- 0Total ContractorHours- 0- 0130- 0243275120- 0- 0- 0- 0- 0768$- 0- 05,528- 012,47213,8546,723- 0- 0- 0- 0- 038,576Capital (Detail Items)Hardware$000000000000- 0Software$000000000000- 0Other Costs (Detail Items)Team/Factory Costs$000089212.83000000089,213Travel$000000000000- 0$- 0Total 1998$4,6557,12512,1403,411131,49650,46730,967- 0- 0- 0- 0- 0240,259 1998 Y2K Budget Revision &L&D&C&P&R&T APBudget Description: UpdateApp Mgr NameLarry LafreniereApplication Name: Adjunct Processor (AP)Project Coord NameJeff TylerPhase: Decom AssessmentVP NamePatrice CarrollWork Request #Director NameBob LairdWork Request NameAuthorized Dep'ts2895Project #Date6/7/98Company #SHL Project Code #1998JanFebMarAprMayJunJulAugSepOctNovDecTotalInternal (MCI Staff)Hours32323296Rate383838383838383838383838$- 0- 0- 0- 0- 0- 0- 0- 0- 01,216.001,216.001,216.003,648External (Contractors)GradeHours16161616161696Rate56565656565656 5656565656$- 0- 0- 0- 0- 0- 0896.38896.38896.38896.38896.38896.385,378GradeHours- 0Rate- 0- 0- 0- 0- 0- 0- 0- 0- 0- 0- 0$- 0- 0- 0- 0- 0- 0- 0- 0- 0- 0- 0- 0- 0GradeHours- 0Rate- 0- 0- 0- 0- 0- 0- 0- 0- 0- 0- 0$- 0- 0- 0- 0- 0- 0- 0- 0- 0- 0- 0- 0- 0Total ContractorHours- 0- 0- 0- 0- 0- 016161616161696$- 0- 0- 0- 0- 0- 08968968968968968965,378Capital (Detail
- 28. Items)Hardware$1000100010003,000Software$- 0Other Costs (Detail Items)Team/Factory Costs$- 0Travel$3000300030009,000$- 0Total 1998$- 0- 0- 0- 0- 0- 08968968966,1126,1126,11221,026ACWP1998JanFebMarAprM ayJunJulAugSepOctNovDecTotalInternal (MCI Staff)Hours- 0Rate383838383838383838383838$- 0- 0- 0- 0- 0- 0- 0- 0- 0- 0- 0- 0- 0External (Contractors)GradeHours- 0Rate565656565656565656565656$- 0- 0- 0- 0- 0- 0- 0- 0- 0- 0- 0- 0- 0GradeHours- 0Rate- 0- 0- 0- 0- 0- 0- 0- 0- 0- 0- 0$- 0- 0- 0- 0- 0- 0- 0- 0- 0- 0- 0- 0- 0GradeHours- 0Rate- 0- 0- 0- 0- 0- 0- 0- 0- 0- 0- 0$- 0- 0- 0- 0- 0- 0- 0- 0- 0- 0- 0- 0- 0Total ContractorHours- 0- 0- 0- 0- 0- 0- 0- 0- 0- 0- 0- 0- 0$- 0- 0- 0- 0- 0- 0- 0- 0- 0- 0- 0- 0- 0Capital (Detail Items)Hardware$- 0Software$- 0Other Costs (Detail Items)Team/Factory Costs$- 0Travel$- 0$- 0Total 1998$- 0- 0- 0- 0- 0- 0- 0- 0- 0- 0- 0- 0- 0JanFebMarAprMayJunJulAugSepOctNovDecBCWS- 0- 0- 0- 0- 0- 08961,7932,6898,80214,91421,026BCWP000000ACWP0- 0- 0- 0- 0- 0 APJanJanJanFebFebFebMarMarMarAprAprAprMayMayMayJun JunJunJulJulJulAugAugAugSepSepSepOctOctOctNovNovNovD ecDecDec BCWS BCWP ACWP Cumulative Costs for AP Y2K Decommission 0 0 0 0 0 0 0 0 0 0 0
- 29. 0 0 0 0 0 0 0 896.380952381 1792.7619047619 2689.1428571429 8801.5238095238 14913.9047619048 21026.2857142857 BDRRBudget Description: UpdateApp Mgr NameLarry LaFreniereApplication Name:Billing Detail Record Reporting (BDRR)Project Coord NameJeff TylerPhase: Conversion AssessmentVP NamePatrice CarrollWork Request #Director NameBob LairdWork Request NameAuthorized Dep'ts2895Project #Date6/6/98Company #Project Code #1998JanFebMarAprMayJunJulAugSepOctNovDecTotalInternal (MCI Staff)Hours21525534031570101,205Rate3838383838383838383 83838$- 0- 0- 0- 0- 0- 08,170.009,690.0012,920.0011,970.002,660.00380.0045,790Ext ernal (Contractors)GradeHours508580852015335Rate5656565656565 65656565656$- 0- 0- 0- 0- 0- 02,801.194,762.024,481.904,762.021,120.48840.3618,768Grade Hours70125100130150440Rate100100100100100100100100100 100100100$- 0- 0- 0- 0- 0- 07,000.0012,500.0010,000.0013,000.001,500.00- 044,000GradeHours- 0Rate- 0- 0- 0- 0- 0- 0- 0- 0- 0- 0- 0$- 0- 0- 0- 0- 0- 0- 0- 0- 0- 0- 0- 0- 0Total ContractorHours- 0- 0- 0- 0- 0- 01202101802153515775$- 0- 0- 0- 0- 0- 09,80117,26214,48217,7622,62084062,768Capital (Detail Items)Hardware$- 0Software$- 0Other Costs (Detail
- 30. Items)Team/Factory Costs$- 0Travel$- 0$- 0Total 1998$- 0- 0- 0- 0- 0- 017,97126,95227,40229,7325,2801,220108,558ACWP1998JanF ebMarAprMayJunJulAugSepOctNovDecTotalInternal (MCI Staff)Hours- 0Rate383838383838383838383838$- 0- 0- 0- 0- 0- 0- 0- 0- 0- 0- 0- 0- 0External (Contractors)GradeHours- 0Rate565656565656565656565656$- 0- 0- 0- 0- 0- 0- 0- 0- 0- 0- 0- 0- 0GradeHours- 0Rate100100100100100100100100100100100$- 0- 0- 0- 0- 0- 0- 0- 0- 0- 0- 0- 0- 0GradeHours- 0Rate- 0- 0- 0- 0- 0- 0- 0- 0- 0- 0- 0$- 0- 0- 0- 0- 0- 0- 0- 0- 0- 0- 0- 0- 0Total ContractorHours- 0- 0- 0- 0- 0- 0- 0- 0- 0- 0- 0- 0- 0$- 0- 0- 0- 0- 0- 0- 0- 0- 0- 0- 0- 0- 0Capital (Detail Items)Hardware$- 0Software$- 0Other Costs (Detail Items)Team/Factory Costs$- 0Travel$- 0$- 0Total 1998$- 0- 0- 0- 0- 0- 0- 0- 0- 0- 0- 0- 0- 0JanFebMarAprMayJunJulAugSepOctNovDecBCWS- 0- 0- 0- 0- 0- 017,97144,92372,325102,057107,338108,558BCWP000000AC WP0- 0- 0- 0- 0- 0 Jeff Tyler: Est cost of shipping and hanling of stratus boxes for turn-in credit. Jeff Tyler: Est cost of shipping and hanling of stratus boxes for turn-in credit. Jeff Tyler: Est cost of shipping and hanling of stratus boxes for turn-in credit. Jeff Tyler: Est. cost of trips to two sites for unexpected problems. Jeff Tyler: Est. cost of trips to two sites for unexpected problems. Jeff Tyler: Est. cost of trips to two sites for unexpected problems. BDRRJanJanJanFebFebFebMarMarMarAprAprAprMayMayMay JunJunJunJulJulJulAugAugAugSepSepSepOctOctOctNovNovNo
- 31. vDecDecDec BCWS BCWP ACWP Cumulative Cost Of BDR Y2K Conversion 0 0 0 0 0 0 0 0 0 0 0 0 0 0 0 0 0 0 17971.1904761905 44923.2142857143 72325.119047619 102057.142857143 107337.619047619 108557.976190476 DSEBudget Description: 1998 Y2K UpdateApp Mgr NameLarry LafreniereApplication Name: ISPNISDSEProject Coord NameJeff TylerPhase: Conversion AnalysisVP NamePatrice CarrollWork Request #120743Director NameOpenWork Request NameAuthorized Dep'ts2895Project #Date5/7/98Company #SHL Project Code #1998JanFebMarAprMayJunJulAugSepOctNovDecTotalInternal
- 32. (MCI Staff)Hours2937.75220.523413667618727020550231,600Rate38 3838383838383838383838$1,1021,434.508,379.00874.0015,694 .002,508.002,888.007,106.0010,260.007,790.001,900.00874.006 0,810External (Contractors)GradeHours4048384070353511317Rate565656565 656565656565656$- 0- 0- 0- 02,240.952,689.142,128.902,240.953,921.671,960.831,960.8361 6.2617,760GradeHours16050210Rate1001001001001001001001 00100100100100$- 0- 0- 0- 0- 0- 0- 0- 0- 016,000.005,000.00- 021,000GradeHours- 0Rate- 0- 0- 0- 0- 0- 0- 0- 0- 0- 0- 0$- 0- 0- 0- 0- 0- 0- 0- 0- 0- 0- 0- 0- 0Total ContractorHours- 0- 0- 0- 040483840701958511527$- 0- 0- 0- 02,2412,6892,1292,2413,92217,9616,96161638,760Capital (Detail Items)Hardware$- 0Software$- 0Other Costs (Detail Items)Team/Factory Costs$26,727.8826,728Travel$- 0$- 0Total 1998$1,1021,4358,37987444,6635,1975,0179,34714,18225,7518 ,8611,490126,297Ass/ReqAnalysisStress Test Delay (DP&D)CodingTestFVORoll- Out93.00%79.00%74.00%58.00%9.00%8.00%1,024.862,158.12 8,358.588,865.5012,885.1513,300.921998ACWPJanFebMarApr MayJunJulAugSepOctNovDecTotalInternal (MCI Staff)Hours2937.7590.523151060.5266Rate38383838383838383 8383838$1,1021,434.503,439.00874.00570.00380.002,299.00- 0- 0- 0- 0- 010,099External (Contractors)GradeHours404330113Rate5656565656565656565 65656$- 0- 0- 0- 02,240.952,409.021,680.71- 0- 0- 0- 0- 06,331GradeHours130130Rate434343434343434343434343$- 0- 05,527.60- 0- 0- 0- 0- 0- 0- 0- 0- 05,528GradeHours- 0Rate- 0- 0- 0- 0- 0- 0- 0- 0- 0- 0- 0$- 0- 0- 0- 0- 0- 0- 0- 0- 0- 0- 0- 0- 0Total ContractorHours- 0- 0130- 0404330- 0- 0- 0- 0- 0243$- 0- 05,528- 02,2412,4091,681- 0- 0- 0- 0- 011,858Capital (Detail Items)Hardware$- 0Software$- 0Other Costs (Detail Items)Team/Factory Costs$27,763.0627,763Travel$- 0$- 0Total 1998$1,1021,4358,96787430,5742,7893,980- 0- 0- 0- 0- 049,720JanFebMarAprMayJunJulAugSepOctNovDecBCWS1102
- 33. 2,53710,91611,79056,45261,64966,66676,01390,195115,946124 ,807126,297BCWP1,0253,18311,54220,40733,29235,052ACWP 11022,53711,50312,37742,95145,740 &L&D&C&A&R&T DSEJanJanJanFebFebFebMarMarMarAprAprAprMayMayMayJu nJunJunJulJulJulAugAugAugSepSepSepOctOctOctNovNovNov DecDecDec BCWS BCWP ACWP Cumulative Costs for DSE Y2K (7/14/98) 1102 1024.86 1102 2536.5 3182.975 2536.5 10915.5 11541.55 11503.1 11789.5 20407.045 12377.1 56452.3323809524 33292.1949142857 42951.1123809524 61649.4752380952 35051.5662571429 45740.1361904762 66666.38 76013.3323809524 90194.999047619 115945.832380952 124806.665714286 126296.927619048 MMBudget Description: 1998 Y2K UpdateApp Mgr NameLarry
- 34. LaFreniereApplication Name: Match Merge (MM)Project Coord NameJeff TylerPhase: Decom AssessmentVP NamePatrice CarrollWork Request #Director NameBob LairdWork Request NameAuthorized Dep'ts2895Project #Date6/6/98Company #SHL Project Code #1998JanFebMarAprMayJunJulAugSepOctNovDecTotalInternal (MCI Staff)Hours505050505050300Rate383838383838383838383838 $- 0- 0- 0- 0- 0- 01,900.001,900.001,900.001,900.001,900.001,900.0011,400Exte rnal (Contractors)GradeHours16161616161616112Rate56565656565 6565656565656$- 0- 0- 0- 0- 0896.38896.38896.38896.38896.38896.38896.386,275GradeHou rs- 0Rate- 0- 0- 0- 0- 0- 0- 0- 0- 0- 0- 0$- 0- 0- 0- 0- 0- 0- 0- 0- 0- 0- 0- 0- 0GradeHours- 0Rate- 0- 0- 0- 0- 0- 0- 0- 0- 0- 0- 0$- 0- 0- 0- 0- 0- 0- 0- 0- 0- 0- 0- 0- 0Total ContractorHours- 0- 0- 0- 0- 016161616161616112$- 0- 0- 0- 0- 08968968968968968968966,275Capital (Detail Items)Hardware$- 0Software$- 0Other Costs (Detail Items)Team/Factory Costs$- 0Travel$- 0$- 0Total 1998$- 0- 0- 0- 0- 08962,7962,7962,7962,7962,7962,79617,675ACWP1998JanFeb MarAprMayJunJulAugSepOctNovDecTotalInternal (MCI Staff)Hours- 0Rate383838383838383838383838$- 0- 0- 0- 0- 0- 0- 0- 0- 0- 0- 0- 0- 0External (Contractors)GradeHours- 0Rate565656565656565656565656$- 0- 0- 0- 0- 0- 0- 0- 0- 0- 0- 0- 0- 0GradeHours- 0Rate- 0- 0- 0- 0- 0- 0- 0- 0- 0- 0- 0$- 0- 0- 0- 0- 0- 0- 0- 0- 0- 0- 0- 0- 0GradeHours- 0Rate- 0- 0- 0- 0- 0- 0- 0- 0- 0- 0- 0$- 0- 0- 0- 0- 0- 0- 0- 0- 0- 0- 0- 0- 0Total ContractorHours- 0- 0- 0- 0- 0- 0- 0- 0- 0- 0- 0- 0- 0$- 0- 0- 0- 0- 0- 0- 0- 0- 0- 0- 0- 0- 0Capital (Detail Items)Hardware$- 0Software$- 0Other Costs (Detail Items)Team/Factory Costs$- 0Travel$- 0$- 0Total 1998$- 0- 0- 0- 0- 0- 0- 0- 0- 0- 0- 0- 0- 0JanFebMarAprMayJunJulAugSepOctNovDecBCWS- 0- 0- 0- 0- 08963,6936,4899,28612,08214,87817,675BCWP000000ACWP0
- 35. - 0- 0- 0- 0- 0 Jeff Tyler: Lack of tester will require product testing in ICCA with a contracted teser. Jeff Tyler: Lack of tester will require product testing in ICCA with a contracted teser. MMJanJanJanFebFebFebMarMarMarAprAprAprMayMayMayJu nJunJunJulJulJulAugAugAugSepSepSepOctOctOctNovNovNov DecDecDec BCWS BCWP ACWP Cumulative Cost Of Match Merge Y2K Conversion 0 0 0 0 0 0 0 0 0 0 0 0 0 0 0 896.380952381 0 0 3692.7619047619 6489.1428571429 9285.5238095238 12081.9047619048
- 36. 14878.2857142857 17674.6666666667 NAPBudget Description: 1998 Y2K UpdateApp Mgr NameLarry LaFreniereApplication Name: NIC Adjunct Processor (NAP)Project Coord NameJeff TylerPhase: Decom AssessmentVP NamePatrice CarrollWork Request #Director NameBob LairdWork Request NameAuthorized Dep'ts2895Project #Date6/6/98Company #Project Code #1998JanFebMarAprMayJunJulAugSepOctNovDecTotalInternal (MCI Staff)Hours505050505050300Rate383838383838383838383838 $- 0- 0- 0- 0- 0- 01,900.001,900.001,900.001,900.001,900.001,900.0011,400Exte rnal (Contractors)GradeHours16161616161616112Rate56565656565 6565656565656$- 0- 0- 0- 0- 0896.38896.38896.38896.38896.38896.38896.386,275GradeHou rs- 0Rate- 0- 0- 0- 0- 0- 0- 0- 0- 0- 0- 0$- 0- 0- 0- 0- 0- 0- 0- 0- 0- 0- 0- 0- 0GradeHours- 0Rate- 0- 0- 0- 0- 0- 0- 0- 0- 0- 0- 0$- 0- 0- 0- 0- 0- 0- 0- 0- 0- 0- 0- 0- 0Total ContractorHours- 0- 0- 0- 0- 016161616161616112$- 0- 0- 0- 0- 08968968968968968968966,275Capital (Detail Items)Hardware$- 0Software$- 0Other Costs (Detail Items)Team/Factory Costs$- 0Travel$- 0$- 0Total 1998$- 0- 0- 0- 0- 08962,7962,7962,7962,7962,7962,79617,675ACWP1998JanFeb MarAprMayJunJulAugSepOctNovDecTotalInternal (MCI Staff)Hours- 0Rate383838383838383838383838$- 0- 0- 0- 0- 0- 0- 0- 0- 0- 0- 0- 0- 0External (Contractors)GradeHours- 0Rate565656565656565656565656$- 0- 0- 0- 0- 0- 0- 0- 0- 0- 0- 0- 0- 0GradeHours- 0Rate- 0- 0- 0- 0- 0- 0- 0- 0- 0- 0- 0$- 0- 0- 0- 0- 0- 0- 0- 0- 0- 0- 0- 0- 0GradeHours- 0Rate- 0- 0- 0- 0- 0- 0- 0- 0- 0- 0- 0$- 0- 0- 0- 0- 0- 0- 0- 0- 0- 0- 0- 0- 0Total ContractorHours- 0- 0- 0- 0- 0- 0- 0- 0- 0- 0- 0- 0- 0$- 0- 0- 0- 0- 0- 0- 0- 0- 0- 0- 0- 0- 0Capital (Detail Items)Hardware$- 0Software$- 0Other Costs (Detail Items)Team/Factory Costs$-
- 37. 0Travel$- 0$- 0Total 1998$- 0- 0- 0- 0- 0- 0- 0- 0- 0- 0- 0- 0- 0JanFebMarAprMayJunJulAugSepOctNovDecBCWS- 0- 0- 0- 0- 08963,6936,4899,28612,08214,87817,675BCWP000000ACWP0 - 0- 0- 0- 0- 0 NAPJanJanJanFebFebFebMarMarMarAprAprAprMayMayMayJu nJunJunJulJulJulAugAugAugSepSepSepOctOctOctNovNovNov DecDecDec BCWS BCWP ACWP Cumulative Cost Of NAP Y2K Claimed Compliance 0 0 0 0 0 0 0 0 0 0 0 0 0 0 0 896.380952381 0 0 3692.7619047619 6489.1428571429 9285.5238095238 12081.9047619048 14878.2857142857 17674.6666666667 NICBudget Description: 1998 Y2K UpdateApp Mgr NameLarry
- 38. LaFreniereApplication Name:Network Information Concentrator (NIC)Project Coord NameJeff TylerPhase: Conversion AnalysisVP NamePatrice CarrollWork Request #120742Director NameBob LairdWork Request NameAuthorized Dep'ts2895Project #Date6/6/98Company #SHL Project Code #1998JanFebMarAprMayJunJulAugSepOctNovDecTotalInternal (MCI Staff)Hours3841.54429.54134134134040404001,552Rate383838 383838383838383838$1,4441,577.001,672.001,121.0015,694.00 15,694.0015,694.001,520.001,520.001,520.001,520.00- 058,976External (Contractors)GradeHours4048384048404050344Rate565656565 656565656565656$- 0- 0- 0- 02,240.952,689.142,128.902,240.952,689.142,240.952,240.952, 801.1919,272GradeHours- 0Rate- 0- 0- 0- 0- 0- 0- 0- 0- 0- 0- 0$- 0- 0- 0- 0- 0- 0- 0- 0- 0- 0- 0- 0- 0GradeHours- 0Rate- 0- 0- 0- 0- 0- 0- 0- 0- 0- 0- 0$- 0- 0- 0- 0- 0- 0- 0- 0- 0- 0- 0- 0- 0Total ContractorHours- 0- 0- 0- 04048384048404050344$- 0- 0- 0- 02,2412,6892,1292,2412,6892,2412,2412,80119,272Capital (Detail Items)Hardware$1500015,000Software$- 0Other Costs (Detail Items)Team/Factory Costs$27,457.3227,457Travel$15001,500$- 0Total 1998$1,4441,5771,6721,12145,39218,38334,3233,7614,2093,76 13,7612,801122,206Ass/ReqAnalysisCodingTestFVORoll- Out90.00%81.00%88.00%77.00%56.00%17.00%1,299.602,576. 972,770.963,634.1329,053.8032,178.94ACWP1998JanFebMarA prMayJunJulAugSepOctNovDecTotalInternal (MCI Staff)Hours3841.54444.589.2514764468Rate3838383838383838 38383838$1,4441,577.001,672.001,691.003,391.505,586.002,43 2.00- 0- 0- 0- 0- 017,794External (Contractors)GradeHours605745162Rate5656565656565656565 65656$- 0- 0- 0- 03,361.433,193.362,521.07- 0- 0- 0- 0- 09,076GradeHours- 0Rate- 0- 0- 0- 0- 0- 0- 0- 0- 0- 0- 0$- 0- 0- 0- 0- 0- 0- 0- 0- 0- 0- 0- 0- 0GradeHours- 0Rate- 0- 0- 0- 0- 0- 0- 0- 0- 0- 0- 0$- 0- 0- 0- 0- 0- 0- 0- 0- 0- 0- 0- 0- 0Total
- 39. ContractorHours- 0- 0- 0- 0605745- 0- 0- 0- 0- 0162$- 0- 0- 0- 03,3613,1932,521- 0- 0- 0- 0- 09,076Capital (Detail Items)Hardware$- 0Software$- 0Other Costs (Detail Items)Team/Factory Costs$28,538.0928,538Travel$- 0$- 0Total 1998$1,4441,5771,6721,69135,2918,7794,953- 0- 0- 0- 0- 055,407JanFebMarAprMayJunJulAugSepOctNovDecBCWS1,44 43,0214,6935,81451,20669,589103,912107,673111,882115,6431 19,404122,206BCWP1,3003,8775,3486,40532,68861,233ACWP 1,4443,0214,6936,38441,67550,454 &L&D&C&A&R&T NICJanJanJanFebFebFebMarMarMarAprAprAprMayMayMayJu nJunJunJulJulJulAugAugAugSepSepSepOctOctOctNovNovNov DecDecDec BCWS BCWP ACWP Cumulative Costs for NIC Y2K (7/14/98) 1444 1299.6 1444 3021 3876.57 3021 4693 5347.93 4693 5814 6405.09 6384 51206.2723809524 32687.9325333333 41675.0185714286 69589.4152380952 61232.739352381 50454.3757142857 103912.32
- 40. 107673.272380952 111882.415238095 115643.367619048 119404.32 122205.51047619 SAVEBudget Description: 1998 Y2K UpdateApp Mgr NameLarry LaFreniereApplication Name:Storage And Verification Element (SAVE)Project Coord NameJeff TylerPhase: Conversion Design & PlanningVP NamePatrice CarrollWork Request #120741Director NameBob LairdWork Request NameAuthorized Dep'ts2895Project #Date6/6//1998Company #Project Code #1998JanFebMarAprMayJunJulAugSepOctNovDecTotalInternal (MCI Staff)Hours55.5108.2539.522.2532240240240404040401,552Ra te383838383838383838383838$2,1094,113.501,501.00845.5012 ,236.0015,276.0015,276.001,520.001,520.001,520.001,520.001, 520.0058,957External (Contractors)GradeHours4048384048404050344Rate565656565 656565656565656$- 0- 0- 0- 02,240.952,689.142,128.902,240.952,689.142,240.952,240.952, 801.1919,272GradeHours- 0Rate- 0- 0- 0- 0- 0- 0- 0- 0- 0- 0- 0$- 0- 0- 0- 0- 0- 0- 0- 0- 0- 0- 0- 0- 0GradeHours- 0Rate- 0- 0- 0- 0- 0- 0- 0- 0- 0- 0- 0$- 0- 0- 0- 0- 0- 0- 0- 0- 0- 0- 0- 0- 0Total ContractorHours- 0- 0- 0- 04048384048404050344$- 0- 0- 0- 02,2412,6892,1292,2412,6892,2412,2412,80119,272Capital (Detail Items)Hardware$1200500,000501,200Software$- 0Other Costs (Detail Items)Team/Factory Costs$23,749.6423,750Travel$10001,000$- 0Total 1998$2,1094,1141,50184638,22719,16518,4053,7614,2093,7615 03,7614,321604,179Ass/ReqAnalysisDesignCodingTestFVORol l- Out100.0%87.0%78.0%79.0%71.0%11.0%2,109.005,687.751,17 0.78667.9527,140.882,108.17ACWP1998JanFebMarAprMayJun JulAugSepOctNovDecTotalInternal (MCI
- 41. Staff)Hours55.5108.2539.522.25680.25806.5513.52,226Rate383 838383838383838383838$2,1094,113.501,501.00845.5025,849. 5030,647.0019,513.00- 0- 0- 0- 0- 084,579External (Contractors)GradeHours606045165Rate5656565656565656565 65656$- 0- 0- 0- 03,361.433,361.432,521.07- 0- 0- 0- 0- 09,244GradeHours82.5115198Rate434343434343434343434343 $- 0- 0- 0- 03,507.904,889.80- 0- 0- 0- 0- 0- 08,398GradeHours- 0Rate- 0- 0- 0- 0- 0- 0- 0- 0- 0- 0- 0$- 0- 0- 0- 0- 0- 0- 0- 0- 0- 0- 0- 0- 0Total ContractorHours- 0- 0- 0- 014317545- 0- 0- 0- 0- 0363$- 0- 0- 0- 06,8698,2512,521- 0- 0- 0- 0- 017,642Capital (Detail Items)Hardware$- 0Software$- 0Other Costs (Detail Items)Team/Factory Costs$32,911.6832,912Travel$- 0$- 0Total 1998$2,1094,1141,50184665,63138,89822,034- 0- 0- 0- 0- 0135,132JanFebMarAprMayJunJulAugSepOctNovDecBCWS2,1 096,2237,7248,56946,79665,96184,36688,12792,33696,097599, 858604,179BCWP05,6886,8597,52634,66736,776ACWP21096,2 237,7248,56974,200113,098 Jeff Tyler: The NAP box in Perryman needs to have an OS upgrade to VOS 12.4. This is necessary for Y2K compliance, and to stay current with the kit revision level (build 08). We have been requested to fund Sheldons trip to Perryman for this activity. The costs should not exceed $1200, and this should be billable to the Y2K funds. The maintenance is necessary before May 29, and is requested for a Sunday afternoon due to the behavior patterns of the NAP. Jeff Tyler: Estimated cost of memory repacement for NIC testing box canibalized to support Lab in Y2K testing. &L&D&C&A&R&T SAVE BCWS BCWP ACWP Cumulative Cost of SAVE Y2K (7/14/98) Risk AssessmentIDRisk
- 42. EventProbabilityImpactResponsePriorityResonsibilityNIS Adjunct Processor (AP) Y2K Project1Decom by 12/31/98MedHi1Edie Smith2Use as Tape Drive for NICHiLow2Jeff Tyler3Get ExemptionHILow3Jeff TylerNIS Billing Detail Record Reporting (BDRR) Y2K Project1Not decom'dHIHI(a) Get exmption (b) Xfer to DSS (c) Claim Compliance (d) Convert12Get exmptionHILow5Jeff Tyler3Transfer to DSSLowHI3Bob Laird4Claim ComplianceLow-MedHI4Jeff Tyler5ConvertHIMedRamp up staffing ASAP2Larry LafreniereNIS Data Server for EVS (DSE) Y2K Project1Coding SlipMedHiRequest Exemption2Jeff Tyler2No test capabilityHiHiICCA product test1John Anderson3No PMMedHiJob Req.3John AndersonNIS Match Merge (MM) Y2K Project1Not decom'dHIHIExemption2Jeff Tyler2Host migration delaysHIHIRequires Assesment1John Libermann3Get exmptionHILow3Jeff TylerNIS NIC Adjunct Processor (NAP) Y2K Project1Not decom'd by 12/31/98MedLow(a) Submit exception. (b) Xfer to NEMAS as front end processor. (c) See if TEFAC can replace it. (d) Institute TCP/IP with NEMAS. (e) Resort to Claimed Compliance.1Bob Laird2Receive exmptionMed-HILow2Jeff Tyler3Transfer to NEMASLowHIIf not then goto TEFAC3Bob Laird4TEFEC to replace need for NAPMed-LowHIIf not then goto TCP/IP4Kim Greer5Institute TCP/IP with NEMASMed-HIMedIf not then goto Claimed Compliance5Dave Weis6Go Claimed ComplianceLowMedIf not then retire6Jeff Tyler7RetireLowLowEscalate Business Case7Bob LairdNIS Storage And Verification Element (SAVE) Y2K Project1Not Compliant by 12/31/98HIHIPurchase remaining eight SAVE boxes1Bob Laird2RolLowut by MoratoriumMedMedApply for exemption2Jeff Tyler Jeff Tyler: Estimated cost of O/S upgrade
- 43. Jeff Tyler: Includes $6K in change controls not planned for NCC OTB CBB TAB Profit / Fees Contract Price Earned Value Management ‘Gold Card’‘Gold Card’ Management Reserve OVERRUN AUW Control Accounts Undistributed Budget OTB PMB Summary Level Planning Packages
- 44. Management Reserve EAC PMB TAB BAC TERMINOLOGY NCC Negotiated Contract Cost Contract price less profit / fee(s) AUW Authorized Unpriced Work Work contractually approved, but not yet negotiated / definitized CBB Contract Budget Base Sum of NCC and AUW OTB O T t B li S f CBB d i d Work Packages Planning Packages g g g Cost Variance Schedule Variance ACWP BCWS $ OTB Over Target Baseline Sum of CBB and recognized overrun TAB Total Allocated Budget Sum of all budgets for work on contract = NCC, CBB, or OTB BAC Budget At Completion Total budget for total contract thru any given level
- 45. PMB Performance Measurement Baseline Contract time-phased budget plan MR Management Reserve Budget withheld by Ktr PM for unknowns / risk management UB Undistributed Budget Broadly defined activities not yet distributed to CAs CA Control Account Lowest CWBS element assigned to a single focal point to plan & control scope / schedule / budget WP W k P k N t d t il l d ti iti ithi CAVARIANCES Favorable is Positive Unfavorable is Negative BCWP Time Now Completion Date Time WP Work Package Near-term, detail-planned activities within a CA PP Planning Package Far-term CA activities not yet defined into WPs BCWS Budgeted Cost for Work Scheduled Value of work planned to be accomplished = PLANNED VALUE BCWP Budgeted Cost for Work Performed Value of work accomplished = EARNED VALUE ACWP Actual Cost of Work Performed Cost of work accomplished = ACTUAL COST EAC Estimate At Completion Estimate of total cost for total contract thru any given level;
- 46. may be generated by Ktr, PMO, DCMA, etc. = EACKtr / PMO / DCMA LRE Latest Revised Estimate Ktr’s EAC or EACKtr SLPP S L l Pl i P k F t ti iti t t d fi d i t CA VARIANCES Favorable is Positive, Unfavorable is Negative Cost Variance CV = BCWP – ACWP CV % = (CV / BCWP) *100 Schedule Variance SV = BCWP – BCWS SV % = (SV / BCWS) * 100 Variance at Completion VAC = BAC – EAC OVERALL STATUS % Schedule = (BCWSCUM / BAC) * 100 % Complete = (BCWPCUM / BAC) * 100 SLPP Summary Level Planning Package Far-term activities not yet defined into CAs TCPI To Complete Performance Index Efficiency needed from ‘time now’ to achieve an EAC EVM POLICY: DoDI 5000.02, Encl 4. Table 5. EVMS in accordance with ANSI/EIA-748 is required for cost or incentive contracts, subcontracts, intra-government work agreements, & other agreements valued > $20M (Then-Yr $). EVMS contracts > $50M (TY $) require that the EVM system be formally validated by the cognizant contracting officer. Additional Guidance in Defense Acquisition Guidebook and the Earned Value Management Implementation Guide (EVMIG). EVMS is discouraged on Firm-Fixed Price, Level of Effort, & Time & Material efforts regardless of cost. DoD TRIPWIRE METRICS Favorable is > 1.0, Unfavorable is < 1.0 Cost Efficiency CPI = BCWP / ACWP Schedule Efficiency SPI = BCWP / BCWS
- 47. p ( CUM ) % Spent = (ACWPCUM / BAC) * 100 BASELINE EXECUTION INDEX (BEI) (Schedule Metric) BEI = # of Baseline Tasks Actually Completed / # of Baseline Tasks Scheduled for Completion EVM CONTRACTING REQUIREMENTS: Non-DoD FAR Clauses – Solicitation – 52.234-2 (Pre-Award IBR) or 52.234-3 (Post Award IBR) – Solicitation & Contract – 52.234-4 DoD( ≥ $20M) DFAR Clauses - 252.234-7001 for solicitations and 252.234-7002 for solicitations & contracts Contract Performance Report – DI-MGMT-81466A * 5 Formats (WBS, Organization, Baseline, Staffing & Explanation) Integrated Master Schedule – DI-MGMT-81650 * (Mandatory for DoD EVMS contracts) Integrated Baseline Review (IBR) – Mandatory for all EVMS contracts BEI = # of Baseline Tasks Actually Completed / # of Baseline Tasks Scheduled for Completion CPLI = (Critical Path Duration + Float Duration (to baseline finish)) / Critical Path Duration CRITICAL PATH LENGTH INDEX (CPLI) (Schedule Metric) TO COMPLETE PERFORMANCE INDEX (TCPI) # § TCPIEAC = Work Remaining / Cost Remaining = (BAC – BCWPCUM) / (EAC – ACWPCUM) ESTIMATE AT COMPLETION # EAC A t l t D t + [(R i i W k) / (Effi i F t )]
- 48. EVM Home Page = https://acc.dau.mil/evm eMail Address: [email protected] DAU POC: (703) 805-5259 (DSN 655) Revised January 2009 g ( ) y * See the EVMIG for CPR & IMS tailoring guidance.EAC = Actuals to Date + [(Remaining Work) / (Efficiency Factor)]EACCPI = ACWPCUM + [(BAC – BCWPCUM) / CPICUM ] = BAC / CPICUM EACComposite = ACWPCUM + [(BAC – BCWPCUM) / (CPICUM * SPICUM)] # To Determine a Contract Level TCPI or EAC; You May Replace BAC with TAB § To Determine the TCPI BAC or LRE Replace EAC with BAC or LRE Deliverables1.0 ASSEMBLE ENGINE MOUNT2.0 FIN PREPARATION3.0 MARK FIN AND LAUNCH LUG LINES4.0 INSERTING ENGINE MOUNT5.0 ATTACH FINS6.0 ATTACH SHOCK CORD7.0 ASSEMBLE NOSE CONE8.0 ATTACH PARACHUTE/SHOCK CORD9.0 ATTACH LAUNCH LUG10.0 PAINTING THE ROCKET11.0 APPLICATION OF DECALS12.0 APPLYING CLEAR COAT13.0 DISPLAY NOZZLE ASSEMBLY14.0 ROCKET PREFLIGHT15.0 PREPARE FOR TEST LAUNCH TITLEGAUCHITO ROCKET PROJECTPROJECT WORKBOOKDoubleclick to open Hi-Level WBS1.0 ASSEMBLE ENGINE MOUNT1.1 Measure, Mark and Cut Engine Tube 1.2 Cut Engine Tube1.3 Glue, Tube, Assemble Hook 1.3.1 Apply thin line of glue completely around engine at 3/4" mark1.3.2 Position Hook per
- 49. diagram1.3.3 Insert Engine Hook into 1/8" Slit on Engine Mount Tube1.4 Assemble Mylar Ring to Tube1.5 Assemble Yellow Engine Block to Engine Mount Tube1.6 Assemble Centering Rings1.7 Application of Glue Fillets2.0 FIN PREPARATION2.1 Sand/Cut fins2.2 Cutting Out Fins2.3 Stack and Sand Fins3.0 MARK FIN AND LAUNCH LUG LINES3.1 Cut Tape 3.2 Remove guide, connect fins and lug lines, extend LL line3.3 Extend Launch Lug Line4.0 INSERTING ENGINE MOUNT4.1 Mark inside of tube @ 5/8" where LL is4.2 Glue Tube4.3 Assemble Engine Hook 4.4 Gluing Center Body Ring5.0 ATTACH FINS5.1 Attach Fin #1 5.2 Attach Fin #2 5.3 Attach Fin #35.4 Attach Fin #45.5 Check Fin Alignment 5.6 Allow glue to dry 6.0 ATTACH SHOCK CORD6.1 Cut out shock cord mount 6.2 First Glue Application6.3 Second Glue Application6.4 Squueze and Hold6.5 Attaching Shock Cord Mount7.0 ASSEMBLE NOSE CONE7.1 Glue nose cone 8.0 ATTACH PARACHUTE/SHOCK CORD8.1 Attach Lines8.2 Attach Parachute8.3 Tie Lines9.0 ATTACH LAUNCH LUG9.1 Glue launch lines 9.2 Application of Glue Fillets10.0 PAINTING THE ROCKET10.1 Apply first coat10.2 Sand 10.3 Apply final coat11.0 APPLICATION OF DECALS11.1 Apply first decal 11.2 Apply second decal 11.3 Apply third decal11.4 Apply fourth decal 11.5 Apply fifth decal 11.6 Apply sixth Decal 11.7 Apply seventh Decal12.0 APPLYING CLEAR COAT12.1 Apply clear coat to entire rocket13.0 DISPLAY NOZZLE ASSEMBLY13.1 Spray Nozzle Base White13.2 Apply Glue14.0 ROCKET PREFLIGHT14.1 Prepare Rocket for Preflight14.2 Spike14.3 Fold14.4 Roll14.5 Reinsert15.0 PREPARE FOR TEST LAUNCH15.1 Insert Engine Activity List1.0 ASSEMBLE ENGINE MOUNT1.1 Measure, Mark and Cut Engine Tube -1.1.1 Lay ruler along engine tube- 1.1.2 Measure engine from left of engine tube tube @ 1/8"-1.1.3 Mark left end of Engine Tube @ 1/8' -1.1.4 Measure engine from left of engine tube @ 3/4"-1.1.5 Mark from left of EngineTube @ 3/4" -1.1.6 Measure engine tube from left of engine tube @ 11/2"-1.1.7 Mark from left of Engine Tube @ 1
- 50. 1/2"-1.2 Cut Engine Tube-1.2.1 Cut Slit of 1/8" @ 1 1/2 inch Mark on Engine Tube-1.3 Glue, Tube, Assemble Hook -1.3.1 Apply thin line of glue completely around engine at 3/4" mark- 1.3.2 Position Hook per diagram-1.3.3 Insert Engine Hook into 1/8" Slit on Engine Mount Tube-1.4 Assemble Mylar Ring to Tube-1.4.1 Slide Mylar ring onto Engline Mount tube at 3/4" mark -1.4.2 Let Dry-1.5 Assemble Yellow Engine Block to Engine Mount Tube-1.5.1 Apply glue inside front of Engine Mount tube -1.5.2 Insert Yellow Engine Block flush with the right end per diagram-1.5.3 Let Dry-1.6 Assemble Centering Rings-1.6.1 Remove Centering rings from card with modeling knife-1.6.2 Apply thin line of Glue around engine mount tube @ 1/8" mark-1.6.3 Slide notched Centering Ring onto glued line @ 1/8" mark-1.6.4 Let Glue Set-1.6.5 Apply thin line of Glue to opposite side of notched center ring flush with end of engine mount tube-1.6.6 Slide unnotched Centering Ring in place over glue flush with end of engine tube mount-1.6.7 Let Dry-1.7 Application of Glue Fillets-1.7.1 Apply Glue Fillets to both sides of Centering Rings for reinforcement-1.7.2 Let Dry2.0 FIN PREPARATION-2.1 Sand/Cut fins-2.1.1 Sand Laser Cut Balsa Sheet w/Fine Sandpaper -2.2 Cutting Out Fins2.2.1 Cut out fin #1 w/modeling knife2.2.2 Cut out fin #2 w/modeling knife2.2.3 Cut out fin #3 w/ modeling knife2.2.4 Cut out fin #4 w/modeling knife-2.3 Stack and Sand Fins-2.3.1 Stack Fins- 2.3.2 Sand Edges of fins3.0 MARK FIN AND LAUNCH LUG LINES-3.1 Cut - Tape 3.1.1 Cut out tube marking guide-3.1.2 Tape tube marking guide around body tube-3.1.3 Mark body tube at arrows-3.1.4 Mark Launch Lug Line as LL on Body tube-3.2 Remove guide, connect fins and lug lines, extend LL line-3.2.1 Remove Tube Marking guide from body tube -3.2.2 Connect Fins using door frame-3.2.3 Connect launch lug lines using door frame-3.3 Extend Launch Lug Line-3.3.1 Extend launch lug line 3 3/4" from end of tube4.0 INSERTING ENGINE MOUNT-4.1 Mark inside of tube @ 5/8" where LL is- 4.1.1 Measure inside tube to 5/8" position on tube-4.1.2 Mark inside tube at 5/8"-4.2 Glue Tube-4.2.1 Measure inside rear of
- 51. body tube to 1 3/4' position on tube-4.2.2 Use finger to smear glue 1 3/4" inside rear of body tube along LL.-4.3 Assemble Engine Hook -4.3.1 Align engine hook with LL line-4.3.2 Insert engine mount into body tube until centering ring is even w/the 5/8" glue mark-4.3.3 Let Dry-4.4 Gluing Center Body Ring-4.4.1 Locate scrap piece of balsa to apply glue-4.4.2 Apply glue to centering/body tube joint-4.4.3 Let Dry5.0 ATTACH FINS-5.1 Attach Fin #1 -5.1.1 Apply thin layer of glue to edge of fin -5.1.2 Allow to dry (1 minute for model)- 5.1.3 Apply second layer of glue to edge of fin-5.1.4 Attach Fin to body tube along one of fin lines flush w/end-5.2 Attach Fin #2 -5.2.1 Apply thin layer of glue to edge of fin#2-5.2.2 Allow to dry (1 minute for model)-5.2.3 Apply second layer of glue to edge of fin #2-5.2.4 Attach Fin #2 to body tube along one of fin lines flush w/end-5.3 Attach Fin #3-5.3.1 Apply thin layer of glue to edge of fin #3-5.3.2 Allow to dry (1 minute for model)- 5.3.3 Apply second layer of glue to edge of fin #3-5.3.4 Attach Fin #3 to body tube along one of fin lines flush w/end-5.4 Attach Fin #4-5.4.1 Apply thin layer of glue to edge of fin #4- 5.4.2 Allow to dry (1 minute for model)-5.4.3 Apply second layer of glue to edge of fin #4-5.4.4 Attach Fin #4 to body tube along one of fin lines flush w/end-5.5 Check Fin Alignment - 5.5.1 Check Fin #1 Alignment as shown in diagram-5.5.2 Check Fin #2 Alignment as shown in diagram-5.5.3 Check Fin #3 Alignment as shown in diagram-5.5.4 Check Fin #4 Alignment as shown in diagram-5.6 Allow glue to dry -5.6.1 Let Glue Set- 5.6.2 Stand Rocket on end-5.6.3 let glue dries completely6.0 ATTACH SHOCK CORD-6.1 Cut out shock cord mount -6.1.1 Cut out shock cord from front page-6.2 First Glue Application- 6.2.1 Attach shock cord to shock cord mount-6.2.2 Apply glue to shock cord mount-6.2.3 Fold edge of shock cord mount forward over glued shock cord-6.3 Second Glue Application- 6.3.1 Apply glue to shock cord mount-6.3.2 Fold forward again-see diagram for clarification-6.4 Squueze and Hold-6.4.1 Squeeze shock cord/shock cord mount tightly-6.4.2 Hold for 1 minute-6.5 Attaching Shock Cord Mount-6.5.1 Glue mount 1"
- 52. inside body tube-6.5.2 Hold until glue sets-6.5.3 Let Dry Completely7.0 ASSEMBLE NOSE CONE-7.1 Glue nose cone - 7.1.1 Apply plastic cememt to inside rim of nose cone -7.1.2 Press Nose Cone Insert into place over plastic cement inside of nose cone rim-7.1.3 Let Dry Completely8.0 ATTACH PARACHUTE/SHOCK CORD-8.1 Attach Lines-8.1.1 Pass shroud line on parachute through eyelit -8.2 Attach Parachute- 8.2.1 Pass parachute through loop in shroud-look to diagram for clarification-8.3 Tie Lines-8.3.1 Tie shock cord to nose cone using a double knot9.0 ATTACH LAUNCH LUG-9.1 Glue launch lines -9.1.1 Glue LL centerd onto LL Line on rocket body -9.2 Application of Glue Fillets-9.2.1 Apply glue fillets along launch lug-9.2.2 Apply glue fillets along fin/body tube joints-9.2.3 Smooth each fillet with finger-9.2.4 Let glue dry completely10.0 PAINTING THE ROCKET-10.1 Apply first coat-10.1.1 Spray rocket with white primer-10.1.2 Let Dry-10.2 Sand -10.1.2 Sand entire rocket-10.3 Apply final coat-10.3.1 Spray completed rocket with white second coat of primer - 10.3.2 Let Dry-10.3.3 Spray Nose Cone with Copper paint- 10.3.4 Let Dry11.0 APPLICATION OF DECALS-11.1 Apply first decal -11.1.1 Remove First decal from back sheet -11.1.2 Place on Rocket where indicated-11.1.3 Rub decal to remove bubbles-11.2 Apply second decal -11.2.1 Remove second decal from backing sheet-11.2.2 Place on Rocket where indicated- 11.2.3 Rub decal to remove bubbles-11.3 Apply third decal- 11.3.1 Remove third decal from backing sheet-11.3.2 Place on Rocket where indicated-11.3.3 Rub decal to remove bubbles- 11.4 Apply fourth decal -11.4.1 Remove fourth decal from backing sheet-11.4.2 Place on Rocket where indicated-11.4.3 Rub decal to remove bubbles -11.5 Apply fifth decal -11.5.1 Remove fifth decal from backing sheet-11.5.2 Place on Rocket where indicated -11.5.3 Rub decal to remove bubbles-11.6 Apply sixth Decal -11.6.1 Remove sixth decal from backing sheet-11.6.2 Place on Rocket where indicated-11.6.3 Rub decal to remove bubbles -11.7 Apply seventh Decal-11.7.1 Remove seventh decal from backing sheet-11.7.2 Place on Rocket where
- 53. indicated-11.7.3 Rub decal to remove bubbles12.0 APPLYING CLEAR COAT-12.1 Apply clear coat to entire rocket 12.1.1 Apply clear coat to entire rocket 12.1.2 Dry Completely13.0 DISPLAY NOZZLE ASSEMBLY-13.1 Spray Nozzle Base White-13.1.1 Paint Nozzle #1 w/Silver Paint Pen-13.1.2 Paint Nozzle #2 w/ Silver Paint Pen-13.1.3 Paint Nozzle #3 w/ Silver Paint Pen-13.1.4 Paint Nozzle #4 w/ Silver Paint Pen-13.1.5 Allow to dry-13.2 Apply Glue-13.2.1 Apply glue to tab on nozzle #1-13.2.2 Place Nozzle #1 into hole on base-13.2.3 Apply glue to tab on nozzle #2-13.2.4 Place Nozzle #2 into hole on base-13.2.5 Apply glue to tab on nozzle #3-13.2.6 Place Nozzle #3 into hole on base-13.2.7 Apply glue to tab on nozzle #4-13.2.8 Place Nozzle #4 into hole on base14.0 ROCKET PREFLIGHT14.1 prepare-14.1.1 Remove Nose Cone from Rocket-14.1.2 Locate recovery wadding-14.1.3 Insert 4-5 loosely crumpled squares of recovery wadding14.2 Spike-14.2.1 Pull parachute into a spike-see diagram for clarification14.3 Fold-14.3.1 Fold parachute according to diagram14.4 Roll- 14.4.1 Roll parachute according to diagram14.5 Re-insert-14.5.1 Wrap lines loosly around rolled parachute-see diagram for clarification-14.5.2 Insert parachute into body tube of rocket- 14.5.3 Insert shock cord into body tube of rocket-14.5.4 Insert nose cone into body tube of rocket15.0 PREPARE FOR TEST LAUNCH-15.1 Insert Engine-15.1.1 Remove engine -15.1.2 Insert tip to touch propellant-15.1.3 Insert engine into rocket Decomposed WBS1.0 ASSEMBLE ENGINE MOUNT1.1 Measure, Mark and Cut Engine Tube "1.1.1 Lay ruler along engine tube1.1.2 Measure engine from left of engine tube @ 1/8"""1.1.3 Mark left end of engine Tube @ 1/8' 1.1.4 Measure engine from left of engine tube @ 3/4"""1.1.5 Mark from left of engine tube @ 3/4"" "1.1.6 Measure engine tube from left of engine tube @ 11/2"""1.1.7 Mark from left of engine tube @ 1 1/2"""1.2 Cut Engine Tube1.2.1 Cut Slit of 1/8"" @ 1 1/2 inch Mark on Engine Tube"1.3 Glue, Tube, Assemble Hook "1.3.1 Apply thin line of glue completely around engine at 3/4"" mark"1.3.2 Position Hook per diagram1.3.3 Insert Engine Hook
- 54. into 1/8"" Slit on Engine Mount Tube"1.4 Assemble Mylar Ring to Tube1.4.1 Slide Mylar ring onto Engine Mount tube at 3/4"" mark "1.4.2 Let Dry1.5 Assemble Yellow Engine Block to Engine Mount Tube1.5.1 Apply glue inside front of Engine Mount tube 1.5.2 Insert Yellow Engine Block flush with the right end per diagram1.5.3 Let Dry1.6 Assemble Centering Rings1.6.1 Remove Centering rings from card with modeling knife1.6.2 Apply thin line of Glue around engine mount tube @ 1/8"" mark"1.6.3 Slide notched Centering Ring onto glued line @ 1/8"" mark"1.6.4 Let Glue Set1.6.5 Apply thin line of Glue to opposite side of notched center ring flush with end of engine mount tube1.6.6 Slide un-notched Centering Ring in place over glue flush with end of engine tube mount1.6.7 Let Dry1.7 Application of Glue Fillets1.7.1 Apply Glue Fillets to both sides of Centering Rings for reinforcement1.7.2 Let Dry2.0 FIN PREPARATION2.1 Sand/Cut fins2.1.1 Sand Laser Cut Balsa Sheet w/Fine Sandpaper 2.2 Cutting Out Fins2.2.1 Cut out fin #1 w/modeling knife2.2.2 Cut out fin #2 w/modeling knife2.2.3 Cut out fin #3 w/ modeling knife2.2.4 Cut out fin #4 w/modeling knife2.3 Stack and Sand Fins2.3.1 Stack Fins2.3.2 Sand Edges of fins3.0 MARK FIN AND LAUNCH LUG LINES3.1 Cut - Tape 3.1.1 Cut out tube marking guide3.1.2 Tape tube marking guide around body tube3.1.3 Mark body tube at arrows3.1.4 Mark Launch Lug Line as LL on Body tube3.2 Remove guide, connect fins and lug lines, extend LL line"3.2.1 Remove Tube Marking guide from body tube 3.2.2 Connect Fins using door frame3.2.3 Connect launch lug lines using door frame3.3 Extend Launch Lug Line3.3.1 Extend launch lug line 3 3/4"" from end of tube"4.0 INSERTING ENGINE MOUNT4.1 Mark inside of tube @ 5/8"" where LL is"4.1.1 Measure inside tube to 5/8"" position on tube"4.1.2 Mark inside tube at 5/8"""4.2 Glue Tube4.2.1 Measure inside rear of body tube to 1 3/4' position on tube4.2.2 Use finger to smear glue 1 3/4"" inside rear of body tube along LL."4.3 Assemble Engine Hook 4.3.1 Align engine hook with LL line4.3.2 Insert engine mount into body tube until centering ring is even w/the 5/8"" glue
- 55. mark"4.3.3 Let Dry4.4 Gluing Center Body Ring4.4.1 Locate scrap piece of balsa to apply glue4.4.2 Apply glue to centering/body tube joint4.4.3 Let Dry5.0 ATTACH FINS5.1 Attach Fin #1 5.1.1 Apply thin layer of glue to edge of fin 5.1.2 Allow to dry (1 minute for model)5.1.3 Apply second layer of glue to edge of fin5.1.4 Attach Fin to body tube along one of fin lines flush w/end5.2 Attach Fin #2 5.2.1 Apply thin layer of glue to edge of fin#25.2.2 Allow to dry (1 minute for model)5.2.3 Apply second layer of glue to edge of fin #25.2.4 Attach Fin #2 to body tube along one of fin lines flush w/end5.3 Attach Fin #35.3.1 Apply thin layer of glue to edge of fin #35.3.2 Allow to dry (1 minute for model)5.3.3 Apply second layer of glue to edge of fin #35.3.4 Attach Fin #3 to body tube along one of fin lines flush w/end5.4 Attach Fin #45.4.1 Apply thin layer of glue to edge of fin #45.4.2 Allow to dry (1 minute for model)5.4.3 Apply second layer of glue to edge of fin #45.4.4 Attach Fin #4 to body tube along one of fin lines flush w/end5.5 Check Fin Alignment 5.5.1 Check Fin #1 Alignment as shown in diagram5.5.2 Check Fin #2 Alignment as shown in diagram5.5.3 Check Fin #3 Alignment as shown in diagram5.5.4 Check Fin #4 Alignment as shown in diagram5.6 Allow glue to dry 5.6.1 Let Glue Set5.6.2 Stand Rocket on end5.6.3 let glue dries completely6.0 ATTACH SHOCK CORD6.1 Cut out shock cord mount 6.1.1 Cut out shock cord from front page6.2 First Glue Application6.2.1 Attach shock cord to shock cord mount6.2.2 Apply glue to shock cord mount6.2.3 Fold edge of shock cord mount forward over glued shock cord6.3 Second Glue Application6.3.1 Apply glue to shock cord mount6.3.2 Fold forward again-see diagram for clarification6.4 Squeeze and Hold6.4.1 Squeeze shock cord/shock cord mount tightly6.4.2 Hold for 1 minute6.5 Attaching Shock Cord Mount6.5.1 Glue mount 1"" inside body tube"6.5.2 Hold until glue sets6.5.3 Let Dry Completely7.0 ASSEMBLE NOSE CONE7.1 Glue nose cone 7.1.1 Apply plastic cement to inside rim of nose cone 7.1.2 Press Nose Cone Insert into place over plastic cement inside of nose cone
- 56. rim7.1.3 Let Dry Completely8.0 ATTACH PARACHUTE/SHOCK CORD8.1 Attach Lines8.1.1 Pass shroud line on parachute through eyelet 8.2 Attach Parachute8.2.1 Pass parachute through loop in shroud-look to diagram for clarification8.3 Tie Lines8.3.1 Tie shock cord to nose cone using a double knot9.0 ATTACH LAUNCH LUG9.1 Glue launch lines 9.1.1 Glue LL centered onto LL Line on rocket body 9.2 Application of Glue Fillets9.2.1 Apply glue fillets along launch lug9.2.2 Apply glue fillets along fin/body tube joints9.2.3 Smooth each fillet with finger9.2.4 Let glue dry completely10.0 PAINTING THE ROCKET10.1 Apply first coat10.1.1 Spray rocket with white primer10.1.2 Let Dry10.2 Sand 10.1.2 Sand entire rocket10.3 Apply final coat10.3.1 Spray completed rocket with white second coat of primer 10.3.2 Let Dry10.3.3 Spray Nose Cone with Copper paint10.3.4 Let Dry11.0 APPLICATION OF DECALS11.1 Apply first decal 11.1.1 Remove First decal from back sheet 11.1.2 Place on Rocket where indicated11.1.3 Rub decal to remove bubbles11.2 Apply second decal 11.2.1 Remove second decal from backing sheet11.2.2 Place on Rocket where indicated11.2.3 Rub decal to remove bubbles11.3 Apply third decal11.3.1 Remove third decal from backing sheet11.3.2 Place on Rocket where indicated11.3.3 Rub decal to remove bubbles11.4 Apply fourth decal 11.4.1 Remove fourth decal from backing sheet11.4.2 Place on Rocket where indicated11.4.3 Rub decal to remove bubbles 11.5 Apply fifth decal 11.5.1 Remove fifth decal from backing sheet11.5.2 Place on Rocket where indicated 11.5.3 Rub decal to remove bubbles11.6 Apply sixth Decal 11.6.1 Remove sixth decal from backing sheet11.6.2 Place on Rocket where indicated11.6.3 Rub decal to remove bubbles 11.7 Apply seventh Decal11.7.1 Remove seventh decal from backing sheet11.7.2 Place on Rocket where indicated11.7.3 Rub decal to remove bubbles12.0 APPLYING CLEAR COAT12.1 Apply clear coat to entire rocket12.1.1 Apply clear coat to entire rocket12.1.2 Dry Completely13.0 DISPLAY NOZZLE ASSEMBLY13.1 Spray Nozzle Base White13.1.1 Paint Nozzle
- 57. #1 w/Silver Paint Pen13.1.2 Paint Nozzle #2 w/ Silver Paint Pen13.1.3 Paint Nozzle #3 w/ Silver Paint Pen13.1.4 Paint Nozzle #4 w/ Silver Paint Pen13.1.5 Allow to dry13.2 Apply Glue13.2.1 Apply glue to tab on nozzle #113.2.2 Place Nozzle #1 into hole on base13.2.3 Apply glue to tab on nozzle #213.2.4 Place Nozzle #2 into hole on base13.2.5 Apply glue to tab on nozzle #313.2.6 Place Nozzle #3 into hole on base13.2.7 Apply glue to tab on nozzle #413.2.8 Place Nozzle #4 into hole on base14.0 ROCKET PREFLIGHT14.1 Prepare Rocket for Preflight14.1.1 Remove Nose Cone from Rocket14.1.2 Locate recovery wadding14.1.3 Insert 4-5 loosely crumpled squares of recovery wadding14.2 Spike14.2.1 Pull parachute into a spike- see diagram for clarification14.3 Fold14.3.1 Fold parachute according to diagram14.4 Roll14.4.1 Roll parachute according to diagram14.5 Re-insert14.5.1 Wrap lines loosely around rolled parachute-see diagram for clarification14.5.2 Insert parachute into body tube of rocket14.5.3 Insert shock cord into body tube of rocket14.5.4 Insert nose cone into body tube of rocket15.0 PREPARE FOR TEST LAUNCH15.1 Insert Engine15.1.1 Remove engine 15.1.2 Insert tip to touch propellant15.1.3 Insert engine into rocket Cost Estimate Resource types - estimates in man-hours for Duration EstimateTASKSFitterDraftsmanGluerCutterSanderISanderIIPain ter IPainter IIEngineerDummy1.0 ASSEMBLE ENGINE MOUNT1430740000040951.1 Measure, Mark and Cut Engine Tube "530000000001.1.1 Lay ruler along engine tube51.1.2 Measure engine from left of engine tube @ 1/8"""51.1.3 Mark left end of engine Tube @ 1/8' 51.1.4 Measure engine from left of engine tube @ 3/4"""51.1.5 Mark from left of engine tube @ 3/4"" "51.1.6 Measure engine tube from left of engine tube @ 11/2"""51.1.7 Mark from left of engine tube @ 1 1/2"""51.2 Cut Engine Tube00020000001.2.1 Cut Slit of 1/8"" @ 1 1/2 inch Mark on Engine Tube"21.3 Glue, Tube, Assemble Hook "50200000001.3.1 Apply thin line of glue completely around engine at 3/4"" mark"21.3.2 Position Hook per diagram21.3.3
- 58. Insert Engine Hook into 1/8"" Slit on Engine Mount Tube"31.4 Assemble Mylar Ring to Tube10000000081.4.1 Slide Mylar ring onto Engine Mount tube at 3/4"" mark "11.4.2 Let Dry81.5 Assemble Yellow Engine Block to Engine Mount Tube10100000081.5.1 Apply glue inside front of Engine Mount tube 11.5.2 Insert Yellow Engine Block flush with the right end per diagram11.5.3 Let Dry81.6 Assemble Centering Rings202200000161.6.1 Remove Centering rings from card with modeling knife21.6.2 Apply thin line of Glue around engine mount tube @ 1/8"" mark"11.6.3 Slide notched Centering Ring onto glued line @ 1/8"" mark"11.6.4 Let Glue Set81.6.5 Apply thin line of Glue to opposite side of notched center ring flush with end of engine mount tube11.6.6 Slide un-notched Centering Ring in place over glue flush with end of engine tube mount11.6.7 Let Dry81.7 Application of Glue Fillets00200000081.7.1 Apply Glue Fillets to both sides of Centering Rings for reinforcement21.7.2 Let Dry82.0 FIN PREPARATION200121600000302.1 Sand/Cut fins00008000002.1.1 Sand Laser Cut Balsa Sheet w/Fine Sandpaper 82.2 Cutting Out Fins000120000002.2.1 Cut out fin #1 w/modeling knife32.2.2 Cut out fin #2 w/modeling knife32.2.3 Cut out fin #3 w/ modeling knife32.2.4 Cut out fin #4 w/modeling knife32.3 Stack and Sand Fins20008000002.3.1 Stack Fins22.3.2 Sand Edges of fins83.0 MARK FIN AND LAUNCH LUG LINES191202000000333.1 Cut - Tape 38020000003.1.2 Cut out tube marking guide23.1.2 Tape tube marking guide around body tube33.1.3 Mark body tube at arrows43.1.4 Mark Launch Lug Line as LL on Body tube43.2 Remove guide, connect fins and lug lines, extend LL line"160000000003.2.1 Remove Tube Marking guide from body tube 43.2.2 Connect Fins using door frame43.2.3 Connect launch lug lines using door frame83.3 Extend Launch Lug Line04000000003.3.1 Extend launch lug line 3 3/4"" from end of tube"44.0 INSERTING ENGINE MOUNT1110600000016434.1 Mark inside of tube @ 5/8"" where LL is"07000000004.1.1 Measure inside tube to 5/8""
- 59. position on tube"44.1.2 Mark inside tube at 5/8"""34.2 Glue Tube03200000004.2.1 Measure inside rear of body tube to 1 3/4' position on tube34.2.2 Use finger to smear glue 1 3/4"" inside rear of body tube along LL."24.3 Assemble Engine Hook 100000000084.3.1 Align engine hook with LL line54.3.2 Insert engine mount into body tube until centering ring is even w/the 5/8"" glue mark"54.3.3 Let Dry84.4 Gluing Center Body Ring10400000084.4.1 Locate scrap piece of balsa to apply glue14.4.2 Apply glue to centering/body tube joint44.4.3 Let Dry85.0 ATTACH FINS20162000000017735.1 Attach Fin #1 40500000015.1.1 Apply thin layer of glue to edge of fin 35.1.2 Allow to dry (1 minute for model)15.1.3 Apply second layer of glue to edge of fin25.1.4 Attach Fin to body tube along one of fin lines flush w/end45.2 Attach Fin #2 40500000015.2.1 Apply thin layer of glue to edge of fin#235.2.2 Allow to dry (1 minute for model)15.2.3 Apply second layer of glue to edge of fin #225.2.4 Attach Fin #2 to body tube along one of fin lines flush w/end45.3 Attach Fin #340500000015.3.1 Apply thin layer of glue to edge of fin #335.3.2 Allow to dry (1 minute for model)15.3.3 Apply second layer of glue to edge of fin #325.3.4 Attach Fin #3 to body tube along one of fin lines flush w/end45.4 Attach Fin #440500000015.4.1 Apply thin layer of glue to edge of fin #435.4.2 Allow to dry (1 minute for model)15.4.3 Apply second layer of glue to edge of fin #425.4.4 Attach Fin #4 to body tube along one of fin lines flush w/end45.5 Check Fin Alignment 016000000005.5.1 Check Fin #1 Alignment as shown in diagram45.5.2 Check Fin #2 Alignment as shown in diagram45.5.3 Check Fin #3 Alignment as shown in diagram45.5.4 Check Fin #4 Alignment as shown in diagram45.6 Allow glue to dry 400000000135.6.1 Let Glue Set55.6.2 Stand Rocket on end45.6.3 let glue dries completely86.0 ATTACH SHOCK CORD160195000008486.1 Cut out shock cord mount 00050000006.1.1 Cut out shock cord from front page56.2 First Glue Application80400000006.2.1 Attach shock cord to shock cord mount46.2.2 Apply glue to shock cord mount46.2.3 Fold edge of shock cord mount forward
- 60. over glued shock cord46.3 Second Glue Application40400000006.3.1 Apply glue to shock cord mount46.3.2 Fold forward again-see diagram for clarification46.4 Squeeze and Hold00600000006.4.1 Squeeze shock cord/shock cord mount tightly26.4.2 Hold for 1 minute46.5 Attaching Shock Cord Mount40500000086.5.1 Glue mount 1"" inside body tube"446.5.2 Hold until glue sets16.5.3 Let Dry Completely87.0 ASSEMBLE NOSE CONE4040000008167.1 Glue nose cone 40400000087.1.1 Apply plastic cement to inside rim of nose cone 47.1.2 Press Nose Cone Insert into place over plastic cement inside of nose cone rim47.1.3 Let Dry Completely88.0 ATTACH PARACHUTE/SHOCK CORD18000000000188.1 Attach Lines70000000008.1.1 Pass shroud line on parachute through eyelet 78.2 Attach Parachute50000000008.2.1 Pass parachute through loop in shroud-look to diagram for clarification58.3 Tie Lines60000000008.3.1 Tie shock cord to nose cone using a double knot69.0 ATTACH LAUNCH LUG00240000008329.1 Glue launch lines 00400000009.1.1 Glue LL centered onto LL Line on rocket body 49.2 Application of Glue Fillets002000000089.2.1 Apply glue fillets along launch lug49.2.2 Apply glue fillets along fin/body tube joints129.2.3 Smooth each fillet with finger49.2.4 Let glue dry completely810.0 PAINTING THE ROCKET00001168480249710.1 Apply first coat000000800810.1.1 Spray rocket with white primer810.1.2 Let Dry810.2 Sand 0000116000010.1.2 Sand entire rocket11610.3 Apply final coat00000004801610.3.1 Spray completed rocket with white second coat of primer 1610.3.2 Let Dry810.3.3 Spray Nose Cone with Copper paint3210.3.4 Let Dry811.0 APPLICATION OF DECALS035000000003511.1 Apply first decal 050000000011.1.1 Remove First decal from back sheet 111.1.2 Place on Rocket where indicated311.1.3 Rub decal to remove bubbles111.2 Apply second decal 050000000011.2.1 Remove second decal from backing sheet111.2.2 Place on Rocket where indicated311.2.3 Rub decal
- 61. to remove bubbles111.3 Apply third decal050000000011.3.1 Remove third decal from backing sheet111.3.2 Place on Rocket where indicated311.3.3 Rub decal to remove bubbles111.4 Apply fourth decal 050000000011.4.1 Remove fourth decal from backing sheet111.4.2 Place on Rocket where indicated311.4.3 Rub decal to remove bubbles 111.5 Apply fifth decal 050000000011.5.1 Remove fifth decal from backing sheet111.5.2 Place on Rocket where indicated 311.5.3 Rub decal to remove bubbles111.6 Apply sixth Decal 050000000011.6.1 Remove sixth decal from backing sheet111.6.2 Place on Rocket where indicated311.6.3 Rub decal to remove bubbles 111.7 Apply seventh Decal050000000011.7.1 Remove seventh decal from backing sheet111.7.2 Place on Rocket where indicated311.7.3 Rub decal to remove bubbles112.0 APPLYING CLEAR COAT00000008081612.1 Apply clear coat to entire rocket000000080812.1.1 Apply clear coat to entire rocket812.1.2 Dry Completely813.0 DISPLAY NOZZLE ASSEMBLY80800090083313.1 Spray Nozzle Base White000000900813.1.1 Paint Nozzle #1 w/Silver Paint Pen213.1.2 Paint Nozzle #2 w/ Silver Paint Pen213.1.3 Paint Nozzle #3 w/ Silver Paint Pen213.1.4 Paint Nozzle #4 w/ Silver Paint Pen313.1.5 Allow to dry813.2 Apply Glue808000000013.2.1 Apply glue to tab on nozzle #1213.2.2 Place Nozzle #1 into hole on base213.2.3 Apply glue to tab on nozzle #2213.2.4 Place Nozzle #2 into hole on base213.2.5 Apply glue to tab on nozzle #3213.2.6 Place Nozzle #3 into hole on base213.2.7 Apply glue to tab on nozzle #4213.2.8 Place Nozzle #4 into hole on base214.0 ROCKET PREFLIGHT420000000004214.1 Prepare Rocket for Preflight1300000000014.1.1 Remove Nose Cone from Rocket614.1.2 Locate recovery wadding114.1.3 Insert 4-5 loosely crumpled squares of recovery wadding614.2 Spike400000000014.2.1 Pull parachute into a spike-see diagram for clarification414.3 Fold400000000014.3.1 Fold parachute according to diagram414.4 Roll400000000014.4.1 Roll parachute according to diagram414.5 Re-
- 62. insert1700000000014.5.1 Wrap lines loosely around rolled parachute-see diagram for clarification514.5.2 Insert parachute into body tube of rocket614.5.3 Insert shock cord into body tube of rocket214.5.4 Insert nose cone into body tube of rocket415.0 PREPARE FOR TEST LAUNCH000000003203215.1 Insert Engine0000000032015.1.1 Remove engine 1015.1.2 Insert tip to touch propellant1015.1.3 Insert engine into rocket12RESOURCE TOTALS 15410388231716175632137643Add resource totals as cross check 643RESOURCE HOURLY RATES$50.00$40.00$25.00$40.00$25.00$30.00$25.00$30.00$5 5.00$36BLENDED RATESRESOURCE COSTS $7,700.00$4,120.00$2,200.00$920.00$425.00$480.00$425.00$1 ,680.00$1,760.00$19,710.00Number Staff HoursWeek- 14027181916Week-23315127Week-3653Week-4553Week- 5201620Week-624Week-7116848Week-835Week-98898Week- 1042Week-1132 Spend Plan-BaselineCATEGORYWeek 1Week 2Week 3Week 4Week 5Week 6Week 7Week 8Week 9 Week 10Week 11Week 12Week 13Week 14Week 15Week 16Labor$21,600$11,520$4,320$4,320$4,320$1,440$5,760$1,44 0$5,760$2,880$1,440$64,800Material $15,685$2,500$5,800$0$0$375$270$650$1,875$550$50,000$0$ 0$0$0$0$77,705Equipment / $1,025$0$0$0$0$0$0$0$0$0$0$0$0$0$0$0$1,025 partsTOTAL$38,310$14,020$10,120$4,320$4,320$1,815$6,030 $2,090$7,635$3,430$51,440$0$0$0$0$0$143,530CUMULATIV E $38,310$52,330$62,450$66,770$71,090$72,905$78,935$81,025 $88,660$92,090$143,530$143,530$143,530$143,530$143,530$1 43,530PROJECT BASELINEEAC=$143,530 Week 1 Week 2 Week 3 Week 4 Week 5 Week 6 Week 7 Week 8 Week 9 Week 10 Week 11 38310 52330 62450 66770 71090 72905 78935 81025 88660 92090 143530 GANTT ScheduleWeek 1Week 2Week 3Week 4Week 5Week
- 63. 6Week 7Week 8Week 9Week 10Week 11Week 12Week 13Week 14Week 15Week 161.0 ASSEMBLE ENGINE MOUNT2.0 FIN PREPARATION3.0 MARK FIN AND LAUNCH LUG LINES4.0 INSERTING ENGINE MOUNT5.0 ATTACH FINS6.0 ATTACH SHOCK CORD7.0 ASSEMBLE NOSE CONE8.0 ATTACH PARACHUTE/SHOCK CORD9.0 ATTACH LAUNCH LUG10.0 PAINTING THE ROCKET11.0 APPLICATION OF DECALS12.0 APPLYING CLEAR COAT13.0 DISPLAY NOZZLE ASSEMBLY14.0 ROCKET PREFLIGHT15.0 PREPARE FOR TEST LAUNCH Network Diagram095h951: Assemble Engine Mount00959543h13830735h3424: Insert Engine Mount11: Application of Decals033h3395013813873h21121132h24330703423: Mark Fin & LL Lines5: Attach Fins9: Attach Launch Lug1380211211024334216h358030h3012: Applying Clear Coat2: Fin Preparation3420358108108138044h4424364h30735842h4006: Attach Shock Cord10: Painting the Rocket14: Rocket Pre-Flight196196240443h47243030735804008: Attach Chute Shock Cord016h162401982437: Assemble Nose Cone40032h43222422424015: Prepare for Test Launch4000432032h3213: Display Nozzle Assembly400400432LegendEarly StartDurationEarly FinishTask NameLate StartSlackLate Finish M& E ForecastCodeItemCostWeek 1Week 2Week 3Week 4Week 5Week 6Week 7Week 8Week 9Week 10Week 11Week 12Week 13Week 14Week 15Week 16Equipment$1,025$1,025$0$0$0$0$0$0$0$0$0$0$0$0$0$0$0S cissors x 10$100$100Pencil x10$25$25Ruler x10$50$50Modeling Knife x 5$100$100Guide, Tube
- 64. Marking$500$500Tool, Framing x 1$125$125Tool, Fin Alignment x 1$125$125Material$77,705$15,685$2,500$5,800$0$0$375$270 $650$1,875$550$50,000$0$0$0$0$0Guide, Shock Cord Mount$250$250Sand Paper (Course)$75$75Sand Paper (Fine)$75$75Glue$150$150Cement$120$120Tape, Masking$100$100Primer, Spray$110$110Paint, Spray (White)$160$160Paint, Spray (Clear)$125$125Pen, Paint (Silver)$250$250Tube, Body BT-58$5,800$5,800Block, Engine EB-5B$5,000$5,000Cord, Shock, Rubber$115$115Hook, Mini Engine EH-3$300$300Tube, Engine Mount BT-5$500$500Ring, Retainer (Mylar)$250$250Sheet, Decal #60859$650$650Card, Centering Ring RA5-58$550$550Lug Launch LL- 2A$375$375Fins, Laser Cut x4$4,000$4,000Parachute Assembly 12' x 1$2,500$2,500Base, Nozzle, Display x 1$750$750Nozzles x 4$1,000$1,000Cone, Nose x 1$3,000$3,000Insert, Nose Cone x 1$1,200$1,200Wadding, Recovery x 1pk$300$300Engine Assembly, A10-3T x 1$50,000$50,000TOTAL$16,710$2,500$5,800$0$0$375$270$6 50$1,875$550$50,000$0$0$0$0$0 PABLO DE LEON & ASSOCIATES GAUCHITO RESUPPLY VEHICLE Pablo de Leon and Associates (Pablo de Leon y Asociados) is an Argentine-based team formed to design, build and operate a suborbital space transportation system. Our team was created to compete for the Ansari X Prize and was accepted by the X Prize Foundation on February 10, 1997. Our team is formed by Argentine specialists in several fields, including propulsion, mechanical design, aerodynamics, thermal systems, cryogenics, computer science, etc. Pablo de Leon, Team Leader, is an Argentine aerospace engineer with wide experience in space systems design, project management and development of space vehicles and components.
- 65. More than 42 scientists, engineers, technicians and volunteers have worked on this program for years in order to one day achieve the first suborbital manned flight in Latin America. Our team, conscientious of the past, believes it is necessary to learn from those who preceded us, and reach a level of technological development comparable with the times. If Argentina wants to be once more an industrialized nation, we need to invest heavily in science and technology. That is why we are working in this project, because we believe it is valuable and it will help to inspire a new generation of young Argentines and Latin Americans. The VESA “Gauchito” is a conventional style rocket launch vehicle, using 4 hybrid rocket engines in cluster configuration. The length of the “Gauchito” is 12 meters without the escape tower, with a diameter of 2.20 meters in the main body, and 6.60 meters including the aerodynamic fins. The weight of the rocket is 8,000 kilograms while the empty weight is 2,400 kilograms. The capsule can accommodate 1 crewmember with a maximum weight of 300 kilograms of cargo. The capsule maintains a controlled atmosphere of oxygen and nitrogen and the crew will use full pressure suits with 100%.oxygen The propulsion system of the “Gauchito” was designed by Prof. Jorge Lassig. Its combines safety, economy, and reusability. The propellant grain, shaped as a cylinder and using several channels with geometrical shapes is placed in the combustion chamber. The “Gauchito” uses 4 hybrid rocket engines which burns Polyester Resin as propellant, and liquid oxygen (LOX) as oxidizer for 60 seconds. The throttle can be regulated and the engines are re-startable. The propulsion system has redundant safety devices and can be stopped in case of malfunction. The total thrust is 250,000 newtons (52,910 lb). Each engine uses 380 kilograms of polyester resin and 1,080 kilograms of LOX. This requires a volume of 4 m3 for the 4
- 66. rocket engines. The LOX is feed by high pressure nitrogen coming from an additional tank located at the top of the rocket body. The total length of the rocket body is almost 8 meters, with a 2 meters diameter. The pressurized nitrogen tank is ½ meter diameter and the spherical LOX tank is 2 meters diameter. The longitude of each motor tube is 3,3 meters with a diameter of .60 meter. Sheet1CATEGORYWEEK 1WEEK 2WEEK 3WEEK 4WEEK 5Labor$500.00$500.00$500.00$500.00$300.00Material$300.00$ 200.00$100.00Equipment$200.00$200.00TOTAL$1,000.00$500. 00$700.00$800.00$300.00$3,300.00The grand total of this lineBB+CB+C+DB+C+D+EB+C+D+E+Fshould match the cumulativeCUMULATIVE$1,000.00$1,500.00$2,200.00$3,000. 00$3,300.00total of this lineGraph the cumulative total Sheet1 Sheet2 EAC $3,300.00 Sheet3