
Recommended
More Related Content
Similar to AvizoImageSegmentation.pptx
Similar to AvizoImageSegmentation.pptx (20)
Recently uploaded
Recently uploaded (20)
AvizoImageSegmentation.pptx
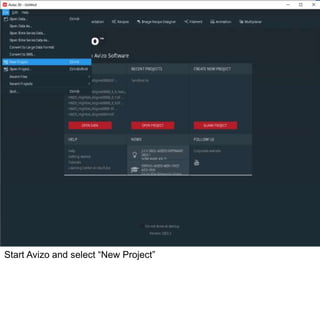
- 1. Start Avizo and select “New Project”
- 2. On the Project page, select “Open Data…”
- 3. In the Windows Explorer dialog navigate to your unlabelled microscopy slides and select all the images (from last to first to ensure correct ordering of slices) and click “Open”.
- 4. If you have a large dataset you will be prompted about the “Out-of-Core” warning. For Deep Learning you must select “Read complete volume into memory”, then click ”OK”.
- 5. On the next dialog box, you can adjust the Voxel sizes here if required, otherwise simply select ”OK”.
- 6. Now repeat the process for the labelled image masks. These work as tiff masks, but other formats may also be appropriate. Each unique value in the mask should be assigned with a class of organelle. Add a “Color Wash” to visualize the two datasets.
- 7. Depending on how your data is labelled you may need to apply an “Arithmetic” filter to the dataset. Here we select all labels greater than 0 using the “Expression” A>0. This removes the background of the tiff file (which had a pixel value of 0) and groups all other pixel values into the single class. Other filter expressions might be something like: A==1+2*(A==2)+3*(A==3) to make 3 classes from 3 pixel values.
- 8. Now add a “DL Training – Segmentation 2D” module to your training images “Input (X)”, and training labels “Target (Y)”.
- 9. Now add a “DL Training – Segmentation 2D” module to your training images “Input (X)”, and training labels “Target (Y)”.
- 10. You have the option to adjust any of the ”hyperparameters”. Consult the documentation or experiment to help find the best combination for your dataset, but the defaults are a good starting point. Click “Apply” to kick off the Training. This will take from a few minutes to many days, depending on the complexity/size of your task and the GPU hardware of your machine.
- 11. During training a run TensorBoard will open and show you how your model is performing. See here for how to interpret these plots: https://developers.google.com/machine-learning/testing- debugging/metrics/interpretic
- 12. When training completes three output files will be generated. These are your model! You can take these anywhere to make predictions on unlabeled data, or to use transfer learning by using these weights as initial inputs.
- 13. Within Avizo you can make predictions on new data! Start a new Project, load in the images you would like to make predictions on, then select the “Deep Learning Prediction” module. From there select the trained model files that were output during the training process and click Apply.
- 14. This will generate a corresponding stack of image mask predictions. Making a pixel-by-pixel prediction for which class the model assigns. You can export this a tiff stack or whatever format for further analysis.