2. Setting Up BibleWorks
1. Have the versions displayed that you want.
I recommend the following. At command line, type:
d c BGT NAU KJV DRA ESV NRS NET TNIV NJB NLT
2. Make sure that you have your versions in the order
that you want them.
How do I get versions in the correct order? >> Go to slide 3
My versions are in correct order. >> Go to slide 5
SLIDE 2
3. Set Version Order in BibleWorks
1. Use this VDO file and save it in your BibleWorks8/init
directory
2. In BW8, use Settings >Version Order>Open LitDyn.vdo
OR
1. Have the versions displayed that you want.
(I recommend: BGT NAU KJV DRA ESV NRS NET TNIV NJB
NLT)
Get these versions by typing: d c BGT NAU... in the
command box and hit Enter.
2. From menu: Tools > Options (or click on in toolbar)
3. Under “Bible Versions” > choose “Version Order”
4. Under “Version List” > choose “Show Active Only”
SLIDE 3 NEXT
4. Use the Move Up/Down buttons to put them in the order you want.
I have my recommended order shown above.
Click on “Save to File” > Type a name that you will remember
(perhaps: LitDyn or BGT.NAU.NET.NRS.KJV.DRA.TNIV.NLT) >> OK
Whenever you want this order again, get to this window and use the Open button.
SLIDE 4 NEXT
5. Setting Up BibleWorks
Now that you have your versions in correct order...
1. From menu: Tools > Options (or click on in toolbar)
2. Under “Output Format Option” >
click on “Verse List or Range”
3. Under “Copy Settings for this Menu Option” >
Popup Copy Window
4. Under “Favorite Settings for this Menu Option” >
choose “Undefined” and type in “Interweaved Texts”
SLIDE 5
6. • Replicate the settings shown here.
• Note: You can add whatever versions you want to include.
If you had already set the versions you want to display,
then click on the box with 3 dots to open this box >>
and check “Show Only Active Languages”
SLIDE 6
7. • As set on the previous page, you will get no book, chapter, or verse reference. You
will have to add those in yourself in Word.
• If you want book and/or chapter and/or verse references, click to “Place reference
before/after text”
• Click on the “Valid Tags” dropdown and add your desired options
• Click OK
SLIDE 7
8. Setup Your
Document in MS
Word
Start a new document
Use “Page Layout” >
Margins > Custom (or
double-click on ruler
bar)
Set your margins and
orientation like this
Click OK
SLIDE 8
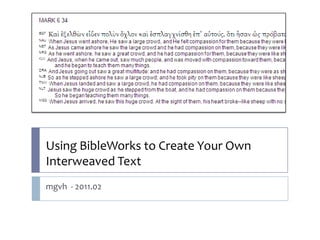
9. In MS Word, now press: CTRL + SHIFT + B
This dialogue box should appear.
If Interweaved Texts does not show at the top, then click on Favorites to choose it.
If the version indicated in the button is not one of the ones you want, click on the
button and make your selection.
Enter any range of verses you want in the input area.
Hit Copy!
SLIDE 9