Surgical scrub hats instructions
•
0 likes•1,331 views

Surgical scrub hat instructions to be used with surgical scrub hat pattern. Help our medical professionals stay safe!

Recommended
More Related Content
Similar to Surgical scrub hats instructions
Similar to Surgical scrub hats instructions (20)
More from Marsha Fulton
More from Marsha Fulton (20)
Recently uploaded
Recently uploaded (20)
Surgical scrub hats instructions
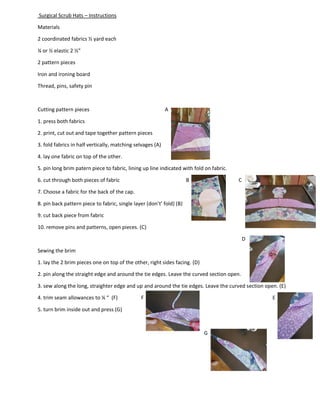
- 1. Surgical Scrub Hats – Instructions Materials 2 coordinated fabrics ½ yard each ¼ or ½ elastic 2 ½” 2 pattern pieces Iron and ironing board Thread, pins, safety pin Cutting pattern pieces A 1. press both fabrics 2. print, cut out and tape together pattern pieces 3. fold fabrics in half vertically, matching selvages (A) 4. lay one fabric on top of the other. 5. pin long brim patern piece to fabric, lining up line indicated with fold on fabric. 6. cut through both pieces of fabric B C 7. Choose a fabric for the back of the cap. 8. pin back pattern piece to fabric, single layer (don’t’ fold) (B) 9. cut back piece from fabric 10. remove pins and patterns, open pieces. (C) D Sewing the brim 1. lay the 2 brim pieces one on top of the other, right sides facing. (D) 2. pin along the straight edge and around the tie edges. Leave the curved section open. 3. sew along the long, straighter edge and up and around the tie edges. Leave the curved section open. (E) 4. trim seam allowances to ¼ “ (F) F E 5. turn brim inside out and press (G) G
- 2. F Adding elastic to the back 1. press the rectangular section on the wrong side of the fabric twice to create a ½” fold. (F) 2. Cut a piece of elastic ½” and pin a safety pin to one end. (G) 3. pin elastic into center of fold, lining edge of elastic to edge of fabric, leaving safety pin end free (H) 4. sew along the edge to secure the elastic in place (I) G 5. Sew along the long edge to create a tube H 6. slide the safety pin out of the tube, gathering the fabric as you go (J) 7. Sew the opposite edge down to secure the elastic in place (K) I K J Sewing brim to back 1. press a short crease into the middle of both the middle of both the brim (at the curve) and back. (L) 2. line the crease of the brim on the curve to the crease of the right side of the back, same fabric facing and pin. (M) L 3. work your way around pinning the brim’s curve to the right side of the back. (N) 4. sew the brim to the back with a 1/4” seam allowance. (O) N 5. trim the seam allowance close to the seam (P) 6. zig zag along the finished edge to keep from fraying (or sew with a serger) 7. turn cap inside out and you’re done! (Q) Cap can be worn with brim folded up or left down and tied in the back P Q