Identifying Polymers Using Density Experiments
•
1 like•1,225 views

Classic, mini chemistry experiments- some require materials typically found in a high school chemistry lab, while others are extremely simple. Very straightforward!

Recommended
Recommended
More Related Content
What's hot
What's hot (12)
Viewers also liked
Viewers also liked (20)
Similar to Identifying Polymers Using Density Experiments
Similar to Identifying Polymers Using Density Experiments (12)
More from Emma Wise
More from Emma Wise (20)
Recently uploaded
Recently uploaded (20)
Identifying Polymers Using Density Experiments
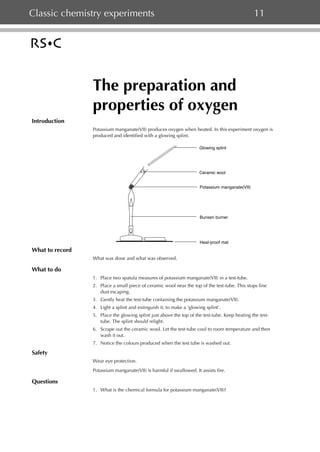
- 1. Classic chemistry experiments 11 The preparation and properties of oxygen Introduction Potassium manganate(VII) produces oxygen when heated. In this experiment oxygen is produced and identified with a glowing splint. Glowing splint Ceramic wool Potassium manganate(VII) Bunsen burner Heat-proof mat What to record What was done and what was observed. What to do 1. Place two spatula measures of potassium manganate(VII) in a test-tube. 2. Place a small piece of ceramic wool near the top of the test-tube. This stops fine dust escaping. 3. Gently heat the test-tube containing the potassium manganate(VII). 4. Light a splint and extinguish it, to make a ‘glowing splint’. 5. Place the glowing splint just above the top of the test-tube. Keep heating the testtube. The splint should relight. 6. Scrape out the ceramic wool. Let the test-tube cool to room temperature and then wash it out. 7. Notice the colours produced when the test tube is washed out. Safety Wear eye protection. Potassium manganate(VII) is harmful if swallowed. It assists fire. Questions 1. What is the chemical formula for potassium manganate(VII)?
- 2. Classic chemistry experiments 12 Identifying polymers Introduction In this experiment solutions with known densities are used to identify the polymers used in everyday materials. Glass rod Floaters Test-tube Samples of plastic containers Sinkers What to record Solutions Sample Colour (or shape) 1 2 3 4 5 6 What to do 1. Fill six test-tubes with solutions 1 to 6 and label each tube. 2. Place a sample of each type of polymer into solution 1. 3. Use a glass rod to stir the contents of the tube. Observe whether the waste plastics float or sink. 4. For samples that sink, write the letter S in column 1 of the results table. 5. Wash the glass rod and dry it on a tissue or paper towel. 6. Repeat the test for solutions 2 to 6. Use a new sample each time. Safety Wear eye protection. Solutions 1,2 and 3 are highly flammable and toxic. Solutions 5 and 6 are irritants.
- 3. Classic chemistry experiments Questions 1. Why were the solutions stirred once the plastics were added? 2. Use the following table to identify the plastics. Fill in the table. Fingerprint Polymer name Acronym Colour 1 2 3 4 5 6 Polyethylene terephthalate PET Any S S S S S S Polyvinyl chloride PVC Any S S S S S – Polystyrene PS Any S S S S – – High density polyethylene HDPE Any S S S - – – Low density polyethylene LDPE Any S S – - – – Polypropylene PP Any S – – – – – Expanded polystyrene EPS Any – – – – – – Polymer name Acronym Polyethylene terephthalate PET Polyvinyl chloride PVC Polystyrene PS High density polyethylene HDPE Low density polyethylene LDPE Polypropylene PP Expanded polystyrene EPS Sample
- 4. Classic chemistry experiments 13 Energy values of food Introduction In this experiment various foods are tested to find how much energy they contain. Clamp Test-tube Water Burning food Needle Wooden handle What to record Measurement Food Mass/g Temperature of water before heating/°C Temperature of water after heating/°C Change in temperature/°C Heat absorbed by water/J (Temperature change x 4.2) Heat absorbed by water per gram of food/J What to do 3 1. Put 10 cm of water in a test-tube. Clamp the test-tube in the retort stand at an angle as shown in the diagram. 2. Weigh a small piece of food and record the mass in your table. 3. Take the temperature of the water in the test-tube and record it in the table. 4. Fix the food on the end of the mounted needle. If the food is likely to melt when heated put it on a teaspoon instead of on the needle. 5. Light the food using a bunsen burner. As soon as the food is alight, hold it about 1 cm below the test-tube. If the flame goes out, quickly relight it. 6. When the food stops burning, stir the water in the test-tube with the thermometer and note the temperature. Record it in your table. 3 7. Empty the test-tube and refill it with another 10 cm of water. Repeat the experiment using a different food each time. Safety Wear eye protection.
- 5. Classic chemistry experiments Questions 1. Suggest reasons why this experiment may not be a fair test? 2. Burning gives out heat. What is the name given to this sort of reaction? 3. The label on a packet of cheese says 100 g provides 1638 kJ. Calculate how many joules this is per gram of cheese and compare it to the cheese in your experiment. (1 kJ = 1000 J)
- 6. Classic chemistry experiments 14 A compound from two elements Introduction A mixture of iron and sulfur can easily be separated. This is because there are no chemical bonds between the sulfur and the iron. The iron is magnetic and is therefore easily removed from the sulfur. In this experiment, a mixture of iron and sulfur are heated to make a new compound. Hold with tongs Iron and sulfur Bunsen burner What to do 1. Examine the plastic bag of sulfur, the bag of iron and the bag containing a mixture of the two. 2. Run a magnet over each of the bags. 3. Set up the apparatus as shown in the diagram. 4. Light a Bunsen burner and half open the air-hole to give a medium flame. 5. Heat the very end of the tube strongly. When the mixture starts to glow, move the Bunsen burner to one side. 6. Watch the mixture in the tube. (If the glow just goes out, heat the tube again.) 7. Let the tube cool down completely. 8. The substance from the tube is a new compound called iron sulfide. 9. Test the iron sulfide with a magnet. Does the magnet pick it up? Safety Wear eye protection. Do not get too close to the fumes. Questions 1. Write a word equation for this reaction. 2. What has happened to the iron and the sulfur in forming iron sulfide? 3. What is the chemical formula for iron sulfide?
- 7. Classic chemistry experiments 15 Chemistry and electricity Introduction In this experiment, electricity and some indicators are used to make coloured writing. Filter paper soaked with sodium chloride and indicator solution Petri dish Positive terminal Carbon electrode Negative terminal 6V Battery or power pack Lead What to do 3 1. Dissolve a spatula measure of sodium chloride in 2 cm of water. Add three drops of methyl orange indicator. 2. Lay a filter paper inside a plastic petri dish. Drop the solution onto the paper using a dropping pipette, until the paper holds no more solution. 3. Attach the positive end of a 6 V battery to a lead ending in a crocodile clip. Use the crocodile clip to grip one end of the paper. 4. Attach the negative end of the battery to a carbon electrode. 5. Write lightly on the wet paper, using the carbon electrode. What colour is the writing? 6. Repeat the experiment using Universal Indicator. Describe what happens. Safety Wear eye protection. Questions 1. What would happen if the lead were attached to the positive electrode using Universal Indicator? Try this if there is time. 2. Explain what reactions have occurred to produce the colours.
- 8. Classic chemistry experiments 16 Combustion Introduction Hydrocarbons produce carbon dioxide and water when they burn. In this experiment the products of combustion are captured and tested. Gas jar Candle Tray Heat-proof mat What to record What was done and what was observed. What to do 1. Set up the apparatus as shown in the diagram. The gas jar should be placed over the lit candle on a heatproof mat. 2. When the candle goes out, put a lid on the gas jar. 3. Test to see if the candle made water by adding a piece of blue cobalt chloride paper, test the sides of the jar. If it turns pink, water is present. 4. Now test to see if carbon dioxide was produced. Pour a little limewater into the gas jar. Swill it around a little. If carbon dioxide is present, the limewater turns cloudy. Safety Wear eye protection. Questions 1. What is the gas that reacts with the hydrocarbon when it burns? 2. What gases does the candle produce when it burns? 3. Name another fuel that produces the same gases when it burns.
- 9. Classic chemistry experiments 17 The determination of relative atomic mass Introduction One mole of any gas occupies the same volume when measured under the same conditions of temperature and pressure. In this experiment, the number of moles of hydrogen produced from a known mass of magnesium is measured. The relative atomic mass of magnesium can therefore be calculated. Magnesium ribbon Burette Dilute hydrochloric acid Burette Beaker Magnesium ribbon Water What to record The mass of magnesium used and the volume of hydrogen produced. What to do 1. Clean a piece of magnesium ribbon (about 3.5 cm long) and weigh it accurately (This should weigh between 0.02 g and 0.04 g; if not adjust the amount used.) 3 3 2. Measure 25 cm of dilute hydrochloric acid into the burette. Carefully add 25 cm of water on top of this. 3. Push the magnesium in the end of the burette so it stays in position with its own tension. 3 3 4. Add 50 cm of water to a 250 cm beaker. 5. Quickly invert the burette into the water, (if this is done quickly and carefully very little will be lost. It is important that the liquid level in the burette starts on the graduated scale. If it is not on the scale; momentarily open the tap, this allows the level to drop). 6. Clamp the burette vertically. 7. Take a burette reading (NB: it is upside down!) 8. Observe how the magnesium reacts as the acid diffuses downwards, wait until all the magnesium has reacted. 9. Note the new volume on the burette (NB: it is upside down). 10. Record your results.
- 10. Classic chemistry experiments Safety Wear eye protection. Questions The equation for the reaction is Mg + 2HCl → MgCl2 + H2 1. Copy out and fill in the gaps: 3 ____ g magnesium was produced from _____cm of hydrogen. 3 ____ g magnesium was produced from 1 cm of hydrogen 3 ____ g magnesium was produced from 24000 cm of hydrogen. ____ g magnesium would be produced from 1 mole of hydrogen. This is the mass of 1 mole of magnesium. Numerically, this number is the relative atomic mass of magnesium.
- 11. Classic chemistry experiments 18 The reaction of a Group 7 element (iodine with zinc) Introduction This experiment involves producing a salt by reacting a Group 7 element (iodine) with zinc. This is an example of salt preparation by direct synthesis. Filter paper Filter funnel Test-tube rack Watch glass Testtubes Hot water from kettle Beaker Iodine solution and zinc What to do 3 1. Use the measuring cylinder to add 4 cm of alcohol to a test-tube. 2. Dissolve a few crystals of iodine in the alcohol. 3. Note the temperature. 4. Add some powdered zinc (about the volume of a grain of rice) to the iodine solution. 5. Stir with the thermometer and note the highest temperature. 6. Record any changes which suggest a chemical reaction has taken place. 7. Filter the liquid into another test-tube (the excess zinc is left behind). 8. Collect a beaker of hot water, and place a watch glass on the top 9. Pour the liquid filtrate onto the watch glass and allow the alcohol to evaporate. Observe the product. 10. The product is classified as a SALT. Safety Wear eye protection. Do not touch the iodine. Questions 1. What is the collective name for the Group 7 elements? 2. What does this name mean? 3. Complete the word equation: Zinc + iodine →
- 12. Classic chemistry experiments 19 Reactions of halogens Introduction The Group 7 elements are called the halogens. This experiment involves some reactions of the halogens. Test-tube with halogen solution Glass stirring rod Solution of halogen Universal Indicator paper Tile What to record Complete the table. Effect on indicator paper Reaction with potassium chloride solution Reaction with potassium bromide solution Reaction with potassium iodide solution Chlorine water Bromine water Iodine water What to do 1. Put a piece of Universal Indicator paper onto a white tile. 2. Use a glass stirring rod to transfer a few drops of the first solution onto the indicator paper. 3. Repeat this with a fresh piece of paper and the different solutions. 4. In a test-tube, add some chlorine solution to a solution of potassium bromide. 5. Add some chlorine solution to a solution of potassium iodide. 6. Now try mixing solutions of bromine and potassium iodide. If there is time, mix the other combinations of solutions to complete the table.
- 13. Classic chemistry experiments Safety Wear eye protection. Do not breathe chlorine gas. Questions 1. Which halogen solution is the strongest bleaching agent? 2. Which halogen is the most reactive? 3. Write a word and symbol equation for the reaction of chlorine with potassium bromide.
- 14. Classic chemistry experiments 20 The sublimation of air freshener Introduction Sublimation is an interesting physical change. When a substance sublimes, it changes directly from a solid to a gas without passing through the liquid state. Dry ice sublimes, as do iodine and mothballs. This experiment involves the study of another common substance that sublimes – air freshener. Ice LOOK HERE Dish Hot water Piece of air freshener What to do 3 1. Place a few lumps of air freshener in the bottom of the 100 cm beaker. 3 3 2. Put the 100 cm beaker carefully on top of the other 100 cm beaker. 3. Fill the top beaker three quarters full with ice. Ensure no ice enters the beaker below. 4. Fill the shallow dish or pan about one-third full of hot water (at a higher temperature than 45 °C). 5. Place the sublimation apparatus in the shallow dish in a fume cupboard. 6. Observe what happens to the solid. Be patient, it may take a while. Safety Wear eye protection. Use a fume cupboard. Questions 1. What might be the significance of 45 °C? Try lower and higher temperatures if there is time. 2. Define ‘sublimation’. 3. Use the particle theory of matter to explain what is happening and include a particle diagram.