Call Girls Mukherjee Nagar Delhi reach out to us at ☎ 9711199012
Y1 gd level_designworkflow
1. Level Design Workflow
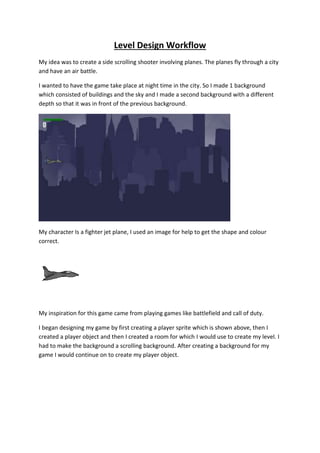
My idea was to create a side scrolling shooter involving planes. The planes fly through a city
and have an air battle.
I wanted to have the game take place at night time in the city. So I made 1 background
which consisted of buildings and the sky and I made a second background with a different
depth so that it was in front of the previous background.
My character Is a fighter jet plane, I used an image for help to get the shape and colour
correct.
My inspiration for this game came from playing games like battlefield and call of duty.
I began designing my game by first creating a player sprite which is shown above, then I
created a player object and then I created a room for which I would use to create my level. I
had to make the background a scrolling background. After creating a background for my
game I would continue on to create my player object.
2. Objects in the game use sprites and can be coded using different events. In my player object
I selected sprites and added events so that I could move, shoot and be destroyed. I also
added an event so that when my character spawns he has a jet flame on the back.
After this I created a system object and a jetpack object, which would allow enemy’s to
spawn and for me to respawn when I died, I would then go on to create my first enemy. I
created a sprite for my first enemy. Then I created the enemy object using this sprite. I
added codes so that the enemy will shoot if my character is on screen and so that when
they leave the room border they are destroyed. I also added some sounds for the enemy
shooting.
3. I also created “player_lazer” sprites which my player would shoot, as you can see from the
image I added a collision event so that when my player missiles hit my enemy he will be
destroyed. I also added sounds so that when the player_lazer and enemy_lazer are shot
they make a noise.
Next I added a sprite for when my enemy is destroyed, for this I made a set of sprites to
create an animation for my enemys death, I also made one for my player. I also created a
bar at the top left of the screen and added and event so that when the bar reaches 0 my
player would die. This would act as my player health bar.
I also added an event in the system so that when my player object is hit by an enemy missile
the health bar decreases. I went into my enemy_lazer object and added a collision event
and some coding to make the health bar decrease. The code for this was;
4. ///hit
Global.shield -= 25;
Which meant it was now possible for my player to die in game. The code I used was put into
the system create event and was name shield. The code was as follows;
///shield
Global.var shield;
Shield = 100
I also had to add a draw event to actually draw the health bar in game. This draw event was
also added to the system object. The code used was;
///draw shield
Draw_rectangle_colour(32, 32, 32+global.shield, 40, c_green, c_green, c_green,
c_green, false);
At first the health bar would go negative (below zero health) and would continue to
increase in size backwards off the screen. This was easily sorted out by creating a player
destroyed sprite and creating an object for this sprie, in the sprite object I added the code;
///explosion particle system
Explosion_2 = part_system_create();
Part3 = part_type_create();
Part_type_sprite(part3, playerdestroyed_sprite, true, true, true);
Part_type_size(part3, 0.5, 2, -0.3, 0);
Part_type_life(part3, 30, 60)
Part_type_gravity(part3, random_range(2,7), random(360));
Part_type_alpha(part3, random_range(0.1, 0.75));
Part_particles_create(explosion_2, x, y, part3, 10);
Next I added an alarm event into my player_destroyed object, this would allow my player to
explode for a set number of frames then restart the game. The code which I used to do this
was;
Instance_destoy()
Room_restart()
5. I also needed to create a create event in the player_destroyed object to initialize the alarm.
For this I coded;
Alarm[0] = 60
Audio_play_sound(playerdestroyedsound, 1, false);
Finally I had to add a step event into my player_1 object so that it would be destroyed, the
code was;
///destroyed
If global.shield <=0
{
Instance_change(player_destroyed, true)
With(jetpack)
{
Instance_destroy()
}
}
Now when my player object is hit it should be destroyed, show the explosion sprite and also
reset the game to the start.
6. As you can see the health bar in the top left is down to zero and my player has been killed so
the explosion takes place and the game restarts. After this my next task was to create a
score system which would count the amount of points a player gets in the game before they
die and it is reset. For this I went into the system object and created a score variable in the
create event. The code I put into this was;
///score variable
Global.var points;
Points = 0
Then in the draw event of the system object I added some code so that the points system is
draw on screen below the health bar. First I created a font using the create font tool which I
then named font1. Then I began coding my score variable. For this I entered the code;
///draw score
Draw_set_font(font1);
Draw_set_colour(c_white);
Draw_set_halign(fa_center);
Draw_text(36,40,global.points);
I had to add the amount of score I get when an enemy is destroyed. I added a cod to the
enemy movement and shoot event in the create event. I added;
///increase score
Global.points +=1;
Next I went into my collision with the player missile in the enemy destroyed object and
edited the code. I added;
Global.points +=1;
Now when my missile hits the enemy the enemy is destroyed and also I get points added to
my score. My next task was to add a second enemy. I did this by creating a new sprite, a
new enemy destroyed sprite and a new enemy_lazer2 sprite. Also I added a new sound for
when my enemy 2 shoots. I went about creating the second enemy by first creating a new
alarm in the system object called alarm 1. This contained the spawn enemy 2 code which
was as follows;
///spawn enemy 2
Randomize()
7. Var y_spawn;
Y_spawn = random_range(32, 448)
Instance_create(1104, y_spawn+0, enemy_2)
///reset alarm
Alarm[1] = random_range(20, 80);
I also added an enemy 2 spawn alarm code into my create event in the system object to
initiate the alarm 1 which spawns the enemy. This code was;
///enemy 2 spawn alarm
Alarm[1] = 60
This means my second enemy will spawn 30 frames after the second enemy appears so 1
second after as my game runs at 30fps. Next I created the enemy 2 object which would be
the actual enemy we see in game. I added the enemy 2 sprite, a create event for the
movement and shooting of my enemy 2, an alarm 0 and alarm 1 event, a step event and 2
collision events, one for each of my players weapons. In the create event I added the code;
///movement and shoot alarm
Hspeed =-8
///shoot alarm
Alarm [0] = 20;
///move alarm
Alarm [1] = 20;
In my alarm 1 I added the code;
///movement
Randomize()
Vspeed = choose(0, -5, +5)
Alarm[1] = random_range(30,60)
The vspeed function means that the enemy can either mover up or down at a speed of 5 so
they will move around the screen. In the step event I added two pieces of code. One being
the leave screen code and the other being the limits code. The leave screen code was;
///leave screen
8. If x<=0
{
Instance_destroy
}
This means that when the enemy leaves the left side of the screen it will be automatically
destroyed. In the limits the code was;
///limits
If y<=32
{
Y=32;
If y>=544
{
Y=544;
}
This means that the enemy will not be able to go off of the top or the bottom of the screen.
Finally in the collision event with the player missile I added the code;
///shot by player
Instance_change(explosion1, true)
///increase score
Global.points +=5;
This means that when the enemy 2 is destroyed then it will change to the explosion and will
disappear off screen, also global.points +=5; means that when you destroy this enemy you
get an additional 5 points added to your total score. Next I created the enemy_lazer2 object
which I added a create event, a step event and a collision event with my player. In the
create event I added the code;
If instance_exists(player_1)
{
Hspeed = 20
9. }
Audio_play_sound(pew_sound, 1, false);
This means that the enemy_lazer2 moves towards my player at a speed of 20 and also when
shot the enemy_lazer2 makes a sound. In my step event I added the code;
If x>=room_width
{
Instance_destroy()
}
This means that if the enemy_lazer2 object leaves the room then it will be destroyed. Next I
added a code to the collision event which was;
Instance_destroy()
Which means that if the enemy_lazer2 collides with the player then the lazer is destroyed.
To make this work with our damage system we had to create a collision with the
enemy_lazer2 in our player_1 object. In the collsion I added the code;
///hit
Global.shield -=25
This means that when my player object is hit by the enemy_lazer2 it loses 25 health.
Player
score and
health
Enemy 2 Group of 3
enemy1s
10. After doing this I had basically finished my game however I went back to it and added a title
screen for my game. I did this by creating a second room. My title screen would link to the
actual game room and that is how the game would start.
The only thing left for me to do was to do final testing to make sure everything worked well
and that I was happy with the final product. After playing my game for a while I decide I
wanted to make it harder by mking my enemy 2 spawn quicker but also by making my
enemy 1 and 2 shoot and move faster. This mad my game a lot more challenging and a lot
more fun.
11. After playing my game for a while decided that my second missile the rocket was too
powerful and made my game too easy. I want to put a timer on it so it could only be used
once every 5 seconds however I never got to doing it and it may be something I add in the
future if I ever come back to this game. I am happy with the way my game turned out as this
is the way I pictured it in my planning, I made my sprites 128x128 and 64x64 so I could add
more detail and make my sprites a lot more detailed.