
Recommended
More Related Content
What's hot
What's hot (18)
Similar to Editing process
Similar to Editing process (20)
Recently uploaded
Recently uploaded (20)
Editing process
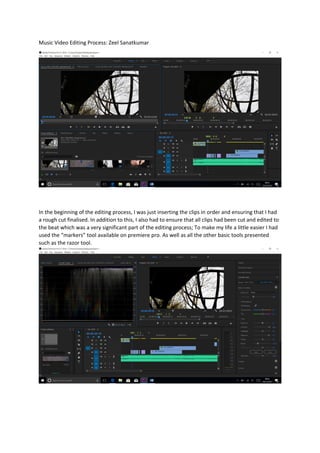
- 1. Music Video Editing Process: Zeel Sanatkumar In the beginning of the editing process, I was just inserting the clips in order and ensuring that I had a rough cut finalised. In addition to this, I also had to ensure that all clips had been cut and edited to the beat which was a very significant part of the editing process; To make my life a little easier I had used the “markers” tool available on premiere pro. As well as all the other basic tools presented such as the razor tool.
- 2. In terms of colour grading, I had opted for the more complex way of editing, this is called using lumetric scopes, to add a more cinematic effect to the footage. As well as using “Lumetri Colour” which enabled me to experiment with the basic colour characteristics such as contrast, exposure, highlights etc. By using a variety of tools, it enabled me to colour grade to a professional standard, the clips of the powder paint. This also included adding my very own custom input LUT. In addition to this I have also created the ghost effect which was used to convey confusion and loss of individualism and ability to think. This was done easily by using the “opacity” tool on video effects and then changing percentages to suit my needs. After this, I had to also change the start point and end point of the clips to initiate the “ghost effect”.
- 3. A more complex effect I used is called the “scribble effect” which was used to engage EDM genre side to our music video. To do this, I had to link the Adobe Premiere Pro Composition of the clip wanted to edit to Adobe After Effects whereby I had to individually draw every single frame I wanted to be visible in the music video by simply changing the paint duration to “One Frame.” As well as adding a variety of tools such as colour and paint and brushes, bearing in mind that I could only edit on the unlocked layer and not the composition. PROBLEMS ENCOUNTERED:
- 4. When loading up the clips on my timeline to continue previous work it was not present meaning on one instance I had to start all over again, however after learning from my mistakes I always make a copy of the work I have done as a MP4 file for any worst-case scenario incidents, also saved to 2 USB’s and my desktop. Screening Effect: I had also used a “screen” effect to produce the following effect: The process needed to gain this effect consists of over laying both the video clips on top of each other and changing the opacity to multiply and screen. This in turn creates a both opaque finish to the video yet still screens the white screen. This is used to connote that he is now pure of all of his thoughts. Ultra Key Effect :
- 5. The use of the visual effect: “ultra key” was essential to creating an aesthetically pleasing video that had the intended deeper meaning that we initially wanted to portray through the use of shadows. Not only does this link back to our group name of “Shadow Inc” but is also useful in helping the audience understand our story line more in depth. Furthermore, we also had to use Matte Generation to ensure that no background was present and the effect we added was black and white. We also had to reshoot some of the scenes of the people arguing through the use of a green screen.
- 8. Another effect that I had decided to incorporate into my video was the use of the toggle and speed effects. This included adding the slow motion parts for example: This part was not only edited in slow motion but I had to use the “reverse speed” button to ensure that the video played background as this was a reoccuring theme within our video as we decided as a group to stick to the codes and conventions of the music videos in our EDM genre.
- 9. Keyframe Editing was an essential to ensuring that the audience could understand what was going on. This effect was used so that the camera zoomed into the actors head to show what was going on in his head. Furthermore, this effect was learnt through the latest version of Adobe Premiere Pro 2018. This effect will zoom in and toggle into the desired section of the video to create a medium speed zoom in.
- 10. Keyframe Editing was an essential to ensuring that the audience could understand what was going on. This effect was used so that the camera zoomed into the actors head to show what was going on in his head. Furthermore, this effect was learnt through the latest version of Adobe Premiere Pro 2018. This effect will zoom in and toggle into the desired section of the video to create a medium speed zoom in.