Applications of ZIPPTORK torque control products
•
0 likes•49 views

Bolt tightening applications of ZIPPTORK torque control products

Recommended
Recommended
More Related Content
What's hot
What's hot (17)
Similar to Applications of ZIPPTORK torque control products
Similar to Applications of ZIPPTORK torque control products (20)
More from China Pneumatic Corporation & ZIPP GROUP
More from China Pneumatic Corporation & ZIPP GROUP (11)
Recently uploaded
Recently uploaded (20)
Applications of ZIPPTORK torque control products
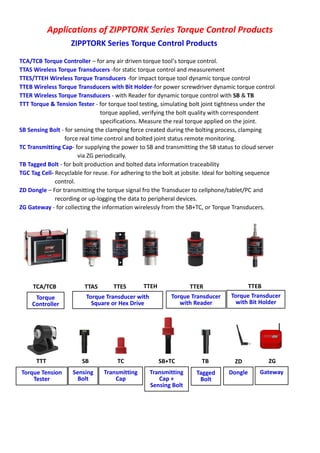
- 1. Applications of ZIPPTORK Series Torque Control Products ZIPPTORK Series Torque Control Products TCA/TCB Torque Controller – for any air driven torque tool’s torque control. TTAS Wireless Torque Transducers -for static torque control and measurement TTES/TTEH Wireless Torque Transducers -for impact torque tool dynamic torque control TTEB Wireless Torque Transducers with Bit Holder-for power screwdriver dynamic torque control TTER Wireless Torque Transducers - with Reader for dynamic torque control with SB & TB TTT Torque & Tension Tester - for torque tool testing, simulating bolt joint tightness under the torque applied, verifying the bolt quality with correspondent specifications. Measure the real torque applied on the joint. SB Sensing Bolt - for sensing the clamping force created during the bolting process, clamping force real time control and bolted joint status remote monitoring. TC Transmitting Cap- for supplying the power to SB and transmitting the SB status to cloud server via ZG periodically. TB Tagged Bolt - for bolt production and bolted data information traceability TGC Tag Cell- Recyclable for reuse. For adhering to the bolt at jobsite. Ideal for bolting sequence control. ZD Dongle – For transmitting the torque signal fro the Transducer to cellphone/tablet/PC and recording or up-logging the data to peripheral devices. ZG Gateway - for collecting the information wirelessly from the SB+TC, or Torque Transducers. TCA/TCB TTAS TTES TTEH TTER TTEB TTT SB TBTC SB+TC ZD ZG Torque Controller Torque Transducer with Square or Hex Drive Torque Transducer with Reader Torque Transducer with Bit Holder Torque Tension Tester Sensing Bolt Transmitting Cap Transmitting Cap + Sensing Bolt Tagged Bolt Dongle Gateway
- 2. Applications Application 1- Tire Shop Works -1 Makes the audible “clicks” visible. 1. Use Air Impact Wrench to tighten the Lug Nut/Bolt to maximum 80% of the target torque 2. Use a Click Wrench + TTAS (Wireless Torque Transducer) + ZD (Dongle) + Cell Phone/Tablet to tighten the bolt/nut to the preset target torque until it clicks. 3. The final torque data will be transmitted to the cellphone/tablet via the ZD (Dongle) and recorded or up-loaded to peripheral devices. Application 2- Tire Shop Works -2 1. Use Air Impact Wrench + TCB ( Torque Controller) + TTES/TTEH(Wireless Torque Transducer) to tighten the Lug Nut/Bolt to maximum 50% of the target torque as the snug fit for the 1st stage/round. 2. Tighten the bolt/nut to the target torque for the 2nd stage/round. 3. The final torqued data will be recorded or up-loaded to peripheral devices. Application3- Tire Shop Works -3 Makes the audible “clicks” visible. 1. Use Cordless Impact Wrench to tighten the Lug Nut/Bolt to maximum 80% of the target torque 2. Use a Click Wrench + TTAS (Wireless Torque Transducer) + ZD (Dongle) + Cell Phone/Tablet to tighten the bolt/nut to the preset target torque until it clicks. 3. The final torqued data will be transmitted to the cellphone/tablet via the ZD (Dongle) and recorded or up-loaded to peripheral devices. Application4- Tire Shop Works -4 1. Use Air Impact Wrench + TCB ( Torque Controller) + TTER (Wireless Torque Transducer with Reader) + TB ( Tagged Bolt ) for bolting sequence control. 2. Tighten the Lug Nut/Bolt to maximum 50% of the target torque as the snug fit for the 1st stage/round. 3. Tighten the bolt/nut to the target torque by bolting sequence control for the 2nd stage/round. 4. The bolting process information and final torqued data will be recorded or up-loaded to peripheral devices. P.S. For bolting sequence control, please read the instruction manual prior to work. Application 4- general Assembly Line - 1 1. Calibrate the tool torque of Air Screwdriver or Electric Brushless Screwdriver with the TTEB (Wireless Torque Transducers with Bit Holder) to the desired target torque in advance. 2. Use the Air Screwdriver or Electric Brushless Screwdriver with the TTEB to tighten the Screw/Bolt to the target torque. 3. As soon as the tool clutch dis-engaged, the final torqued data will be transmitted to the cellphone / tablet via the ZD (Dongle) and recorded or up-loaded to peripheral devices. Application 5- general Assembly Line – 2 Makes the audible “clicks” visible. 1. Use Air Impact Wrench + TCB ( Torque Controller) + TTES/TTEH/TTEB(Wireless Torque Transducer) to tighten the bolt to the target torque for the 1st stage/round. 2. Use a Click Wrench + TTAS (Wireless Torque Transducer) + ZD (Dongle) + Cell Phone/Tablet to tighten the bolt to the preset target torque until it clicks. 3. The final torqued data will be recorded or up-loaded to peripheral devices.
- 3. Application 6- Industrial Bolting Works-1 1. Use Air Impact Wrench + TCA ( Torque Controller) + TTER (Wireless Torque Transducer with Reader) + TB (Tagged Bolt) for bolting sequence control. 2. Tighten the Bolt to maximum 50% of the target torque as the snug fit for the 1st stage/round. 3. Tighten the bolt/nut to the target torque by bolting sequence control as the 2nd stage/round. 4. The bolting process information and final torqued data will be recorded or up-loaded to peripheral devices. P.S. For bolting sequence control, please read the instruction manual prior to work. Application7 -Industrial Bolting Works-2 As more and more customers insist upon full traceability for every bolted joint on each of their assets, it’s becoming increasingly more requirement to have effective solutions to gather, store, and process associated data. For example, in the assembly of high pressure vessels or pipe line works, it’s always a problem to ensure the operators will follow the rules to tighten the bolts properly and securely. ZIPPTORK developed a patented solution for the industry to solve this problem effectively and economically. Features: Enables the supervisor monitors the bolting process remotely in real time. Two options for the identification of the bolt. i.e. TB- a RFID tag embedded securely and permanently on the bolt, or a reusable TGC-tag cell for temporarily adhering on the bolt. It can be removed after the joint inspected or verified. Bolting sequence and stages to tighten the bolts can be programmed prior to work. Bolting process associated data such as operator I.D., the time and torque applied to each bolt will be recorded. Since the bolted torque is recorded stage by stage, it will not only prevent miss bolting but also re-hit during the bolting process. How to use it? 1. Connect the air impact wrench to the TCA (Torque Controller). 2. Set operation parameters such as the units of pressure and torque, torque control accuracy, and how many stages/rounds and seconds to reach the target torque. 3. Program the bolting sequence with stages/rounds and torque % for each stage/round in advance. 4. Have the TTER (Wireless Torque Transducer with Reader) attached to the front anvil of the torque tool. 5. Preload the TB-Tagged Bolt to the joint clock-wisely or counter-clock-wisely. 6. Start bolting according to the guidance of the Controller. The tool cannot be actuated if the operator didn’t follow the indicated sequence. 7. Full control and record for each bolt sequentially with the operator ID, the torque applied in each stage/round and time.
- 4. This system has definitely help you to conduct your work on bolted connections in a more controlled and efficient manner, and it prevents any missed connections/fasteners. It enables you the ability to record and present the data to any auditors, OEM’s, or clients, and you can now register all our connection torque data in our maintenance system. Full, real-time bolt torqueing data acquisition and reporting. User friendly software with step by step procedures that boosts the operator’s confidence in doing his/her job. Customers are raving about the ability to locate each job by longitude and latitude. This leads to increased productivity and less wasted time. It enables monitoring the bolting process live remotely, accompanied by user defined traceability information on every bolt torqued. Date, time, GPS location, operator, tool and many other parameters were tagged with the collected data. The system is easy to set up and use and the technical support is phenomenal. Highly recommended if data acquisition is a necessity. This system saves time and money. It moves through the bolting sequence smoothly without any issues. This advanced technology is the way forward. Obtaining a leak-free flange connection can be a difficult task on-site without a plethora of equipment to fall back on. A proper gasket installation, bolts with correct tension, and an evenly divided bolt strength must be adhered to create a good flange connection. However with torque tightening the correct tensions can be realized for the ultimate connection for your flange. Correct tightening of a bolt means making the best use of the bolt's elastic properties. To work well, a bolt must behave just like a spring and create equal and opposite compression force applied on the assembled components, also known as the 'tightening load'. With tips from Wermac, here's our 5 step guide to create the ultimate torque tightening for your flange: Use a torque wrench and suitable technique A torque wrench is a hand-guided screwing tool, and is used to accurately set the force of the bolt. It allows the operator to measure the rotational force applied to the bolt so it can be matched to the specifications. Techniques require quality tools and experienced colleagues who can carry out the work. Some of the most common techniques to flange bolt tightening include manual, impact, hammer, hydraulic torque, manual beam and gear-assisted torque wrench and hydraulic bolt tensioner.
- 5. Torque loss on bolted joints An inevitability of any bolted joints is the loss of torque over time. Within 24 hours, 10% of the torque is lost in the bolt after the joint has relaxed. The more torque that is lost over time, the bigger the chance the flange will leak. The key to reducing these effects in the installation process is by slowly bringing the flanges together in a parallel line, taking a minimum of four bolt tightening passes, and by following the current bolt tightening sequence. This not only creates a better connection, it also reduces ongoing maintenance costs and increases safety. It is important to note that gasket thickness is vital. The thicker the material, the higher the gasket creep will be - resulting in torque loss. Reduce friction with lubrication Lubrication not only reduces the friction during tightening, it can also decreases the chance of bolt failure during installation and increases bolt life too. Remember, variation in friction affects the amount of preload achieved at a specific torque. Higher friction results in less conversion of torque to preload. The value for the friction coefficient provided by the lubricant manufacturer must be known to accurately establish the required torque value. Anti-seizure compounds should also be applied to both the nut bearing surface and the male threads for an easier process. The sequence of tightening Lightly tighten 1st bolt. This is one of the most important factors of the process. Using Wermac's tightening sequence drawing, follow the below steps: Move 180 degrees and tighten 2nd bolt Move another 90 degrees around the flange for the 3rd bolt Move another 180 degrees for 4th bolt Continue bolt tightening until all are completed Preparing for bolt-up The most common cause of a leaky flange is improper installation. Therefore, before beginning any bolting process, preliminary steps must be taken to avoid future issues. Clean the flange faces and check for damage Inspect all bolts for damage Remove burrs from all threads Lubricate threads of the bolt and surface of the nut face Install and center the new gasket Check flange alignment ASME B31.3 Adjust position of the nuts to insure that 2-3 threads are visible above the top of the nut.